

Black and red nails are bold, sophisticated, and endlessly versatile — whether you’re going for edgy glamour, classic elegance, or something that turns heads at every angle. The contrast between deep black and rich red is inherently striking, giving your nails instant personality without requiring over-the-top length or embellishment. Stiletto nails amplify this effect even more. Their sharp, tapered shape commands attention and elongates your fingers, making the color combination feel even more dramatic and intentional.
The beauty of black and red stiletto combinations is how adaptable they are. You can create designs that feel vampiric and dark, romantic and mysterious, modern and minimalist, or festival-ready and wild. You can go half-and-half, use geometric patterns, layer geometric shapes with metallic accents, or keep things simple with a striking color block. Each approach reads completely differently depending on the proportions, finish (matte, glossy, glitter), and any supporting nail art details you add.
If you’ve been scrolling through nail inspiration without finding the exact look you’re imagining, this collection covers 15 distinct black and red stiletto styles — each one practical enough to actually wear, specific enough that you (or your nail artist) can recreate it, and distinctive enough that you won’t see every other person with the same manicure.
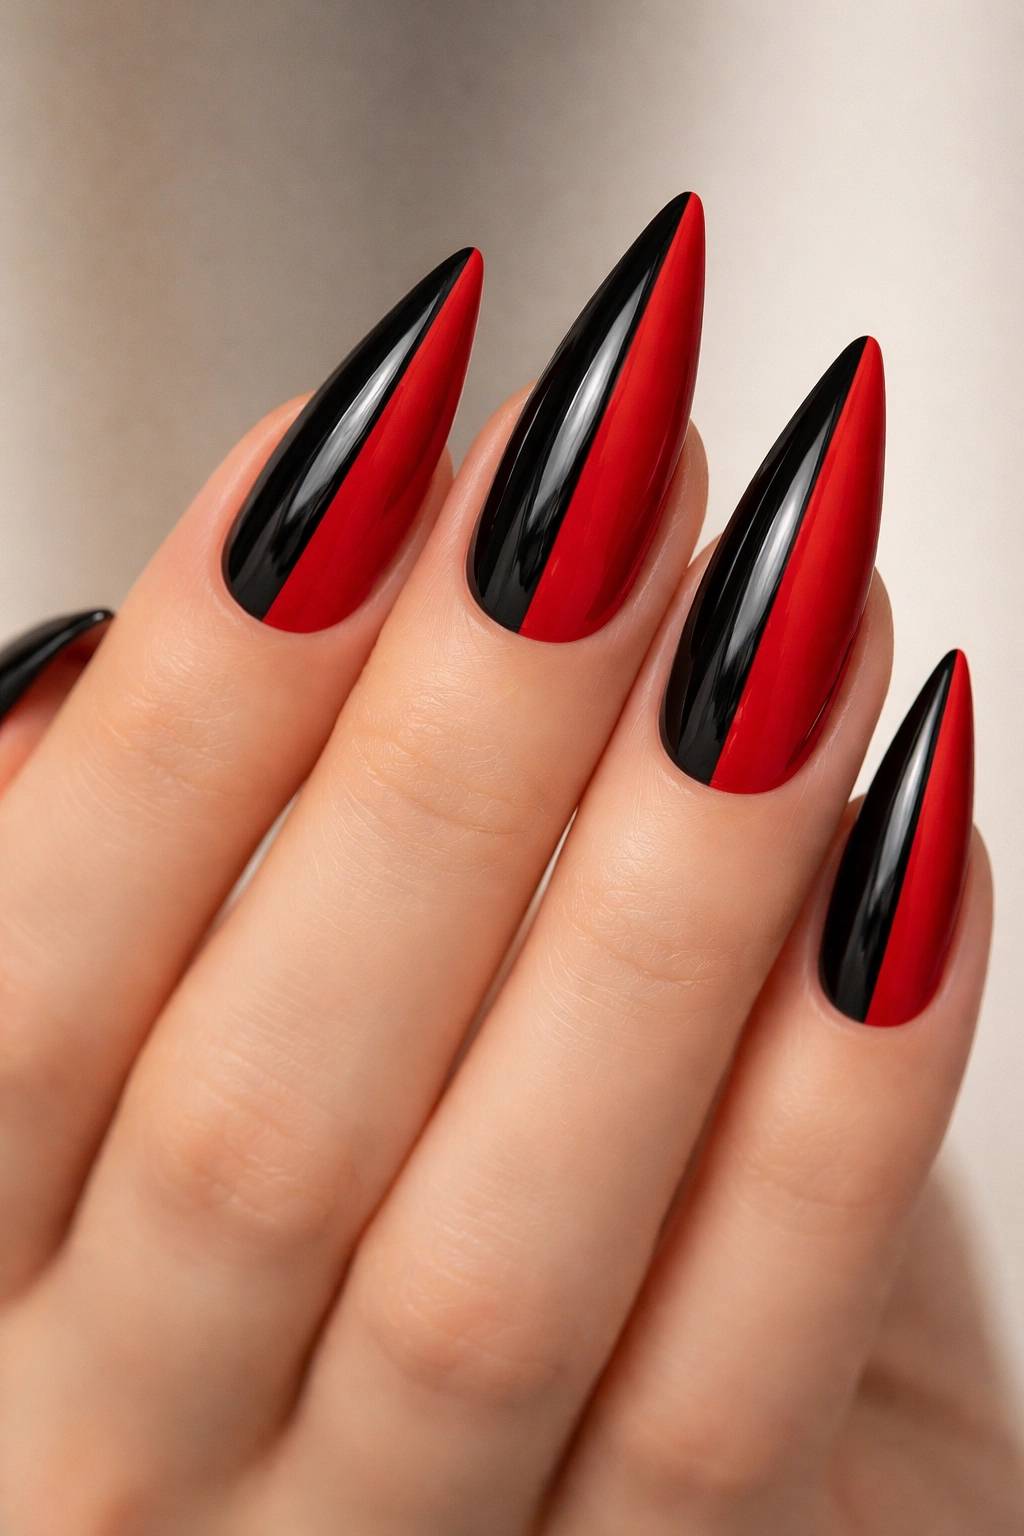
1. Classic Half-and-Half Black and Red
The simplest designs are often the most striking. This style splits each nail straight down the middle: black on one side, red on the other. The division is clean and geometric, with a sharp vertical line running from cuticle to tip. The effect is modern and balanced without feeling fussy. You get the full visual impact of both colors without any pattern complexity — just pure color blocking.
Why This Design Works
The half-and-half approach creates symmetry while keeping things bold. Because stiletto nails are naturally elongated, the vertical split feels intentional and architectural rather than accidental. The contrast between the two sides prevents the look from feeling one-dimensional, and it’s simple enough that it works for work settings, going out, or everyday wear depending on how you style it. Most nail artists can execute this perfectly with clean tape lines and precision.
How to Nail It
- Use a high-quality red that leans blue-red or burgundy rather than orange-red for better contrast against the black
- Apply the first color (let’s say black) as your base coat, then let it dry completely
- Use painter’s tape or a thin nail striping tape down the center of the nail, running vertically from cuticle to tip
- Paint the exposed half with red, using two thin coats for full opacity
- Remove the tape slowly and carefully while the red is still slightly tacky — this prevents the red from chipping away at the edge
2. Ombre Gradient From Black to Red
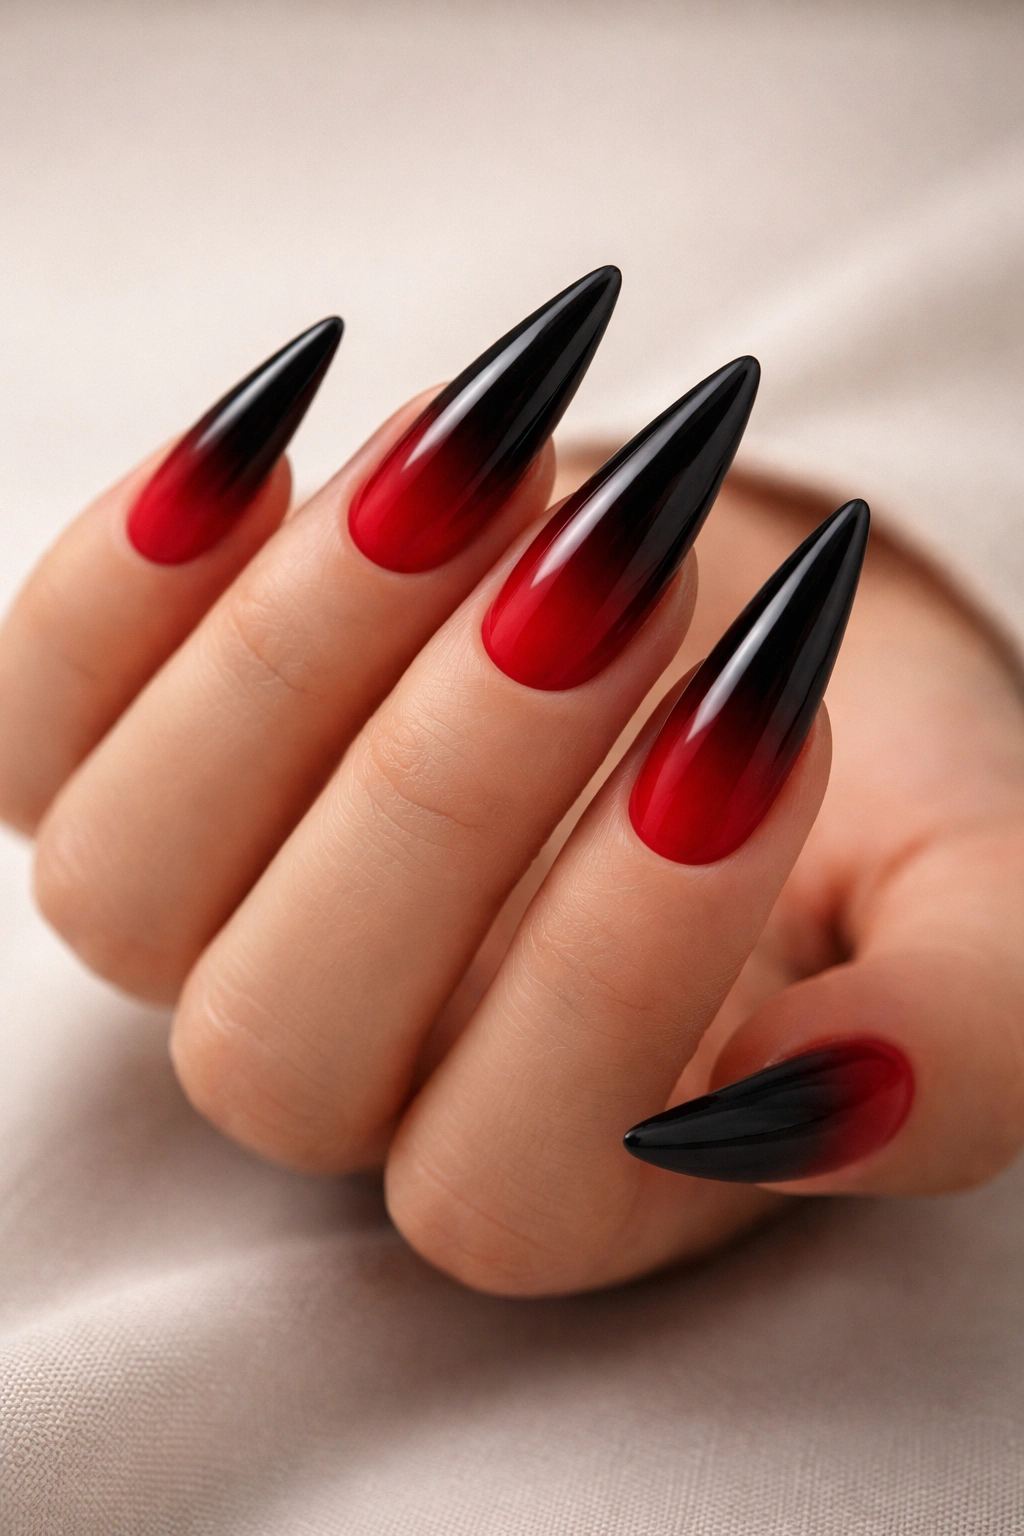
This design blends black and red together in a gradient that transitions across the nail. The black sits heavy at the base or on one side, gradually fading into red as it moves toward the other side or the tip. The effect is fluid, dimensional, and artistic without being chaotic. The gradient can run vertically (black base to red tips), horizontally (black on left to red on right), or even diagonally for something a bit more unexpected.
Why This Design Reads as More Sophisticated
Ombre creates the illusion of movement and depth on your nails. Rather than a stark color division, the gradient feels blended and intentional, almost like a sunset or a deliberate color melt. It works particularly well on stiletto shapes because the elongated nail gives the gradient room to breathe and show off the color transition. This design also photographs beautifully, which matters if you’re posting your nails online or want them to look exceptional in person.
Application Tips for Flawless Results
- Start with a clear or nude base coat to help the colors blend smoothly
- Apply black to the area you want it darkest (base or side), then apply red to the opposite end
- Use a damp sponge or a gradient tool to dab and blend the overlapping edge while both polishes are still wet
- The key is working quickly — if the polish dries too much, the gradient gets harsh rather than seamless
- Seal with a glossy topcoat to enhance the blended effect and make the gradient look more intentional
3. Red Stilettos With Black Tips (Reverse French Manicure)
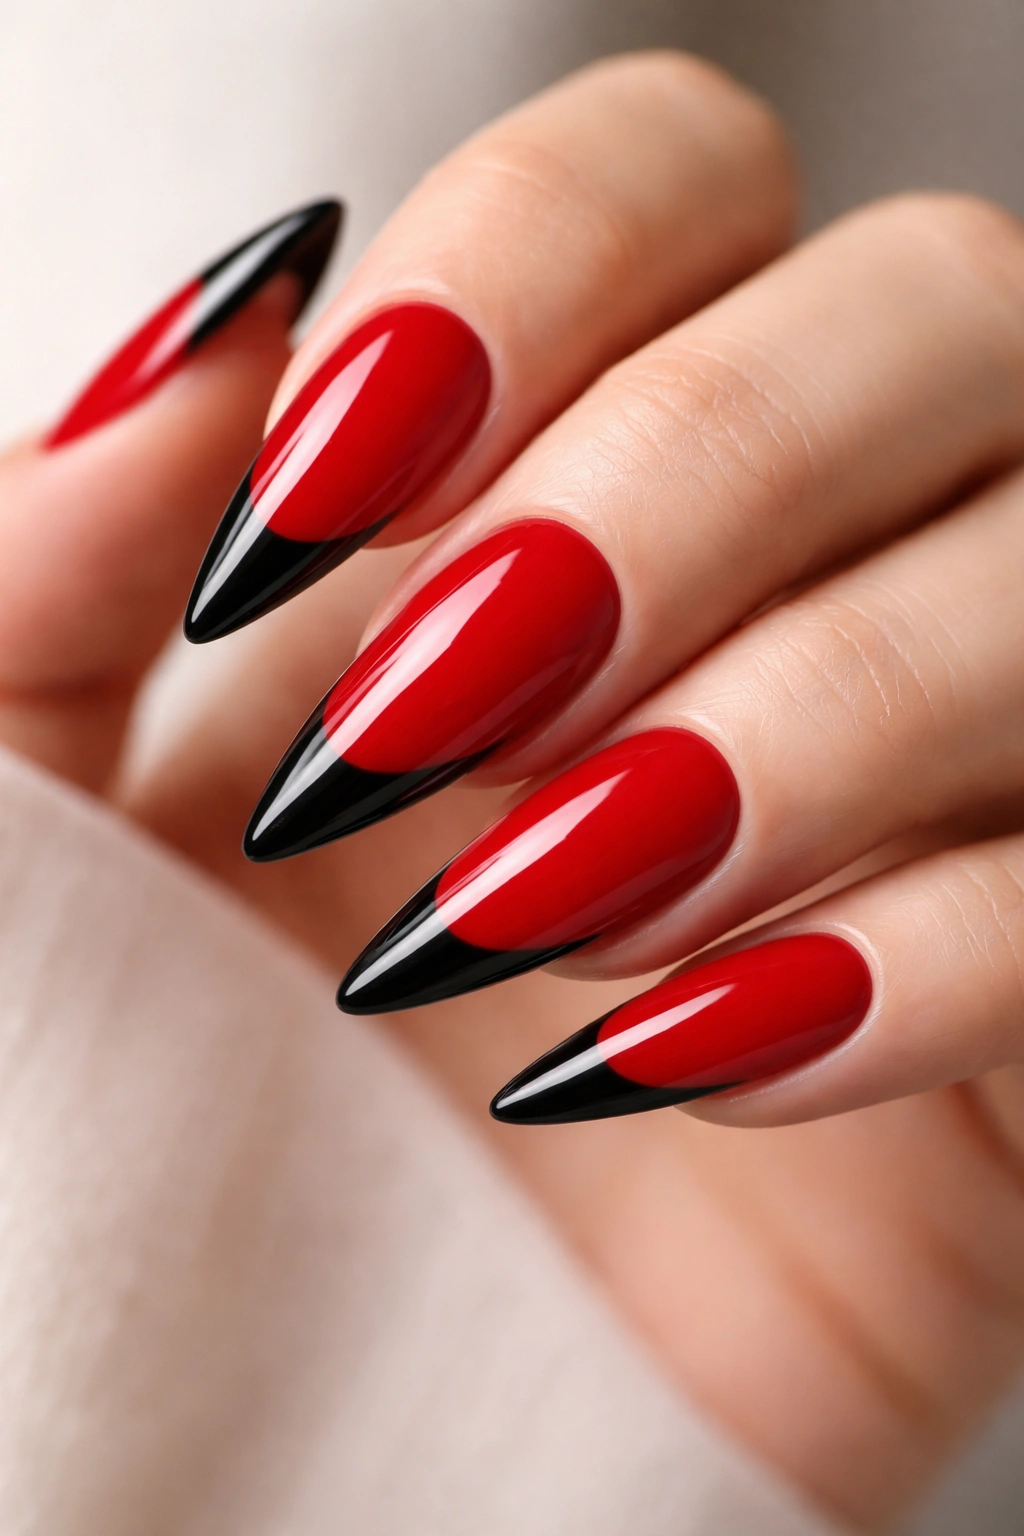
Instead of the classic French manicure (white tips on a nude base), flip the script entirely. The nail bed stays deep red while the very tip of each stiletto nail is painted solid black. The black tip acts like a frame, emphasizing the sharpness of the stiletto point and creating a clean, modern look that’s equal parts chic and edgy.
What Makes This Style Stand Out
This is technically a reverse French manicure, but the black-and-red version feels far more dramatic than the traditional white-on-pink. The red draws the eye to the entire nail, while the black tip creates definition and sharpness that plays up the stiletto shape. It’s a design that works year-round — not too seasonal, not too trendy, just timelessly bold. The simplicity also means it holds up well as the manicure grows out, since the design doesn’t depend on perfect proportions.
How to Execute It Perfectly
- Paint the entire nail with two coats of a true red (not burgundy, not orange — a clear red)
- Wait for it to dry completely, then use a thin nail art brush or a French manicure guide to paint just the tip black
- The black line should be thin enough to look intentional, roughly 2-3mm from the very edge of the nail
- Use a thin topcoat to seal without disrupting the design, and apply a glossy topcoat for that clean, polished finish
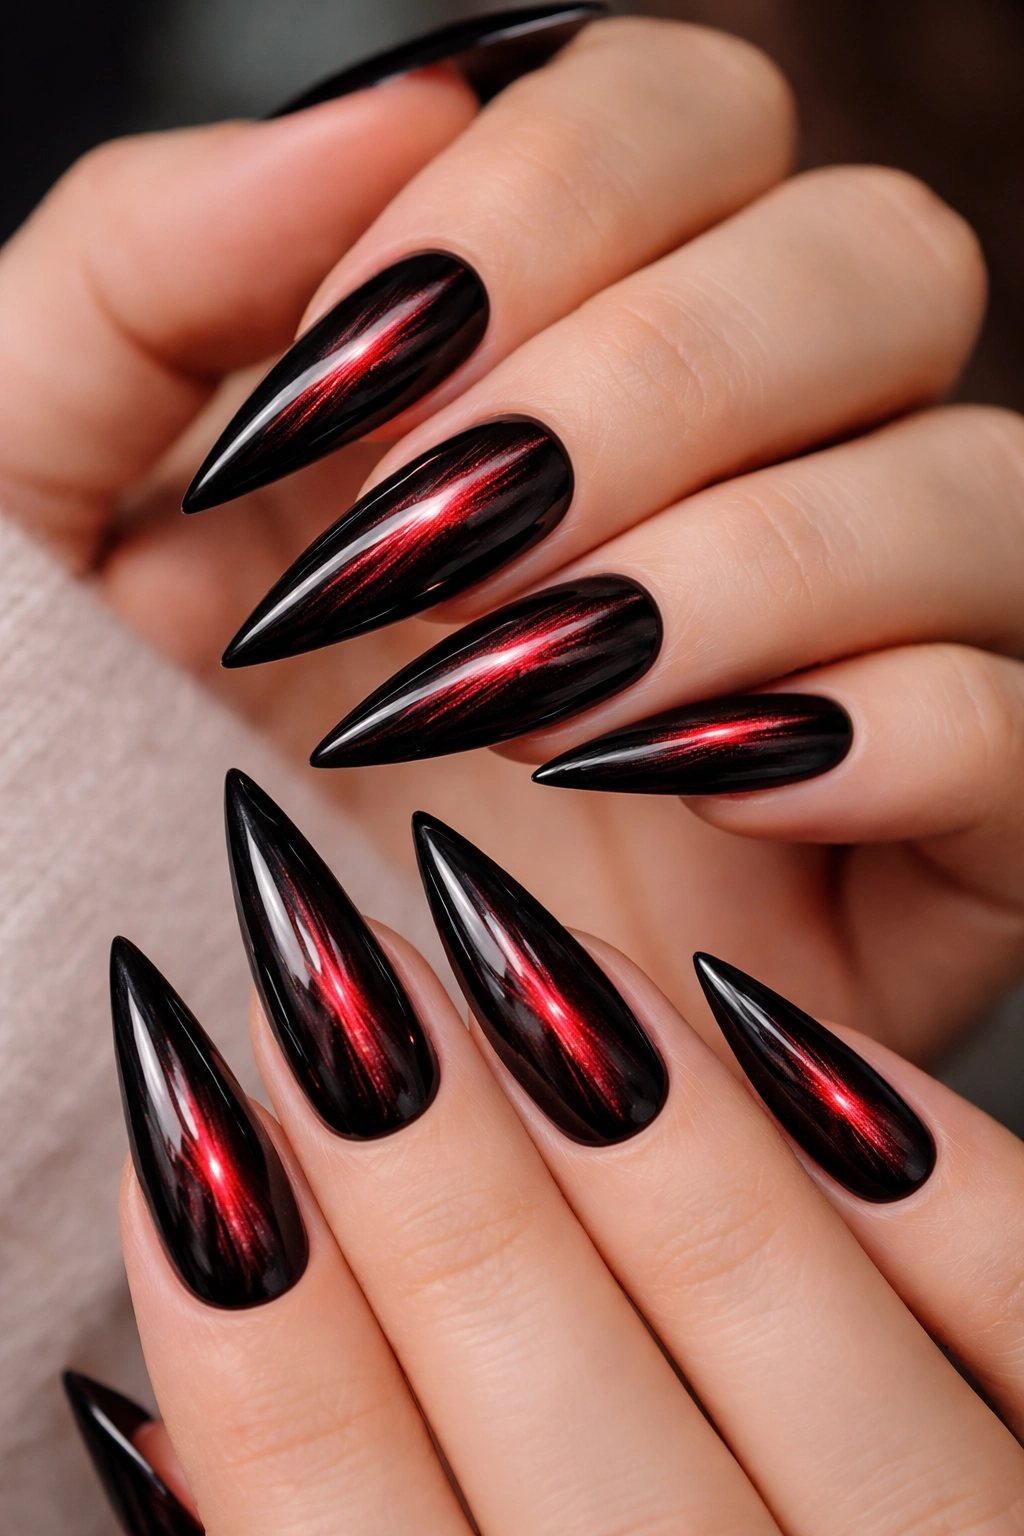
4. Black With Red Metallic Stripes
Here’s where you add pattern without overcomplicating things. Start with a solid black base, then add thin metallic red stripes running vertically, diagonally, or even in a more geometric pattern. The metallic finish catches light and creates dimension that solid red alone wouldn’t. The stripes break up the black while keeping the overall design clean and modern.
Why Metallic Red Changes Everything
Standard red is beautiful, but metallic red is show-stopping. The shimmer adds texture and visual interest without making the design look busy. On black, metallic red stripes feel sophisticated and intentional — like you planned this exact balance between minimalism and glamour. The stripes can be thin and delicate or thicker and more bold depending on the look you’re going for. Thinner stripes read more elegant; thicker stripes feel bolder and more statement-making.
Creating Crisp Metallic Stripes
- Paint black as your base and let it cure completely
- Use a thin striping brush or a nail art pen with metallic red polish
- Paint stripes with a light hand — you want them visible but not so thick that they overwhelm the black
- Alternatively, use thin metallic red tape pressed onto the black and sealed with topcoat
- A glossy topcoat amplifies the metallic effect and makes the whole design shimmer
5. Matte Black With Glossy Red Tips
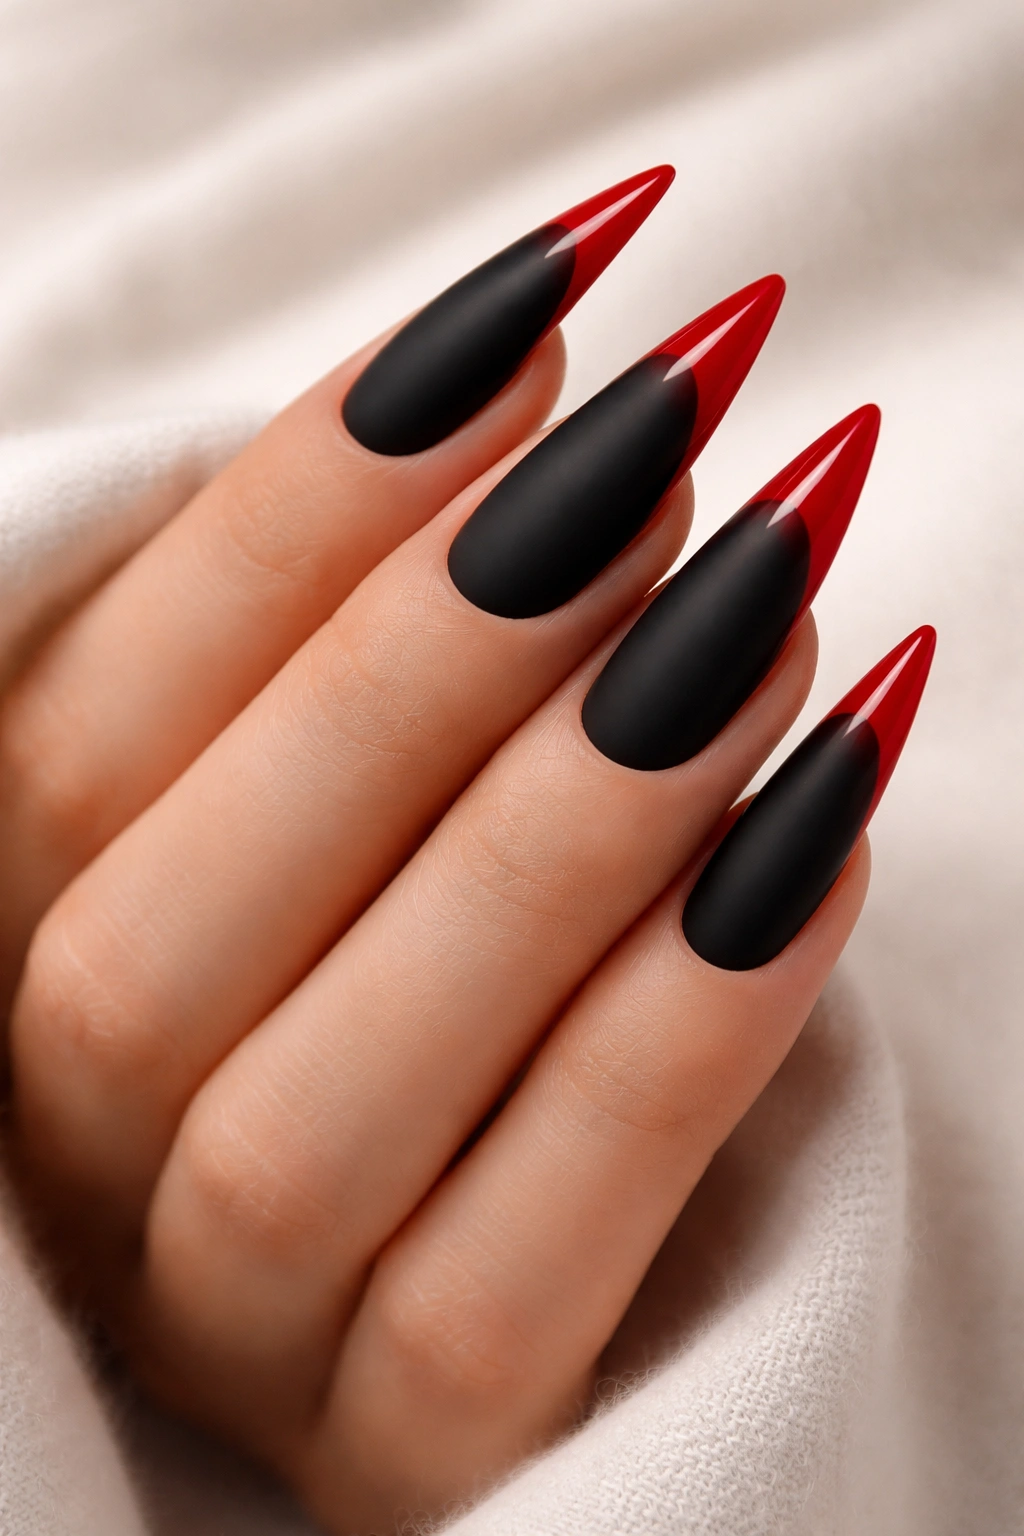
This design plays with finishes to create contrast in a completely different way. The nail base is matte black (unsealed, flat, no shine), while the tips are glossy red. The matte-versus-glossy contrast creates visual interest and texture that keeps the design from feeling flat. Matte black also feels more modern and sophisticated than high-shine black, which makes this approach feel very current.
The Power of Combining Finishes
When you mix matte and glossy on the same nail, you’re not just mixing colors — you’re mixing how light interacts with your nails. The matte black absorbs light, appearing deep and velvety, while the glossy red reflects light and shimmers. This contrast makes both colors pop more than they would if both finishes were the same. The glossy tips also draw extra attention to the stiletto point, which is exactly where you want the eye to land.
How to Achieve the Matte-Glossy Contrast
- Apply two coats of black and do NOT seal it with topcoat — leave it matte
- Use a thin striping brush or guide to carefully paint glossy red on just the tips
- The red will have shine from its own finish, creating the automatic contrast
- Be careful not to get glossy topcoat on the black portion, or you’ll lose the matte effect
- If you do use topcoat to seal, apply it only to the red tips area, avoiding the matte black base
6. Black Nails With Red Marble Effect
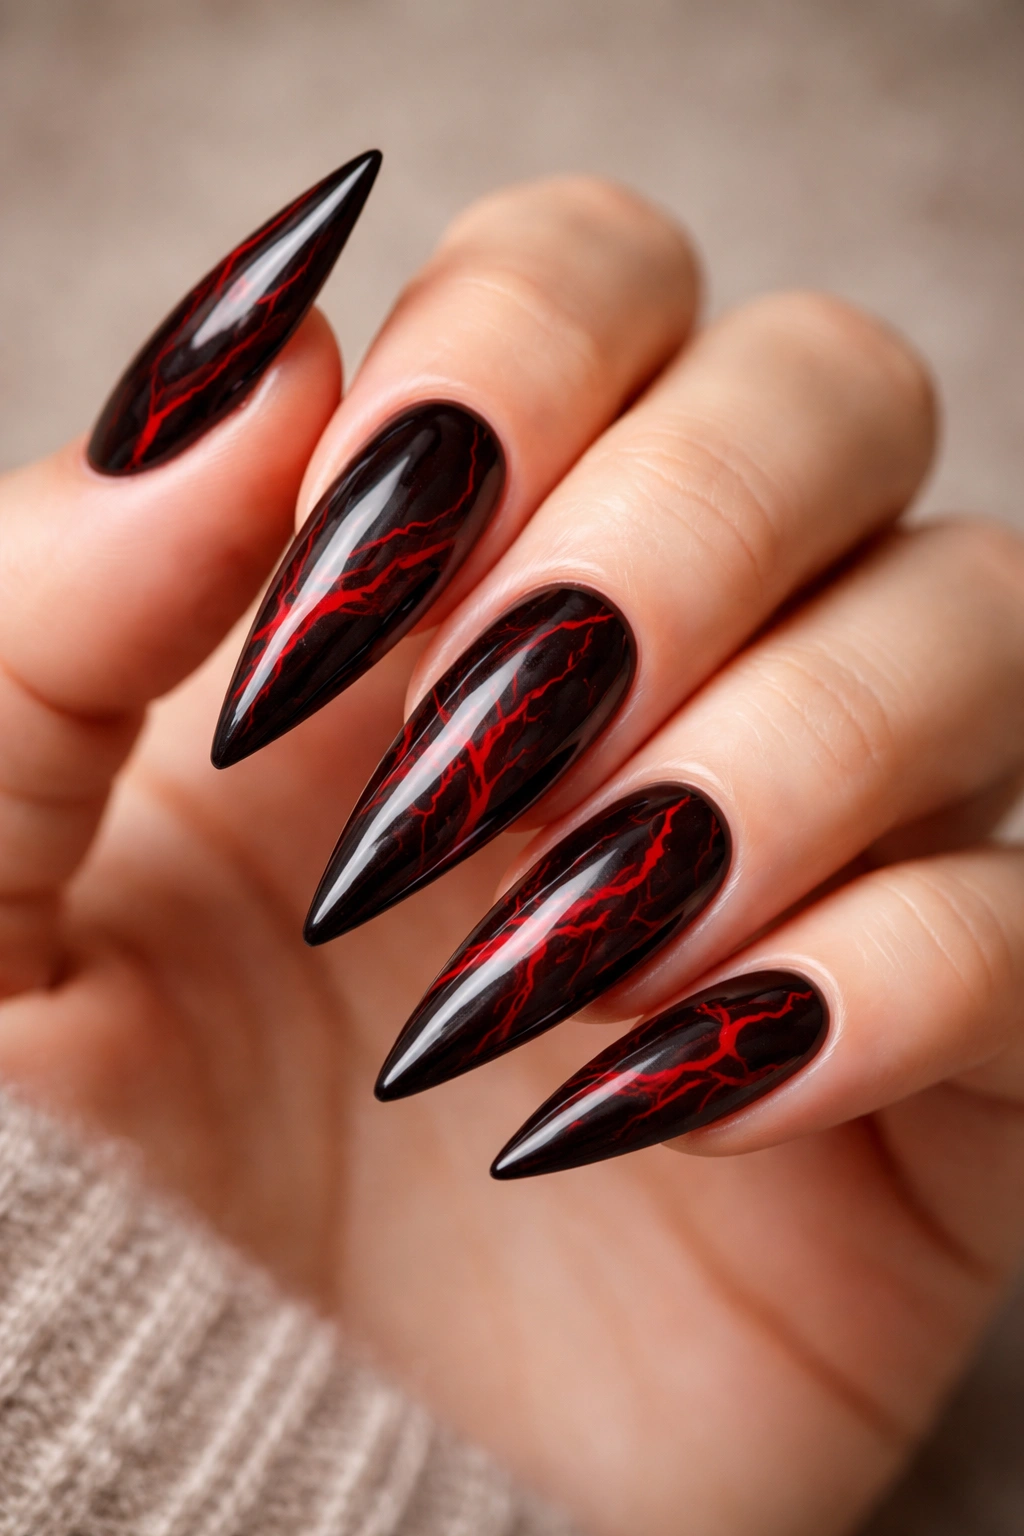
Marble is everywhere in nail art for a reason — it looks expensive, artistic, and intentionally designed. Start with a black base, then create a marble pattern using red polish. The marble swirls look organic and flow across the nail surface in a way that feels both random and intentional. You can make the marble subtle (just a few thin red veins) or bold (more red than black showing through the pattern).
Why Marble Works on Stilettos
The elongated surface area of a stiletto nail gives you plenty of room for marble detail to really shine. Unlike shorter nails where marble can feel cramped, stilettos let the swirling lines flow and create movement. The black-and-red color combination is perfect for marble because the contrast is stark enough that the pattern reads clearly, but the colors are sophisticated enough that it doesn’t look costume-y.
Creating a Convincing Marble Pattern
- Paint your entire nail black and let it dry completely
- Use a thin nail art brush or dotting tool dipped in red polish to create thin, irregular lines and swirls
- The key is varying the line thickness — some thin, some slightly thicker — so it looks organic
- Let the red lines intersect and overlap rather than creating perfect patterns
- Seal with a glossy topcoat, which will make the marble look more cohesive and intentional
7. Red Nails With Black Geometric Shapes
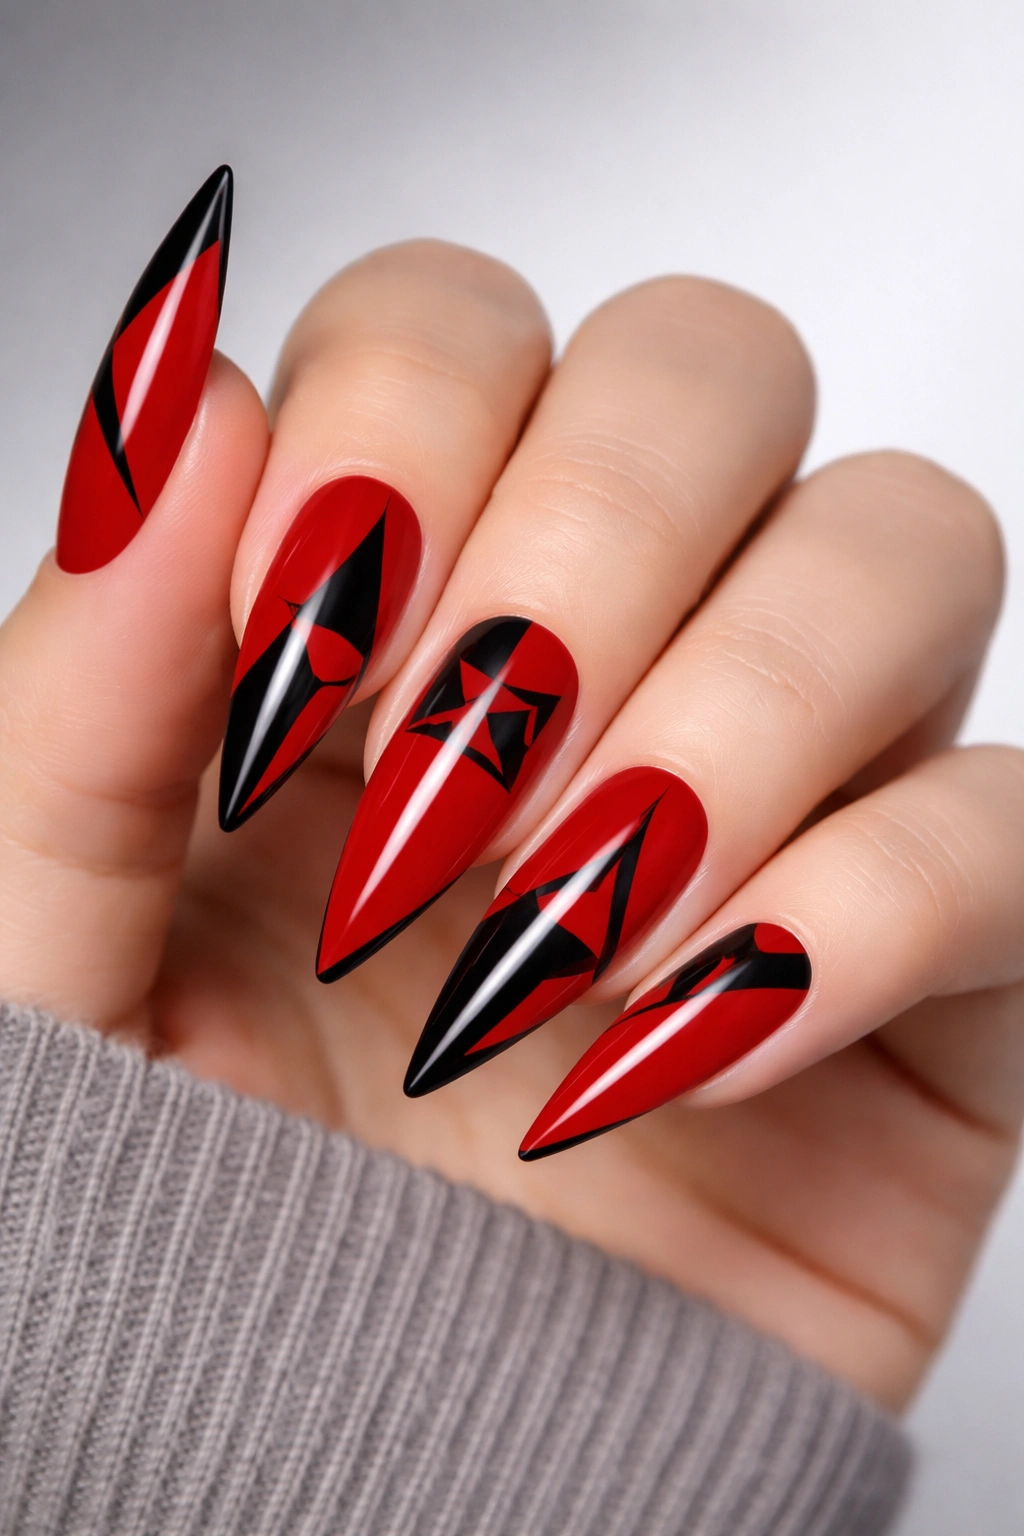
Instead of the base being one color with the tip another, create distinct geometric shapes in black over a red base. Think triangles, squares, lines, or abstract angular shapes placed strategically on the nail. The red becomes the canvas, and the black shapes are the statement. This style reads very modern and artistic, perfect if you want nail art that feels personalized without being too decorative.
What Makes Geometric Nail Art Compelling
Geometric designs feel intentional and controlled. Unlike free-form patterns, geometric shapes feel planned and precise, which gives your nails a very put-together, high-design vibe. The black-on-red combination is ideal because the contrast makes every shape crisp and visible. You can go minimal (one or two small shapes per nail) or more complex (overlapping shapes), and both approaches feel sophisticated.
Executing Sharp Geometric Designs
- Paint your entire nail with two coats of red and let it dry completely
- Use a thin striping brush or nail art pen with black polish to draw your chosen shapes
- If you’re doing triangles, measure twice or use a guide to keep proportions even
- Clean up any wobbly lines with a thin brush dipped in acetone or a bit of red polish
- A glossy topcoat seals everything and makes the black shapes really pop against the red
8. Red Stilettos With Black Lace Detail
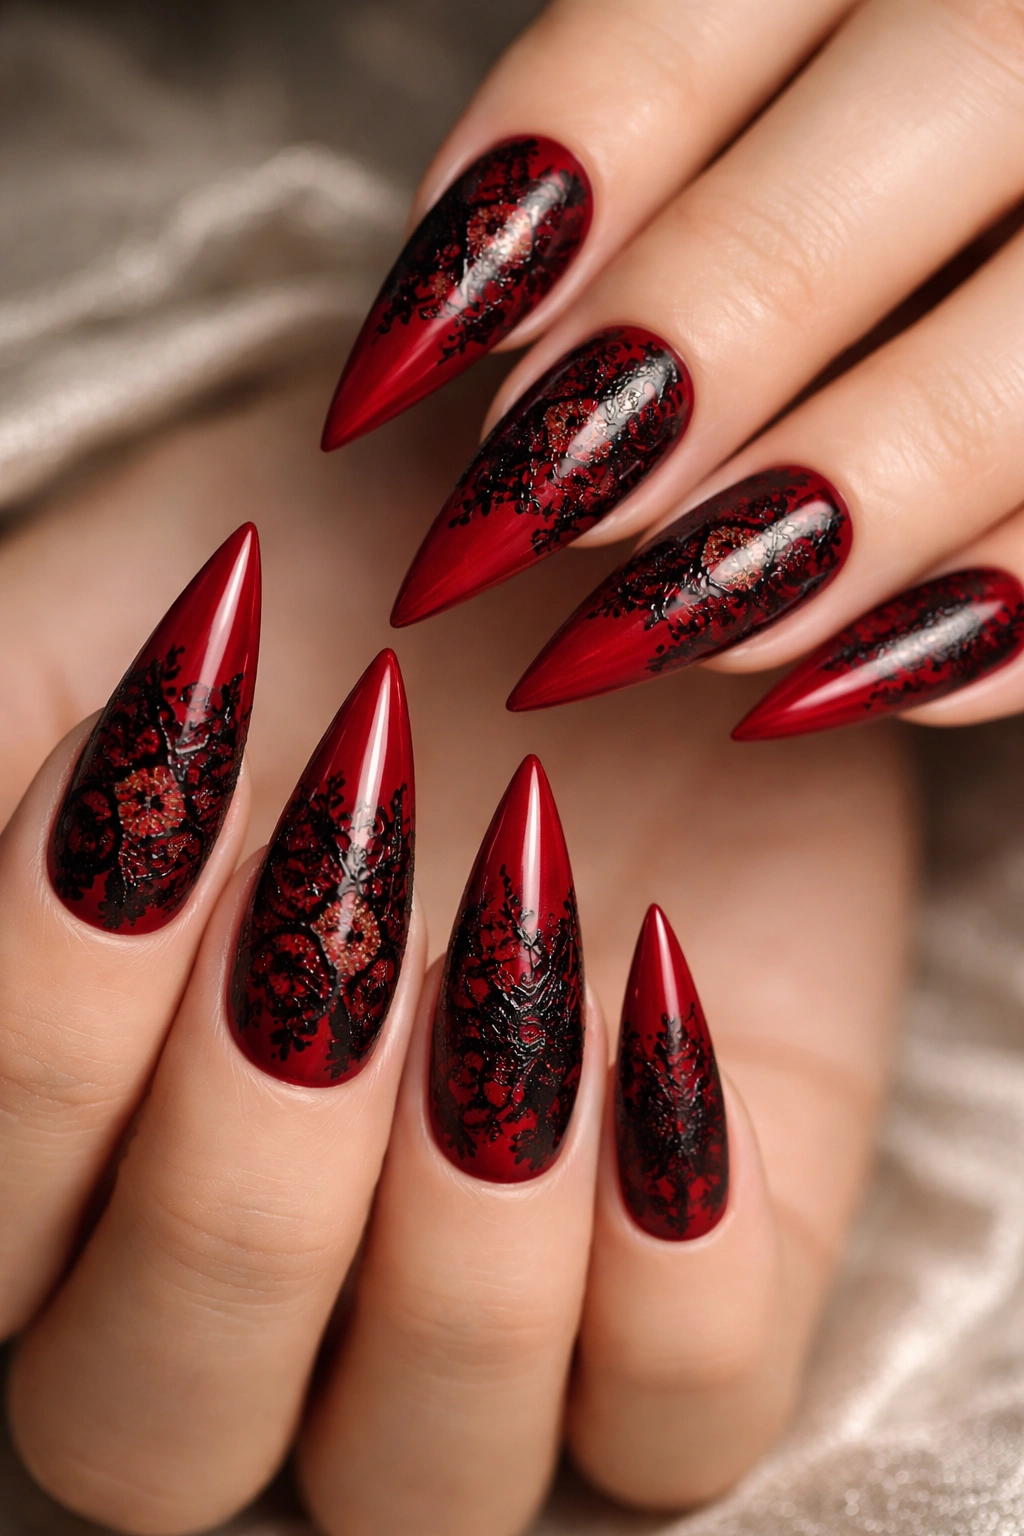
For something more romantic and intricate, add a delicate lace pattern in black across the red. The lace can wrap around the nail like a cuff, run down one edge, or cover the entire surface in a delicate webbed pattern. Black lace on red feels sophisticated and a bit vintage-inspired, but on modern stiletto nails, it reads as edgy-romantic rather than dated.
Why Lace Changes the Whole Vibe
Lace introduces femininity and intricacy that pure color blocking doesn’t have. It shows effort and artistry, making your nails feel like a deliberate style choice rather than a casual color combo. Black lace on red specifically plays with contrast — the intricate pattern against the bold red base creates visual interest while keeping the overall aesthetic elegant.
Creating Convincing Lace Details
- Start with two coats of bright, true red
- You can freehand the lace pattern with a very thin brush, but it’s easier to use a lace nail stamp
- If stamping, roll the lace stamp gently across the nail to transfer the pattern in black
- For hand-painted lace, use a very thin brush and take your time with the delicate lines
- Seal with a topcoat, which will integrate the lace into the design and make it feel cohesive
9. Black and Red Ombre With Glitter Gradient
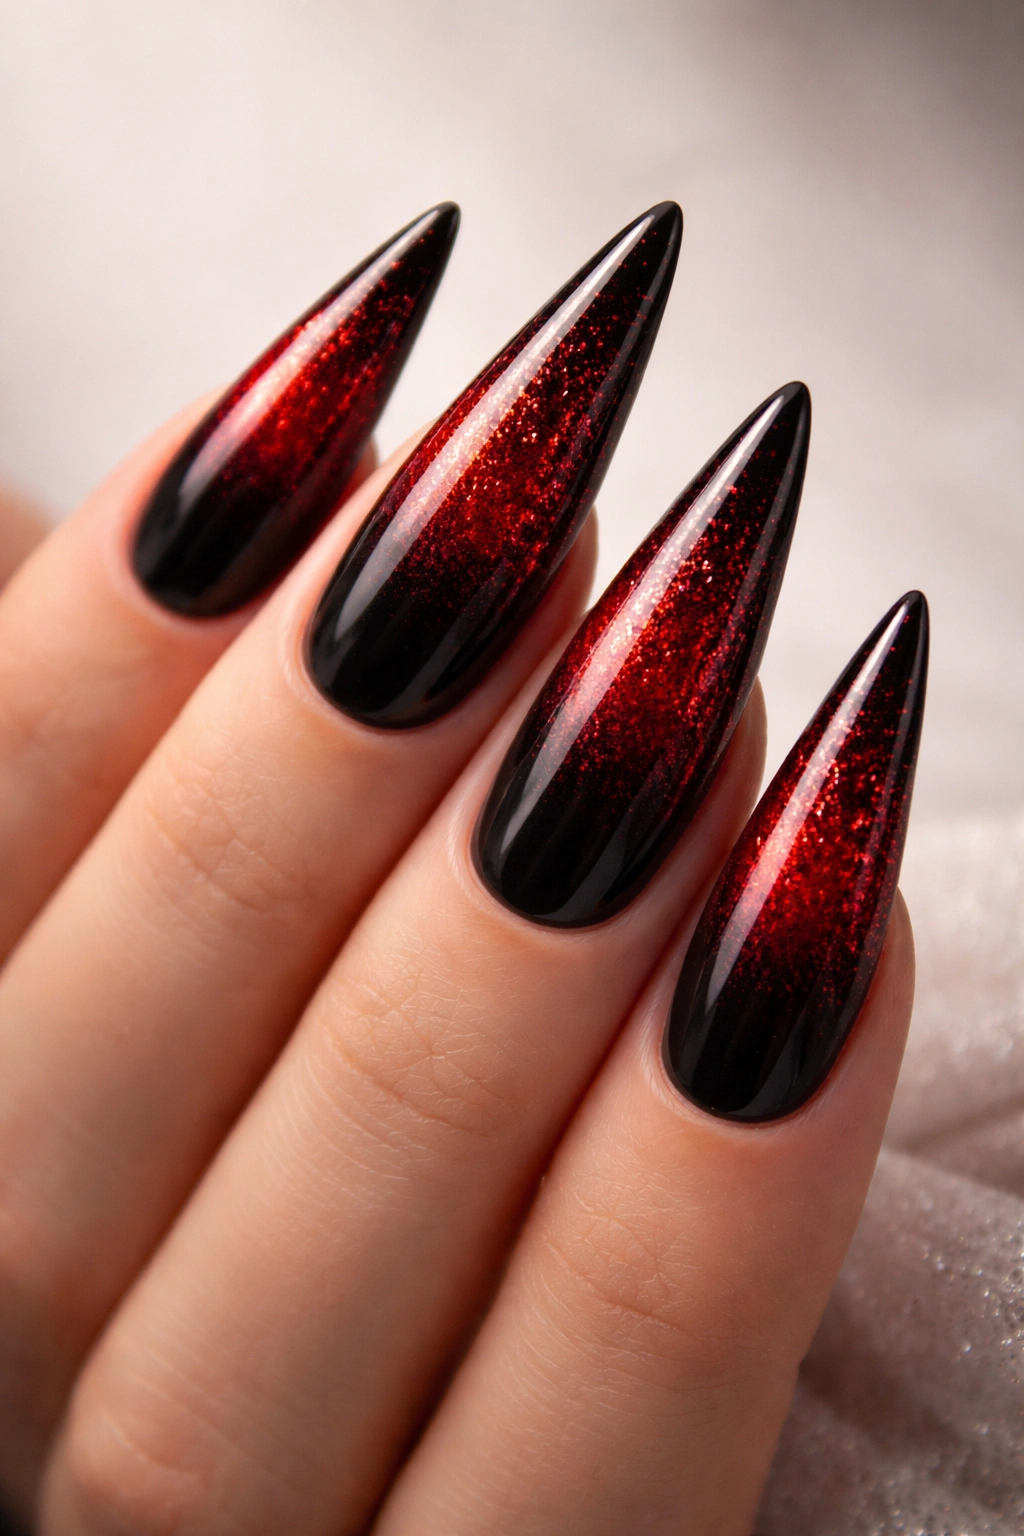
Combine the ombre gradient we discussed earlier with a glitter element. The gradient transitions from black to red, and then incorporates fine glitter that gets denser as the color gets redder. So you’ve got solid black fading to red with more and more glitter, creating a gradient that’s not just about color but about texture and shine too. The effect is glamorous without being over-the-top.
Why Glitter Gradients Elevate a Design
Adding glitter to an ombre makes the design feel special occasion-ready while still being wearable. The glitter catches light and adds sparkle that pure colors don’t have, but because it’s gradated (more at the tips, less at the base), it feels balanced and intentional. The black-to-red gradient keeps the design from being too “girly,” while the glitter adds just enough glamour.
Blending Glitter Into a Gradient
- Create your black-to-red ombre as described in design #2
- While the polish is still wet or slightly tacky, sprinkle fine glitter into the red portion of the gradient
- Start with less glitter at the middle transition and build it up as you move toward the tips
- Use a topcoat to seal the glitter in place, then add another topcoat for a smooth finish
- The topcoat will also help blend the glitter into the polish so it feels like part of the design, not just glitter on top
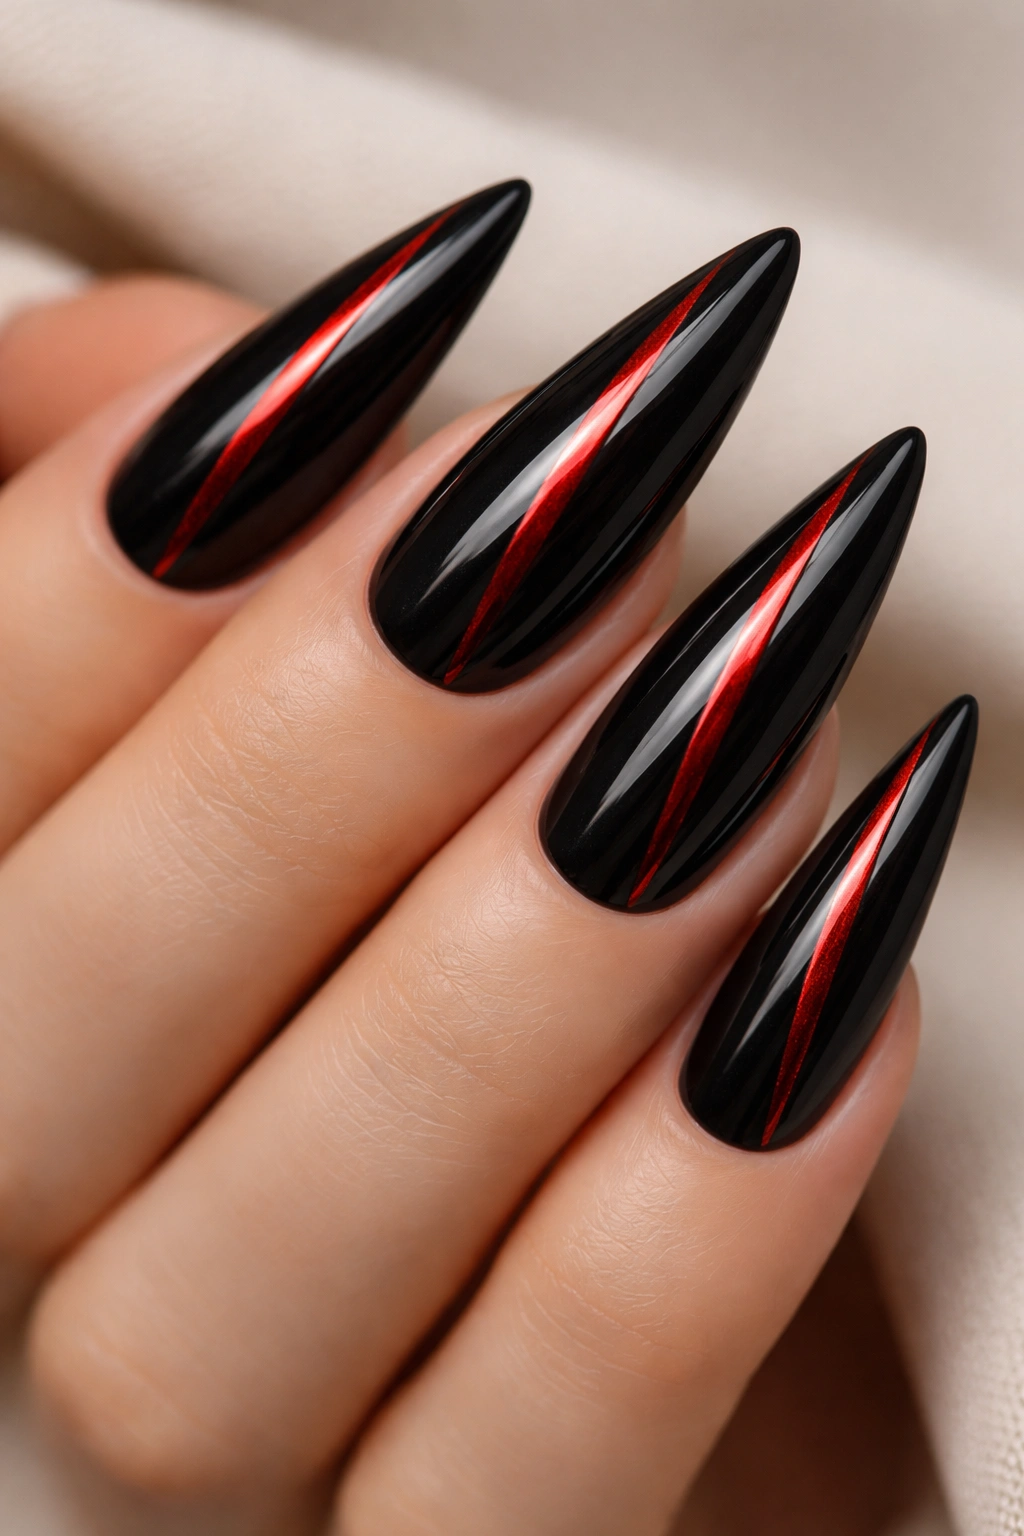
10. Stiletto Nails With Black Cat Eye Effect in Red
Cat eye polish creates that magnetic, light-reflecting line that looks like a cat’s eye. Create this effect in red on a black base. The black is your canvas, and the red cat eye line runs vertically down the center or at an angle across the nail. Cat eye is one of those effects that looks complicated but reads as incredibly cool and modern.
What Makes Cat Eye Stand Out
Cat eye polish is magnetic — it reflects light in a specific line that shifts as you move your hand, creating an almost 3D effect. On a black background, a red cat eye line becomes the focal point. It’s an eye-catching design that feels both trendy and timeless because the effect itself is so visually striking that the specific colors become secondary to the wow factor of the finish.
Applying Cat Eye Polish Correctly
- Paint your entire nail with two coats of black and let it cure
- Apply cat eye red polish according to the brand’s instructions — most cat eye polishes need to be applied with gentle, even strokes
- Use a magnet held about 1cm above the nail to create the light-reflecting line
- Different magnet placements create different line positions — experiment to see where you want the line
- Seal with topcoat, being careful not to smudge the effect
11. Red Nails With Black Accent Nail in Full Design
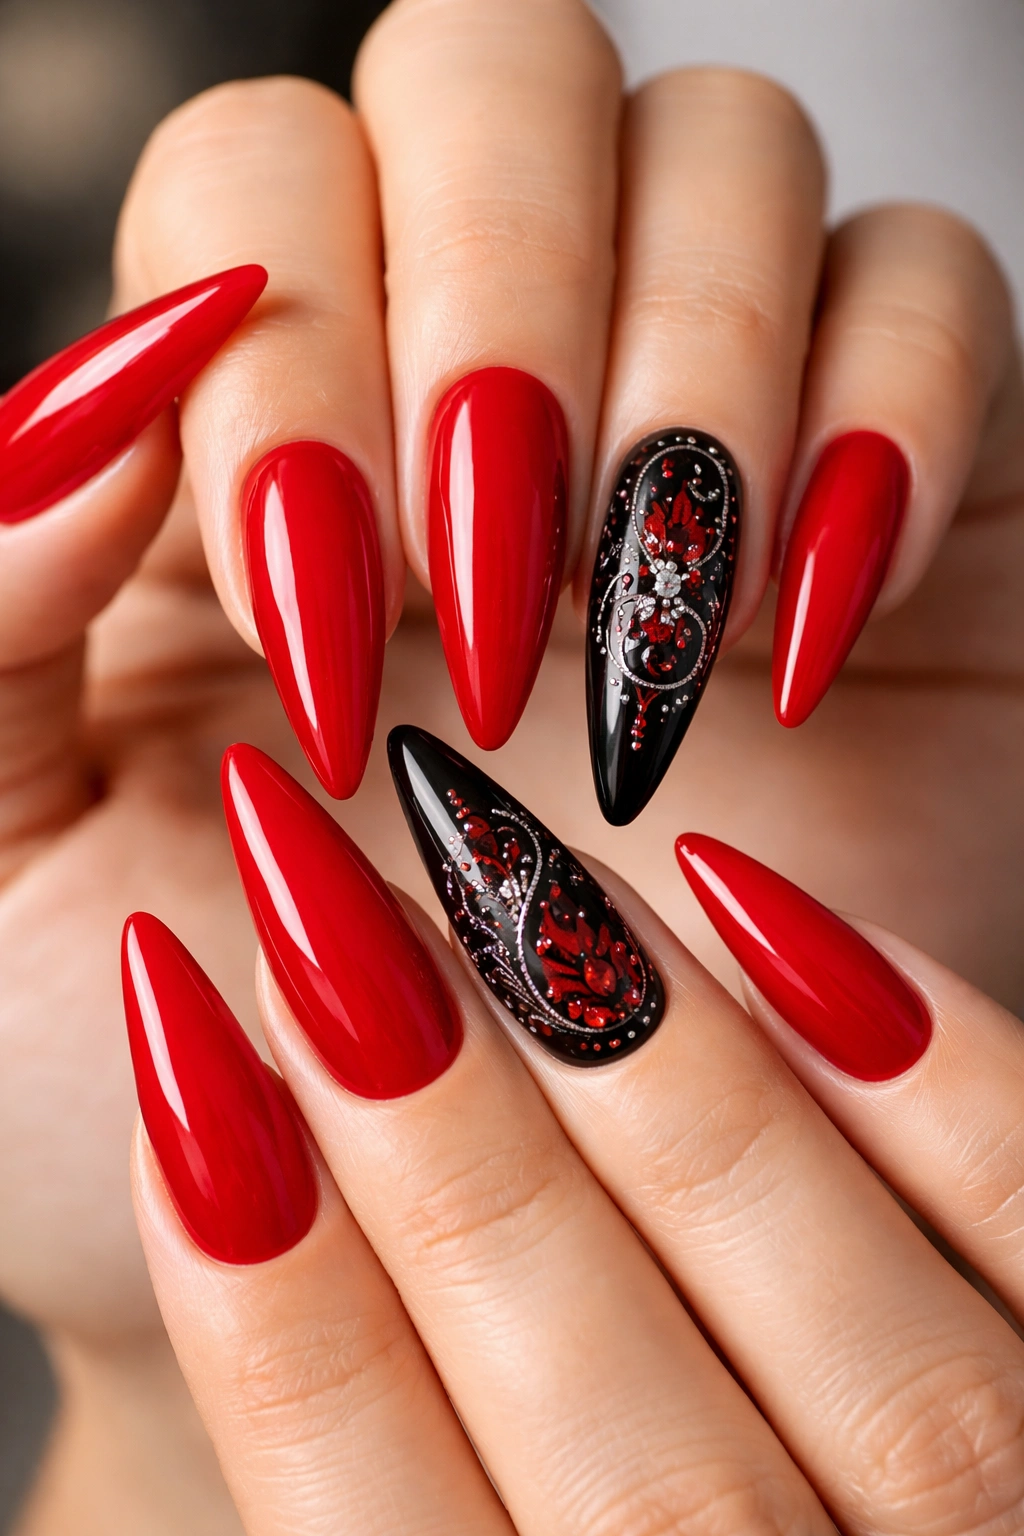
Most of your nails are solid red, but one accent nail (usually the ring finger or middle finger) is completely different. That accent nail features a full black design — maybe a gold geometric pattern, a black cat eye effect, or even a tiny red-and-black ombre on just that one nail. This approach gives you the simplicity of solid color while still having a statement moment.
Why the Accent Nail Strategy Works
An accent nail lets you have complex nail art without committing all ten nails to a busy design. It draws attention and creates a focal point. On stilettos, one accent nail with detailed black design stands out beautifully against the red nails, creating visual balance and making the manicure feel intentional.
Designing an Impactful Accent Nail
- Paint nine nails solid red with two coats
- On your accent nail, paint a solid black base
- Add your chosen detail: ombre, geometric shapes, cat eye, glitter, or lace
- The key is making that one nail feel special without making it look disconnected from the others
- A glossy topcoat on all nails unifies the whole look
12. Black Nails With Red Micro-Dots
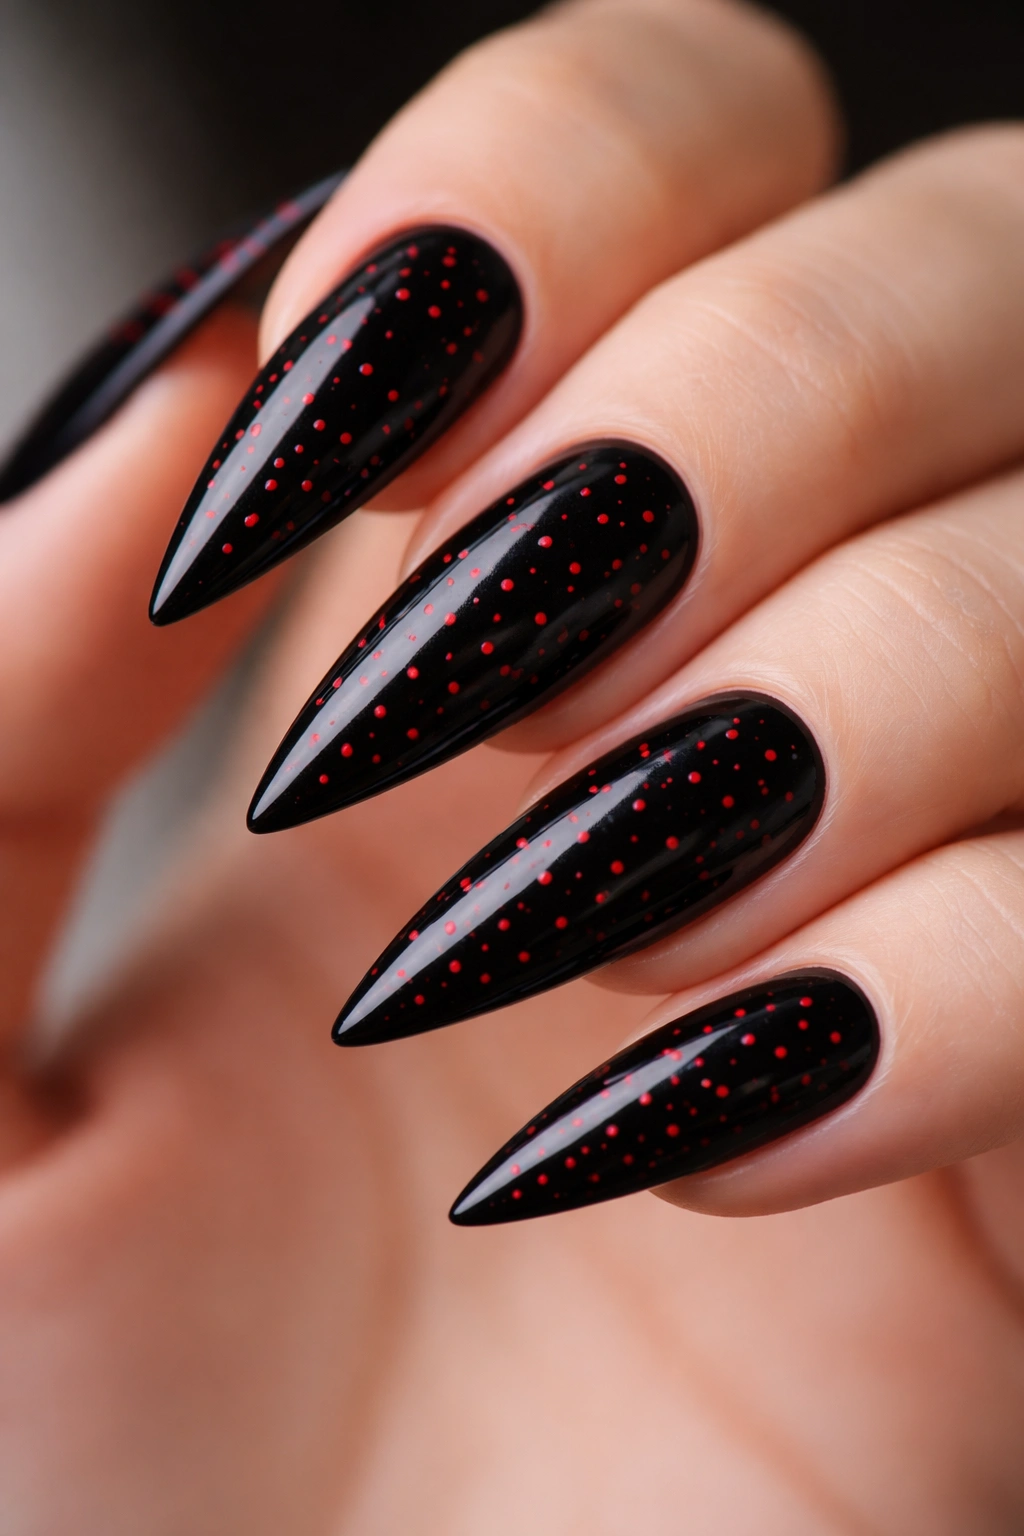
This design is minimalist but visually interesting. Start with solid black nails, then add tiny red dots scattered across the surface. The dots can be perfectly regular (a polka dot pattern) or randomly placed for a more organic feel. Either way, the tiny red pops against the black create texture and detail that prevent the design from feeling flat.
Why Micro-Dots Feel Modern
Dots are simple, but on black, tiny red dots feel contemporary and artistic. Unlike bold polka dots, micro-dots feel subtle enough for professional settings while still being visually interesting. The dots draw your eye and create movement across the nail without requiring elaborate detail work.
Creating Perfect Micro-Dots
- Paint two coats of black and let it dry completely
- Use a dotting tool with a fine tip dipped in red polish
- For regular dots, measure spacing (roughly 2-3mm apart) or use a dotting guide
- Press the dotting tool gently onto the nail and lift straight up to create clean dots
- You can scatter dots across the entire nail or concentrate them in certain areas
- A topcoat seals everything and keeps the dots from chipping
13. Red Stilettos With Black Negative Space Design
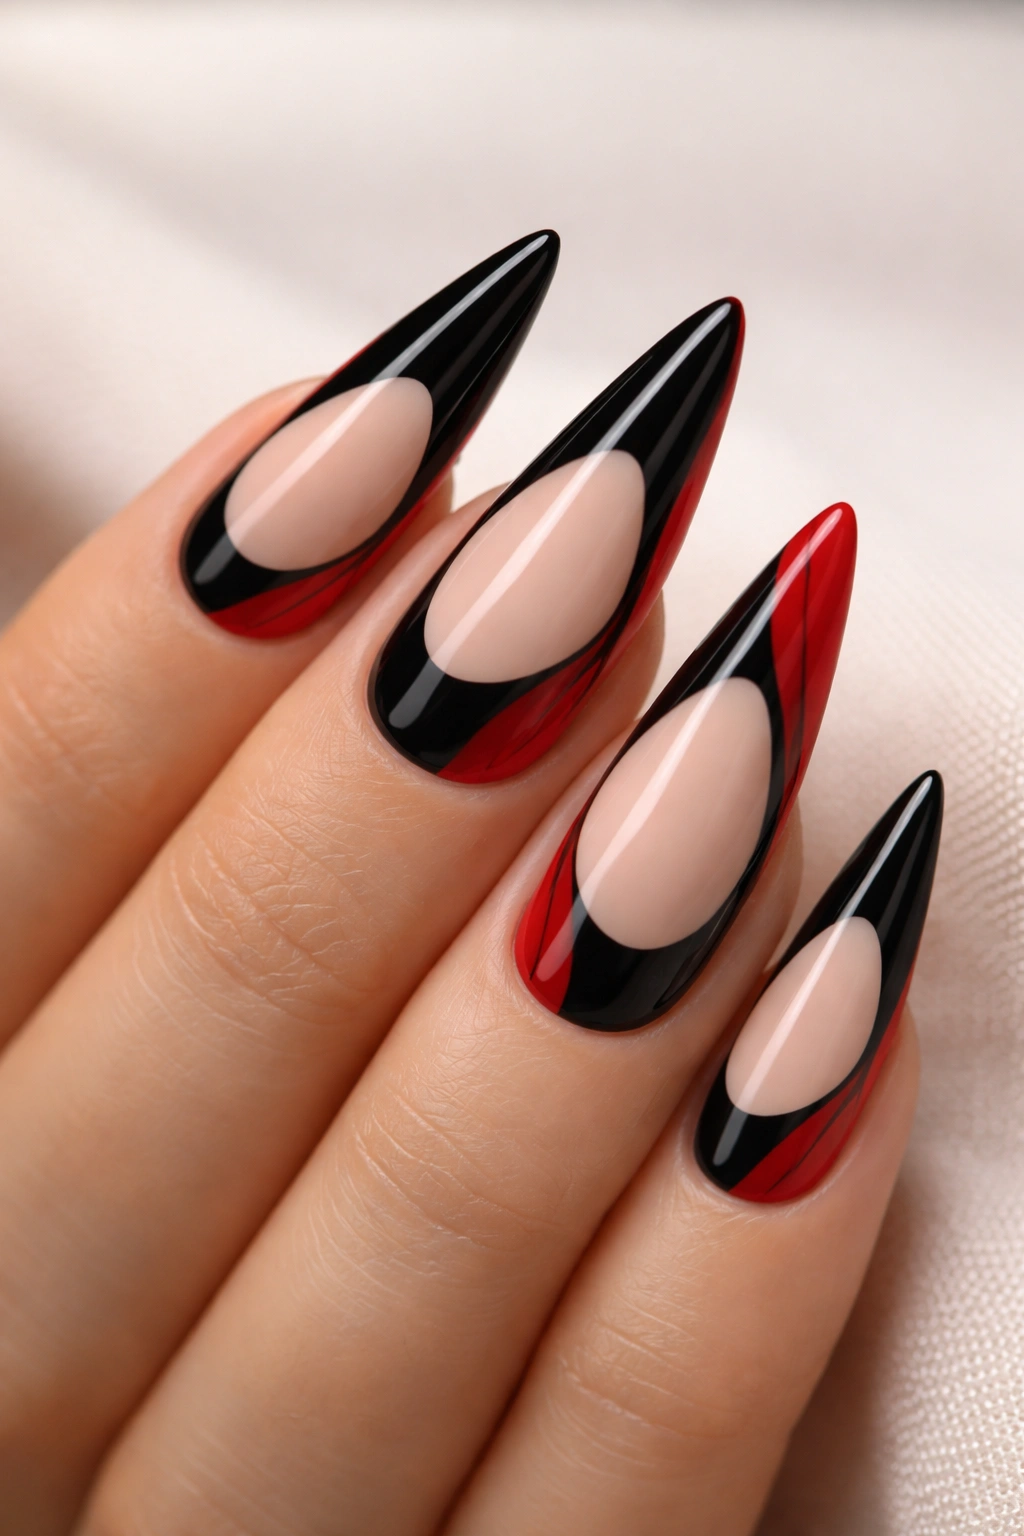
Negative space designs use the natural nail color (or a base coat) to create pattern within the polish. Paint black on most of the nail, but leave specific areas unpainted to show the nude or natural nail underneath (or a thin white base). The exposed areas create a design — maybe geometric shapes, a stripe, or an abstract pattern. This approach feels very modern and requires a steady hand but looks incredibly intentional.
Why Negative Space Reads as Sophisticated
Negative space forces you to think about the design differently. Instead of adding color on top, you’re strategically removing it, which creates a more minimalist, intentional aesthetic. On stilettos, negative space designs feel architectural and high-design, especially when combined with red accents.
Executing Negative Space Designs
- Apply a nude or pale pink base coat, or use a thin white base coat
- Plan your design (geometric shapes, stripes, or an abstract pattern) and lightly sketch it with a pencil
- Paint red in specific areas where you want red to appear
- Paint black around and over the red, leaving the planned negative space unpainted
- This requires precision, so use painter’s tape or a detailed brush to maintain clean lines
- Seal everything with a topcoat
14. Black Stilettos With Red Jeweled Tips
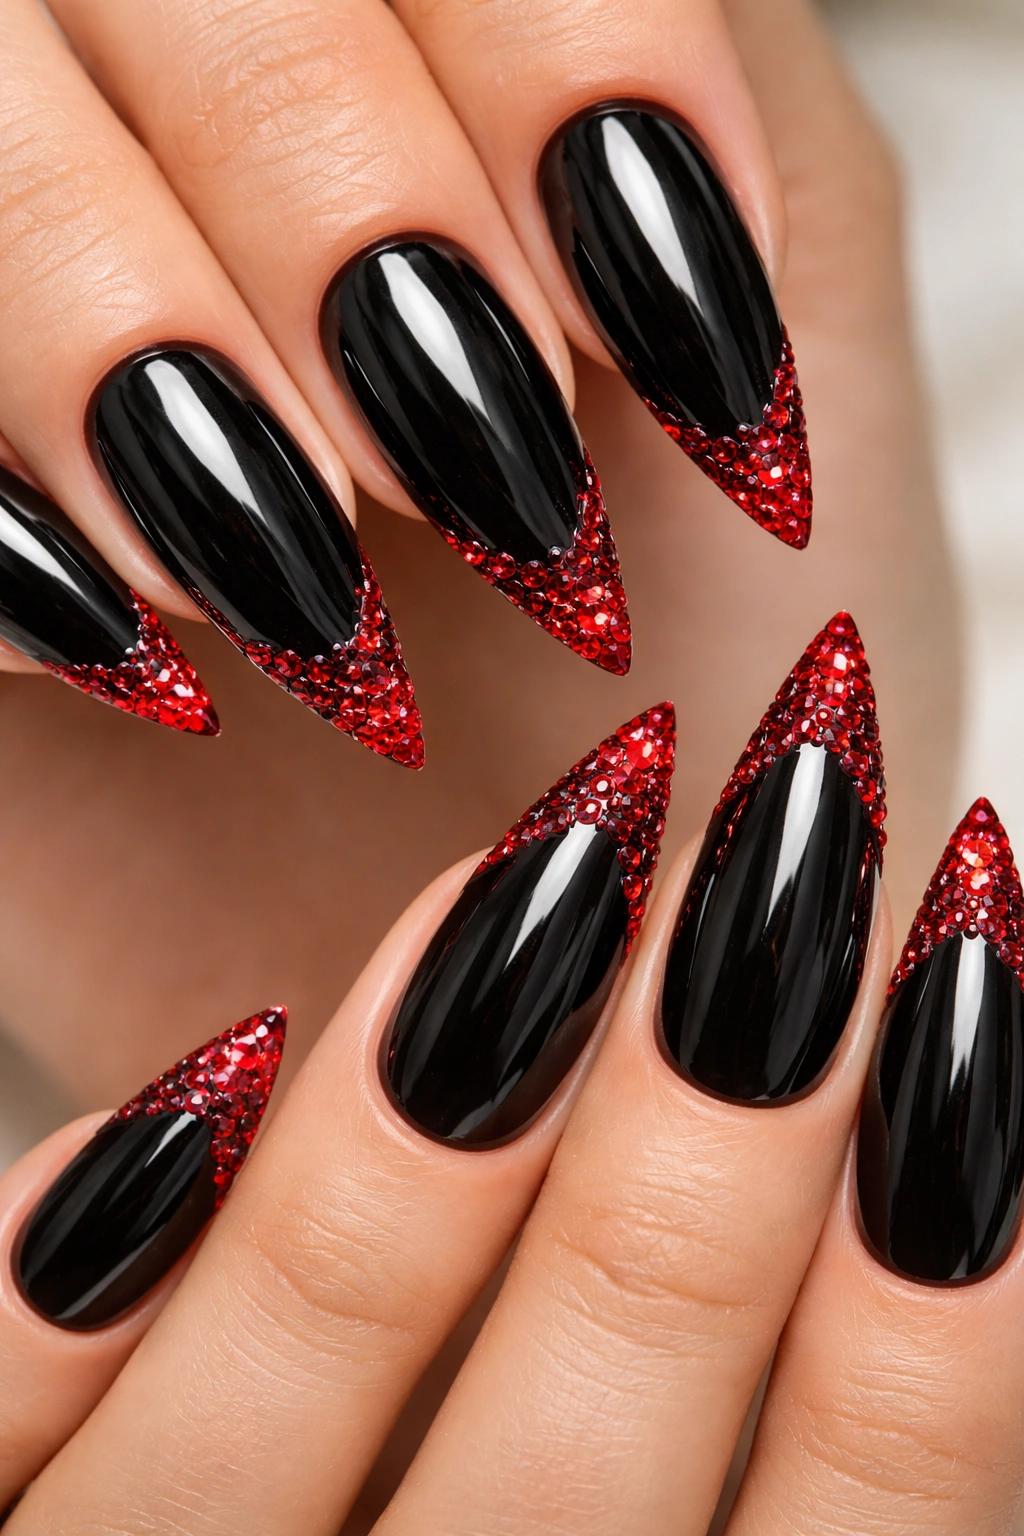
Attach small rhinestones or nail gems in red or with red detailing to the tips of black nails. The gems become the focal point, catching light and adding dimension. You can create a gradient of gems (more at the tips, fewer as you move toward the cuticle) or cluster them in a specific design. The jewels elevate the look from simple to special occasion–ready instantly.
What Gems Add to a Design
Gems introduce luxury and sparkle in a way that polish alone cannot. They catch light differently than flat finish, creating depth and dimension. On a black base with red gems, the look is instantly more glamorous and eye-catching. It’s a design that works for nights out, celebrations, or whenever you want your nails to feel extra special.
Applying Gems Permanently
- Paint black as your base color and let it dry completely
- Use a nail glue or a sticky base coat (some gems come with adhesive backing)
- Apply gems to the tips, either in a scattered pattern or clustered design
- For extra security, seal over any gems with a thick topcoat (unless the gems have flat backs that don’t sit under topcoat well)
- Red rhinestones will show the design most clearly, but even clear gems with red foil backing create a red reflection
15. Red and Black Striped Stilettos
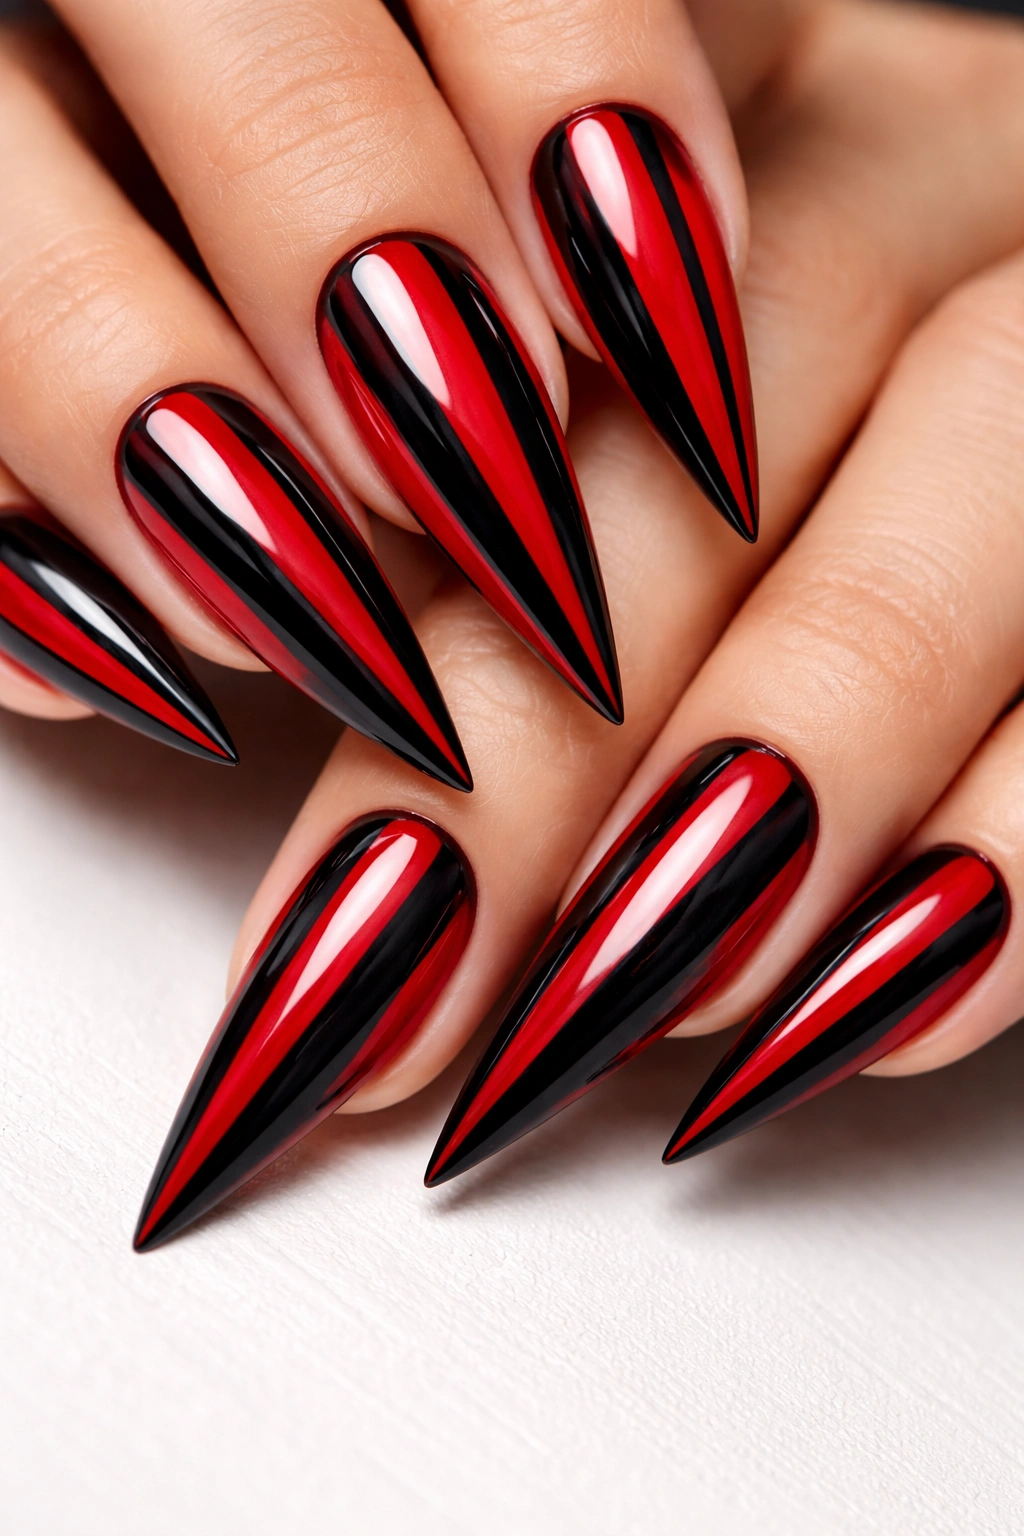
Create thin alternating stripes of red and black running vertically, horizontally, or diagonally across each nail. The stripes should be even and regular, creating a bold pattern that feels almost nautical or classic. This design works best when the stripes are roughly equal in width, creating visual balance. It’s simple but makes a strong statement.
Why Stripes Feel Timeless
Stripes have been a design element forever because they work — they’re bold, clear, and visually striking without being complicated. On stileto nails, stripes emphasize the nail’s length and shape. Red and black stripes specifically feel classic and equally at home in formal settings or going out. The high contrast between the two colors makes the stripes really pop.
Creating Perfectly Even Stripes
- Start with a clear or nude base coat
- Decide on your stripe direction and width (maybe 2-3mm wide stripes)
- Use painter’s tape to mark out your stripe areas, or use a striping brush with a steady hand
- Paint your first color (say red) in alternating stripes, then let dry
- Remove tape if you used it, then tape the opposite areas and paint black
- A glossy topcoat seals the design and makes the colors vibrant
Final Thoughts
Black and red stiletto nails are a statement in the best possible way — they’re bold enough to feel intentional and sophisticated enough to work in almost any setting. Whether you choose simple color blocking or go for detailed nail art with gradients, geometry, or gems, the key is picking a design that actually excites you. The best manicure is one you’ll wear with confidence.
If you’re getting these done professionally, bring photos of your exact favorite design to your appointment and don’t hesitate to ask clarifying questions about timeline and cost. If you’re doing them yourself, invest in good quality red and black polishes (they make a huge difference) and take your time with application. Black and red nails demand precision because the contrast means any mistakes are visible, but that’s also what makes them so stunning when done right.
Your stilettos are prime real estate for creative expression. Use them.
