

Duck nails are having a major moment, and there’s something so satisfying about the way they reshape your fingertips into that distinctive curved, squared-off silhouette. Orange shades bring warmth, energy, and serious visual impact to this trendy nail shape — whether you’re going for a monochromatic manicure or layering in patterns, textures, and accent details. The beauty of orange is that it works across so many moods: peachy and romantic, vibrant and bold, earthy and sophisticated, or even burnt and moody. If you’ve been thinking about embracing duck nails but weren’t sure how to style them, orange is honestly one of the most forgiving and flattering colors to experiment with.
The rise of duck nails has completely shifted how we think about nail shape. Unlike the squared-off coffin nail or the tapered almond, duck nails (also called the squin nail) feature that characteristic curved indentation on the sides that makes them look almost webbed — hence the name. It’s a polarizing shape, sure, but once you commit to it, you realize it’s actually incredibly wearable. Orange adds this undeniable presence to the design. It catches light, it photographs beautifully, and it pairs with almost any aesthetic you’re leaning into. Below are sixteen distinct approaches to orange duck nails, each one offering a different vibe and level of complexity.
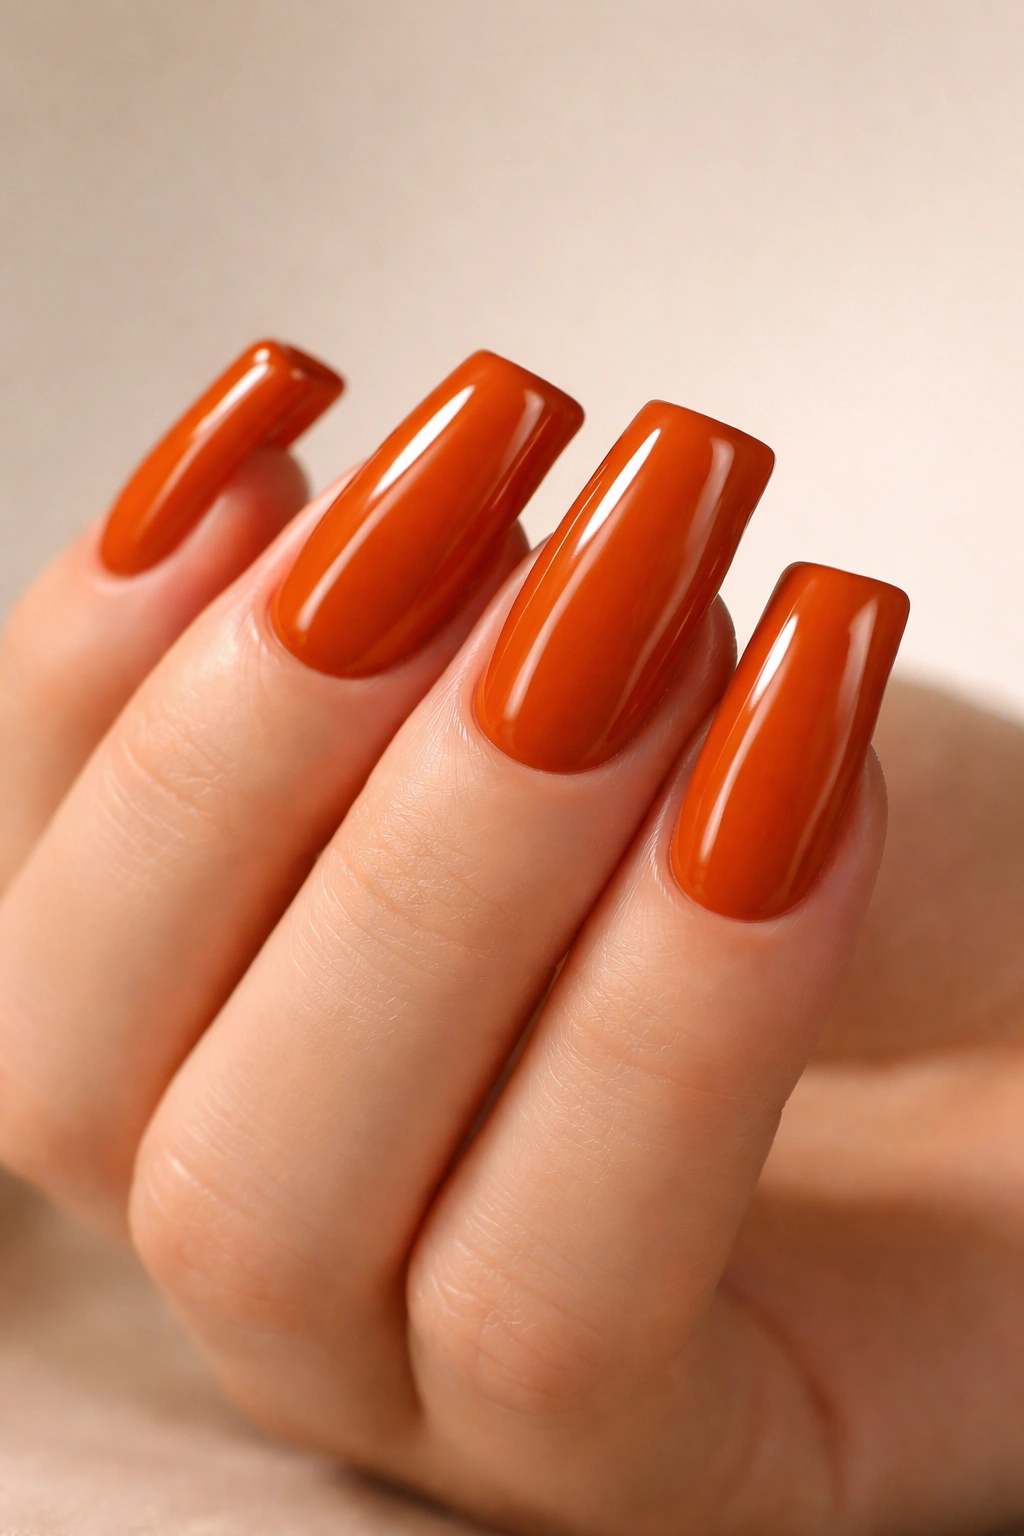
1. Solid Burnt Orange with Glossy Finish
A rich burnt orange is the sophisticated cousin of bright citrus shades, and it absolutely sings when you keep the finish shiny and clean. This is nail design stripped down to its essence — the color and shape are doing all the talking. Burnt orange reads as more autumnal and grounded than neon orange, which makes it feel surprisingly wearable for professional settings and everyday wear.
Why This Works So Well
The burnt orange tone has that magical quality of appearing different depending on the lighting — it can look almost rust-like in warm indoor light and more vibrant peachy-orange in natural daylight. The glossy finish amplifies this effect and makes the nail color pop without requiring any nail art skills. Duck nail shape automatically adds visual interest, so you don’t need patterns or embellishments.
Key Details to Get Right
- Use a high-quality burnt orange formula that doesn’t streak — apply thin, even coats and let each one dry fully before adding the next
- A professional glossy top coat is non-negotiable for this look; it should be ultra-shiny with zero cloudiness
- Keep your cuticles pushed back and your nail edges clean and filed to perfect the duck nail shape
- This look works best on nails that are at least 8-10 weeks into growth so the shape reads clearly
Pro tip: If your burnt orange shade leans too peachy, add one extra thin coat of a nude or clear base polish underneath to deepen and warm the tone.
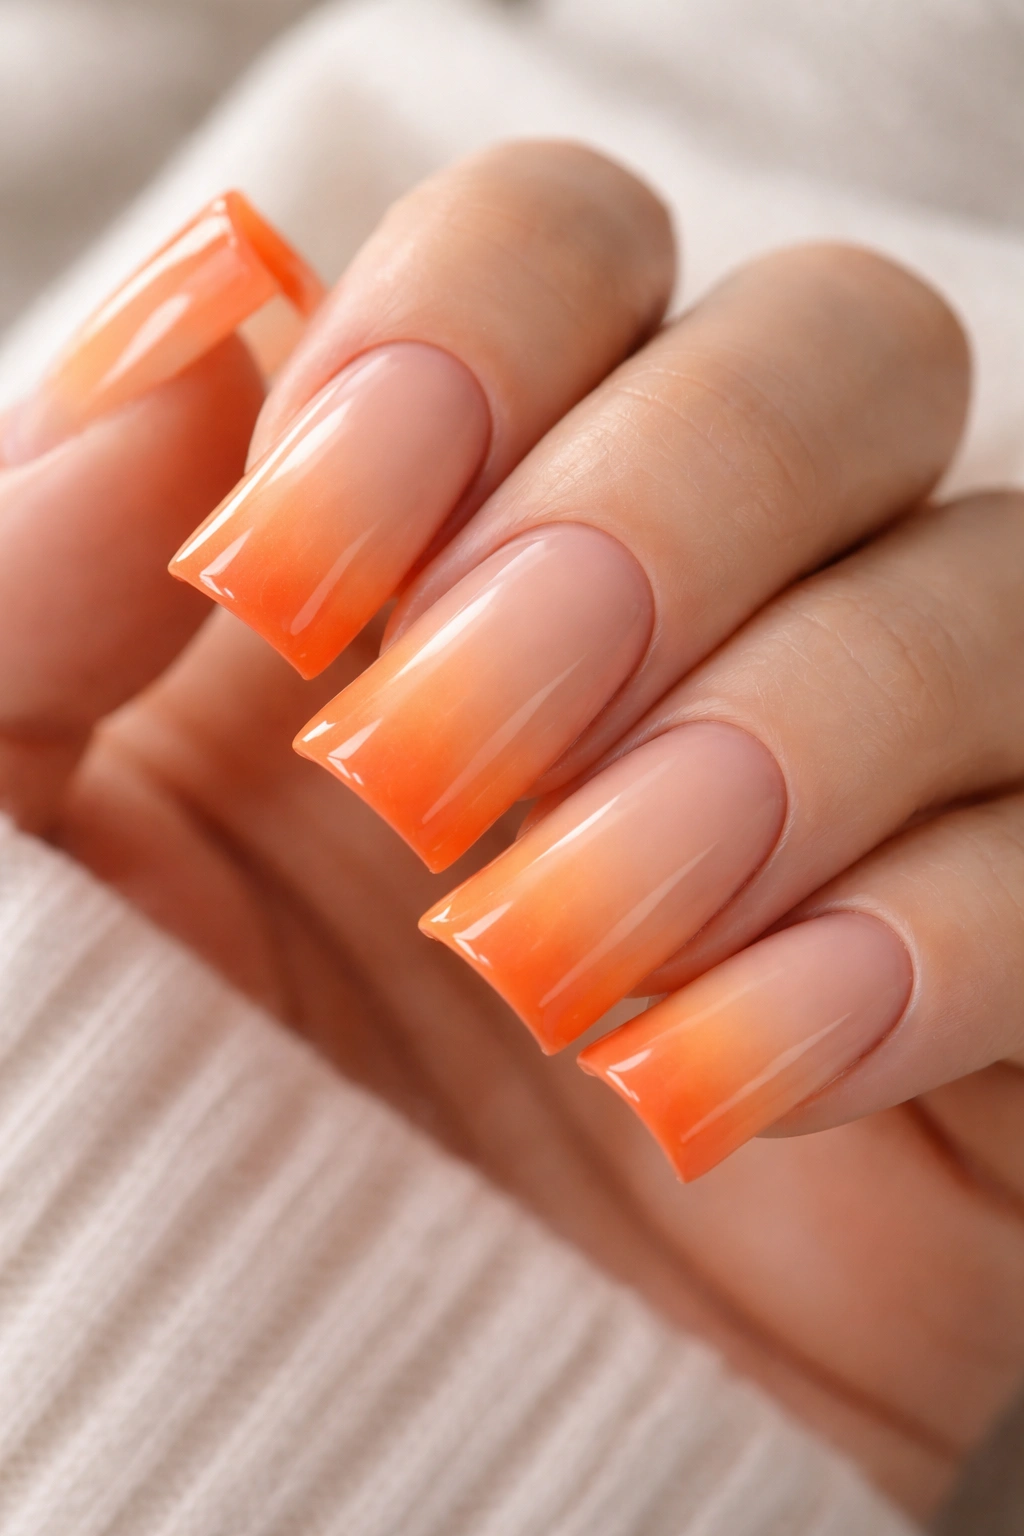
2. Ombré Orange to Peach Gradient
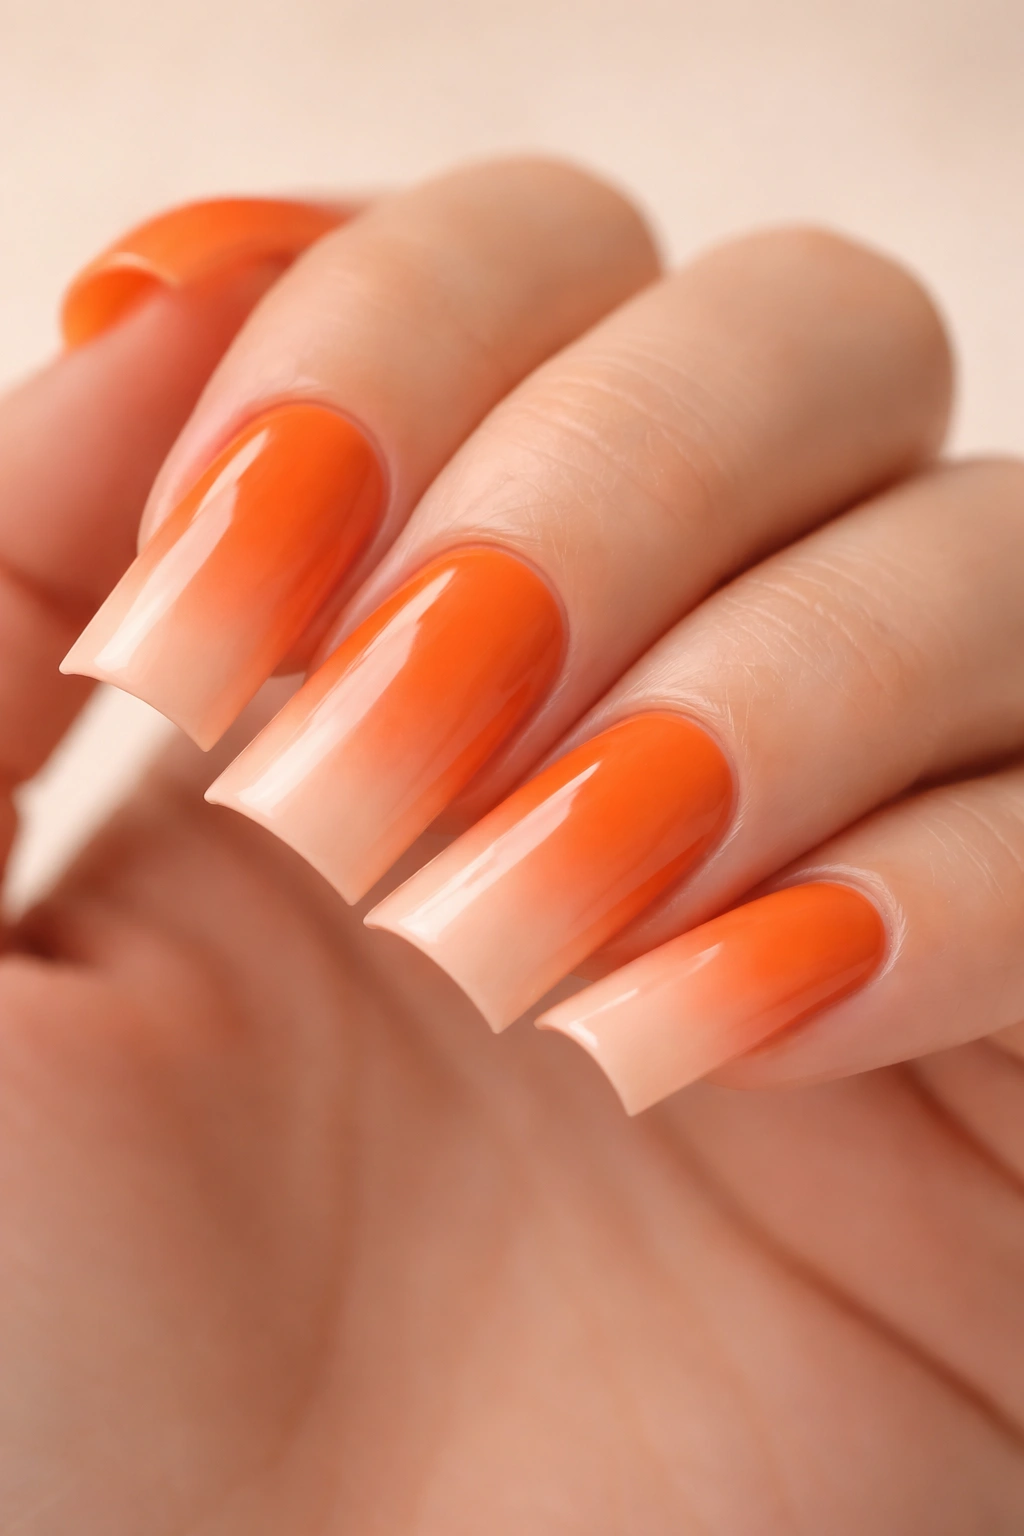
An ombré that transitions from deep burnt orange at the base to soft peachy-coral at the tips creates dimension and draws attention to the nail tips — perfect for showing off the duck nail silhouette. This gradient technique doesn’t require advanced nail art skills if you use a makeup sponge and a couple of carefully chosen shades.
The Technique That Works Best
A dry sponge method is far more forgiving than trying to blend with a brush. Paint two or three shades (dark orange, medium coral, light peach) in horizontal stripes on a makeup sponge, then dab repeatedly onto your nail, overlapping slightly so the colors blend where they meet. The repeated dabbing motion creates that soft, blended ombré effect.
What Makes the Ombré Pop
- The gradient should be directional — darker at the base, lighter toward the tip, never reversed
- The duck nail shape elongates the gradient area, giving you more space for the color transition
- Use creme finishes (not metallics or glitters) so the ombré reads smoothly without texture interference
- Seal the whole thing with a glossy top coat once the base colors are fully dry
Worth knowing: You can create this look with just two colors if you prefer simplicity, but three colors give you a more sophisticated, blended appearance.
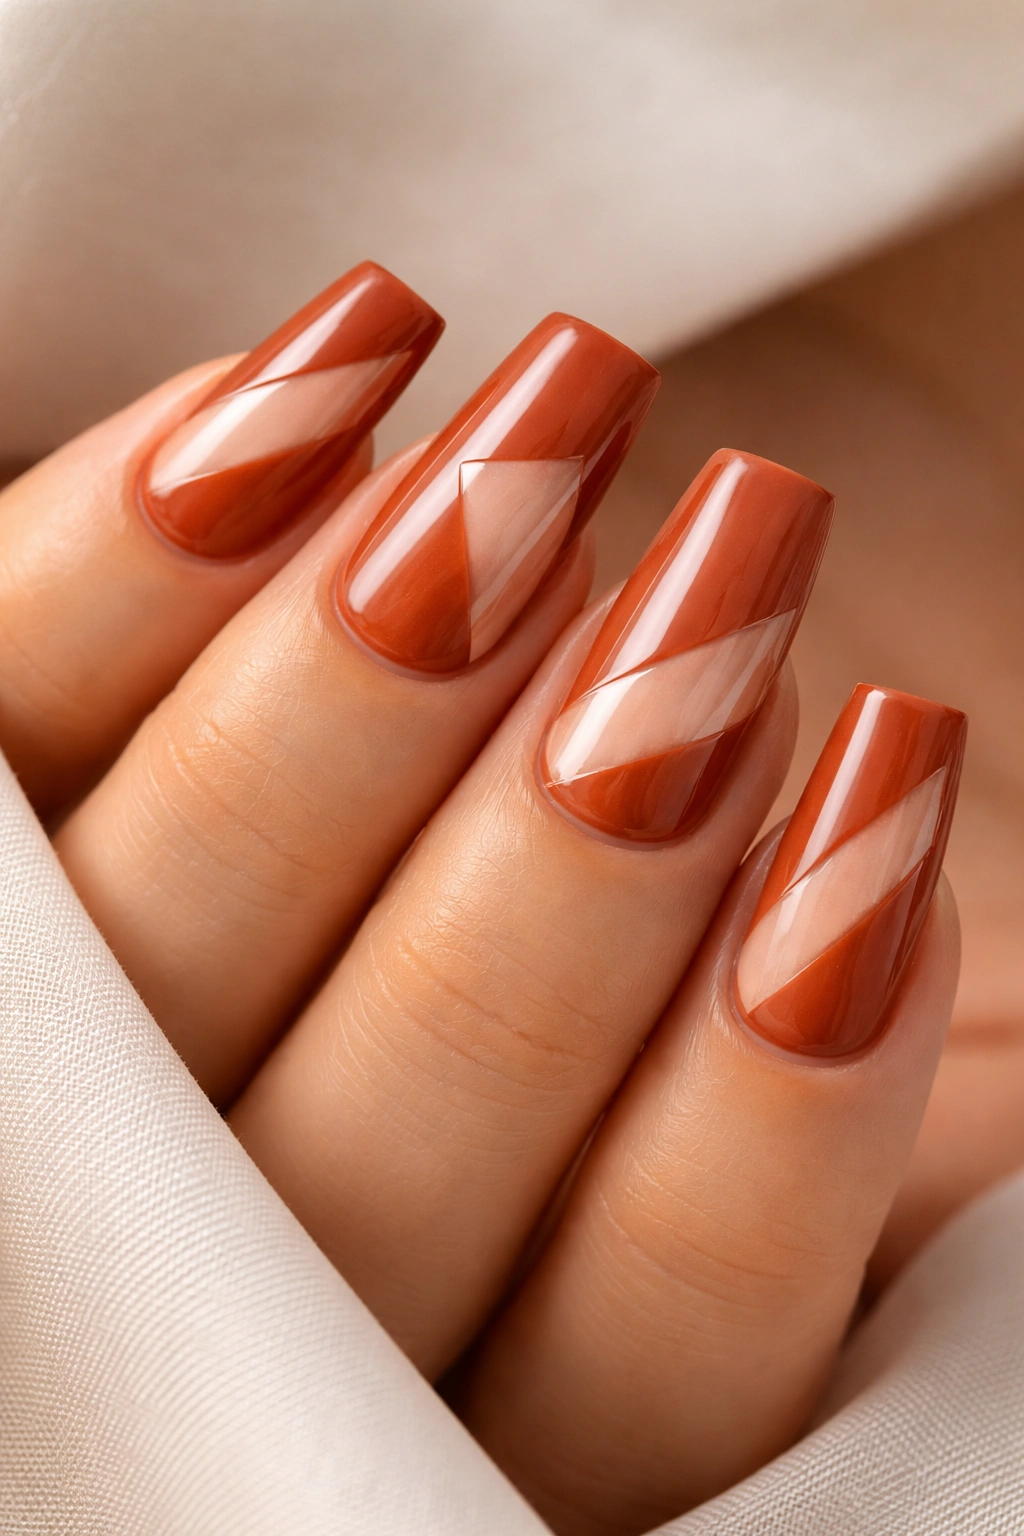
3. Orange with White Geometric Line Work
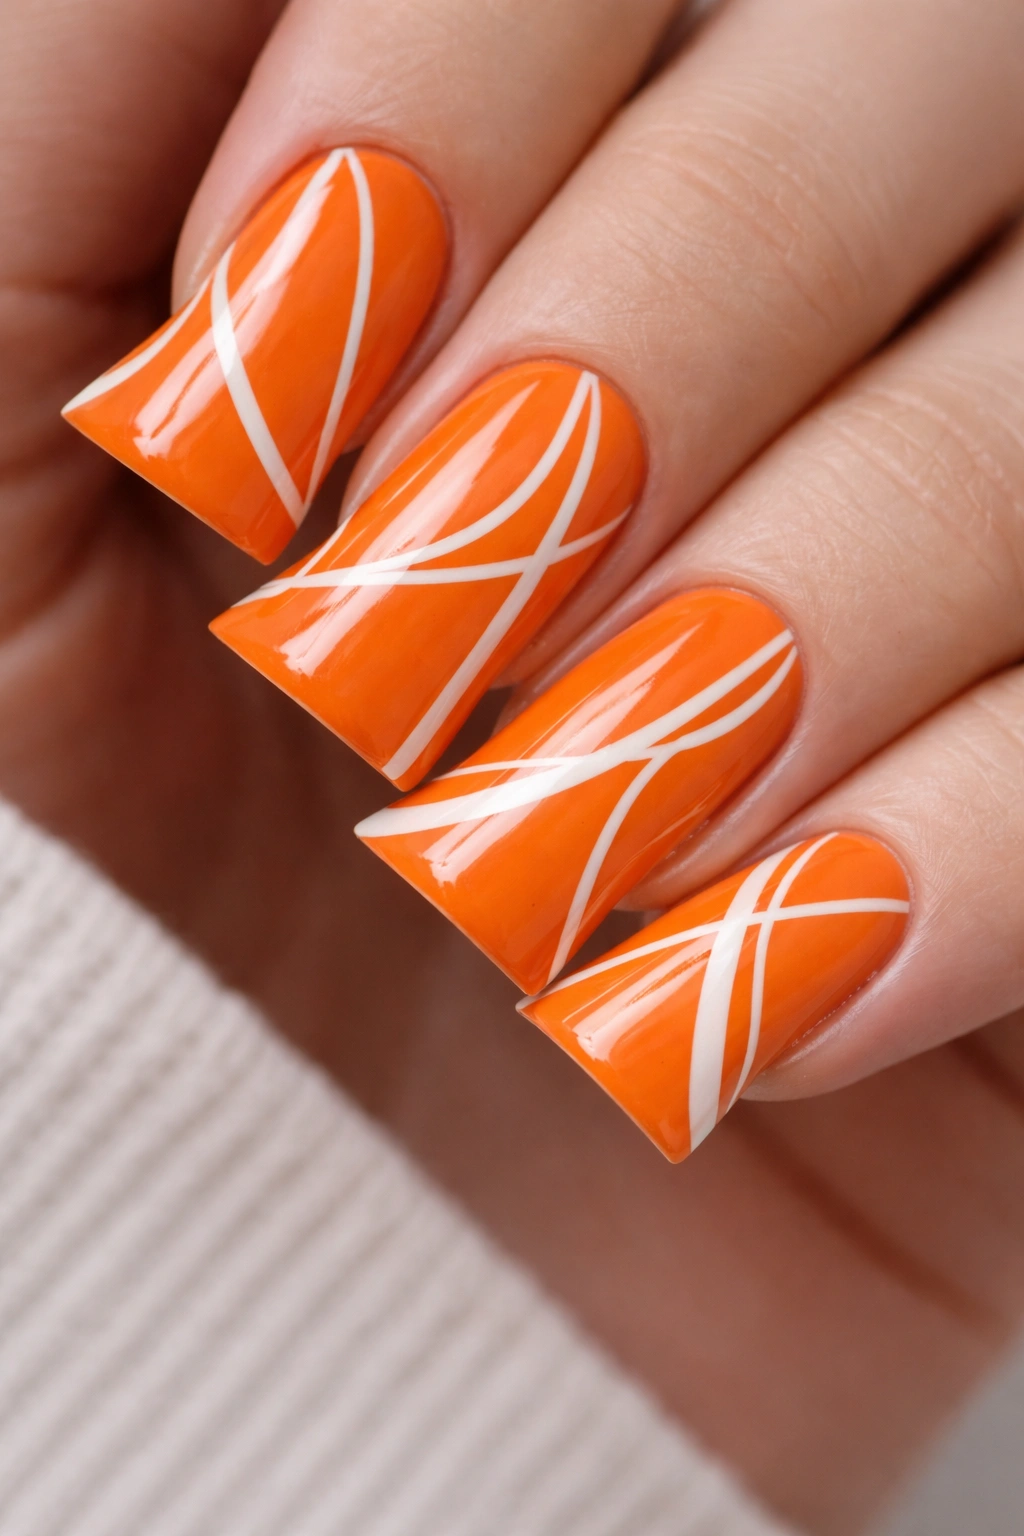
Clean white lines that cross, intersect, or frame portions of your burnt orange or coral-orange duck nails instantly give off a modern, editorial aesthetic. This is geometric nail art that doesn’t require a steady hand — you can use striping tape or a thin nail art brush with white gel or traditional polish.
Design Options That Look Fresh
- Parallel lines running down the center of each nail, creating a minimalist look
- Diagonal lines that angle across the nail for a dynamic, directional feel
- A white border or frame around the entire edge of the nail
- Asymmetrical line work where some nails have geometric details and others stay solid orange
How to Execute This Cleanly
- Start with your orange base (at least two thin coats for even coverage) and let it cure completely
- Use striping tape for perfectly parallel lines, or a thin gel brush for more organic angles
- White shows best on medium to dark orange shades; on lighter peachy oranges, you might want off-white or cream instead
- Finish with a glossy top coat to seal everything and create that editorial polish
Pro tip: If your white lines aren’t perfectly straight, that’s actually fine — slightly imperfect, hand-drawn geometry looks intentional and artistic rather than like a mistake.
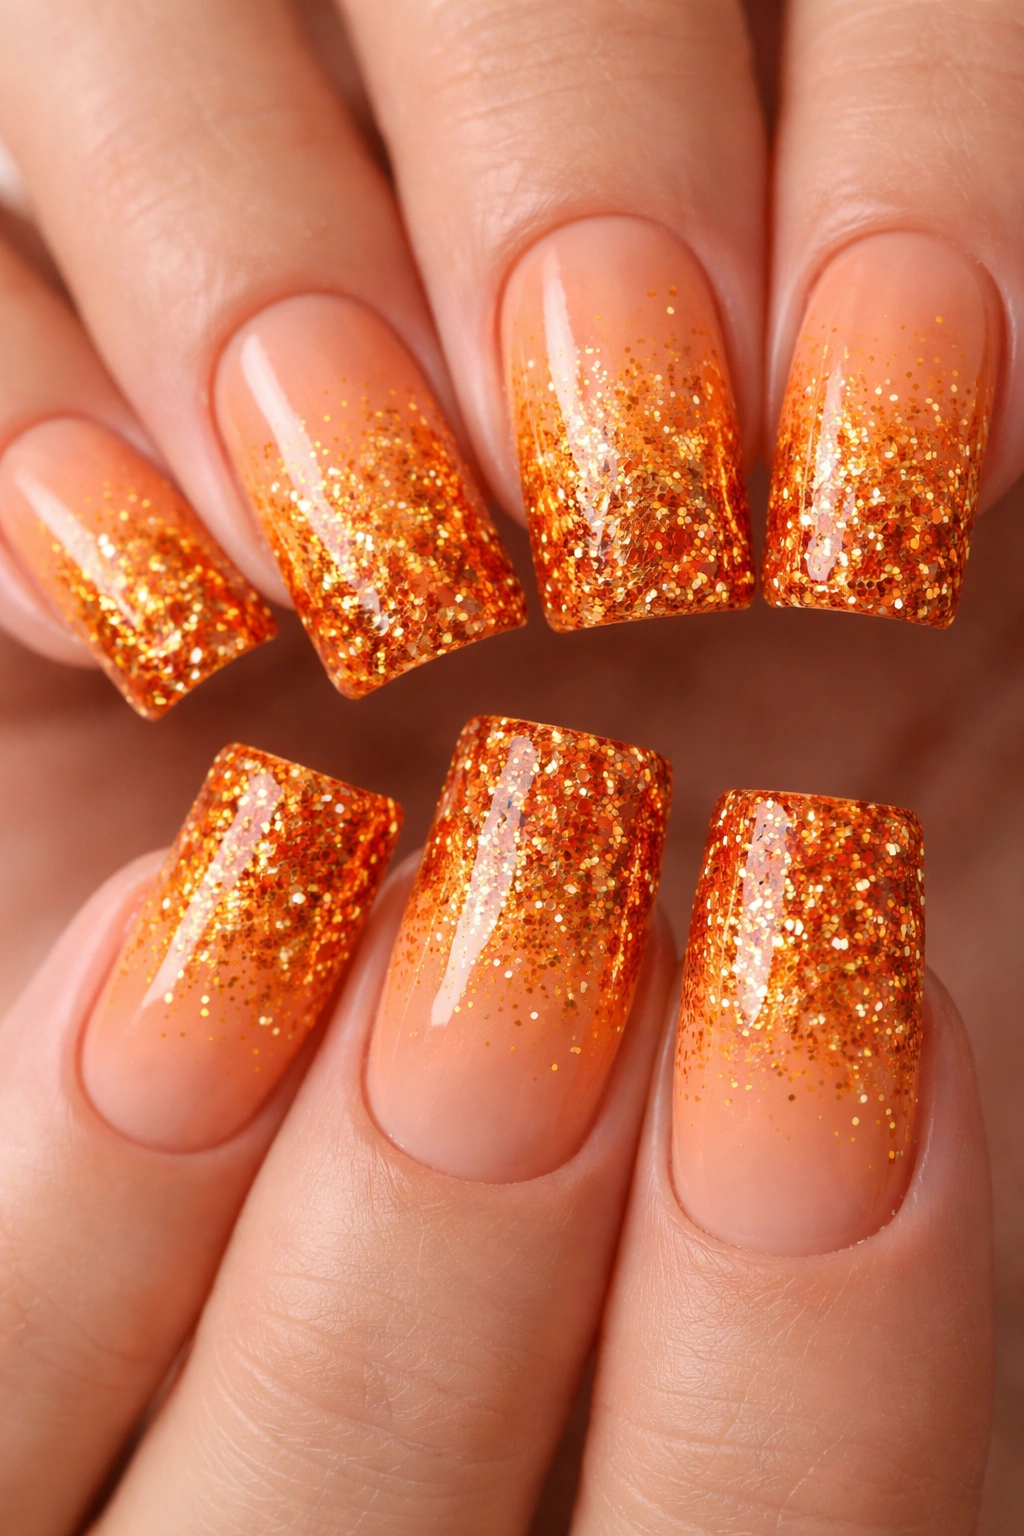
4. Speckled Orange with Gold Flecks
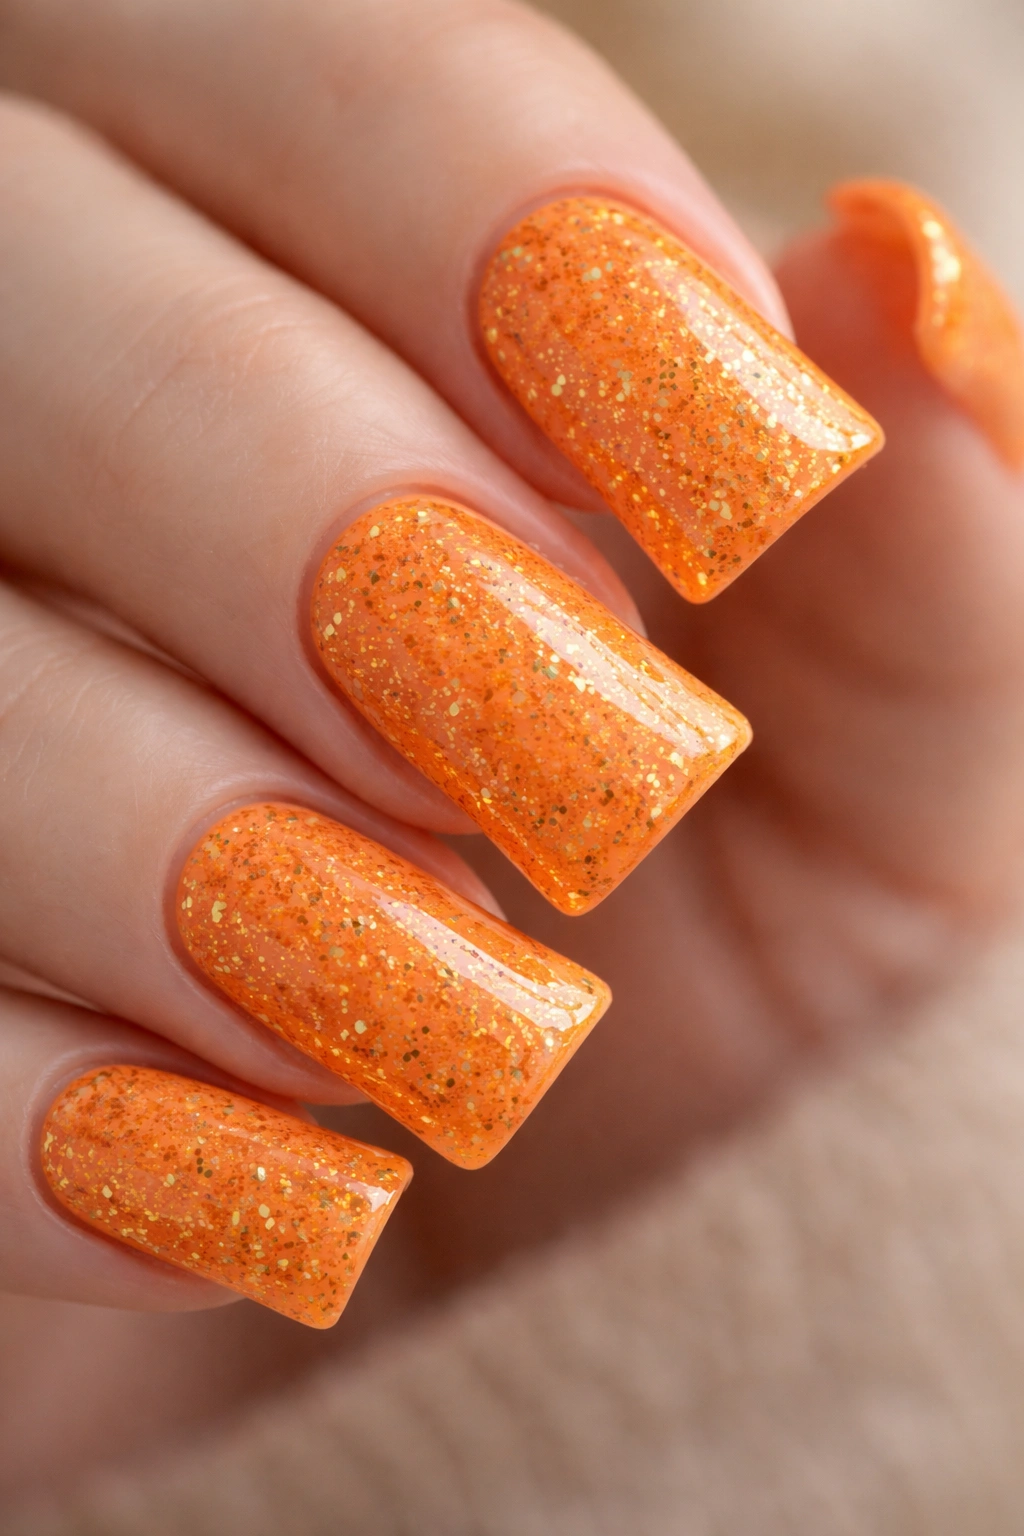
A warm orange base studded with tiny gold specks, dust, or foil creates a celebratory, almost festive energy. This is an excellent choice if you want something with visual texture without requiring advanced nail art skills — speckle patterns are forgiving and have that organic, artisanal feel.
Achieving the Speckled Effect
- Apply your orange base as normal, then while it’s still slightly tacky (or after it sets, if you’re being patient), use a dotting tool loaded with gold foil or glitter to add tiny specks across the nail
- Alternative method: use a very thin nail art brush and tiny dabs of gold polish to create specks manually
- Space the specks irregularly so they look natural rather than deliberately placed
Why Gold and Orange Pair So Perfectly
- Gold is the complementary warm tone to orange, making both colors appear richer and more luxurious
- The specks draw the eye and highlight the duck nail shape without overwhelming the base color
- This look works equally well on burnt orange, coral-orange, or peachy-orange shades
Insider note: If you want the speckles to be even more eye-catching, use rose gold or copper-toned foils instead of standard yellow gold for a more modern twist.
5. Orange Duck Nails with Marble Effect
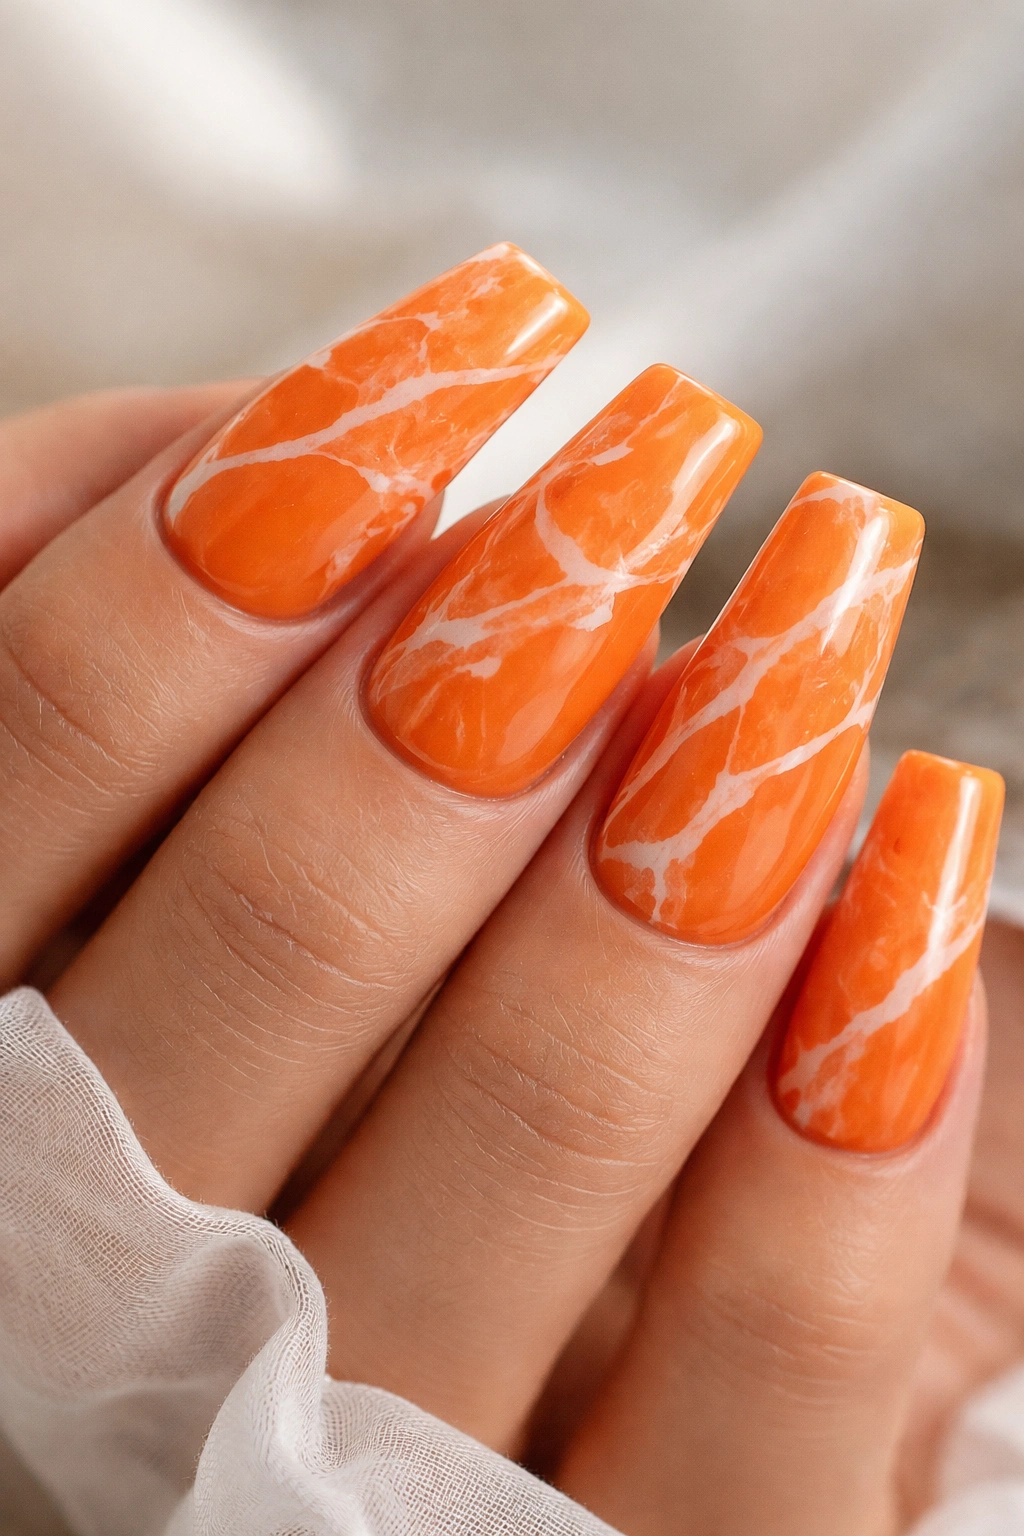
Marble is one of the most Instagram-friendly nail finishes, and it looks stunning on the larger canvas that duck nails provide. A white or cream marble pattern over an orange base creates that sophisticated, stone-like aesthetic that feels both trendy and timeless.
Creating a Marble Effect
- Start with your orange base (two thin coats, fully cured)
- Use a thin brush and white or off-white polish or gel to create organic, branching lines across the nail — imagine the veining you’d see in actual marble
- The lines should be irregular and organic, not geometric, with some thicker sections and some delicate thin veins
- Seal with a glossy or slightly matte top coat (matte makes marble look more authentic)
Why Marble on Duck Nails Feels Special
- The irregular pattern across the larger duck nail surface creates more visual interest than the same design would on smaller nails
- Marble is inherently sophisticated, which elevates even bright orange into a more refined aesthetic
- This design works equally well for a casual manicure or a polished professional look
Worth knowing: You don’t need to cover every inch of the nail with marble lines — even a few strategic veins scattered across the nail create the effect convincingly.
6. Coral-Orange with Chrome or Mirror Finish
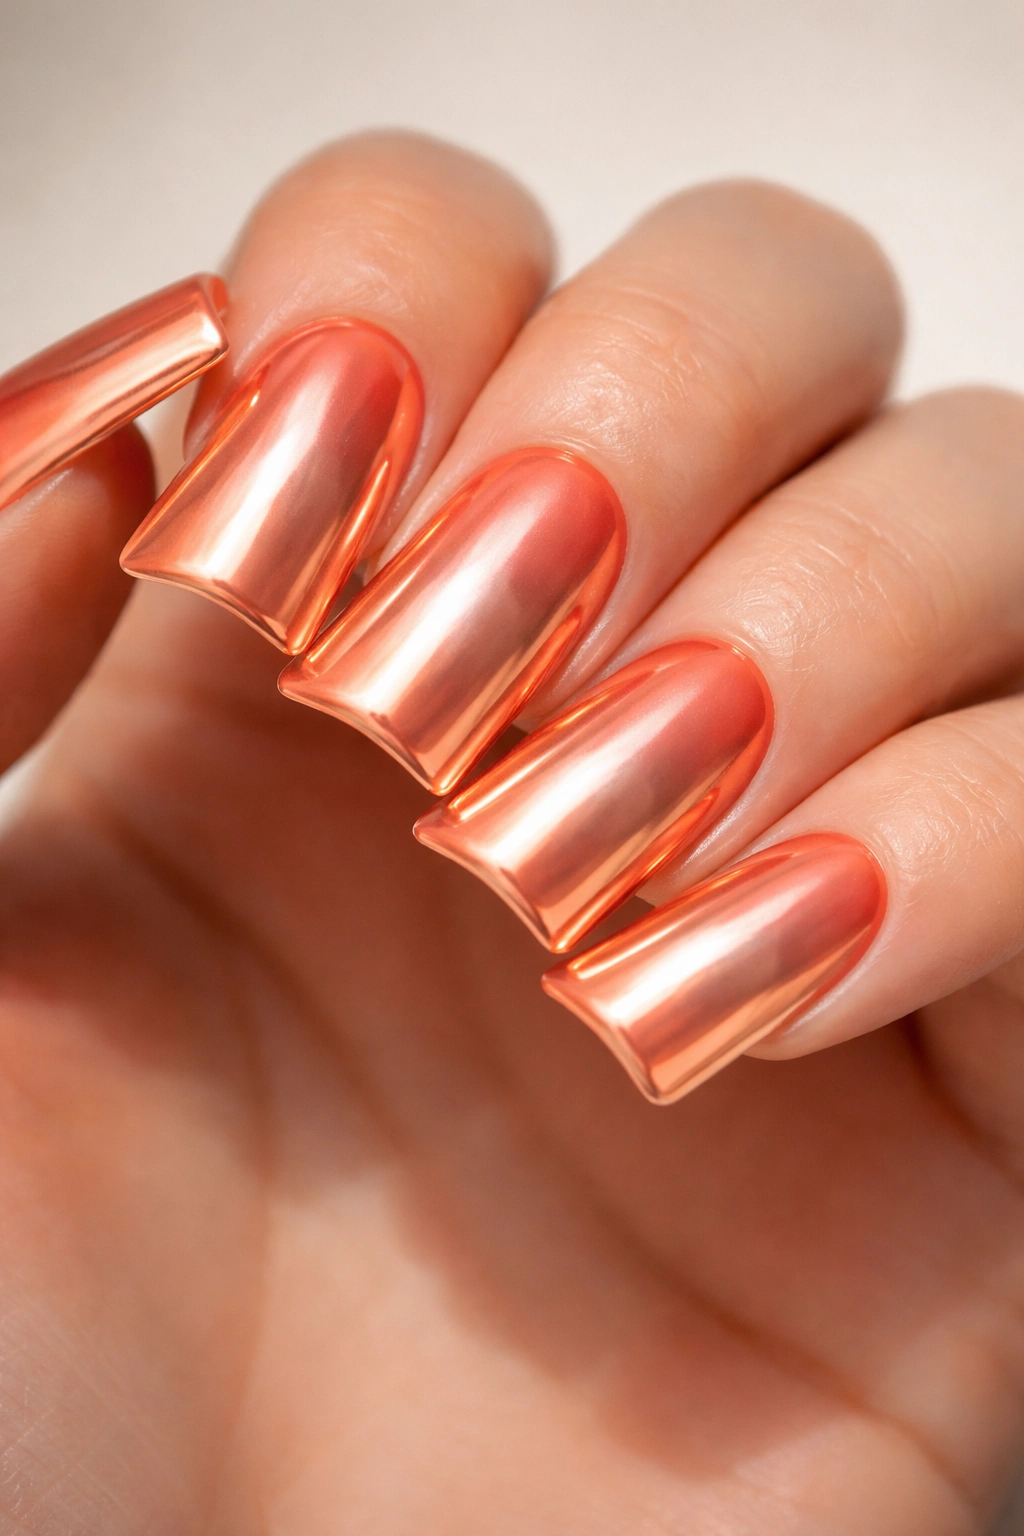
Chrome and mirror finishes represent a whole different level of nail design drama, and they look absolutely spectacular on duck nails. A chrome powder applied over a coral-orange base creates this liquid metal, almost wet-looking effect that’s almost hypnotic.
How to Apply Chrome on Duck Nails
- Build your coral-orange base carefully — the color underneath affects how the chrome reflects
- Once your base is fully cured, apply a tacky gel layer (or a special chrome prep coat designed for this)
- Use a flat brush or applicator to buff chrome powder directly onto the tacky surface, working in small sections
- Seal with a clear top coat
Why Chrome Works on These Nails
- The reflective quality of chrome makes the duck nail shape read even more pronounced — the curves catch light differently
- Chrome over an orange base creates this warm, rose-gold-ish metallic that’s neither fully silver nor fully gold
- The effect is high-impact and undeniably modern
Pro tip: If you’re trying chrome for the first time, practice on practice nails or start with just one or two accent nails rather than committing to all ten.
7. Burnt Orange with Burgundy Tips
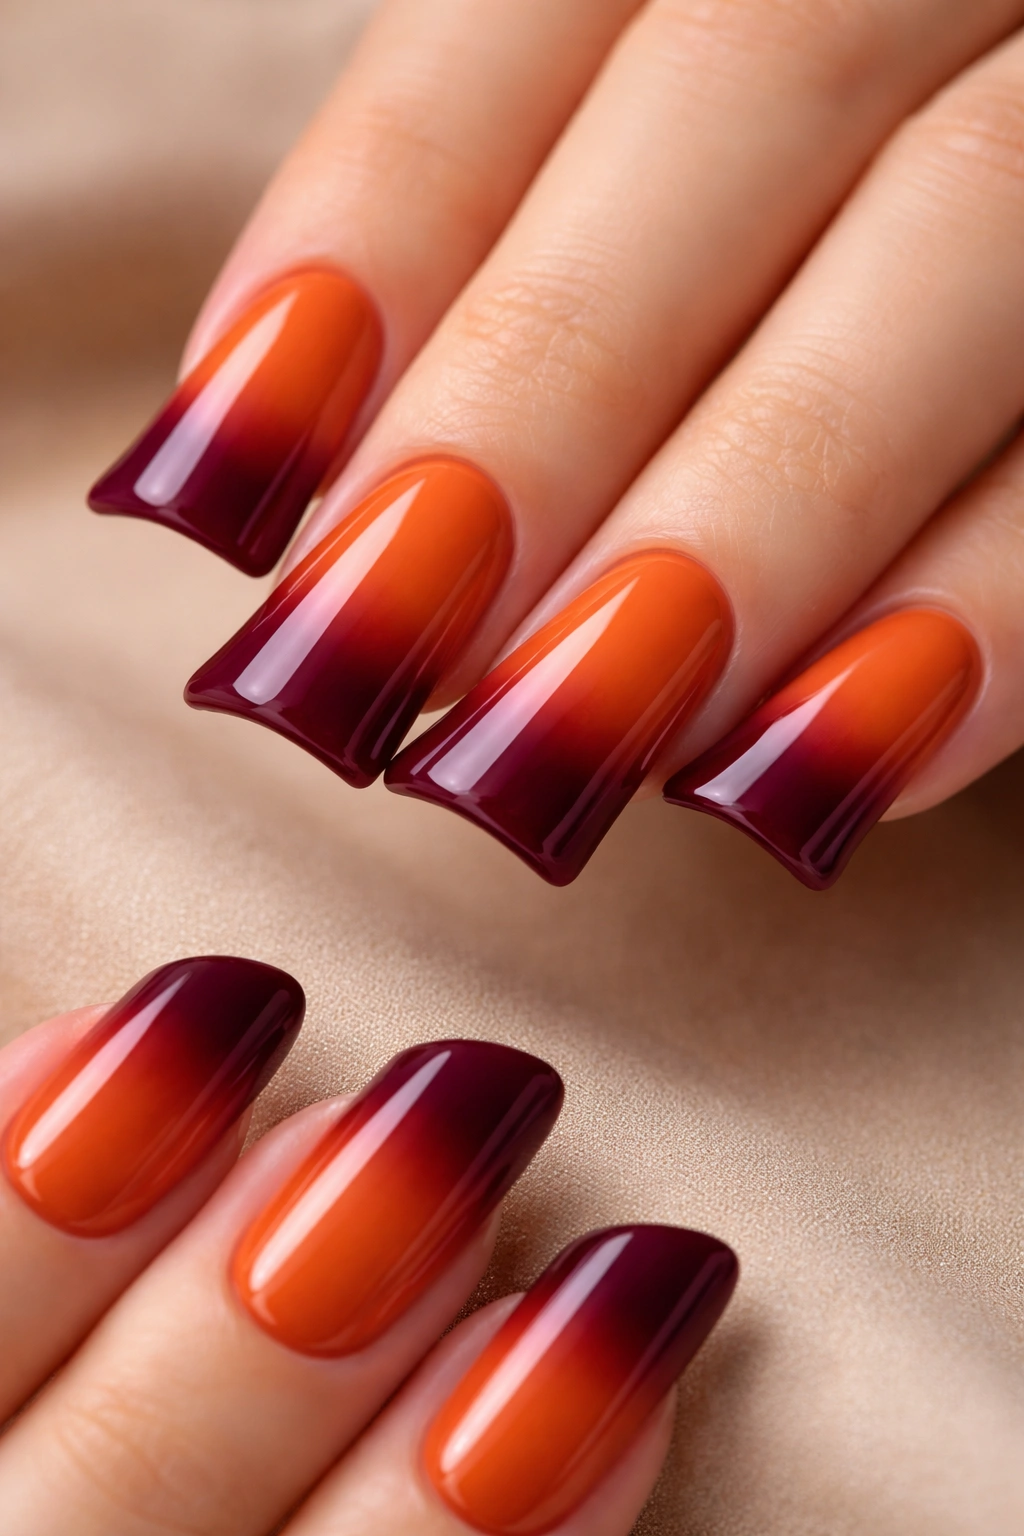
A multi-tone mani that uses a deeper burgundy-wine shade on the tips while keeping the burnt orange on the nail base creates beautiful tonal depth. It’s an ombré cousin that’s easier to execute — you’re not blending, you’re creating a clear color block transition.
Execution Strategy
- Paint the lower three-quarters of your nail burnt orange
- Once fully dry, paint the upper portion (the tip area) with a deep burgundy or wine shade
- Keep the transition line relatively clean but not razor-sharp — a slightly soft edge looks more intentional and elegant
- The duck nail shape means your “tip” section is broader and more visible than on traditional nail shapes
Color Combinations That Work
- Burnt orange with deep eggplant burgundy
- Rust orange with oxblood red
- Warm peachy-orange with muted wine
- Coral-orange with deep berry
Worth knowing: This look automatically reads as fall or autumn-inspired, making it perfect if you’re dressing seasonally (though orange and burgundy pair beautifully year-round).
8. Neon Orange with Black Line Details
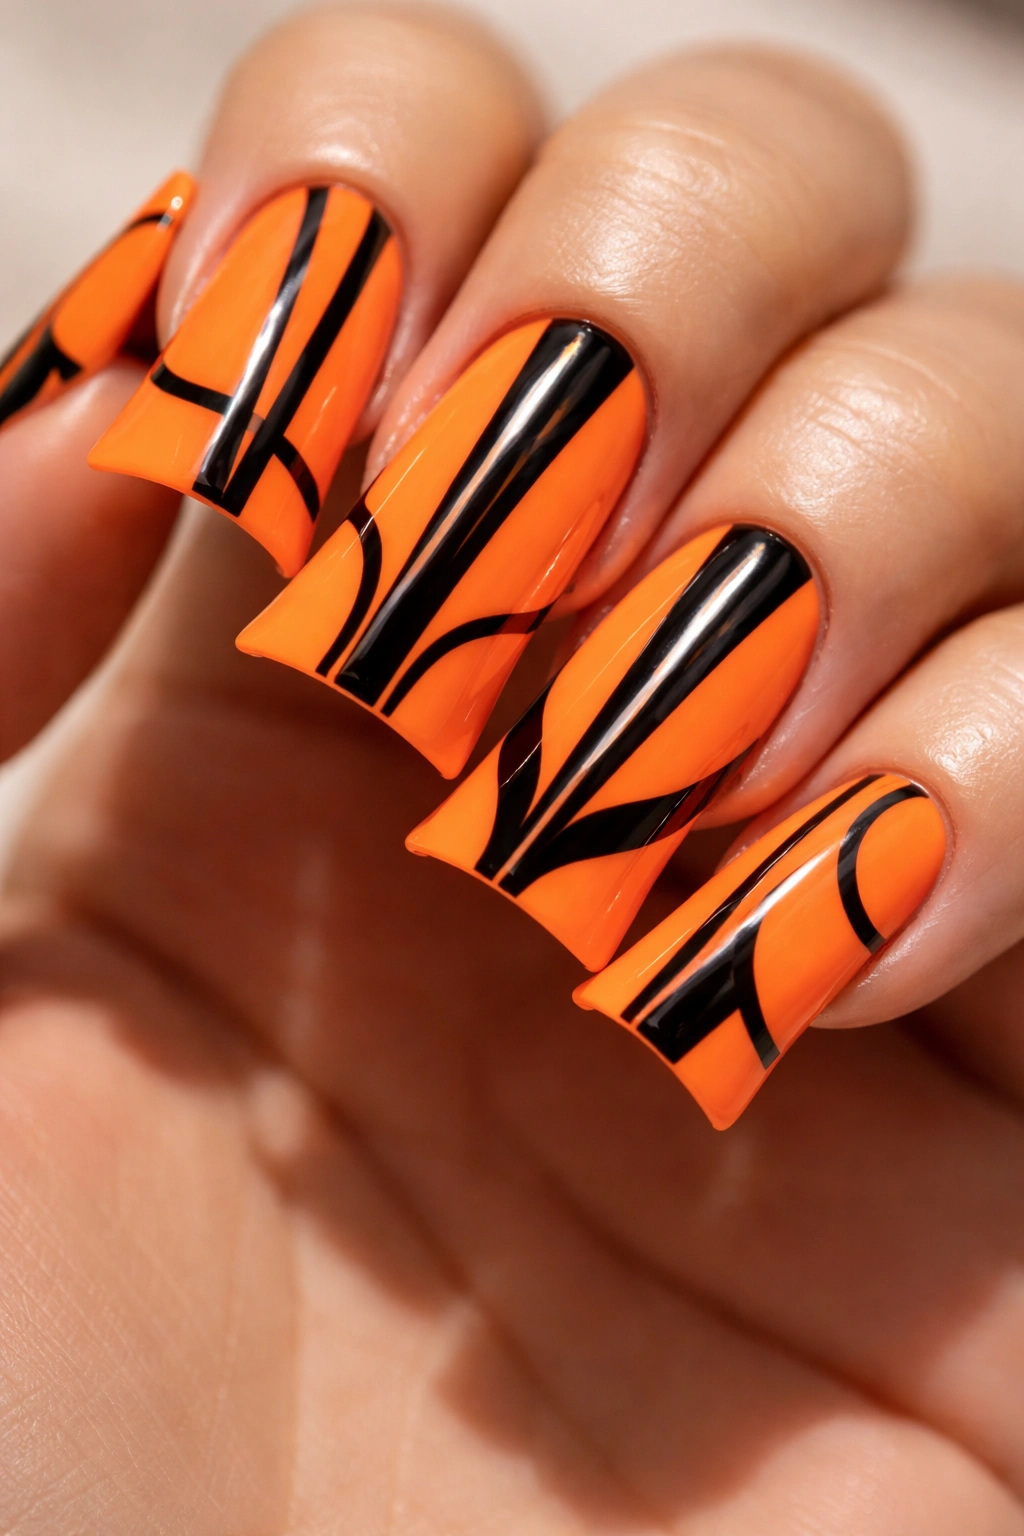
For those who want maximum visual impact, neon or electric orange paired with bold black lines creates a contemporary, almost graphic design feel. This is pop-art energy applied to your fingernails, and it absolutely delivers on the drama front.
Design Ideas That Work
- A single bold black line down the center of each nail, dividing the neon orange
- Black geometric shapes (triangles, rectangles, abstract forms) overlaid on the neon orange
- A thick black border or frame around the edge of the nail
- Asymmetrical black designs where only some nails have details and others stay solid neon
Making Neon and Black Actually Work
- The high contrast between neon orange and pure black is striking but requires confidence
- Use a gel formula for the neon if possible — it will be more vibrant than traditional polish
- The black lines should be clean and bold; thin lines can look messy on neon
- This look demands significant nail length for the design to read clearly
Pro tip: If full neon feels too intense, try neon orange on just a few accent nails and a softer orange-coral on the others for a more balanced look.
9. Orange Duck Nails with Pressed Flower Details
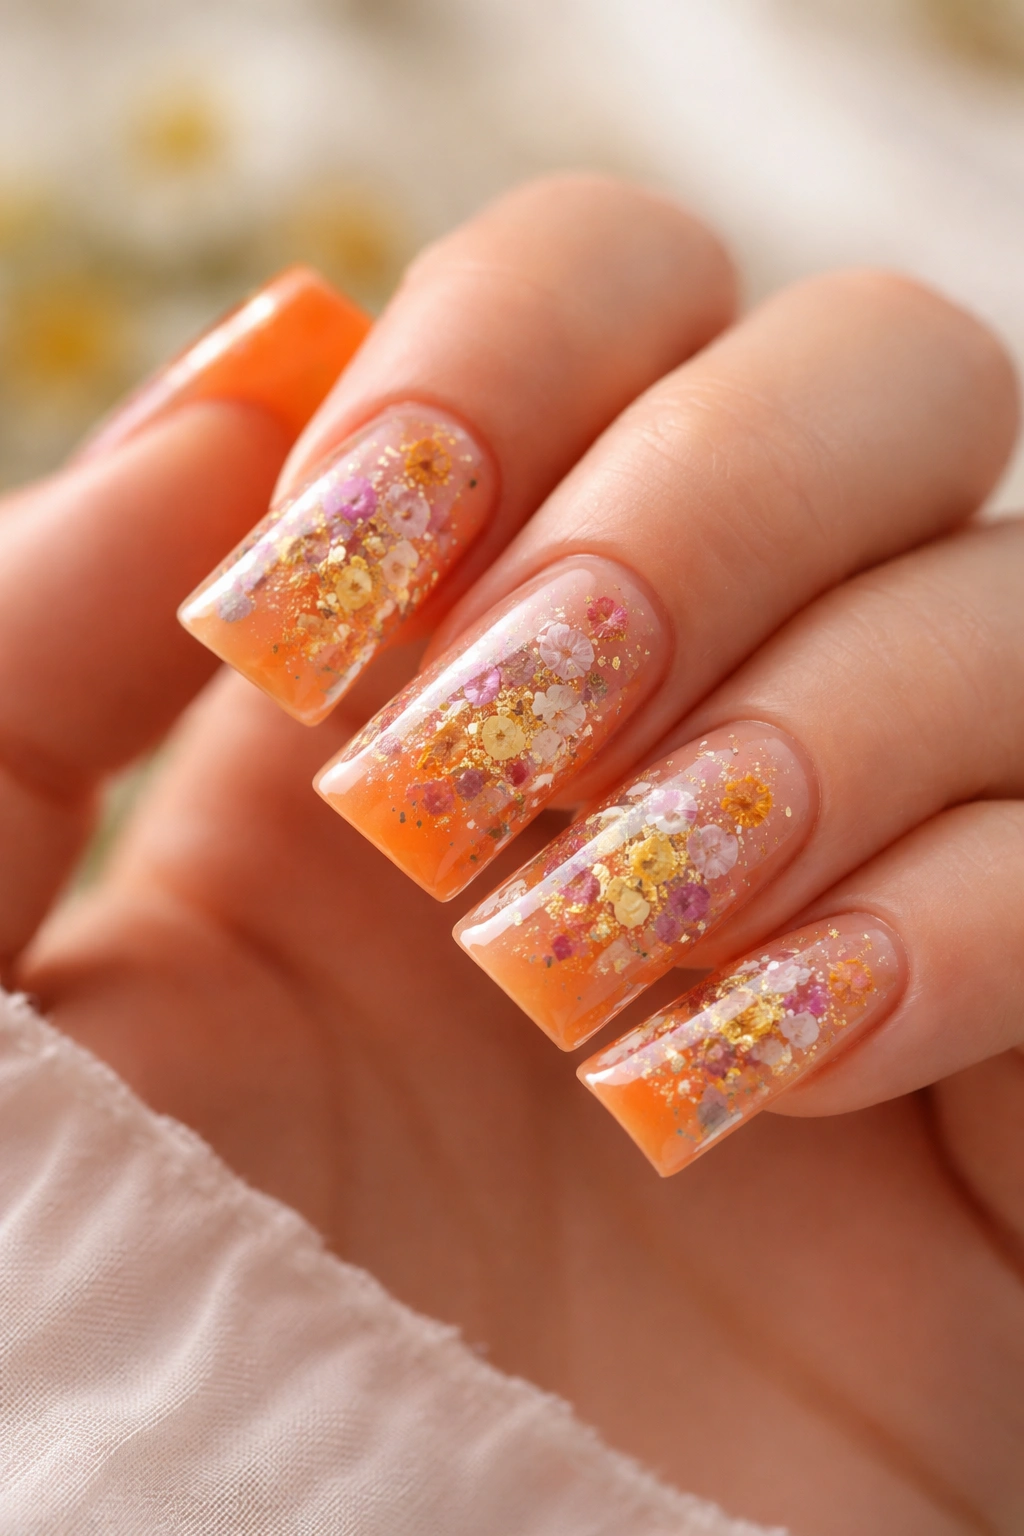
For a romantic, botanical twist on duck nails, you can create a design using actual pressed flowers or realistic floral hand-painting. Real pressed flowers (like tiny daisies, baby’s breath, or flat leaves) can be encapsulated under a clear gel layer for a dreamy, garden-inspired manicure.
Two Methods for Flowers
- Encapsulated method: layer pressed flowers between layers of gel, trapping them inside for a 3D effect
- Hand-painted method: use a thin nail art brush and acrylics or gel to paint tiny floral designs directly onto your orange base
Why This Works on Duck Nails
- The larger surface area of duck nails gives you actual space to showcase floral details
- Orange serves as a warm, neutral backdrop that lets delicate floral designs shine
- This design automatically reads as more artistic and less commercial than solid color
Worth knowing: If you choose the encapsulated flower method, understand that the flowers will fade or discolor slightly over time as the manicure ages — that’s part of the charm.
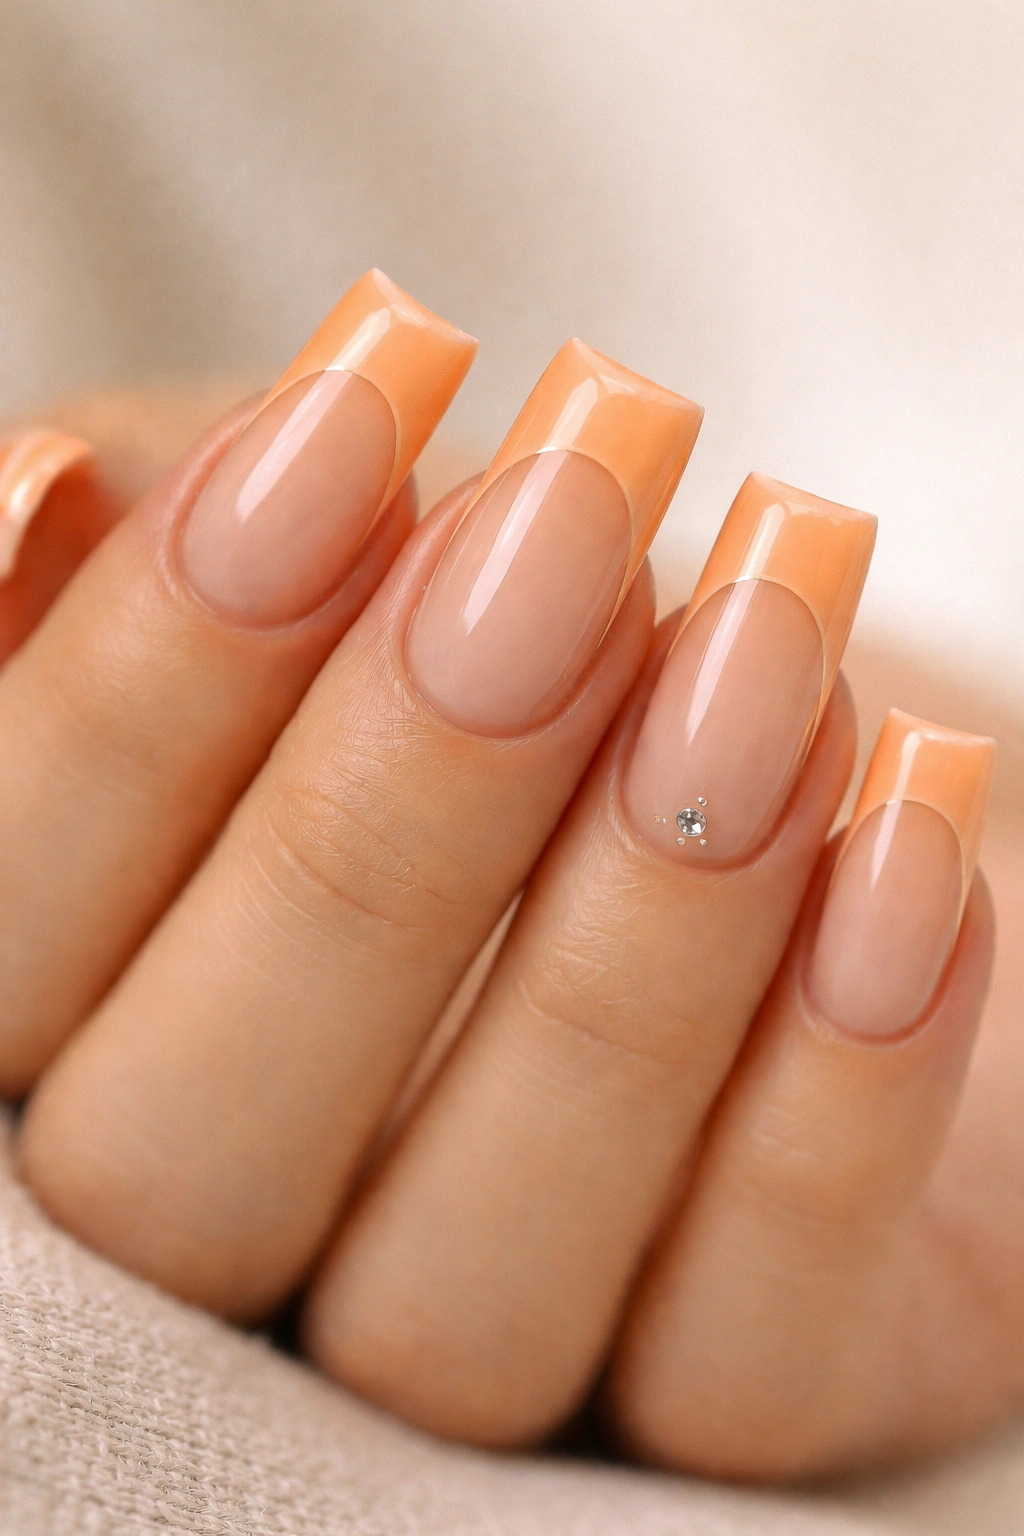
10. Peachy-Orange Ombre French Manicure
A French manicure twist where the “tip” color is a deeper orange or coral and the base is a lighter peachy shade creates a classic-meets-contemporary vibe. The duck nail shape actually enhances the French manicure concept because the broader, squared tip reads more distinctly.
Executing a Duck Nail French
- Paint the full nail in a soft peachy-orange creme
- Once dry, use a curved brush or the edge of a regular brush to paint a deeper orange or coral shade across the tip area
- The line between colors should be soft and curved rather than razor-sharp
- Finish with glossy top coat
Why Peachy-Orange French Feels Fresh
- A French manicure no longer feels dated when you use warm, saturated colors like peach and orange
- The duck nail shape gives you more tip area to show off the color transition
- This design bridges the gap between classic and trendy
Pro tip: If you want the tip color transition to look perfect, use a soft damp cotton pad to blend the line slightly before sealing with top coat.
11. Orange with Leopard Print Pattern
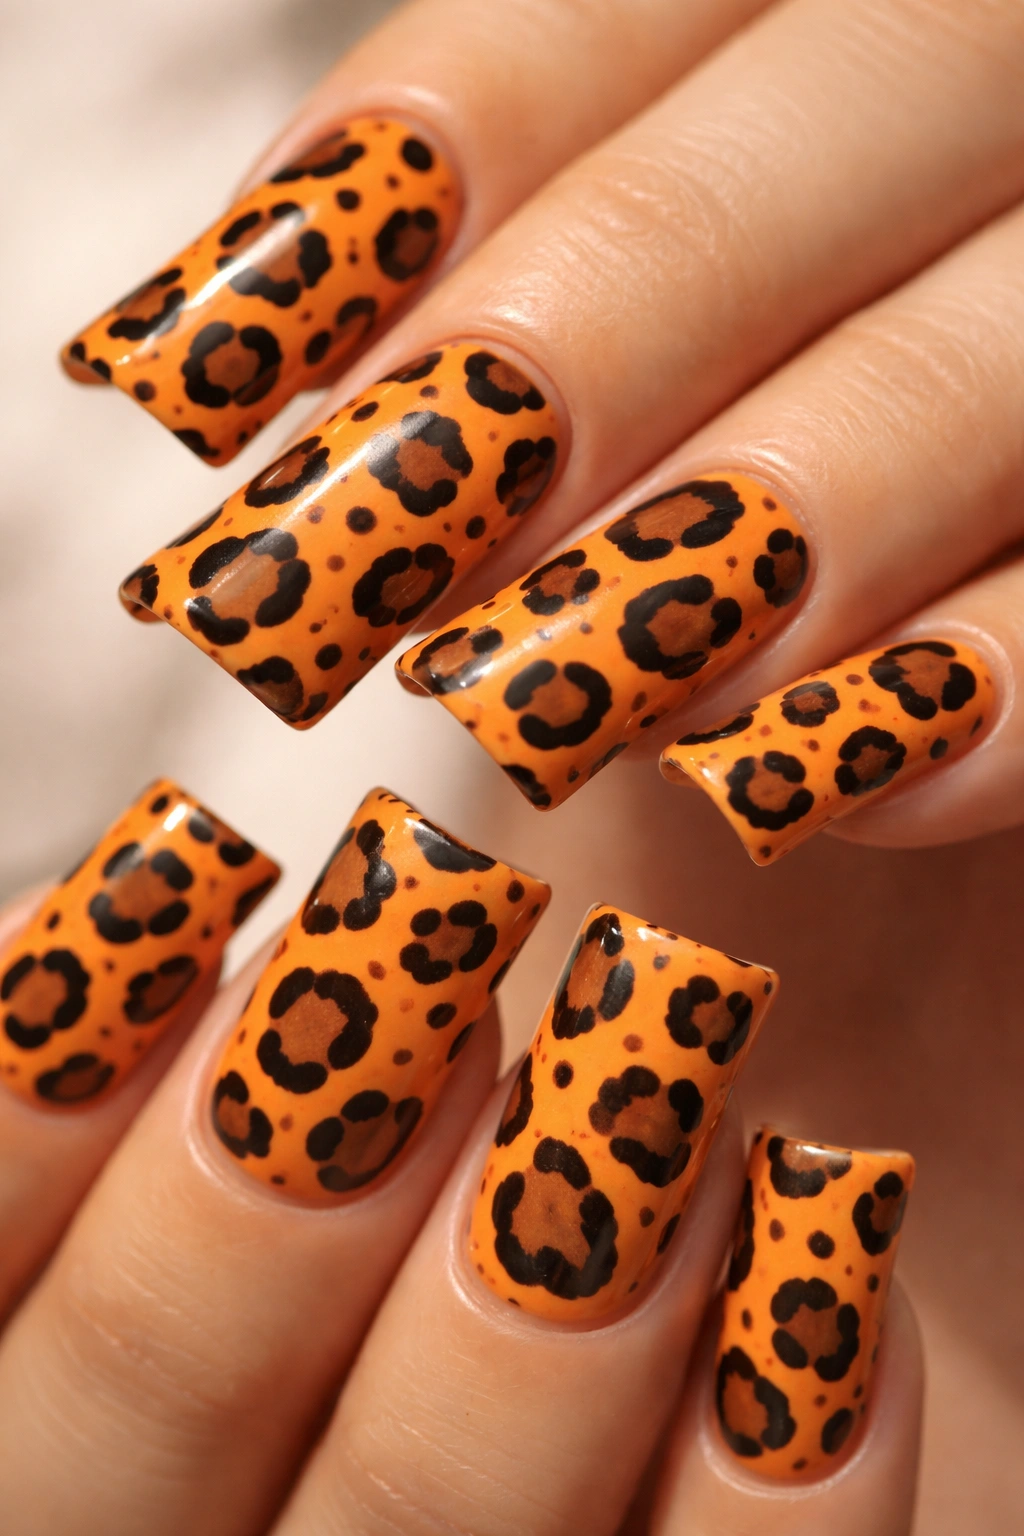
Leopard print is experiencing a resurgence, and it looks absolutely killer on duck nails in orange and black or orange and brown color combinations. This is a pattern that reads as sophisticated rather than wild when executed cleanly on a nail-sized canvas.
Creating Leopard Spots
- Start with your orange base (at least two coats)
- Use a thin brush and black or dark brown polish to paint irregular oval or comma shapes across the nail
- Leopard spots are organic and don’t follow a strict pattern — randomness is key
- Some spots should be solid, and some should just be outlined or incomplete for visual interest
- Finish with glossy top coat
Making Leopard Pattern Work
- The duck nail shape gives you ample space for the pattern without it feeling too busy
- Orange as your base color makes leopard print feel warm and fashionable rather than costume-y
- Keep the spots to a moderate density — don’t cover every inch of the nail
Worth knowing: You can make leopard print feel more editorial by using rose gold or bronze instead of pure black for the spots.
12. Pastel Orange with Soft Nude Details
For those who prefer understated elegance, a soft pastel peachy-orange paired with muted nude accents creates a whisper-quiet manicure that’s sophisticated and feminine. Think apricot-meets-beige rather than traffic-cone orange.
Design Approach
- Base your nails in soft peachy-orange (think of a faded apricot or peach skin tone)
- Add subtle nude detailing: maybe a thin border at the cuticle, a tiny shape on the accent nail, or an ombré that fades from orange to nude
- The key is restraint — the design should feel cohesive and soft, not high-contrast
Why This Works
- Pastel orange is inherently flattering and universally wearable
- The nude accents create dimension without adding visual noise
- This is a manicure you can wear for weeks without it feeling tired or dated
Pro tip: Layer a very thin nude shade over your base orange in a few strategic spots to create an almost ombré effect that reads more subtle than bold.
13. Orange Duck Nails with Holographic Sparkle
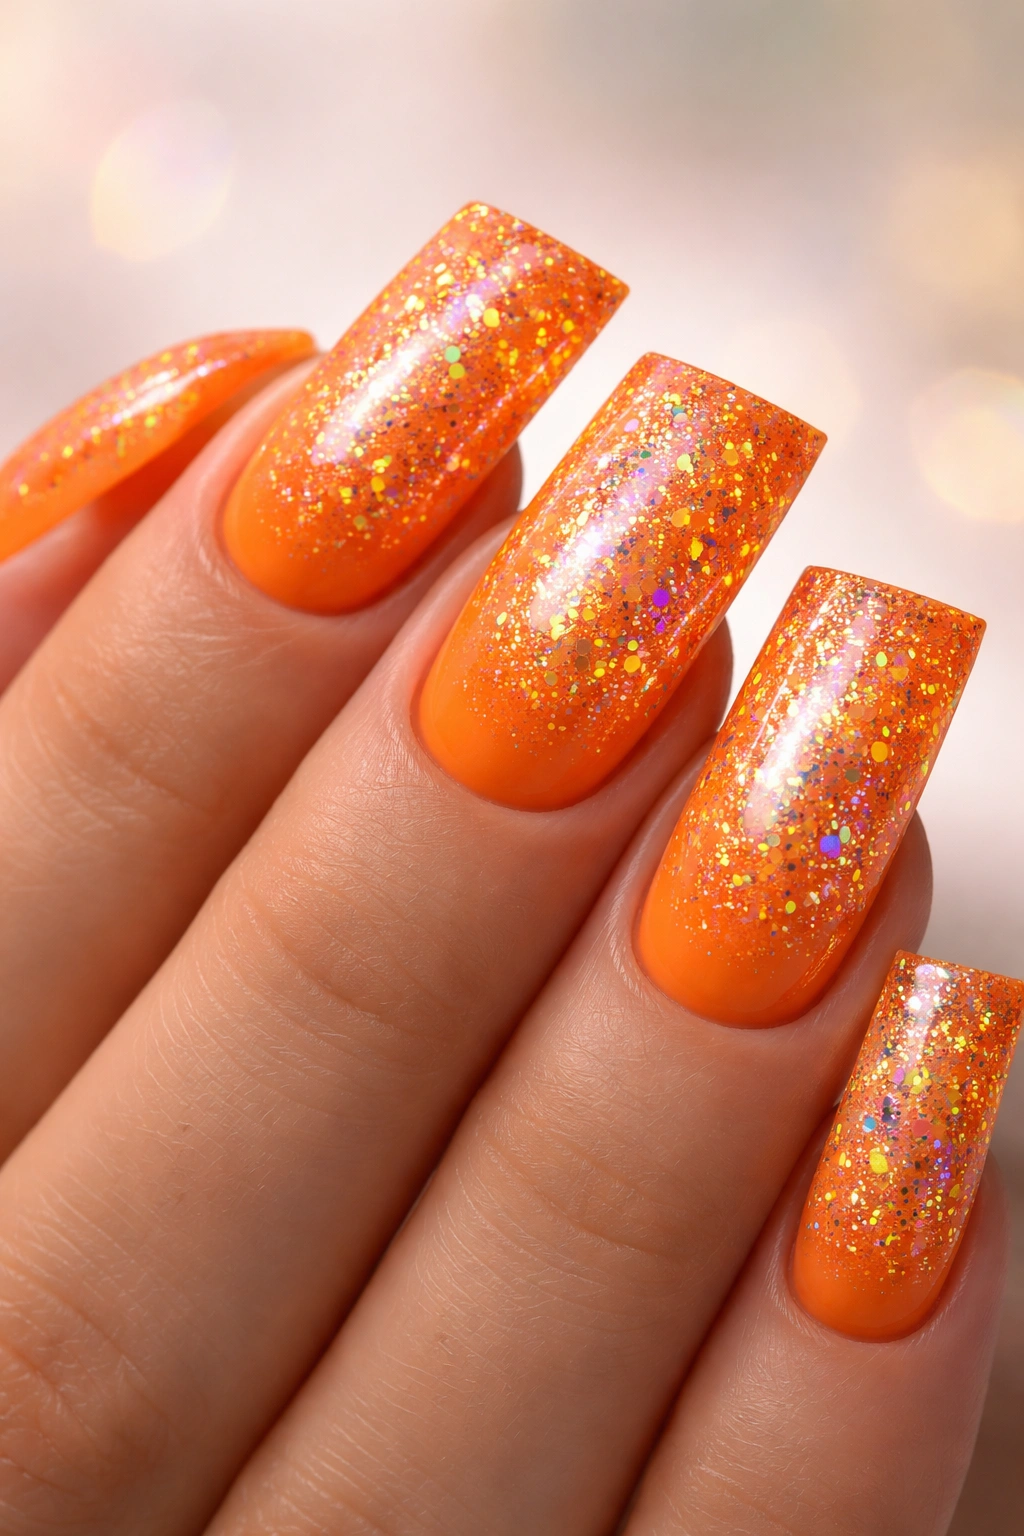
Holographic or iridescent glitter layered over a vibrant orange base creates a multi-dimensional, light-catching effect that’s undeniably eye-catching. This is the choice if you want your nails to shift and shimmer as you move your hands.
Application Methods
- Glitter-top method: apply your orange base, then layer a glitter topcoat (traditional or gel) over top
- Embedded glitter: mix holographic glitter into a clear gel before curing it over your orange base
- Dust method: use holographic powder over a tacky gel layer for a more refined shimmer
Why Orange and Holographic Pair So Beautifully
- Holographic effects over warm tones like orange create this warm, rainbow-like shimmer
- The effect is playful and celebratory without feeling childish
- Duck nails maximize the light-catching surface area, making the holographic effect even more pronounced
Worth knowing: Holographic glitter is best sealed under a thick, protective top coat to prevent chipping and to keep the glitter from catching on clothing or hair.
14. Rust-Orange with Negative Space Design
Negative space designs (where you intentionally leave part of your nail bare or show the natural nail) paired with rust-orange polish creates a modern, architectural aesthetic. This is a design approach that works beautifully on duck nails because the shape reads so distinctly.
Negative Space Design Ideas
- Paint only the tip area of the nail, leaving the base bare or in a nude shade
- Create a geometric cutout effect where a triangular or rectangular section remains unpainted
- Paint around a central negative space, creating a frame of rust-orange around a bare center
- Use negative space in an asymmetrical way across your ten nails for visual interest
Why This Works on Duck Nails
- The broad shape of duck nails means negative space reads clearly and intentionally rather than looking like an accident
- Rust-orange over bare nail (or nude nail bed) creates beautiful tonal contrast
- Negative space feels modern and minimalist, which pairs perfectly with the contemporary duck nail shape
Pro tip: Use a nail stencil or striping tape to keep your negative space edges clean and precise — hand-drawn negative space can look sloppy if you’re not confident with a brush.
15. Orange with Glitter Gradient (Scattered to Dense)
A glitter gradient where sparkle increases from the base to the tip creates layered dimension and is easier to execute than you might think. Start with scattered glitter and gradually increase the density as you move toward the tip.
How to Build the Gradient
- Apply your orange creme base (2-3 coats)
- Using a glitter topcoat, apply one thin coat to the entire nail for light sparkle
- Apply a second coat but only to the upper half of the nail, building density
- Apply a third coat only to the tip area for maximum sparkle concentration
- Seal with a clear top coat
Why This Design Feels Fresh
- The gradient effect means your manicure has built-in visual direction and depth
- Starting minimal (scattered glitter at the base) and building to bold (dense glitter at the tip) feels intentional
- The duck nail tip area shows off the densest glitter beautifully
Worth knowing: You can create a glitter gradient with any glitter size — use fine glitter for understated sparkle or chunky holographic glitter for maximum impact.
16. Matte Orange with Shiny Accent Details
A matte finish on most of the nail paired with glossy shiny details creates interesting texture contrast and feels very current. Matte orange is inherently sophisticated, and the glossy accents draw focus.
Accent Ideas Over Matte Orange
- A shiny stripe down the center
- Glossy geometric shapes or dots scattered across the matte base
- A glossy frame or border around the nail edge
- One or two accent nails fully glossy while the rest stay matte
Why Matte and Glossy Contrast Works
- The texture variation keeps the design from feeling flat or boring
- Matte orange reads as more subtle and earthy than glossy, while glossy accents add pop
- This is an easy design to do at home — just apply matte topcoat to most nails, then apply glossy topcoat to only your accent areas
Pro tip: Allow your matte topcoat to fully cure before applying glossy topcoat to specific areas — if they’re not fully set, the glossy will blend into the matte and defeat the purpose.
Final Thoughts
Orange duck nails offer genuinely versatile styling options, whether you’re drawn to bold, high-impact designs or prefer something more subtle and refined. The duck nail shape itself is statement-making, so you have the luxury of pairing it with either maximalist designs (like neon with black lines or holographic sparkle) or letting the color and shape do all the talking with a simple solid manicure. The best design is the one that aligns with your personal style and the amount of maintenance you’re willing to commit to. A solid burnt orange is literally a two-week manicure that looks expensive and polished with zero effort, while something like leopard print or pressed flowers might require a professional application and careful daily care. Start with one design that genuinely excites you, master the execution, and then branch out into more complex territory once you feel confident with the fundamentals. Orange is forgiving and flattering, so you genuinely can’t go wrong.
