

Red ombre on stiletto nails is one of those nail trends that commands attention the moment you walk into a room. There’s something about the gradient effect combined with the sharp, elongated shape of a stiletto that creates an undeniably bold statement. The beauty of red ombre specifically is that it works whether you’re going for sultry and dramatic or soft and sophisticated—it all depends on which shades you choose to blend.
The challenge with ombre nails isn’t the concept itself—it’s the execution. Getting a smooth, seamless gradient to flow naturally across the nail requires the right technique, the right products, and honestly, a bit of practice. But once you nail it (pun intended), you’ve got a manicure style that looks expensive, feels luxurious, and gives you that confident energy that comes with truly polished nails. The red ombre approach also means you’re not locked into one rigid look. You can play with undertones, pair it with metallics, or adjust the intensity to match your mood or the occasion.
If you’ve been scrolling through nail inspiration boards and wondering which red ombre stiletto design would actually work for your lifestyle, your skin tone, and your personal style, you’re in the right place. Here are ten red ombre stiletto nail ideas that range from classic and wearable to dramatic and head-turning.
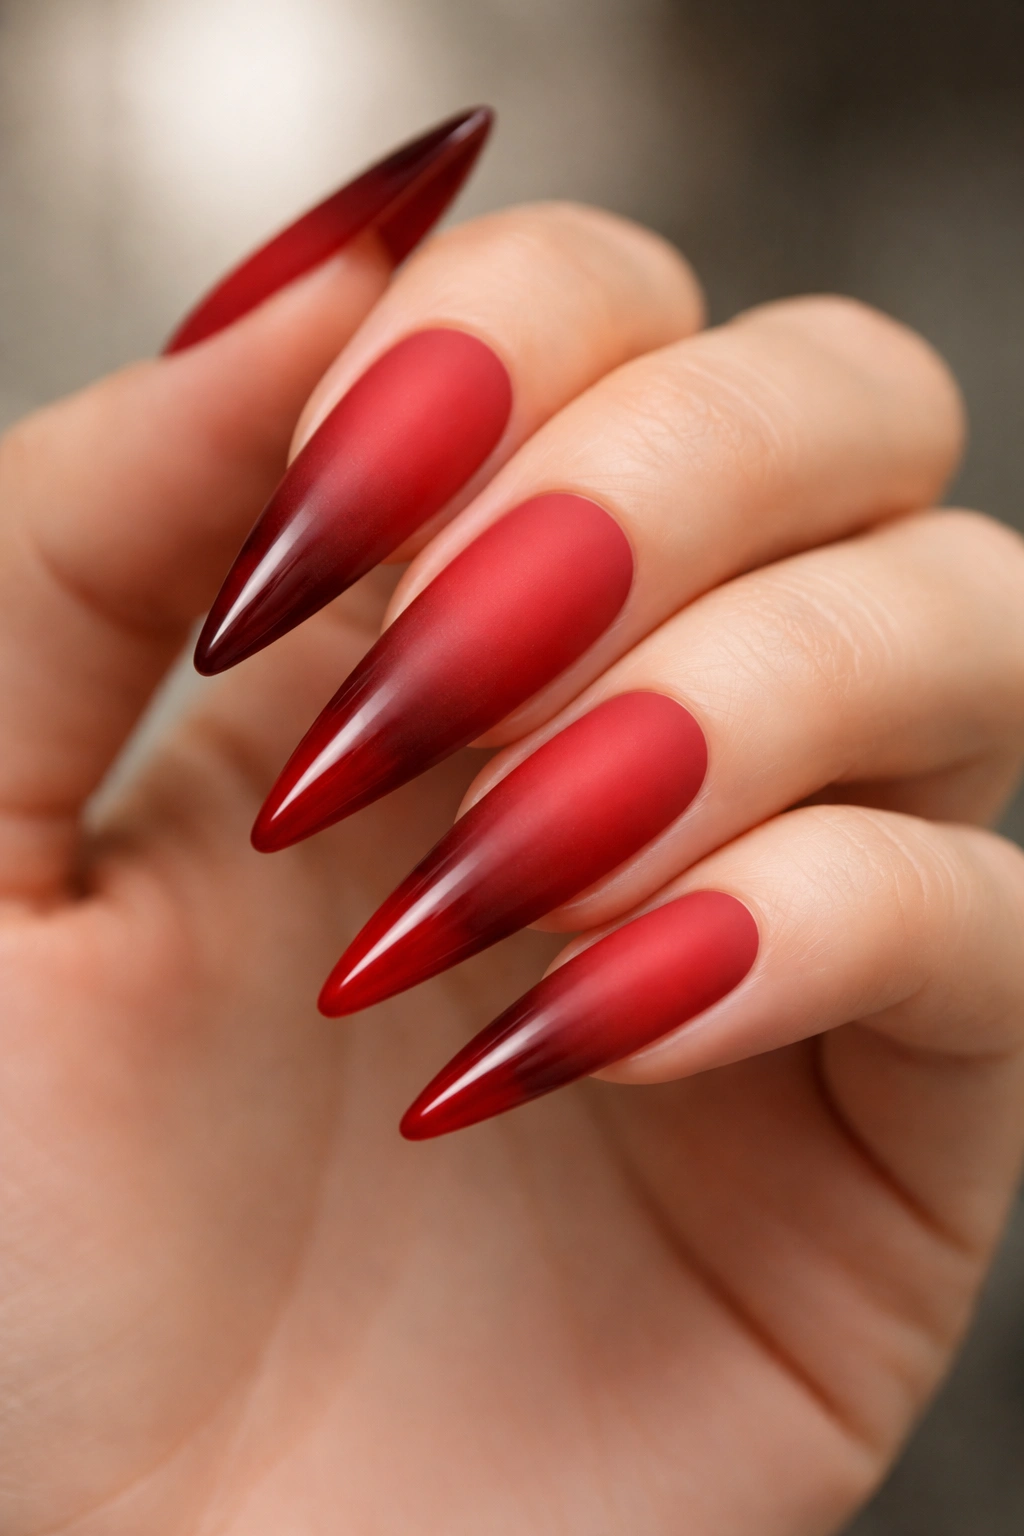
1. Classic Red-to-Black Ombre
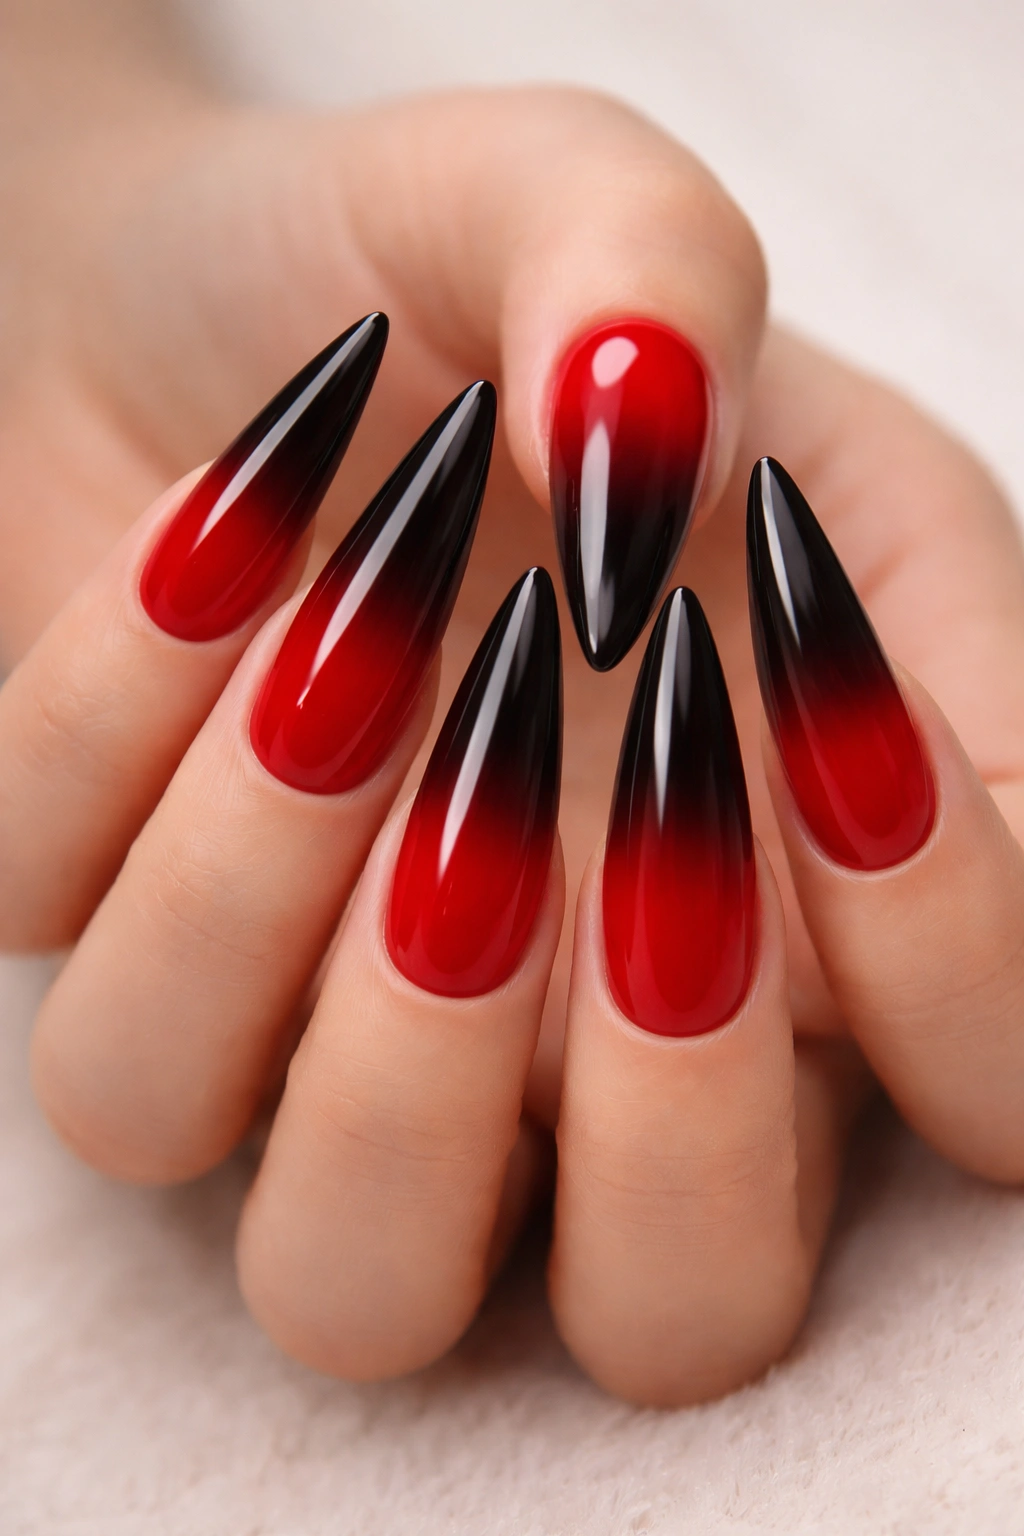
This is the design that proves red ombre doesn’t have to be complicated to be stunning. You’re starting with a true red—think bright crimson or a slightly deeper ruby tone—and letting it fade to pure black at the tip. The contrast between the warmth of the red and the coolness of the black creates visual drama without feeling over the top.
How to Create This Look
The key to making this work is choosing your red shade carefully. A true red (not orange-leaning, not pink-leaning, but right down the middle) will photograph beautifully and won’t clash with the black. Apply your red polish as the base, and let it cure. Then, using a makeup sponge and black gel or regular polish, dab and roll the color from the tip toward the middle of the nail, creating a transition zone. Blend gently with a smaller sponge piece for smoothness.
Why This Works on Stilettos
- Creates an elongated visual effect that emphasizes the nail’s length
- High contrast reads as intentional and sophisticated, not accidental
- Works with virtually any skin tone and any wardrobe
- Surprisingly wearable for professional settings when the gradient is subtle
- Pairs beautifully with silver jewelry and metallic accents
Pro tip: Use a gel base coat and work with gel polish for this design—the black won’t muddy as easily, and you’ll get cleaner lines where colors meet.
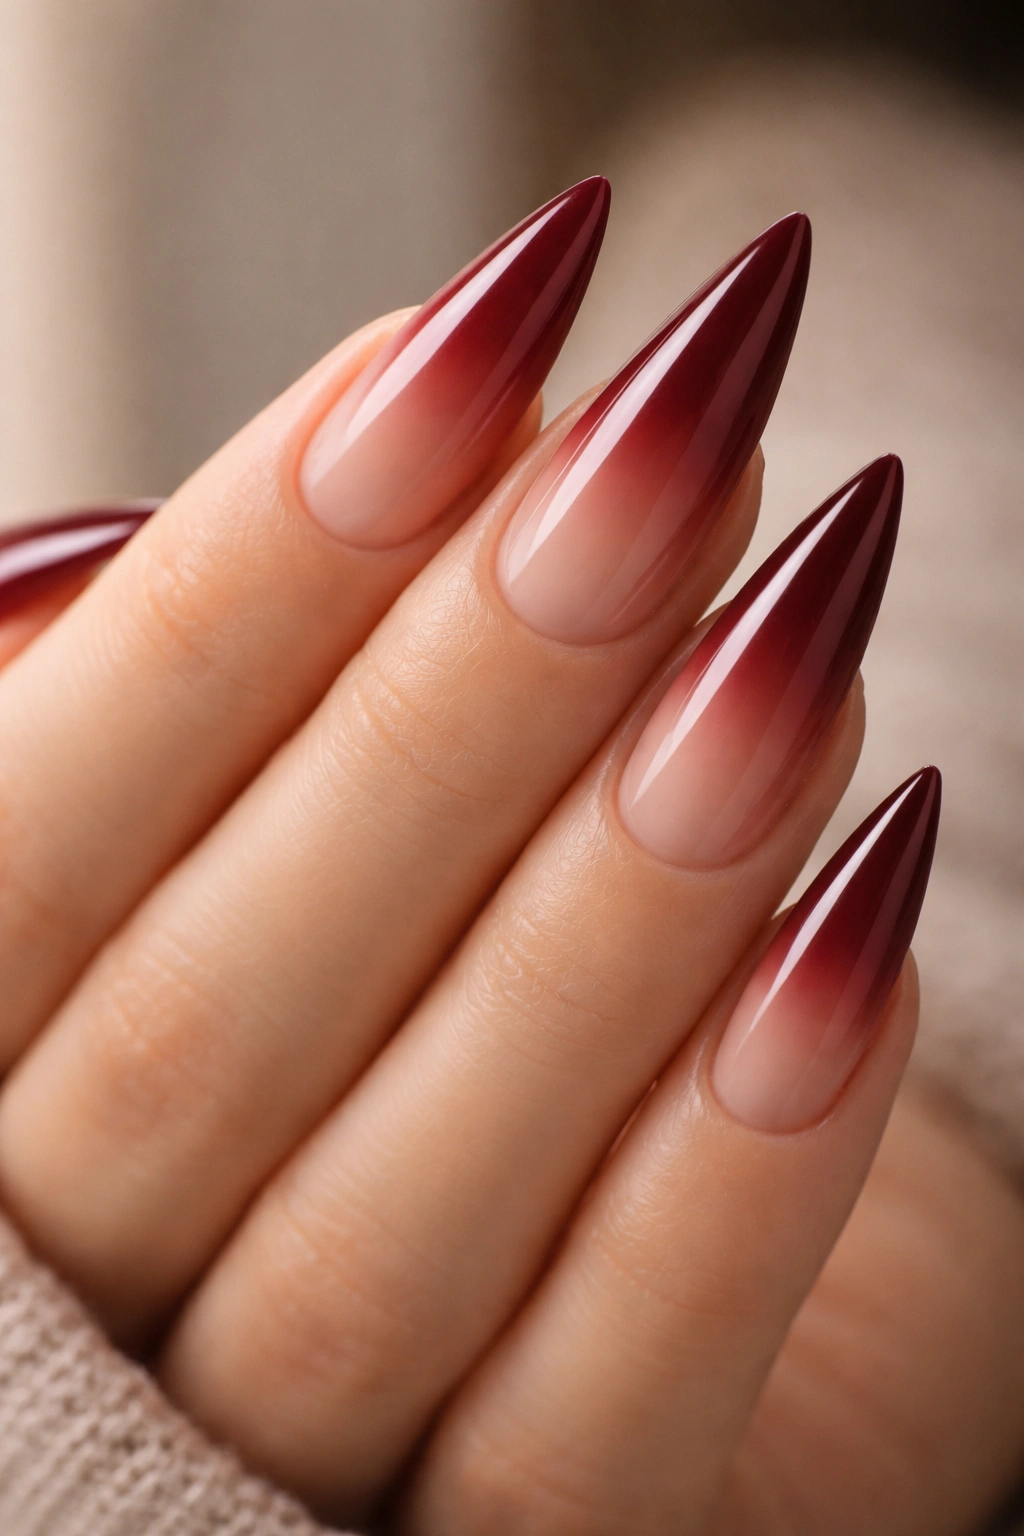
2. Deep Burgundy to Bright Red Ombre
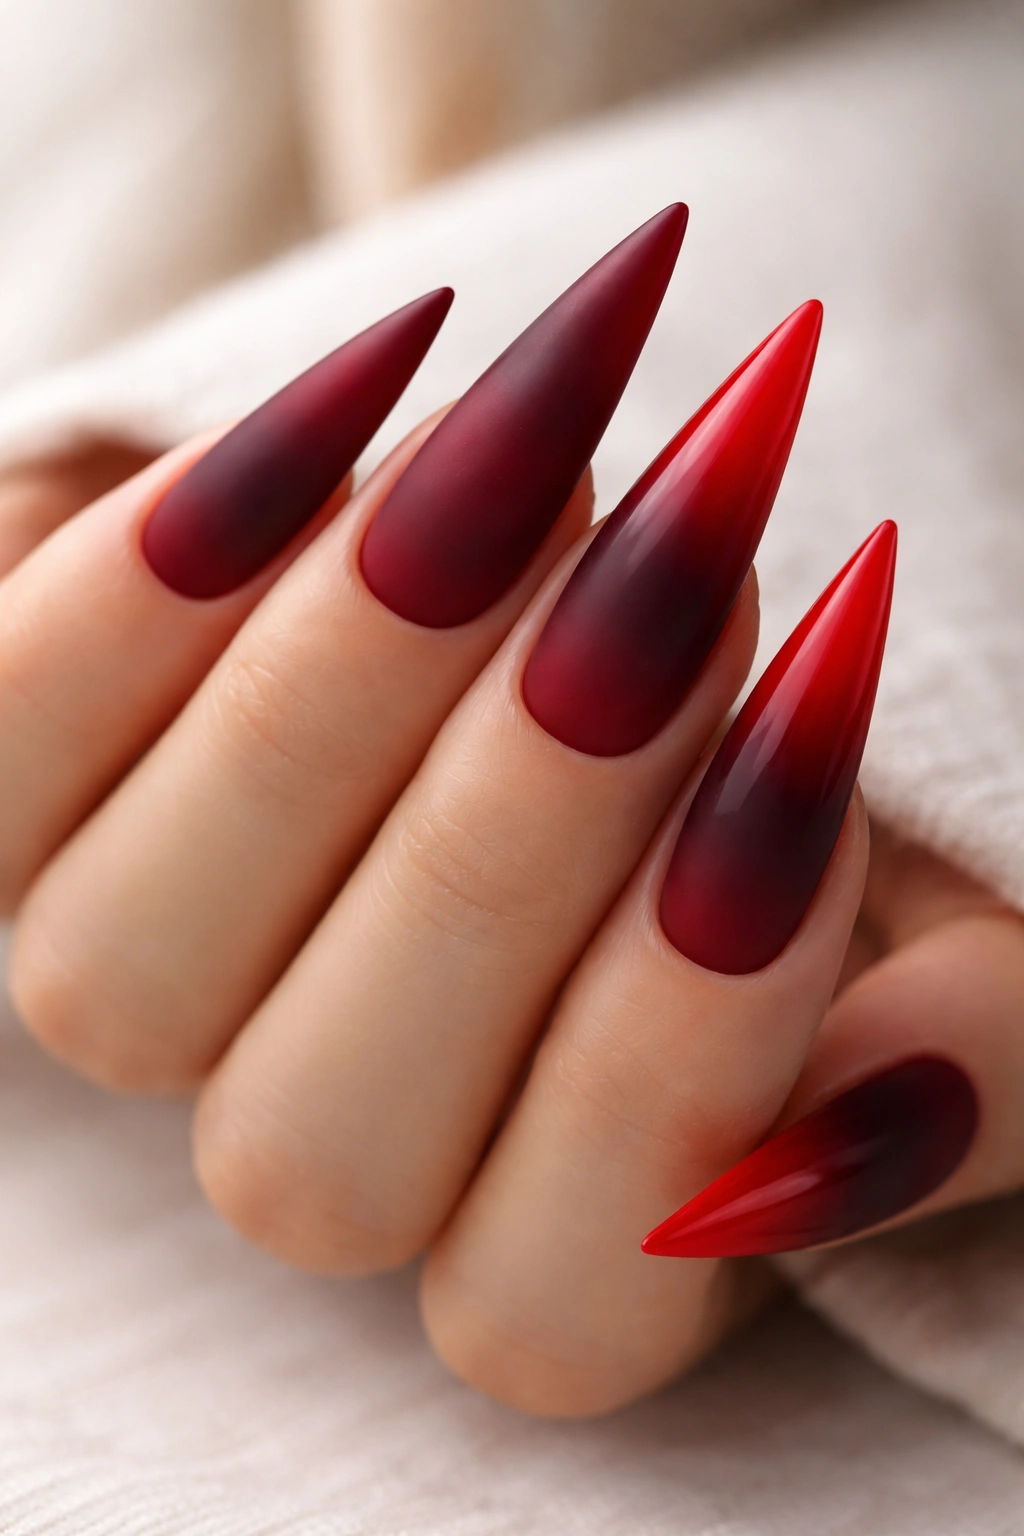
If you want the ombre effect to be noticeable but prefer to stay within the same color family, this gradation is your answer. Deep burgundy at the base transitions smoothly into bright, vibrant red toward the tips. The two shades are close enough that the blend feels cohesive, but the lightness shift is dramatic enough to create real dimension and movement on your nails.
The Psychology Behind This Shade Pairing
Burgundy reads as classic and grounded—it’s the color of wine, leather, and autumn. Red is bold and energetic. When you combine them, you get sophistication with an edge. Burgundy at the base keeps the look refined, while the bright red tips pull focus forward and create that “look at me” moment.
Application Tips for Best Results
- Use a matte burgundy at the base so the bright red pops even more
- Start the red transition about halfway down the nail for maximum impact
- Blend using a damp sponge rather than a dry one—moisture helps colors merge naturally
- Consider adding a subtle shimmer to the bright red section for extra dimension
Worth knowing: This combination works especially well in fall and winter, though honestly, it looks good year-round on stilettos because the length of the nail itself carries the design.
3. Red to Gold Glitter Ombre
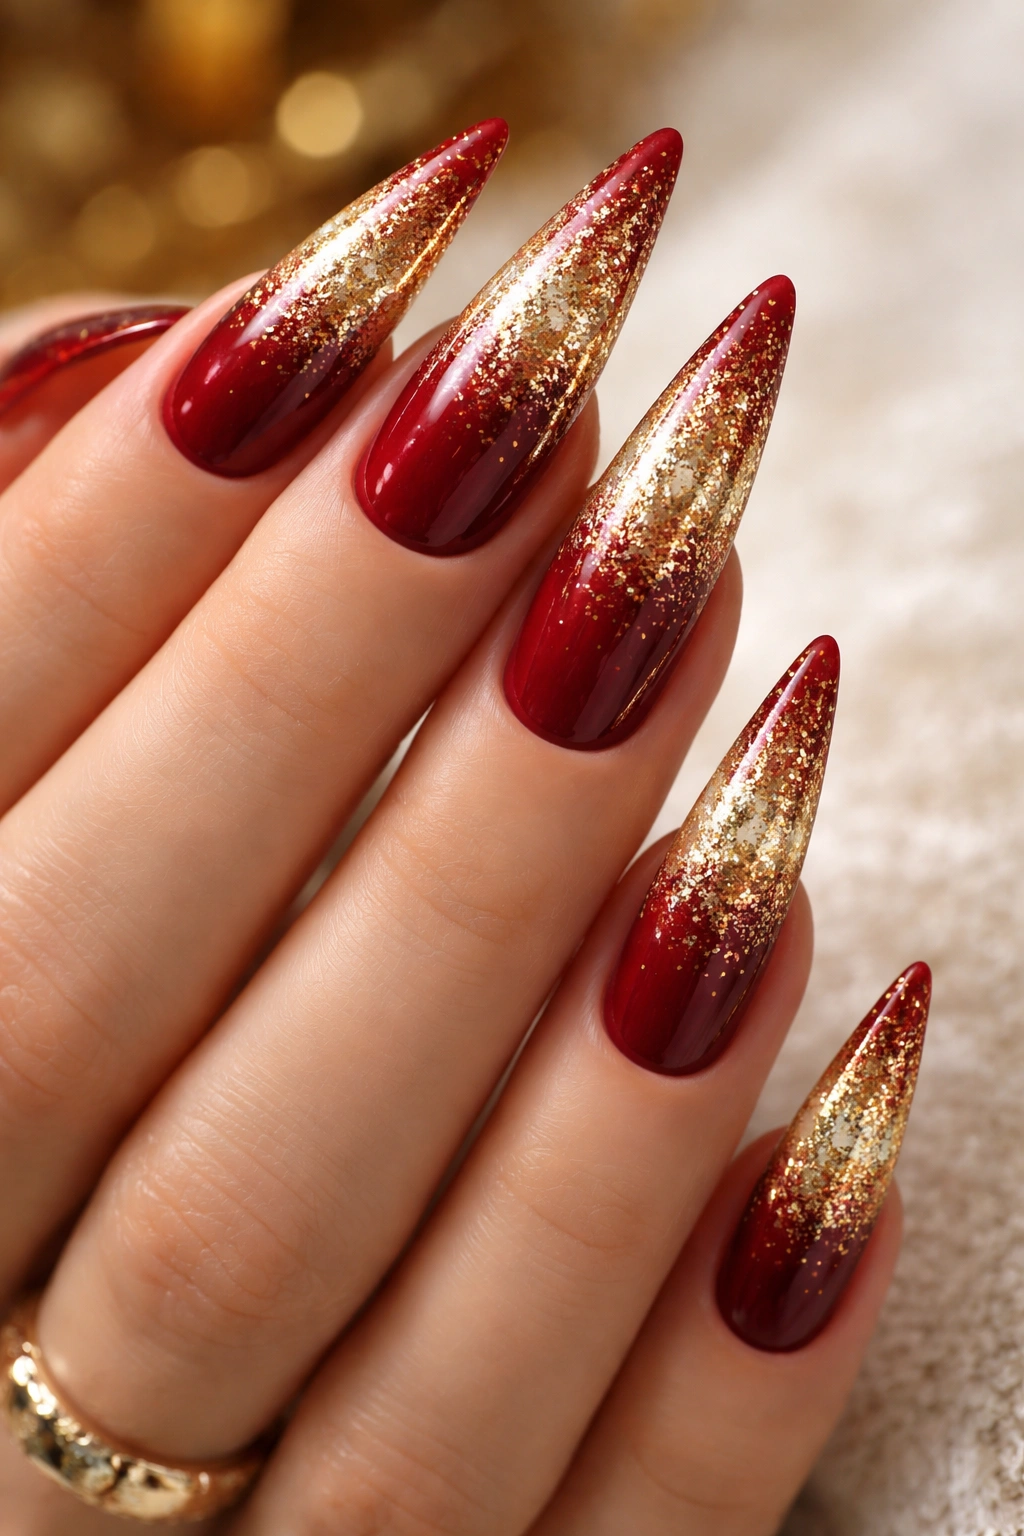
Here’s where you add dimension that catches light. You’re blending a rich red from the base into a gold or rose gold glitter that becomes denser toward the tip. This isn’t just color graduation—it’s a texture shift that makes your nails look expensive and intentional.
Building the Glitter Transition
Start with a deep red base. Once cured, mix gold glitter polish with clear polish in a small dish, starting with a higher ratio of clear to glitter. Apply this mixture to the tips using a thin brush, focusing on the outer edges first. In a second application, increase the glitter-to-clear ratio and apply closer to the middle of the nail. In the final layer, use pure glitter polish at the very tip. This creates a natural gradient from solid color to sparkle.
Why Gold Works With Red
- Gold and red are complementary in fashion and beauty, especially with warm undertones
- The glitter catches light and creates visual interest on the elongated surface of stilettos
- Works for both day (with a matte top coat) and night (with a glossy top coat)
- Feels celebratory without being costume-like
- Gold glitter flatters warm, olive, and deep skin tones particularly well
4. Coral Red to Orange Ombre
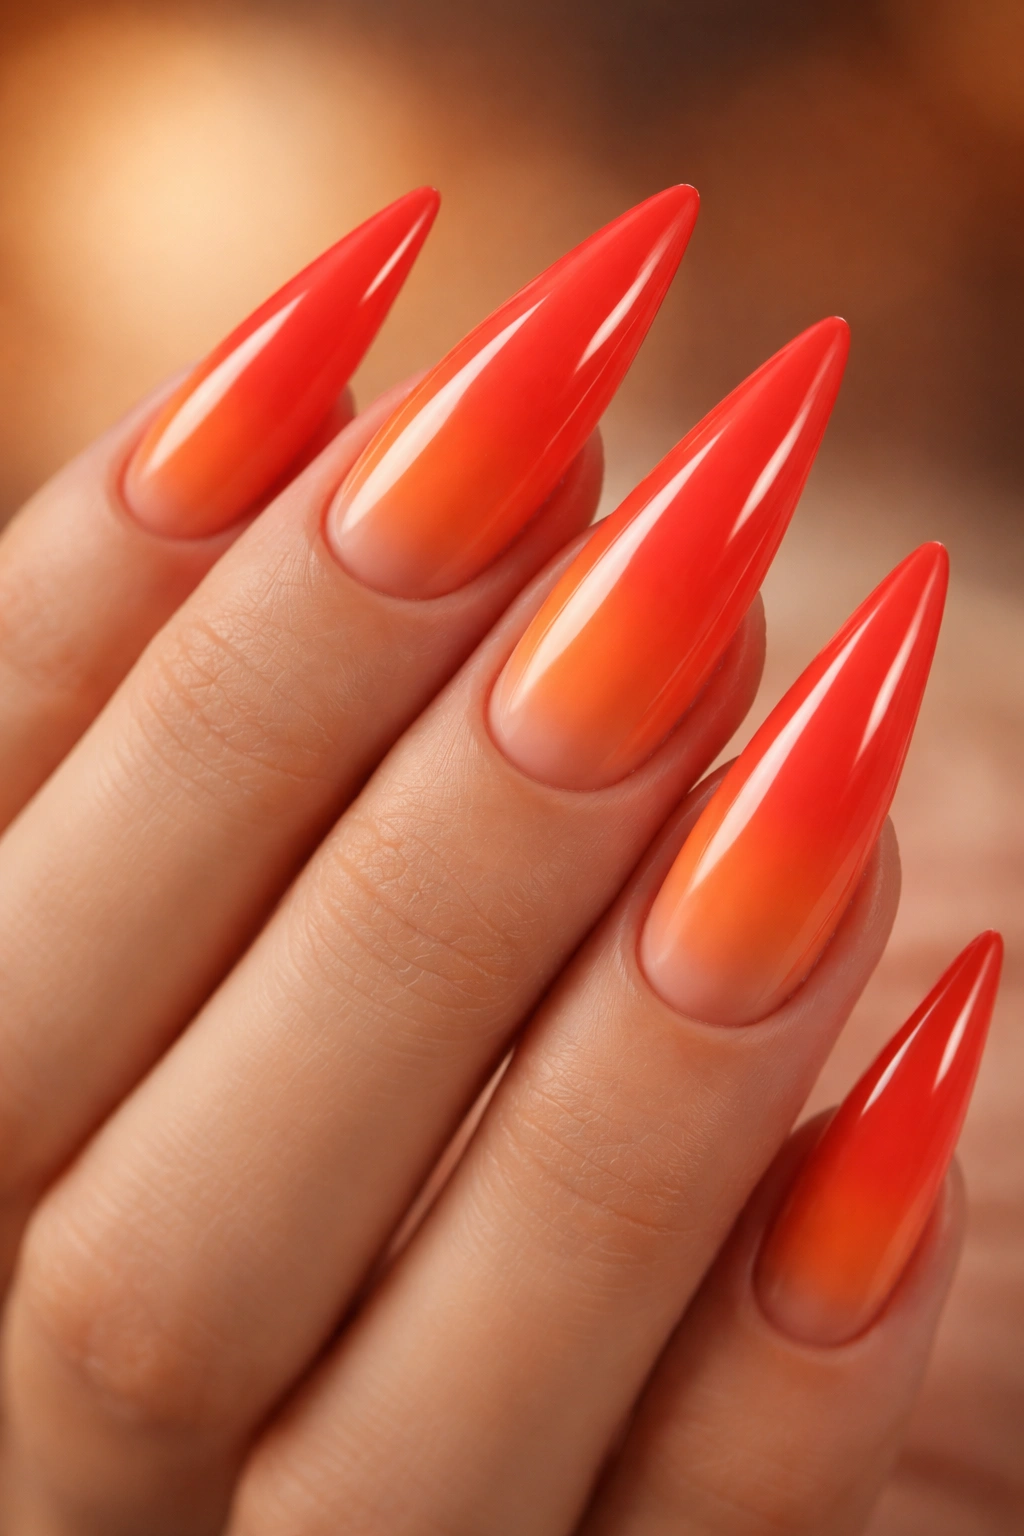
If you want something warm, cheerful, and a touch unexpected, this is your design. You’re working with shades that sit at the intersection of red and orange—coral red at the base deepening into a true orange or burnt orange at the tip. The effect is warm and energetic without veering into Halloween territory.
Making the Blend Seamless
The trickier part with warm-toned ombres is that the colors can look muddy if the blend isn’t smooth. Use a makeup sponge with a thin texture and work in very light dabbing motions rather than dragging motions. The key is building the gradient gradually through multiple light applications rather than trying to force it in one pass.
Best For
- Spring and summer manicures, though totally year-round appropriate
- Warm skin tones with golden or bronze undertones
- Anyone who loves color but wants to avoid the intensity of pure red
- Beach vacations, outdoor events, and casual styling
- Creating dimension that feels natural rather than graphic
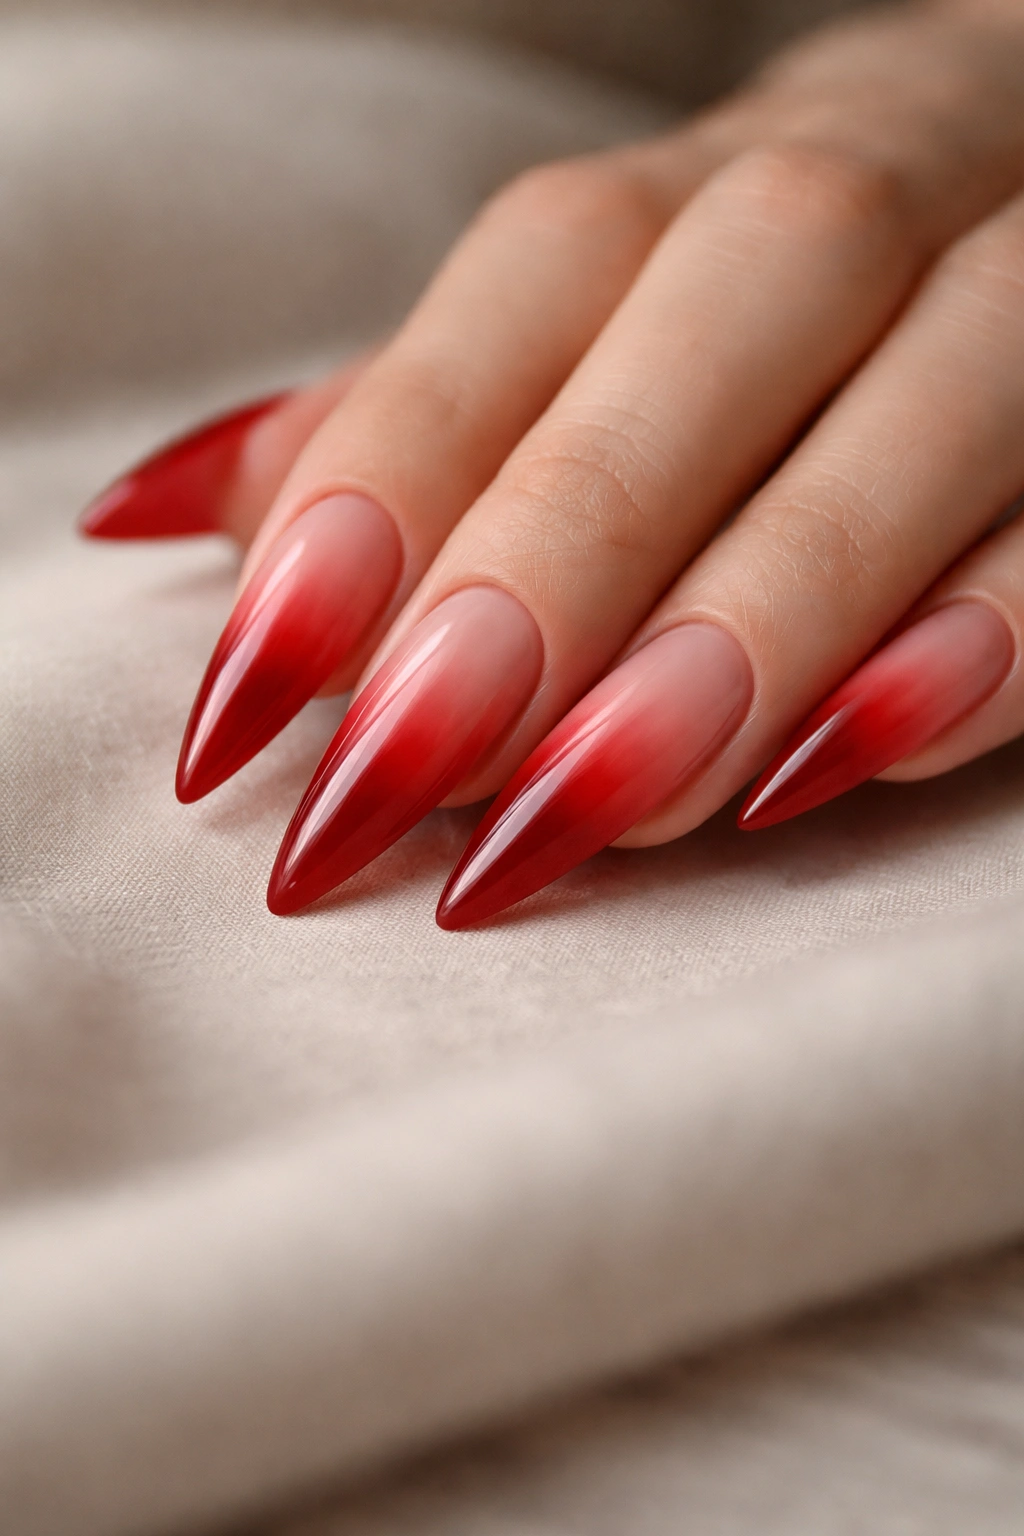
5. Deep Red to Nude Ombre
This design walks the line between bold and wearable with sophistication. You start with a deep wine red or burgundy and transition to a nude or beige that’s very close to your skin tone. The effect is subtle enough that people might not immediately realize it’s an ombre, but once they do, they’ll recognize the thought behind it.
The Nude Shade Matters
Not all nude shades are created equal. The nude you choose needs to complement your undertone just like foundation does. If you have warm undertones, go for a warm nude with peachy or golden notes. If you have cool undertones, try a nude with pink or grayish notes. This shift from saturated color to almost-neutral is elegant and allows your nail shape to be the real star.
When to Wear This Design
- Professional settings where you still want to make a statement
- Minimalist outfits where you want one detail to carry visual weight
- Daytime events and business meetings
- Any occasion where you want sophisticated without loud
- With delicate jewelry and understated style
Insider note: This design actually makes your nails look longer because of the tonal graduation—it creates an optical extension of the nail shape.
6. Ruby Red to Pink Ombre
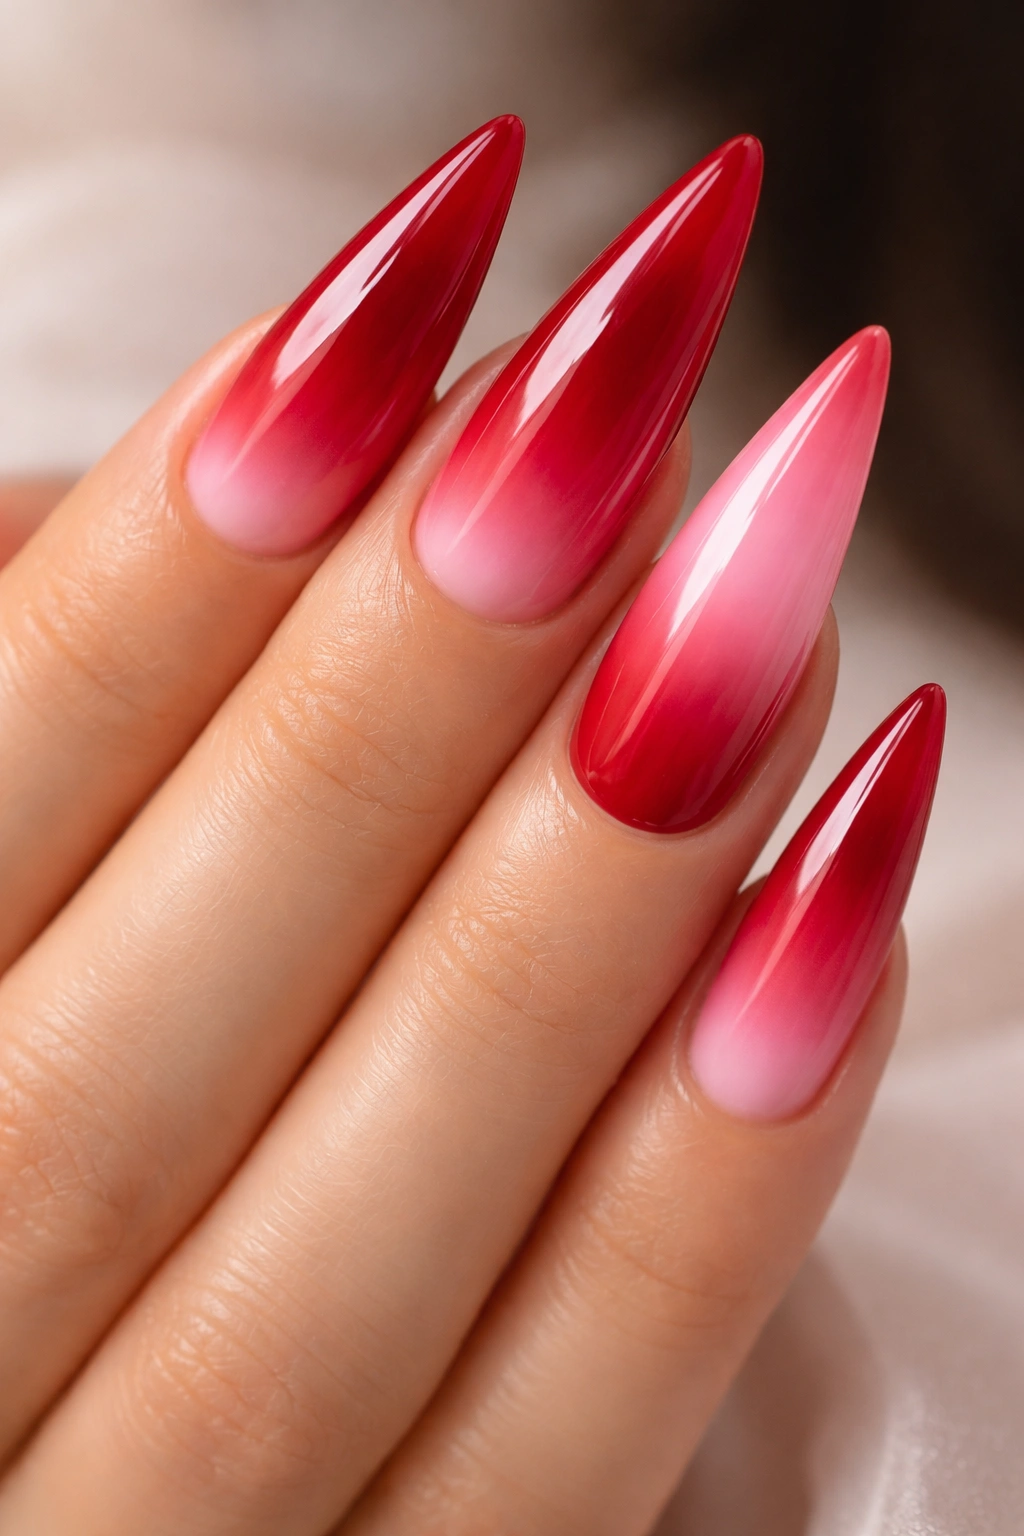
Here’s the move if you want something romantic, slightly playful, and absolutely flattering on most skin tones. Ruby red at the base transitions into pink at the tips—and depending on which pink you choose (blush pink, hot pink, mauve pink), the whole vibe shifts. A soft pink creates elegance; a brighter pink adds fun.
Choosing Your Pink
Your pink choice completely changes this design’s personality. Cool-toned pinks (mauve, dusty rose, cool bubble gum) pair beautifully with ruby red for an elegant effect. Warm pinks (coral pink, peach pink, warm salmon) create a more youthful, energetic look. The ruby red grounds the design and keeps it from feeling too soft or girly.
Who This Works For
- Anyone with fair skin—this combination is extremely flattering and not overly saturated
- People who love romantic aesthetics but want an edge
- Those seeking a design that photographs beautifully (the warm-to-cool gradient is very Instagram-friendly)
- Bridal-inspired looks—this works as a wedding manicure alternative to white or nude
- Any season, though it feels especially fresh in spring
7. Crimson Red to Silver Ombre
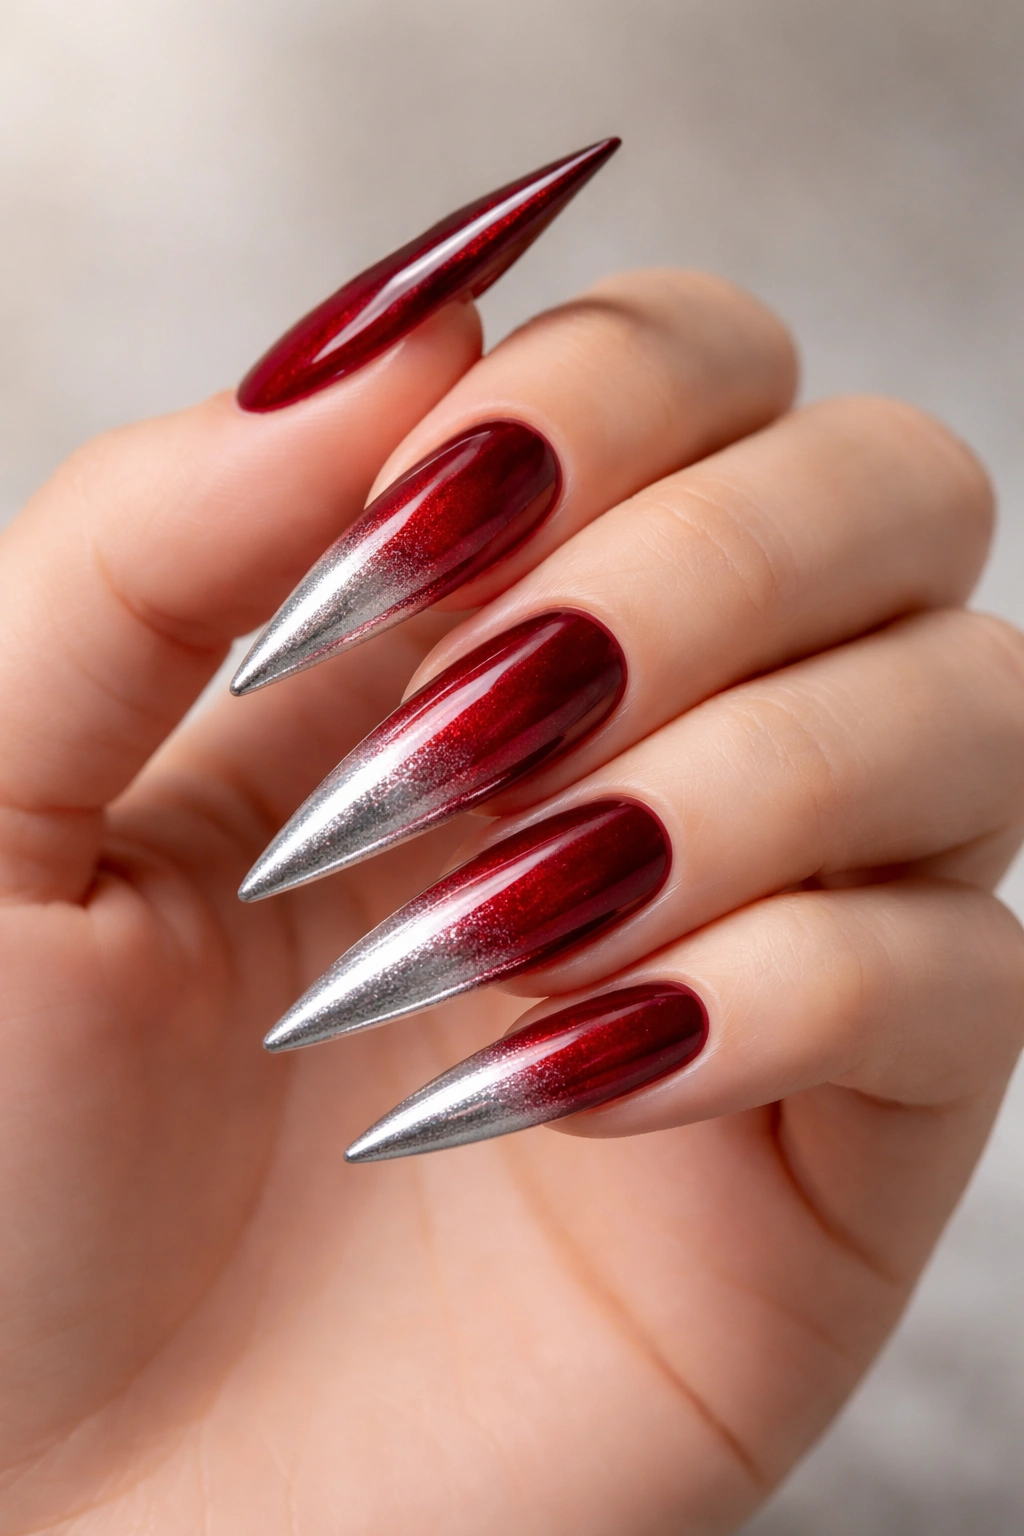
Crimson has depth that pure red sometimes lacks—there’s something almost jewel-toned about it. When you pair crimson with silver or white as the transition color, you get a design that feels luxurious, modern, and slightly futuristic. The cool silver against warm crimson creates contrast that reads as intentional and high-end.
Achieving the Metallic Blend
Silver ombre requires a light hand. Too much shimmer and it looks glittery rather than metallic—and those are different moods. Use a silver polish with a fine shimmer or a metallic finish rather than chunky glitter. Apply it as you would the glitter ombre, building density toward the tip. The silver should look almost ethereal, like light reflecting off the nail rather than sparkles sitting on top.
Visual Impact on Stilettos
- The contrast creates incredible definition on long nails
- Silver reads as cool and modern, perfect for contemporary styling
- Photographs beautifully in both natural and artificial light
- Works for evening events, cocktail parties, and night-out occasions
- Pairs well with black, white, gray, and jewel-tone clothing
8. Red to Deep Purple Ombre
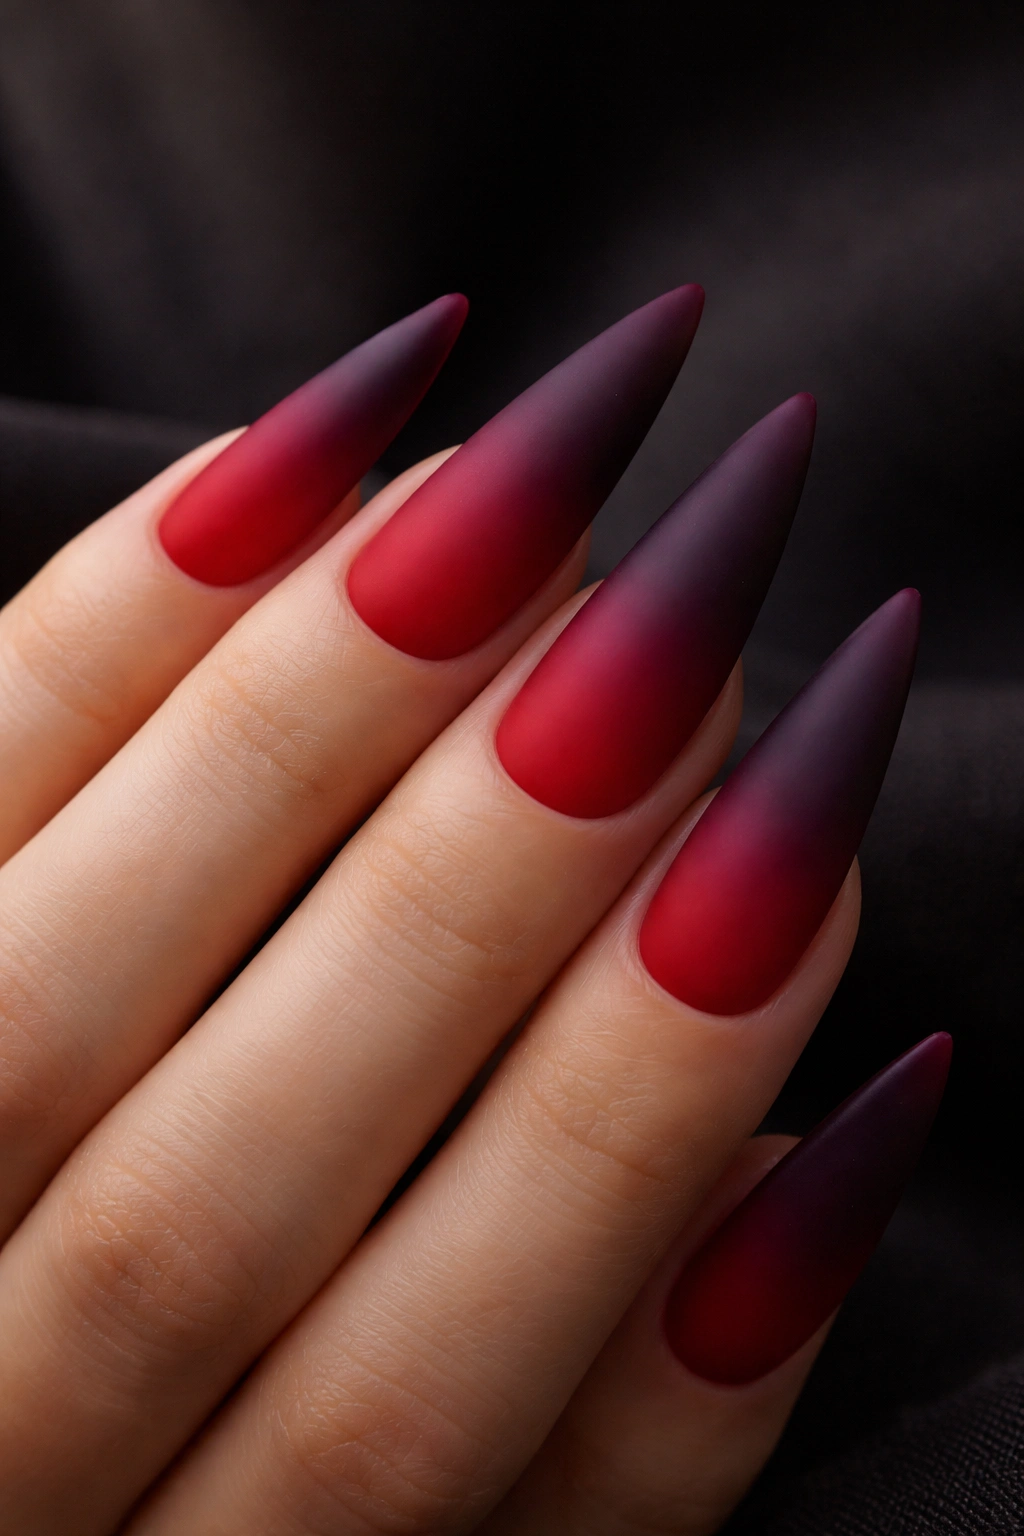
This is bold, it’s unexpected, and it absolutely works on stilettos. You’re starting with red and letting it shift into deep plum or eggplant purple. The two colors are different enough to be visually interesting, but similar enough in temperature that the blend feels intentional rather than random.
The Color Theory Behind It
Red and purple exist next to each other on the color wheel. When you blend them, you’re creating a gradient that feels natural and sophisticated. The deeper you go with the purple, the more dramatic the effect. A wine purple creates elegance; a true deep plum creates mystery.
Making It Work With Your Wardrobe
This design pairs beautifully with jewel tones, black, deep greens, and metallics. It’s less versatile with pastels or bright neutrals. If you wear bold colors regularly or gravitate toward darker palettes, this ombre is made for you. The purple undertones read as luxurious and artistic.
Pro tip: Use a matte top coat on this design rather than glossy—it emphasizes the color saturation and creates a more artistic, intentional look.
9. Fire Red to Orange-Yellow Ombre

If you want to go full-energy and embrace a design that feels hot and alive, this gradient is it. You’re working across the warm spectrum: fire engine red at the base, transitioning through orange, toward a deep golden yellow at the tips. It’s sunset caught on your fingernails.
The Technical Challenge
Blending three-color ombres is more complex than two-color ones. The key is creating multiple transition zones rather than trying to blend everything at once. Start with red and orange as your focus until that blend is smooth, then introduce the yellow as a separate gradient zone. Think of it as layering transitions rather than creating one continuous blend.
Who Should Try This
- Anyone comfortable taking risks with color and style
- People with deep or warm skin tones where these colors truly shine
- Those who love statement nails and aren’t looking to blend in
- Summer manicures, vacation looks, and occasions where you want maximum impact
- Anyone inspired by fire, sunset, or bold color in general
Worth knowing: This design can read as slightly costume-y if the blend isn’t smooth or if the colors are too saturated. Use slightly muted versions of each shade for sophistication rather than novelty.
10. Matte Red to Glossy Red Ombre
Sometimes the most sophisticated ombre isn’t about color—it’s about finish. You keep the same true red throughout the entire nail, but transition from a velvety matte finish at the base to a high-gloss shine at the tips. The effect is subtle but undeniably luxurious, and it showcases the nail shape itself rather than competing with it.
Why Finish Matters
A matte finish feels sophisticated, modern, and slightly understated. Gloss feels traditional, shiny, and reflects light. When you combine them on the same nail, you create dimension without adding another color to the palette. It’s a move that looks deceptively simple but requires precision to execute properly.
The Execution
Apply your matte red base coat to the entire nail and cure. Then, using a glossy version of the same red (or a clear glossy top coat mixed with red shimmer), apply only to the tip section. Blend where they meet using a very fine brush or the edge of a sponge. The transition from matte to gloss should happen gradually over about a quarter of the nail’s length.
When This Design Works Best
- Professional environments where statement nails are appreciated
- Minimalist aesthetic—this shows restraint and confidence
- Showcasing beautiful nail shape and length
- Any skin tone, any season, any occasion
- Creating an elegant look that reads as “intentional” rather than trendy
Final Thoughts
Red ombre on stiletto nails isn’t just a design choice—it’s a confidence statement. Whether you’re going deep and moody with burgundy-to-black, soft and romantic with ruby-to-pink, or bold and energetic with fire red to orange-yellow, the style you choose says something about how you’re feeling and what you’re projecting into the world that day.
The technical skill required to create a smooth ombre improves with practice, so don’t get frustrated if your first attempt isn’t flawless. The sponge technique, the ratio of colors, the curing time between layers—these are all things that feel natural once you’ve done them a few times. Consider investing in quality tools: a good makeup sponge, thin brushes, and gel or high-quality polish products make a noticeable difference.
Remember that ombre nails don’t have to be complicated or over-the-top to be effective. Sometimes the most striking designs are the ones that feel intentional and thoughtfully executed rather than cluttered or overdone. Start with whatever design speaks to you, trust the process, and enjoy the reactions you get when people notice the care and creativity that went into your manicure.
