

White stiletto nails adorned with rhinestones represent one of the most versatile and luxurious nail designs available today. Whether you’re heading to a wedding, a formal event, or simply want to elevate your everyday look, this combination delivers sophistication and sparkle without overwhelming your aesthetic. The beauty of white as a base color lies in its chameleon-like ability to work with virtually any rhinestone placement strategy — from subtle accent details to full-coverage bling that catches the light from every angle. Rhinestones bring dimension, glamour, and that unmistakable sense of occasion that transforms ordinary nails into statement pieces. The stiletto shape elongates the finger, providing an elegant canvas that shows off intricate rhinestone work beautifully, while the white base keeps the design feeling polished rather than costume-like.
The key to nailing this look (pun intended) is understanding how different rhinestone placement patterns, sizes, and configurations interact with the white base to create distinct moods and effects. Some designs whisper luxury through minimal, strategic placement, while others announce glamour through denser rhinestone coverage. Understanding these variations helps you choose a style that fits your personal aesthetic, the occasion, your lifestyle, and your tolerance for maintenance. We’ll walk through ten distinct interpretations of white stiletto nails with rhinestones, each bringing a different energy and skill level to the table.
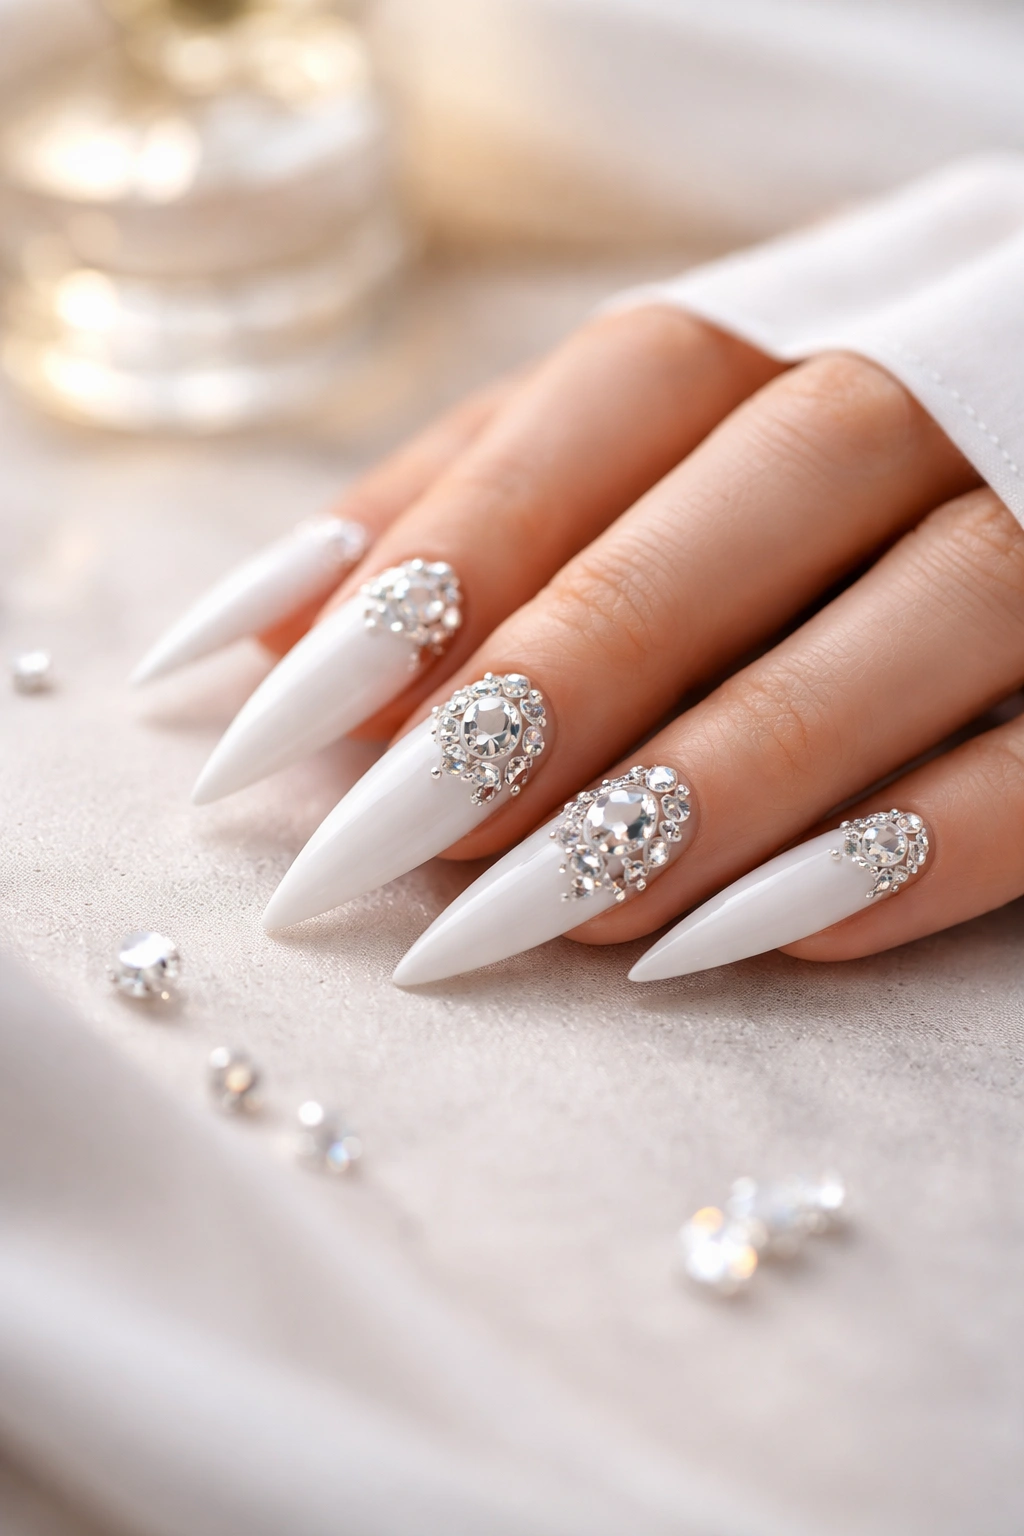
1. Classic Elegant White With Diamond Center
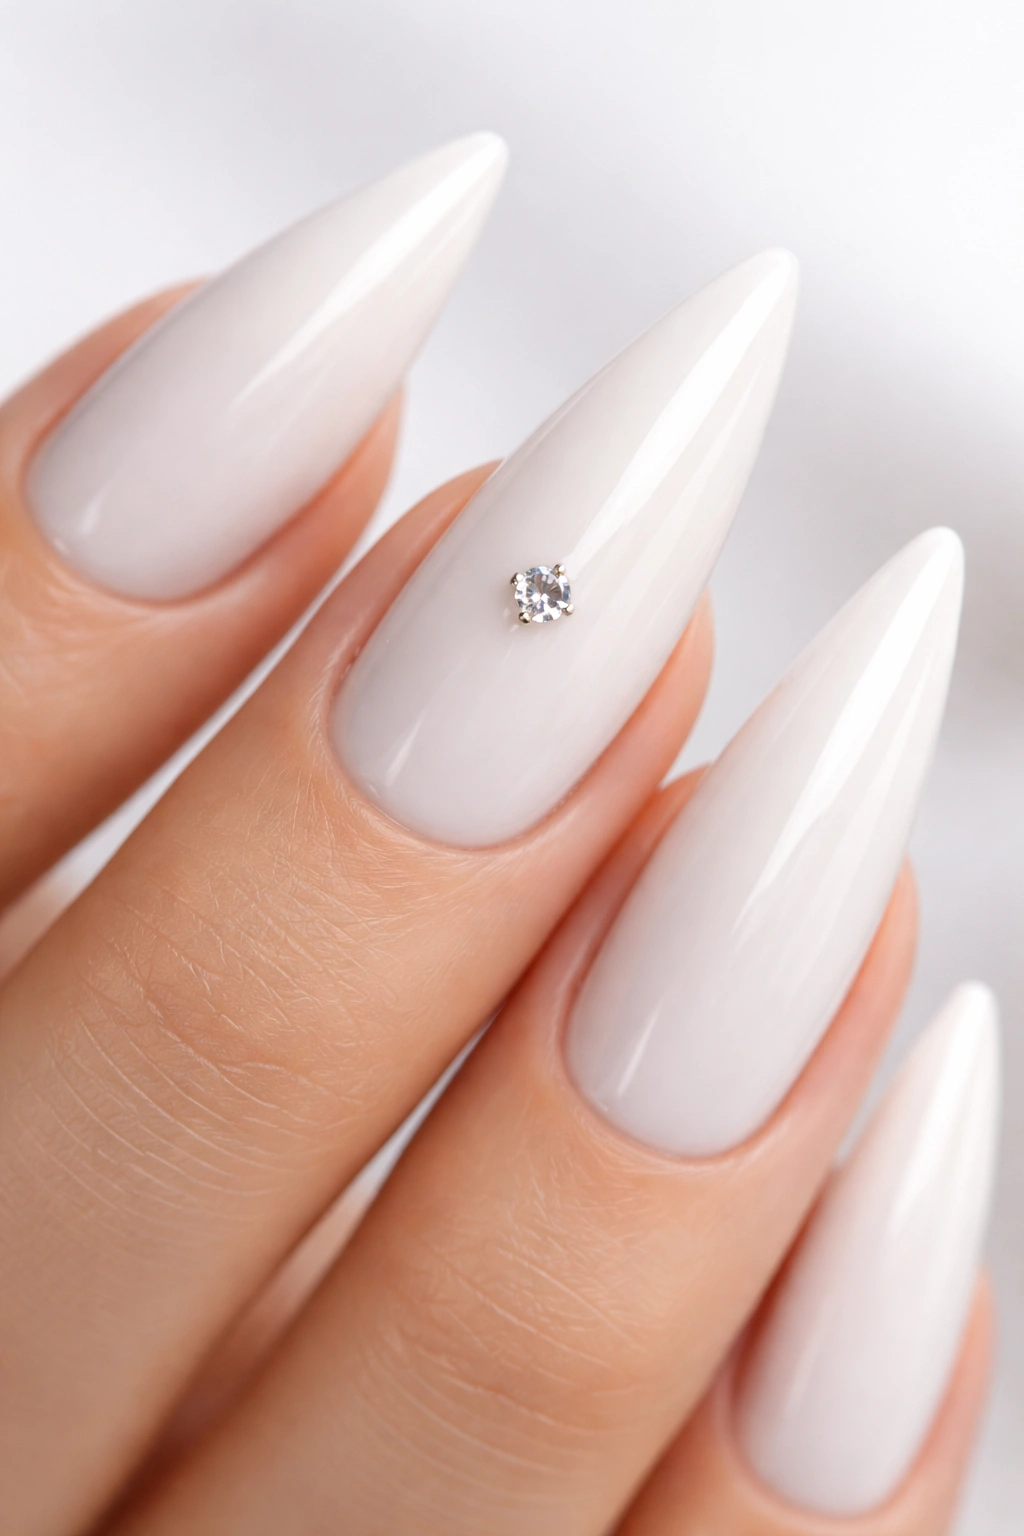
This design strips everything back to pure sophistication — a flawless white base with a single, substantial rhinestone or crystal placed at the center of each nail’s top portion. The rhinestone sits like a jewel on a crown, drawing the eye without demanding attention. This minimalist approach works beautifully for professionals, brides, and anyone who wants undeniable elegance without obvious flashiness.
Why This Design Works So Well
The power of this look comes from its restraint and the quality of the single rhinestone you choose. A clear Swarovski crystal or premium lab diamond catches light with incredible depth, creating a focal point that feels intentional and high-end rather than cluttered. The white creates a pristine backdrop that makes even a modest-sized stone appear more prominent and precious. This design suits all hand shapes and works equally well for casual daily wear or formal occasions.
How to Execute It Perfectly
- Choose a high-quality rhinestone — Swarovski crystals or genuine diamond-shaped crystals work best because they refract light beautifully
- Prep nails with a white gel or polish base and cure fully before applying the stone
- Use a nail-safe rhinestone glue or gel adhesive (not regular nail glue, which can be too thick and cloud the appearance)
- Apply the smallest dot of adhesive to the back of the rhinestone using a precision tool or toothpick
- Place the stone in the center of the nail slightly closer to the cuticle area to create balance
- Let adhesive cure completely before using your hands
- Seal with a clear top coat to protect the stone’s edges and ensure longevity
Maintenance and Longevity
This design can last 2–3 weeks if your rhinestones are firmly adhered and you’re careful with activities that put direct pressure on the nail tips. If a stone loosens, don’t pull at it — gently soak it in warm water and reapply with fresh adhesive. The white base hides regrowth well, so you can go longer between full redesigns if you simply refresh the base color.
Pro tip: Choose oversized rhinestones on shorter stilettos and delicate, moderately-sized stones on extremely long nails — proportion matters more than most people realize.
2. Ombre Gradient White to Clear With Scattered Rhinestones
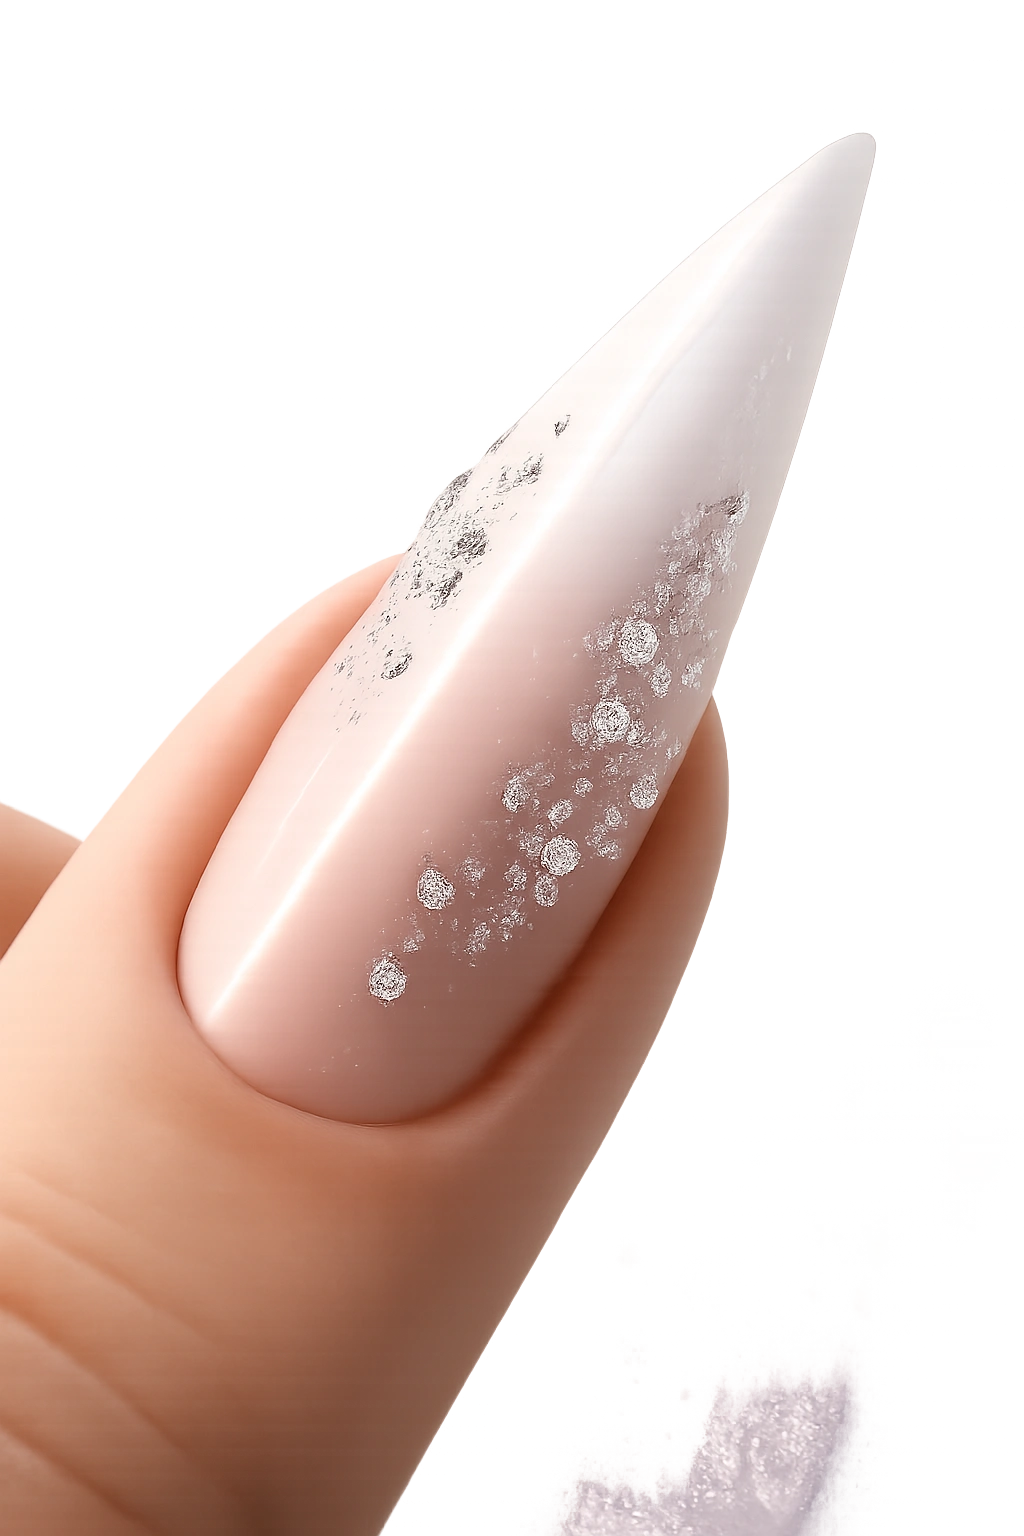
This design blends white gel polish at the base, graduating smoothly to clear at the tip, creating depth and the illusion of transparency. Rhinestones scattered throughout catch light as they travel down the gradient, creating dimension and movement. The effect feels modern, ethereal, and surprisingly wearable despite its evident glamour.
The Visual Impact and Who Loves It
The gradient creates a softness that pure white can’t achieve — the nails look like they’re glowing from within. This design appeals to people who love sparkle but prefer a contemporary, less structured look. It works beautifully for brides who want something ethereal, for night-out looks, and for anyone drawn to gentle, dreamy aesthetics.
Application Technique Step-by-Step
- Start with a white gel polish on clean, prepped nails and cure
- Using a soft brush or sponge method, begin applying clear gel polish at the tip
- Work it slightly upward, then blend where white and clear meet using a clean brush and wiping motions
- Cure the blended base
- Choose rhinestones in varying sizes — a mix of large and small creates visual interest
- Place larger rhinestones near the tip and smaller ones scattered throughout the gradient
- Use a nail glue or rhinestone gel to secure each stone, making sure they’re fully adhered
- Apply a glossy top coat to seal everything and add shine
Best Nail Length and Longevity
Longer stilettos (around 2-3 inches) showcase this gradient most effectively because they provide space for the color transition to be visible and for rhinestones to have room to scatter naturally. The design lasts about 2–3 weeks with normal care, though you may notice some rhinestones working loose after 10 days if your adhesive application wasn’t perfect.
Worth knowing: Using a matte or semi-matte top coat instead of glossy adds a frosted quality to the gradient that some people find even more striking.
3. White Marble With Gold Accents and Rhinestone Details
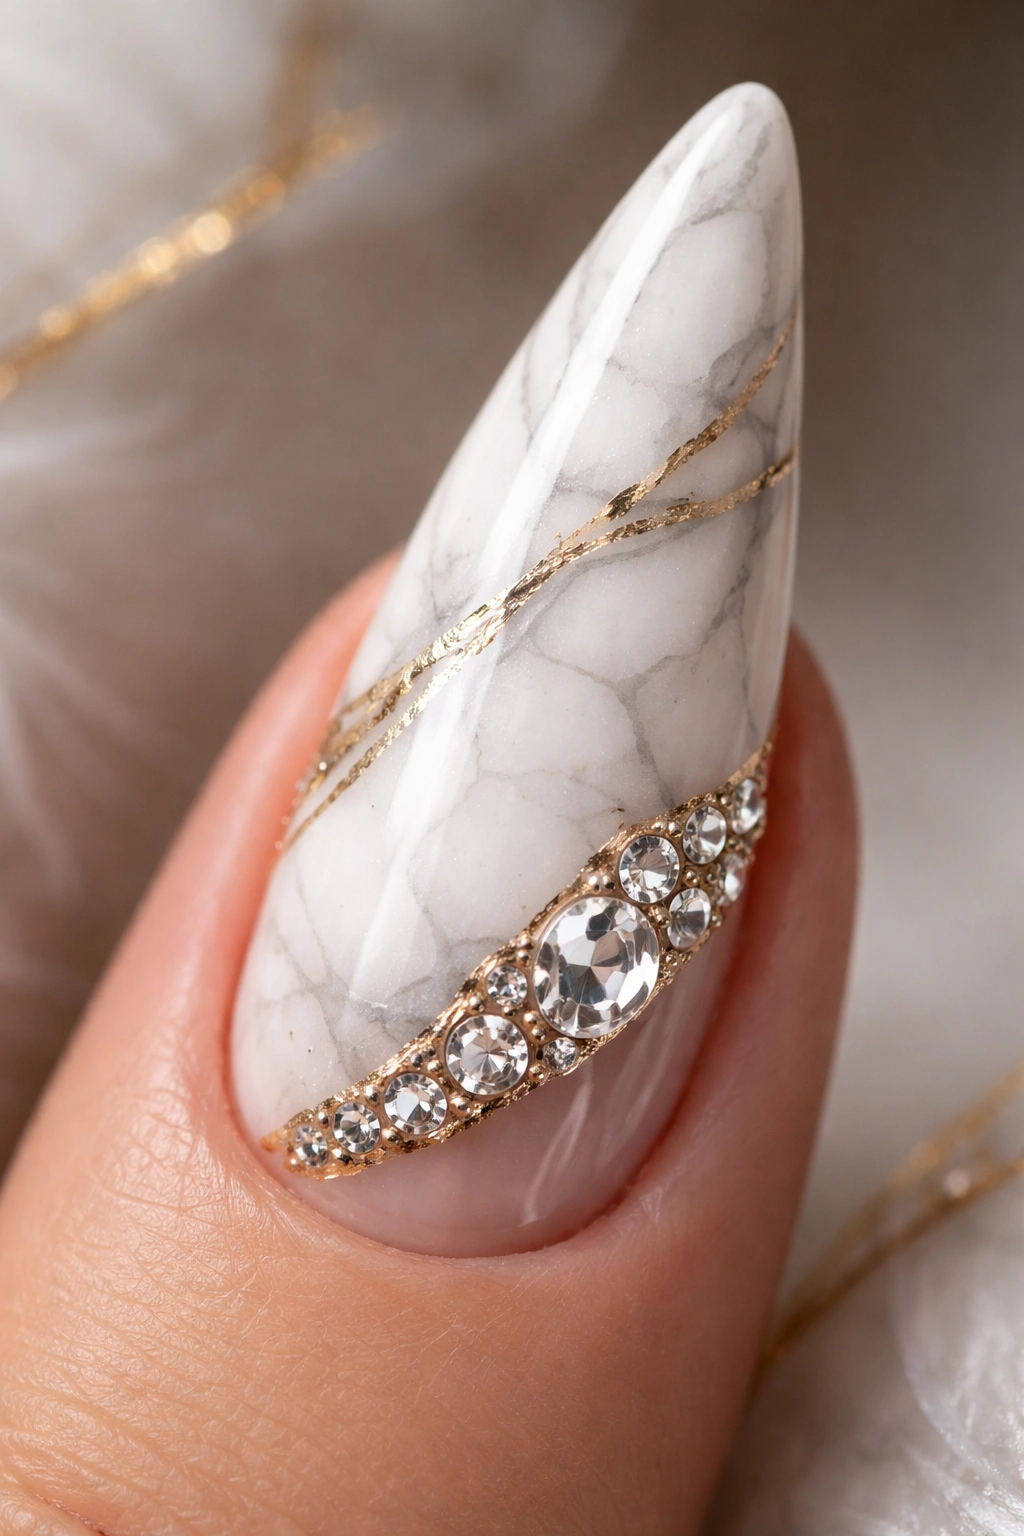
Marble effects mimic natural stone — swoops and veins of color within the white base create an organic, artistic feel. When paired with gold foil accents and strategically placed rhinestones, the design becomes luxurious without feeling costume-like. This is sophisticated maximalism done right.
Creating Authentic-Looking Marble
The key is using thin, organic-looking lines rather than bold, graphic strokes. Water marbling is one technique, but the easier approach for stilettos is using a marble gel kit or hand-painting thin, irregular lines with a gray or dark taupe gel polish. The lines should be slightly wavy and asymmetrical, like actual marble veining. Once your white base is cured and the marble veins are applied, you layer the glamour.
Integrating Gold and Rhinestones
- Apply thin strips of gold foil or gold gel lines alongside or following your marble veins
- Place larger rhinestones where gold accents meet the white base, creating anchor points for the eye
- Scatter smaller rhinestones in the veining areas or along the edges of the nail
- The combination of three textures — matte white, shiny gold, and sparkly rhinestones — creates richness and dimension
Design Longevity and Touch-ups
Expect this design to hold strong for 2–3 weeks, though the marbling can look slightly less crisp as your natural nail grows out. The rhinestones and gold foil are durable if sealed properly with a top coat, making touch-ups minimal. If a rhinestone loosens, you can reapply it without redoing the entire nail.
Pro tip: This design works best on medium-to-long stilettos where there’s enough real estate for the marbling to breathe and not look cramped.
4. Minimalist Line Art White With Strategic Rhinestone Placement
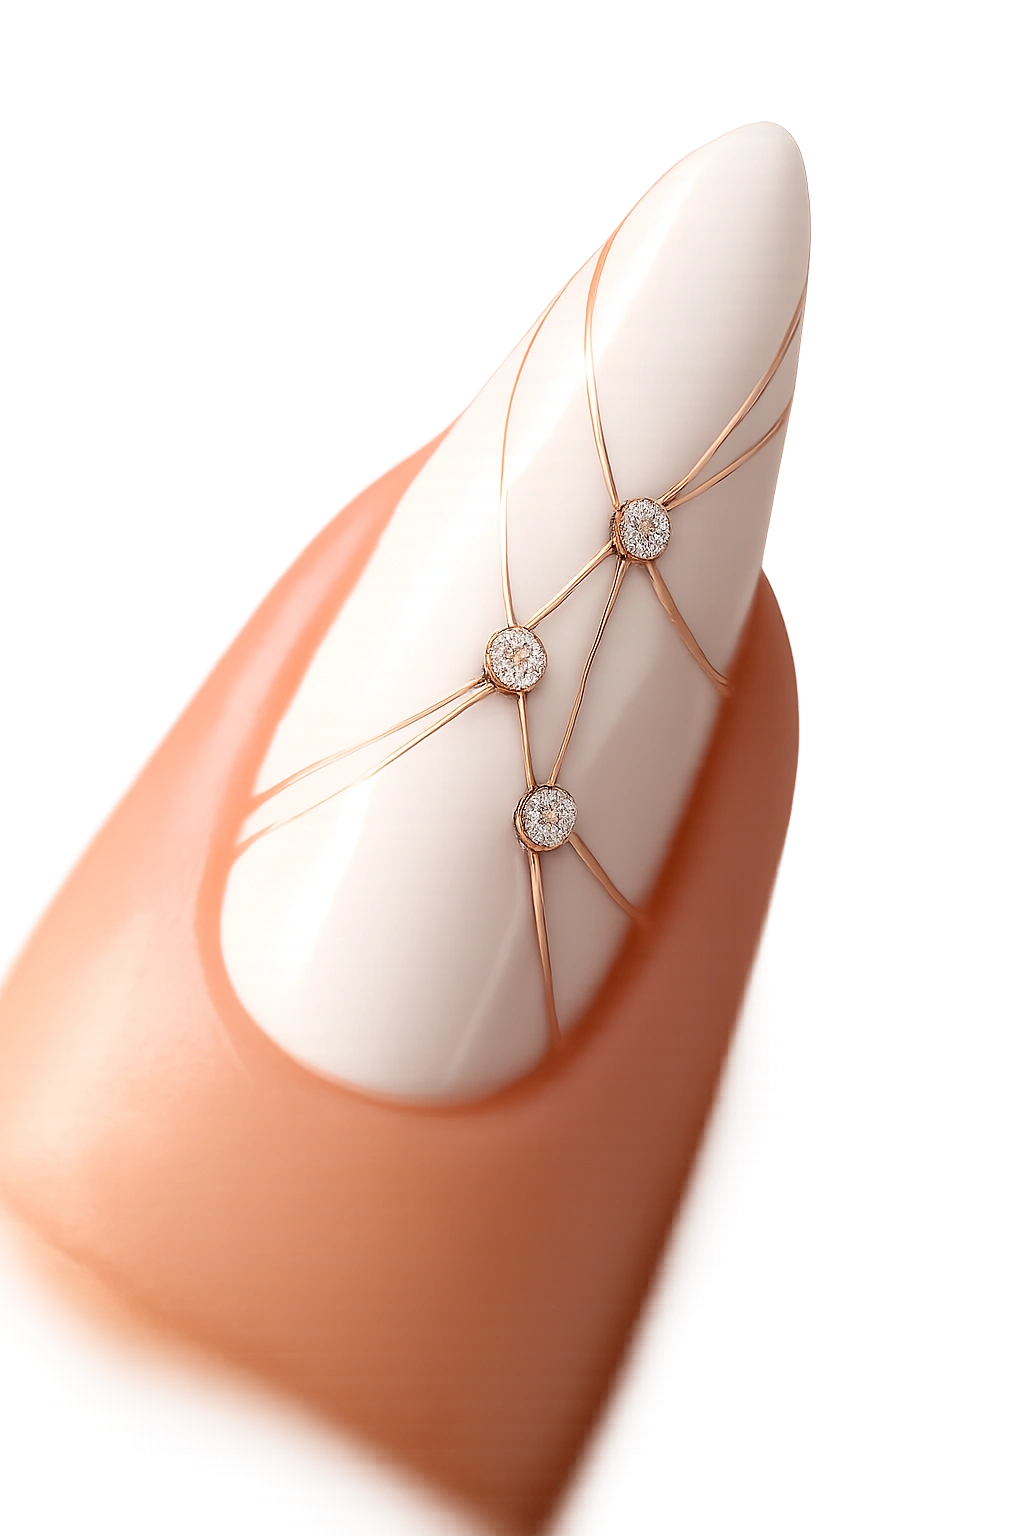
Line art designs use thin, clean geometric lines or simple drawings as the focal point, with rhinestones acting as accents rather than the main attraction. Think delicate gold lines forming geometric shapes, thin arcs, or abstract patterns, with rhinestones placed at intersections or endpoints. This design appeals to people who love minimalist aesthetics with a touch of glam.
Design Ideas and Execution
Possibilities include thin triangles pointing toward the tip, parallel horizontal lines with a rhinestone at each end, a single diagonal line with a cluster of small rhinestones, or minimalist abstract shapes. The lines are usually applied with a thin brush and gel polish, cured, and then the rhinestones are adhered afterward.
The key is restraint — you’re creating visual interest through design and placement strategy, not through volume. Each element should feel intentional and serve a visual purpose. Asymmetrical placement often feels more modern and artistic than perfectly symmetrical designs.
Styling and Real-World Wear
This design is incredibly office-appropriate, works beautifully for creative professionals, and feels fresh and contemporary. It’s the kind of design that people notice on second glance — sophisticated enough to hold up to close inspection, but not so loud that it distracts in professional settings.
- Apply a clean white gel base and cure
- Use a very thin gel liner or nail art pen to draw your chosen pattern
- Cure the lines
- Apply rhinestones where lines intersect or at endpoints, using precise placement
- Seal with a top coat
Insider note: Using matte white gel with shiny gold lines creates subtle contrast that makes the design read as more intentional and elevated.
5. Glitter Gradient White Fade With Rhinestone Border
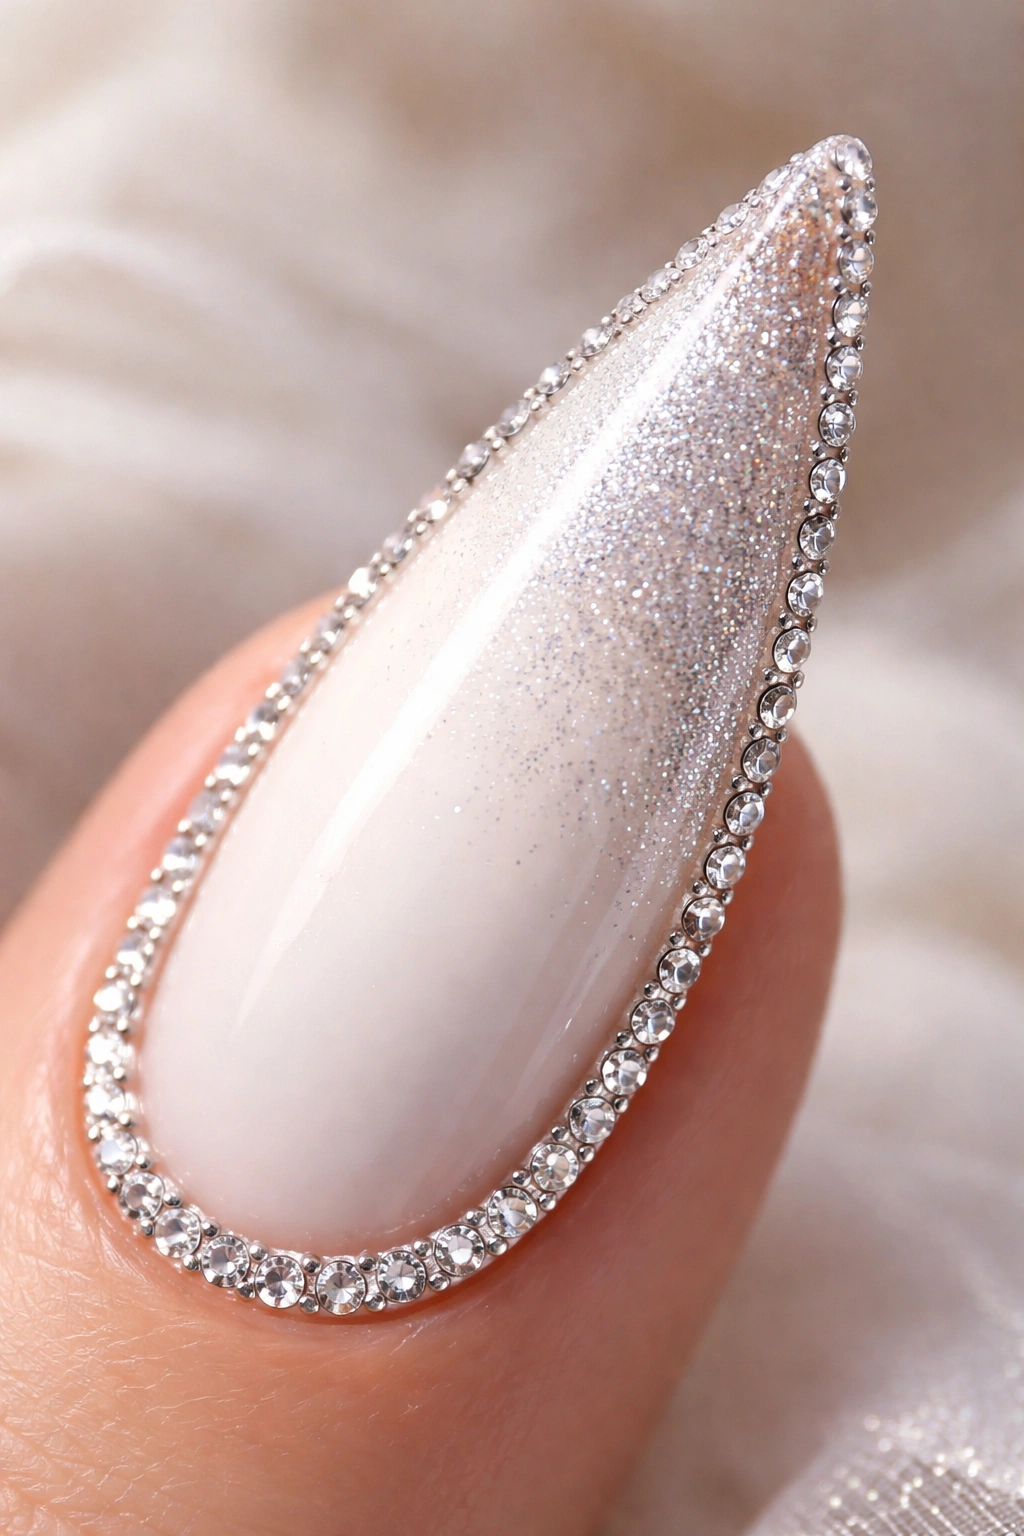
This design features a white base that gradually incorporates glitter as it moves toward the tip, creating a sparkly ombre effect. The very tip is rimmed with a line of rhinestones that acts like a crown or border, framing the glitter gradient. The effect is pure glamour with enough structure to feel polished.
Building the Gradient Effectively
Start with white gel polish on the entire nail and cure. Then, using a clear or white gel mixed with fine glitter, apply this mixture to the top third of the nail. Cure. Add a denser glitter concentration to the top quarter of the nail. Cure again. This layering creates a gradient where glitter density increases as you move toward the tip, rather than a harsh line.
Creating the Rhinestone Border
Once your glitter gradient is complete and sealed with a base top coat, apply a thin line of rhinestone glue or special nail adhesive along the very edge of the tip. Using tweezers or a rhinestone applicator tool, place stones in a single line or double line, depending on your aesthetic preference. Smaller rhinestones (about 2-3mm) work better for border application than large ones, which can snag and break.
Maintenance Specifics
The glitter can trap moisture and debris, so clean under the rhinestone border regularly with a soft brush. The stones may occasionally loosen where the tip meets daily wear surfaces, so check them weekly and reapply as needed. This design typically lasts 2–3 weeks with careful handling, though it shows wear slightly faster than solid designs due to the glitter particles loosening over time.
Real talk: This design is high-maintenance compared to simpler options, but the payoff is striking, especially in evening or event settings.
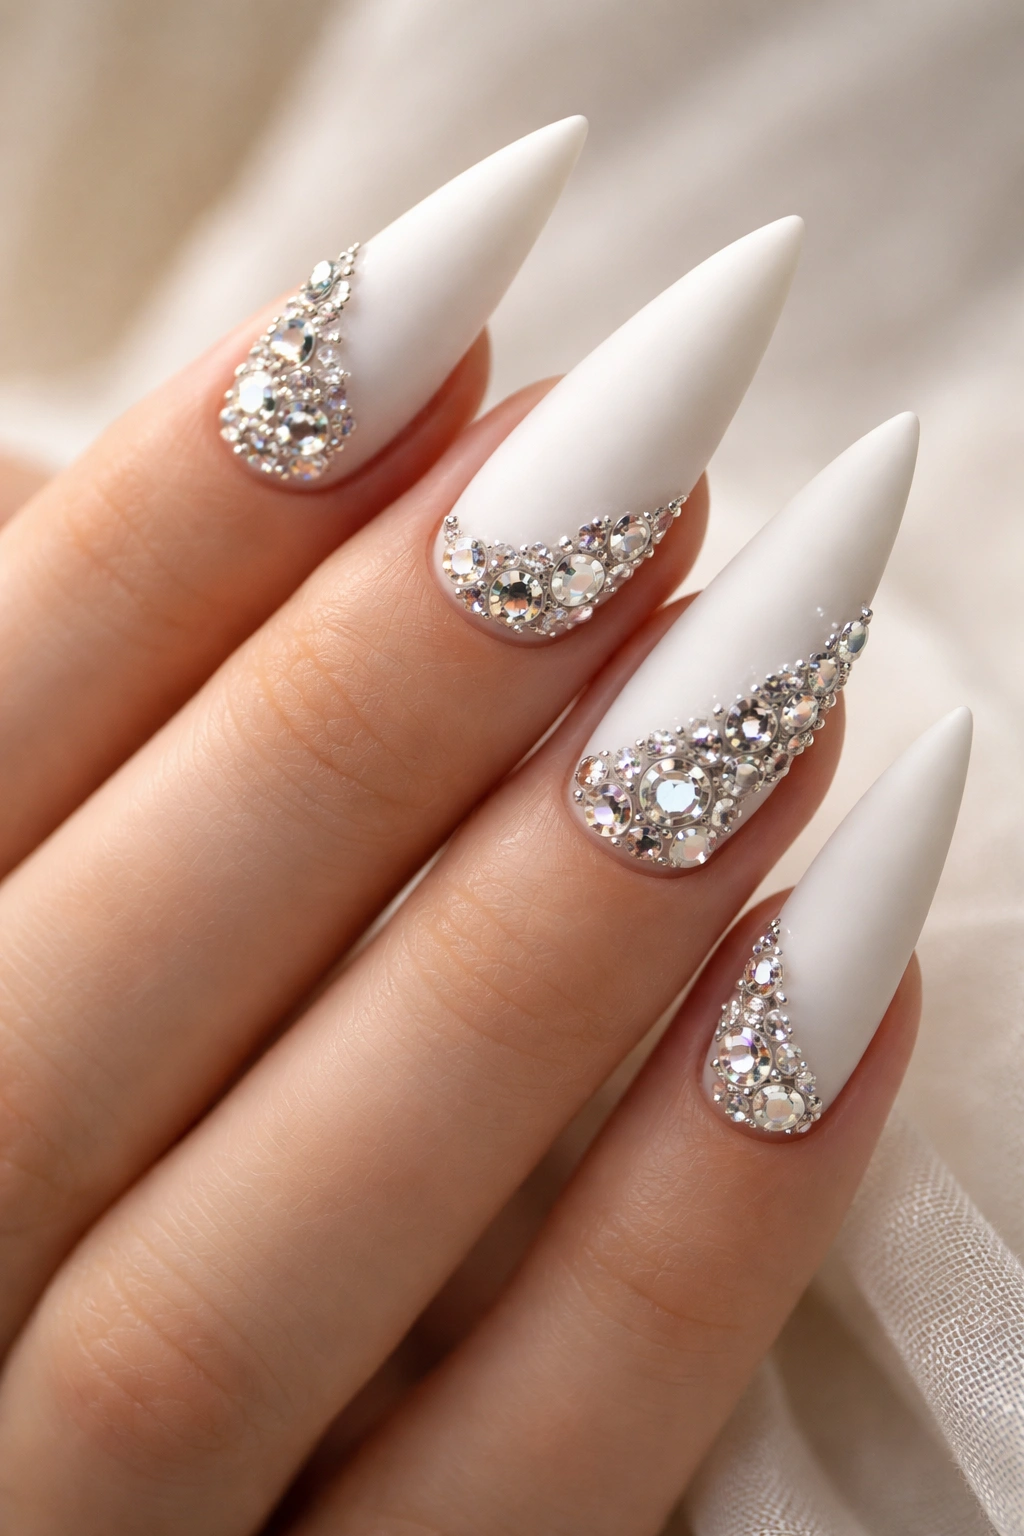
6. Full Rhinestone Coverage on White Base (Blinged-Out Luxury)
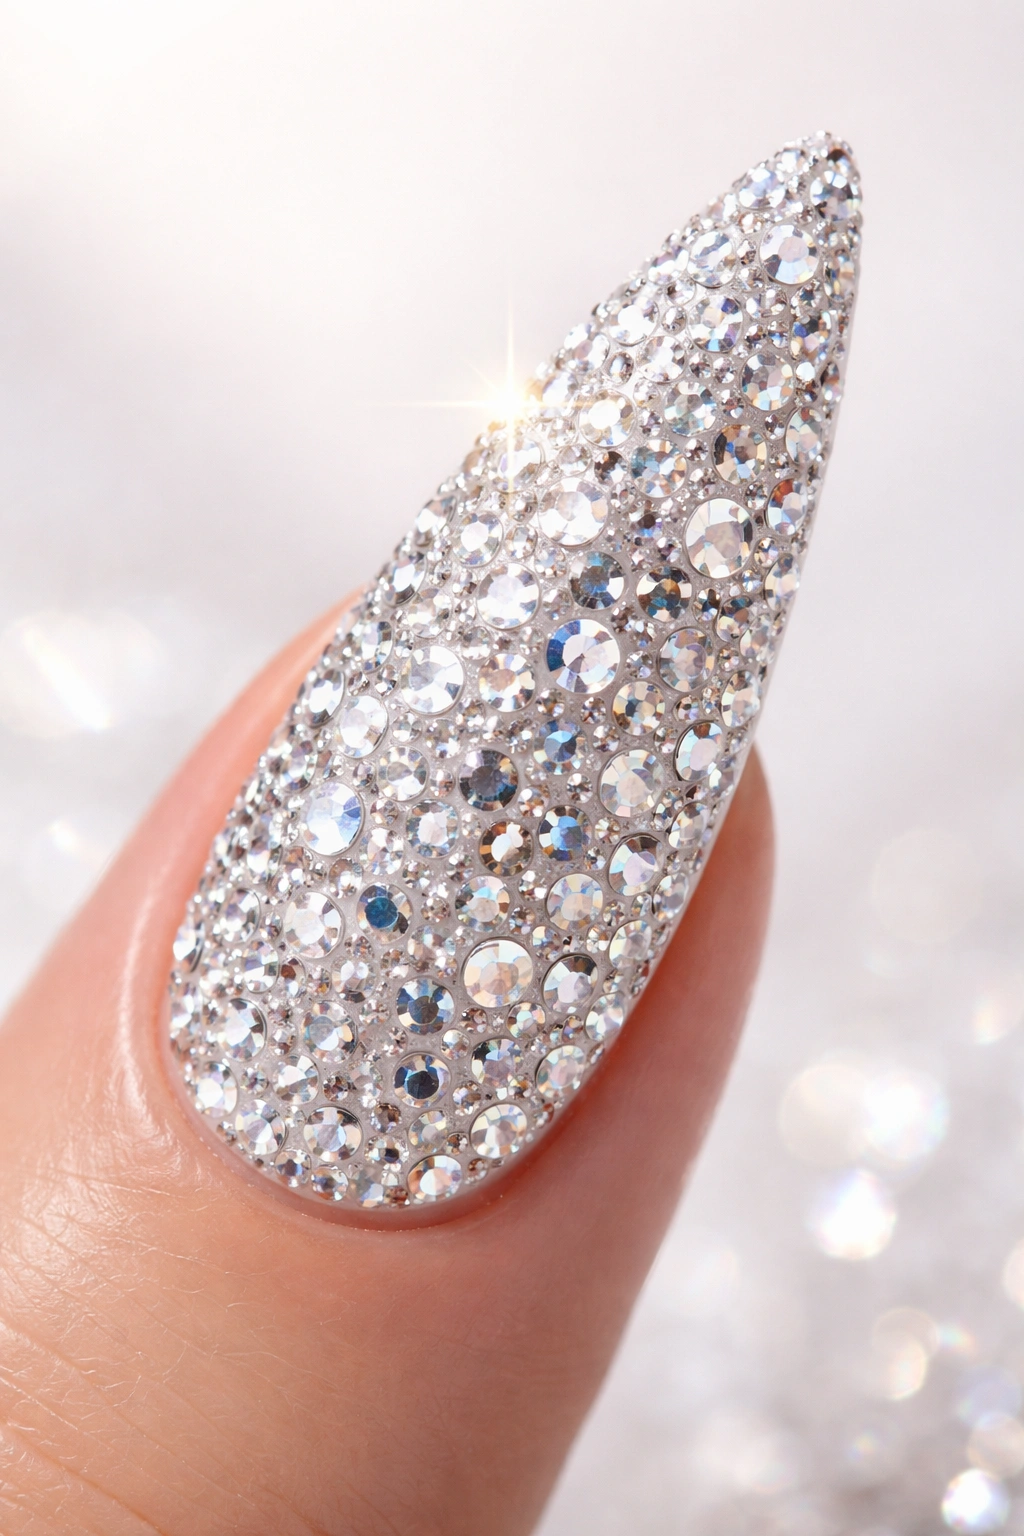
Some occasions call for maximum glam — a white base completely covered with rhinestones of varying sizes, creating a texture that catches light from every conceivable angle. This isn’t subtle. This is a statement that broadcasts confidence, glamour, and a willingness to sparkle unapologetically.
Achieving Full Coverage Without Gaps
The secret to making this look polished rather than chaotic is using a variety of rhinestone sizes in a somewhat planned distribution. Start with larger rhinestones as anchors and fill gaps with progressively smaller stones. This mimics how gemstone setting works in high-end jewelry.
- Apply a white gel base and cure
- Start with your largest rhinestones (6-8mm) and place them in a slightly offset pattern
- Cure or allow glue to set between stone placements to avoid accidentally moving previous stones
- Add medium-sized stones (3-4mm) to fill some gaps
- Use smaller stones (1-2mm) for final fills
- Each stone should be fully adhered with no visible adhesive showing
- A final glossy top coat seals and protects the entire design
Durability and Longevity
Fully covered rhinestone designs require more durable adhesive — consider using a specialized rhinestone gel rather than nail glue for better longevity. Expect these nails to last about 2 weeks before you start seeing any stone loosening, especially at the tip where nails experience the most pressure and stress.
Who Wears This Look
Brides, people heading to galas or red-carpet events, performers, and anyone who wants nails that are genuinely conversation-starters. This design isn’t for everyday, but it absolutely owns special occasions.
Worth knowing: Darker-colored rhinestones (smoke, black, or champagne) can create a more sophisticated look than clear stones on white, adding depth and preventing an overly “costume” appearance.
7. White French Ombre With Rhinestone Tips
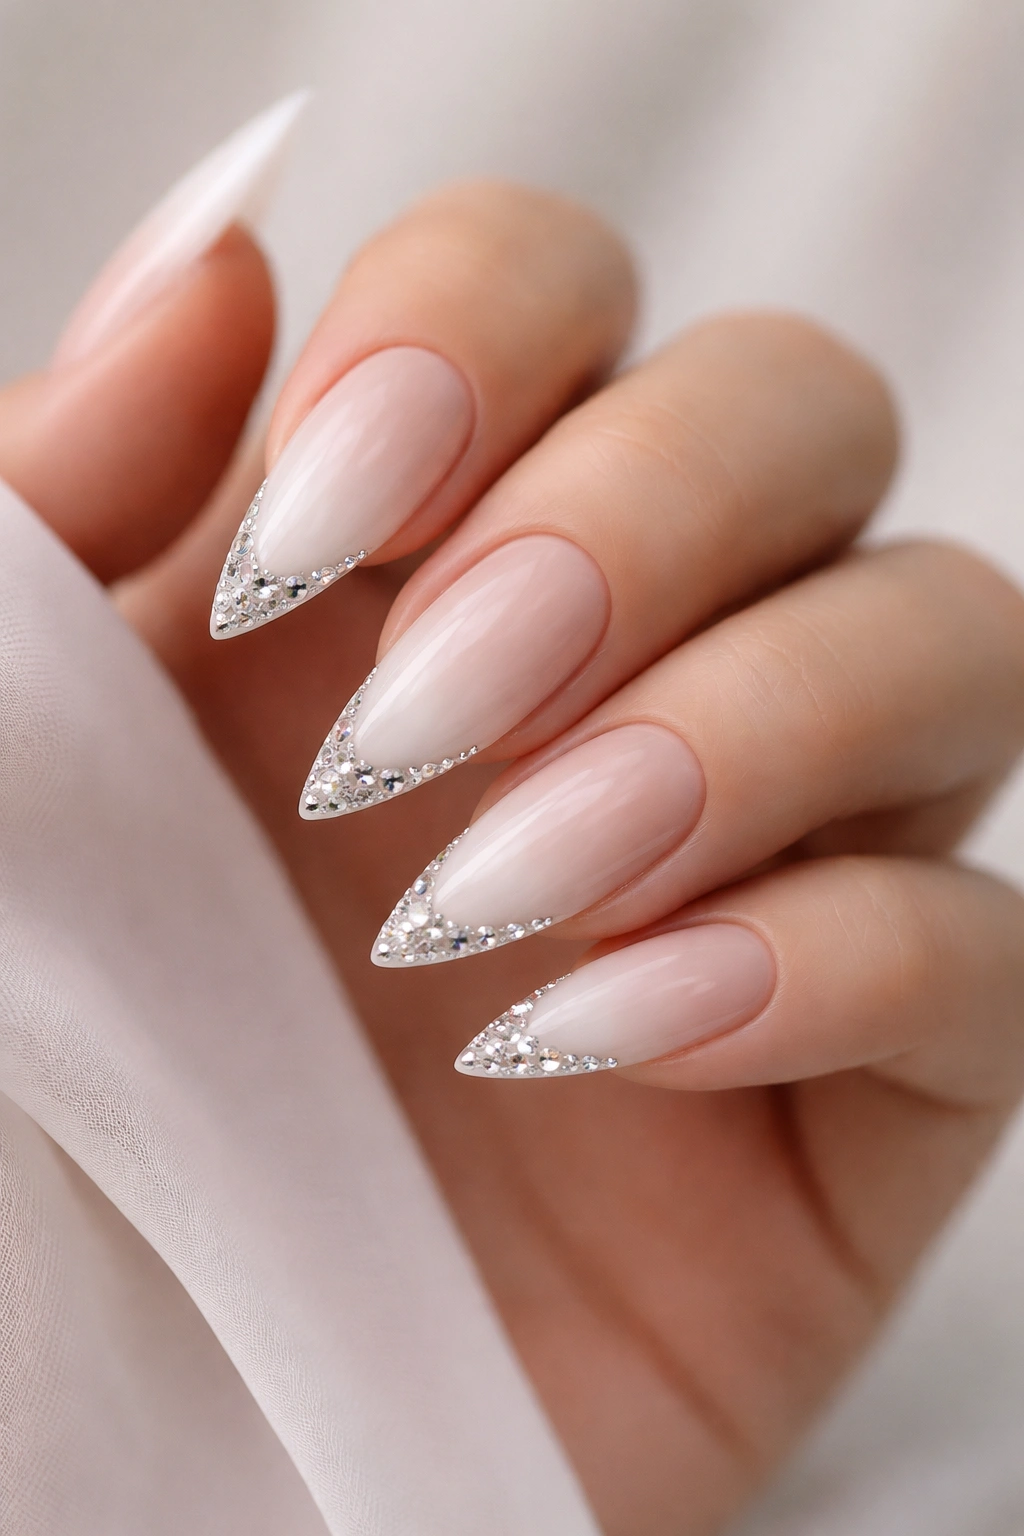
A modern take on the French manicure, this design features a white base that graduates to a clear or slightly tinted tip, mimicking a French ombre. The gradient itself is minimal, but the tip is capped with a line or arrangement of rhinestones that creates definition and luxury. It’s elegant, timeless, and surprisingly fresh.
The Modern French Evolution
Traditional French manicures can feel dated, but adding a gradient and rhinestones brings them firmly into contemporary territory. The gradient is subtle — you’re not going for a dramatic color shift, but rather a sophisticated softening of the line between white and clear. This creates the effect of naturally grown nails that happen to be professionally finished.
Rhinestone Tip Application
Rather than a full border, place larger rhinestones spaced slightly apart along the tip line — think five or six larger stones strategically spaced across the tip of each nail. This creates impact without overwhelming. Alternatively, use smaller stones in a full line for a more delicate approach.
- Apply white gel and cure
- Blend white into clear gel using the sponge-and-brush method to create gradient
- Cure the blended base
- Place rhinestones along the tip line with precision
- Seal with glossy top coat
Occasions and Styling
This design works beautifully for professionals, brides, and anyone who loves classic style with a modern twist. It’s sophisticated enough for formal events but can also work as an elevated everyday look depending on rhinestone size and spacing.
Pro tip: Slightly angling the rhinestones — so the top of each stone points slightly upward — creates the illusion of an even more lifted, elegant hand position.
8. Art Deco Geometric White With Rhinestone Accents
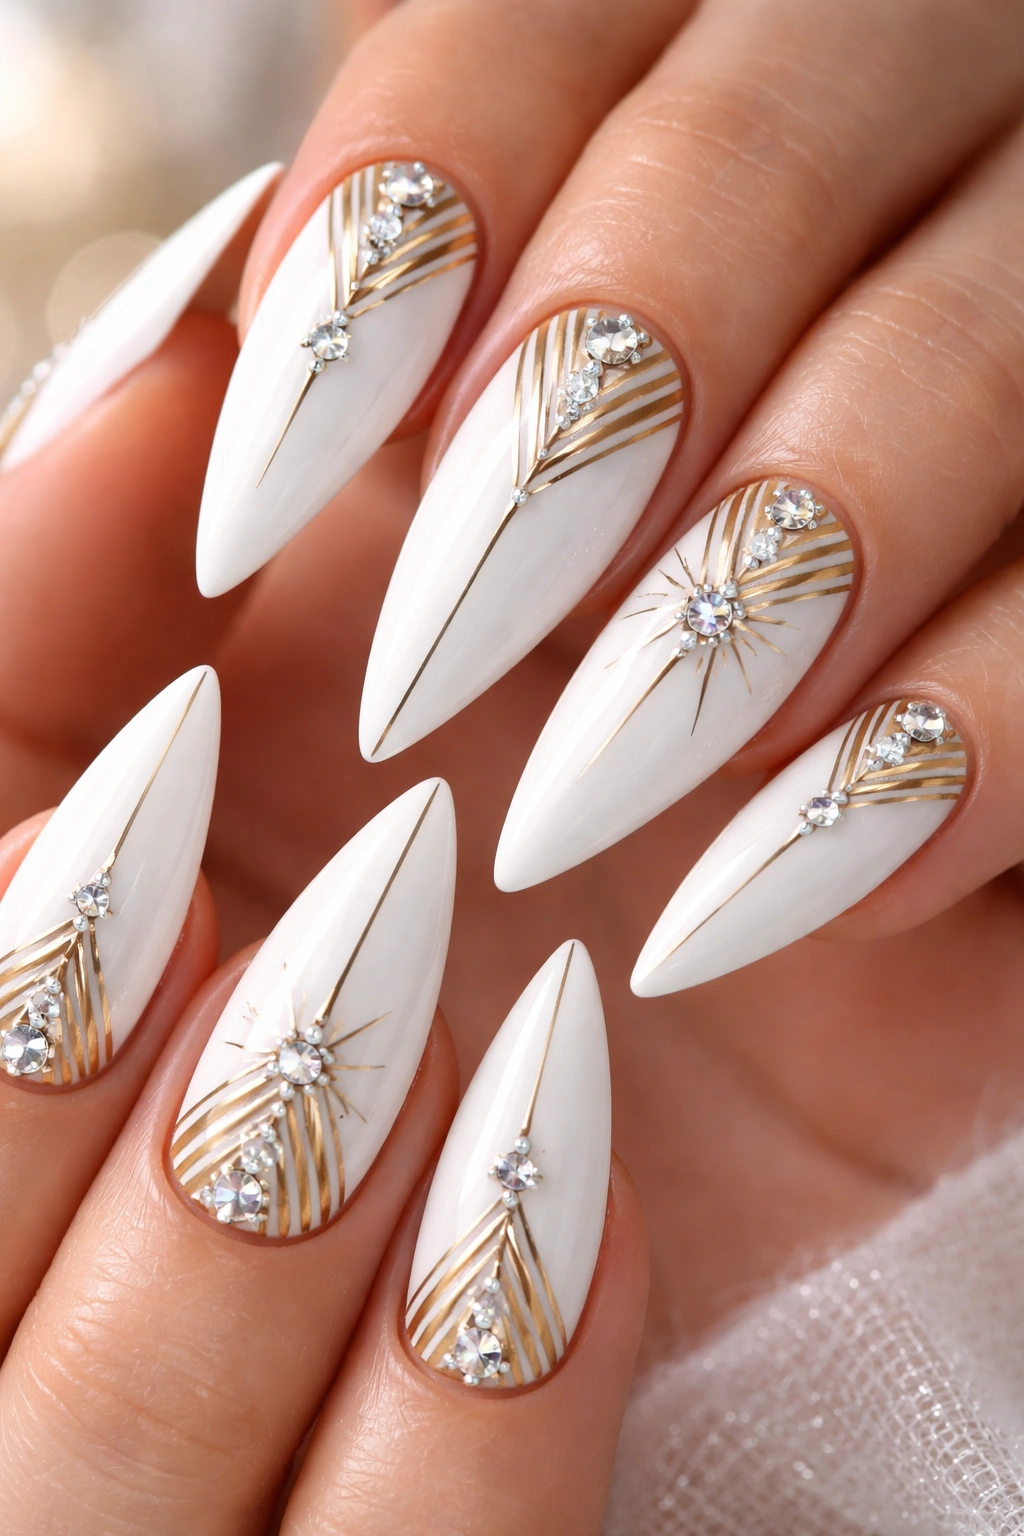
Art Deco design brings structure, symmetry, and bold geometry — perfect for people who love maximalist design that still feels controlled and intentional. Think chevrons, sunburst patterns, Greek key designs, or stepped triangular shapes, all rendered in gold or silver lines with rhinestones highlighting key points.
Designing With Geometric Precision
Thin gold foil or metallic gel polish creates the geometric shapes on a white base. The rhinestones act as accent points rather than primary decoration — they might sit at the apex of a chevron, at the center of a sunburst, or at regular intervals along a geometric pattern. The goal is clean lines and intentional placement.
Art Deco designs work beautifully when you use negative space effectively — not every inch of the nail is decorated, which actually makes the design feel more sophisticated and modern. The white base is as important visually as the gold and rhinestones.
Application and Precision
- Apply white gel base and cure
- Using a thin gel liner and steady hand (or nail stickers if precision is challenging), apply your geometric pattern
- Cure after each color layer
- Place rhinestones at predetermined points within your design
- Use smaller stones for this style — 2-3mm stones maintain the delicate, refined feel
- Seal with top coat
Design Longevity
Geometric patterns with rhinestone accents typically last 2–3 weeks with normal wear. The precision lines stay crisp longer than organic designs like marble, so this is a good choice if you like your designs looking freshly done for longer.
Insider note: Using matte white gel with shiny gold lines and sparkly rhinestones creates a texture play that elevates the design from pretty to genuinely luxe-looking.
9. Bridal White With Pearl and Rhinestone Mix
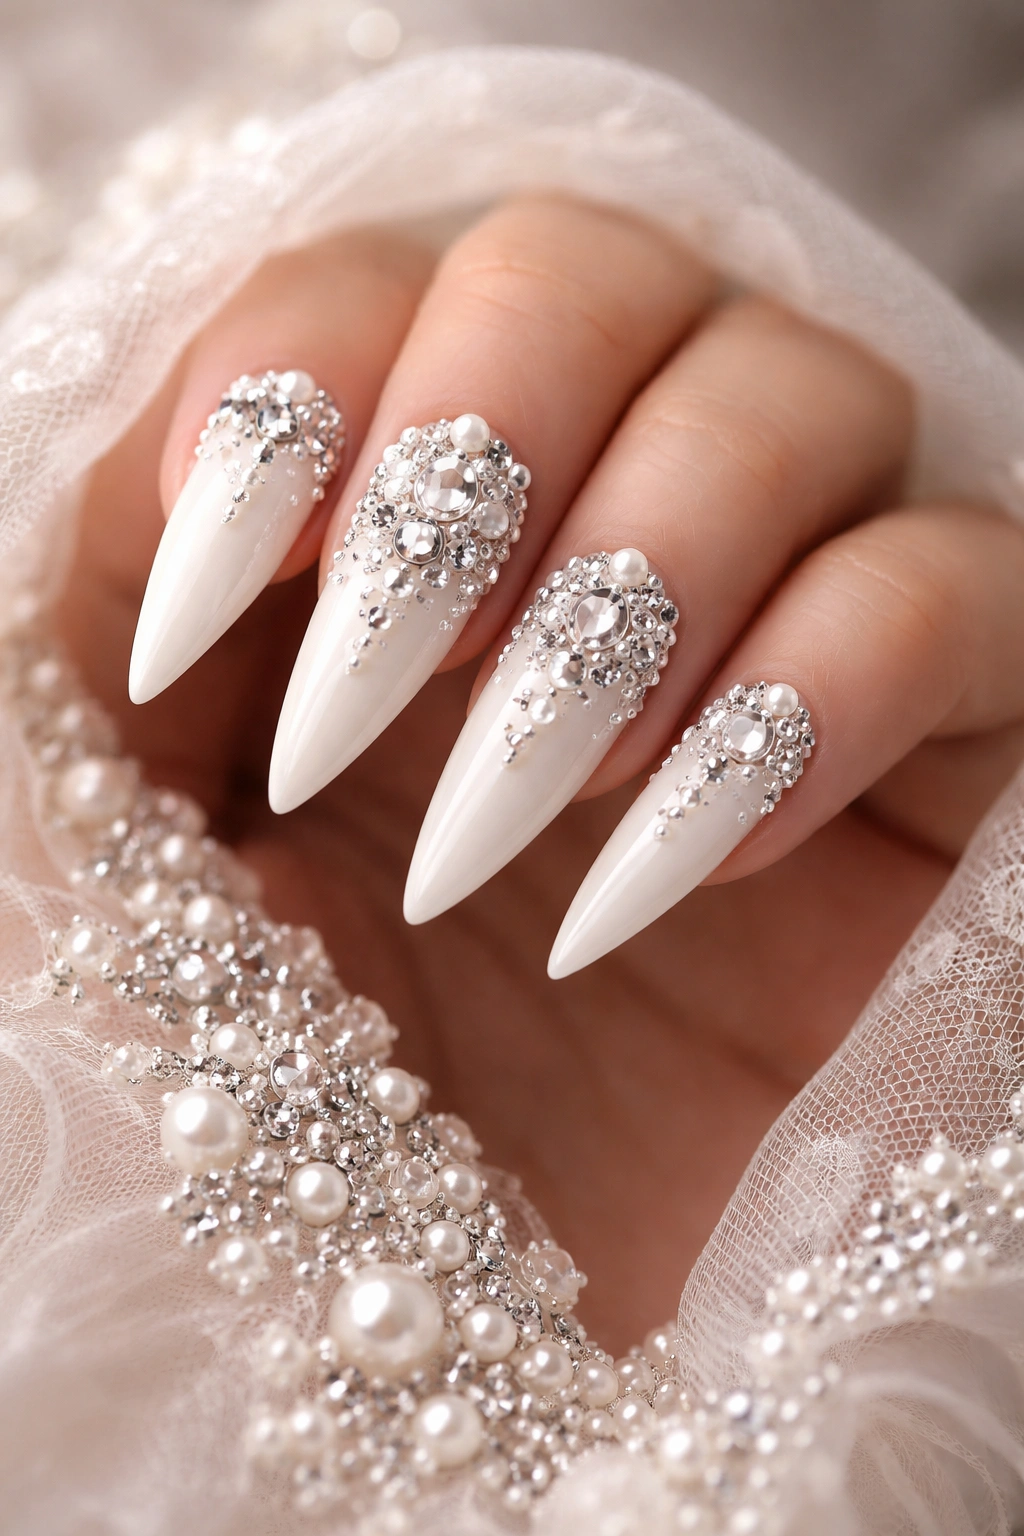
Some people prefer pearls to traditional rhinestones for a more organic, sophisticated sparkle. Combining both pearls and rhinestones on white creates depth and visual interest while feeling distinctly bridal, romantic, and elegant. The mixture of round pearls and faceted rhinestones creates two different types of light reflection and texture.
Choosing Pearls and Rhinestones
Pearls (whether real or faux nail-safe versions) come in white, cream, pink, and champagne. Mixed with clear or light-colored rhinestones, they create a sophisticated, layered sparkle. Pearls read as classic and romantic, while rhinestones provide modern sparkle — together they’re a perfect balance.
Application Strategy
You can create various looks with pearls and rhinestones:
- A scattered pattern mixing the two randomly across the nail
- Stripes or lines of alternating pearls and rhinestones
- Pearls at the base with rhinestones toward the tip
- A full coverage approach where pearls and rhinestones are interspersed
Each approach requires the same basic application: white gel base, cured, then precise placement of both pearls and rhinestones using nail-safe adhesive, sealed with top coat.
Durability and Care
Pearls and rhinestones use different adhesion methods sometimes, so test your adhesive on a practice nail first. Pearl-specific nail adhesive exists and often works better than general rhinestone glue. Expect this design to last 2–3 weeks with careful handling. Pearls are generally less durable than rhinestones if they experience direct pressure, so avoid putting pressure on the nail tips.
Pro tip: This design is particularly stunning in evening and wedding photography — pearls and rhinestones photograph beautifully under flash and mixed lighting.
10. White Matte With 3D Rhinestone Clusters
Contrast is key in this design — a matte (non-glossy) white base serves as a subtle backdrop for raised, 3D clusters of rhinestones that create actual dimensional texture. Rather than flat rhinestones lying flush against the nail, these clusters build upward, creating nails that catch light and demand tactile interaction.
Creating 3D Impact
The 3D effect comes from stacking rhinestones, using thick gel adhesive to create height, or using special 3D nail art elements like resin flowers with rhinestones embedded in them. Alternatively, you can use nail art gels designed to build dimension — they’re thicker than regular adhesives and allow you to create raised, textured surfaces.
Placement Ideas
- Small clusters at each corner of the nail for a balanced, understated approach
- One large cluster at the tip as a focal point
- A vertical line of small clusters from cuticle to tip
- Scattered clusters creating a naturally organic distribution
The matte white base is crucial here — glossy surfaces would reflect light and compete visually with the rhinestone clusters. Matte creates a quiet backdrop that lets the sparkly, shiny clusters be the undeniable star.
Application for Dimension
- Apply white gel and cure, then apply a matte top coat instead of glossy
- Using thick 3D gel or special nail adhesive, build small mounds on predetermined spots
- Place rhinestones into these mounds while they’re still slightly tacky
- Allow to set fully (longer than regular rhinestone application)
- Apply a glossy top coat only to the rhinestone clusters, leaving the white base matte — this creates beautiful contrast
Real-World Durability
3D designs require slightly more careful handling because protruding elements can catch on fabric, hair, or bag zippers. Expect about 10–14 days before you notice any loosening, though with extremely careful handling, some people keep these designs intact for 2–3 weeks. The raised nature makes them more vulnerable than flat designs, so this is worth considering before committing.
Worth knowing: This design looks absolutely stunning in person but is less photogenic than flat designs — the camera struggles to capture the actual dimension your eyes see in real life.
Final Thoughts
White stiletto nails with rhinestones offer something for every personality, occasion, and comfort level. Whether you prefer minimalist elegance or full-coverage glamour, subtle sophistication or obvious sparkle, this combination delivers. The beauty of white as your base is its versatility — it anchors all of these designs, prevents them from feeling costume-like, and allows the rhinestones to be the stars without the design feeling overwhelming.
The key to a stunning result is precision in placement, quality adhesive products, and nails that are properly prepped and sealed. Invest in high-quality rhinestones if you want them to maintain their sparkle and durability throughout the weeks you’ll wear them. Don’t skimp on the gel base or top coat — these are what transform a cute design into one that lasts and stays gorgeous.
Beyond the aesthetics, consider your lifestyle when choosing your design. If you’re constantly typing, gardening, or working with your hands, minimize rhinestone clusters and choose full-coverage adhesive for maximum durability. If you’re wearing these for a specific event and won’t have them long-term, go wild with the most elaborate design that speaks to you. This combination of nails works best when it feels authentically you rather than like something you think you’re supposed to wear.
