

When it comes to making a bold statement with your nails, black stilettos are the ultimate power move. There’s something undeniably striking about the combination of a sleek black shade with that iconic pointed silhouette—it’s sophisticated, edgy, and works for literally any occasion, from a Monday morning in the office to a Friday night out. The beauty of black stiletto nails on medium-length nail beds is that you get the elegant drama without the extreme vulnerability that comes with extra-long stilettos. Medium stilettos hit the sweet spot where they’re still dramatic and flattering to your hands, but practical enough for everyday wear if you’re careful.
Black is the ultimate chameleon of nail colors. It looks stunning whether you’re going minimalist and clean, or you’re layering it with textures like matte finishes, glitter, chrome, or intricate nail art. Medium stiletto nails give you the perfect canvas to play with different finishes, designs, and complementary elements without sacrificing functionality. You can type, scroll, and live your life without constantly worrying that your nails are going to snap off.
The 20 designs ahead showcase the incredible range of possibilities when you commit to black stilettos on medium nails. Whether you’re into pure, unapologetic gloss or you prefer matte elegance with artistic touches, you’ll find inspiration here. Let’s explore these stunning nail designs that prove black stilettos are truly timeless.
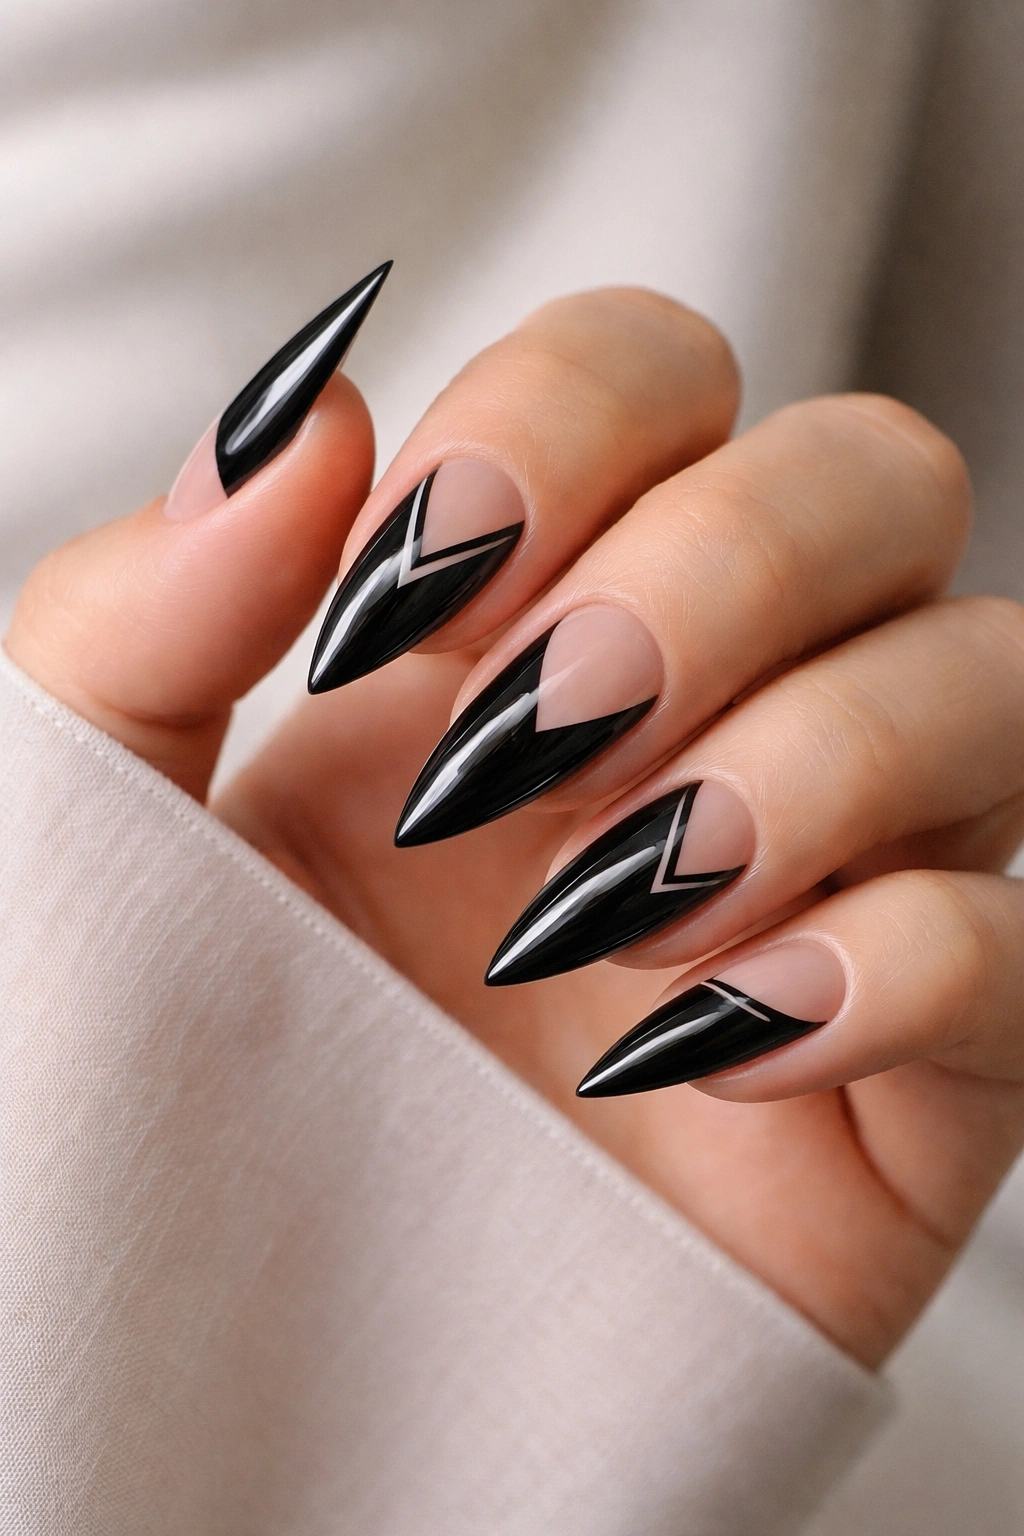
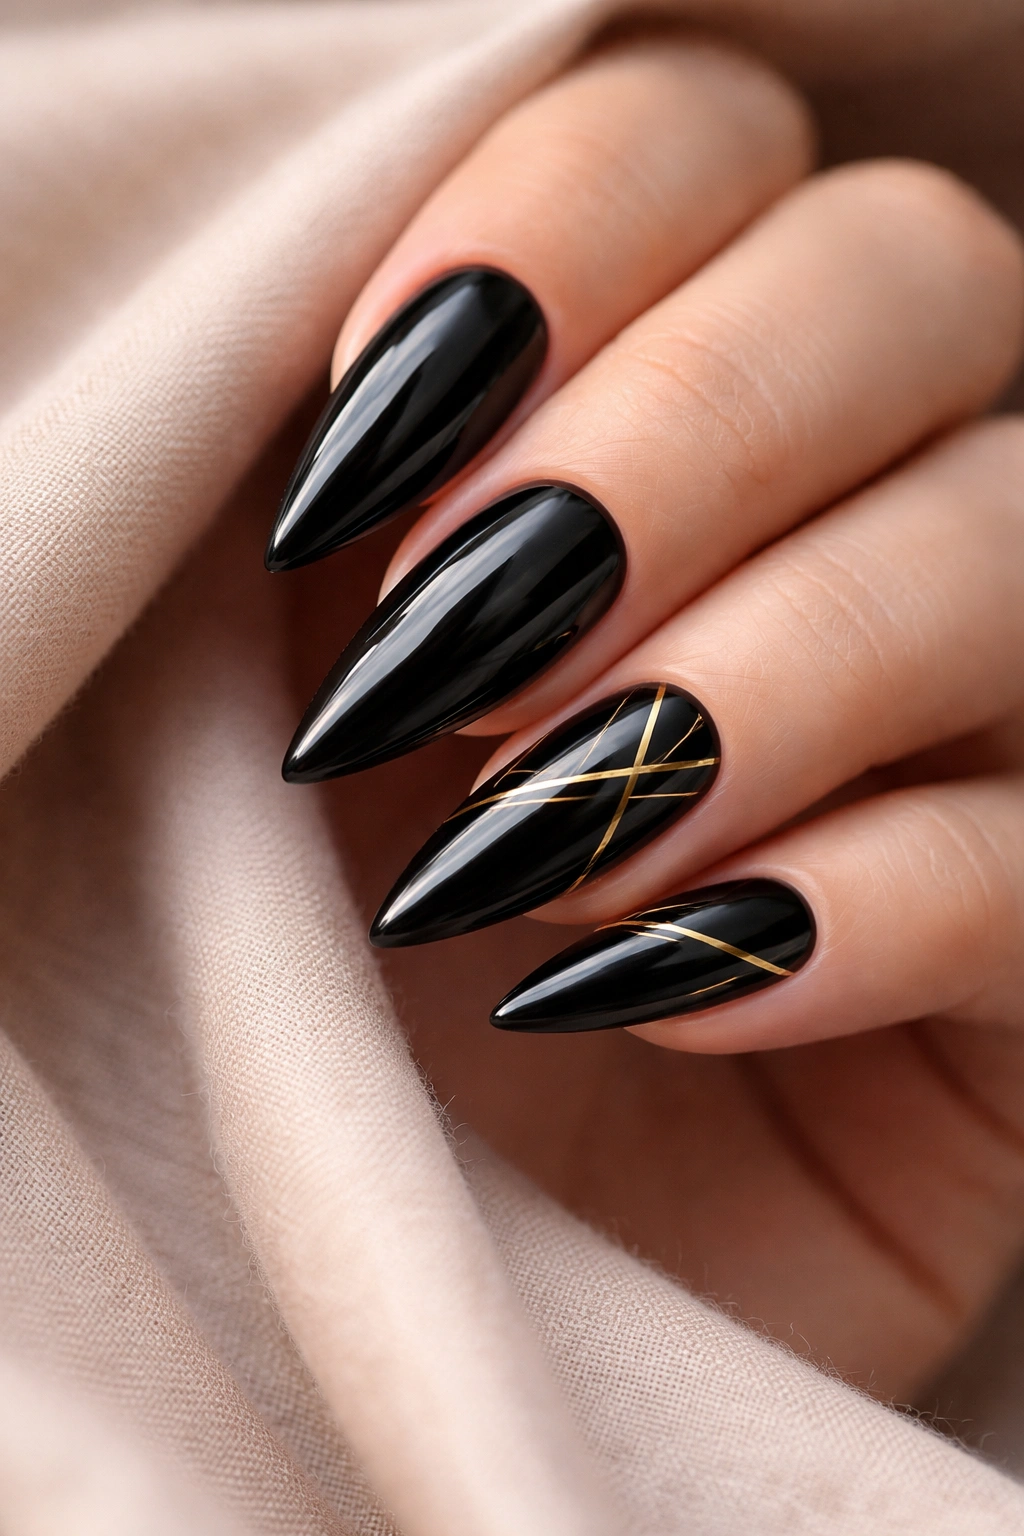
1. Glossy Jet Black with Gold Geometric Accents
Pure, liquid-like shine combined with strategic gold geometric shapes—this design is all about controlled luxury. The base is a high-shine, deep jet black that catches the light beautifully, while thin gold lines create triangles, stripes, or angular shapes on one or two accent nails. The contrast between the cool black and warm gold creates an incredibly sophisticated visual impact. This design works because the geometric elements are minimal enough to maintain elegance but bold enough to prevent the look from feeling boring or one-note.
Why This Design Stands Out
The pairing of gold with jet black reads expensive and intentional. Geometric shapes on a pointed nail elongate the visual line of your finger, making the stiletto shape feel even more dramatic and purposeful. This is the kind of design that looks equally at home at a cocktail party or a professional networking event.
Perfect Occasions
- Corporate environments and business meetings
- Evening events and date nights
- Photo shoots where you need sophisticated, camera-ready nails
- Any situation where you want understated glamour
Pro tip: Use thin striping tape to create perfectly straight geometric lines, then seal everything with a glossy topcoat for that liquid-looking finish.
2. Matte Black with Holographic Sparkle Gradient
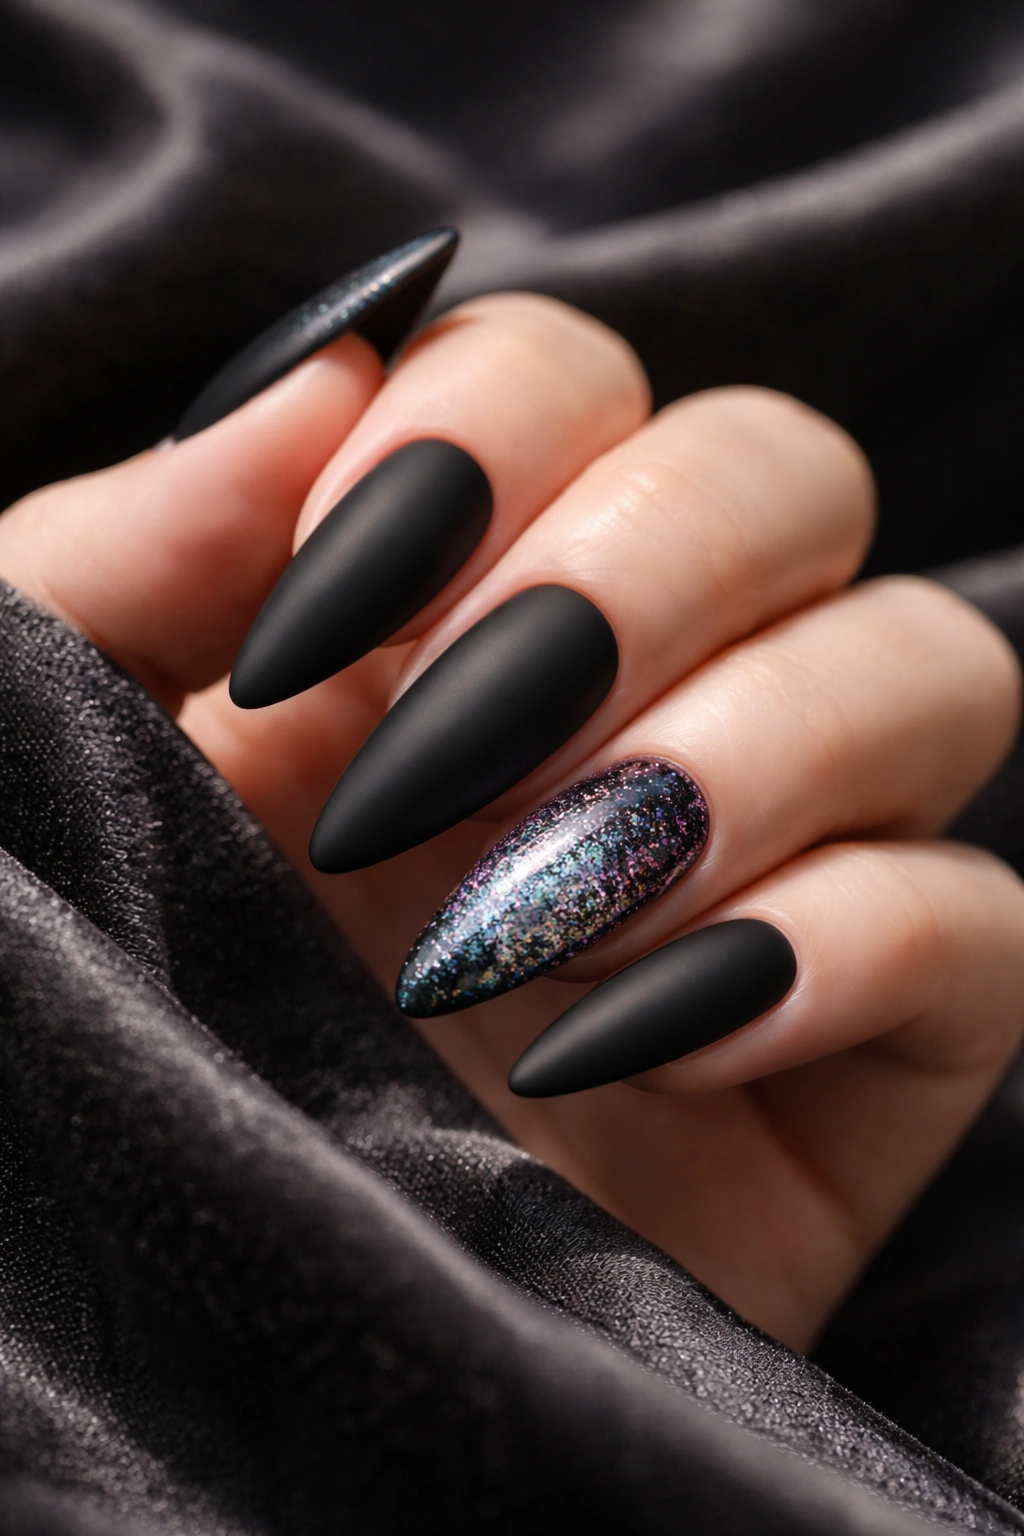
This design plays with unexpected texture contrast—a velvety matte black that transitions into holographic sparkle along the tips or one accent nail. The holographic element creates an almost oil-slick effect with rainbow refractions that catch light from every angle. The matte base grounds the design, while the sparkle keeps it modern and playful. It’s technically complex but visually stunning, giving you that high-fashion editorial nail moment.
What Makes It Different
Matte black feels sophisticated and almost mysterious on its own, but when you layer a holographic gradient into it, the design suddenly feels contemporary and unexpected. This combination appeals to people who want black nails but don’t want them to feel overdone or classic—they want edge with a modern twist.
Essential Details
- Matte black should be absolutely smooth and even—no streaks
- The holographic element works best concentrated on tips for a gradient effect
- Use a topcoat designed for matte finishes to preserve the velvety texture on the black portions
- The sparkle-to-matte ratio should be approximately 30% sparkle, 70% matte for balance
Worth knowing: Holographic finishes show up best in natural sunlight and under UV light; they may look more subtle in indoor lighting.
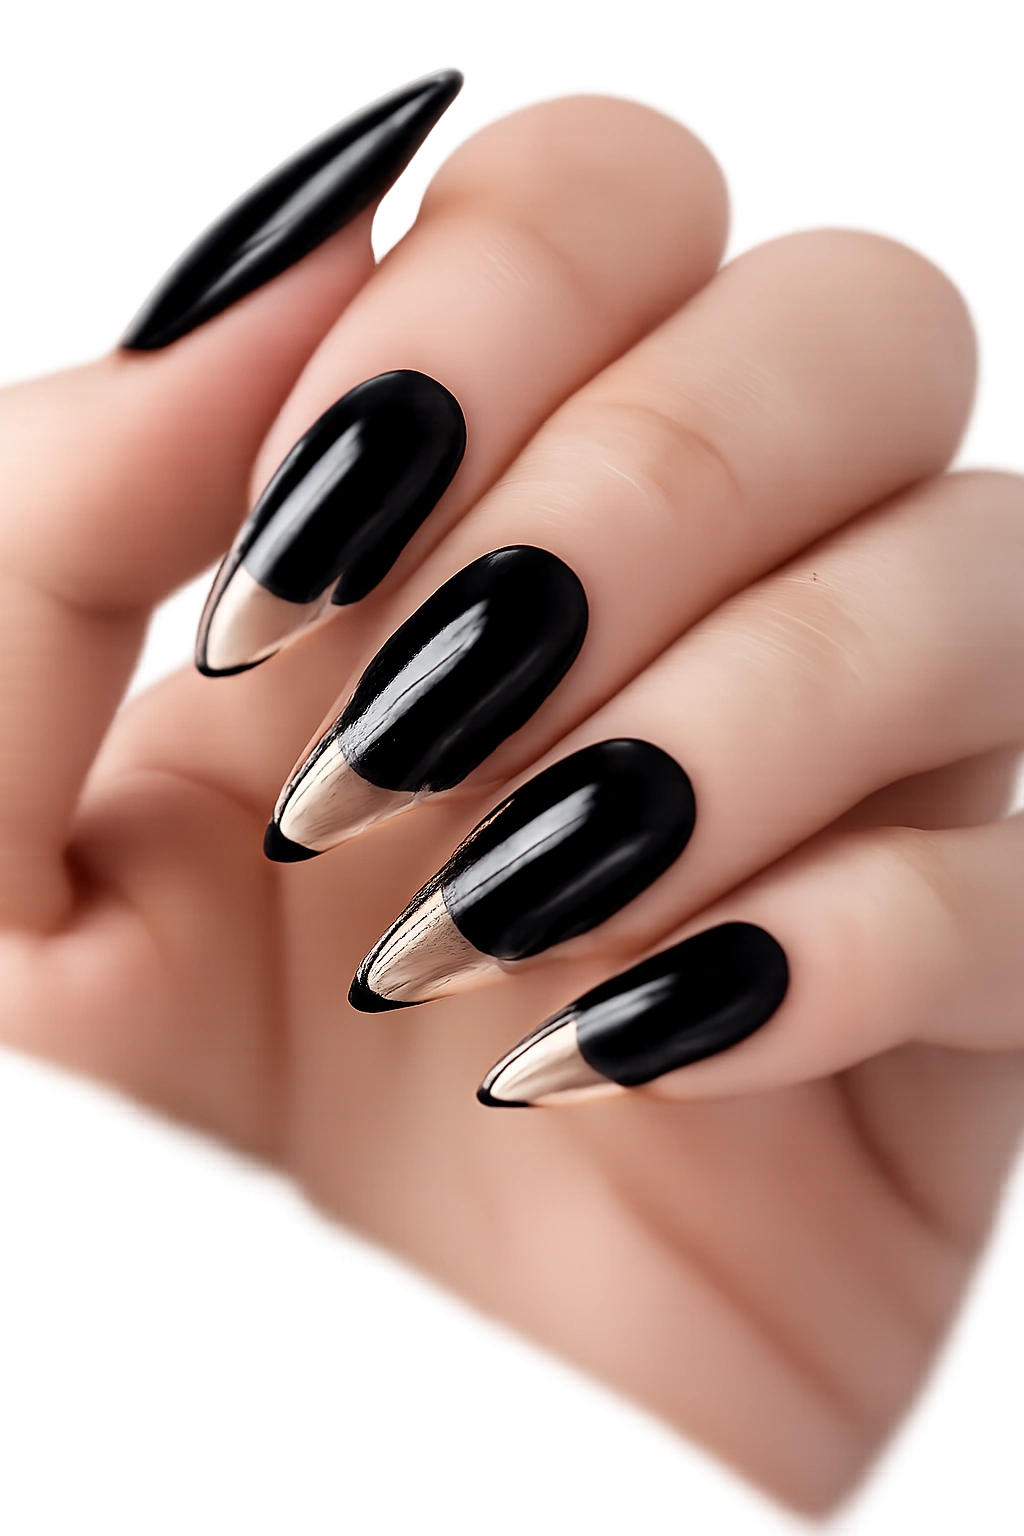
3. Classic Black Stilettos with Nude Ombre Fade
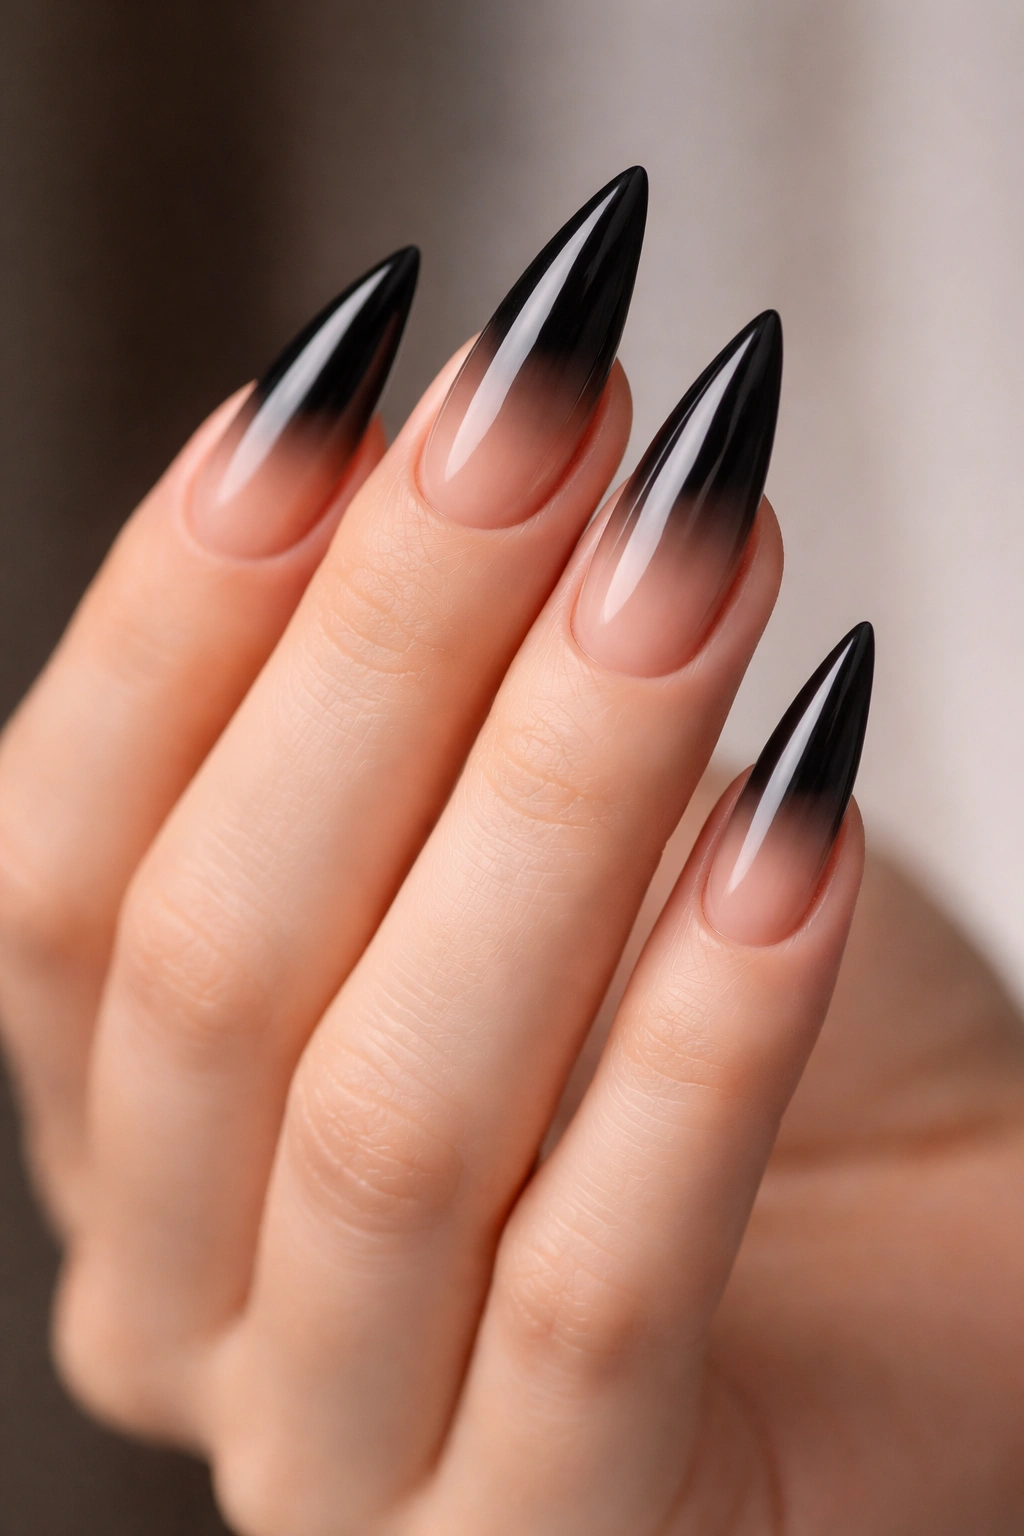
Here’s a design that softens the edginess of pure black while maintaining elegant drama. The stiletto nails start as rich black at the base and fade gradually into a nude, skin-tone color toward the tips. This ombre effect creates an elongating visual line that makes your fingers appear longer and more refined. It’s the perfect bridge between dramatic and wearable—you get the sophistication of black nails with a touch of nude that’s universally flattering.
Why This Works for Medium Nails
The ombre gradient actually enhances the length of medium stilettos by creating a visual extension. Your eye follows the gradual color transition from base to tip, making the nail appear longer than it actually is. The nude fade also creates a lighter finish that prevents the design from feeling too heavy or formal.
How to Achieve It
- Start with a solid black base color
- Use a makeup sponge to dab nude polish progressively from the middle toward the tips
- Create thin layers with each application to avoid harsh lines
- Blend with a fine brush if needed
- Seal with a glossy topcoat
Design tip: The slower you blend the gradient, the more sophisticated it looks. Rushed ombres look sloppy—patience is everything.
4. Black Stilettos with Minimalist White Line Art
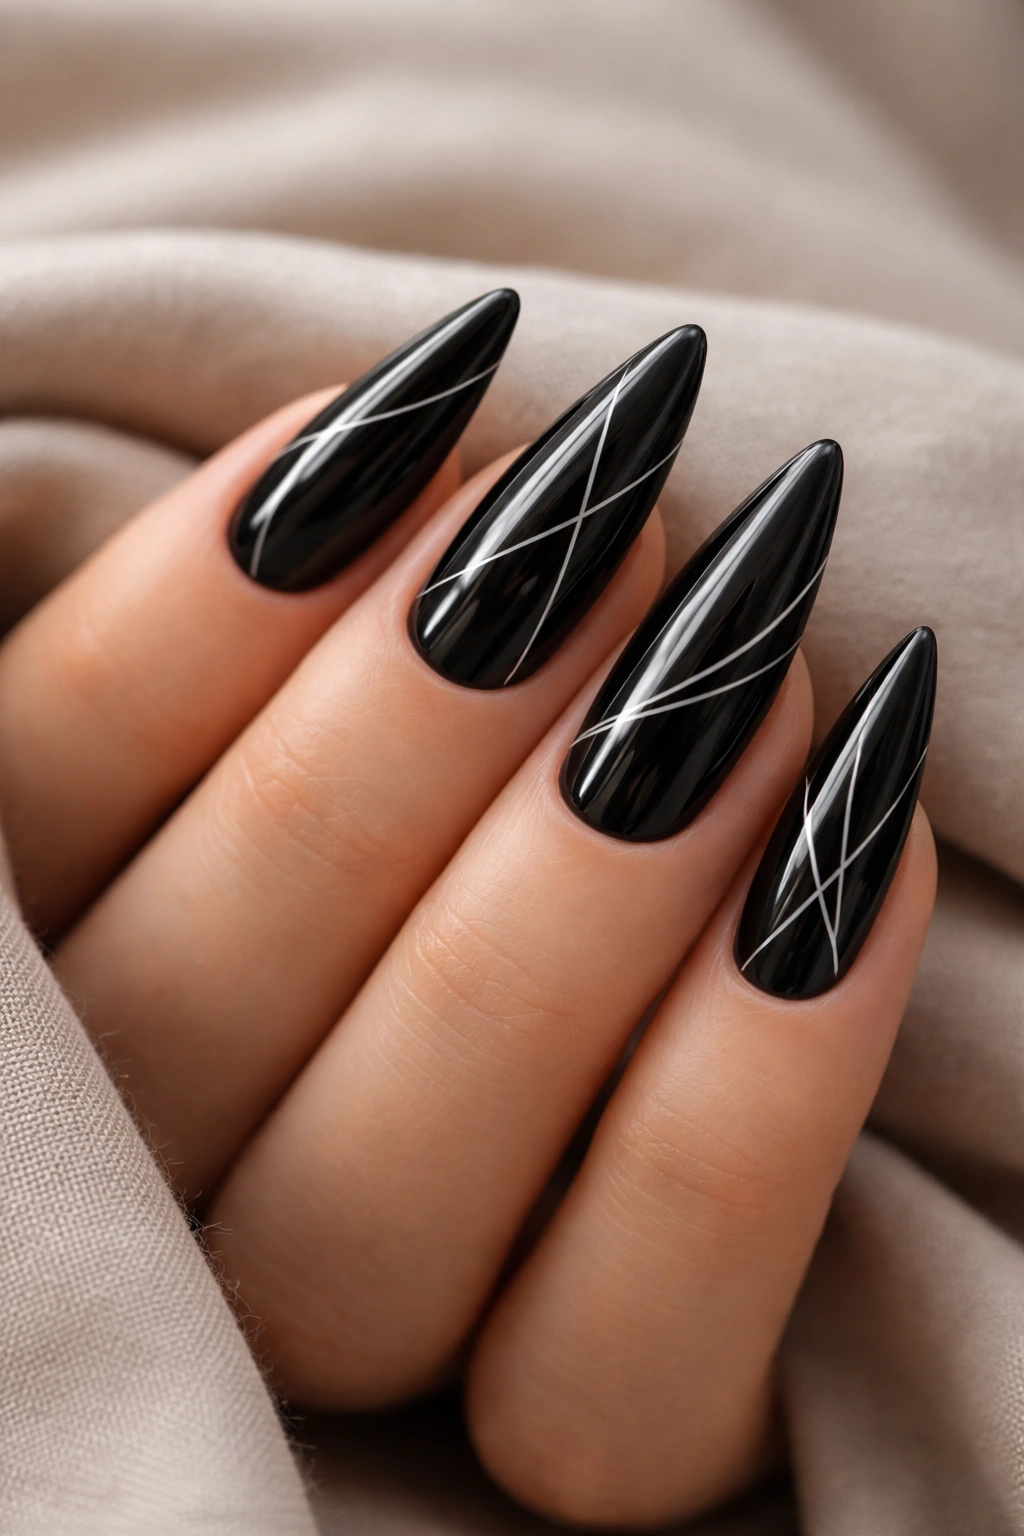
Elegant, artistic, and subtly complex—this design features ultra-thin white lines creating simple line-art designs on a glossy black base. Thin white lines might depict abstract faces, geometric shapes, or flowing curves. The key is restraint; you’re using white as an accent line tool, not filling in large areas. This design appeals to people who appreciate nail art but want something more refined than colorful, detailed designs.
What Makes It Special
White on black creates maximum contrast, so even thin lines pop visually. The minimalist line-art approach feels contemporary and gallery-worthy—like wearable nail art. This design requires a very steady hand or a professional artist, but the payoff in sophistication is absolute.
Design Ideas to Try
- Single continuous line forming a geometric shape
- Abstract facial profile
- Simple botanical line (leaf, branch, flower stem)
- Constellation or dot-connection pattern
- Architectural or angular line composition
Pro tip: Use a white gel pen or an ultra-fine striping brush. Regular polish tends to blob on the edges, but gel and specialized brushes give you actual control.
5. Matte Black with Diamond-Pattern Studs
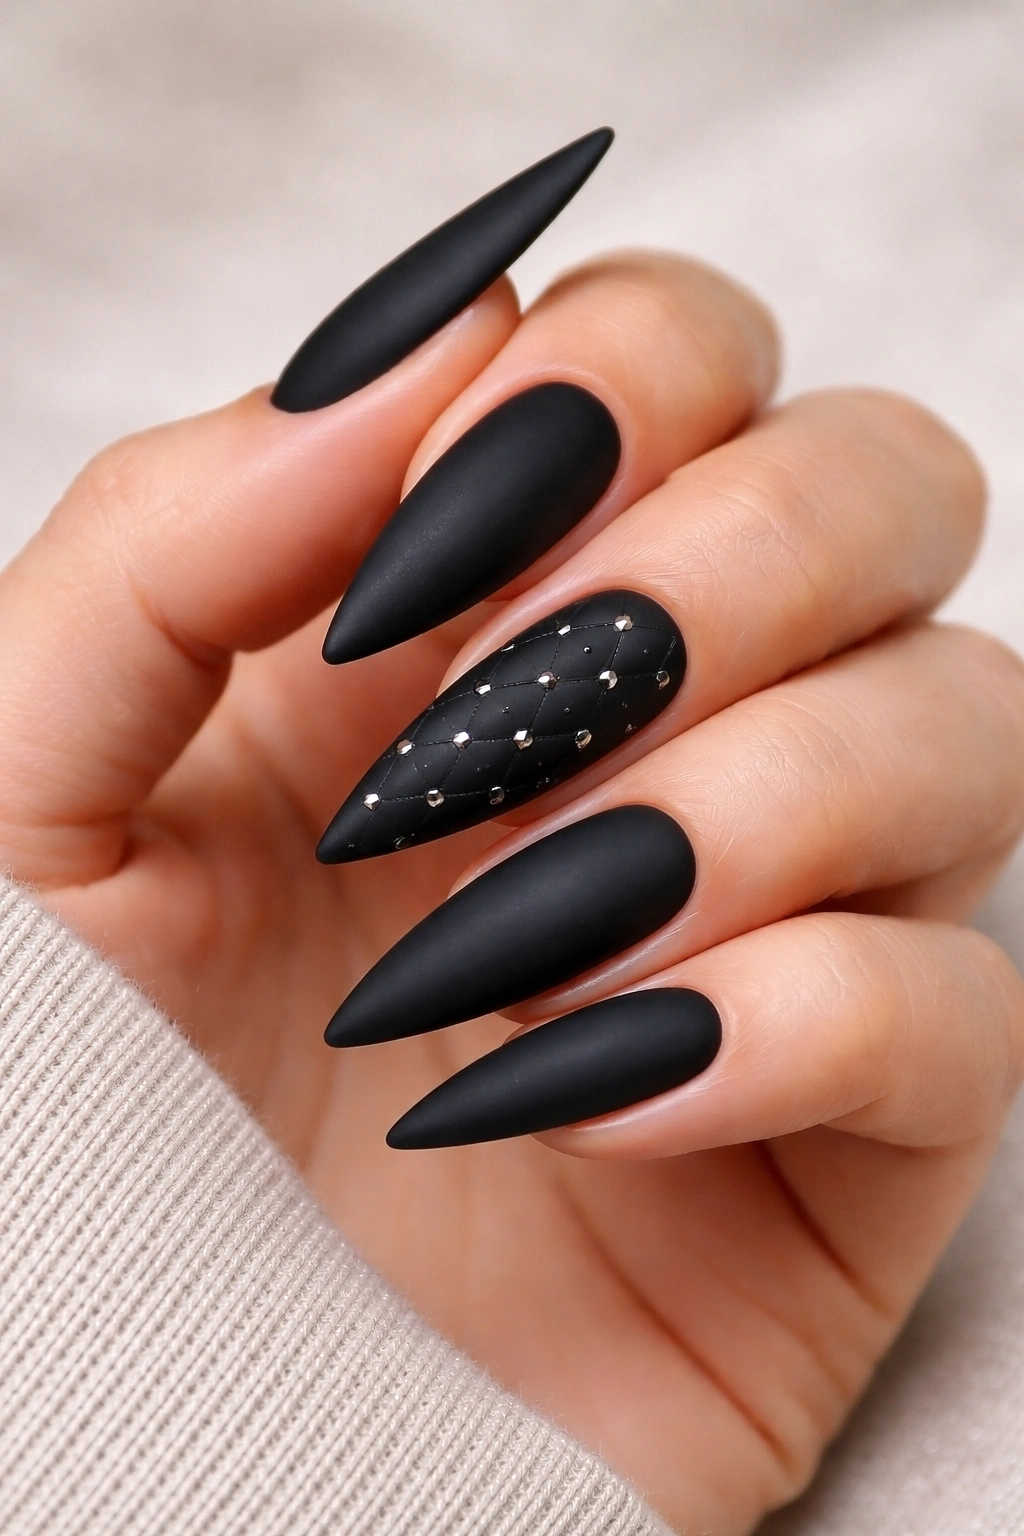
Combine matte black polish with small metallic studs arranged in a subtle diamond pattern across one or two nails for a texture-rich design that feels high-fashion. The matte finish keeps the look refined and not too flashy, while the studs add just enough tactile interest and sparkle to catch attention. Medium stilettos are the perfect length for this design—the studs feel balanced and purposeful rather than overwhelming.
Why Studs Elevate the Design
Studs create a 3D element that glossy polish alone can’t achieve. They catch light differently at different angles, giving the design movement and dimension. The diamond arrangement is geometric and intentional, preventing the studs from feeling random or juvenile.
Application Tips
- Apply studs to completely dry, matte polish
- Use a stud pusher tool or the back of a dotting tool to position each stud precisely
- Press firmly to ensure adhesion
- Seal with a clear topcoat to lock everything in place
- Avoid excessive water contact for 24 hours after application
What to know: Not all manicure services offer stud application, so you may need a nail artist who specializes in embellishments. DIY is possible but requires patience.
6. Glossy Black with Pearl Accent Nails
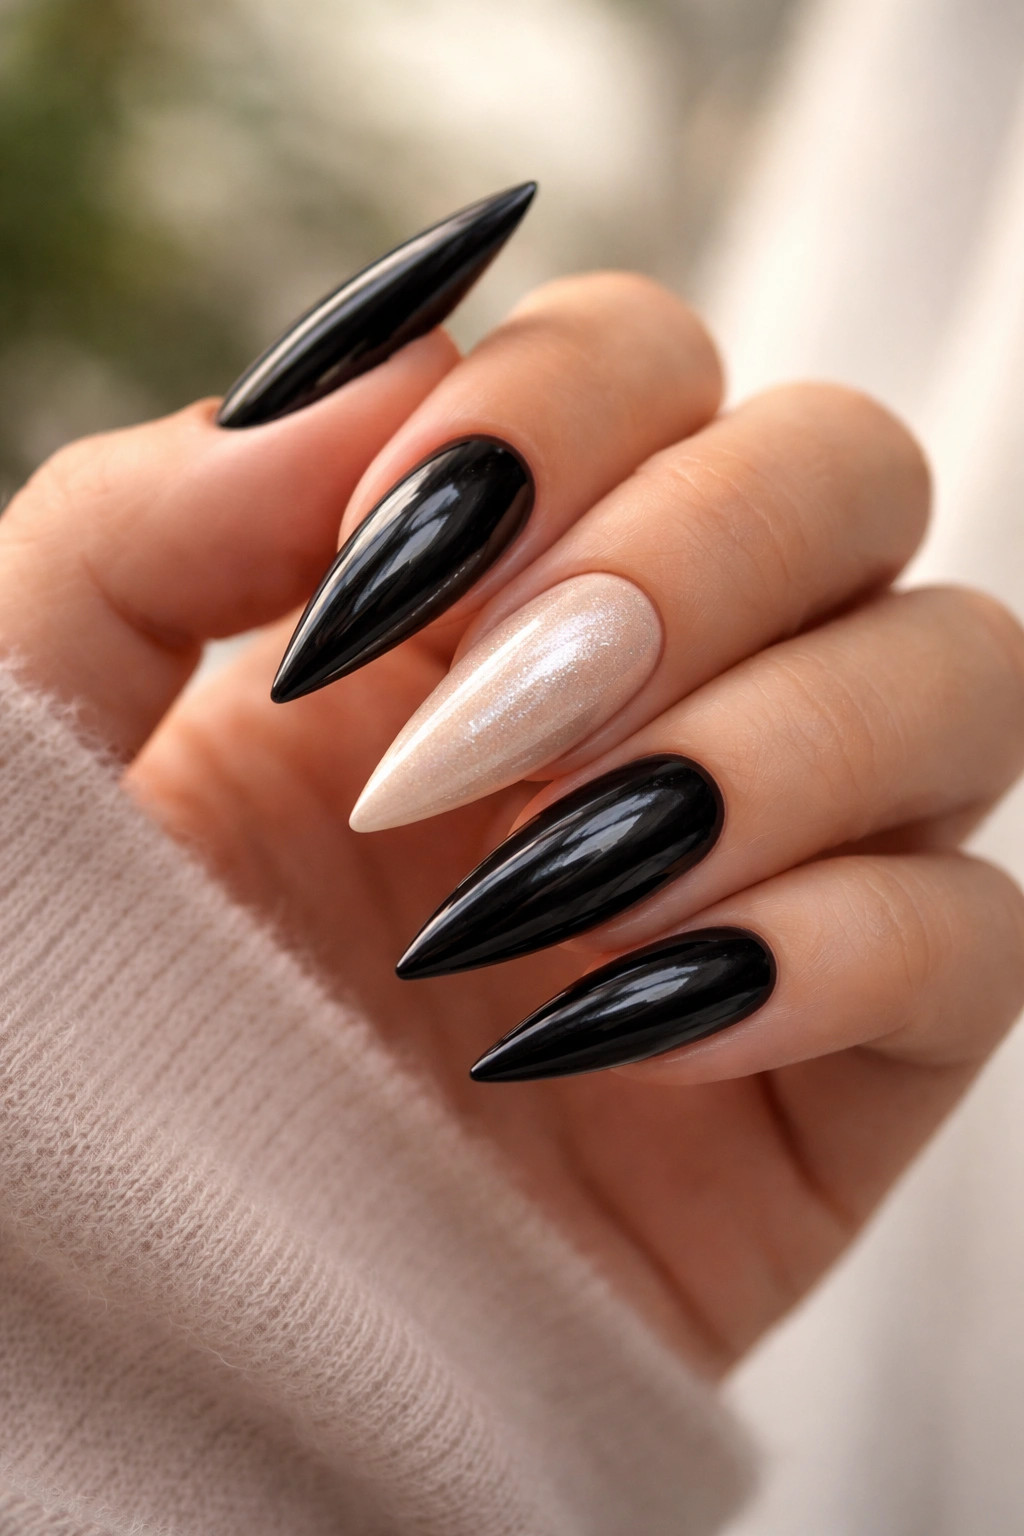
Take the simplicity of jet black stilettos and add just enough femininity with pearl-finish accent nails. Two nails (typically ring finger and pinky) become lustrous pearl or champagne color, creating a soft contrast against the black. This design is sophisticated, not fussy—it feels luxurious without trying too hard. The pearl brings warmth to black’s coolness, creating a balanced, harmonious palette.
Why Pearl Works as a Complement
Pearl has an inherent luminosity and subtle shimmer that reads as expensive and refined. Against black, pearl nails become a focal point without clashing. The color combination feels cohesive and intentional rather than random. Medium stilettos showcase both colors beautifully—neither overwhelms the other.
Perfect for These Settings
- Weddings (as a guest with elegant, not-too-dramatic nails)
- Professional environments with creative fields
- Formal dinners and upscale events
- Any occasion where you want polish without making nails the statement piece
Expert touch: Make sure your pearl polish is genuinely pearlescent, not just shimmery. Real pearl finish has a soft iridescence; cheap shimmer looks thin and less impressive.
7. Black Stilettos with Chrome Gold Tips
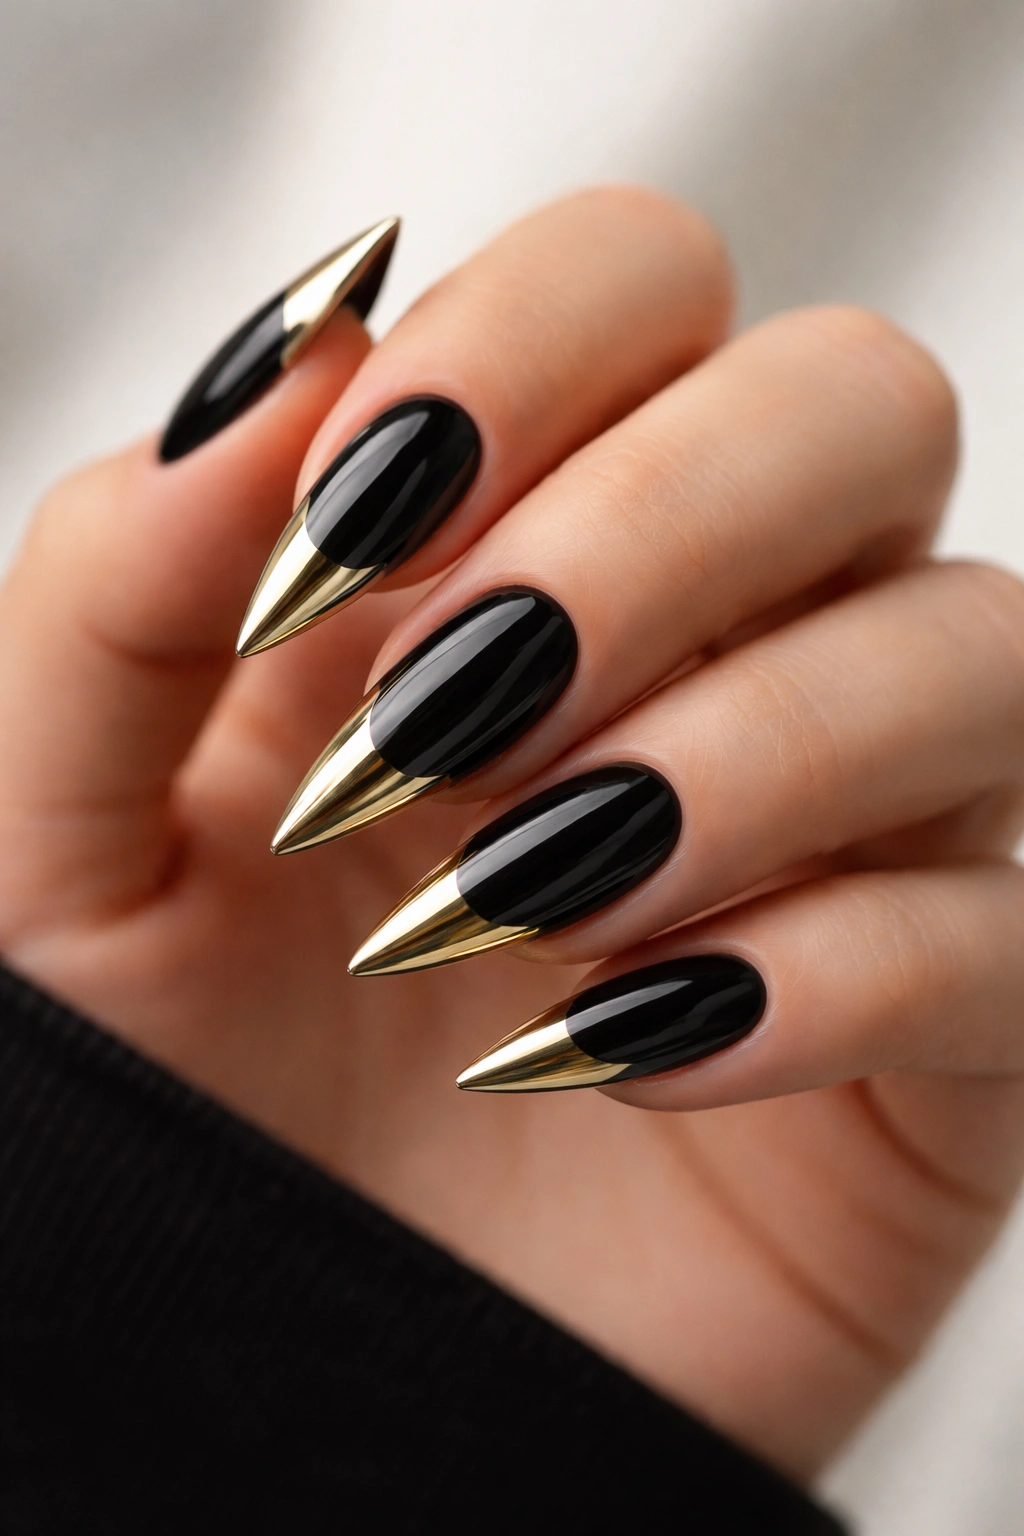
Bring dramatic shine to your stiletto nails with mirror-like chrome or liquid metal effects concentrated on the tips. The base remains jet black, but the upper portion of each nail features a reflective, mirror-finish gold or silver chrome. This is a bold design that absolutely catches light and gets compliments. Chrome finishes are trendy but they work specifically well on stilettos because the pointed tip naturally draws the eye to where the chrome is most concentrated.
What Makes Chrome Special
Chrome polish creates an almost holographic, mirror-like finish that’s visually striking in person. Unlike matte or satin finishes, chrome seems to shift and reflect depending on the angle and lighting. On medium stilettos, the chrome effect is concentrated in an area that’s visible when you’re typing or gesturing, making it catch attention throughout the day.
How to Apply Chrome
- Start with a smooth, even black base
- Apply a chrome polish or special chrome powder with a special applicator brush or sponge
- Chrome applications require precision—invest in professional application if you’re unsure
- Seal with a topcoat designed for chrome (not all topcoats work equally well)
- Expect a learning curve if attempting DIY
Real talk: Chrome finishes require maintenance. They can get dull or patchy after a few days, so professional application or careful upkeep matters.
8. Matte Black with Velvet Texture Finish
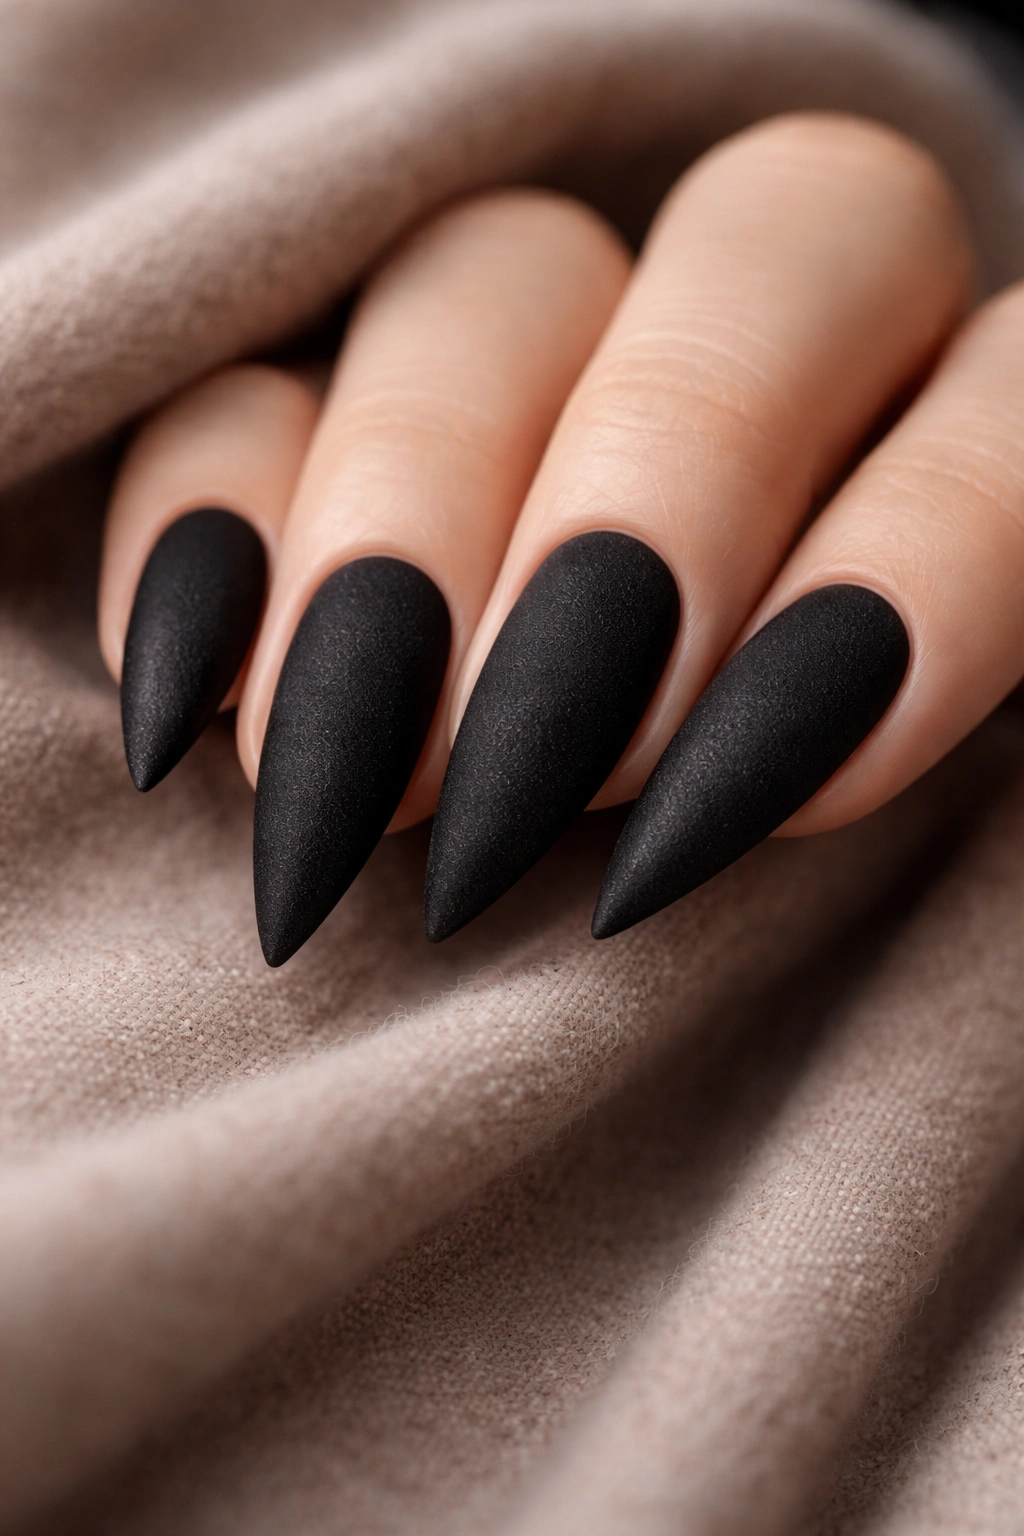
Upgrade your matte black nails to velvet finish—a specialized powder-based texture that creates an almost suede-like feeling. Instead of glossy shine, velvet finish creates a soft, velvety tactile surface that’s genuinely pleasant to touch. Visually, it catches light differently than matte, creating subtle depth and dimension. This finish feels luxurious and unique—not everyone does velvet nails, so it’s a sophisticated choice that sets you apart.
Why Velvet Deserves Recognition
Velvet finish on black nails creates an incredibly elegant, understated luxury. It’s not flashy or attention-seeking, but it’s immediately noticeable when someone actually touches or examines your nails. The texture elevates basic black to something special and intentional. On medium stilettos, the velvet surface emphasizes the shape’s drama without adding competing visual elements.
Care and Maintenance
- Velvet finish is delicate—be gentle during daily activities
- Avoid excessive water contact immediately after application
- Use cuticle oil or hand cream regularly to maintain the texture
- The velvet may dull slightly over time; this is normal and actually adds to the sophisticated look
- Professional application is highly recommended for optimal results
Worth knowing: Velvet finishes fade faster than standard matte polish, so plan for more frequent touch-ups.
9. Black Stilettos with Rose Gold Foil Accents
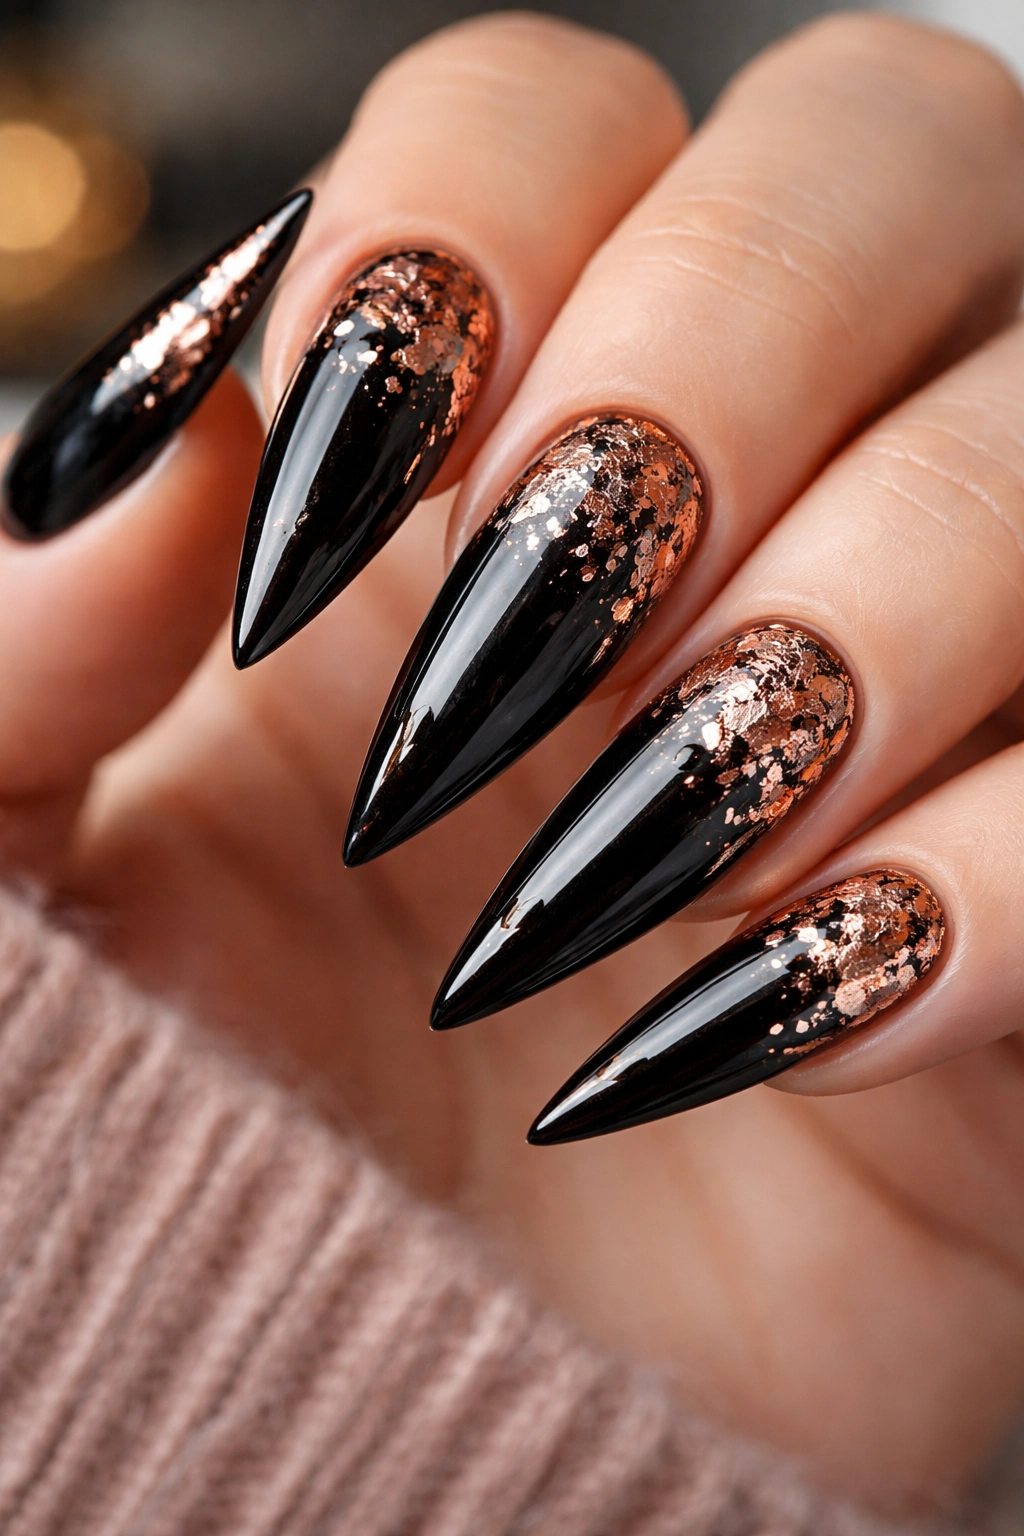
Create visual interest by embedding rose gold foil accents into a glossy black base. Rather than painting on the gold, actual foil pieces are pressed into tacky gel or polish, creating areas of concentrated metallic shine. This technique creates luxury-level nail art that looks incredibly expensive and custom. The rose gold on black is warm, flattering, and feels elevated rather than gaudy.
What Makes Foil Different From Regular Polish
Foil creates genuine metal surface that reflects light as actual metal does. It’s more visually impressive than metallic polish because it has depth and genuine shine. Foil accents arranged strategically on stiletto nails—perhaps on one accent nail or scattered along the tips—create a design that catches genuine light flashes.
Application Reality Check
- Foil application requires special technique and tools
- You’ll need foil specifically designed for nails (not crafting foil)
- Most people should have this applied professionally
- The foil needs to be embedded into tacky polish or gel, then sealed
- Results are stunning but DIY application is tricky
Professional insight: When choosing a nail artist, verify they’ve done foil work before. Poor foil application peels or looks cheap.
10. High-Gloss Black with Transparent Accent Tips
Here’s a design that plays with negative space in a sophisticated way. The base is solid high-gloss black, but the tips are transparent—showing your actual nail underneath through a clear polish or gel layer. This creates a clean, modern silhouette effect where your nail tip has a different visual weight than the base. The transparent area reads as slightly nude against the black, creating a soft graduated effect without requiring ombre blending.
Why This Design Is Clever
This design uses simplicity as sophistication. You’re not adding designs or extra colors; you’re working with the nail itself as a design element. The clear tips create visual lightness on medium stilettos, making them feel less heavy-handed than solid black stilettos. It’s a modern, minimalist choice that appeals to people with refined taste.
How It’s Applied
- Apply high-gloss black to the base and mid-nail
- Stop the black short of the tip, leaving the transparent nail visible
- Seal with a clear topcoat that creates a completely smooth finish
- The transition should be intentional, not accidental—keep it clean and defined
- Make sure your nail underneath is clean and healthy-looking
Design consideration: This works best if your natural nails are in good condition—no staining or damage that would show through the transparent tip.
11. Matte Black with Glitter Dust Halo
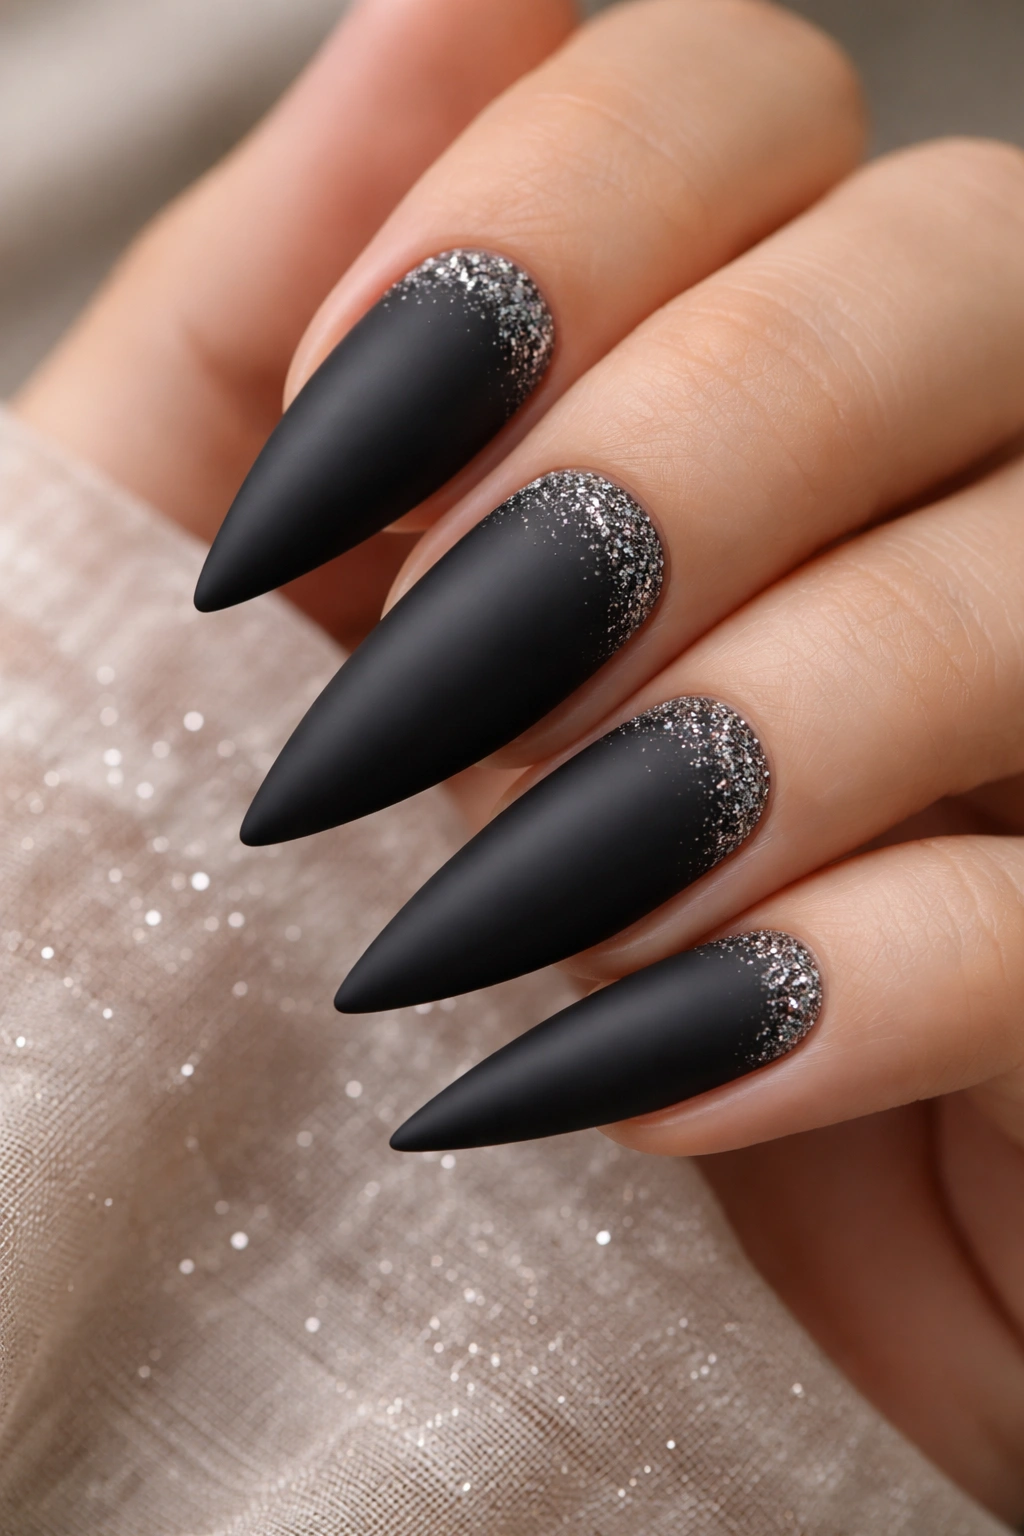
Add dimension and catching-light appeal with a subtle glitter halo effect around the base of each nail on a matte black background. Rather than covering the entire nail in glitter, you’re creating a concentrated ring of fine glitter particles where the nail meets the cuticle area. This design is refined and not over-the-top—the glitter is understated enough to feel elegant but present enough to add visual interest.
What Makes the Halo Effect Work
A halo concentrates visual interest in one area, creating a focal point. On stiletto nails, the halo draws attention to the base and creates a visual anchor. The matte black prevents the glitter from feeling too party-focused or glittery; it keeps the overall look sophisticated and balanced. This is perfect for people who like sparkle but want it controlled and elegant.
Application Method
- Apply a clean matte black base
- While the polish is still slightly tacky, apply fine cosmetic-grade glitter around the base
- Use a cosmetic glitter, not chunky craft glitter
- You can use tweezers to place individual glitter pieces for precision
- Seal with a topcoat (this secures the glitter and adds shine to the base, creating contrast)
Pro tip: Use a cosmetic glitter in gold, silver, or even black-toned colors for the most sophisticated look. Rainbow or bright glitters feel too casual.
12. Black Stilettos with Hand-Painted Gold Marble
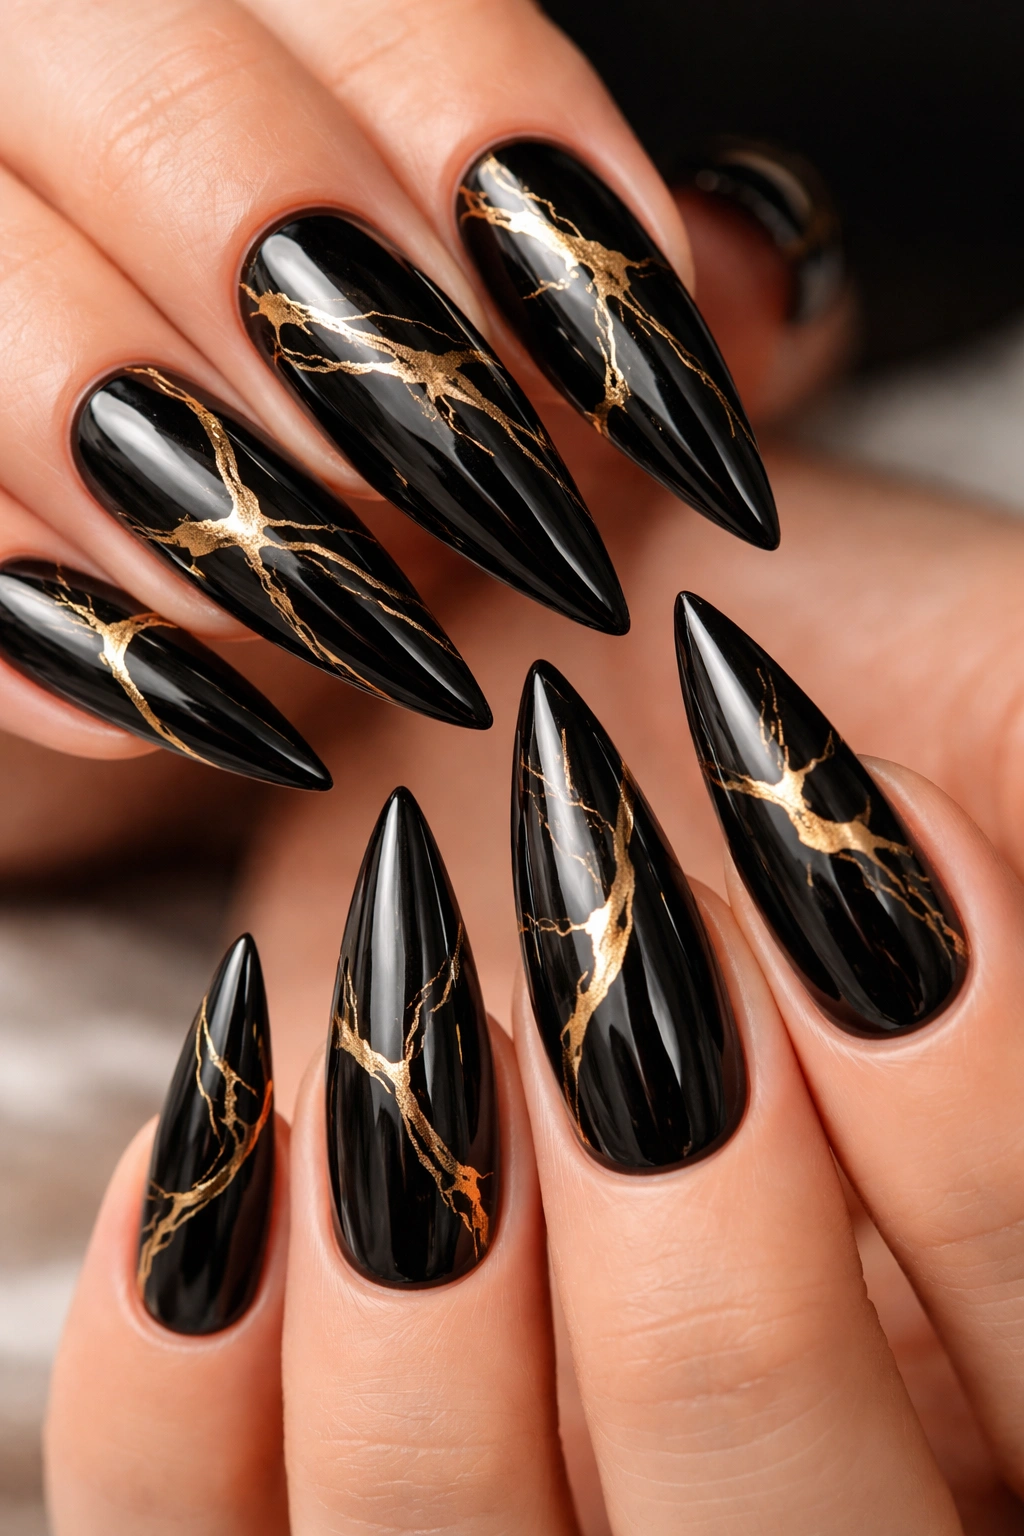
Elevate your design game with hand-painted gold marble veining on a glossy black base. Using a thin brush and gold polish, an artist creates organic, flowing marble lines across the nail. The marble pattern looks natural and luxurious—like actual stone. No two nails have identical patterns, creating a custom, bespoke feeling. This design requires genuine artistic skill, but the result is one of the most beautiful nail art finishes available.
Why Marble on Black Is Timeless
Marble is inherently elegant and expensive-looking. When executed well on black stilettos, it reads as high-fashion and artistic. The gold on black is a classic luxury combination (think gold jewelry on black clothing). This design works for formal events, professional settings, or anyone who appreciates nail art as wearable art.
What Makes Execution Matter
- A shaky hand or inexperienced artist will create an amateur-looking result
- Real marble veining is organic and flowing, not perfectly geometric
- The gold lines should vary in thickness and spacing
- Professional application is almost non-negotiable for this design
- Budget appropriately—hand-painted designs cost more than standard manicures
Investment perspective: This design commands higher prices because it requires skill and artistic talent. You’re paying for customization and artistry.
13. Matte Black with Metallic Gradient Fade to Nude
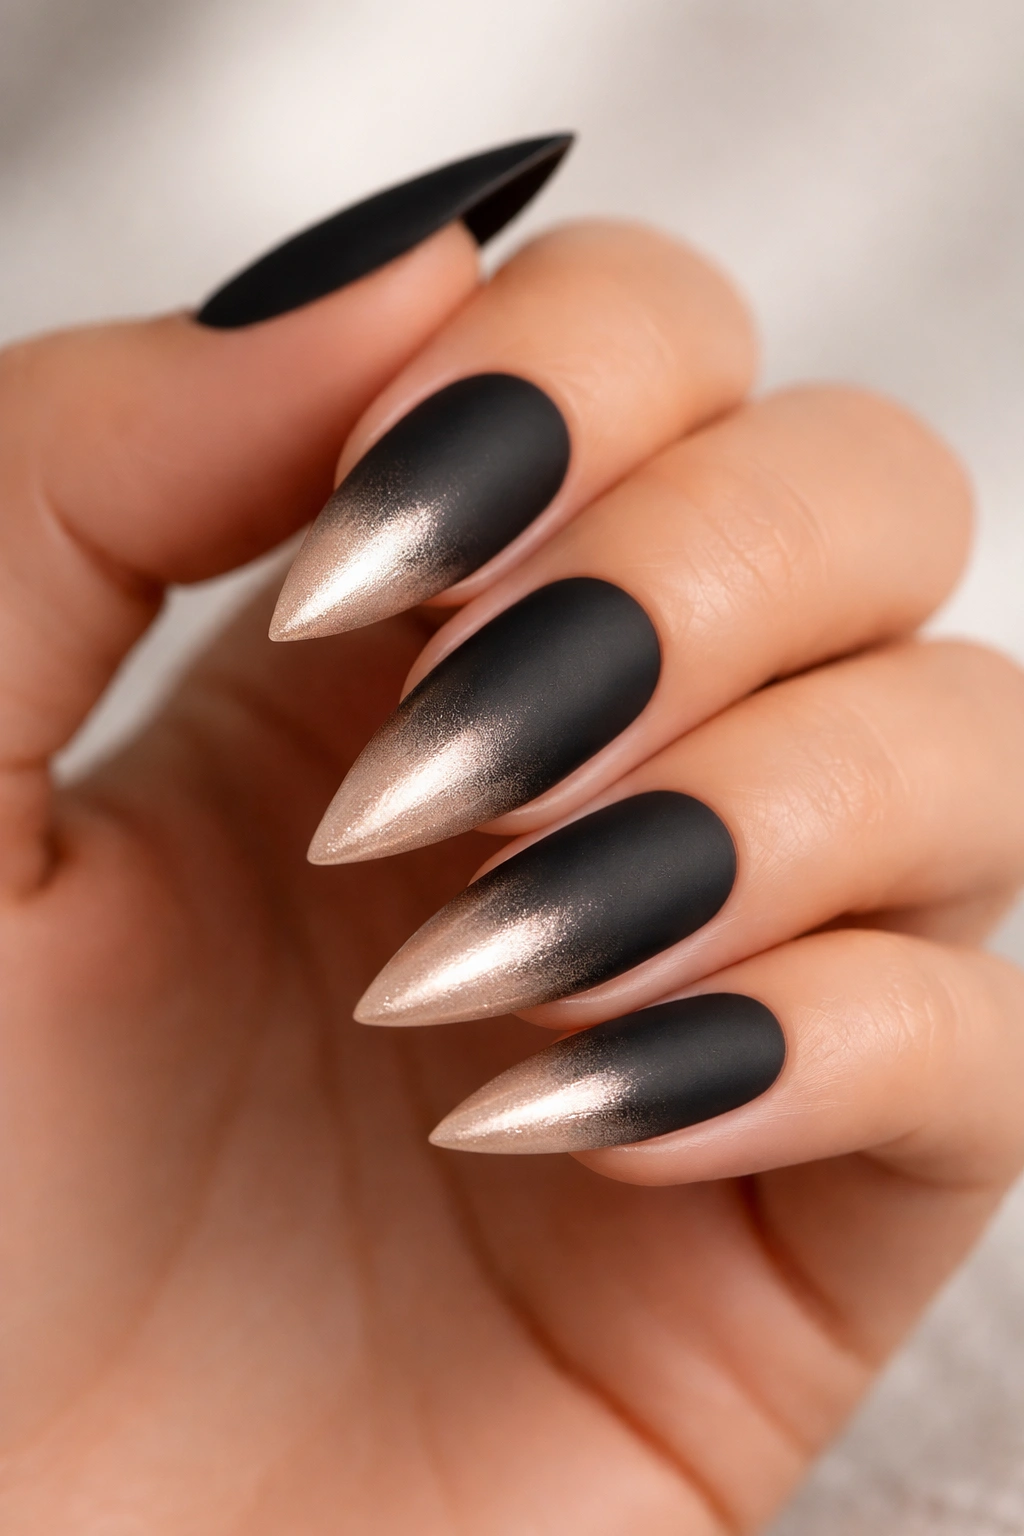
Create an ultra-modern design by combining matte black with a fade into metallic nude or champagne. The base is matte black, but toward the tips, the color transitions into a shimmery, metallic nude. Unlike traditional ombre, this design uses two completely different finishes—matte to metallic—creating texture contrast along with color gradient. The result is deeply sophisticated and feels contemporary without looking trendy in a way that will feel dated.
What Makes This Different From Standard Ombre
This design uses finish shift as a design element, not just color shift. The movement from matte to metallic creates visual interest and depth. Metallic finishes catch light in ways matte cannot, so the tips become visibly brighter and more reflective. On medium stilettos, this gradient creates the illusion of extended length and light.
Technical Application
- Start with an even matte black base
- Apply metallic nude in very thin layers, gradually transitioning toward the tips
- The finish change is part of the design, so don’t blend it too much
- Seal with a topcoat appropriate for matte finishes on the black side
- Professional blending is recommended for seamless integration
Maintenance note: Matte and metallic finishes require different care approaches, so follow specific aftercare instructions.
14. Glossy Black with Negative Space Nail Art
Create intricate negative space designs by painting black only in specific areas, leaving portions of the nail bare or transparent. For example, geometric shapes, abstract designs, or line art can be created using just black polish on a clear or nude base. This approach feels modern and minimalist—you’re using restraint as a design element. The black areas become the focal point precisely because they’re not covering the entire nail.
Why Negative Space Feels Sophisticated
Negative space is a design principle used in high-fashion and fine art. By intentionally leaving areas unpainted, you create visual tension and sophistication. The eye is drawn to the black areas, but the clear spaces create balance. This design requires vision and planning—it’s not just painting the nail; it’s designing within the nail shape.
Design Possibilities
- Geometric cutouts (triangles, stripes, color-blocked shapes)
- Line art forming shapes with blank spaces inside
- Border designs (black only along edges, clear in the center)
- Abstract patterns that intentionally reference the nail shape
- French tip variations with artistic twists
Artist note: This design definitely benefits from professional application. Getting clean lines and intentional negative space requires precise control.
15. Black Stilettos with Pearl Dust Shimmer

Take glossy black stilettos and add ultra-fine pearl dust shimmer throughout for subtle luminosity. Unlike chunky glitter, pearl dust creates an almost invisible shimmer that catches light softly and creates depth. The effect is understated but present—when light hits your nails, you see gentle sparkle, but the nails still read as solid black. This is the design for people who want sophistication without visible sparkle.
Why Pearl Dust Isn’t Glitter
Pearl dust is extremely fine and sits smoothly within the polish, unlike glitter particles that sit on top. The result is a nail that feels smooth to the touch and looks uniformly colored, but has built-in shine. This creates a subtle luxury feel—people will notice your nails look particularly polished without understanding exactly why.
Application Details
- Apply a thin base coat first
- Mix pearl dust directly into glossy black polish
- Alternatively, apply glossy black, then dust with pearl powder while tacky
- Seal thoroughly so the dust doesn’t come off
- The result should look like slightly iridescent black, not like you have visible glitter
Quality matters: Professional-grade pearl dust looks refined; cheap cosmetic glitter looks cheap. This is where quality matters.
16. Matte Black with Pressed Flower or Dried Botanical
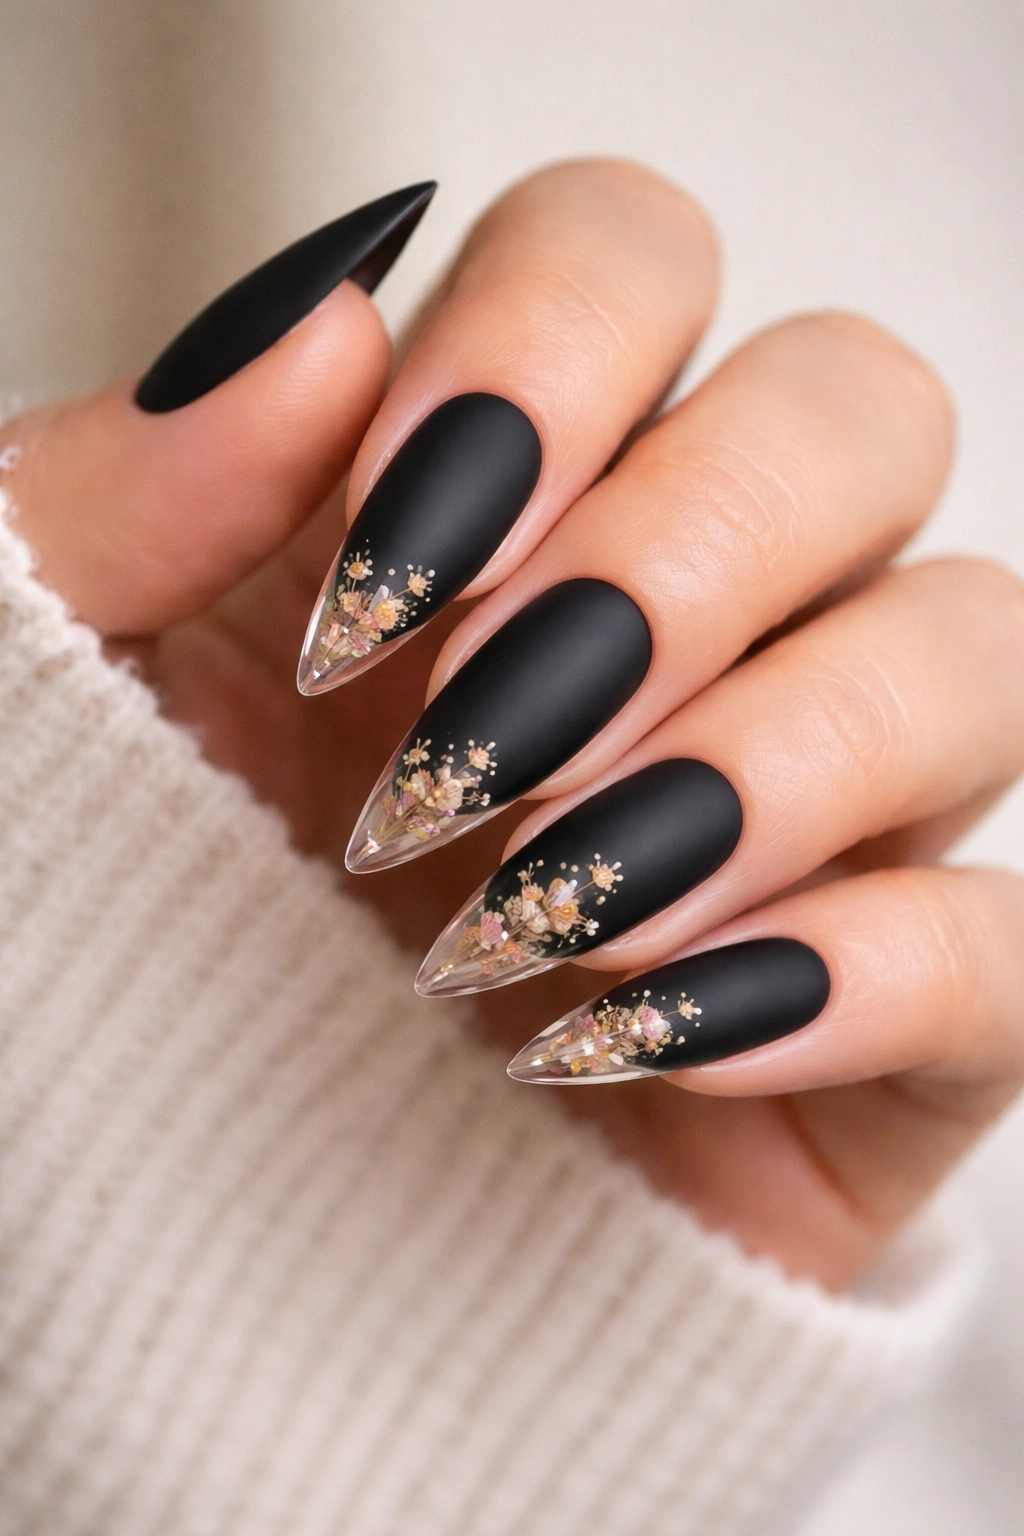
Add artisanal, natural-inspired design by embedding tiny pressed flowers, leaves, or dried botanicals into clear topcoat over matte black. This creates a nature-inspired, pressed-flower-bookmark aesthetic on your nails. You can use tiny dried flowers, baby’s breath, lavender, or delicate leaves. The botanical elements add organic beauty to the geometric edge of stiletto nails—it’s a beautiful contradiction.
What Makes This Design Unique
This design merges natural, organic elements with geometric nail shapes. It’s artistic without being colorful, botanical without being girly. Medium stilettos provide enough surface area for actual botanical pieces to be visible and appreciated. The matte black background ensures the flowers become the focal point rather than getting lost in shine.
Sourcing and Application
- Use actual dried flowers specifically prepared for nail application (not craft flowers)
- Your nail artist should apply flowers between layers of topcoat for security
- The flowers become sealed within clear topcoat, making them permanent and water-resistant
- Custom flower selections create truly one-of-a-kind nails
- This requires professional application—DIY is possible but finicky
Important detail: Make sure flowers are food-safe and nail-safe. Some dried flowers can cause allergic reactions or staining.
17. Black Stilettos with Holographic Chrome Accents
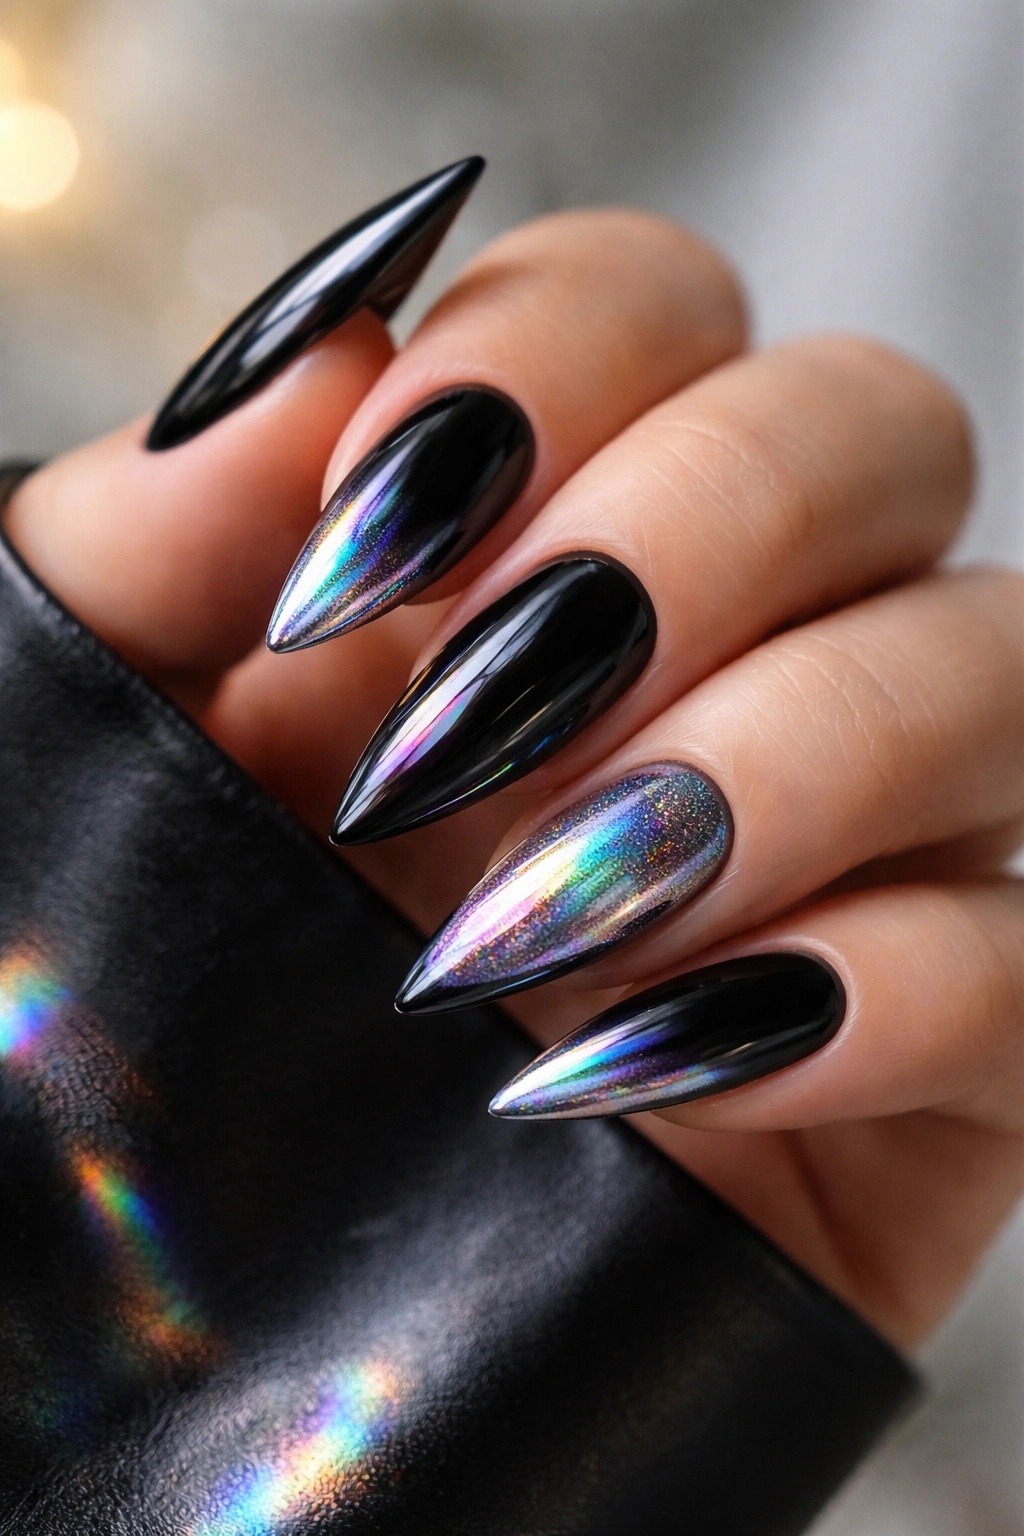
Combine chrome mirror effects with holographic shifts for a design that looks impossibly futuristic. The base is glossy black, but specific areas—perhaps tips or one accent nail—feature holographic chrome that reflects rainbow light. This is technically complex and absolutely stunning in person. The chrome and holographic elements create an almost alien, otherworldly aesthetic that photographs beautifully and feels contemporary.
Why This Design Turns Heads
Holographic chrome on black is a visual showstopper. The rainbow refractions combined with mirror-like reflection create something that looks genuinely otherworldly. It’s not a subtle design, but it’s not costume-level either. It’s artistic, modern, and visually sophisticated. This appeals to people who want serious nail art that’s still wearable.
What You Need to Know
- Requires professional-grade products and application
- Application is complex and requires an experienced artist
- The effect changes depending on lighting, angle, and time of day
- This is a bold design for people who embrace statement nails
- Budget accordingly for professional application and high-quality materials
Reality check: This design gets compliments and turns heads. If that’s not your goal, choose something more understated.
18. Matte Black with Delicate White Lace Detailing

Create romantic, feminine contrast by painting delicate white lace designs on matte black—think actual lace pattern, intricate and detailed. Rather than geometric or bold designs, this approach uses the fine lines and curves of lace to create sophisticated detail. The white lace on black matte reads as elegant and refined, perfect for someone who wants artistic nails but with a romantic or vintage-inspired aesthetic. Medium stilettos are actually ideal for lace designs because you have enough surface area for the pattern to be appreciated without overwhelming.
What Makes Lace Pattern Perfect for Nails
Lace is inherently intricate and small-scale, making it perfect for nail art where space is limited. The white lines on black create high contrast, so even detailed lines remain visible. Lace patterns also create visual interest without using color—you’re working with line and negative space. This design feels refined rather than trendy.
Design Inspiration Sources
- Actual lace (hold it up to your nails for inspiration)
- Bridal lace patterns
- Historical lace designs
- Geometric lace (more modern and angular)
- Corner or border lace (applied only to specific nail areas)
Artist requirement: Lace designs require genuine fine-line painting skill. This is definitely a professional-application design.
19. Glossy Black with Opal Accent Nail Shift
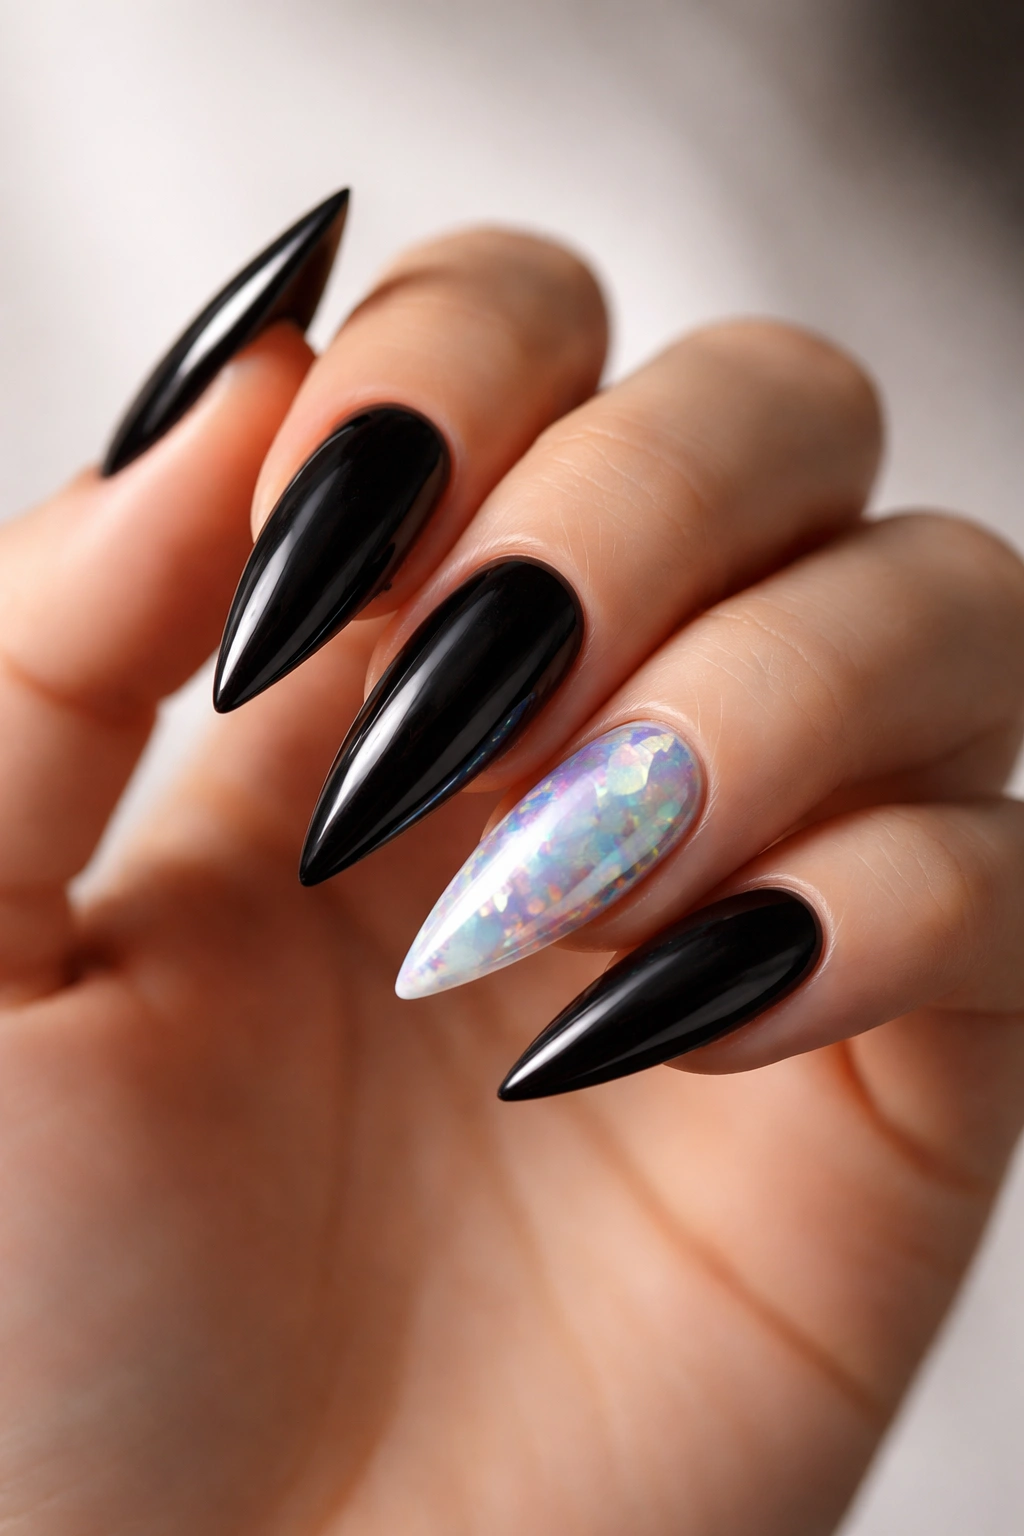
Make one or two accent nails opal-finish instead of black, creating a stunning color-shifting focal point. Opal finishes display play-of-color, creating blues, greens, pinks, and purples depending on the angle and light. Against the jet-black base nails, the opal shifts feel absolutely magical. This design is bold but not overly complicated—it’s about showcasing the beauty of the opal finish itself rather than layering multiple design elements.
Why Opal Works as the Perfect Accent
Opal is naturally beautiful and eye-catching. The shifting colors mean the design never looks static—it changes as you move and change angles. Against black, the colors in the opal become even more vivid and striking. Medium stilettos give enough surface area for the opal color-shifting to be genuinely visible and appreciated.
Finding Quality Opal Polish
- Professional-grade opal finishes look significantly better than drugstore versions
- Real opal finishes have genuine color-shifting; cheap versions are just iridescent
- Quality matters immensely with this design—budget for professional polish
- Your nail artist should have experience applying opal finishes
- Expect to spend more on this service than standard manicures
What to expect: Opal finishes may require multiple coats for proper color-shifting depth and intensity.
20. Black Stilettos with Gold Filigree Details
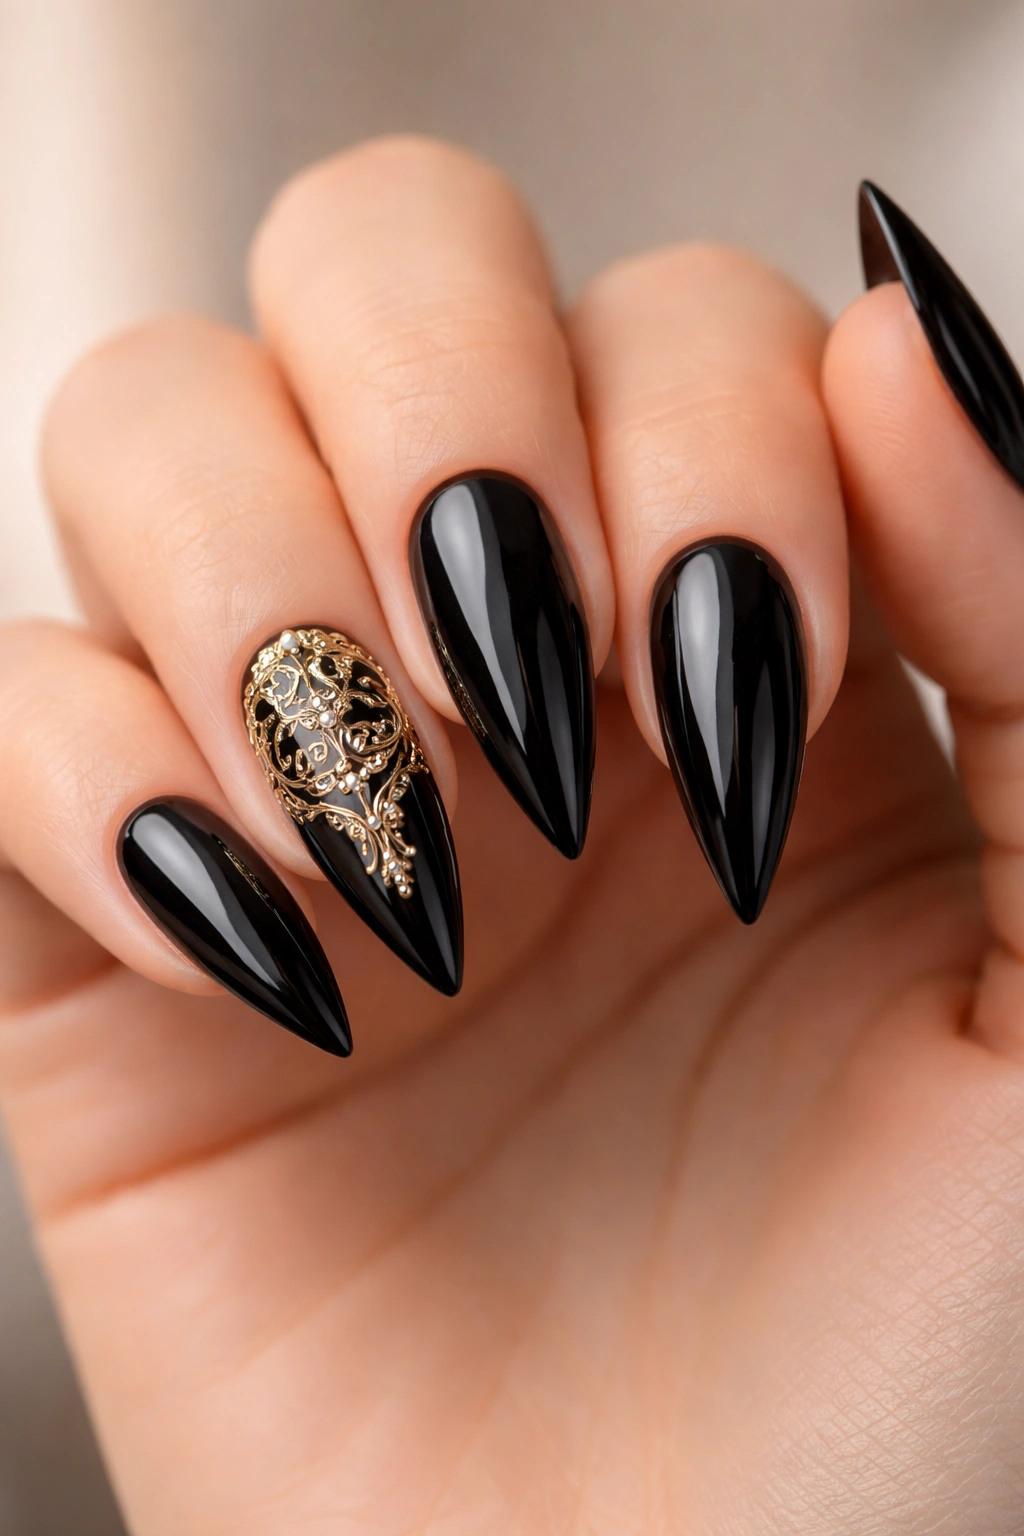
Finish your design collection with ornate elegance—glossy black nails with delicate gold filigree details. Filigree involves intricate gold scrollwork, flourishes, and decorative patterns reminiscent of vintage jewelry. The fine gold lines create elaborate, detailed designs that read as incredibly sophisticated. Filigree work requires genuine artistic skill, but the result looks genuinely custom and high-fashion.
What Makes Filigree Timeless
Filigree has been used in jewelry and decoration for centuries because the style is universally elegant. Ornate but not overwrought, filigree creates complexity without feeling chaotic. On black nails, gold filigree becomes the absolute focal point—the contrast and detail create visual richness. This design appeals to people with refined taste and appreciation for decorative arts.
Application Considerations
- Filigree requires hand-painting skill and artistic ability
- Tiny scrollwork and flourishes demand steady hands and precision
- Professional artists typically offer this as a specialty service
- Budget appropriately for custom, detailed nail art
- This design works best on longer nails (so medium stilettos are ideal—they provide enough space)
- Each nail can have unique patterns, creating truly custom designs
Design flexibility: You can do filigree on all nails, or concentrate it on one or two accent nails for slightly less complexity.
Final Thoughts
Black stiletto nails on medium-length nail beds are endlessly versatile. Whether you’re drawn to high-shine glossy finishes, sophisticated matte textures, or intricate nail art, there’s a black stiletto design that matches your aesthetic and lifestyle. The beauty of choosing black is that it works for any occasion—you can go ultra-minimal with simple glossy black, or embrace full artistic expression with hand-painted details and mixed finishes.
Medium stilettos hit that perfect sweet spot between dramatic and practical. You get the elongated, sophisticated silhouette that makes your hands look elegant, but you maintain functionality for actual daily living. These designs showcase just how much range black nails offer—from timeless classics to trendy modern approaches, there’s genuine newness to explore within the black palette.
Start with whichever design speaks to you most right now. If you’re a minimalist, go glossy jet black or matte with subtle accents. If you appreciate artistry, invest in hand-painted designs or complex finishes like chrome or holographic elements. The real secret to loving your nails is choosing designs that genuinely make you feel confident and beautiful—that’s what makes any manicure truly work.
