

Halloween is the perfect excuse to go wild with your nails, and if you’ve been rocking almond-shaped tips, you’ve got one of the most flattering and versatile bases for spooky designs. The elegant elongated silhouette of almond nails creates natural drama on its own—add some Halloween-inspired art, and you’ve got instant conversation starters. Unlike shorter, rounder shapes, almond nails give you plenty of canvas space to work with intricate details, bold colors, and creative patterns that really stand out.
The beauty of almond nails for Halloween is that you can go as minimal or as elaborate as you want. Whether you’re leaning into classic spooky vibes with blacks and oranges, going full glam with sparkles and chrome accents, or embracing something quirky and unexpected, the almond shape works for every approach. It’s sophisticated enough for work or social events where you want to stay professional, but dramatic enough to make a genuine Halloween statement when you want to fully commit to the season.
What makes this shape particularly special for Halloween designs is how it draws attention to your fingertips—and what better place to showcase a tiny haunted house, a detailed spider web, or glittering vampire fangs? We’ve pulled together 30 creative almond nail ideas that run the full spectrum of Halloween aesthetics, from darkly elegant to playfully kitschy. Whether you’re painting these yourself or bringing these concepts to your nail technician, you’ll find something here that captures exactly the Halloween vibe you’re after.
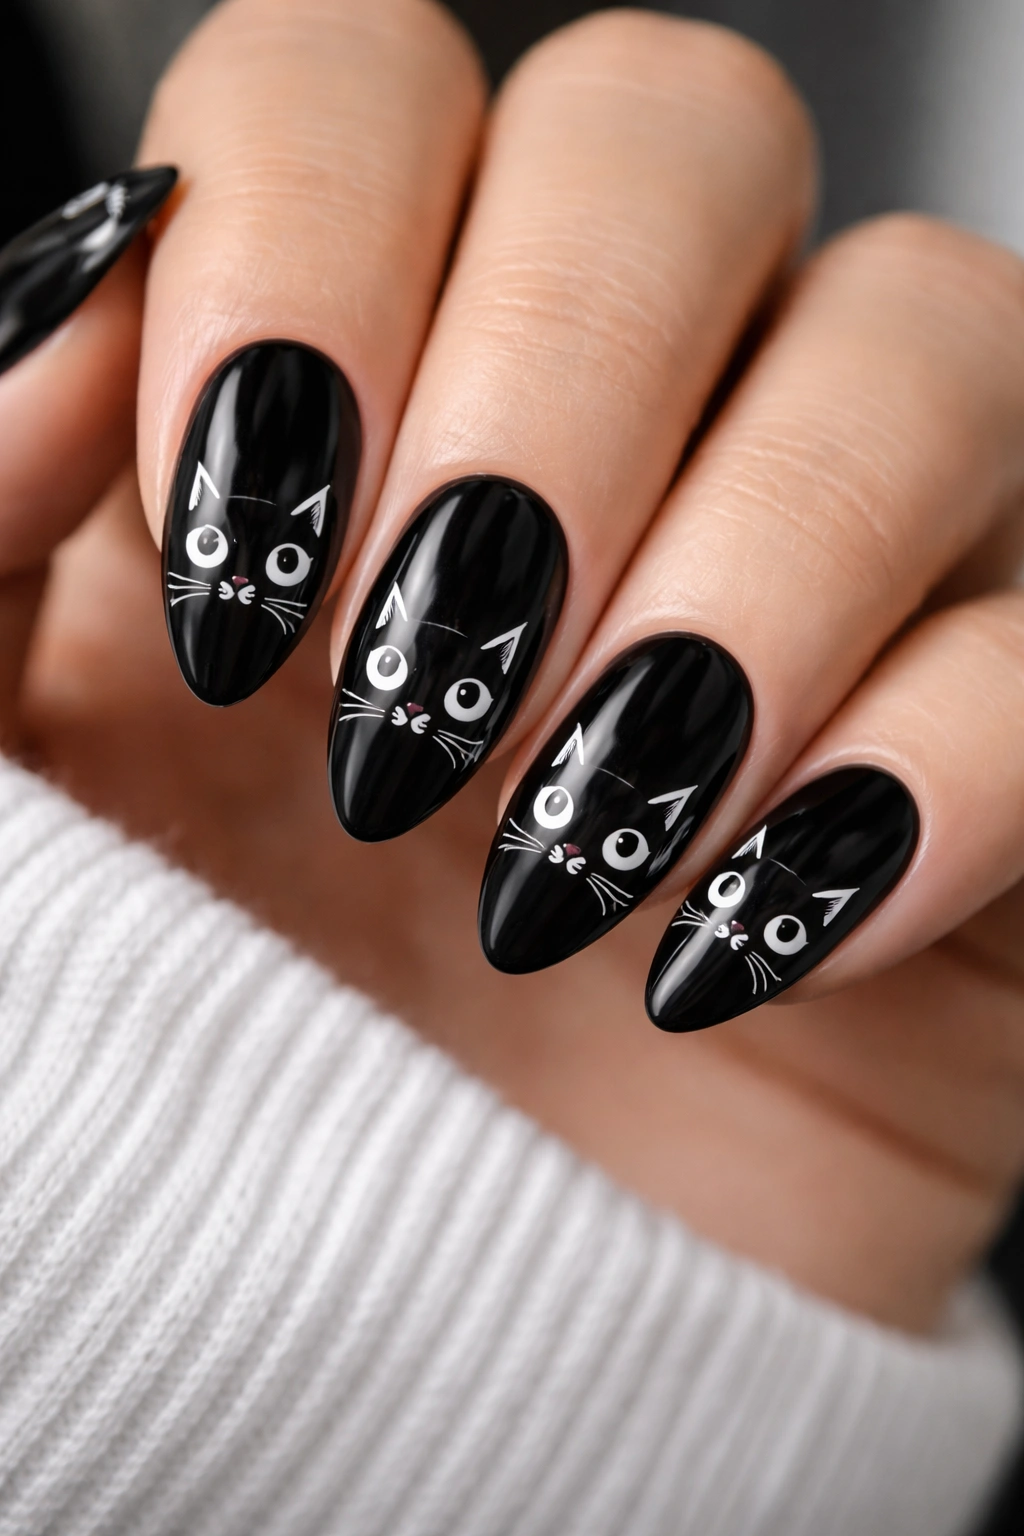
1. Classic Black Cat Face Design
Black cats are an absolute Halloween staple, and when you translate them onto almond nails, they become adorably creepy little characters peeking out from your fingertips. Start with a sleek black base coat on each nail, then paint a simple cat face on each one using white polish for the eyes and mouth. The almond shape naturally mimics the pointed ears of a cat, so you can emphasize those with tiny black triangles at the tips.
Why It Works for Almond Nails
The elongated shape of almond nails actually enhances the cat face design—the pointed tip becomes the cat’s pointy ear without any extra work on your part. You’re working with the nail’s natural geometry rather than against it, which makes this design both easier to execute and more striking when finished. Simple line work in white against the black background creates high contrast that reads clearly even from a distance.
What You’ll Need
- Black gel or regular polish (at least 2 coats for opacity)
- White gel or acrylic pen for details
- Thin detail brush or dotting tool
- Clear top coat
- The design takes about 10-15 minutes once you get the hang of it
Pro tip: Use a white gel pen instead of a brush if you’re not confident with hand-painting details—the pen gives you more control and creates cleaner lines, plus it’s less forgiving so mistakes are immediately obvious and easier to avoid in the first place.
2. Intricate Spider Web Nails
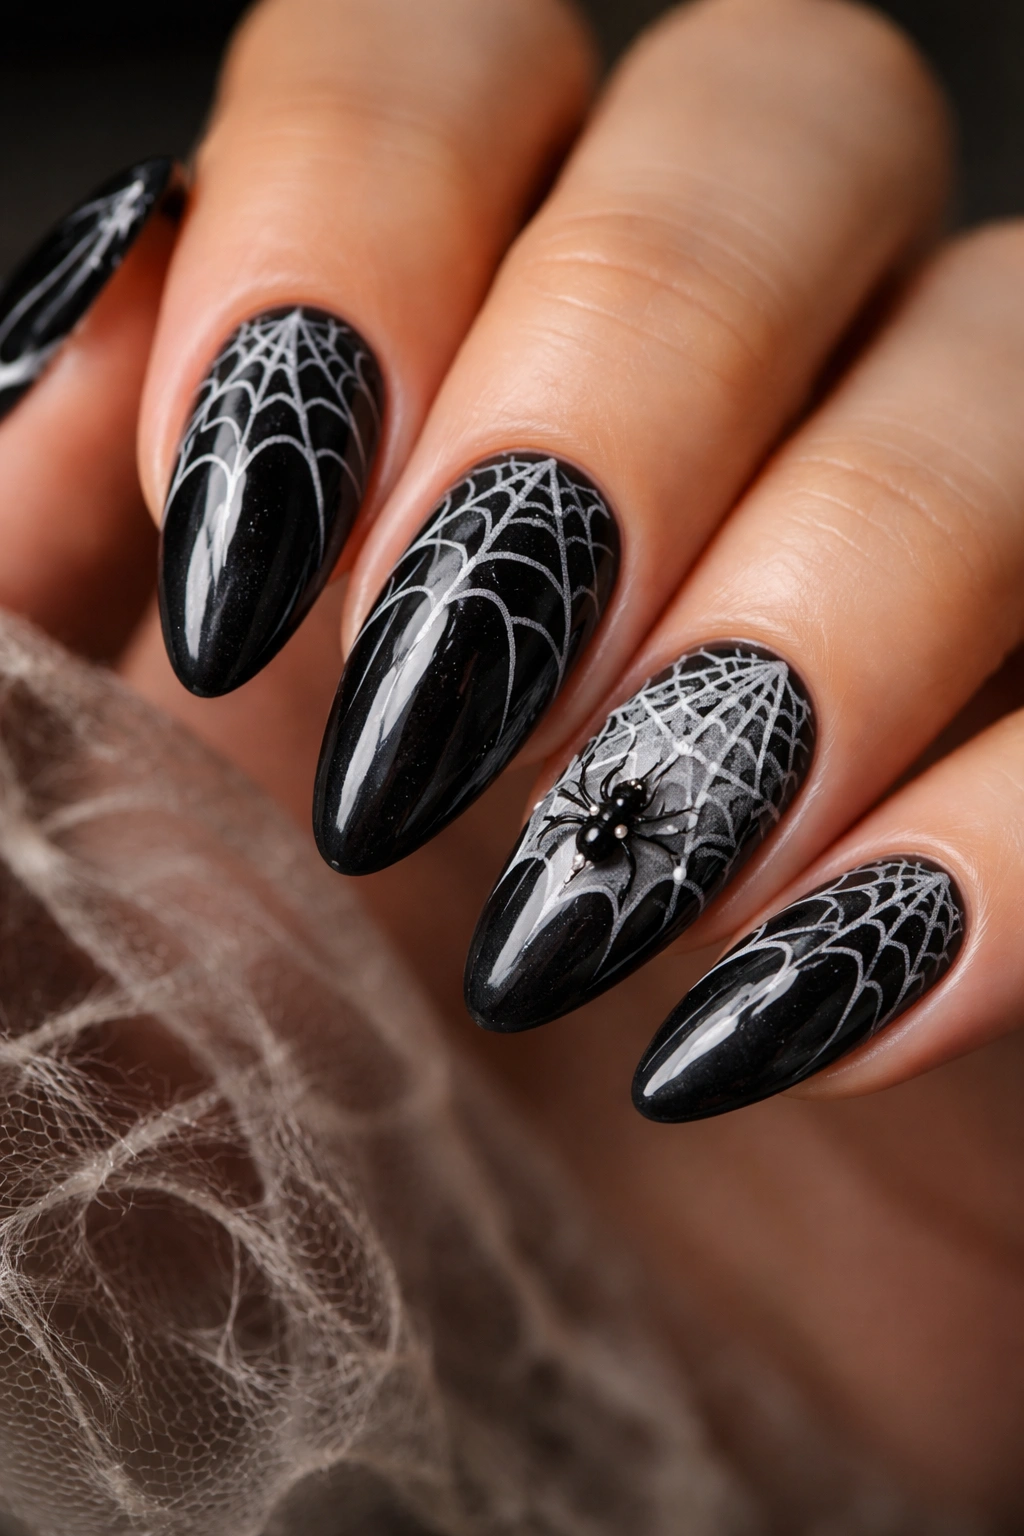
Spider webs are endlessly customizable, which is why they’re such a perfect Halloween design for almond nails. You can go delicate and minimal with just a few white lines against a dark background, or create elaborate webs that cover the entire nail. The almond shape gives you an elongated canvas where you can actually fit a realistic-looking web without it feeling cramped.
What Makes This Design Stand Out
Instead of trying to recreate a perfect geometric web, embrace the organic, slightly irregular pattern of a real spider web. This actually makes the design easier to paint because your mistakes look intentional and part of the natural variation. Many people add a tiny black spider (just a few dots and lines) somewhere in the web, which gives the design a story and makes it feel more complete.
Getting the Details Right
- White or silver polish works best for the web against dark backgrounds
- Thin brush or thin-tipped gel pen creates cleaner lines
- Start with one main horizontal line across the nail
- Draw angled lines from center to the sides, like actual web geometry
- Connect these with curved lines for an authentic look
- Add a small spider using a dotting tool for extra detail
Insider note: Paint the base color first and let it dry completely, then add the web. If you’re nervous about freehand lines, you can use a thin striping tape as a guide and remove it once the polish is tacky but not fully dry.
3. Vampire Fangs with Dripping Blood
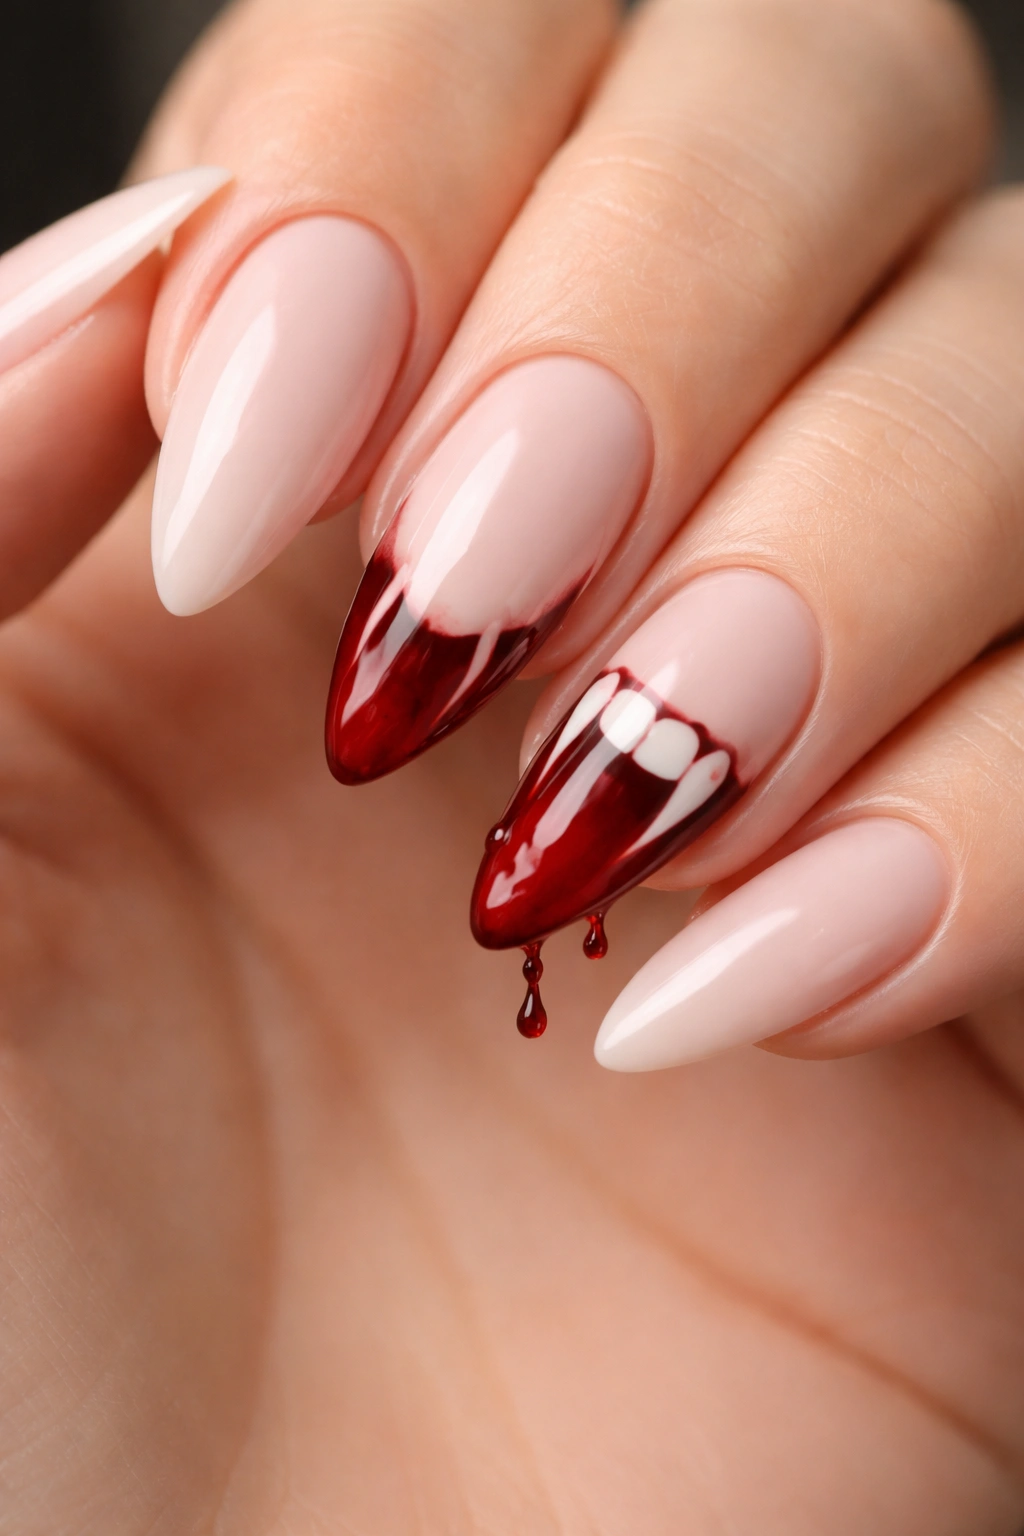
This design taps into the vampire aesthetic that never goes out of style during Halloween. Paint each nail in a nude, pale pink, or even white base to mimic a vampire’s pale complexion. Then add dramatic blood-red nails (typically the accent nails) with exaggerated pointed tips to represent fangs, and let the “blood” drip down the nail in dramatic red streaks.
Why It’s Perfect for Almond Shape
The natural pointed tip of almond nails is already half the work—you’re essentially just extending that point visually and coloring it to look like fangs. The elongated shape gives you plenty of space for the dripping blood effect to actually read as intentional rather than accidental. It’s a design that looks way more complicated than it actually is to execute.
How to Paint It
- Apply pale nude or white base to all nails
- On 1-2 accent nails, paint the bottom half in deep blood red
- Use a thin brush to create dripping lines that extend from the red down toward the tip
- Optional: add a small black dot at the tip of each fang to create dimension
- Seal with glossy top coat for that wet, fresh-blood appearance
Worth knowing: The dripping effect works better when the base is completely dry before you add the drips—if the base is still slightly tacky, the drip polish will blend and blur, losing the clean dripping effect you’re going for.
4. Haunted House with Spooky Windows
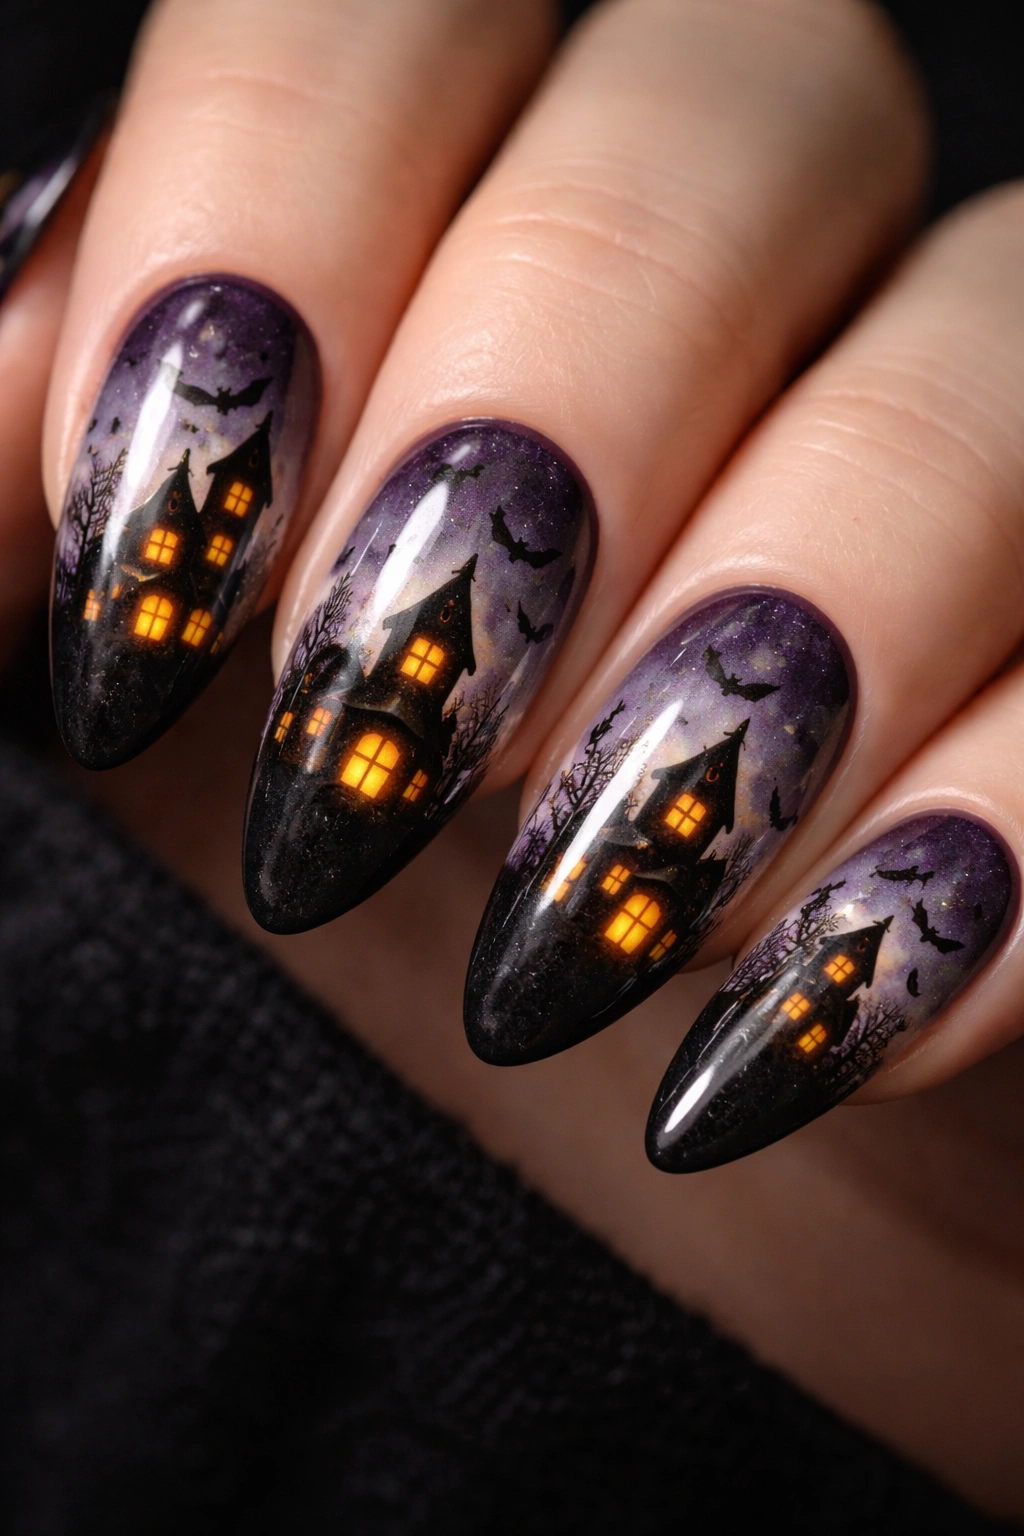
A haunted house design brings a narrative quality to your nails that makes them feel like tiny pieces of Halloween art. Paint a dark purple or deep gray base, then create a simple black silhouette of a house shape at the bottom of the nail. Add glowing yellow or orange windows using a dotting tool, and maybe a few bats flying around the top—suddenly you’ve got a whole spooky scene.
What Makes It Different
Unlike many Halloween designs that rely on abstract patterns or repeated motifs, the haunted house gives you a complete composition—a beginning, middle, and end. This creates visual interest that keeps people looking longer because there’s an actual story happening on your nail. The almond shape accommodates the perspective surprisingly well, with the house sitting at the base and space above for bats and sky.
Painting the Details
- Start with dark purple, gray, or black base
- Use black polish for the house outline and details
- Add a triangular roof, rectangular door, and window cutouts
- Fill windows with yellow or orange for the glowing effect
- Paint tiny bat silhouettes using a thin brush or dotting tool
- A tiny moon in the corner completes the scene
Pro tip: Paint the house shape with a thin black striping brush rather than trying to freehand every line. This gives you much cleaner edges and makes the whole design look more polished and intentional.
5. Mummy Wraps with Googly Eyes
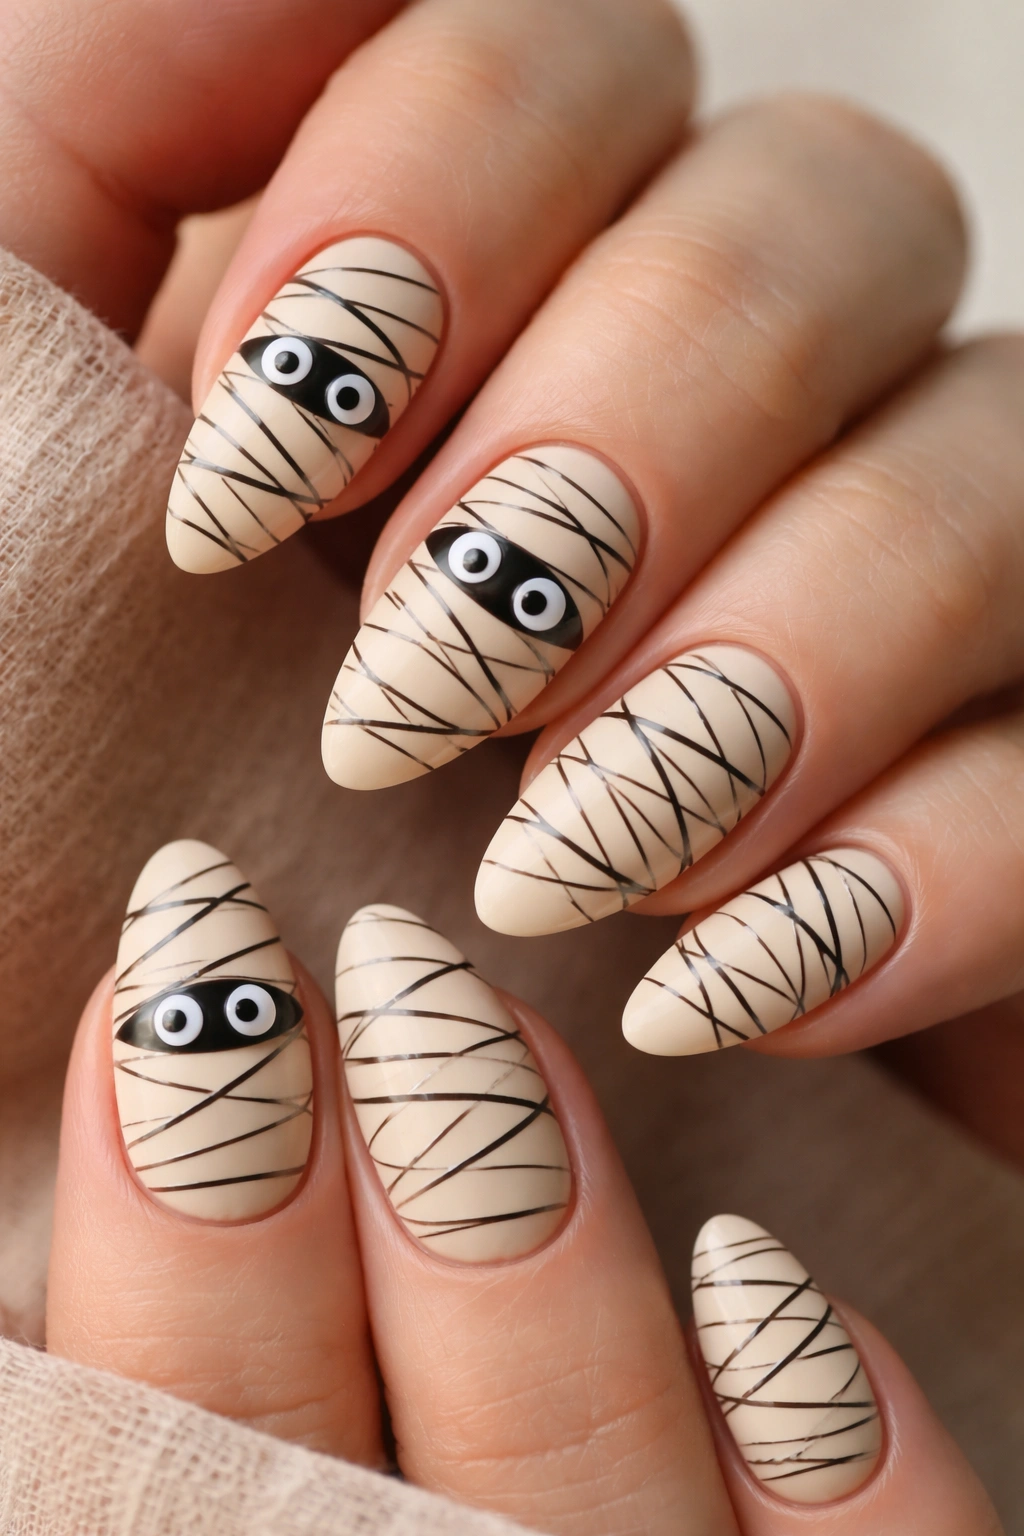
Mummies are a nostalgic Halloween reference that translates beautifully to nail art. Paint each nail in a beige, tan, or cream base, then use black or dark brown thin lines to create a wrapped bandage effect that winds around the nail. On one or two accent nails, add googly eyes or just paint simple black circles—instantly you’ve got a silly, charming mummy character.
Why It Works on Almond Shape
The length of almond nails actually helps the wrapped bandage effect look more realistic because you have more surface area for the wrapping pattern to spiral around. The pattern doesn’t feel cramped or repetitive—it genuinely looks like the nail is wrapped in bandages. The pointed tip becomes the top of the mummy’s head, which is exactly where you’d want those googly eyes.
Creating the Wrapped Look
- Paint all nails in cream, tan, or beige (2 coats for opacity)
- Using a thin black brush, paint diagonal stripes across each nail
- Leave small gaps between stripes so the base color shows through
- Vary the angle slightly on each nail so it doesn’t look like a pattern
- Add two black dots or googly eyes on the accent nail
- Optional: paint a tiny scared or silly expression below the eyes
Worth knowing: If you’re using actual googly eyes (the movable kind), apply them with strong nail-safe glue and seal them with a thick layer of clear gel to protect them and keep them secure through daily wear.
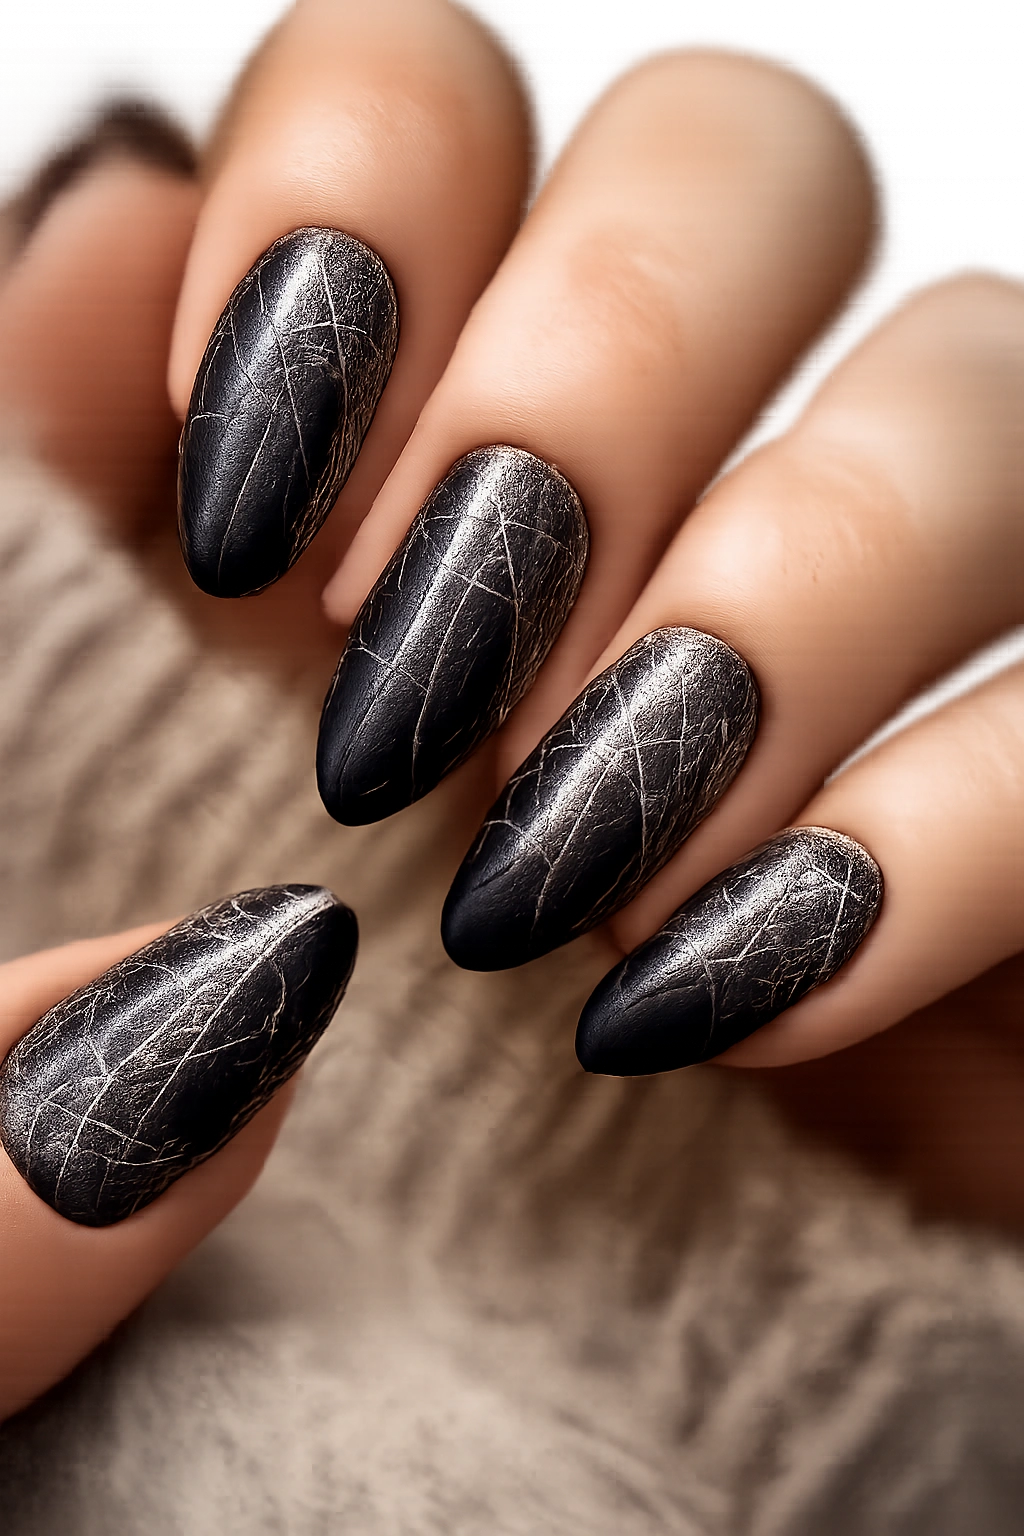
6. Chrome Skull with Metallic Gradient
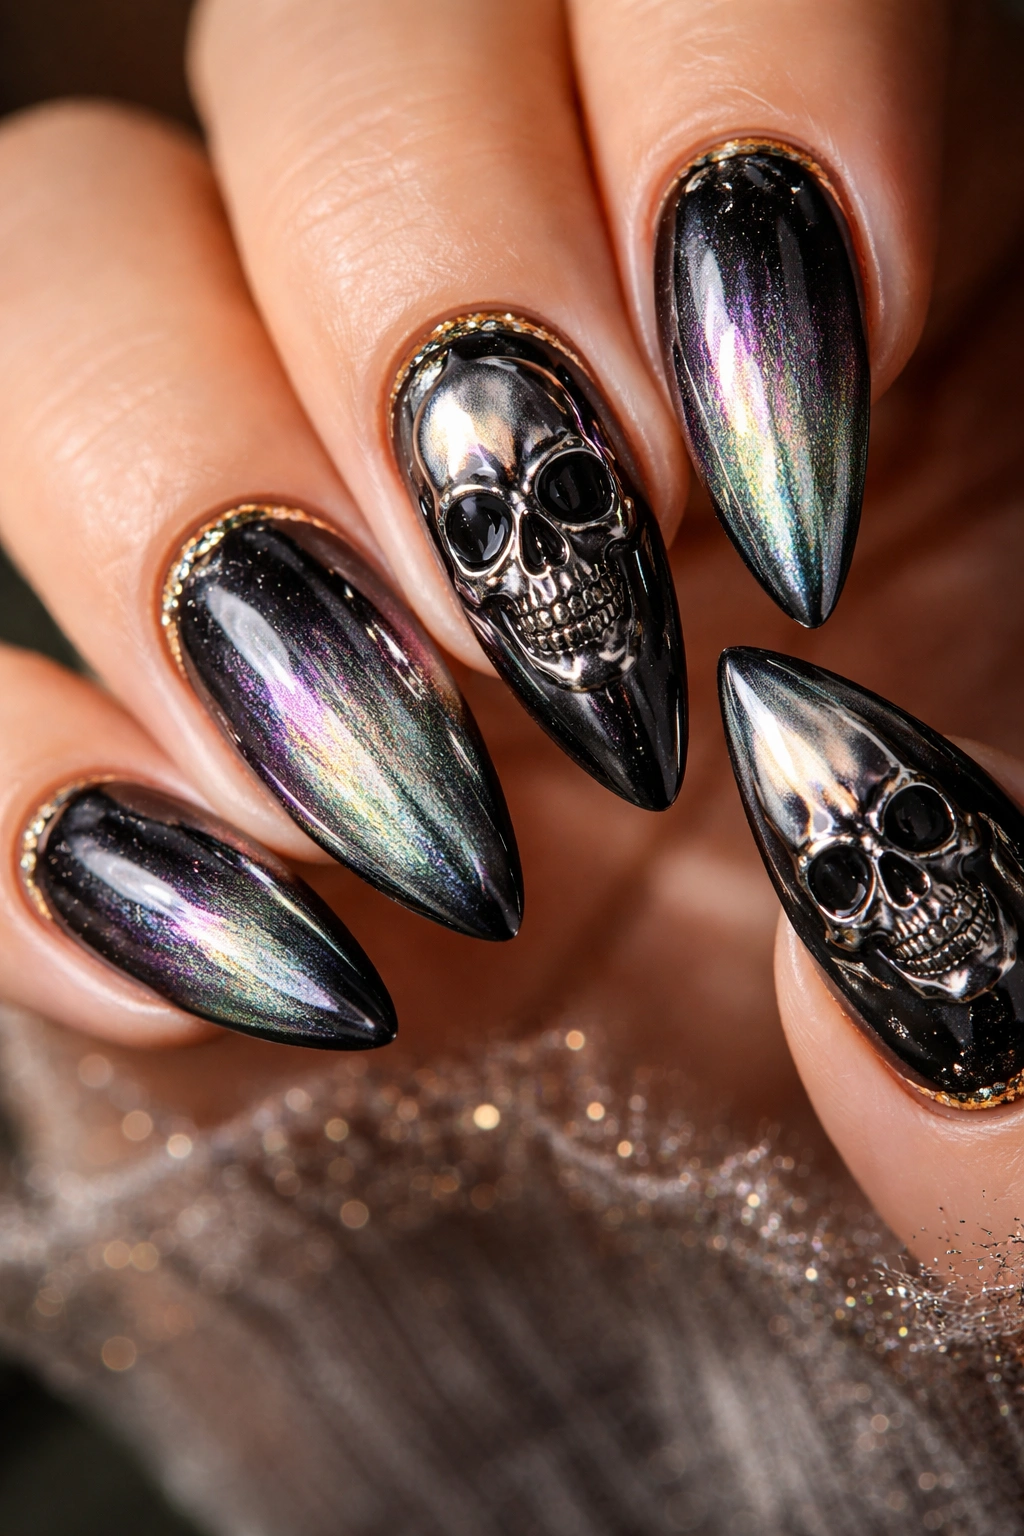
Skulls get a serious upgrade when you use chrome or metallic finishes instead of flat colors. Create a gradient from dark to light using chrome powder or metallic gel, which creates an almost three-dimensional effect. The skull itself can be detailed with gold accents, or you can go full chrome with a holographic finish that shifts colors as you move your hand.
What Makes This Design Stand Out
The metallic finish catches light in a way that flat polish never can, making the skull feel modern and sophisticated rather than cartoonish. When you layer different chrome effects or use a holographic powder over chrome, you create depth and movement that makes the design feel alive. On almond nails, this reflected light is especially visible because of the increased surface area and the way the pointed tip catches light.
Getting the Chrome Effect
- Apply a strong base color (black or deep purple) and seal with top coat
- Apply chrome powder using a rubber applicator, buffing gently
- Layer a holographic powder over the chrome for color-shifting effects
- Paint skull details using black gel or polish pen
- Add gold leaf or gold gel accent lines around the eyes and jaw
- Finish with matte or glossy top coat depending on your preference
Insider note: Chrome powder is delicate and can lose its effect if you’re rough with it. Once applied, seal it with at least two coats of clear top coat and handle your nails gently to preserve that mirror-like finish.
7. Candy Corn Gradient Design
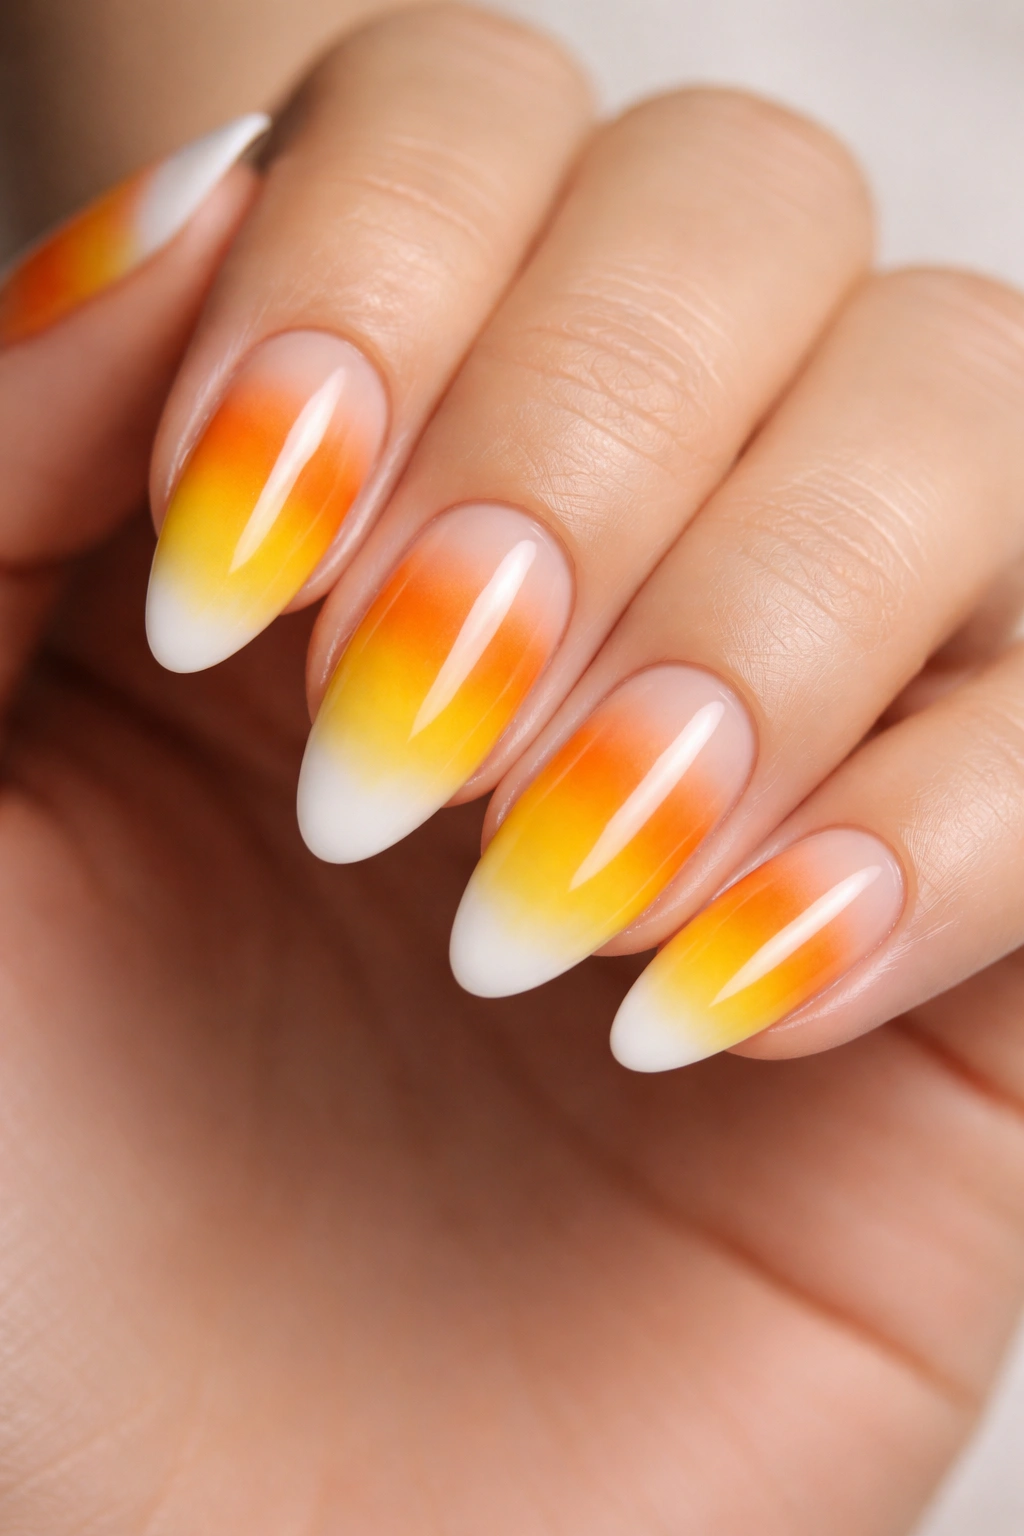
Candy corn is quintessentially Halloween, and its three distinct color blocks translate perfectly onto nails. Create a gradient that moves from yellow at the base to orange in the middle to white at the tip—essentially painting candy corn directly onto your almond nails. It’s instantly recognizable, cheerful, and surprisingly striking without being complicated.
Why It’s Perfect for Almond Shape
The pointed tip of almond nails naturally mirrors the shape of actual candy corn pieces, which makes this design feel intentional and polished rather than random. Each color section has enough space to be clearly visible and distinct from the others. The gradient effect is easier to blend on the longer surface of an almond nail than on short, round nails.
Painting the Gradient
- Apply yellow polish to the lower third of the nail
- Apply orange polish to the middle third
- Apply white polish to the upper third and tip
- Use a sponge to blend the colors where they meet, creating soft transitions
- Optional: add a glossy top coat for a candy-like shine
- The whole look is surprisingly simple but looks intentional and well-executed
Pro tip: If gradient blending feels tricky, skip the blending step entirely and just use clean color blocks. The candy corn effect still works perfectly with sharp lines between colors, and it’s arguably more recognizable when the colors don’t blur together.
8. Creepy Eyeball Design with Realistic Details
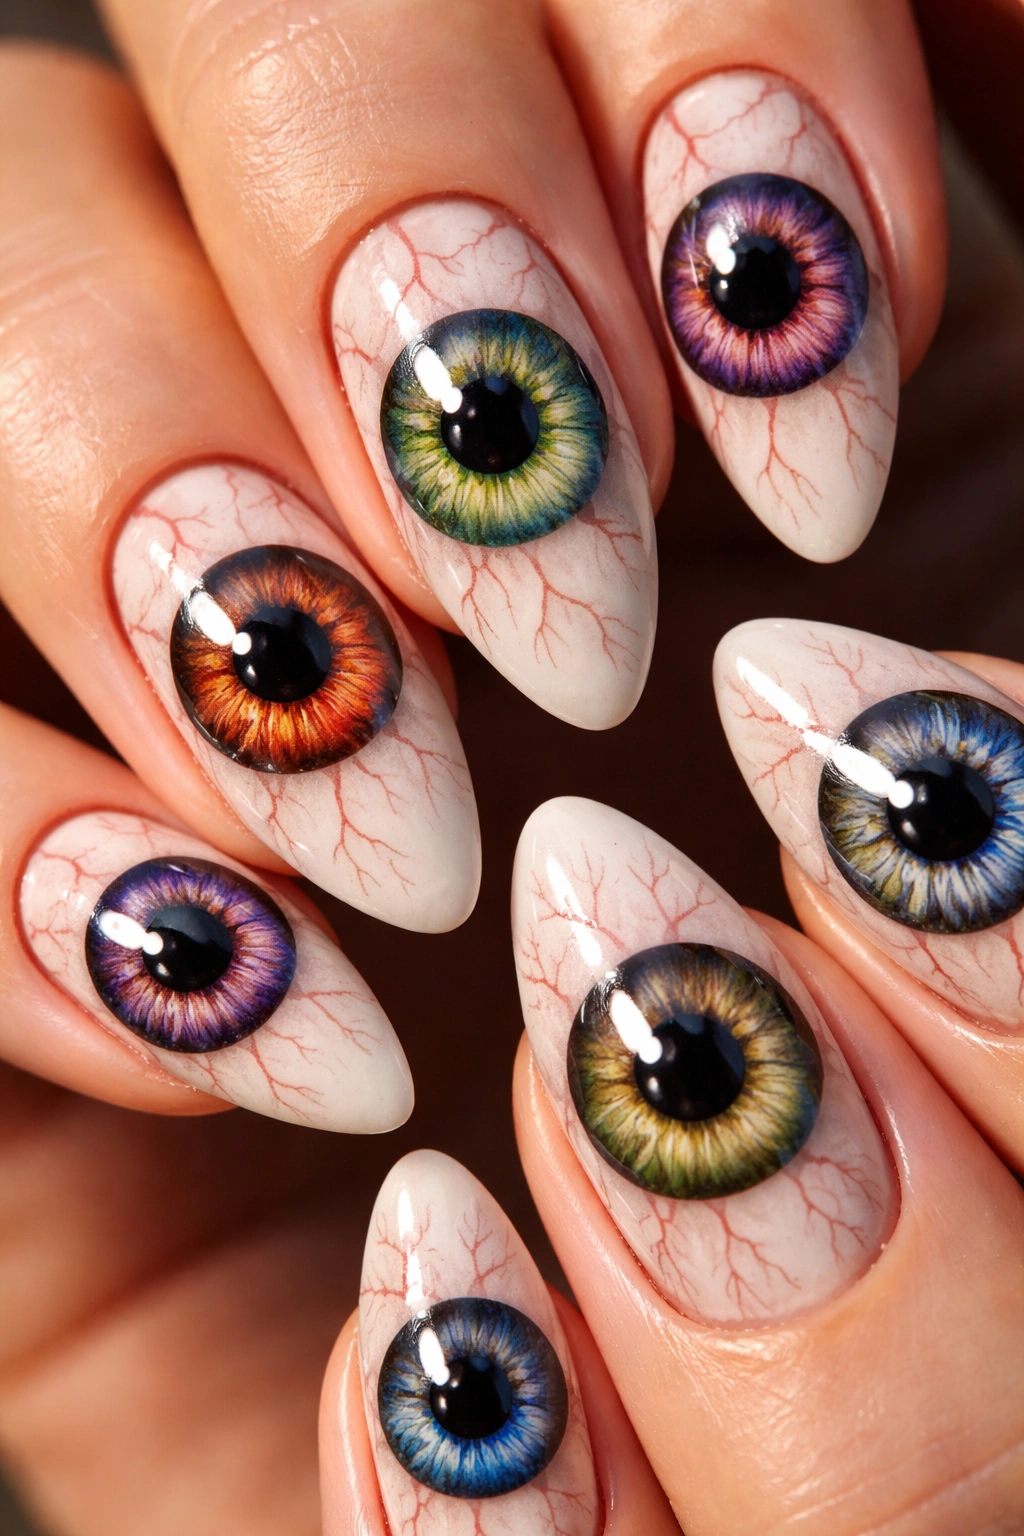
Eyeballs are inherently creepy on nails, especially when you add realistic veining and blood vessels. Paint a white or pale base, then create a large iris in the center using your choice of color—deep brown, icy blue, or even solid black for maximum creep factor. Add a thin black pupil, and then use thin lines to create blood vessels radiating outward from the iris.
What Makes It Different
The realism is what elevates this design from simple to genuinely unsettling. Most eyeball designs are cartoonish and cute, but when you add detailed veining and shadows, you transform them into something that actually looks slightly wrong and deeply Halloween-appropriate. The almond shape naturally resembles the shape of an actual eye, which makes this design feel surprisingly anatomically fitting.
Getting the Details Right
- Paint white base on each nail
- Create a large iris circle using a dotting tool or thin brush
- Add a black pupil at the center
- Use very thin red or pink lines for blood vessel detailing
- Add shadows under the iris using gray or brown
- A thin black outline around the iris creates definition
- Glossy top coat enhances the wet, eyeball-like appearance
Worth knowing: The blood vessels make all the difference in how realistic this looks. Use a very thin brush and create thin lines that radiate outward from the pupil, varying their direction slightly so they don’t look painted or geometric.
9. Ghostly Transparent with White Outlines
This design leans into ethereal and elegant rather than scary. Use a nude, pale pink, or even transparent base, then paint simple ghost silhouettes in white. The transparency of the base allows your natural nail color to show through, creating a delicate ghost effect that feels more sophisticated than opaque white ghosts. Add tiny black dots for eyes and a mouth to give each ghost character.
Why It Works on Almond Nails
The transparency effect is especially striking on longer nails because you can see the gradient from the nail bed color at the base to the white ghost outline at the tip. This creates a subtle ombre effect that makes the design feel intentional and artistic rather than just outline drawings. The elongated shape gives you space to paint multiple ghosts without them feeling crowded.
Creating Transparent Ghosts
- Apply a nude, pale pink, or sheer clear base (or skip base entirely for natural nails)
- Using white polish, paint simple rounded ghost shapes
- Leave the bottom half of each ghost slightly transparent so the nail shows through
- Add tiny black dots for eyes and a small curved line for a mouth
- Optional: add a small white outline around each ghost for definition
- Matte top coat gives an ethereal, ghostly finish; glossy is also nice for contrast
Pro tip: If you’re working with completely natural nails, applying a sheer pink or nude base first gives the ghost a softer appearance than white ghost outlines on pure white natural nails.
10. Jack-O-Lantern Face with Gradient Orange
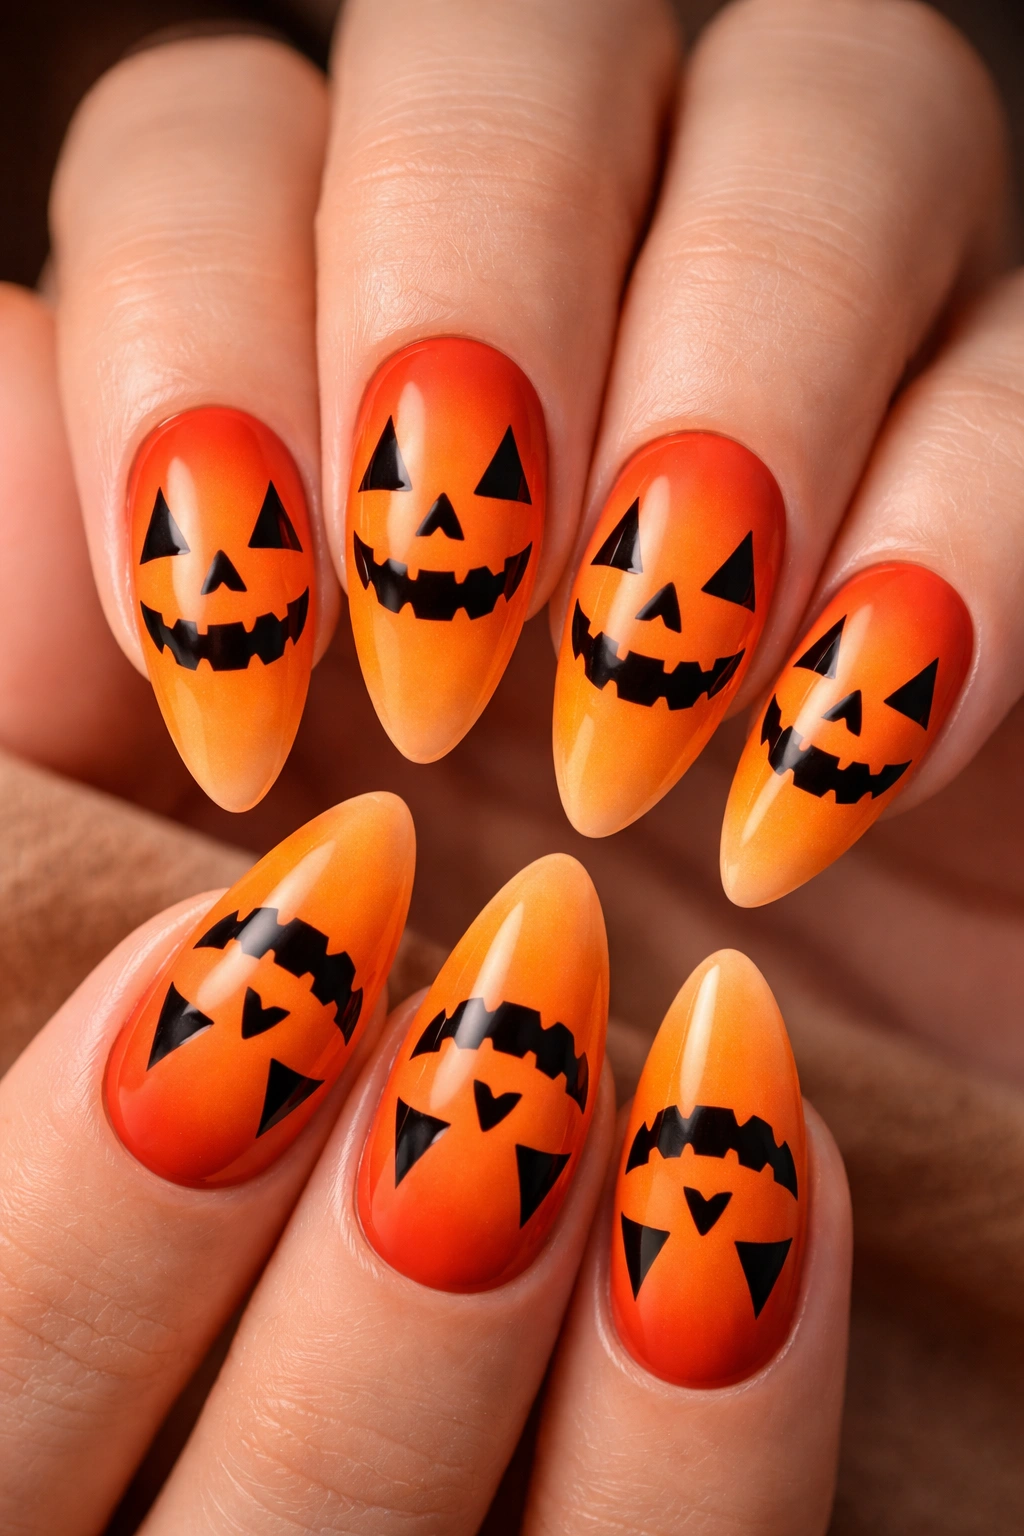
Transform your almond nails into tiny jack-o-lanterns by creating a gradient from deep orange to bright orange, then painting spooky faces on each one. The pointed tip becomes the stem of the pumpkin, and the face—triangular eyes and a gap-toothed grin—lives on the wider part of the nail. It’s playful, recognizable, and surprisingly easy to execute even if you’re not confident with nail art.
What Makes This Stand Out
Jack-o-lanterns are such an iconic Halloween symbol that they’re instantly recognizable, which means you can get away with simpler details and people will immediately understand what you’re going for. The orange gradient adds visual interest without adding complexity. Each nail becomes its own character, which creates a charming cohesive look across all ten fingers.
Painting Jack-O-Lanterns
- Apply a gradient from deep orange to bright orange using a sponge
- Once dry, use black polish to paint two triangular eyes
- Add a curved triangle nose
- Paint a wavy or gap-toothed smile using black
- Optional: add small black dots around the edges to mimic pumpkin ridges
- Glossy top coat enhances the pumpkin-like shine
Insider note: The gradient looks impressive but is actually one of the easier techniques to master—just apply one color, sponge the second color on top while overlapping, and blend gently. Perfection isn’t the goal; a slightly blotchy gradient actually looks more organic and pumpkin-like.
11. Poison Bottle with Skull and Crossbones Label
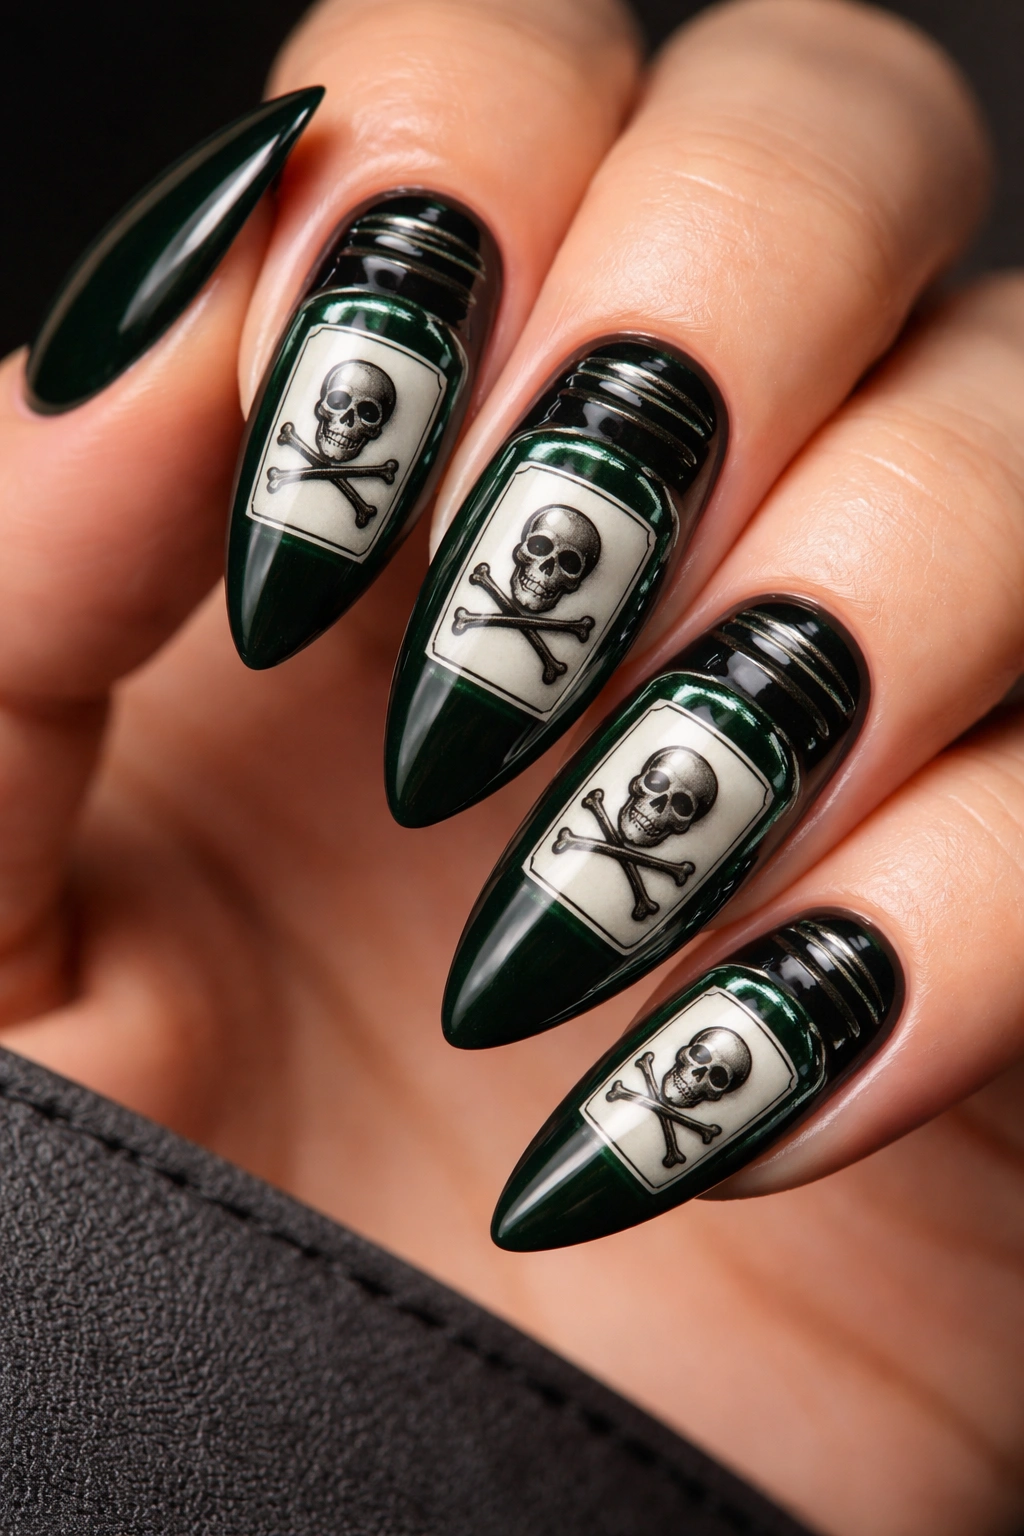
This design channels classic poison bottle imagery with a chic, slightly macabre aesthetic. Paint the base in deep emerald green or black, then add a white label section in the middle of the nail. On the label, paint a skull and crossbones symbol in black. Add a few additional details like tiny white stripes around the “bottle” to mimic bottle ridges, and you’ve got a vintage apothecary look.
Why It’s Perfect for Almond Shape
The vertical length of almond nails is ideal for creating a bottle shape—narrow at the base, wider in the middle where you’d place the label, and pointed at the top like a bottle stopper. The label section has just enough space for the skull and crossbones without feeling cramped. This design actually looks more sophisticated on longer nails because the proportions feel intentional.
Creating the Poison Bottle Look
- Paint base in emerald, black, or deep purple
- Create a white rectangular label section in the middle of the nail
- Paint skull and crossbones in black on the label
- Optional: add tiny white lines on either side to mimic bottle ridges
- Frame the label with thin black lines for definition
- A glossy finish enhances the glass bottle appearance
Worth knowing: If you’re painting the skull and crossbones freehand, remember that it doesn’t need to be perfect—vintage poison bottles often had hand-drawn labels, so slight imperfections actually add to the aesthetic rather than detracting from it.
12. Witchy Purple with Black Cat Silhouette
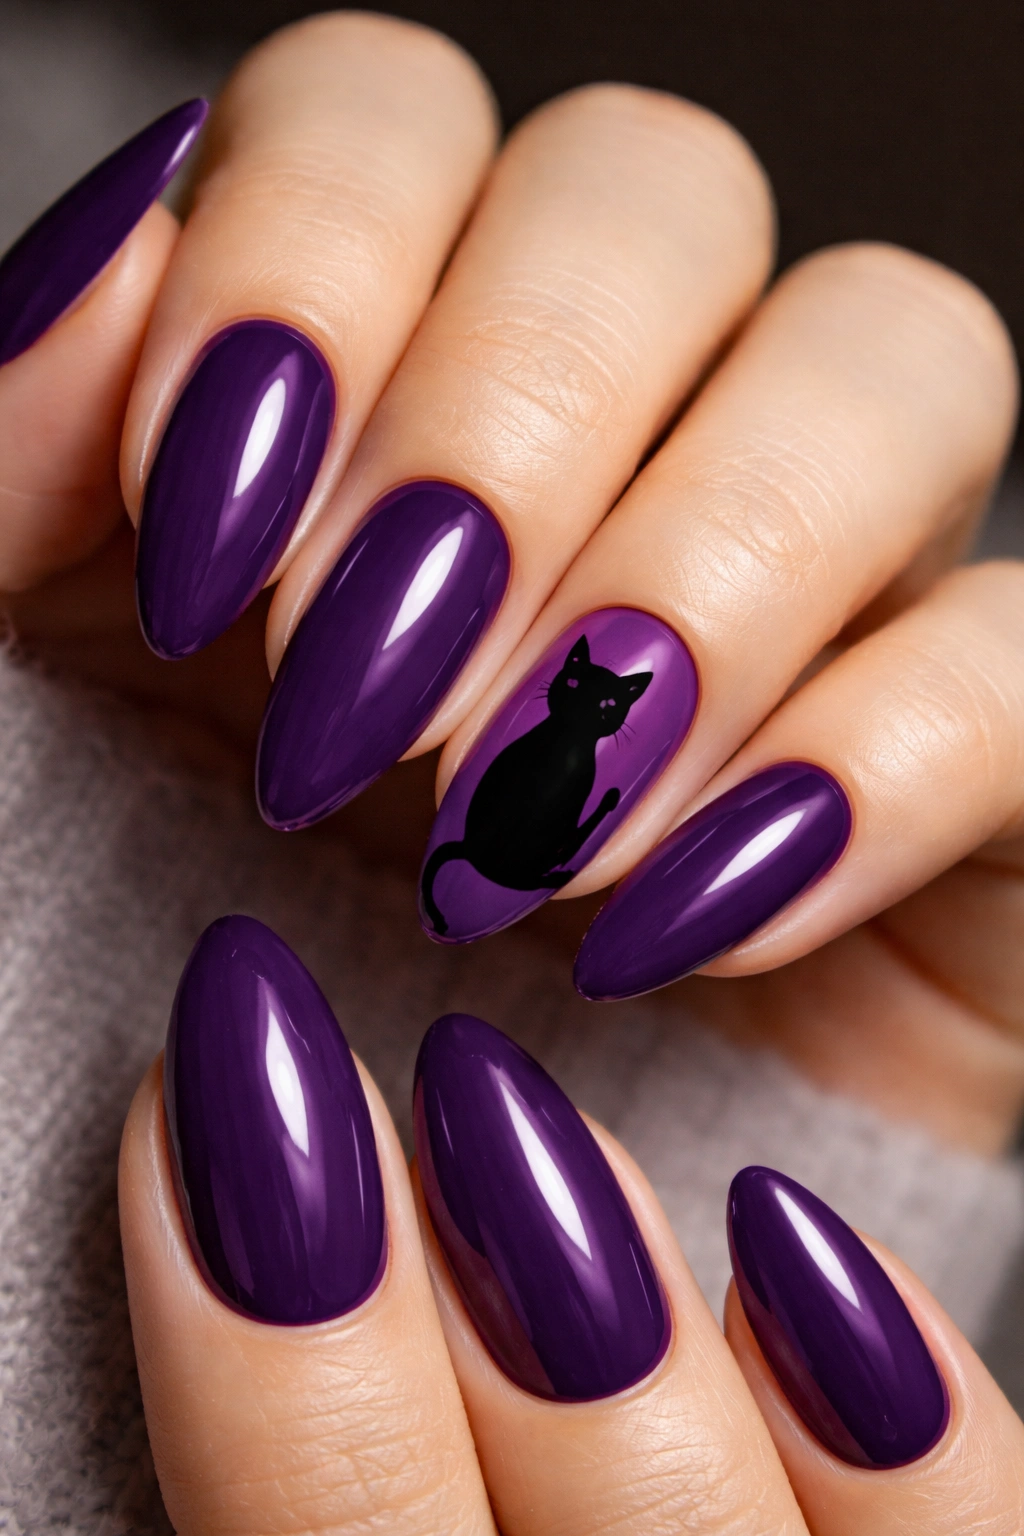
Combine two Halloween favorites—witchy purples and black cats—into one cohesive design. Paint each nail in a rich purple, aubergine, or plum shade, then paint a black cat silhouette on one or two accent nails. The cat can be sitting, walking, or even flying on a broomstick. The purple creates a magical, witchy backdrop that makes the black cat silhouette pop with drama.
What Makes It Different
The simplicity of a solid silhouette against a rich background creates an elegant, sophisticated look that feels less costume-y and more intentional. Purple is a surprisingly versatile Halloween color that bridges between spooky and glam. On almond nails, this combination feels especially refined because the shape naturally elongates the silhouette.
Painting Witchy Purple Nails
- Apply 2-3 coats of rich purple, aubergine, or plum polish
- On accent nails, paint a black cat silhouette using a thin brush
- Cats can be sitting with tail curved around them, walking, or perched on a broomstick
- Keep the silhouette solid black with no interior detail—the impact comes from the contrast
- Optional: add a tiny white crescent moon or star near the cat
- Glossy or matte finish both work beautifully with this color combination
Pro tip: If you’re nervous about painting a cat silhouette freehand, sketch it in with a toothpick using a tiny bit of black polish, then paint over your sketch lines once you’re happy with the shape.
13. Dripping Black Paint Effect
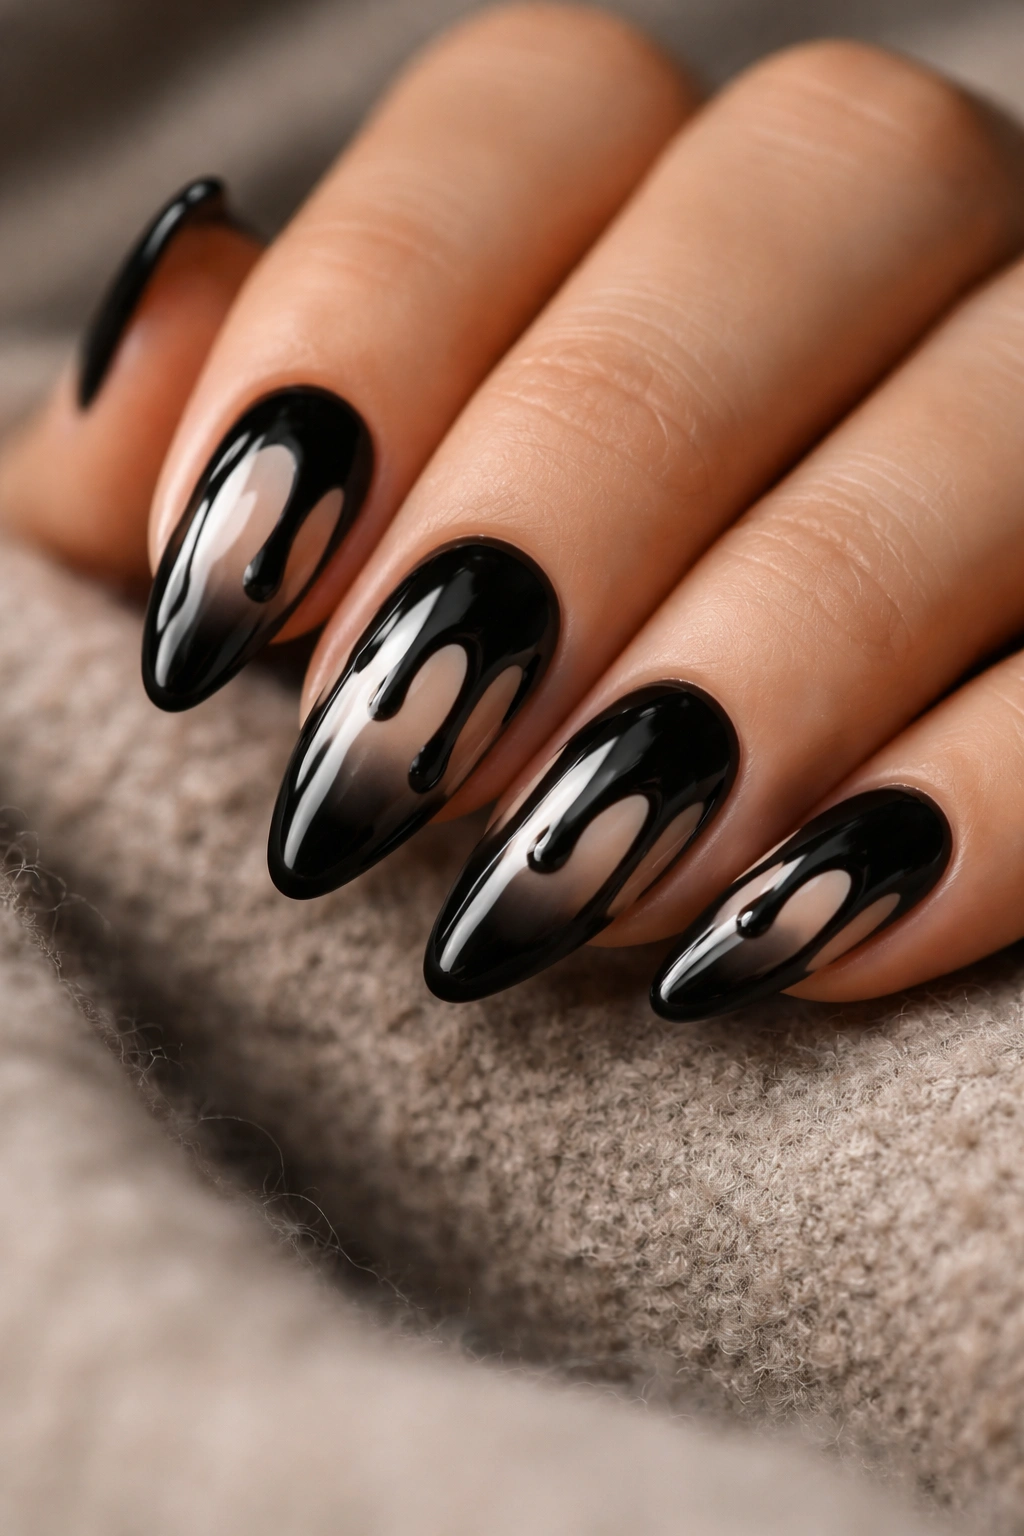
This design is all about controlled chaos—black polish that looks like it’s actively dripping down your nails. Start with a light base color like white, nude, or pale pink, then create thick black lines that drip downward from the tips. The lines should be organic and slightly irregular, not perfectly symmetrical. It’s modern, edgy, and dramatically Halloween without being obviously spooky.
Why It Works for Almond Nails
The length and taper of almond nails make the dripping effect look more natural—the drips follow the line of the nail shape rather than fighting against it. You can create longer drips on longer nails, which makes the effect more pronounced and visually interesting. The pointed tip is the natural endpoint for drips, so they feel like they belong there.
Creating the Dripping Effect
- Paint a pale base (white, nude, or pale pink) on all nails
- Once completely dry, use a thin brush to paint thick black lines
- Start the line at the tip or near the cuticle, then let it drip downward
- The drips should be organic and slightly irregular in width
- Layer 2-3 thick coats of black to create genuine depth
- Let the design dry completely before adding top coat
Insider note: The thickness of the black lines is what makes this design work—thin lines just look like streaks, but thick drips create actual dimension and drama.
14. Tarot Card Inspired Design
Channel mystical energy with a tarot-inspired nail design. Paint the base in deep midnight blue or black, then create a simplified tarot card image on one accent nail. This could be a star, the moon, a tower, or any tarot symbolism you’re drawn to. Use gold or silver accents to create that luxe, mystical card aesthetic.
What Makes This Design Stand Out
The tarot aesthetic bridges Halloween spookiness with genuine artistic interest—it’s mysterious without being scary. The symbolism appeals to people beyond just Halloween enthusiasts. Gold or silver accents against dark backgrounds create an inherently luxe look that feels special and intentional.
Creating Tarot Imagery
- Paint base in midnight blue, black, or deep purple
- Choose simple tarot imagery (star, moon, sun, tower, skull)
- Paint the image in gold or silver, keeping lines clean and distinct
- Add decorative elements like small diamonds or stars around the imagery
- Optional: add thin gold or silver lines creating a frame around the image
- Glossy finish enhances the mystical, jewel-like appearance
Pro tip: Look up actual tarot card imagery for inspiration—the symbolism and proportions are actually quite elegant, and referencing real cards helps you create something that feels authentically mystical rather than made-up.
15. Bloody Handprint Design
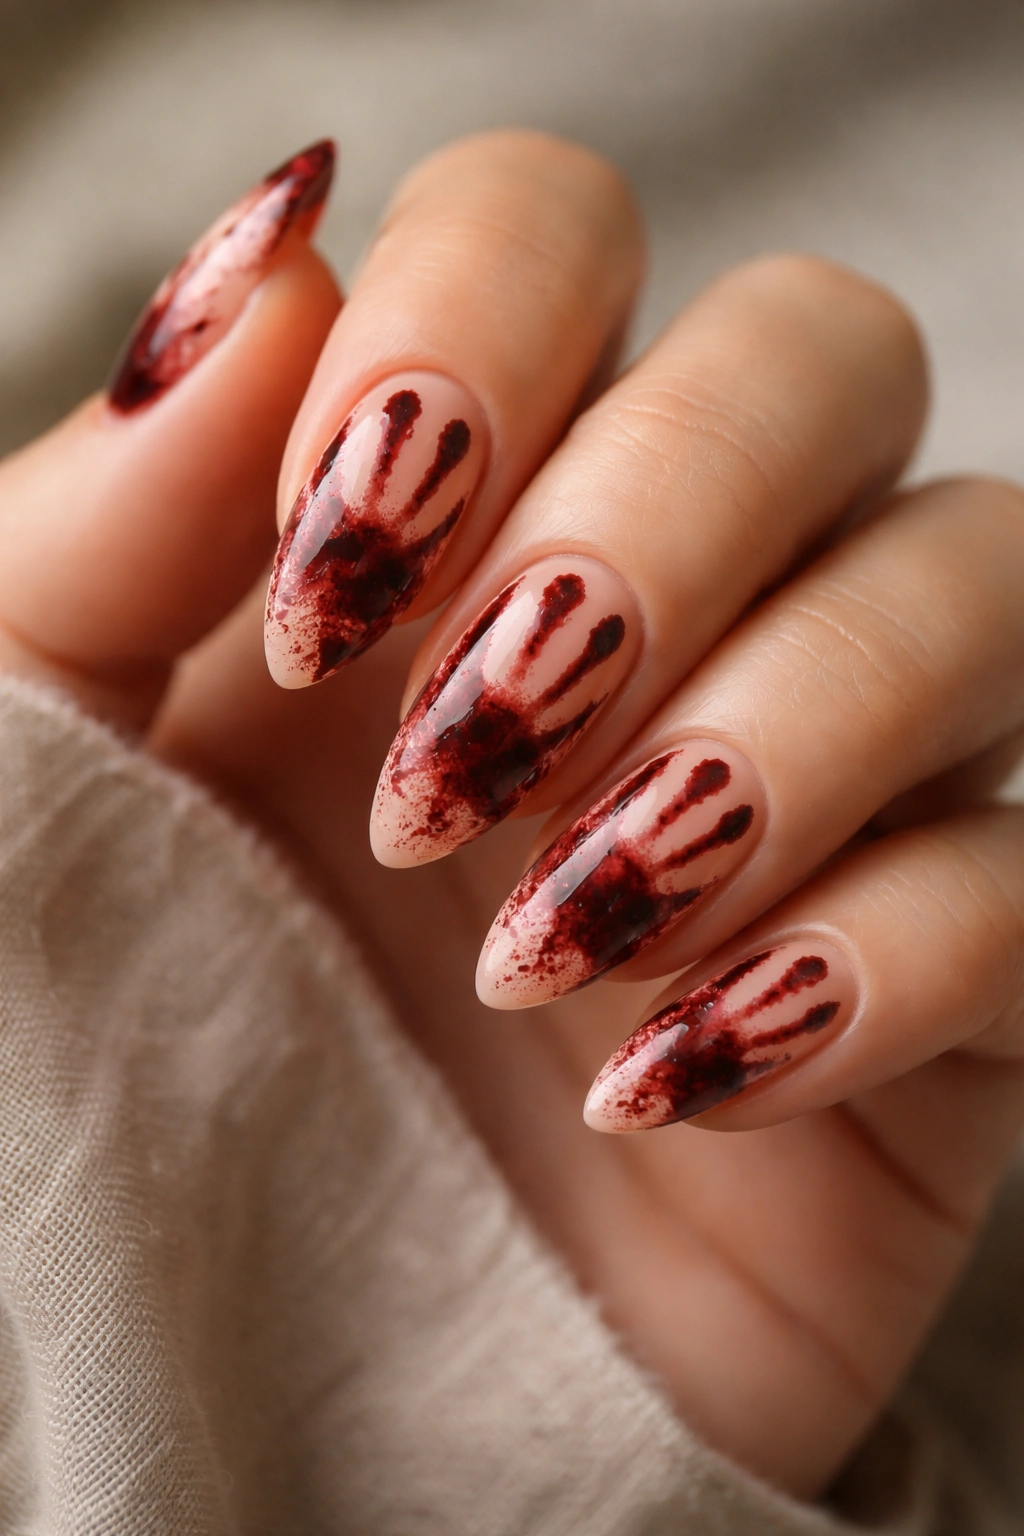
This design is genuinely creepy and surprisingly simple to execute. Paint your nails in a pale nude or white base, then create the impression of a bloody handprint across the nails. You can do this with a dark red or blood-orange polish applied with a sponge, or paint actual handprint details using a thin brush. Either approach creates an unsettling, dramatic effect.
Why It’s Perfect for Almond Shape
The variety of finger lengths on different nails creates a naturally interesting composition for a handprint design. The pointed tips add to the slightly menacing quality of a handprint. Across multiple nails, you can create the impression of fingers and palm in a way that actually looks fairly realistic.
Creating a Bloody Handprint
- Paint pale nude or white base on all nails
- Using dark red or blood-orange polish, sponge color onto the nails to create handprint shapes
- If using sponge, dab gently to create a slightly texture, bloody appearance
- Optional: paint individual finger and palm details using a thin brush in dark red
- Add dripping effect where the “blood” runs downward
- Matte finish creates a more realistic, less obviously-done appearance
Worth knowing: The imperfection of a handprint is actually its strength—if it doesn’t look perfectly clean or evenly applied, it actually looks more real and therefore more creepy.
16. Glittery Bat Design with Wing Detail
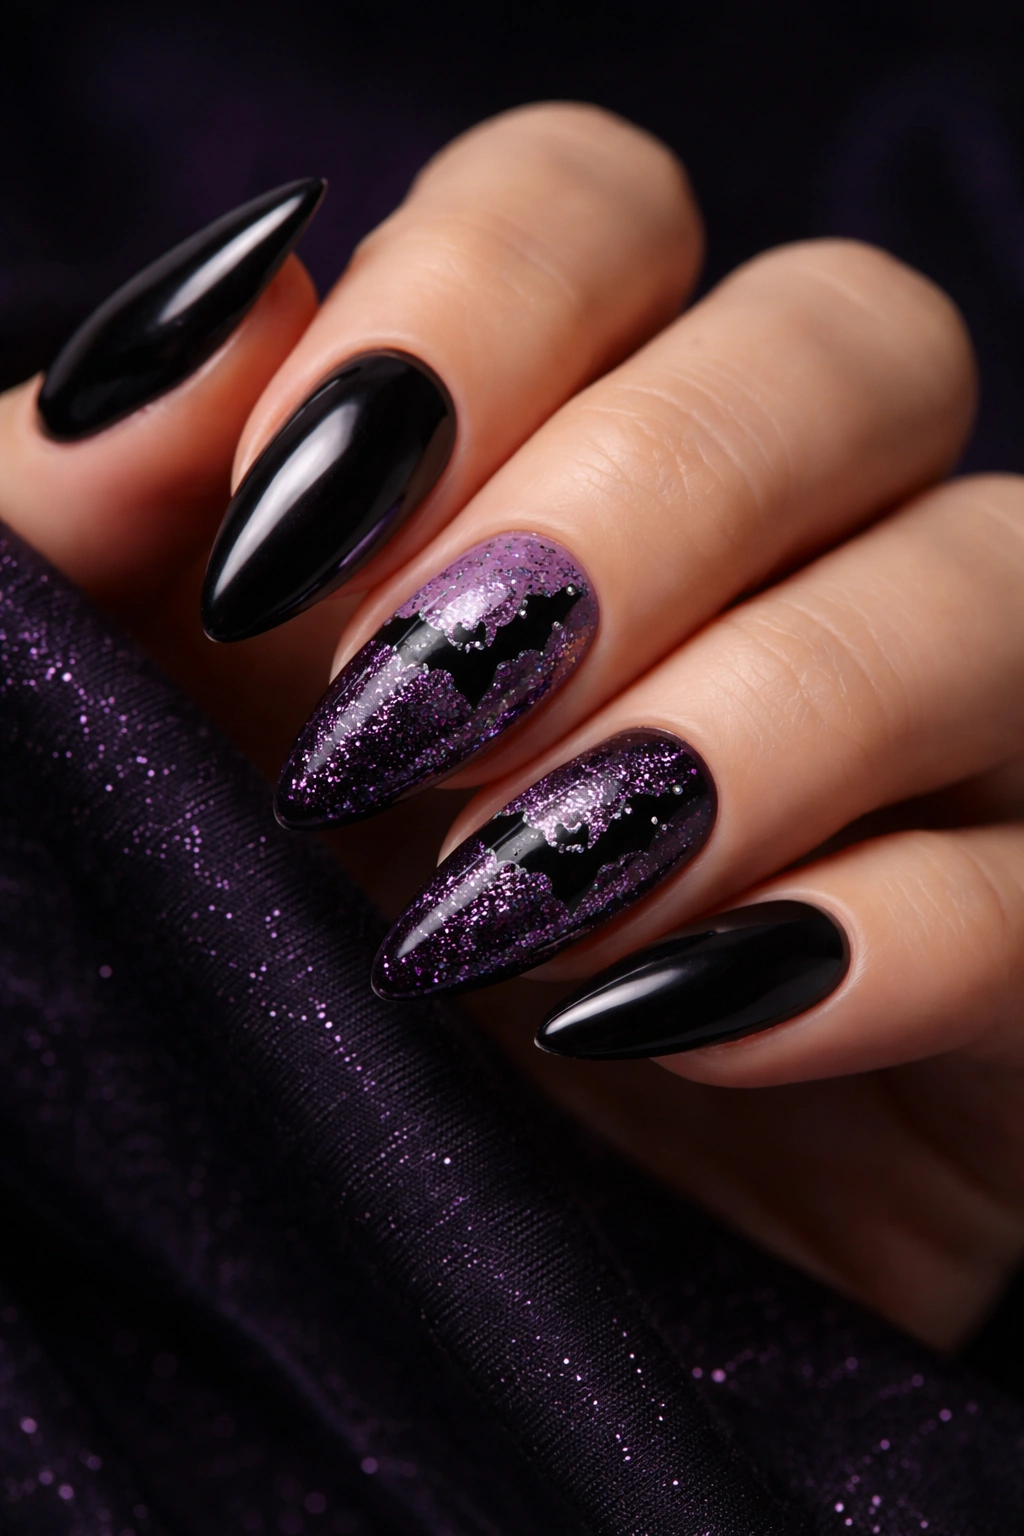
Bats are Halloween perfection, and when you add glitter or sparkle, they become elegant rather than scary. Paint the base in black or deep purple, then paint two bat silhouettes (wings spread) on accent nails. Add glitter polish or sparkle effects to the wings to make them shimmer and catch light. It’s a design that manages to be both spooky and glam.
What Makes It Different
The glitter adds a sophistication that pure black bat silhouettes wouldn’t have on their own. Bats automatically have good negative space because of their wing shape, which means the design reads cleanly even with added sparkle. The contrast between solid body and sparkly wings creates visual interest.
Painting Glittery Bats
- Paint base in black or deep purple (2-3 coats for opacity)
- Paint bat body (small circle or oval) in the center of the nail using black
- Paint wings extending outward, creating a V-shape
- Add small details like ears at the top of the body
- Fill wings with glitter polish or apply glitter gel
- Optional: add a tiny white crescent moon nearby
- Seal with matte or glossy top coat depending on the overall effect you want
Pro tip: If you’re not confident painting symmetrical bat wings freehand, use a striping brush to create the main wing lines, then fill in around them with black—this keeps the wings relatively even without requiring perfect freehand work.
17. Coffin Shape with Ornate Gold Details

This design is sophisticated and darkly elegant. Paint the base in black or deep burgundy, then use gold or rose gold polish to paint ornate details inspired by actual coffin imagery. Think decorative crosses, floral patterns, or ornamental borders. The almond shape naturally mimics the coffin silhouette, which makes this design feel especially fitting.
Why It Works on Almond Nails
The pointed tip at the foot end and slightly wider middle mirrors the shape of an actual coffin. The vertical length gives you plenty of room for ornate details without everything feeling cramped. The elegance of almond nails naturally complements the ornate, formal aesthetic of coffin imagery.
Creating the Ornate Coffin Look
- Paint base in black, deep burgundy, or dark plum
- Use gold, rose gold, or silver polish to paint decorative details
- Paint a cross at the center, or ornamental border patterns
- Add small floral or geometric designs around the border
- Use a thin brush for all gold details to keep lines delicate
- Glossy finish makes the metallic elements really shine
- Optional: add tiny diamonds or rhinestones for extra glamour
Insider note: You don’t need to paint actual realistic coffin shapes—the almond nail already IS the coffin shape. Your gold details just need to be ornate and centered on the nail for the overall effect to work.
18. Matte Black with Holographic Spider Accents
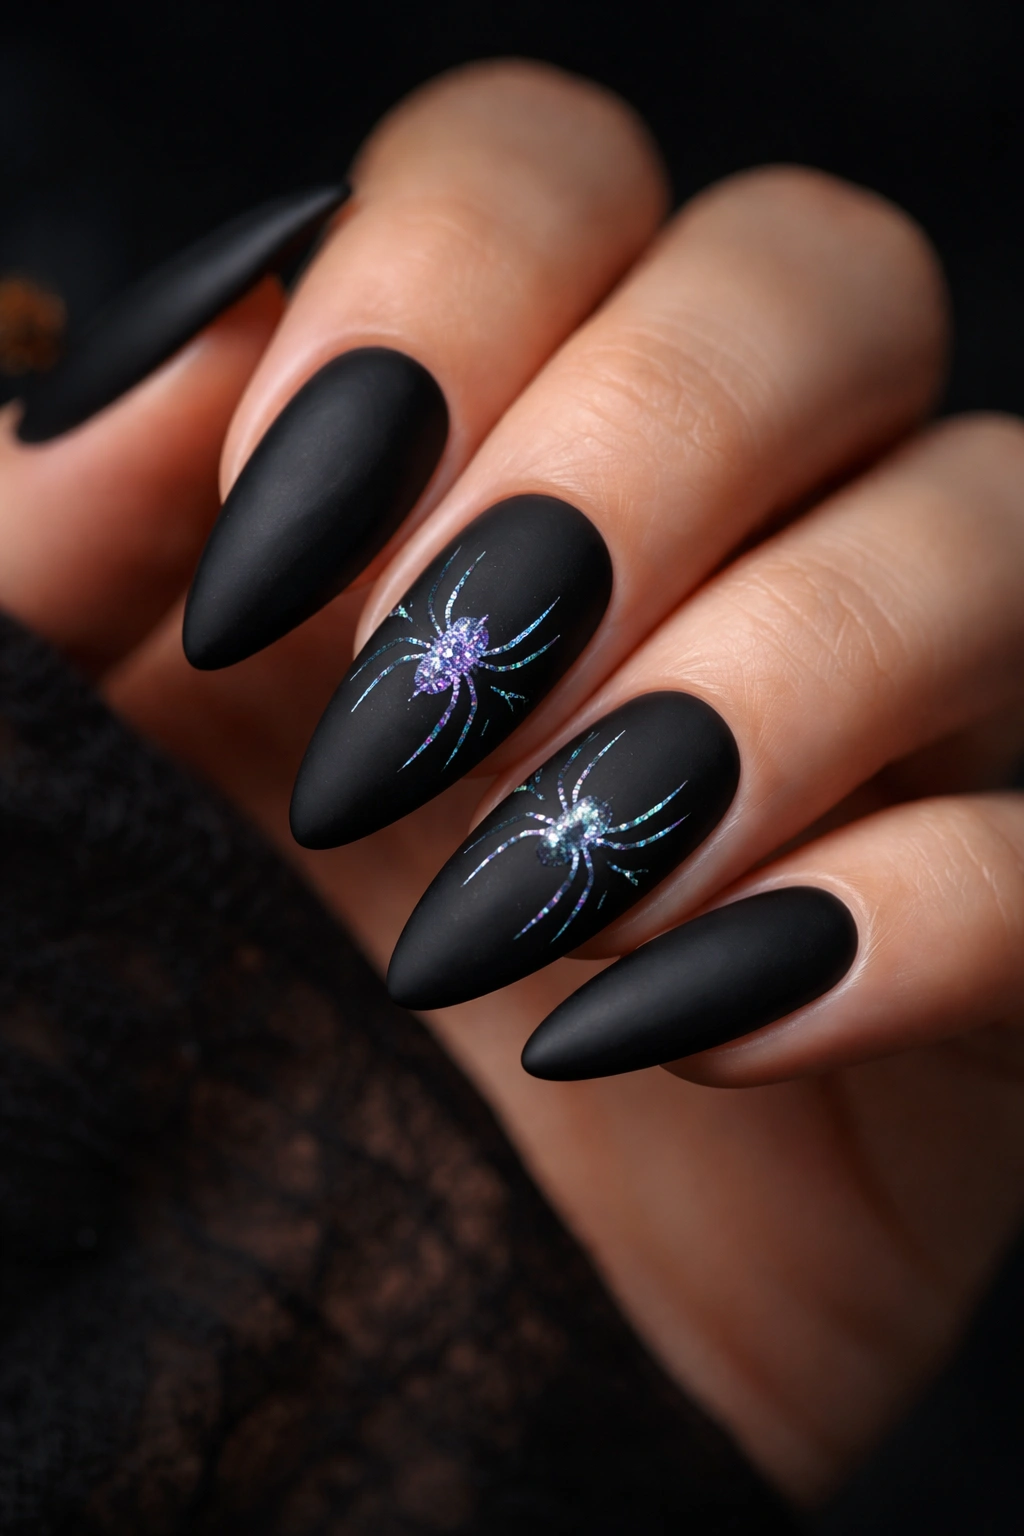
This design balances minimalism with sparkle. Paint the base in matte black on all nails, then add small holographic accents on one or two nails—a holographic spider or spider web that shifts colors as you move your hand. The contrast between matte and holographic is striking and modern.
What Makes It Stand Out
Holographic finishes are inherently eye-catching, and against a matte background, they become almost three-dimensional. The movement and color-shifting quality creates visual interest without needing to add actual complexity. This design reads as sophisticated and intentional rather than costumey.
Creating Matte Black with Holographic Details
- Paint all nails with matte black polish (usually matte polishes require 2-3 coats)
- On one or two accent nails, apply holographic powder or use holographic gel
- Create a simple spider shape or web using the holographic effect
- Keep the rest of the nail matte to create contrast
- Seal with matte top coat to preserve the matte finish on non-holographic areas
- The holographic elements will shift color depending on the angle and light
Worth knowing: Holographic powders are delicate and require careful handling. Once applied to a matte base, seal thoroughly with top coat to protect the powder and prevent it from rubbing off with daily use.
19. Ombre Haunted Forest Silhouette
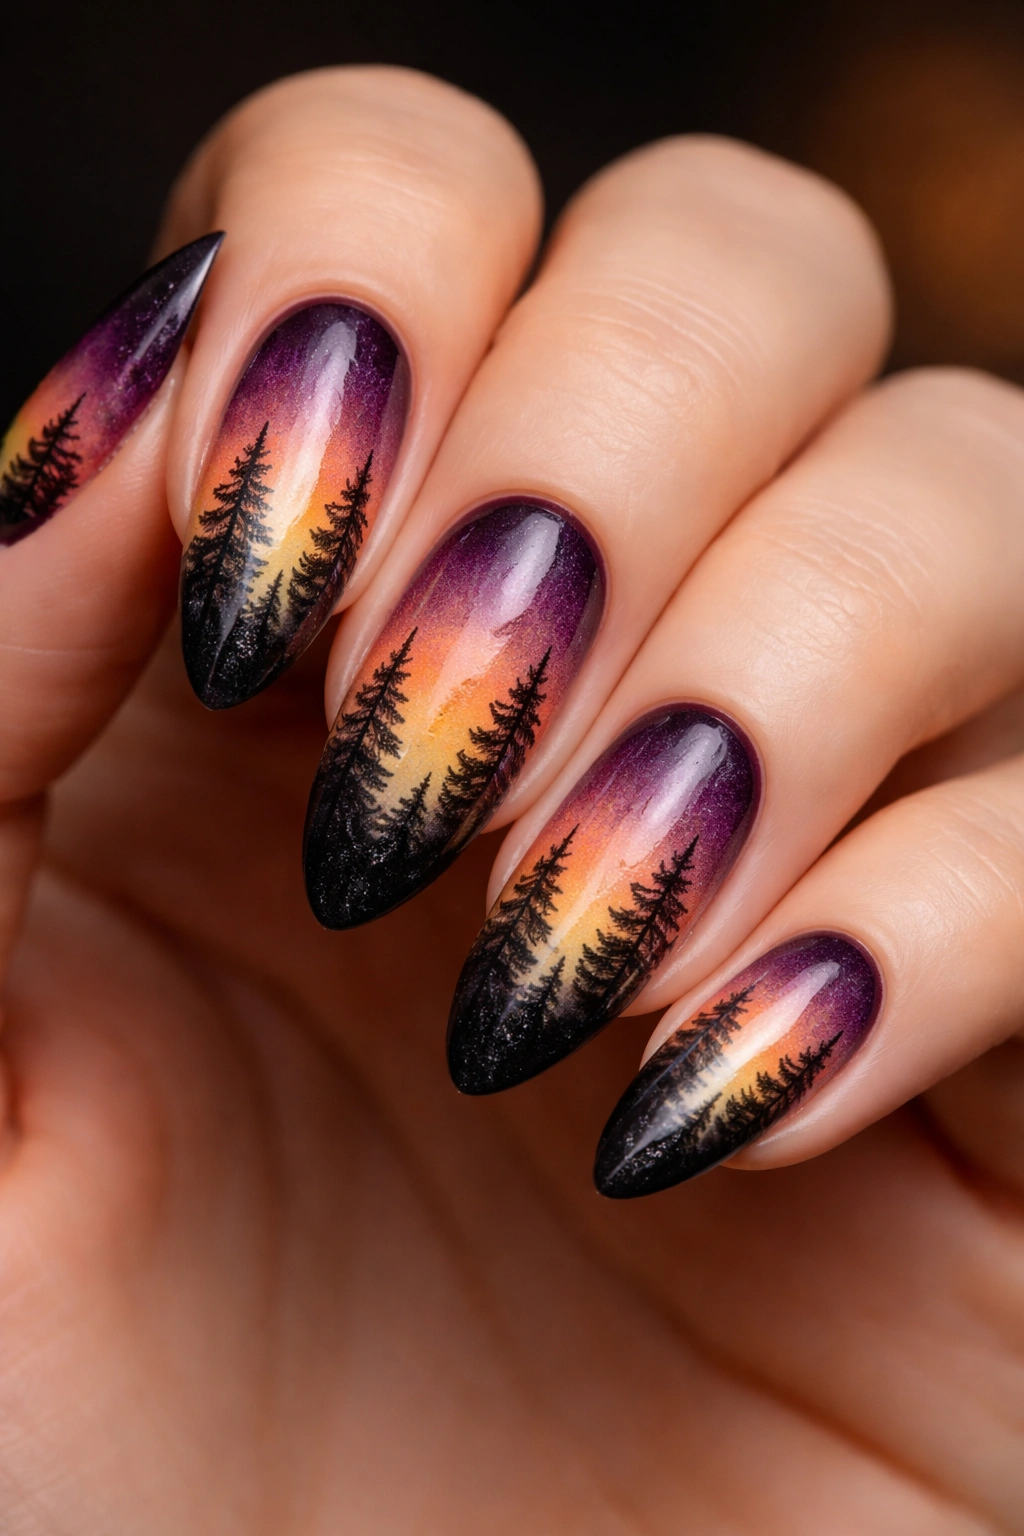
Create a landscape design with dark trees silhouetted against an ombre background. Paint a gradient from deep purple at the base to orange at the middle to pale yellow at the tip, mimicking a sunset or moon-lit sky. Then add black pine tree silhouettes in the distance, getting progressively smaller as they recede. It’s artistic, atmospheric, and quintessentially Halloween.
Why It’s Perfect for Almond Shape
The vertical gradient naturally follows the length of the almond nail, creating a landscape effect that actually flows. The pointed tip becomes the sky, and the base becomes the ground—the shape naturally creates perspective. You can paint multiple trees at different positions and sizes to create actual depth.
Creating the Haunted Forest
- Paint base in deep purple
- Use a sponge to apply orange in the middle section
- Blend in pale yellow or pale orange at the tip
- Once completely dry, paint black tree silhouettes using a thin brush
- Trees should be simple shapes: trunk and triangular branches
- Vary tree sizes, with larger trees closer to the base and smaller in the distance
- Optional: add a tiny moon or stars in the pale tip area
- Matte or glossy finish both work beautifully with this design
Pro tip: The beauty of silhouettes is that they don’t need to be detailed or realistic—simple shapes create the strongest visual impact. Think “paper cutout forest” rather than “realistic forest painting.”
20. Skeleton Hand Bones Design

Paint your nails to look like skeleton hands with bone details. Use pale nude or off-white as a base, then paint black bone lines across the nail to mimic the structure of hand bones. The almond shape naturally mimics the elongated shape of finger bones, making this design feel anatomically appropriate. Add tiny black lines for knuckles and joints.
What Makes It Different
This design is darkly anatomical in a way that’s more interesting than just painting skulls. The bone structure is recognizable but slightly unsettling, especially when you see all ten “skeleton hands” together. It’s the kind of design that makes people do a double-take because it’s surprisingly detailed.
Creating Skeleton Hand Bones
- Paint pale nude, off-white, or cream base on all nails
- Using black or dark brown polish, paint bone lines down the center of each nail
- Add small black lines perpendicular to the main lines to mimic knuckles and joints
- Paint tiny white or light highlights on the outer edges of bones for dimension
- Optional: add a tiny skull or cross-bones symbol on one accent nail
- Matte finish emphasizes the bone-like, slightly chalky appearance
Insider note: You can look up actual hand bone X-rays for anatomical inspiration, which helps you paint realistic-looking bone structures rather than just random lines.
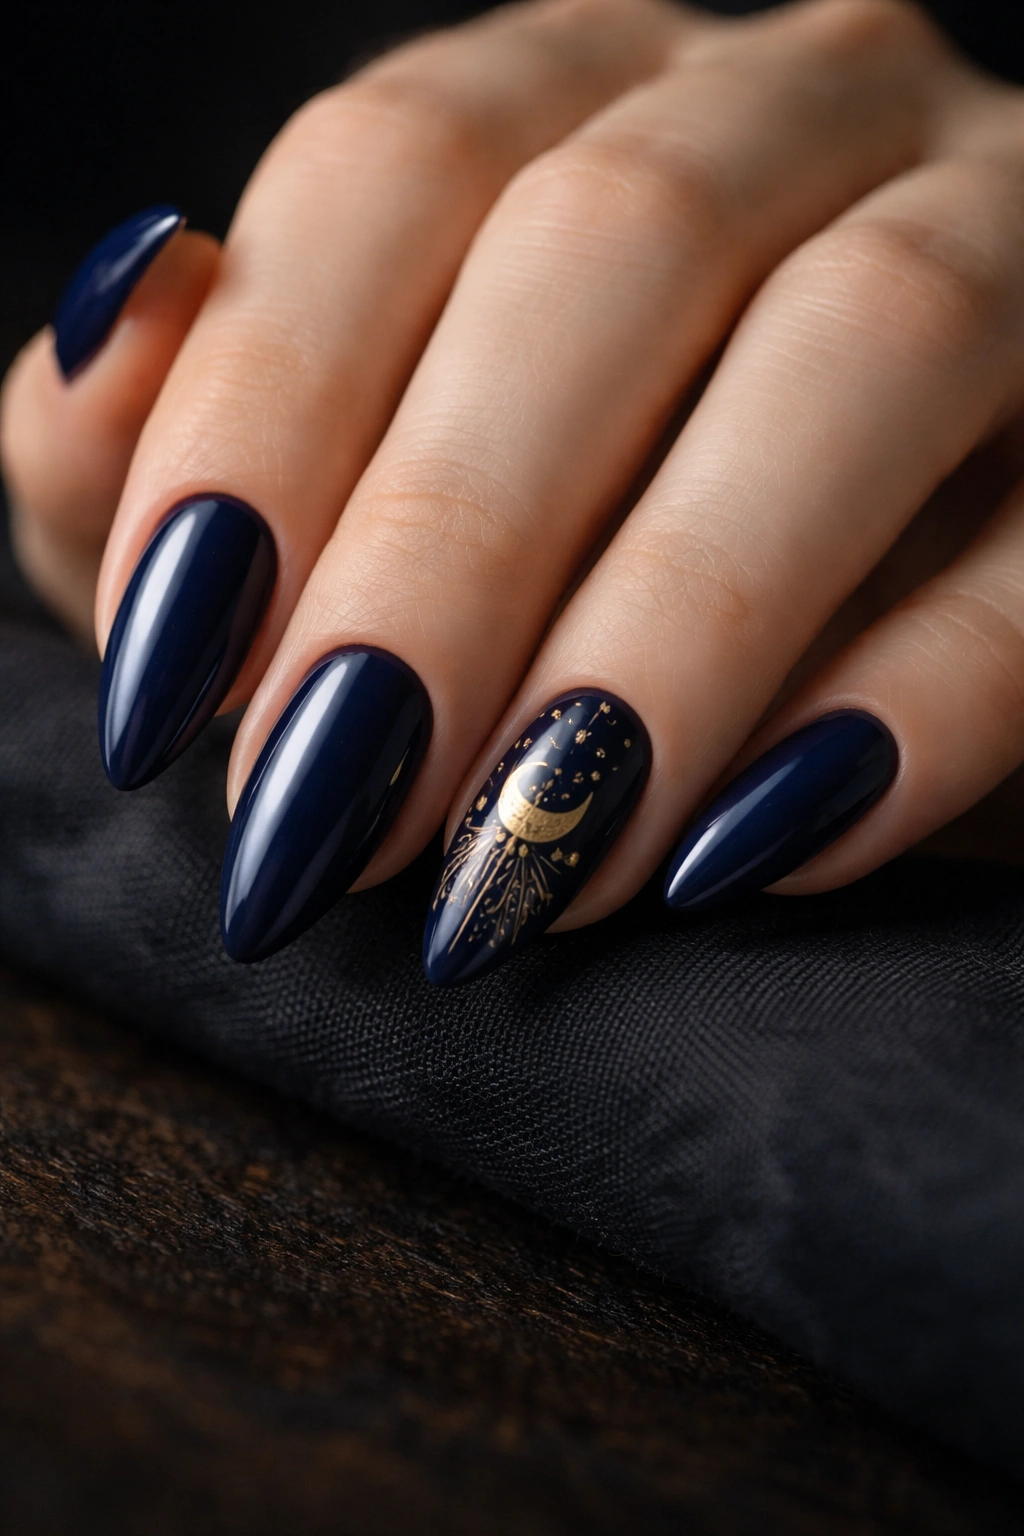
21. Golden Crescent Moons with Stars
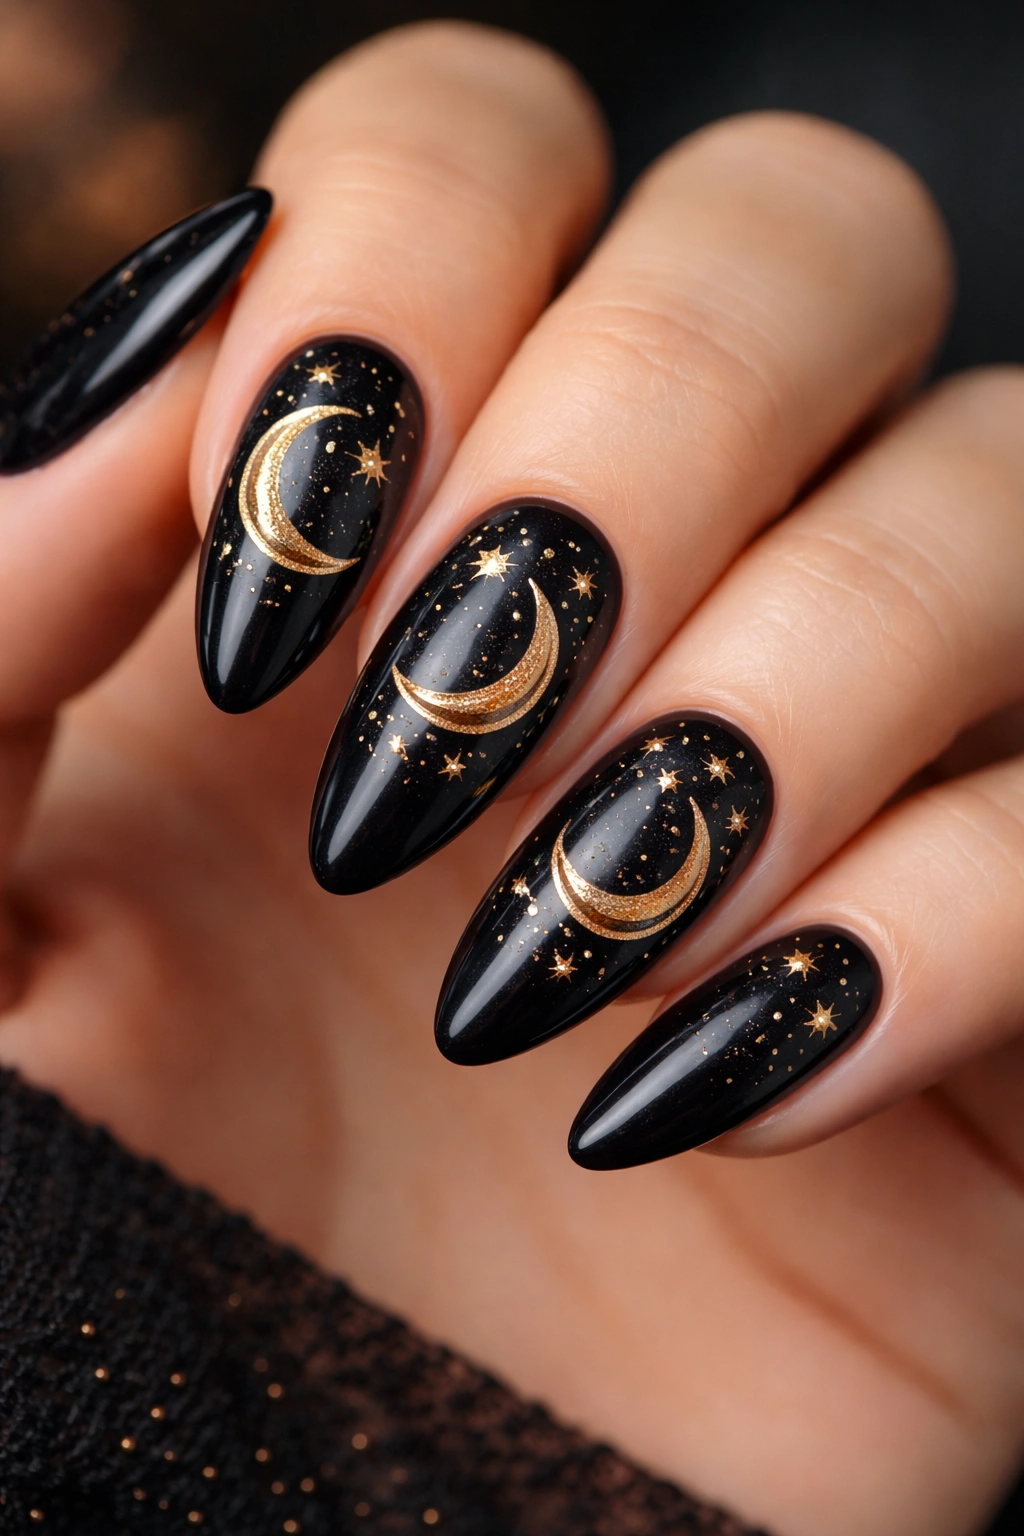
This design is witchy and celestial. Paint the base in deep midnight blue or black, then use gold or silver polish to paint crescent moon shapes on accent nails. Scatter tiny stars around the moons, creating a night sky effect. It’s elegant, mystical, and manages to be both spooky and surprisingly pretty.
Why It Works for Almond Nails
The crescent moon shape follows the curve of the almond nail beautifully, making it feel like the moon is naturally part of the nail rather than something painted on top. The vertical length gives you plenty of room for scattered stars without the design feeling cluttered. The pointed tip can become the tip of a star, creating a natural compositional endpoint.
Creating Golden Moon and Stars
- Paint base in midnight blue, deep purple, or black
- Use gold or silver polish to paint crescent moon shapes on accent nails
- Paint or dot small stars scattered around the moons
- Optional: add small dots and lines to create constellation patterns
- Add a thin golden border around the cuticle area for extra elegance
- Glossy finish makes the gold or silver really shine
- Optional: add tiny white accents to the moon curves for dimension
Pro tip: If you’re painting moons freehand and they look uneven, adding thin stars around them actually helps balance any imperfection—the eye focuses on the whole composition rather than any single element.
22. Toxic Green Slime Effect with Black Drips
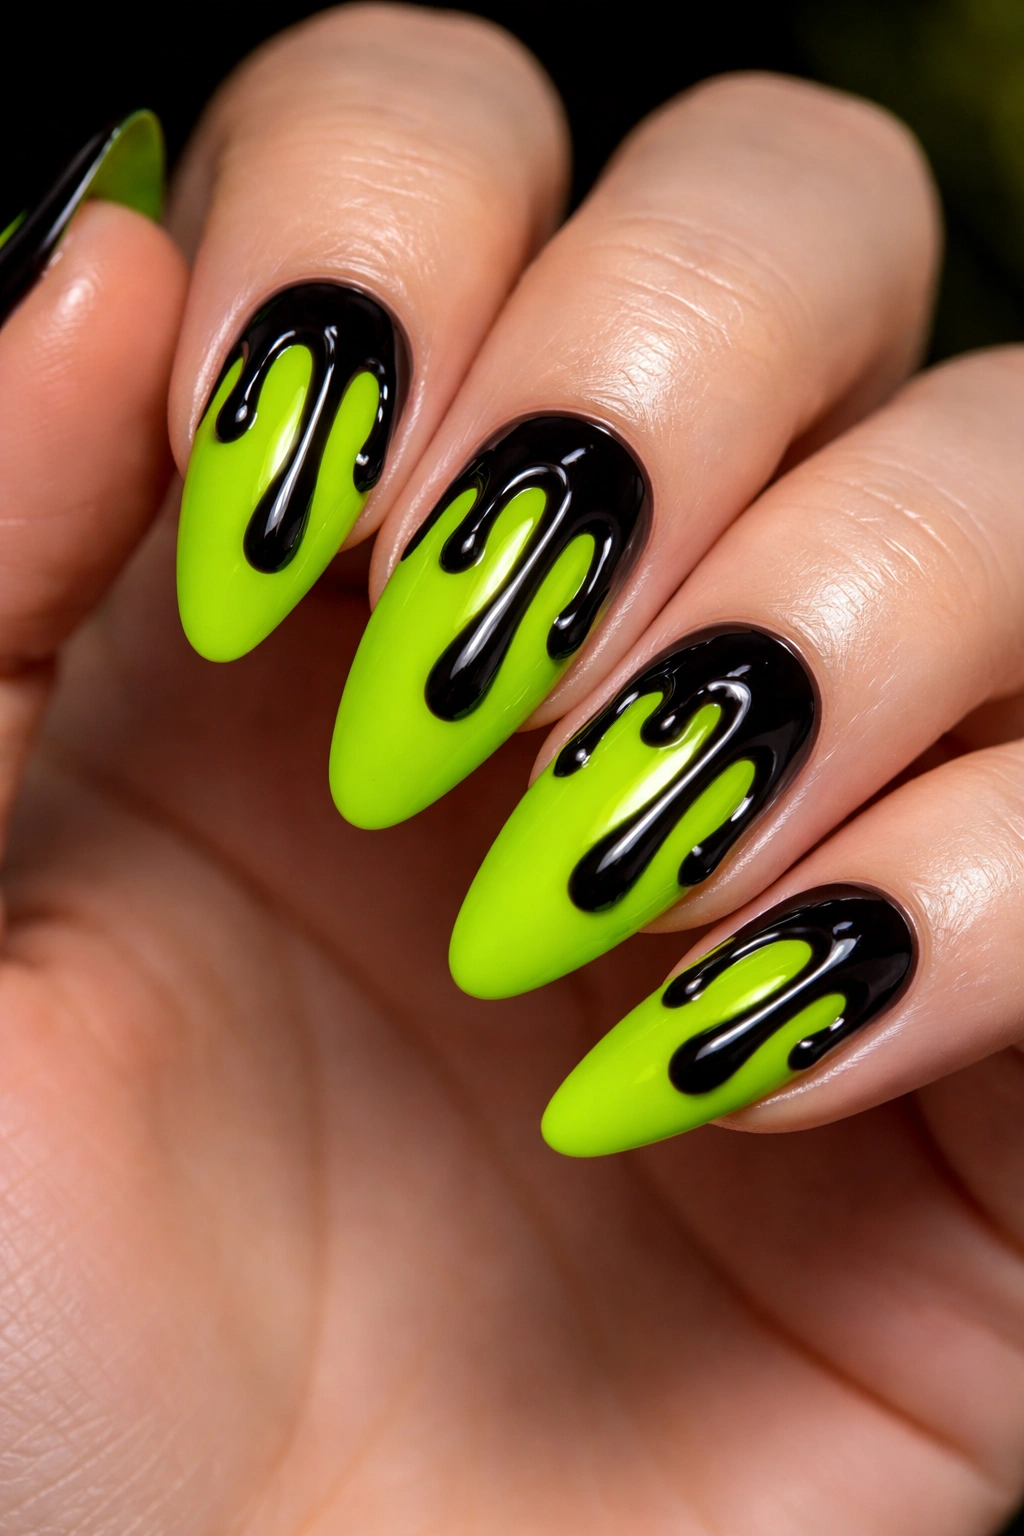
Channel mad scientist energy with a toxic green slime design. Paint the base in a sickly neon green, then create thick black drips running downward. The combination of bright green and black is instantly recognizable as toxic or poisonous. It’s dramatic, unexpected, and definitely eye-catching.
What Makes This Stand Out
The color combination is bold and slightly uncomfortable, which is exactly what makes it work for Halloween. The neon green against black creates maximum contrast and visual punch. It’s the kind of design that reads clearly from a distance because the colors are so dramatically different.
Creating Toxic Green Slime
- Paint base in neon green, neon lime, or toxic-looking green (2-3 coats for opacity)
- Once completely dry, use black polish to paint thick dripping lines
- Drips should start from various points along the nail and run downward
- Make drips uneven and organic—some thick, some thin, some shorter, some longer
- Layer the black in multiple coats to create genuine dimension
- Keep the bright green visible between and around the drips
- Glossy finish makes the “slime” look wet and active
Worth knowing: Neon greens can be tricky to work with because they’re semi-transparent. You’ll likely need 3-4 coats to get true opacity, and even then, the black drips help create contrast if the green is lighter than you’d prefer.
23. Classic White Ghosts with Boo Bubbles
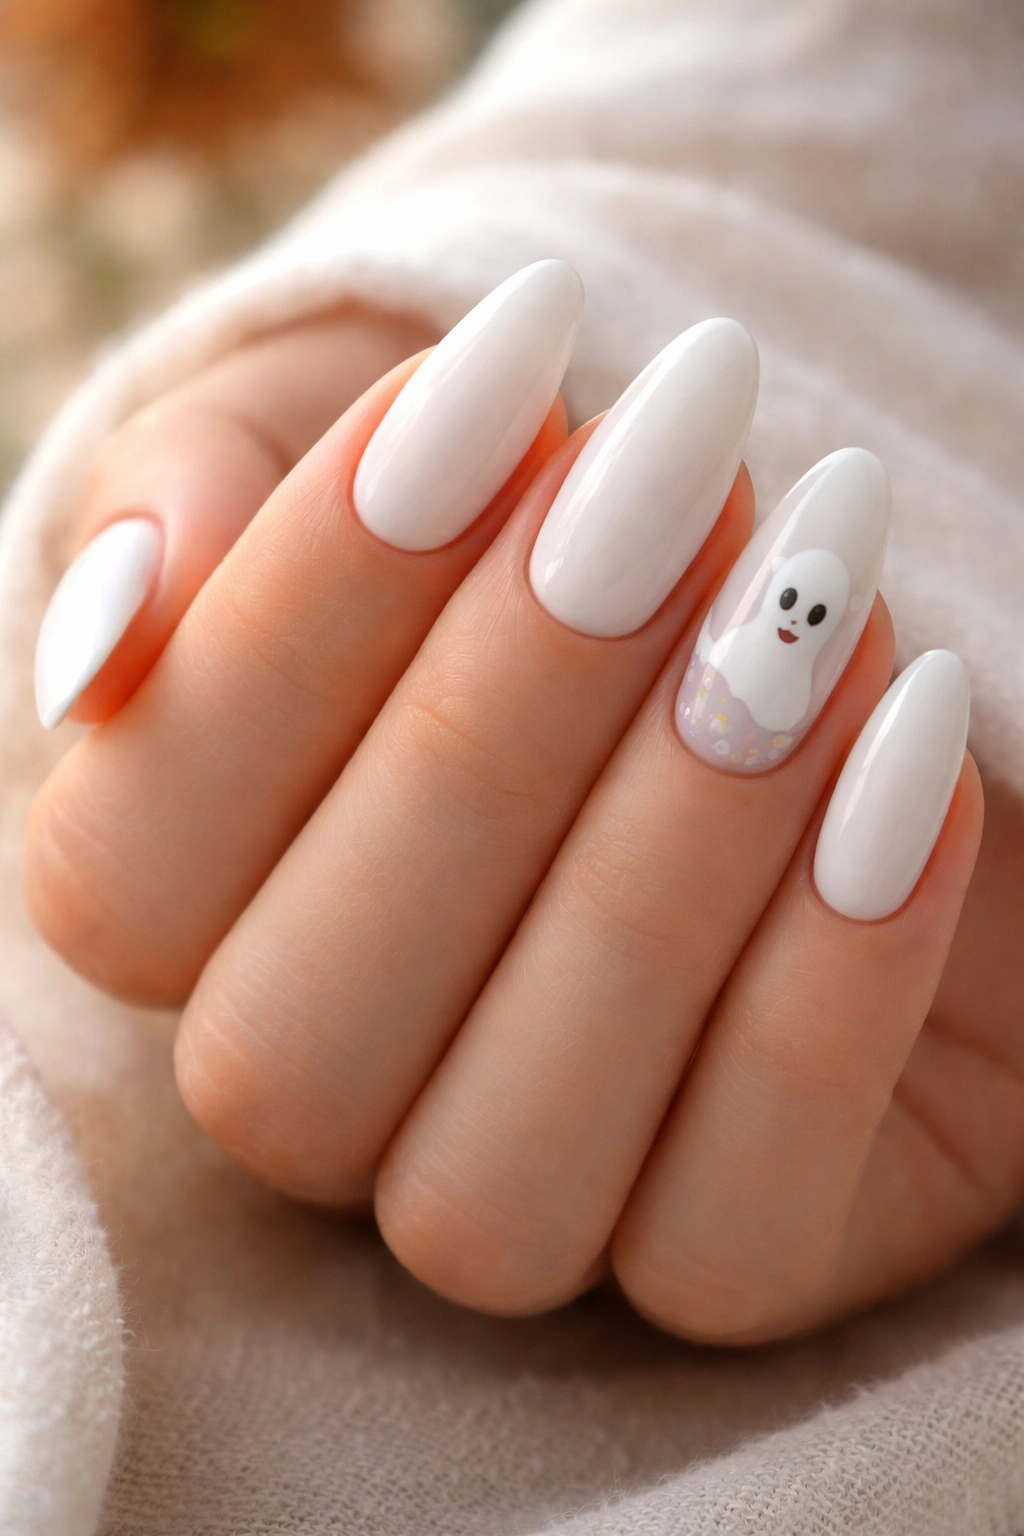
Keep it simple and playful with classic white ghosts. Paint all nails in white, then add ghost faces (two black dots for eyes and an O-shaped mouth) on accent nails. Add small text or simple “BOO” in black near the ghosts. It’s nostalgic, immediately recognizable, and surprisingly charming even for adults.
Why It Works for Almond Shape
The elongated tip of almond nails becomes the “head” of the ghost naturally, with the wider base becoming the flowing ghostly body. You can paint multiple ghosts at different positions on different nails, creating a cohesive set. The simplicity means even if your brushwork isn’t perfect, the design still reads clearly.
Creating Classic Ghosts
- Paint white base on all nails (2-3 coats for opacity)
- On accent nails, paint two black dots for eyes
- Paint a small curved line or O for the mouth
- Use black polish to write “BOO” or other ghostly messages
- Optional: add small black circles or squiggles around the ghosts as ghostly motion
- Matte or glossy finish both work beautifully—matte feels more classic
Pro tip: The imperfection of hand-painted ghosts actually adds to the charm. Wonky eyes and wiggly mouths make them feel more endearing than perfectly executed versions.
24. Rose Gold Pumpkins on Deep Orange
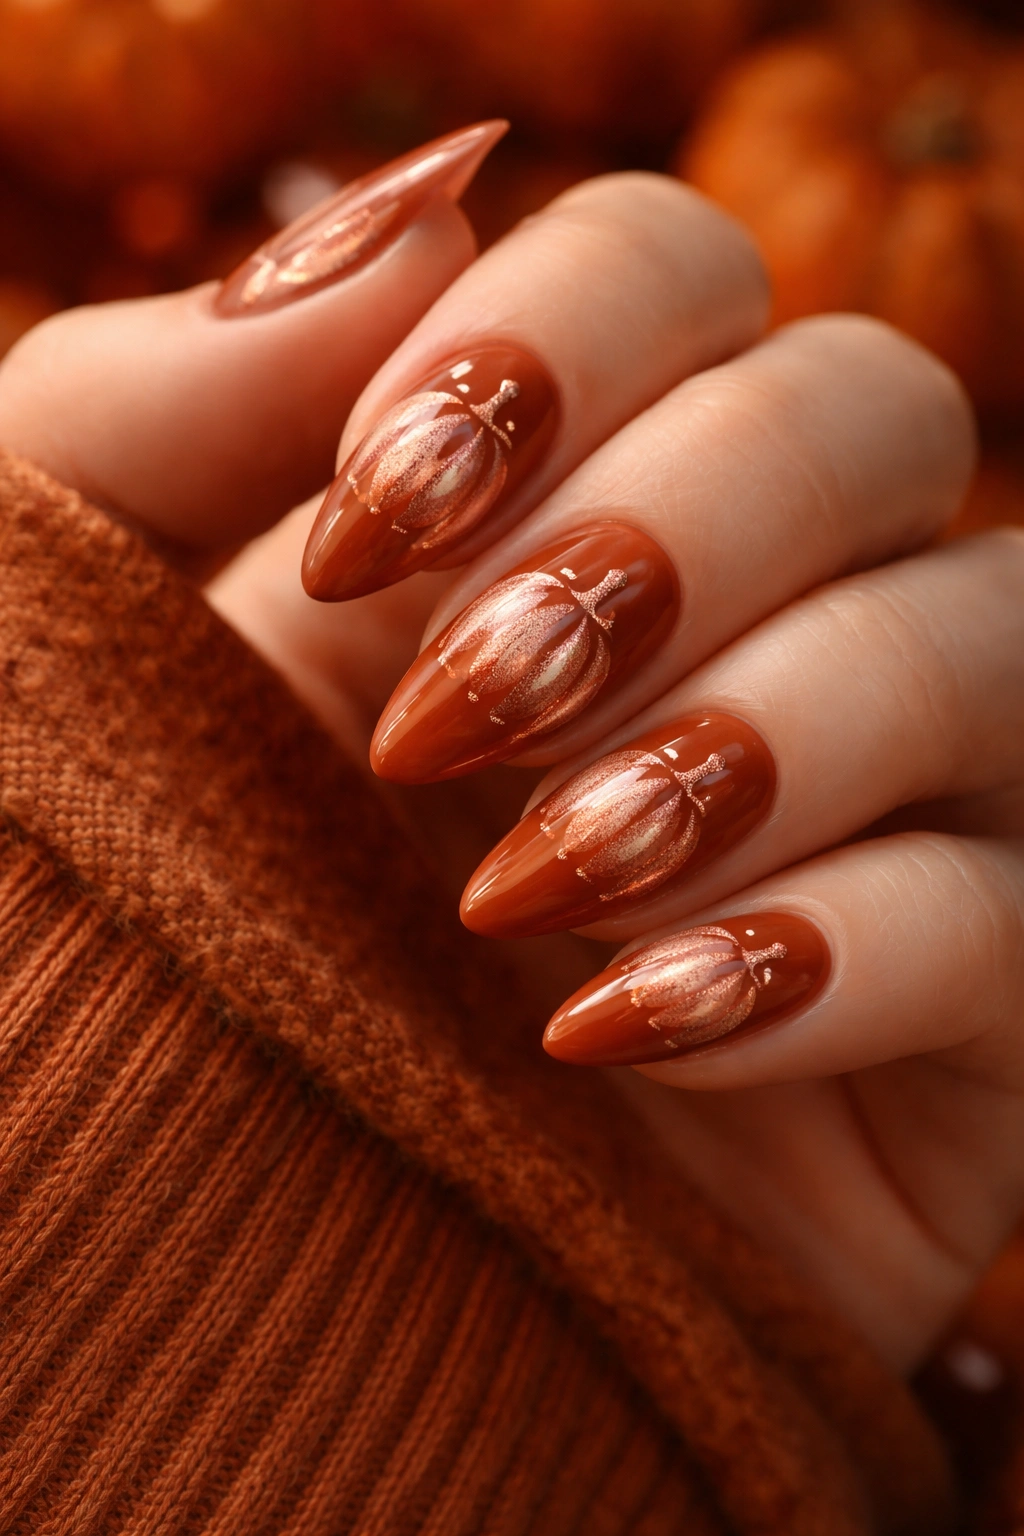
Combine metallic elegance with Halloween spirit using rose gold pumpkin details on a deep orange base. Paint all nails in deep, warm orange, then use rose gold or champagne polish to paint delicate pumpkin shapes. Add thin rose gold lines for the pumpkin ridges. It’s a design that feels both Halloween and unexpectedly sophisticated.
What Makes It Different
Rose gold creates an elegant, feminine take on traditional orange pumpkins. The metallic finish elevates what could be a simple design into something that feels more refined. On almond nails, the rose gold shimmer is especially visible and eye-catching.
Creating Rose Gold Pumpkins
- Paint base in deep, warm orange (2 coats for opacity)
- Use rose gold or champagne polish to paint pumpkin shapes
- Pumpkins can be simple circles with vertical lines for ridges
- Paint a small stem at the top of each pumpkin in dark orange or green
- Add thin rose gold lines radiating outward from center for dimension
- Optional: add small rose gold leaves or vines
- Glossy finish enhances the metallic appearance
Insider note: Deep orange works better than bright orange for this design because it creates more contrast with the rose gold accents—bright orange can make the rose gold harder to see.
25. Witches’ Cauldron Bubbling Over
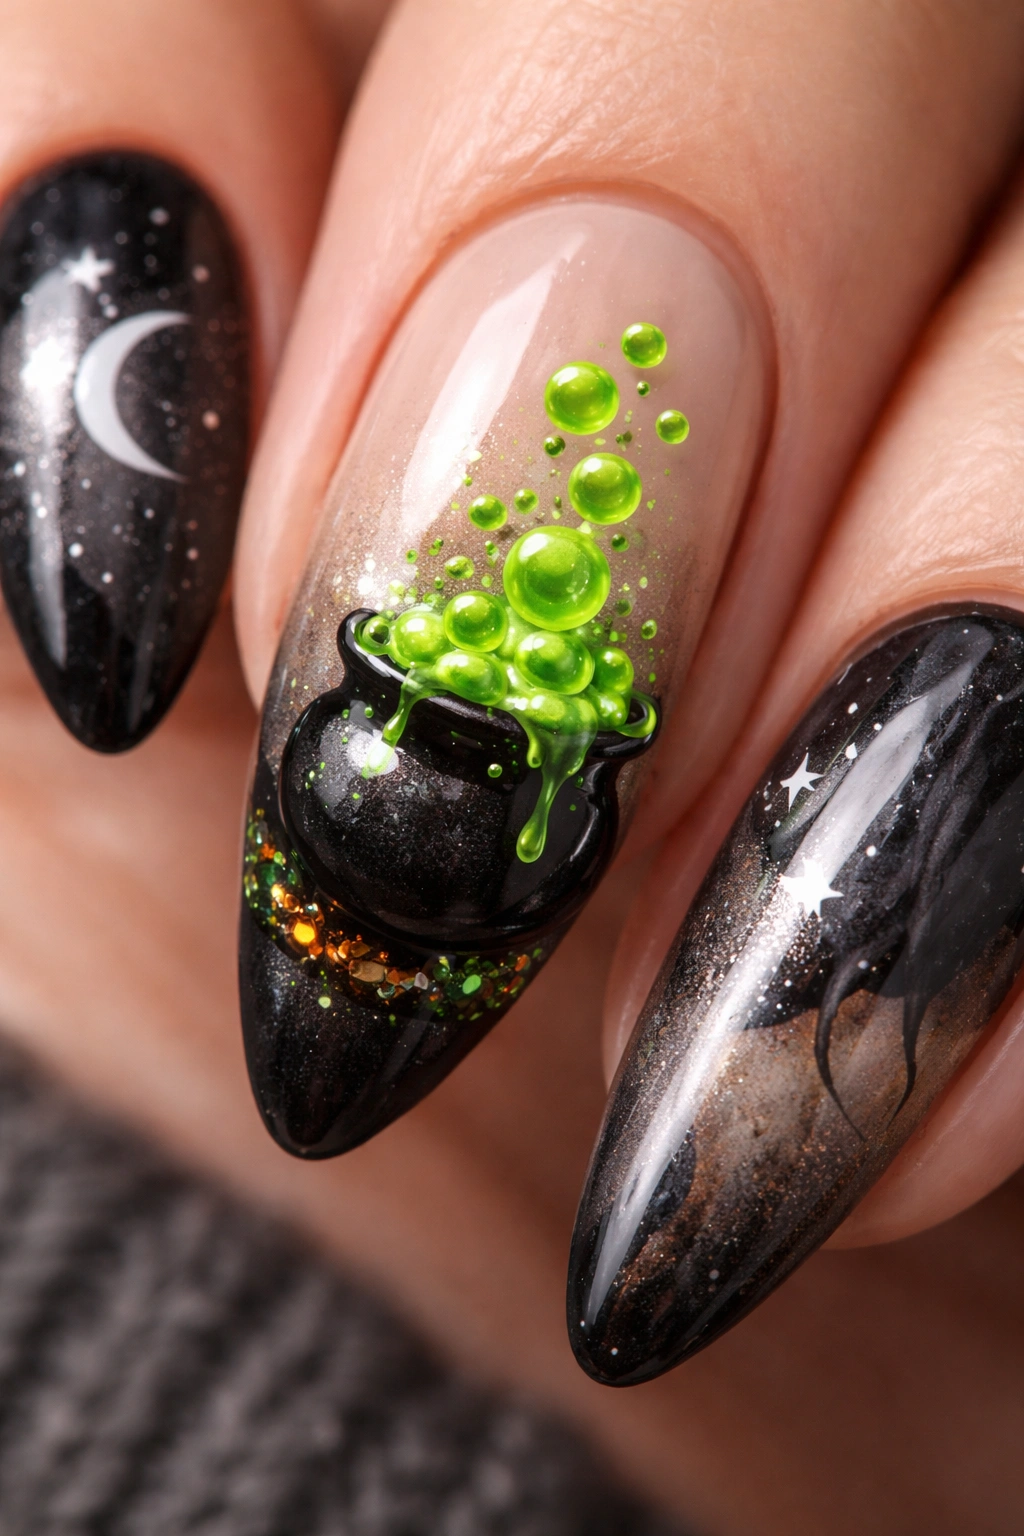
Create a miniature witches’ cauldron on accent nails. Paint a black cauldron shape at the base of the nail, then paint green or purple “potion” bubbling up and overflowing in cartoonish bubbles. Use dark colors with white or light highlights on the bubbles to create dimension. It’s playful, festive, and distinctly Halloween.
Why It’s Perfect for Almond Nails
The cauldron shape works well within the nail boundaries, with the wider middle of the almond nail becoming the cauldron body and the tip becoming the handle area. The vertical length gives you room for the potion to bubble up realistically. The pointed tip becomes the apex of the bubbling effect.
Creating a Bubbling Cauldron
- Paint black base on all nails
- On accent nails, paint a cauldron shape using black or dark gray
- Add dark green or purple potion inside the cauldron
- Paint round shapes above the cauldron to represent bubbles
- Use white or light green to add highlights on each bubble
- Add a small black handle on the cauldron
- Optional: add tiny stars or sparkles around the bubbling potion
- Glossy finish makes the potion look wet and active
Pro tip: The bubbles don’t need to be perfectly round—slightly irregular bubbles look more organic and natural, like actual boiling liquid.
26. Blood Orange Ombré with Black Vein Details
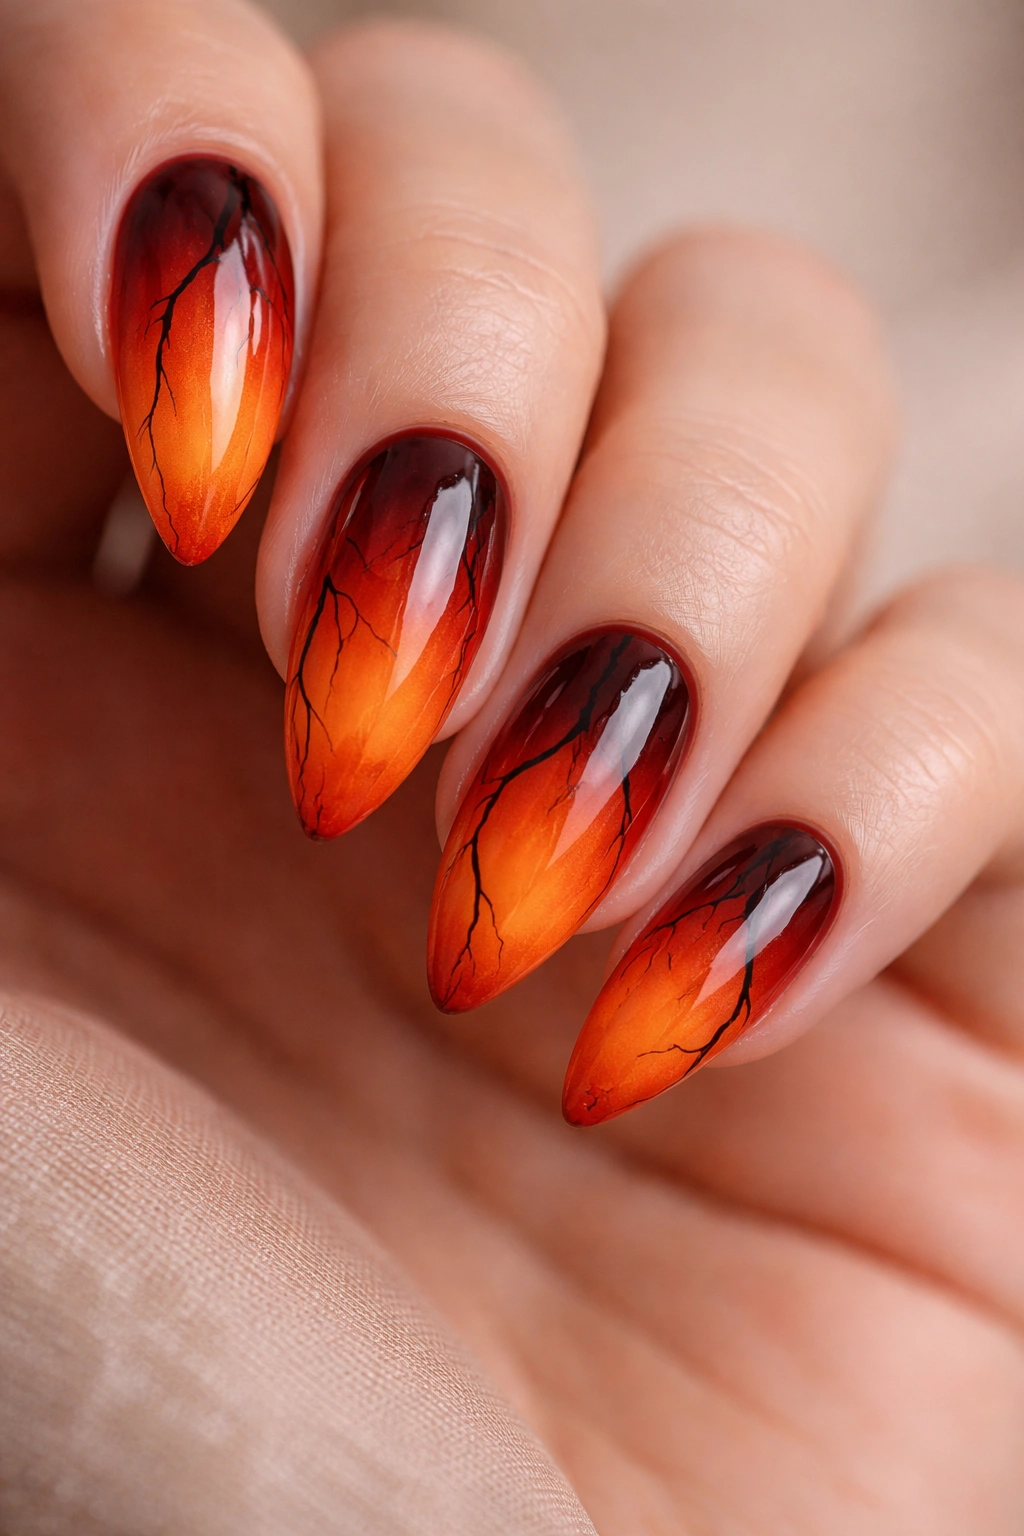
Create a gradient from deep blood red to bright orange, then add delicate black “vein” details that follow the contours of the almond nail. This design is simultaneously fruity and slightly unsettling—like looking at a blood orange but with added Halloween creepiness. The black veins create a naturalistic effect.
What Makes This Stand Out
The gradient creates visual interest while the black veining adds detail and intentionality. The design is subtle enough to be understated but detailed enough to be interesting. It’s the kind of design that looks more complex than it actually is to execute.
Creating Blood Orange Vein Design
- Paint deep blood red at the base
- Blend into bright orange in the middle
- Transition to pale orange at the tip using a sponge for blending
- Once completely dry, use thin black lines to paint delicate vein-like details
- Veins should radiate outward from a central point or follow organic patterns
- Vary the thickness and curvature of lines for a naturalistic appearance
- Glossy finish enhances the fruit-like appearance
Worth knowing: The veins are what elevate this from a simple gradient to a intentional design. Even simple veins add enough detail to make the design feel polished and complete.
27. Haunted Mirror Reflection Design
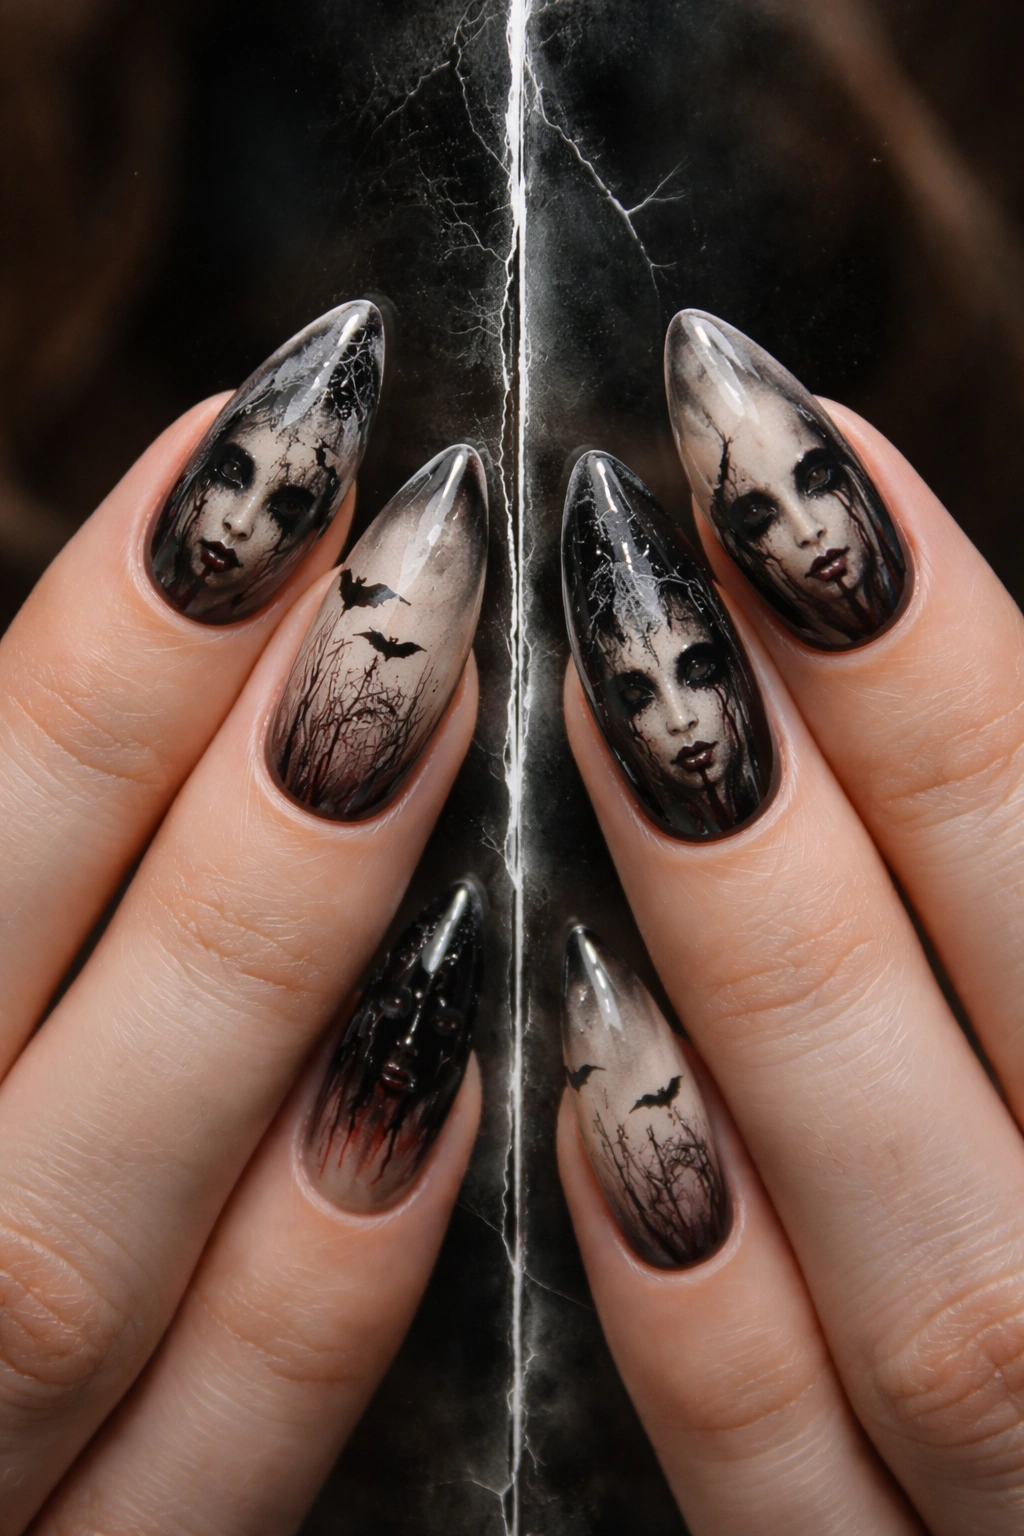
This design is conceptually interesting—paint a split design where one half of the nail is a “mirror image” of the other, with something slightly off in the reflection. This could be a face that’s slightly different on each side, or a scene with a twist. It’s artistic and actually quite spooky when executed well.
Why It’s Perfect for Almond Shape
The vertical line down the center of the almond nail naturally divides it into two halves, which makes this mirror design concept feel organic. You’re working with the nail’s natural geometry rather than against it. The length gives you room for detailed imagery on both sides.
Creating a Haunted Mirror Effect
- Paint a base color on all nails
- Using a thin brush, paint matching images on each side of a vertical center line
- On the right side, paint your “reflection” with a subtle difference
- Differences could be: misaligned features, different expression, missing element, wrong color
- Use a vertical black or metallic line down the center as a “mirror frame”
- Optional: add cracks or distortion to one side of the “mirror”
- The subtle wrongness is what creates the unsettling, spooky feeling
Pro tip: The effectiveness of this design depends on the subtlety of the difference—if it’s too obvious it’s not creepy, too subtle and people won’t notice. Aim for something visible but not immediately apparent.
28. Sparkly Vampire Fangs with Gem Accents
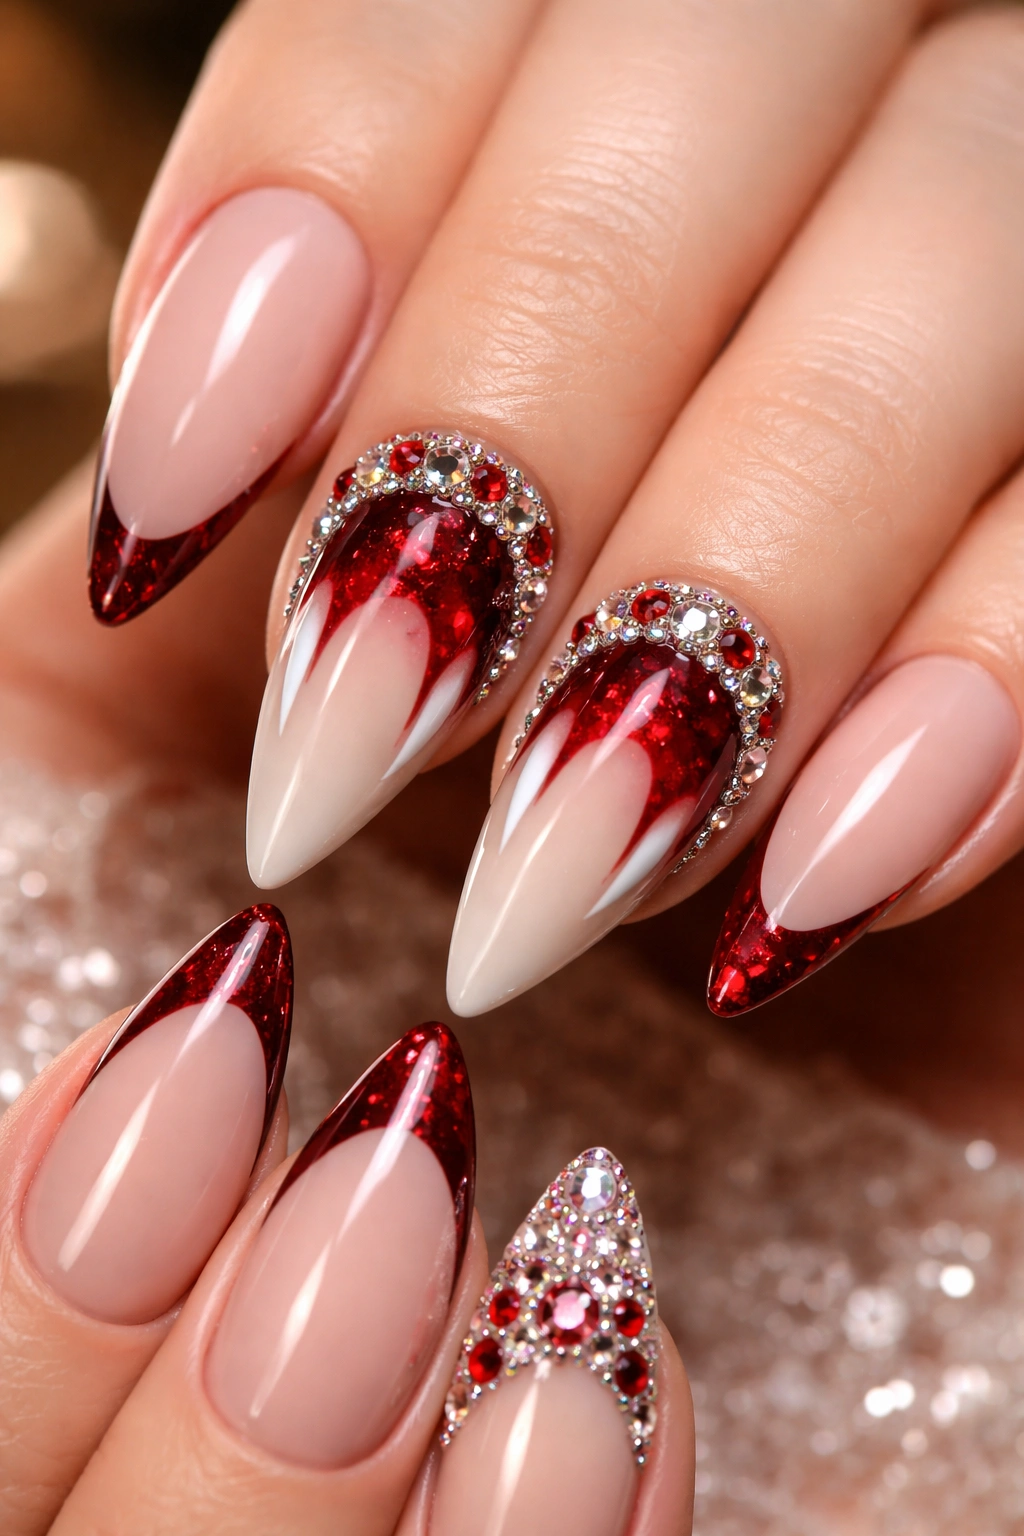
Combine vampire fangs with glamorous gem accents for a design that’s both spooky and glam. Paint a nude or pale base, then create dramatic red fang nails with rhinestones or gems placed strategically around them. The combination of classic vampire imagery with gem-studded elegance makes this feel both Halloween and unexpectedly fashion-forward.
What Makes It Different
Adding gems or rhinestones to traditional Halloween designs immediately elevates them into glam territory. This design says “I want to be spooky but also fabulous,” which is a valid approach to Halloween nails. On almond nails, the gems are displayed beautifully because of the increased surface area.
Creating Sparkly Vampire Fangs
- Paint all nails in nude, pale pink, or pale nude
- Paint 1-2 accent nails in deep blood red from the base to mid-nail
- Create pointed fang shapes on the red nails
- Optional: paint black drips of “blood” from the fangs
- Apply rhinestones or gems around the base or edges of the red nails
- Use nail-safe glue or builder gel to secure gems
- Seal everything with clear top coat for protection
- Glossy finish enhances both the gems and the dramatic red
Insider note: Gems are best applied with builder gel (clear gel that hardens under UV light) rather than polish glue because it’s more durable and less likely to come loose with daily wear.
29. Cobweb Pattern with Tiny Spider Accents
Create a repeating cobweb pattern across all nails using fine white lines on a dark background. Then add tiny black spiders crawling across the webs on some nails. The pattern itself is intricate and visually interesting, and the tiny spiders add a narrative quality—like you’re looking at a real cobweb.
Why It Works for Almond Nails
The length of almond nails gives you room to create an actual detailed cobweb pattern without everything becoming a visual mess. The pointed tip creates a natural endpoint for web lines. The repetition of the cobweb pattern across all ten nails creates a cohesive, intentional look.
Creating Detailed Cobwebs
- Paint all nails in black or deep purple base
- Using white polish and a thin brush, paint interconnected web lines
- Start with one main horizontal line across the nail
- Add angled lines radiating outward like spokes
- Connect these with curved lines to create web geometry
- Add tiny black dots or small spiders at various points in the web
- Use a dotting tool to place tiny spider bodies with thin leg details
- Glossy or matte finish both work—matte creates a more naturalistic appearance
Pro tip: Reference actual spider web photos while painting to get authentic geometry—real webs have organic patterns that are actually easier and more interesting to paint than perfectly geometric ones.
30. Final Boss: Full Blacklight-Reactive Halloween Scene

The ultimate Halloween nail design: a full scene that glows under blacklight. Use blacklight-reactive (fluorescent) polish to create a spooky landscape—haunted house, graveyard, bats, moon, all rendered in neon colors that glow brilliantly under UV light. This design is show-stopping, interactive, and absolutely unforgettable.
Why It’s the Ultimate Design
This design has a built-in wow factor—in normal light it looks like a creative Halloween scene, but under blacklight it becomes something else entirely. The glow-in-the-dark effect makes this interactive and genuinely impressive. People will ask about it and want to see it under blacklight, making it the conversation-starting nail design.
Creating a Blacklight-Reactive Scene
- Use blacklight-reactive polish in neon pink, neon green, neon blue, or neon yellow
- Paint a detailed Halloween scene: haunted house, graveyard, full moon, bats
- Keep the scene relatively simple because fluorescent colors are already visually busy
- Paint a dark (non-fluorescent) background to make the glowing elements pop
- Optional: layer regular polish over parts of the fluorescent design for depth
- Add details with thin fluorescent lines or dotting tool
- Seal with clear top coat that’s also blacklight-reactive for maximum glow
- Test under blacklight before committing to the design on your nails
Worth knowing: Blacklight-reactive polish shows up normally in regular light but transforms under UV light. This creates two different designs depending on the lighting situation, which is incredibly fun and creative. The tradeoff is that fluorescent colors are very bright and can be harder to work with because they’re semi-transparent.
Final Thoughts
Halloween nails are all about giving yourself permission to experiment and play with colors, patterns, and designs you might not normally wear. The almond shape is genuinely the perfect canvas for this—it’s long enough for detail, pointed enough for drama, and elegant enough that even the spookiest designs feel sophisticated. Whether you’re going for subtle and elegant, playful and cute, or genuinely creepy and unsettling, there’s an idea here that matches your specific Halloween aesthetic.
The most important thing is choosing a design that genuinely excites you. If you love it, you’ll wear it confidently, and that confidence is what makes nail art truly shine. If almond nails aren’t your usual style, Halloween is honestly the perfect time to try them because the designs are inherently attention-grabbing—the shape becomes part of the overall concept rather than something you need to get used to.
Start with the designs that speak to you most, and don’t stress about perfection. Some of the best Halloween nail designs have a slightly DIY, hand-crafted quality to them. If you’re painting these yourself, embrace small imperfections—they add character and authenticity. If you’re showing these to a nail technician, they’ll appreciate the specific visual references and can bring their own expertise to elevate the concepts. Either way, you’re about to have nails that make a genuine Halloween statement.
