

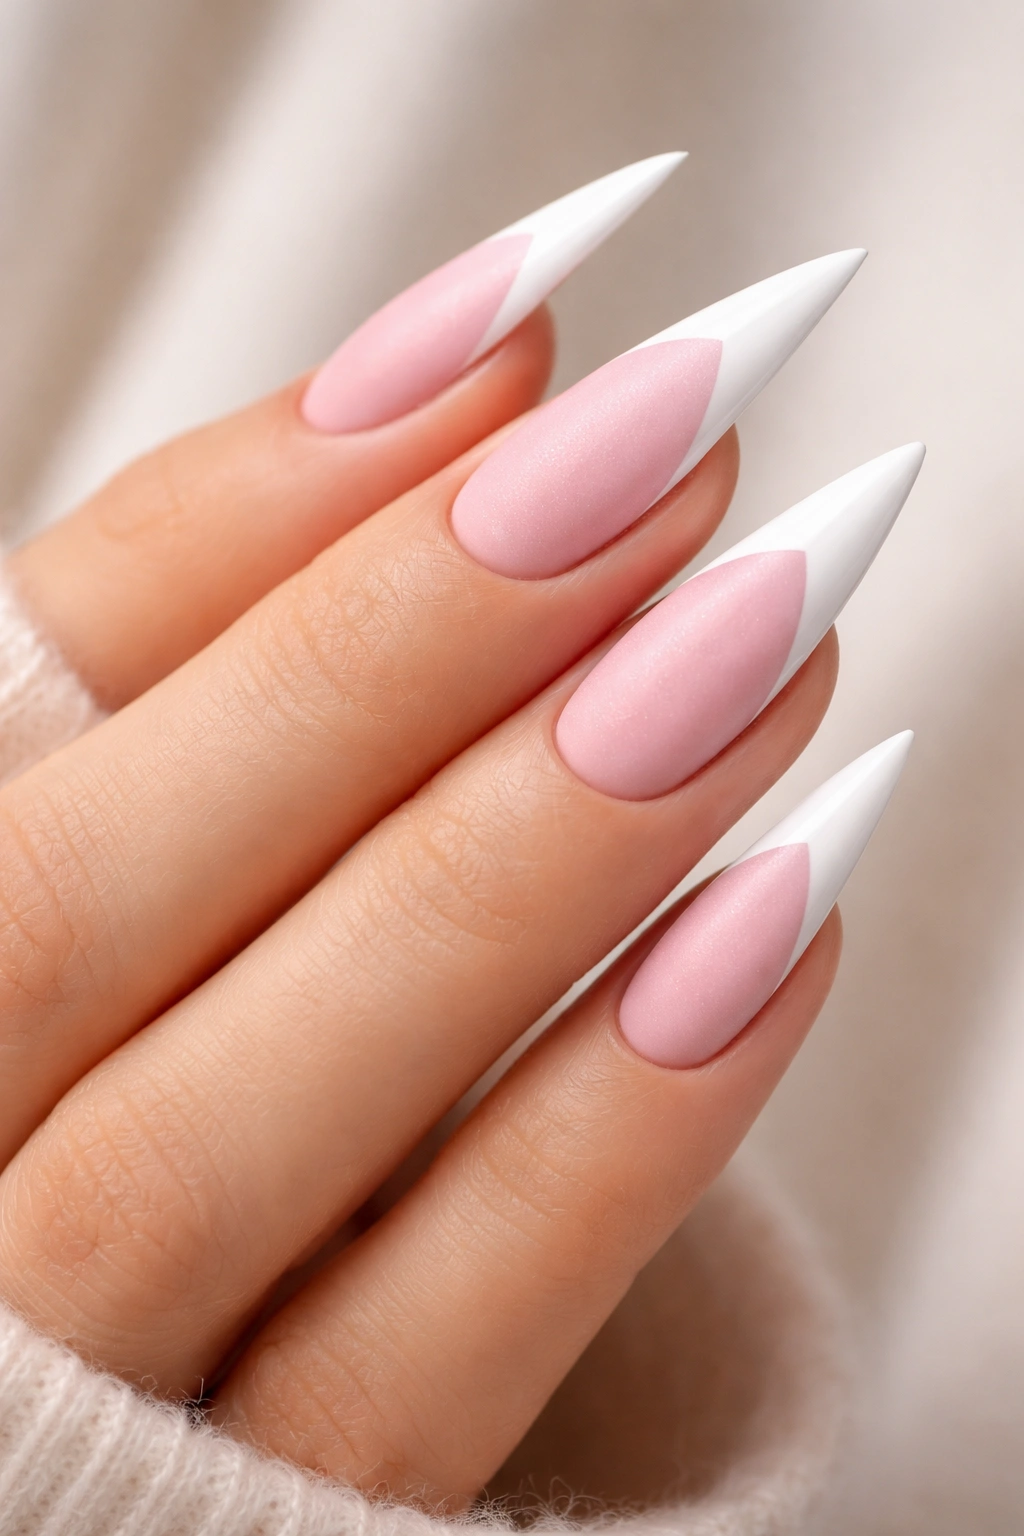
Pink and white French tip stiletto nails represent one of the most elegant and versatile nail designs out there. The combination of classic French tips with the bold statement of stiletto length creates a look that’s simultaneously sophisticated, feminine, and undeniably eye-catching. Whether you’re heading to a wedding, a boardroom meeting, or just want to elevate your everyday style, this timeless design works across virtually every aesthetic and occasion.
What makes this particular combination so appealing is how it bridges the gap between refined tradition and modern edge. French tips have symbolized elegance for decades—they’re the go-to for anyone wanting a polished, put-together appearance. But pair those delicate white tips with the elongated, tapered silhouette of stiletto nails and a soft pink base, and suddenly you’ve got a design that commands attention while maintaining an air of sophistication. The pink shade adds warmth and femininity without compromising the professional appearance the French tip provides.
The beauty of exploring different variations of pink and white French tip stilettos is that there’s genuinely something for everyone. From minimalist and understated designs to elaborate artwork and embellishments, the possibilities feel endless. You can keep things classic and timeless, or you can experiment with different pink undertones, tip widths, and decorative elements to make the style entirely your own.
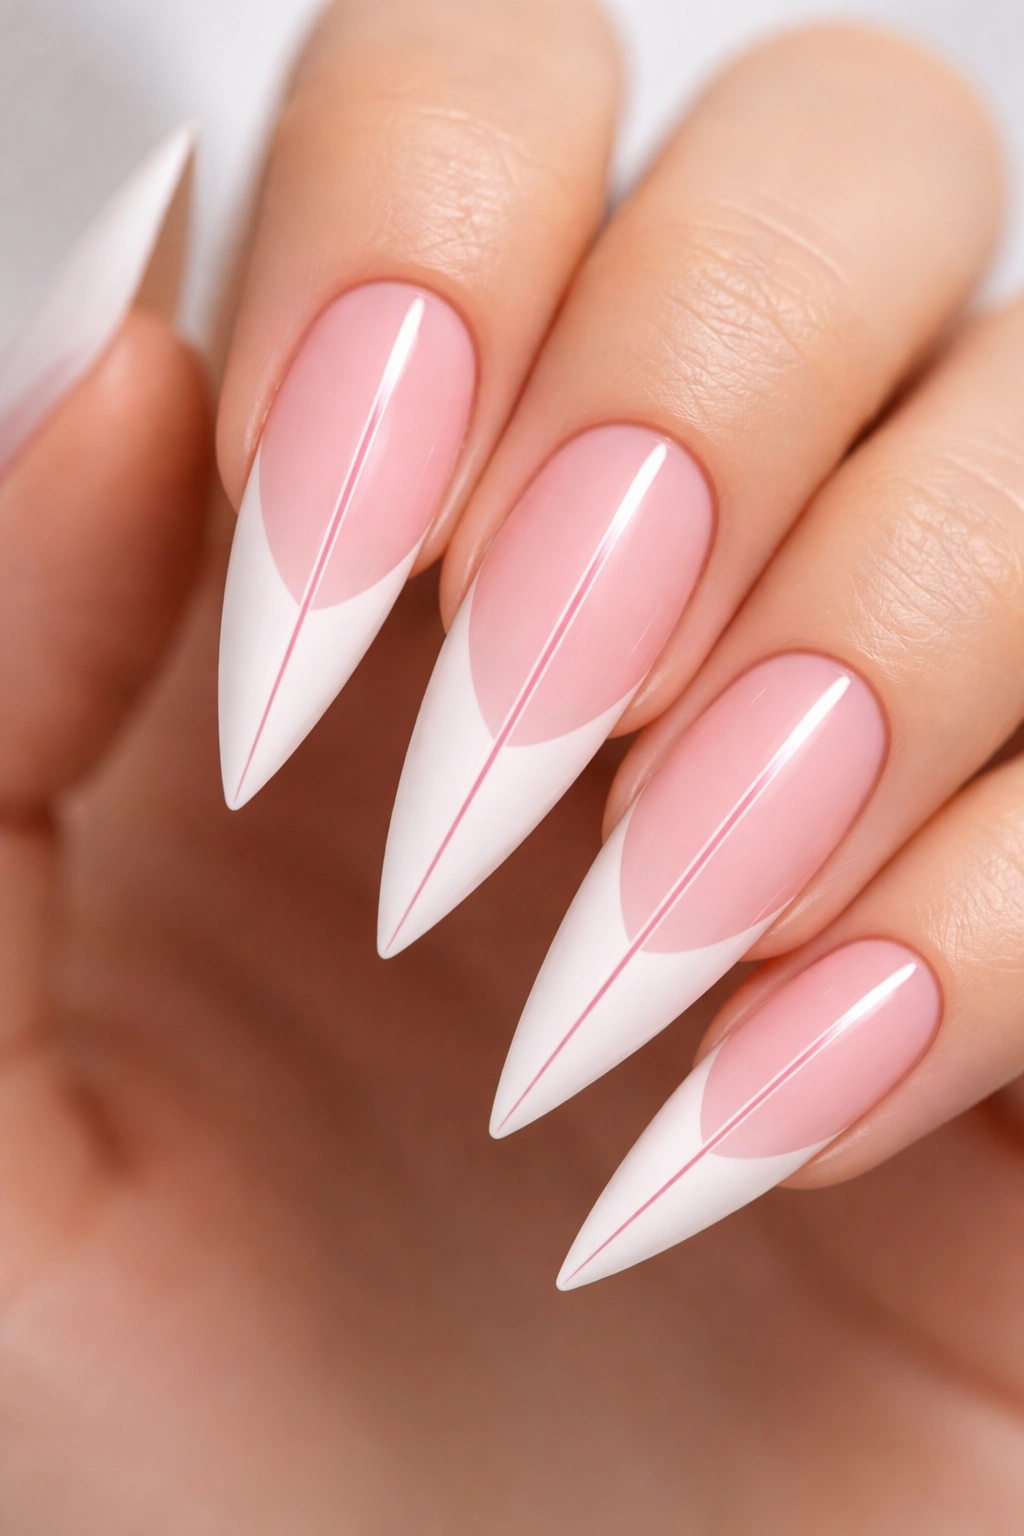
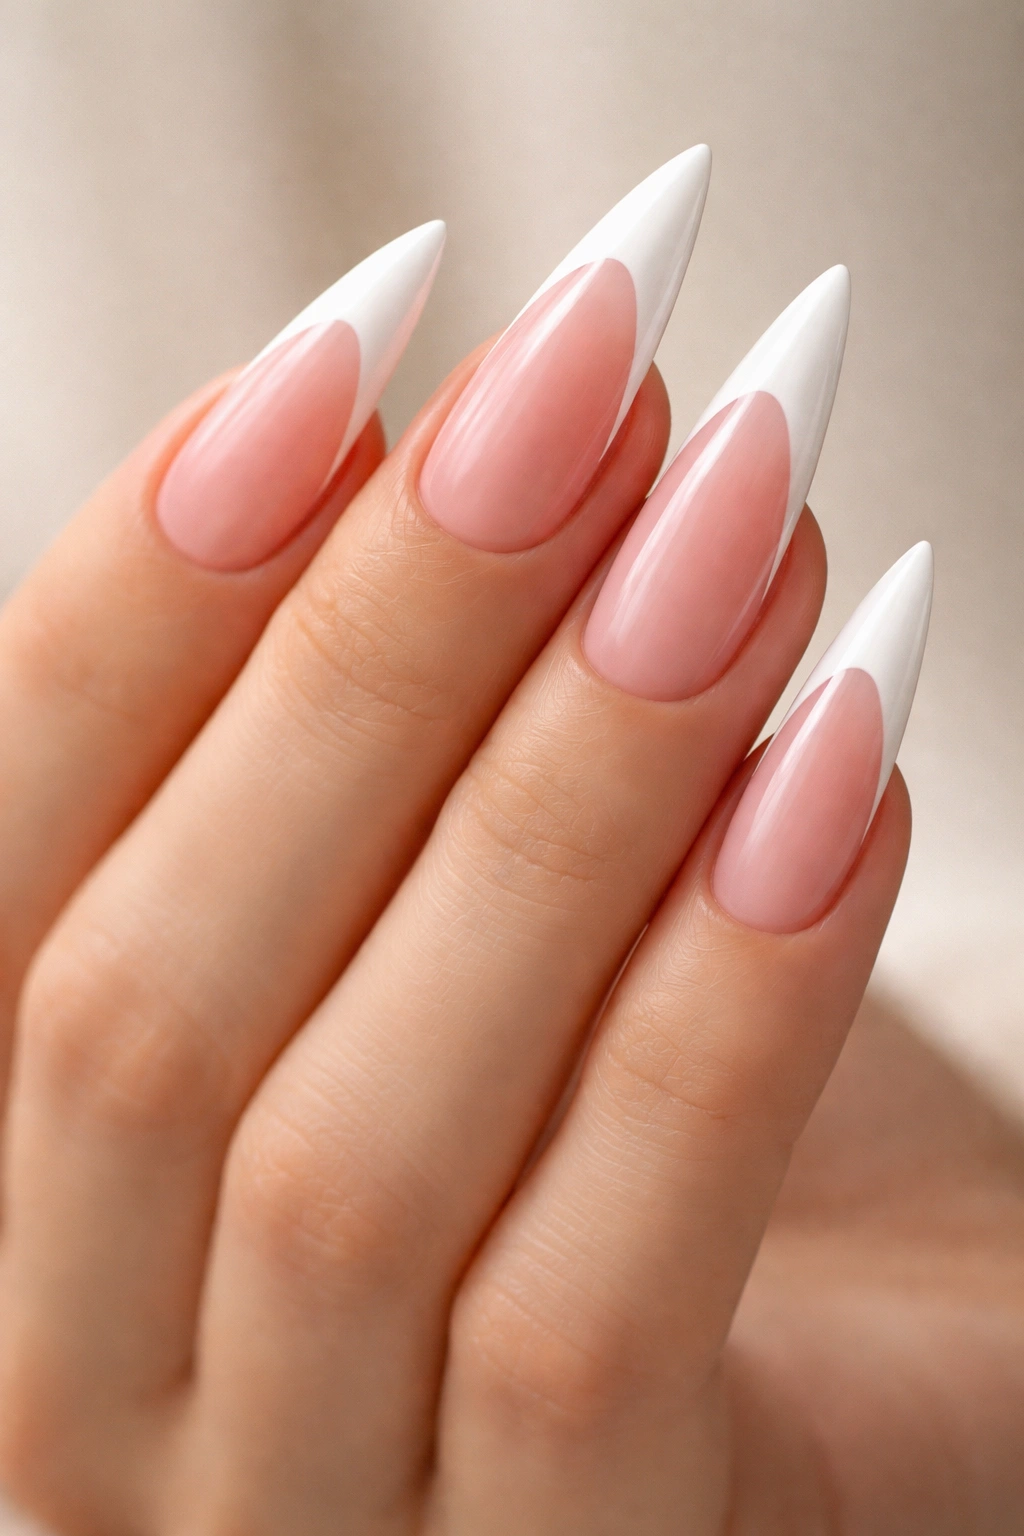
1. Classic Pink and White French Tip Stilettos
This is the foundation of the entire design category—the version that never goes out of style. A soft, neutral pink covers the nail bed while a clean white stripe creates the signature French tip. The pink should be warm and flattering, not too pale and not too vibrant. The white tip is painted straight across with crisp, clean lines that extend roughly a quarter-inch past the nail edge.
Why This Design Is Timeless
The classic version works because it follows an unspoken rule: simplicity is always elegant. There’s nothing competing for attention, which means the focus stays on the nail shape and overall presentation. This design flatters virtually every skin tone because the soft pink acts as a neutral canvas. It’s appropriate for every occasion imaginable—from job interviews to black-tie events.
How to Achieve Crisp White Tips
The secret to salon-quality white tips is using a thin striping brush or a thin nail art brush rather than the regular polish brush. Paint the white carefully along the edge, keeping your hand steady. A steady hand comes from supporting your brush hand with your other hand. Two thin coats of white polish always look better than one thick coat that can appear chalky or uneven.
Styling and Longevity Considerations
This design lasts longer than you might expect because there are no intricate details to catch or chip. The white tips do show wear first, so plan on touch-ups every two to three weeks if you want perfection. The length and shape make this a commitment—you’ll want to be prepared for the adjustment period if you’re new to stiletto nails.
2. Rose Gold Accents on Pink and White Stilettos

Adding rose gold to the classic formula introduces a touch of luxury and warmth. The rose gold can appear as thin lines, scattered along the white tip section, or as a delicate accent down the center of the nail. This version feels special without looking over-the-top.
The Rose Gold Color That Works Best
Rose gold reads differently depending on the brand and finish you choose. Matte rose gold creates a sophisticated, understated look, while shimmer or metallic rose gold catches light beautifully and adds dimension. A good rose gold polish should have warm peachy undertones rather than pure gold, which would clash with the soft pink base.
Placement Options for Maximum Impact
Run a thin rose gold line just above the white tip for a subtle detail that reads as intentional and polished. Alternatively, place small rose gold flecks or dots along the white section for a more playful approach. You could also create a thin rose gold stripe down the center of each nail—it acts as a vertical line that can make fingers appear slightly longer.
Product Recommendations and Application
Use a thin striping brush or a specialized rose gold liner for clean, controlled application. If you’re working with a thicker rose gold polish, dilute it slightly with a clear topcoat or nail thinner to get the right consistency. One coat of rose gold usually provides enough coverage without appearing heavy or overwhelming against the soft pink.
3. Ombre Gradient Pink to White Stilettos
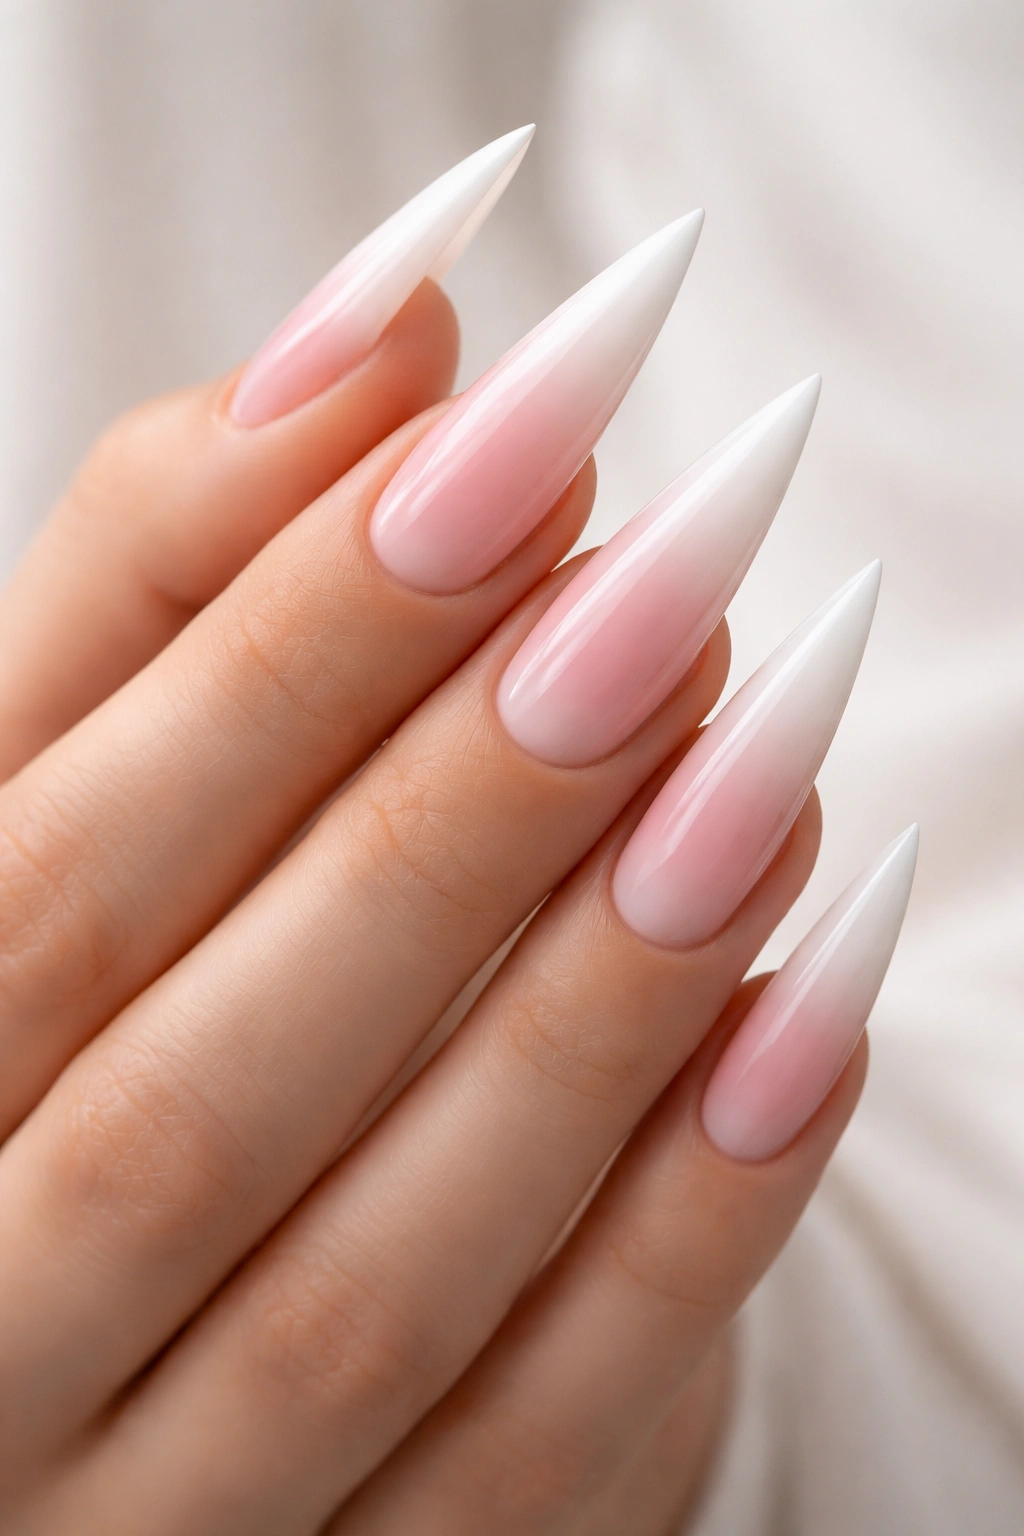
Instead of a stark line separating pink and white, create a gradient where the pink gradually transitions into white as you move toward the tip. This soft ombre effect feels more modern and artistic than the traditional French design.
Creating the Gradient Effect
The gradient requires a bit of technique but is absolutely achievable at home. Paint the entire nail with your pink shade first. Once dry, apply white polish to a makeup sponge (a regular beauty sponge works perfectly), dab it along the tip area, and gently press and bounce it against the nail to create a blended, soft transition. The key is patience—build the gradient slowly with multiple light applications rather than one heavy one.
Color Choices That Enhance the Ombre
A soft, milky pink creates a more romantic ombre, while a deeper dusty rose produces a more dramatic effect. Warm pinks with peachy undertones transition beautifully to white, whereas cool-toned pinks can sometimes look slightly muddy in the gradient zone. Experiment with what flatters your skin tone best.
Sealing and Protecting Your Gradient
Once you’ve achieved your gradient, apply a thick, glossy topcoat to seal everything and create a smooth finish. The topcoat also helps blend any harsh lines that might remain from the sponging process. A gel topcoat creates an especially smooth, professional-looking result and lasts longer than regular topcoat.
4. Glitter Gradient Tips with Pink and White Base
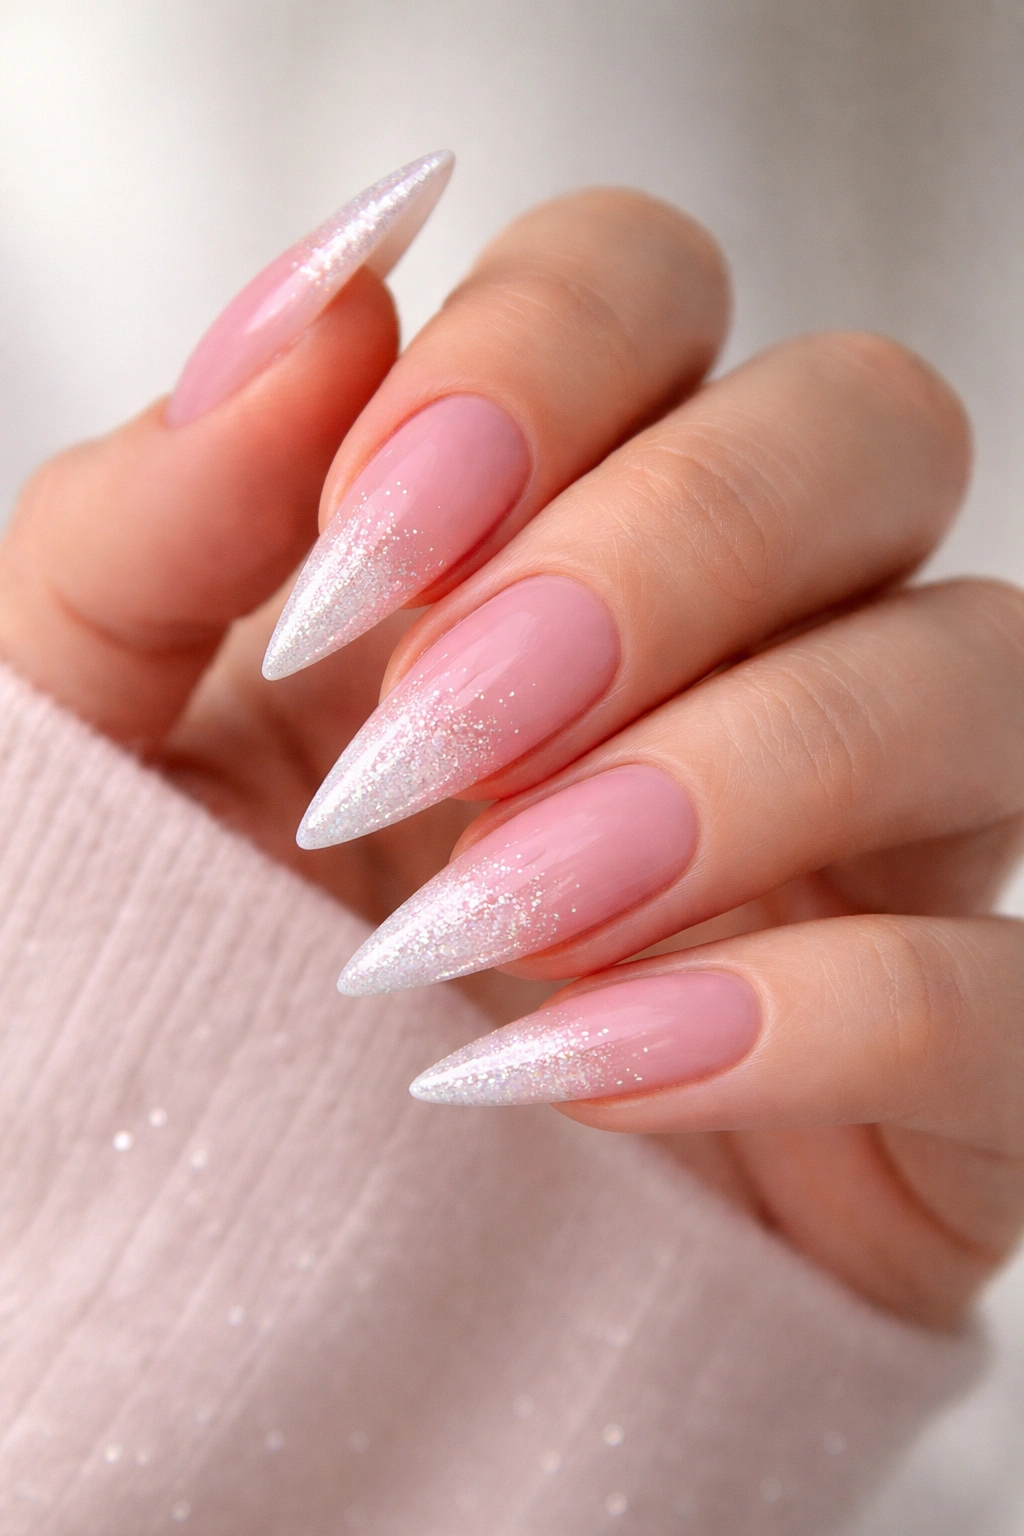
Combine the soft ombre effect with a touch of sparkle by incorporating fine glitter into the gradient zone. This creates a nail design that catches light beautifully and feels celebratory without being too costume-y.
Choosing Glitter That Complements Pink and White
Fine, multi-colored glitter works universally, but you can also match the glitter to your undertones for a more cohesive look. Rose gold glitter, champagne glitter, or even pearl white glitter all harmonize beautifully with pink and white. Avoid chunky or holographic glitter for this design—the goal is subtle sparkle that enhances rather than dominates.
Application Technique for Even Distribution
Apply your ombre gradient as described in the previous design, then, while the gradient is still wet or slightly tacky, sprinkle fine glitter onto the white tip area. Use a makeup brush or a clean nail brush to gently press the glitter into the polish and distribute it evenly. You can also apply a thin layer of clear glitter-infused polish over the tips instead—this gives you more control and a polished, intentional appearance.
Topcoat Strategy for Glitter Longevity
A thick, protective topcoat is essential when glitter is involved. The topcoat seals the glitter in place and prevents pieces from lifting or falling off prematurely. Gel topcoat provides exceptional durability, but even regular topcoat works well if applied generously. Reapply topcoat every week or two to maintain the sparkle and extend the life of your design.
5. French Tips with Rhinestone Accents
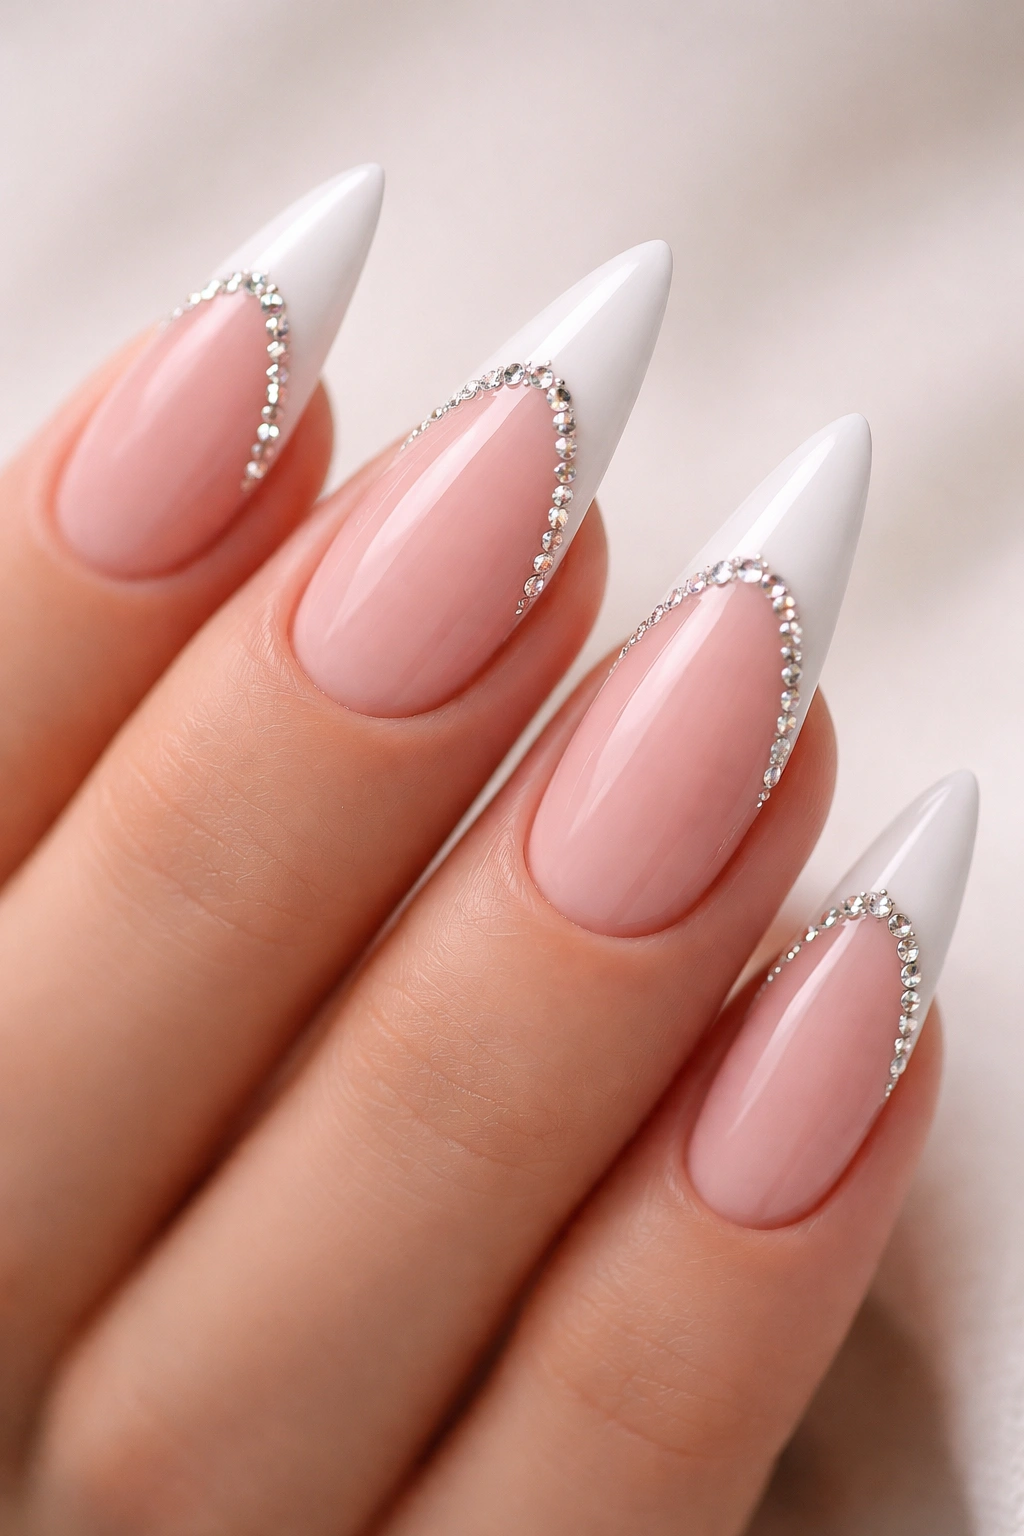
Elevate your pink and white stilettos with strategically placed rhinestones along the white tip section or creating a delicate line down the center of each nail. This design feels special and is perfect for occasions where you want your nails to make a statement.
Rhinestone Placement for Visual Impact
A single rhinestone at the outer corner of each nail creates a subtle sparkle that catches light when you move your hands. Alternatively, create a thin line of gradually decreasing rhinestones moving from the center of the nail toward one corner for a directional, dynamic look. Some people prefer a diagonal line of rhinestones across the white tip—it’s playful and eye-catching.
Securing Rhinestones Properly
Use a nail-specific adhesive or a thick, sticky base coat to secure rhinestones. Regular nail polish doesn’t hold rhinestones securely enough for long-term wear. Press each rhinestone firmly into the adhesive and allow it to cure fully before applying topcoat. If using gel polish, you can embed the rhinestones in a thick layer of gel before curing, which creates exceptional durability.
Rhinestone Sizes and Quality Matters
Smaller rhinestones (2-4mm) create a delicate, sophisticated look, while larger stones (5-7mm) make a bolder statement. Glass rhinestones provide better sparkle and light refraction than plastic alternatives, and the quality difference is immediately noticeable. Investing in higher-quality stones means they’ll maintain their brilliance throughout the life of your manicure.
6. Marble Effect Pink and White Stilettos
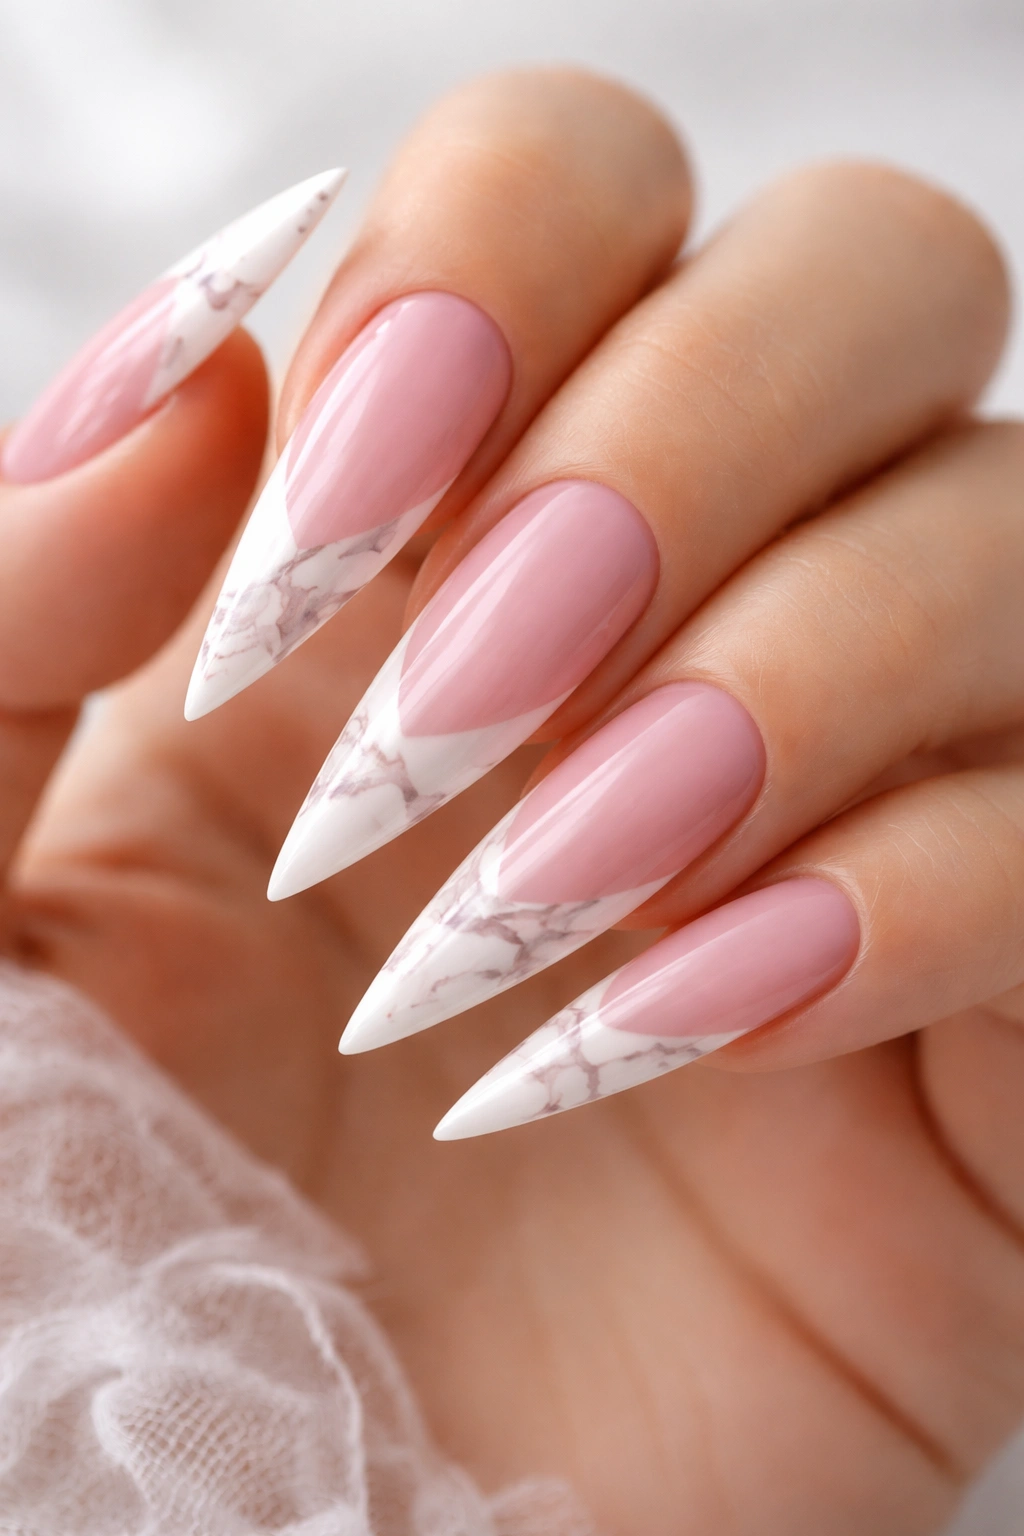
A marble pattern across the white tip section creates an artistic, contemporary look that feels far more interesting than a solid white stripe. This works especially well on stiletto nails because the elongated shape gives you more room for the pattern to shine.
Creating a Marble Pattern at Home
The water marble technique is the traditional method, but it requires a steady hand and practice. A simpler approach is to use a thin brush to create irregular, veining lines with gray or pale pink polish over your white tips. Start from the outer edge and work inward with organic, flowing strokes. Don’t aim for perfection—slight irregularity is what makes marble look authentic.
Alternatively, Marble-Print Nail Decals
If freehand marble feels intimidating, high-quality nail decals with marble designs are available online. These decals adhere directly to your nail and can be sealed with topcoat. The advantage is consistency and precision; the trade-off is slightly less customization. Either approach yields a sophisticated, modern result.
Sealing Marble Designs for Durability
Marble patterns benefit from a generous topcoat application to protect the detailed work. A gel topcoat creates the smoothest finish and lasts longest. If using regular topcoat, apply at least two coats to ensure the pattern is well-sealed and protected from daily wear.
7. Gold Striping Lines on Pink and White Base
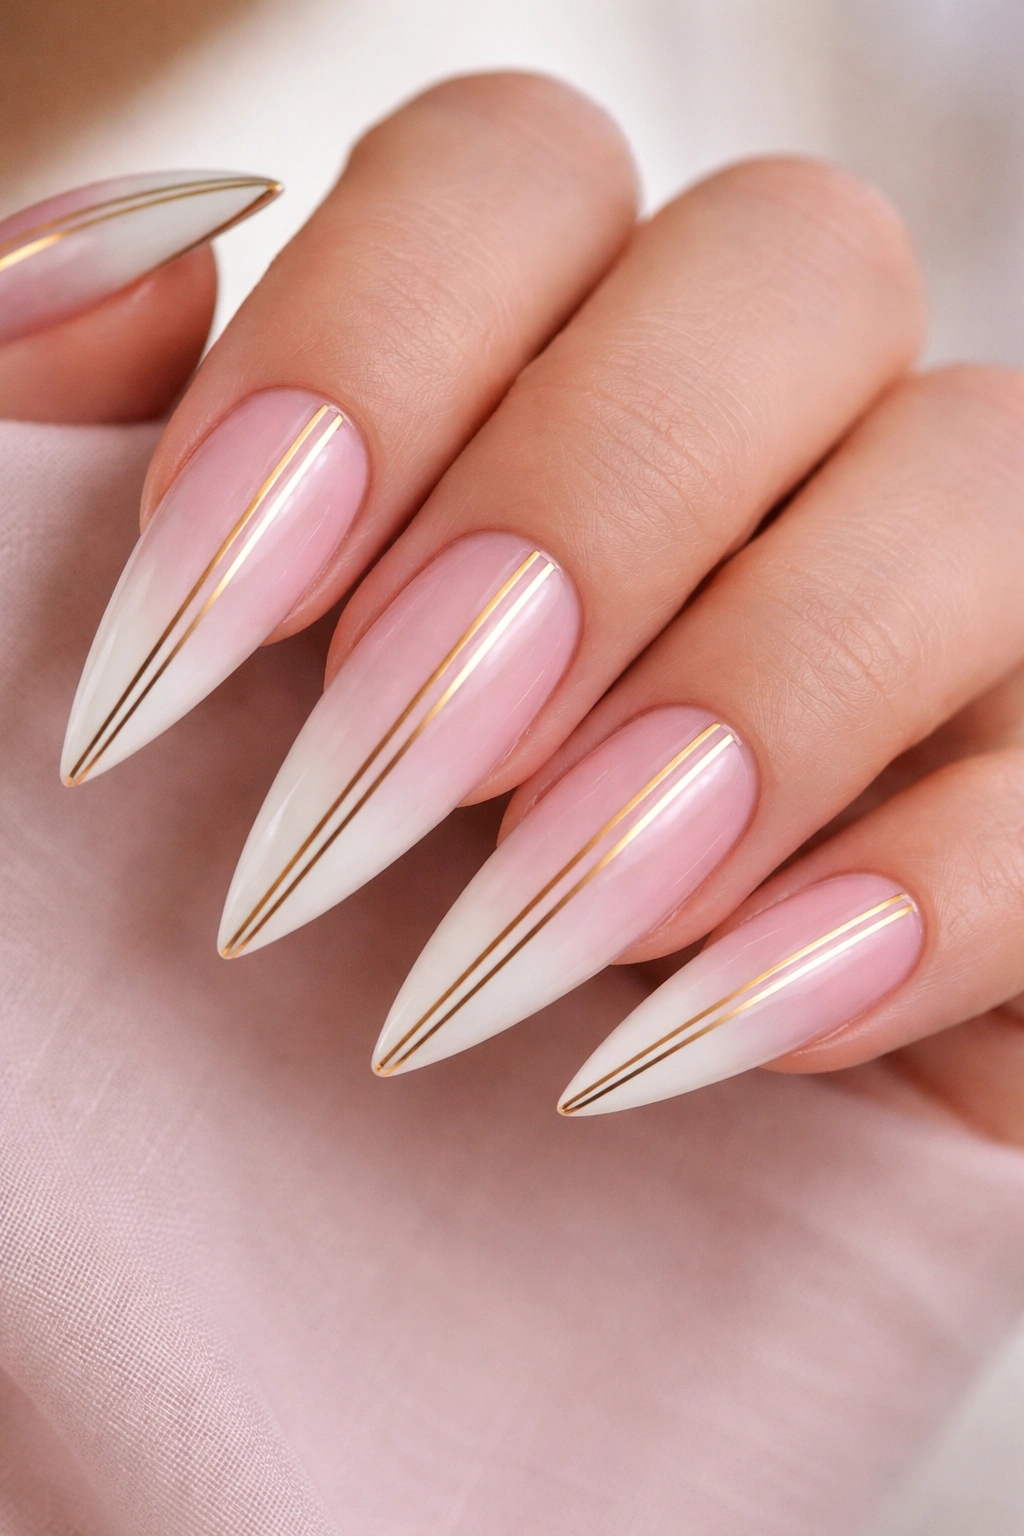
Instead of a traditional white tip, replace it with thin gold striping lines that run down the length of the nail. This creates a vertical emphasis that elongates the finger and adds a touch of luxury to the soft pink base.
Gold Polish Weight and Application
Metallic gold polish tends to be thinner and more transparent than regular polish, so you’ll need two or three coats for full opacity. Use a thin striping brush for clean, controlled lines. Alternatively, use gold foil or gold metallic tape specifically designed for nails—this provides instant, perfect lines with zero effort and lasts just as long as hand-painted stripes.
Line Placement Variations
A single gold line down the center of each nail is understated and elegant. Three thin lines—one down the center and one closer to each side edge—creates a more deliberate, artistic look. Some people prefer diagonal lines for a playful angle, or a combination of vertical and diagonal lines for more complexity.
Pairing Gold With Your Pink Shade
Warm-toned pinks with peachy or coral undertones look stunning with gold. Cool-toned or mauve pinks can sometimes clash with gold, which naturally leans warm. If you love cool-toned pinks, consider using silver striping instead, or choose a warm pink specifically for this design combination.
8. Negative Space French Tips with Pink and White
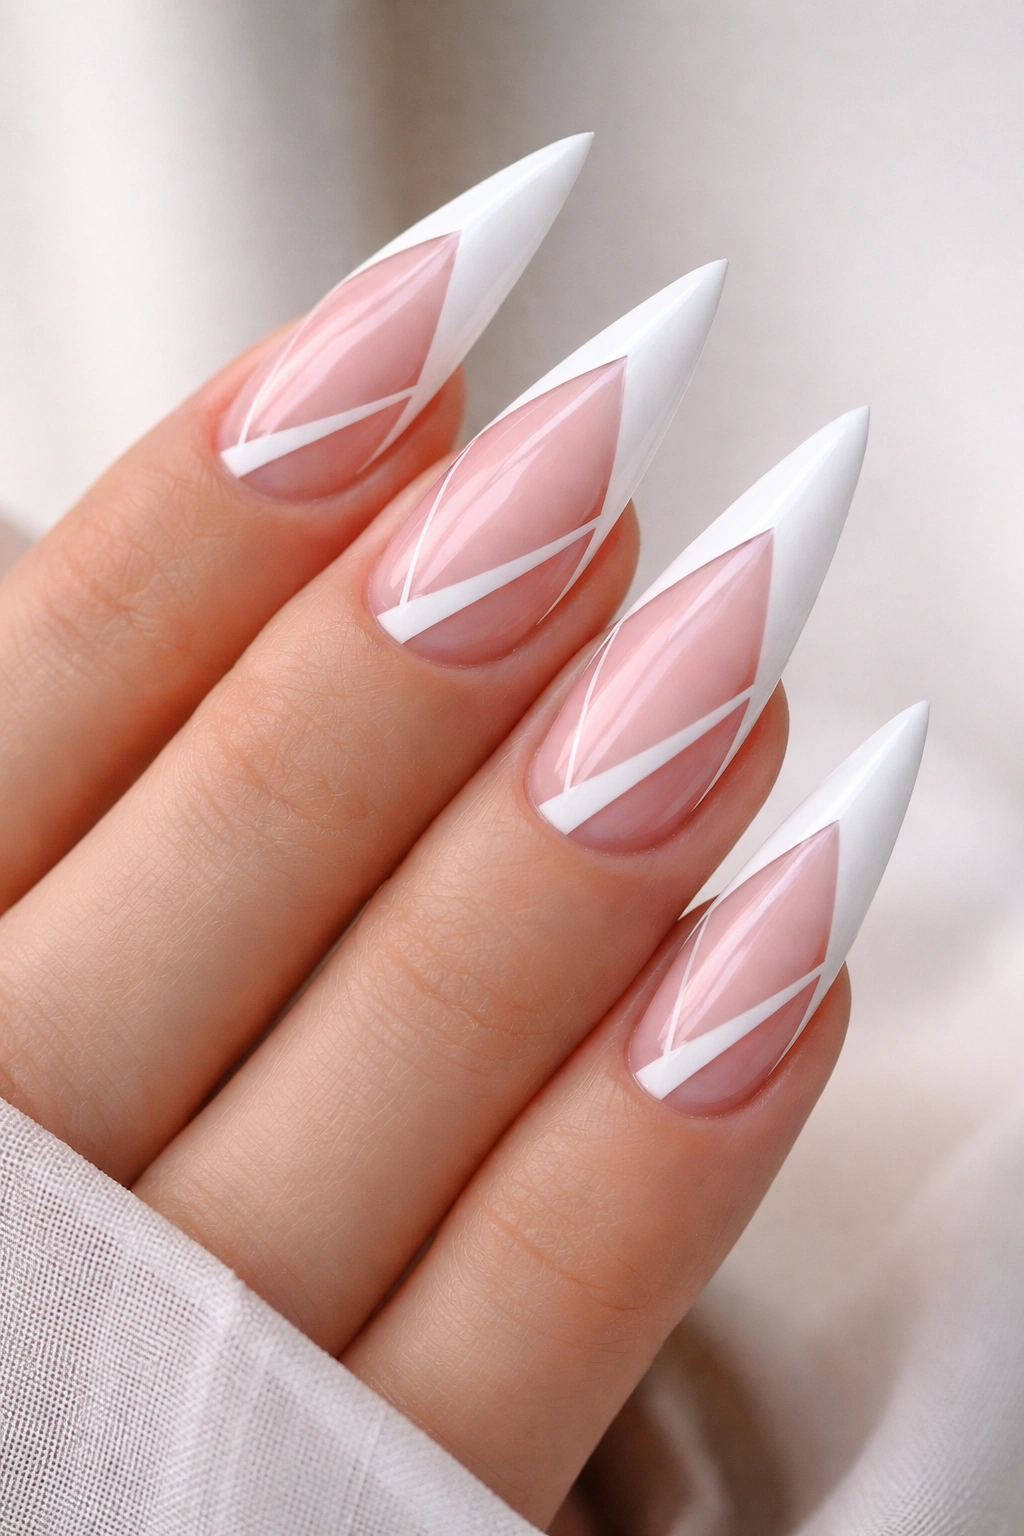
Create a French tip design where portions of the white are removed or left unpainted, revealing the pink base underneath. This creates a modern, artistic look that feels contemporary and fashion-forward.
Geometric Negative Space Designs
Cut triangles or small sections out of the white tip area using a thin striping brush and your base pink polish. Create a chevron pattern by removing the center section of white, leaving a “V” shape on each side. Or paint thin horizontal lines of pink through the white section for a striped effect. The negative space adds visual interest and breaks up the solid white in unexpected ways.
Negative Space Placements That Work Well
The outer corners of the white tip are ideal for negative space—removing polish from these areas creates an asymmetrical, modern look. A thin negative space line running down the center of the white section divides the visual space and adds sophistication. Experiment with different placements to find what resonates with your personal style.
Maintaining Crisp Edges With Negative Space
Clean edges are essential when working with negative space designs. Use painter’s tape on the areas you want to protect, or work with a very fine striping brush to create sharp, deliberate lines. A steady hand and good lighting make all the difference between a polished design and one that looks accidental.
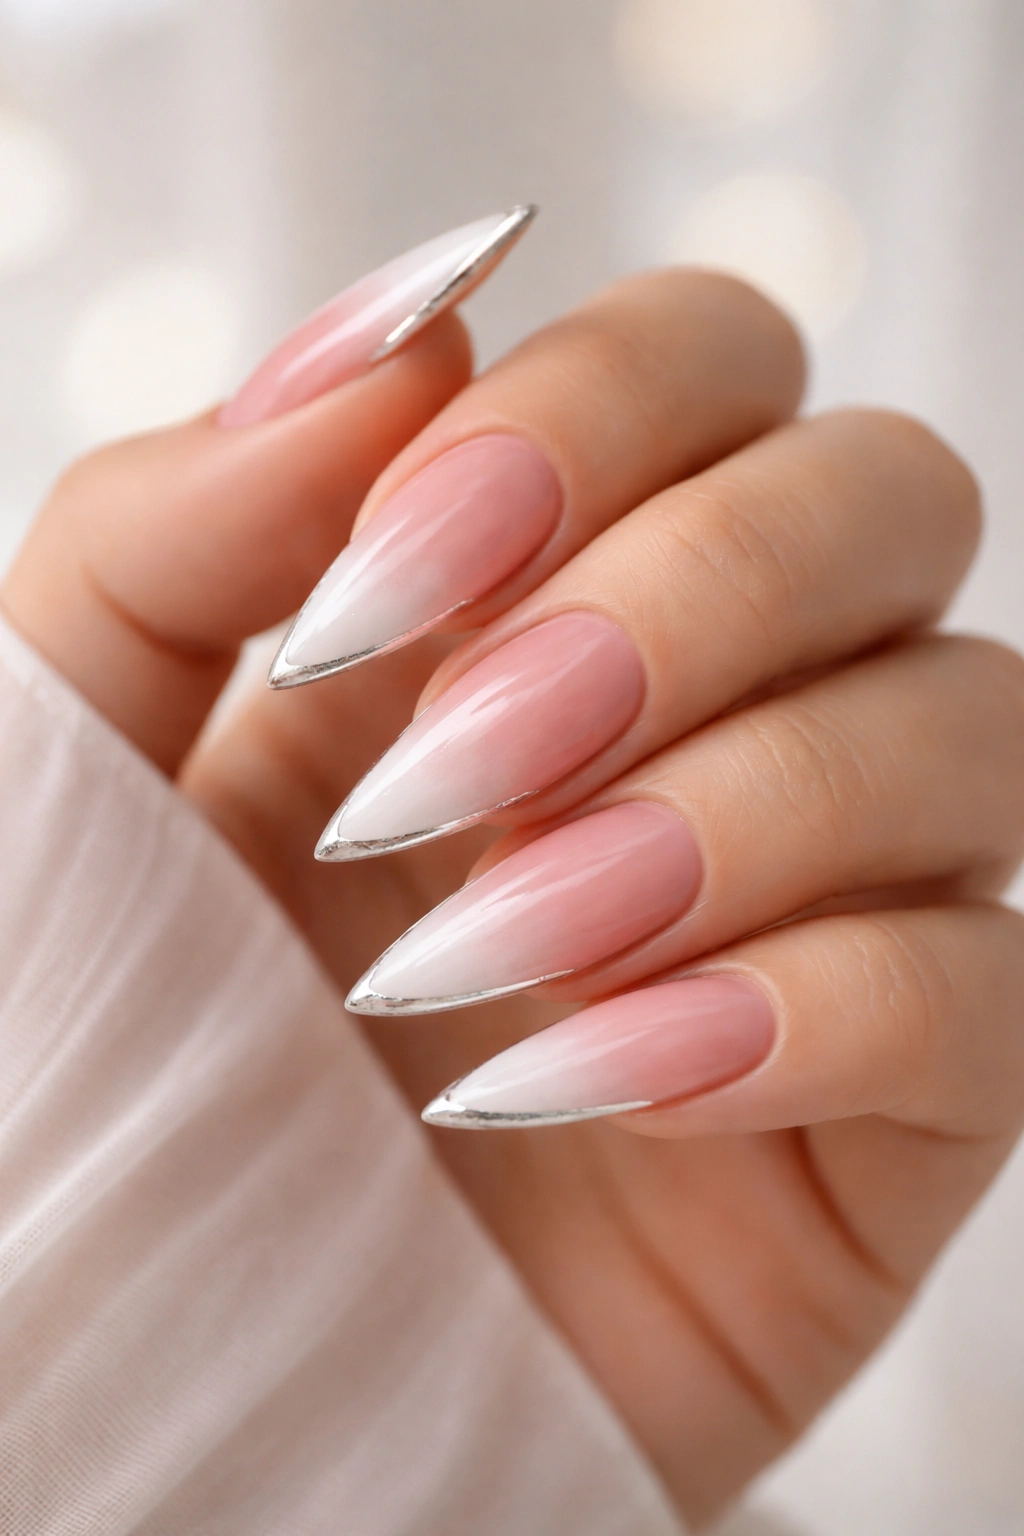
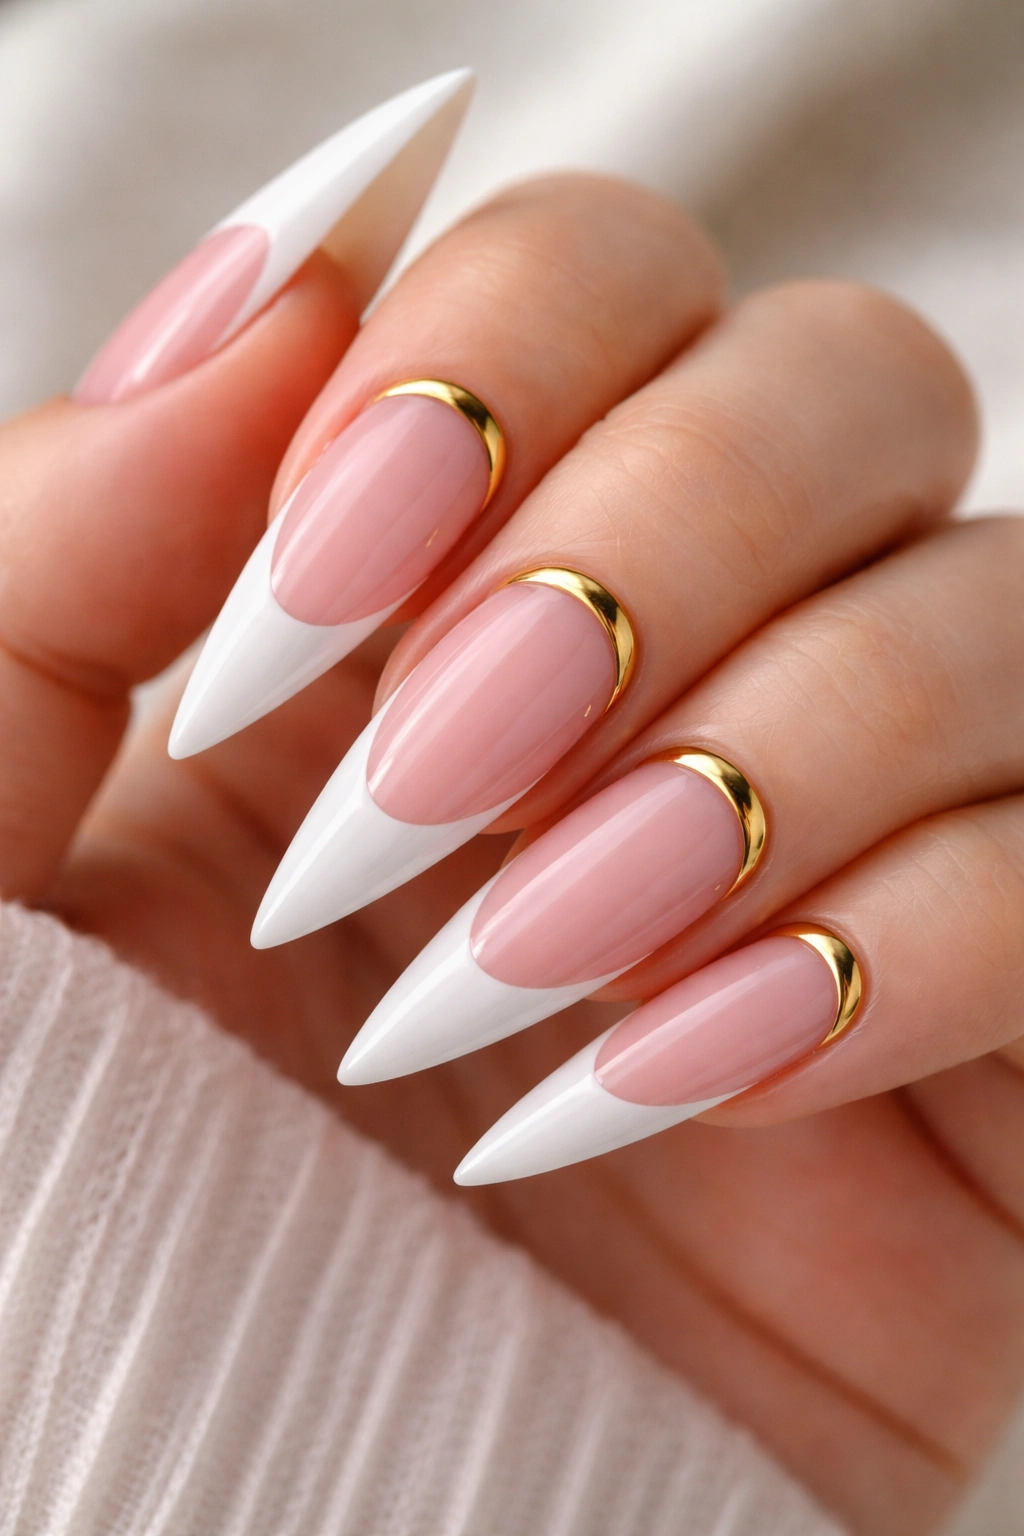
9. Pink and White Stilettos With Thin Gold Tips
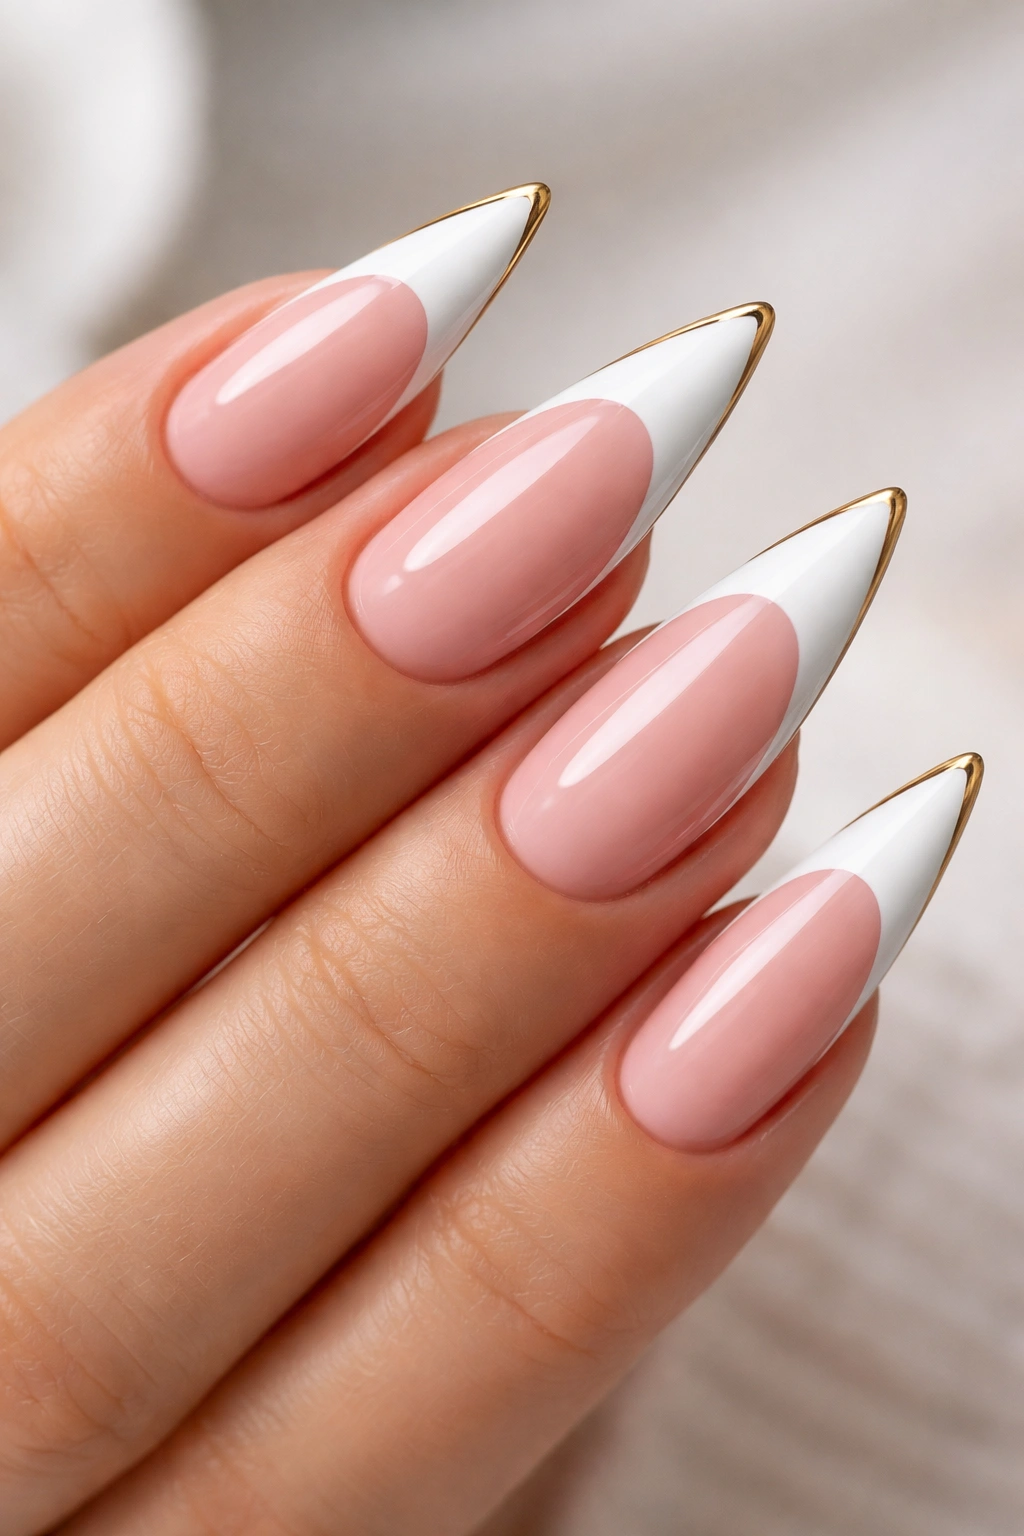
Instead of a traditional wide white tip, create a dramatically thin gold line at the very edge of the nail. This minimalist approach feels modern and sophisticated while still maintaining the French tip silhouette.
Why Thin Metallic Tips Feel Contemporary
A very thin line—perhaps just 1-2mm—signals intent and precision. It feels intentional rather than like a standard manicure, which is what makes it feel fashion-forward. The slimness of the line also creates an elongating effect that emphasizes the length and shape of the stiletto nail.
Achieving Perfect Thin Lines
Use a professional-quality thin striping brush or a nail art brush specifically designed for detail work. Practice on a nail wheel or practice tips before attempting this on your nails, since the margin for error is smaller than with wider tips. Steady your hand by resting your brush hand on your other hand and moving your entire arm rather than just your wrist.
Gold Alternatives to Explore
While gold is classic, you could also try rose gold for warmth, silver for a cooler tone, or even a metallic copper for something unexpected. Black thin tips create a dramatic, edgy look. The key is consistency—all ten nails should have the same metallic color and line thickness for a cohesive, intentional appearance.
10. Glitter-Infused Pink Base With White Tips
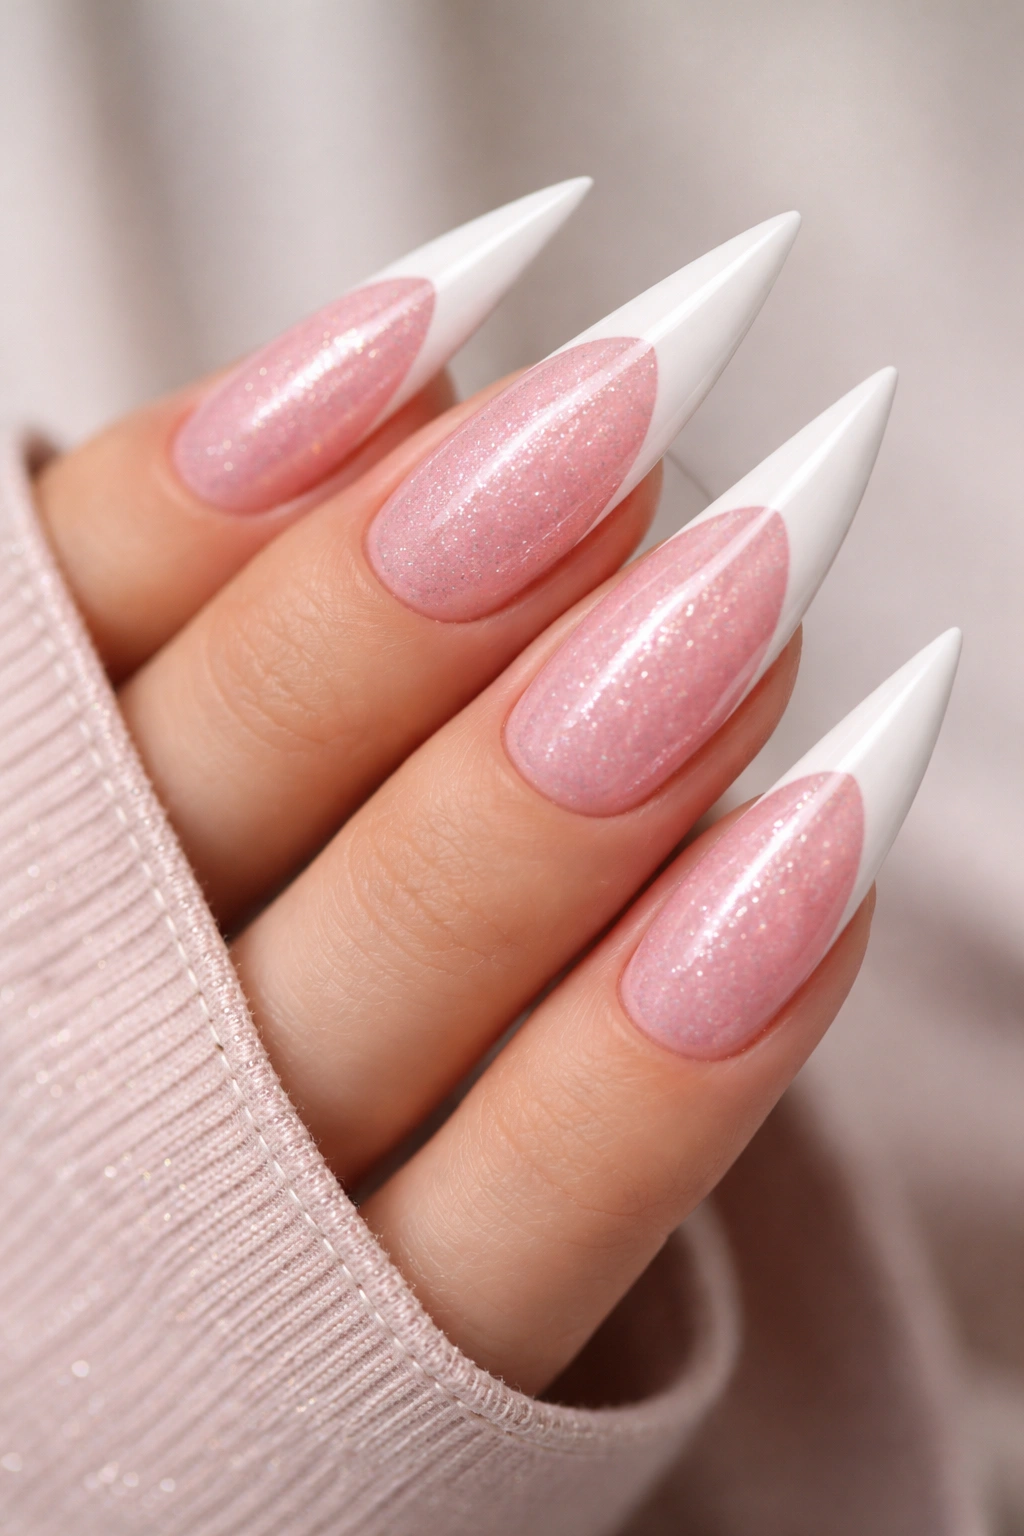
Instead of a solid pink base, use a pink polish with subtle glitter particles throughout the entire nail. This adds texture and sparkle while maintaining the elegance of the white French tip design.
Glitter Polish Weight and Coverage
Glitter-infused pink polishes vary widely in density. Some are quite sheer and require three coats to appear opaque, while others provide good coverage in two coats. The thicker, more densely glittered versions often apply more evenly. Use a base coat before applying glitter polish, as glitter particles can sometimes be slightly rough on the nail surface.
Building Even Color With Glitter
Apply glitter polish in thin coats rather than one thick coat. This prevents the glitter particles from becoming clumpy or uneven. Between coats, gently tap your brush on the rim of the polish bottle to ensure the glitter is evenly distributed in the mixture. A topcoat seals the glitter and creates a smooth, finished look.
Choosing the Right Pink-Glitter Combination
A soft pink with fine, champagne-toned glitter creates an understated sparkle. A deeper mauve pink with rose gold glitter feels luxurious and warm. Consider how much the glitter will be visible in different lighting—more densely glittered polishes will be more noticeable, which is great if you want your nails to catch light, but less ideal if you prefer subtlety.
11. Ombre Pink to Nude to White Stilettos

Extend the gradient concept by creating a three-color transition: pink at the base, transitioning through a neutral nude in the middle, and finishing with white at the tip. This creates a sophisticated, elongated effect that’s especially flattering on longer nail beds.
Color Selection for Seamless Transitions
Choose a pink, nude, and white that logically transition from one to the next. The nude should be halfway between the pink and white in terms of depth and warmth. If your pink is warm and peachy, your nude should also lean warm. A cool-toned pink works better with a cool-toned or gray-based nude.
Sponging Three Colors for Smooth Blending
Create this gradient using a makeup sponge, just as you would with a two-color gradient, but apply each color in its own designated zone. Dab pink near the base, nude in the middle, and white near the tip, allowing the colors to overlap slightly. Gently bounce the sponge to blend the overlap zones together. This takes slightly more patience than a two-color gradient but creates a stunning result.
The Elongating Effect of Three-Color Gradients
The visual transition from warm pink to neutral nude to cool white creates an optical illusion that makes the nail appear longer and more refined. The eye travels the length of the nail following the color progression, which is why this design is particularly flattering on stiletto nails.
12. Hand-Painted Floral Details on White Tips
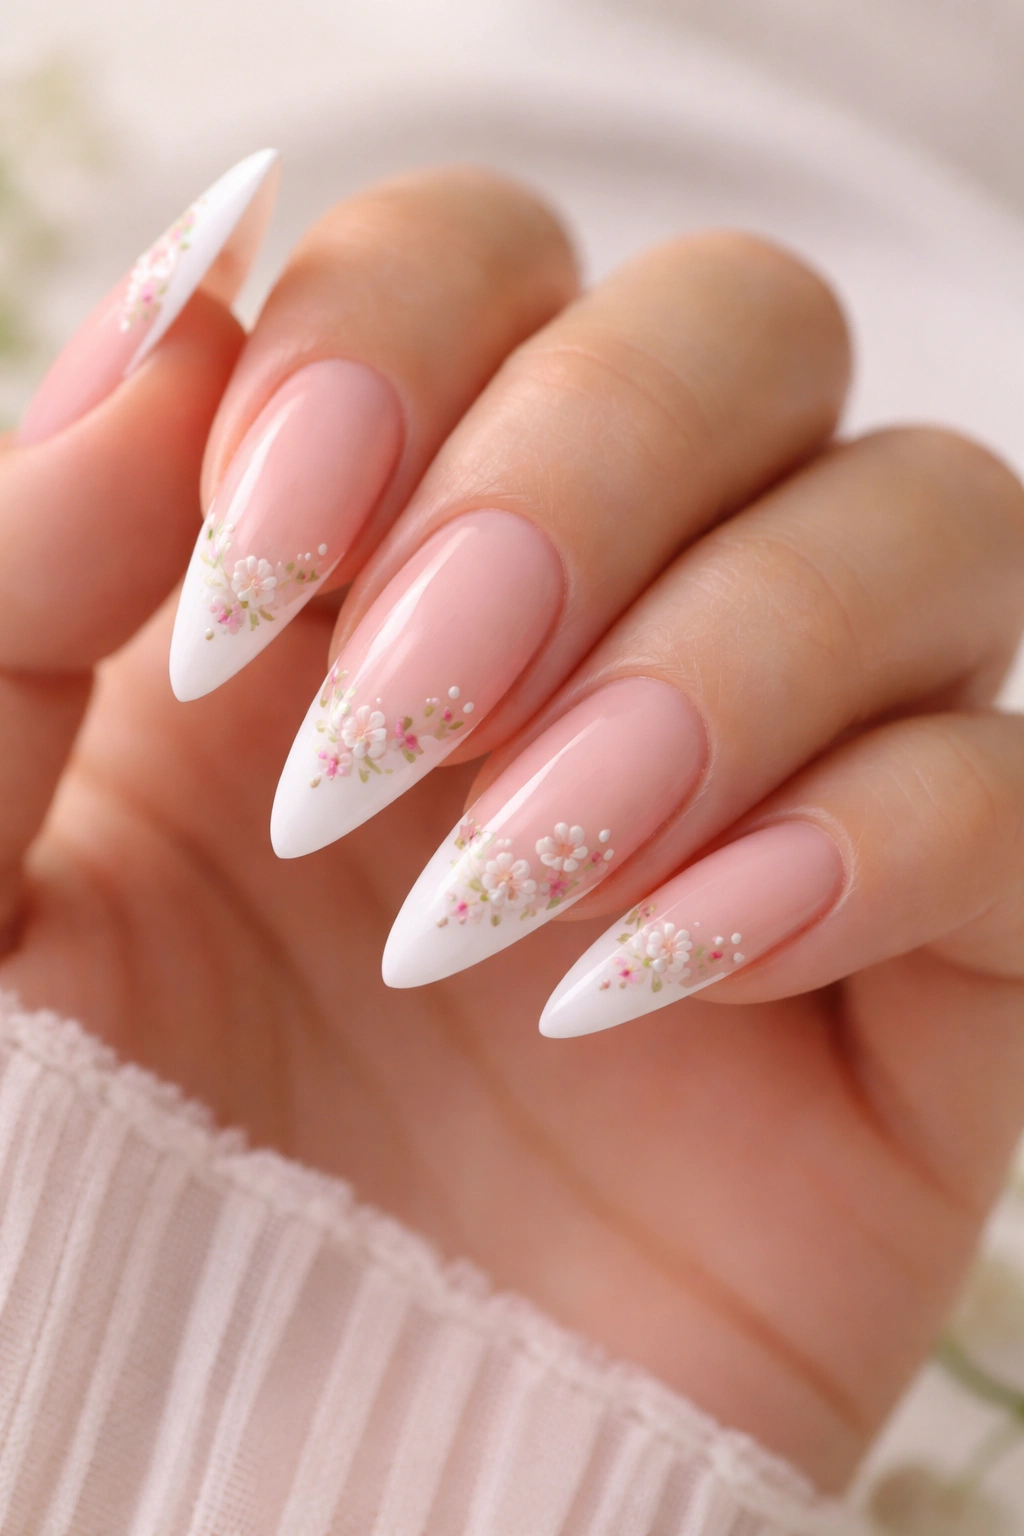
Combine the classic pink and white French tip with delicate hand-painted florals along the white section. This design works beautifully on stiletto nails because the larger surface area gives the artist more room to create detailed artwork.
Simple Floral Designs for Beginners
If you’re painting these yourself, start with simple designs like tiny dots arranged in flower shapes, or minimal line-art flowers. A three-dot pattern arranged in a triangle with a thin line stem is surprisingly recognizable as a flower and requires minimal skill. Alternatively, use nail decals with floral designs and seal them with topcoat—this achieves a professional result without requiring artistic ability.
Placement on White Tips
Paint florals along the edge where the white begins, creating a border effect. Or concentrate the flowers on one corner of each nail for an asymmetrical, artistic look. Some people prefer a single larger flower on each nail, while others scatter tiny flowers across the entire white section.
Paint Types for Detailed Work
Acrylic paint mixed to a nail-polish-like consistency provides better control than regular nail polish for detailed work. Alternatively, use nail art-specific thin-line polish in black, dark pink, or green (for leaves and stems). A very fine brush—thinner than a traditional nail brush—is essential for detailed florals.
13. Pearl Finish Pink and White Stilettos
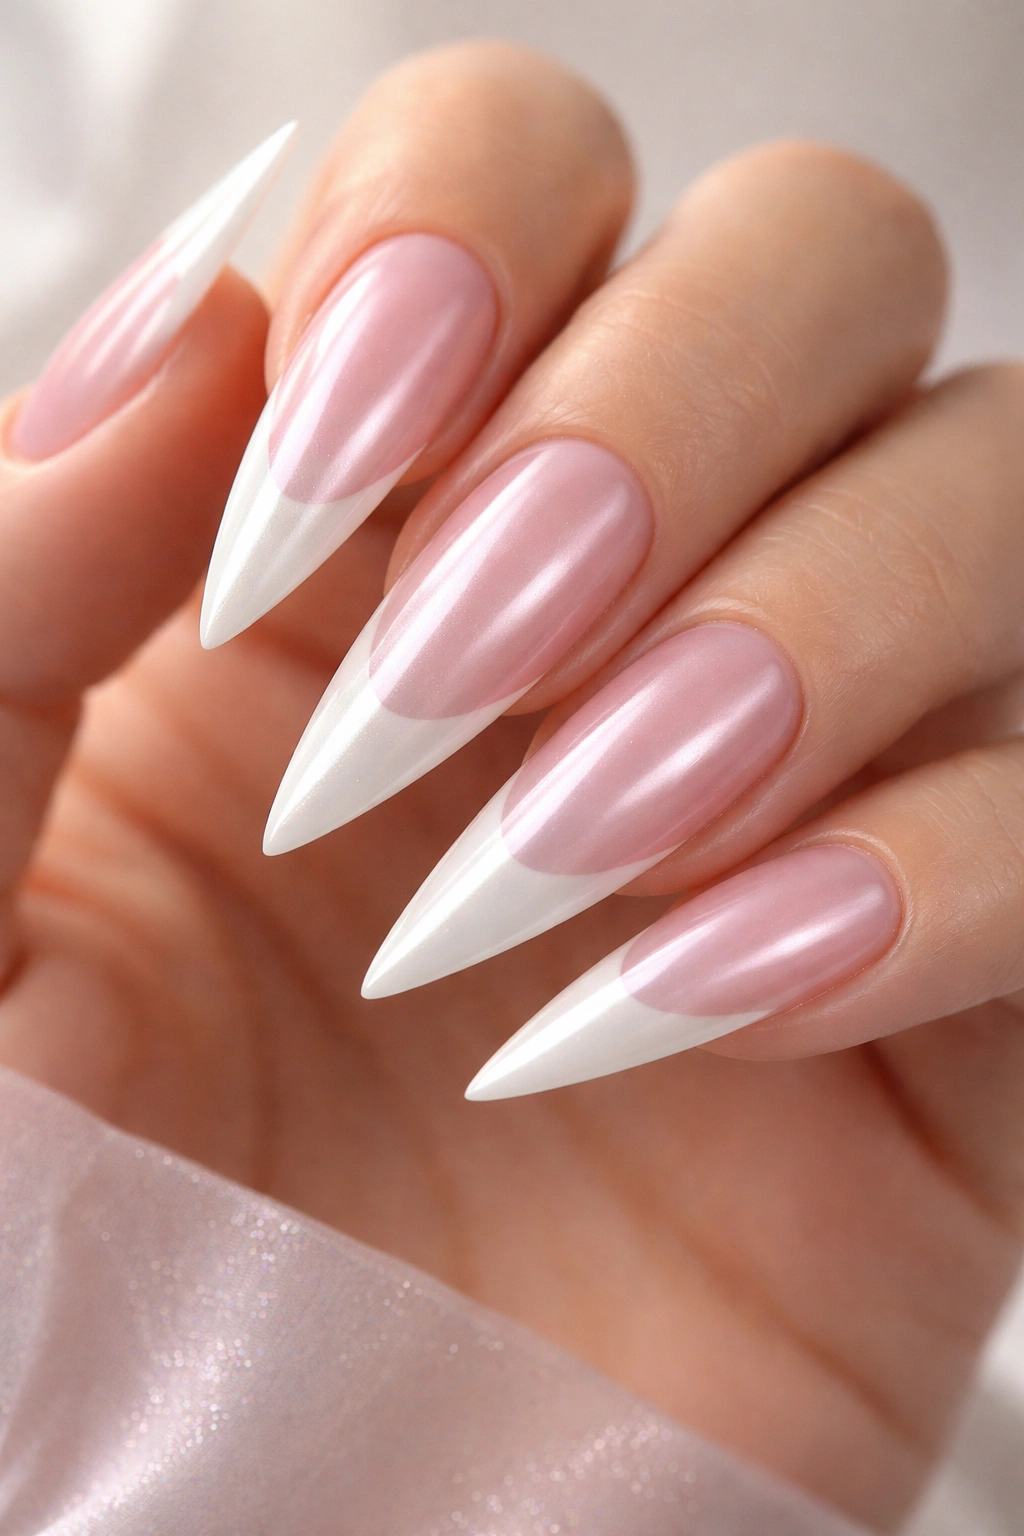
Replace the standard pink and white with pearl versions of each color, creating a design with subtle iridescence that shifts in different lighting. This creates an ethereal, modern feel that’s distinctly different from a traditional matte or glossy French tip.
Pearl Polish Characteristics and Coverage
Pearl polishes have a translucent, shimmery quality that requires good lighting to appreciate fully. They often need three coats to achieve full opacity, and they look best with a pearl or shimmer topcoat rather than a matte one. Some brands create pearl pink and pearl white specifically; others require mixing or layering to achieve the effect.
The Modern Appeal of Pearl Finishes
Pearl finishes feel contemporary and sophisticated without being flashy or over-the-top. They’re especially beautiful in natural lighting and look particularly striking under UV light. The subtle iridescence means the nails look different—and equally stunning—in various lighting conditions.
Enhancing Pearl Shine
A glossy topcoat maximizes the pearl finish’s reflective qualities. Apply a generous topcoat to really bring out the pearlescence. The smooth, shiny surface created by topcoat also makes the subtle color shifts more visible, so the pearl really comes alive.
14. Confetti Sprinkles Effect on White Tips
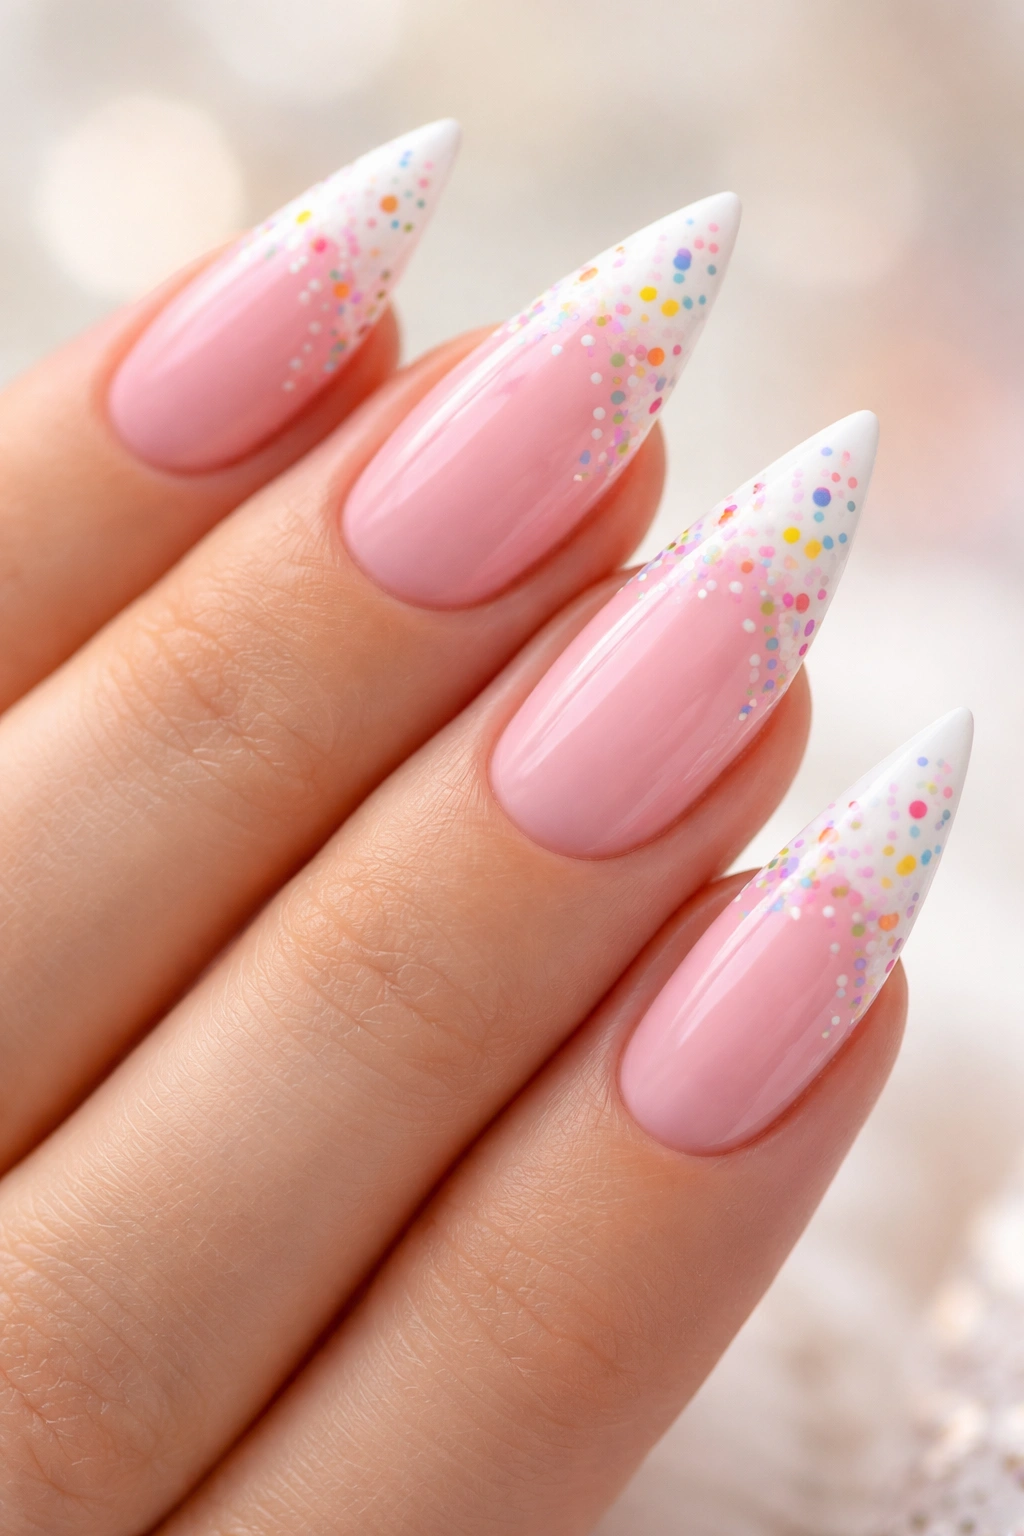
Add a playful, celebratory element by sprinkling tiny confetti-colored pieces across the white tip section. This design works especially well for special occasions or if you want your nails to feel fun and youthful.
Confetti Application Methods
Use a nail polish dotting tool to create tiny dots in various bright colors (hot pink, gold, silver, turquoise, coral) randomly across the white tips. Alternatively, use thin striping brushes to paint tiny dash marks in multiple colors. Or, apply small decorative confetti pieces designed for nails using a thick base coat or adhesive.
Color Combinations That Work
Bright, saturated colors pop beautifully against a soft pink base and white tips. Keep the confetti in the same general color family (all pastels, or all jewel tones, or all metallics) for a cohesive look rather than a chaotic rainbow effect. A mix of one or two bright colors with metallics creates visual interest without feeling overwhelming.
Best Occasions for Confetti Nails
This design shines at celebrations, parties, or whenever you want to add a touch of playfulness to your look. It’s perfect for New Year’s celebrations, birthdays, or just days when you want your nails to reflect a happy mood. The playfulness is tempered by the classic pink and white base, so it still works for semi-formal settings.
15. Chrome or Mirror Finish White Tips
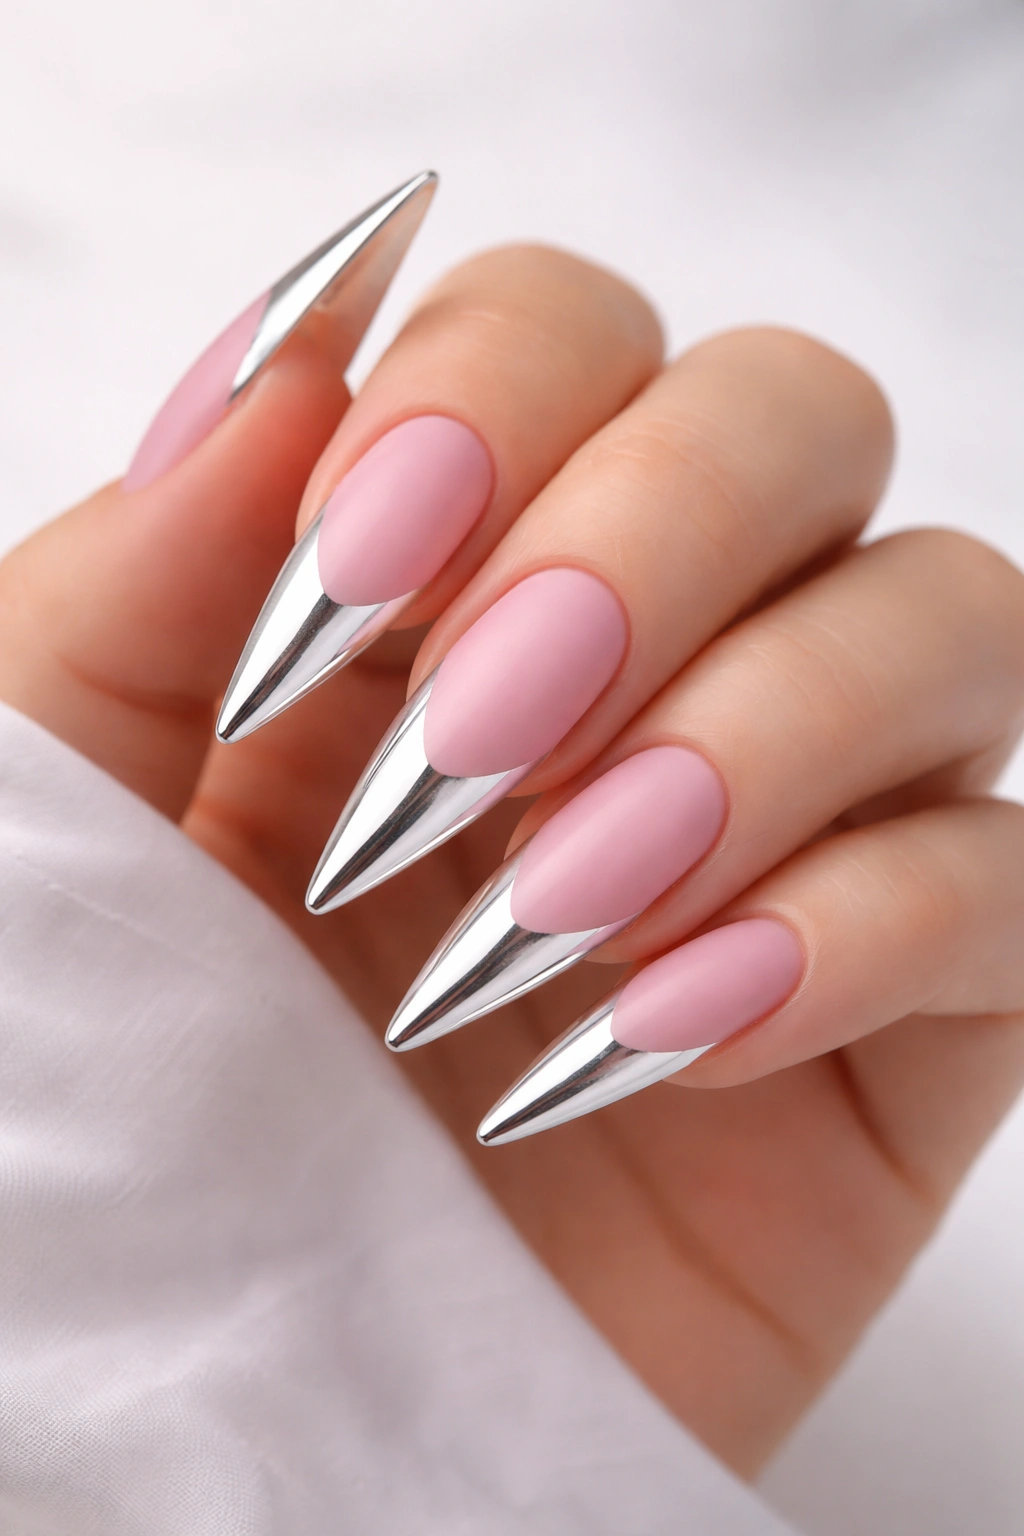
Create a dramatic effect by using a chrome or mirror finish polish for the white tip section while keeping the base a soft, matte pink. The reflective, liquid-metal quality of chrome tips creates a futuristic, high-fashion look.
Achieving Chrome Effects
True chrome finishes require either specialized chrome polish and powder, or a reflective gel base topped with metallic powder. These create a mirror-like, almost impossible-looking finish that’s incredibly striking in person. The application process is slightly more involved than regular polish but absolutely worth the effort for the stunning result.
Chrome Polish Alternatives
If true chrome feels too extreme, use a highly reflective metallic white polish or a mirror-finish white gel polish. These provide significant reflective quality without the full chrome effect. The key is choosing a polish with maximum shine and minimal texture.
Balancing Chrome Tips With a Matte Pink Base
A matte or satin-finish pink base provides the perfect contrast to highly reflective chrome tips. The matte finish grounds the design and prevents the nails from feeling too shiny or plastic-looking. This contrast also makes the tips really stand out visually.
16. Minimalist Negative Space Line Down the Center
Create a sophisticated design by painting a thin line of your base pink directly down the center of the nail through both the pink and white sections, creating a visual dividing line. This is minimalist, modern, and works beautifully on elongated stiletto nails.
Creating a Perfectly Straight Center Line
Use painter’s tape down the center of the nail before applying your pink and white polish, or use a thin striping brush to paint the center line last as a finishing detail. The line should be very thin—1-2mm—and crisp with clean edges. Mastering this requires a steady hand and good lighting, but the payoff is a design that looks intentional and polished.
Variations on the Center Line Concept
Instead of a continuous line, create a dashed line down the center for a slightly playful, less formal look. Or paint a slightly wider (3-4mm) stripe down the center and add a metallic or contrasting color to it. The center line naturally creates a vertical emphasis that elongates the finger, making it especially flattering on longer nails.
Topcoat Considerations for Fine Details
Apply topcoat very carefully when you have fine detail work. Use a thin topcoat brush or apply topcoat with a light touch to avoid disturbing or smudging your center line. Gel topcoat tends to be easier to control than regular topcoat and provides a smoother, more professional finish.
17. Pink and White Ombre With a Metallic Edge
Combine an ombre gradient from pink to white with a thin metallic line at the very edge of the nail, creating a three-element design. This feels more elevated than a simple ombre and adds a jewelry-like quality to your nails.
Ombre Application as the Foundation
Start with your pink-to-white ombre as the base, using the sponging technique described in earlier designs. Ensure your gradient is completely dry and sealed with at least one coat of clear topcoat before proceeding to the next step.
Adding the Metallic Edge Line
Once your ombre is set, use a thin striping brush and metallic polish (gold, silver, or rose gold) to paint a thin line along the very edge of the nail where the tip ends. This line acts as a finishing detail that elevates the entire design. The metallic catches light beautifully and creates a luxe, intentional appearance.
Layering for Durability
Apply your metallic line and allow it to dry, then seal everything with a final topcoat. The topcoat protects the metallic line and ensures it doesn’t chip or fade prematurely. A thick, protective topcoat is especially important when you’re layering multiple design elements.
18. Subtle Holographic Shimmer on White Tips
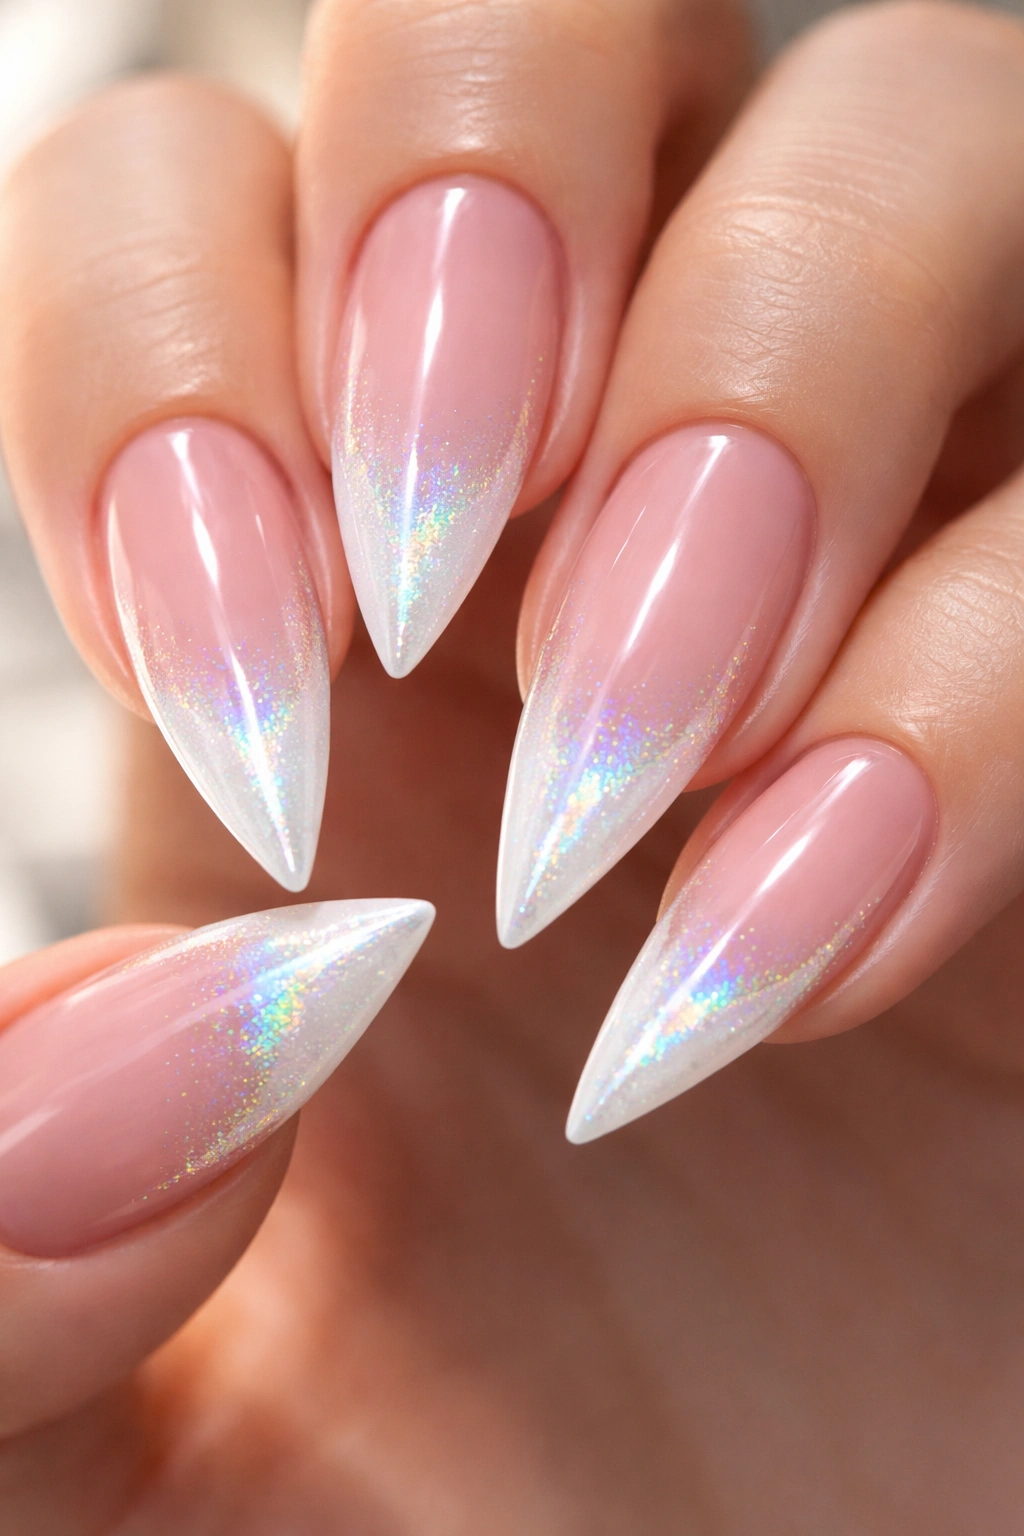
Add a touch of holographic shimmer exclusively to the white tip section, creating an iridescent effect that catches light in multiple colors. This design feels magical and special while maintaining the sophistication of the pink and white base.
Holographic Polish and Powder Application
Holographic effects are achieved through specialized holographic polish or by applying holographic powder over a sticky gel base. The powder method provides a more intense, obvious holographic effect, while some holographic polishes offer a more subtle, refined shimmer. Both approaches work beautifully on white tips.
Light Refraction and Visual Impact
Holographic shimmer is most visible in bright or natural light, making this design perfect for daytime wear or outdoor events. The rainbow shimmer effect becomes more subtle in dim indoor lighting, so it’s a design that changes appearance depending on your environment. This versatility is part of what makes it special.
Application Strategy for Even Coverage
Whether using holographic polish or powder, apply your white tip base first and allow it to dry completely. Then apply your holographic finish to just the tip section. Keep the holographic effect contained to the white tips rather than extending it onto the pink base—this maintains the classic French tip silhouette while adding a contemporary shimmer.
19. Pink Base With White Tips and Gold Half-Moon Detail
Add a gold half-moon shape at the base of the nail, creating a modern take on the classic half-moon manicure design. This combines pink, white, and gold in a design that feels both timeless and current.
Creating the Half-Moon Shape
Use a half-moon nail stencil (available online or at beauty supply stores) to paint a precise half-moon shape at the base of each nail in gold metallic polish. Alternatively, freehand the shape using a thin curved brush or a dotting tool to paint dots that form a half-moon pattern. The stencil method ensures consistency across all ten nails.
Gold Color and Finish Choices
Matte gold creates a more modern, understated look, while glossy or metallic gold is more reflective and eye-catching. Rose gold offers a warmer alternative that sometimes complements pink even better than traditional yellow gold. Experiment with different gold shades to find what pairs best with your chosen pink.
Proportion and Visual Balance
The half-moon should occupy roughly 20-25% of the nail at the base, creating a distinct design element without overwhelming the pink and white sections. The proportions create visual interest and make the overall design feel more intentional than a simple French tip.
20. Textured Matte Pink With Glossy White Tips
Create contrast in both color and finish by using a matte pink base paired with high-gloss white tips. This textural variation adds visual depth and creates a sophisticated, contemporary look.
Creating a Matte Finish
After applying your pink polish, use a matte topcoat instead of a glossy one. Matte topcoats transform any polish into a velvety, non-reflective finish that feels modern and refined. Allow the matte topcoat to dry fully before applying your white tips.
Glossy White Tips for Contrast
Apply your white tip as usual, and seal it with a regular glossy topcoat rather than matte. This creates a striking contrast between the velvety matte pink and the shiny, reflective white tips. The variation in finish makes the design feel intentional and adds a luxury quality.
Texture and Finish Appreciation
The matte-to-gloss transition feels especially luxurious in person, even though it’s more subtle in photographs. This is a design that really rewards being seen up close. The textural contrast also makes the white tips appear brighter and more crisp against the softer matte pink.
Maintenance and Longevity Considerations
Both matte and glossy finishes require topcoat reapplication to maintain their appearance over time. The matte finish can appear slightly dull after a couple of weeks, so reapply matte topcoat as needed. The glossy white tips maintain their shine longer but will eventually need a fresh topcoat layer as well.
Final Thoughts
Pink and white French tip stiletto nails offer an almost infinite realm of design possibilities while maintaining the elegant, sophisticated foundation that makes this style so timeless. Whether you choose to keep things classic and simple, or you explore more complex variations with ombre gradients, metallic accents, and artistic embellishments, the versatility of this design means you’ll never run out of fresh ideas to try.
The beauty of stiletto nails is that they transform even simple designs into statements. The elongated shape naturally draws attention to your hands and makes any nail art look more intentional and polished. Combined with the universally flattering pink and white color palette, you’ve got a foundation that works for your everyday life, professional settings, and special occasions alike.
Start with the classic design if you’re new to French tips, and then gradually experiment with the variations that appeal to you most. You don’t need to attempt elaborate designs to make your nails look absolutely stunning—sometimes the most elegant choices are the simplest ones. But whenever you’re ready to add a bit of sparkle, gradient, metallic accent, or artistic detail, you’ll have plenty of proven approaches to choose from. The key is choosing designs that feel authentic to your personal style and that make you feel confident and beautiful every single day.
