

Pink and green might not be your first instinct for nail color pairing, but these two shades create a surprisingly sophisticated and eye-catching combination that ranges from soft botanical to bold and daring. When you commit to stiletto nails—those dramatic, elongated almond or coffin-shaped tips—the contrast between delicate pink and fresh green tones becomes even more striking. The key is understanding which shades of pink (blush, hot pink, rose gold, mauve) pair best with which greens (sage, emerald, lime, forest) and how to layer them with design elements like ombre, geometric patterns, glitter, and intricate nail art that turns your fingers into miniature masterpieces.
Stiletto nails are all about confidence and creating a statement. They demand bolder color choices and more adventurous designs than shorter, rounder nails would typically showcase. A simple two-color manicure can look elegant on blunt nails, but on stilettos, it becomes a fashion feature that commands attention. The combination of pink and green works particularly well because these colors are nearly opposite on the color wheel, which means they naturally complement each other—one is warm and romantic, the other is cool and calming, and together they create visual interest and depth.
Whether you’re drawn to neon contrasts, pastel dreams, or jewel-tone luxury, pink and green stiletto nails offer endless creative possibilities. From ombre designs that blend the colors seamlessly to nail art that features one color as the base with the other as intricate detailing, there’s a style to suit every preference and occasion. Let’s explore sixteen unique pink and green stiletto nail ideas that you can bring to your next manicure appointment or recreate at home with patience and practice.
1. Soft Pink and Sage Green Ombre Blend
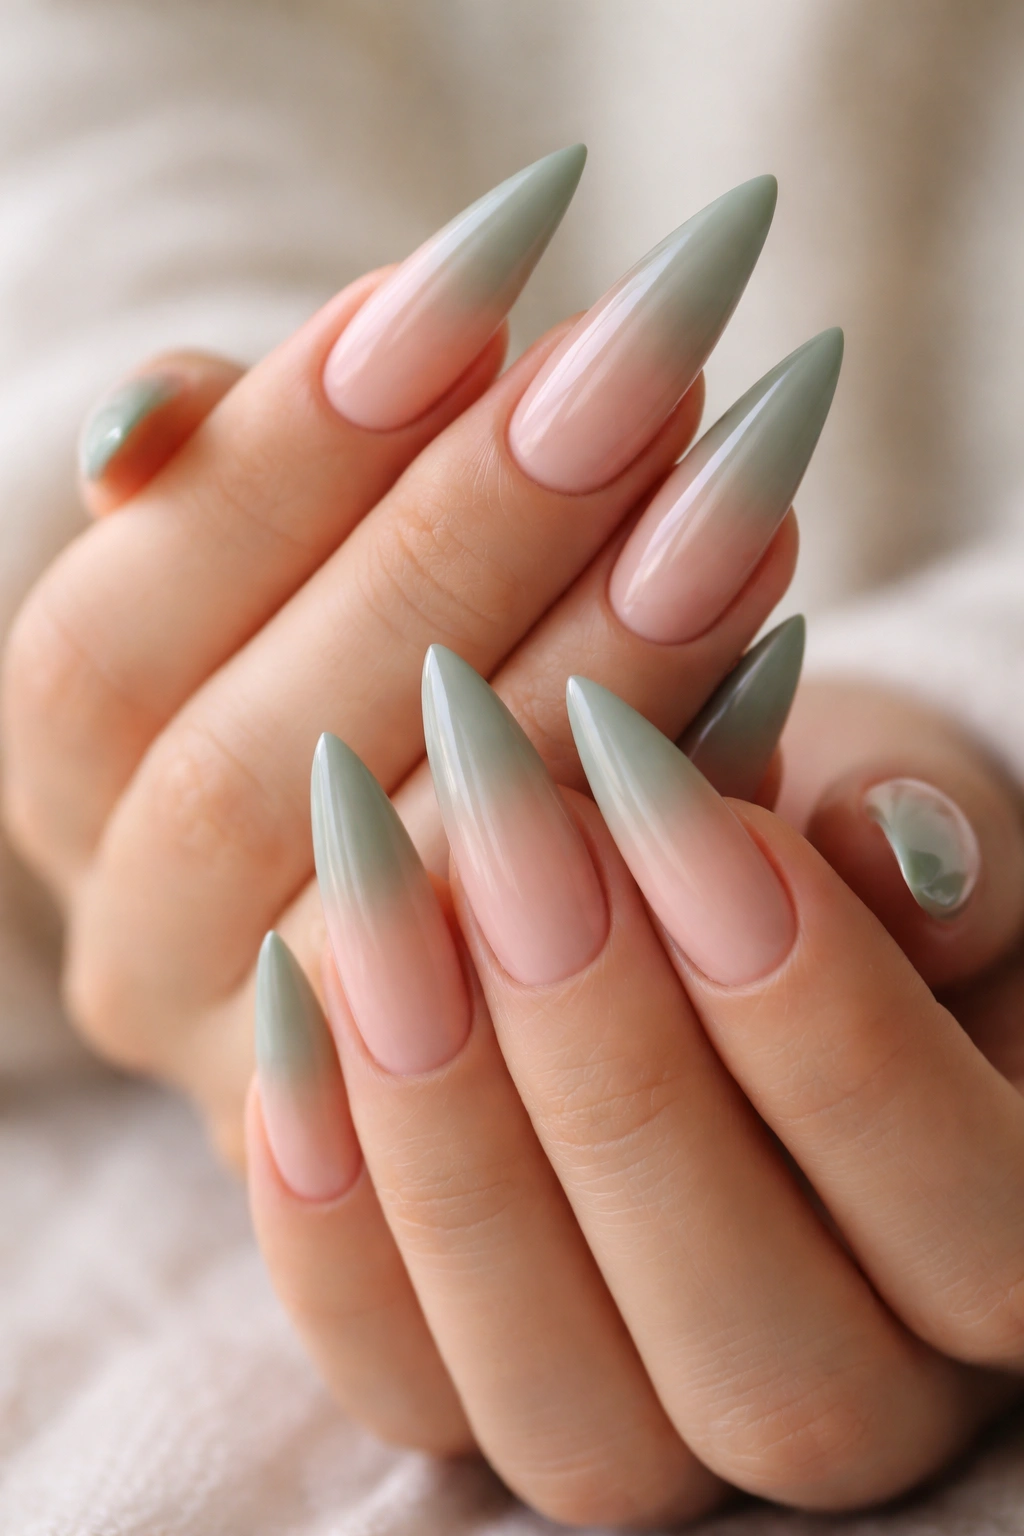
Ombre manicures work beautifully on stilettos because the elongated shape gives you more surface area to create a smooth color gradient. This design starts with a peachy-soft pink on the nail bed and gradually transitions to a muted sage green toward the tips, creating a sunset-into-forest effect that feels both romantic and earthy.
Why This Design Works So Well
The combination of soft pink and sage green is inherently soothing, making it perfect for those who want their nails to look sophisticated without being overly bold. The ombre technique requires careful blending using a makeup sponge and multiple layers of polish, but the result is a seamless gradient that looks like a professional mani. This style complements almost any skin tone and works for both casual and formal settings. The muted nature of these shades means they won’t clash with your outfits—they enhance rather than compete.
Application Tips and Techniques
- Sponge the colors onto a makeup sponge rather than blending on the nail itself for better control and faster transitions
- Apply each color in thin layers, allowing each to dry slightly before adding the next shade
- Use a white base coat to make both colors appear more true to their intended shade
- Seal everything with a glossy top coat to blend the colors further and create shine
- Consider adding a delicate gold foil accent along the nail tips for extra sophistication
Pro tip: Practice the ombre technique on fake nails first—the sponging method takes patience and repetition to master, but once you get it, you can create this look almost anywhere.
2. Hot Pink and Emerald Green Color Block Design
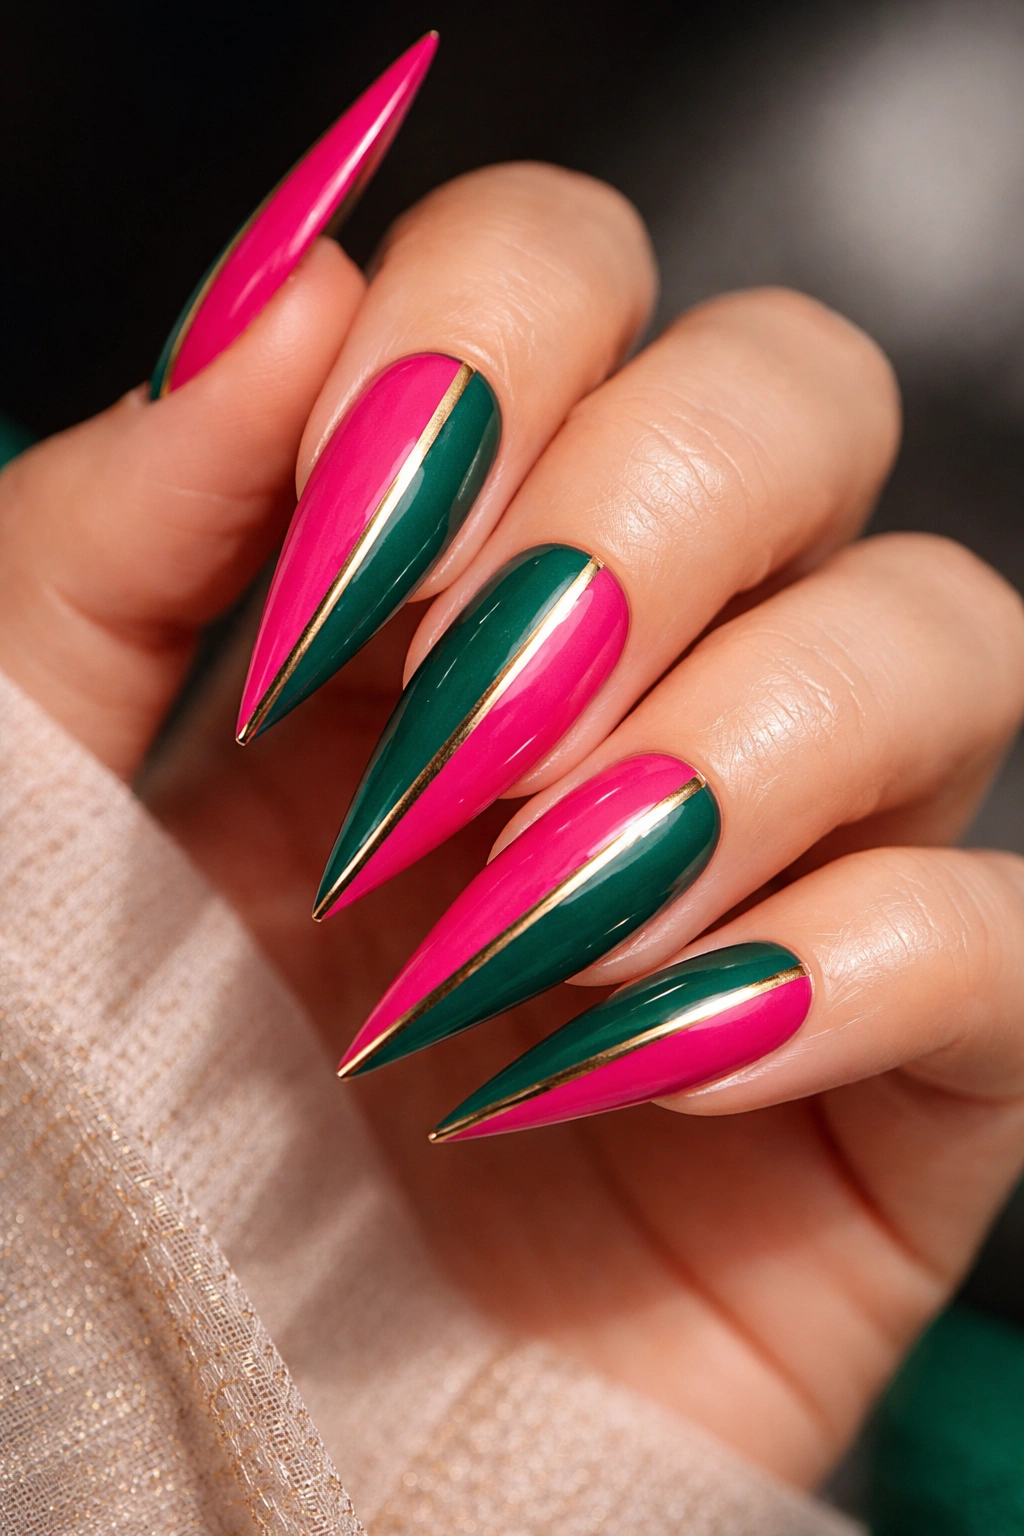
Color blocking means dividing the nail into distinct sections with contrasting colors, and on stilettos, you can be as creative with the geometry as you want. This design features a bold hot pink on half the nail and a rich emerald green on the other half, typically separated by a diagonal, vertical, or curved line created with tape or steady hands and a thin brush.
The Visual Impact of Jewel Tones
Hot pink and emerald are both jewel tones, which means they’re saturated, rich, and inherently luxurious-looking. Together, they create a high-contrast manicure that photographs beautifully and stands out in person. This isn’t subtle—it’s meant to be noticed and admired. The boldness of these colors is perfect for special occasions, nights out, or whenever you’re feeling confident and want your nails to match that energy. On stilettos, the elongated shape amplifies the color blocking effect even more than it would on shorter nails.
Design Variations You Can Try
- Diagonal split with hot pink on the top-left and emerald on the bottom-right for a sleek modern look
- Vertical halves with a metallic gold stripe running down the center as a separator
- Emerald base with hot pink triangles or abstract geometric shapes layered on top
- Alternating sections (hot pink, emerald, hot pink, emerald) if you’re feeling adventurous
- Add white dots or small stars scattered across both colors for a playful twist
Worth knowing: The steadier your hand or the better your tape placement, the cleaner your color blocks will look—invest in good nail tape or use thin strips of painter’s tape for crisp lines.
3. Blush Pink with Forest Green Marble Swirl
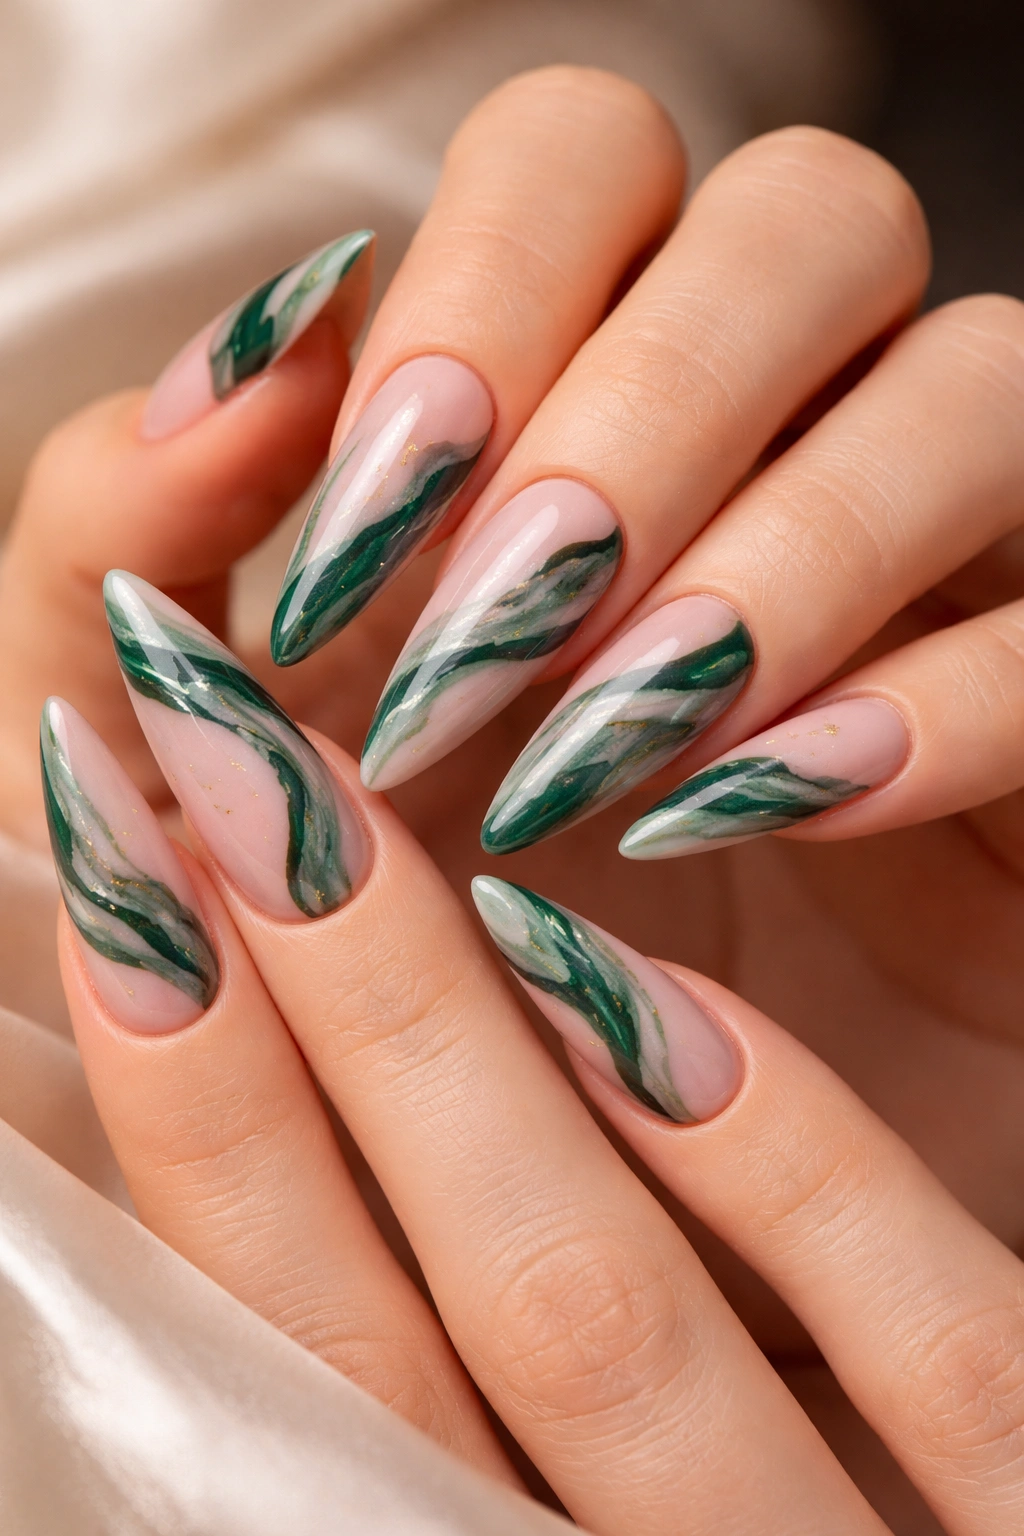
Marble effects create an organic, artistic look that feels high-end and unique. Combining blush pink with forest green marble gives you an earthy, sophisticated manicure that works year-round. The swirling pattern is achieved by applying both colors to the wet polish and dragging a toothpick or dotting tool through them to create organic, flowing lines that look like natural stone patterns.
Creating Authentic Marble Effects
True marble nails require wet polish, which means you have a very limited window (30 seconds or so) to work before the base color sets. The trick is applying your base color, immediately dropping or swirling your accent color into it, and then using a thin tool to drag through both colors while they’re still wet. The unpredictability is part of the charm—no two marble nails are ever identical. Forest green against blush pink creates a marbled effect reminiscent of natural stone you’d see in luxury spas or high-end homes, giving your nails that “expensive salon” aesthetic.
The Best Tools and Techniques
- Use a water marble bowl technique with room-temperature water, or do direct-on-nail marble
- A clean toothpick works perfectly for dragging lines through wet polish
- Keep a cotton swab or paper towel nearby to clean your dragging tool between nails
- Multiple thin coats of the accent color create more depth than one thick application
- Seal with a glossy top coat once fully dry to add shine and protect the intricate design
Insider note: If the marble effect isn’t perfect on your first try, consider it “vintage marble”—the slight imperfections often look more authentic and artistic than perfectly symmetrical designs anyway.
4. Baby Pink Base with Dark Green Geometric Line Work
Geometric line work appeals to people who appreciate clean, modern design aesthetics. This manicure uses a soft baby pink as the dominant color and adds precise dark green lines—stripes, triangles, or abstract geometric shapes—usually created with a thin nail art brush or a thin-tipped nail polish pen.
Why Geometric Designs Elevate Simple Color Combinations
A solid baby pink on stilettos is already pretty, but adding graphic elements makes it memorable and intentional-looking. The green lines draw the eye and create visual interest, while the baby pink keeps things from feeling too harsh. This style works beautifully in professional settings because it’s creative without being outrageous, and it suits almost every preference from minimalist to artistic. The geometric shapes can be as simple as vertical stripes or as complex as interlocking triangles or abstract angular designs.
Different Geometric Patterns to Explore
- Vertical stripes in varying widths for a classic striped look
- Triangles arranged in patterns along the nail or at the tips
- Diagonal lines creating a lattice or cross-hatch effect
- Abstract angular shapes that don’t follow any particular pattern
- Negative space designs where you leave portions of the baby pink completely bare to create shape
- Tiny geometric shapes clustered near the cuticle or tip
Quick tip: Nail art pens with ultra-fine tips give you way more control than trying to use a brush with liquid polish—they’re worth the small investment if you plan to do line work regularly.
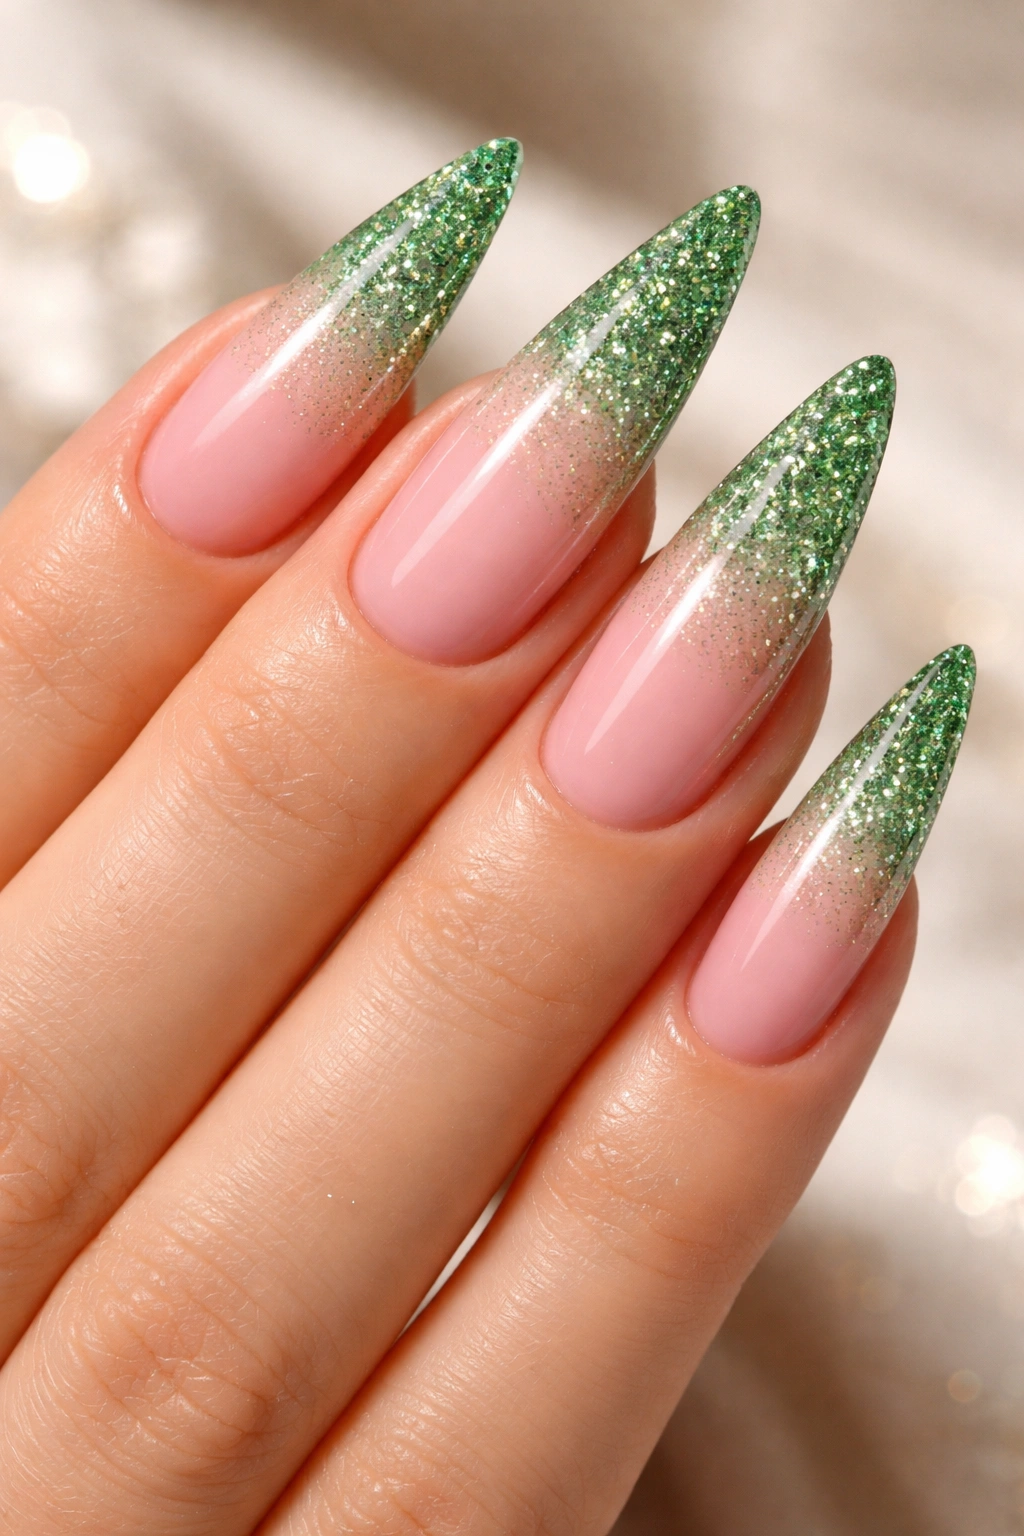
5. Pastel Pink and Pale Green Gradient with Glitter Fade
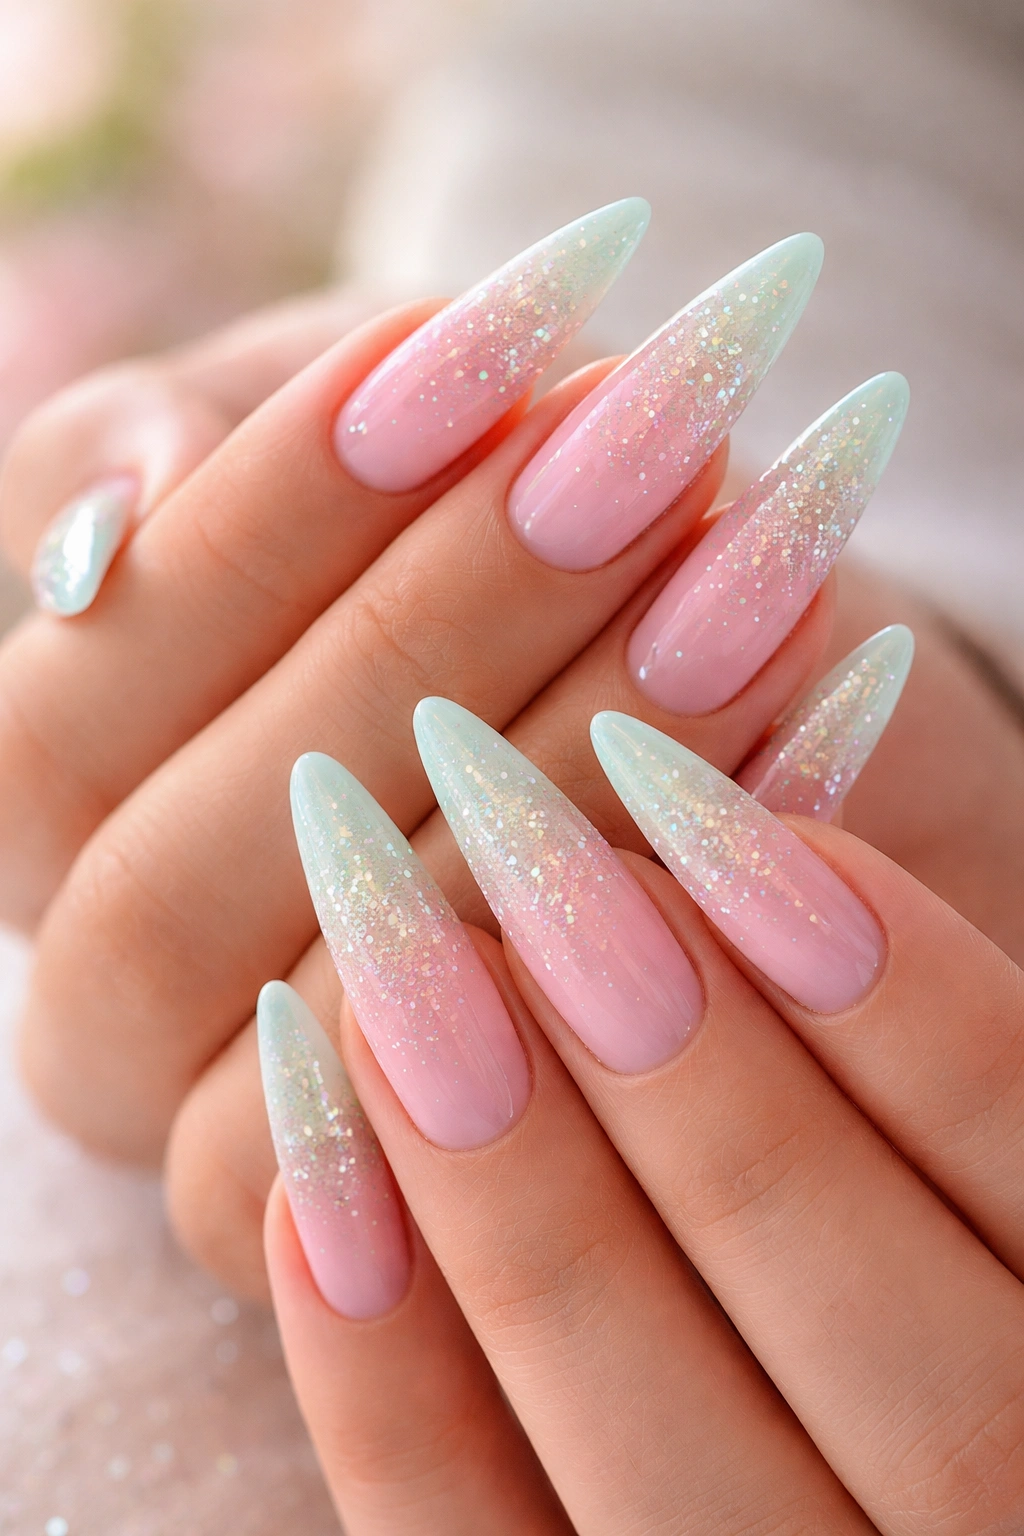
Gradient nails where one color fades out and another fades in are essentially lighter-colored ombres, and adding glitter makes them look even more magical. This design uses pastel pink and pale green as the base colors, then incorporates clear or holographic glitter that fades from dense at the tips to sparse near the cuticle, creating a champagne-and-sparkle effect.
The Romance of Pastel and Glitter Combinations
Pastels are inherently romantic and soft, making them perfect for anyone who wants femininity without being overly cutesy. Adding glitter elevates the design into something more special and celebratory. The glitter fade effect is particularly stunning on stilettos because the elongated shape gives the glitter more room to cascade and create a tail-like sparkle effect. This manicure is perfect for weddings, proms, anniversaries, or any time you want your nails to feel like a special occasion.
How to Create a Perfect Glitter Fade
- Apply pastel pink to the full nail and allow to dry
- Apply pale green to the tip area (approximately the top third) while the pink is still slightly tacky
- Blend the junction between colors with a makeup sponge or small brush
- Mix clear or holographic glitter with clear top coat in a small dish
- Apply the glitter mixture densely to the very tips and fade outward by using a dry brush to spread it thinner as you move toward the center
- Seal with a shiny top coat once the glitter is positioned
Pro tip: Glitter can be messy—work over a small tray or piece of paper to catch any loose bits, and keep paper towels nearby to clean your brush frequently.
6. Neon Pink and Lime Green Sunset Stilettos
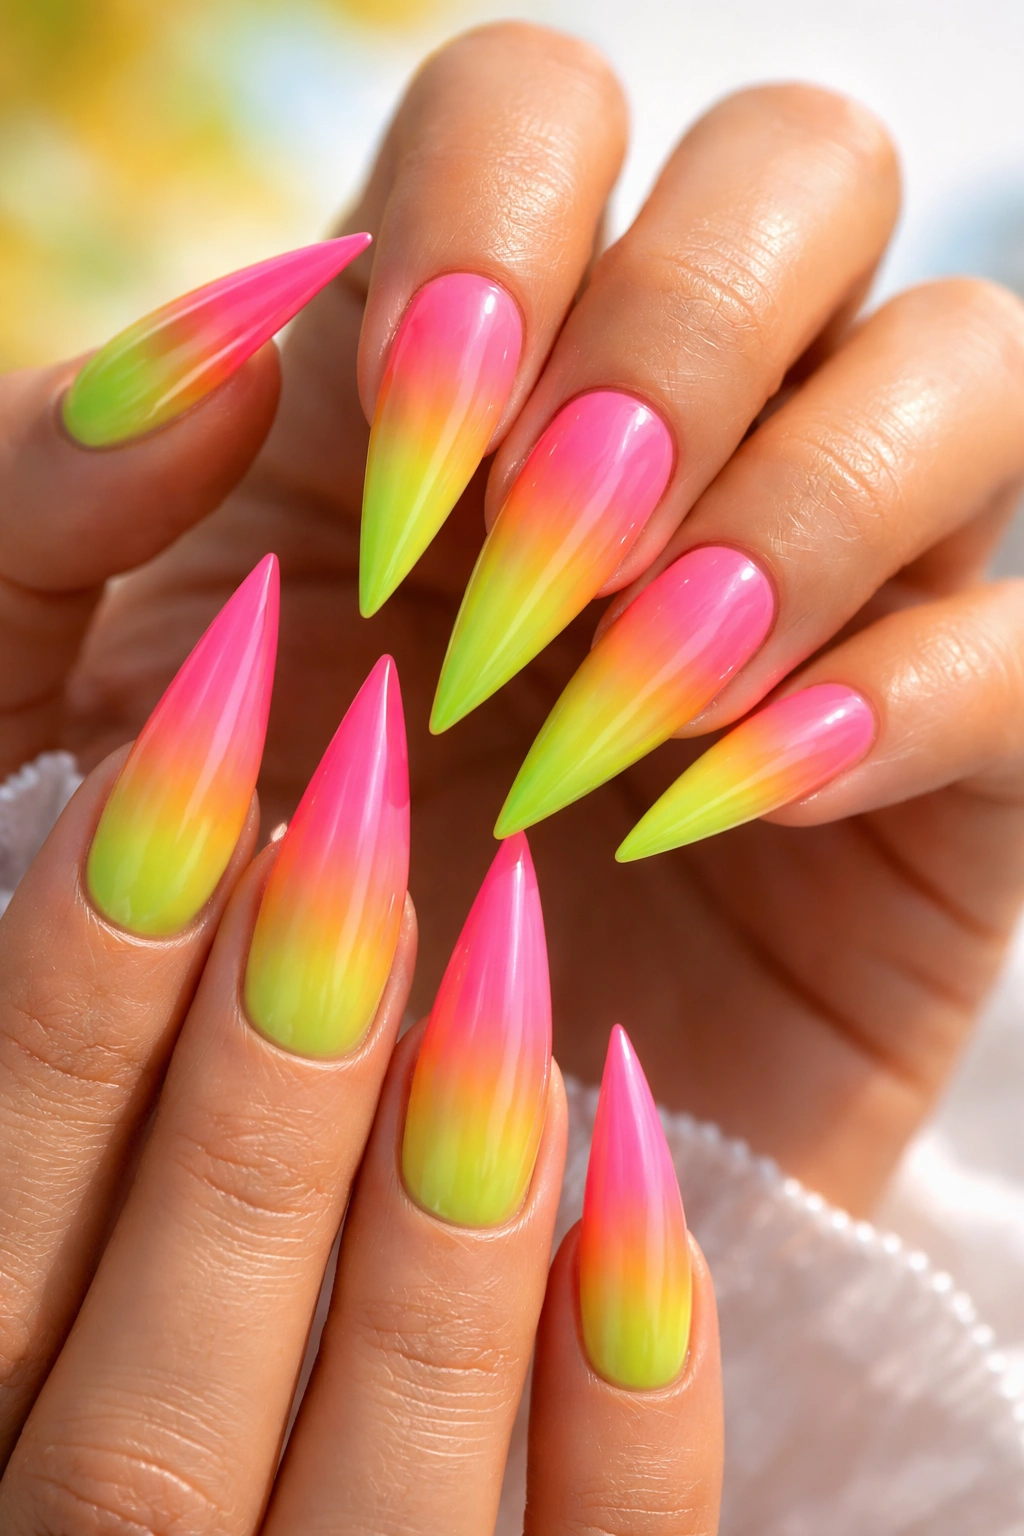
For those who want their nails to absolutely pop, neon pink and lime green is the combination that delivers maximum visual impact. This design is essentially an ombre where neon pink fades into lime green, or vice versa, creating a sunset-goes-neon effect that’s pure energy and attitude.
When and Where to Wear High-Impact Neons
Neon combinations aren’t for every occasion, but they’re perfect for summer events, beach trips, music festivals, parties, or any time you want to make a bold statement. Neon shades are trendy and youthful-feeling, and they photograph beautifully (especially in natural light). On stilettos, the neon effect is even more dramatic because the elongated tips draw attention. This is the manicure to wear when you want confidence and visibility—it’s impossible to miss and it signals to the world that you’re not afraid to be noticed.
Styling Tips for Neon Manicures
- Keep your outfit relatively neutral or let the nails be the statement piece
- Pair with minimal jewelry so your hands remain the focal point
- Neons look even brighter next to certain skin tones—experiment to see what works for you
- Consider matte top coat for a more fashion-forward look, or glossy for extra shine
- The brightness will fade as the polish sits on your nails, so capture photos in natural daylight
- Neon shades chip more visibly than other colors, so plan for frequent touch-ups
Worth knowing: Neon polishes often require more coats than regular colors to achieve full opacity—usually three to four thin coats rather than the typical two.
7. Mauve Pink and Seafoam Green with Pearl Accents
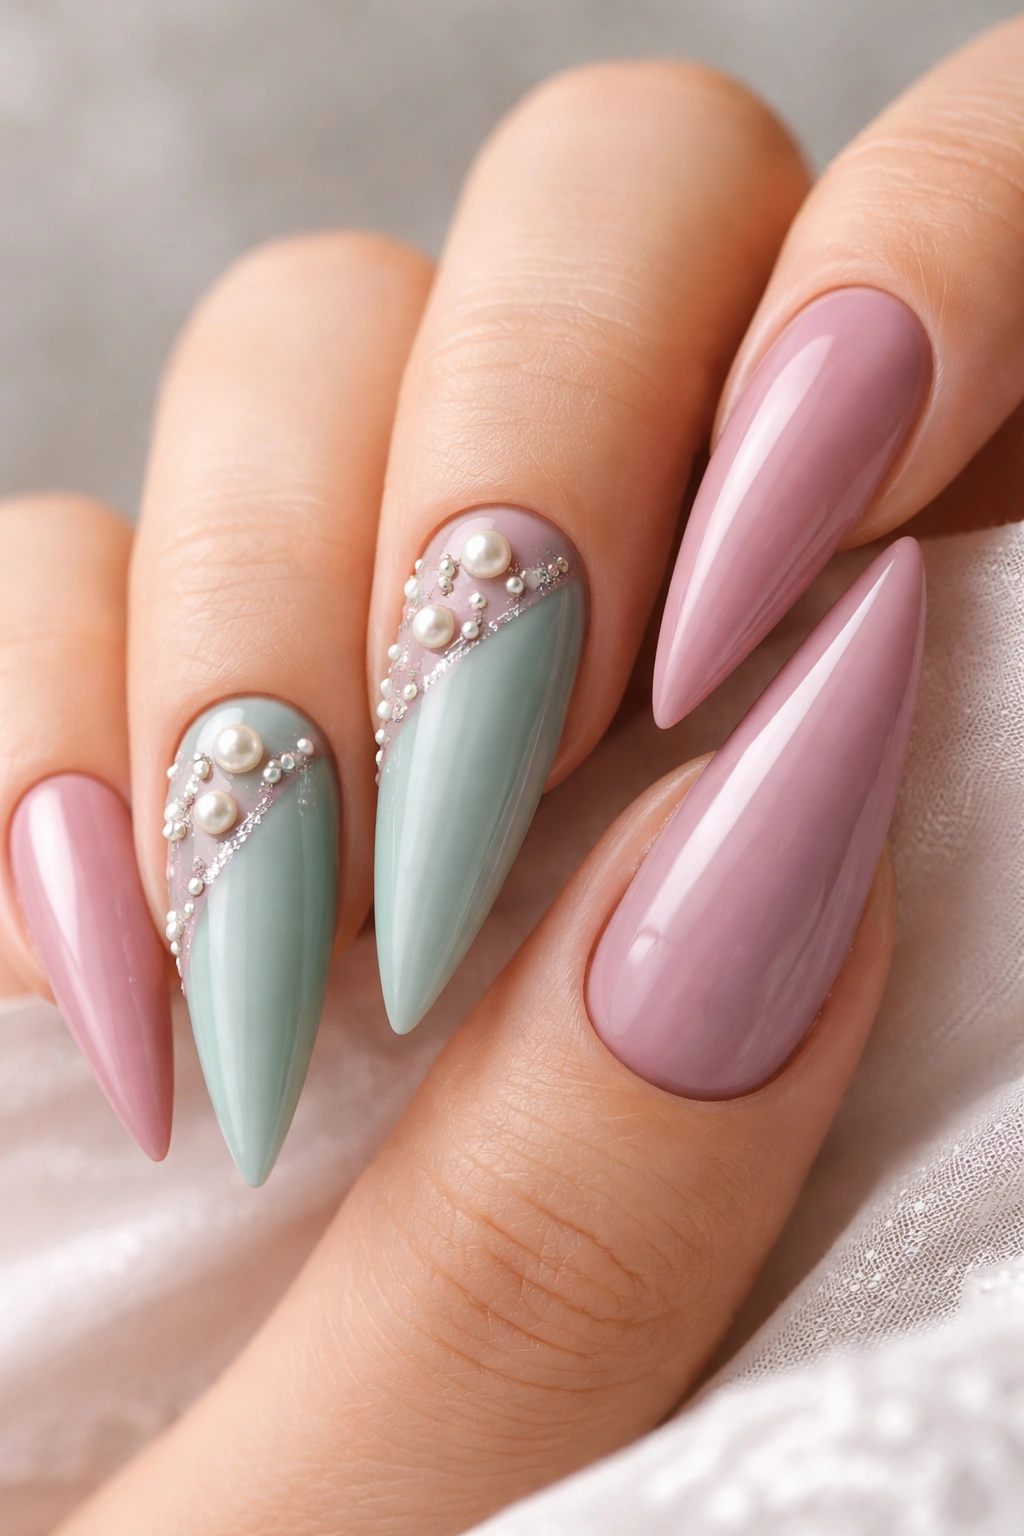
Mauve and seafoam represent the softer, more muted side of the pink-and-green palette, and they’re utterly elegant together. This design features these gentle shades as the base, with pearl or shimmer accents—either scattered across both colors or applied to just one nail per hand for accent purposes.
The Sophisticated Appeal of Muted Tones
Mauve and seafoam are sophisticated colors that feel less trendy and more timeless than brighter alternatives. They’re perfect for people who want their nails to be noticeable but not loudly attention-seeking. Pearl accents add luxury and depth without making the manicure feel over-the-top. This combination works beautifully in professional settings, at formal events, or for everyday wear if you want your nails to feel a bit more special than a standard solid color. The pearlescent finish catches light and adds dimension that makes these soft colors feel more dynamic.
Ways to Incorporate Pearl and Shimmer
- Apply pearl-finish polish as a full base coat, then layer transparent mauve and seafoam shades over select nails
- Use pearl as a top coat over both mauve and seafoam for an all-over shimmer effect
- Create a gradient that transitions from mauve to seafoam and finishes with a pearl-heavy glitter fade
- Use pearl powder mixed with clear top coat to create custom pearl accents
- Apply pearl as thin accent stripes or abstract shapes on top of solid mauve or seafoam
- Combine pearl with metallic gold or rose gold accents for extra elegance
Insider note: Pearl-finish polishes often have a subtle color-shifting quality—they look different depending on the angle and light, which adds sophistication that photographs beautifully.
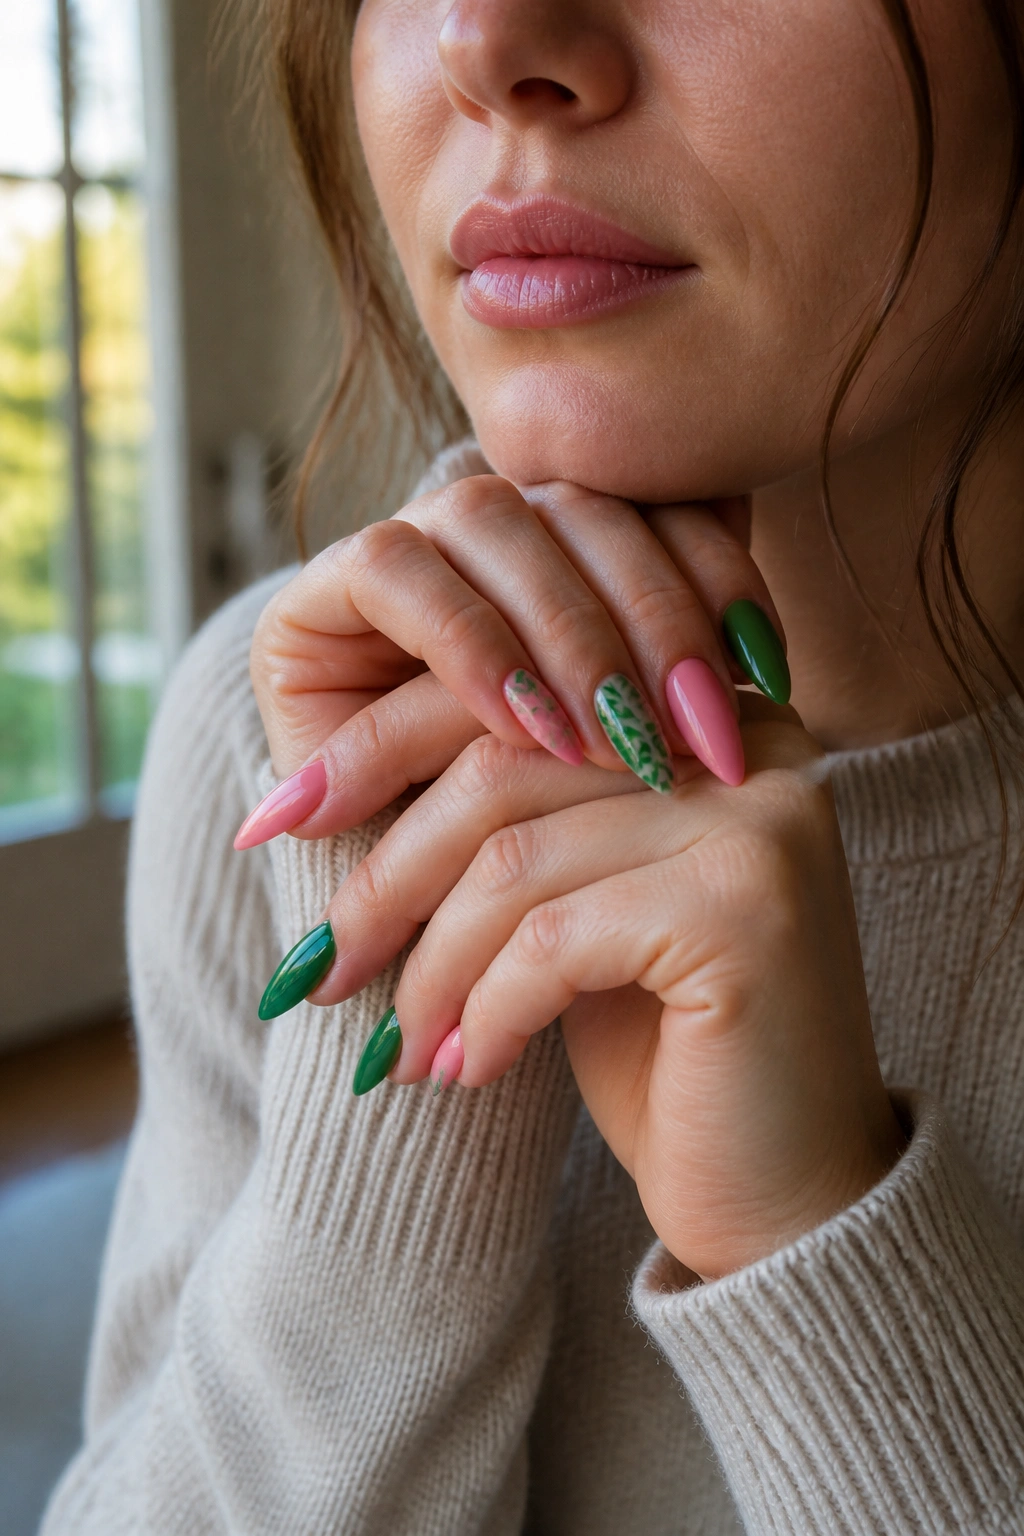
8. Hot Pink Stilettos with Sage Green Leaf or Plant Nail Art
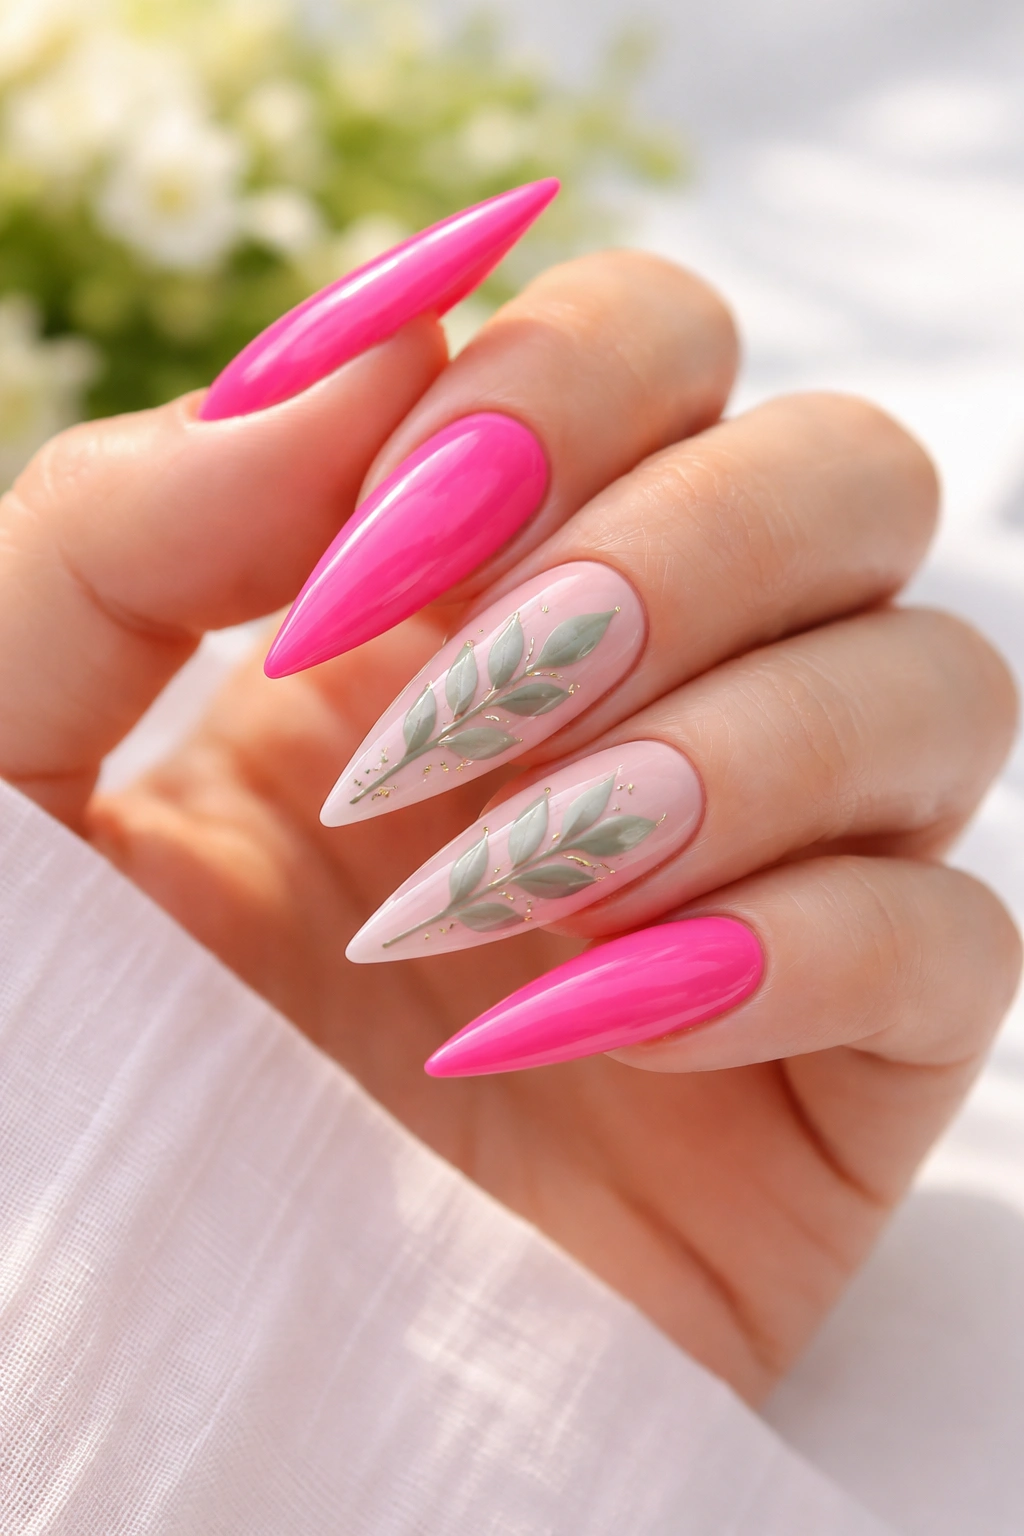
For a design that combines both a dominant color and artistic detail work, hot pink stilettos with delicate sage green leaf or botanical nail art is a striking and unexpected combination. The hot pink serves as the bold base, while hand-painted or stamped green leaves, ferns, or plants add an organic, nature-inspired element.
Bringing Nature Vibes to Bold Color Palettes
Hot pink might seem contrary to nature-inspired art, but the combination is actually quite beautiful—it’s like bright tropical flowers against green foliage. The botanical element softens the aggressiveness of hot pink, while the vibrant base makes the green details pop more than they would on a neutral background. This style works wonderfully for spring and summer, and it’s perfect for anyone who loves plants or wants their nails to reflect a nature-loving aesthetic. Hand-painted leaf details take skill but look incredibly elegant, while nail stamping plates make botanical designs accessible to anyone.
Design Approaches for Botanical Stiletto Nails
- Hand-paint delicate small leaves in sage green scattered across the hot pink base
- Use a nail stamping plate to transfer detailed fern or leaf designs onto the hot pink
- Create a botanical wreath or garland effect around the nail edge
- Paint small potted plants or succulents on the accent nail
- Use green ombre to create a watercolor plant effect
- Layer the botanical design with thin gold or copper lines for added elegance
Pro tip: If hand-painting feels intimidating, start with a stamping plate and stamper—the tool does the work, and you just have to line it up correctly and apply pressure.
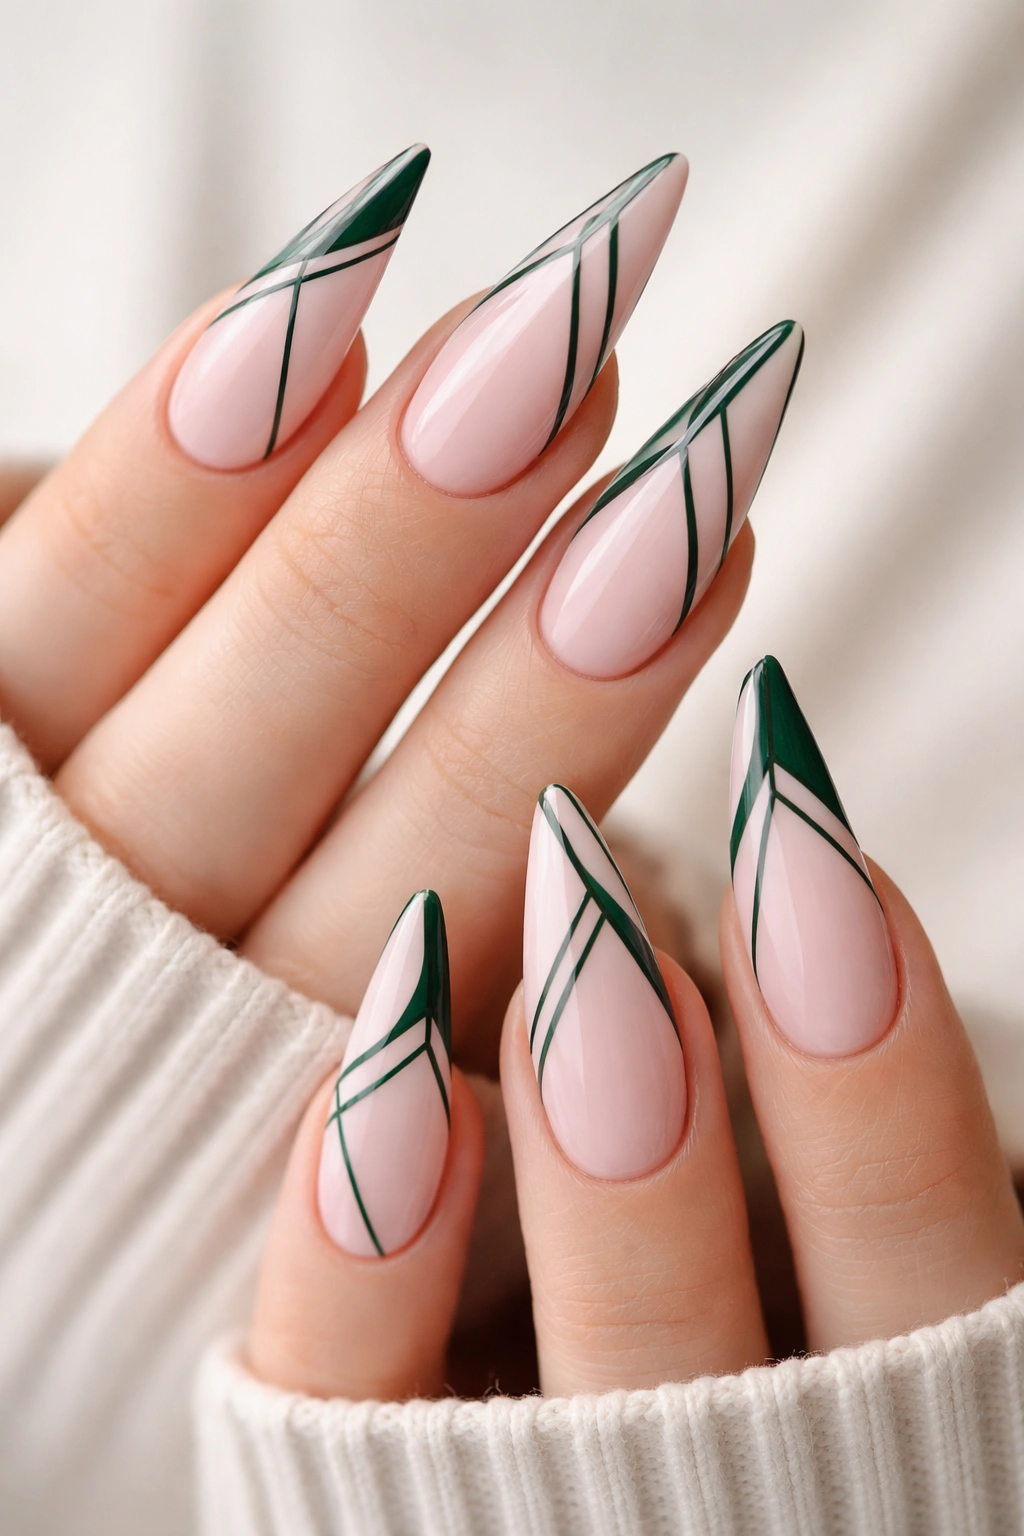
9. Pink Ombre Stilettos with Green French Tips

The French tip is a classic manicure style, but reimagined with a green tip on an ombre pink base, it becomes something fresh and modern. This design features pink fading lighter from cuticle to nail, with a sharp dark green line separating the ombre from the colored tip, and the tips themselves are a bright or emerald green.
Reinventing the Classic French Manicure
French tips are universally flattering and professional-looking, but they can feel dated or boring on their own. Swapping the traditional white tip for green and adding an ombre base completely modernizes the look. The combination reads as intentional and creative, showing that the wearer put thought into their manicure design. On stilettos, the green tips become an elegant point accent—the shape of the nail and the color create a cohesive look that’s both fashion-forward and wearable.
Variations on the French Tip Design
- Thick green tips with a thin black or gold separator line for high contrast
- Thin green tips for a more delicate, minimalist look
- Ombre within the green tip area (lime to dark green) for extra dimension
- Skip the separator line entirely and let the green fade naturally into the pink
- Add a tiny gold accent line just before the green tips for luxury
- Use chrome or mirror-finish green for a futuristic feel
Quick fact: French tips look better on stilettos than on any other nail shape because the sharp point naturally draws the eye to the tip accent—your nail shape does half the work for you.
10. Blush Pink with Emerald Green Accent Nails
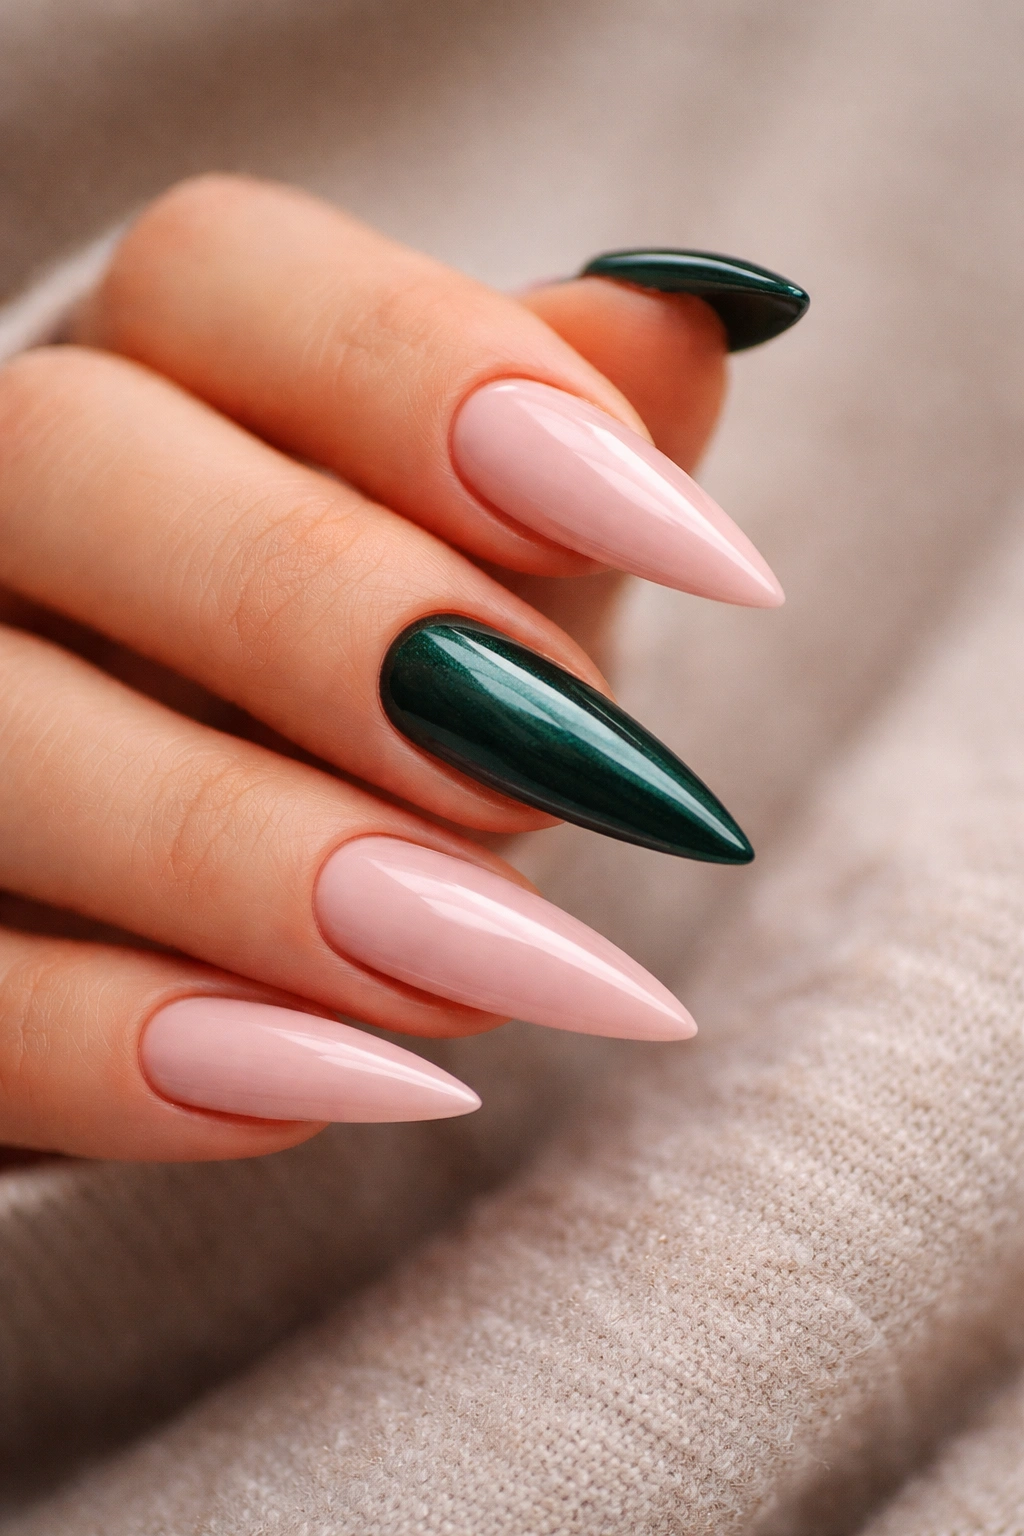
This design is perfect if you don’t want both hands to be entirely pink and green but still want the color combination represented. Here, most nails are blush pink, while one or two accent nails (usually the ring finger or index finger) feature emerald green, sometimes with additional design elements like gold foil, gems, or detailed nail art.
The Power of Strategic Accent Nails
Accent nails let you incorporate bold or complex designs without committing every single nail to them. The blush pink nails provide a soft, simple background that makes the emerald green accent nail(s) stand out even more dramatically. This approach works beautifully for people who want a manicure that’s pretty but not overwhelming, or for those who want to ease into bolder nail designs. Emerald green is rich and luxurious-looking, and even a single accent nail in this color feels elevated and intentional.
Ideas for Emerald Accent Nail Details
- Solid emerald green with gold foil scattered across the surface
- Emerald base with hand-painted gold or blush pink nail art on top
- Chrome or mirror-finish emerald for maximum luxury and eye-catching effect
- Emerald with small rhinestones or gems arranged in a pattern
- Emerald with a blush pink ombre fade for a gradient accent nail
- Matte emerald with a metallic gold tip for contrast
Worth knowing: Accent nails work best when they’re positioned on fingers that naturally draw attention—your ring fingers, thumbs, or index fingers are your best bets.
11. Rose Gold Pink with Mossy Green Texture Design
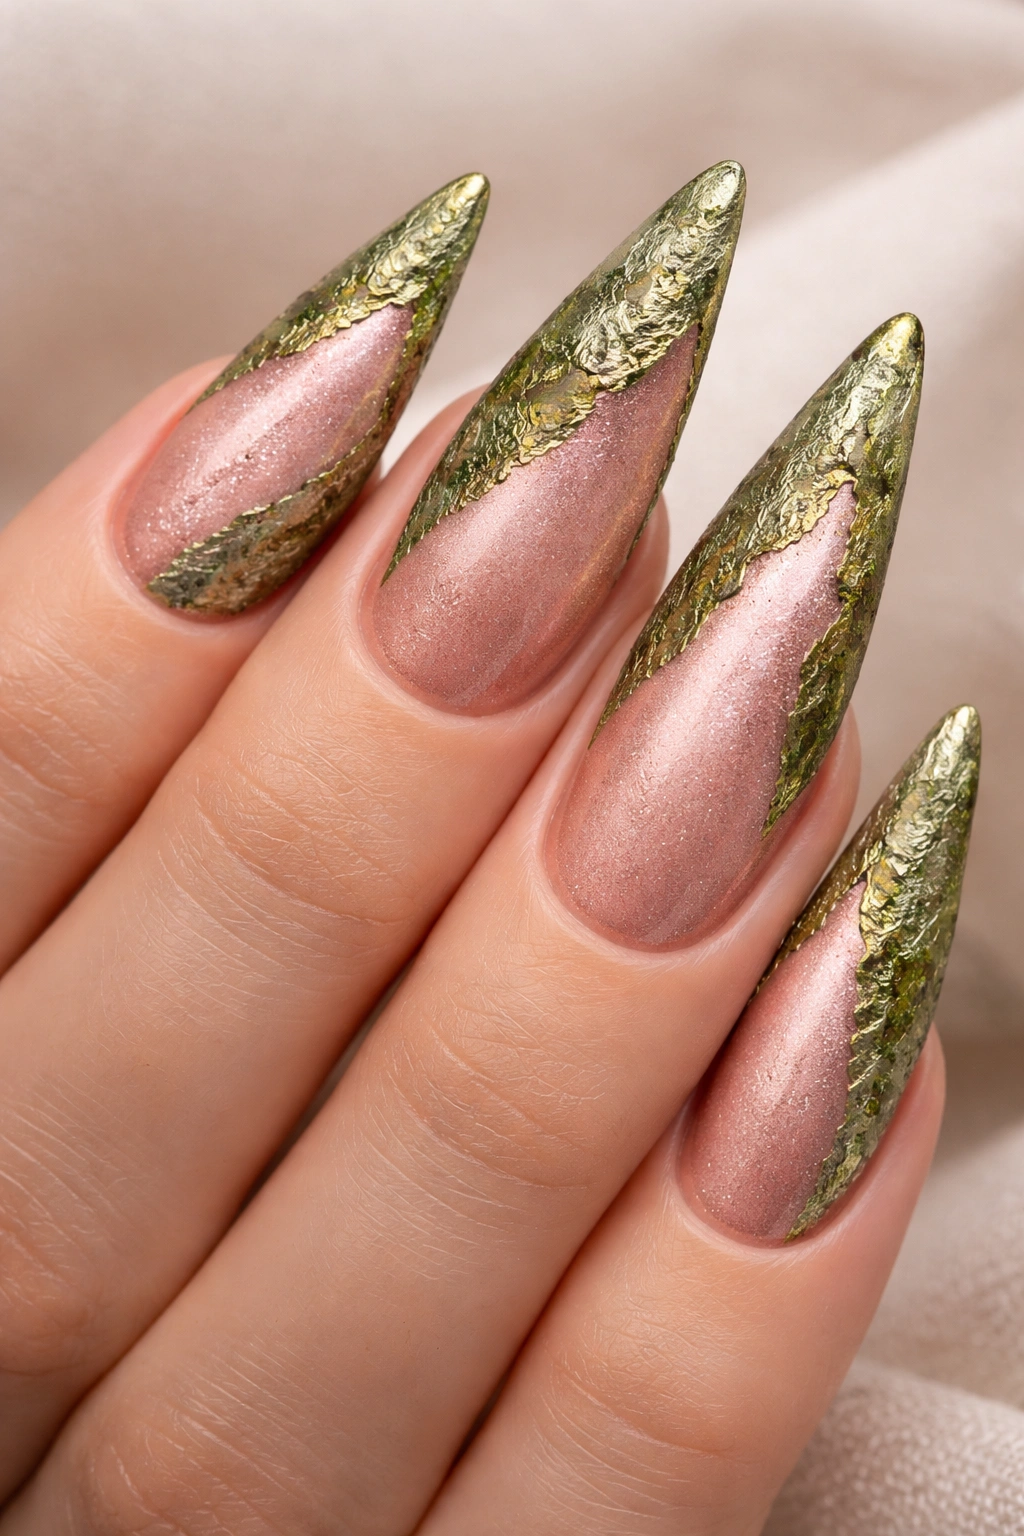
Texture adds tactile interest and visual complexity to nail designs that flat polish alone can’t achieve. This manicure combines rose gold pink (a warm, shimmery pink) with a mossy green base that has matte or crackle texture, creating a design that looks almost as good in person as it does in photos.
Adding Texture for Dimension and Interest
Textured finishes—whether velvet, sugar, or crackle effects—make nails feel more artisanal and designer-made. A crackle texture in mossy green creates a broken-glass or weathered effect that’s visually interesting, while rose gold pink adds warmth and shine. Together, they create contrast in both color and finish, making the manicure feel thoughtfully designed rather than thrown together. Textured stilettos are especially effective because the longer nail gives the texture more space to shine.
Texture Techniques You Can Explore
- Crackle polish in mossy green over a rose gold pink base
- Velvet or sand-finish polish for a matte, velvety feel
- Stamped patterns that create texture through layered design
- Combining matte and glossy finishes on the same nails
- Using sugar nail powder for a crystallized effect
- Layering textured glitter over smooth base colors
Pro tip: Textured finishes show imperfections more than smooth finishes, so apply base coats carefully and ensure your nail surface is completely clean and smooth before applying texture.
12. Pale Pink and Sage Green Striped Stilettos
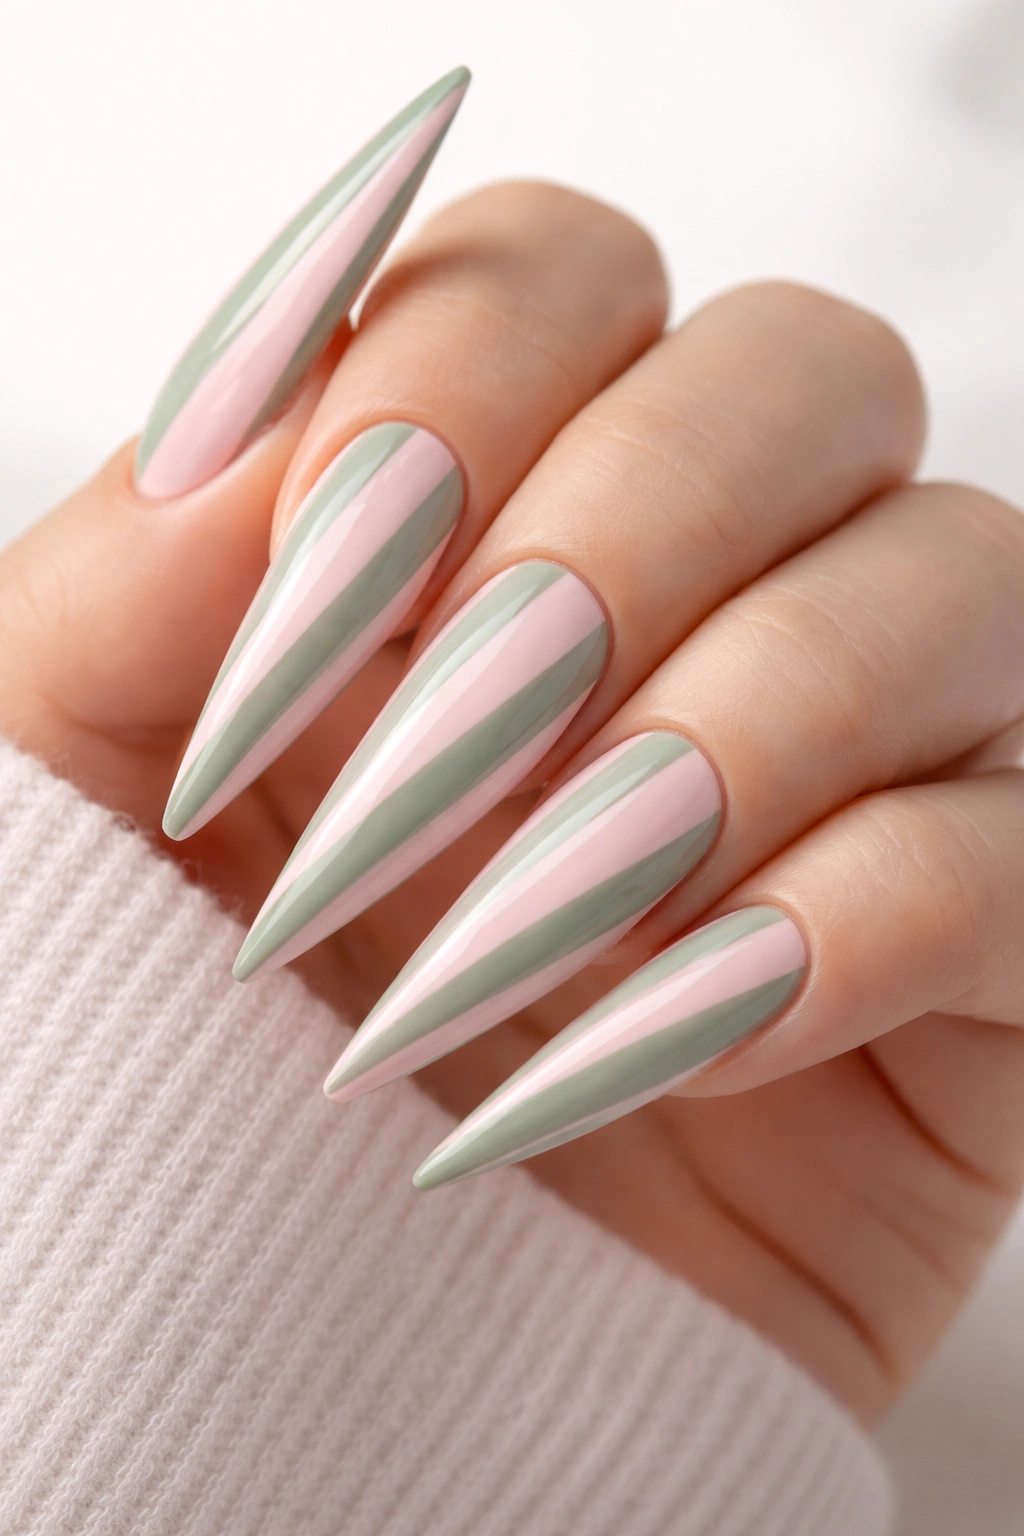
Stripes are a classic pattern that works on virtually every nail length and shape, but on stilettos, vertical or diagonal stripes create an elongating effect that complements the nail’s natural shape. This design features pale pink and sage green stripes—whether vertical, diagonal, or even spiraling around the nail—for a preppy, timeless look.
Why Stripes Work So Well on Elongated Nails
Vertical stripes naturally elongate any surface they appear on, which means they work in harmony with the already-elongated stiletto shape. The effect is sleek and sophisticated without being trendy or fleeting. Sage green and pale pink stripes together read as vintage-inspired or fresh depending on how you style them. This manicure is perfect for anyone who loves classic patterns and wants something a bit more interesting than a solid color but less labor-intensive than complex nail art.
Stripe Variations You Can Try
- Thin vertical stripes alternating pale pink and sage green across each nail
- Thick horizontal stripes for a bolder statement
- Diagonal stripes running from cuticle to tip at a sharp angle
- Double stripes (two thin lines close together) for a detailed look
- Spiraling stripes that wrap around the length of the nail
- Ombre stripes that gradually transition in width or opacity
Worth knowing: The thinner your stripes, the more precision and steady hands you need—wider stripes are more forgiving and still look elegant.
13. Hot Pink with Kelly Green Metallic Details and Gold Accents
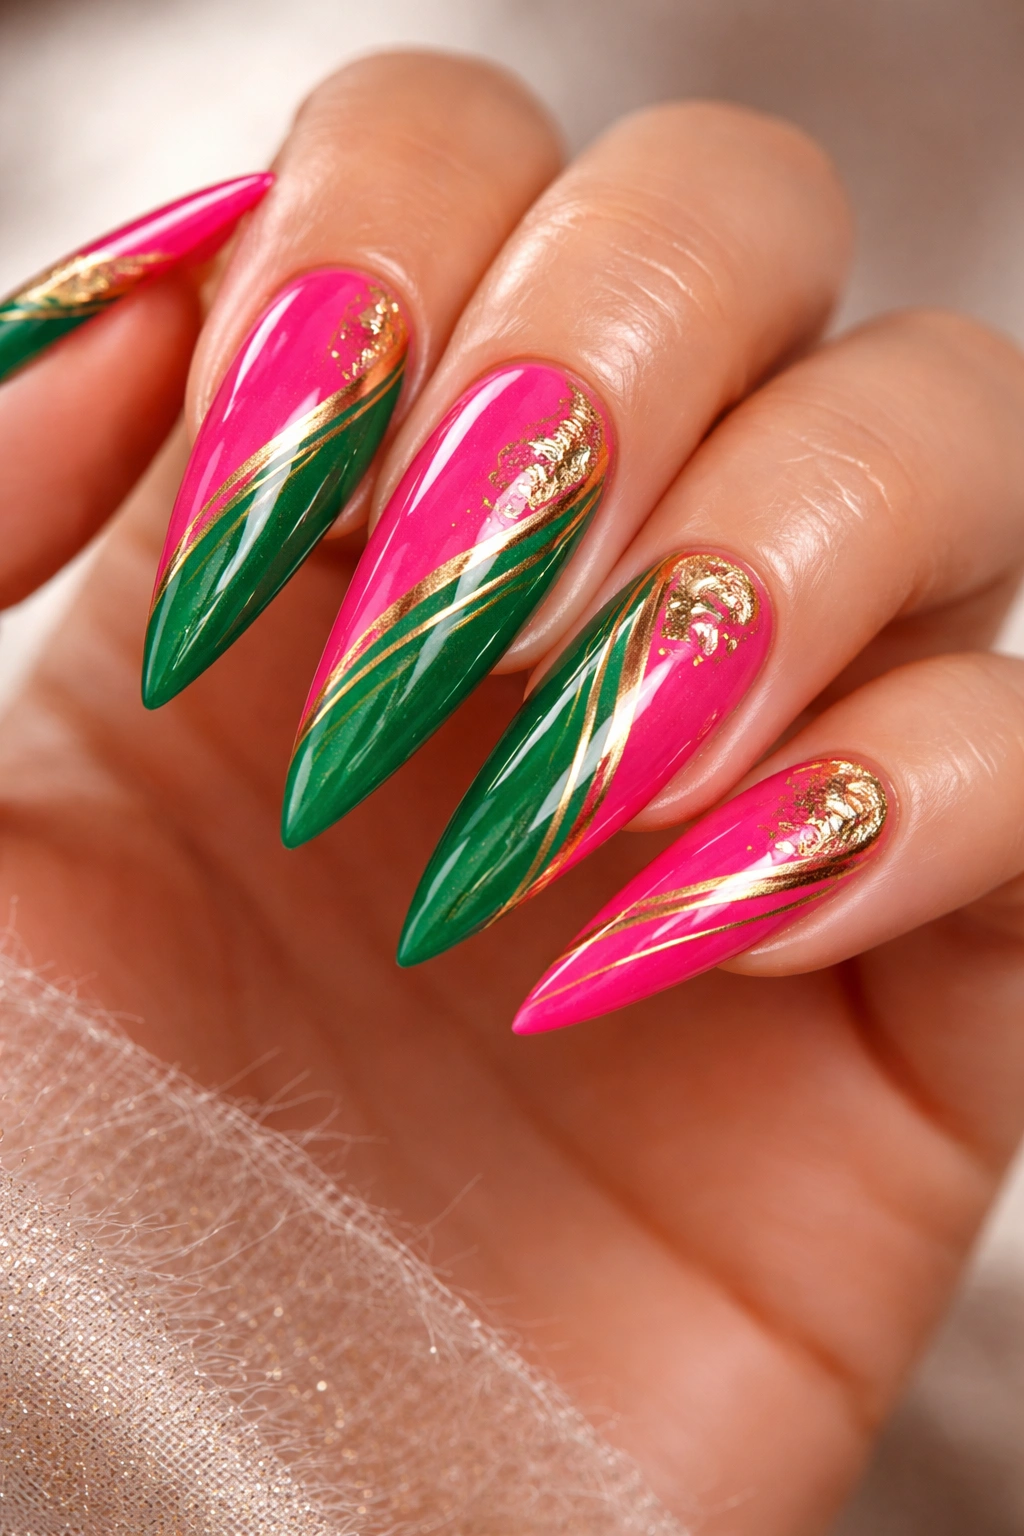
For maximum glamour, combine hot pink and kelly green (a bright, true green) with metallic gold details scattered throughout. This manicure reads as bold and luxurious, perfect for special events or anyone who lives their best high-shine life. The gold accents tie the two colors together and add warmth that prevents the combination from feeling too cool-toned.
The Magic of Metallics in Bold Color Combinations
Metallics act as bridges between contrasting colors—they reflect light and add richness that makes both the pink and green look more luxurious. Gold specifically adds warmth and sophistication. This combination is perfect for evening events, celebrations, or whenever you want your nails to be a true statement piece. The addition of metallic elements elevates what might otherwise feel like a simple two-color design into something that looks expensive and intentional.
Metallic Application Ideas
- Gold foil applied randomly across both pink and green areas
- Gold striping or geometric shapes over the solid base colors
- Metallic gold ombre fading from pink to green
- Studded details using gold rhinestones or metallic studs
- Metallic gold tips with pink and green base colors
- Mixed metallics (gold and rose gold) for extra dimension
Pro tip: Metallic polishes and foils require a sticky base coat or special adhesive—regular top coat won’t hold them in place, so invest in the right products.
14. Soft Pink Base with Green Glitter Ombre and Sparkle Fade
Glitter ombre creates a magical, gradient effect where glitter transitions from dense and sparkly at the tips to barely-there near the cuticle. Combined with soft pink and green, this creates a dreamy, fairy-tale quality that’s perfect for special occasions or anyone who loves anything sparkly.
The Romance and Magic of Glitter Effects
Glitter ombre is inherently romantic and celebratory, regardless of which colors you use. The fade effect creates movement and depth that makes the manicure feel more artistic and complex than a simple two-color design. Soft pink and green allow the glitter to shine without overwhelming the overall look—they’re gentle enough to let the sparkle be the star. This manicure is perfect for weddings, anniversaries, birthdays, prom, or any time you want to feel magical and special.
Creating Perfect Glitter Ombre Fades
- Apply soft pink to the full nail and let dry completely
- Apply pale green to approximately the top half of the nail, blending with a sponge
- Mix glitter with clear top coat to achieve your desired density
- Apply the glitter mixture densely to the very tips
- Use a clean, dry brush to spread and fade the glitter toward the center of the nail
- Work carefully to create a gradual fade rather than a harsh line
- Seal with glossy top coat to secure and shine
Insider note: Holographic or iridescent glitter creates more sparkle and color-shift effects than regular glitter, making the ombre even more magical.
15. Mint Green Stilettos with Hot Pink Marble Inlay

Inlay designs (where one color appears to be embedded into another) create stunning visual depth. This design features mint green as the dominant color with hot pink marble inlays—sections where hot pink marble appears to be set into the green surface, creating a jewelry-like effect.
Creating High-Impact Inlay Designs
Inlays look incredibly complex and expensive, but they’re actually achievable with patience and the right technique. The effect is created by painting marble details on top of the base color and then sealing everything with a glossy top coat that blurs the line between colors, making it look like the pink is actually embedded in the green rather than painted on top. Mint green and hot pink together create a tropical, vacation-vibes energy that’s fresh and playful. This manicure is perfect for summer, beach trips, or anyone who wants their nails to feel like a vacation accessory.
Techniques for Successful Inlay Effects
- Create the base marble pattern first using your hot pink color and a wet polish technique
- Once fully dry, apply the mint green around and over the marble details
- Use a thin brush to define edges where the colors meet
- Apply multiple light coats of mint green rather than one thick coat to avoid completely covering the marble
- Seal with a glossy top coat—the shine helps create the illusion of inlay
- Consider adding gold leaf or thin gold lines to further define the inlaid sections
Worth knowing: Inlay designs take practice—your first attempt might look more like layered marble than true inlay, but that still looks beautiful.
16. Blush Pink and Green Ombre with Nude Transitional Tips
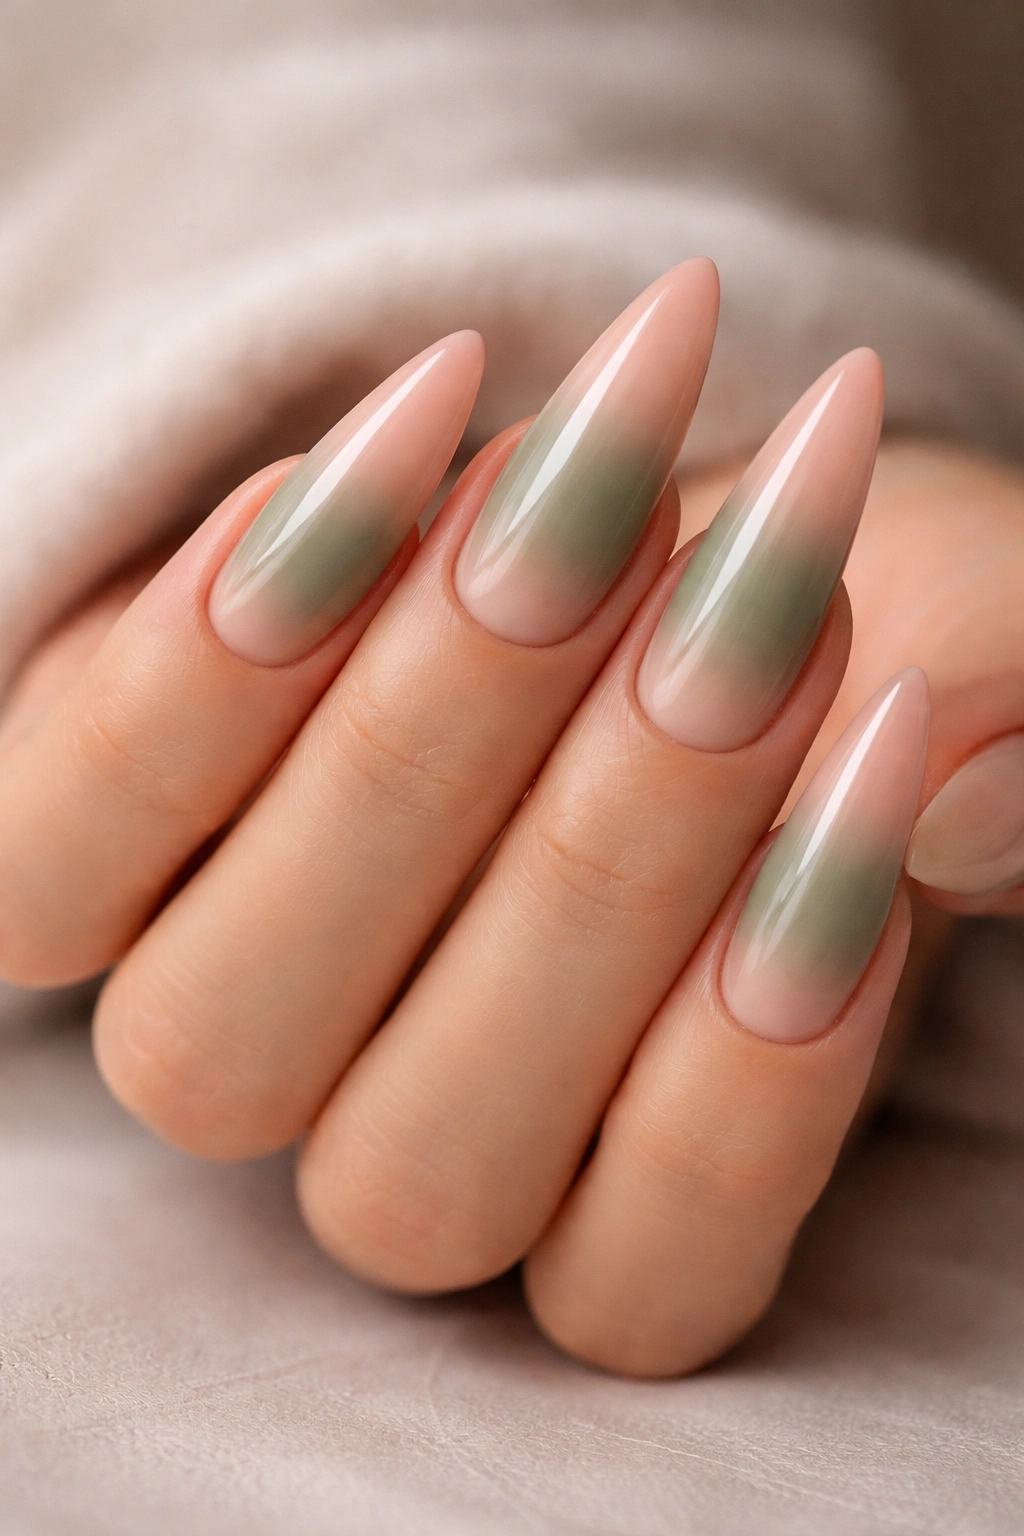
For an ultra-sophisticated finish, create an ombre that flows from blush pink at the cuticle to sage green in the middle, then transitions to a nude or natural shade at the very tips. This creates a tricolor effect that’s subtle, elegant, and incredibly wearable for any occasion.
The Elegance of Nuanced Ombre Designs
Three-color ombres feel more advanced and designer-made than simpler two-color gradients. By adding a neutral tone at the tips, you create visual interest and sophistication while keeping the overall look wearable and professional. This design works beautifully for work settings, formal events, or everyday wear—it’s pretty without being attention-seeking, and it demonstrates real skill and care in nail design. The neutral tips also have the practical benefit of showing less yellowing and staining over time, making the manicure last longer without touch-ups.
Perfecting Three-Color Ombre Technique
- Apply blush pink to the full nail and allow to dry
- Apply sage green to approximately the middle-to-upper portion of the nail using a makeup sponge for blending
- Apply nude or natural shade to the very tips, blending carefully into the green
- Build each color in thin layers rather than trying to achieve full opacity in one coat
- Use a clean, barely damp makeup sponge to blend the junctions between colors
- The key is patience—let each layer dry before adding the next for best results
- Finish with a high-shine top coat to enhance the gradient effect
Pro tip: If the ombre looks too blotchy, add an extra coat of each color and blend again—sometimes additional layers create a smoother transition.
Final Thoughts
Pink and green stiletto nails represent a beautiful intersection of unexpected elegance and bold self-expression. Whether you choose soft pastels that whisper sophistication or vibrant neons that demand attention, the combination offers endless creative possibilities that work for nearly every occasion and personal style.
The most important thing to remember is that your nails should make you feel confident and beautiful. These sixteen designs are starting points and inspiration—feel free to adapt them based on what speaks to you. If you love the emerald and hot pink color blocking but prefer a matte finish, make that swap. If the rose gold and mossy green texture calls to you but you’d rather use a different texture technique, experiment and find what works.
Stiletto nails require commitment in terms of maintenance and upkeep, so choose designs you’ll genuinely love wearing every single day. The polish will chip eventually, and the nails may need fills as they grow—but a design you’re genuinely excited about makes the maintenance feel like self-care rather than a chore. Take your favorite ideas from this list to your nail technician, or gather inspiration to practice at home, and let your pink and green stilettos be a reflection of your personality and style.
