

Stiletto nails are basically a blank canvas waiting for your boldest color dreams. There’s something undeniably stunning about that elongated shape paired with vibrant, multi-colored designs—the drama, the polish, the sheer confidence of it all. If you’re craving nail art that turns heads but don’t know where to start with the rainbow spectrum, you’re about to get inspired. From subtle ombré blends to full-on color-blocking statements, rainbow stiletto nails offer endless possibilities for showing off your personality through your fingertips.
The beauty of rainbow nail designs is that they work whether you’re into soft, dreamy pastels or bold, saturated jewel tones. You can go subtle with a gradient that whispers color across your nails, or go loud with stripes, geometric shapes, and multi-colored patterns that command attention. Stiletto nails amplify every design choice—the length creates a perfect display area, and the tapered shape actually makes intricate nail art look more elegant rather than busy. Whether you’re planning a special occasion manicure or just want to refresh your everyday look with something more interesting, these 20 ideas cover every rainbow nail aesthetic imaginable.
1. Soft Pastel Ombré Rainbow
This design features a gentle gradient that flows from pale pink at the base, through soft lavender, mint green, and finishes with a barely-there peach at the tip. The colors blend seamlessly without harsh lines, creating an almost watercolor effect across your stiletto nails. It’s sophisticated without being over-the-top, making it perfect for someone who wants rainbow vibes in a more subdued, wearable way.
Why Soft Pastels Work So Well on Stilettos
The elongated shape of stiletto nails naturally draws the eye downward, which makes gradient designs incredibly flattering. When you use soft colors, the whole effect feels refined rather than childish—these are subtle enough for professional settings yet artistic enough to spark conversations.
How to Create This Look Yourself
- Use a makeup sponge to dab colors onto your nails in horizontal bands before the base coat fully dries
- Blend each color where it meets the next using a clean, slightly damp makeup sponge
- Apply a glossy top coat to seal the blend and enhance the glass-like finish
- Keep the transitions soft by working in thin layers and not pressing too hard
Pro tip: Paint the ombré effect onto a sponge first, then press your nail into it rather than the other way around—this gives you more control and prevents over-application.
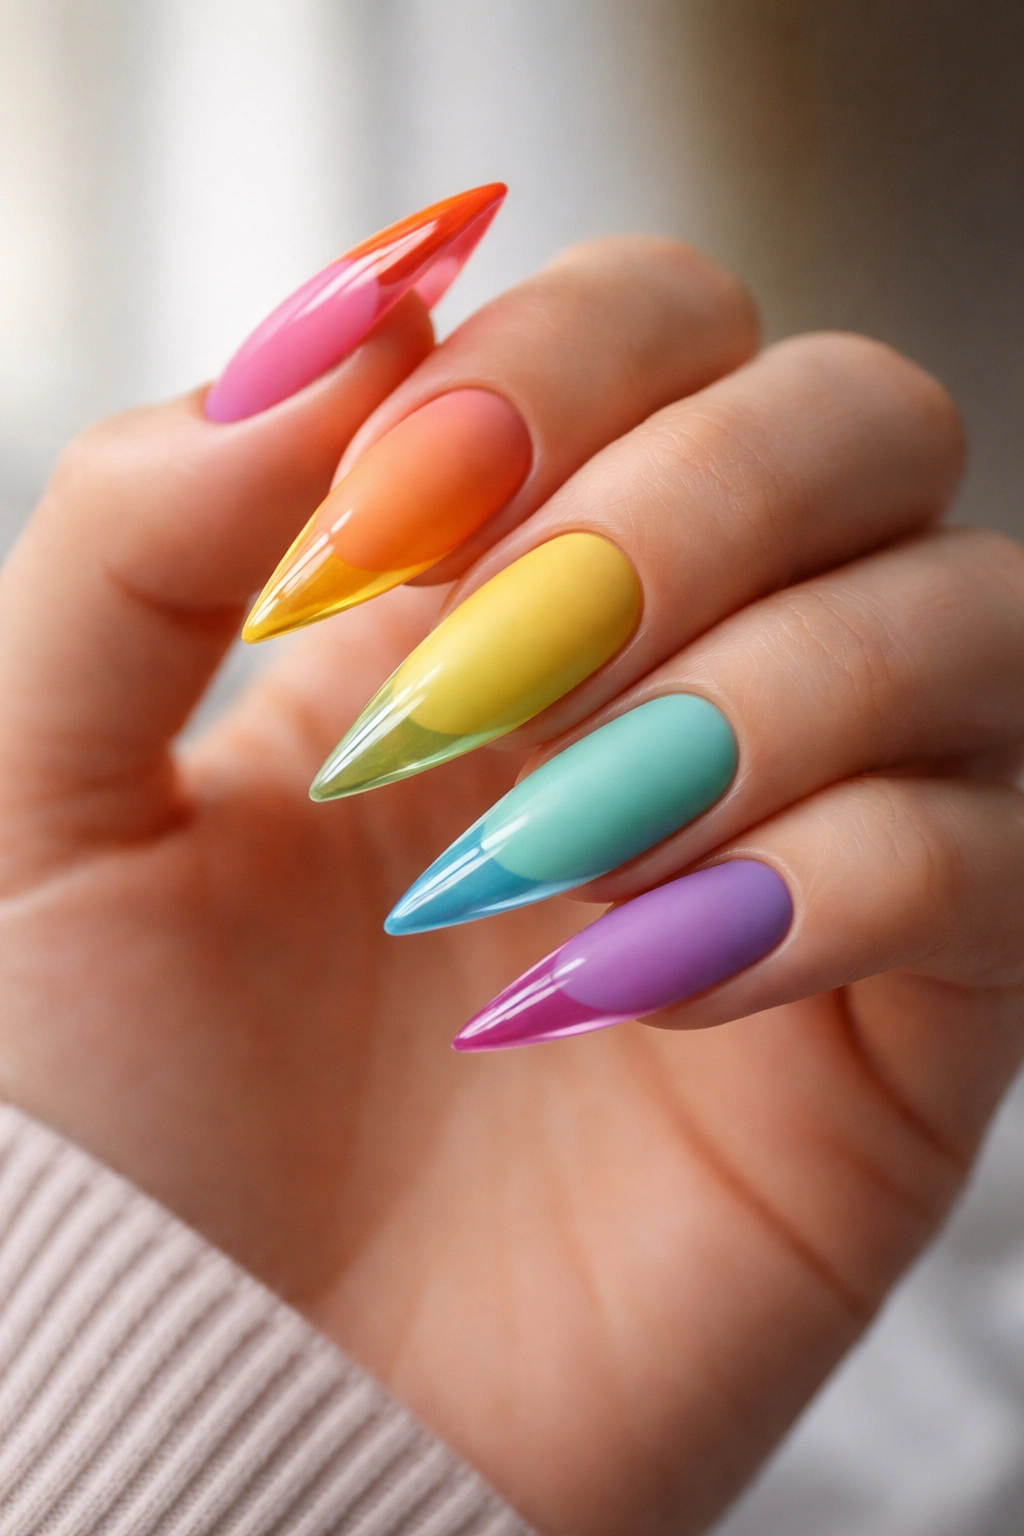
2. Bold Rainbow Stripe Design
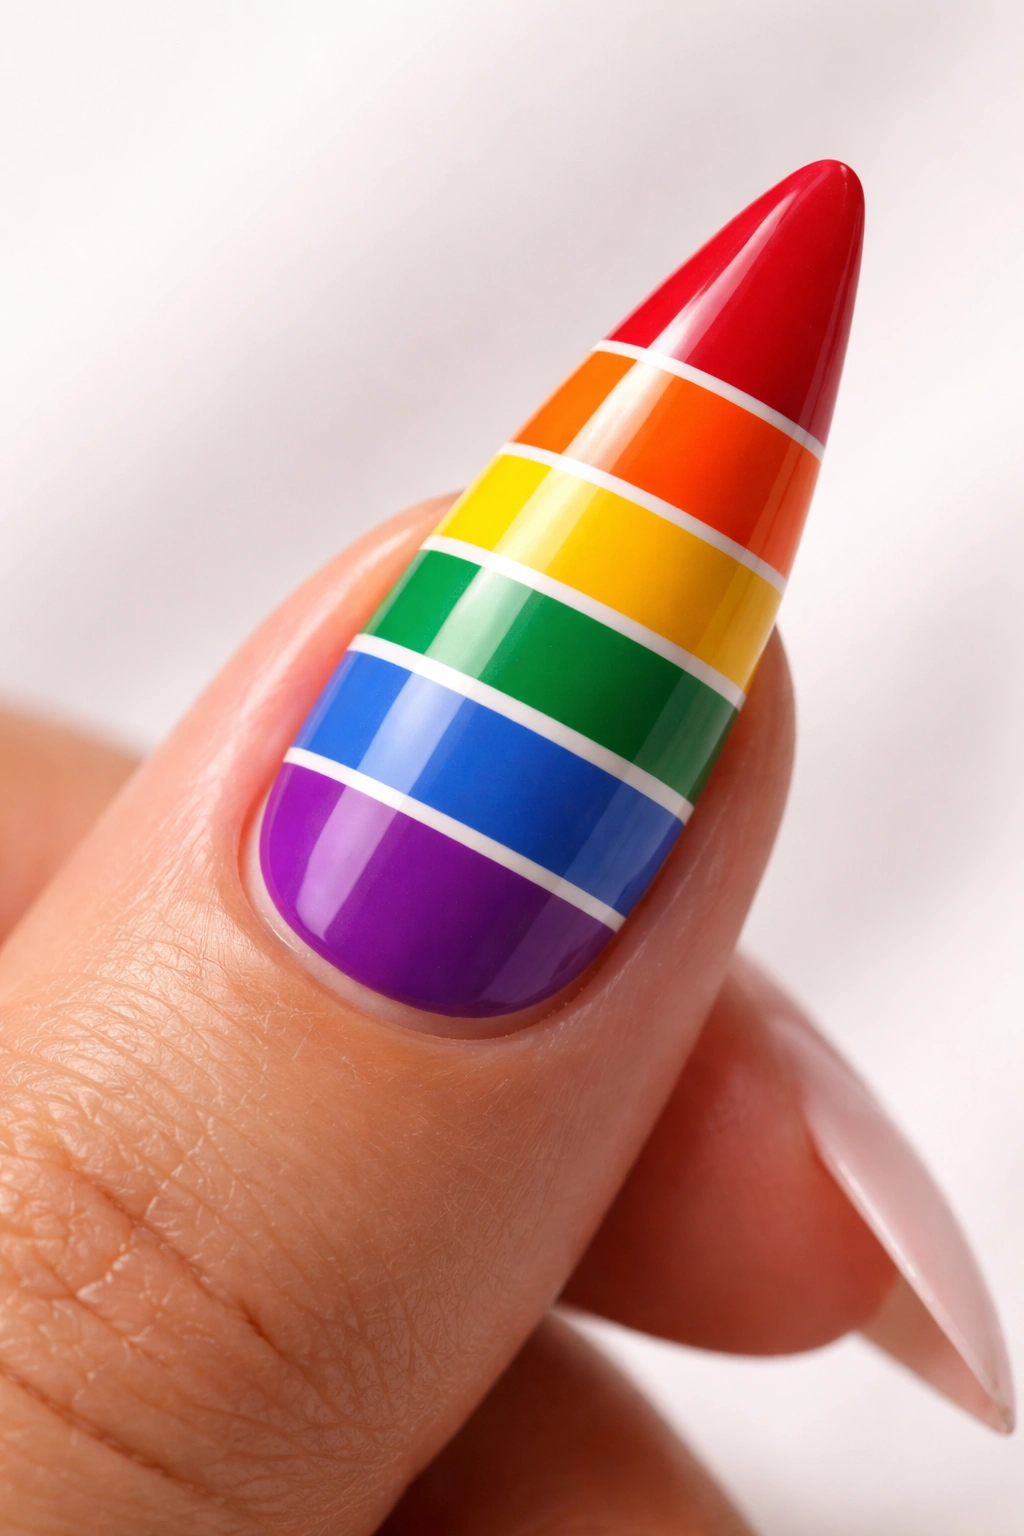
Thick, distinct color bands run horizontally across your nails in classic rainbow order—red, orange, yellow, green, blue, and purple. Each stripe is roughly equal in width, creating a cheerful, graphic look that’s impossible to miss. This design works best with bright, saturated colors that pop against each other, giving your nails that vintage, retro-inspired energy.
What Makes Stripes So Effective
Horizontal stripes on stiletto nails create a stretching visual effect that makes your nails look even longer. The structured geometry is also forgiving—slight imperfections in the lines actually add character rather than looking like mistakes.
Steps to Get Flawless Stripes
- Apply a white base coat as your foundation (this makes colors appear more vibrant and uniform)
- Use thin striping brushes or nail art pens to create each color band
- Leave the tiniest gap of white showing between colors to keep lines crisp and intentional
- Seal everything with a matte or glossy top coat depending on your preference
Insider note: If you’re worried about keeping lines perfectly straight, use painter’s tape as a guide—apply thin strips horizontally, paint your color, then peel the tape away while the polish is still slightly tacky.
3. Watercolor Rainbow Blend
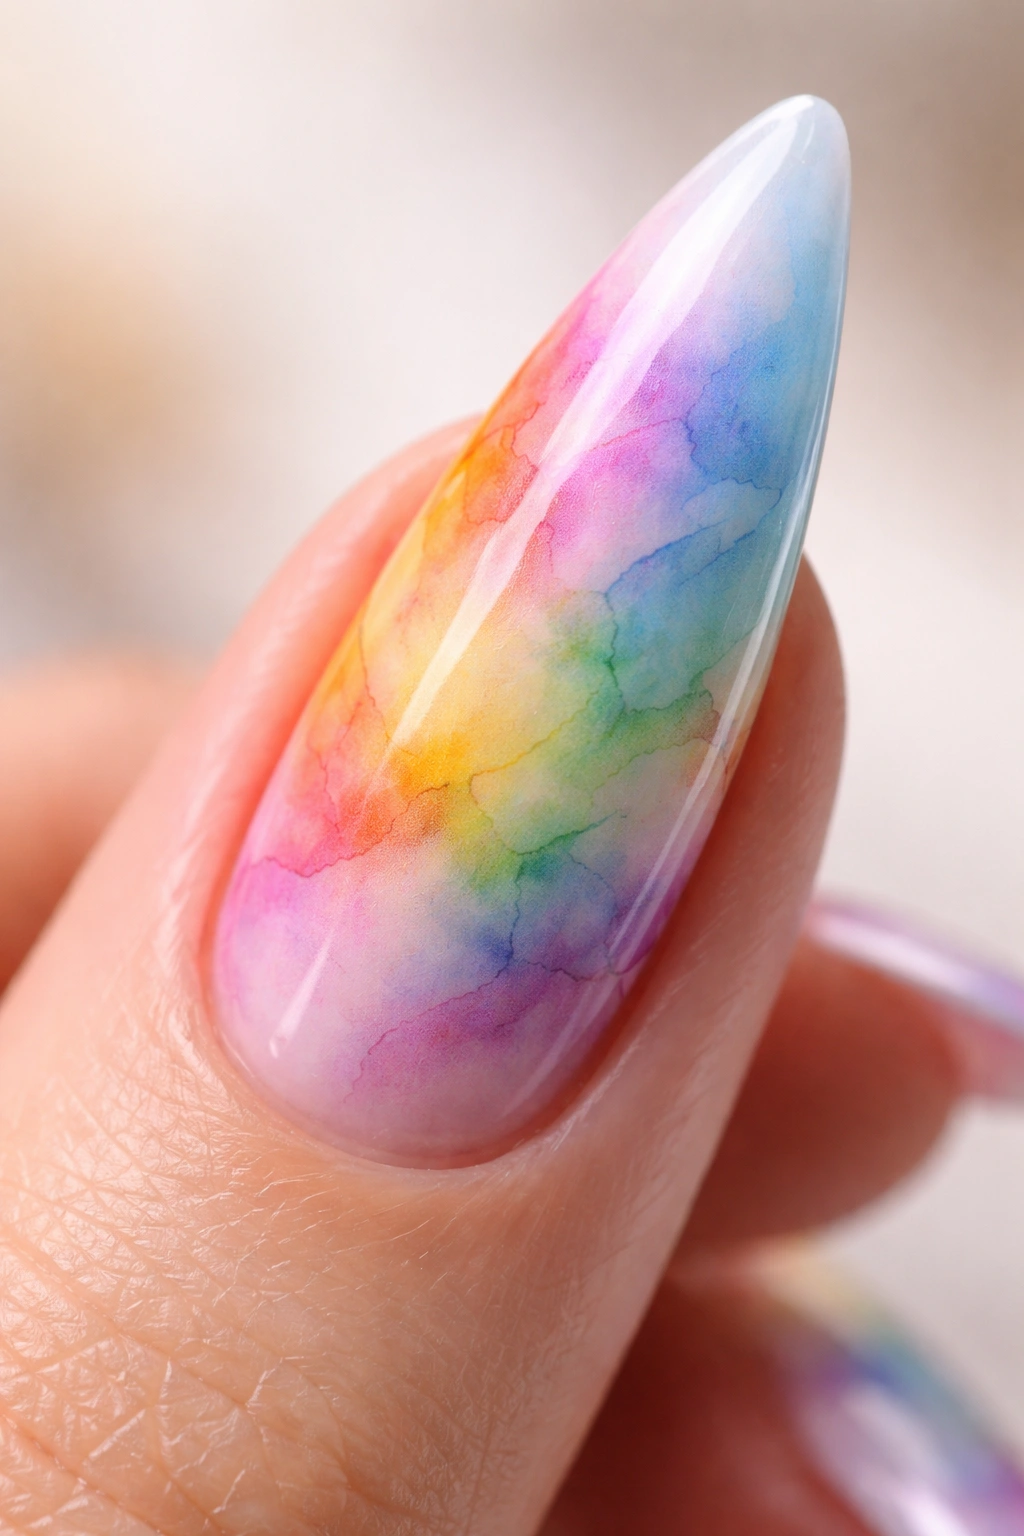
This dreamy design uses multiple colors that blend and bleed into each other in an organic, artistic way—imagine watercolors on paper but on your nails. Colors float and overlap without distinct boundaries, creating an ethereal, almost painted quality. It’s less structured than an ombré and more spontaneous feeling, perfect for expressing a free-spirited aesthetic.
The Appeal of Watercolor Nails
Watercolor designs hide minor imperfections beautifully since the whole point is a soft, blended appearance. They photograph beautifully, have an artistic quality that feels intentional even when done casually, and work with any color combination imaginable.
How to Achieve the Watercolor Effect
- Start with a wet or semi-wet base coat (some people actually use water mixed with a bit of nail glue)
- Drop multiple colors onto the nail using thin brushes or even eyedroppers
- Let them naturally blend while still wet, tilting your nail gently to encourage bleeding
- Pat and swirl with a clean, damp brush if you want more control
- Set with a clear top coat once dry
Worth knowing: This technique works better on a slightly sticky base coat or a specific watercolor medium designed for nails—regular polish dries too fast to blend smoothly.
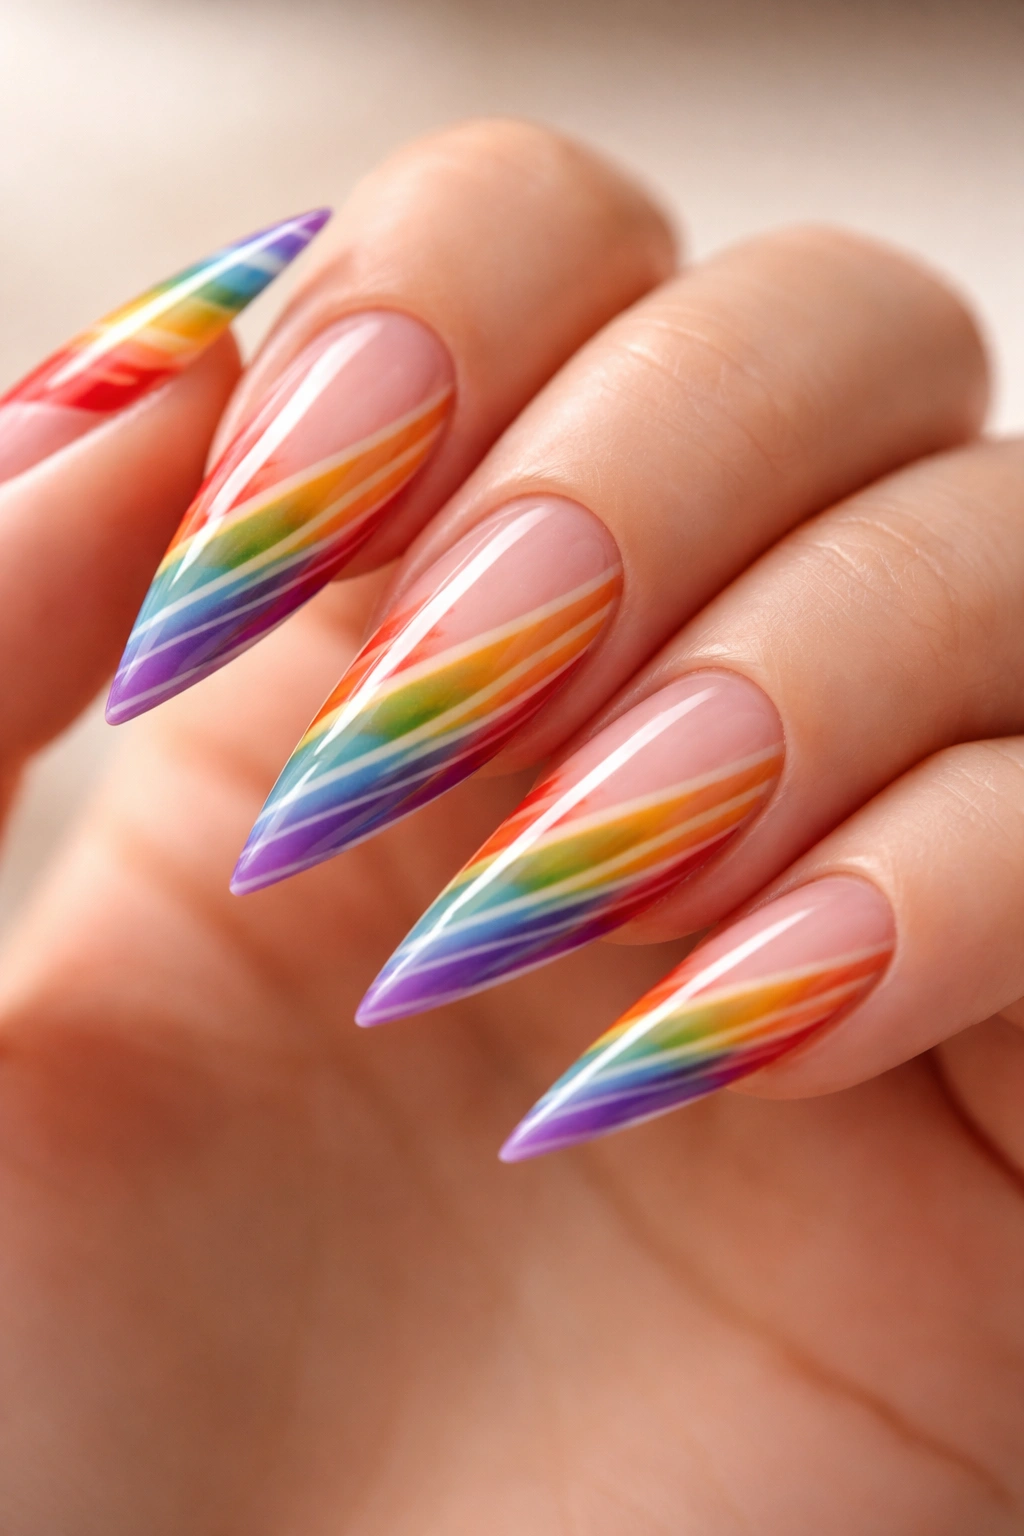
4. Diagonal Rainbow Gradient
Instead of vertical or horizontal movement, colors graduate diagonally across your stiletto nails from the lower left corner to the upper right. The angle creates a dynamic, almost directional quality that makes your nails look sophisticated and intentional. Colors can be bold or soft depending on your preference, but the diagonal orientation automatically elevates the design.
Why Diagonal Works Differently Than Other Gradients
A diagonal gradient leverages the stiletto’s natural length differently than vertical designs do. It creates visual movement and can actually make your fingers appear longer because the line draws the eye across and downward simultaneously—very flattering.
Creating a Perfect Diagonal Gradient
- Lightly sketch a diagonal line with a pencil as your guide (it’ll wipe away before polish)
- Place lighter colors on one side and darker on the other, or use multiple rainbow colors
- Use a makeup sponge to blend the colors along the diagonal, working in small sections
- Blend toward the center from both sides for the smoothest transition
- Finish with a protective top coat that adds shine
Pro tip: If you’re concerned about the angle, create your gradient on a makeup sponge first, then test-press it against your nail before committing.
5. Neon Rainbow with Black Details
Neon rainbow colors (hot pink, electric orange, lime green, bright turquoise, vivid purple) are paired with bold black outlines, stripes, or geometric shapes. The black acts as a visual anchor that keeps the neon colors from feeling chaotic, plus it creates striking contrast that makes every color pop. This design screams confidence and works beautifully for someone who loves bold statement nails.
The Neon + Black Combination
Black has a grounding effect on bright colors—it creates definition, structure, and prevents the design from looking overwhelming. This pairing is especially effective on stiletto nails because the length can accommodate both the bright colors and the detailed black work without feeling cramped.
Executing Neon Rainbow with Black Details
- Apply a white or pale neutral base to make neons appear as vibrant as possible
- Paint your neon colors in whatever pattern appeals to you (stripes, blocks, sections, ombré)
- Use a thin black striping brush to add outlines, negative space designs, or geometric patterns
- Create purposeful black details that enhance rather than cover the neon colors
- Seal with a glossy top coat for maximum shine and vibrancy
Insider note: Neon polishes work best over white bases, and they often require thin, multiple coats to achieve full opacity and true brightness.
6. Ombre Sunset to Purple Sky
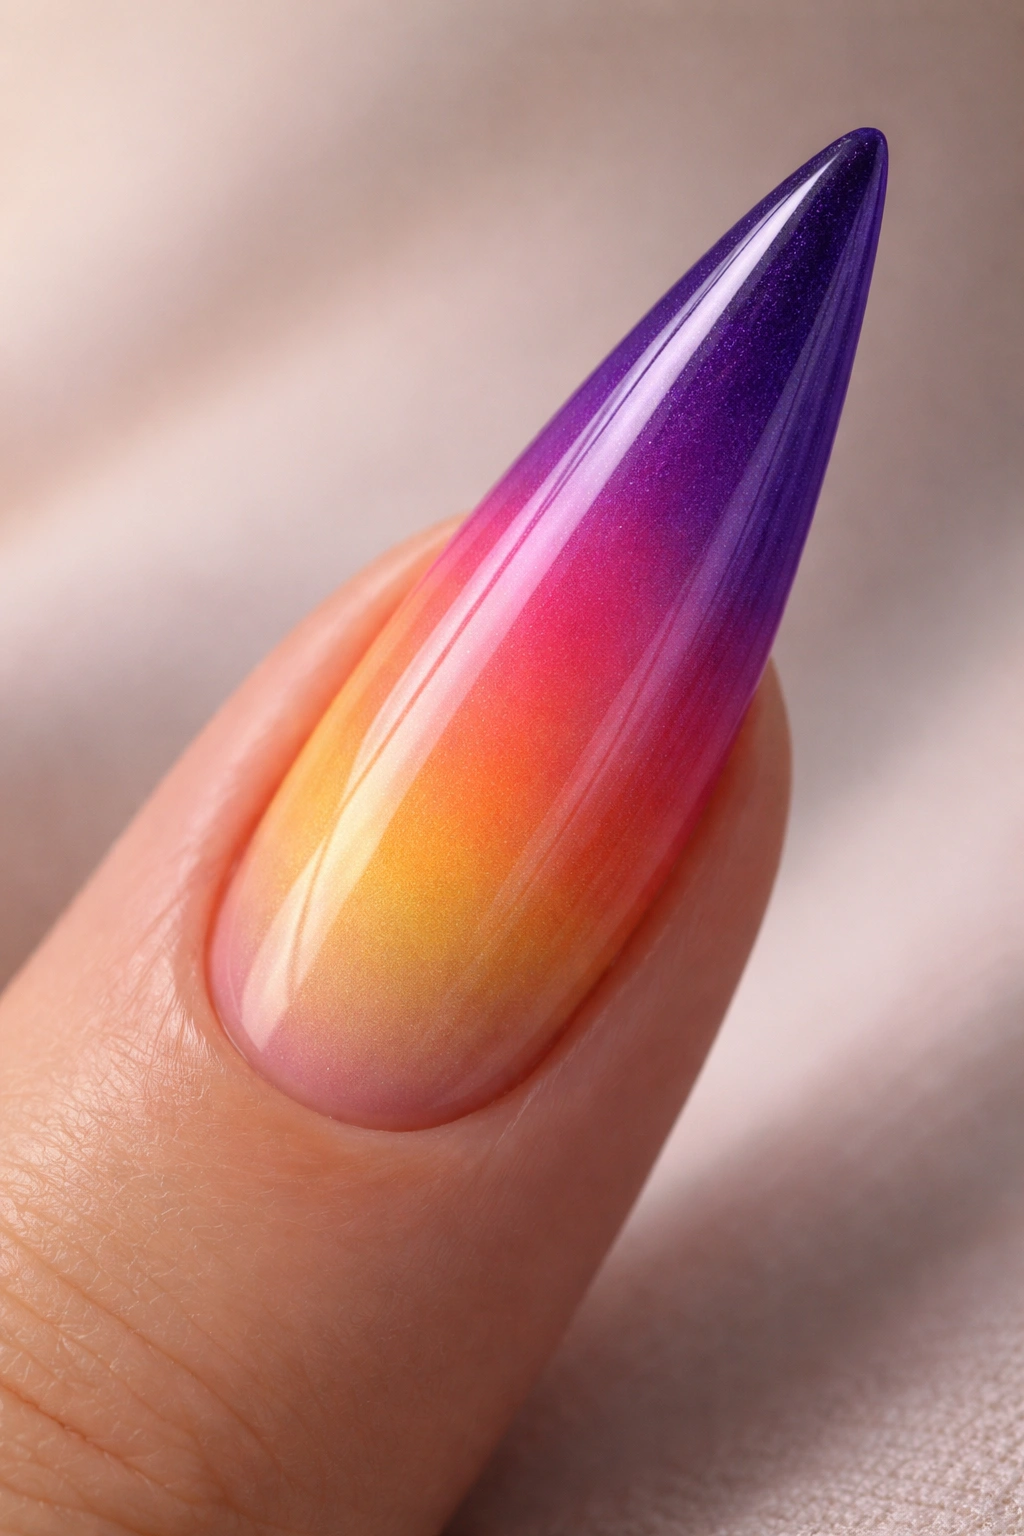
Colors transition from warm sunset tones (coral, orange, golden yellow) at the base to cool evening tones (purple, deep blue, midnight) at the tip. The effect mimics watching the sky change from day to night, which is romantic and visually stunning. On stiletto nails, this gradient can be particularly dramatic because there’s plenty of space for the colors to naturally transition.
Why Sunset-to-Night Works Visually
The warm-to-cool color shift feels natural and aesthetically pleasing to the eye—it’s a transition we actually witness in nature. On elongated stiletto nails, this gradient has room to breathe and show each color distinctly before blending to the next.
Creating the Sunset-to-Night Gradient
- Paint the base color (coral or warm orange) at the base of your nail and let it dry
- Using a sponge, apply the next warm tone (golden yellow or peachy tone) slightly higher
- Transition into cooler tones in the middle (purple or hot pink)
- Finish at the tip with cool colors (deep blue or purple)
- Blend between each section with a clean, damp sponge for seamless transitions
Pro tip: Let each color dry slightly before adding the next to prevent muddy blending, but keep enough tackiness that colors still blend smoothly.
7. Rainbow Confetti with Nude Base
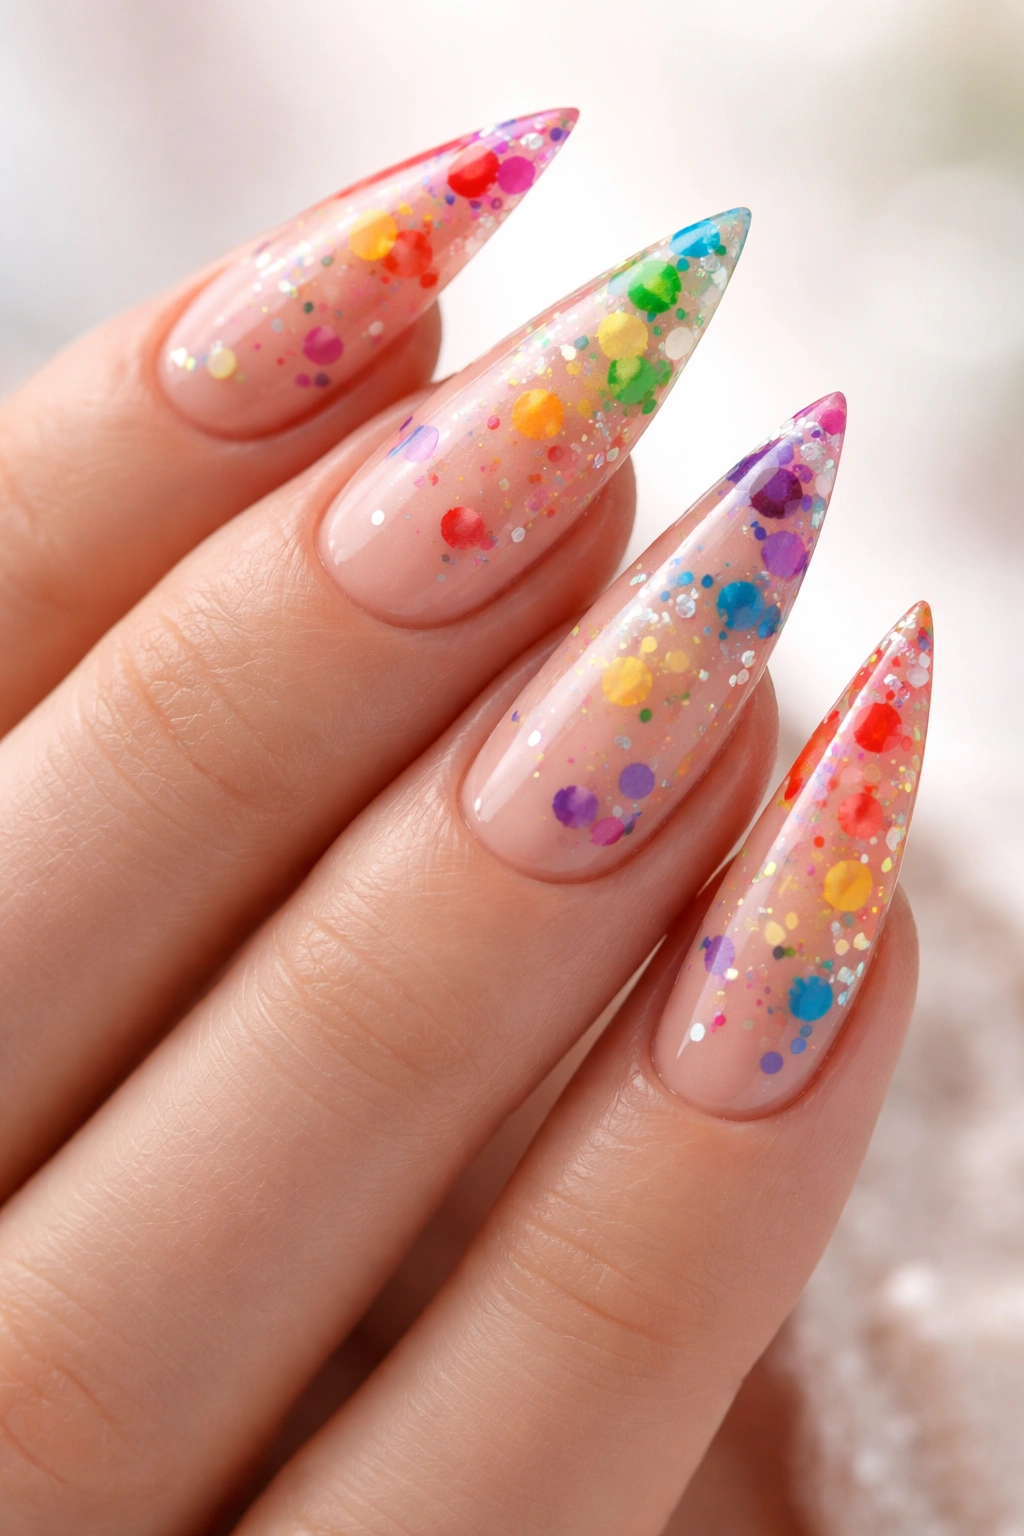
A neutral nude or beige base provides the perfect backdrop for scattered, colorful confetti-style dots and splashes in rainbow colors. Think tiny circles, paint splatters, and dots in red, orange, yellow, green, blue, and purple distributed across the nail in a random, playful pattern. This design is fun without being overwhelming, and it works with virtually any outfit.
The Psychology of Confetti Design
Confetti symbolizes celebration and joy, and that mood comes through in your nails. The scattered pattern feels less formal than geometric designs, which makes it perfect for a cheerful everyday look. The nude base keeps it grounded and office-appropriate while the rainbow confetti keeps it interesting.
DIY Rainbow Confetti Technique
- Paint your stiletto nails with a nude base and let dry completely
- Using dotting tools, a toothpick, or the end of a thin brush, create small dots in each rainbow color
- Add some larger splatter marks for variety—flick your brush gently for organic splashes
- Vary the size and opacity of dots (some can be more transparent, some solid)
- Seal with a glossy top coat that gives the confetti a playful, dimensional quality
Worth knowing: This design is forgiving—slight irregularities in dot placement actually add to the playful confetti vibe.
8. Metallic Rainbow with Gold Accents
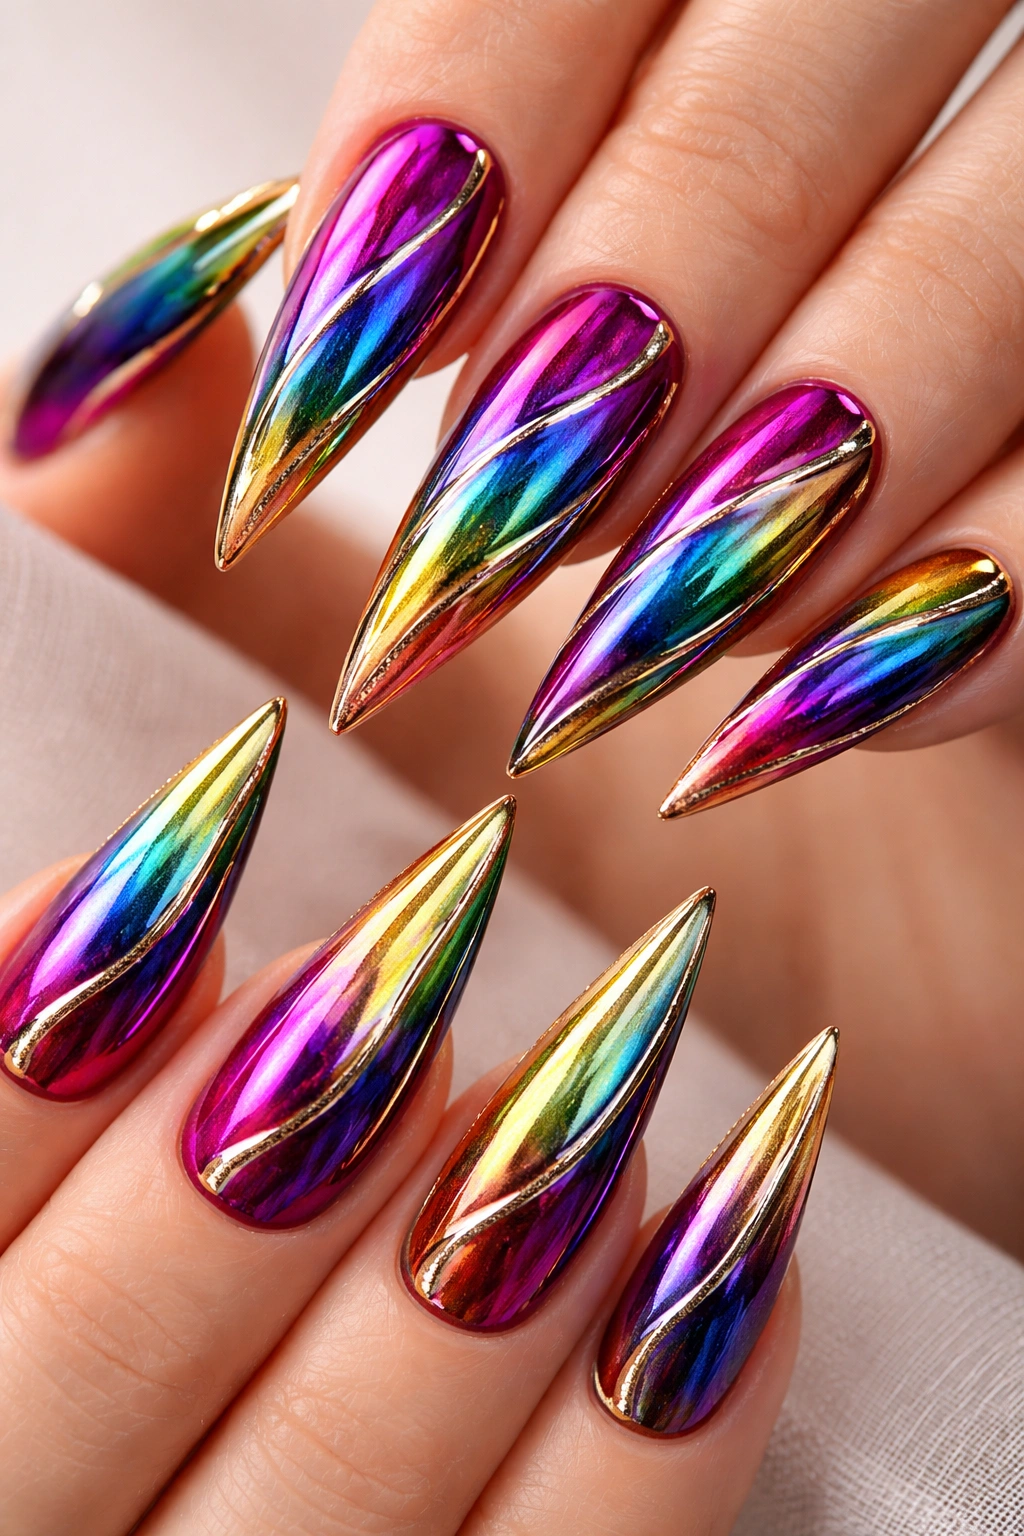
Rainbow colors are created with shimmery, metallic finishes rather than solid mattes—think iridescent peach, holographic orange, shimmer pink, chrome green, and pearl purple. Gold accents in the form of thin stripes, geometric patterns, or detailed gold lines run through the design. The result is luxurious and glamorous while still celebrating every color of the spectrum.
Metallic Polish Magic on Stilettos
Metallic and chrome finishes catch light beautifully and make your nails look three-dimensional. On the elongated canvas of stiletto nails, these finishes create a jewelry-like quality—your nails literally become accessories.
Applying Metallic Rainbow Designs
- Start with a smooth, even base coat designed for metallic polish (metallic polishes need a perfectly smooth foundation)
- Apply metallic rainbow colors in your chosen pattern (ombré, stripes, or sections)
- Let each color dry completely before overlapping colors
- Add gold accents using thin brushes or gold nail tape for crisp lines
- Finish with a clear protective top coat (some metallic polishes apply their own shine, but protection is important)
Pro tip: Use a sticky base coat specifically designed for metallic polishes—it helps the shimmer particles adhere and prevents them from shifting during application.
9. Matte Rainbow with Glossy Tips
All rainbow colors are matte (flat, non-shiny finish) across the nail, but the very tip of each nail has a glossy, shiny topcoat. This creates visual contrast and makes the tips appear to glow. It’s a clever design trick that adds sophistication while celebrating color—the matte base keeps it artistic, and the glossy tips add elegance.
The Matte + Gloss Contrast
Mixing finishes creates visual hierarchy and interest without needing complex patterns. The matte keeps focus on the colors themselves, while the glossy tips catch light and draw the eye. On stilettos, this is especially effective because tips are already a focal point.
How to Layer Matte and Glossy Correctly
- Apply your rainbow colors (stripes, ombré, or sections) and let dry completely
- Apply a matte top coat over the entire nail and let cure if using gel, or dry thoroughly if using regular polish
- Using painter’s tape, create a line across each nail to mark where the gloss section begins (about 1/4 to 1/3 down from the tip)
- Apply glossy top coat only to the tip section
- Remove tape carefully while the glossy coat is still slightly tacky
Insider note: The transition between matte and gloss should be crisp and intentional—this contrast is what makes the design work visually.
10. Rainbow Marble with Swirled Design
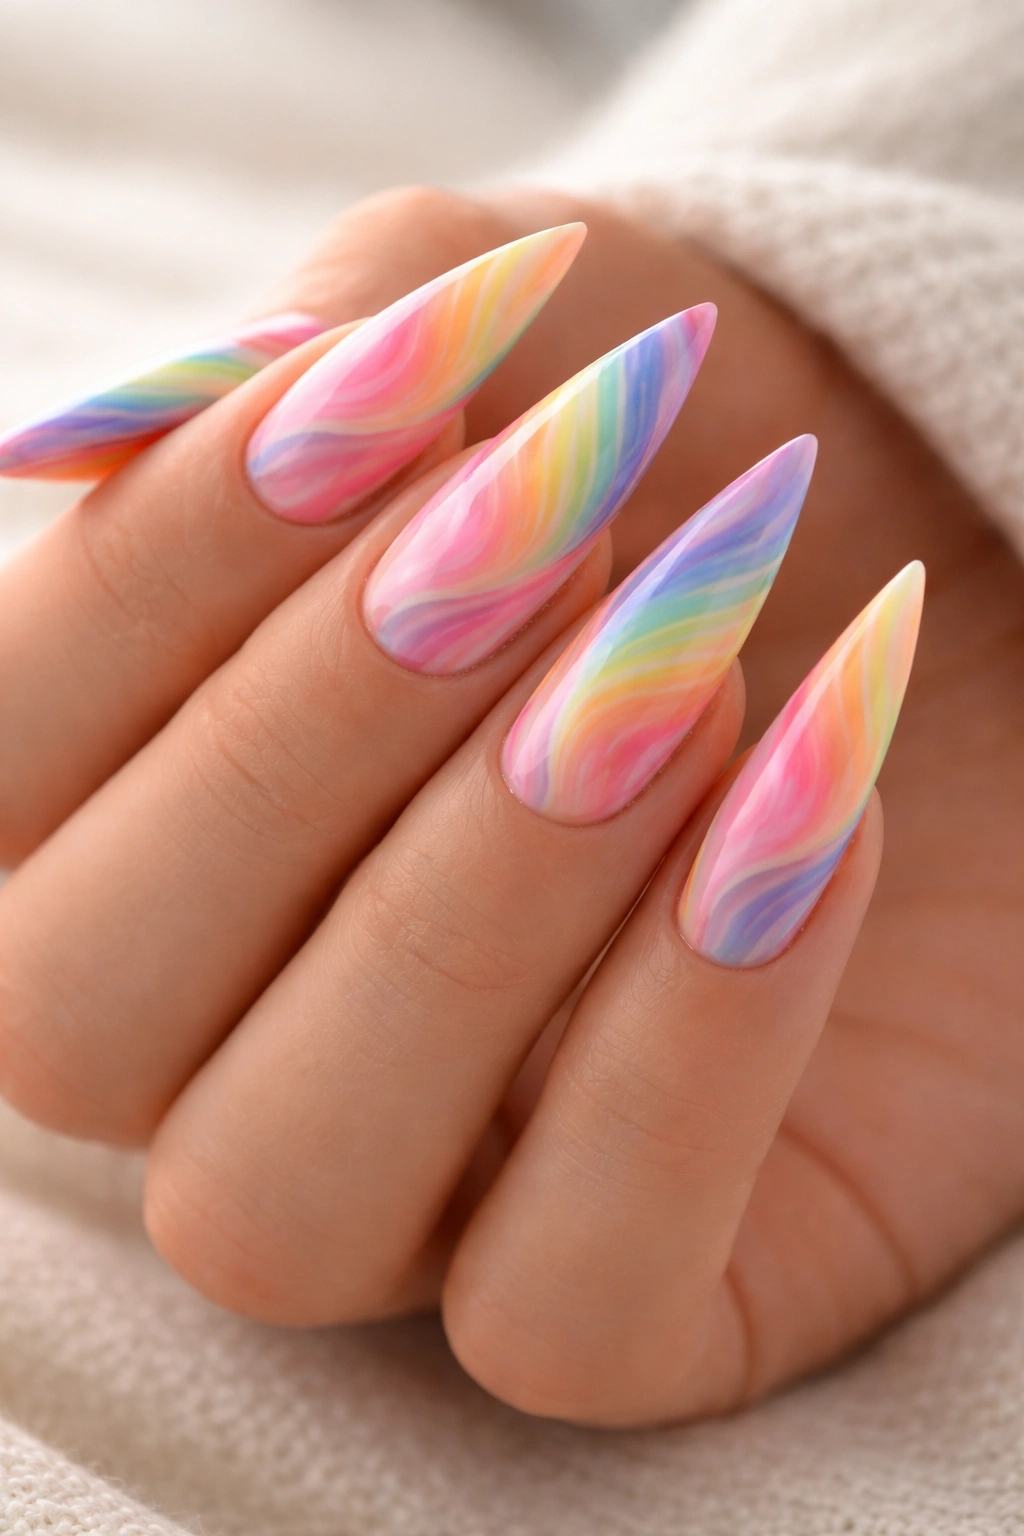
Swirled, marble-like patterns in multiple rainbow colors create an organic, stone-like texture on your stiletto nails. Unlike traditional marbling that uses water, this version involves blending colors directly on the nail in swirling patterns. Each nail should have its own unique marble pattern, making this a truly one-of-a-kind design.
Why Marble Feels Elevated
Marble patterns have an inherent luxury quality—they reference natural stone and feel timeless. When executed in rainbow colors, marble becomes playful rather than formal, combining sophistication with fun.
Creating Rainbow Marble Effect
- Apply a white or nude base coat as your foundation
- Drop rainbow colors onto the nail in no particular pattern
- Using a thin brush, dotting tool, or toothpick, swirl the colors together in flowing, organic patterns
- Don’t blend too thoroughly—you want distinct color areas that swirl into each other
- Create some negative space where the base coat shows through for depth
- Seal with glossy top coat that enhances the stone-like appearance
Pro tip: Practice the swirling motion on a piece of paper first—you want graceful, flowing lines rather than chaotic scribbles.
11. Geometric Rainbow Triangles
Large, solid triangles in rainbow colors (each triangle a different color) create a bold, modern design across your stiletto nails. Triangles can point up, down, or be arranged in a pattern—the geometry feels intentional and contemporary. This design works especially well on stilettos because the pointed shape of the nail echoes the triangles, creating visual harmony.
Geometric Design Appeal
Geometric designs feel intentional, modern, and artistic. Triangles specifically have a dynamic, directional quality that creates visual movement. This is perfect for someone with a more fashion-forward aesthetic.
Painting Geometric Triangles Precisely
- Sketch very light pencil lines to map out your triangle shapes (pencil wipes away easily)
- Fill each triangle with a different rainbow color using a thin brush
- Keep your lines clean and crisp—precision makes geometric designs look professional
- You can outline triangles in black or white for extra definition if desired
- Seal with a glossy top coat for a polished, gallery-worthy finish
Worth knowing: Thin artist brushes designed for nail art are essential for clean geometric work—regular nail brushes are too thick to create precise lines.
12. French Ombre Rainbow Tips
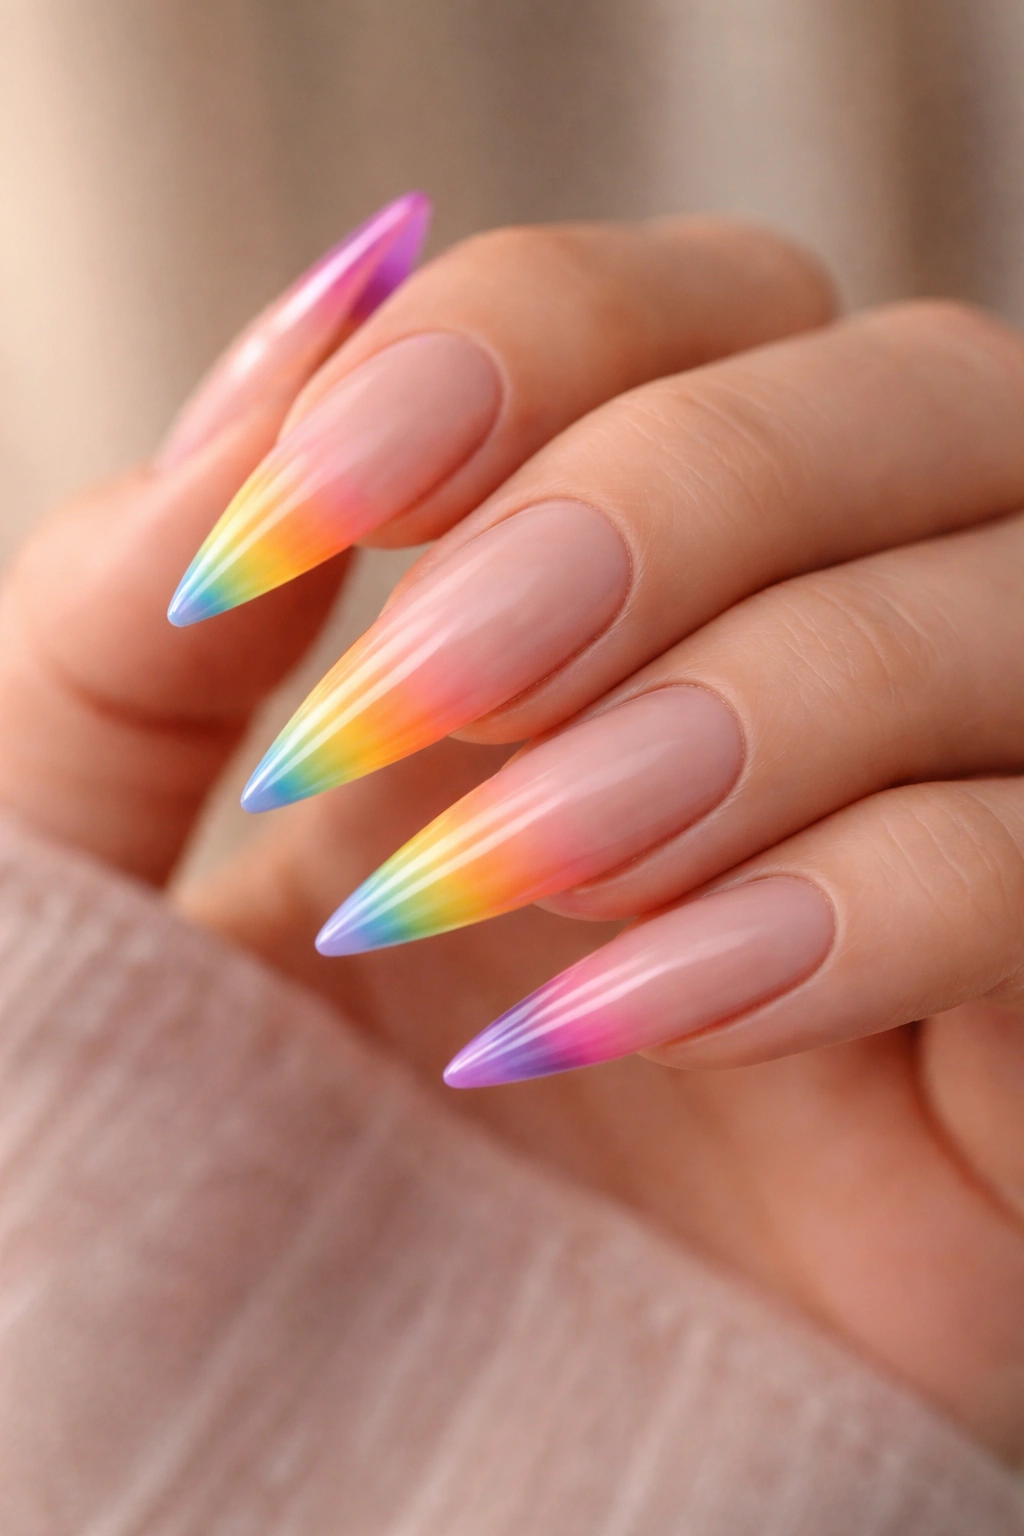
Rather than a traditional solid French tip, the tips feature a gradient from one rainbow color at the edge to another rainbow color toward the base of the tip section. The nail bed itself can be nude, white, or a light color. This updated French manicure celebrates rainbow colors in a more subtle, refined way that still reads as polished and intentional.
Modernizing the Classic French Manicure
French manicures are timeless for a reason, but adding an ombré rainbow to the tips makes them fresh and contemporary. This respects the classic nail shape while celebrating color in a sophisticated way—perfect if you want rainbow nails that still feel elegant.
Executing French Ombre Tips
- Paint your entire nail with a nude, white, or pale pink base coat
- Using painter’s tape, create a curved line marking where the tip begins (classic French is about 1/5 of the nail)
- Create an ombré gradient within just the tip section using 2-3 rainbow colors
- Blend the colors using a makeup sponge within the tape-marked area
- Remove tape carefully once dry
- Seal with a protective top coat
Pro tip: Curved French tape (pre-made stencils) make it much easier to get that classic French shape without fussing with straight tape.
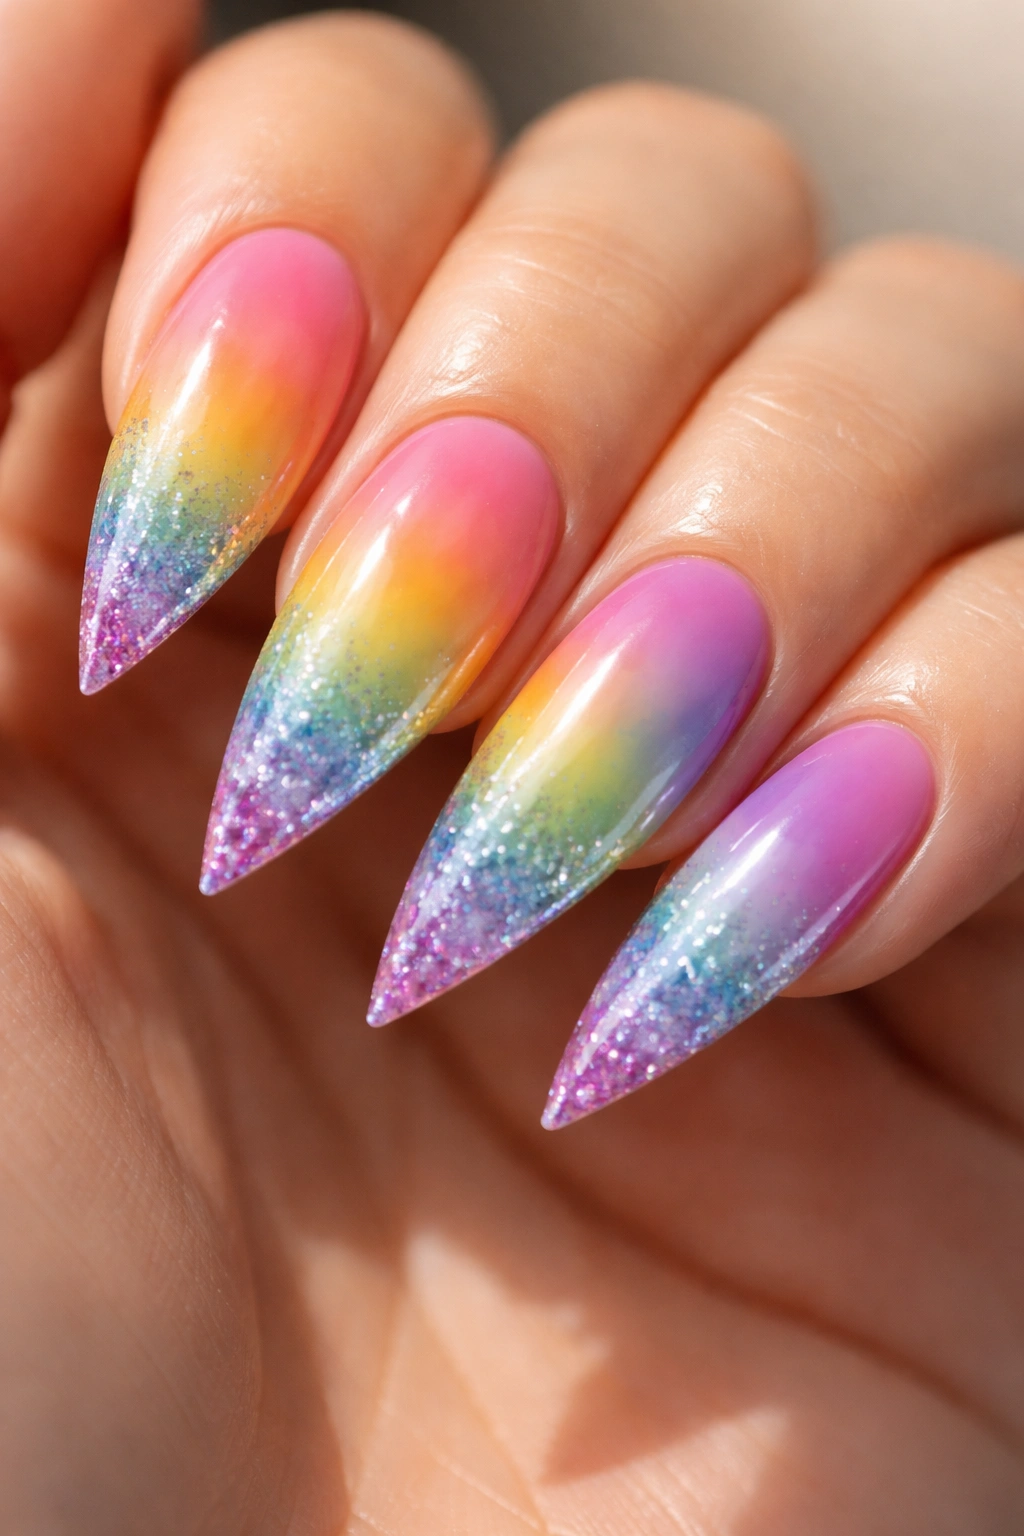
13. Rainbow Glitter Gradient
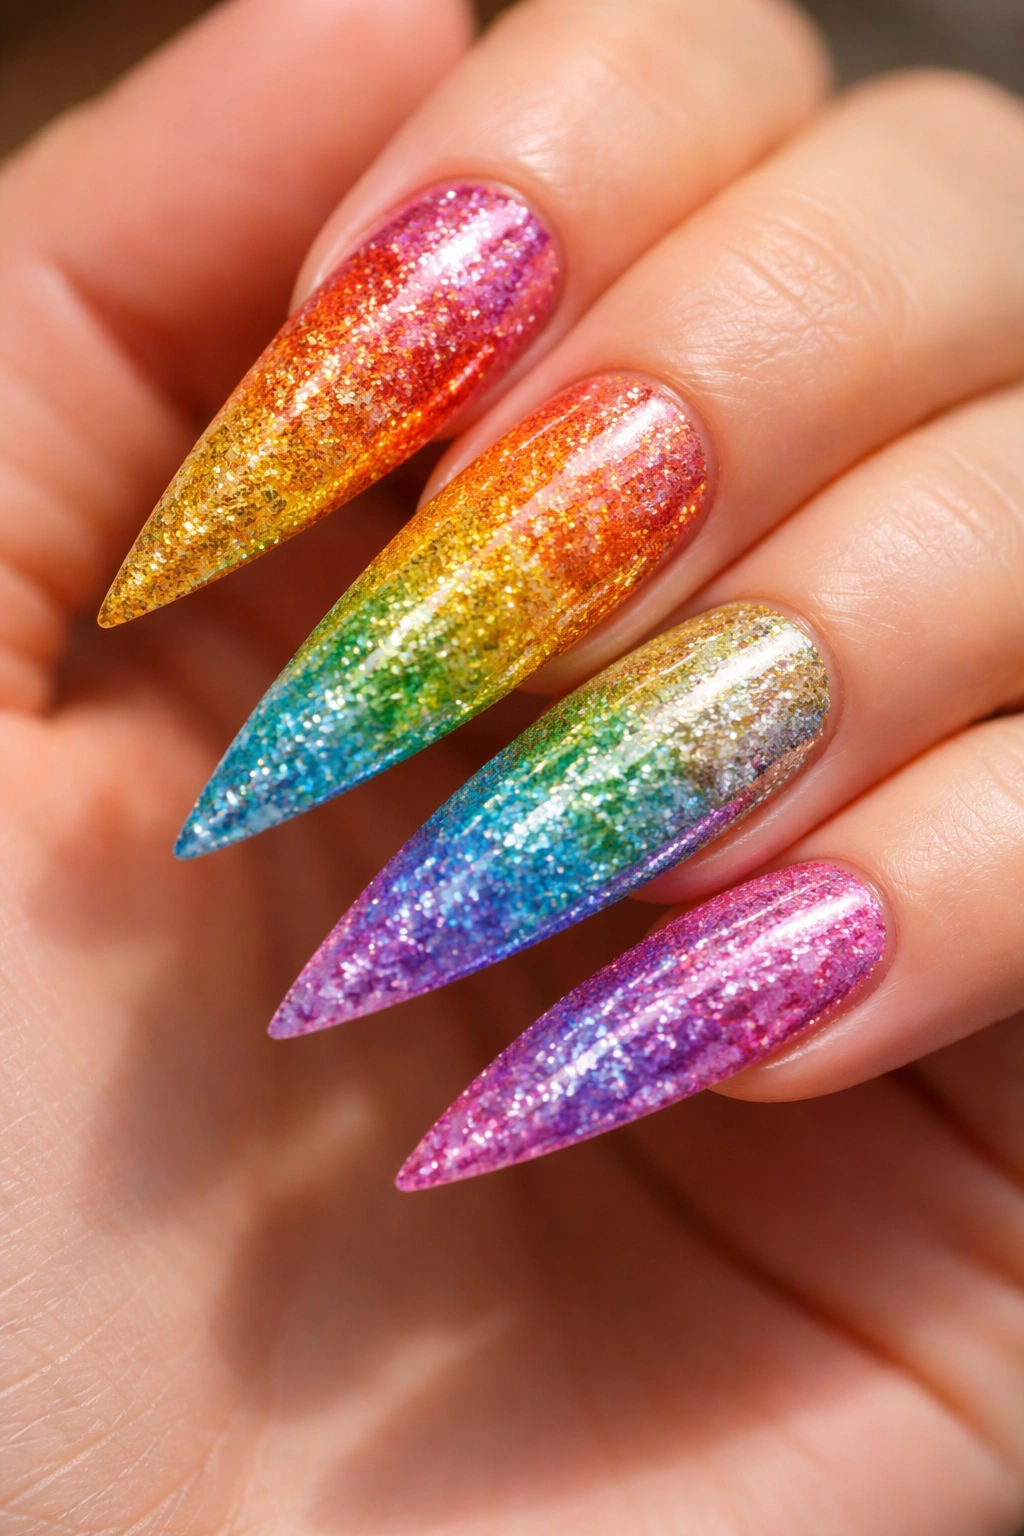
Rainbow colors transition from one to the next, with coordinating glitter seamlessly integrated throughout. Gold glitter in the warm sections (red to yellow), and silver glitter in the cool sections (green to purple) creates dimension. The glitter catches light and makes your nails sparkle while still celebrating each rainbow color distinctly.
Glitter’s Role in Rainbow Designs
Glitter adds dimension, sparkle, and a celebratory quality to any color palette. When integrated into a rainbow gradient, it prevents the design from feeling flat and adds visual interest. It’s especially effective on stilettos because the extra surface area shows off the glitter beautifully.
Layering Glitter Into a Rainbow Gradient
- Create your rainbow gradient base (ombré or striped) and let dry completely
- Using a glitter-embedded top coat or loose glitter mixed with clear polish, apply glitter strategically
- Place warmer-toned glitter (gold, champagne) in the warm color sections
- Place cooler-toned glitter (silver, holographic) in the cool color sections
- Apply glitter more heavily at certain points and lighter at others for dimension
- Seal with a thick, clear protective top coat
Insider note: Glitter top coats designed specifically for nails adhere better than craft glitter, and they’re easier to remove without damage.
14. Rainbow Striped with Negative Space
Vertical or horizontal rainbow stripes cover only portions of your stiletto nails, leaving significant negative space that shows your natural nail or a neutral base. Maybe the stripes start halfway down the nail, or they cover only the outer edges. This design feels modern and artistic rather than cutesy because the restraint creates impact.
The Power of Negative Space
Negative space makes designs look more sophisticated and intentional. It also prevents the design from feeling overwhelming—your eye gets a break from color, which actually makes the colors pop more. This is an excellent approach for someone who wants rainbow nails that still feel subtle.
Creating Negative Space Striped Design
- Paint your base color or leave natural nails as your negative space
- Create thin or medium-width rainbow stripes only in your chosen areas (sides, lower half, upper third)
- Keep stripe lines clean and parallel for a polished, contemporary look
- The uncolored areas should feel intentional, not accidental
- Seal everything with a clear protective top coat
Pro tip: Negative space designs look cleaner if painted over a light base—nude, pale pink, or white makes the contrast more intentional than bare nail.
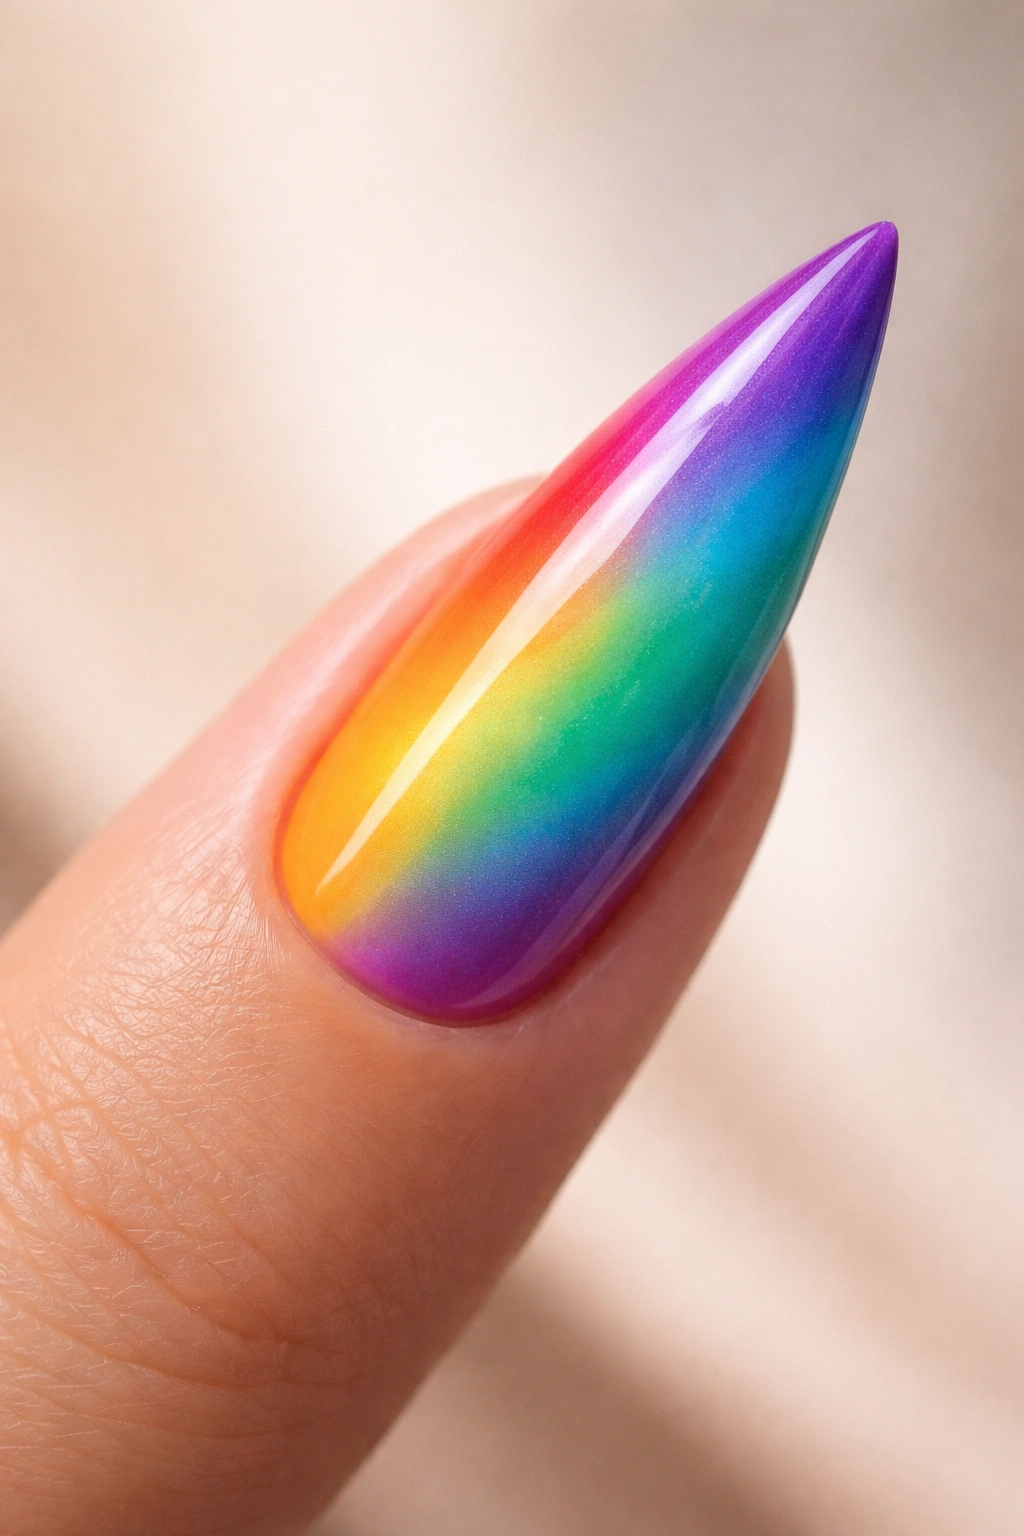
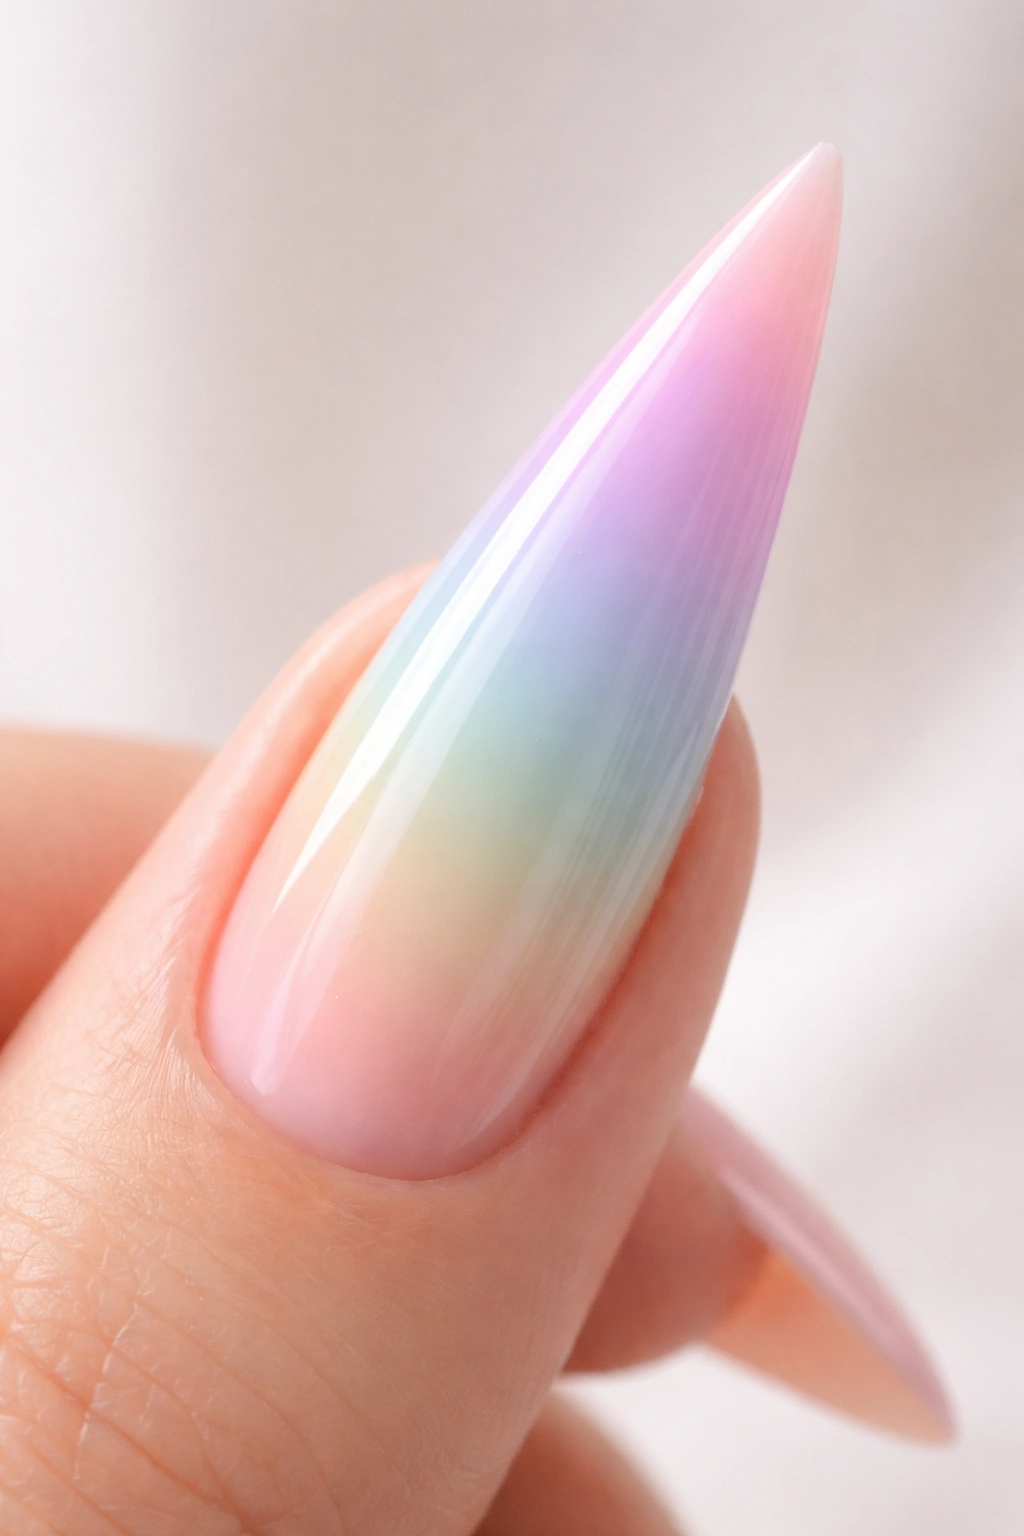
15. Rainbow Holographic Stilettos
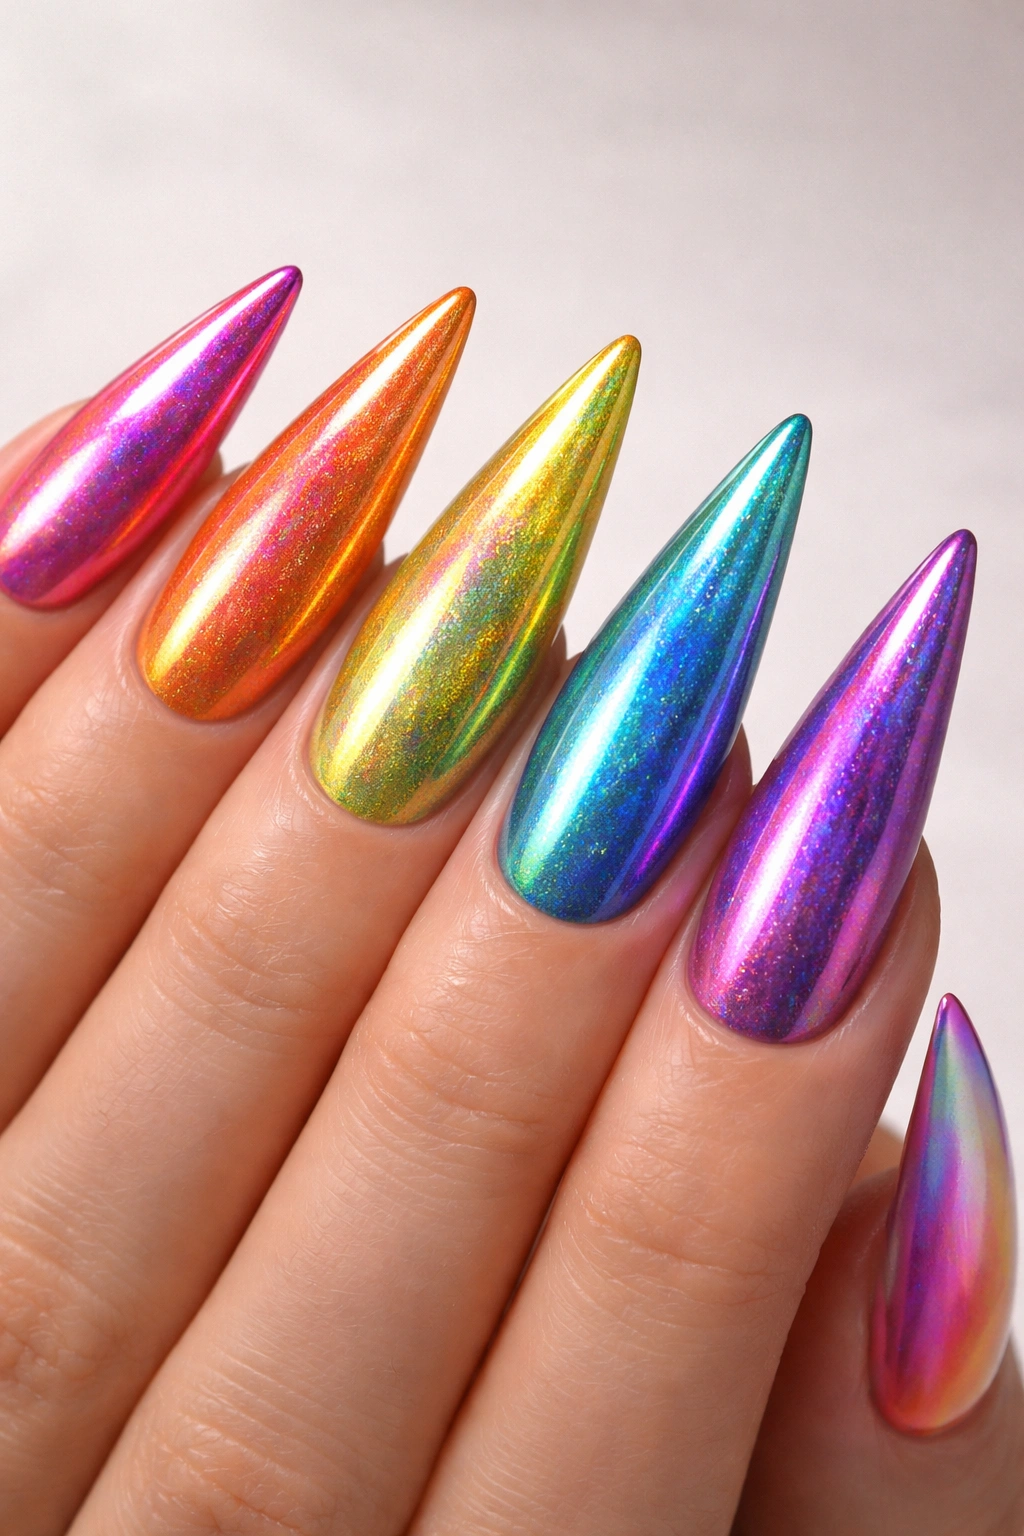
Each nail is a different solid rainbow color, but each color is a holographic or chrome finish that shifts and changes depending on the angle and light. From certain angles the nails appear one color, and from other angles they appear completely different. It’s subtle, sophisticated, and utterly eye-catching—perfect for someone who loves subtle-but-stunning nail art.
Holographic Polish Technology
Holographic polishes contain light-refracting particles that create a prismatic effect. Instead of looking flat, your nails literally shift colors as you move. It’s pure nail art magic and works beautifully on stilettos because the length shows off the shifting colors throughout the day.
Applying Holographic Polish Correctly
- Start with a smooth, perfectly even base coat (holographic finishes highlight any bumps or texture)
- Apply holographic polish in thin, even coats—usually 2-3 thin coats beat one thick coat
- Let each coat dry completely before applying the next (rushing causes streaking)
- Use a sticky base coat designed for metallics and holos to help particles adhere
- Seal with a protective clear top coat (optional—many holos are durable on their own)
Worth knowing: Holographic polishes show off their magic best in natural light and when your nails catch the sun—indoor fluorescent lighting can mute the effect.
16. Rainbow Splatter with White Base
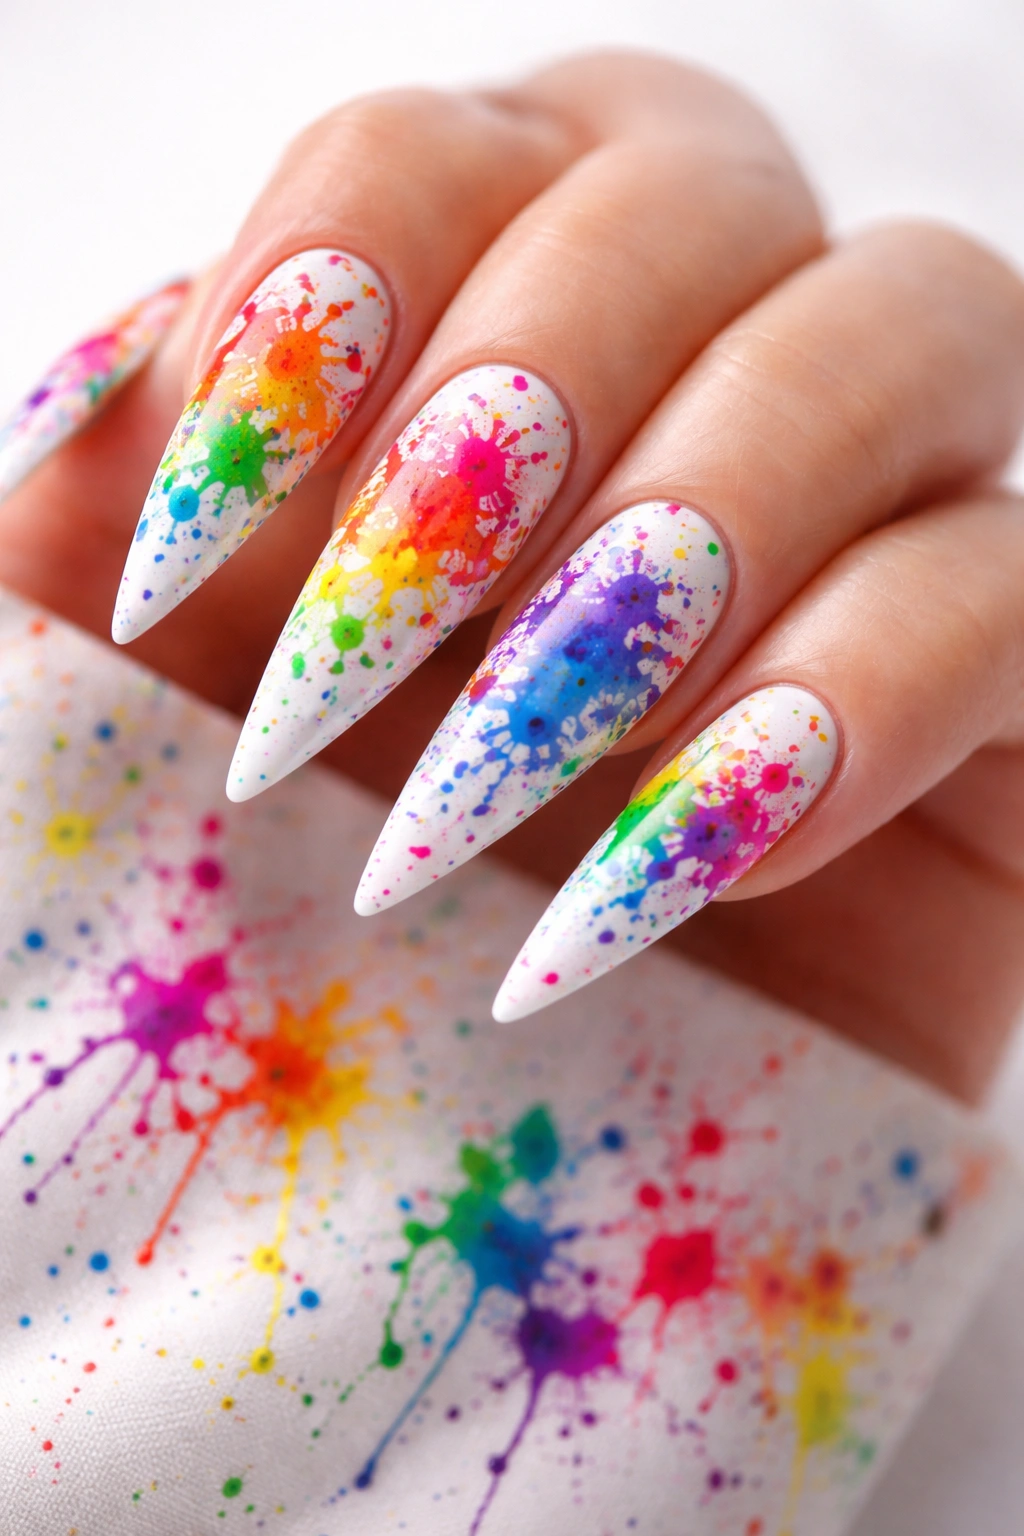
A clean white base is covered with intentional splatter marks in rainbow colors created by flicking a brush or tapping it against something to scatter drops. It’s playful, energetic, and feels artistic without requiring serious freehand painting skills. The splatters can be dense or sparse depending on your preference.
Splatter Design Energy
Splatter designs feel spontaneous, creative, and youthful—they’re the opposite of rigid. Yet when done intentionally (not randomly), they look artistic and deliberate. This is perfect for someone who wants nails that express creativity and personality.
Executing Perfect Nail Splatters
- Paint your stiletto nails white and let dry completely
- Load a thin brush with rainbow colors one at a time
- Hold the brush about 1-2 inches from your nail and flick it gently to scatter drops
- Tap the brush against your finger to create smaller splatter marks
- Vary the color and splatter size throughout the nail
- Let colors overlap slightly where they land
- Seal with a glossy top coat
Pro tip: Do this over a paper towel first to control splatter direction and see how much force you need for your preferred splatter size.
17. Stiletto Rainbow French with Gradient Base

A multi-color gradient covers the entire nail (red to orange to yellow to green), and the French tip section (usually white or pale) extends about 1/4 down from the tip. This combines the elegance of a French manicure with the boldness of rainbow colors. It’s sophisticated enough for formal events yet colorful enough to feel fun and expressive.
Blending Classic with Colorful
This design respects the timeless beauty of the French manicure shape while modernizing it with color. It’s especially effective on stilettos because the nail shape already draws attention to the tips—adding the French white or pale color there creates a elegant focal point.
Creating Rainbow Gradient French Tips
- Paint your entire nail with a rainbow gradient (ombré from red to purple)
- Once dry, use painter’s tape to create a French tip line (about 1/4 from the tip)
- Paint the tip section white, nude, or a very pale color
- Remove tape carefully
- You can leave the line as is for a bold look, or soften it with a damp brush for a blended effect
- Seal with a glossy protective top coat
Insider note: If you want the French line to be the focal point, keep it crisp and defined. If you want it softer, blend it slightly with a clean, slightly damp brush.
18. Rainbow Ombre with Glitter Tips
A smooth rainbow ombré gradient transitions across your stiletto nails from one color at the base to another at the tip, and the very tip 1/4 inch is solid glitter (usually clear or white glitter, or glitter matching the tip color). The glitter creates a sparkly endpoint that catches light and adds glamour. It’s elegant with a touch of sparkle.
Glitter as an Accent Element
When glitter is confined to just the tips, it becomes an elegant accent rather than the main event. This restraint makes it feel sophisticated while still adding the celebratory, festive quality that glitter brings.
Layering Ombré with Glitter Tips
- Create your rainbow ombré gradient across the entire nail and let dry completely
- Using painter’s tape, mark where you want the glitter section to begin (usually 1/4 to 1/3 from the tip)
- Apply a sticky base coat or glitter top coat to just the tip section
- Apply glitter generously to the tip area, pressing it in slightly so it adheres
- Remove tape carefully
- Seal with a clear protective top coat that locks the glitter in place
Pro tip: Glitter adheres better to slightly tacky surfaces, so don’t apply a full top coat before glitter—let the base coat be slightly sticky for best adhesion.
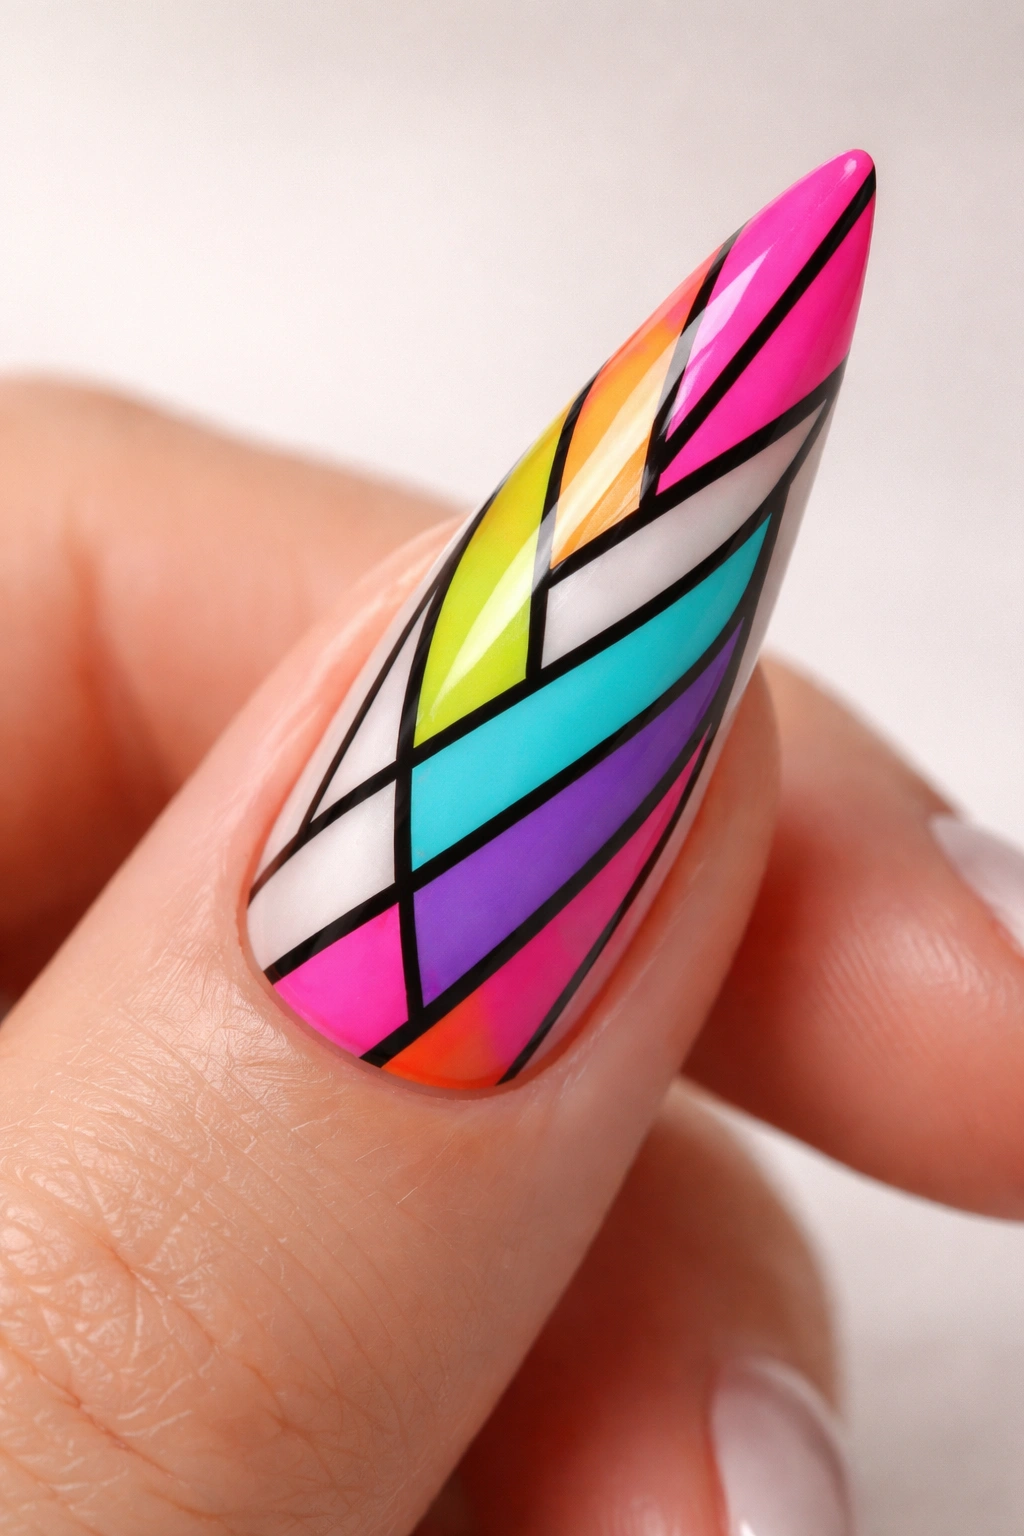
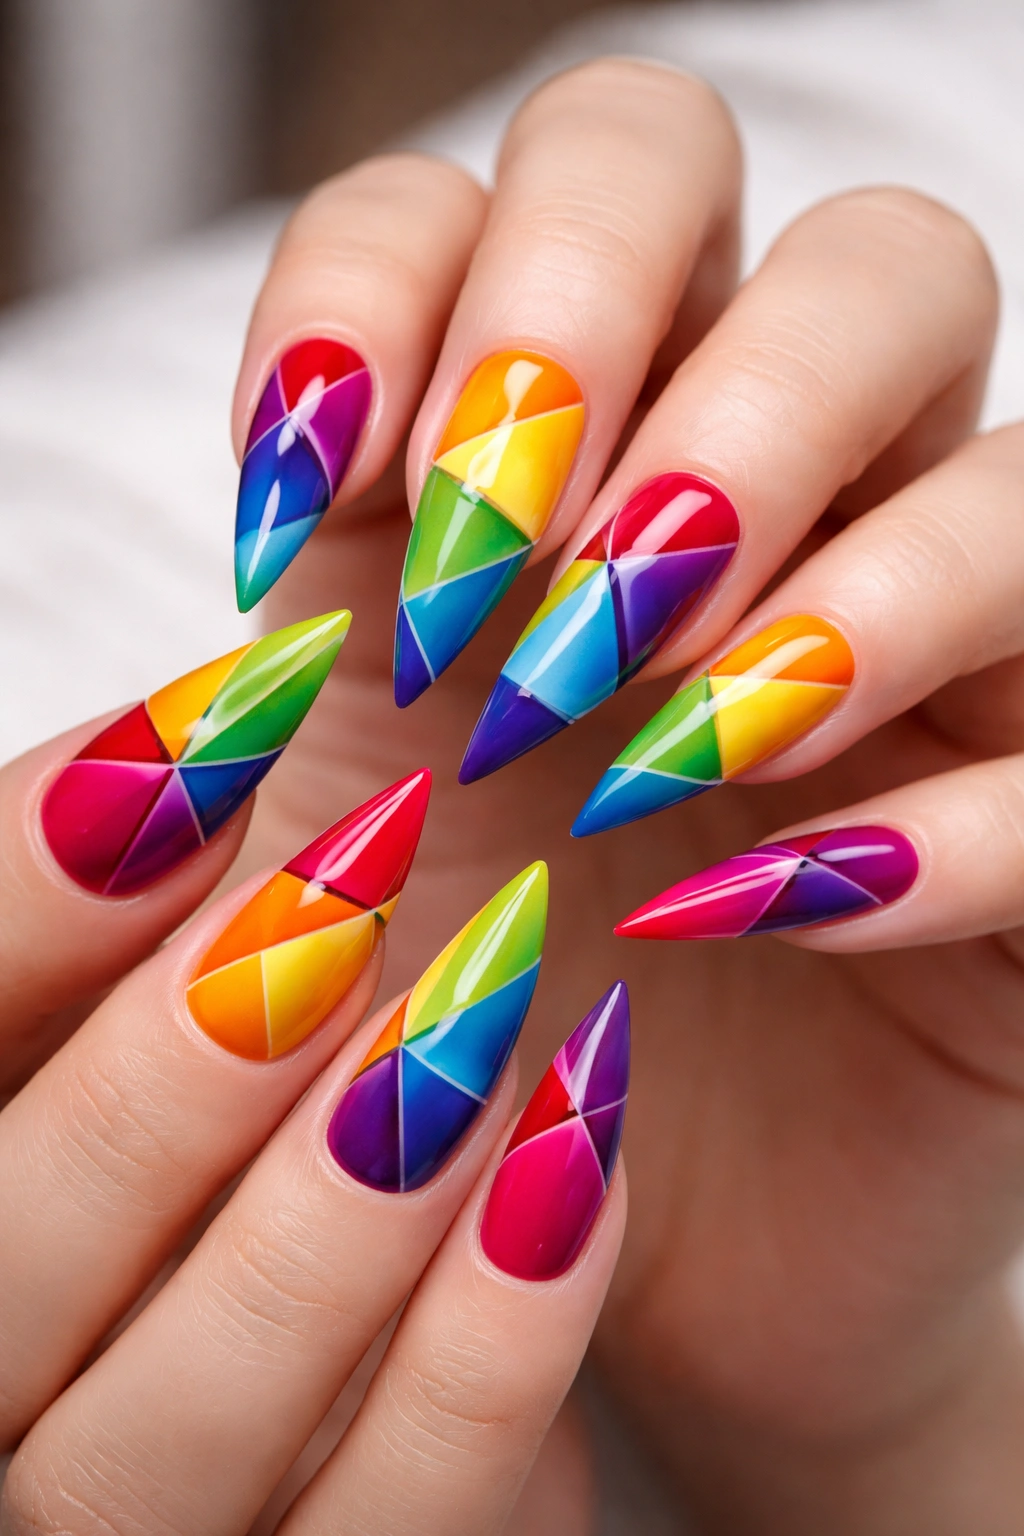
19. Rainbow Color-Block Geometric

Your nail is divided into distinct geometric sections—maybe quadrants, maybe a different pattern—and each section is a solid rainbow color with crisp, defined lines. There’s no blending or gradients, just bold, distinct blocks of color. It’s modern, graphic, and feels intentional. This design works beautifully on stilettos because the length accommodates multiple color blocks without feeling cramped.
Geometric Color-Blocking Appeal
This design feels contemporary and artistic—it references modern art and graphic design. The crisp lines and distinct colors create visual impact while the geometric arrangement prevents it from feeling chaotic.
Creating Precise Color Blocks
- Sketch your geometric divisions very lightly with a pencil
- Use painter’s tape to mark your geometric sections precisely
- Paint each color block using a thin brush, filling it completely
- Allow colors to dry before removing tape for the crispest lines possible
- Remove tape carefully—working slowly prevents dragging polish
- Seal with a glossy top coat for a polished, professional finish
Worth knowing: Perfect precision is less important than intentionality—clean edges matter more than pixel-perfect precision, and slight imperfections add character.
20. Sunset Rainbow Ombre with Matte Finish
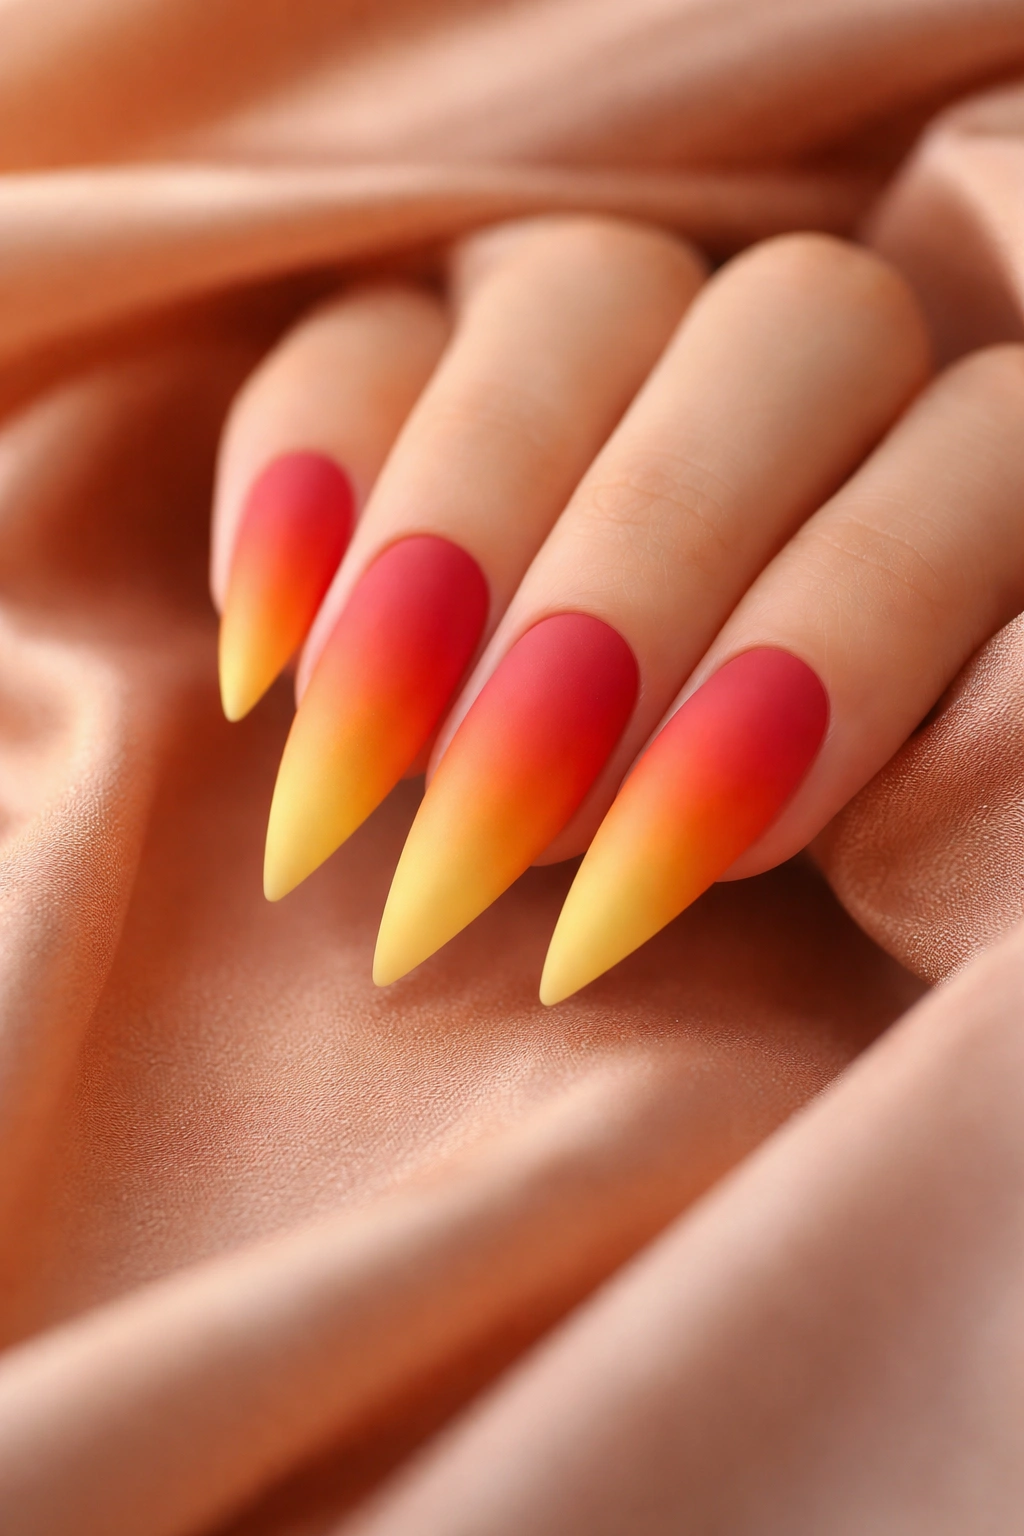
A warm rainbow gradient flows across your stiletto nails from deep red at the base through orange, yellow, and peach toward the tip. Instead of a glossy finish, everything is matte—creating a soft, velvety appearance that feels artistic and sophisticated. The warmth of the sunset palette paired with the matte finish creates an elegantly understated look.
Matte Rainbow Aesthetics
Matte finishes make colors appear more subdued and artistic—less shiny equals more serious. A warm rainbow gradient in matte finish feels like a sunset painting rather than a glossy, playful design. It’s sophisticated and wearable while still celebrating color.
Creating a Sunset Matte Ombre
- Paint your warm-tone gradient (red-to-orange-to-yellow-to-peach) using regular polish or gel
- Create smooth transitions between colors using a makeup sponge to blend
- Let the gradient dry completely
- Apply a matte top coat over the entire nail (this is the key step that changes the whole aesthetic)
- If using regular polish, the matte top coat is essential. If using gel, cure after each step
- Avoid touching or pressing on the matte surface while wet—it scuffs easily
Pro tip: Matte finishes show fingerprints and dust more readily than glossy finishes, so handle your nails carefully while the matte top coat is setting.
Wrapping Up
Rainbow stiletto nails are all about expressing yourself through color and design. Whether you gravitate toward soft, subtle pastels or bold, saturated jewel tones, toward geometric precision or organic, artistic blending—there’s a rainbow stiletto style for your personality. The stiletto shape is genuinely forgiving for nail art because the elongated canvas gives you space to work with. Even if you’re not a skilled nail artist, most of these designs can be recreated with patience, the right tools (thin brushes, dotting tools, makeup sponges), and a willingness to embrace the process.
The most important thing to remember is that your nails should feel like you. If you love bold, unapologetic color, go full saturation. If you prefer subtle, understated elegance, build in negative space or choose soft pastel tones. If you want to try something entirely new, test it on one or two nails first before committing to all ten. Your stiletto nails are a daily accessory, a form of self-expression, and honestly, one of the easiest ways to feel confident and intentional about your appearance.
