

Stiletto nails are the ultimate canvas for romance—their elongated, dramatic shape practically demands elegance and artistry. Whether you’re preparing for a special date, a formal event, or simply want to feel confident in your everyday elegance, the right design can transform your nails into a statement of sophistication and charm. Romantic designs on stilettos aren’t just about looking beautiful; they’re about expressing your personality, celebrating femininity, and channeling that effortless confidence that comes from having nails you absolutely adore.
The beauty of romantic nail designs lies in their versatility. Some lean toward classic elegance with timeless colors like deep reds and blush tones, while others embrace modern techniques like ombre, marble, and metallic accents that feel both luxurious and contemporary. What makes a design feel romantic isn’t necessarily complexity—it’s thoughtfulness. A single rose gold accent can feel just as romantic as an intricate lace pattern, depending on how it’s executed and how it makes you feel when you look down at your hands.
Stilettos, with their sharp point and elongated length, amplify the impact of any design you choose. The shape itself is inherently sophisticated and bold, which means your nail art has room to be both subtle and striking. You can play with negative space, gradient effects, delicate details, and bold colors in ways that might feel overwhelming on shorter or rounder nail shapes. This article walks through twelve stunning romantic stiletto nail ideas that range from minimalist to ornate, ensuring there’s something here that speaks to exactly what you’re envisioning.
1. Blush Pink with Gold Foil Accents
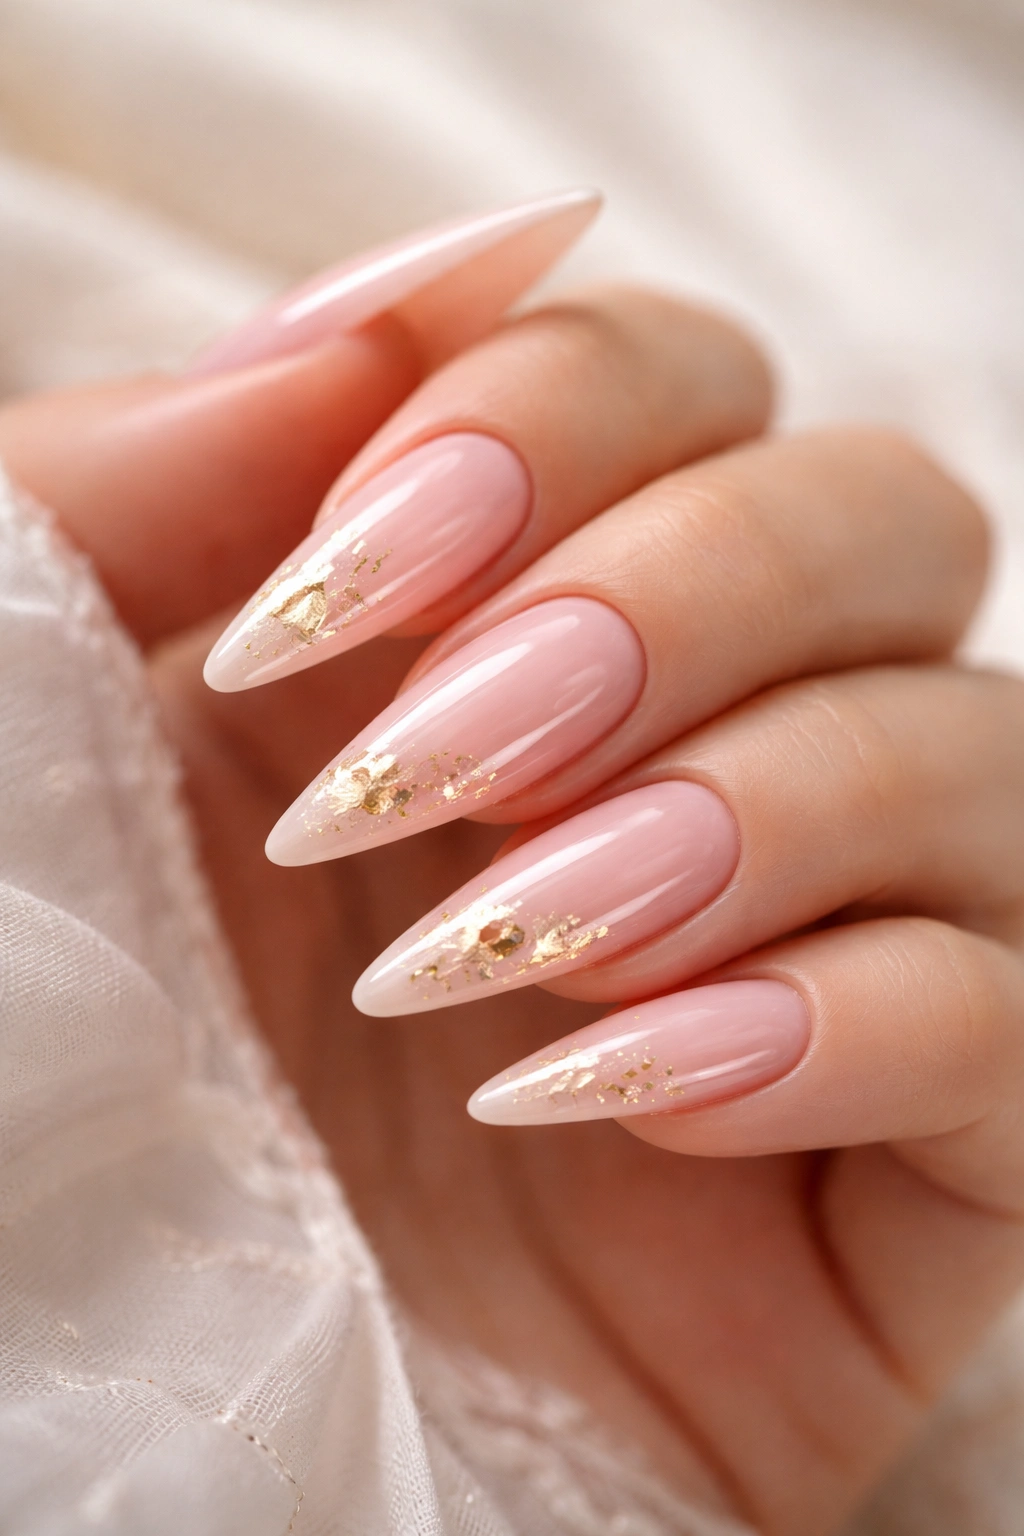
Blush pink is the quintessential romantic color, and when paired with gold foil, it becomes timelessly elegant. This combination works because blush pink is soft and approachable—it doesn’t feel dramatic or aggressive—while gold foil adds just enough luxury to make the design feel special and intentional. The contrast between the matte or glossy pink base and the reflective shimmer of foil creates visual interest without overwhelming the eye.
Why This Design Works for Romance
Blush pink evokes femininity, softness, and understated confidence. Gold foil catches the light beautifully, drawing attention to your hands in the most flattering way. Together, they create an aesthetic that feels both romantic and put-together. This combination suits nearly every skin tone and pairs well with any wardrobe, making it incredibly wearable for dates, weddings, brunches, or everyday elegance.
Application Details and Variations
- Start with a blush pink base coat—opt for a cream finish rather than shimmer so the foil stands out distinctly
- Apply gold foil to accent nails (typically the ring finger and pinky) or create a scattered pattern across all nails for more drama
- You can apply foil in geometric shapes (triangles, half-moons), organic swirls, or even delicate stripes
- Seal everything with a glossy top coat to protect the foil and add shine
Pro tip: Foil application requires a special foil-adhesive gel or a regular gel base coat. Press the foil onto the wet gel, smooth it down gently, then cure. Precision matters here, so take your time and use a small brush or tweezers to position each piece.
2. Deep Red Ombre with Glitter Fade
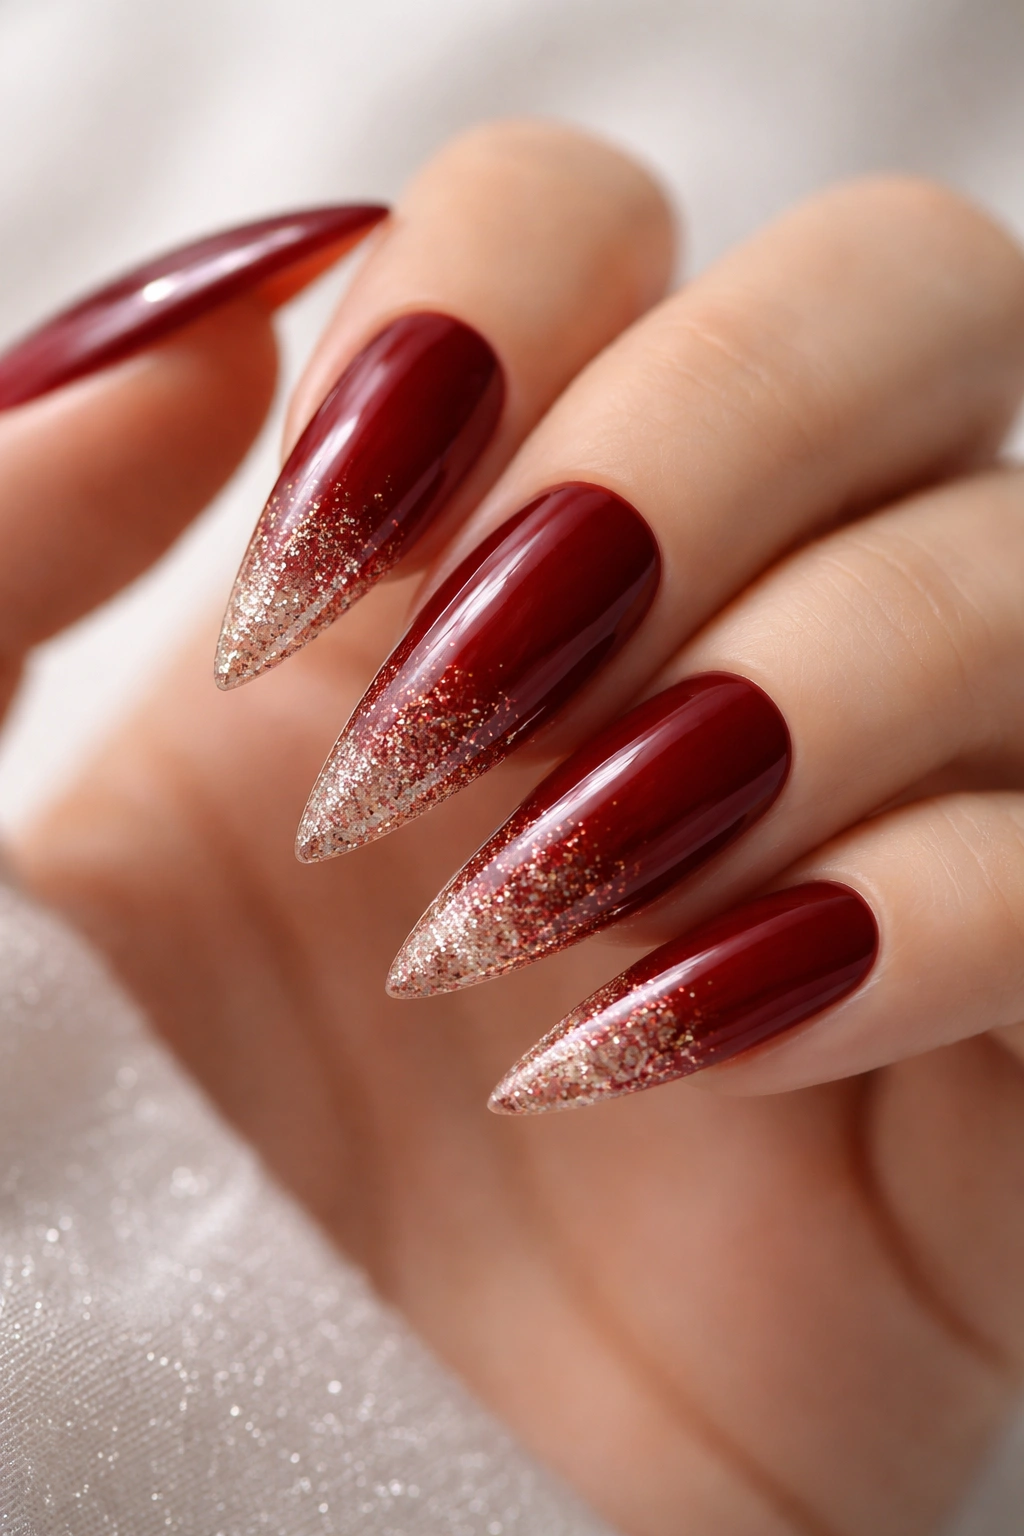
There’s something inherently romantic about deep red—it’s confident, sensual, and timeless. When you introduce an ombre effect that gradually fades to glitter, you’re adding movement and dimension that makes the design feel less flat and more dynamic. The glitter fade creates a subtle sparkle that catches light as your hands move, adding an unexpected moment of glamour.
The Romance of Red Ombre Design
Deep red ombre taps into classic romance. The color itself carries historical weight—it’s the shade of roses, wine, and passion. By fading it gradually into glitter, you soften the intensity slightly while adding texture and visual complexity. This design reads as both elegant and fun, never feeling too serious or theatrical despite the boldness of red.
How to Achieve This Look
- Apply a deep red base coat and let it cure completely
- Create your ombre using either a sponge technique with glitter polish or by layering translucent glitter polish gradually toward the tips
- The fade should be subtle—you want to see the red clearly at the base, with glitter becoming more concentrated toward the tips
- Finish with a glossy or matte top coat depending on your preference (matte can look more sophisticated; glossy amplifies shine)
- Consider using glitters in burgundy, rose gold, or champagne shades rather than traditional clear glitter for added depth
Worth knowing: If you’re using a sponge technique, work in thin layers. A single thick application of ombre tends to look messy; three to four thin layers build a seamless gradient.
3. Nude with Rose Gold Floral Details
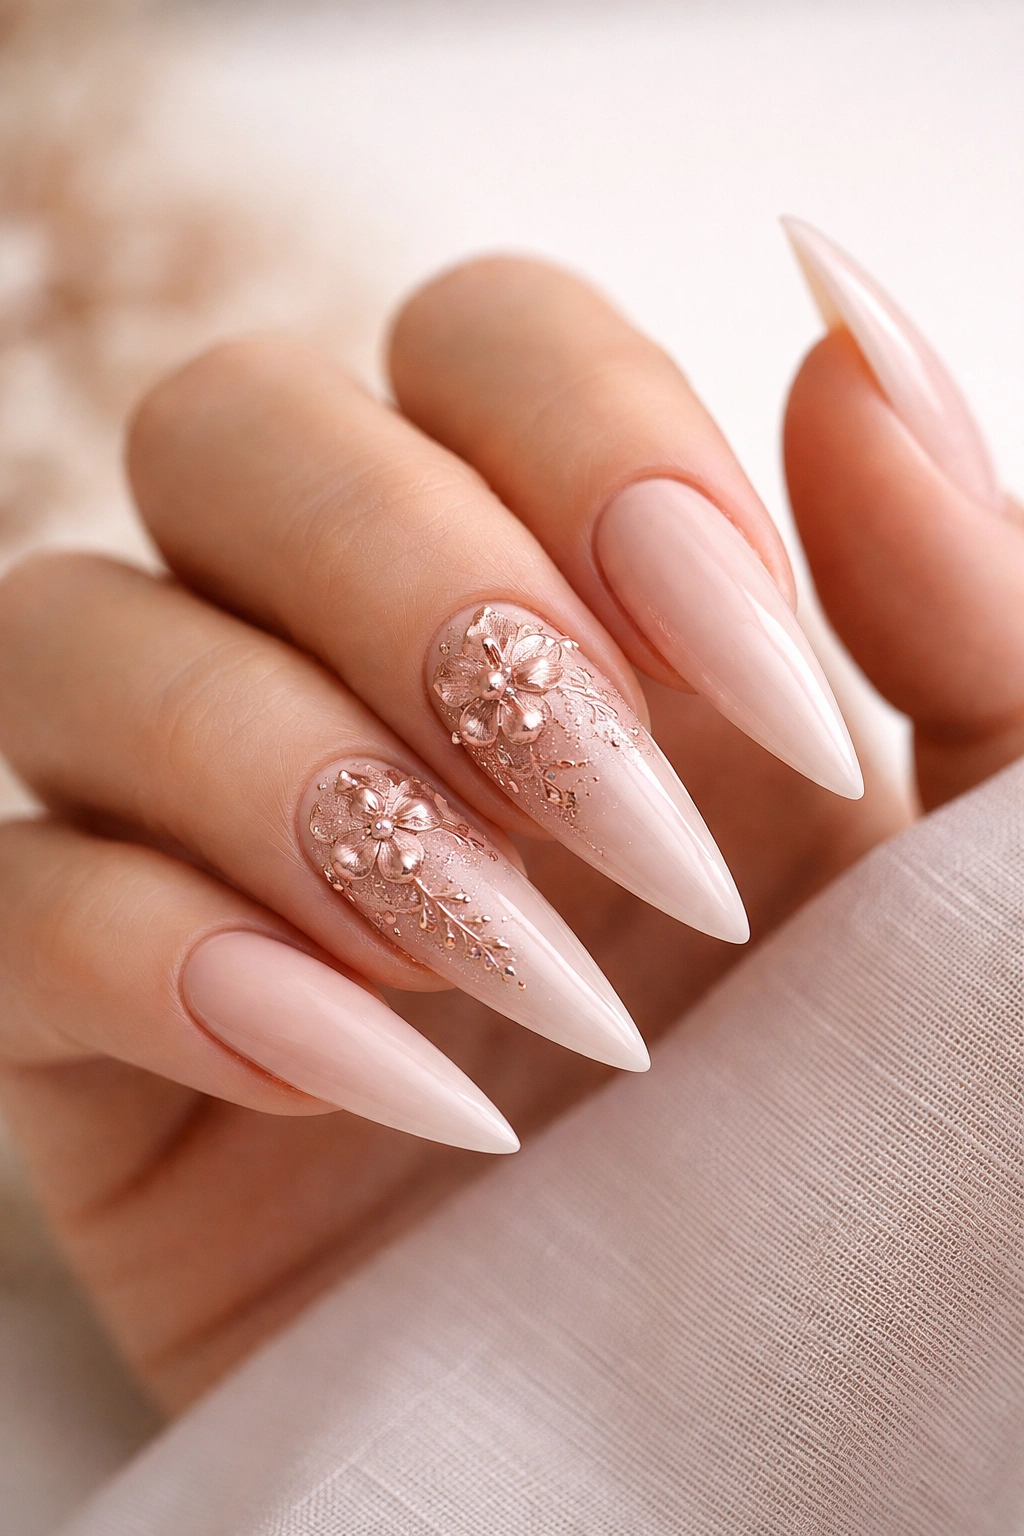
This design strikes a perfect balance between minimalist and ornate. Nude nails are the foundation of any romantic manicure because they elongate the fingers and feel universally flattering. Rose gold florals—whether hand-painted or created with thin metallic detailing—add artistry without overwhelming the overall aesthetic. The delicate flowers create focal points that draw the eye without making the design feel busy.
Why Florals Feel Inherently Romantic
Flowers symbolize growth, beauty, and love across virtually every culture. When rendered in rose gold on a neutral base, florals feel elegant and refined rather than childish or casual. The metallic finish adds luxury and prevents the florals from reading as too soft or feminine in an unbalanced way. This design has both strength and softness, making it perfect for anyone who wants to feel beautiful without being overly girly.
Nail Art Execution Tips
- Use a true nude shade that matches your skin tone—this extends the visual line of your finger and makes hands look longer
- Rose gold florals work best when applied to 2-3 accent nails (typically the ring fingers) or scattered sparsely across all nails
- Hand-painted florals offer more personality, but if hand-painting isn’t your skill, stamped designs or press-on options with this design are equally beautiful
- Keep floral elements delicate and outlined rather than heavily filled in—negative space prevents the design from feeling crowded
Insider note: Ask your nail tech if they can create hand-painted details using a fine liner brush. The added artistry justifies the cost and creates a bespoke piece that feels uniquely yours.
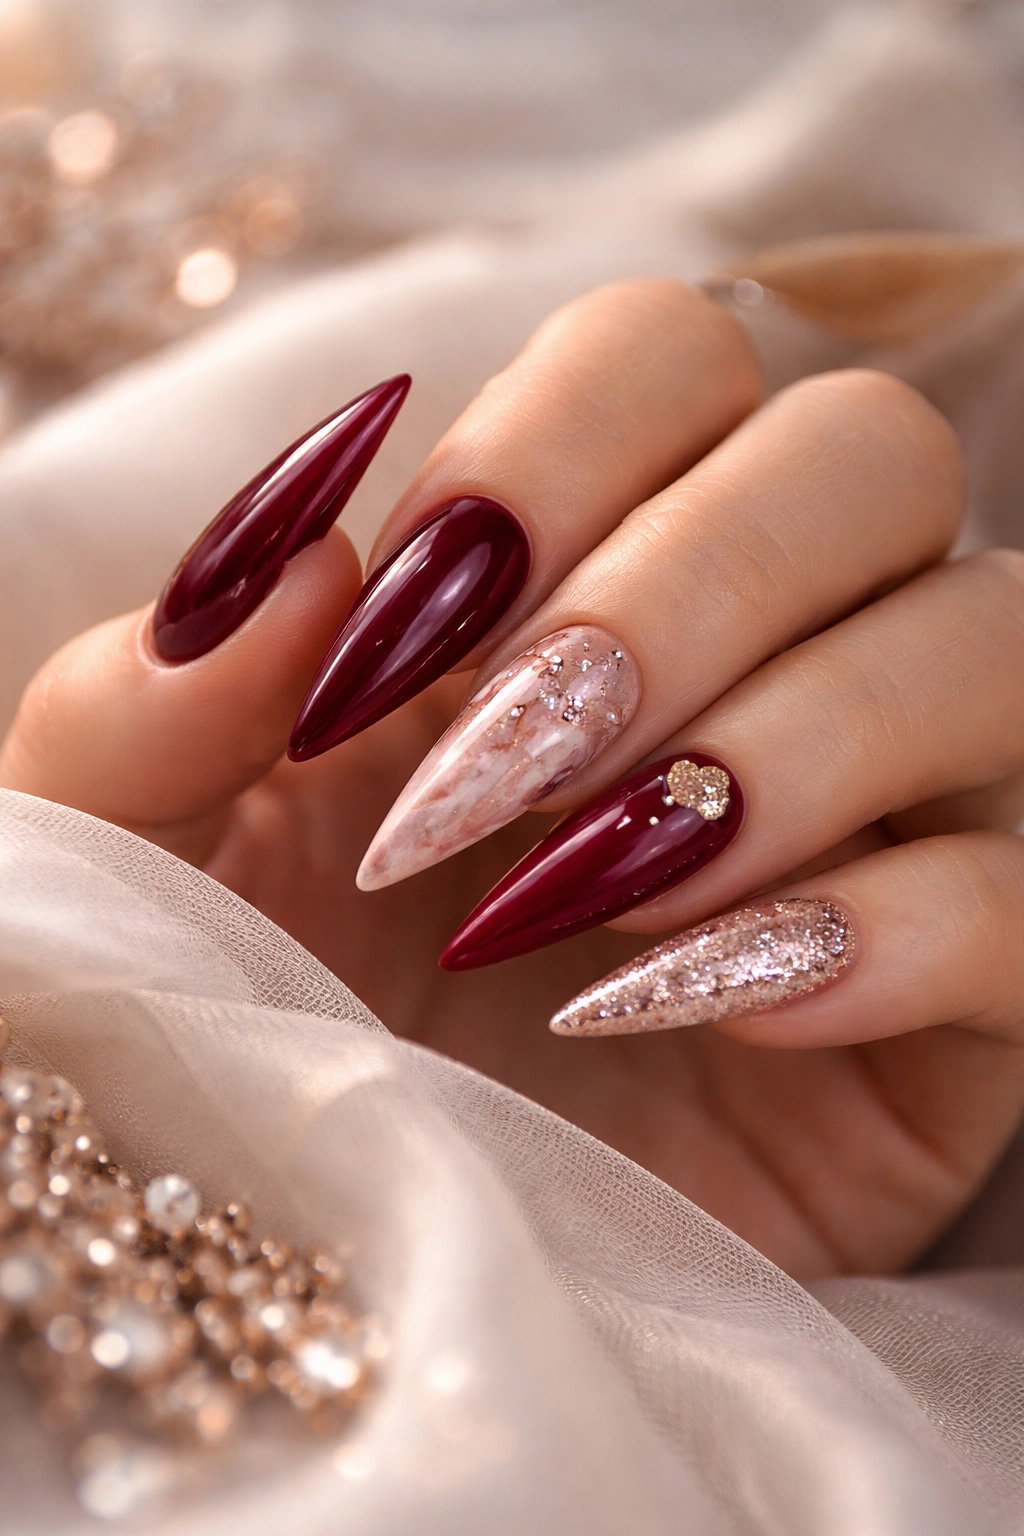
4. Burgundy and Pearl Marble
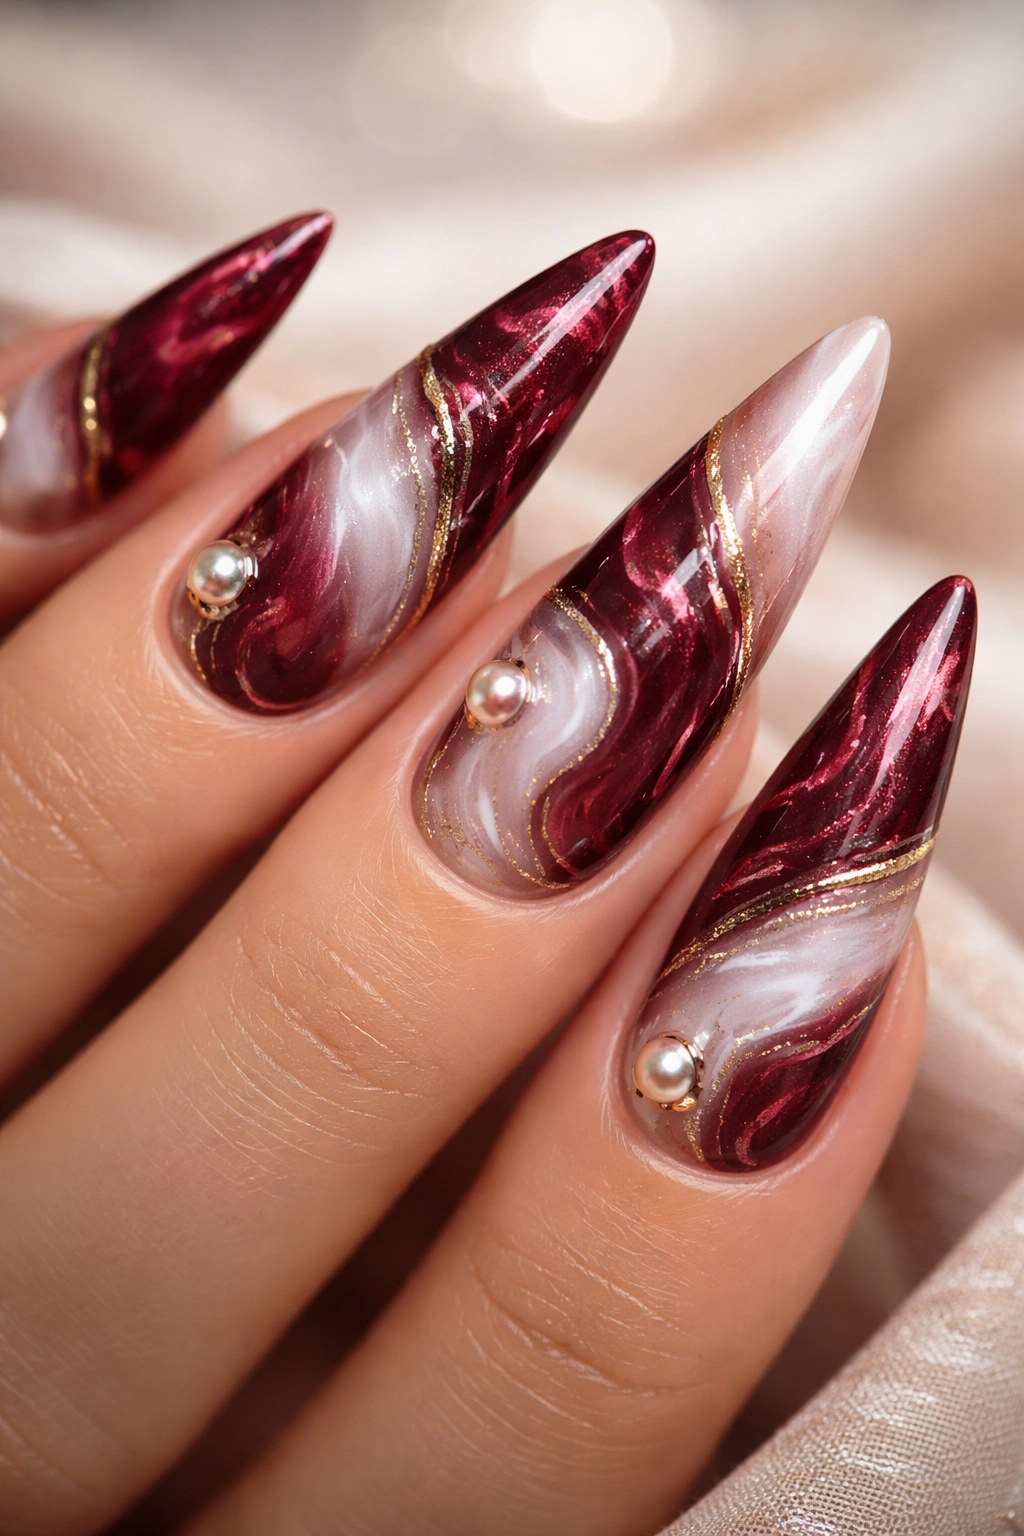
Marble effects are having a moment, and for good reason—they instantly elevate any design to luxury status. When you use burgundy and pearl as your colors, you’re creating a design that’s rich, sophisticated, and undeniably romantic. The burgundy brings depth and drama; the pearl adds elegance and a sophisticated shimmer. Together, they create an effect that looks intentional and artistic, never accidental.
The Psychology of Marble in Romantic Design
Marble has long been associated with luxury, timelessness, and artistry. It’s the material of classical sculpture and high-end architecture. When reproduced on nails, it tells the viewer that care and sophistication went into this design. Burgundy marble specifically feels romantic because burgundy itself is a romantic color—it’s warmer and more mysterious than basic red. Pearl adds an element of luminescence that prevents the design from feeling too heavy.
Creating Marble Effects
- Start with a pearl or white base coat and let it dry completely
- Use a thin brush or a marble tool to create veins and swirls using burgundy polish
- Don’t aim for perfection—the beauty of marble is in its organic, slightly imperfect veining patterns
- You can create veins that flow from cuticle to tip or random swirled patterns; both look authentically marble-like
- Seal with a glossy top coat to enhance the luxe factor and protect your art
Real talk: Marble designs can be tricky if you’re new to nail art. Practice on a practice wheel first, or ask your nail tech to do this—it’s worth the investment for a design that looks this impressive.
5. Soft Champagne with Diamond Embellishments
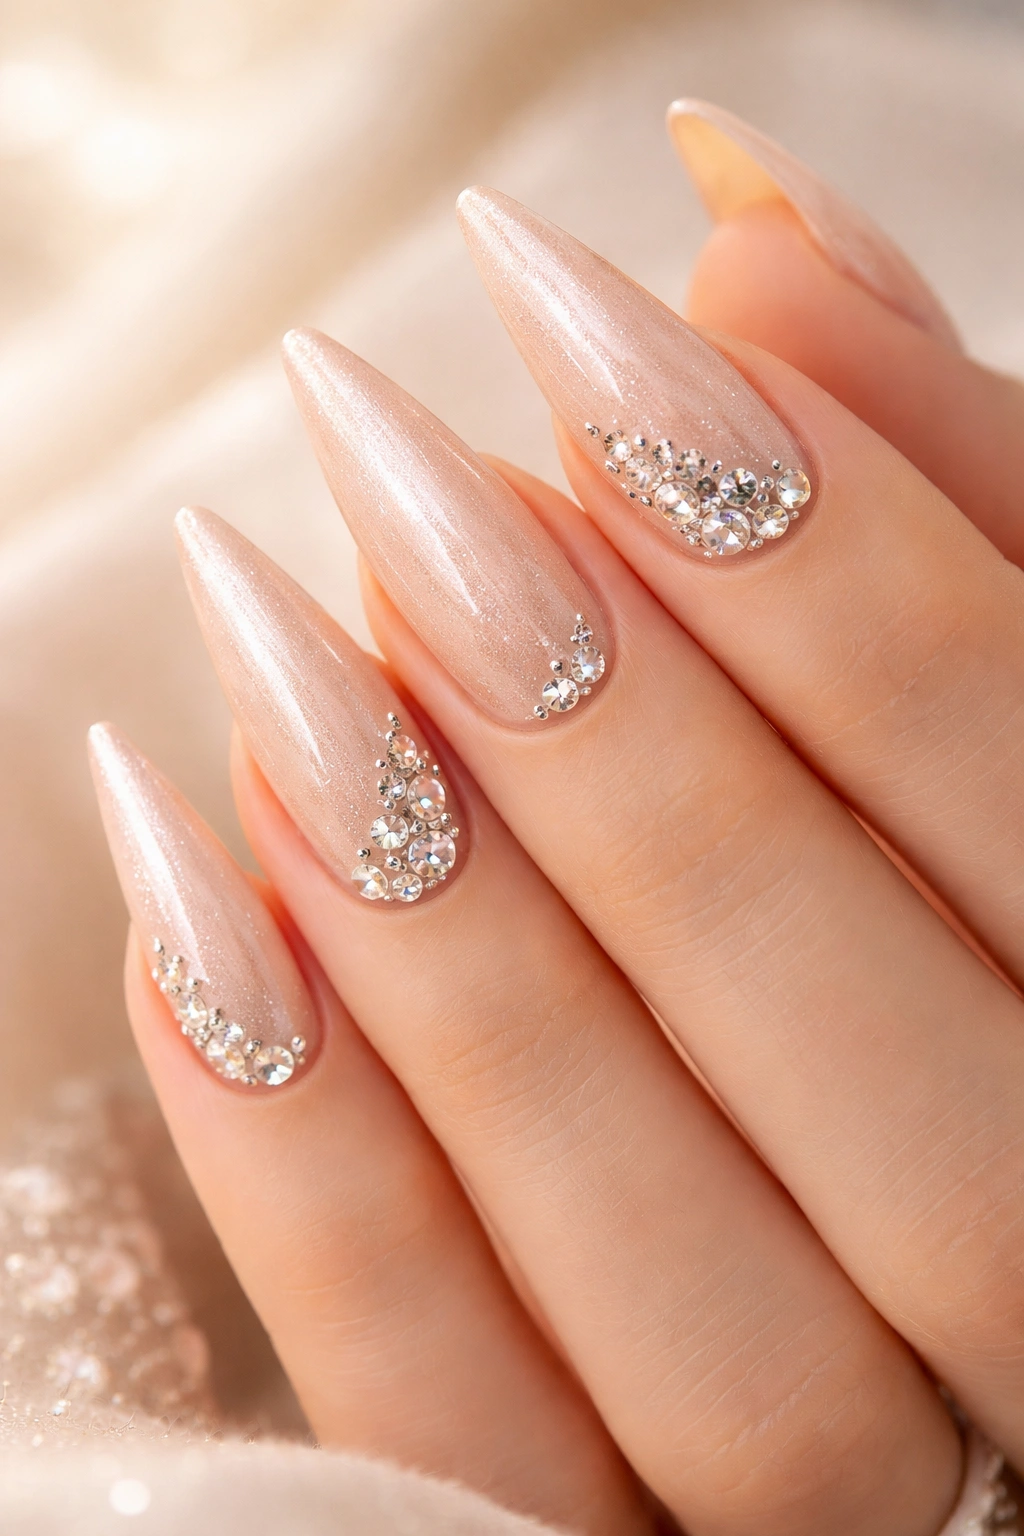
Champagne is the color of celebration, refinement, and romantic occasions. When combined with actual diamond-shaped embellishments or diamond-shaped nail art, the effect is utterly luxe. This design works because it’s understated enough for professional settings but glamorous enough for special events. The shimmer of champagne paired with sparkly elements creates the kind of nails that catch light beautifully in photos and in person.
Champagne and Diamonds: A Timeless Pairing
Champagne represents elegance, celebration, and sophisticated femininity. Diamonds are the ultimate symbol of luxury, strength, and romance. Together, they’re almost foolproof—you’re working with colors and concepts that are universally recognized as premium and romantic. The beauty of this design is its adaptability; you can go minimal with a few strategically placed diamonds or more ornate with an overall diamond-studded effect.
Techniques for Diamond Embellishments
- Use a champagne shimmer or metallic base coat as your foundation
- Diamonds can be applied using: rhinestones (actual small crystals glued down), stamped diamond patterns, or hand-painted geometric diamond shapes
- If using rhinestones, apply them to wet gel base coat before curing, or use a special rhinestone adhesive if doing them after
- For a balanced look, apply diamonds to the tips or in a diagonal gradient pattern rather than covering the entire nail
- Ensure proper sealing so embellishments don’t catch and lift prematurely
Pro tip: If you’re using real rhinestones, invest in higher-quality stones (Swarovski crystals) that won’t dull or lose shine over time. Cheaper alternatives can look tacky within days.
6. Classic Red with Negative Space Design
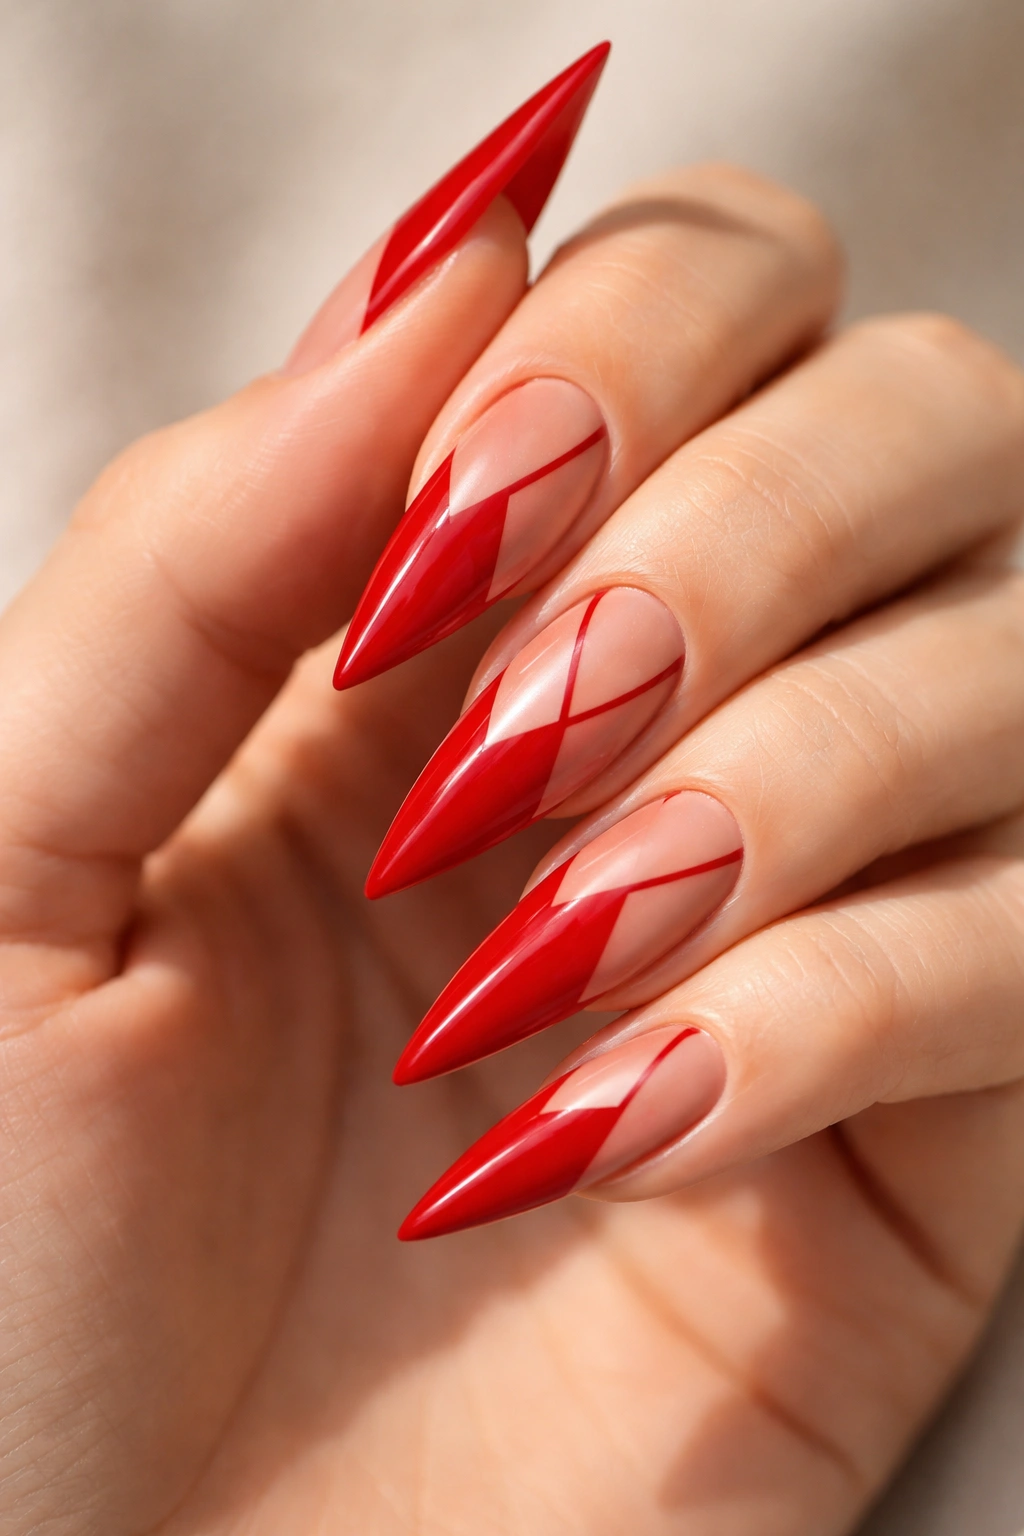
This design proves that you don’t need complexity to feel romantic—sometimes the most striking effect comes from knowing exactly what to leave out. A classic red base with negative space—areas where the nail base (or a contrasting color underneath) shows through—creates a modern, artistic vibe. The negative space acts as a visual rest for the eye while making the red feel more intentional and carefully considered.
Negative Space as an Design Tool
Negative space in nail art is sophisticated because it requires confidence and restraint. It says, “I know what I’m doing, and this is exactly how I want it.” Negative space designs feel contemporary and artistic without being trendy in a way that will date them quickly. When applied to a timeless color like red, negative space elevates the design from basic manicure to intentional statement.
Negative Space Execution
- Geometric patterns work best—think triangles cut out from the sides, a clean rectangular block on the nail tip, or diagonal stripes of negative space
- You can use tape to create clean lines if your freehand skills aren’t perfect
- The exposed area can show your natural nail or a contrasting color layered underneath (nude under red is particularly striking)
- Negative space typically looks best on 2-4 nails rather than all ten—let some nails stay fully red for balance
Worth knowing: Negative space designs are easier than you might think. Tape is your friend; use it liberally to get clean lines, then paint over and around your tape design.
7. Dusty Rose with Metallic Tips
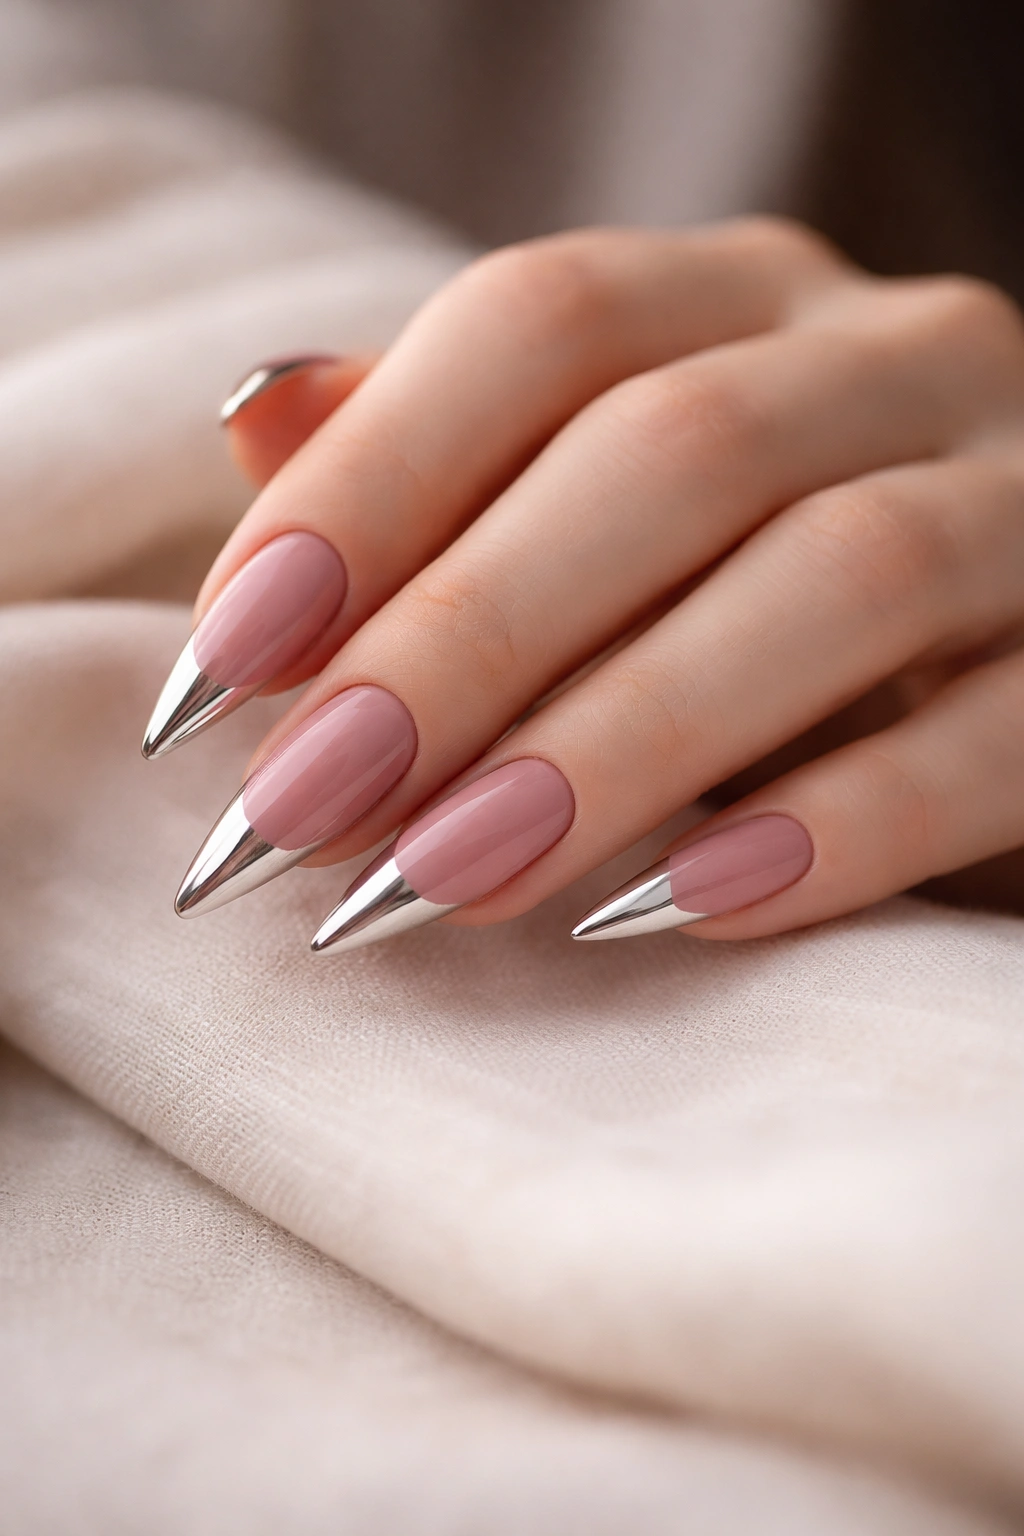
This design combines two trends that work beautifully together: the soft, romantic dusty rose color and the modern metallic tip effect. Dusty rose is more sophisticated than bright pink—it’s muted, complex, and feels grown-up without being boring. Metallic tips add contemporary glamour. Together, they create nails that feel current, romantic, and surprisingly wearable for everyday wear.
Why Dusty Rose Feels Romantic
Dusty rose is rose color stripped of intensity—it’s what happens when rose is viewed through gauze or photographed in soft light. This quality makes it feel romantic in an introspective, gentle way. It’s the color of vintage romance, of quiet moments and deep feelings. Adding metallic tips prevents the overall effect from feeling too soft or washed out; the metal adds just enough edge to keep it modern and stylish.
Application Methods for Metallic Tips
- Apply dusty rose as a full base coat across all nails
- Create metallic tips by either applying metallic polish directly to the nail tips or using a metallic foil technique
- Rose gold, champagne, or copper metallic finishes all complement dusty rose beautifully
- The metallic tip can be a sharp French tip style or a more diffused, feathered edge depending on preference
- Consider adding a thin line of metallic polish at the cuticle area as well for a frame-like effect
Pro tip: If you’re worried about your metallic line being too harsh, try feathering it with a sponge so the transition from dusty rose to metal is gradual rather than sharp. It creates a more cohesive, intentional look.
8. Nude Gradient to Deep Plum
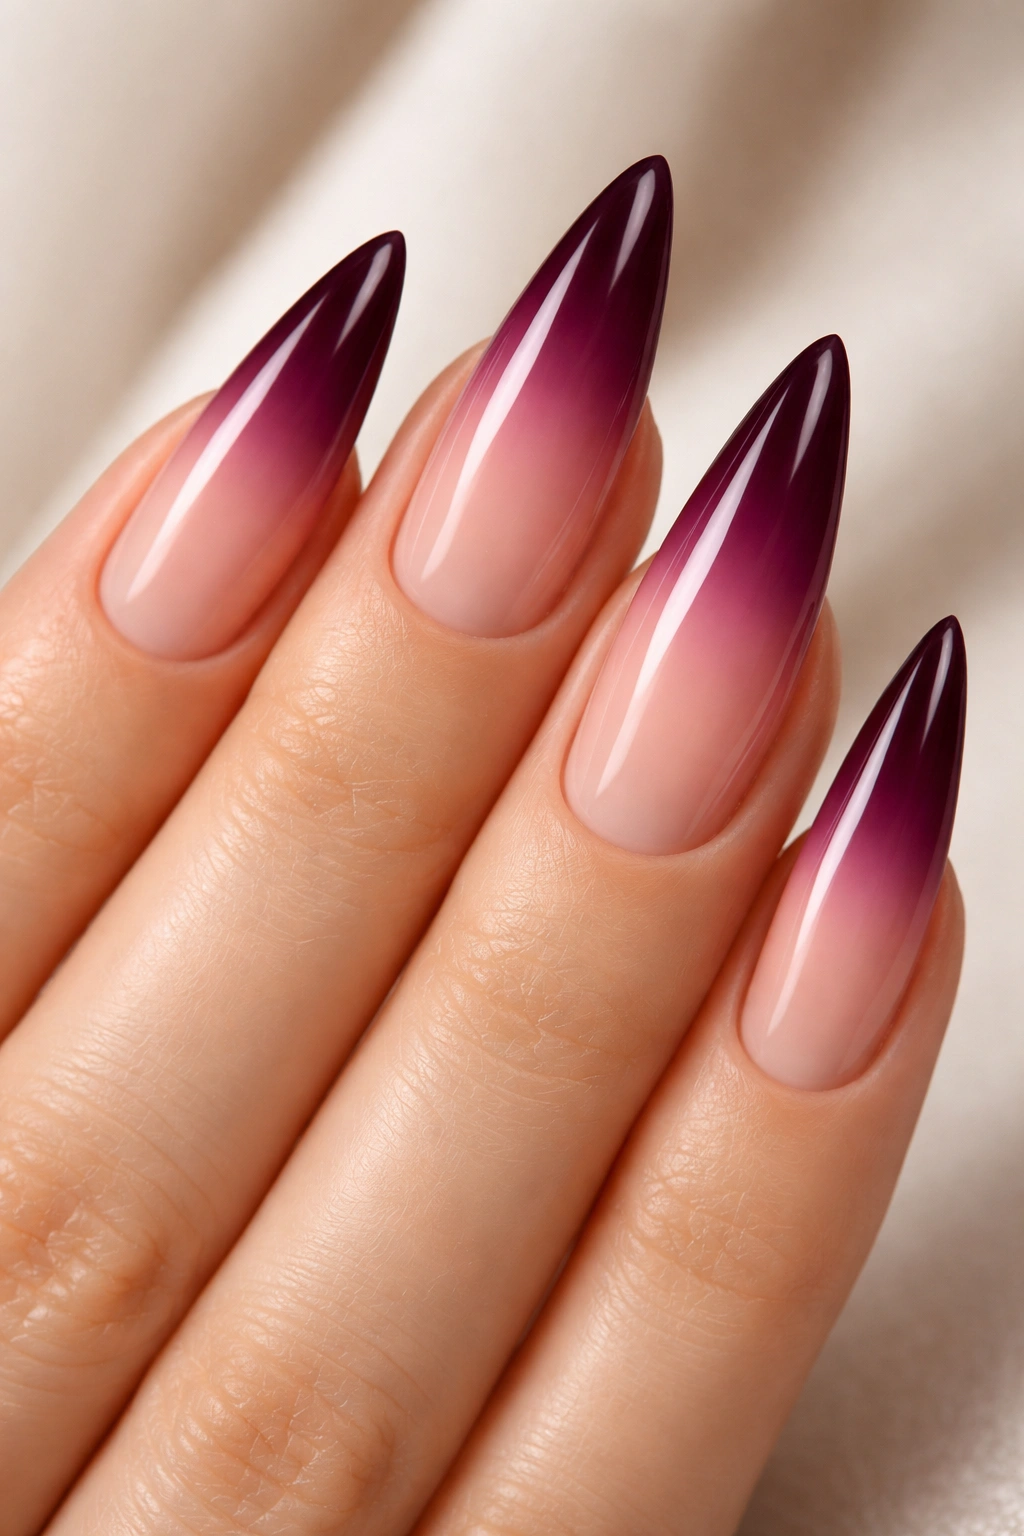
Ombre and gradient designs are romantic by nature because they suggest movement, transition, and transformation. When you transition from a neutral nude at the base to a deep, jewel-toned plum at the tips, you create nails that are both elegant and unexpected. The gradient works because your eye is drawn down toward the tips, which emphasizes the length of the stiletto shape. The plum is rich without being overwhelming because it gradually fades in rather than appearing suddenly.
The Romance of Color Gradients
Gradients suggest depth and dimension. They feel artistic and intentional, yet modern and slightly playful. The combination of nude and plum is particularly romantic because nude represents purity and simplicity while plum represents mystery and depth. The transition between them creates a narrative—moving from basic to bold, simple to complex, light to mysterious.
Creating a Flawless Gradient
- Start with a nude base coat that covers the entire nail
- Using a cosmetic sponge or a gradient tool, dab plum polish onto the tips of the sponge
- Gently tap the sponge onto your nail tips in a dabbing motion rather than stroking
- Work in thin layers—three to four thin layers create a smoother gradient than one thick layer
- The transition should be gradual; if you can see a hard line, add an extra layer to blend
- Finish with a shiny top coat to enhance the gradient effect and seal everything
Real talk: Gradient designs take practice, but they’re absolutely achievable with patience. Start on your non-dominant hand where imperfection is more forgivable.
9. Blush with Delicate Lace Pattern
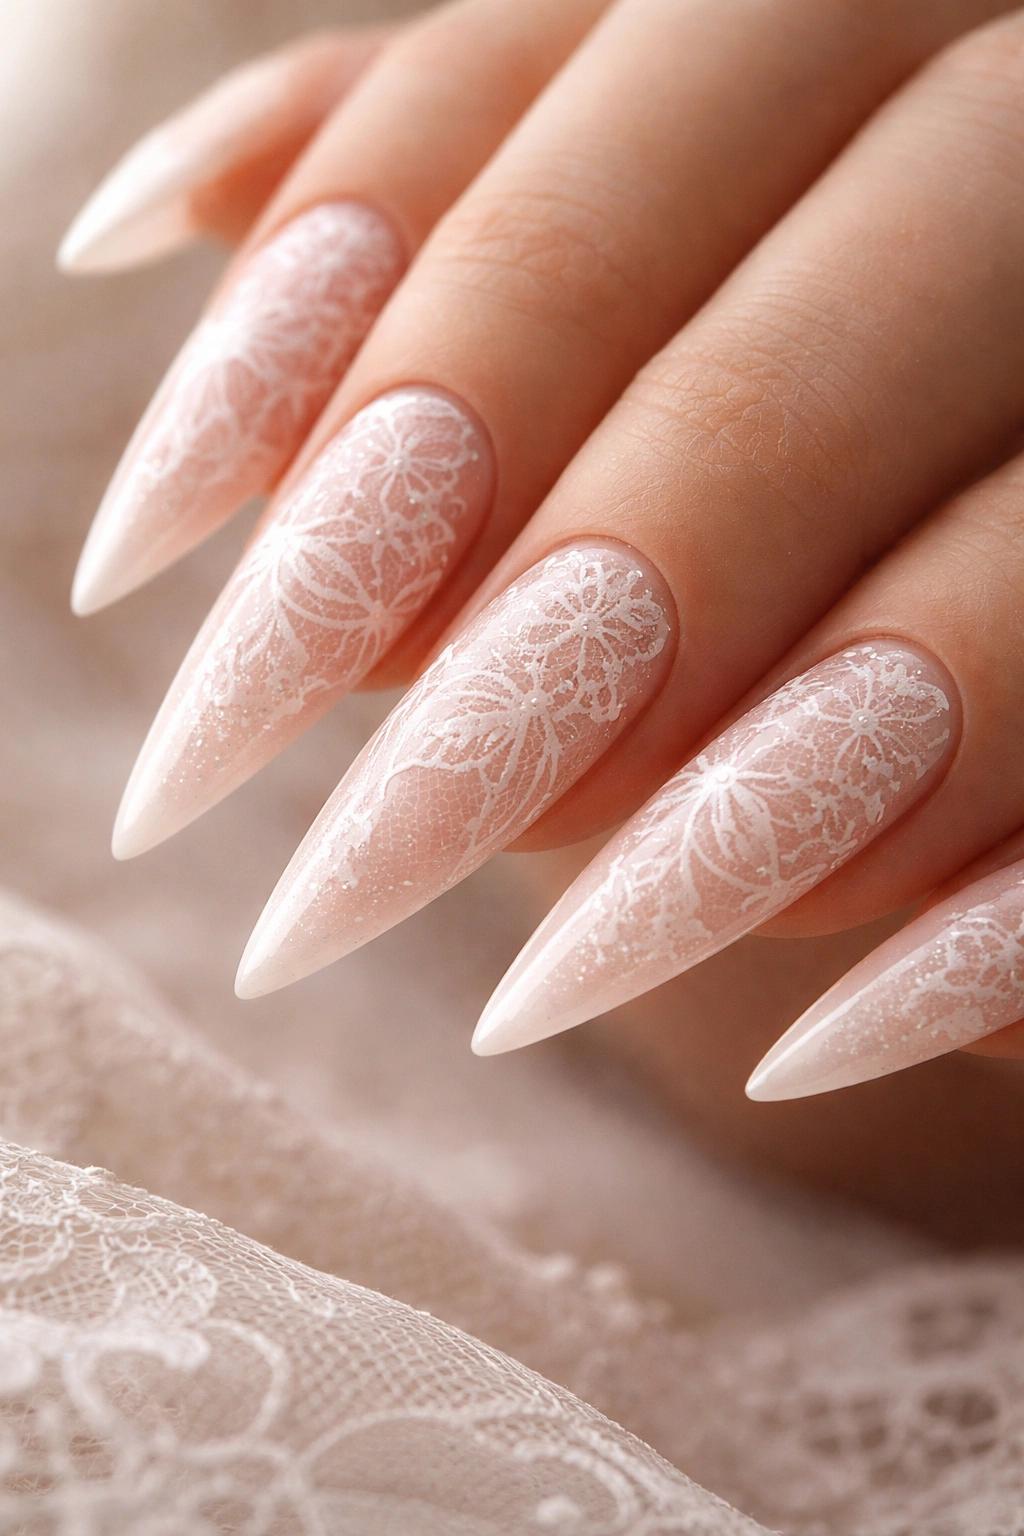
Lace is inherently romantic—it’s ornate, delicate, and evokes bridal wear, vintage elegance, and femininity. When applied as a pattern over soft blush nails, lace creates something ethereal and beautiful. The beauty of this design is that it reads as intricate without being garish. Delicate lace lines over blush feel dainty and romantic in the most classic sense. The negative space between lace lines keeps it from feeling overwhelming, even when the design covers the entire nail.
Why Lace Symbolizes Romance
Lace has centuries of romantic and bridal associations. It’s a fabric that celebrates femininity and artistry. Translating that same delicate, intricate aesthetic to nails creates an effect that immediately feels special and romantic. Lace patterns on nails work because they’re detailed enough to show clear artistry but fine enough to feel wearable in professional settings.
Lace Pattern Application
- Begin with a smooth blush base coat—this is your canvas
- Lace patterns can be hand-painted with a very fine brush, stamped using specialized lace stamp plates, or applied using adhesive nail art lace (thin adhesive strips with lace patterns)
- If stamping, use a white or nude stamping polish so the lace lines stand out against the blush base
- Keep lace lines thin and delicate rather than thick and bold—the fineness is what makes it feel romantic and elegant
- Alternate between full-coverage lace (covering the entire nail) and partial lace (just along edges or tips) for visual interest
Insider note: Adhesive lace sheets are the easiest method if hand-painting isn’t your forte. They apply easily and look incredibly detailed without requiring steady hands or artistic skill.
10. Wine with Silver Confetti
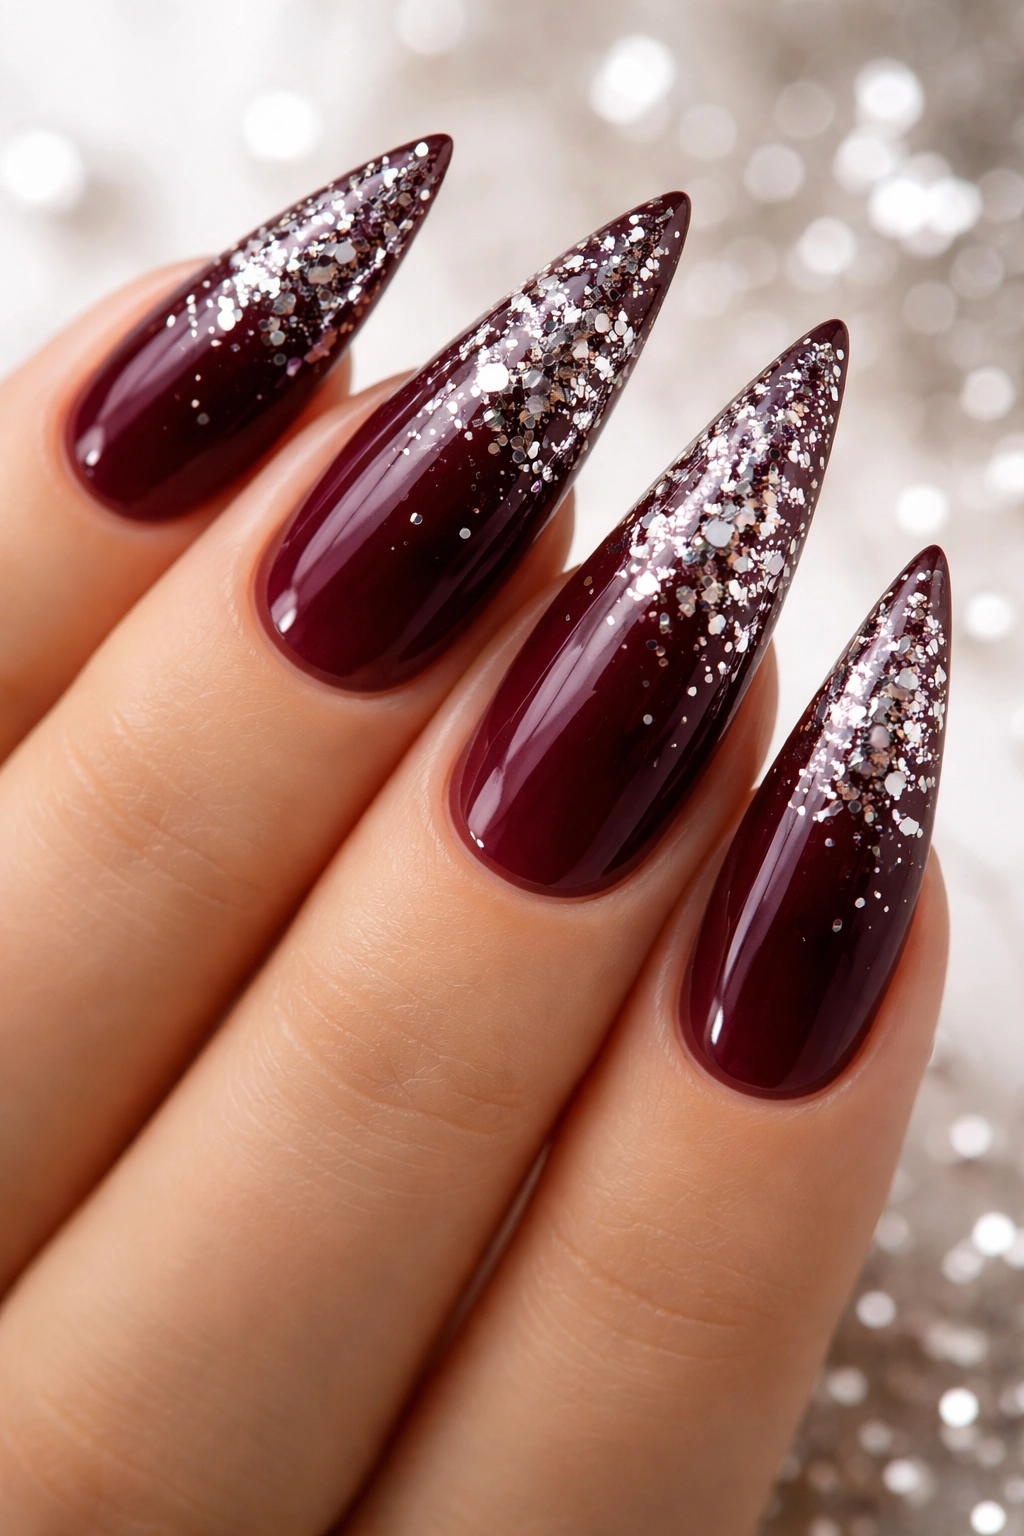
Wine-colored nails are sophisticated, romantic, and slightly mysterious—they suggest depth, maturity, and refined taste. When you add silver confetti elements, you introduce sparkle and celebration without compromising the elegant, romantic mood. The confetti effect is playful enough to feel special without being juvenile. Silver complements wine beautifully because the cool shimmer of silver cuts through the warmth of wine, creating contrast that keeps the overall design from feeling monotone.
Wine as a Romantic Foundation
Wine represents celebration, intimacy, and sophisticated indulgence. It’s the color of roses in certain lights, of romantic dinners, and of thoughtful evening wear. Wine nails feel romantic because they suggest occasion and intentionality. Adding confetti elevates the occasion further—you’re not just wearing wine nails; you’re celebrating something worthy of sparkle and shine.
Confetti Application Techniques
- Start with a wine-colored base coat and let it cure completely
- Confetti effects can be achieved using glitter polish, metallic flakes, or individual tiny rhinestones
- Apply confetti in varied sizes and densities—some concentrated areas with multiple pieces, some sparse areas with single pieces
- You can apply confetti before top coat (for a flat finish) or embed them in a clear top coat for a domed, dimensional effect
- Silver, champagne, or rose gold confetti all complement wine beautifully
Pro tip: For the most elegant confetti effect, avoid covering the entire nail uniformly. Instead, concentrate confetti toward the tips or in a diagonal gradient pattern from cuticle to tip, leaving some solid wine showing.
11. Pale Pink with Rose Quartz Effect
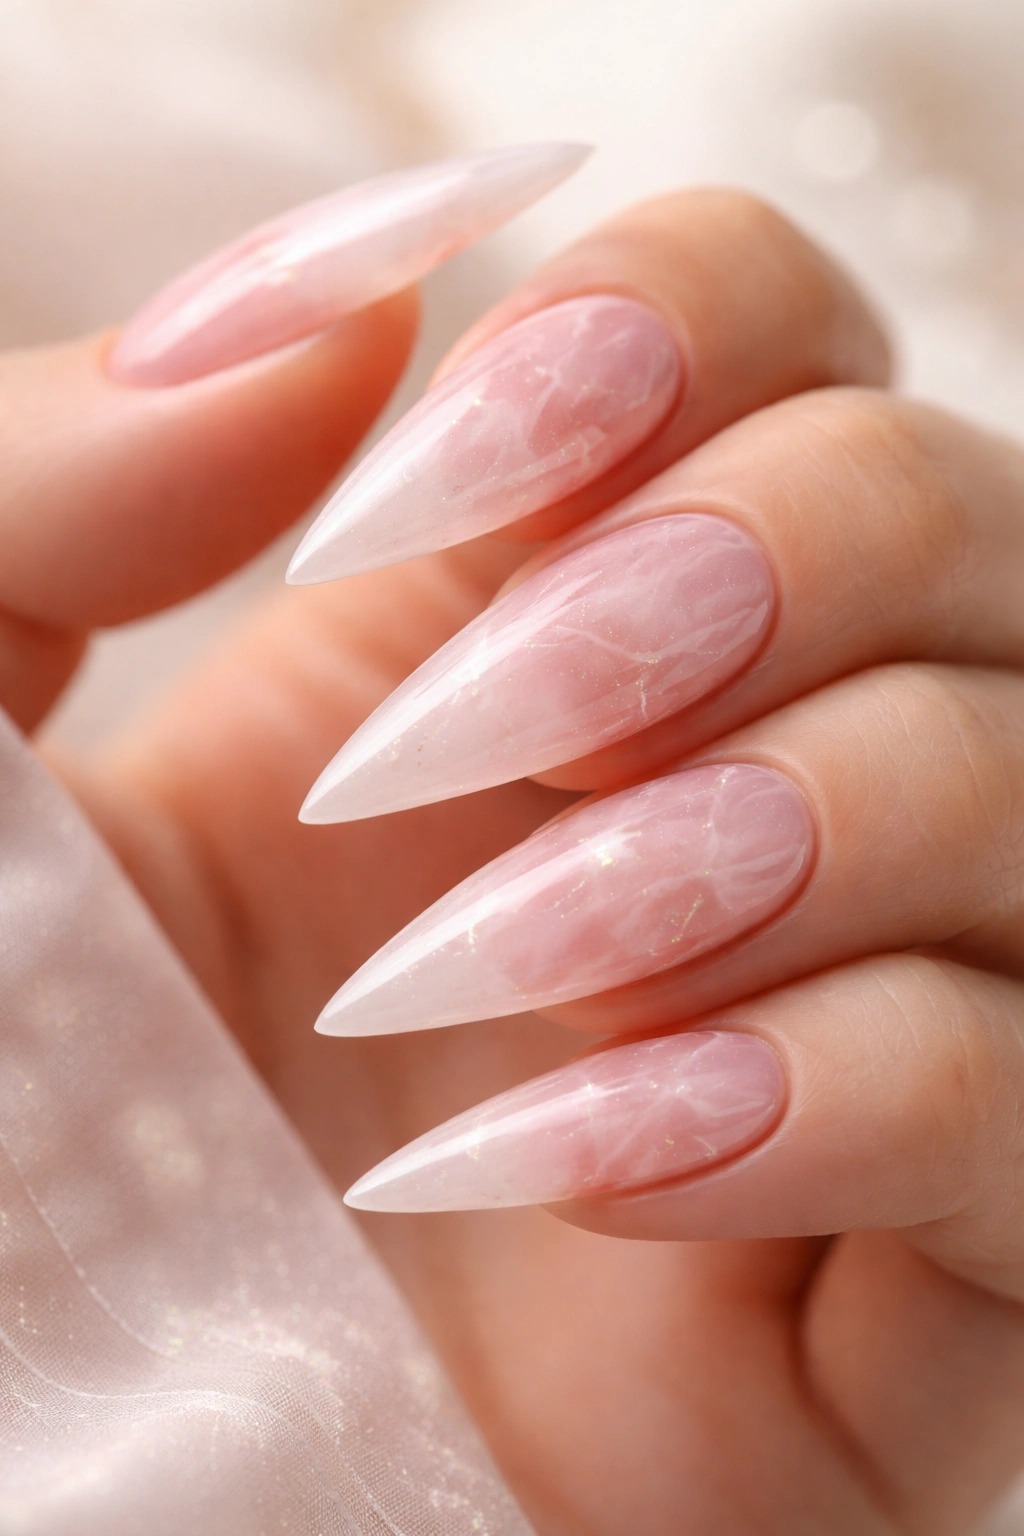
Rose quartz has become incredibly popular in nail design because of its beautiful soft pink color and its association with love, compassion, and calm energy. Creating a rose quartz effect on nails involves a technique that mimics the stone’s characteristic marbling and slight translucency. Pale pink nails with a rose quartz effect feel modern, romantic, and connected to wellness and self-care—they tell the viewer that you’re intentional about beauty and well-being, not just chasing trends.
The Appeal of Gemstone-Inspired Nails
Gemstone-inspired designs feel special because they’re connected to things we already find beautiful in nature. Rose quartz specifically carries connotations of gentleness, love, and emotional wellness. Nails that mimic rose quartz feel like wearable art, not just manicures. They spark conversations and feel personal in a way that flat color or generic glitter doesn’t quite achieve.
Creating a Rose Quartz Effect
- Start with a pale pink base coat—the softer and more muted the pink, the more authentic the quartz effect
- Use a slightly darker pink, blush, or mauve to create marbling patterns across the nail
- You can create these patterns using a sponge, a thin brush, or even a toothpick for more organic, natural-looking veining
- The key is irregularity—rose quartz is beautifully imperfect, so embrace organic swirls rather than symmetrical patterns
- Add hints of shimmer (pale nude or pearl highlights) to mimic the subtle translucence of actual rose quartz
- Seal with a shiny top coat to enhance the gemstone quality
Worth knowing: The closer you examine actual rose quartz, the more inspiration you’ll get for subtle color variations and natural marbling patterns. Keep a rose quartz stone nearby while you design or paint your nails.
12. Mauve with Pearl and Gold Details
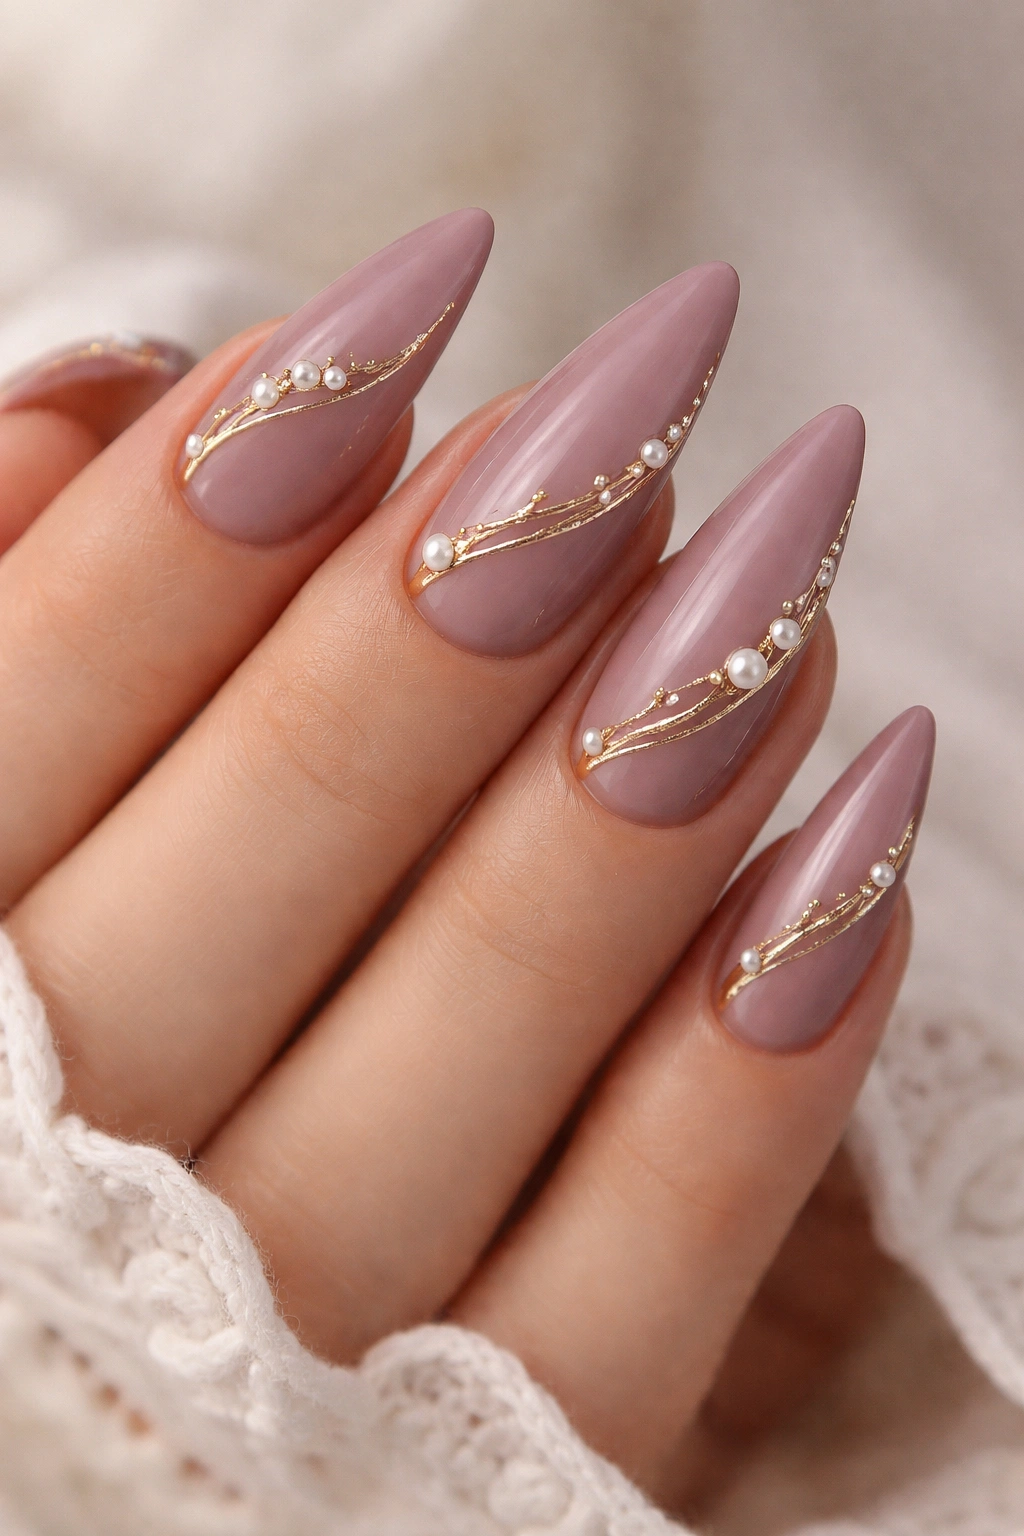
Mauve is the sophisticated cousin of pink—it’s muted, complex, and feels mature without sacrificing femininity. When paired with pearl and gold details, mauve nails become a lesson in restraint and elegance. Pearl adds luminescence and softness; gold adds warmth and luxury. Together, these three elements create nails that feel expensive, thoughtfully designed, and effortlessly romantic. This design suits both professional settings and romantic occasions because of its understated sophistication.
The Subtle Elegance of Mauve
Mauve is having a renaissance in nail design because it bridges the gap between neutral and colorful, between trendy and timeless. Mauve nails feel romantic because they’re slightly unexpected—not everyone reaches for mauve, which makes wearing it feel like a personal choice rather than following a trend. It’s the color of vintage gardens, of twilight, of thoughtful, quiet femininity. Adding pearls and gold elevates it further, suggesting luxury and intention.
Combining Mauve, Pearl, and Gold
- Use mauve as your primary base coat—creamier finishes work better than shimmer for this design
- Pearl details can be applied as small dots, lines, or decorative elements using pearl polish or small pearl cabochons
- Gold accents work best as thin lines, delicate filigree-style details, or as frames around pearls
- Apply pearls and gold to accent nails (ring and pinky) or scattered sparsely across all nails
- The spacing is important—too much detail overwhelms the design; spacing details out maintains the sophisticated, restrained aesthetic
Real talk: This design is all about balance and spacing. Resist the urge to cover every inch of the nail with embellishment. The sophistication comes from knowing when to stop and letting the mauve breathe.
Final Thoughts
Romantic stiletto nail designs are about capturing feeling as much as they’re about creating visual beauty. Each of these twelve designs approaches romance from a different angle—some lean into classic colors like red and burgundy, others embrace modern techniques like ombre and marble, and still others play with sparkle and embellishment. The common thread isn’t any single technique or color; it’s intentionality.
What makes any of these designs work on you is choosing the one that genuinely speaks to your aesthetic and makes you feel confident and beautiful when you look down at your hands. There’s no universal romantic design because romance itself means different things to different people. For some, it’s the quiet elegance of nude with rose gold details. For others, it’s the bold statement of classic red with dramatic negative space. Both are absolutely romantic.
The wonderful thing about stiletto nails is their dramatic shape amplifies whatever design you choose. These nails command attention, and that means your romantic nail design won’t go unnoticed. Whether you’re designing these yourself or bringing images to your nail technician, you now have a full palette of romantic directions to choose from. Pick the design that makes your heart feel something when you imagine it on your nails—that’s the one that will feel most romantic to you.
