

Chrome stiletto nails represent the perfect marriage of futuristic glamour and bold femininity. The mirror-like, reflective finish catches light from every angle, transforming your nails into luminous statement pieces that demand attention. When paired with the sharp, elongated silhouette of a stiletto shape, chrome creates an undeniably powerful aesthetic — edgy yet sophisticated, dramatic yet wearable for those brave enough to embrace them. Whether you’re drawn to monochromatic metallics, multi-dimensional ombre blends, or chrome combined with unexpected color accents, the styling possibilities are genuinely endless.
What makes chrome stilettos so compelling is their versatility across different moods and occasions. They photograph beautifully, transition seamlessly from casual to formal settings, and instantly elevate any look with an injection of high-fashion edge. The stiletto shape itself commands confidence — it’s an intentional choice that signals you’re not afraid of making a visual statement. Add the futuristic shimmer of chrome, and you’ve created something that feels both current and timeless.
The challenge isn’t finding inspiration for chrome stiletto designs — it’s choosing which idea to try first. Below are twenty expertly curated chrome stiletto nail concepts, each with specific styling guidance, achievement tips, and the reasoning behind why each design works so beautifully. Whether you’re booking your next salon appointment or planning your nail art future, these ideas will give you a complete roadmap for chrome stiletto excellence.
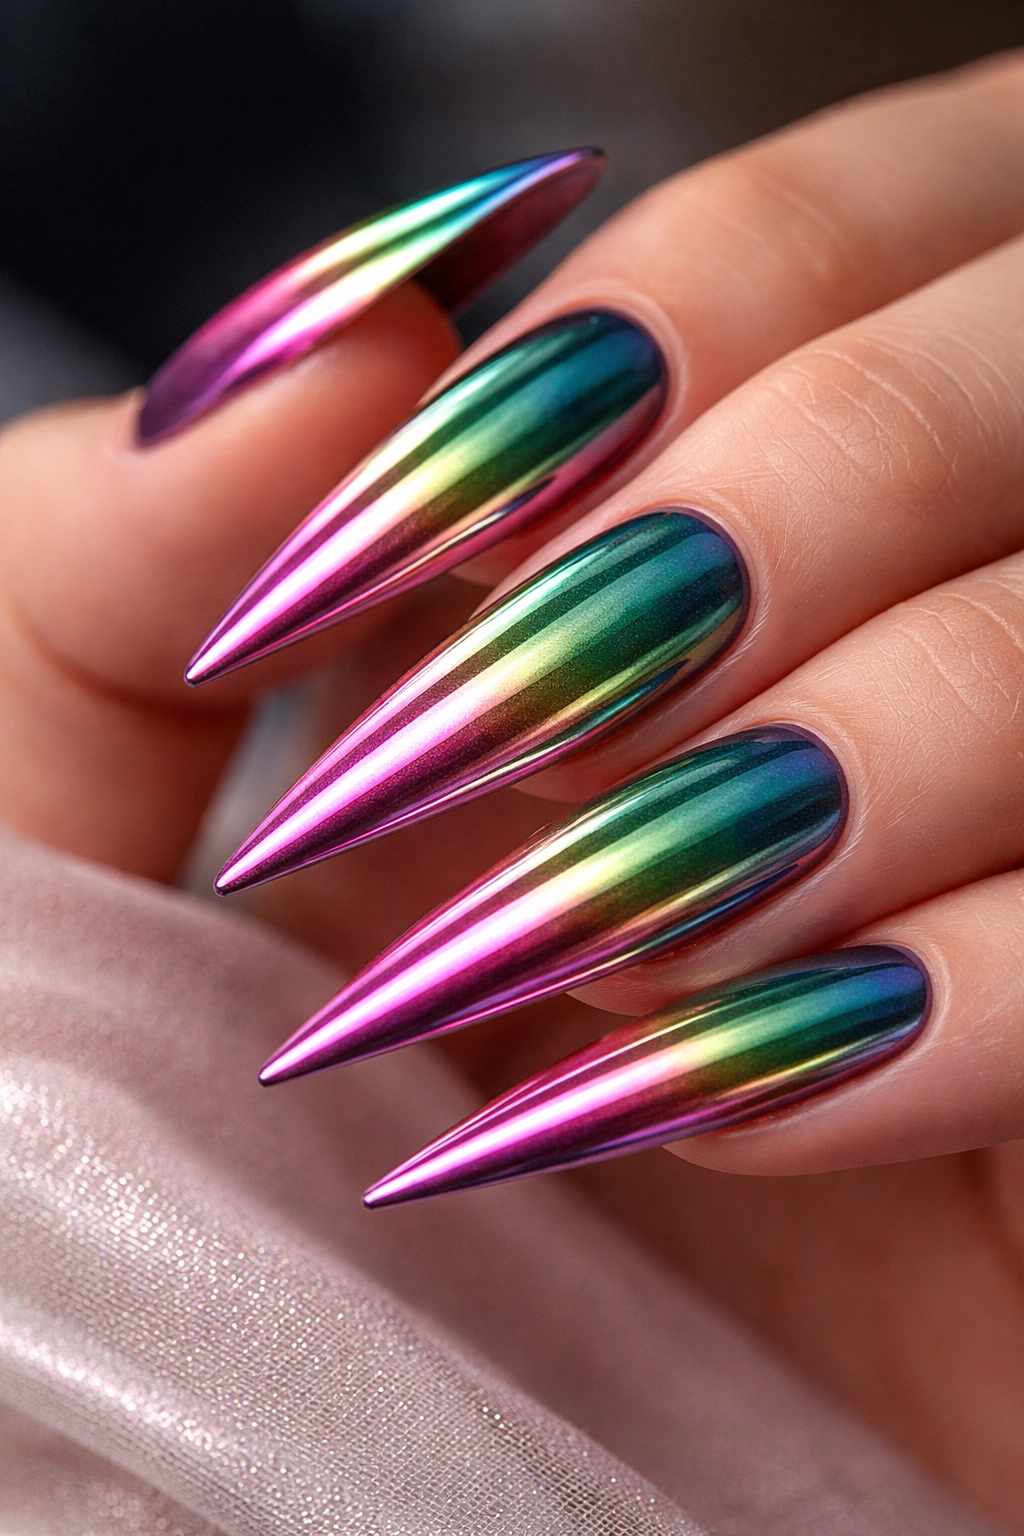
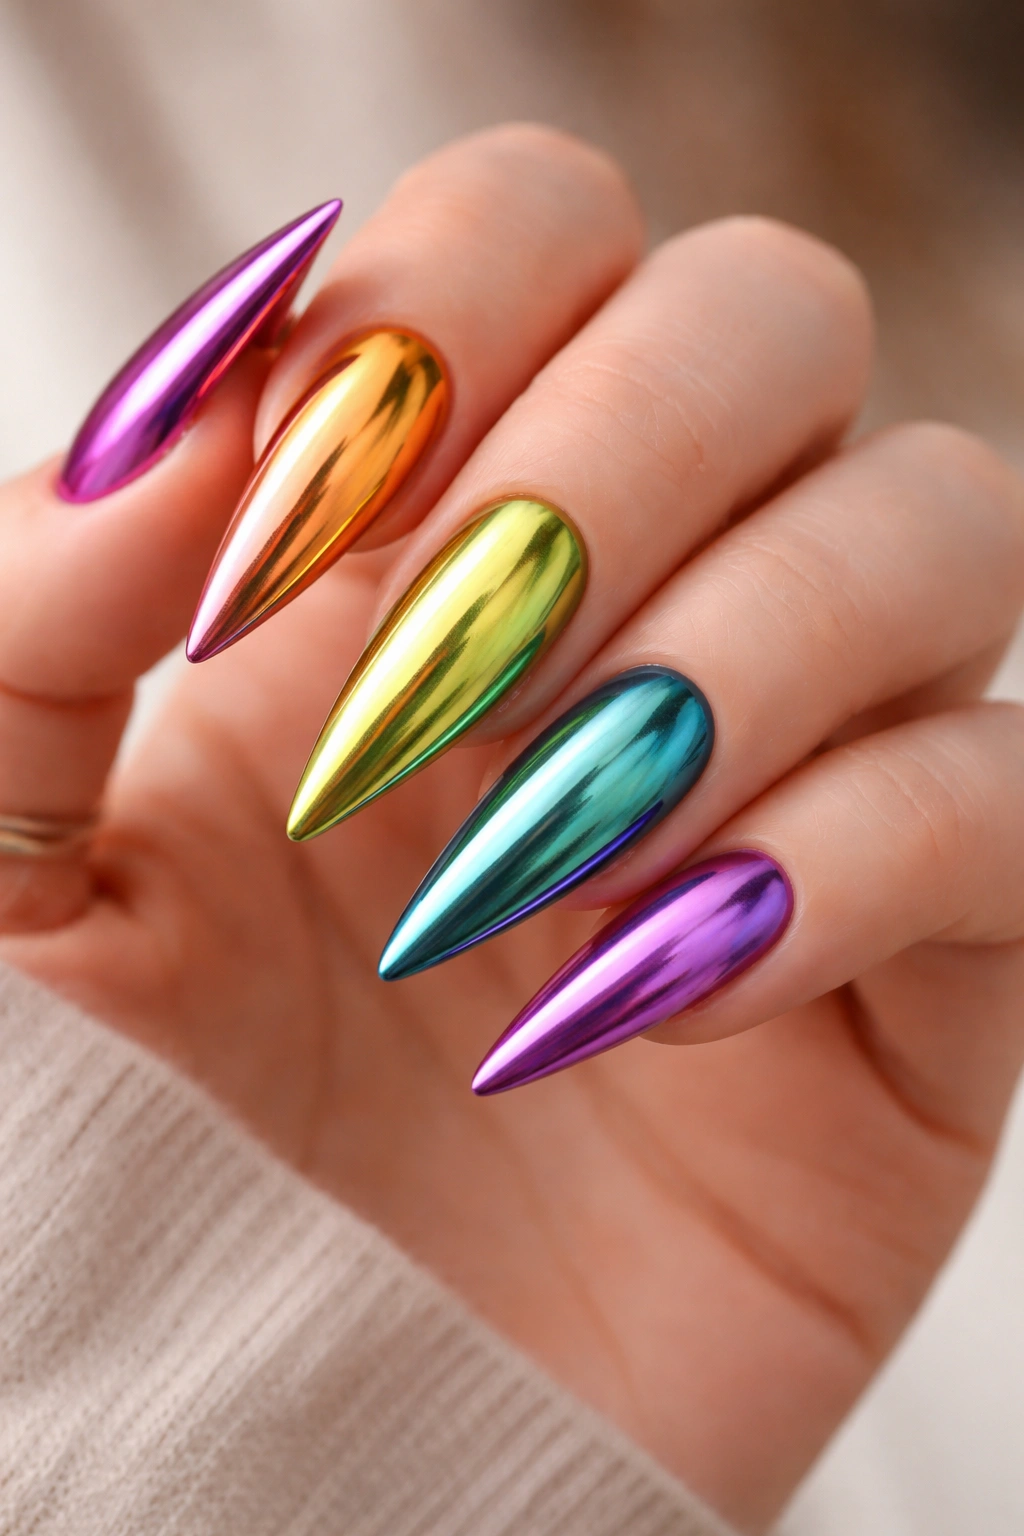
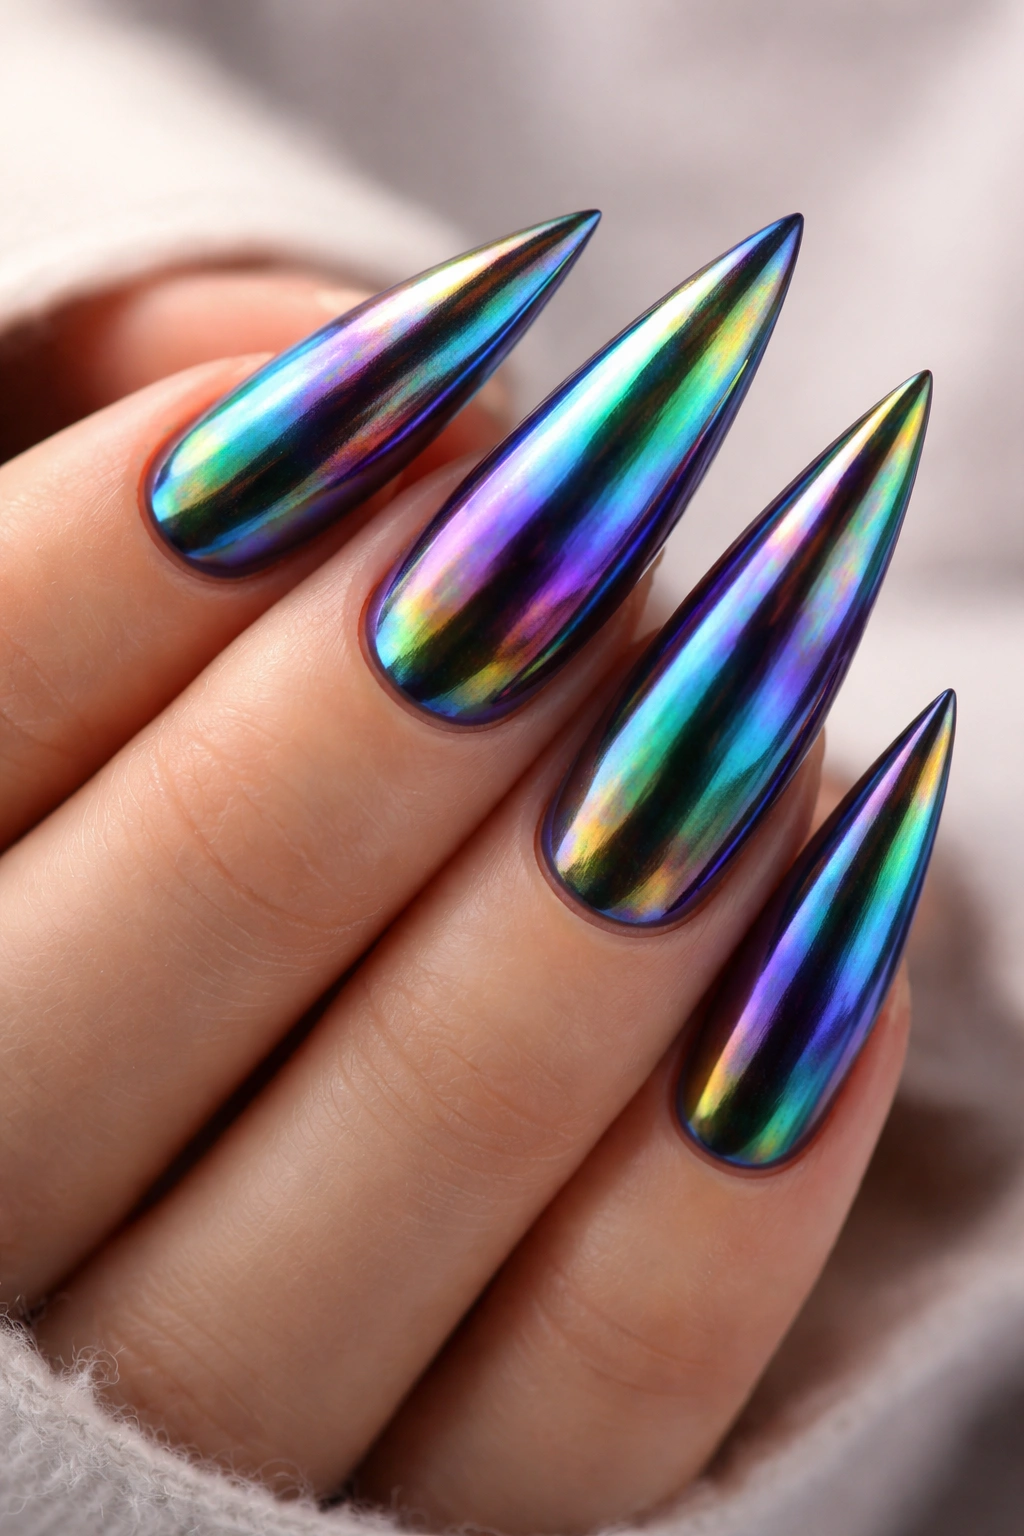
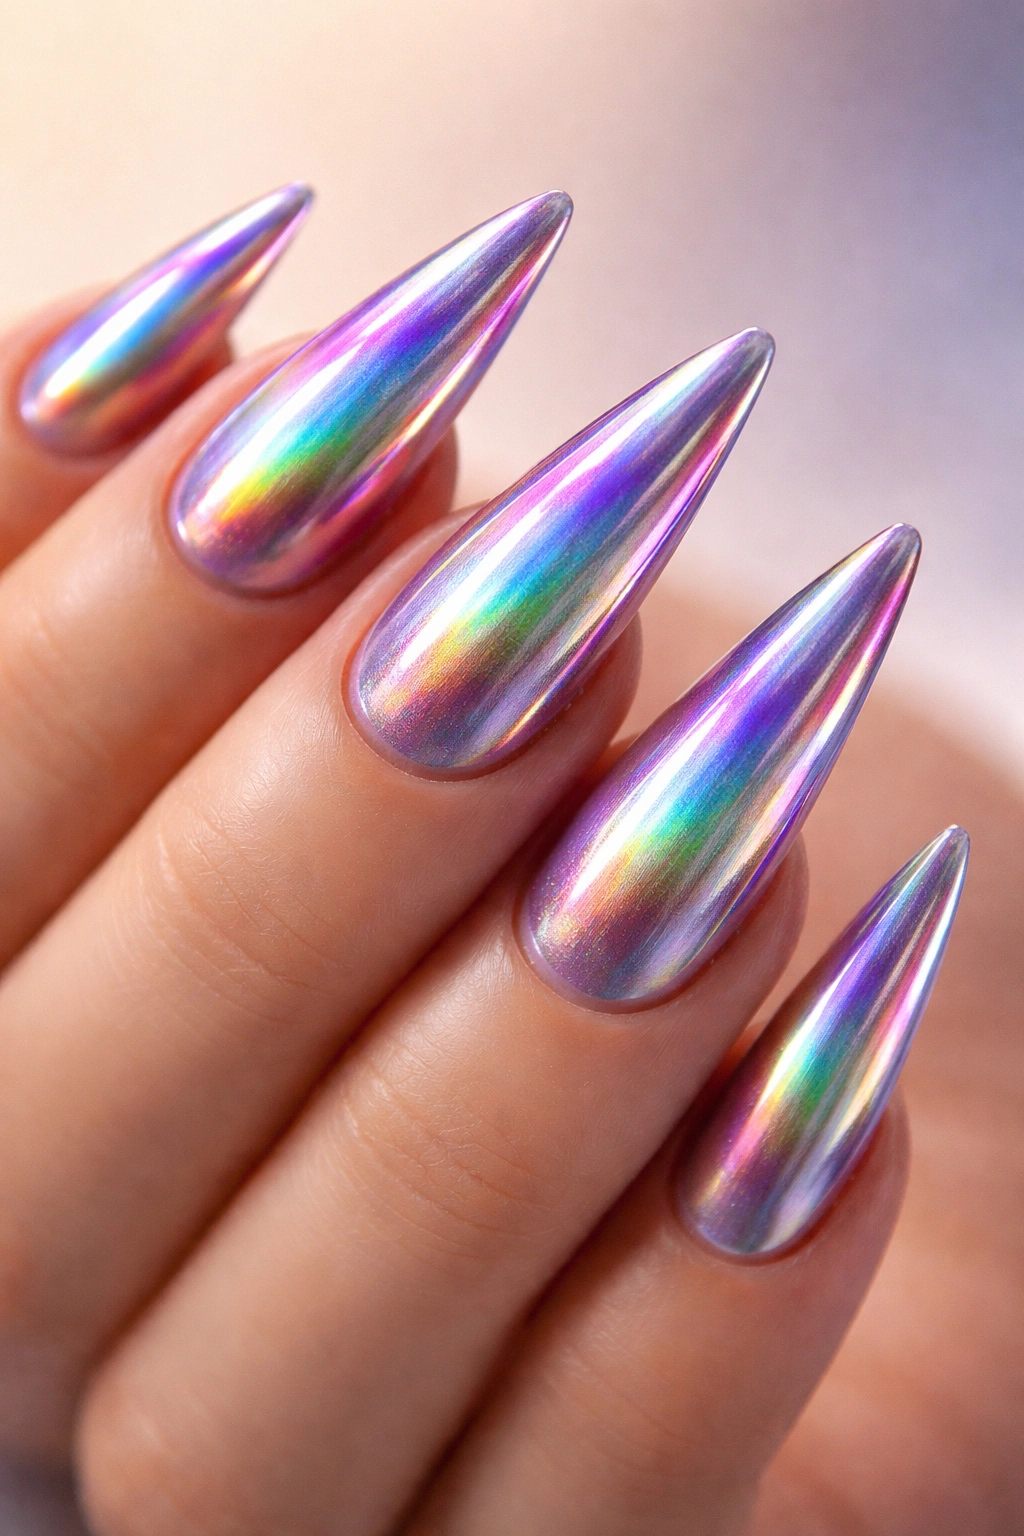
1. Holographic Rainbow Chrome
Holographic chrome catches light in shifting prisms of color, transforming your nails into miniature light shows that shift from pink to purple to blue to green depending on the angle and lighting. This design works because it’s inherently eye-catching without requiring any additional embellishment — the chrome finish itself does all the heavy lifting. The rainbow effect feels celebratory and playful while the stiletto shape keeps it sophisticated and intentional rather than juvenile.
Why This Design Stands Out
Holographic chrome is the most versatile of all chrome finishes because it complements virtually every skin tone and pairs with any outfit or occasion. The multidimensional quality means your nails will look different and interesting every time you move your hands — people genuinely can’t look away. Unlike solid chrome, which can feel slightly harsh or cold, the rainbow effect adds warmth and movement that feels alive.
How to Achieve This Look
- Use a high-quality holographic chrome powder (brands like Mirror Miracle or Modelones produce excellent results)
- Apply a sticky base coat and press the powder firmly into the surface with a soft brush or velvet applicator
- Seal with a glossy topcoat to trap the holographic particles and create that signature mirror finish
- Keep your nails extra long and sharp — the length amplifies the light-catching effect
- Schedule maintenance every 2-3 weeks because holographic chrome can show wear at the edges faster than solid chrome
Pro tip: Photograph your nails in sunlight, indoor lighting, and under UV light separately — each will show completely different color shifts.
2. Silver Chrome with Gold Drip Accent
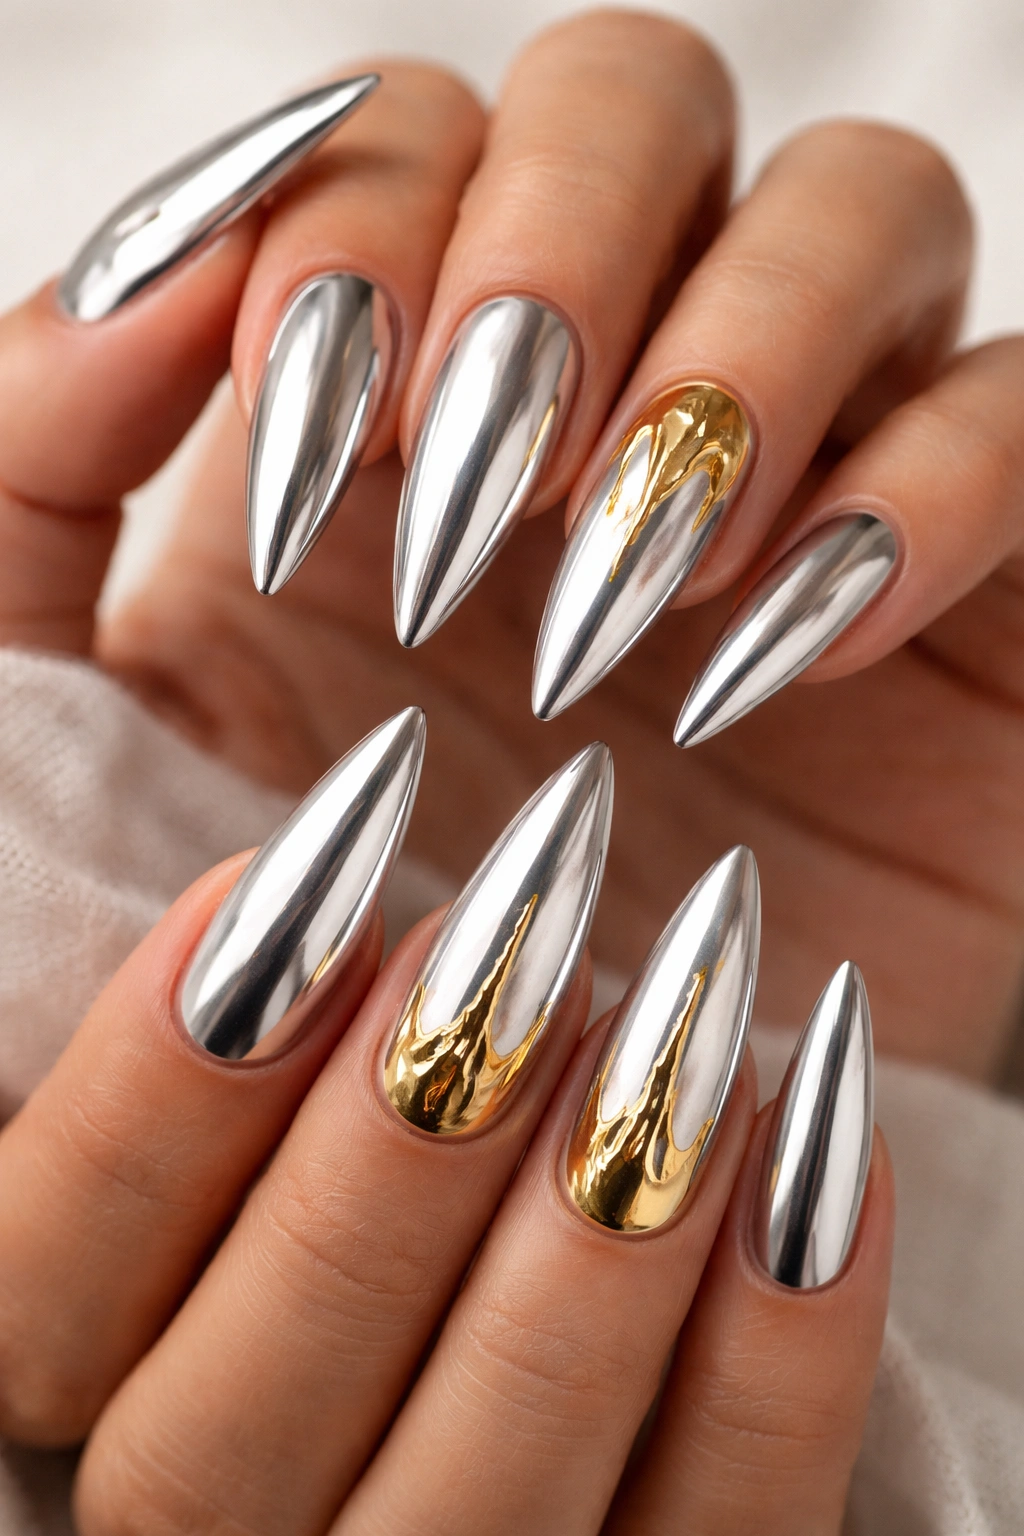
This design layers a sleek silver chrome base with asymmetrical gold accents that “drip” down one or two nails like liquid metal running downward. The contrast between warm gold and cool silver creates visual tension that feels sophisticated and intentional. Stiletto shape amplifies the drip effect — the length of the nail extends the visual metaphor, making it feel purposeful rather than random.
What Makes It Unique
The asymmetry is key here — rather than applying accents equally across all ten nails, you’re strategically placing gold drips on 2-3 nails only, usually the ring finger and middle finger or the pointer and pinky. This restraint is what separates this from looking costume-y. The drip itself isn’t perfectly smooth; slight irregularity in the gold lines makes it feel artisan and intentional.
Design Details to Consider
- Apply silver chrome as your base across all ten nails, ensuring full coverage and high shine
- Use 18k gold leaf or metallic gold paint (not regular gold nail polish, which lacks the reflective quality)
- Create the drip effect using a thin nail art brush and steady hand, or ask your technician for freehand detail work
- Keep drips to 1-2 nails maximum per hand to avoid visual chaos
- Seal everything with a ultra-glossy topcoat that enhances both the chrome and the gold
Worth knowing: This design works beautifully for wedding season, evening events, or any time you want subtle luxury appeal.
3. Rose Gold Chrome with Minimalist White Lines
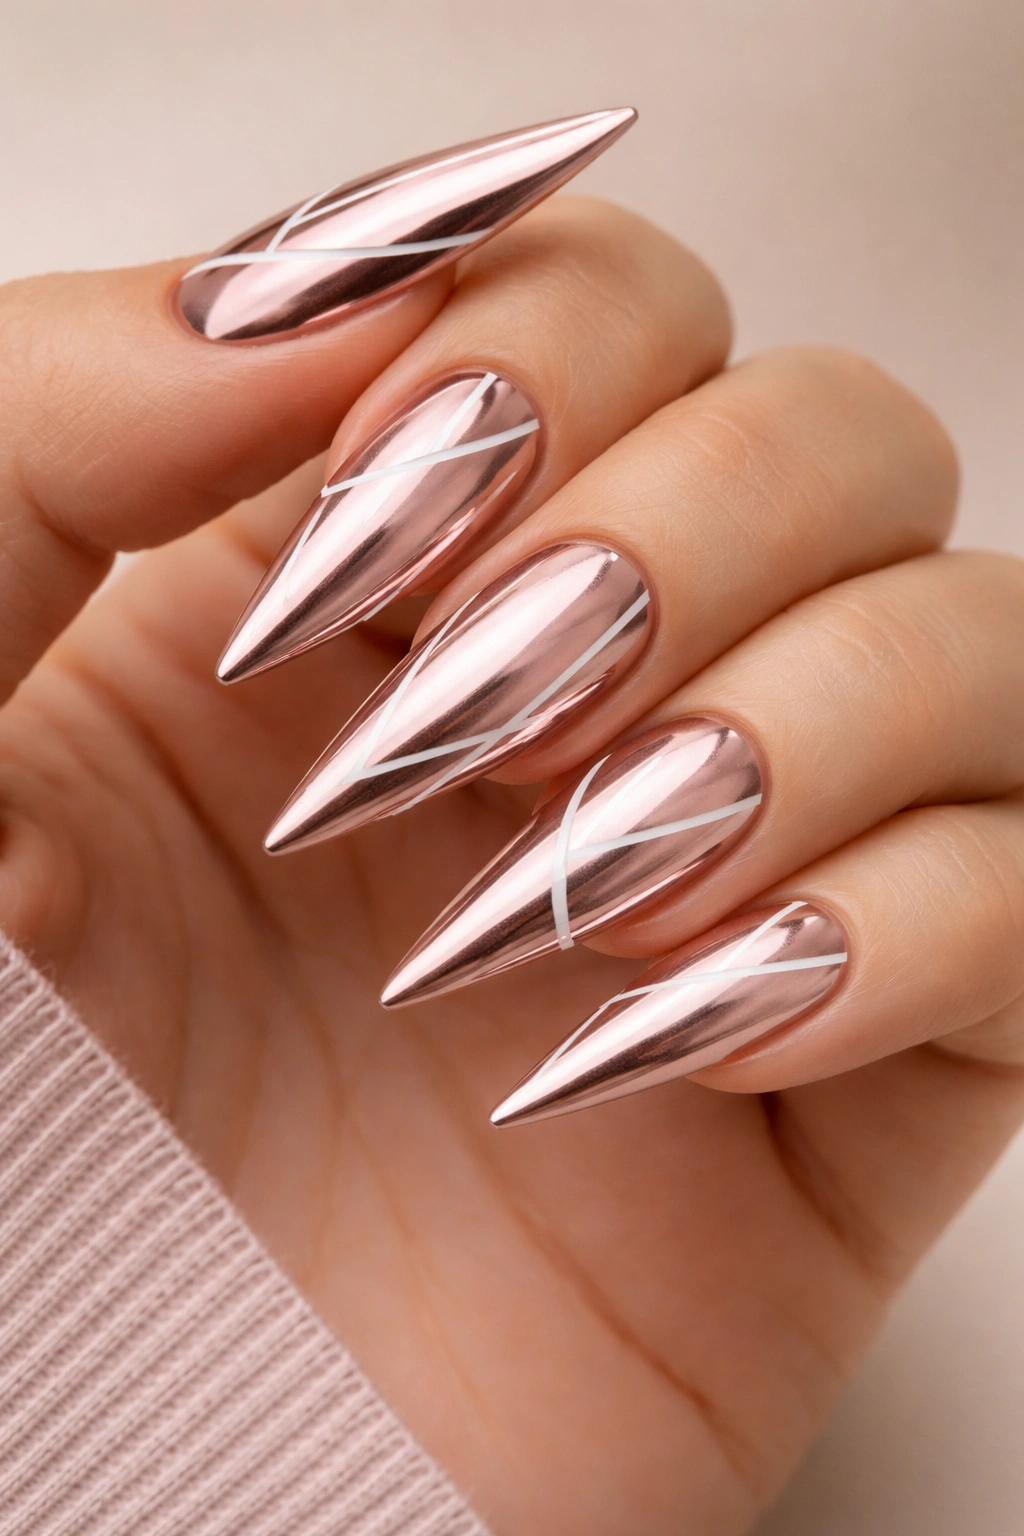
Rose gold chrome offers a warmer alternative to traditional silver chrome, and when paired with clean geometric white lines, it becomes an art deco-inspired masterpiece. The white lines create negative space that prevents the rose gold from feeling overwhelming, while the lines themselves feel intentional and structured rather than chaotic. This design appeals to people who love chrome’s futuristic quality but want something slightly softer and more wearable.
Why This Pairing Works
Rose gold chrome has an innate glamour that feels less cold than silver — it photographs warmer, complements more skin tones effortlessly, and pairs with both warm and cool color wardrobes. The minimalist white lines add graphic sophistication without cluttering the visual impact. Together, they create a design that feels modern, editorial, and intentionally curated.
Technical Execution
- Start with a rose gold chrome powder applied over a sticky base coat with a velvet applicator
- Let the chrome cure fully before adding white lines
- Use a thin striping brush and pure white gel or acrylic paint for crisp, clean lines
- Geometric options: vertical stripes on a few nails, a thin horizontal line across the middle, diagonal lines on alternating nails, or V-shaped lines pointing upward
- Top everything with a glossy seal that unifies the chrome and the white
Professional detail: Ask your nail technician to remove any topcoat from the white lines before final sealing — this creates depth and prevents the lines from appearing raised or embossed.
4. Holographic Chrome Ombre from Pink to Purple
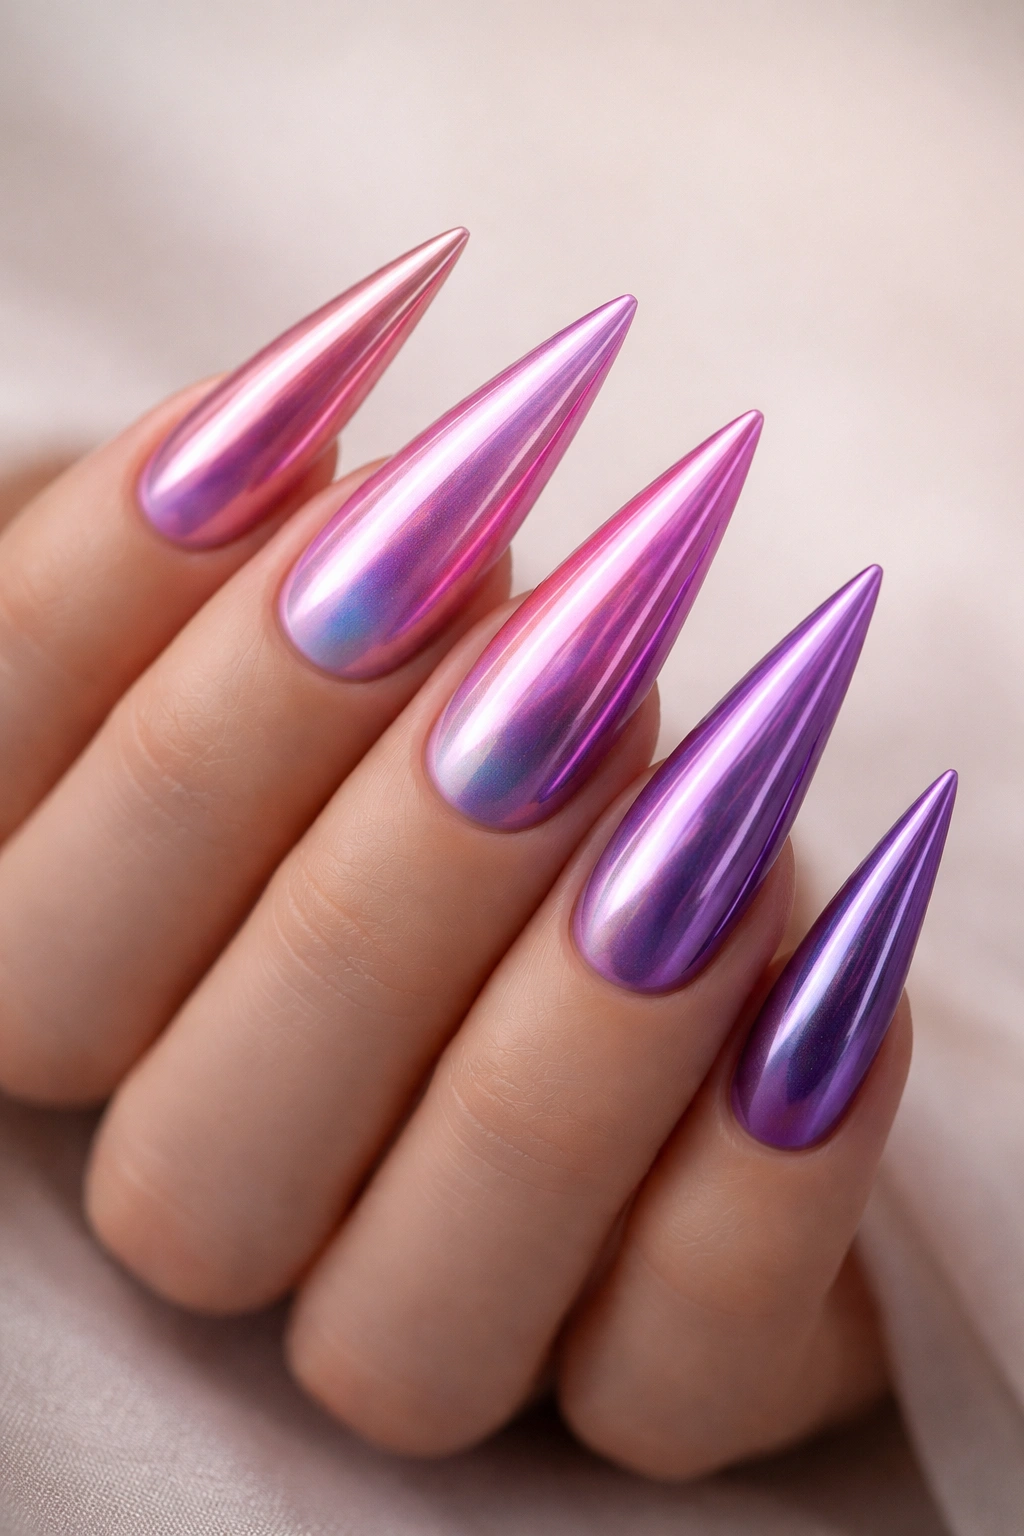
An ombre gradient across the ten nails, where holographic chrome shifts from rose tones on the pointer finger to deep purple shades on the pinky, creates a stunning rainbow effect that’s more refined than a full-spectrum holographic. This design works because the gradient feels intentional and elegant rather than chaotic. The ombre directs the eye along the hand, and the holographic effect adds movement to an already dynamic design.
How the Gradient Creates Impact
Rather than applying one color across all nails, you’re creating a color journey that spans multiple nails. This technique requires either precise chrome powder application at the salon or choosing pre-made gradient chrome powders specifically designed for ombre effects. The gradient naturally looks more sophisticated than a random color mix because it follows a logical color progression.
Achieving Seamless Gradation
- Invest in at least 3-4 holographic chrome powders in your chosen color range (pink, magenta, purple, violet)
- Apply them in overlapping sections so the transition is smooth rather than abrupt
- Each nail typically features a slightly different dominant shade, with slight blending at the edges
- Keep the overall shape extremely clean and sharp — any raggedness in the outline diminishes the polish of the gradient
- Use a quality topcoat that won’t disturb the chrome pattern
Insider note: This design photographs better in natural sunlight than in fluorescent lighting — the holographic effect really shines outdoors.
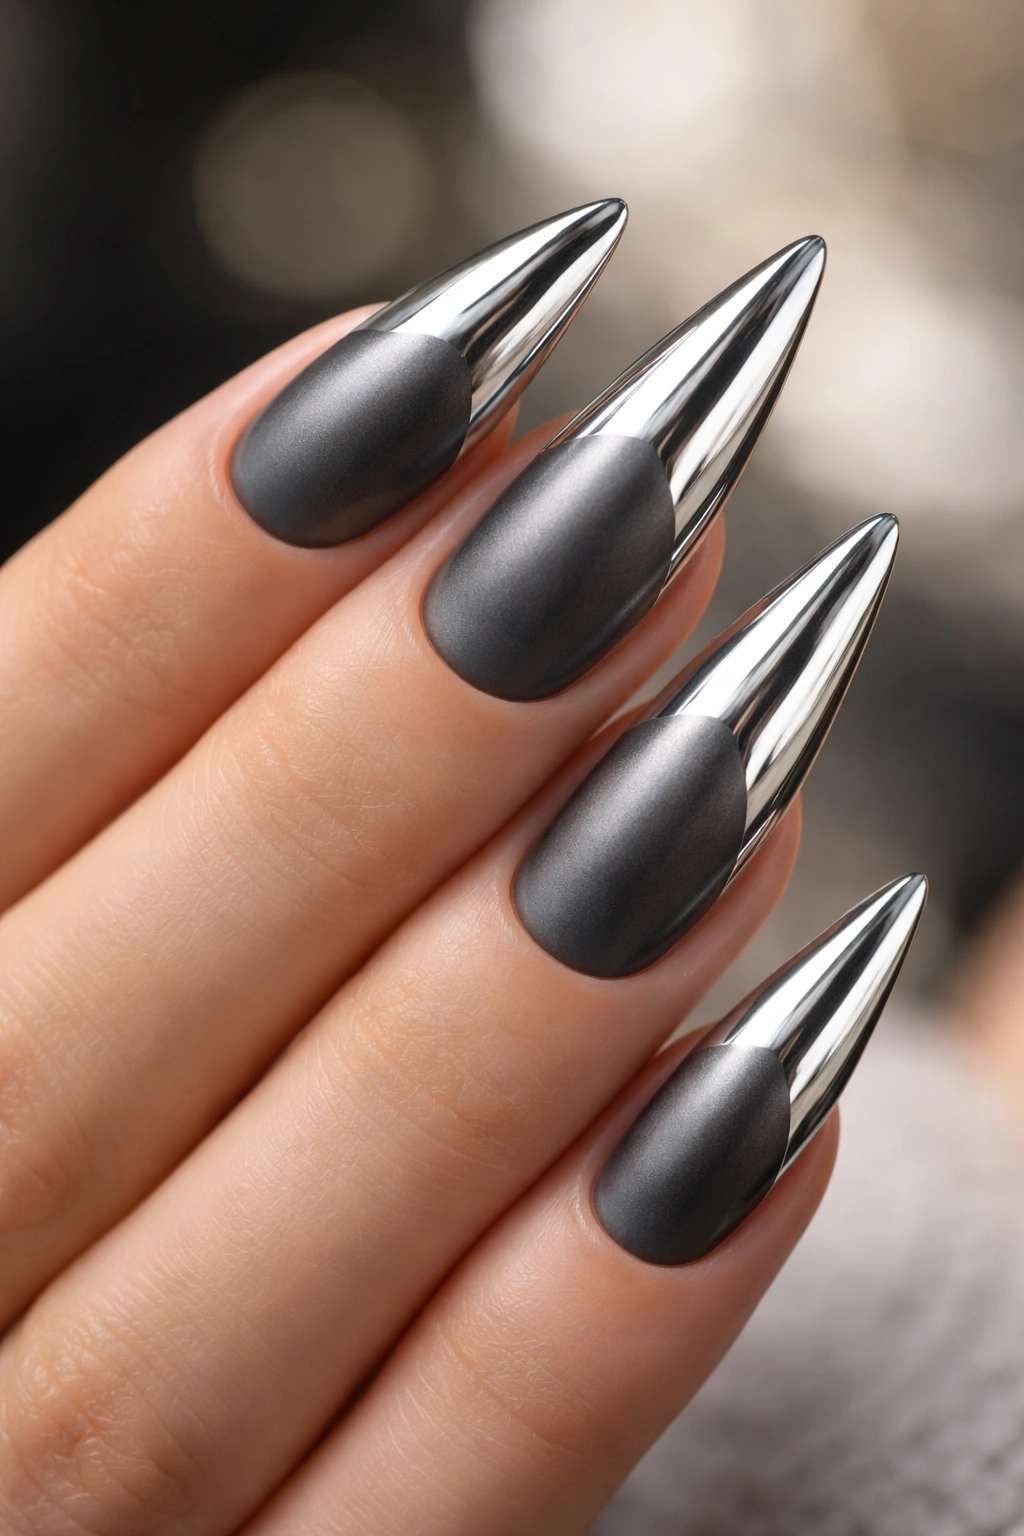
5. Matte Black with Chrome Accent Nails
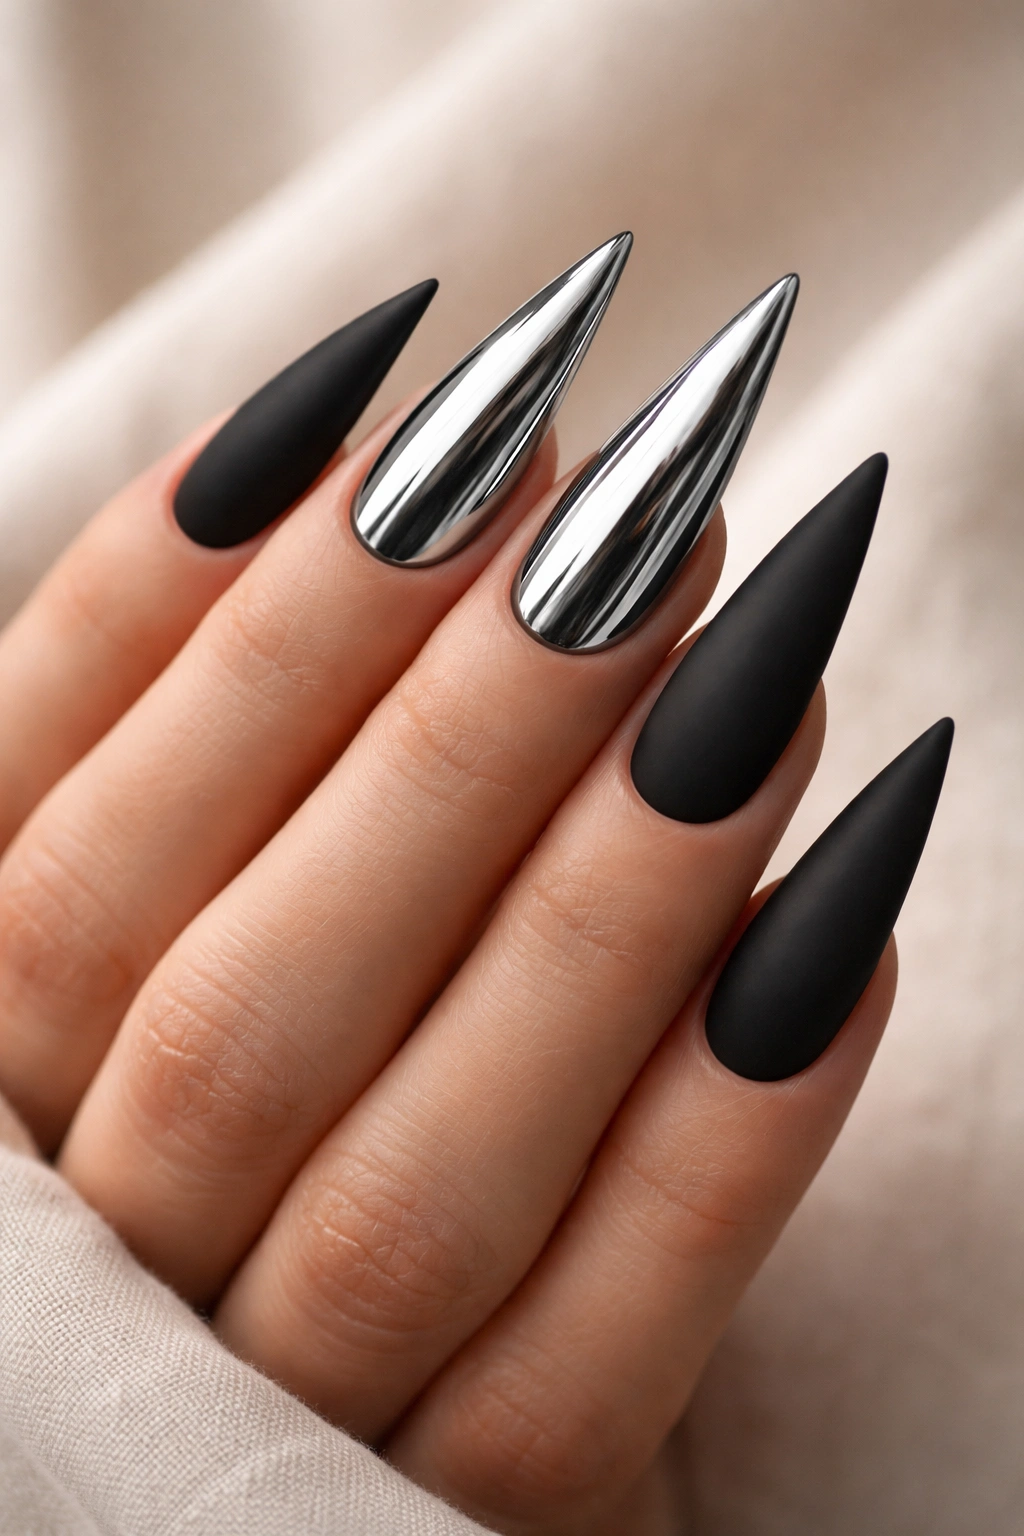
A striking contrast emerges when you pair matte black stiletto nails with chrome accent nails on select fingers (usually 1-2 per hand). The matte black provides a dramatic backdrop that makes the chrome appear to glow by comparison. This design appeals to minimalists and those who prefer understated luxury — the black makes a statement, while the chrome adds just enough shine to feel special without being over-the-top.
Why Matte and Chrome Work Together
Matte finishes absorb light, which makes the chrome accents appear even more reflective by contrast. This interplay between light absorption and light reflection is what makes this pairing so visually compelling. The matte black also keeps the overall look from feeling “too much” — it grounds the design and prevents chrome from overwhelming all ten nails at once.
Strategic Placement of Chrome
- Apply matte black polish to 8 nails (all except two accent nails)
- Chrome typically goes on the ring finger and either the middle or pointer finger for balanced asymmetry
- Keep the chrome nails identical in color and finish to create visual balance
- Ensure the matte and chrome nails have equally crisp edges for a professional appearance
- The stark contrast is the entire point — clean lines are non-negotiable
Quick fact: This design reads as sophisticated in professional settings while still feeling edgy and current.
6. Chrome Gradient: Silver to Blue to Black
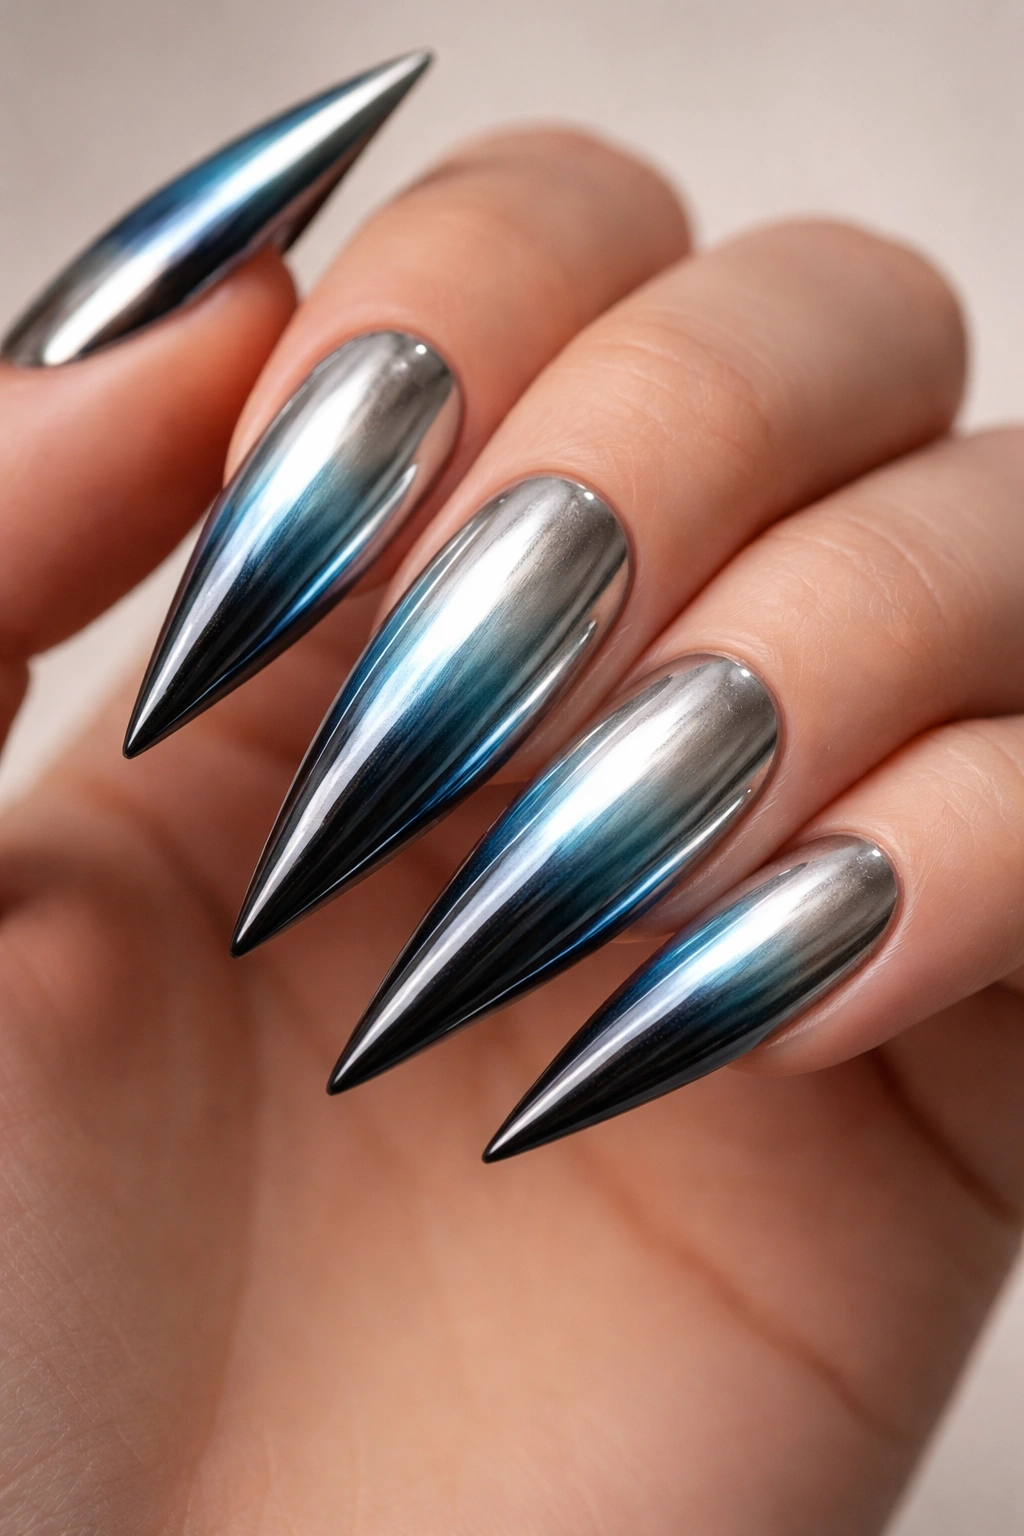
A three-color gradient that transitions from mirror-like silver through icy blue tones into deep charcoal chrome creates visual drama while maintaining cohesion. The progression feels intentional and artistic rather than random. The blue-to-black transition is particularly striking because both are cool tones but dramatically different in depth and luminosity.
The Technical Approach to Multi-Tone Chrome
Creating this gradient requires either precise application of three separate chrome powders with careful blending, or using pre-made gradient powders designed specifically for this effect. The key is ensuring smooth transitions between color zones so the gradient reads as intentional rather than patchy or separated. This design is ambitious and truly benefits from professional application.
Application Sequence
- Section your nails into three zones (base, middle, tip) either visually or with guides
- Apply silver chrome to nails 1-3, with slight overlap into the blue zone
- Apply icy blue chrome to nails 4-7, with overlaps on either side
- Apply dark charcoal chrome to nails 8-10
- Blend edges using a soft brush or slightly damp applicator to soften harsh lines
- Seal with topcoat only after all three colors are fully cured
Design insight: This gradient looks dramatically different under warm versus cool lighting — under LED it reads more blue-toned, while warm interior lighting emphasizes the silver and charcoal contrast.
7. Rose Gold Chrome with Black Cat-Eye Stripe

A thin black stripe positioned vertically down the center of each nail creates a cat-eye effect that contrasts stunningly against rose gold chrome. The stripe makes the chrome appear to sit “behind” the line, creating depth and dimension. This design walks the line between avant-garde and wearable — it’s bold and intentional without being costume-y.
Why the Vertical Line Works
A vertical line following the axis of your finger naturally elongates the visual appearance of your already-long stiletto nails. It creates a clean graphic element that guides the eye down the nail rather than across it. The matte black line against reflective rose gold creates a compelling foreground-background dynamic that feels three-dimensional.
Executing the Cat-Eye Stripe
- Apply and cure rose gold chrome base across all nails
- Use an ultra-thin striping brush and pure black gel or acrylic paint
- Apply the stripe down the center of each nail with a single confident stroke — wobbling lines look unintentional
- Keep the stripe width consistent across all ten nails for uniformity
- Some nail artists add a tiny dot of black at the base and tip for additional polish
- Seal with glossy topcoat that sits over the entire design
Pro tip: If your hand isn’t steady enough for freehand stripes, ask your technician to use nail guides or stencils — there’s no shame in precision tools.
8. Full Chrome with Scattered Diamond Gems
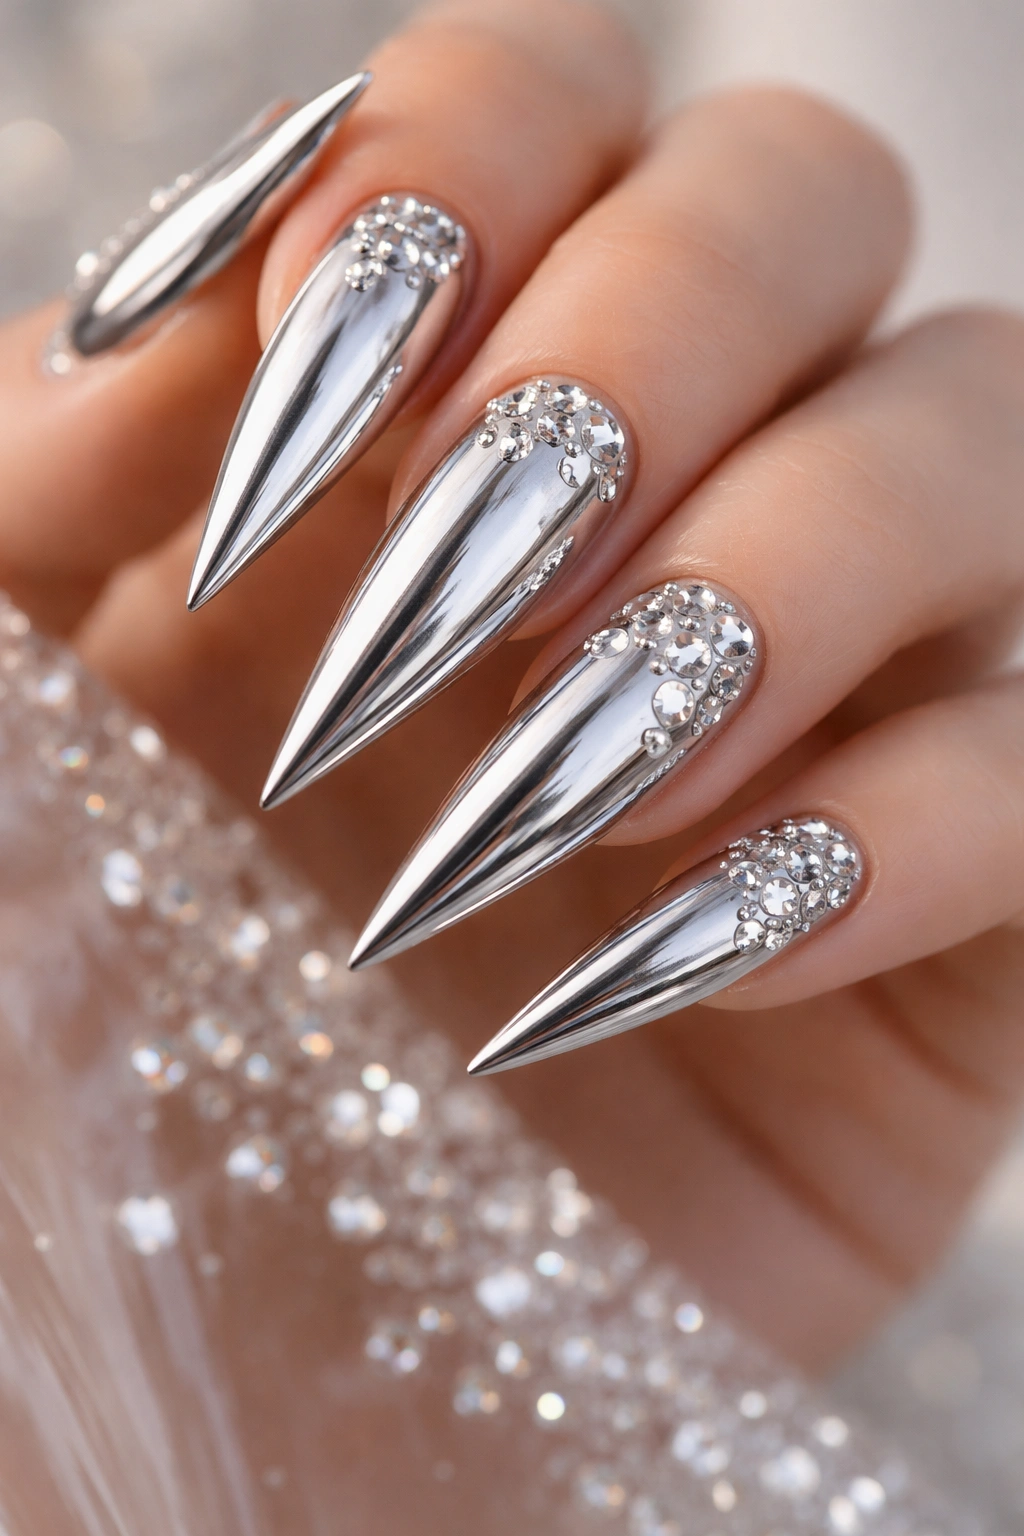
A complete chrome coverage across all nails paired with strategically placed tiny diamond or crystal gems creates luxury-level sparkle. The chrome provides the foundation shine, while the gems add additional points of light that catch and refract differently. This design reads as genuinely luxurious because the gems are intentionally scattered rather than covering the entire nail — restraint is what makes it elegant.
Gem Placement Strategy
The gems aren’t randomly placed — they follow a loose pattern that suggests intentional design rather than accident. Common approaches include scattered gems across all nails in a loose constellation pattern, gems concentrated on the ring finger and pinky only, or gems following a diagonal line across each nail. The fewer gems you use, the more dramatic each one becomes.
Achieving Professional-Quality Gem Setting
- Select genuine crystals (Swarovski) or high-quality glass gems — cheap rhinestones look costume-y
- Apply gems onto sticky base coat before topping, or embed them into uncured topcoat
- Use a dotting tool or tweezers for precise placement
- Ensure gems are completely surrounded by topcoat so they won’t catch on fabric or come loose
- Gem colors should either match the chrome (crystal clear on silver, golden amber on rose gold) or provide striking contrast
Worth knowing: Gem placement on the very tips of stiletto nails can catch on things — consider placing them slightly higher on the nail for practicality without sacrificing visual impact.
9. Chrome Chameleon (Color-Shifting Chrome)
Color-shifting chrome powders that contain special particles create nails that appear to change color as you move and turn your hands. Unlike holographic (which shows rainbow), chameleon chrome typically shifts between two primary colors — green to pink, blue to purple, or copper to gold. This design feels like a magical illusion and genuinely holds people’s attention.
The Science Behind Color-Shifting Chrome
Color-shifting pigments contain special flakes that reflect different wavelengths of light depending on the angle and light source. This creates an optical illusion where the color appears to shift and change. The effect is most dramatic with chameleon specifically designed for chrome application rather than generic color-shifting powders meant for other uses.
Getting the Best Color-Shift Results
- Invest in premium chameleon chrome powder — this is where quality truly matters
- Apply over a sticky base coat with a velvet applicator for full, even coverage
- The longer your nails, the more dramatic the color shift appears as different sections move through light
- Avoid matte topcoats which will dull the shifting effect — glossy or gel topcoat is essential
- Photograph your nails in multiple lighting conditions to see the full range of color shifting
Design fact: Chameleon chrome looks completely different in sunlight versus indoor lighting — some people describe it as two completely different nail colors.
10. Peacock Chrome with Teal and Gold Swirls
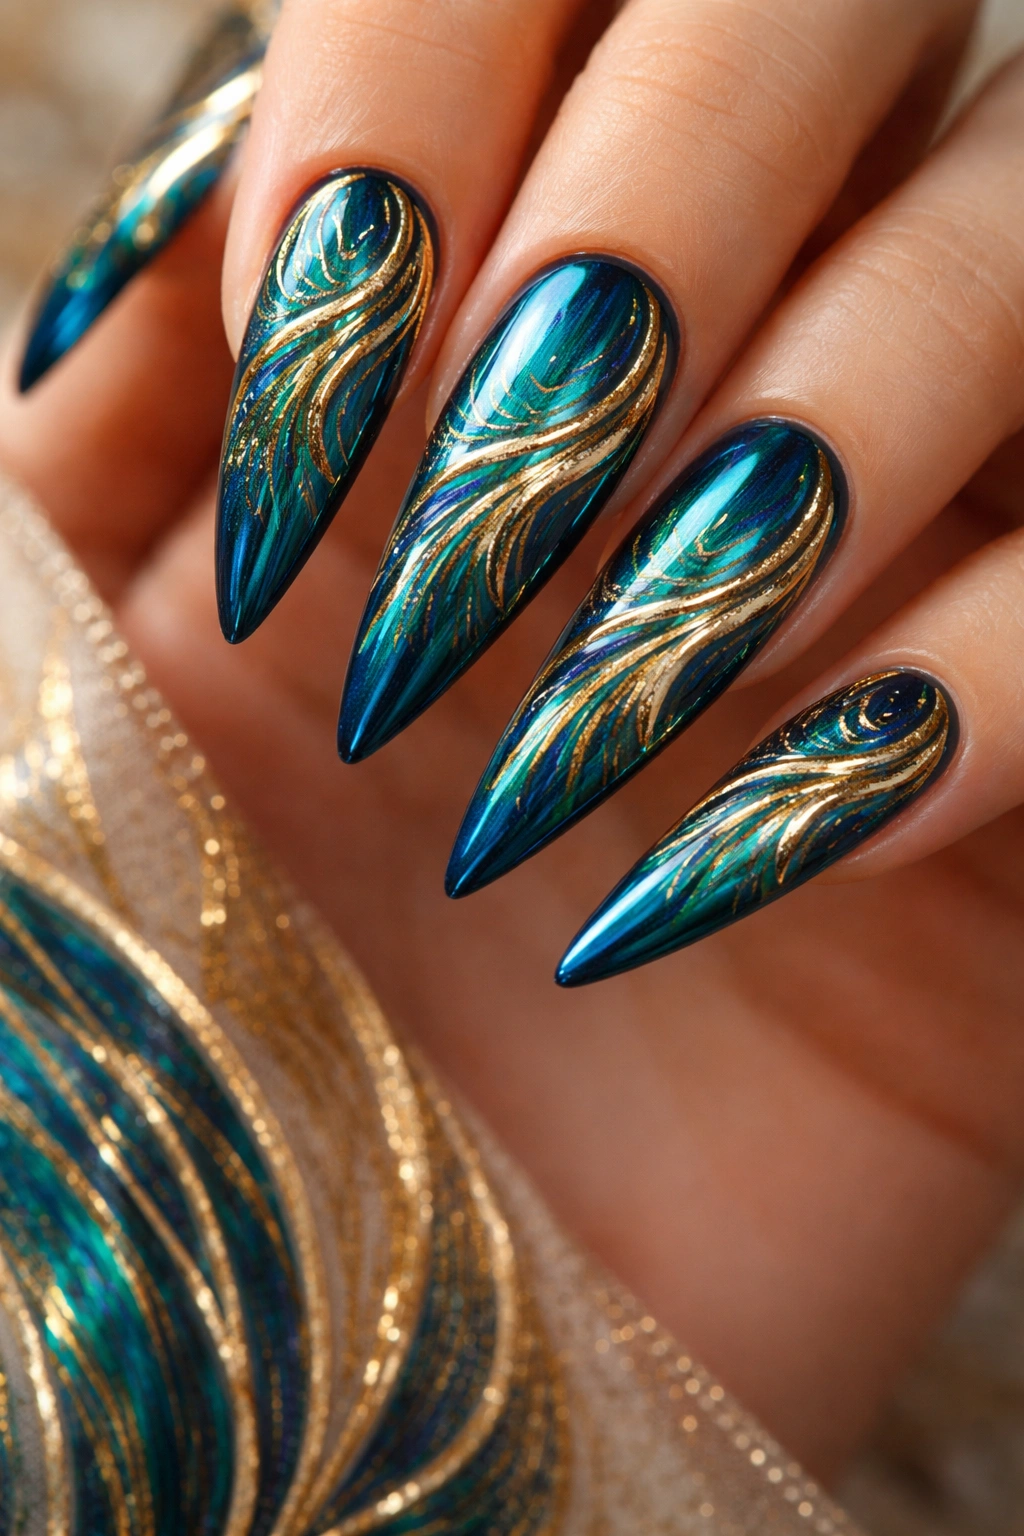
Layering peacock blue and teal chrome with metallic gold swirls or abstract brushstrokes creates a design inspired by peacock feathers. The swirls aren’t perfectly geometric — they’re organic and flowing, suggesting movement and natural beauty. This design feels artistic and luxurious while remaining structured enough to look intentional rather than accidental.
Capturing Peacock-Inspired Movement
The swirls should follow organic curves rather than straight lines, mimicking the flowing patterns of actual peacock feathers. Some swirls can spiral upward toward the tip, while others might curve horizontally. The pattern doesn’t need to be identical across all nails — in fact, variation makes it feel more naturally inspired.
Multi-Element Application Technique
- Start with a teal or peacock blue chrome base across all nails, fully cured
- Mix in touches of darker blue chrome on some nails for depth variation
- Use gold metallic paint or 18k gold leaf to create flowing swirl patterns
- Apply swirls with a thin brush using flowing, confident strokes
- Some designers add white accents to enhance the “peacock feather” illusion
- Seal everything under glossy topcoat
Technical note: This design requires steady hands and artistic ability — if freehand art isn’t your strength, bring reference images to your nail technician and discuss whether they’re comfortable with the brushwork.
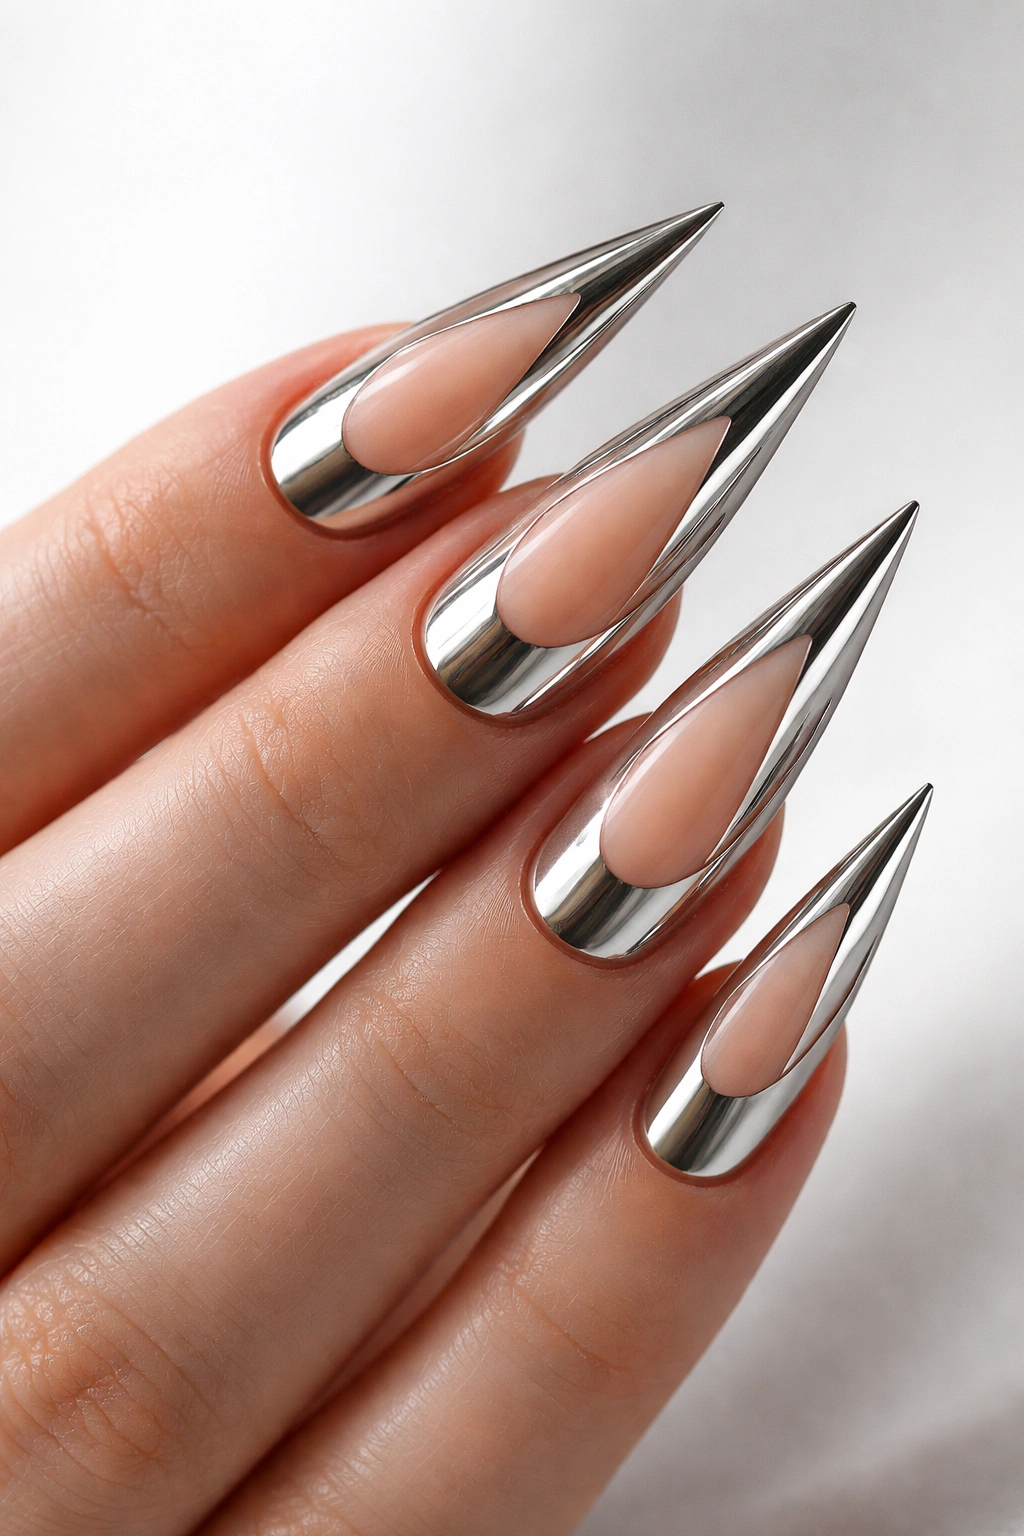
11. Gunmetal Chrome with Reverse French Tip
Instead of a white tip, this design features a clean line of matte gunmetal gray or charcoal sitting at the base (cuticle area) of each nail, with the rest in high-shine chrome. This inverted French tip feels modern and edgy because it breaks the traditional expectations of how French tips should look. The matte base creates a grounding effect that prevents the chrome from feeling floaty or unanchored.
Why Reverse French Breaks the Rules
A traditional French tip places the accent color at the tip of the nail. Reversing this placement feels unexpected and sophisticated — it shows intentional design thinking rather than following convention. The matte base color acts as a visual anchor, making the chrome-tipped stilettos feel more purposeful and structured.
Executing the Reverse French
- Choose your chrome color (silver, rose gold, or gunmetal itself)
- Establish a clean line approximately 2-3mm from the base using a thin brush or nail guide
- Apply matte gunmetal color to the base section and cure
- Apply chrome to everything above that line, ensuring a perfectly crisp boundary
- The line should be exactly the same width across all nails for professionalism
- Seal the entire nail with topcoat, which will make the chrome glossy while the gunmetal remains matte
Design detail: This works beautifully with negative space — you could also leave the base section bare (unpainted) rather than matte for an even more minimalist effect.
12. Mirror Chrome with Geometric Negative Space
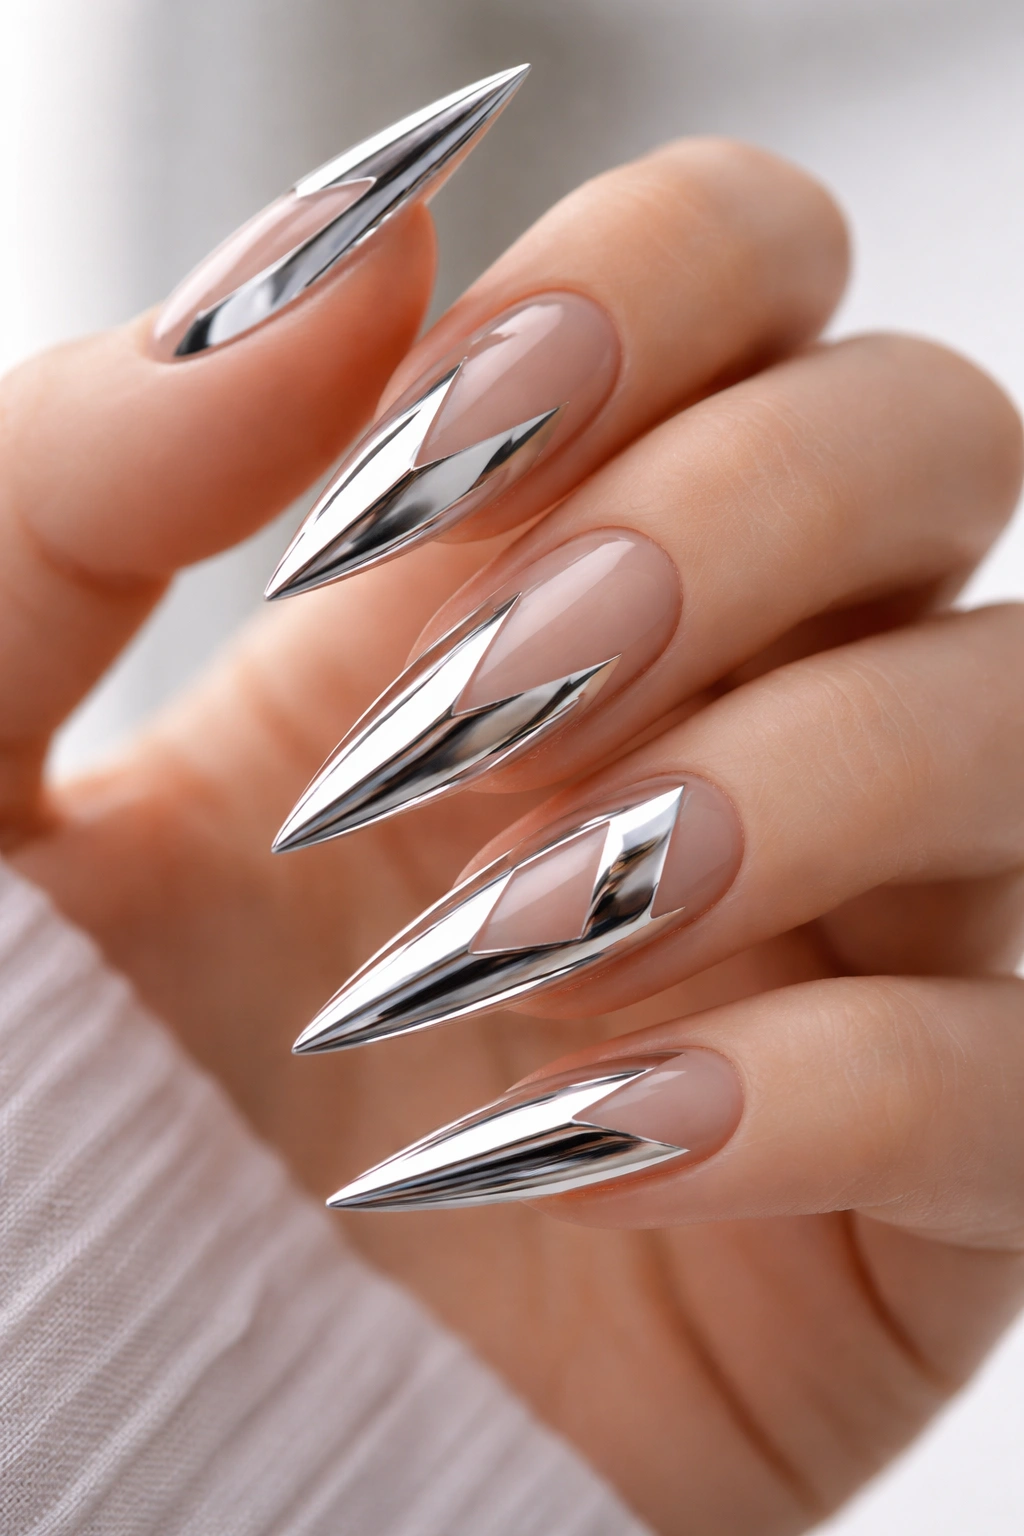
Rather than filling every surface with chrome, this design applies mirror chrome to specific geometric shapes while leaving strategic sections bare or in contrasting colors. For instance, chrome triangles on a nude or white base, or chrome circles with negative space in between. The negative space prevents visual overload and creates a graphic, editorial quality.
The Power of Negative Space in Nail Design
When you don’t fill every millimeter of nail with color, the design reads as more intentional and sophisticated. Negative space gives the eye places to rest and makes the design feel less “busy.” This approach particularly suits stiletto nails because the length provides plenty of surface area to play with geometric arrangement.
Geometric Shapes That Work
- Vertical chrome stripes with white negative space between them
- Chrome triangles pointing up or down with bare nail underneath
- Chrome shapes clustered on the lower portion of the nail with empty space above
- Chrome circles or ovals scattered asymmetrically
- Chrome forming a partial frame around the nail edges, with bare center
- Angular chrome shapes that follow the stiletto point’s natural line
Application strategy: Plan your design on paper first — sketch where chrome and empty space will live so you can apply with confidence rather than guessing during application.
13. Champagne Chrome with Subtle Sparkle

A soft, warm champagne chrome that catches light like actual champagne bubbles, paired with barely-there sparkle elements (fine glitter mixed into topcoat, or scattered tiny gems). This design is sophisticated and elevated without being over-the-top — perfect for formal occasions or anyone who prefers subtle luxury. The champagne tone is more forgiving and wearable than cooler chrome shades.
Why Champagne Chrome Feels Different
Champagne chrome has warm undertones that suggest luxury and celebration without the stark futurism of silver or the intensity of rose gold. It feels elegant and slightly nostalgic — like liquid gold without being actually gold. The champagne tone works with virtually every skin tone and pairs beautifully with both warm and cool-toned clothing.
Achieving the Subtle Sparkle Effect
- Apply champagne chrome base with impeccable technique — any streaks or bubbles will show
- For subtle sparkle, mix ultra-fine champagne or gold glitter into your final topcoat layer
- Alternatively, place 1-2 tiny gems on accent nails (ring finger or pinky) rather than across all nails
- Keep everything high-shine and glossy — matte finishes won’t suit this luxurious aesthetic
- The design is refined because of its restraint — more sparkle isn’t better here
Styling note: This design pairs beautifully with formal wear, evening events, or any occasion where you want to feel polished and put-together without the boldness of full bling.
14. Multichromatic Chrome (Every Nail a Different Color)
Rather than matching all ten nails, this design gives each nail its own unique chrome color — one nail might be silver, the next rose gold, then copper, then holographic, then gunmetal, etc. The variety creates visual interest and playfulness while the chrome finish unifies everything. This design appeals to people who love color but want sophistication — the chrome finish prevents the mix from feeling chaotic.
The Cohesion Challenge
Applying ten completely different colors could look chaotic, but the key is selecting colors from the same “family” — all cool tones, or all warm tones, or a mix that flows logically from cool to warm. The chrome finish itself provides visual cohesion that prevents the design from feeling like a random color mess.
Color Selection Strategy
- Choose 10 chrome shades that flow logically across your nails
- Cool option: silver → light blue chrome → sky blue → navy → gunmetal (one progression)
- Warm option: pale gold → rose gold → copper → bronze → bronze-black (another progression)
- Rainbow option: systematically progress through the color spectrum with chrome versions of each
- Apply each nail individually, ensuring each chrome color is fully cured before moving to the next
- Seal all ten nails with a unified glossy topcoat for cohesion
Design philosophy: This works because each nail is intentionally different — variation by choice, not accident.
15. Black Chrome with White Geometric Design
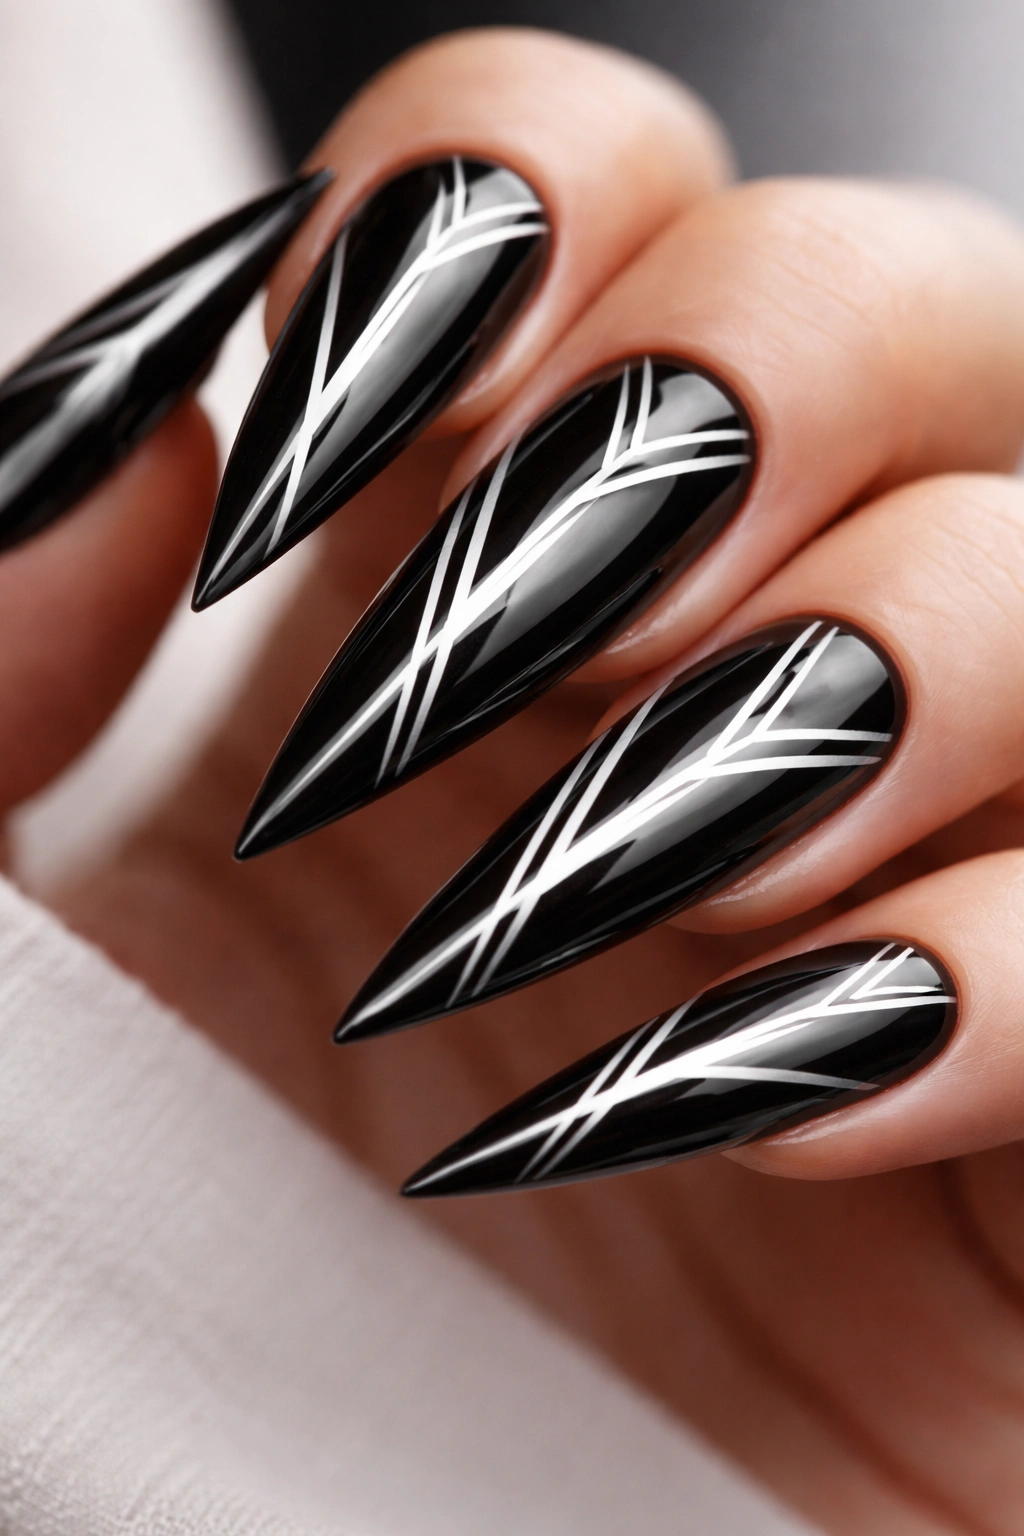
A deep, reflective black chrome base paired with clean white geometric designs (negative space lines, shapes, or patterns) creates stunning visual contrast. The black chrome appears darker and deeper than regular black polish, while white elements appear brighter against it. This design feels art-deco inspired and architectural — modern and intentional.
Why Black Chrome Outperforms Black Polish
Regular black polish absorbs light and appears flat. Black chrome, by contrast, has subtle reflectivity that gives it dimension while still reading as dark. The metallic quality prevents it from feeling heavy or gothic. Against white geometric elements, black chrome appears almost to glow at the edges.
Geometric Design Options
- Vertical white lines on a black chrome base
- White triangles positioned at the base, middle, or tip
- Thin white frame around the edge of the nail with black chrome center
- White diagonal stripes across the nail
- Minimalist white shapes (circles, squares) scattered asymmetrically
- White negative space creating a balance or asymmetrical design
Technical execution: Ensure white lines are pure white and absolutely crisp — any gray or blurred edges diminish the impact of the contrast.
16. Oil Slick Chrome (Iridescent Multi-Color)
Similar to holographic but with an oil-slick effect, this chrome shifts between unexpected color combinations — greens and purples and blues creating an iridescent effect like gasoline on water. The colors seem to move and shift as light hits them differently. This design feels futuristic and slightly surreal — utterly mesmerizing to look at.
The Oil Slick Aesthetic
Oil slick chrome is distinguishable from holographic by its more complex, swirling color patterns and the way colors blend into each other. Rather than clear rainbow stripes, oil slick creates organic-looking swirls of unexpected color combinations. The effect is hypnotic.
Application and Maintenance
- Seek out oil slick specific chrome powders — not every chrome powder creates this effect
- Apply with impeccable technique over a sticky base coat using a velvet applicator
- Ensure complete coverage with no bald spots or streaks
- Seal with a glossy topcoat that won’t dull the iridescent effect
- These powders can be slightly more delicate than standard chrome — avoid excessive hand washing immediately after application
- Schedule maintenance every 2-3 weeks
Visual fact: Oil slick chrome looks dramatically different in sunlight versus indoor lighting — photograph it in multiple conditions to see its full range.
17. Silver Chrome with Thin Gold Geometric Border
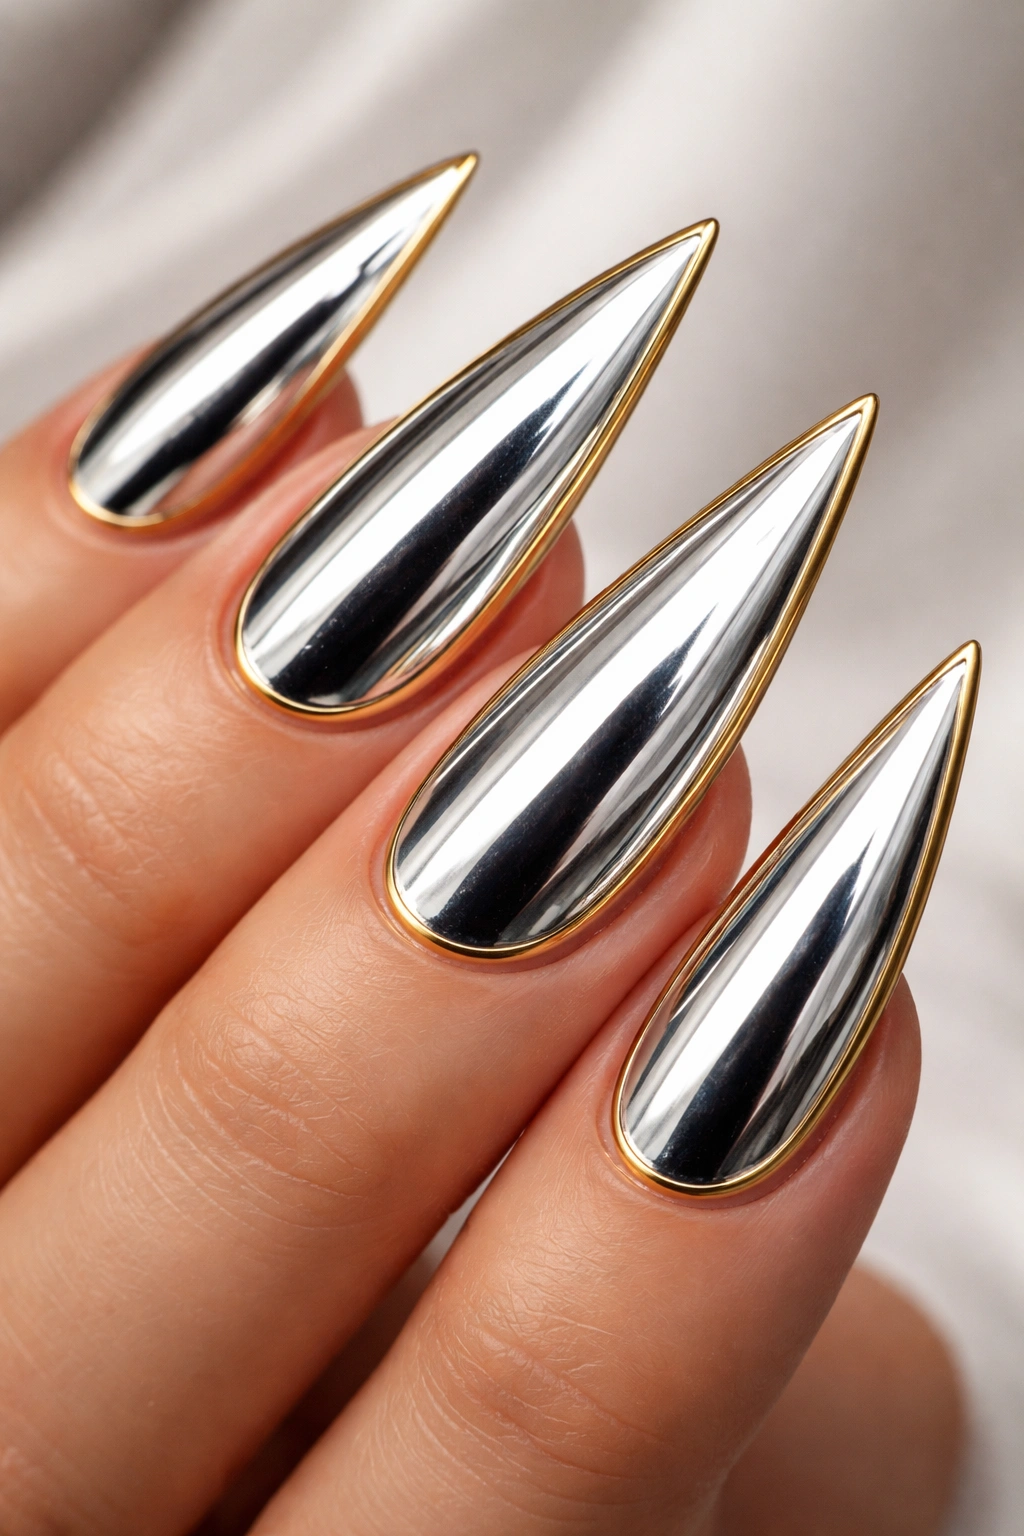
A complete silver chrome base with a thin gold geometric border framing each nail (either around the outer edge or following a specific geometric shape) creates a luxurious, framed artwork effect. The gold border draws the eye and creates defined boundaries that make the design feel intentional and curated. The contrasting metals give luxury vibes without being costume-y.
The Framing Effect
By creating a border, you’re literally framing the chrome as if it’s a work of art. This simple technique elevates the design from “just chrome” to something more considered and editorial. The border can be extremely thin (single-line thin) for minimalism, or slightly thicker for more dramatic effect.
Border Style Options
- Thin gold line around the entire outer edge of each nail
- Gold line only at the tip (different from French tip — this frames the tipmost portion)
- Gold geometric shapes (triangles, squares) at the base of each nail
- Gold accent line at specific points (cuticle, tip, or side)
- Multiple thin gold lines creating a layered frame effect
- Gold forming an asymmetrical frame on select nails
Application note: Use actual gold metallic paint or 18k gold leaf rather than gold polish — metallic elements look more luxurious against reflective chrome.
18. Chrome Ombre with Matte Tips
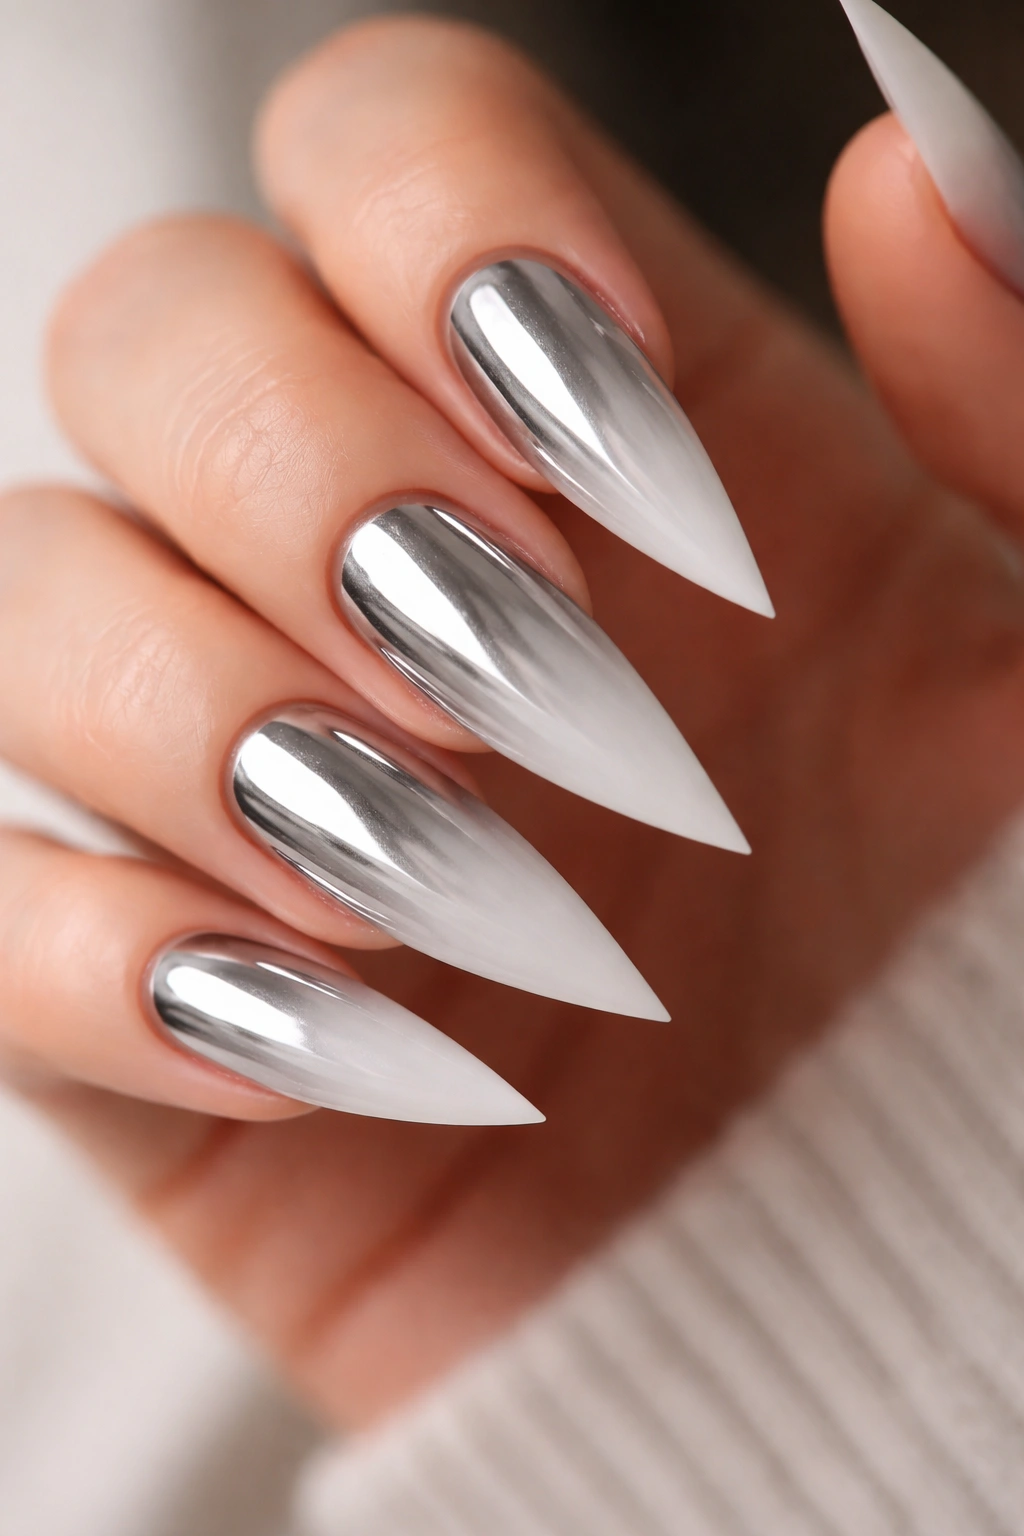
Blending chrome seamlessly into matte color at the tips creates a dimensional effect — shiny chrome gradually transitions to matte color toward the stiletto point. This design feels more sophisticated than a stark chrome-to-color division because the gradient makes the transition feel natural. The matte tip creates visual interest and prevents the nail from being uniformly shiny.
Why Gradient Chrome-to-Matte Works
The contrast between glossy and matte creates visual depth. As the eye travels from the reflective chrome base toward the matte tip, the gradient suggests intentional design thinking. This technique also works well for camouflaging any imperfections in the chrome application — a slightly uneven base looks more intentional once you blend it into matte color.
Color Combinations That Work
- Rose gold chrome fading to matte dusty rose tip
- Silver chrome transitioning to matte black tip
- Gold chrome blending into matte champagne tip
- Holographic chrome fading to matte white tip
- Blue chrome graduating to matte navy tip
- Copper chrome softening to matte bronze tip
Technical detail: The transition zone between chrome and matte should be approximately 3-4mm in width, creating a gradual blend rather than an abrupt line.
19. Rose Gold Chrome with Rose Quartz Texture
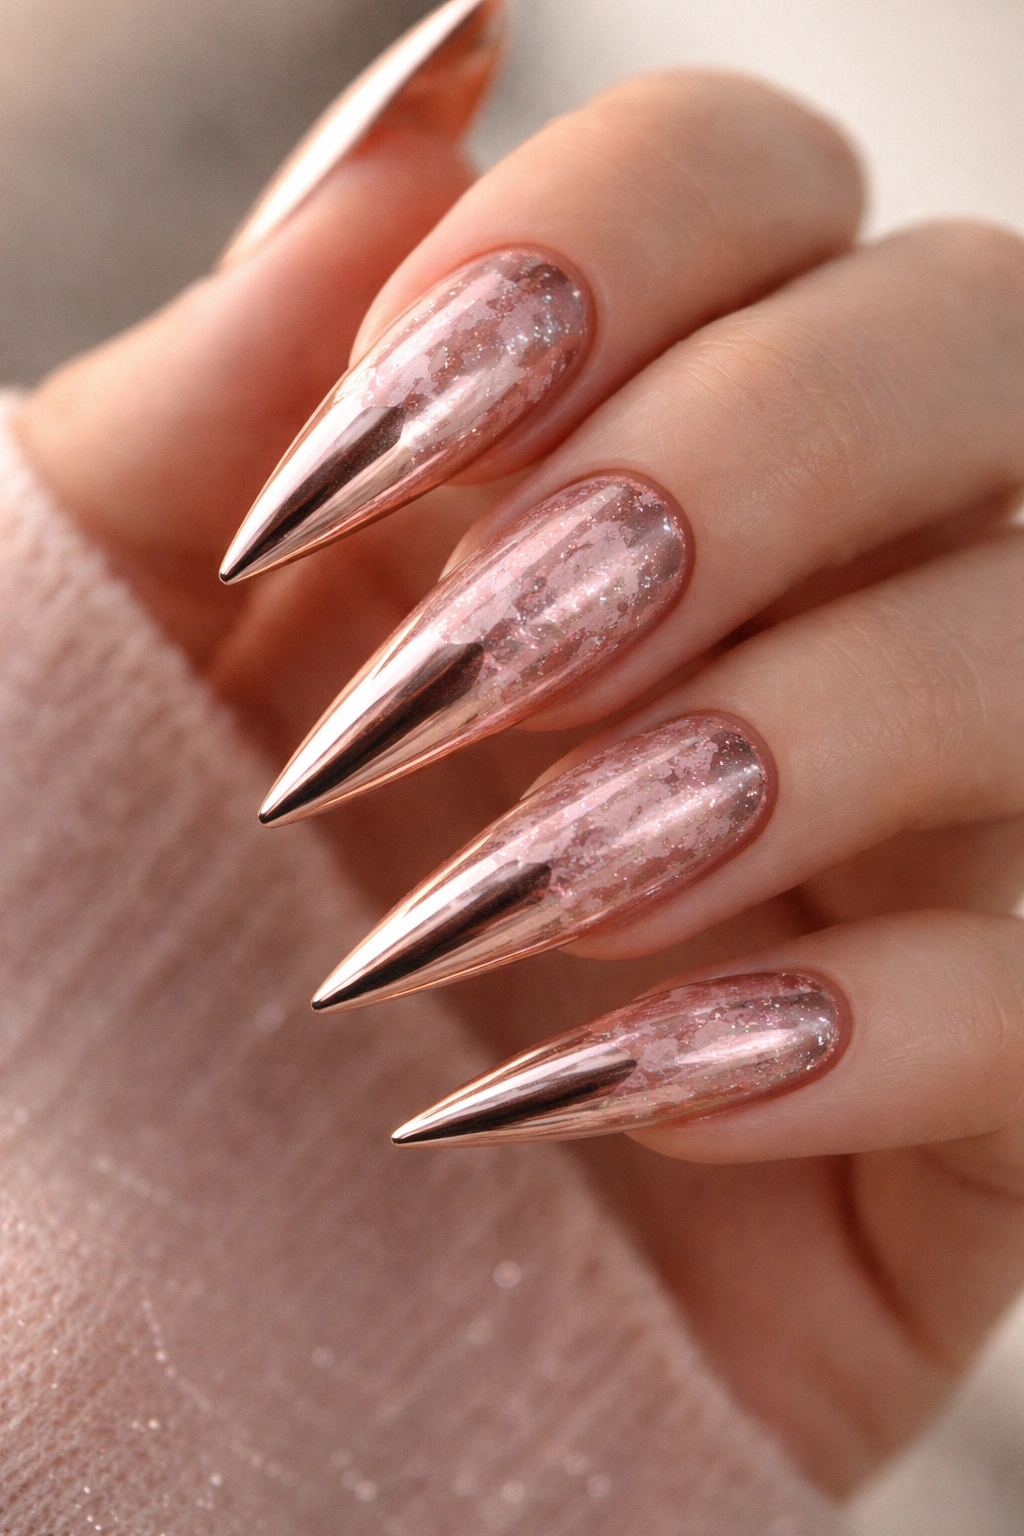
Embedding or layering rose quartz-inspired texture (actual crushed rose quartz, rose quartz-colored glitter, or textured powder) over rose gold chrome creates an earthy, luxurious aesthetic. The texture adds tactile interest and prevents the chrome from feeling flat or one-dimensional. This design appeals to people who love rose gold but want something beyond standard shine.
The Rose Gold and Rose Quartz Connection
Both rose gold and rose quartz share warm, feminine, slightly romantic energy. Combining them feels natural and cohesive. The texture adds organic, natural-feeling dimension that contrasts beautifully with the high-tech shine of chrome. The design feels simultaneously earthy and futuristic.
Texture Application Methods
- Mix fine rose quartz-colored glitter into the chrome base for subtle texture
- Apply rose gold chrome base, then dust finely crushed rose quartz into the sticky surface before curing
- Use rose quartz-colored textured powder applied over chrome base
- Create texture on accent nails only (ring and pinky) for balance
- Seal with topcoat that captures the texture without smoothing it completely
- The texture should feel present but not rough — this is about visual texture more than tactile roughness
Design consideration: This works beautifully for spring and summer occasions, or year-round for anyone drawn to rose quartz’s aesthetic energy.
20. Chrome with Negative Space Nail Art (Bare Nail Design)
This design leaves strategic sections of the actual nail bare (unpolished) while applying chrome to other areas, creating negative space nail art. For instance, a chrome base with bare nail forming geometric shapes, or chrome edges with a bare nail center. The natural nail color showing through creates contrast and visual interest that’s different from traditional layered designs.
Why Bare Nail Negative Space Feels Modern
Showing the natural nail intentionally is a design choice that feels contemporary and editorial. It breaks expectations of nails being completely covered with color, and the contrast between pigmented and unpigmented nail creates graphic impact. This technique works particularly well with stiletto nails because the length provides room for sophisticated spatial arrangement.
Negative Space Layout Ideas
- Chrome forms a frame with bare nail in the center
- Parallel chrome stripes on the sides with bare nail down the middle
- Chrome only on the top third of each nail with bare nail below
- Chrome geometric shapes (triangles, circles) scattered with bare nail background
- Chrome at the tip and base with bare nail band in the middle
- Asymmetrical chrome placement with varying amounts of negative space on each nail
Execution note: The bare nail sections must be perfectly clean and healthy-looking for this design to work — any ridges, discoloration, or imperfections will show, so nail prep is critical.
Final Thoughts
Chrome stiletto nails represent a category of self-expression that goes far beyond basic manicure. The reflective finish combined with the commanding stiletto shape creates a statement that’s impossible to ignore — whether you’re selecting subtle elegance like champagne chrome with scattered gems, or bold drama like oil slick chrome with geometric accents. What ties all these twenty designs together is intentionality; each concept works because it’s clearly a deliberate choice rather than random application.
The beauty of chrome nails is their adaptability to your personal aesthetic. If you typically prefer minimalism, the matte black with chrome accents or the reverse French tip approach gives you chrome’s impact without overwhelming visual noise. If you love maximalism and artistic expression, the multichromatic designs, peacock-inspired swirls, or holographic ombre styles let your nails become a canvas for creativity. The middle ground options — rose gold with geometric accents, gradient designs, or chrome with texture — give you endless ways to feel polished and intentional without choosing either extreme.
When booking your appointment, bring clear photos of designs that resonate with you and discuss whether your nail technician has experience with chrome applications. Chrome requires specific powders and techniques that don’t transfer directly from traditional nail polish — a skilled technician will make the difference between mediocre chrome and that jaw-dropping, light-catching, genuinely luxurious finished look. With proper application and realistic maintenance expectations, chrome stiletto nails will absolutely deliver the high-impact aesthetic you’re seeking.
