

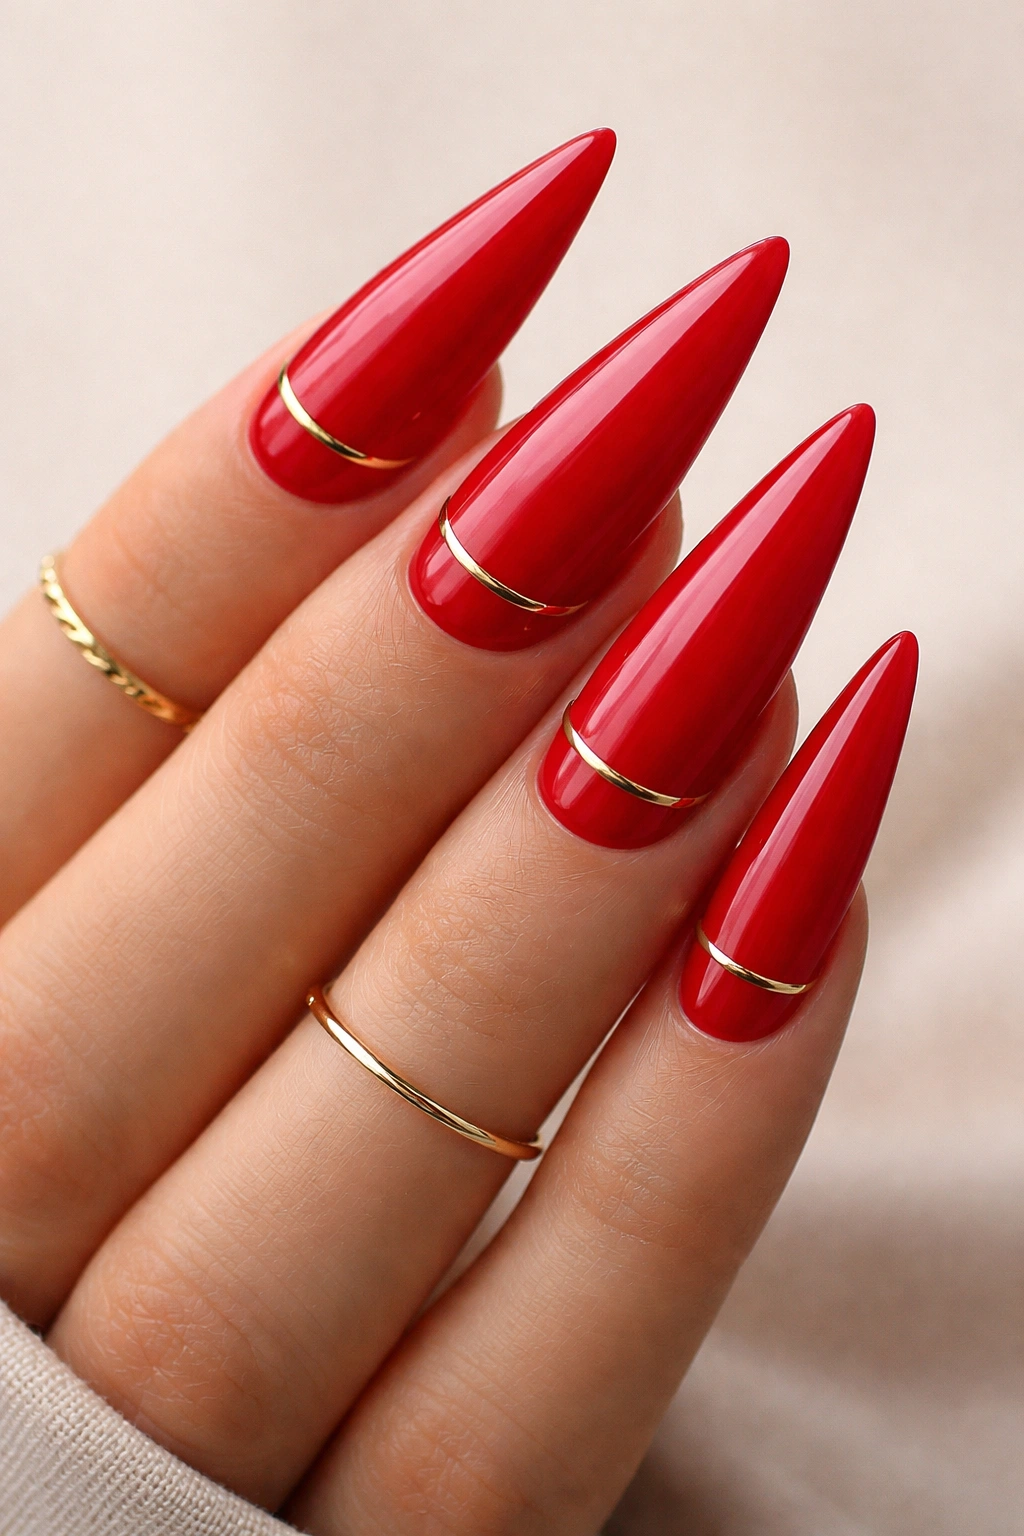
There’s something undeniably powerful about a perfectly executed red stiletto nail. Red doesn’t just sit on your nails—it announces your presence, commands attention, and speaks volumes about your confidence and taste. Stilettos, with their elongated almond shape and dramatic point, amplify that effect tenfold. But here’s what many people don’t realize: not every red nail look is created equal. The difference between stunning and overdone often comes down to the specific shade of red, the finish, and the details you layer on top.
The beauty of red stiletto nails is their incredible versatility within elegance. Whether you’re drawn to classic creamy reds, deep burgundy undertones, or shimmering finishes, there’s a classy interpretation waiting for you. Some of the most sophisticated nail designs whisper rather than shout—they rely on subtle textures, minimalist accents, or unexpected techniques to elevate a traditional red beyond the ordinary. This is where the real artistry lives, and where your personal style truly emerges.
Red stilettos work for every occasion, season, and reason. They’re equally at home at a black-tie event, a professional setting, or a casual night out when done with intention and restraint. The key to keeping red nails feeling classy rather than costume-like is understanding that elegance often means editing. A perfect red base paired with strategic negative space, refined metallic accents, or a single statement detail often reads as more sophisticated than a heavily decorated nail. Let’s explore twenty distinctly different red stiletto nail ideas that span from timeless to contemporary, each one offering a different way to wear red with undeniable class.
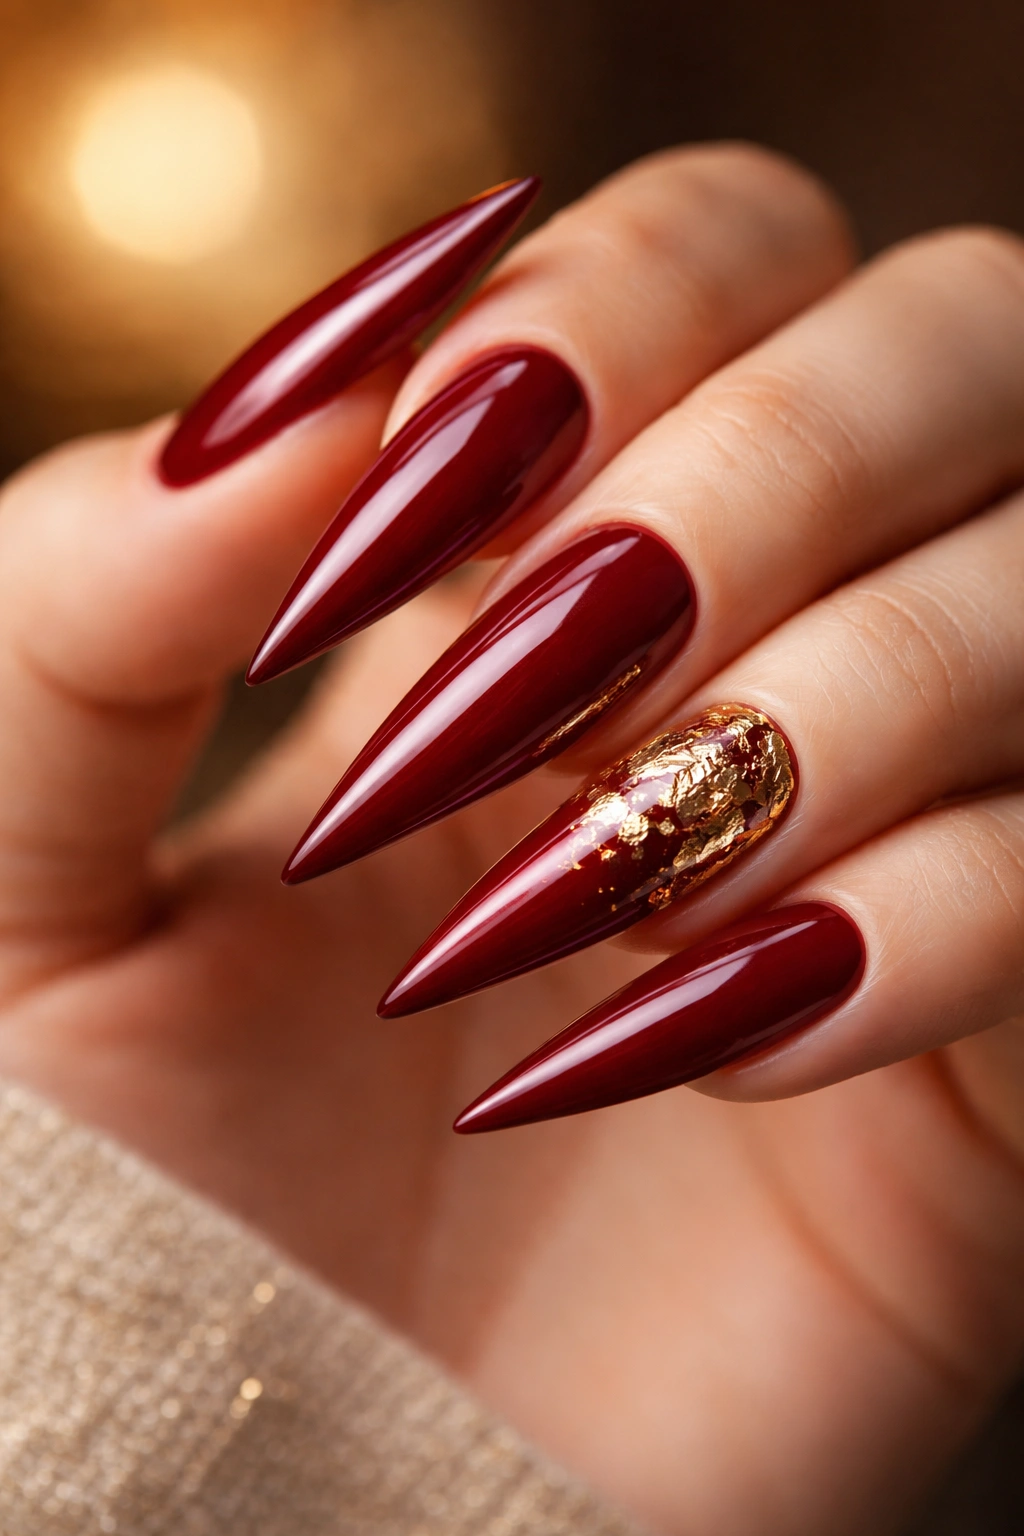
1. Glossy Crimson with Gold Leaf Accents
A deep, lustrous crimson red serves as the perfect canvas for subtle gold foil elements that catch the light without overwhelming the design. This combination works because the warmth of crimson red naturally complements gold, creating a luxurious pairing that feels both timeless and intentional. Glossy finishes on stiletto nails create maximum visual impact—the reflective surface makes your nails appear longer and more defined, which is exactly what you want with this elongated shape.
Why This Works So Well
The glossy finish amplifies the depth of crimson, making it appear richer and more multidimensional than a matte version. Gold leaf placement on just one or two accent nails prevents the look from feeling overdone, while still adding that touch of glamour that elevates the entire manicure. The contrast between the smooth gloss and delicate metallic elements creates visual interest that keeps the design feeling fresh.
What Makes It Stand Out
- Crimsons with slightly warm undertones photograph beautifully and flatter most skin tones
- Gold leaf can be applied to just the ring finger or pinky for asymmetrical elegance
- The glossy finish requires a high-quality topcoat to maintain that mirror-like shine
- This design pairs perfectly with minimalist jewelry and works for formal occasions
- Reapplying topcoat every week keeps the glamorous shine intact
Pro tip: Apply gold leaf to the lower corner of the nail rather than the center—it draws the eye to the length of the nail and creates a more sophisticated visual line.
2. Matte Cherry Red with Geometric Line Work
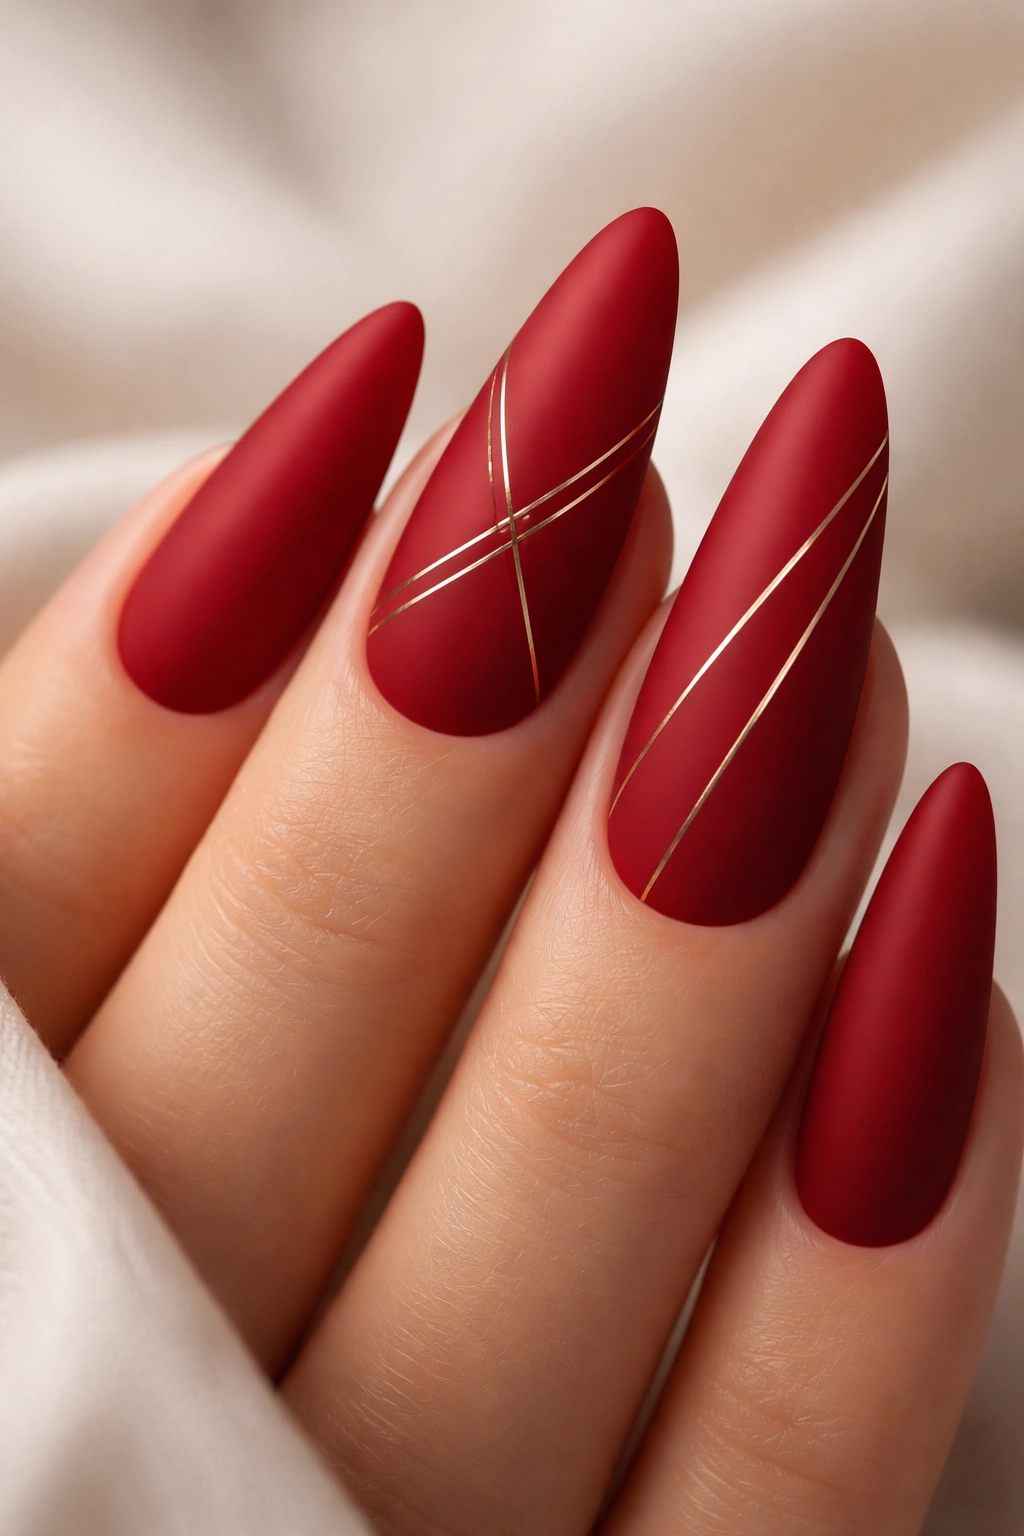
Matte finishes have revolutionized nail design, and cherry red in matte form feels distinctly modern while remaining undeniably classy. Fine gold or silver lines creating geometric patterns—triangles, stripes, or angular accents—add structure and contemporary flair without screaming for attention. The matte texture absorbs light differently than gloss, making it feel softer and more refined, especially on stiletto nails where the pointed tip can otherwise feel sharp.
Why Geometric Minimalism Matters
Geometric designs work because they’re intentional and controlled—there’s a mathematical precision that reads as sophisticated. On matte nails, these lines become architectural elements rather than decorative flourishes. The lines don’t need to cover the entire nail; even a single diagonal stripe or corner triangle delivers impact when executed with clean, confident placement.
What to Know About This Approach
- Use a thin nail art brush or a striping pen for precise, clean lines
- Matte topcoat provides a finished look that makes the geometric work pop
- Lines should be deliberate and measured—freehand can work, but stencils ensure perfection
- This style works exceptionally well on shorter stilettos if you prefer practicality
- The contrast between matte and metallic creates visual depth that commands attention
Worth knowing: Matte finishes chip slightly more easily than gloss, so prioritize a durable topcoat made specifically for matte manicures.
3. Deep Burgundy with Subtle Glitter Gradient

Burgundy red reads as more sophisticated than bright true red—it carries sophistication and maturity without the boldness. A barely-there glitter gradient that starts transparent near the cuticle and gradually introduces fine sparkle toward the tip creates dimension and movement. This is restraint done right—the glitter exists without dominating, catching light only when your hands are in motion. On stiletto nails, this gradient naturally draws the eye along the length of the nail, emphasizing the elongated shape.
What Makes Burgundy Different
Burgundy has deeper undertones than bright red—think wine, mahogany, or wine-stained velvet. These undertones feel less summery and more seasonless, making burgundy nails feel appropriate year-round. The slight earthiness of burgundy paired with delicate sparkle creates a surprisingly luxurious combination that feels both modern and classic simultaneously.
How to Execute It Perfectly
- Use a matte burgundy base in a rich, saturated shade with good opacity
- Create the gradient using a makeup sponge and increasingly sparkle-laden glitter polishes
- Blend the sparkle gradient so the transition is gradual rather than abrupt
- Set everything with a glossy topcoat to unify the matte base with the sparkly tips
- The gradient should be most visible from the side profile of the nail
Quick fact: Burgundy works particularly well if you have cool skin undertones, but it’s universally flattering when paired with glitter that adds warmth and movement.
4. Classic Fire Engine Red with Negative Space
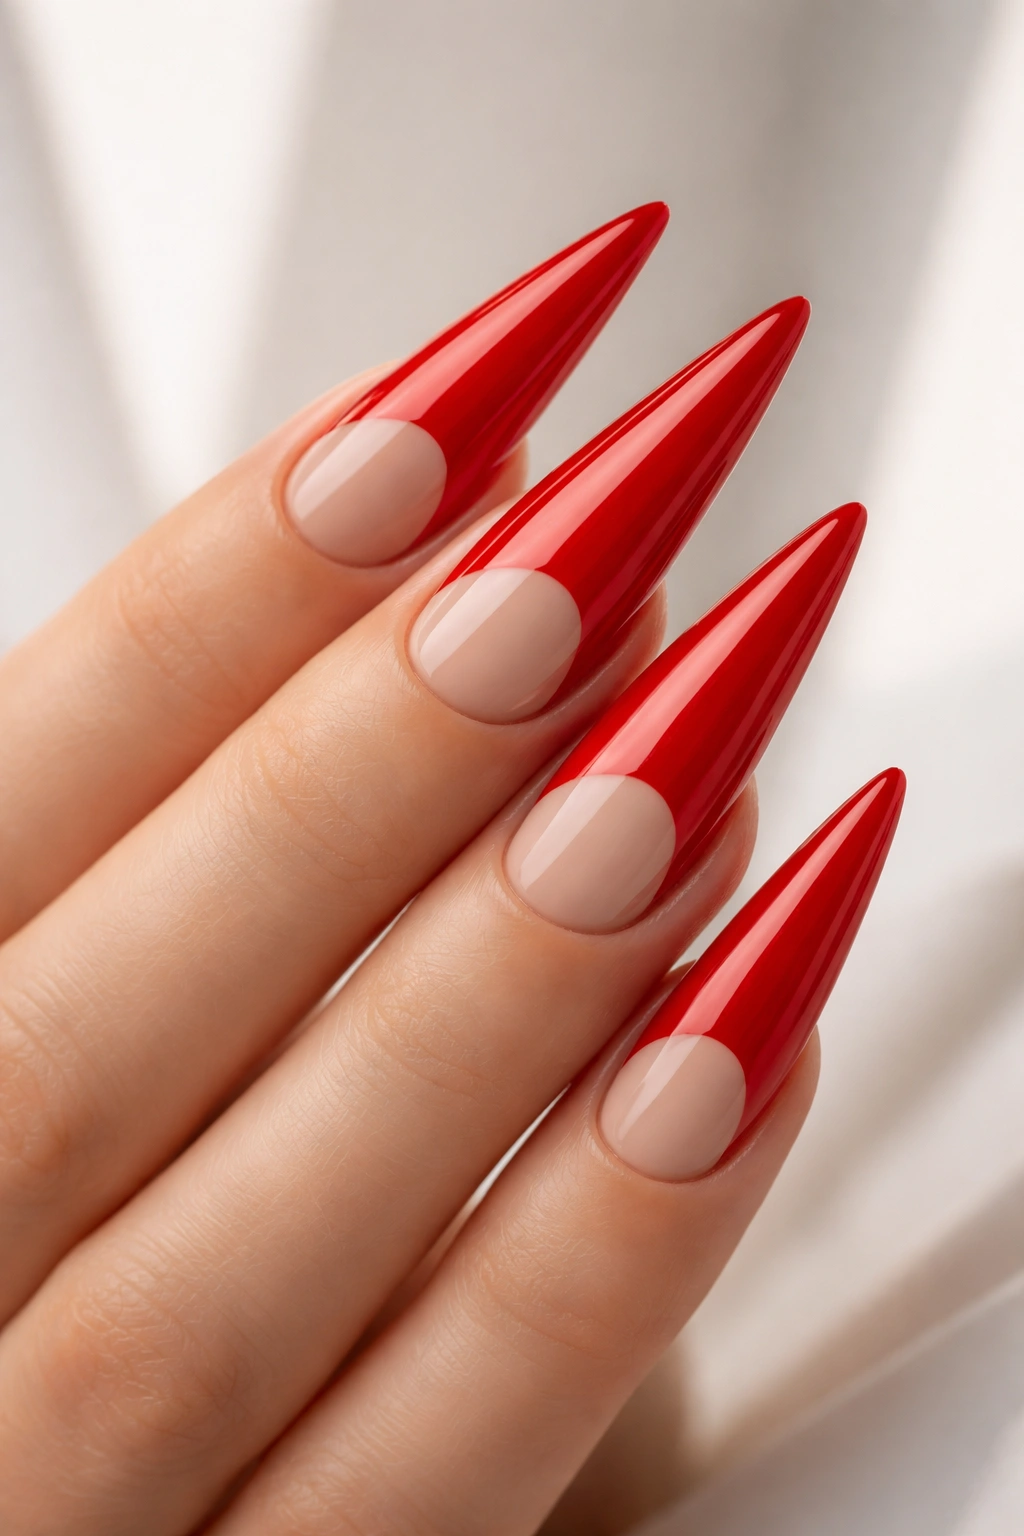
Sometimes elegance means knowing what to leave out. A stunning fire engine red, precisely applied to fill only the tip and outer edges of the nail while leaving a curved or geometric negative space near the cuticle, creates a design that’s bold and restrained simultaneously. This approach works beautifully on stilettos because the pointed tip is naturally the focal point—drawing attention there through color placement feels intentional and designed. The negative space can be shaped as a classic half-moon, a curved swoosh, or sharp geometric angles depending on your preference.
Why Negative Space Elevates Everything
Negative space forces the design to be architectural and precise rather than just colorful. It creates optical illusions that make nails appear even longer and more elegant. On stiletto nails, the interplay between red and bare nail creates rhythm and visual breathing room, preventing the look from feeling too heavy or costume-like.
Details That Matter
- Use an extremely sharp striping brush or a thin stencil for clean, precise edges
- The negative space design should be symmetrical across all ten nails for maximum polish
- File a crisp, defined edge between the red and bare nail area—no fuzzy transitions
- Negative space designs look best when the exposed nail area is perfectly buffed and clean
- This style allows shorter stiletto nails to feel elongated through visual line work
Insider note: Negative space works best when your nail beds are naturally uniform in color—if you have visible veining or discoloration, the bare sections become less impactful.
5. Red with Delicate White Striping and Silver Tips

A balanced approach that combines elegance with subtle visual interest: deep red as the base, paired with hair-thin white vertical stripes, and silver metallic tips that catch light when light hits them. This design walks the line between bold and refined beautifully. White striping against red creates high contrast that reads as intentional and sophisticated, while silver tips add just enough metallic element to feel polished without becoming costume jewelry. On stiletto nails, the vertical white lines naturally emphasize the length and pointed shape.
Why This Combination Works
Red and white have always been a striking pairing—think of vintage nail designs and timeless aesthetics. When white appears as fine stripes rather than bold blocks, it reads as contemporary and artistic rather than retro. The silver tips add a modern metallic touch that feels present-day without overwhelming the classic red base. Together, these elements create a design that feels intentional and well-thought-out.
Technical Execution Points
- Use a thin striping brush and white gel or polish that provides full opacity in thin lines
- Stripes should be evenly spaced and consistent in width across all ten nails
- Silver can be applied as a full metallic tip or a partial ombre that fades from red into silver
- This design requires patience and a steady hand, but stencils can help if precision isn’t your strength
- The contrast between red, white, and silver works best with a glossy finish
Pro tip: Creating the white stripes first, then adding silver tips, prevents the colors from muddy mixing and ensures clean lines.
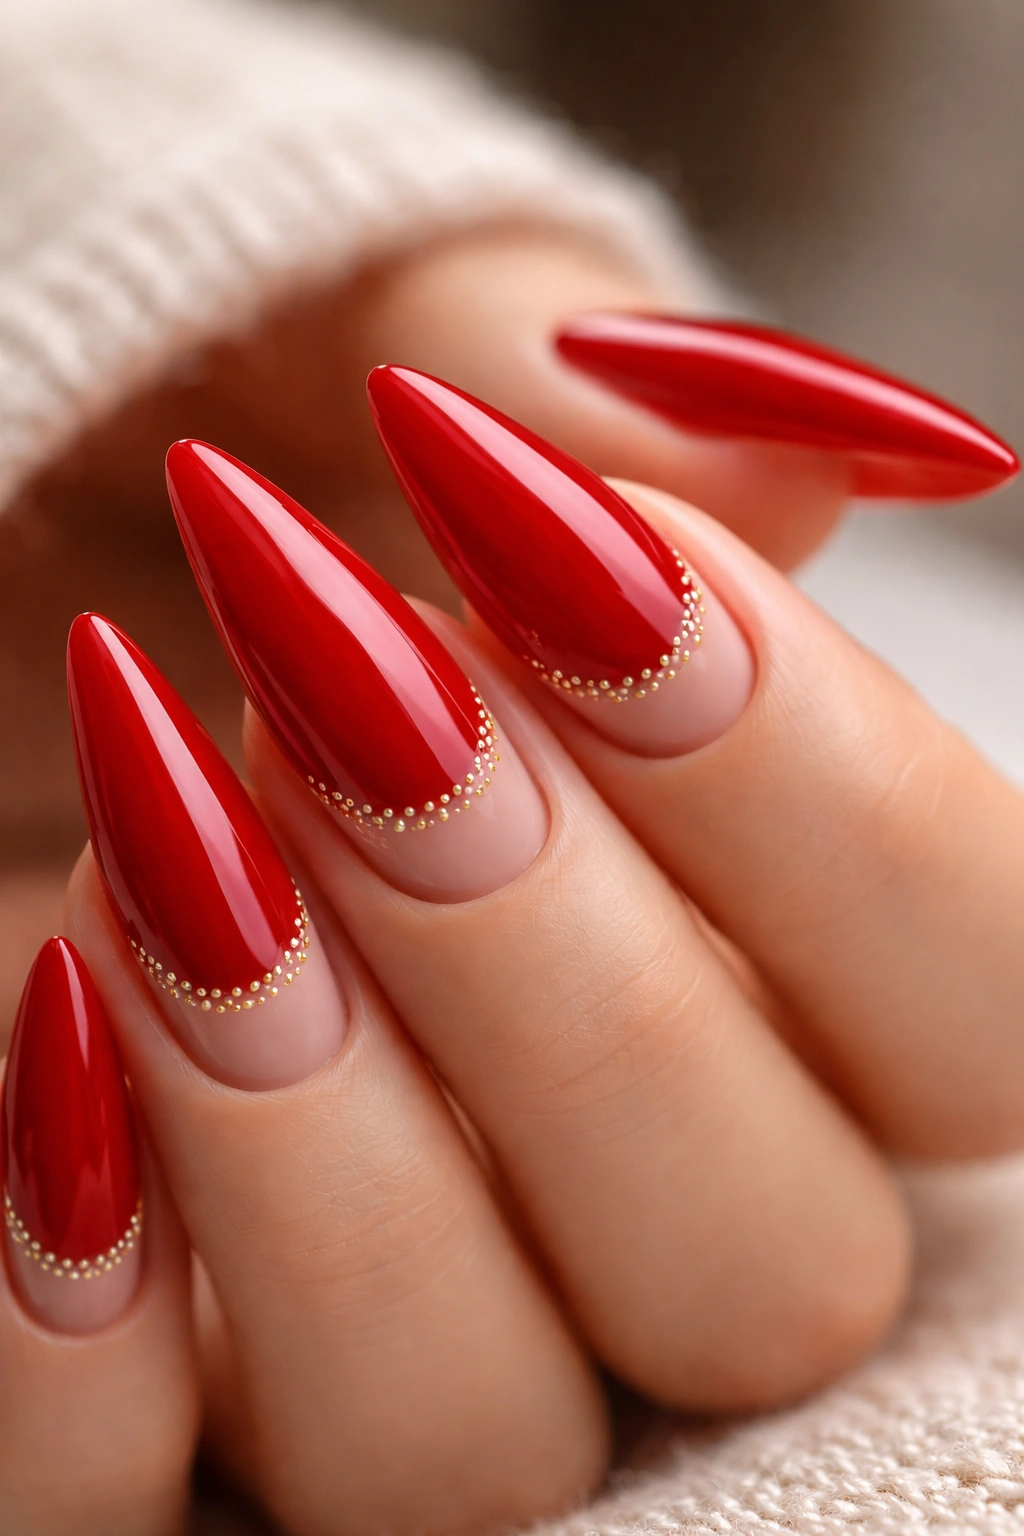
6. Scarlet Red with Pearl Accents and Subtle Texturing
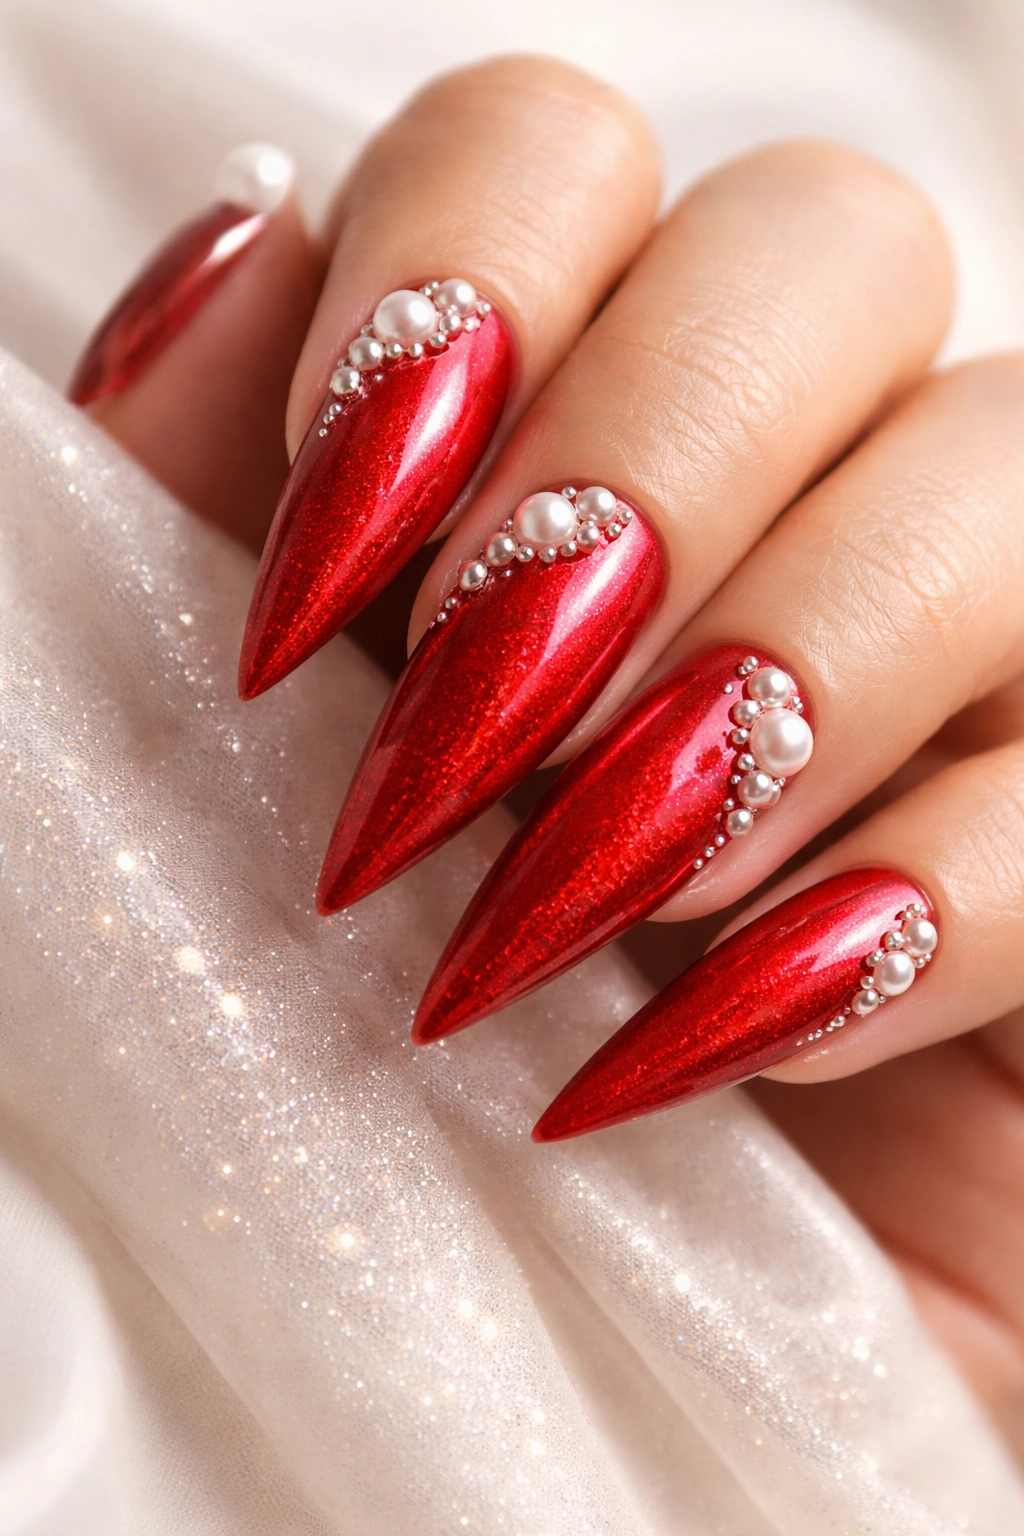
Scarlet red—bright, saturated, true red—becomes classy when paired with pearl elements that add sophistication and texture. Pearl accents can be tiny pearl beads applied to specific areas, pearl dust mixed into a clear topcoat for shimmer, or pearl-finish elements that create a subtle iridescence. This design feels expensive and intentional because it combines multiple techniques. The texture adds sensory interest and makes the design feel more artistic and less flat. On stiletto nails, the interplay between the bright red and subtle pearl shimmer creates a design that transforms depending on the lighting and angle.
What Pearl Brings to the Design
Pearls feel inherently luxurious—they carry associations with timeless elegance and precious materials. When paired with bright red, they create a combination that’s both bold and refined. The slight iridescence of pearl elements prevents the red from feeling flat or one-dimensional. This pairing works across all occasions because pearls are universally associated with class and formality.
Practical Considerations
- Pearl dust mixed into topcoat creates subtle shimmer without visible texture
- Small pearl beads can be applied to accent nails only for a balanced look
- Ensure pearl elements are sealed properly with topcoat to prevent them from lifting
- This design photograph beautifully because the pearl elements catch camera flash
- Works best on longer stilettos where there’s enough surface area for pearl placement
What to know: Apply pearl elements after the base red has fully cured, then seal everything with a protective topcoat for durability.
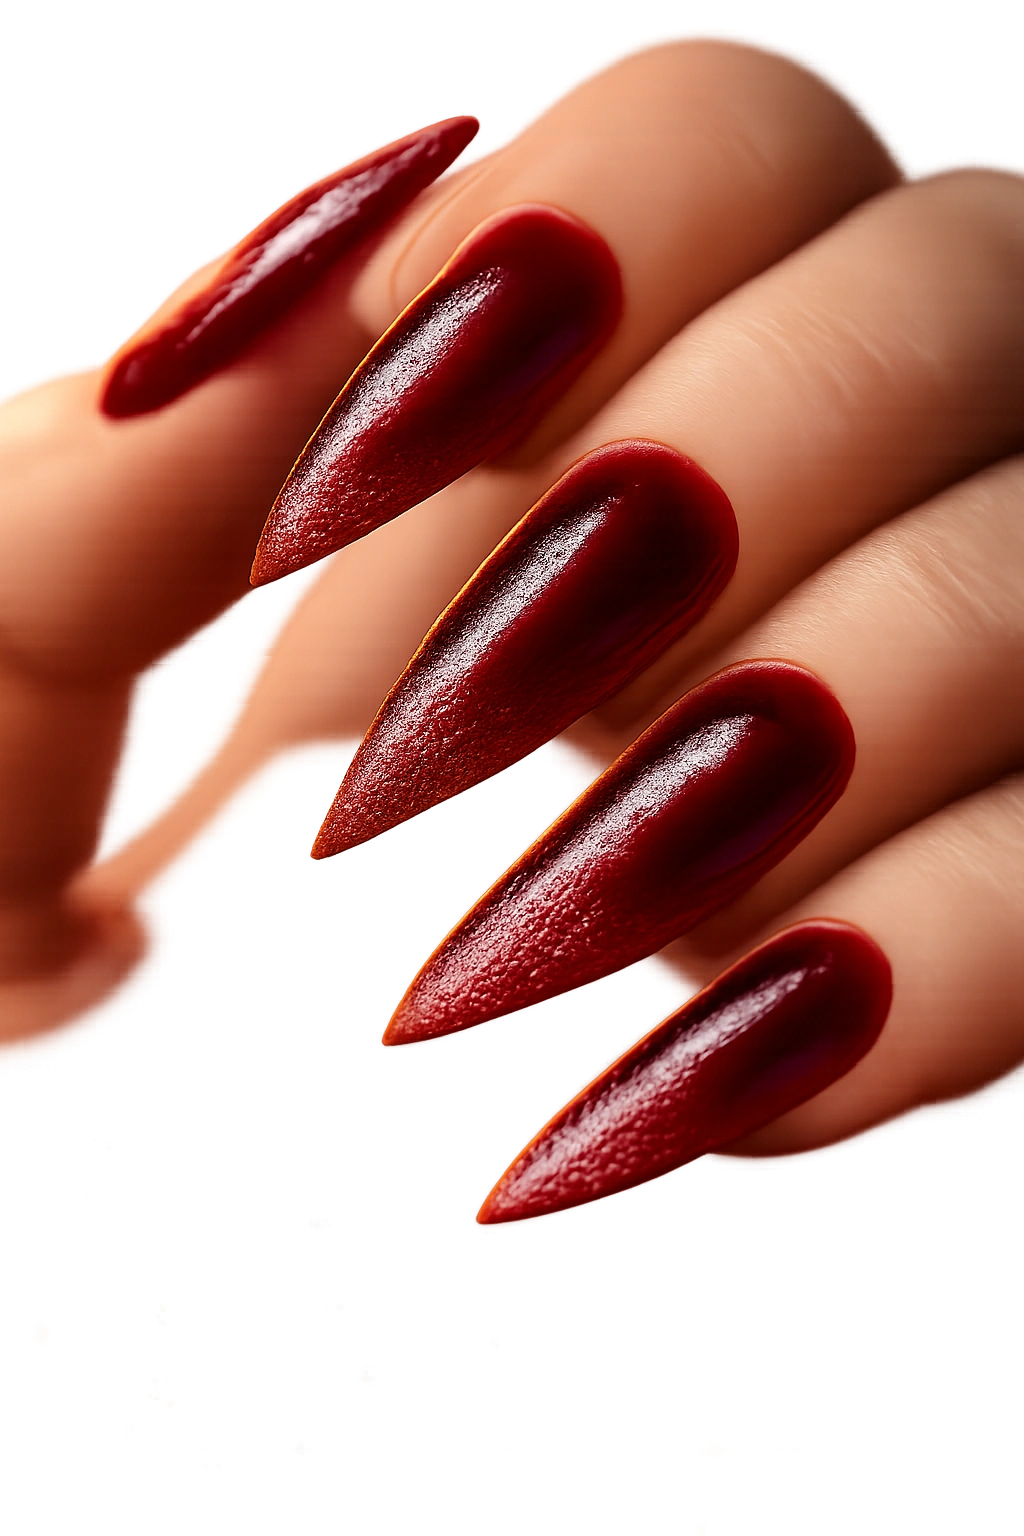
7. Burgundy Ombré from Deep Maroon to Bright Red
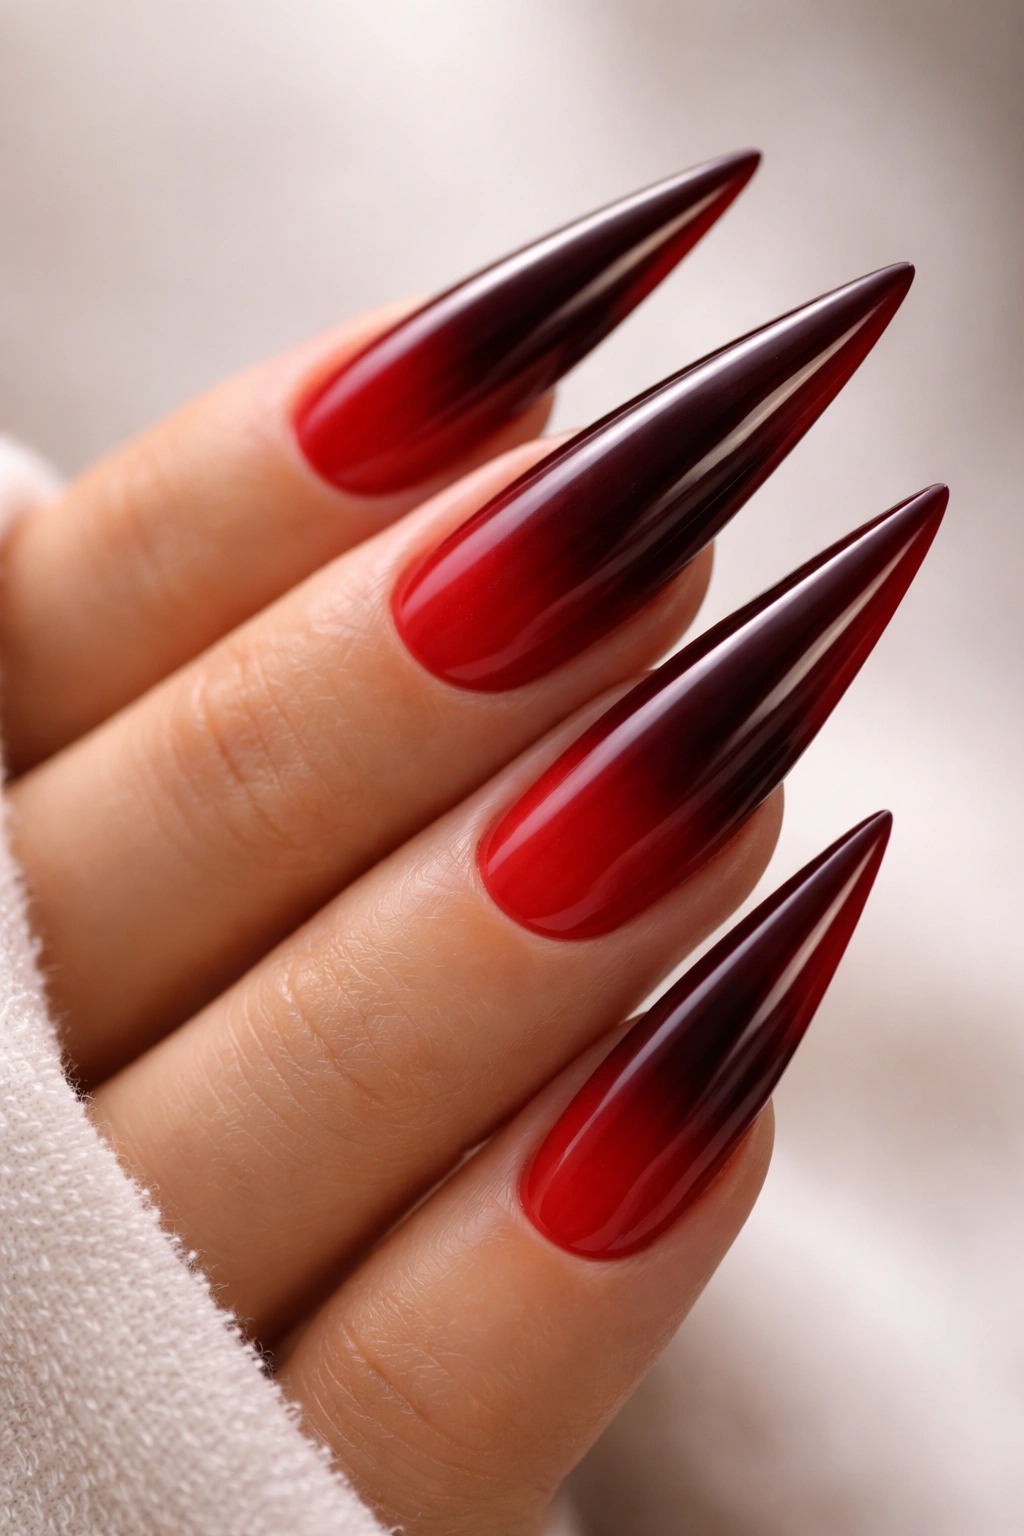
An ombré that transitions from deep, almost-black maroon at the cuticle to bright cherry red at the tip creates movement, dimension, and a gradient that feels contemporary. The ombré technique requires blending multiple shades of red, burgundy, and maroon together in harmony. On stiletto nails, this gradient naturally follows the length of the nail, emphasizing the pointed shape while adding visual interest across the entire surface. The color transition feels sophisticated because it shows intention and technical skill—ombré nails require planning and execution.
Why Ombré Feels Elevated
Ombré is inherently artistic—it’s not a single statement color but rather a carefully orchestrated color journey. Blending multiple shades within the red family shows restraint and sophisticated color understanding. The darker burgundy at the base grounds the design while the bright red tips keep it playful. This balance is what makes ombré sophisticated rather than frivolous.
How to Execute This Gradient
- Use a makeup sponge and stipple three to four shades from dark to light over the nail
- Blend between colors using a damp sponge or soft brush to prevent harsh lines
- Start with a darker burgundy or maroon near the cuticle and gradually lighten toward the tip
- Seal the gradient with a glossy topcoat that unifies all the shades
- This technique is easiest with gel polish because the colors don’t dry as quickly, allowing for blending time
Worth trying: Create the ombré on a makeup sponge first, then apply to the nail as a complete unit—this often creates a more even transition than sponging directly on the nail.
8. Bright Red with Minimalist Gold Ring Details
A crisp, clean bright red paired with delicate gold ring designs—thin circles, stacked rings, or geometric gold elements applied to the lower third of the nail—creates sophistication through restraint. These gold rings might appear on just accent nails, or scattered across all nails at varying heights. The key is keeping the design minimal and precise. On stiletto nails, these ring elements draw the eye downward along the length of the nail, emphasizing the elongated shape. The minimalist approach prevents the look from feeling over-decorated while the gold adds just enough luxury to elevate the design.
Why Minimalist Gold Works
Gold has natural associations with luxury and high value. When applied sparingly—a single ring on an accent nail, or thin rings on all nails—it feels intentional and designed rather than costume-like. The negative space around the gold elements makes them more prominent and impactful than they would be if the nail were heavily decorated.
Design Placement Strategies
- Single rings work beautifully on just the ring finger and pinky for balanced asymmetry
- Stacked rings on a single accent nail create a focal point that draws attention
- Rings positioned lower on the nail naturally elongate the red area above them
- Use a thin brush and steady hand for precise ring application
- This design looks best with a bright, true red base that contrasts cleanly with gold
Quick fact: Ring details look more refined when they’re perfectly symmetrical and evenly spaced—hand-drawn rings that are slightly uneven can read as imprecise rather than artistic.
9. Deep Red with Transparent Overlay and Sparkle Detail
Layer a shimmery transparent polish over a deep red base to create depth and movement—the transparency creates a frosted, jewel-like effect that feels luxurious. Add fine sparkle details strategically—perhaps concentrated near the tips or scattered across the surface—to amplify the effect. This layering technique creates visual complexity and dimension that reads as more sophisticated than a single-layer color. The transparent overlay keeps the red visible while adding texture and catch-the-light qualities that make the design feel special.
What Makes Layering Sophisticated
Layering demonstrates technical knowledge and intentional design. It’s not simply “red nails” but rather a carefully constructed design where multiple elements work together. On stiletto nails, this layering creates dimension that emphasizes the nail shape and length. The interplay between the deep red base and sparkly transparent overlay catches light differently depending on the angle and lighting, making the design feel dynamic and alive.
Technical Requirements
- Apply the deep red base and allow it to fully cure before adding overlay
- Use a shimmery transparent polish that doesn’t completely obscure the base color
- Add fine sparkle details on top using a damp brush, sponge, or dotting tool
- Seal everything with a protective topcoat to ensure longevity
- This design requires quality products to prevent chipping and maintain shine
Pro tip: Test the sparkle placement on a single nail first before committing to all ten—sometimes less sparkle is more elegant than covering the entire nail.
10. Classic Red with Thin White French Tip and Gold Accent Line
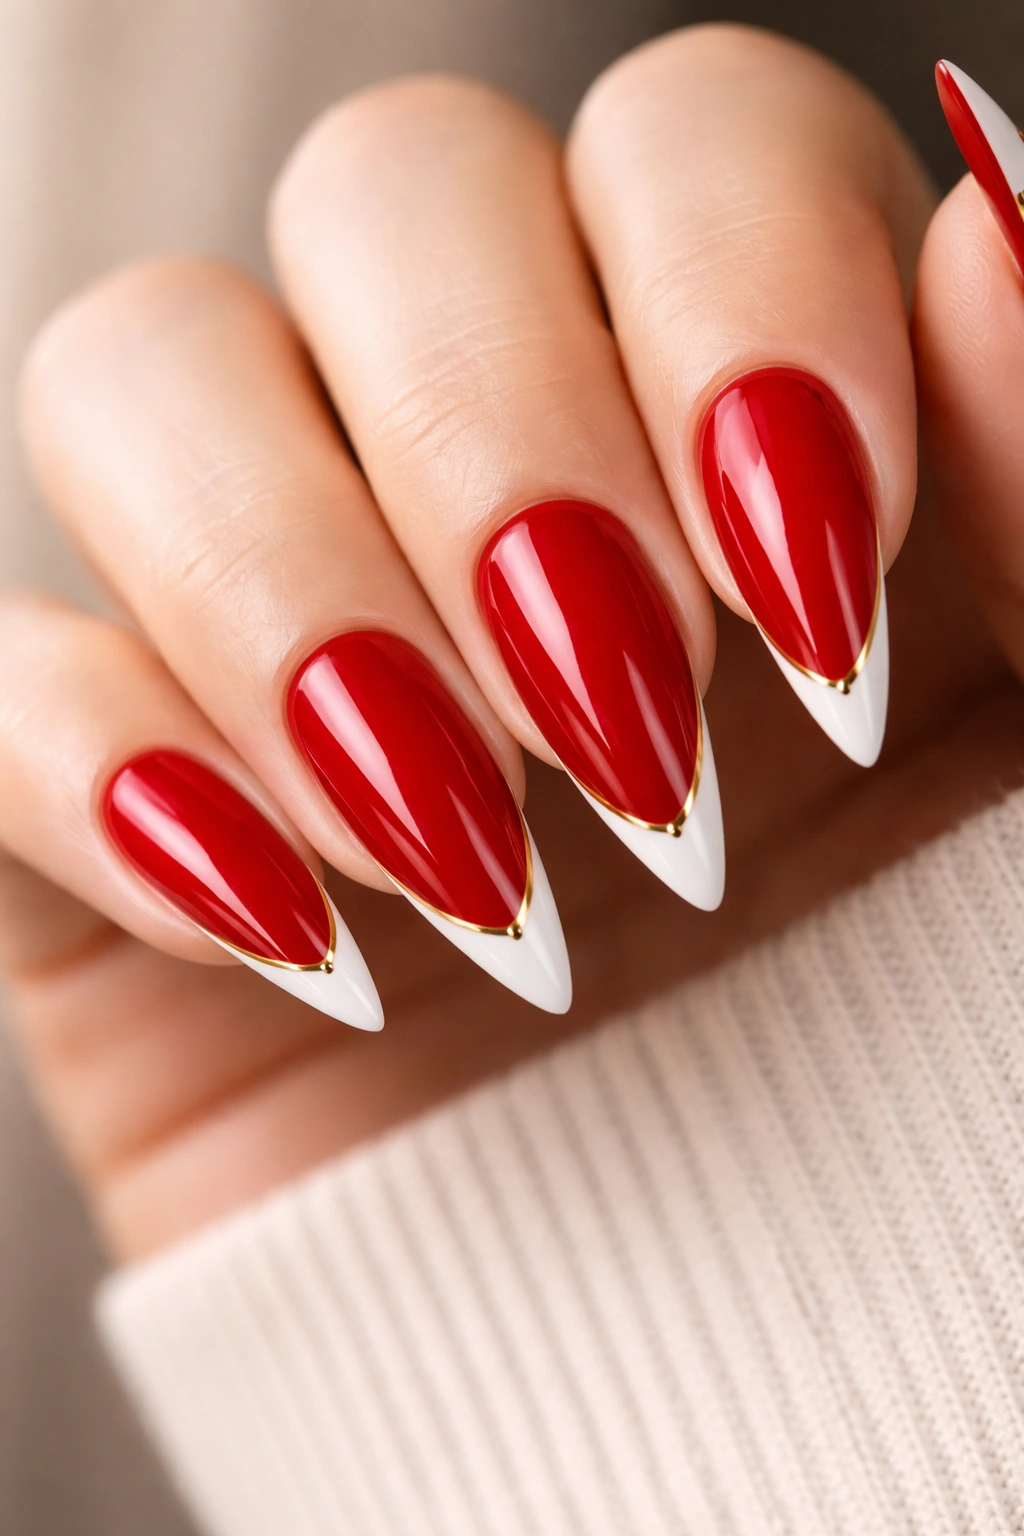
A refined twist on the beloved French manicure: classic bright red as the base, a thin white tip (thinner than traditional French nails for a more contemporary feel), and a delicate gold accent line that separates the red from the white. This design feels simultaneously timeless and modern because it plays with traditional French manicure proportions. The thin white tip prevents the design from reading as dated, while the gold accent line adds a contemporary metallic touch. On stiletto nails, the white tip naturally emphasizes the pointed shape while the gold line adds sophistication and visual interest.
Why Reimagining French is Brilliant
The French manicure is universally recognized as classy, but contemporary interpretations feel fresher. By thinning the white tip and adding a metallic separator line, you’re honoring the classic while making it distinctly your own. This approach works because it maintains the elegance of French nails while avoiding the dated appearance that thick white tips can create.
Execution Details
- Keep the white tip extremely thin—roughly 1-2mm at the widest point
- The white edge should be crisp and clean, following the pointed tip shape perfectly
- Apply a thin gold line between the red and white using a striping brush
- Ensure the white and red have clean separation—no fuzzy or blurred edges
- This design works best with a glossy finish that unifies all three elements
Worth knowing: Very thin white tips can be challenging to create freehand—stencils or guides ensure perfect proportions every time.
11. Crimson Red with Jet Black Accent Nails
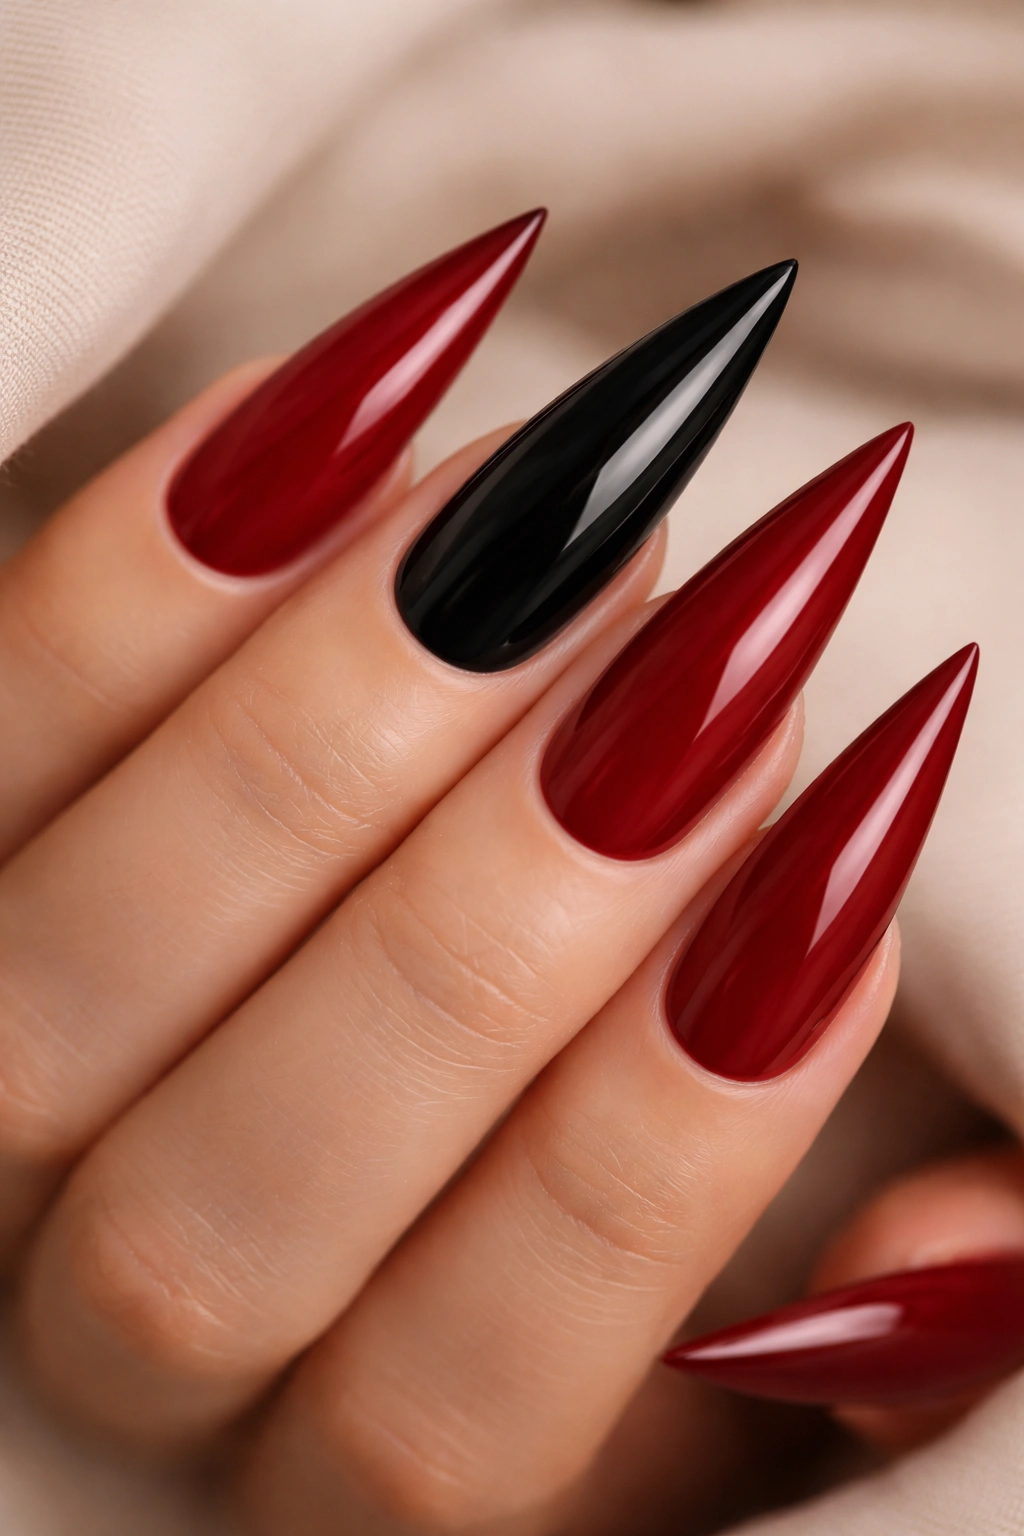
Go bold with an asymmetrical two-tone design: most nails in rich crimson red, with one or two accent nails in jet black. The high contrast between crimson and black creates drama while remaining entirely sophisticated. This design works on stiletto nails because the pointed shape allows for dramatic color blocking and geometric interest. The black accent nails might feature subtle design elements—a single gold detail or a minimalist line—or remain completely solid. The interplay between warm crimson and cool black creates visual balance and prevents either color from overwhelming the design.
Why Contrast Reads as Sophisticated
High contrast, when handled with intention and restraint, reads as bold and confident rather than over-decorated. Using just one or two accent nails in a contrasting color prevents the design from feeling chaotic. On stiletto nails, this two-tone approach creates a strong visual statement while maintaining elegance through careful color placement and proportion.
Design Variations
- Single accent nail (typically the ring finger or thumb) creates balanced asymmetry
- Black accent nails can remain completely solid for maximum impact
- Add a single gold or silver detail to black accent nails for subtle embellishment
- This design works particularly well for evening events or when you want to make a statement
- The contrast between warm and cool tones creates visual complexity that feels intentional
Insider note: This design is particularly striking when the black accent nail sits among the crimson nails, rather than all black nails grouped together.
12. Red with Delicate Lace Overlay Design
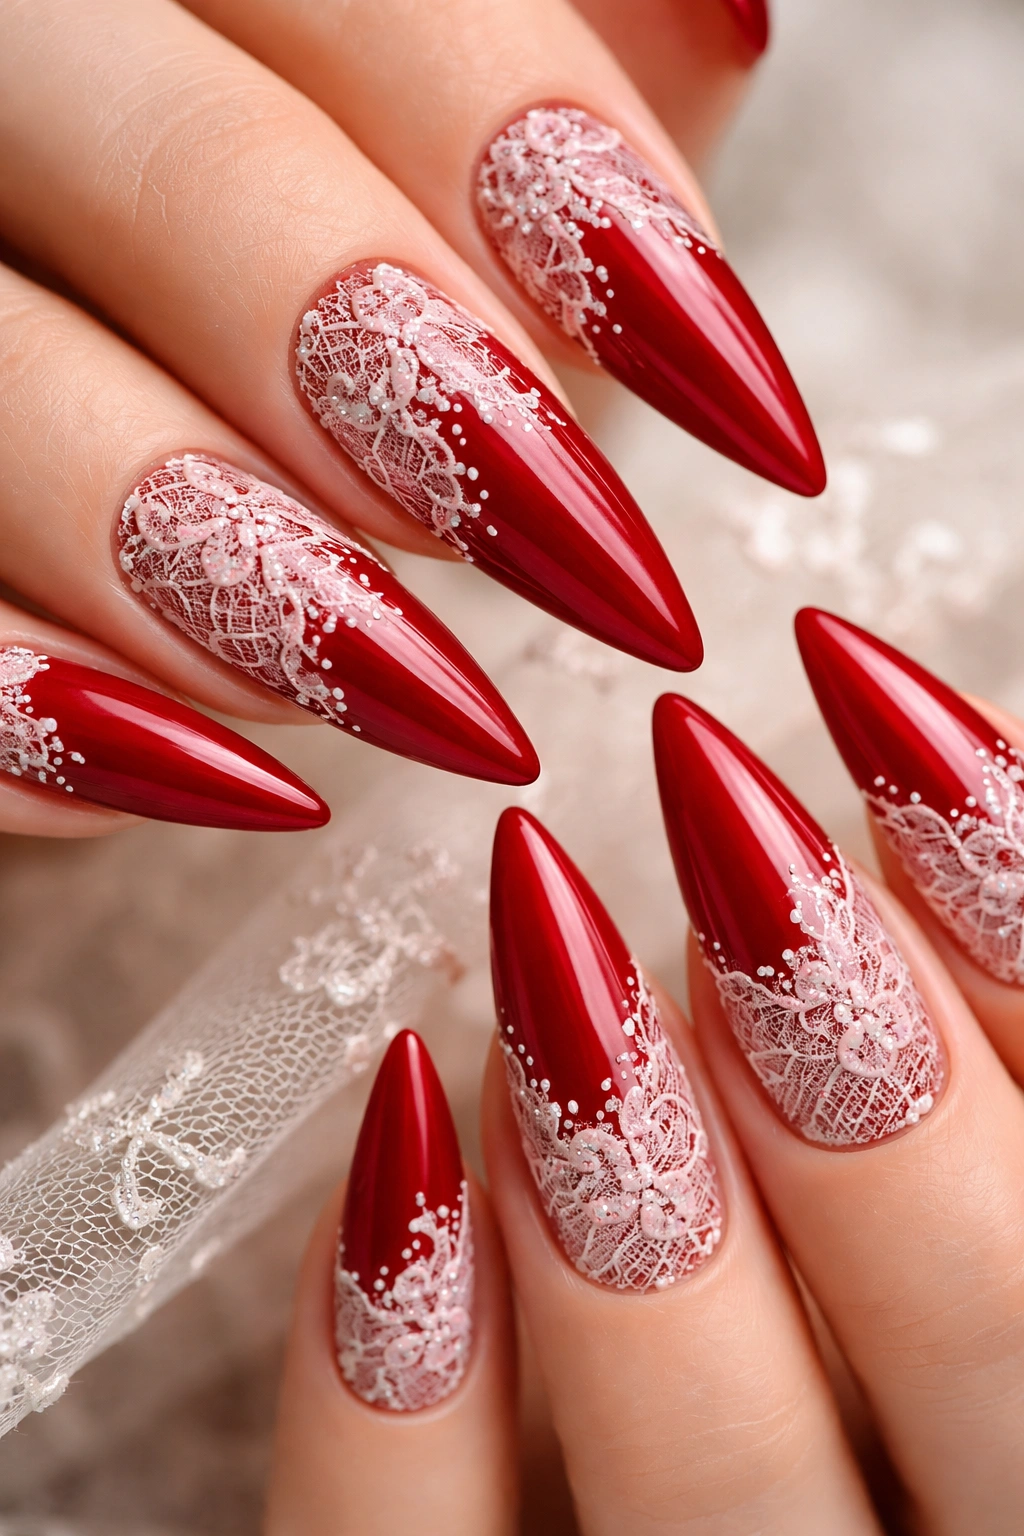
A subtle lace-inspired design overlay in white, ivory, or nude creates a romantic, intricate aesthetic that still reads as classy rather than over-decorated. Lace elements might cover the entire nail or appear only on certain areas—perhaps just near the cuticle, or concentrated near the tips. This design feels feminine and artistic without sacrificing sophistication. On stiletto nails, the delicate line work of lace designs emphasizes the nail shape and length. The contrast between the bold red base and fine white lace creates visual interest and texture.
What Makes Lace Elegant
Lace carries historical associations with luxury, craftsmanship, and refined aesthetics. When translated to nail design, it brings that sense of artisanal skill and intentionality. The complexity of lace patterns—with their intricate interlocking lines—creates visual interest that feels sophisticated rather than childish. This is a design that rewards close inspection.
Application Methods
- Use a thin nail art brush for hand-painted lace details
- Lace stencils are available and create perfectly symmetrical patterns if precision is challenging
- Apply lace in white, ivory, or nude for contrast against the red
- Keep some nail area solid red to balance the intricate lace
- Seal with a protective topcoat to ensure the fine details remain crisp
Quick tip: Lace designs work best when they’re precise and symmetrical—wobbly lines read as imprecise rather than artistic, so take time with application or use guides.
13. Scarlet Red with Chrome Mirror Effect Tips
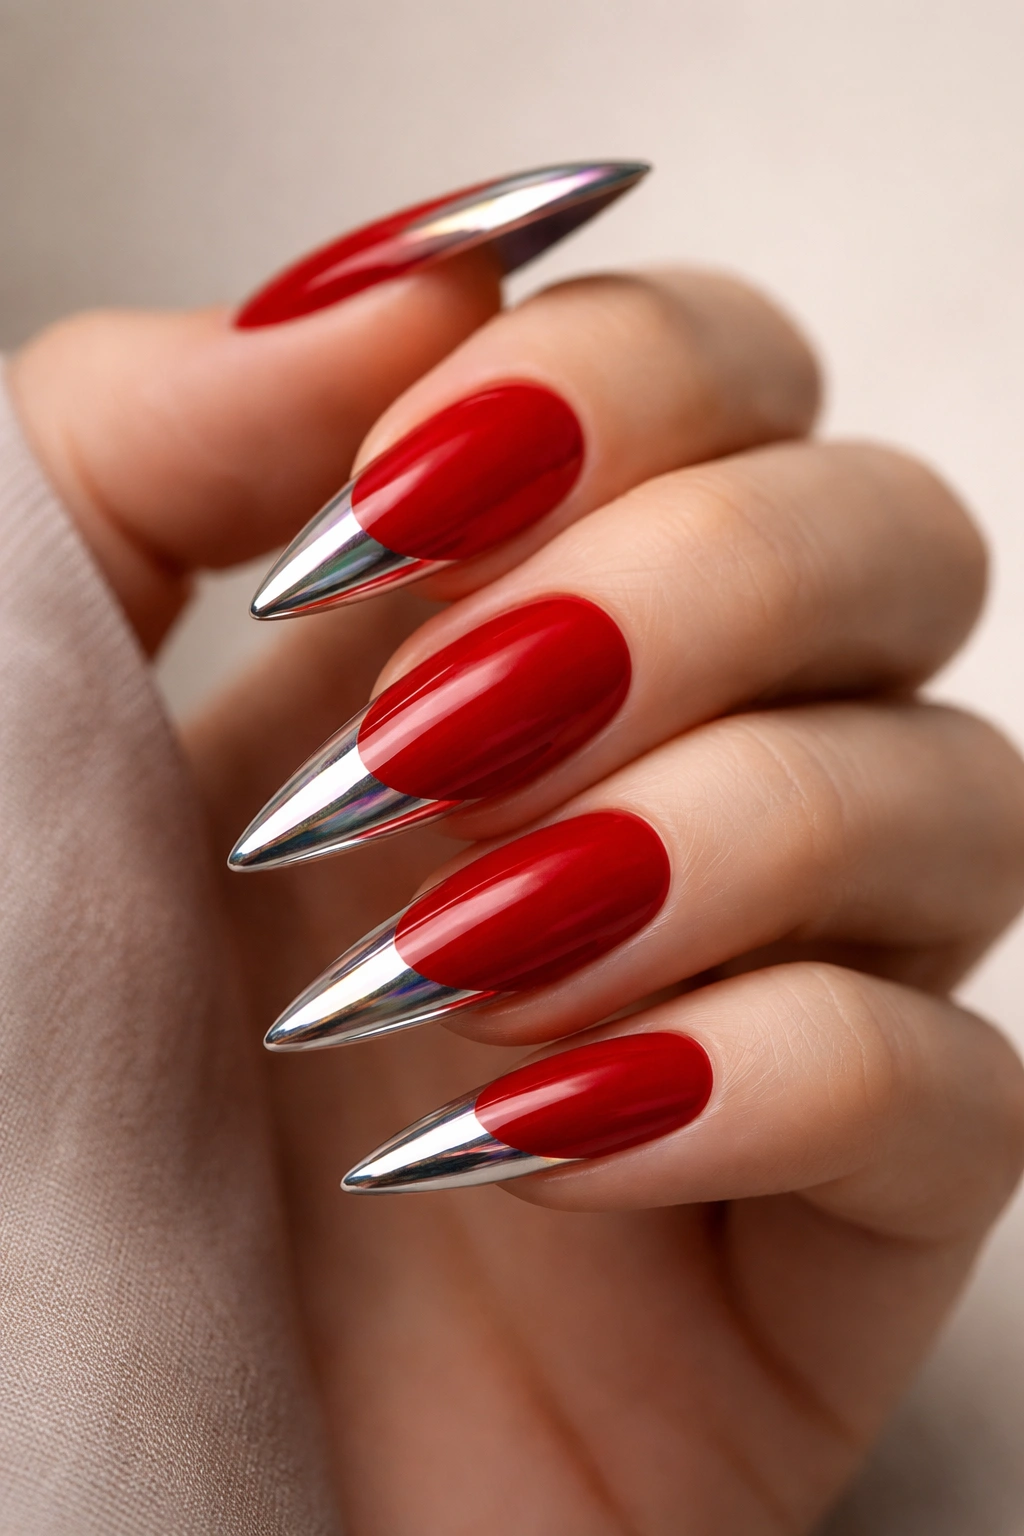
Push into ultra-modern territory with a scarlet red base and chrome mirror tips that reflect light in holographic, multi-colored ways. Chrome powder creates an effect that reads as luxury and contemporary sophistication. Apply the chrome effect only to the tips (roughly the last quarter of the nail) to keep the design balanced—the chrome tips transform the scarlet base underneath while remaining distinctly tied to it. On stiletto nails, chrome tips catch light with every movement, creating a design that’s impossible to ignore while maintaining elegance through the carefully proportioned application.
Why Chrome Feels Sophisticated
Chrome is the most contemporary finish available, used in high-end nail salons and professional designs. The mirror effect creates light-play that’s inherently intriguing. When applied with restraint—just to the tips rather than covering the entire nail—chrome adds drama without reading as costume-like. This is a design that makes a statement about being fashion-forward and confident.
Technical Application
- Apply the scarlet red base and allow it to fully cure
- Create a clear or translucent gel base on the tips where chrome will go
- Apply chrome powder using a velvet applicator, pressing gently for mirror effect
- Seal with a protective topcoat designed specifically for chrome nails
- Chrome effects are most striking under bright light and in photographs
- Maintenance is crucial—chrome requires careful application and quality topcoats to last
Worth knowing: Chrome powder is applied differently than regular polish and requires specific gel products for best results—this is a design best executed by experienced nail technicians or with proper products at home.
14. Dark Red with Subtle Constellation Nail Art
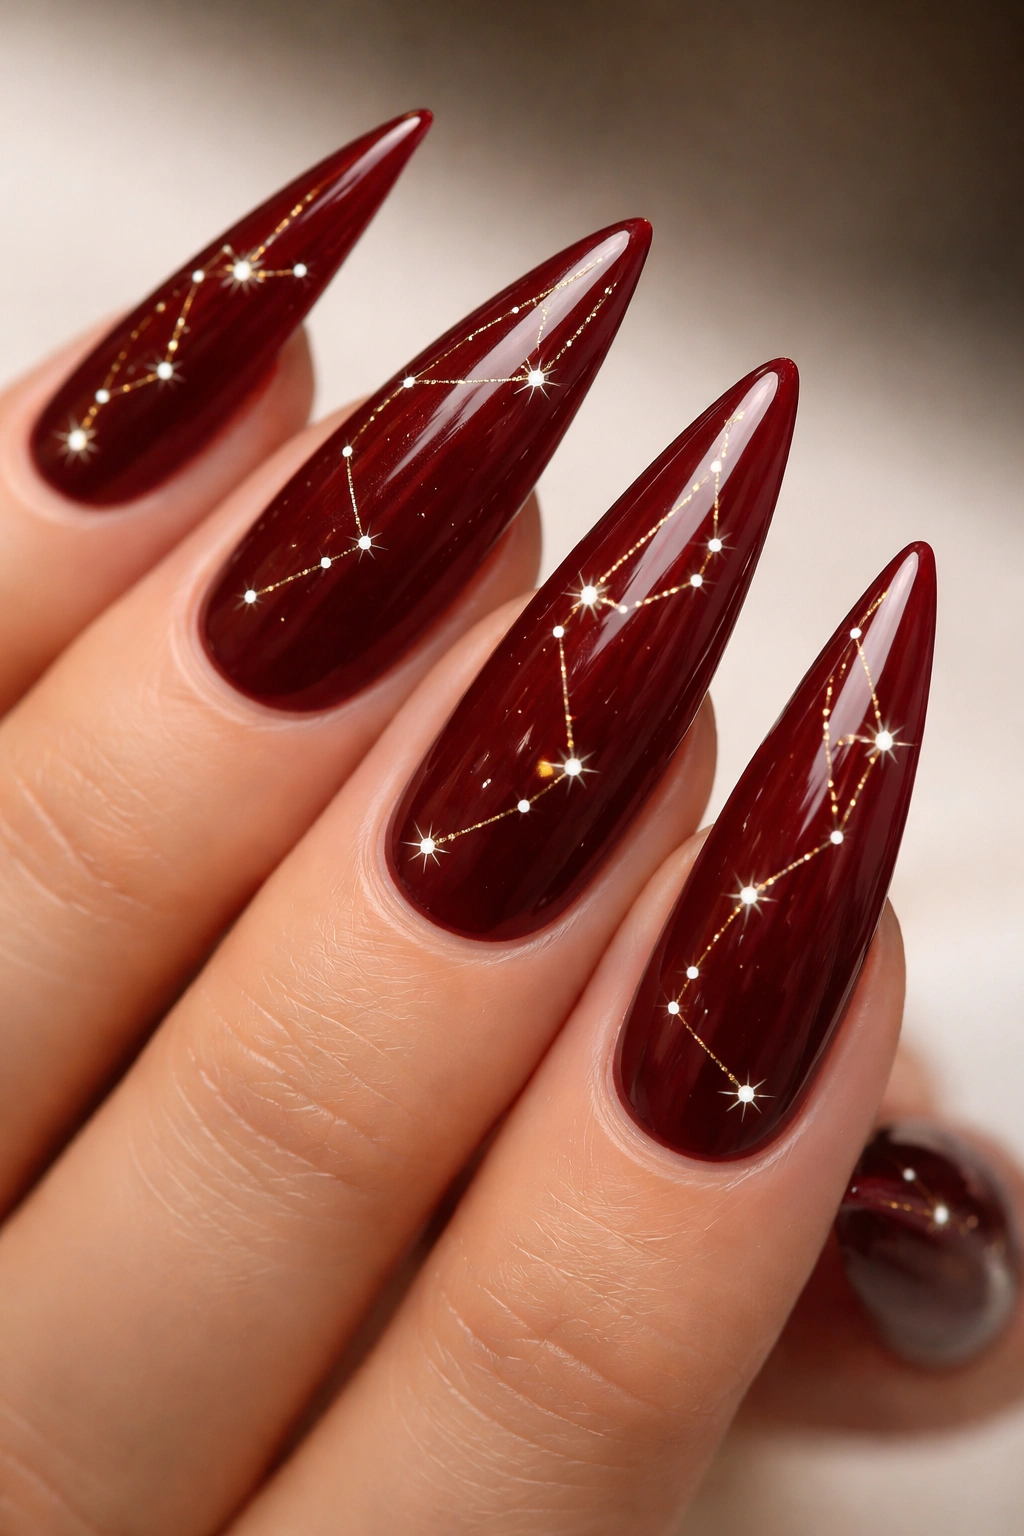
Create a celestial vibe with dark red as the base and tiny white or gold dots arranged in constellation patterns across the nails. The constellation design brings celestial elegance—it’s artistic, meaningful, and sophisticated. This design works because it combines a statement color with subtle, detailed line work. On stiletto nails, the constellation patterns naturally follow the length and shape of the nails, emphasizing their elongated form. The pattern can tell a story (zodiac signs, meaningful constellations) or be purely aesthetic—either way, it creates a design that rewards close inspection and conversation.
Why Constellations Work as Nail Art
Constellations carry associations with wonder, cosmic beauty, and infinite potential. They’re inherently artistic and meaningful. When rendered as tiny dots and delicate lines on dark red nails, they create sophistication through subtlety. This is a design that feels personal and intentional rather than mass-produced.
Design Execution
- Use a dotting tool or thin brush to create tiny white or gold dots
- Connect the dots with delicate lines using a striping brush
- Consider adding meaningful constellations or creating your own pattern
- Keep dots and lines extremely fine for maximum elegance
- This design works best when the pattern is asymmetrical but balanced across all ten nails
Quick fact: Constellation designs often look more sophisticated when dots are irregular in size and spacing—too-perfect patterns feel mathematical rather than artistic.
15. Crimson with Negative Space Geometric Chevron Pattern
Combine crimson red with strategic negative space shaped as angular chevron or zigzag patterns. The negative space allows the natural nail or a neutral base to show through, creating geometric line work that’s bold yet refined. This design requires precision—each chevron or zigzag should be clean and symmetrical. On stiletto nails, geometric chevron patterns naturally follow the elongated shape, creating directional movement that emphasizes the nail length. This approach is sophisticated because it’s architectural, intentional, and demonstrates technical skill through its precision.
Why Geometric Patterns Elevate Design
Geometric patterns are inherently orderly and intentional. There’s a mathematical quality to chevrons and zigzags that reads as designed and sophisticated rather than randomly decorated. When negative space creates these patterns, the design becomes even more striking because the contrast between colored and bare nail areas creates high visual impact.
Precision Requirements
- Use sharp striping brushes or nail guides to create perfectly clean lines
- Chevron patterns should align consistently across all ten nails
- The negative space should be perfectly symmetrical and even
- File the edges of the negative space area for crisp definition
- This design requires patience but pays off in polish and impact
Pro tip: Create a chevron pattern guide or template if working freehand feels too challenging—templates ensure consistency and professional results.
16. Brick Red with Fine Gold Veining Throughout
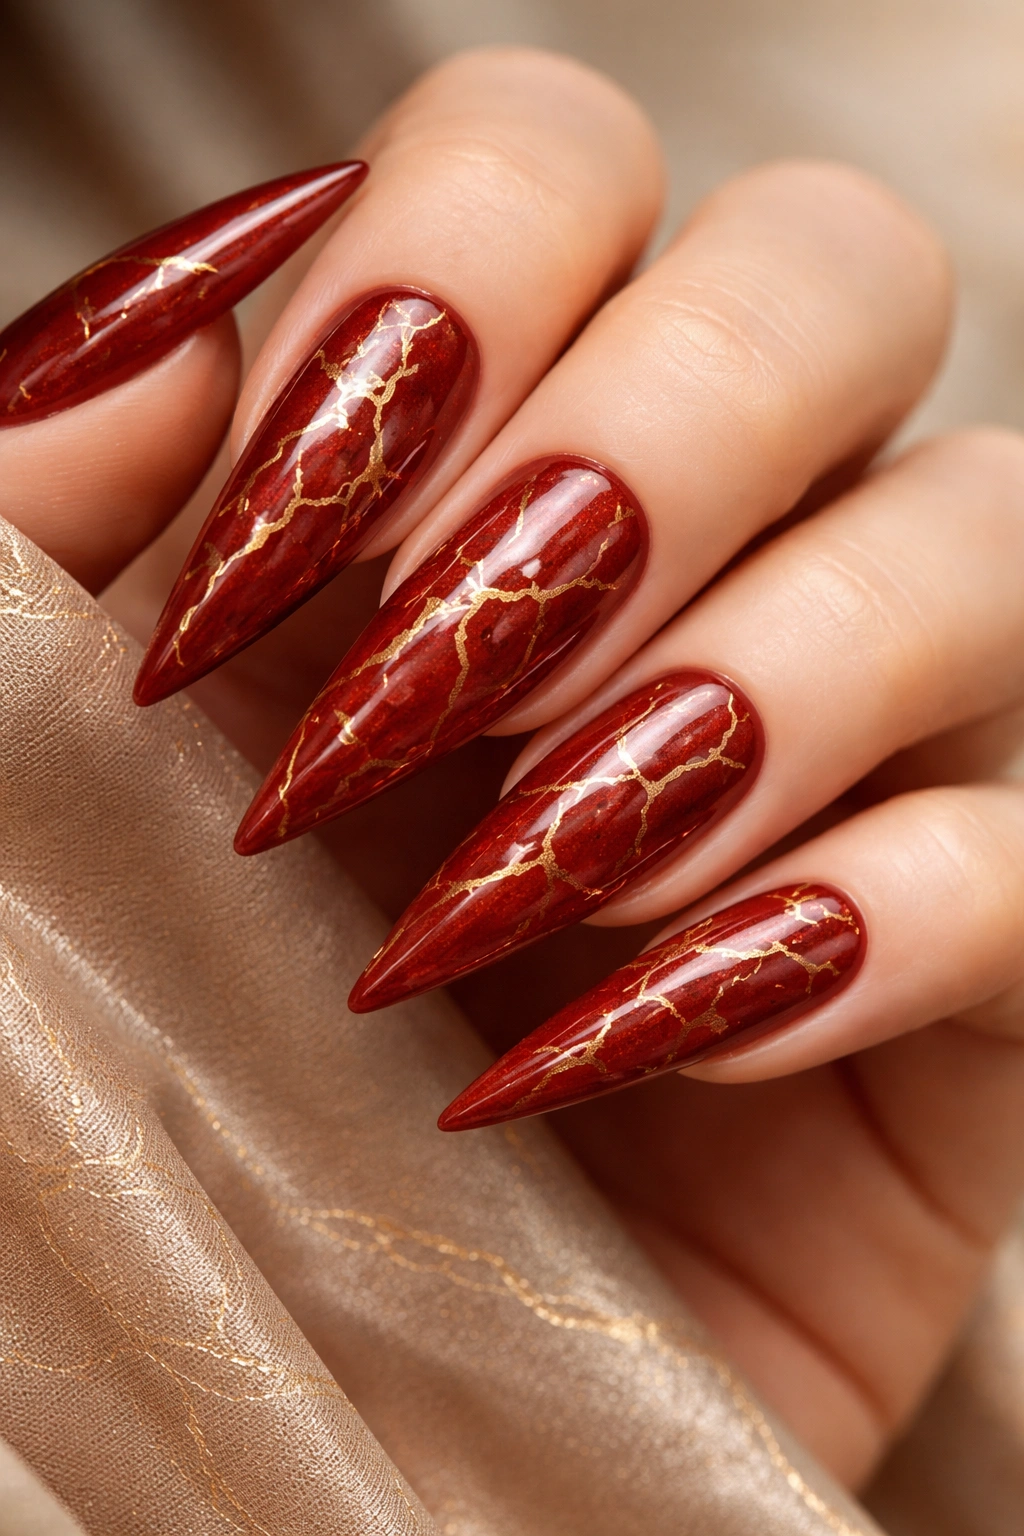
Explore a sophisticated approach using brick red as the base with delicate gold veining that mimics marble, natural stone, or organic veining patterns. The gold lines should be thin, artistic, and somewhat irregular—this is where the design goes from graphic to organic. The veining creates texture and movement across the nail while maintaining elegance. On stiletto nails, the veining patterns naturally follow and emphasize the nail shape, creating a design that’s visually complex but balanced through color cohesion (red and gold are naturally complementary).
What Makes Organic Veining Classy
Veining mimics natural materials like marble and stone, which carry associations with luxury and permanence. When rendered in gold against brick red, it creates a design that feels expensive and intentional. The slight irregularity of hand-drawn veining adds artistry and personality—this isn’t a design that could be mass-produced, which makes it feel unique.
Application Technique
- Use a fine striping brush and gold gel or polish
- Draw veining patterns that appear organic and slightly irregular
- Vary the line thickness and spacing for visual interest
- Apply veining after the brick red base has fully cured
- Seal with a protective topcoat that emphasizes the gold details
Worth knowing: Veining looks more sophisticated when it flows in somewhat consistent directions (like actual marble) rather than being completely random across the nail.
17. Red with Delicate Dotted Half-Moon Design
Transform the classic half-moon manicure by creating tiny dotted patterns instead of solid color blocking. Use red for the main nail and create a half-moon area near the cuticle using small white or gold dots, rather than a solid color or metallic fill. This design feels contemporary and artistic—it takes a traditional manicure shape and reimagines it through a modern lens. On stiletto nails, the curved half-moon shape naturally complements the pointed tip, creating balanced geometric interest. The dotted pattern adds texture and visual interest without overwhelming the design.
Why Reimagined Classics Feel Fresh
Taking a traditional manicure shape (like the half-moon) and updating it through contemporary techniques makes it feel both timeless and modern. The dotted pattern is more intricate than solid color, showing technical skill and intentional design. This approach works because it honors tradition while pushing into contemporary territory.
Technical Details
- Create the half-moon area using a stencil or guide for perfect proportions
- Apply tiny dots using a dotting tool in white or gold
- Keep dots evenly spaced for balanced, intentional appearance
- Ensure the half-moon area has clean edges where it meets the red
- This design works best on longer stilettos where there’s room for dot detail
Insider note: Starting with fewer, larger dots and building coverage creates more control and precision than trying to fill the entire area at once.
18. Deep Red with Matte Finish and Subtle Gloss Accent Line
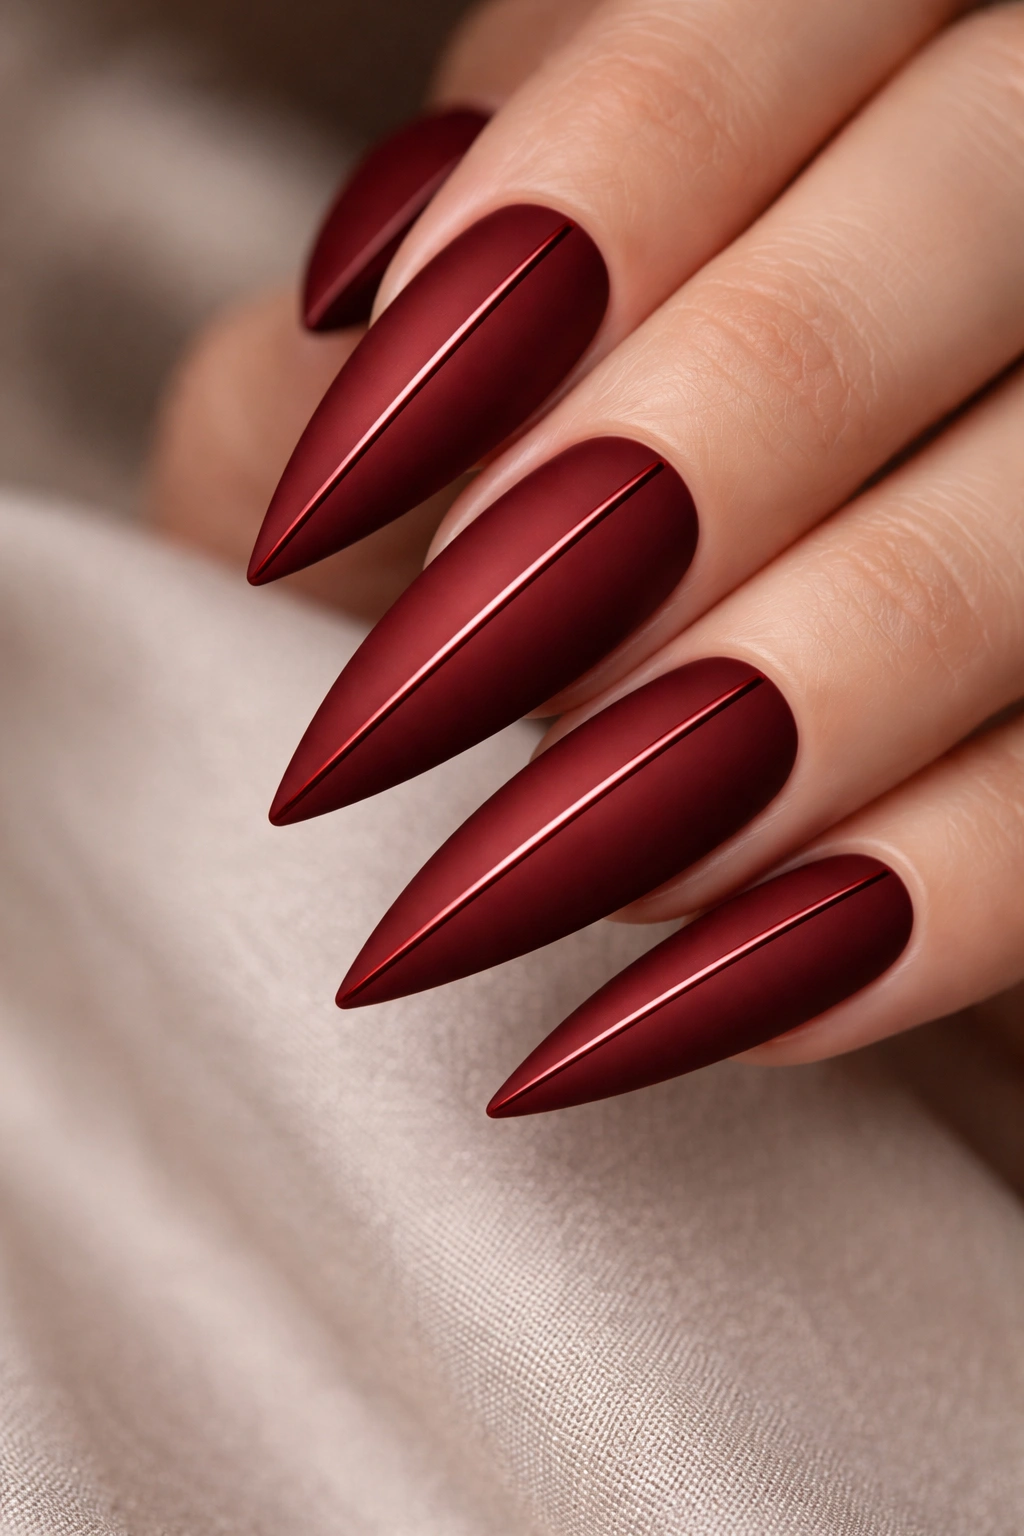
A textural design that plays with finish contrasts: deep red nails with a matte topcoat, paired with a single thin glossy accent line running vertically down the center of each nail (or on accent nails only). The interplay between matte and gloss creates visual interest and dimension. The matte finish feels soft and sophisticated, while the gloss line adds a modern, artistic touch. On stiletto nails, a vertical gloss line naturally emphasizes the elongated shape and pointed tip. This is a design that feels contemporary without being trendy—it’s artistic and intentional.
What Finish Contrasts Accomplish
Mixing matte and gloss finishes creates sensory interest—the eye is drawn to the glossy elements against the softer matte surface. This contrast shows intentional design and technical skill. Matte finishes feel modern and soft, while gloss feels traditional and reflective. Using both creates a dynamic that’s inherently interesting.
Application Steps
- Apply a deep red base and cure properly
- Apply a matte topcoat over the entire nail
- Once matte topcoat has cured, apply a thin glossy line down the center using a striping brush
- The gloss line will stand out dramatically against the matte surface
- Avoid touching the gloss line while still wet to prevent smudging
Quick tip: Keep the gloss line razor-thin for maximum impact and polish—overly thick lines read as less refined.
19. Crimson Red with White Reverse French Tip and Metallic Base Line
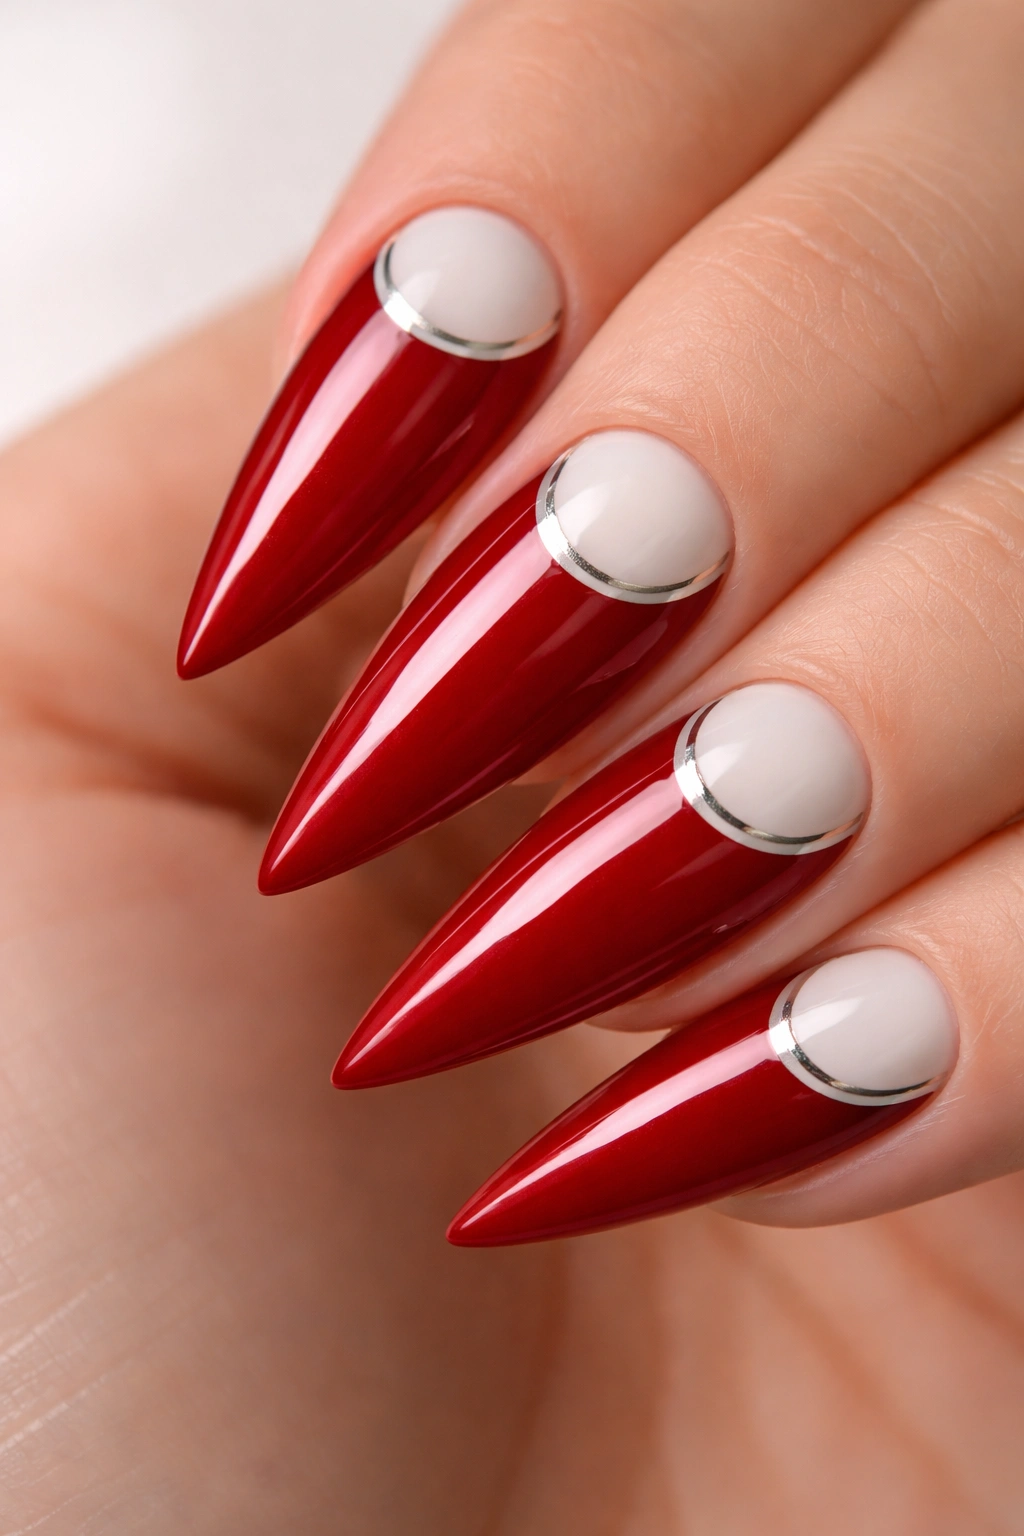
Put a modern spin on the French manicure by reversing it: instead of white tips, use white at the base (near the cuticle) with a reverse French shape, keep the crimson red throughout the main nail area, and add a thin metallic base line where the white meets the red. This design plays with proportion and expectation—it feels surprising but incredibly refined. The metallic line adds luxury while serving as a visual separator. On stiletto nails, the reverse white area near the cuticle creates a contemporary look that prevents the design from reading as traditional.
Why Reversing Tradition Feels Fresh
Taking a beloved classic and inverting it creates something that feels both familiar and innovative. A reverse French manicure reads as design-forward and intentional. This approach works because it maintains the elegance of French nails while completely reimagining the proportions and placement.
Execution Details
- Create a curved white area near the cuticle using a guide or stencil
- Fill the remainder with crimson red
- Apply a thin metallic line (gold or silver) between the white and red sections
- Ensure edges are crisp and clean
- This design requires precision but delivers high-impact results
Worth trying: The metallic base line can be applied either before or after the topcoat, depending on whether you want it to appear integrated or distinctly layered.
20. Burgundy Red with Subtle Sparkle and Matte Seal Finish
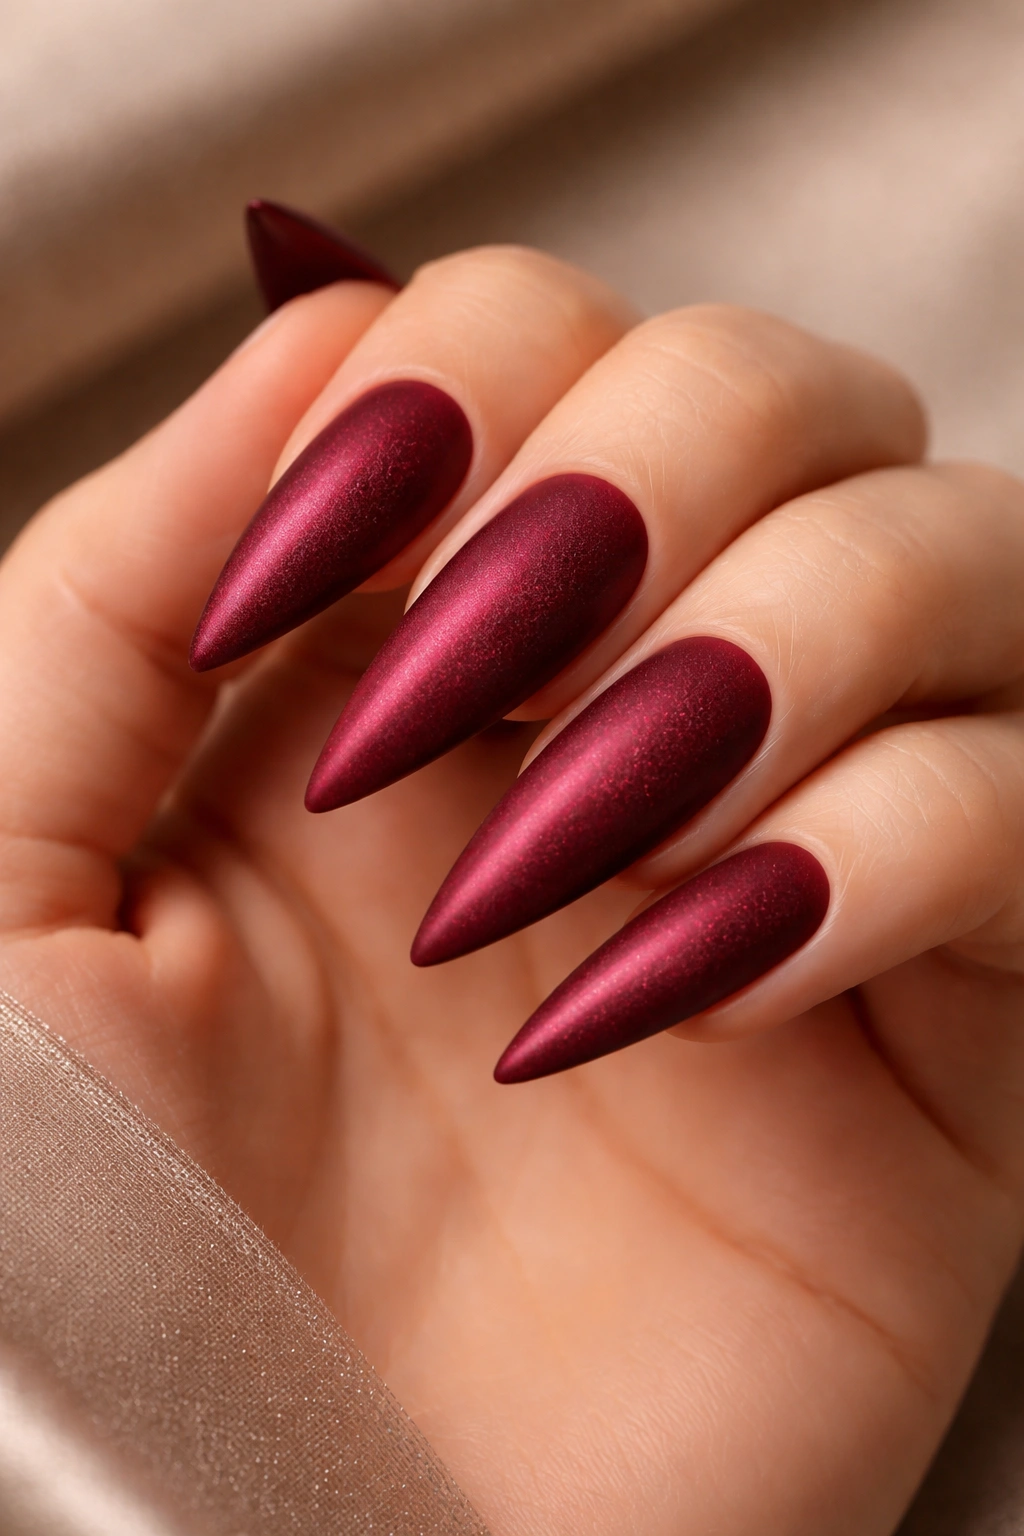
End with an approach that balances sparkle with restraint: burgundy red base with fine sparkle distributed throughout, then sealed with a matte topcoat that mutes the sparkle slightly while creating a sophisticated, understated finish. This design feels luxurious because the sparkle exists but doesn’t dominate. The matte seal creates a soft, sophisticated appearance while the subtle sparkle beneath catches light with movement. On stiletto nails, this combination feels both elegant and special—it’s a design that reads as thoughtfully constructed rather than randomly decorated.
Why Matte Over Sparkle Works
Sealing sparkle with matte topcoat creates an intentional muting effect that feels sophisticated. The sparkle is present but not aggressive—it becomes an Easter egg that reveals itself only under specific lighting. This shows restraint and design sophistication. The matte finish softens what could otherwise be an aggressive sparkle, creating balance.
Application Process
- Apply burgundy red base and allow to cure
- Add fine sparkle throughout using a sponge or brush while the base is still tacky
- Apply a matte topcoat over the entire sparkle area
- The matte layer will diffuse and mute the sparkle, creating a softer appearance
- The design appears understated in normal light but reveals sparkle in bright conditions
Quick fact: This approach works best with very fine glitter or shimmer rather than chunky sparkle—finer particles create a more refined effect when sealed with matte.
Final Thoughts
Classy red stiletto nails aren’t about choosing the brightest red or the most decorated design—they’re about intentional choices that showcase your understanding of proportion, color, and detail. The most sophisticated red nail designs often feel restrained in some ways while making a clear statement in others. Whether you’re drawn to minimalist geometric work, delicate lace overlays, or textural finishes like matte and gloss, the common thread is precision and thoughtfulness. Your nail design is a small canvas that speaks volumes about your aesthetic sensibility.
The beauty of red stiletto nails is that they work across every season, every occasion, and every personal style when executed with intention. A perfectly applied bright red with negative space work reads as artistic and contemporary. A glossy crimson with subtle gold accents feels timeless and luxurious. A matte burgundy with delicate details demonstrates sophistication and restraint. You don’t need to choose between bold and elegant—with the right approach, red stilettos deliver both. The key is understanding what makes each design work, executing with precision, and staying true to the aesthetic that makes you feel most confident.
