

Butterfly designs have become a beloved staple in nail art, and when you combine them with the elongated elegance of duck nails (also called coffin or ballerina nails), you create something truly spectacular. The wide nail bed gives you the perfect canvas for detailed butterfly artwork, while the tapered shape naturally draws attention upward, making any winged design feel even more graceful and intentional. Whether you’re drawn to delicate, ethereal designs or bold, statement-making butterflies, duck nails accommodate every aesthetic—from minimalist single-wing silhouettes to elaborate multi-butterfly garden scenes that wrap around your entire nail set.
The beauty of combining butterflies with duck nails lies in the versatility. You can go full maximalist with intricate wing details, layered colors, and textured embellishments, or keep it subtly sophisticated with a whisper-thin butterfly outline barely visible against a neutral base. The length of duck nails means you have real estate to work with—room for dimension, detail, and personality that a shorter nail simply can’t offer. Plus, butterflies photograph beautifully on this nail shape, which makes them endlessly shareable and Instagram-worthy.
What makes these designs so popular isn’t just their visual appeal—it’s that they work for virtually any occasion. Delicate watercolor butterflies feel romantic and date-night ready, while holographic or chrome butterfly wings lean into bold, modern energy. You can keep your design dainty and barely-there or go full transformation with encyclopedia-level detail. The 14 designs below showcase the incredible range of what’s possible when you marry the grace of butterflies with the statement-making drama of duck nails.
Let’s dive into the most stunning butterfly duck nail ideas that’ll transform your next manicure into wearable art.
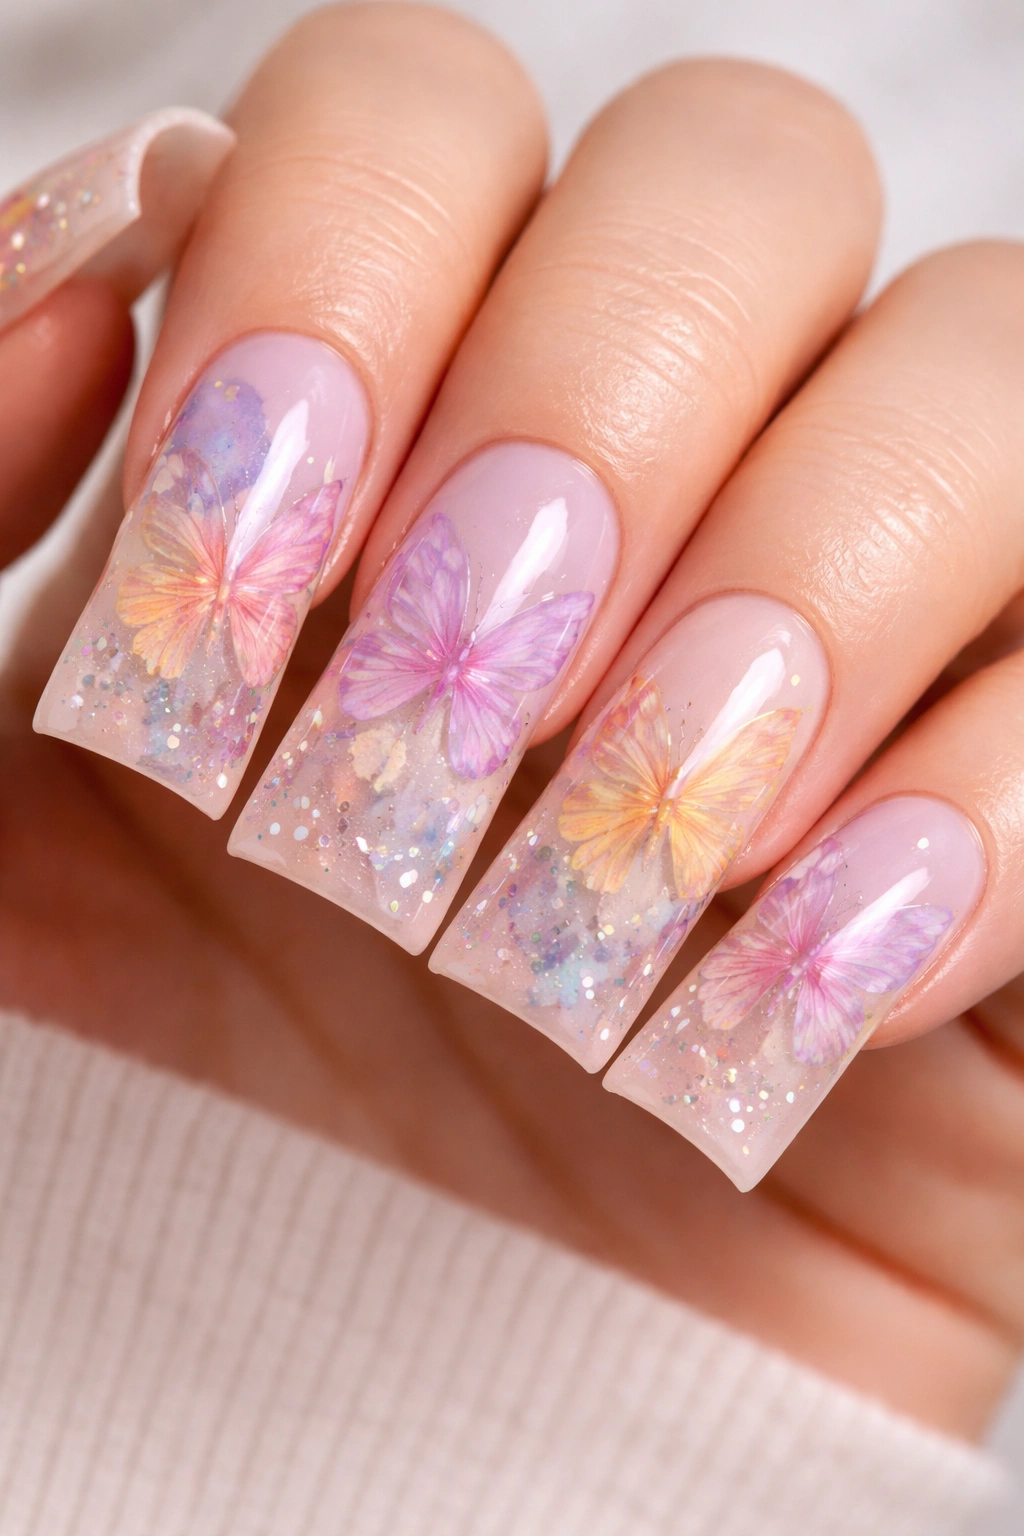
1. Delicate Watercolor Butterflies on Nude Duck Nails
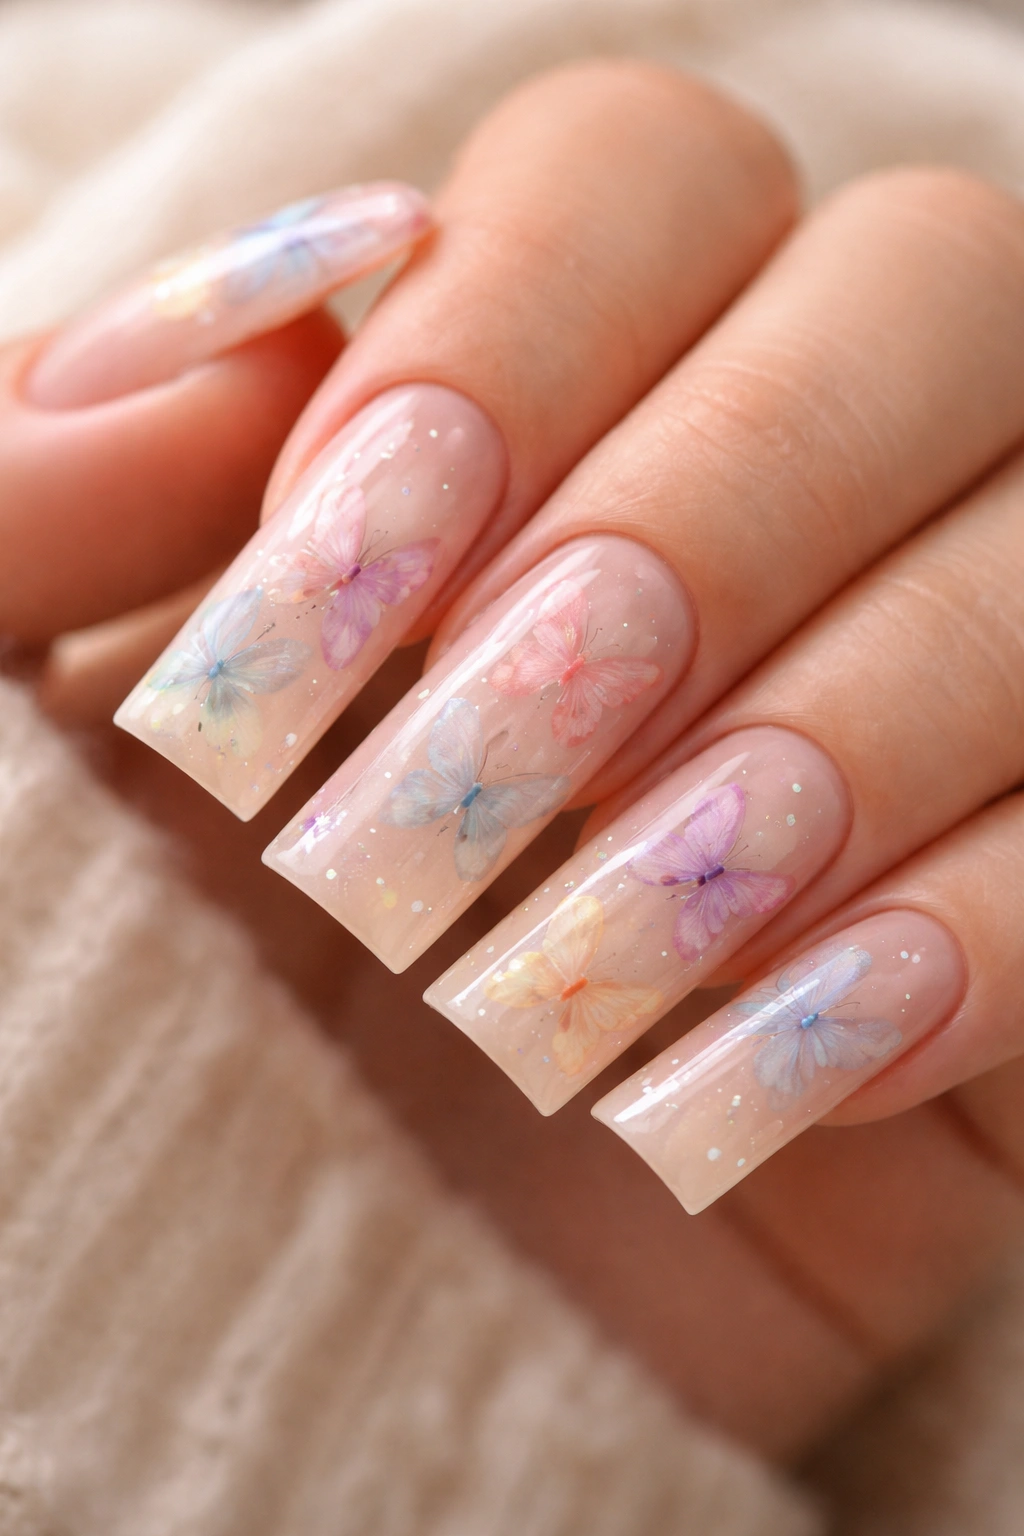
This design embraces soft, romantic energy by layering watercolor-style butterfly illustrations across a warm nude base. The technique mimics the diffused, painterly look of actual watercolors—think soft edges, gentle color bleeding, and a naturalistic quality that feels both artistic and wearable. Rather than creating crisp, outlined butterflies, this approach uses thin brushes to suggest butterfly shapes with translucent washes of color that blend seamlessly into one another.
Why This Design Works
The nude base acts as a neutral anchor that lets the butterfly artwork become the focal point without overwhelming. Watercolor butterflies carry an inherent delicacy—they look hand-crafted and personal rather than mass-produced, which elevates your whole manicure. The soft color blending also means imperfections actually add to the charm; slight variations in pigmentation feel intentional rather than sloppy.
How to Achieve It
- Use a cream or warm nude base coat and let it cure completely before adding art
- Mix your gel colors with a gel thinner to achieve translucency, then use a fine detail brush to loosely paint butterfly silhouettes
- Let each color sit briefly before adding the next layer so colors blend slightly without becoming muddy
- Focus on the outer third of each nail for visual balance and to avoid crowding
- Seal with a matte top coat for an authentically artistic finish, or use glossy if you prefer more dimension
Pro tip: Dilute your gel colors more than feels comfortable—butterflies painted with overly thick pigment look stenciled rather than watercolor. The beauty here is in the delicate pigmentation.
2. Holographic Butterfly Wings with Chrome Duck Tips
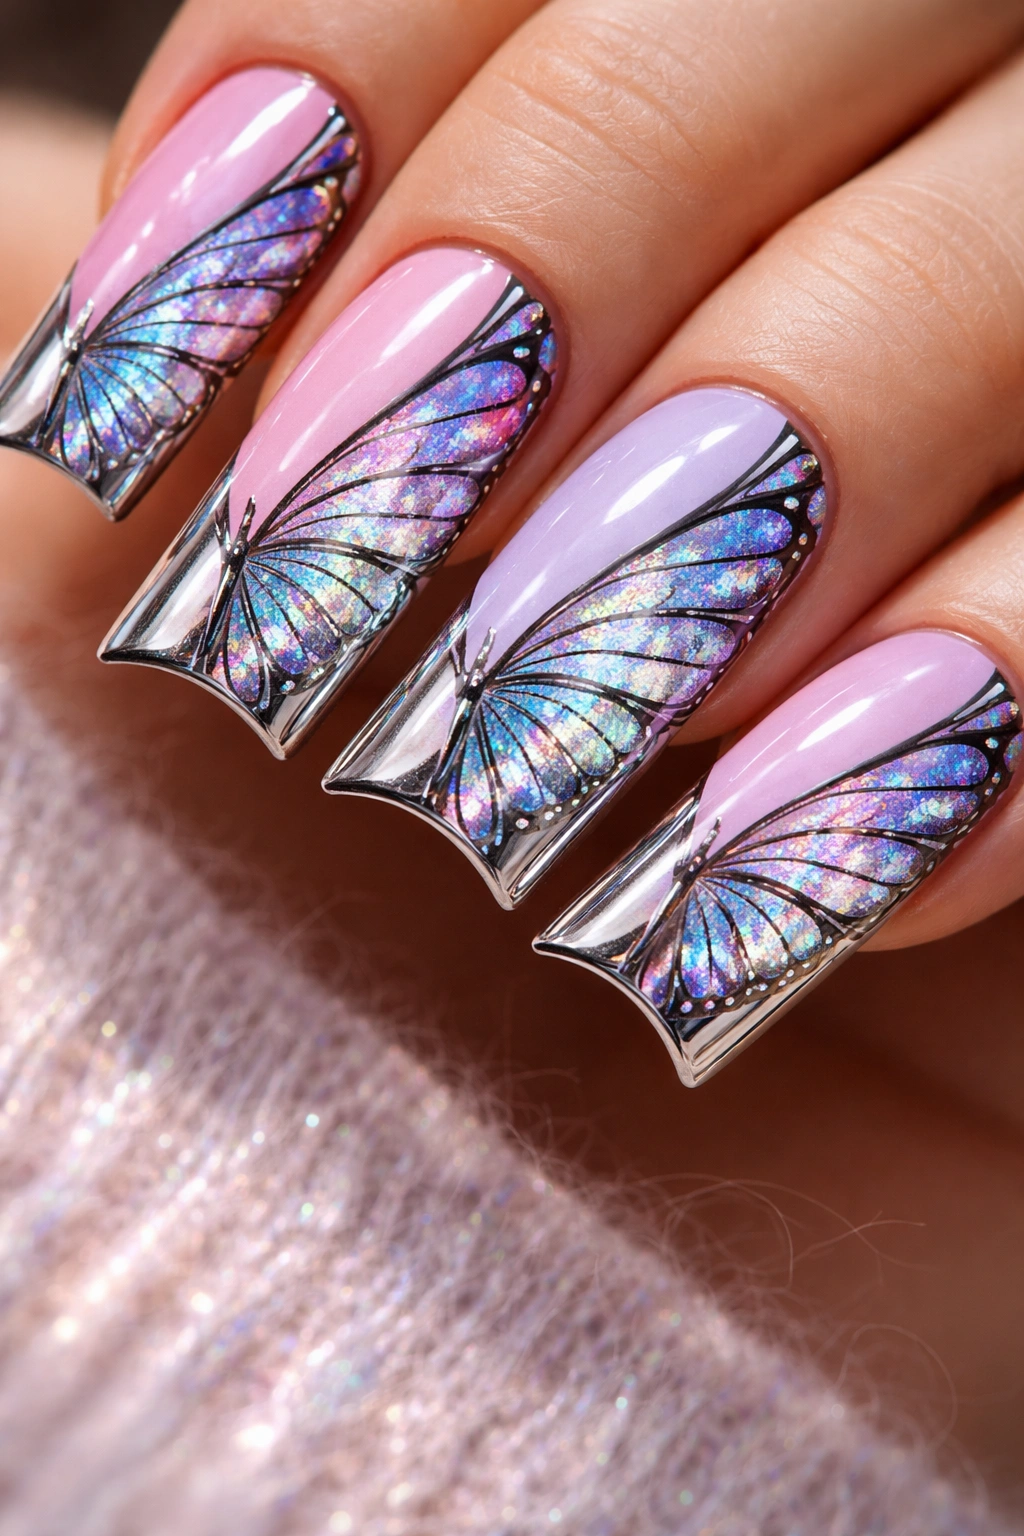
This design pairs dramatically—one half photorealistic holographic butterfly wings rendered in iridescent chrome, the other half a contrasting solid color. The wings shimmer and shift through rainbow light as your hands move, creating an eye-catching optical effect that feels futuristic and bold. The chrome reflects light in every direction, making the butterfly feel almost three-dimensional and alive on your nail.
Why It Stands Out
Holographic and chrome pigments catch light like nothing else—they transform with every movement, so your nails never look quite the same twice. This design reads as high-effort and fashion-forward, even though the technical execution is straightforward once you master chrome application. The contrast between the shimmering wing and a solid color nail base creates visual drama without requiring intricate hand-painting skills.
Chrome Application Tips
- Use a chrome powder specifically formulated for gel polish; regular holographic pigments are too fine
- Apply a thin layer of clear gel, then press the chrome powder in using a velvet applicator or special chrome tool
- Work in sections and be generous with powder—patchy application is the main mistake here
- Buff away excess powder once cured
- Layer butterfly wing outlines in black gel before applying chrome for crisp definition
- Seal with a glossy top coat to enhance the reflective quality
Worth knowing: Holographic effects look best in natural or bright light. In dim settings, they’ll appear more subtle, so this is best for situations where you’ll be outdoors or in well-lit environments.
3. Ombré Butterfly Silhouettes on Pastel Duck Nails

Create a soft color gradient across your duck nails, then layer simple butterfly silhouettes that transition in shade from one end of your mani to the other. A blush-to-peach ombré, lavender-to-lilac fade, or blue-to-teal gradient provides the perfect backdrop for butterfly outlines that deepen or lighten as they move across the spectrum. This design feels modern, cohesive, and utterly Instagram-worthy.
What Makes It Special
Ombré backgrounds create instant visual flow across your entire nail set—your eye naturally travels from pinky to pointer finger following the color progression. When you add butterflies that echo or complement that gradient, you create a unified design that feels both sophisticated and playful. The gradient does so much visual work that you don’t need elaborate butterfly details; simple outlines are absolutely enough.
Creating the Gradient
- Start with your lightest shade on one side and build toward darker color on the other
- Use a makeup sponge slightly dampened with isopropyl alcohol to blend where colors meet
- Keep the sponge motions vertical and gentle to avoid over-blending and mudding colors
- Once the gradient is set, map your butterfly placement mentally before applying any gel
- Use a thin liner brush to paint butterfly silhouettes in a complementary shade
- Black or charcoal works universally, but matching the darkest part of your ombré is also striking
Insider note: The direction of your gradient matters for balance. Transitioning from light to dark as you move from thumb toward pinky feels more intentional than the reverse.
4. 3D Textured Butterfly Details on Clear Duck Nails
Layer textured elements on top of a clear gel base to create butterfly designs that have actual dimension—you can feel them when you touch your nails. Use materials like crushed glass, mica flakes, or even tiny gemstones mixed into clear gel to build up wings, antennae, and body details. On a clear base, these textured elements create a translucent, almost stained-glass effect that’s mesmerizing.
How It Compares to Flat Designs
A clear base with textured 3D butterflies reads as modern and sculptural rather than painted. The design catches light differently depending on the angle and the thickness of buildup, making it genuinely different to look at from different perspectives. It’s also incredibly tactile—you can feel the texture, which adds a sensory dimension most nail art doesn’t have.
Building 3D Texture Properly
- Use a builder or viscous clear gel as your base layer within the butterfly shape
- Mix in mica powder, crushed glass, or flakes before curing
- Cure in short bursts to control how much texture settles
- Layer additional textured gel on top for dimension, curing between layers
- Define butterfly edges with a thin line of dark gel so the shape reads clearly despite the texture
- Seal everything with a glossy top coat to smooth the outer surface slightly
Pro tip: Textured designs catch dirt and debris more easily than smooth nails, so this is a design you’ll want to clean regularly—it’s worth the maintenance for the dramatic effect.
5. Negative Space Butterfly Design on Duck Nails
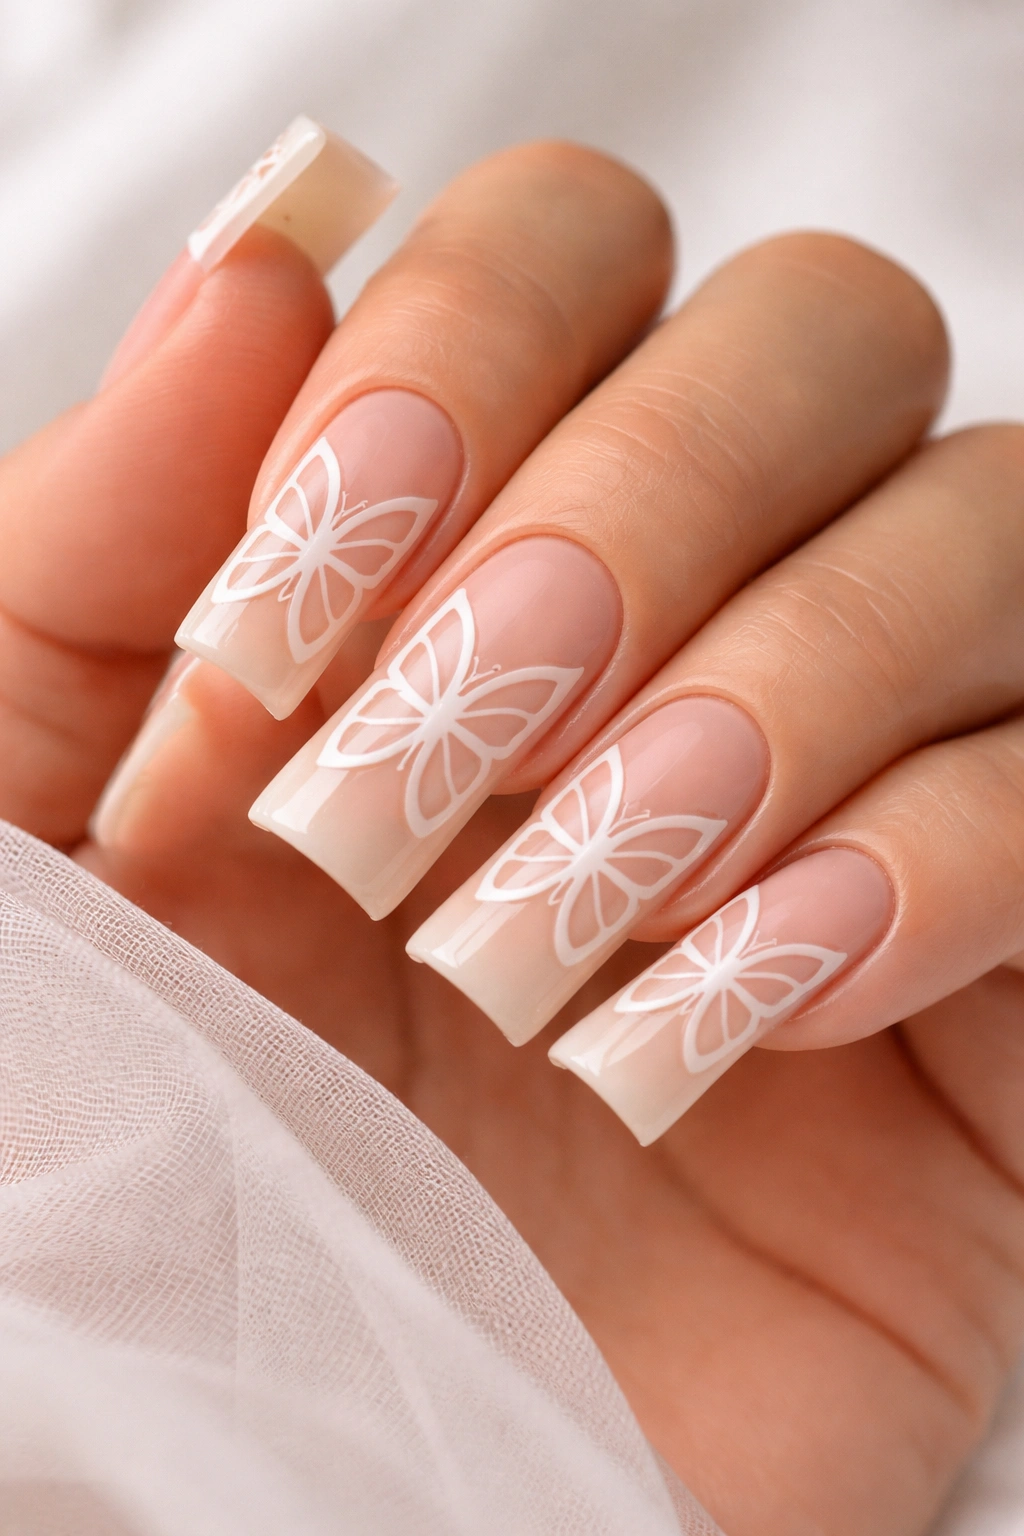
Leave portions of your actual nail bed visible by painting everything except the butterfly shape, creating a striking butterfly outline that’s actually the unpolished nail showing through. This minimalist approach feels contemporary and works beautifully on nude nails or natural nail beds with a subtle undertone. The butterfly appears to float against skin tone rather than sitting on top of color.
Why It Works
Negative space automatically feels intentional and designed—it reads as a sophisticated choice rather than unfinished nails. On duck nails, which are already dramatic due to their elongated shape, negative space butterfly designs feel especially powerful because the outline has so much real estate to be seen clearly. This is also one of the easiest designs to maintain; there’s minimal growth-out awkwardness since you’re not relying on precise color boundaries.
Execution for Negative Space
- Start by mapping your butterfly outline lightly with a pencil or fine erasable marker
- Apply color (or nude polish if you want subtle dimension) everywhere except inside the butterfly shape
- Use a fine detail brush with steady hands to create clean edges around the butterfly perimeter
- Consider adding thin antennae lines that extend slightly beyond the wing outline for elegance
- You can add delicate vein details inside the butterfly outline using a darker shade if you want
- Seal the entire nail with top coat for a finished appearance
Worth knowing: Negative space designs look best when the background color has good contrast with your natural nail bed. Nude polish on pale skin might be too subtle; consider a soft taupe or blush for more definition.
6. Rainbow Butterfly Gradient Duck Nails
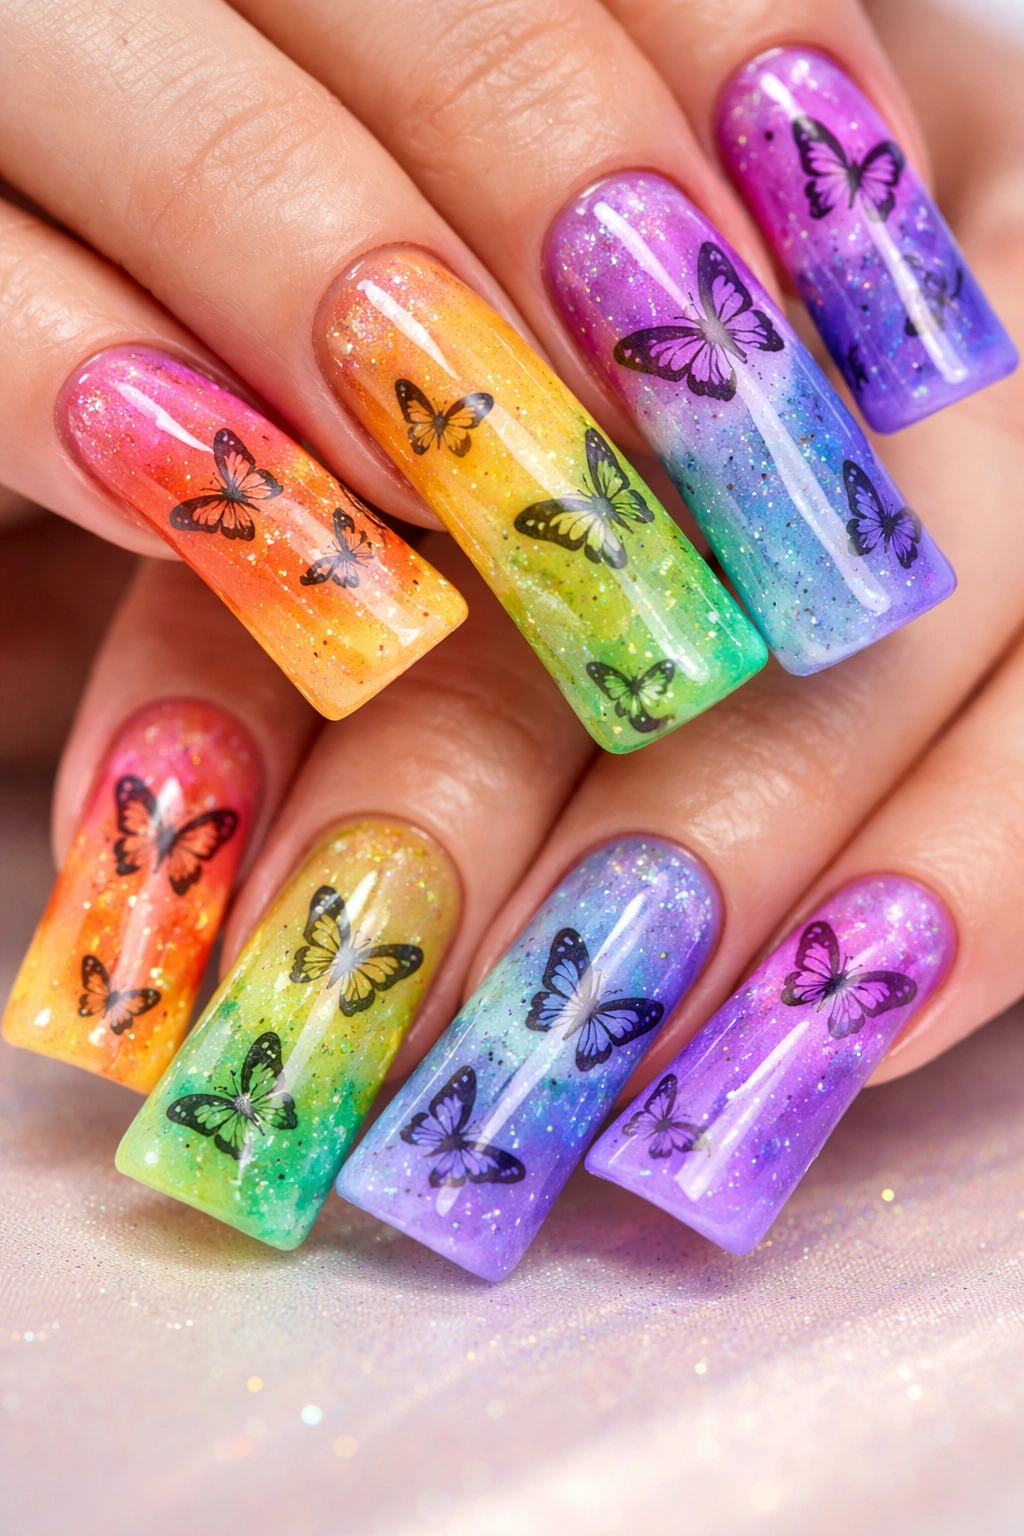
Create a full-spectrum color journey across your duck nails using a smooth gradient that flows from red through purple. Within this rainbow backdrop, paint or stamp butterfly silhouettes that appear to be traveling through the color transition. Each butterfly can echo the local color of wherever it lands, or use a contrasting outline to make butterflies pop against every section of the gradient.
Why This Design Captivates
Rainbow gradients are inherently joyful and energizing, but they can feel chaotic without a focal point. Adding butterflies creates intentional visual anchors that guide the eye and prevent the design from feeling like scattered color. This design works equally well for pride celebrations, spring aesthetics, or anyone who simply loves color. It’s playful without being childish—the duck nail shape and butterfly details keep it sophisticated.
Creating a Seamless Rainbow Gradient
- Map your color placement: red-orange on one edge, progressing through yellow, green, blue, indigo, and violet
- Use a makeup sponge to stipple and blend where each color meets the next
- Work quickly before gel cures; use isopropyl alcohol on your sponge if needed to blend without lifting existing color
- Once the gradient is cured, add butterfly details in black for maximum contrast, or echo the local colors
- Consider adding tiny white highlights along butterfly wings to make them shimmer against the colorful backdrop
Pro tip: A rainbow gradient is inherently busy, so keep butterfly details relatively simple. Detailed wings on a rainbow base can look overwhelming; clean outlines or silhouettes work better.
7. Metallic Gold Butterflies on Deep Navy Duck Nails
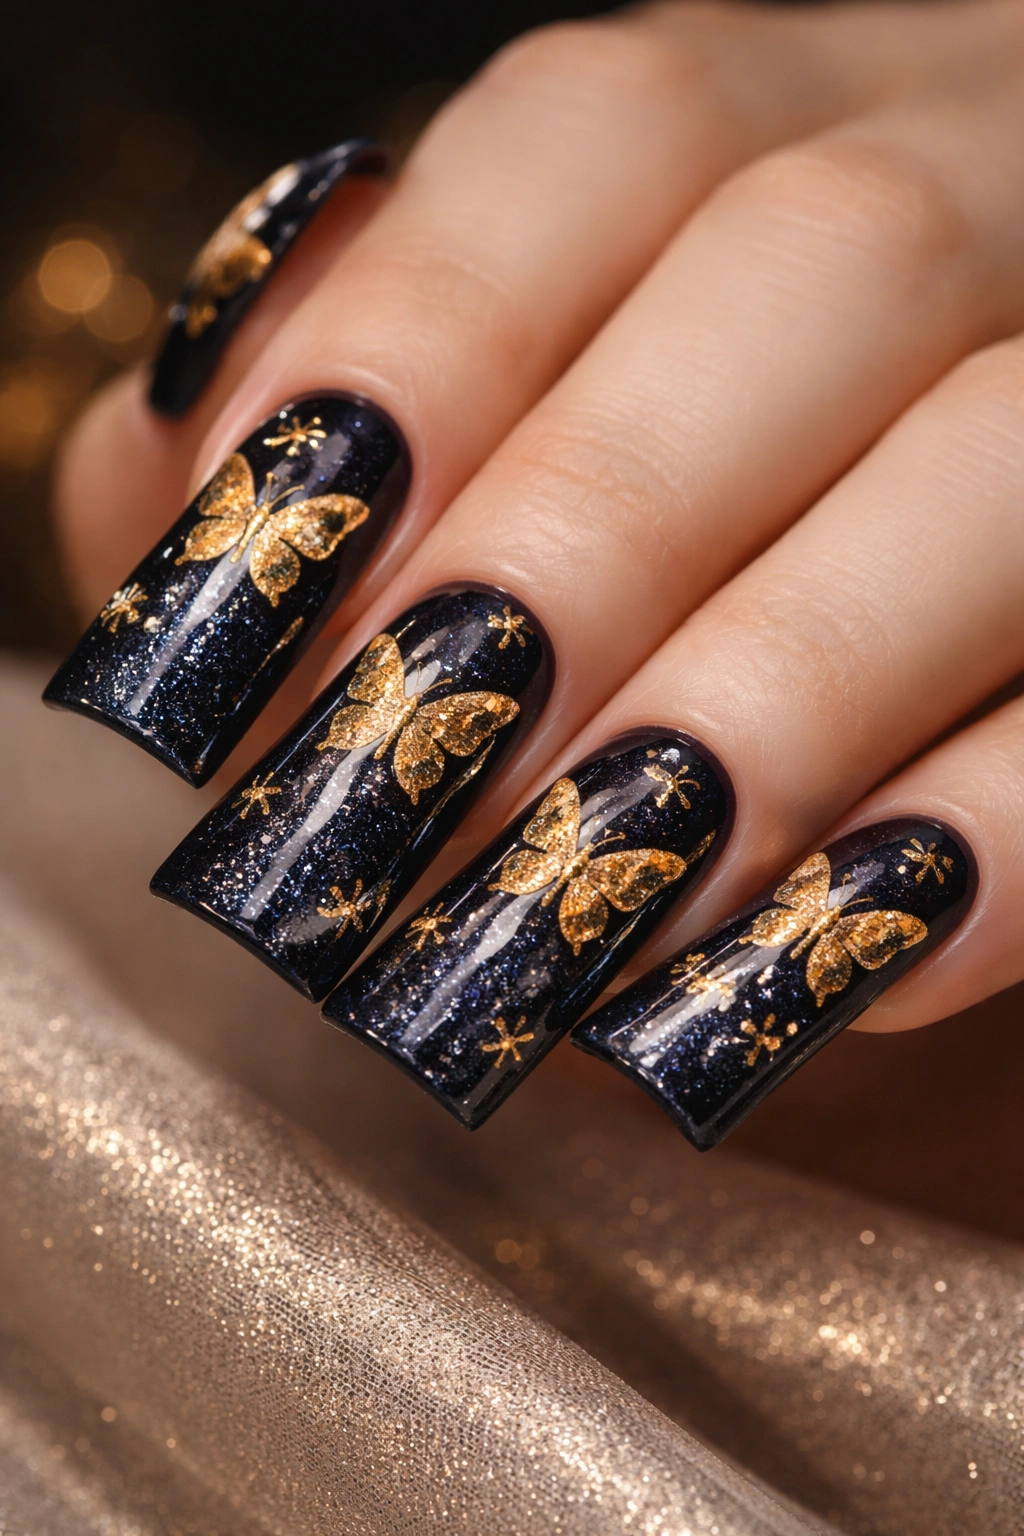
Pair the richness of deep navy or almost-black base color with brilliant metallic gold butterflies for a luxury aesthetic that feels both regal and wearable. The contrast between cool dark and warm gold creates visual pop while maintaining an elegant, sophisticated mood. This combination reads as jewelry-inspired and works for formal occasions, evening events, or anyone who loves jewel-tone aesthetics.
What Makes It Different
Gold on navy is inherently elegant because of the color contrast; this combination appears in fine jewelry and high-end design constantly. On nails, it translates to an upscale feel without requiring complicated techniques. The metallic gold catches light beautifully against the dark base, making butterflies appear to glow. You can use this color combo for minimalist designs (one butterfly per nail) or elaborate multi-butterfly scenes.
Achieving Perfect Gold on Navy
- Use a high-quality metallic gold gel or polish; cheap gold can look brassy or orange-tinted
- Apply navy base in at least two coats to ensure rich, opaque color
- Use a fine brush to apply metallic gold, building up slightly textured wings rather than thin outlines
- Add tiny gold accents elsewhere on the nail (a dot, a thin line, a small geometric shape) to tie the design together
- Consider adding a single clear rhinestone in the butterfly’s body for subtle sparkle
Insider note: If you want an even more luxe feel, use actual gold leaf rather than gold gel—the way light plays through translucent gold leaf is incomparable.
8. Butterfly Garden Scene Across Duck Nail Canvas
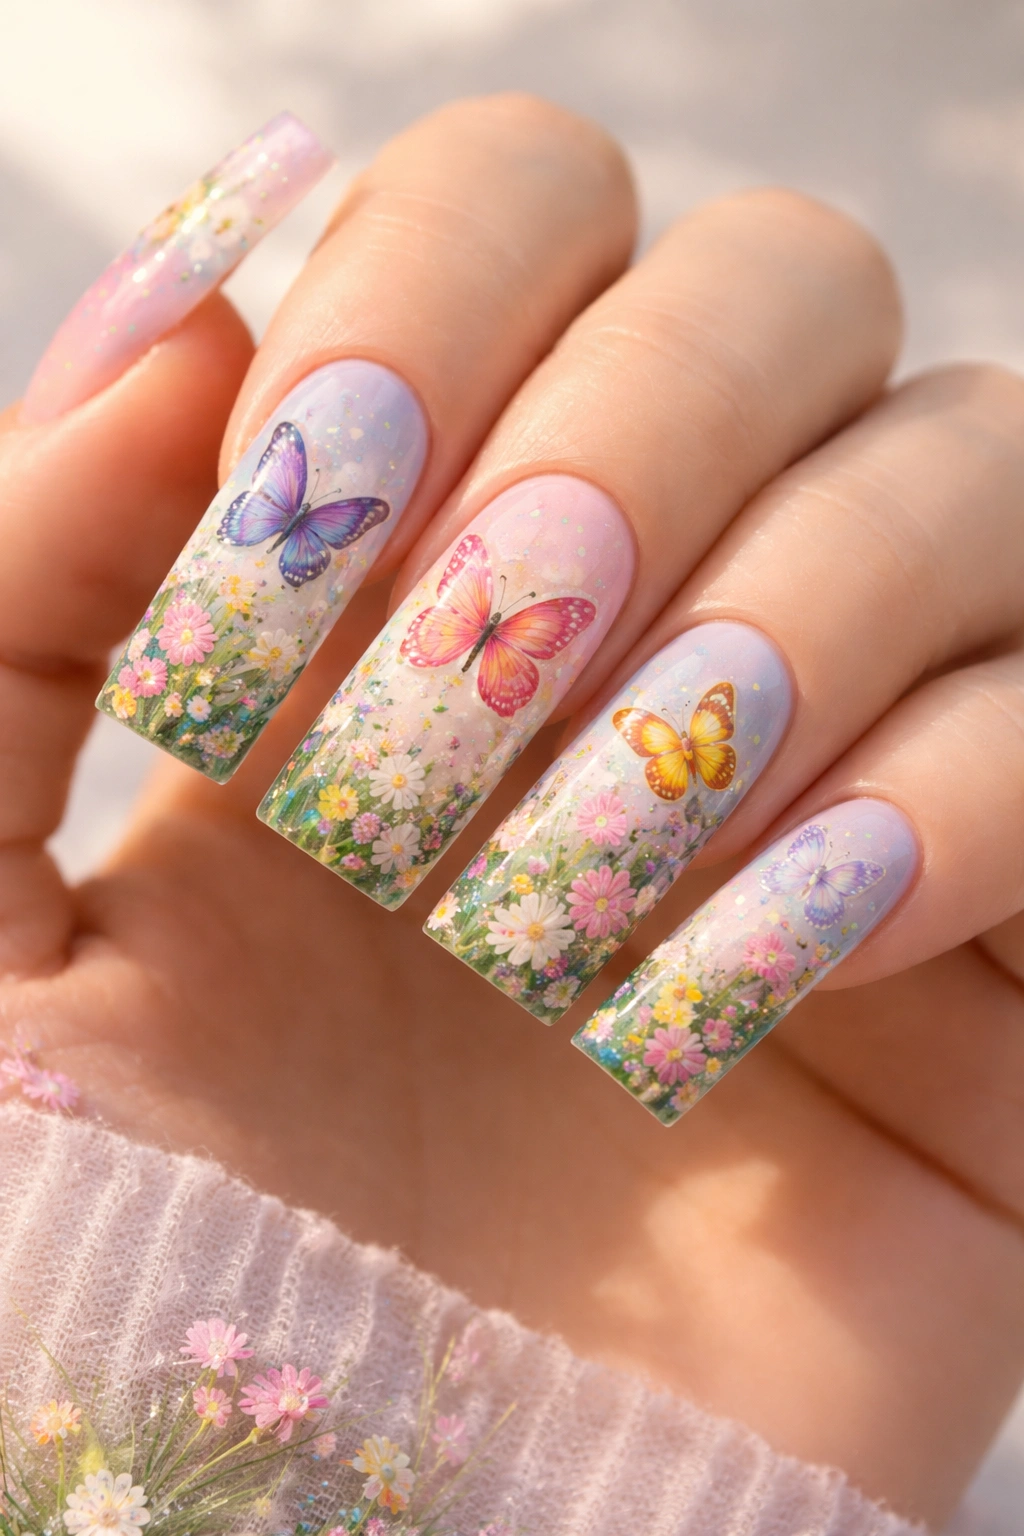
Transform your entire duck nail set into a continuous landscape where multiple butterflies flutter through a painted garden. Use your five-nail canvas to create a scene that flows across your hand—flowers on some nails, butterflies in various stages of flight, maybe even a subtle garden path or fence detail. Each nail is part of a larger narrative rather than a standalone design.
How to Create Narrative Flow
- Map out your scene before applying any gel; rough pencil sketches on each nail help plan composition
- Use your pointer and middle fingers for focal points (the most detailed butterflies or flowers)
- Carry through colors and elements across nails so the scene feels unified
- Consider size variation—butterflies further back in the scene can be smaller, those closer larger
- Add subtle background details (distant foliage, sky gradient, ground) to create depth
Building the Scene
- Start with any background elements (sky, grass, or garden features) across all nails
- Layer flowers or plants on several nails
- Add butterflies last, allowing them to interact with the landscape and each other
- Use shading and detail work on focal-point nails (middle and ring fingers typically)
- Keep less detailed nails balanced with the busy ones for visual rhythm
Worth knowing: Scene designs take longer to execute and are harder to touch up as the nail grows out. This is a design for a special occasion or if you’re committed to frequent visits to your nail artist.
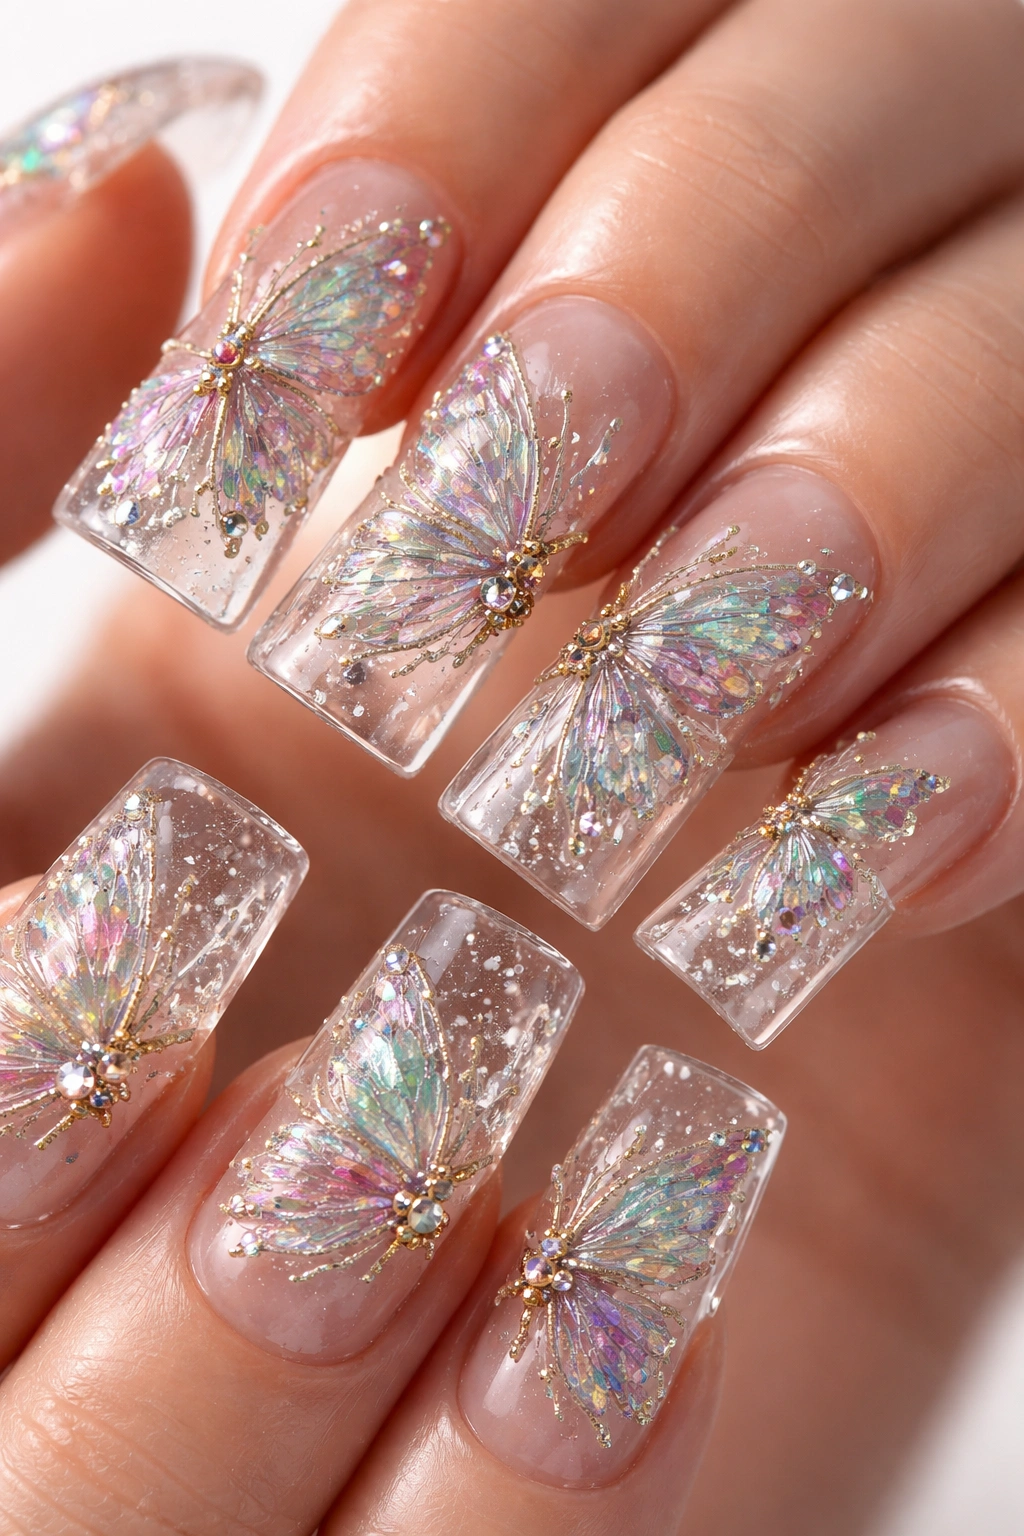
9. Encapsulated Butterfly Flakes in Duck Nails
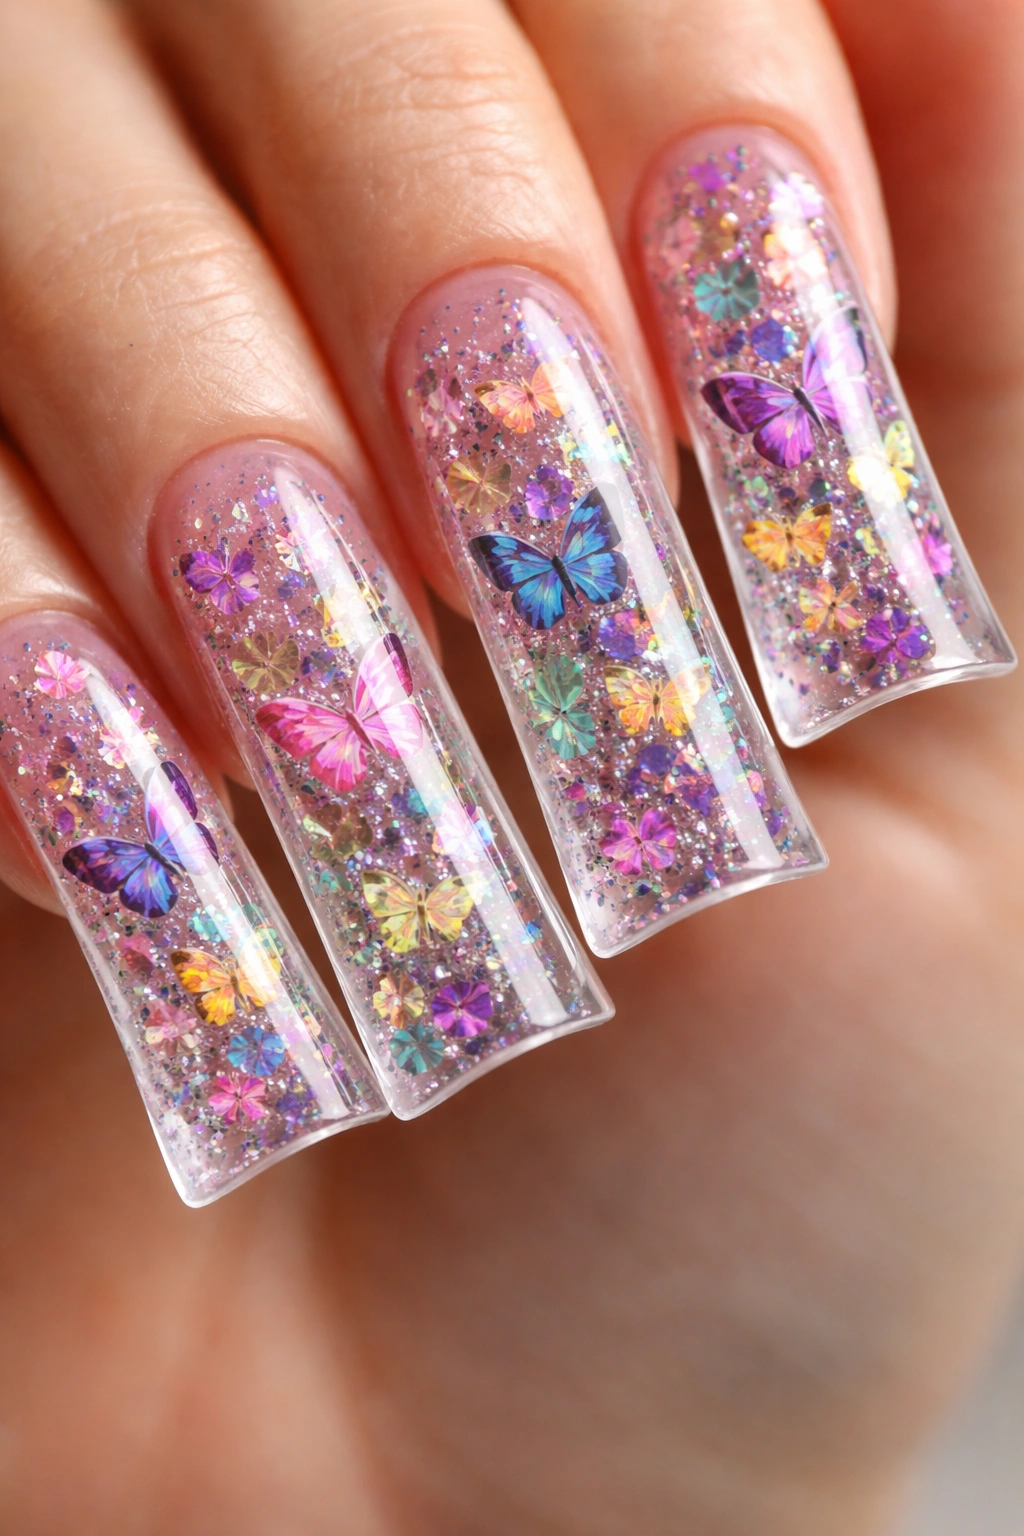
Suspend colorful butterfly flakes, foil pieces, or holographic specks inside clear gel layers, creating the effect of butterflies floating within your nail rather than sitting on top. This three-dimensional encapsulation technique builds gorgeous depth and makes your nails feel almost like tiny art objects you’re wearing. Every time light hits your nails, the encapsulated elements catch and shimmer.
Why Encapsulation Feels Special
Encapsulated designs are genuinely three-dimensional—you can see elements at different depths within the gel, which creates visual interest that flat designs can’t achieve. Butterfly flakes are specially designed with this technique in mind; they’re lightweight and colorful enough to show beautifully at different depths. The flakes don’t scatter or move once encapsulated, so the design is locked in place and durable.
Encapsulation Technique
- Apply a thin base layer of clear builder gel and cure
- Place butterfly flakes or foil pieces at varying depths; don’t arrange them all in one layer
- Apply a second layer of clear gel, curing between layers to control positioning
- Continue layering clear gel and flakes until you achieve the dimension you want
- The final layer should be thick enough that flakes sit safely within, not against the surface
- Cure everything together, then seal with glossy or matte top coat depending on your preference
Pro tip: Butterfly flakes come in different sizes and finishes—iridescent, metallic, matte, and mirror finishes all behave differently when encapsulated. Mix sizes for more visual interest.
10. Marble Butterfly Pattern on Duck Nails
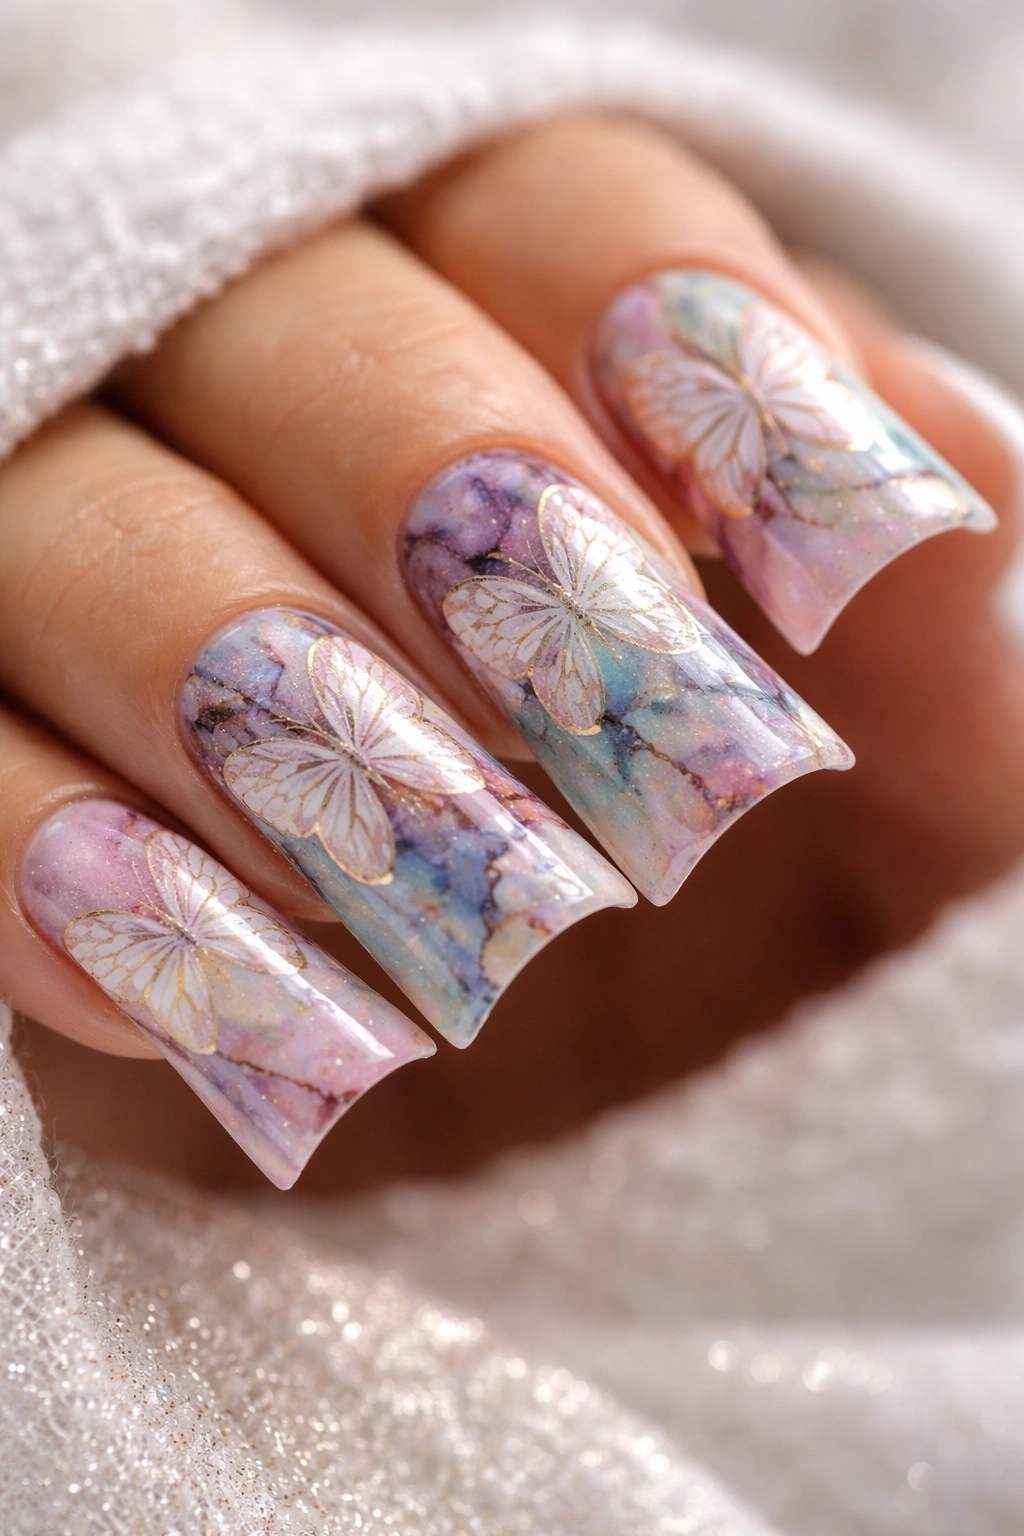
Blend multiple colors together using the wet marble technique to create flowing, organic-looking marble patterns, then layer butterfly outlines on top. The marble base provides a sophisticated, naturally textured backdrop that makes butterfly designs feel almost like they’re part of the nail’s natural stone structure. This works beautifully with any color combination, but jewel tones and pastels are particularly stunning.
Why Marble + Butterflies Works
Marble patterns are inherently organic and beautiful on their own, but adding butterflies gives the design intentional structure and a clear focal point. Without the butterflies, marble can feel random; with them, it becomes cohesive and designed. The combination feels artistic without being overdone. You can use bold colors in your marble base while keeping butterfly details simple and graphic.
Creating Marble Base
- Start with a base color (light pastels create the most beautiful marble effect)
- Drop or drag contrasting colors across the cured base layer
- Use a thin brush or toothpick to swirl the wet color before curing, creating organic patterns
- Don’t overwork it—the beauty is in the movement and imperfection
- Cure the marble pattern, then add butterfly details on top
Layering Butterflies Over Marble
- Use a contrasting or complementary color for butterfly outlines
- Simple, bold butterfly shapes read better over busy marble than delicate details
- Consider adding butterflies on only a few nails (accent nail style) to avoid overwhelming the marble
- Keep butterfly placement toward one area of each nail for visual balance
Insider note: The marble technique is easier than it looks once you understand that less is more—avoid over-swirling, which muddles colors instead of creating pretty patterns.
11. Glitter Butterfly Accent on Duck Nails
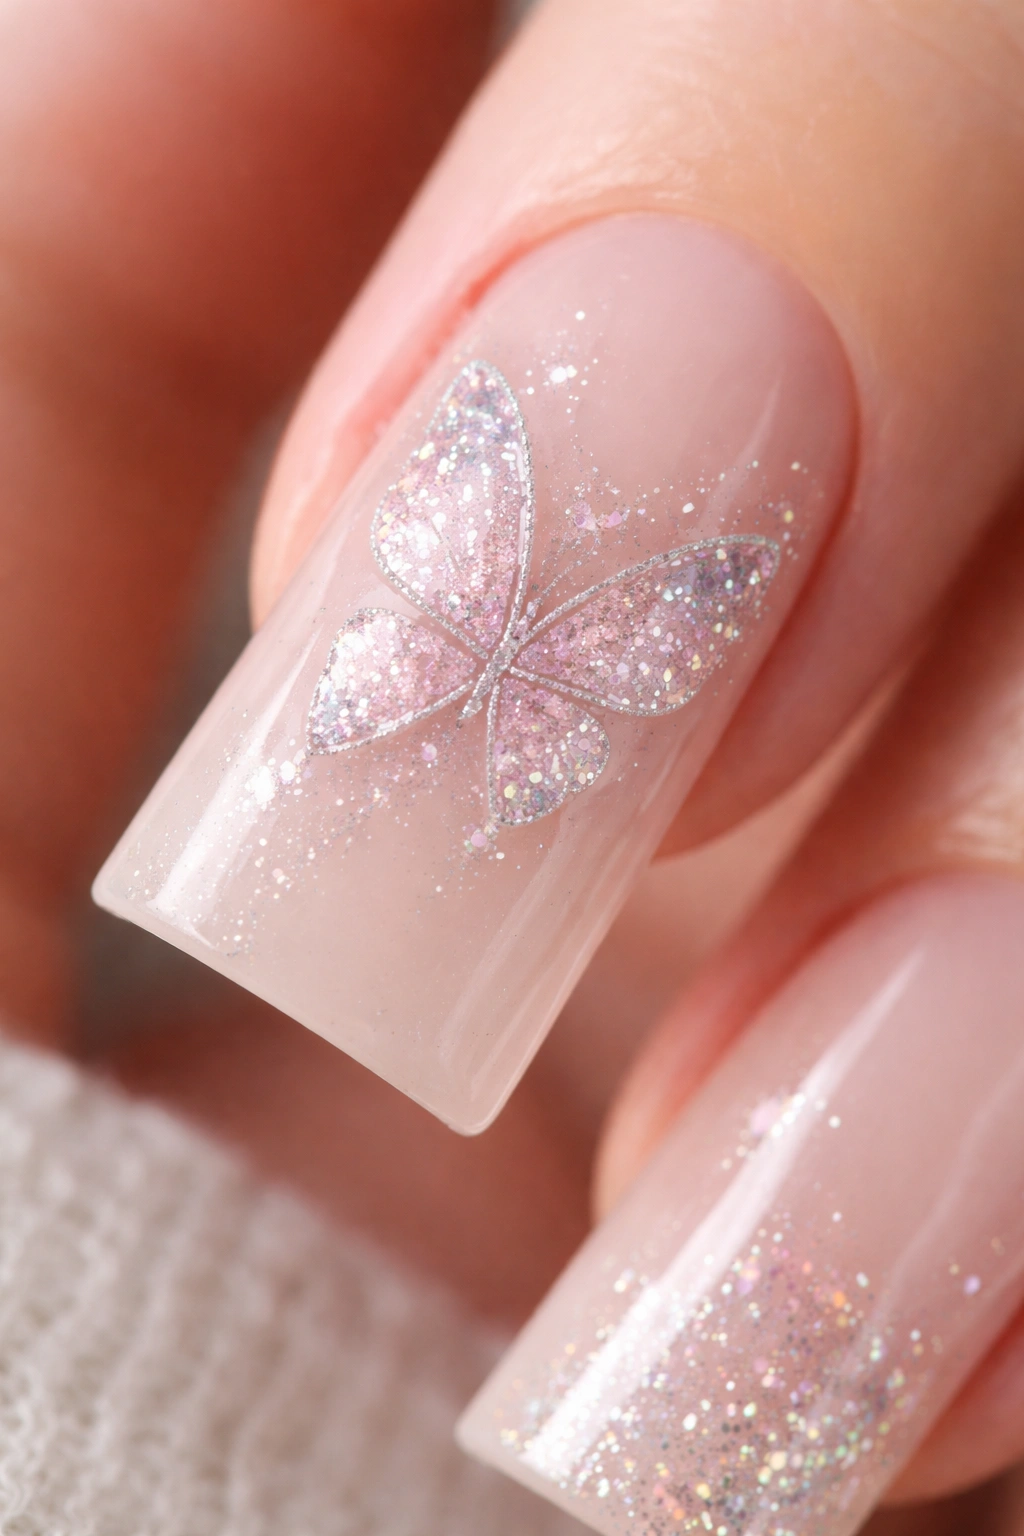
Create a minimalist design with a single nude, blush, or pale base color, then add a single glitter-gradient butterfly accent where glitter transitions from fully opaque near the wing edges to translucent toward the body. This works especially well when the glitter catches light and creates shimmer exactly where your eye lands. One bold glitter butterfly per nail or a single statement butterfly on just your accent nail both work beautifully.
What Makes It Stand Out
Single-accent designs feel elegant and intentional rather than busy. The glitter butterfly becomes jewelry-like—it’s the feature attraction. This design works for minimalists who still want personality and sparkle without maximum coverage. The glitter gradient technique, where shimmer fades toward the center, is more sophisticated than full glitter coverage.
Applying Glitter Gradient
- Create your base color and cure
- Using a glitter-suspension gel, apply glitter heavily at the butterfly’s wing edges
- Gradually reduce glitter density as you move toward the butterfly’s body
- Use a detail brush to define the butterfly outline clearly
- The gradient creates the illusion of light hitting the wings at different angles
- Seal with a glossy top coat to enhance shimmer
Pro tip: Fine hexagonal glitter works better for this technique than chunky glitter, which can look plastic-y and childish on otherwise refined nails.
12. Translucent Butterfly Overlays on Duck Nails
Paint a completely opaque base color, then layer thin, slightly transparent butterfly designs on top using gel polish mixed with builder gel to achieve translucency. The butterflies appear to hover slightly above the base color, creating a dimensional effect where you can see both the colored butterfly and the base color shining through. It’s like having stained glass butterflies on your nails.
How It Differs from Opaque Designs
Translucent layering creates visual depth and elegance that opaque designs can’t achieve. When you can see through the butterfly wings to the base color beneath, it feels more artistic and less like a flat graphic. Translucent designs also photograph beautifully—they have a ethereal quality that reads well in pictures. The technique is also more forgiving than detailed hand-painting because slight opacity variations add to the effect rather than feeling like mistakes.
Creating Translucency
- Mix your gel color with clear gel builder in a 1:2 or 1:3 ratio for varying degrees of see-through
- Apply your test mixture to understand how translucent it becomes when cured
- Use a detail brush to paint butterfly shapes; the translucent mixture allows the base to show through
- Layer multiple butterflies with varying transparency levels for additional depth
- You can even apply translucent butterfly overlays in multiple colors, creating beautiful color-mixing effects
Worth knowing: The thickness of your gel application controls final translucency—thin layers are more see-through, thicker applications more opaque. Test on a practice nail first.
13. Stamped Butterfly Details on Matte Duck Nails
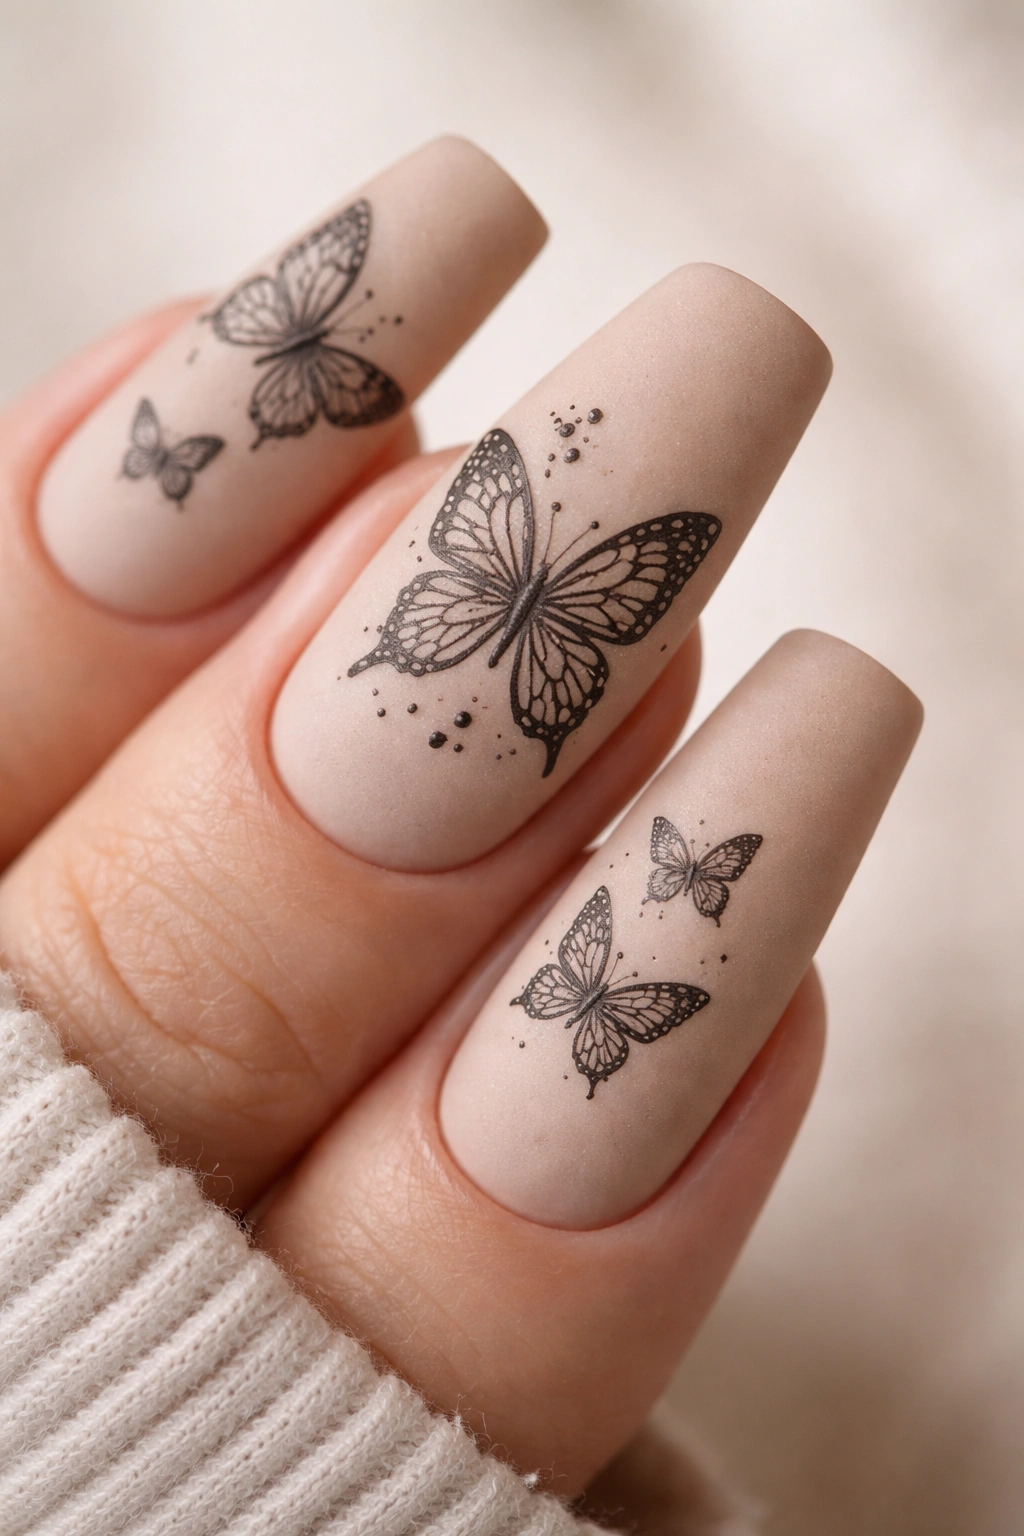
Use a nail stamp plate specifically designed with butterfly images to quickly apply detailed butterfly designs, then finish with a matte top coat for a soft, velvety aesthetic. Stamping allows you to achieve intricate butterfly details without hand-painting skills, and the matte finish creates a sophisticated, almost fabric-like appearance. Pair stamped butterflies with a coordinating matte base color for cohesion.
Why Stamped + Matte Works
Matte finishes have gained serious popularity because they feel modern, tactile, and design-forward. Adding stamped butterflies gives you intricate detail without the time investment of hand-painting. The matte finish actually makes stamped images appear slightly softer and more artistic than they would under gloss—the finish diffuses light in a way that’s very forgiving. This combination reads as intentional design rather than using a shortcut technique.
Stamping Technique
- Apply a standard glossy base color and cure completely
- Apply a sticky layer (uncured gel or stamper polish) to your nail
- Press a stamp plate with butterfly design firmly onto the sticky layer
- Transfer the stamped image to your nail using a stamper, pressing firmly
- Once cured, apply matte top coat
- The matte finish transforms the look; allow it to cure fully before handling
Pro tip: Quality stamp plates are worth the investment—cheaper plates don’t transfer designs cleanly, and you’ll get frustrated fast. Mid-range and premium brands produce beautifully detailed butterfly stamps.
14. Hand-Painted Realistic Butterflies on Duck Nails
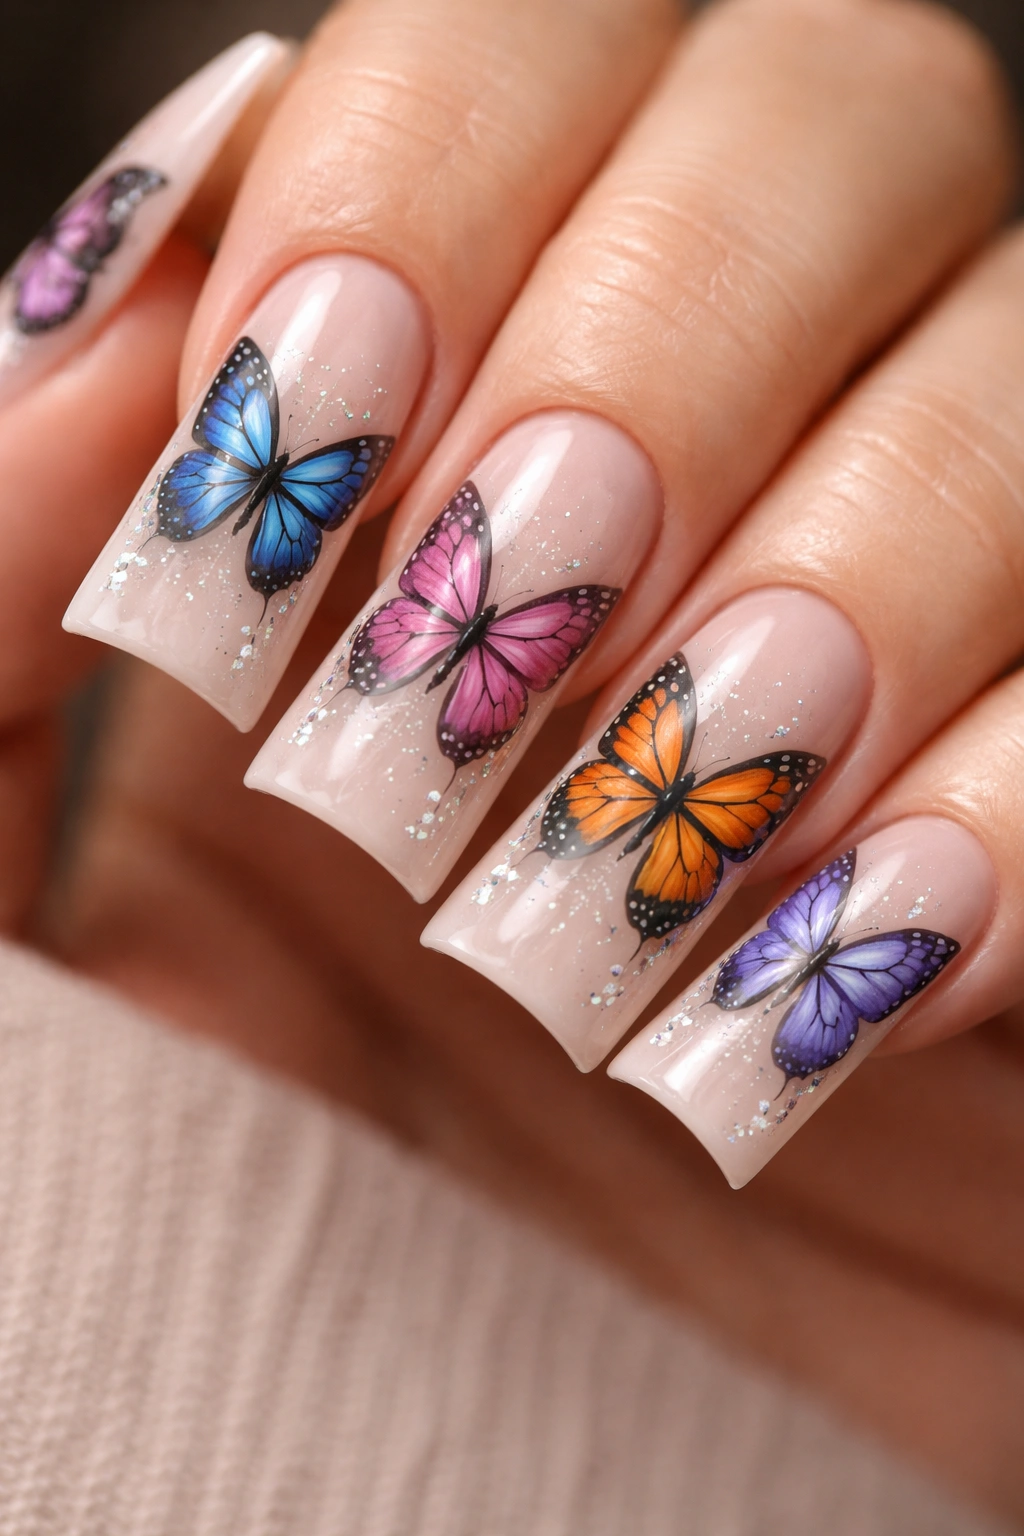
Go full artist mode with detailed, lifelike butterfly paintings rendered in multiple colors and shading techniques. Research real butterfly species, then paint them with accurate wing patterns, body structure, and color gradations. Use fine brushes to add tiny details like antennae texture, wing vein patterns, and subtle shading that makes your painted butterflies look almost three-dimensional and museum-quality.
The Artistry Behind Realistic Butterflies
Hand-painted realistic butterflies showcase genuine nail art skill and turn your nails into a gallery of wearable miniatures. Each butterfly can be a different species, creating an educational and beautiful collection across your nail set. Realistic designs work best on neutral or pale base colors that don’t compete with your painted artwork. This is an advanced technique that requires steady hands, fine brushwork experience, and patience.
Building Realistic Detail
- Research butterfly species and reference actual photographs for accurate wing patterns
- Map your butterfly placement and basic outline lightly with a pencil
- Use progressively finer brushes as details become more intricate
- Build color depth by layering thin applications of gel in multiple shades
- Add wing veins, body texture, and anatomical details last once the basic color is cured
- Include tiny highlights in white gel to suggest light catching on wings
- Work on one nail at a time so details can cure and won’t smudge
Insider note: Realistic hand-painted designs look incredible in natural light but require true artistic ability. If you love this style but don’t paint yourself, finding an artist who specializes in detailed nail art is worth the investment.
Final Thoughts
Butterfly duck nails offer incredible creative potential because you’re combining two design elements that both deserve attention—the graceful elongation of the duck nail shape, and the inherent beauty of butterfly imagery. Whether you gravitate toward delicate watercolors, bold metallics, dramatic scenes, or intricate hand-painted realism, there’s a butterfly duck nail design for your style and skill level.
The key is matching the design complexity to your patience and artistic abilities. Simple designs like negative space butterflies or glitter accents deliver huge visual impact without requiring advanced painting skills, while elaborate garden scenes and realistic species paintings are worth the extra time if detail work brings you joy. Your nails are a canvas that travels with you everywhere—make sure your butterfly design feels authentically you.
Book your next appointment with the knowledge that butterflies on duck nails are endlessly customizable. Share these 14 ideas with your nail artist, mix elements from different designs if something speaks to you, and don’t hesitate to request modifications or color variations that feel personal. The best nail design is one you’ll actually love wearing.
