

Long nails give you the perfect canvas to embrace Y2K aesthetic in all its nostalgic, bold glory, and duck nails — with their distinctive flat, squared-off tips — are absolutely the way to execute this trend. The Y2K era brought us some of the most daring, playful nail designs imaginable: chunky glitters, hot pink acrylics, rhinestone-studded everything, and color combinations that had no business working but somehow absolutely did. Duck nails take that early-2000s energy and amplify it, giving you an exaggerated silhouette that screams confidence and retro charm.
The thing about duck nails on longer lengths is that they command attention in the best possible way. Unlike other nail shapes that might feel delicate or understated, duck nails are unapologetically bold — and pairing them with Y2K design elements makes that boldness intentional and fun rather than accidental. Whether you’re going for hot pink ombré, glossy chrome finishes with rhinestones scattered like confetti, or that quintessential “jelly” look with suspended glitter, duck nails give you the surface area and the attitude to pull it off.
What makes Y2K duck nails so special right now is that they straddle the line between nostalgia and genuine style. You’re not copying what your aunts wore in 2004 — you’re reinterpreting those elements through a modern lens, choosing quality finishes, thoughtful color theory, and designs that actually suit your personal aesthetic. The designs below span different moods and occasions: some are over-the-top party-ready, some feel more wearable for everyday looks, and all of them capture that unmistakable Y2K spirit that refuses to fade.
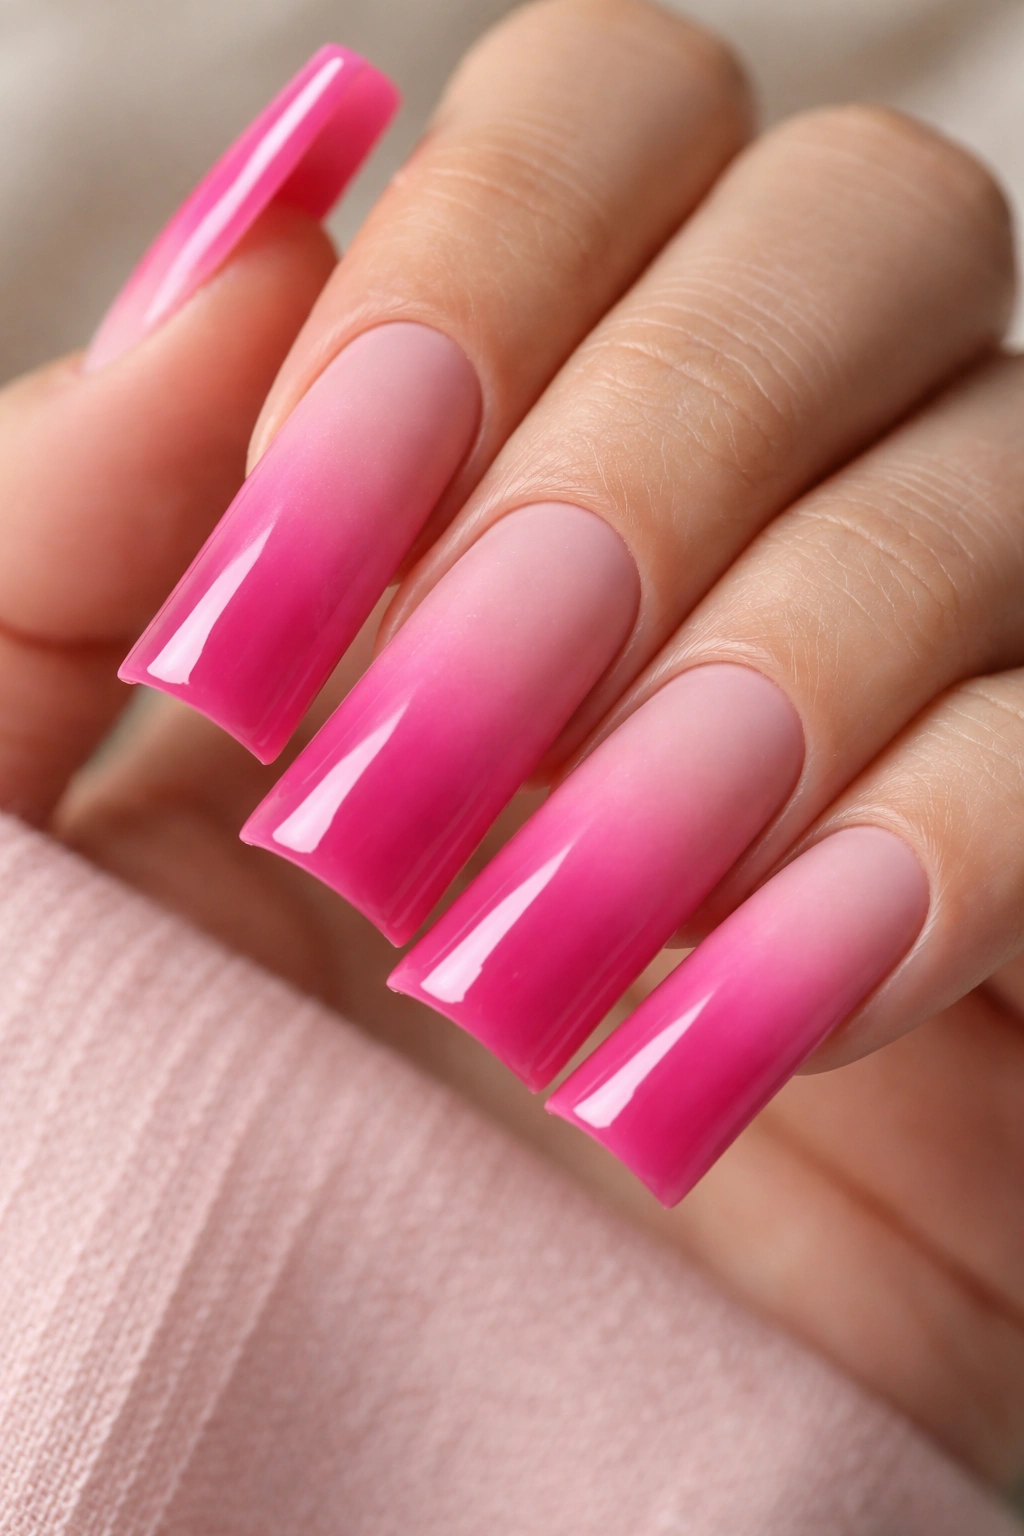
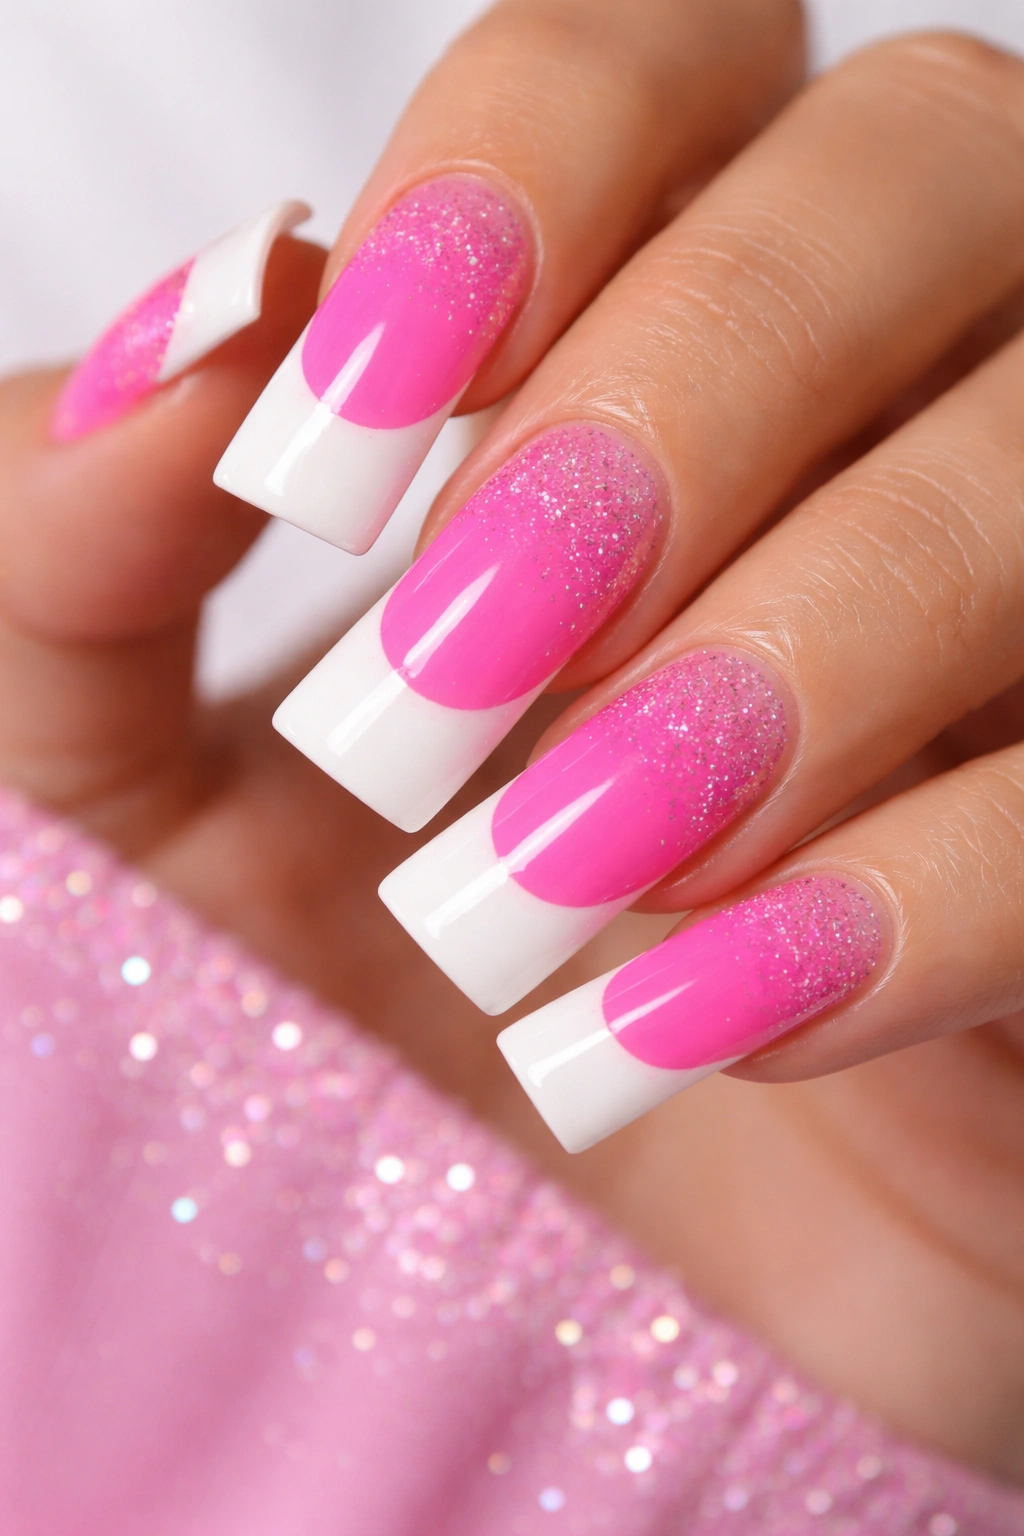
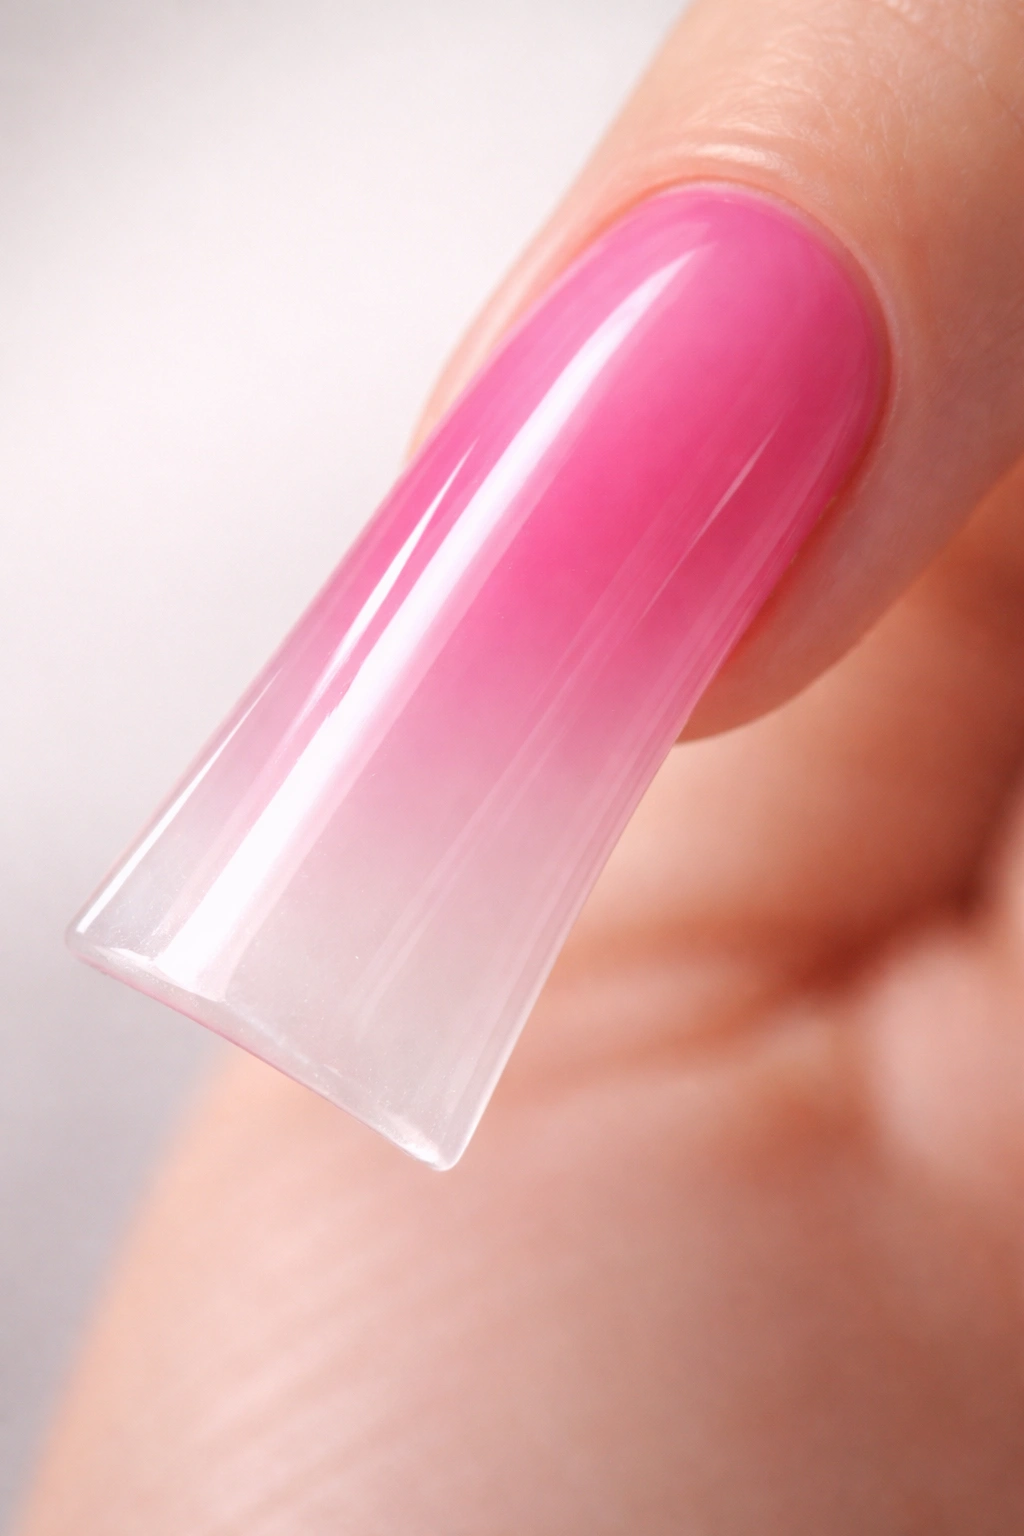
1. Ombré Hot Pink to White Jelly Nails
This is the quintessential Y2K duck nail design, and for good reason — it’s the perfect blend of playful, feminine, and statement-making. The gradient flows from a saturated hot pink at the base down to a soft white or pearl at the tips, creating an ombré effect that catches the light beautifully. Jelly-finish polish gives the whole look a transparent, candy-like quality that feels nostalgic without being costume-y.
Why This Design Captures the Y2K Vibe
The ombré hot pink to white gradient was absolutely everywhere in the early 2000s, but it never goes out of style because it’s fundamentally flattering. On long duck nails, this design becomes even more striking because the extended length amplifies the gradient’s visual impact. The jelly finish is crucial here — it’s not opaque, which means light passes through the polish, creating dimension and that signature translucent, gemstone-like appearance that defined Y2K nail aesthetics.
How to Achieve This Look
- Start with a clear jelly base coat designed specifically for gradient work (brands like Beetles or Modelones make excellent jelly bases)
- Use a hot pink jelly shade for the base layer — apply this across the entire nail
- Apply a white or pearl jelly shade to just the tips, starting about halfway down the nail
- Use a dry sponge or makeup sponge to blend the two colors where they meet, creating a smooth gradient rather than a hard line
- Seal everything with a glossy top coat designed for jelly finishes (the finish should feel slightly gelatinous and translucent)
- Add a single rhinestone or pearl at the base of each nail if you want extra Y2K energy
Pro tip: The key to a seamless jelly ombré is blending on a sponge rather than directly on the nail. Apply each color to a small sponge section, press the sponge onto your nail gently (don’t drag it), and repeat with slightly overlapping sponge impressions until the gradient looks smooth.
2. Chrome Silver Duck Nails with Chunky Rhinestones
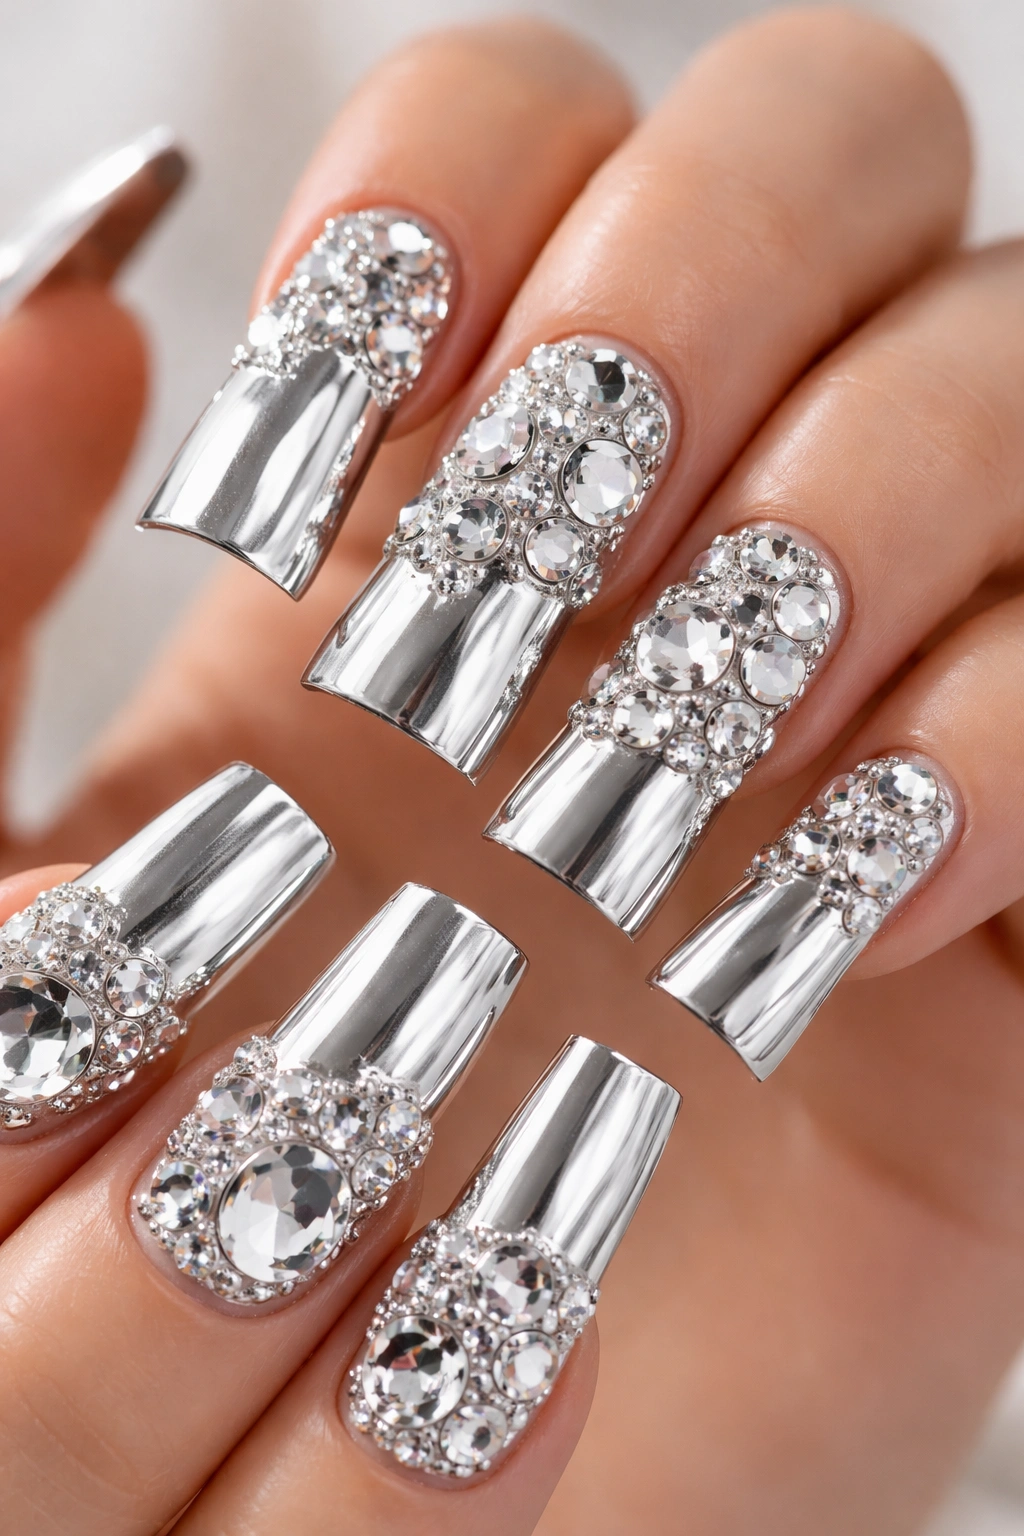
Chrome and rhinestones together are basically the Y2K nail designer’s holy grail. A sleek, mirror-like silver chrome finish across long duck nails, studded with chunky rhinestones scattered across the surface (or arranged in a deliberate pattern), creates a design that reads as both edgy and glamorous. This is the design you wear when you want to feel like a rockstar who also appreciates fine jewelry.
Why Chunky Rhinestones Elevate Duck Nails
Chunky rhinestones — we’re talking larger stones, 5mm and above — became a staple of Y2K nail culture because they added instant dimensionality and luxury. On duck nails, which already have a bold, architectural shape, chunky stones feel proportional and intentional rather than overwrought. The chrome finish underneath provides a sophisticated backdrop that keeps the design from feeling childish, even with all the sparkle.
Rhinestone Placement Ideas and Installation
- Random scattered placement: Apply rhinestones across the nail surface in an organic, non-patterned way for a candid, casual-glam feel
- Center-line design: Place larger rhinestones down the center of each nail, creating a vertical line of sparkle
- Corner accent: Focus rhinestones on the corners or edges of the duck nail tip for a more refined look
- Gradient of sizes: Use larger stones on the tips and gradually smaller stones toward the base
- Apply a sticky base gel before the chrome powder, then place rhinestones while the gel is still wet, and seal them under a thick glossy top coat to prevent losing stones
Worth knowing: Not all rhinestones are created equal. Glass stones stay shinier and catch light better than cheaper plastic alternatives, and they’re more likely to stay put throughout the day.
3. Sunset Gradient with Holographic Glitter Fades
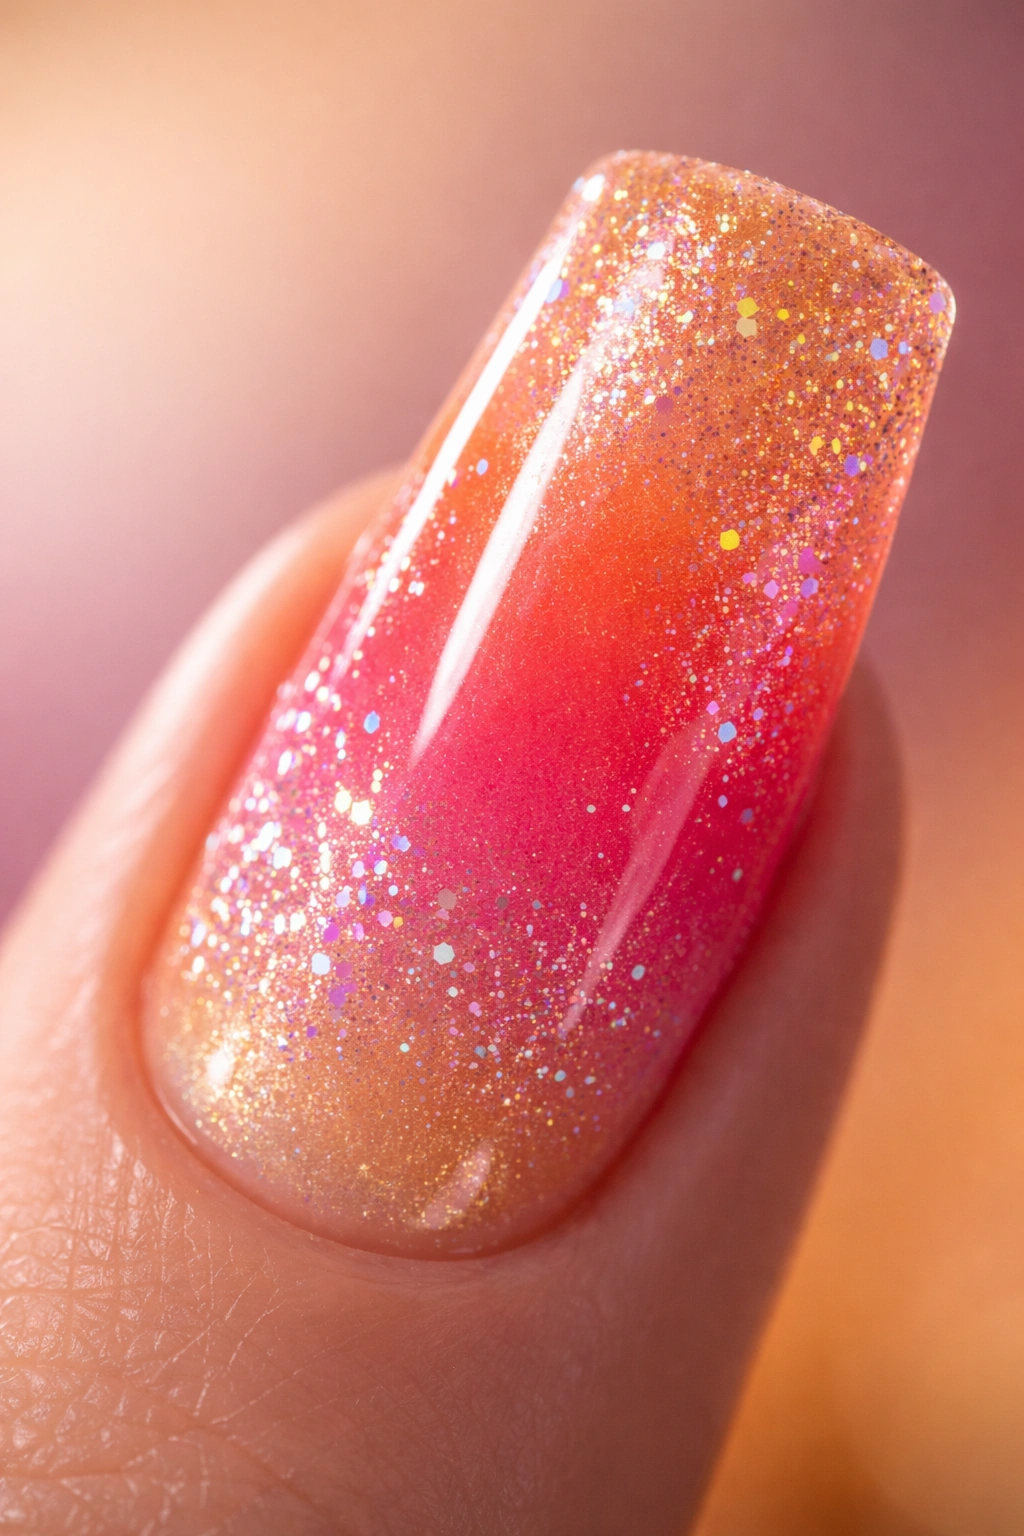
A gradient that flows from warm orange and coral at the base through hot pink, then fading into peachy-gold at the tips, this design screams Y2K warmth and optimism. Holographic glitter suspended in the transition zones creates a prismatic effect that shifts color as you move your hands — every angle reveals different sparkle. It’s maximalist and joyful, the kind of manicure that makes you smile every time you look at your hands.
The Science Behind Holographic Glitter Effects
Holographic glitter isn’t just pretty — it’s engineered to catch and refract light in multiple directions. On duck nails, which have a large, flat surface area at the tip, holographic glitter actually gets showcased better than on shorter nails because there’s more space for the light refraction to occur. The gradient background adds depth that makes the holographic elements pop even more.
Creating the Sunset Gradient with Glitter
- Use a coral or peachy base for the foundation
- Blend in deeper orange tones through the middle section using a sponge
- Transition to hot pink in the upper-middle area
- Add pale yellow or gold tones near the tips
- Drop holographic glitter into the wet gel between each color transition, allowing it to settle naturally
- The glitter should be strategically placed in the gradient zones, not scattered everywhere, so the colors remain visible underneath
- Top coat should be thick and glossy to capture that candy-like finish
Pro tip: Apply holographic glitter while each layer of gradient gel is still uncured. This allows the glitter to sink slightly into the gel rather than sitting on top, creating a more polished, integrated look.
4. Bubblegum Pink with Chunky Glitter Swirls
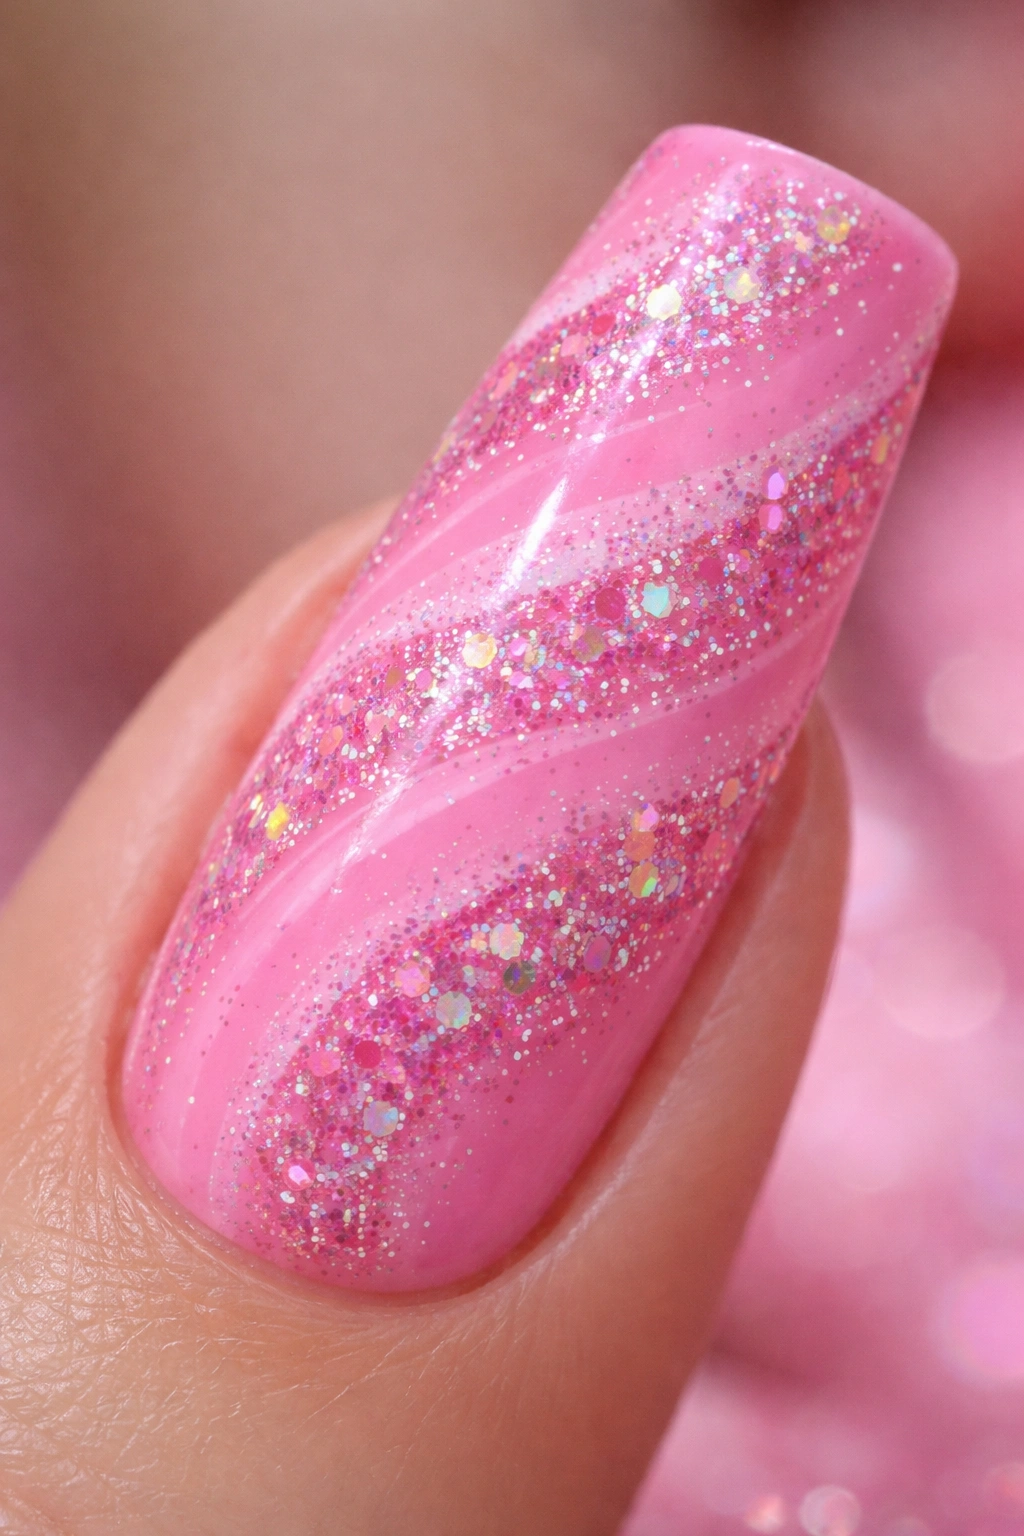
Sometimes Y2K is just about pure, unapologetic pink. A bubblegum pink base — so saturated and vibrant it practically glows — covered with chunky multidimensional glitter swirled across the surface creates a design that’s busy in the best possible way. This is the manicure equivalent of a mood ring that’s permanently stuck on “happy and confident.”
Why Chunky Glitter Reads as Y2K
Regular fine glitter is pretty, but chunky glitter — the kind with irregular shape and noticeable sparkle — became synonymous with early-2000s nail culture because it was unapologetically extroverted. On long duck nails, chunky glitter has room to shine literally and figuratively. You’re not trying to be subtle or minimal; you’re making a statement.
Application Technique for Glitter Swirls
- Start with a solid bubblegum pink base gel; cure this completely
- Apply a sticky base gel layer (many gel brands have a specific sticky layer for glitter)
- Use a toothpick or small dotting tool to distribute chunky glitter across the nail in swirls or scattered patterns
- You can also mix glitter into clear gel ahead of time, then apply it over the pink base in swirling motions
- Make sure glitter sits in the sticky layer and gets sealed underneath a thick top coat
- The final finish should be high-shine and glossy, so the glitter catches maximum light
Insider note: Chunky glitter can feel slightly rough to the touch if it’s sitting on top of the surface. A thick, well-applied top coat smooths it down and protects it from snagging on fabric or hair.
5. Hot Pink Ombré Matte to Glossy Transition
Take the Y2K hot pink ombré concept and invert the finish: start with a soft matte appearance at the base and transition to a high-gloss, reflective surface at the tips. This creates textural interest that goes beyond color — you’re playing with sheen and light reflection. The contrast between matte and glossy is subtly sophisticated while still being undeniably Y2K in color choice.
Why Matte-to-Glossy Finishes Add Depth
When you combine different finishes on the same nail, you’re creating visual layers that make the design feel more complex and intentional. Matte finishes typically read as softer and more understated, while glossy finishes feel polished and reflective. On duck nails, where you have a large, visible surface, this finish transition is even more noticeable and impactful.
Achieving the Matte-to-Glossy Gradient
- Apply a hot pink base and cure it completely
- Create your gradient (darkest hot pink at the base, lighter pink toward tips) using standard gel or polish techniques
- On half the nail (from about the middle to the tips), apply a matte top coat and cure
- On the lower half, seal with a glossy top coat and cure
- The transition line can be fairly distinct or blended slightly with a matte sealant gradient
Worth knowing: Matte finishes require specific matte top coats designed for gel nails. Regular matte polishes don’t cure properly under UV/LED lamps and may feel gummy or unfinished.
6. Milky White Base with Crystal Rhinestone Accents

A milky, opaque white or pale nude base provides a clean, minimalist backdrop for strategic crystal rhinestone placement. This design proves that Y2K wasn’t all neon and saturation — sometimes the most sophisticated Y2K nails used a pared-back neutral base and let the sparkle do the talking. Crystal stones catch light and reflect it in cool, pure tones, creating an almost ethereal quality against the creamy base.
Why Crystals Work on Neutral Bases
Crystals — whether Swarovski or quality glass stones — have a transparent or translucent quality that looks refined and expensive. Placing them on a clean, neutral base means the stones themselves become the focal point rather than competing with bold color. On long duck nails, this restraint feels intentional and sophisticated, even though you’re still embracing Y2K maximalism through sparkle.
Crystal Placement for Maximum Impact
- Scattered across the nail surface: Random placement that looks organic and effortless
- Geometric pattern: Arrange crystals in a deliberate line, cluster, or geometric shape down the center or along one edge
- Graduated size placement: Larger stones at the tip, smaller stones toward the base, creating a visual flow
- Single statement stone: One large crystal placed at the center of the nail, surrounded by negative space
- Use a tacky gel base, place crystals while wet, and seal them under a thick top coat
Pro tip: Hold crystals between your fingers with tweezers while placing them — finger oils can interfere with adhesion, and tweezers give you precise placement control.
7. Y2K Baby Blue with Glossy Jelly Finish and Pearl Details
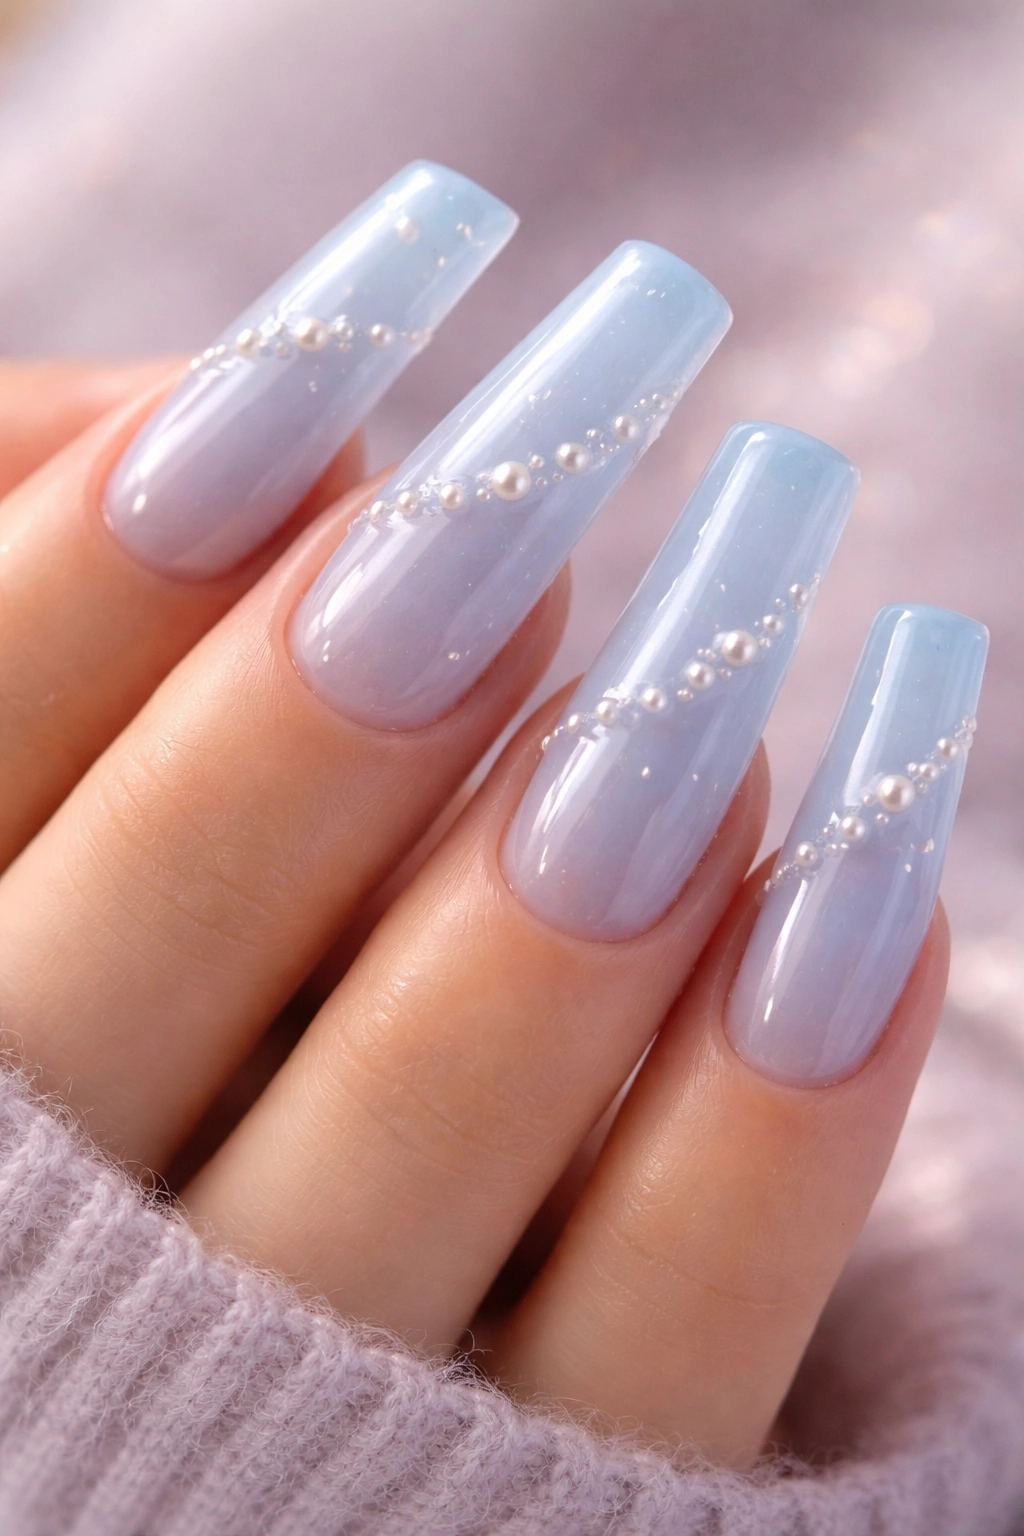
Baby blue — that soft, powder-blue shade that was absolutely everywhere in early-2000s fashion — becomes even more charming on duck nails with a glossy jelly finish. The translucency of jelly polish gives the pale blue a luminous, almost watercolor quality. Tiny pearl embellishments scattered across the surface add subtle luxury without overwhelming the soft, dreamy aesthetic.
The Psychology of Baby Blue in Y2K Design
Baby blue occupied this interesting space in Y2K culture — it was associated with sweetness and innocence, but the way it was used (bold, glossy, embellished) actually felt edgy and confident. On long duck nails, baby blue jelly reads as both nostalgic and contemporary, especially when paired with minimalist pearl accents.
Building the Baby Blue Jelly Look
- Use a baby blue jelly polish as your base — apply 2-3 thin coats for opacity while maintaining translucency
- The jelly finish should feel slightly gelatinous and wet-looking, not flat or matte
- Add tiny pearls or pearl beads while the final gel layer is still tacky but not wet
- Space pearls deliberately (not scattered everywhere) — perhaps 3-5 small pearls per nail arranged in a loose line or cluster
- Seal everything under a glossy, thick top coat that emphasizes the glassy, luminous finish
Worth knowing: True jelly finishes have a specific viscosity. They should feel sticky and slightly translucent on the nail, creating that signature candy-like appearance rather than looking like a regular opaque gel.
8. Hot Pink with Silver Metallic Drips and Glitter
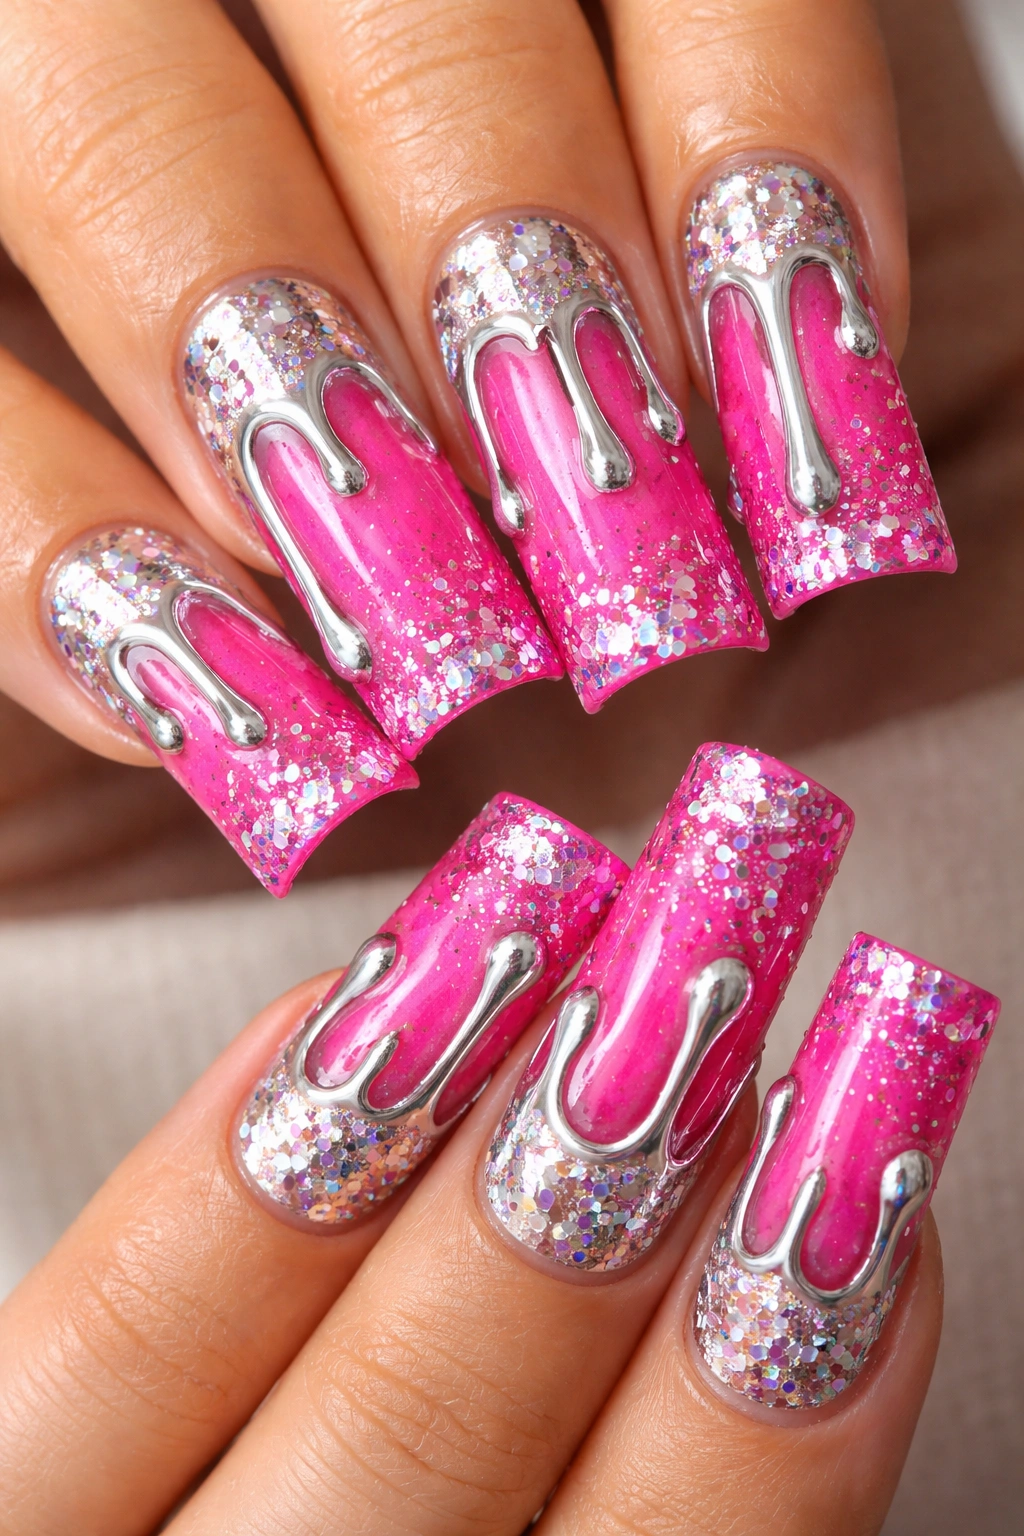
Combine hot pink with silver metallic accents in a drip design, where silver metallic polish drips from the tips of your long duck nails down toward the cuticle, intersecting with scattered glitter. This creates a sense of movement and playfulness — it’s almost like your nails are melting or dissolving, which is peak Y2K maximalist energy. The contrast between the hot pink and cool silver metallics creates visual vibrancy.
Why Metallic Drips Feel Inherently Y2K
Metallic details were a signature Y2K embellishment, whether they appeared as stripes, accents, or (in this case) drips. The asymmetry of a drip design combined with the symmetry of long duck nails creates visual interest. You’re not aiming for perfection; you’re celebrating the handmade, slightly chaotic aesthetic that made Y2K design so charming.
Creating Metallic Drip Effects
- Start with your solid hot pink base and cure it
- Use a thin striping brush or nail art pen dipped in silver metallic polish
- Create drips by starting at the tip and dragging the metallic color toward the base in organic, irregular lines
- The drips don’t need to be perfectly vertical — they can curve, angle, or vary in thickness
- Add chunky or holographic glitter into some sections between the drips for additional sparkle
- Seal with a glossy top coat that brings out the metallic sheen
Pro tip: Metallic drips look best when they’re not completely smooth. A slightly textured, hand-painted appearance actually reads as more intentional and Y2K than something that looks machine-perfect.
9. Pastel Gradient Rainbow with Glossy Finish
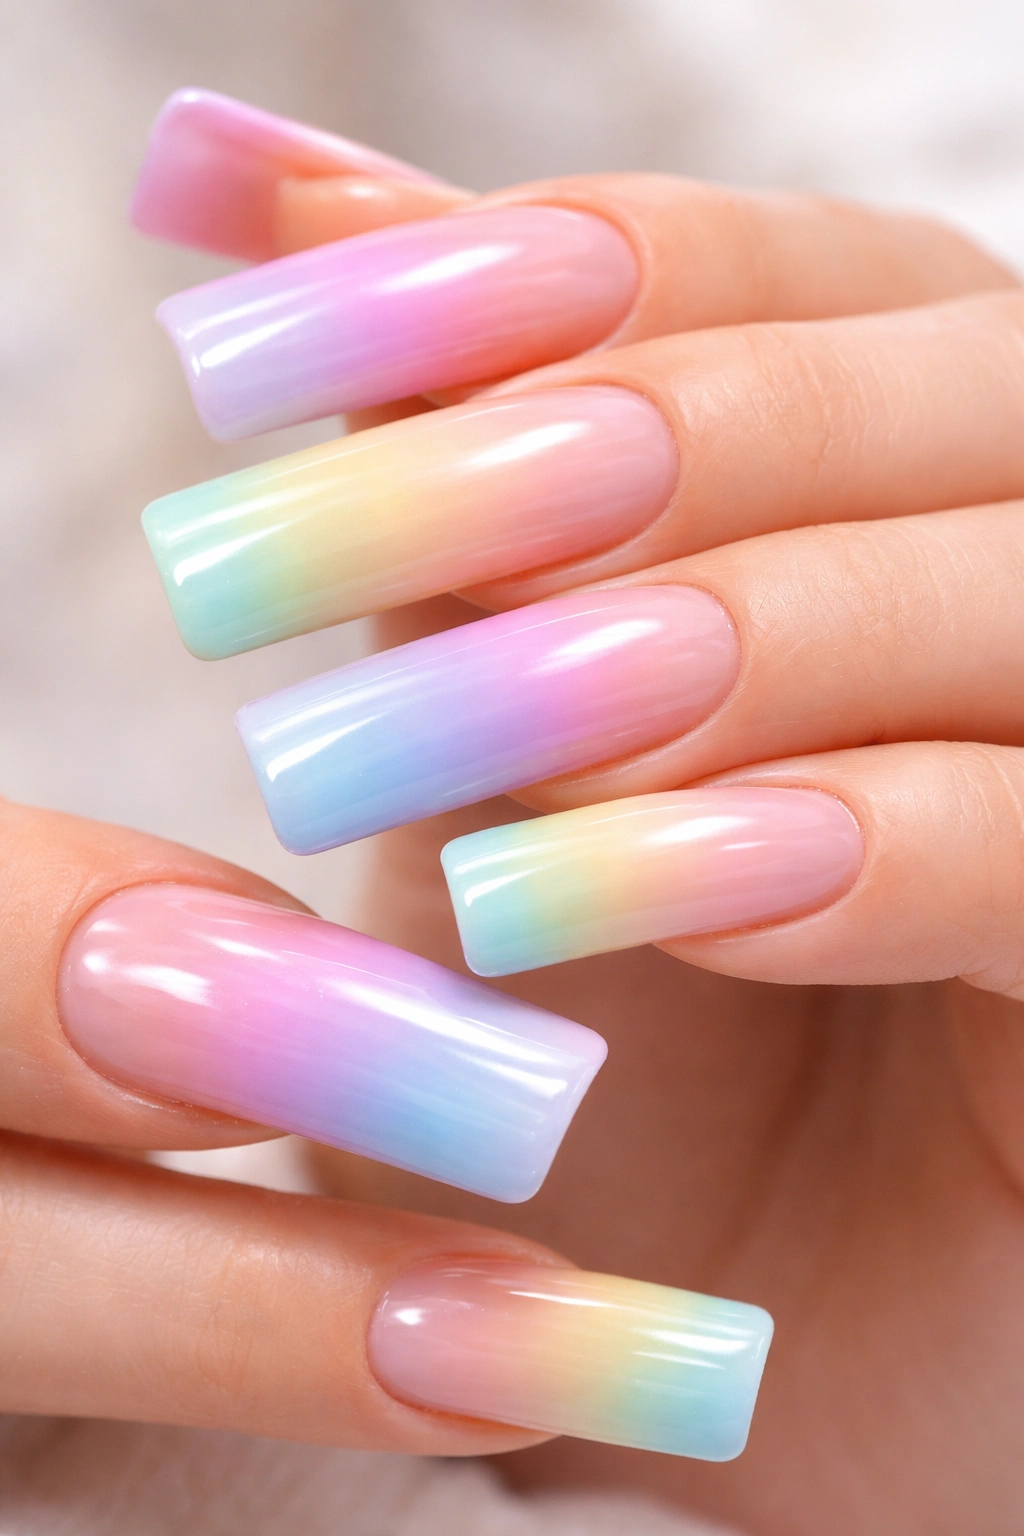
A gradient that flows through pastels — soft pink, peach, yellow, mint green, and lavender — creates a cheerful, optimistic design that celebrates color without being overwhelming. The pastel tones feel less aggressive than bright neon, but the gradient spanning the entire length of your duck nails means you’re still making a color statement. A glossy finish amplifies the sweet, candy-like quality.
Why Pastel Rainbows Work on Long Nails
The extended surface area of long duck nails gives you space to show multiple colors without the nail looking cluttered. Each color segment gets its own visual real estate. Pastel shades, which are lighter and more delicate than neon, actually benefit from this longer format because you can appreciate the subtlety of each shade.
Creating a Seamless Pastel Gradient
- Choose 4-6 pastel shades that flow naturally into one another
- Apply them to a small makeup sponge in order, with slight overlaps between colors
- Press the sponge onto the nail gently (don’t drag) and repeat, slightly overlapping each time, until the gradient is smooth
- The key is having subtle overlaps so colors blend rather than appearing in harsh blocks
- Top with a glossy gel that emphasizes the smooth, candy-like finish
Worth knowing: Pastels can sometimes look washed out or muddy if you’re not using high-quality polish. Invest in brands specifically known for pastel shades — they formulate them to maintain their delicate tone even when semi-transparent.
10. Glossy Chrome with Nude Undertones and Abstract Art Lines
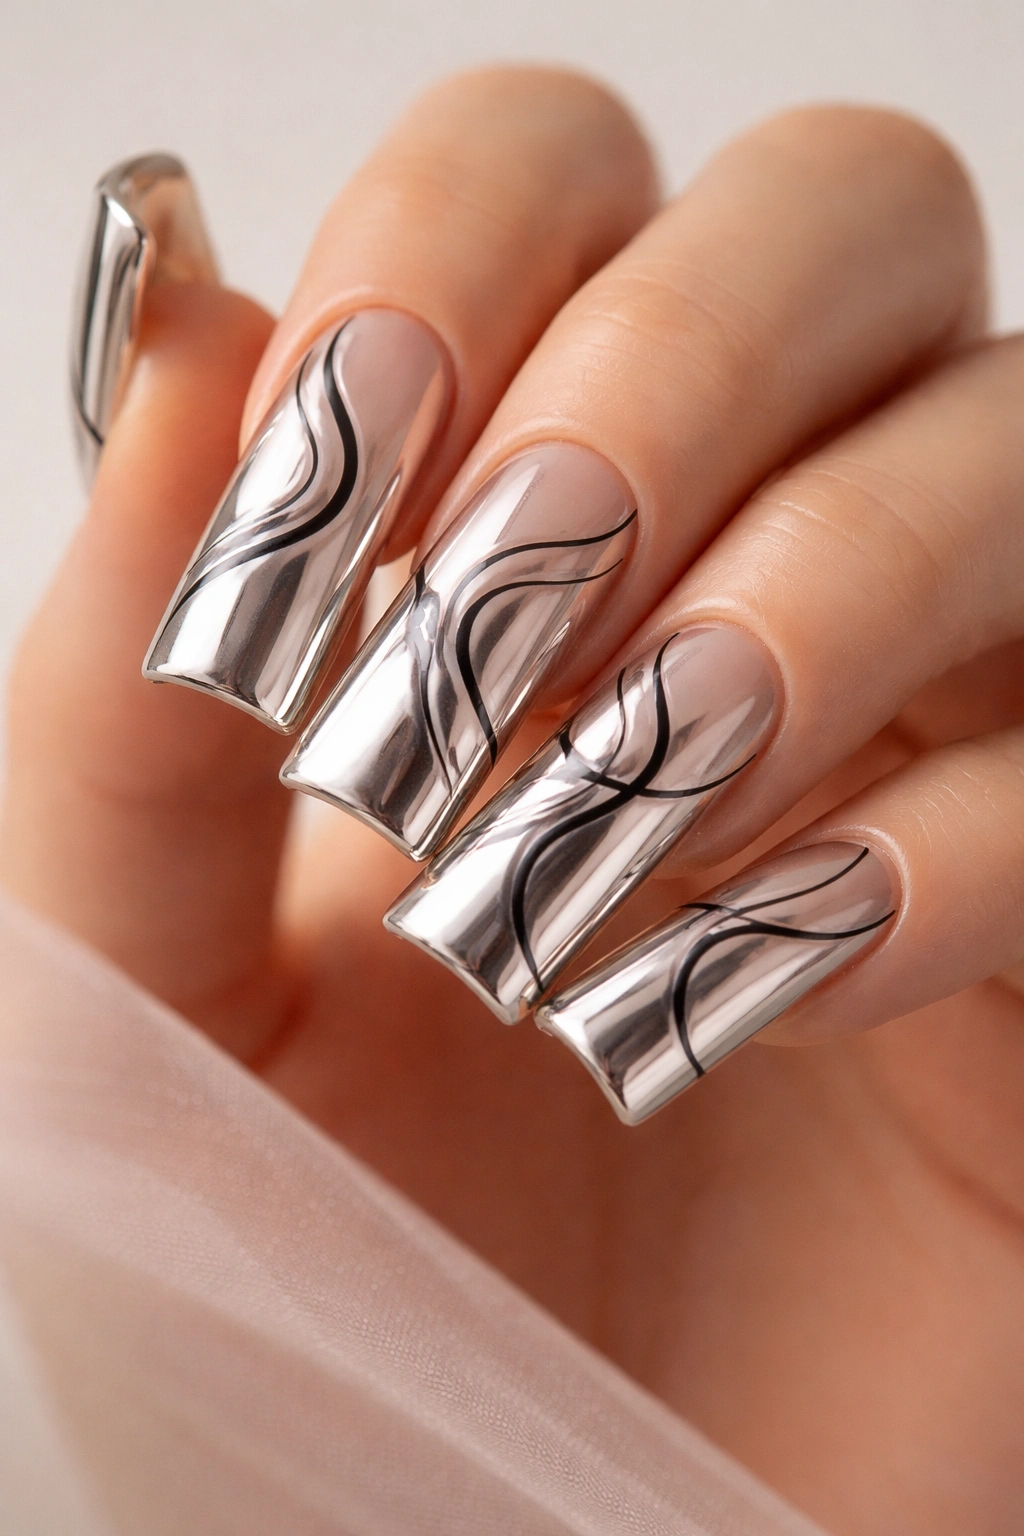
A sophisticated twist on chrome: instead of pure mirror silver, use a chrome finish with warm nude or rose gold undertones, then add abstract, minimalist black or dark blue lines across the surface in organic, non-representational patterns. This design feels surprisingly modern while hitting every Y2K aesthetic note — metallics, art-forward design, and confident execution.
Why Metallic Chrome Reads Timeless and Y2K
Chrome finishes were iconic in Y2K nail culture, but they’ve also remained relevant through the years. By pairing chrome with abstract line work rather than traditional sparkle or rhinestones, you’re modernizing the Y2K element without abandoning it. The result feels fresh and fashion-forward while still nodding to the era.
Adding Abstract Lines to Chrome
- Apply your chrome finish (ideally with warm undertones) to the entire nail and cure
- Use a very thin striping brush or nail art pen with black or dark blue gel
- Create abstract, organic lines — these can be curved, angular, scattered, or flowing, but they should feel intentional rather than random
- Think of this like modern art rather than technical nail design — imperfection is part of the appeal
- Keep some nails with fewer lines and some with more, creating variation across all ten digits
- Seal with a glossy top coat that brings out the chrome shine and protects the line work
Insider note: Abstract line work on a chrome base requires a steady hand but isn’t about technical perfection. The slightly imperfect, hand-drawn quality is exactly what makes it look intentional rather than accidental.
11. Neon Pink with White French Tips and Glitter Gradient
The French manicure, reimagined for the Y2K era: instead of a subtle white tip on a pale base, create a bold white French tip on long duck nails with a vibrant neon pink base. Add a glitter gradient that transitions from the pink base through the white tip, with glitter density increasing as you move toward the tip. It’s a Y2K remix of a timeless classic.
Why French Tips Work on Duck Nails
French tips emphasize the length and shape of duck nails because they create a visible color-block effect across the extended tip. A neon pink base makes the white tip pop even more dramatically. Adding glitter gradient bridges the two colors while introducing sparkle and movement.
Creating the Glittered French Tip Gradient
- Paint the entire nail neon pink and cure
- Apply a white gel to just the tip section — typically about 1/4 to 1/3 of the nail length
- While the white is still tacky (before curing), sprinkle fine glitter across just the white section
- Cure, then apply a second layer of white gel mixed with slightly more glitter density, concentrating on the tips
- The gradient effect comes from glitter being denser in the tips and sparser where pink and white meet
- Final seal with a high-shine top coat
Pro tip: Use a sticky base gel before adding white, so both the white and glitter adhere securely without sliding off the curved surface of duck nails.
12. Clear Jelly Base with Embedded Chunky Glitter and Gold Foil Flakes
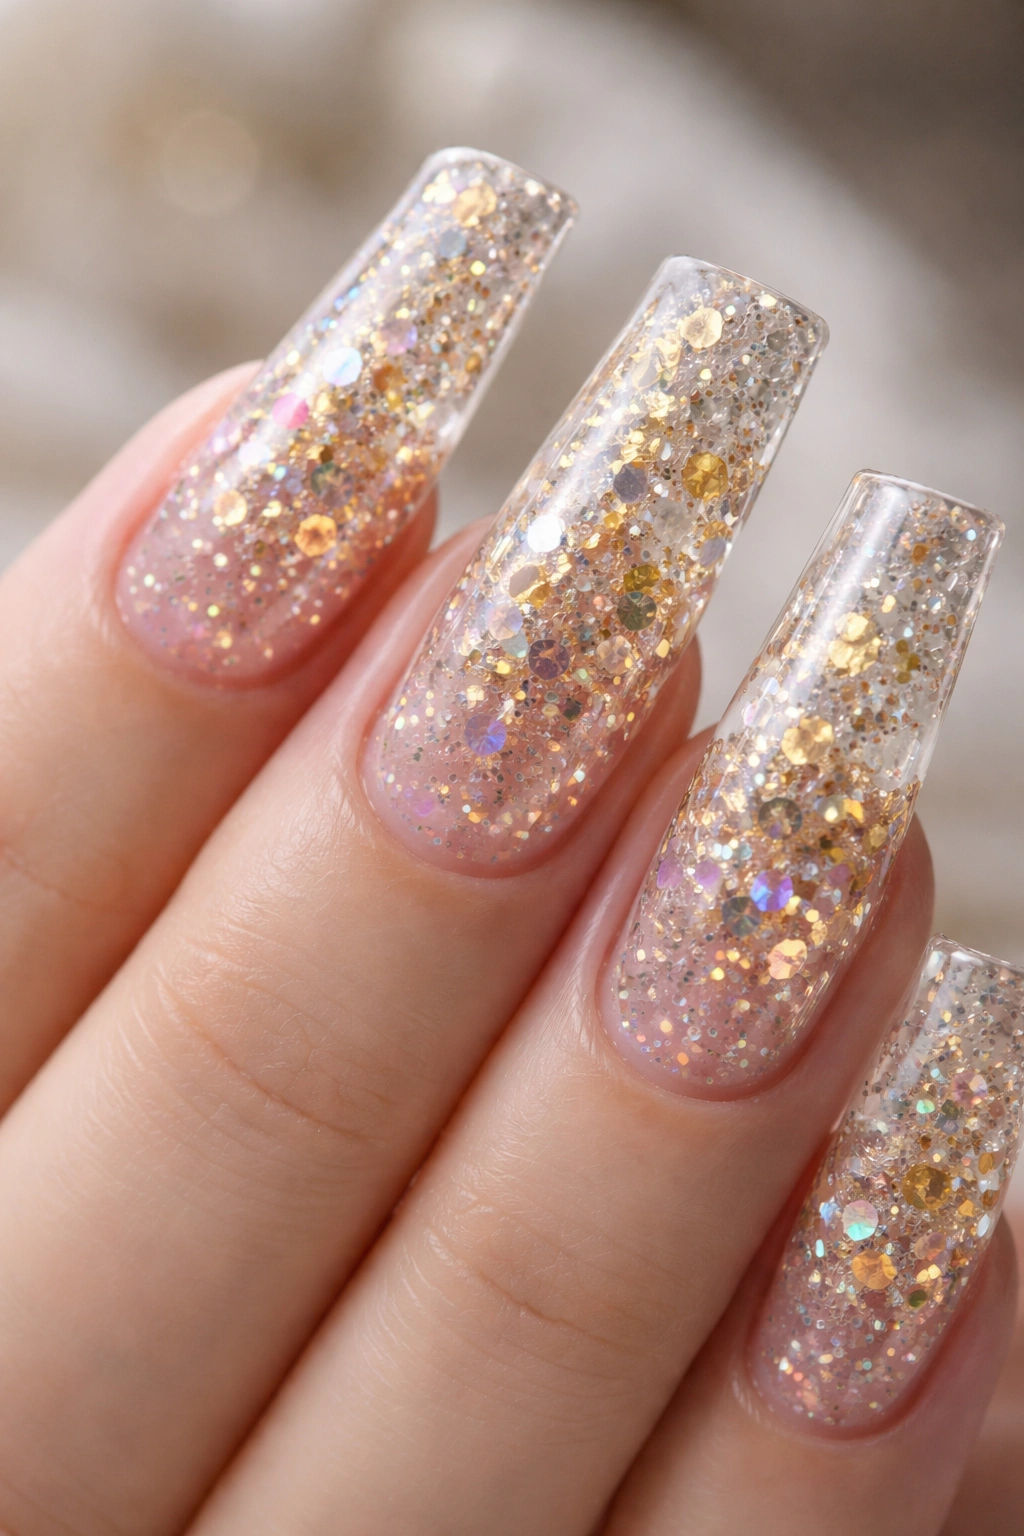
A crystal-clear jelly base that’s almost transparent, studded with chunky multidimensional glitter and shimmering gold foil flakes, creates an ethereal, almost geode-like effect. When you hold your nails up to light, the embedded sparkle creates depth and dimension that reads as luxurious. This design feels more subtle than solid glitter nails but still undeniably sparkly.
Why Embedded Glitter Works Better Than Surface Glitter
When glitter is mixed into a clear jelly base or suspended within layers of gel, it appears to be floating within the nail rather than sitting on top. This creates visual depth and a more polished appearance. On long duck nails, embedded sparkle creates a sophisticated, jewelry-like effect.
Layering Glitter Into Clear Jelly
- Start with a clear jelly base applied to the nail and cure it
- Apply a second layer of clear jelly (tacky, not cured)
- Drop chunky glitter into this layer in varying sizes, using a toothpick to position pieces
- Cure this layer
- Apply another layer of clear jelly mixed with gold foil flakes (foil pieces should be suspended within the gel, not floating on top)
- Cure, then seal with a glossy top coat
- The final result should look like the sparkle is trapped inside the nail, creating a three-dimensional effect
Worth knowing: The ratio of glitter to gel is crucial. Too much glitter makes the nail feel lumpy; too little and you lose the sparkle effect. Aim for approximately 30-40% glitter mixed into your gel base.
13. Hot Pink Ombre with Rhinestone Art Deco Pattern
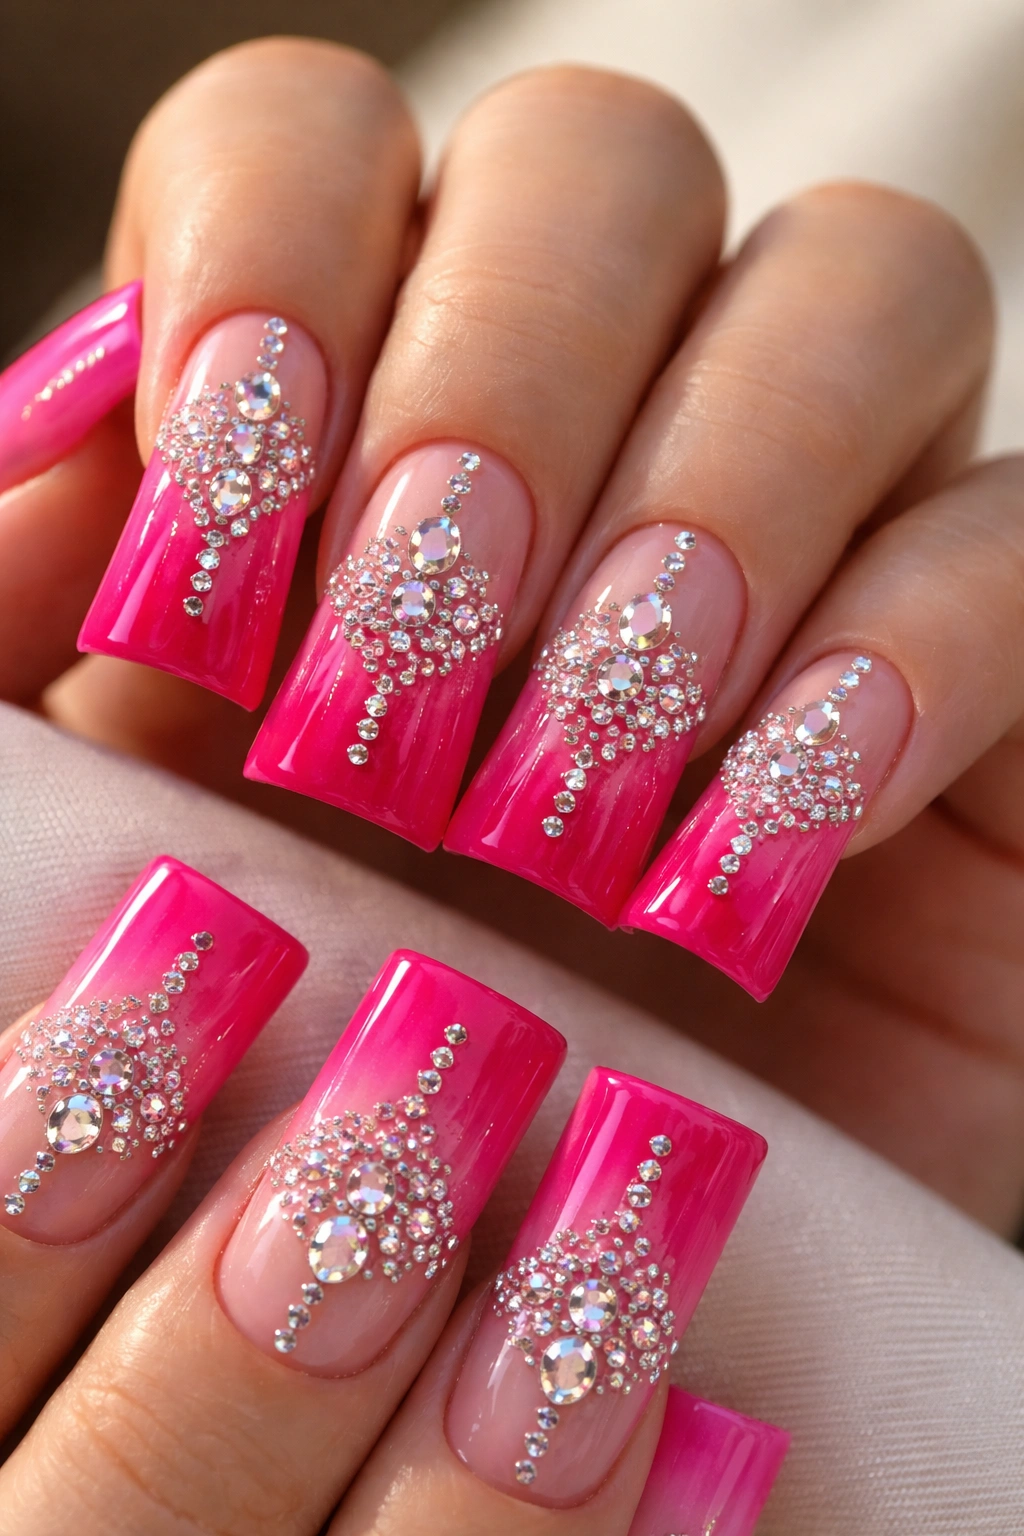
A hot pink ombré (darker at the base, lighter at the tips) combined with rhinestones arranged in a geometric Art Deco pattern down the center of each nail. This design merges Y2K maximalism with the geometric precision of Art Deco styling, creating something that feels both nostalgic and refined. The rhinestones create a jewelry-like quality that elevates the simple ombré.
Why Art Deco Geometry Works on Y2K Nails
Art Deco is all about geometric precision, symmetry, and luxury — it sits at the opposite end of the spectrum from the chaotic, colorful maximalism that defined Y2K. By combining these two aesthetics, you create a design that feels sophisticated and intentional rather than haphazardly thrown together. The geometric placement of rhinestones transforms a simple ombré into something architectural.
Creating an Art Deco Rhinestone Pattern
- Create your hot pink ombré gradient as the base
- Decide on your geometric pattern — this could be a vertical line of stones, a diamond shape, triangular clusters, or interlocking geometric shapes
- Place larger rhinestones for the primary pattern outline
- Fill in with smaller stones in complementary shapes
- Use tweezers for precise placement and a sticky gel base to ensure stones stay put
- Seal heavily under glossy top coat to protect your sparkle
Pro tip: Sketch your Art Deco pattern lightly with a pencil on a piece of paper first, so you know exactly where each stone goes before you start placing them on your nails.
14. Translucent Nude with Scattered Pearl and Crystal Clusters
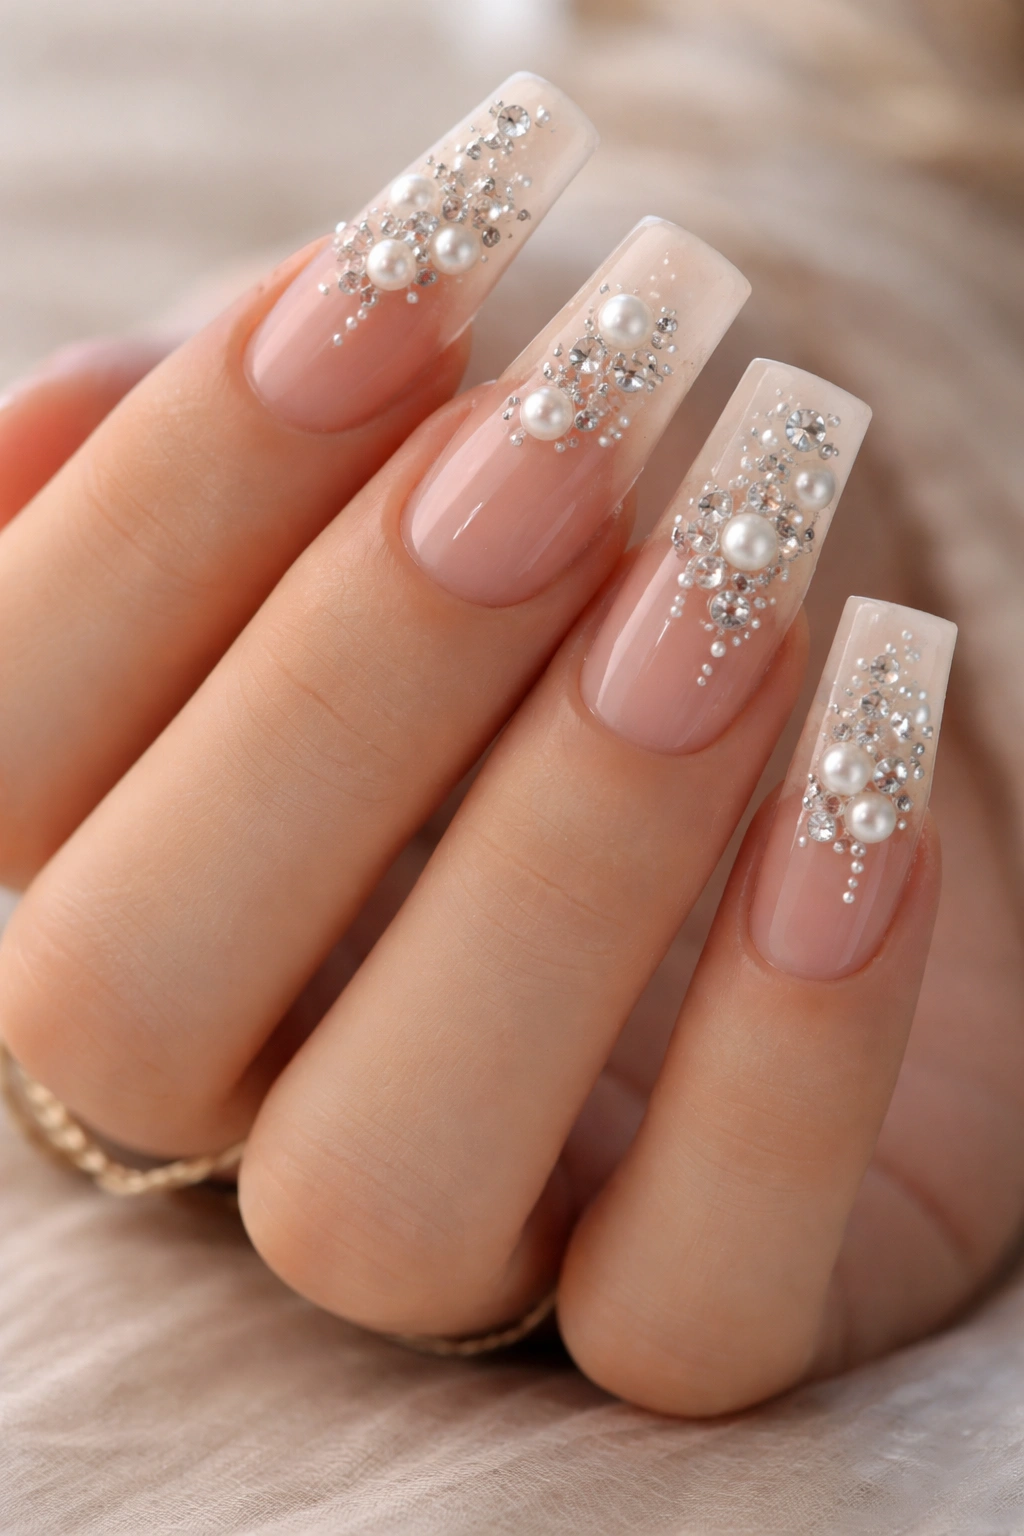
A barely-there nude jelly base that’s almost transparent, creating a clean, minimalist canvas for clusters of pearls and crystals scattered asymmetrically across the nails. This design proves Y2K doesn’t always mean loud and colorful — sometimes it’s about sparkle and luxury layered over simplicity. The translucent base lets your natural nail shine through slightly, creating a sophisticated, manicured appearance.
Why Pearls and Crystals on Nude Bases Feel Timeless
Pearls and crystals are inherently luxurious-looking, and placing them on a neutral base emphasizes their quality and beauty. On duck nails, where you have a large surface area, you can create visual interest through strategic placement rather than through color. This style feels refined and editorial, perfect for occasions where you want your nails to feel elegant rather than playful.
Placing Pearl and Crystal Clusters
- Apply a transparent or very pale pink jelly base — you should be able to see your nail bed faintly through it
- Create clusters of pearls and crystals by grouping 3-5 stones together in 2-3 locations per nail
- Position clusters asymmetrically — not centered, not following a pattern, but scattered naturally
- Vary the size of stones within each cluster for visual interest
- Apply a thick glossy top coat that keeps everything smooth and sealed
Worth knowing: Small pearls (2mm to 3mm) and medium crystals (3mm to 4mm) work best for clusters because they create visual impact without making the nail feel overly heavy or uncomfortable to wear.
15. Y2K Sunset with Metallic Gold Outlines
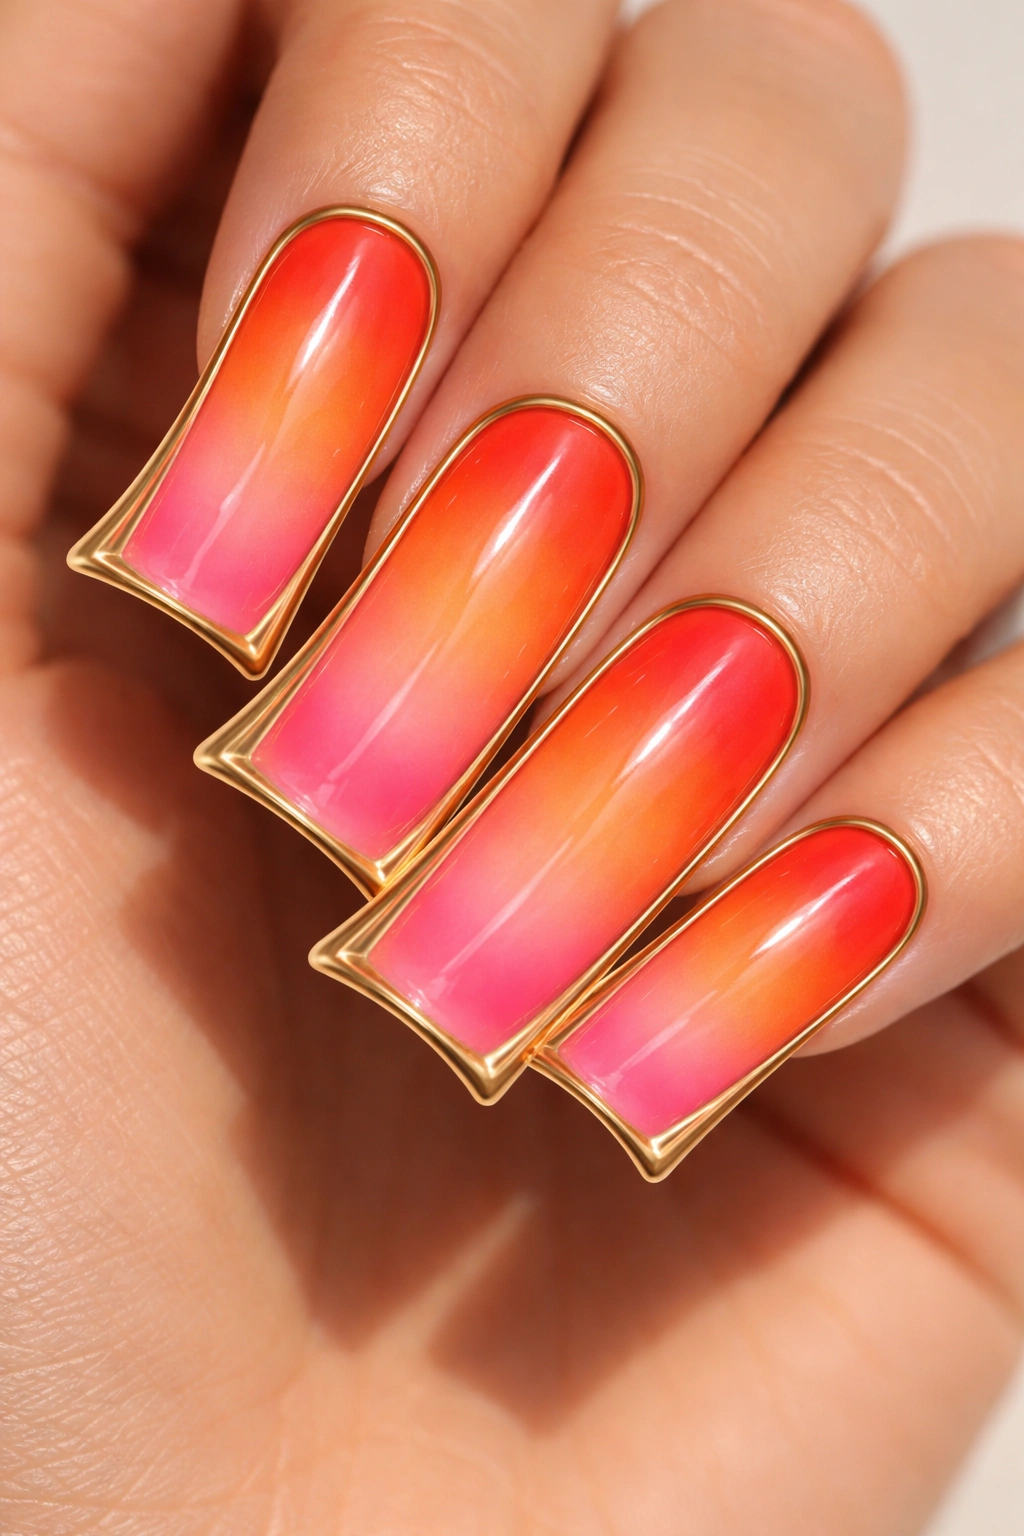
A gradient flowing from warm orange at the base through coral, hot pink, and peach at the tips — essentially a Y2K sunset captured on your nails — finished with thin metallic gold outlines around the edge of each duck nail. The gold outlining emphasizes the shape of the nail while the gradient interior creates a sense of movement and warmth. This design is maximalist without being chaotic because the gold frame provides visual organization.
Why Gold Outlining Adds Intentionality
A frame or border automatically makes any design feel more purposeful and composed. On long duck nails, the extended shape is already a bold statement, but adding a golden outline says you’re being deliberate about showcasing that shape. The metal brightens the warm gradient tones without competing with them.
Creating the Sunset Gradient with Gold Outline
- Build your sunset gradient as described in previous gradient instructions: warm orange to coral to hot pink to peachy-gold
- Once the gradient is fully cured under top coat, use a thin striping brush with metallic gold gel
- Carefully paint along the sides and edge of the duck nail, creating a frame around the gradient
- The outline should be thin (about 1mm) so it’s noticeable without overwhelming the design
- The outline works best on the free edge (the very tip) and around the sides of the nail
Pro tip: Practice your outline strokes on a practice nail wheel before committing to your actual manicure — the outline requires a steady hand and precision, but it’s a learnable skill that transforms a basic gradient into something gallery-worthy.
Final Thoughts
Y2K duck nails are about embracing boldness, celebration, and unapologetic self-expression through color, sparkle, and intentional design. Whether you’re drawn to the full-glitter look, the sophisticated metallics and crystals, the soft pastels, or the saturated neon shades, each of these 15 designs captures a different facet of what made Y2K nail culture so magnetic and fun.
The beauty of duck nails specifically is that their extended, squared-off shape creates a statement all on its own — the design elements you choose to layer onto that shape just amplify what’s already visually distinctive. Long duck nails demand attention, so you might as well make them sparkle, ombré, or shine in ways that make you feel confident and joyful every time you catch your reflection.
Whether you’re creating these designs yourself at home or taking inspiration to a professional nail technician, the key is choosing elements that genuinely excite you rather than what you think you “should” do. Y2K aesthetics were never about restraint or understatement — they were about fun, boldness, and making choices that felt right to you in that moment. That philosophy hasn’t changed, and your duck nails should reflect exactly what makes you happy.
