

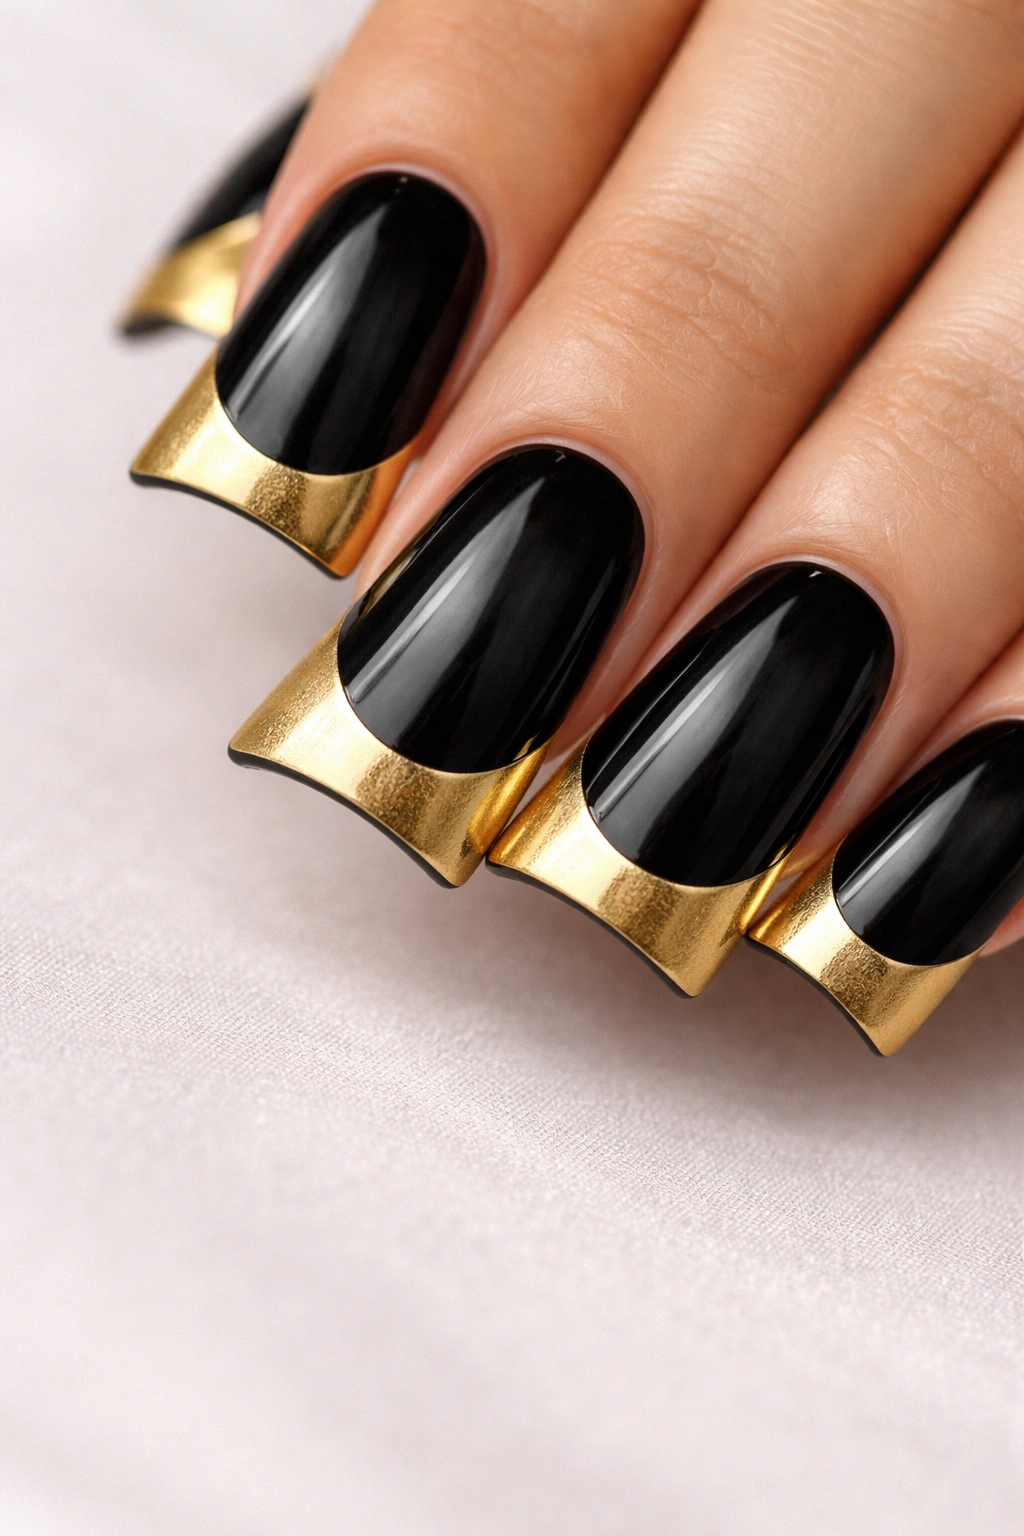
Black and gold might be the most sophisticated color pairing in nail art. There’s something inherently luxe about combining deep, moody black with shimmering gold accents — it reads elegant whether you’re heading to a gala or just want to feel polished on a Tuesday. Duck nails, with their distinctive curved, elongated shape, are the perfect canvas for this timeless color scheme. The dramatic silhouette makes every design detail more pronounced, and black-and-gold combinations lean into that visual drama beautifully.
If you’ve been scrolling through nail inspiration and keep coming back to black and gold but aren’t sure how to actually execute it on duck nails, you’re in exactly the right place. I’m sharing 10 concrete, achievable design ideas that range from minimalist and chic to bold and glamorous. Each one works specifically with the duck nail shape — taking advantage of that extra length and curve to make the design feel intentional and polished. You’ll find techniques suited to every skill level, and all of them deliver that high-impact look that makes people ask where you got your nails done.
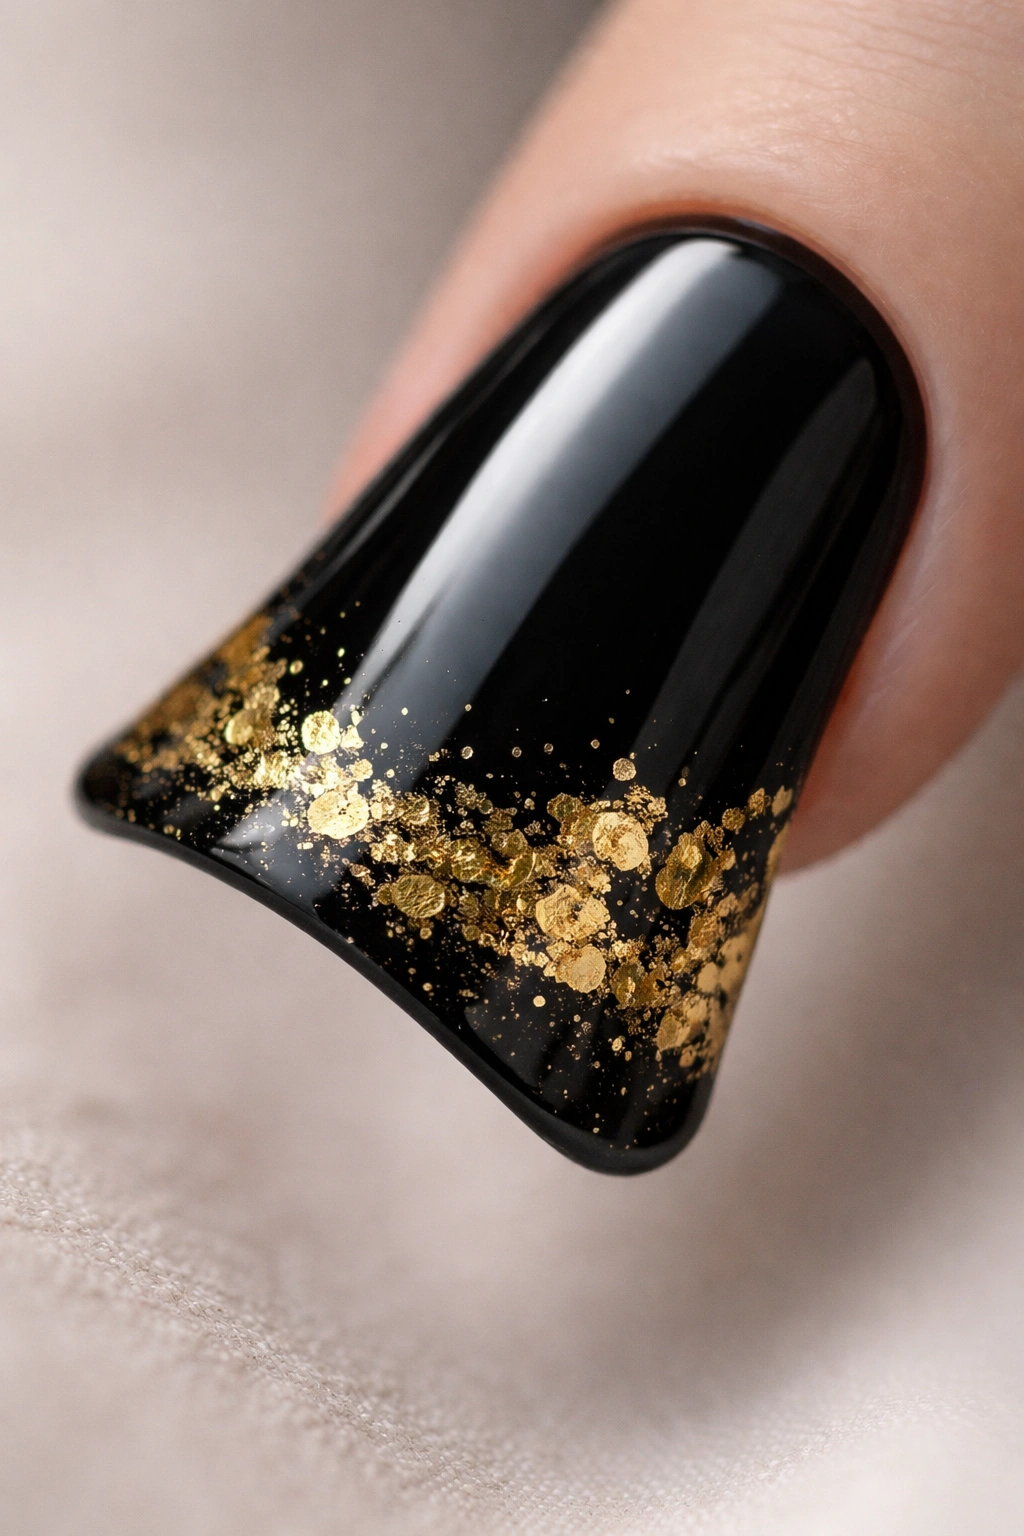
1. Classic Gold Foil on Black
This is the easiest way to get an instantly luxe look, and it’s nearly foolproof even if you’re doing your nails at home. Paint your duck nails with two coats of a rich, jet black base — something creamy and opaque that covers in one or two applications. Once that’s completely dry (wait a full three to five minutes to avoid smudging), apply a thin layer of clear gel or adhesive base coat over the entire nail surface.
Why This Design Works So Well
Gold foil catches light from every angle, so even a simple application becomes dynamic. The foil pieces don’t have to be perfectly placed — slightly irregular coverage actually looks more intentional and modern. On duck nails specifically, the foil tends to gather naturally in the curved tip area, which creates a naturally gradient effect without any extra effort on your part.
Exactly How to Apply the Foil
- Tear small, irregular pieces of thin gold foil (not full-coverage sheets)
- Press each piece gently into the sticky gel layer while it’s still wet
- Use a fine brush or the foil itself to smooth the edges down
- Seal everything with a glossy top coat for durability
- The foil won’t shed or peel as long as the top coat is thick enough
Pro tip: Keep your foil pieces small and random rather than trying to create a pattern — it’ll look intentional and less like a craft project.
2. Ombre Fade from Black to Gold
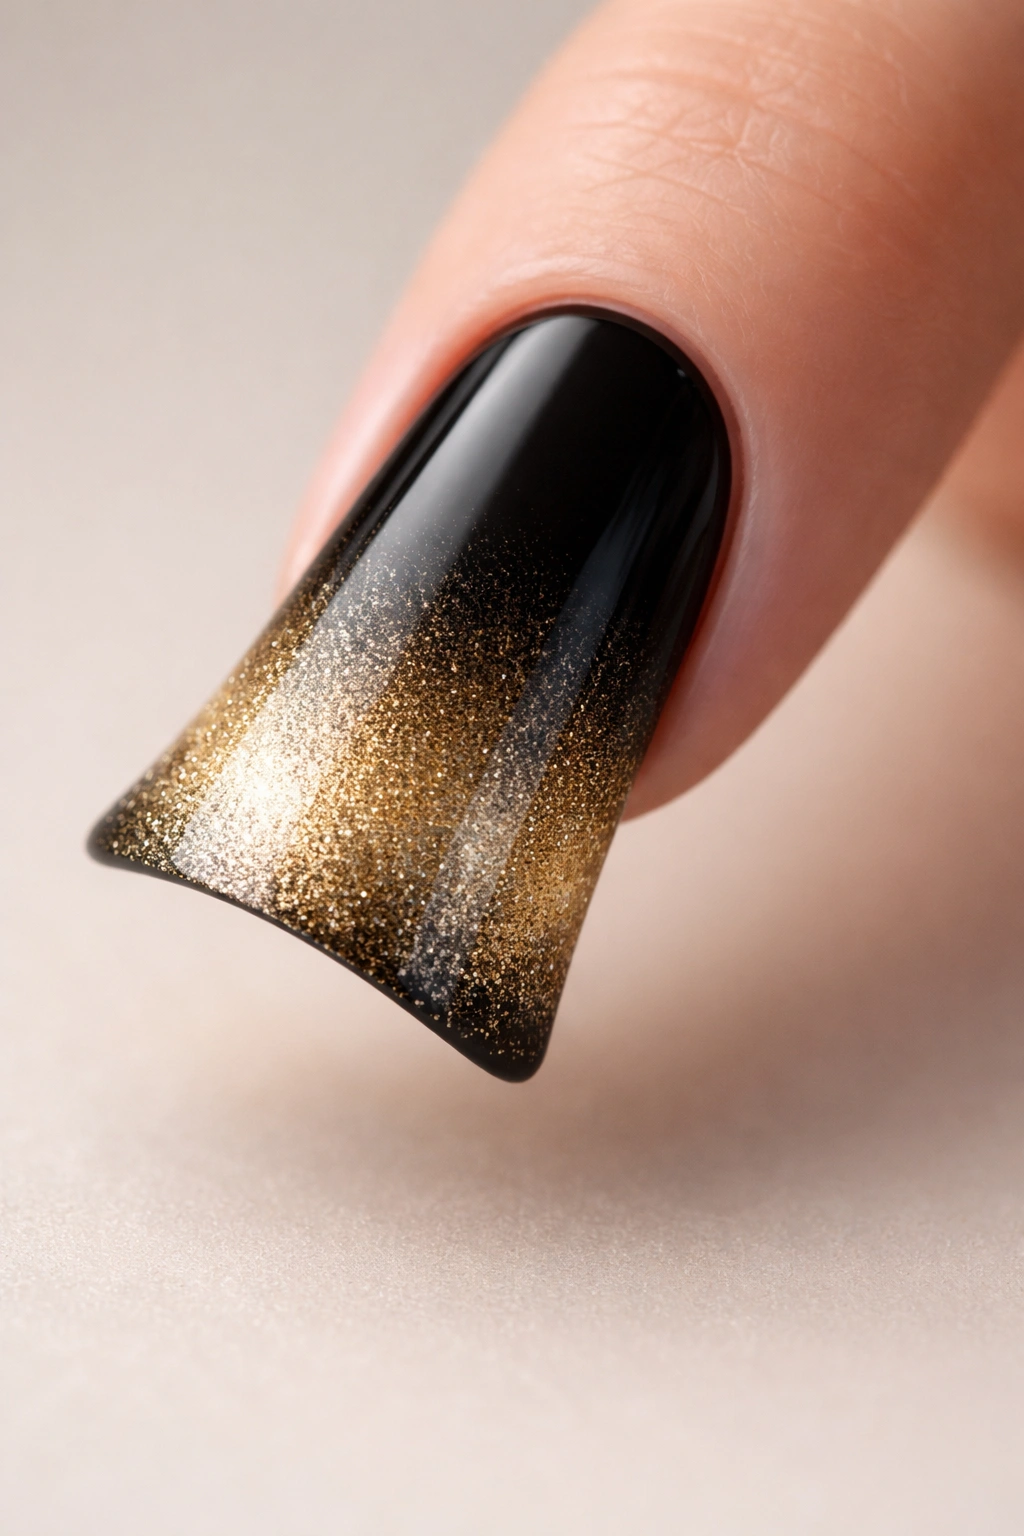
An ombre transitioning from black at the base to gold at the tip is inherently flattering on duck nails because the shape naturally guides the eye along the gradient. You’ll need black and gold gel polishes (or regular polish, though gel holds the blend longer without dustiness). The key is creating multiple stepping-stone shades, so the transition feels smooth rather than sudden.
How to Create a Smooth Color Transition
Paint your base coat, then apply a full coat of black. While it’s still slightly tacky, apply gold to just the very tip of the nail — roughly the top quarter. Use a clean, dry sponge or a makeup sponge to gently bounce between the black and gold zone, blending where they meet. Work quickly and avoid dragging the sponge, which can disturb the polish underneath. Once you’re happy with the blend, seal with top coat.
What Makes This Technique Easier Than It Sounds
- Gel polish stays wet longer, giving you more blending time
- Duck nails’ curved shape means imperfect edges still look intentional
- The length of duck nails means you have more space to work with before the colors meet
- Sponge-blending is more forgiving than brush-blending for achieving soft transitions
Worth knowing: If you mess up the blend, simply wipe it away with a lint-free nail wipe and start the sponge step again — the base coats won’t be affected.
3. Geometric Gold Stripes on Black

Sharp, clean lines feel inherently sophisticated, and geometric patterns on duck nails command attention without being over-the-top. You can create straight vertical stripes, diagonal stripes, or even a crisscross pattern — whatever appeals to you. The trick is using thin striping tape to create perfectly straight edges without hand-painting, which is honestly one of the smartest shortcuts in nail art.
The Easiest Way to Get Perfect Lines
Apply thin striping tape (available at any beauty supply store or online) in your chosen pattern across the dried black base. Make sure each piece is pressed down firmly at the edges so polish doesn’t seep underneath. Paint over the entire nail with gold polish — it only takes one or two coats because you’re painting over black. Carefully peel away the tape while the gold is still slightly wet (not completely dry, or you risk picking up the gold layer). Let it cure fully, then top coat.
Why Geometric Patterns Feel So Elevated
- Lines create visual structure that reads as intentional design, not decoration
- Gold on black has natural contrast, so even thin stripes stand out clearly
- Duck nails’ length makes the pattern more visible and dramatic
- The clean aesthetic works for both professional and evening settings
Insider note: Diagonal stripes elongate the nail even more than the duck shape already does, which is a subtle but effective visual trick.
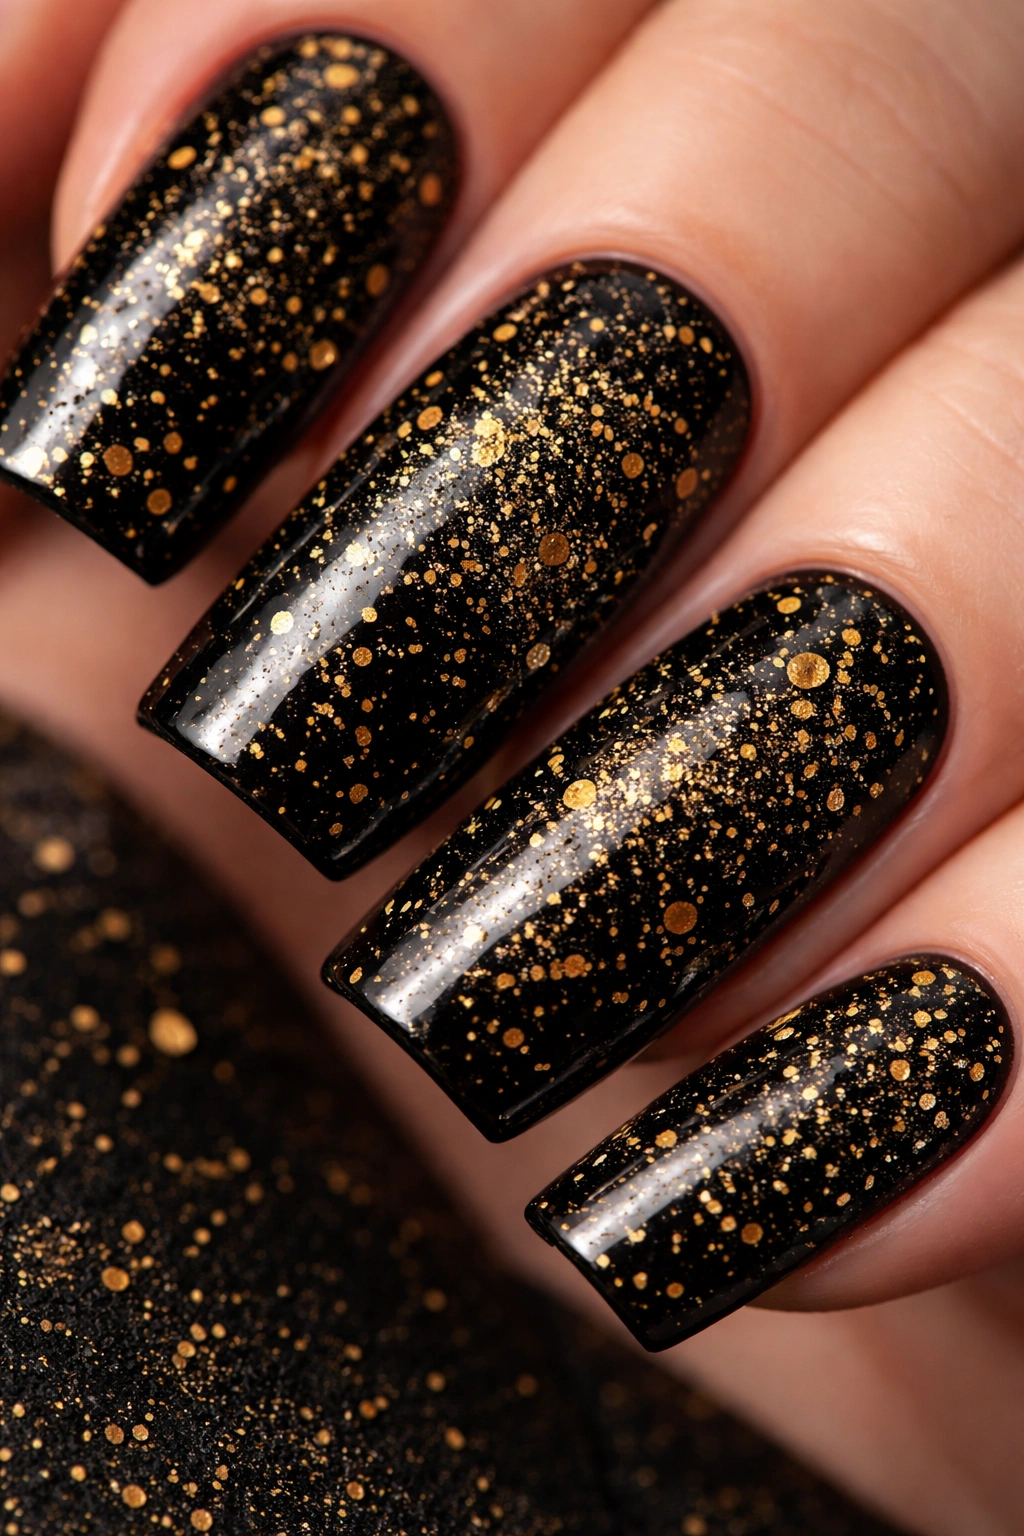
4. Gold Glitter Gradient
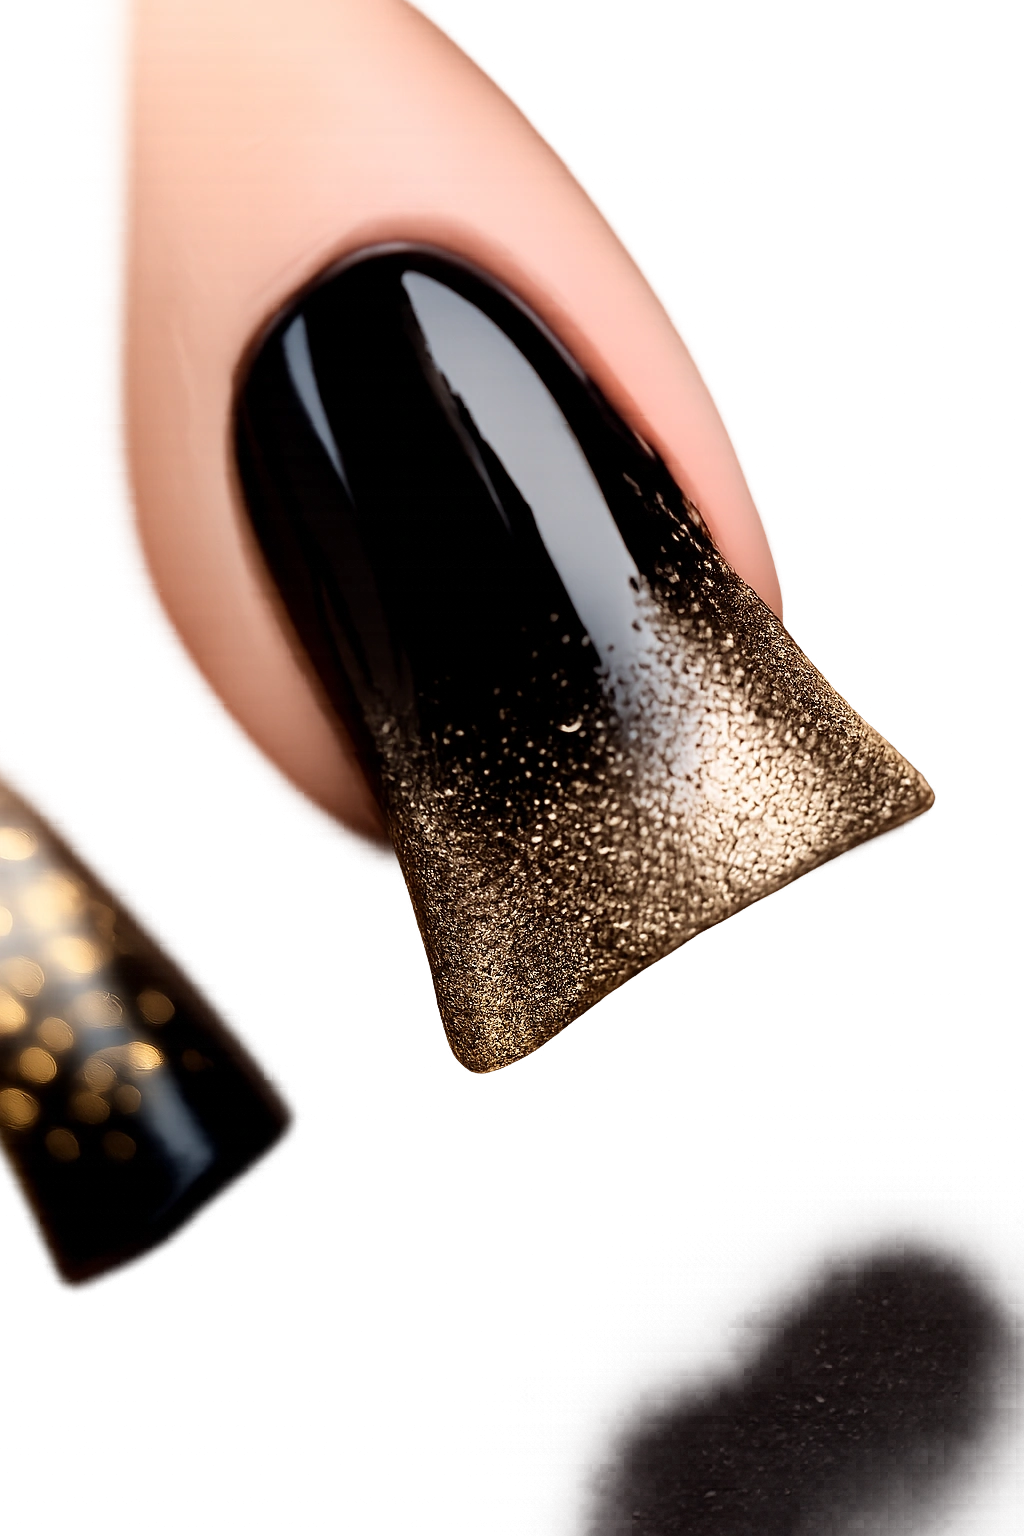
Glitter gradients feel celebratory without being costume-y, especially when you layer fine, refined glitter rather than chunky sparkle. Start with a solid black base, then create a gradient where glitter density increases toward the tip of the nail. This gives you sparkle exactly where people will look most — right at the curved duck nail tip.
Building a Gradient That Doesn’t Look Patchy
Apply your black base and let it cure completely. Mix a tiny drop of clear gel with a small amount of fine gold glitter in a separate container. Apply this mixture to just the top third of the nail, gently patting it on rather than dragging a brush (dragging creates visible streaks). In the middle section, apply a slightly thicker concentration. At the very tip, apply the densest amount of glitter mixture. Seal with a generous top coat, which will even everything out.
Choosing the Right Glitter Type
- Fine cosmetic glitter looks refined; chunky glitter reads more playful
- Holographic or iridescent gold shifts in different lighting
- Matte gold glitter creates a different vibe than shimmery
- Mix two different types of gold glitter for dimension without chaos
Real talk: This technique is more forgiving than solid glitter application because any patchiness just reads as part of the gradient.
5. Marble Effect with Gold Veining
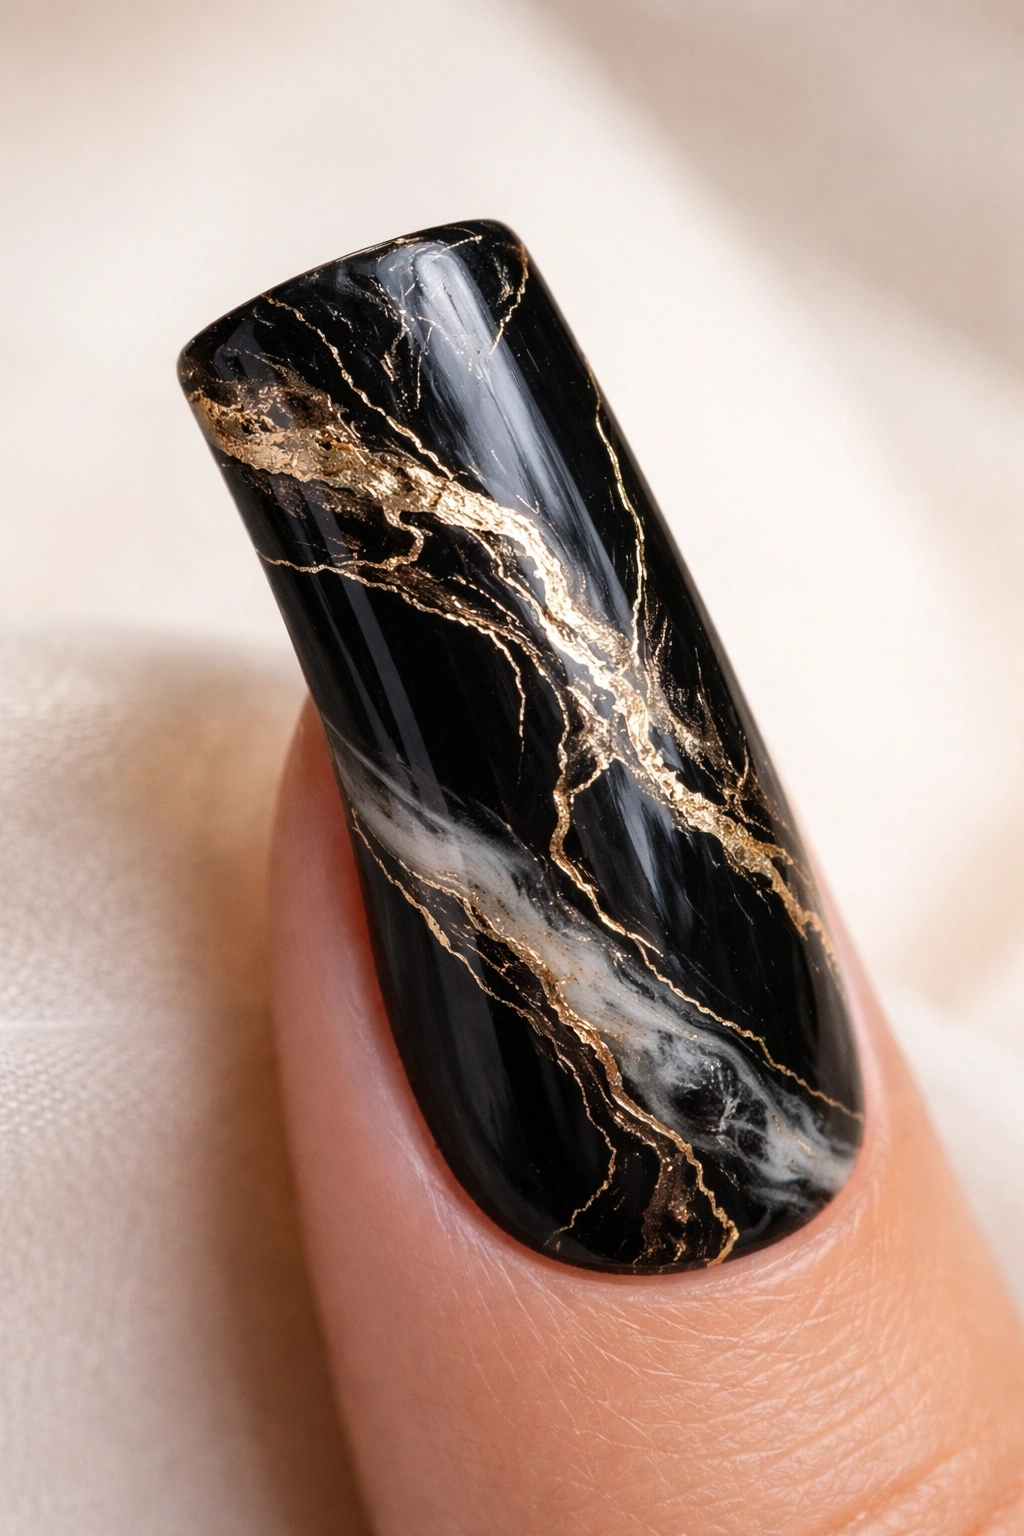
Marble nail art is classically elegant, and when you use black as the base with gold as the “veining,” it immediately channels luxury. The technique looks complicated but is actually quite simple — you’re essentially creating random lines and swirls that mimic how marble naturally fractures and veins. Duck nails’ length gives you plenty of space to make the veining pattern visible and detailed.
The Water Marble Technique (Easiest Method)
Fill a small cup with room-temperature water. Drop alternating drops of black and gold polish into the water, creating concentric circles. Use a thin tool (a toothpick or dotting tool) to drag through the circles, creating a feathered pattern. Dip your nail at an angle into the design, then immediately remove it and let it dry. Trim away excess polish from the sides with a nail file. Seal with top coat.
Alternative: Hand-Painted Marble
If water marbling feels intimidating, hand-paint thin, irregular gold lines across the black base using a fine striping brush. Don’t aim for precision — marble veining is naturally chaotic. Layer several thin lines over each other, varying their thickness and direction. Seal it all with top coat. This version is actually easier than water marbling and looks just as sophisticated.
- Water marble method: unpredictable, unique results every time
- Hand-painted method: more control, easier to repeat
- Both methods look equally professional when sealed properly
- Gold against black automatically reads as elegant
6. Gold Leaf Accents on Black
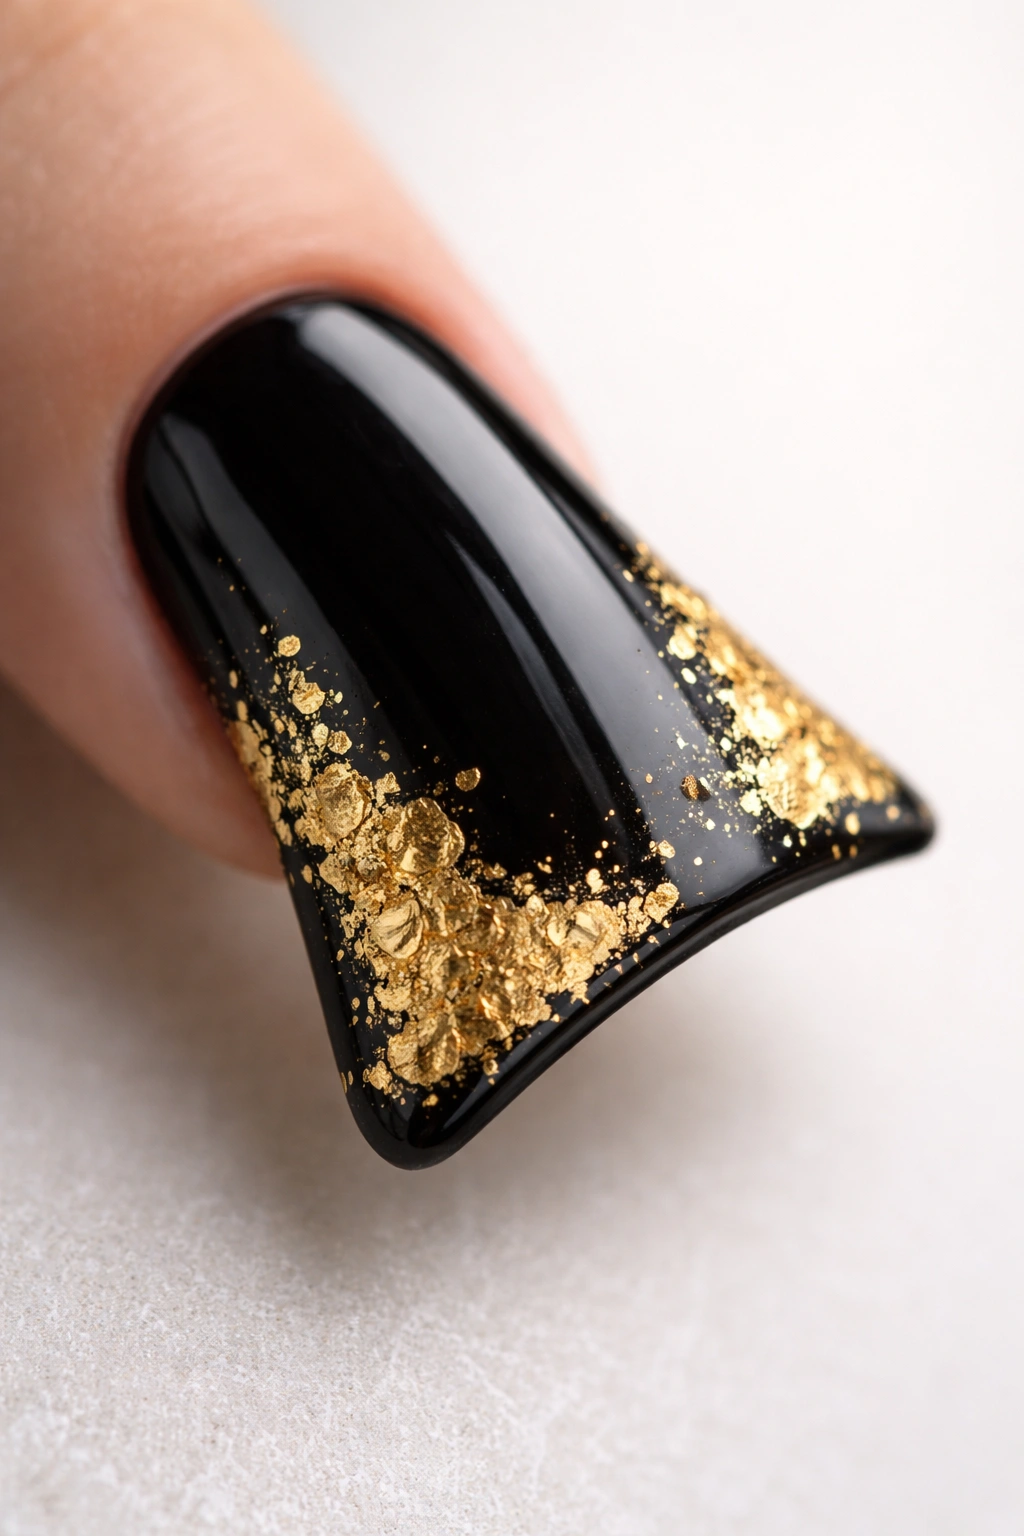
Real or faux gold leaf creates a texture and depth that flat polish simply can’t match. The leaf naturally crumples and catches light unevenly, which is exactly why it looks so expensive. On duck nails, you can apply leaf to just the tips, create a scattered accent pattern, or even frame the entire edge of the nail. The effect is surprisingly easy to achieve.
How to Apply Gold Leaf Without a Mess
Paint your black base and let it cure. Apply a thin layer of clear gel base (this is the “glue”). While it’s still sticky, carefully apply small pieces of gold leaf by gently pressing them onto the nail. Leaf is delicate — use a soft brush or your finger to smooth it down, but avoid heavy pressure. Once the pieces are in place, seal with top coat. The leaf will stay put under the seal.
Where to Place Leaf for Maximum Impact
- Along the curved tip of the duck nail for a natural focal point
- Scattered across the entire nail surface for an abstract look
- Concentrated in one corner for asymmetrical elegance
- Framing the edges to create a bordered effect
Pro tip: Slightly crumpled leaf looks more intentional than perfectly smooth leaf. Don’t worry about making it perfect.
7. Half-Moon Gold Tips
The half-moon manicure is a timeless design, and when you execute it on duck nails with black and gold, it becomes instantly modern. Paint your entire nail black, then create a curved gold half-moon shape at the tip. The duck nail’s natural curve actually aligns beautifully with the half-moon shape, so the design feels custom-made for this nail shape.
Creating a Perfect Half-Moon Boundary
Use thin striping tape or a stencil to create the half-moon line before painting the gold. Position the tape in a gentle curve across the width of the nail, about a third of the way down from the tip. Paint gold over the exposed tip area, then carefully remove the tape while the polish is still slightly wet. This creates a perfectly clean line without hand-painting.
Why This Design Flatters Duck Nails Specifically
- The half-moon follows the natural contour of the curved tip
- Black and gold create strong color contrast, so the design reads clearly
- It’s elegant enough for formal settings but modern enough for everyday
- The simplicity lets the duck nail shape be the real star
Insider note: If you reverse it (gold base with a black half-moon), it reads differently but equally chic. Experiment with both to see which feels more “you.”
8. Speckled or Spattered Gold Design
Speckle and splatter techniques create visual interest with minimal skill required — they’re genuinely hard to mess up. Flick a fine brush loaded with gold polish across your black base to create tiny dots and spatters. The randomness is the whole point, so don’t overthink placement. You can make it sparse and minimalist or dense and dramatic depending on how many flicks you apply.
Getting Speckles to Look Intentional
Use a thin striping brush or even an old toothbrush loaded with gold polish. Hold it a few inches above the nail and flick your finger across the bristles to send tiny spatters onto the nail surface. Work in layers if you want a more filled effect — apply one layer, let it dry, then add another. This gives you control over density without having to commit to a pattern upfront.
What Makes Speckle Art So Forgiving
- There’s no “wrong” placement — randomness is the aesthetic
- Uneven coverage looks intentional rather than sloppy
- It works on any base color and with any accent color
- You can do it in under a minute once you get the technique down
Worth knowing: Gel polish splatters slightly differently than regular polish, so test your flick technique on a practice surface first if you’re using gel.
9. Metallic Gold Borders and Frames
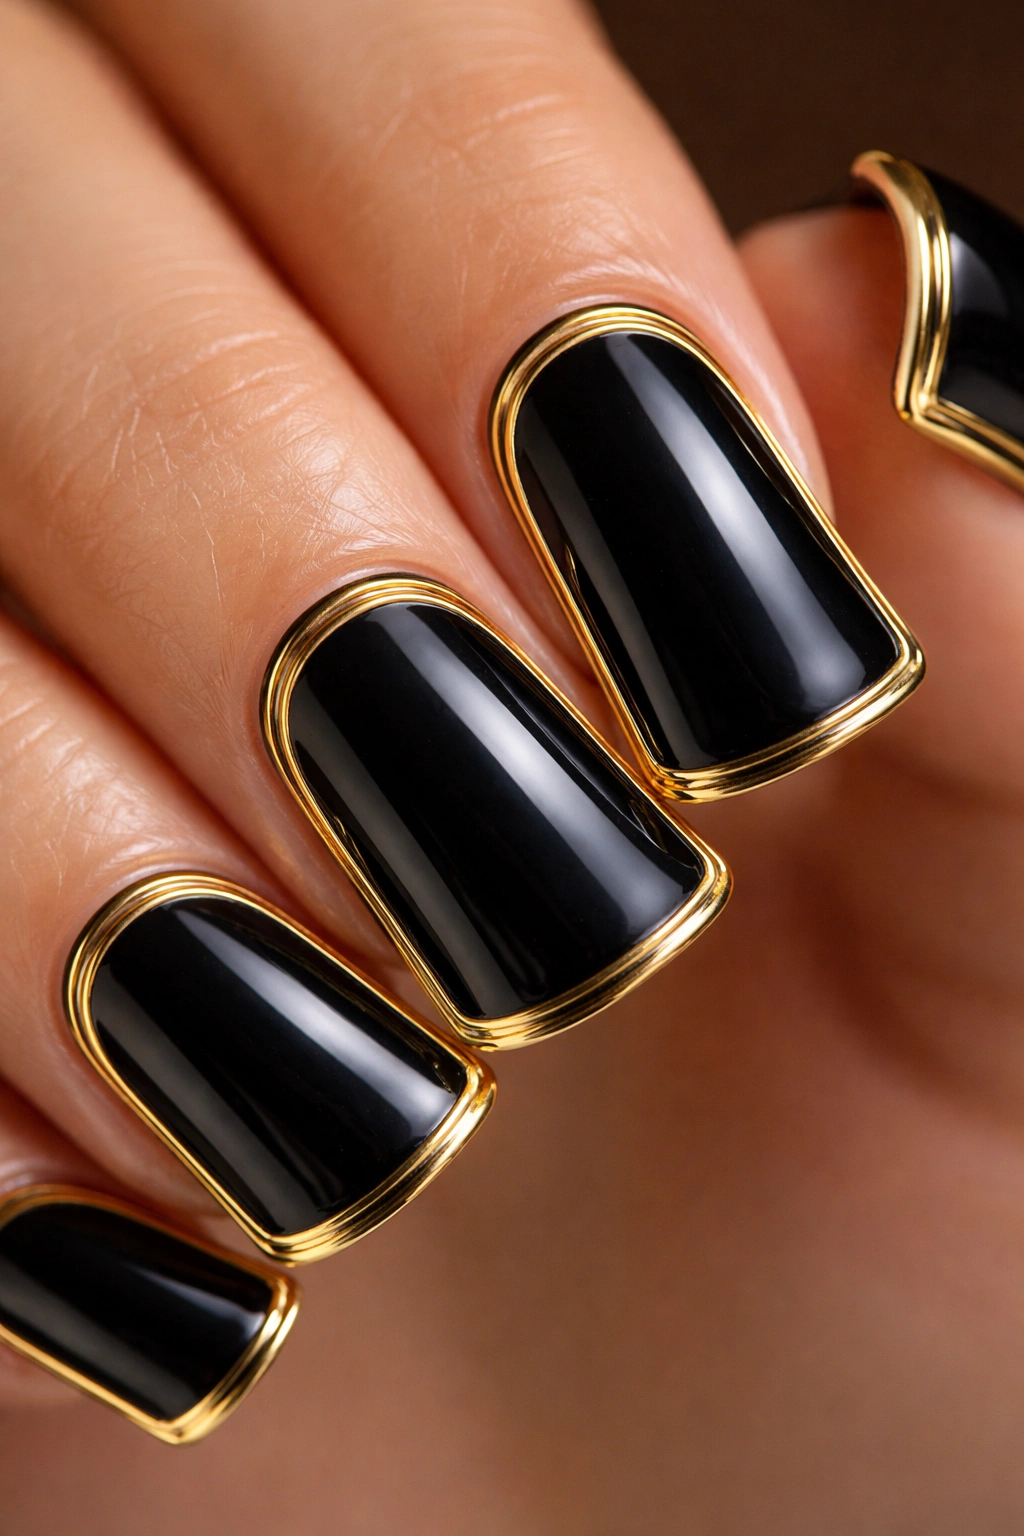
Creating a border or frame around the edge of your duck nail is a way to add visual structure and make the design feel intentional. Paint your base black, then use a fine striping brush to paint a thin gold line around the perimeter of the nail — along the sides, across the base, and following the curve of the tip. You can create a single outline or double lines for more impact.
Executing Clean Border Lines
Load your striping brush with gold gel or polish and draw slowly and steadily around the nail’s edge. Don’t pressure the brush — let it glide. If you’re nervous about shaky lines, use striping tape as a guide just like you would for stripes. For a double-line border, paint your first line, let it set for a few seconds, then paint a parallel line right next to it. The symmetry looks polished and intentional.
Design Variations on the Border Theme
- Single thin line for understated elegance
- Double lines with a small gap between them
- Frame around the tip only (like a horseshoe shape)
- Corner frames at the base of the nail
- A thicker band of gold at the very tip with a thin outline around the rest
Real talk: Even if your lines aren’t perfectly straight, they’ll read as design rather than mistake because borders are such a clean, intentional aesthetic.
10. 3D Gold Embellishments and Studs
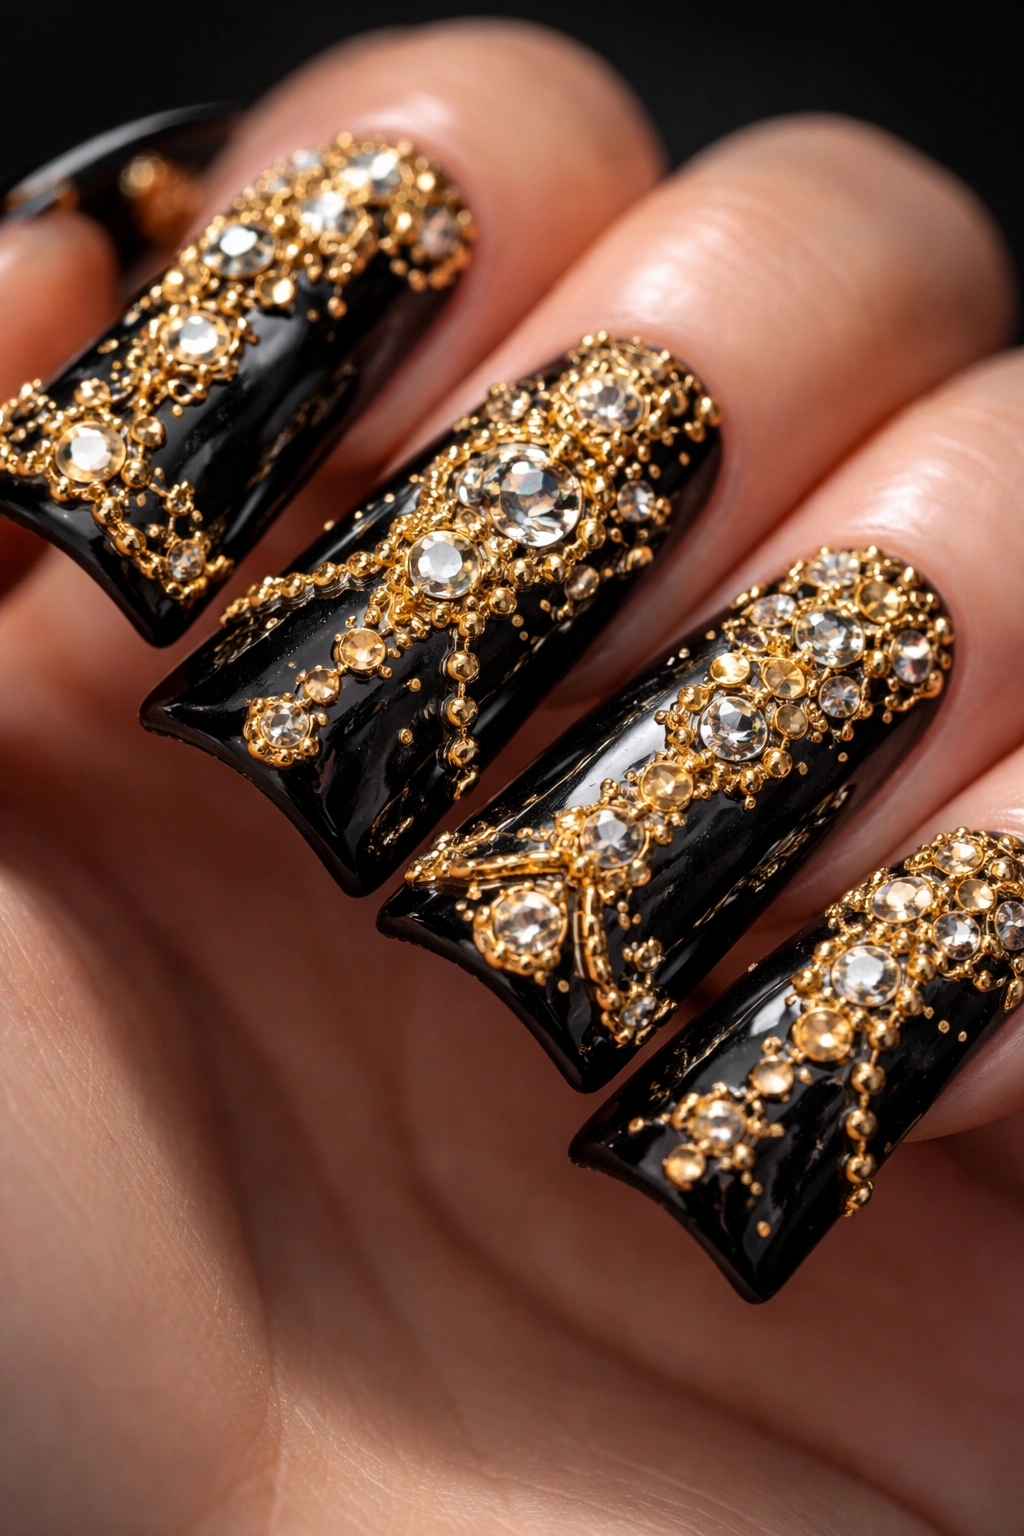
If you want maximum drama and texture, add dimensional gold elements to your black base. You can use gold studs, rhinestones, or even tiny gold charms glued on top of the polish. This technique transforms duck nails from art into jewelry-level accessories. The duck nail shape is actually ideal for this because the surface area and curve give you interesting places to position dimensional elements.
Applying Studs and Gems Securely
Paint your black base and top coat completely. While the top coat is still slightly tacky, carefully place studs or rhinestones where you want them, pressing gently so they sink slightly into the sticky surface. Once the top coat is fully cured, they’ll be locked in place. If you’re applying after the polish is completely dry, use a tiny drop of clear gel as adhesive before placing the stud, then seal over the top.
Placement Ideas That Look Intentional
-
A single stud at the center of the curved tip for focal-point drama
-
A vertical line of studs down the center of the nail
-
Scattered studs across the entire nail in an asymmetrical pattern
-
A border of small studs around the edge
-
Clustered studs in one corner for asymmetrical elegance
-
Gold studs feel more luxe than silver; choose quality studs that don’t feel cheap
-
Rhinestones catch light and sparkle more than flat studs
-
Mix stud sizes for visual interest rather than using all the same size
-
Less is more — 3-5 studs per nail looks intentional; 10+ starts to feel costumey
Final Thoughts
Black and gold on duck nails is genuinely one of the most versatile combinations you can choose. Whether you go minimal with a simple foil accent or maximum with studs and embellishments, the pairing works because of that inherent contrast and sophistication. The duck nail shape amplifies whatever design you choose — it’s longer, it’s curved, and it’s naturally eye-catching.
The beauty of these 10 ideas is that none of them require advanced nail art skills or specialized equipment. You can create any of them with basic tools, gel or regular polish, and a little patience. Start with whichever design calls to you most — whether that’s the minimalist elegance of a half-moon or the textural drama of gold leaf. Once you nail one technique, you’ll feel confident experimenting with the others.
Real talk: your first attempt might not be perfect, and that’s completely fine. Nail art improves with repetition, and even slightly imperfect execution on a duck nail shape still looks intentional and polished. The shape does a lot of the heavy lifting visually. Paint them, admire them, and enjoy that feeling of having luxe nails that coordinate beautifully with absolutely everything in your closet.
