

Black and red duck nails are having a major moment, and honestly, there’s nothing quite like the bold confidence they bring to your hands. The combination of these two striking colors creates an instant visual impact that works whether you’re going for edgy, elegant, or playful. Duck nails themselves—those adorable curved, rounded tips that actually resemble a duck’s bill—have become the go-to shape for creative nail artists and DIY enthusiasts alike. When you pair the shape with the dramatic contrast of black and red, you get nail designs that are impossible to ignore.
What makes black and red such a powerful pairing is the versatility. Red traditionally signals confidence and passion, while black brings sophistication and edge. Together, they create designs that can feel bold without being overwhelming, and they work across practically every aesthetic you can imagine. Whether you’re drawn to minimalist line work, intricate patterns, or full-coverage color blocking, black and red duck nails give you the canvas to make it happen. The good news is that you don’t need professional-level skill to pull off these designs—many of them are surprisingly approachable for at-home manicures.
The duck nail shape itself has some real advantages when it comes to displaying nail art. The rounded tip and wider surface area give you more space to work with than traditional almond or coffin shapes, which means your designs are more visible and easier to execute. This shape became wildly popular because it’s flattering on most hand shapes, feels more wearable than extreme acrylics, and photographs beautifully—a major win if you love posting your nails on social media.
1. Classic Two-Tone Black and Red Ombre Duck Nails
This is the foundation design that started it all for many people—a smooth gradient that transitions from deep black to vibrant red (or vice versa) across the nail surface. The beauty of an ombre is that it feels effortless even though it takes some technique to execute perfectly. The key is blending the colors in the middle so there’s no harsh line, just a soft transition from one shade to the other.
Why This Design Stands Out
The ombre technique works because it mimics natural color shifts you see in nature—think of a sunset or a bruise that’s healing. Your brain recognizes the gradient as intentional and artistic rather than accidental, which makes it feel polished even when you’ve done it yourself at home. On duck nails specifically, the curved shape means the gradient flows beautifully along the contoured tip, creating an almost three-dimensional effect as light hits different parts of the nail.
How to Achieve It at Home
- Use a makeup sponge or a dedicated ombre sponge (they’re cheap and widely available) to blend your colors
- Apply black polish to one half of the sponge and red to the other half with clear separation—don’t premix them
- Dab the sponge onto your nail in a gentle pressing motion, working from the edge where the colors meet toward the tips
- Repeat the dabbing motion 3-4 times, adding more polish to the sponge as needed, until the gradient looks smooth
- Seal everything with a high-quality top coat to blend the texture and make the colors look luminous
- This technique works best with creme polishes (solid colors without shimmer), not glitter or metallics
Pro tip: Practice on a piece of plastic or a nail wheel first—once you get the sponge pressure right, the technique becomes much easier on your actual nails.
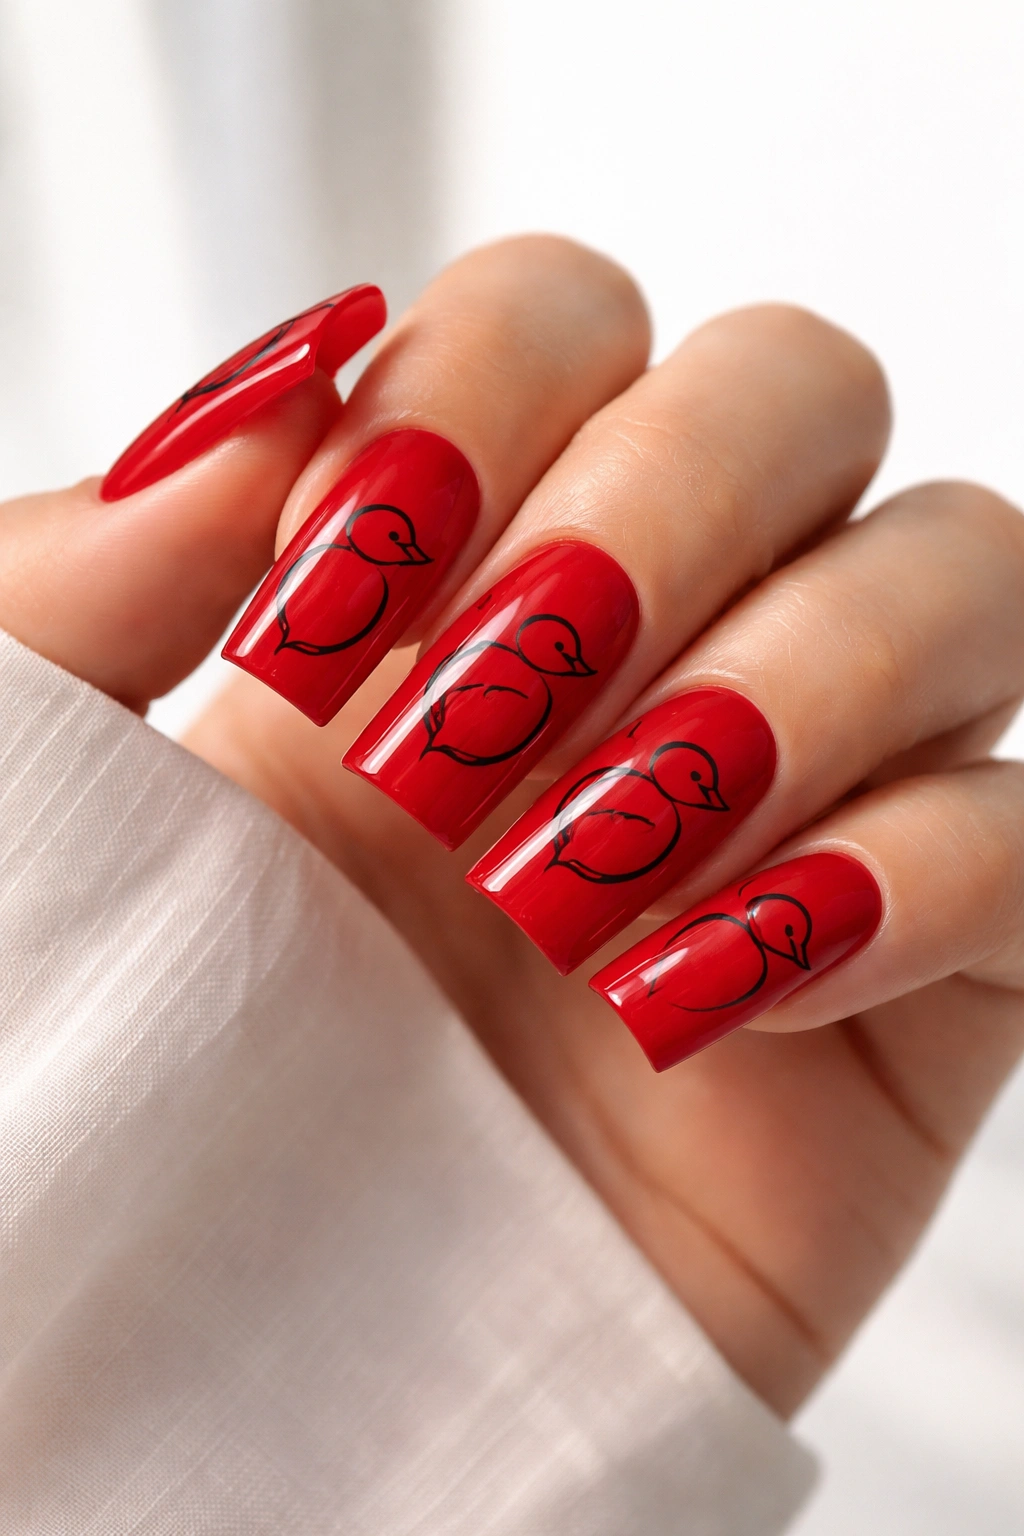
2. Bold Red Base with Black Duck Design Duck Nails
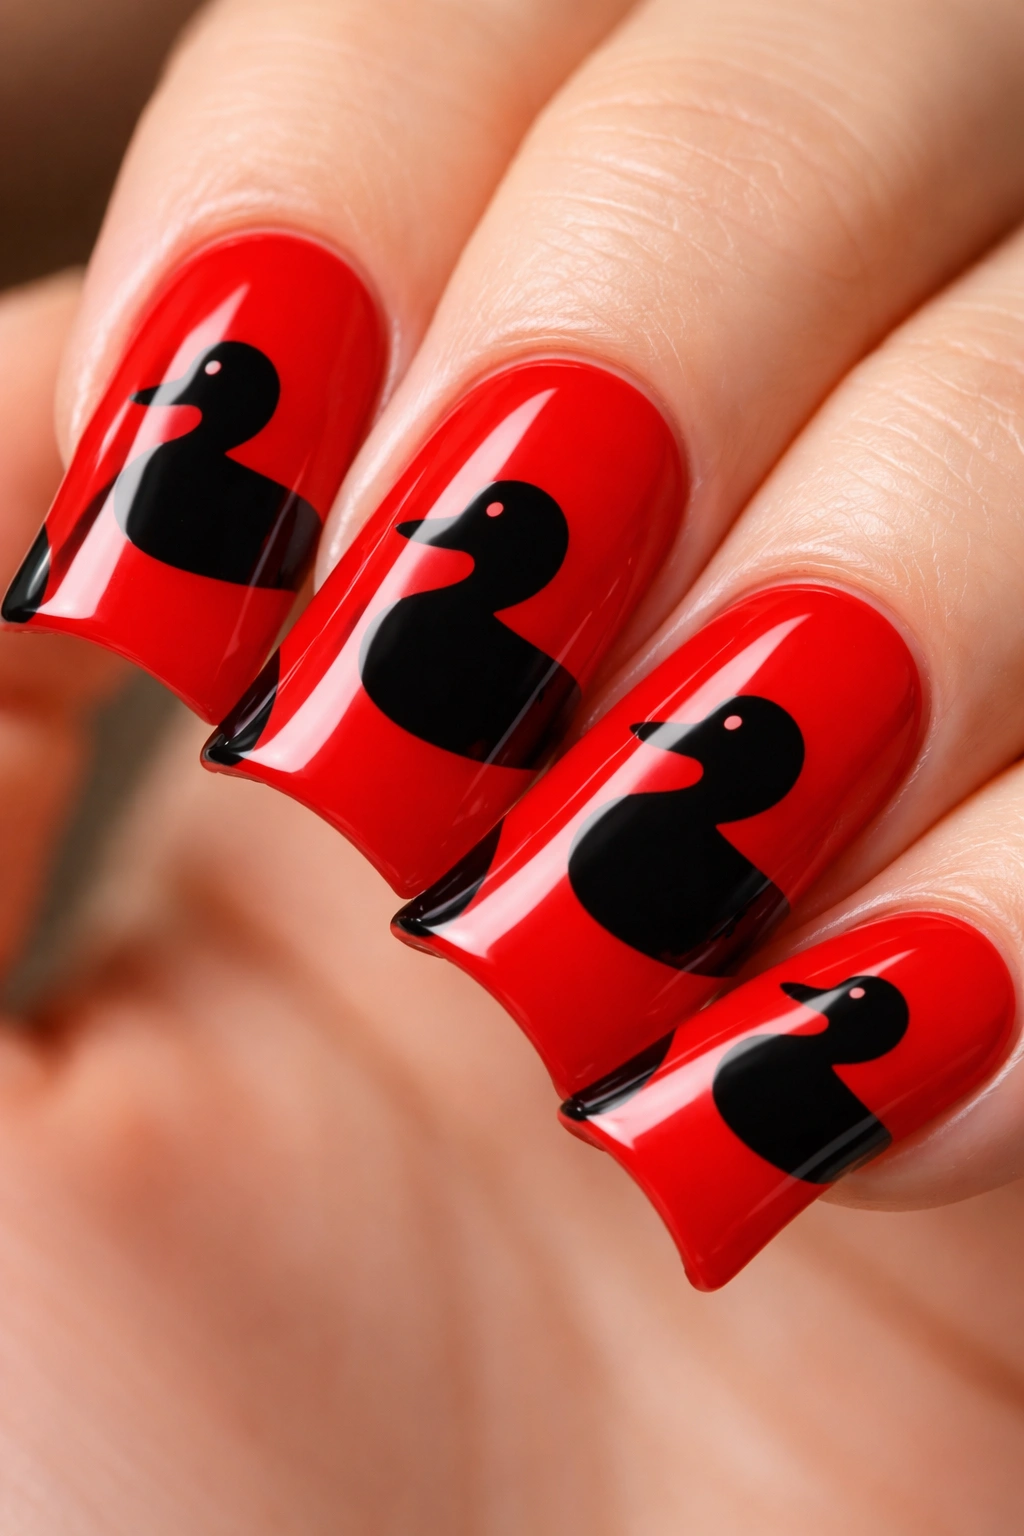
Starting with a vibrant red base immediately establishes energy and confidence. Then you add a black duck silhouette—either a simple outlined duck or a fully filled-in duck shape—that sits prominently on the nail. This design is bold and graphic, and it reads as intentional and statement-making rather than accidental.
What Makes This Design Work
A bold red base is inherently eye-catching, so your black duck design needs to be confident too. This isn’t the place for tiny, delicate details—you want the duck shape to be obvious and recognizable even from a distance. The high contrast between the bright red and dark black ensures your design pops without any additional embellishments. This design works especially well on the accent nail (usually your ring finger), where you want maximum impact.
Application Tips for Clean Results
- Start with two coats of your red base polish, allowing proper drying time between coats
- Use a thin nail art brush or a detail brush to outline your duck shape in black first, rather than trying to fill it in solid from the start
- Once the outline is dry, fill in the duck shape carefully, using small strokes rather than one big swipe
- A black gel polish works beautifully here because it won’t smudge as easily as regular lacquer during application
- Add a glossy top coat to make both colors shine without making the design look sticky or unfinished
Worth knowing: If you’re nervous about freehand duck drawing, you can use nail stickers or decals as a base and then paint over them to customize the design.
3. Matte Black and Glossy Red Contrast Duck Nails
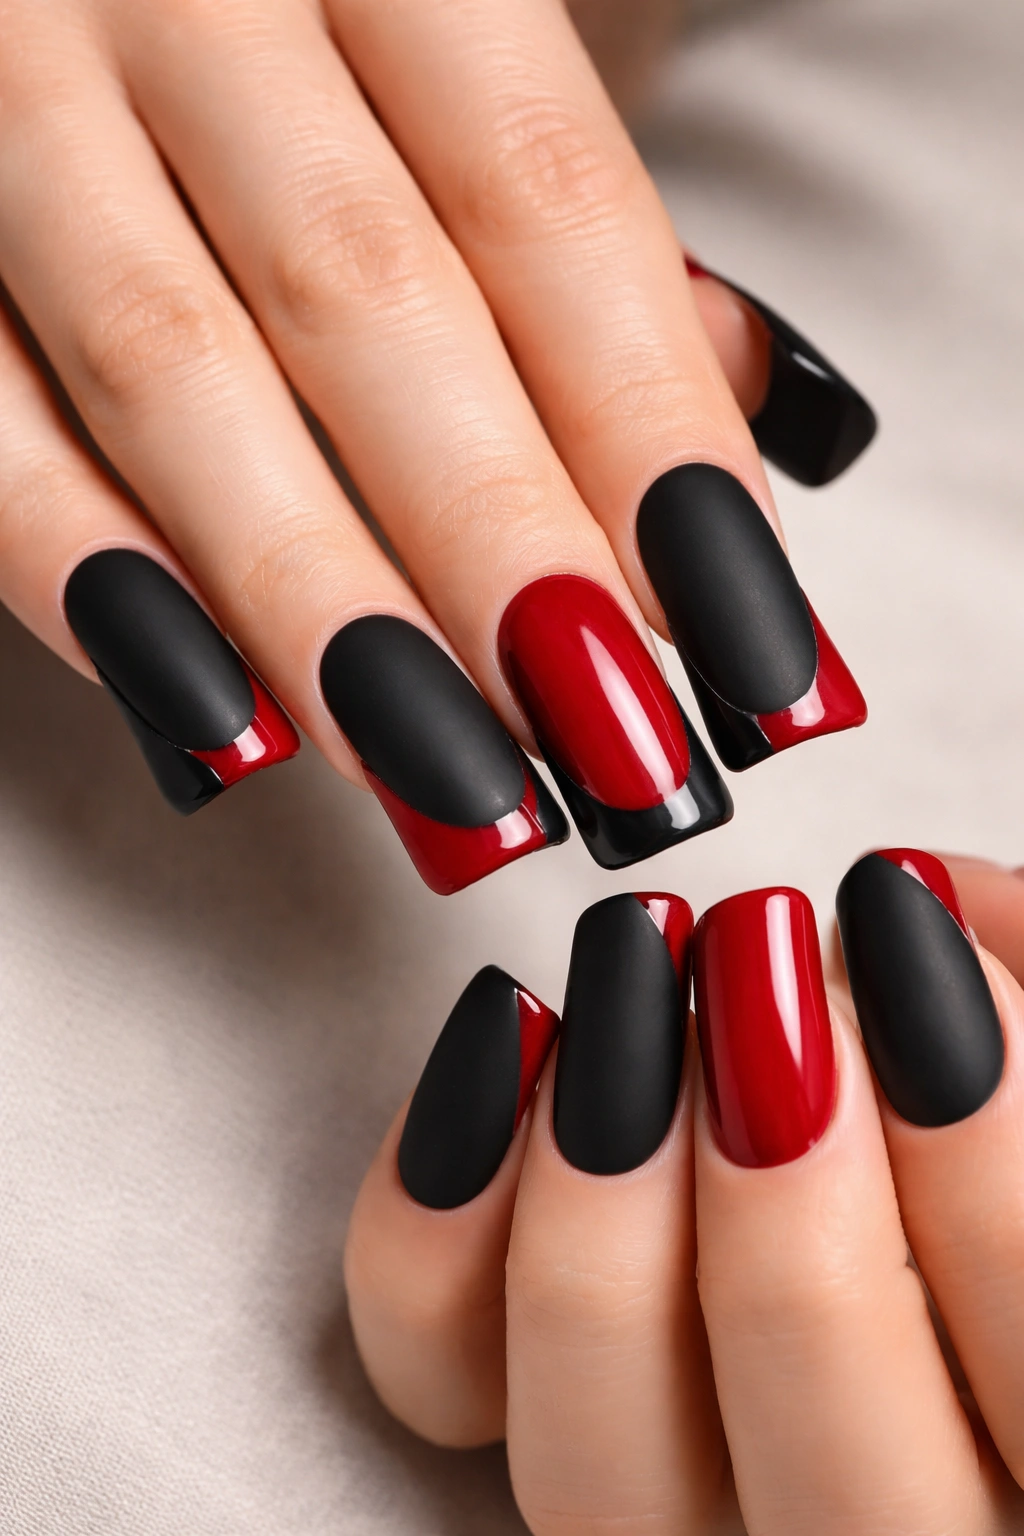
Playing with finish creates visual interest without adding complexity to your design. A matte black combined with a glossy red creates texture contrast that makes your nails feel more dimensional and intentional. The matte finish reads as sophisticated and modern, while the glossy red adds shine and playfulness. This combination is particularly striking because matte and glossy finishes catch light differently, creating depth.
Why Finish Contrast Matters
Finish is one of the most underrated design elements in nail art. Two nails with identical colors and designs can look completely different depending on whether they’re matte or glossy. Matte finishes make colors appear more subdued and elegant, while glossy finishes intensify color vibrancy. When you deliberately mix them, you’re creating visual movement and preventing your nails from feeling flat or one-dimensional.
Achieving Perfect Matte and Glossy Effects
- Paint your black sections with regular polish and seal with a matte top coat (brands like Essie and OPI make reliable matte toppers)
- Apply your red polish to the remaining sections and seal with a standard glossy top coat
- Make sure each section is completely dry before applying the next to avoid accidentally blending the finishes
- If you’re doing a half-and-half design, use painter’s tape to create a clean line between the matte and glossy sections
- The contrast is most visible under bright light, so make sure you’re admiring your nails in good lighting to see the full effect
Insider note: You can also use a matte topcoat selectively—apply gloss first, then use a thin brush to paint matte topcoat only on specific areas like the duck design or certain sections.
4. Gradient Black to Red with Duck Silhouette Duck Nails
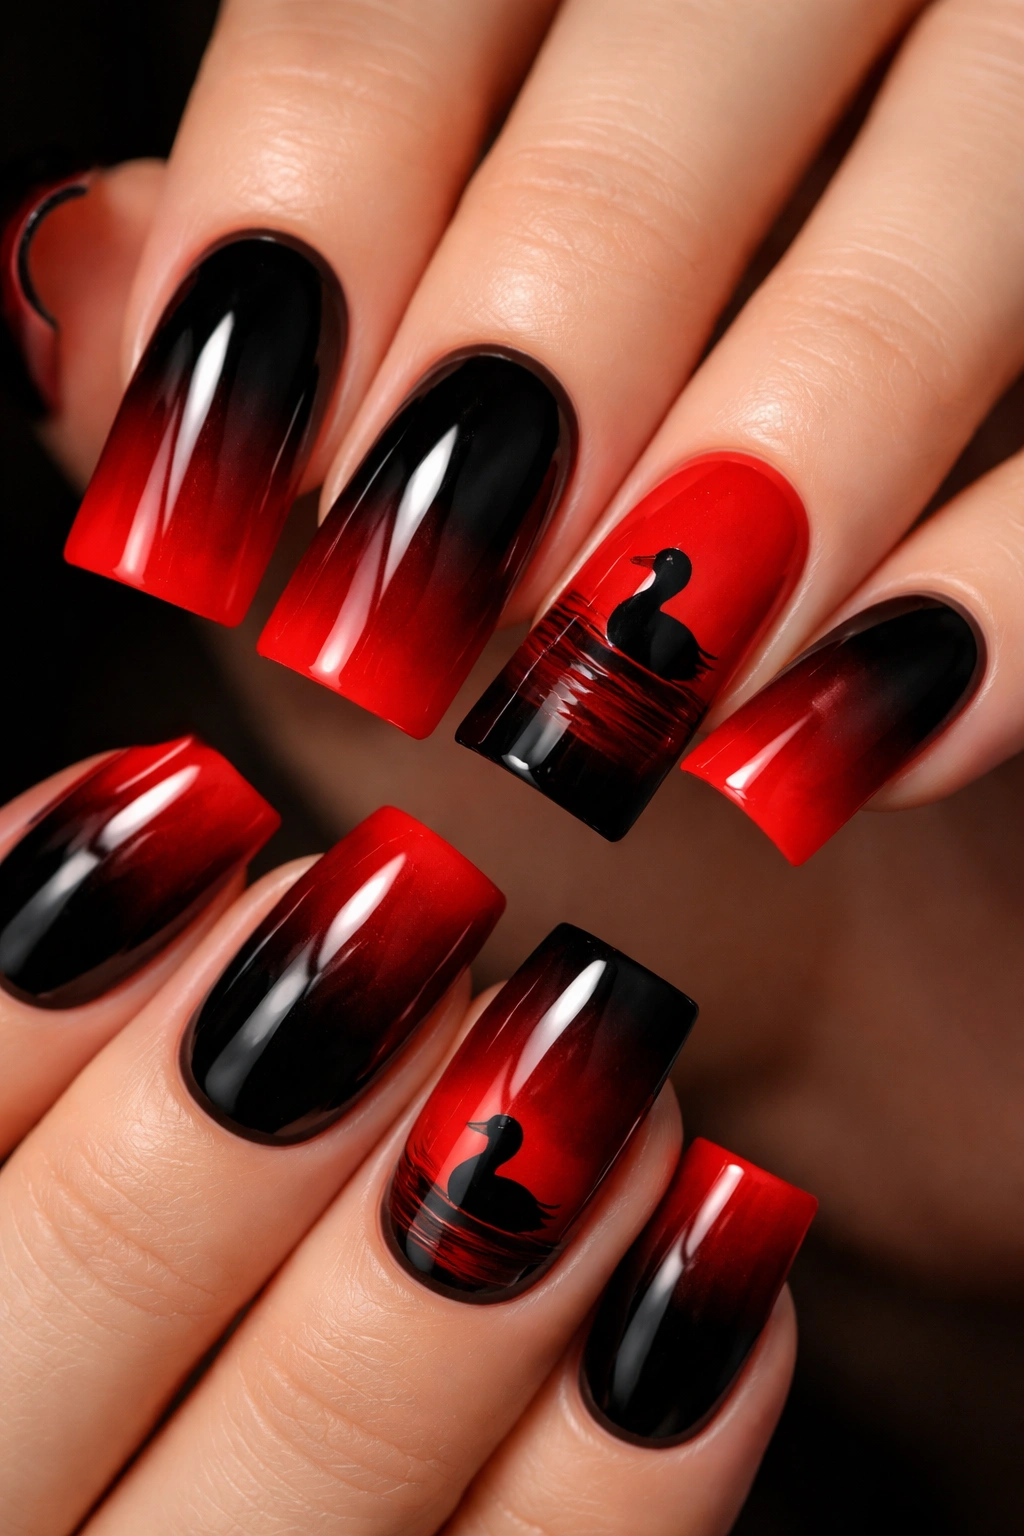
This combines the smooth flow of a gradient with the focus of a duck image. The duck becomes more than just decoration—it’s integrated into the gradient itself, often appearing at the point where black and red meet. This design feels artistic and takes your nail game beyond basic color mixing into actual nail art territory.
Design Execution Strategy
The duck silhouette should anchor your gradient, sitting right in the transition zone where the colors blend. This creates visual interest because the duck naturally draws the eye to the most colorful part of the gradient. The shape of the duck—with its elongated neck and rounded body—actually complements the gradient flow beautifully. You’re not fighting against the design; you’re working with the natural lines to create something cohesive.
Step-by-Step Application
- Create your black-to-red gradient using the sponge technique described in item 1
- Once the gradient is completely dry and sealed, carefully outline your duck shape in white or a complementary accent color
- Fill in the duck outline with either the same accent color or a metallic shade that stands out against both black and red
- Add fine details like an eye, wing lines, or tiny feet using a very thin brush and your accent color
- Seal with a high-quality top coat that won’t yellow or cloud your gradient
- The white or metallic duck will pop beautifully against the gradient background
Pro tip: If your gradient looks blotchy instead of smooth, you can smooth it out after the sponge application by gently dragging a clean sponge across the nail to blend any harsh lines.
5. Striped Black and Red Pattern Duck Nails
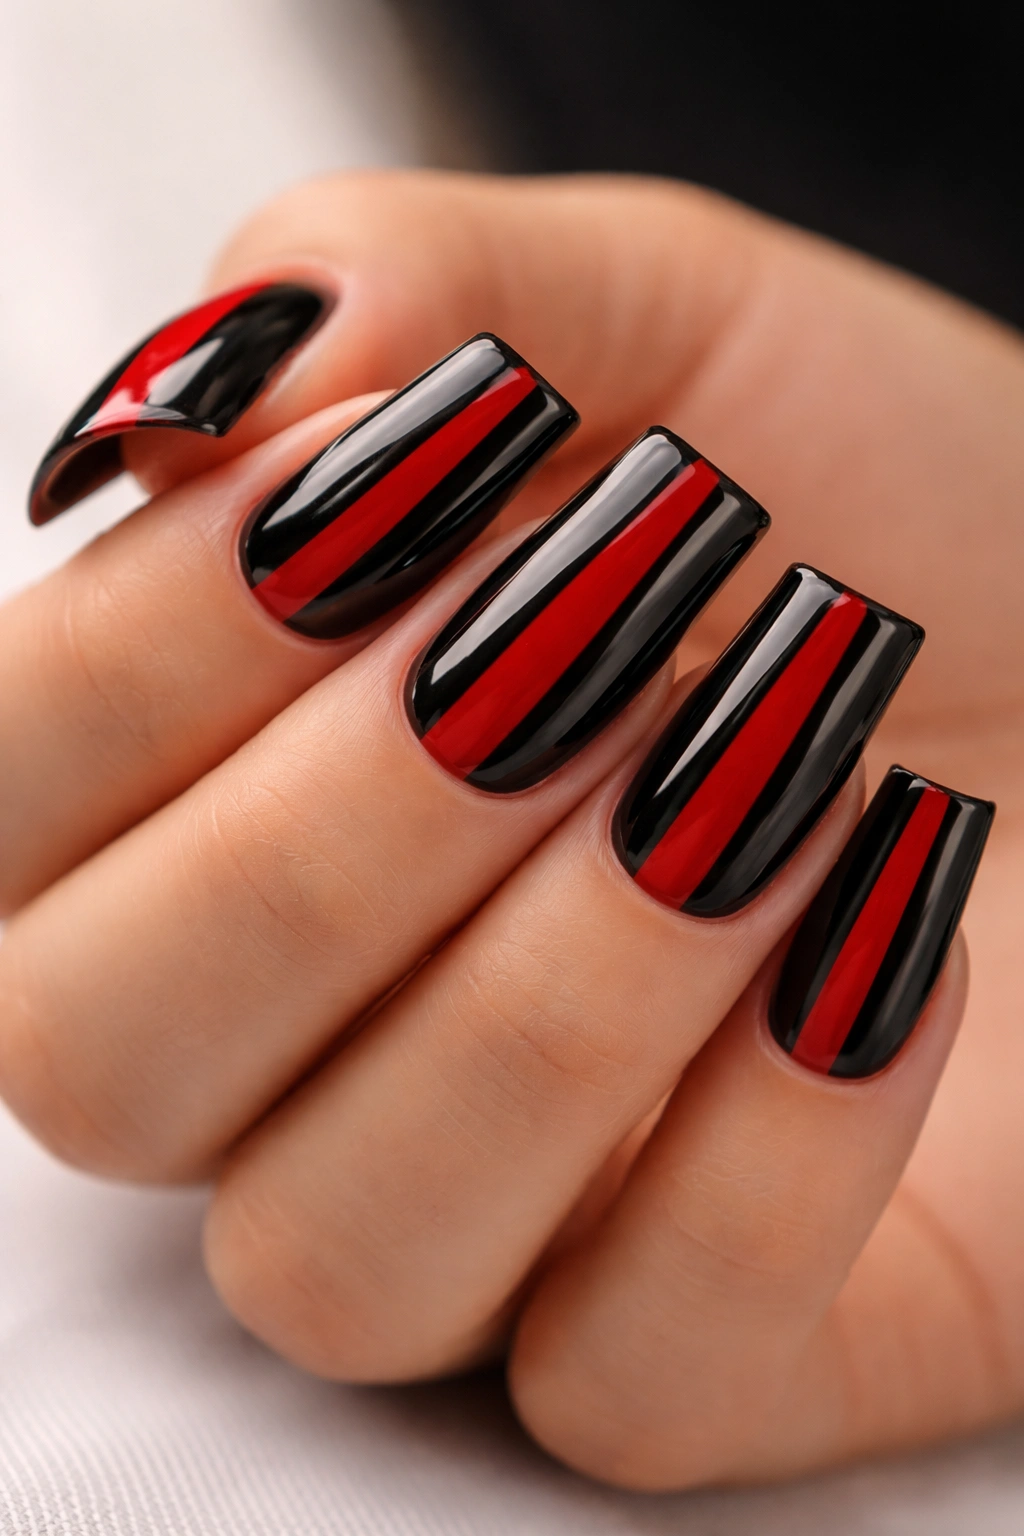
Horizontal, diagonal, or vertical stripes create a bold, almost architectural look that feels modern and clean. Striped designs are surprisingly forgiving because your eye naturally follows the lines and doesn’t scrutinize individual brushstrokes the way it would a gradient or freehand design. Stripes also read as intentional and graphic rather than delicate, which suits the duck nail shape perfectly.
Creating Crisp, Even Stripes
Stripes need to be clean and intentional to work—wobbly or uneven stripes read as accidental rather than artistic. The secret is using tape to guide your lines. Painter’s tape or nail-specific striping tape creates perfectly straight edges and prevents your polish from bleeding under the tape line. You can create as many stripes as you want and space them however appeals to you: thick and thin alternating, evenly spaced, or clustered together for emphasis.
Foolproof Striping Method
- Start with a black or red base coat—whichever color you want to cover less of the nail
- Once dry, apply painter’s tape to create your stripe pattern, pressing it down firmly so polish can’t seep underneath
- Paint your second color (red or black) over the tape and the exposed nail sections
- Work carefully and don’t apply too much polish—one solid coat is better than two thin ones that might pool
- While the polish is still slightly wet, carefully peel the tape away at a forty-five-degree angle
- Let the design dry completely before applying top coat
- Clean up any rough edges with a thin brush and acetone on a cotton swab
Worth knowing: Thermal polish (color-changing with temperature) can create really unexpected striped effects, especially if you alternate thermal stripes with regular black or red sections.
6. Marble Effect Black and Red Duck Nails
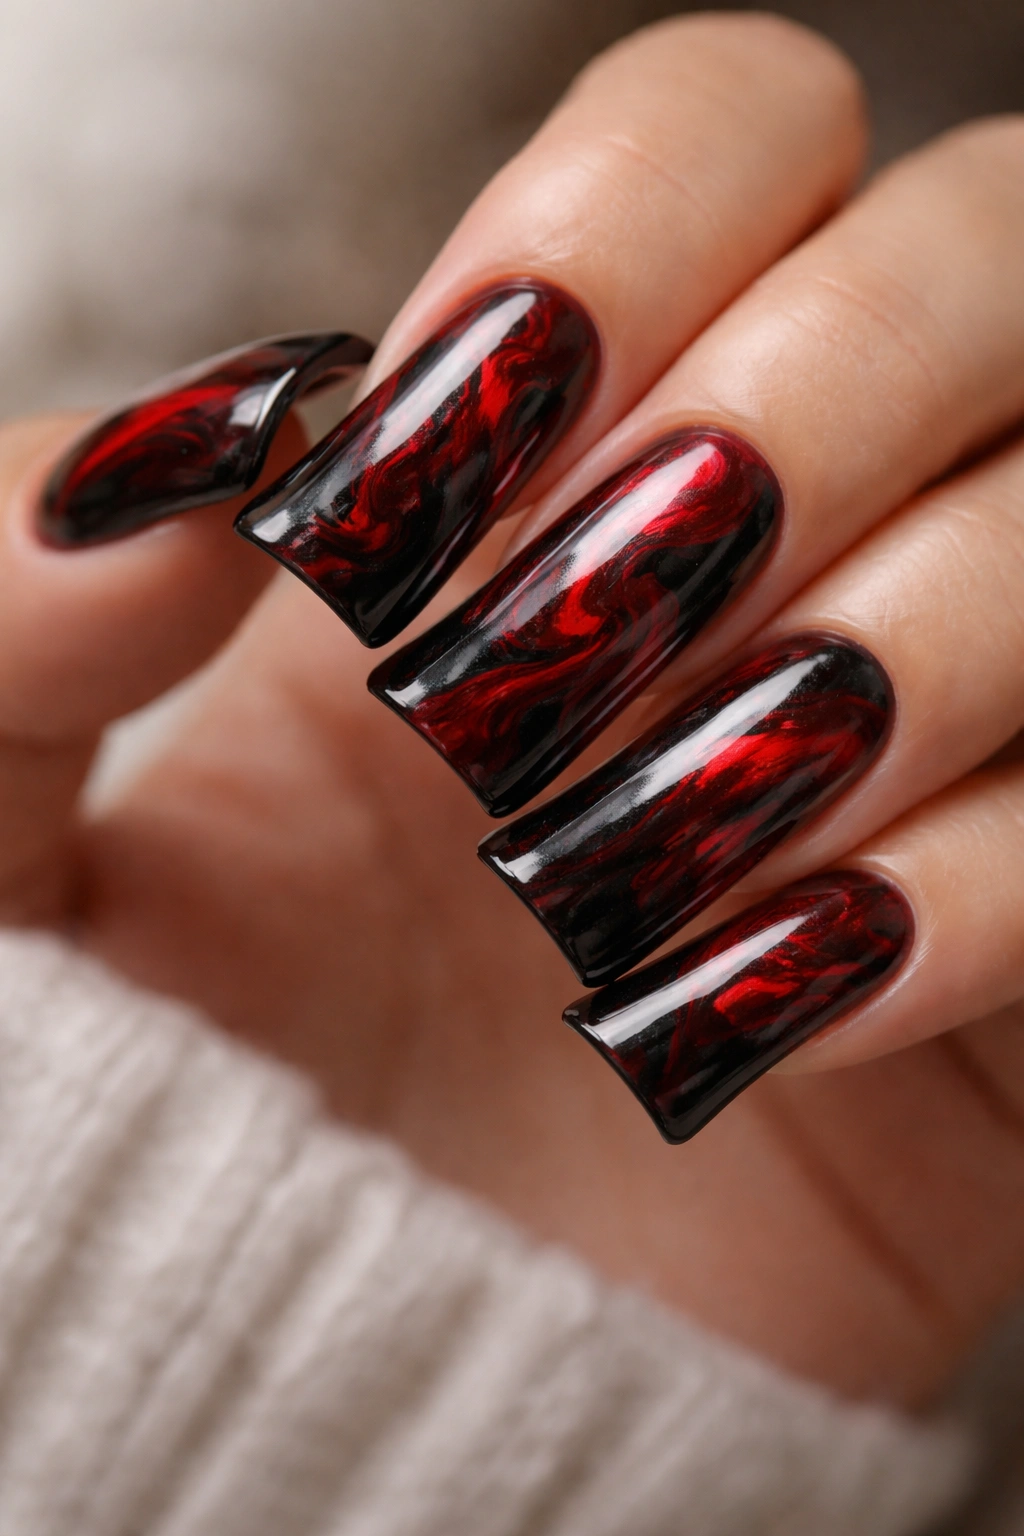
Marble nails create an organic, almost liquid look that feels expensive and artistic. The beauty of marble is that it’s inherently imperfect—no two marble designs are exactly alike, which means there’s no “wrong” way to do it. Black and red marble works particularly well because the high contrast between the colors makes the swirled pattern really visible and striking.
Understanding the Marble Technique
Marble designs typically involve dropping polish into water, swirling the colors together, and then dipping your nail into the mixture. The water acts as a base that allows the polish to flow and blend while keeping it separate from the nail (so you can control the design before it touches your nail). This technique takes practice, but once you understand the basic principle, it becomes quite reliable and addictive because each nail turns out unique.
Water Marble Process for Black and Red
- Fill a bowl or cup with room-temperature water (not hot or cold—room temp works best)
- Drop a small puddle of black polish into the water center, then immediately drop red polish inside the black circle
- The polish will spread into a circle—don’t wait too long or it will start to sink
- Using a toothpick or thin stick, gently drag through the polish circles to create swirl patterns
- Angle your nail parallel to the water surface and gently press it into the design pattern
- Hold your nail in the water for 2-3 seconds, then carefully lift it straight out
- Use a cotton swab with acetone to clean up the excess polish around your nail edges
- The marble pattern will feel slightly raised at first, but a good top coat will seal it smooth
Real talk: Water marbling has a learning curve, and your first few attempts probably won’t be picture-perfect. But once you get the feel for it, you’ll be creating gallery-worthy designs. Practice really does make perfect here.
7. Holographic Red with Black Duck Details Duck Nails
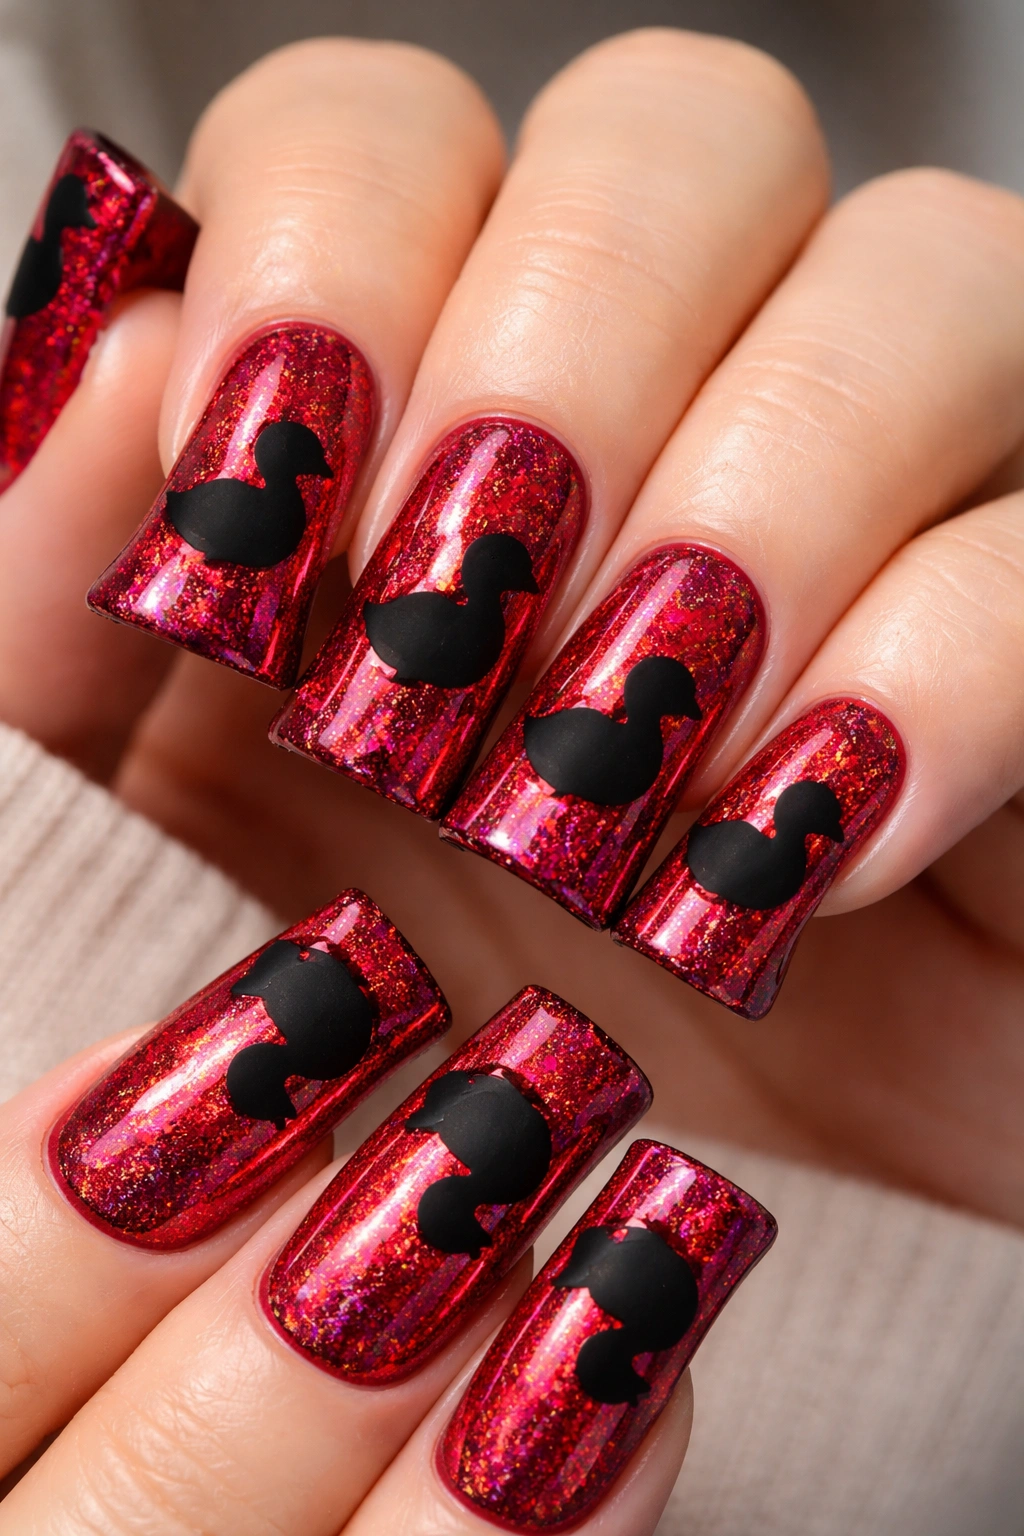
Holographic or color-shift polish adds dimension that regular colors simply can’t match. When you pair holographic red with matte or glossy black details, you create designs that look different depending on the angle and lighting. A duck design in black on top of shimmering holographic red creates a sophisticated, high-fashion look that feels far more complex than it actually is.
Why Holographic Polish Transforms Your Design
Holographic polish contains tiny reflective particles that bounce light in rainbow patterns. When red holographic base catches the light, it creates subtle rainbow shifts that make your nails feel almost iridescent. The black duck silhouette becomes a focal point because it’s solid and matte against all that shimmer. This contrast creates visual drama without being chaotic or overwhelming.
Applying Holographic Polish Correctly
- Holographic polish often requires specific lighting to show its full effect—apply it in daylight or under a bright LED lamp
- Use at least two coats of holographic polish; one coat often looks translucent or streaky
- Make sure each coat is completely dry before applying the next—wet holographic polish is harder to control
- The polish might feel gritty when wet; this is normal and the texture smooths out once sealed
- Apply your black duck design after the holographic base is fully set and dried
- Use a clear or slightly tinted top coat that won’t dull the holographic shimmer
- Avoid overly thick top coats, which can cloud the holographic effect
Pro tip: Holographic polish shows up best under natural daylight or daylight-balanced LED lights. Warm incandescent bulbs will make the holographic effect less visible.
8. Metallic Gold Accents on Black and Red Duck Nails

Introducing a third color—specifically a warm metallic like gold or champagne—adds luxury and sophistication to your black and red base. Gold works beautifully with both black and red because it bridges the two colors and adds a touch of glamour. You can use gold as thin accent lines, a small geometric detail, or metallic dust applied to specific sections.
How to Incorporate Metallic Accents Successfully
Gold accents work best when they’re intentional and not overdone. A thin gold line separating your black and red sections, gold detailing on your duck shape, or gold-painted duck feet create points of visual interest without making your design feel cluttered. Metallic polishes also have different finishes—chrome, mirror, matte metallic, and shimmer metallic all create different effects. Choosing the right metallic finish determines whether your nails feel elegant, edgy, or playful.
Application Methods for Metallic Details
- Use a thin nail art brush to apply metallic polish in precise lines or shapes over your dried black and red base
- Allow the metallic layer to dry completely before sealing with top coat—metallic polish can shift if you apply top coat too quickly
- For a more artistic look, use a makeup sponge to dab metallic polish onto specific areas, creating a textured, scattered effect
- Gold leaf is another option—apply a thin layer of clear or sticky base coat, then carefully press tiny pieces of gold leaf onto the nail and seal with top coat
- Metallic dust or powder applied with a damp brush creates ultra-fine detail and catches light beautifully
- Metallic French tips are an elegant variation—paint your tips entirely in gold over the black and red base
Worth knowing: Not all metallic polishes are created equal. Brands like Zoya, Sally Hansen, and Essie make reliable metallics that don’t look cheap or plastic-y.
9. Negative Space Black and Red Duck Design Duck Nails
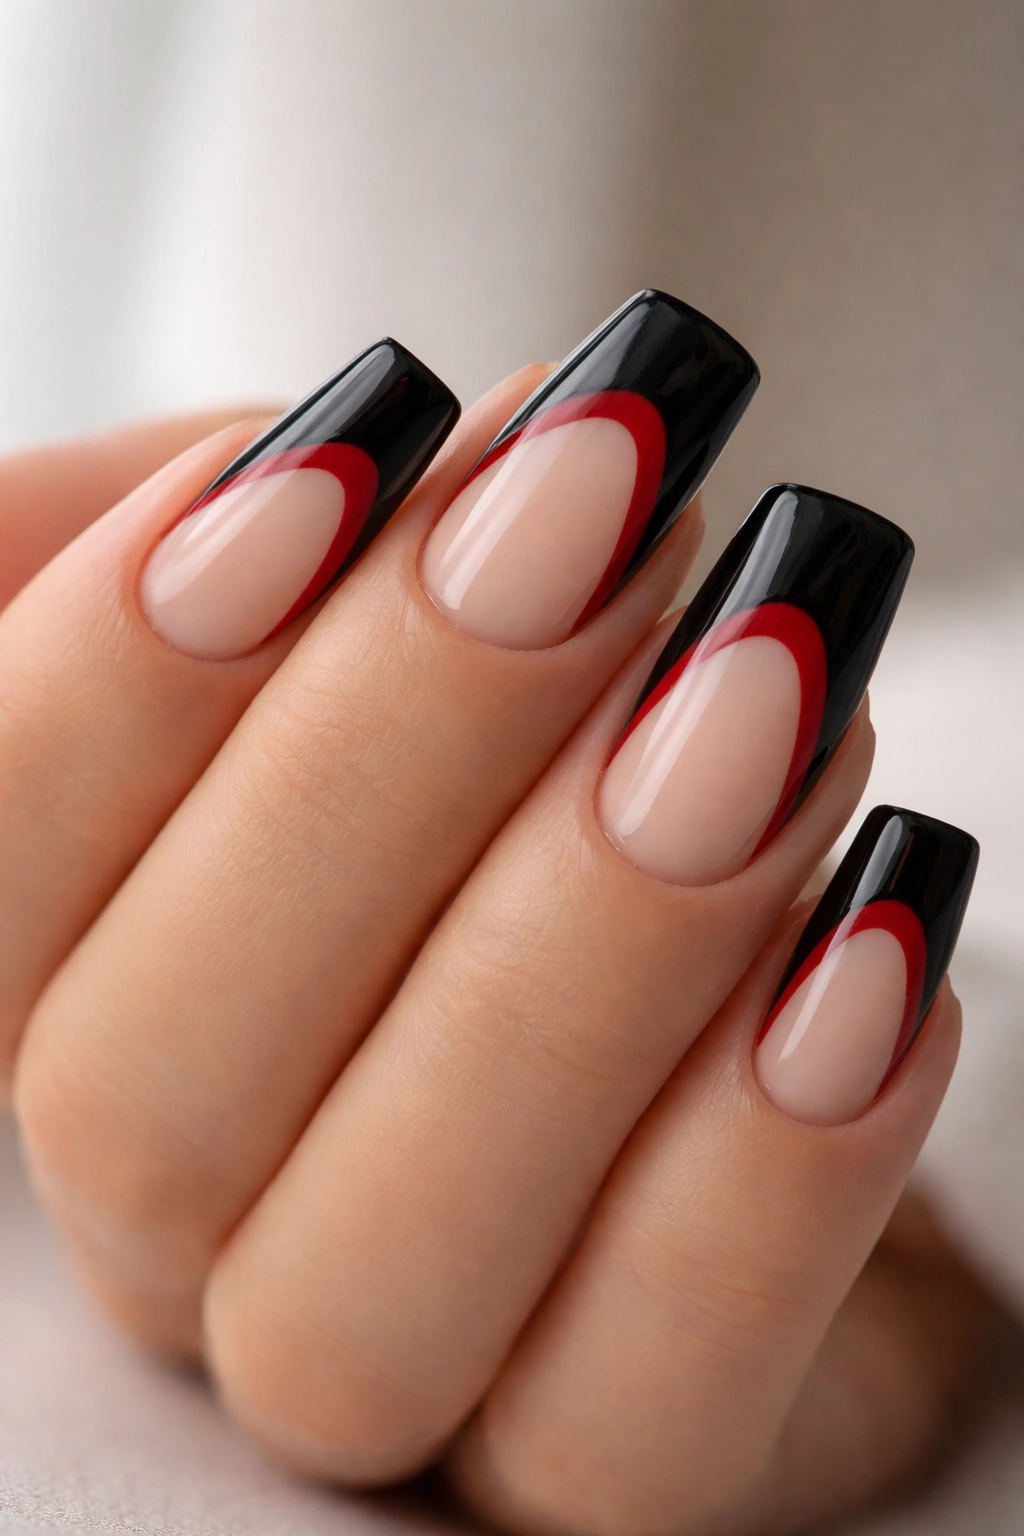
Negative space designs leave portions of your nail bare, letting your natural nail color show through. When you combine this with black and red sections and a duck design, you create something that feels modern, sophisticated, and intentional. Negative space makes your design feel lighter and less heavy-handed, which is especially nice if you’re worried about nails feeling too dark or overwhelming.
Why Negative Space Feels Modern
Designers use negative space to create visual breathing room and guide the eye to what matters most. In nail art, negative space has the same effect—it prevents your nails from feeling like every inch is covered, and it creates contrast that makes your design elements pop. A duck design with negative space around it feels more refined than a duck design on a completely covered nail.
Creating Negative Space Strategically
- Plan your design before you start—sketch it on a nail wheel or paper so you know exactly which areas will be bare
- Paint your black and red sections, leaving the planned bare areas completely untouched
- Paint your duck design in the negative space area or spanning across your black and red sections
- The contrast between the bare nail and the painted sections automatically draws attention to your design
- Seal everything with a top coat—this protects your bare nail areas from staining and yellowing
- Make sure your bare nail areas are clean and well-manicured; they’ll be more visible than usual
Insider note: Negative space works best on short to medium-length nails. On very long nails, too much bare space can look unfinished rather than intentional.
10. Glitter Gradient Black to Red Duck Nails
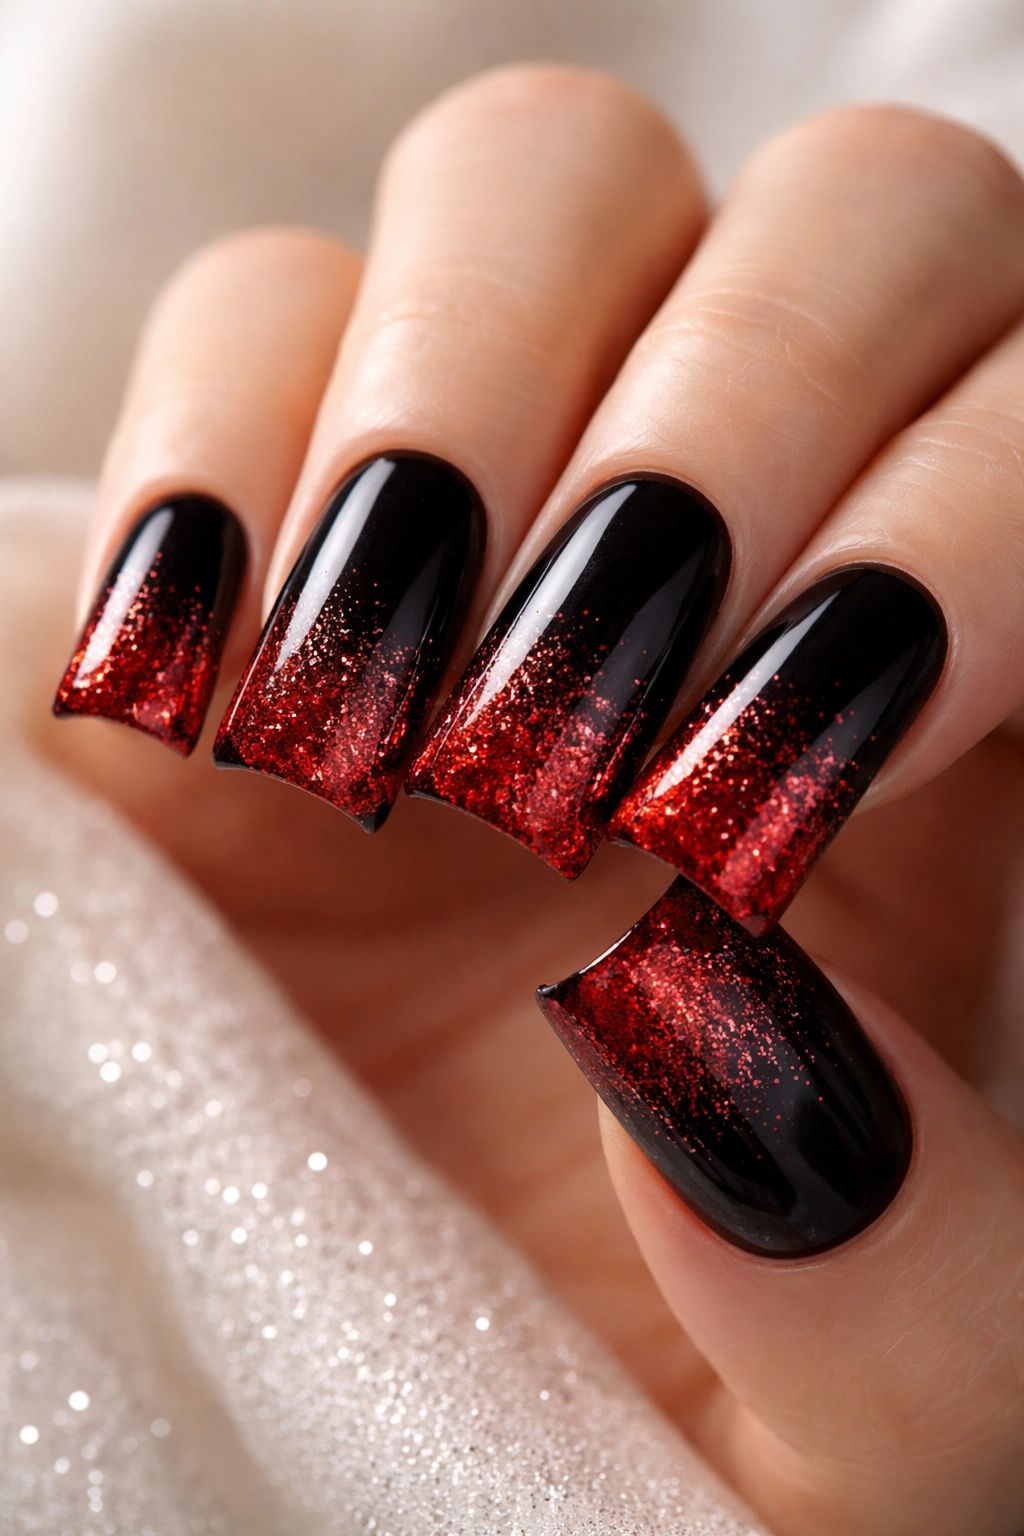
Combining a smooth gradient with glitter adds texture and sparkle without making your design feel chaotic. Glitter gradients work by concentrating more glitter particles toward one end of the nail and fading to less glitter at the other end, creating a gradient effect that’s dimensional and eye-catching. The duck shape can be solid against this gradient backdrop, or it can also incorporate glitter for extra shine.
Why Glitter Gradients Feel Special
Glitter adds movement and light-catching properties that solid polish simply can’t achieve. When applied as a gradient rather than all over, glitter feels artistic and intentional rather than overwhelming. The combination of a color gradient (black to red) with a glitter gradient (more to less) creates multiple layers of visual interest that reward close inspection.
Creating a Flawless Glitter Gradient
- Start with your black-to-red color gradient using the sponge technique
- Once completely dry, apply a clear gel base or sticky layer across the nail
- Mix black and red glitter colors in a small palette or on a surface
- Use a damp brush or sponge to dab glitter onto the nail, concentrating more glitter at the red end and less at the black end
- Allow the glitter layer to dry before sealing with top coat
- The top coat will seal the glitter in place and create a smooth, finished surface
- For extra sparkle, try metallic glitter that matches your base colors rather than clear sparkle glitter
Pro tip: Ultra-fine or holographic glitter creates a more elegant effect than chunky glitter, which can look tacky if not applied carefully.
11. Geometric Black and Red Duck Nail Art Duck Nails
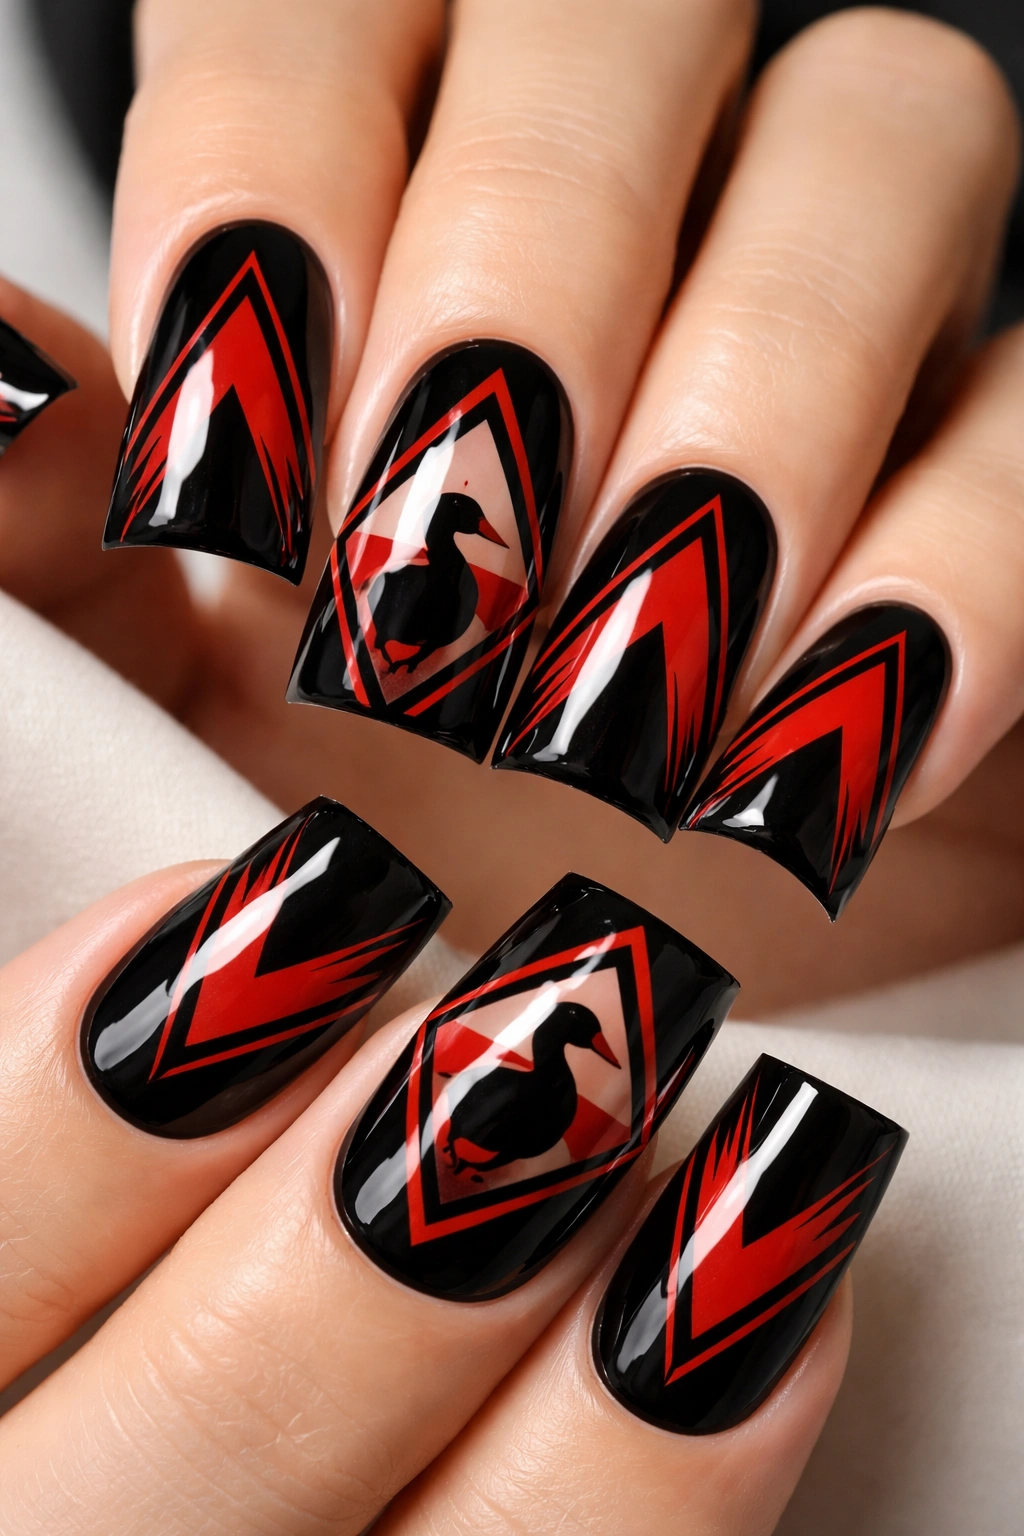
Geometric designs use clean lines, triangles, circles, and angular shapes to create modern, architectural nail art. Incorporating a duck within a geometric framework—perhaps a duck outline inside a diamond shape, or duck silhouettes arranged in a geometric pattern—creates sophisticated designs that feel intentional and artistic. Geometric designs read as more polished than organic designs because of their precision.
Planning Geometric Designs
Geometry requires planning. Sketch your design on paper first, measuring proportions and ensuring your shapes are balanced. You might create a large geometric shape that frames your duck design, or use smaller repeated geometric shapes as a background pattern. The key is balance—if your geometric elements are evenly distributed and proportional, your design will feel intentional and well-executed.
Executing Geometric Designs Precisely
- Use painter’s tape to create perfectly straight lines for your geometric shapes
- Paint your base colors (black and red) in specific sections according to your planned design
- Once dry, use a thin brush to add additional geometric shapes or refine your duck design
- A ruler or straightedge can help you create perfectly parallel lines
- Trust is important here—hesitation shows, so commit to your brushstrokes and move confidently
- Seal with top coat once everything is completely dry
Worth knowing: If freehand geometric design feels too intimidating, you can print out a template, place it under a piece of plastic wrap, and trace over the outline with a thin brush to transfer the pattern onto your nail.
12. Matte Finish Black with Red Glossy Duck Details Duck Nails
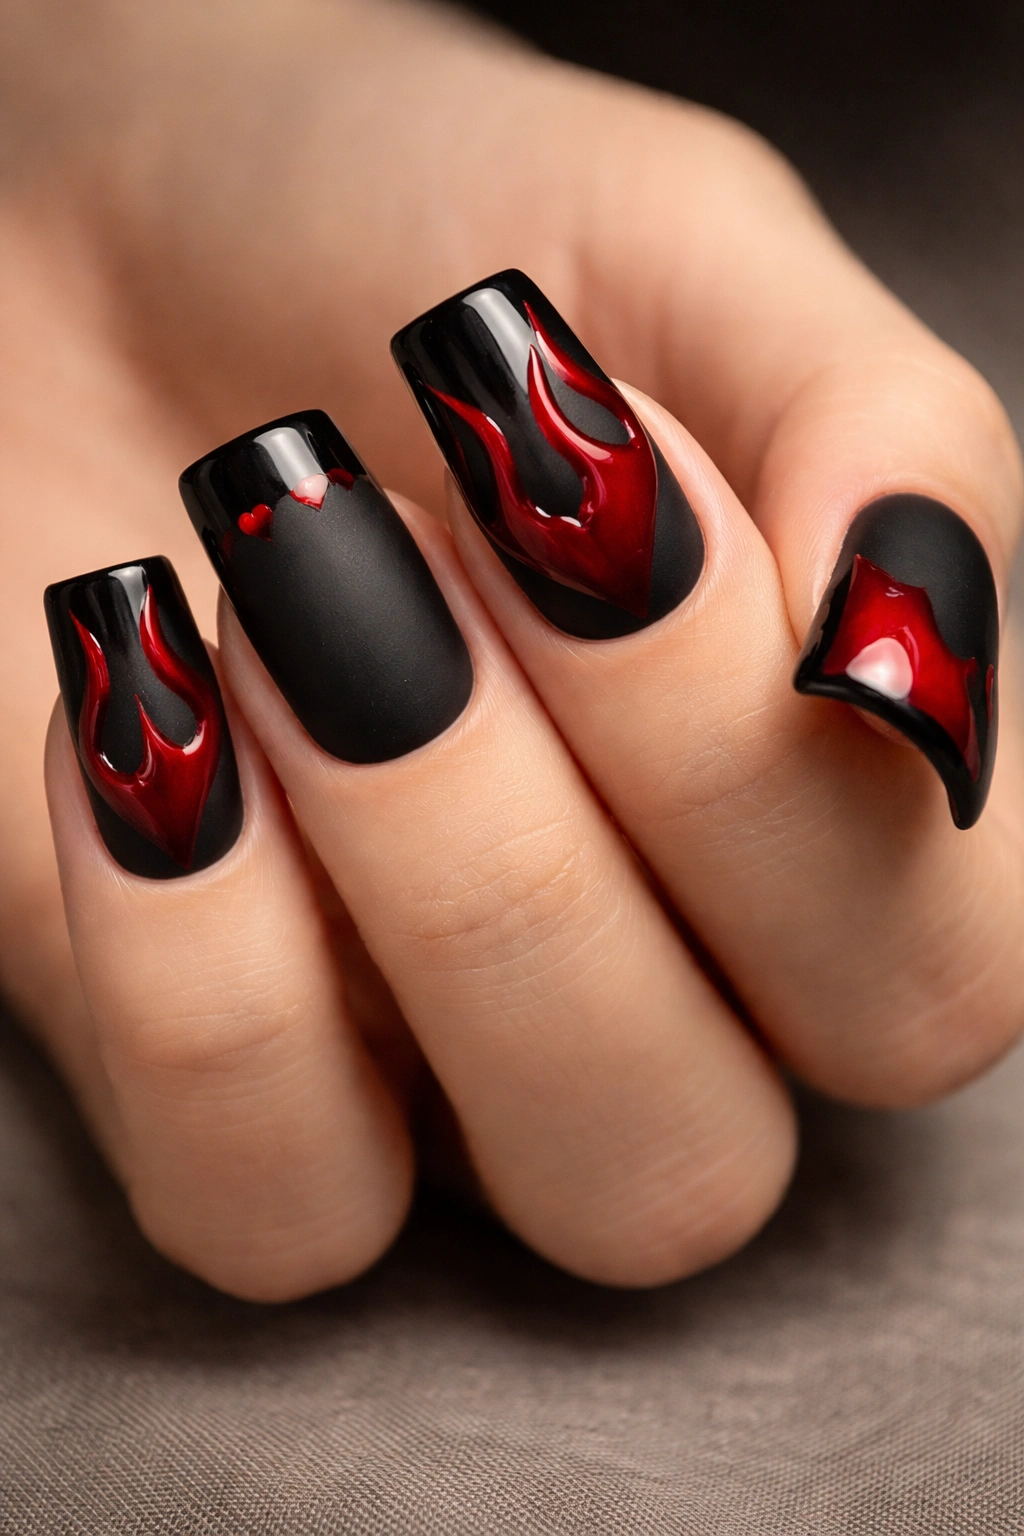
This reverses the dynamic from item 3, creating equal visual weight through different means. A matte black base feels sophisticated and understated, while glossy red duck details (or glossy red accents) provide shine and focal points. The contrast between finishes makes both colors feel more intentional and prevents the design from feeling flat.
Creating Balance Between Finishes
The key to success here is ensuring your glossy red details are substantial enough to feel intentional against the matte black background. A tiny glossy red duck on a large matte black nail might get lost, while a well-proportioned glossy red duck creates visual balance. Think about scale and make sure your glossy elements are prominent enough to create the contrast you’re aiming for.
Application for Matte and Glossy Effect
- Apply two coats of matte black polish as your base, allowing proper drying time between coats
- Seal the matte black with a matte top coat once completely dry
- Plan your red glossy details—usually a duck design, but could be lines, shapes, or dots
- Apply glossy red polish to create your design, being patient and letting it dry completely
- Apply a glossy top coat only to the red areas, leaving the matte black untouched, or apply glossy top coat over the entire nail and use a matte topcoat selectively to maintain the contrast
- The easiest method is usually to apply glossy topcoat to the entire nail for durability, then use a matte topcoat on a small brush to spot-apply to the black areas
Pro tip: Nail dehydrators and primer are crucial for both matte and glossy finishes—they help polish adhere evenly and create a professional appearance.
13. Chrome or Mirror Finish Black and Red Duck Nails
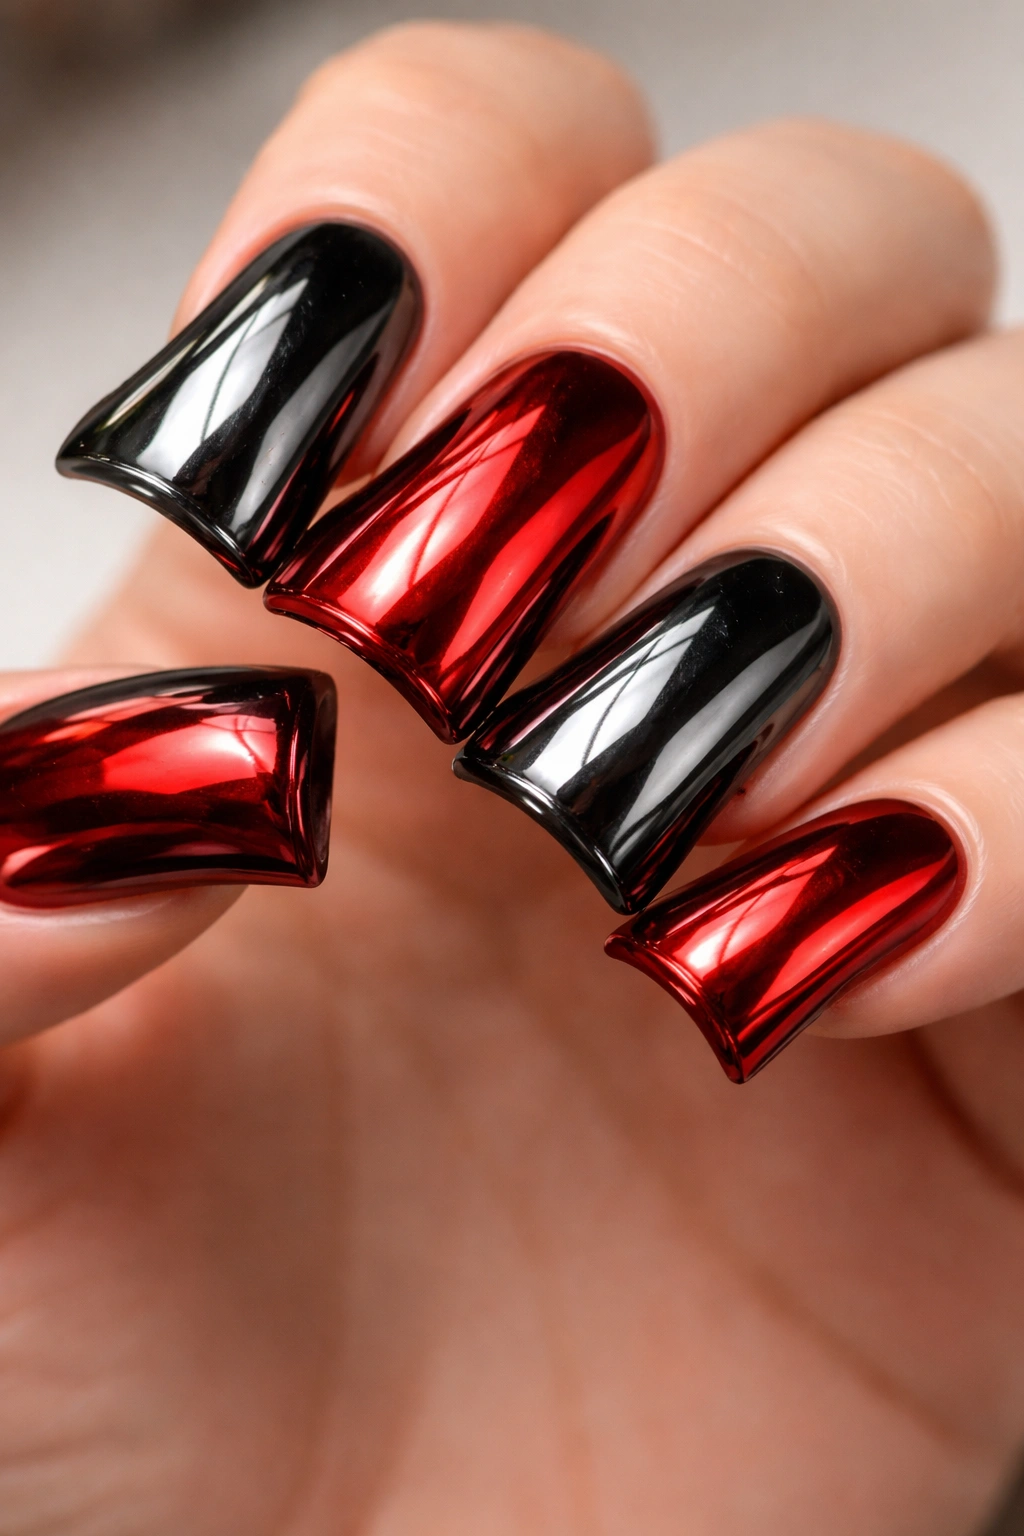
Chrome and mirror finishes use powder pigments that create an ultra-shiny, reflective surface that looks almost metallic. Applied over black and red base colors, chrome creates designs that look futuristic and high-fashion. These finishes are particularly striking in person because they actually reflect light like a mirror, creating an almost three-dimensional effect.
Understanding Chrome vs. Mirror Finishes
Chrome finishes create a solid, shiny metallic appearance that’s slightly less reflective than mirror finish. Mirror finish is even more reflective and can actually show a reverse image like an actual mirror. Both create dramatic effects, particularly on duck nails where the curved surface naturally catches and reflects light. These finishes work best over creme or jelly base colors that are already relatively opaque and smooth.
Achieving Professional Chrome Results
- Chrome and mirror powders are applied using specific techniques, usually with a gel base
- Apply a thin layer of sticky gel base over your black or red base color
- Use a velvet applicator or specialized chrome brush to buff the powder onto the sticky gel layer, working in circular motions
- The powder will create a shiny chrome appearance as you buff—continue buffing until you achieve full coverage and desired shine
- Seal with a gel top coat to protect the chrome finish and prevent it from tarnishing
- This technique really requires gel polish and UV or LED curing to work properly—it’s difficult to achieve the same effect with regular polish
- Practice applying chrome to one nail at a time to build your confidence
Real talk: Chrome and mirror finishes look absolutely stunning in person but can be tricky to photograph because they reflect your camera flash and light sources. They’re worth mastering because they’re so conversation-starting.
14. Minimalist Line Art Black and Red Duck Nails Duck Nails
Minimalist design uses the absolute minimum elements necessary to create impact. A few thin black lines on a red background creating a duck silhouette, or a simple red duck outline on black—that’s minimalist nail art. This approach works beautifully because it relies on confidence and clean execution rather than complexity or decoration. Less is more, and the simplicity becomes the sophistication.
Why Minimalism Works on Duck Nails
The duck nail shape already has visual interest and presence, so you don’t need to cover every inch with design. A few well-placed lines that suggest a duck’s shape—the curved head, the body line, perhaps a tiny eye—create the impression of a complete duck while maintaining elegance and restraint. Minimalist designs also age really well and stay fashionable because they’re not trendy; they’re timeless.
Executing Minimalist Line Art
- Choose your base color—either black or red—as your background
- Use a very thin nail art brush (sizes 0 or 00 work well) with your second color
- Sketch your design lightly in your mind or with a pencil on the nail before committing with polish
- Create your duck silhouette using as few lines as possible—often just 3-5 lines can clearly suggest a duck shape
- An eye (a tiny dot) goes a long way toward making your duck recognizable
- Let the polish dry completely and seal with a top coat
- The simplicity is intentional, so commit to it and don’t overcomplicate things
Worth knowing: Minimalist designs require very steady hands and confidence. If you’re nervous, practice on a nail wheel or synthetic nails first to build your confidence. Hesitation shows in line work.
Final Thoughts

Black and red duck nails offer something for every aesthetic and skill level, from minimalist designs that rely on confidence to complex techniques like water marbling and chrome finishes. The key to success is choosing a design that genuinely appeals to you and then committing fully to the execution. Don’t try to be perfect on your first attempt—nail art is a skill that improves with practice, and your hands will naturally get steadier and more confident the more you create.
The beauty of duck nails is that the shape is already eye-catching and flattering, so your design automatically gets a boost. Whether you go for subtle contrast through finishes or bold impact through color blocking and glitter, black and red provide the foundation for designs that feel personal, intentional, and distinctly yours. Start with whichever design calls to you most, invest in good-quality polishes and tools, and give yourself grace as you learn. Your nails are a canvas for creativity, and black and red duck nails are waiting for your unique interpretation.
