

Lime green has quietly become one of the most versatile nail colors for duck nails — that dramatic, curved nail shape that’s taken over social media and salons. The brightness of lime paired with the bold curvature of duck nails creates a look that’s simultaneously playful, edgy, and impossible to ignore. Whether you’re looking for something subtle or you want to make a serious statement with your nails, lime green offers endless possibilities for customization and creativity.
The appeal of lime green duck nails goes beyond just the color itself. Lime green sits at that perfect sweet spot between neon and spring green — it’s energetic without being overwhelming, and it works on virtually every skin tone when you find the right shade and finish. Duck nails amplify whatever design you choose, turning even simple nail art into something that catches the light and demands attention. When you combine these two elements, you get a nail look that feels both trendy and timeless.
What makes lime green duck nails so special is how versatile they are across different finishes and styles. A glossy lime green duck nail feels completely different from a matte version, and adding glitter, chrome, or other embellishments transforms the whole aesthetic. You can wear them to the beach, to the office with the right confidence level, to parties, or just because you want to feel a little bolder on a regular Tuesday. The nail technicians who specialize in duck nails have developed countless creative approaches to lime green, and we’re going to walk you through fourteen stunning options worth trying.
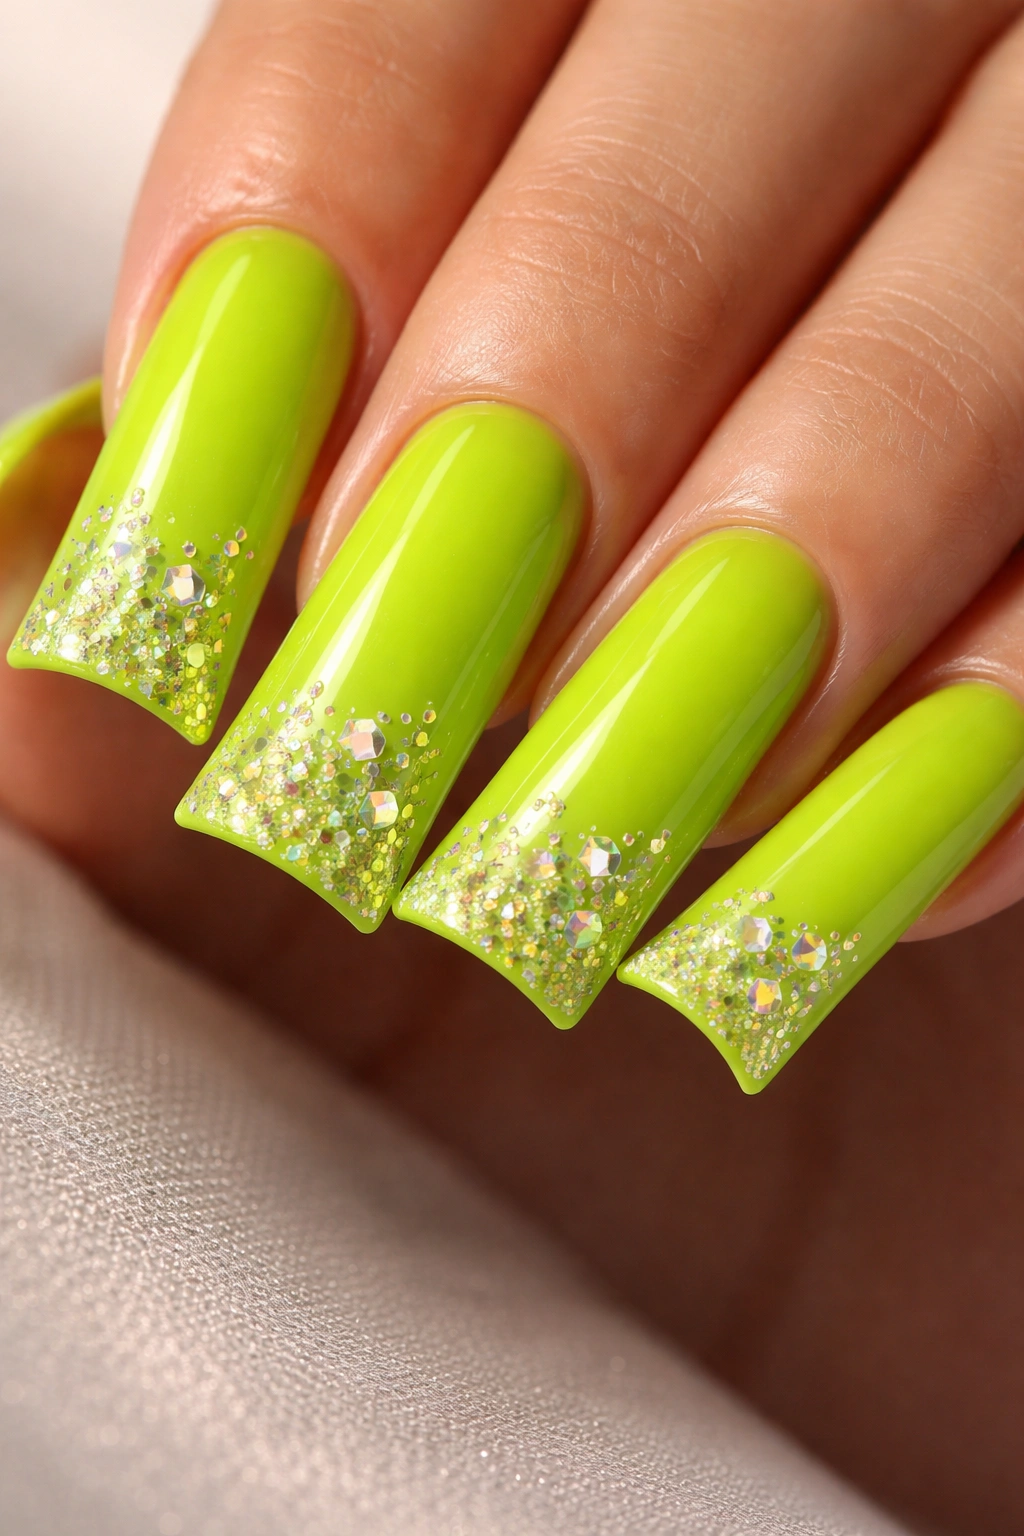
1. Classic Neon Lime Gloss With Diamond Sparkle
A pure neon lime green with a high-shine glossy finish is the foundation of this look, and diamond-shaped glitter accents scattered across the nail add just enough sparkle without overwhelming the lime base. The key to this design is using a true neon lime that practically glows under regular indoor lighting — it should look almost electric. The placement of the diamond glitter matters; cluster them more densely toward the tip of the duck nail where light naturally hits, allowing them to catch and reflect.
Why This Design Works So Well
The contrast between the smooth, reflective lime base and the sharp sparkle of diamond glitter creates visual depth. Neon finishes photograph beautifully, which means this design looks just as good in person as it does in photos. The glossy finish amplifies the lime’s brightness, making your nails look fresh and energetic every time you move your hands.
Design Details Worth Knowing
- A true neon lime (often called “highlighter green”) photographs best and appears brightest in natural sunlight
- Diamond-shaped glitter catches light differently than round glitter, creating a more sophisticated sparkle
- Apply glitter to a wet or tacky base coat layer to ensure it stays put without sliding around
- Seal everything with a high-shine topcoat to lock in the glitter and maximize reflection
- This design works best on medium to long duck nails where there’s enough real estate for the glitter to shine
Pro tip: Paint a thin line of glitter along the very edge where the nail curves to create a subtle “spotlight” effect that makes the duck shape pop.
2. Ombre Lime Green Fading to Soft White Tips

This ombre design starts with a saturated lime green at the base and gradually transitions to a soft white or cream at the curved tip of the duck nail. The gradient creates an elegant, almost ethereal effect that feels more refined than a solid color while still showcasing the lime green’s vibrancy. The transition should be smooth enough that there’s no harsh line, just a gradual shift from warm lime to cool white.
The Technique Behind the Gradient
Creating a smooth ombre requires either a sponge application method or a gradient brush, layering semi-transparent polish to build the fade gradually. Start with your lime base color fully covering the nail, then load a makeup sponge with slightly diluted white polish and dab it repeatedly over the tip area. Each dab builds the color gradually, creating that soft transition. The beauty of this technique is that the gradient becomes a unique fingerprint on each nail — no two ombres are exactly alike.
Tips for a Flawless Ombre
- Use a makeup sponge (the cheaper the better — they absorb more polish) for the most forgiving gradient application
- Dilute your white polish slightly with a topcoat or clear polish so it spreads smoothly without streaking
- Build the ombre in 3-4 very light layers rather than one heavy application — patience creates seamlessness
- Seal with a glossy topcoat to blur any remaining texture lines
- If the gradient isn’t perfect, a fine glitter in the transition zone can disguise any unevenness
Worth knowing: The wider the gap between your two colors, the more gradual the fade needs to be. Lime green to white is actually easier to blend than some other color combinations because they’re very different on the value scale.
3. Holographic Lime Green Duck Nails With Rainbow Shimmer
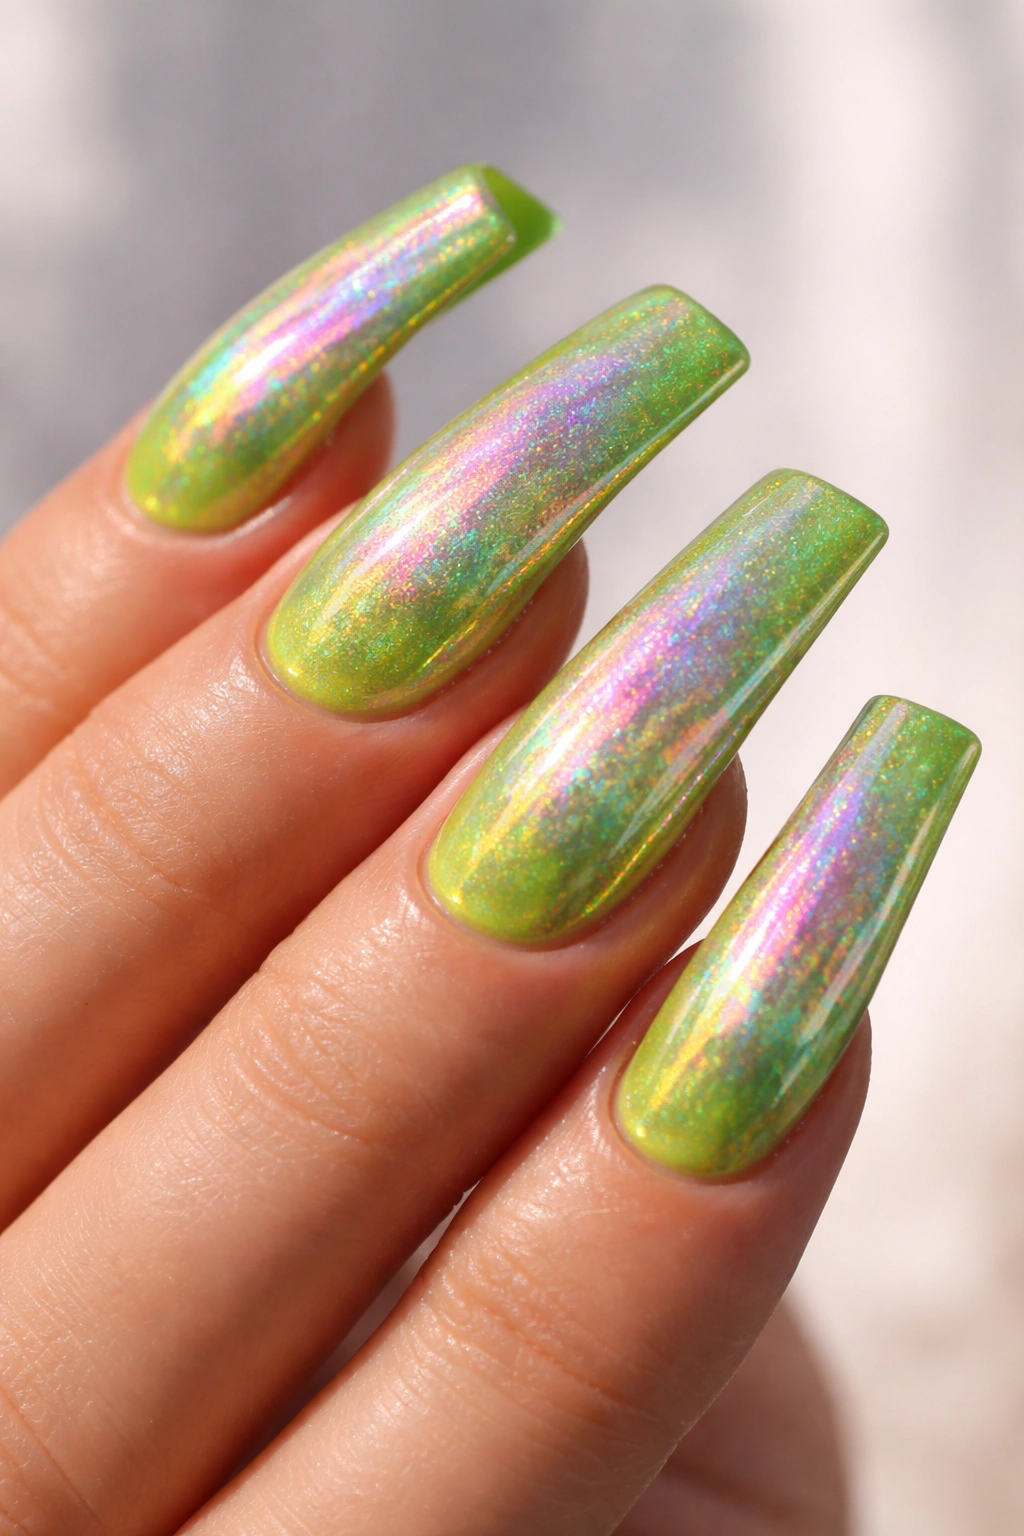
Holographic polish creates a magical rainbow shimmer that shifts across the surface of the nail as light and your angle change. Applied over a lime green base, the holographic effect creates this stunning interplay between the bright green and flashes of pink, purple, and blue. This design feels futuristic and playful at the same time, catching light in unexpected ways throughout the day.
What Makes Holographic Finish Unique
Holographic polish contains microscopic reflective particles that bend light into a rainbow spectrum — it’s almost like having a prism on your fingertip. Over a lime green base, the holographic effect enhances the lime’s brightness while adding those magical color shifts. Unlike regular shimmer or glitter, holographic creates an overall shimmering effect across the entire nail surface rather than individual sparkles.
Application and Maintenance
- Use a holographic top coat over a solid lime green base for the smoothest, most uniform effect
- Holographic finishes show fingerprints more readily than regular polish, so expect to clean them regularly
- The holographic effect shows up best in bright natural light or sunlight — indoors under artificial light it’s more subtle
- A high-quality glossy topcoat seals and intensifies the holographic shimmer
- Holographic nails tend to chip faster than regular polish, so budget for touch-ups every 10-12 days
Insider note: Hold your nails at different angles in the sun to see the full range of the holographic effect — some angles reveal more of the color shift than others.
4. Matte Lime Green Duck Nails With Clean Elegance
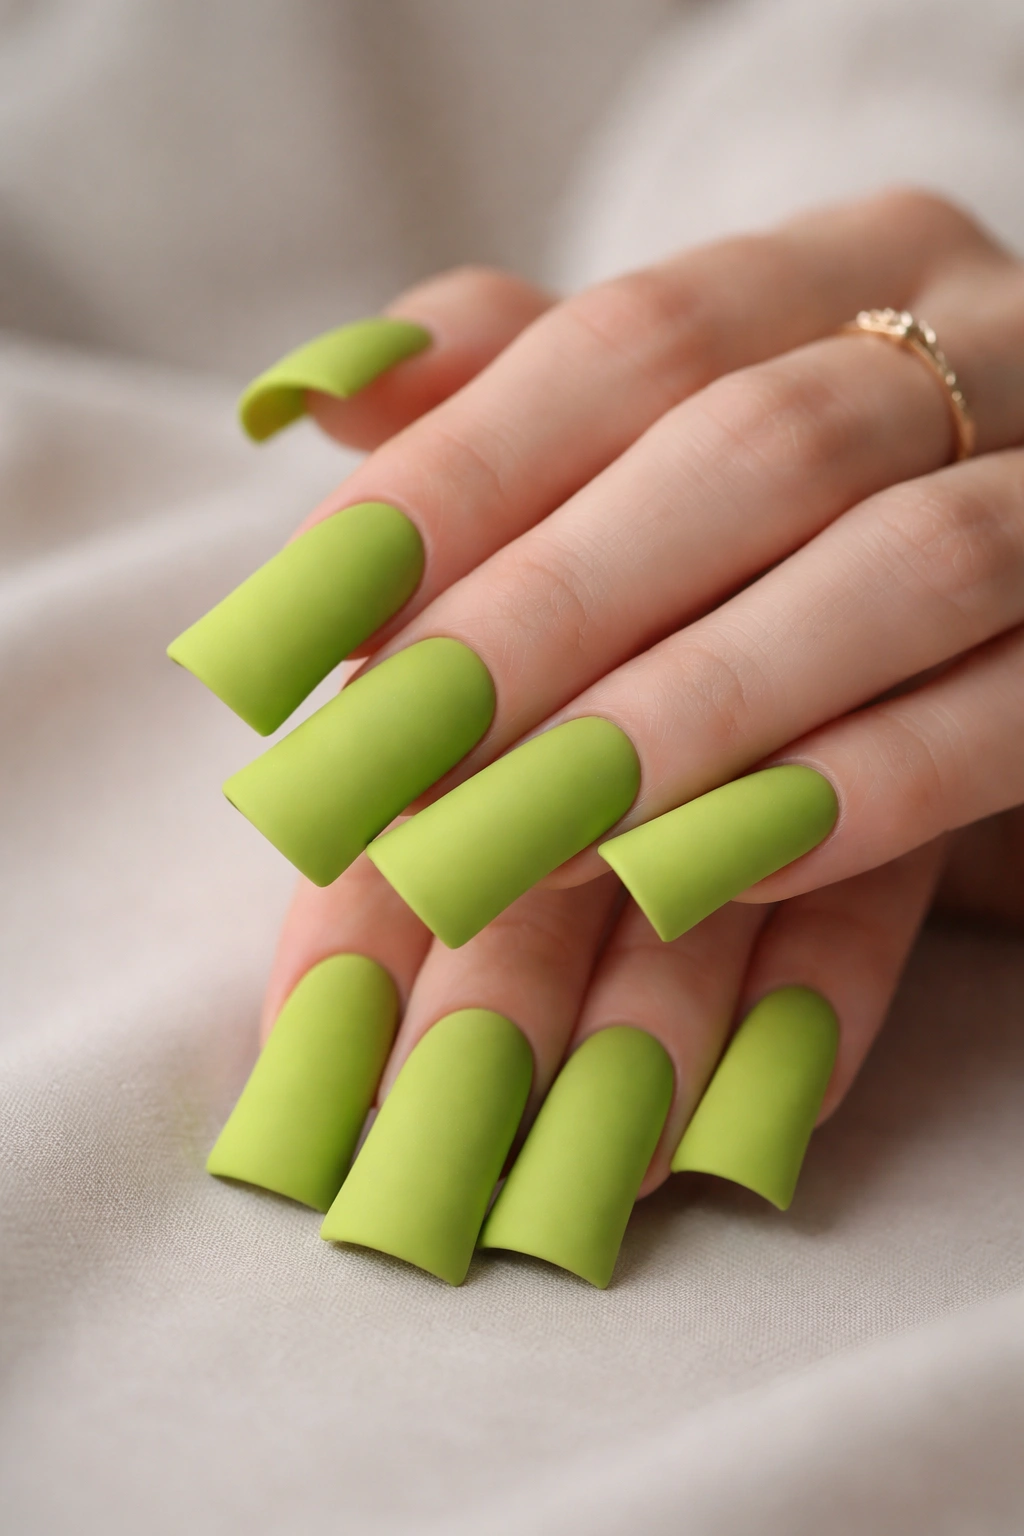
Matte lime green removes all shine and creates an almost velvety texture that feels sophisticated and modern. The matte finish makes the lime green appear slightly deeper and richer than a glossy version, and the lack of shine actually makes the duck nail shape stand out more prominently. This is the choice when you want lime green to feel elevated rather than playful.
Why Matte Changes the Entire Aesthetic
Matte finishes inherently feel more understated and refined, which counterintuitively makes them bolder in their own way. Without shine competing for attention, the pure color of the lime gets all the focus. A matte lime green duck nail almost looks like it’s painted on with architectural precision. This finish works particularly well if you want to wear lime green in more professional or formal settings without it feeling juvenile.
Getting and Keeping a Perfect Matte Finish
- Use a matte topcoat over your lime green base rather than relying on matte polish alone — matte topcoat creates a more durable finish
- Matte surfaces show water spots and dust more readily, so they require more frequent cleaning to stay pristine
- A matte finish can make nails look slightly shorter because there’s no light reflection to add visual length
- If you want to add any detail to matte nails, try a glossy accent stripe or small detail in the center — the contrast between matte and glossy creates visual interest
- Matte nails feel slightly less formal than glossy, making them perfect for creative industries or casual-professional settings
Pro tip: If your matte nails start to lose their velvety texture (this happens with handling), gently buff with a microfiber cloth to restore the matte appearance without damaging the nail.
5. Lime Green Chrome Duck Nails With Metallic Mirror Effect
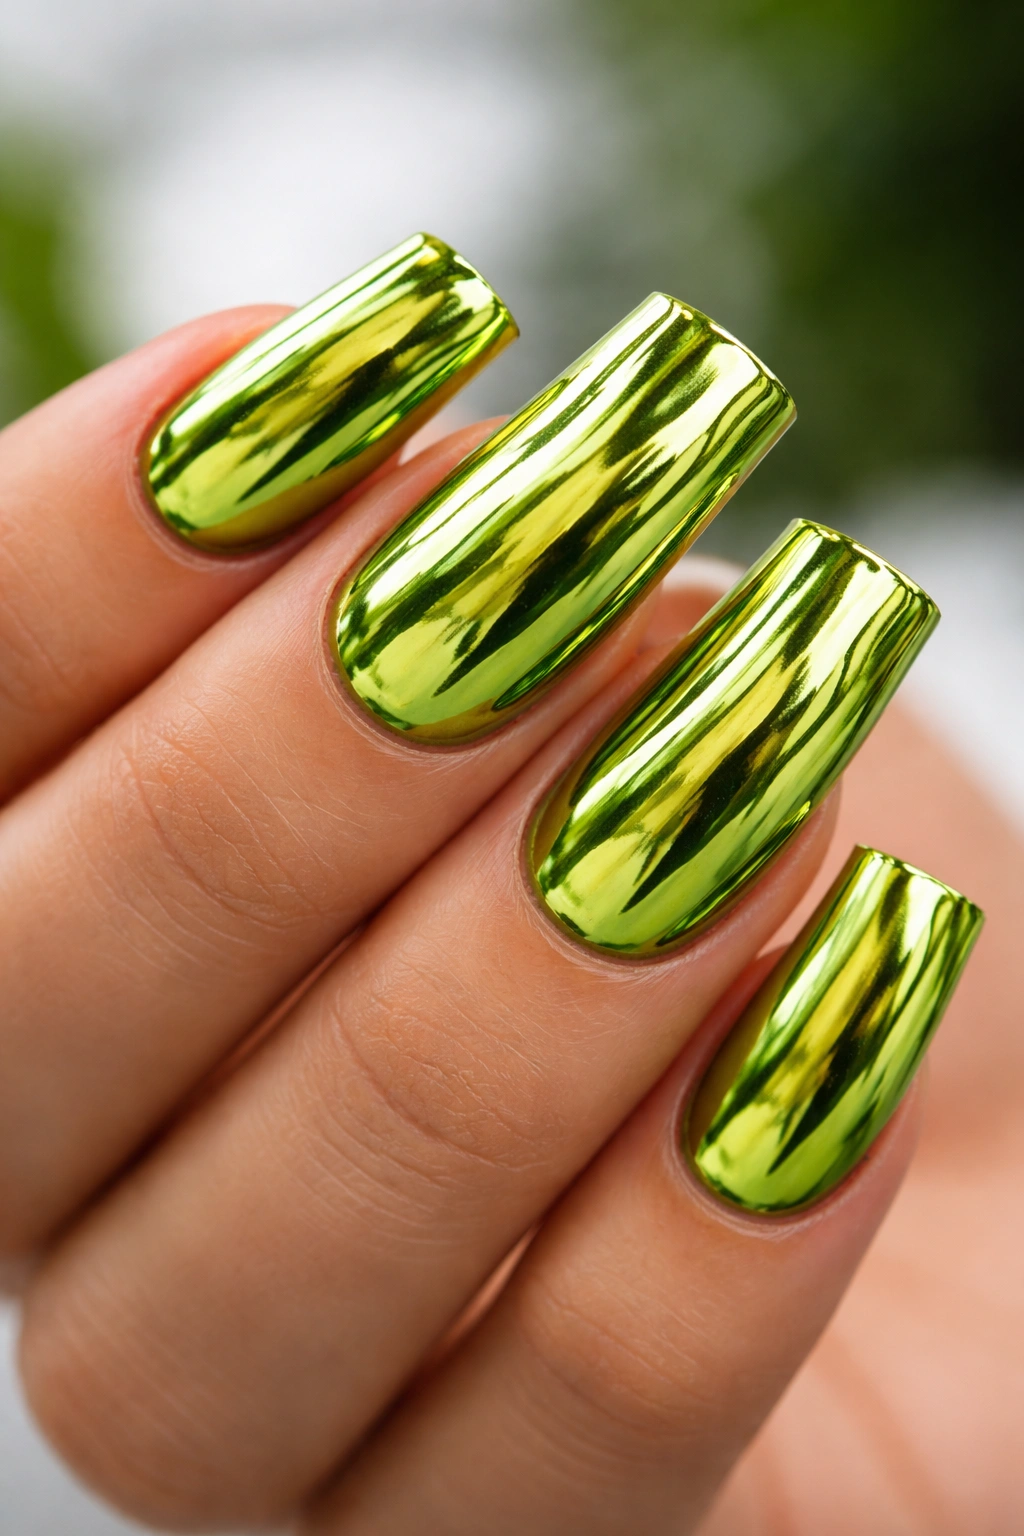
Chrome finish creates an ultra-reflective, mirror-like surface that makes your nails literally look like polished metal. Over lime green, chrome creates an almost liquid, futuristic appearance — the green shifts slightly as you move your hand, and the reflection is so perfect you can see yourself in it. This is the design choice when you want maximum impact and don’t mind your nails being the absolute focal point of your appearance.
The Chrome Finish Technology
Chrome polish typically requires a special application process involving a magnet held above the nail, which aligns microscopic chrome particles into a perfectly reflective surface. Some chrome polishes are easier to apply than others, so budget for a visit to a skilled technician if you’re not experienced with chrome application. The result is incomparably shiny — bright enough that people will literally comment on your nails within seconds of seeing them.
Chrome Durability and Care
- Chrome finishes are surprisingly durable when applied correctly, lasting 2-3 weeks with minimal chipping
- Keep chrome nails away from water as much as possible initially — even a few hours after application, excessive water can compromise the finish
- The mirror finish shows every fingerprint, dust particle, and smudge, so you’ll be cleaning them frequently
- Dry your hands thoroughly after washing — water spots on chrome look particularly obvious
- Avoid picking or peeling at the edges, as chrome is more prone to lifting than regular polish
Worth knowing: Chrome really pops on longer nails, and the duck shape’s curve means the chrome finish creates an even more dramatic effect at the very tip where the curve is most pronounced.
6. Lime Green French Tips With White Curved Edges
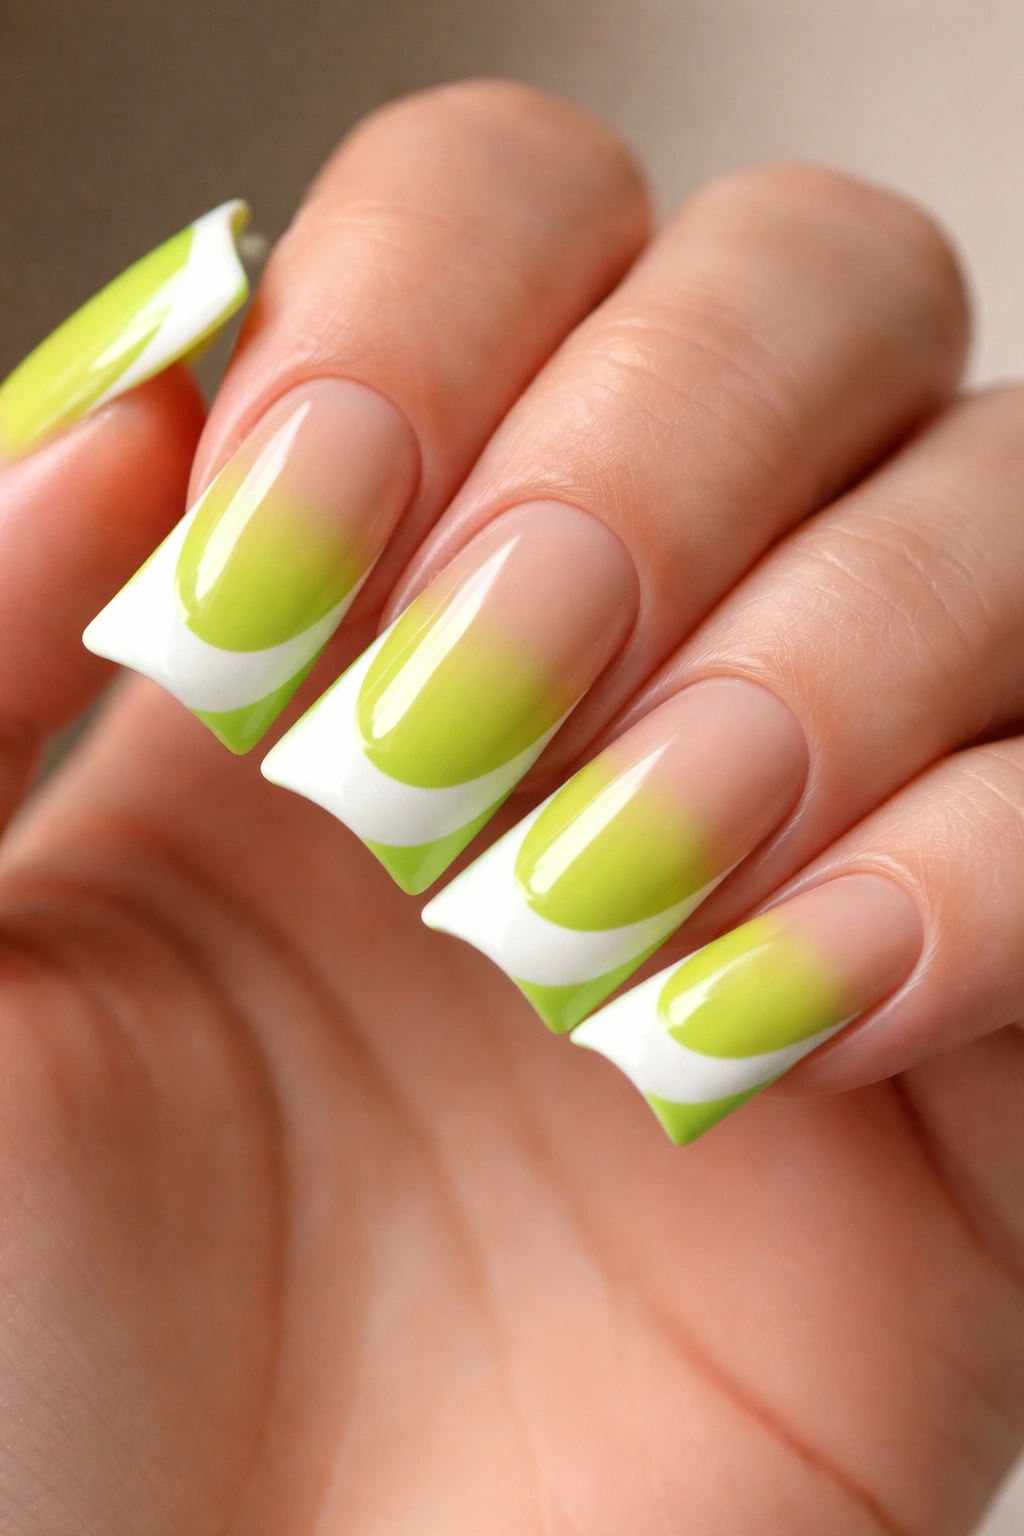
This is a modern spin on the classic French manicure, replacing the traditional straight white tips with curved white edges that follow the duck nail’s natural shape. The lime green base creates a fresh, spring-like vibe, and the white tips provide classic elegance. The white edges don’t have to be perfectly straight — following the curve of the duck nail shape actually makes this design look more intentional and playful.
Adapting French Manicure to Duck Nails
Traditional French tips follow the edge of the nail bed. With duck nails, you get to define where the “tip” ends since the whole nail is curved. You can make the white tips as wide or narrow as you like. A wider white tip creates a bolder statement, while a thin white line feels more minimalist. The curved shape of duck nails means the white area naturally curves upward at the sides, creating an almost 3D effect.
Executing a Flawless French Duck Nail
- Use a curved striping brush or a thin angled brush to paint the white tips — curves are easier to control with a dedicated curved brush
- Paint the white tips freehand or use curved guides/stickers if you want perfectly symmetrical edges
- Two thin layers of white create better opacity than one thick layer that might look chalky
- Seal with glossy topcoat to blend the lime and white and create one unified shine
- If your white lines aren’t perfectly smooth, a thin black or dark green outline can frame them intentionally
Pro tip: The curve of the duck nail naturally guides your brush stroke — let the shape work with you rather than fighting it, and your lines will be smoother.
7. Textured Lime Green With Shimmer Gradient
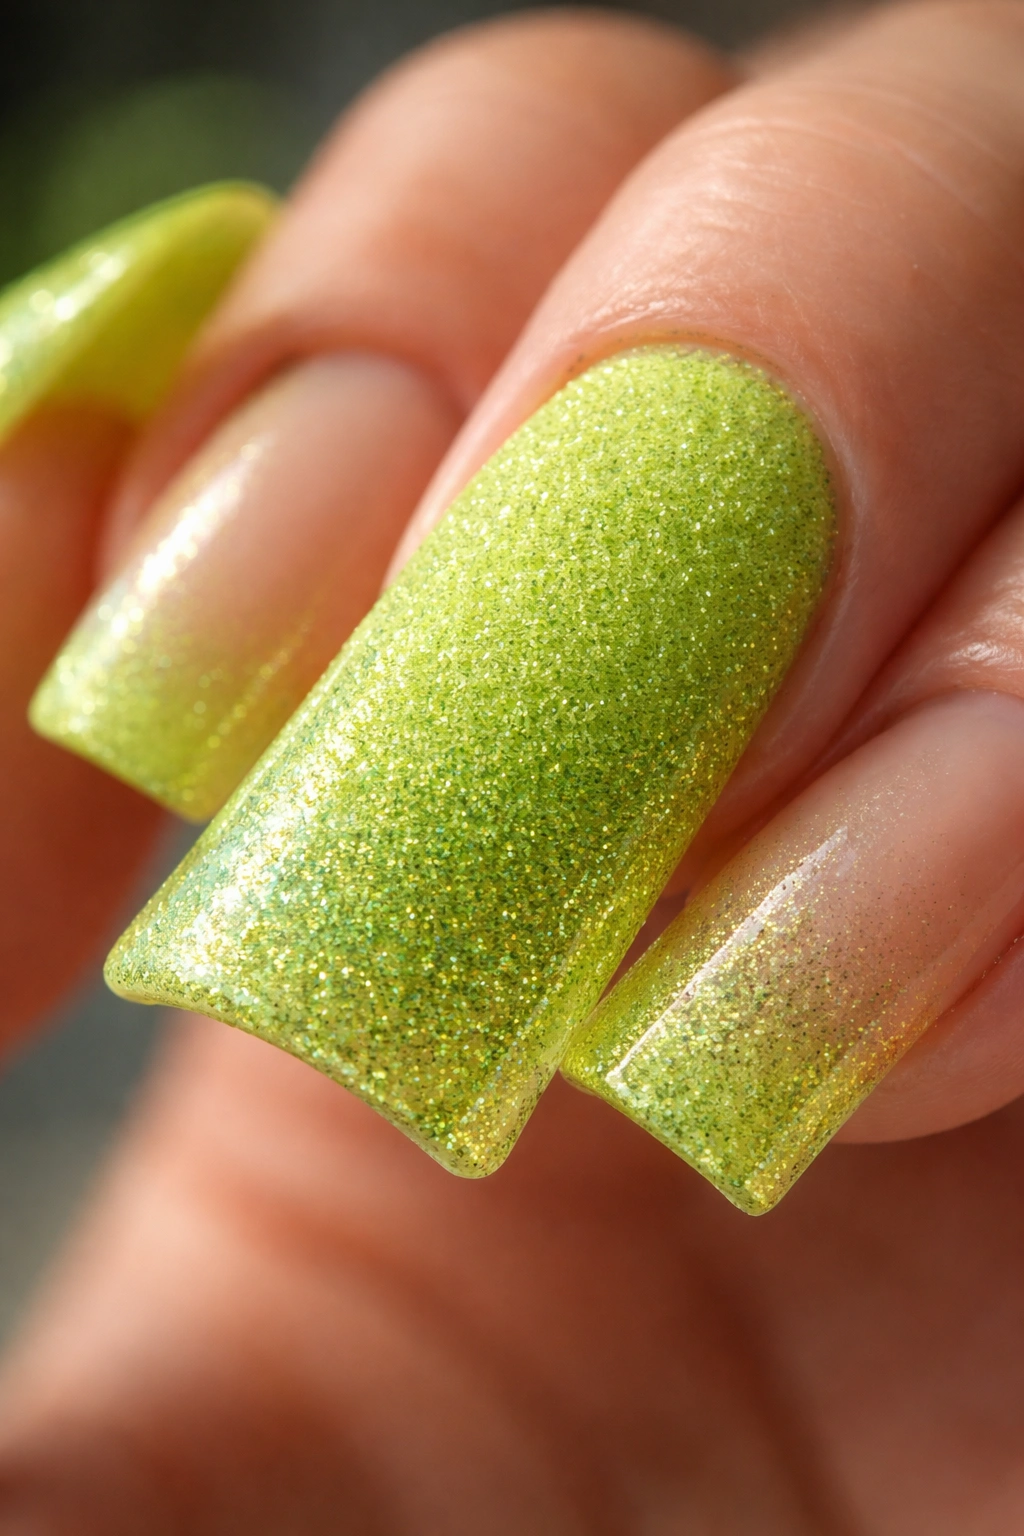
This design combines a grainy, textured lime green base with a shimmering gradient that builds toward the tip. The texture creates visual interest and catches light differently than smooth polish, while the shimmer gradient adds movement. Together they create a design that looks almost three-dimensional and extremely tactile, even though the surface is smooth when you touch it.
Creating Texture in Polish
Textured polish contains particles that create a deliberately rough surface, giving nails a frosted or sandy appearance. This texture is intentional and part of the design, not a flaw. Applied as a base, textured lime green provides a sophisticated foundation for the shimmering gradient. The contrast between the matte-textured base and the reflective shimmer creates compelling visual depth.
Building the Shimmer Gradient
- Start with a solid textured lime base as your foundation
- Sponge a shimmering topcoat or glitter topcoat onto the tip area, blending it into the textured base
- The shimmer will stick to some areas of the texture and slide into others, creating a naturally varied, organic gradient
- Build the shimmer in light layers for a gradual effect rather than concentrating it all at the tip
- Seal everything with a clear glossy topcoat that smooths over the texture while maintaining the visual texture effect
Insider note: Textured polish photographs beautifully because it shows dimension and detail that smooth polish might miss. This design looks even better in pictures than in person.
8. Lime Green With Nude Base and Geometric Gold Accents
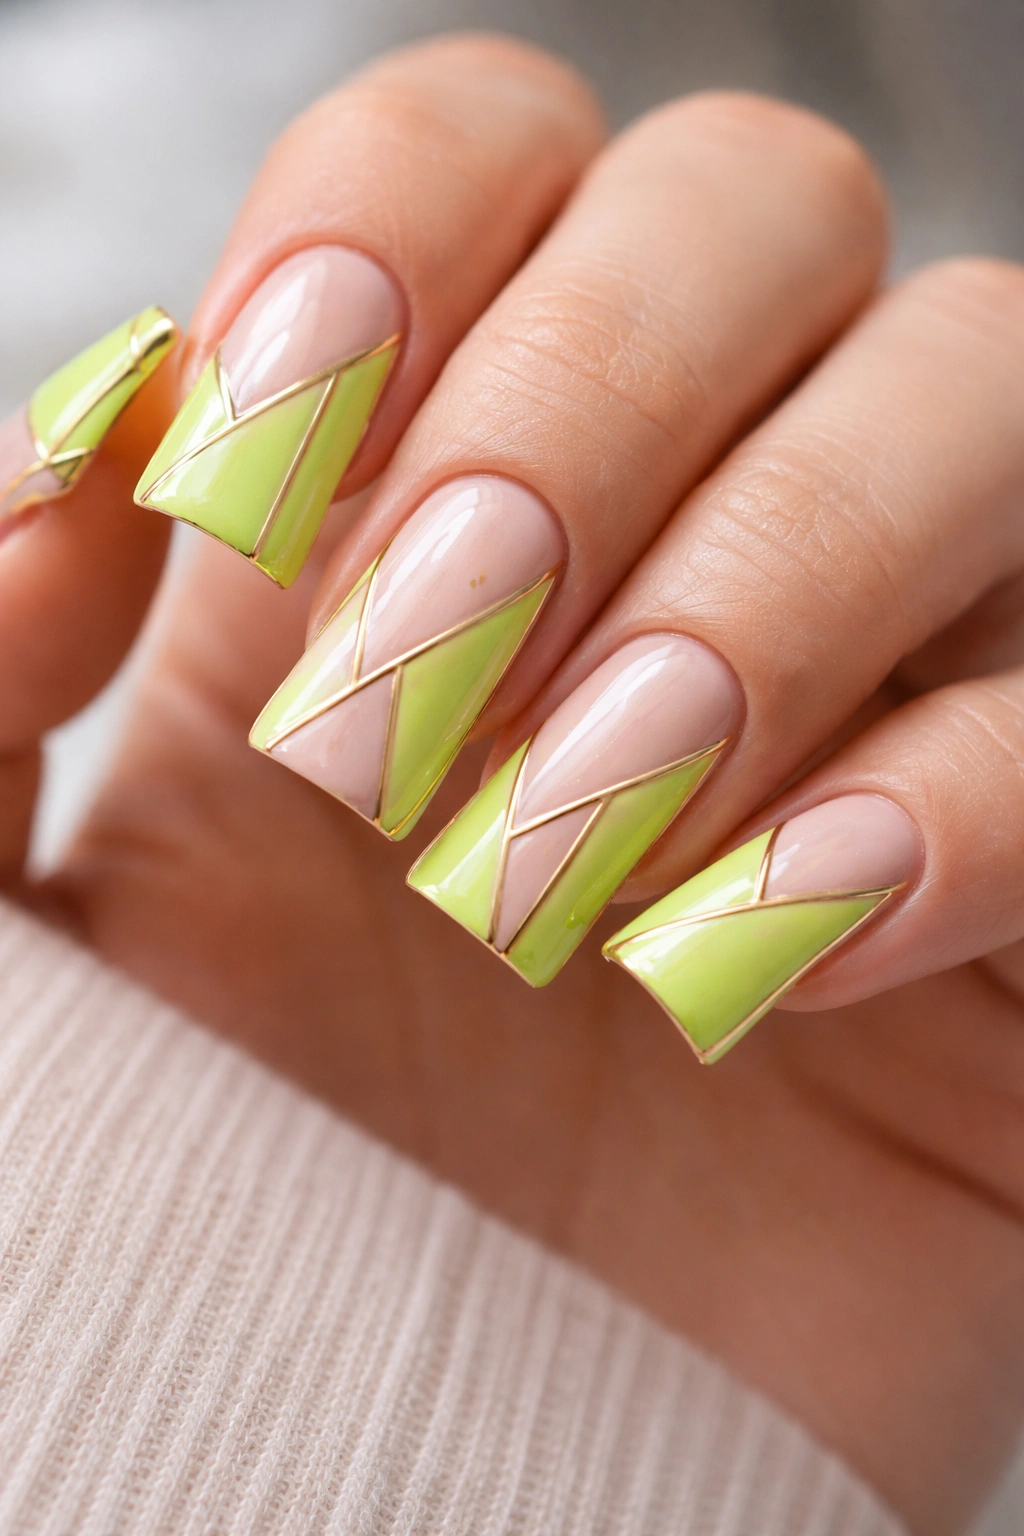
This design takes a more sophisticated approach by using a soft nude or beige base on most of the nail, with lime green concentrated in specific geometric sections, accented with thin gold lines. This creates an artistic, almost architectural look that feels more elevated and intentional than a full lime coverage. The nude base makes the lime sections feel like deliberate design elements rather than a solid color.
Strategic Color Blocking
Divide your duck nail into sections — perhaps a lime green triangular shape at the tip, a lime green section along one side, or alternating blocks of lime and nude. Gold striping tape or thin gold lines separate and define each section. The geometric approach transforms a simple color combination into nail art that looks intentional and designed. This works particularly well if you want to wear lime green but feel like a full solid color is too much.
Executing Geometric Precision
- Use thin striping tape or a thin angled brush to create clean geometric divisions
- Paint your sections in blocks of color, allowing each section to dry before adding the next to prevent smudging
- Thin gold lines drawn with a fine striping brush or gold striping tape define and frame each color block
- This design requires patience but doesn’t require advanced nail art skills
- The geometry is forgiving — slightly imperfect lines actually add to the modern, architectural feel
Pro tip: Use a ruler or measuring tool lightly marked on the nail with a pencil to plan out your geometric sections before applying color — planning makes execution infinitely easier.
9. Lime Green Marble Duck Nails With Swirled Veining
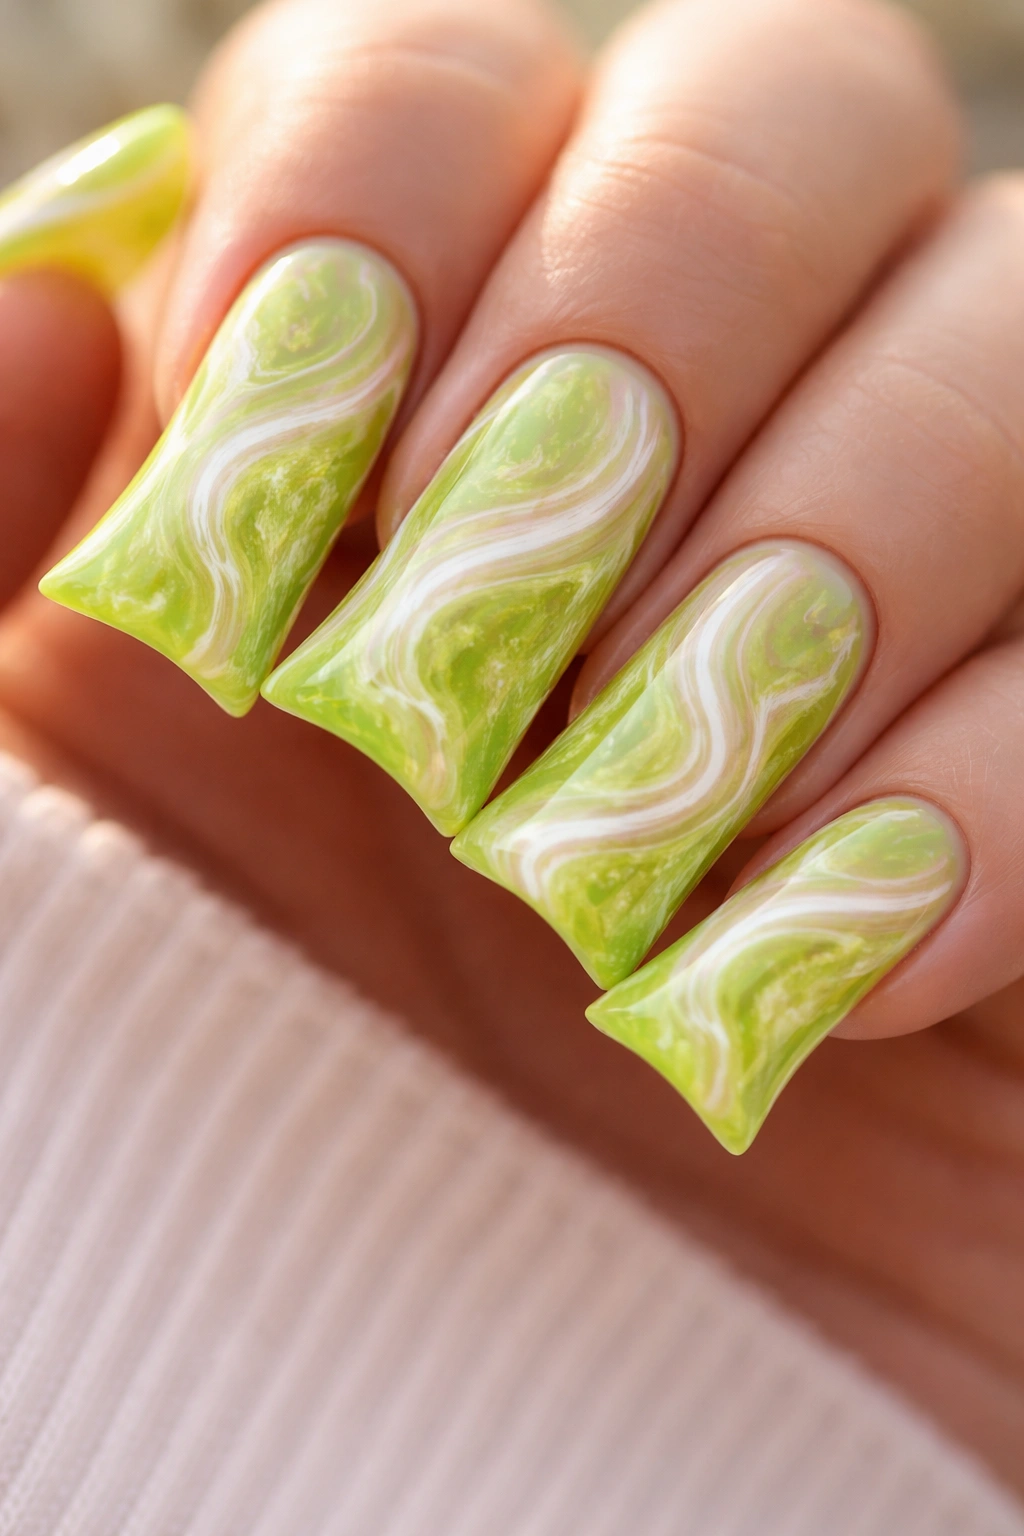
Marble nails create organic, flowing patterns that look like stone or liquid swirled together. Applied over lime green, marble veining in white, pink, or even darker green creates an elegant, natural effect that feels almost geological. Each nail becomes a unique marble pattern, so no two are exactly alike — which is part of the appeal. Marble design makes lime green feel luxurious rather than just bright.
The Water Marble Technique
Traditional water marbling involves dropping different polish colors into water, creating a pattern, then dipping your nail through it. The results are always somewhat unpredictable, but that’s the charm. For lime green marble, you can use white or cream veining to create contrast, or use multiple shades of green for a more monochromatic approach. The technique requires practice, but once you understand the process, it becomes addictively fun.
Alternative Marble Methods
- Use a thin brush to hand-paint marble veining directly onto the lime green base — this takes more control but gives you more predictable results
- Apply marble through dry-brush techniques where you load a brush with very little polish and create texture by brushing lightly
- Use marble effect topcoats or nail stamping plates designed to create marble patterns without the water technique
- Seal your marble design with glossy topcoat to make the pattern really pop and create dimensionality
Worth knowing: Marble patterns look best on longer nails where there’s space for the veining to really develop. On shorter nails, the pattern might feel cramped.
10. Neon Lime With Gold Leaf and Sparkle
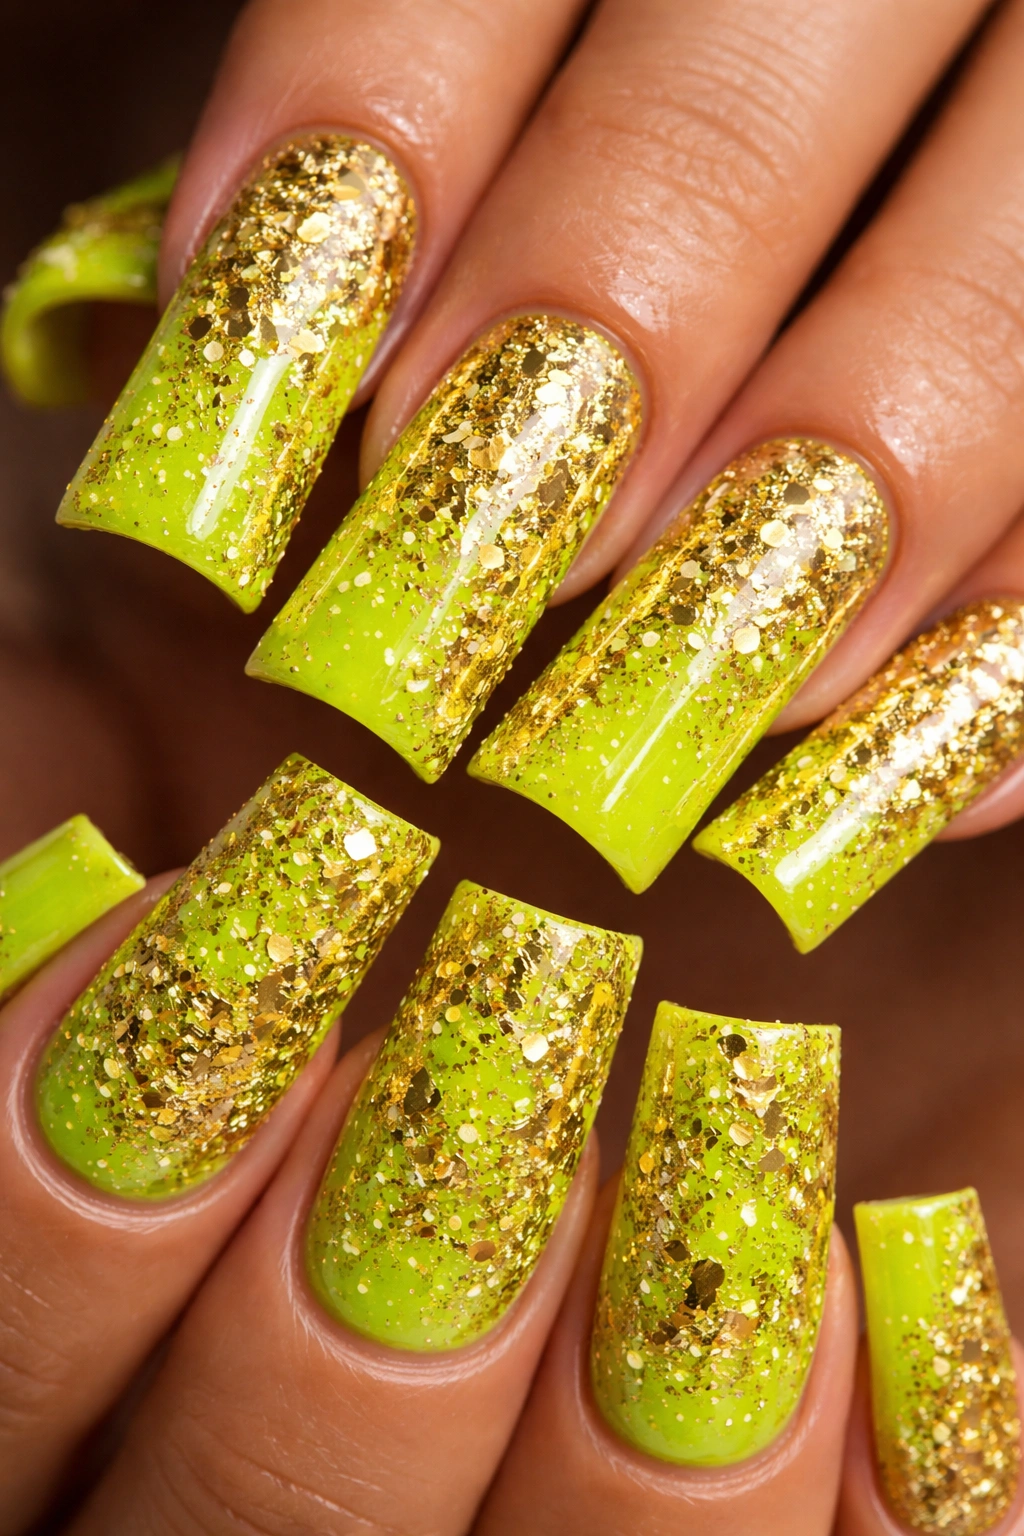
This design layers lime green with actual gold leaf flakes and fine gold glitter for a luxe, glamorous aesthetic. The neon lime provides the brightness, while the gold adds richness and sophistication. Together they create a design that’s both bold and elegant — playful but not childish. This is the choice when you want people to know you’re confident in your style choices.
Working With Gold Leaf
Gold leaf comes in thin, delicate sheets that adhere to slightly tacky or wet topcoat. Tear or cut the gold leaf into irregular pieces and press them gently onto the lime green, creating a scattered pattern. The imperfect placement looks more intentional and natural than perfectly distributed gold. This technique requires a delicate touch but creates a genuinely luxurious effect that’s surprisingly durable.
Layering Materials for Maximum Impact
- Apply neon lime as your base with a high-shine topcoat
- While the topcoat is still slightly tacky, apply gold leaf pieces and gold glitter
- Allow to fully dry, then seal with another layer of clear topcoat to lock everything in place
- The layering creates subtle dimension — different materials catch light differently
- Vary the density of gold across the nail — more concentrated at the tip, more scattered at the base creates visual movement
Pro tip: Mix your gold leaf application with fine gold glitter in the same placement zones for added shimmer. Gold leaf provides luster; glitter adds sparkle. Together they create maximum luxury.
11. Lime Green Jelly Polish Duck Nails With Translucent Effect
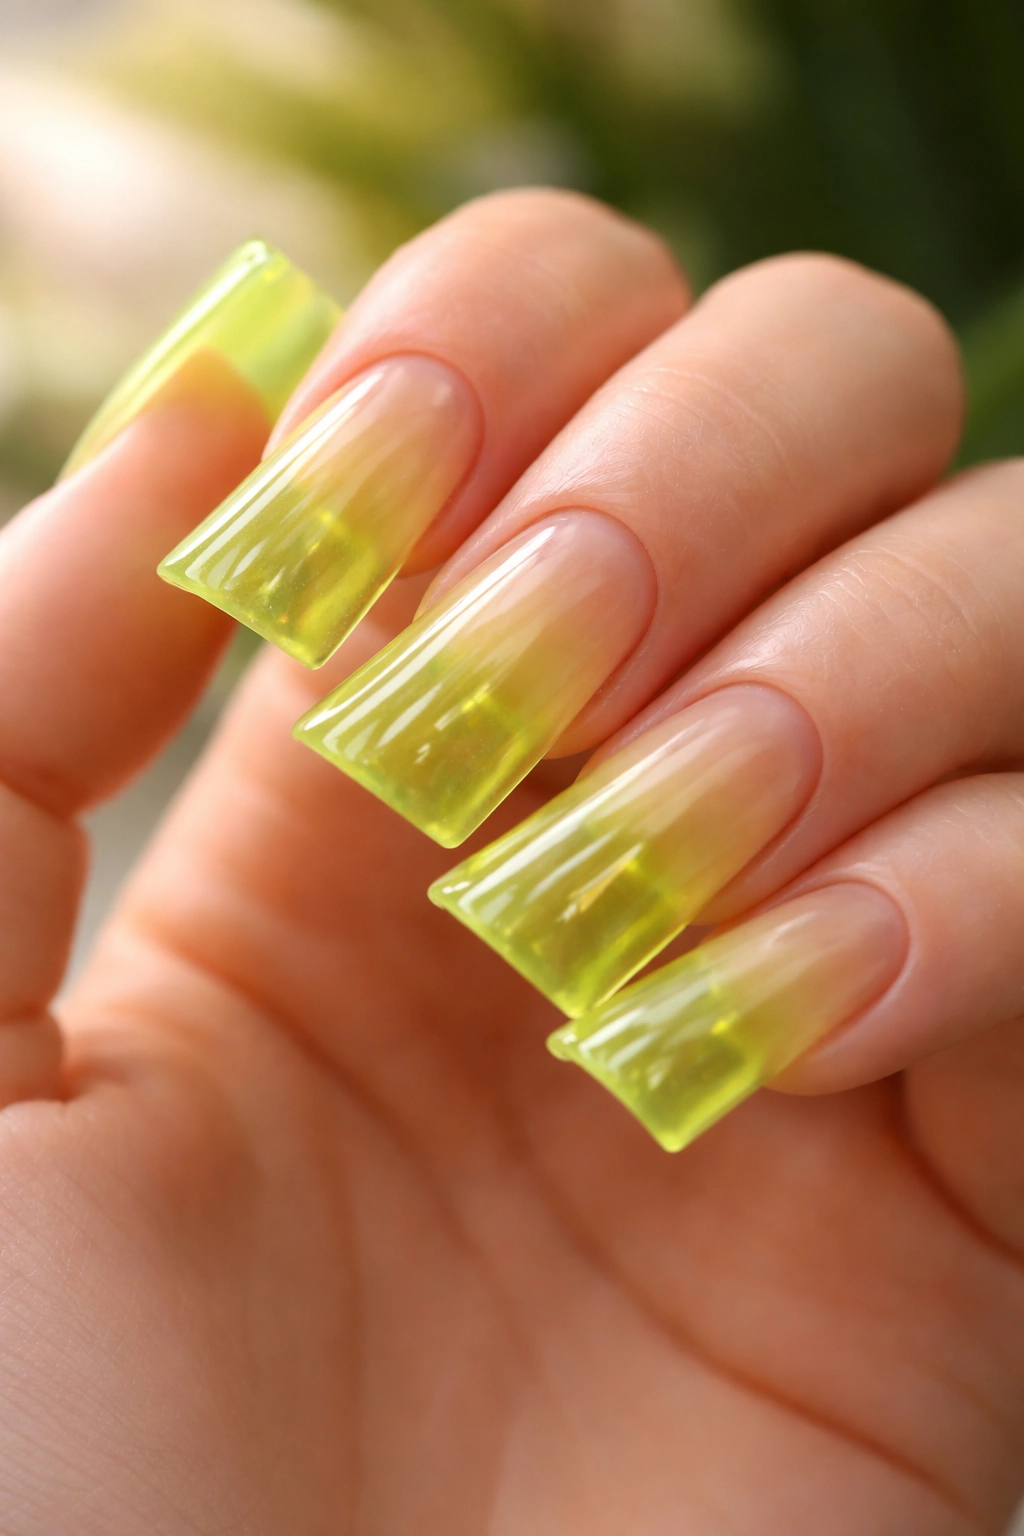
Jelly polishes are semi-transparent, which means when applied, they create a see-through colored effect over your natural nail or a pale base. Lime green jelly creates an almost glass-like appearance — bright and vibrant but with depth and translucence. This design feels sophisticated and modern, and it’s incredibly popular among people who like nail art that’s visually interesting without being heavily decorated.
The Appeal of Translucent Lime
Jelly lime green shows off the natural nail underneath while still providing color. This creates a less opaque, more ethereal appearance than regular lime green polish. The translucence means the color actually changes slightly depending on the thickness of the application and the angle of light. On duck nails, this creates a subtle gradient effect naturally — the tips appear darker because there are more layers of polish stacked there.
Choosing and Applying Jelly Polish
- Use a jelly polish specifically formulated to be transparent — regular opaque polish won’t create the same effect
- Apply in thin layers rather than one thick coat, building the opacity gradually
- 2-3 thin layers of jelly polish create the sweet spot of color and translucence
- Jelly polish takes slightly longer to dry than regular polish, so don’t rush the curing process
- Seal with a glossy topcoat to create uniformity and make the translucent effect really shine
Insider note: Jelly polish looks particularly stunning in bright sunlight where you can really see the translucent quality. Indoors under artificial light it’s more subtle.
12. Lime Green With Rainbow Gradient Across the Nail

A rainbow gradient starting with lime green and shifting through yellow, orange, pink, and purple creates a multi-colored effect that’s joyful and energetic. Applied across a duck nail, the gradient follows the length of the nail and creates an almost tie-dye effect. This design celebrates color without feeling chaotic because the colors transition smoothly rather than sitting side by side.
Building a Rainbow Gradient
- Use a makeup sponge to apply each color in order, overlapping slightly so the colors blend together
- Start with lime green at the base, then layer yellow slightly above it, then orange, then pink, then purple at the tips
- Each color layer should be slightly diluted so it blends smoothly into the next rather than creating stark lines
- The duck nail’s curve means the gradient will follow that curve, creating a naturally flowing effect
- Seal with glossy topcoat to smooth out any lines and maximize the color effect
Making Rainbow Feel Sophisticated
- Use softer, less neon versions of each color for a more refined effect
- Apply the gradient in a very gradual blend so the transitions are almost imperceptible
- Limit the rainbow to just 3-4 colors rather than trying to include every color for a cleaner effect
- Let the duck nail’s natural length showcase the full rainbow spectrum
Pro tip: This design photographs spectacularly, especially in natural light where all the colors in the gradient become visible. It’s worth taking a photo to really appreciate the full effect.
13. Lime Green With 3D Rhinestones and Dimensional Embellishments
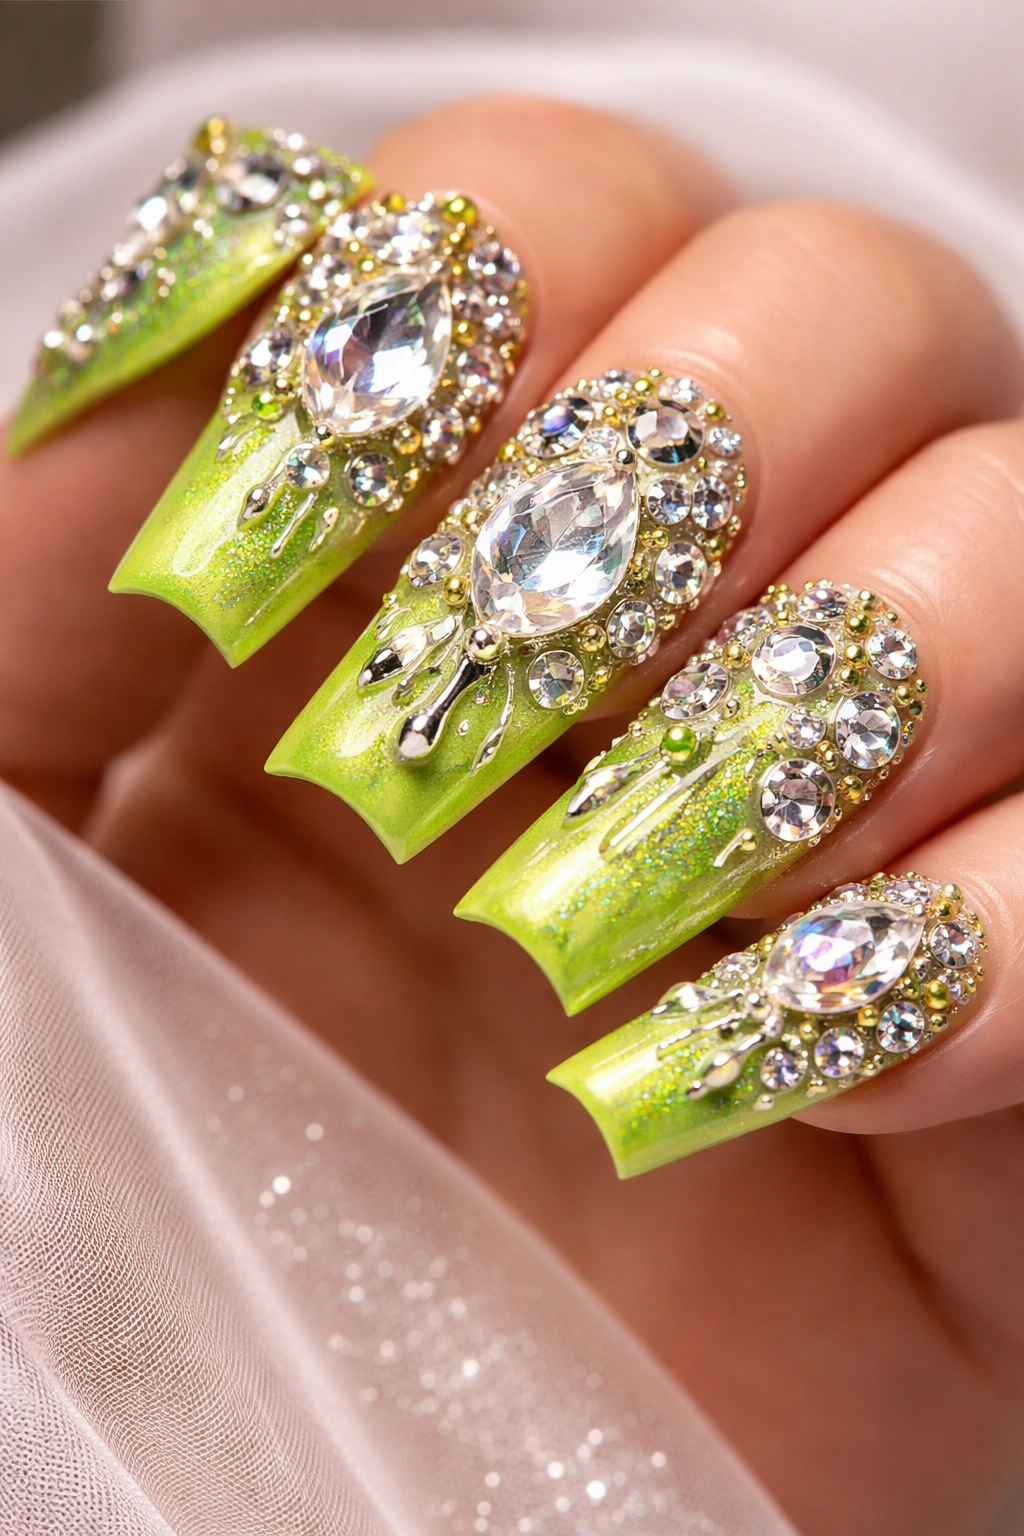
This design takes duck nails to the maximum statement level by adding 3D rhinestones, studs, or dimensional nail charms to a lime green base. The lime green provides the color foundation, while the rhinestones and embellishments create actual height and texture on the nail surface. This is the choice when you want your nails to be an actual art sculpture rather than just polish.
Creating Dimension Safely
- Use rhinestones and embellishments that are specifically formulated for nail art — they’ll have proper adhesive backing
- Place larger rhinestones and charms on the curved tip of the duck nail where they’re most visible and less likely to catch on things
- Mix rhinestone sizes for visual interest — a few large focal stones surrounded by smaller ones creates hierarchy
- Make sure all embellishments are firmly glued on with a strong nail-specific adhesive
- Seal everything with a thick topcoat that builds around (not on top of) the rhinestones
Wearing 3D Nails Practically
- 3D nails will catch on fabrics, so be mindful when reaching into bags, pockets, or wearing fitted clothing
- These nails are more prone to snagging, so reinforce loose pieces with additional adhesive every few days
- When nails start growing out, the embellishments won’t move with the nail, so you’ll need fills more frequently
- 3D nails feel less refined in professional settings, so consider when and where you wear them
Worth knowing: 3D elements photograph dramatically but feel even more elaborate in person. If you’ve ever wondered if dramatic nails are “too much,” 3D lime green duck nails will give you permission to be bold.
14. Lime Green Stamped Nail Art With Intricate Patterns
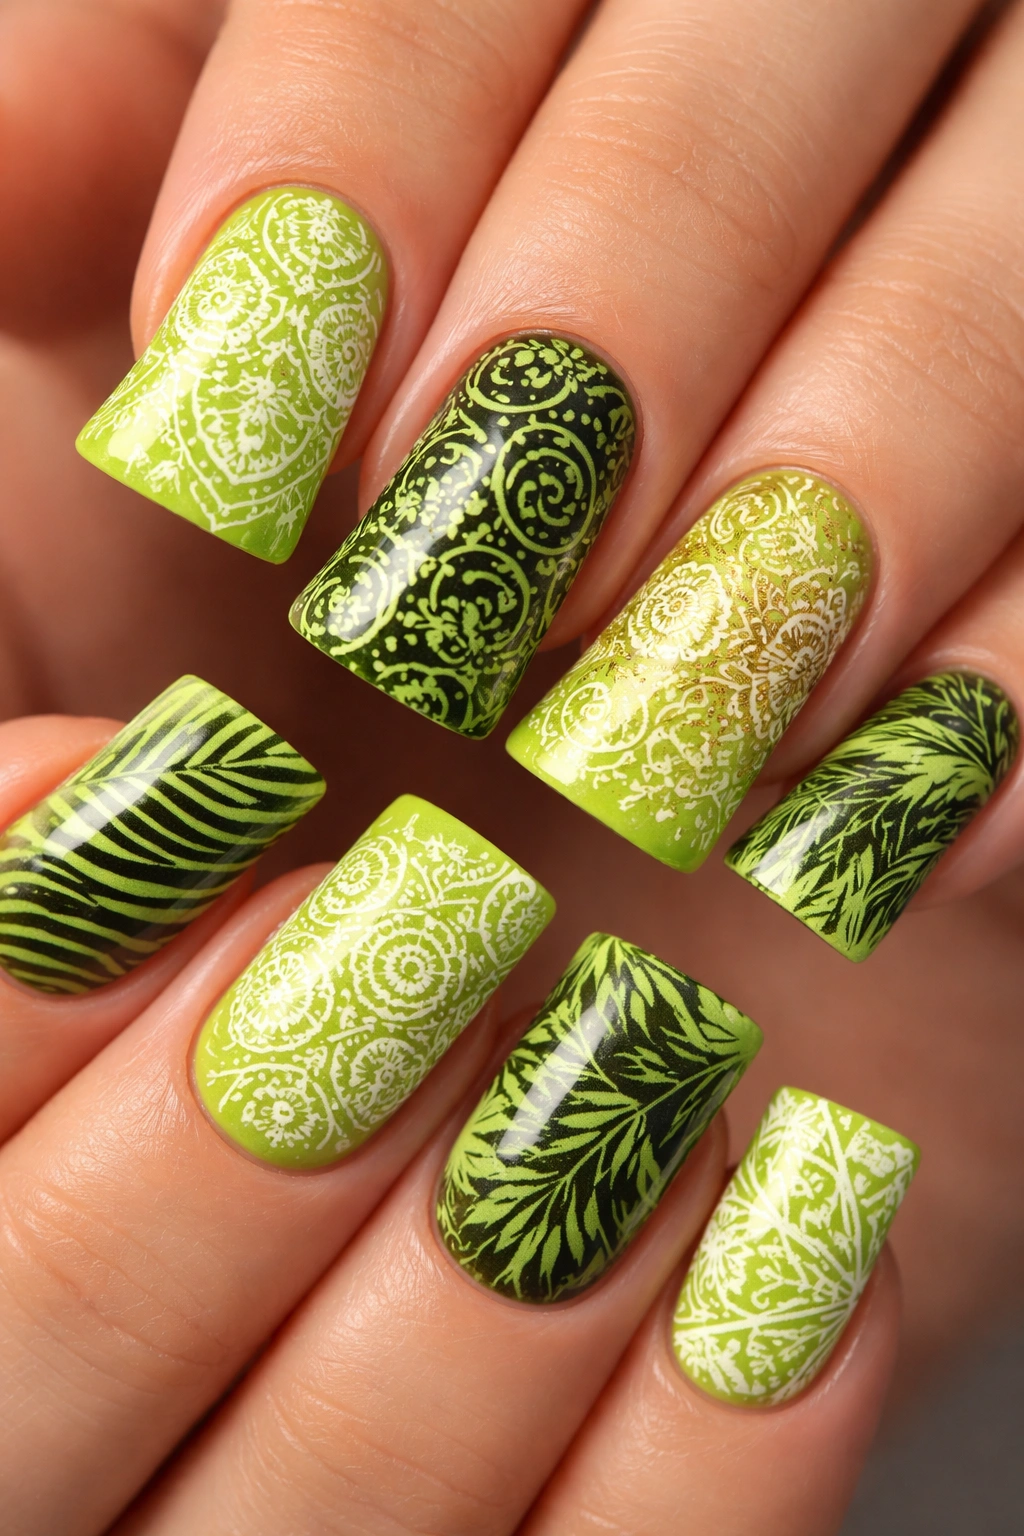
Stamped nail art uses specially designed plates with etched patterns that you apply to the nail with a stamper. Lime green serves as the base, and stamped patterns in white, black, gold, or contrasting green create intricate designs on top. Stamping allows you to create detailed patterns without needing advanced hand-painting skills. The designs range from geometric patterns to nature-inspired motifs to mandalas to lacy details.
The Stamping Process
- Paint your entire nail with lime green base polish and allow it to dry completely
- Choose a stamping plate with a pattern you love — there are literally thousands of designs available
- Roll the stamper across the pattern plate in one smooth motion, picking up the entire image
- Quickly press the stamper firmly onto your nail, holding it still for 2-3 seconds
- Lift the stamper straight up without twisting or sliding
- The stamped image should transfer cleanly to your nail
Selecting Patterns for Lime Green
- Geometric patterns in black or white provide maximum contrast and visibility on lime green
- Lacy or floral patterns in white over lime green feel elegant and refined
- Gold stamping over lime green creates a luxe aesthetic
- Small, intricate patterns work better than bold designs — detailed work shows off the stamping’s precision
- The duck nail’s curved tip means larger stamping plates might not fit the entire pattern, so choose accordingly
Pro tip: If your first stamping attempt doesn’t transfer completely, you can touch up areas with a thin brush and the same polish color you used for stamping — no one will know it’s hand-touched.
Final Thoughts
Lime green duck nails offer something for everyone, whether you’re drawn to bold neon brightness, sophisticated matte elegance, or anything in between. The beauty of lime green is that it works across vastly different aesthetics — it can be playful or refined, minimal or maximalist, depending on how you style it. With these fourteen options, you have endless starting points for your next lime green duck nail design.
The duck nail shape itself makes lime green even more impactful because the curved silhouette catches and reflects light differently than traditional nails. That curved tip means any design element — glitter, chrome, embellishments, or marble patterns — becomes more visually prominent. What might feel subtle on a traditional nail shape becomes a statement on a duck nail.
Your choice between these designs really comes down to what feels right for your style, your lifestyle, and the impression you want to make. If you’re testing out lime green nails for the first time, starting with something simpler like a classic gloss or French tip allows you to decide if you love the color before committing to something more elaborate. Once you’re convinced lime green is your shade, you can explore the more adventurous designs with complete confidence. Whichever design you choose, your nails are about to look absolutely stunning.
