

Duck nails—those adorable, curved nail designs that look like tiny duck bills—have become one of the most fun and creative ways to express yourself through nail art. The beauty of duck nails is that they don’t require a trip to a salon or professional expertise; you can absolutely create stunning press-on versions at home with the right materials and a bit of patience. Whether you’re drawn to minimalist designs or bold, statement-making looks, press-on duck nails give you the freedom to experiment with colors, finishes, and patterns without committing to a permanent manicure.
What makes creating duck nails at home so appealing is the flexibility and cost-effectiveness. You control every aspect of the design—the base color, the embellishments, the finish—and you can create multiple sets for different occasions without breaking the bank. Plus, there’s something deeply satisfying about wearing nail art that you’ve actually created with your own hands. The press-on format means you can remove them whenever you want, take your time perfecting the design without rushing, and even remake them if you’re not happy with the first attempt.
The designs I’m about to walk you through range from sophisticated and wearable to bold and eye-catching. Each one is completely doable with basic nail supplies: press-on nail bases (or crafted nude bases), gel polish or regular polish, a small detail brush or dotting tools, and some optional embellishments like glitter, rhinestones, or foil. You don’t need expensive equipment—just patience and a willingness to experiment. Let’s dive into ten beautiful duck nail designs you can create at home right now.
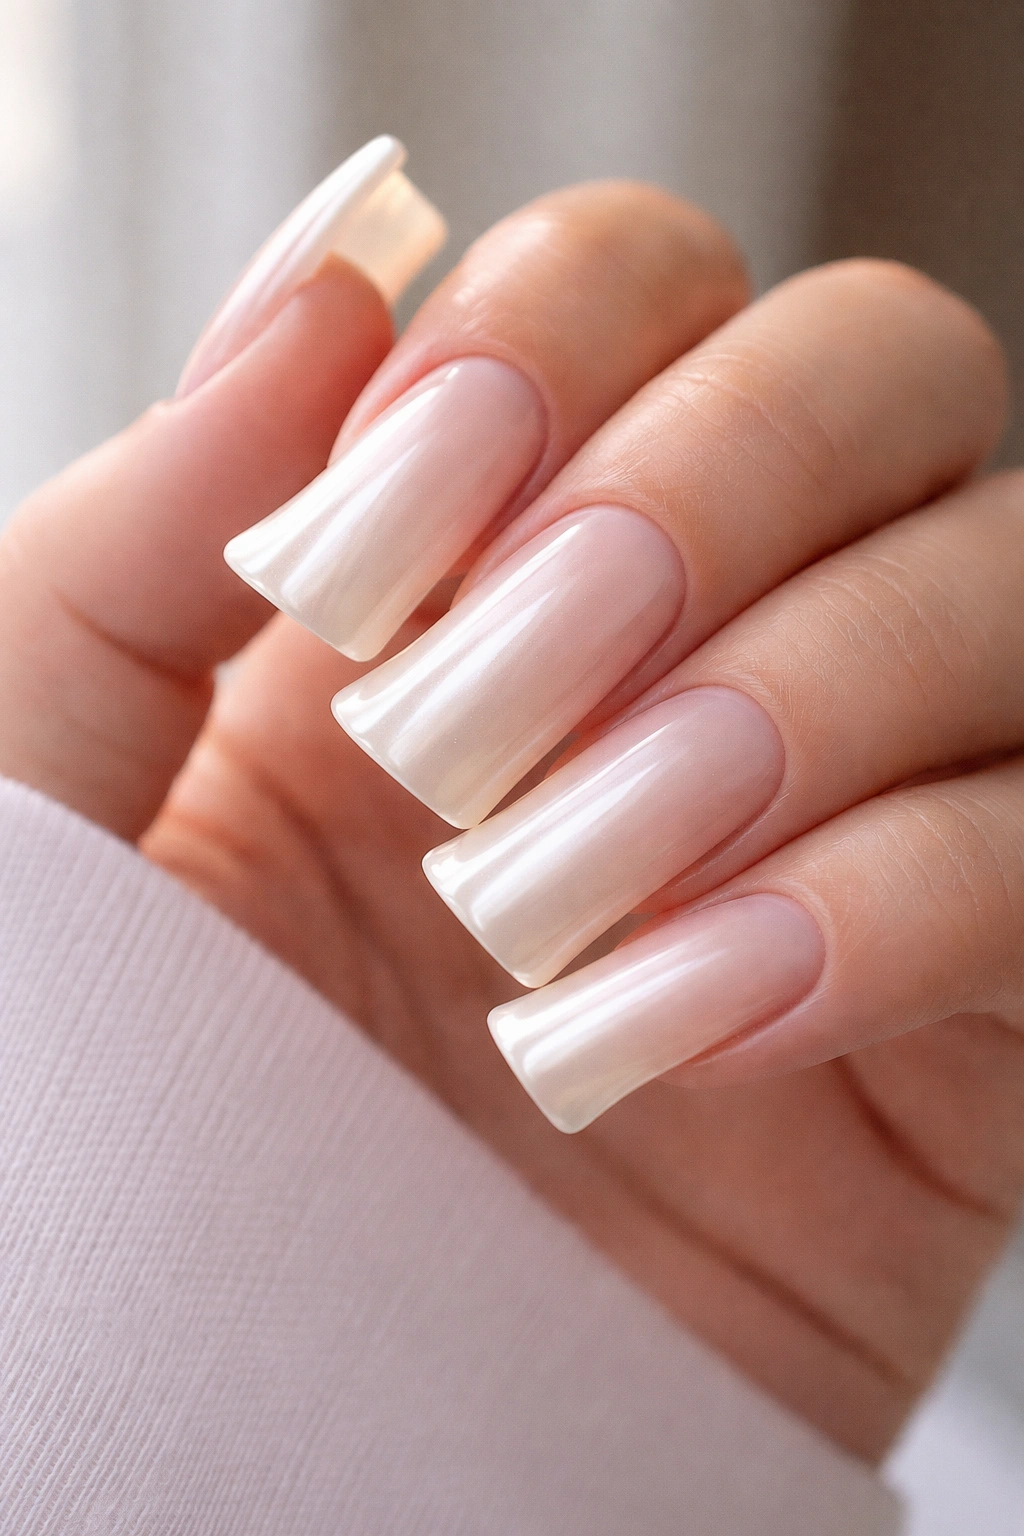
1. Classic Pearl Gradient Duck Nails
The pearl gradient is the perfect entry point for anyone new to duck nail design because it looks elegant and professional while remaining surprisingly forgiving. This design combines soft white and cream tones that create a gentle, luminous effect across the curved surface of the nail. The beauty of this style is that it works for virtually any occasion—from casual everyday wear to professional settings—and it never feels overdone.
Why This Design Works for Beginners
The pearl gradient technique relies on soft color blending rather than intricate detail work, which means minor imperfections actually blend into the overall aesthetic. The gradient movement naturally follows the duck shape, making the nail look intentionally designed rather than requiring pixel-perfect precision. This design also sits beautifully in natural light and catches light in a way that makes your nails look glossy and polished without being flashy.
How to Create It
- Start with a nude or pale pink base coat on your press-on nail tips
- Apply a white gel or regular polish to the very edge and tip of the duck curve
- Use a damp sponge to gently blend the white into the base color, creating a soft gradient that transitions from cream in the middle to white at the tip
- Seal with a glossy top coat to enhance the pearlescent quality and give the nails a luminous finish
- Optional: Add a single tiny rhinestone at the inner curve of the nail for subtle sparkle
The sponging technique is actually easier than it sounds—dampening a makeup sponge and dabbing the polish at the edges creates a naturally blended effect even if you’re not experienced with color transitions.
Pro tip: Let each layer dry completely before sponging the next color, or the colors will muddy together instead of creating a clean gradient.
2. Glitter Ombre Duck Nails
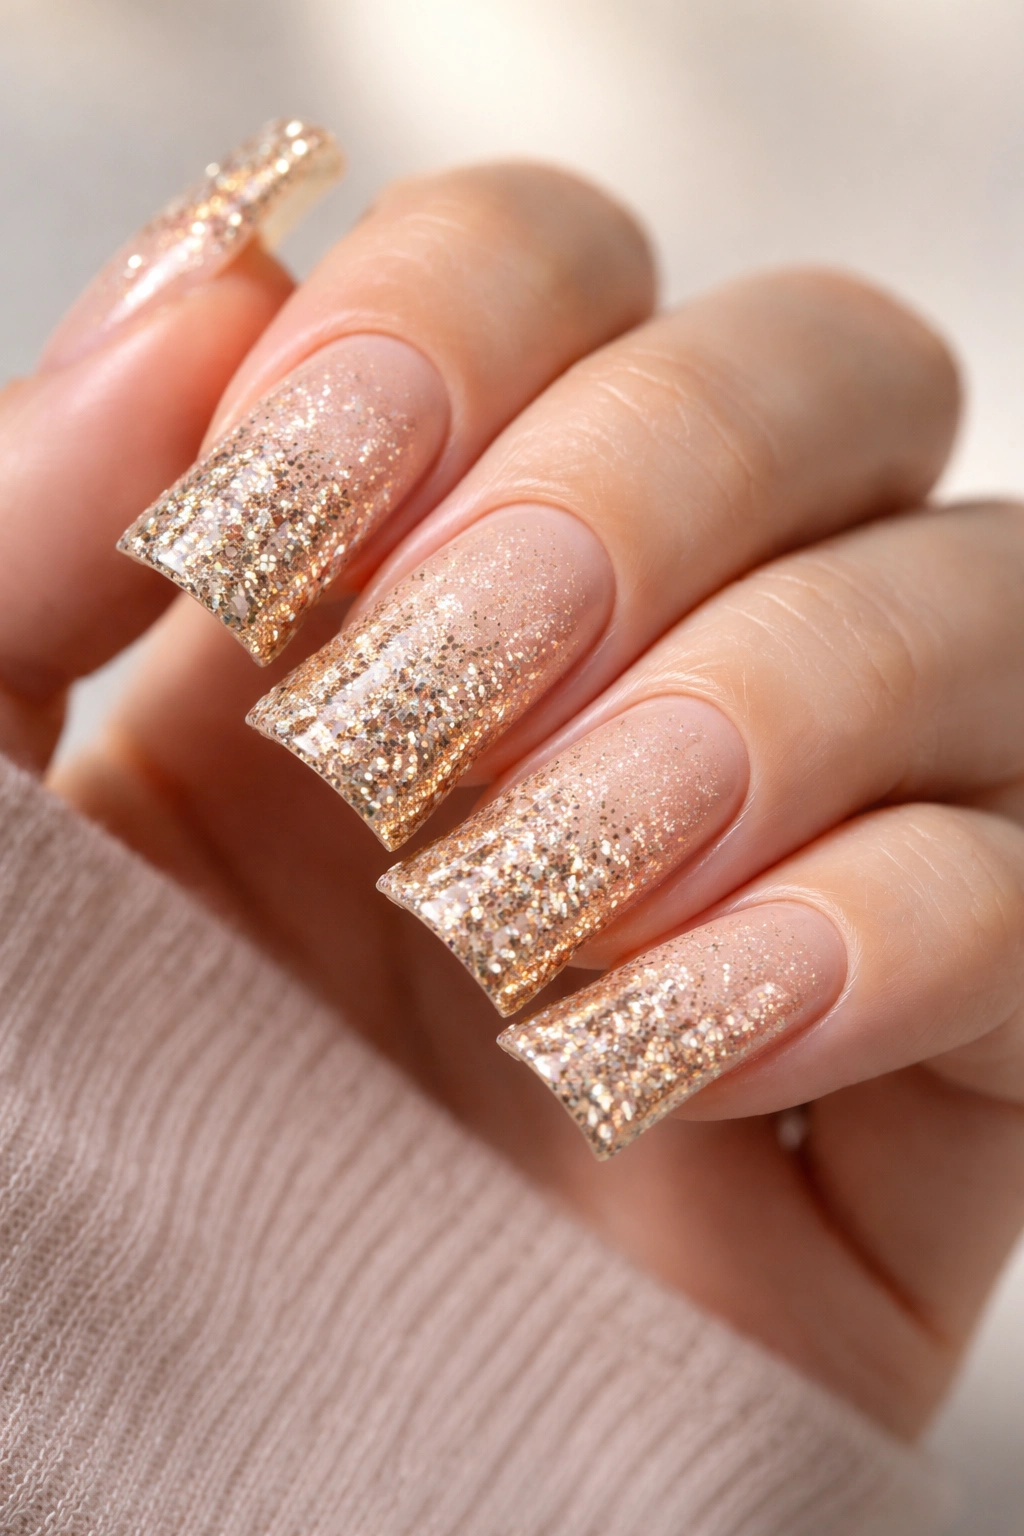
Glitter ombre takes the classic gradient concept and amps it up with texture and sparkle, creating a dramatic look that catches light from every angle. This design features a solid base color that transitions into increasingly dense glitter concentration toward the tip of the duck nail, creating dimension and visual interest. The effect is both fun and sophisticated—perfect for nights out, parties, or whenever you want your nails to make a statement.
The Appeal of Glitter Ombre
The genius of this design is that it layers multiple visual elements: a clean base color, the transition zone, and then concentrated sparkle. This creates depth and prevents the glitter from feeling too overwhelming or costume-like. The ombre effect also means you’re using less glitter overall, which makes the design easier to apply and less prone to chipping or shedding.
Step-by-Step Application Guide
- Apply a solid base color (champagne, rose gold, or dusty blue work beautifully) to the entire nail and let it dry completely
- In a small dish, mix your chosen glitter with a thick glitter adhesive or gel topcoat to create a glitter paste
- Using a small brush or sponge, apply this glitter mixture to the outer third of the nail (the tip and curve of the duck)
- Blend the glitter paste into the solid color using a damp sponge or blending brush, feathering it backward to create a gradient effect
- Apply a second, denser layer of glitter to the very tip if desired for extra dimension
- Seal everything with a glossy topcoat, pressing down gently so the glitter stays in place
The key is working in stages—don’t apply all the glitter at once, or you’ll end up with an uncontrolled, overly sparkly result.
Pro tip: Use cosmetic-grade or nail-specific glitter rather than craft glitter, which has sharper edges and can look cheap or scratch your skin when the nails touch your face.
3. Marble Effect Duck Nails
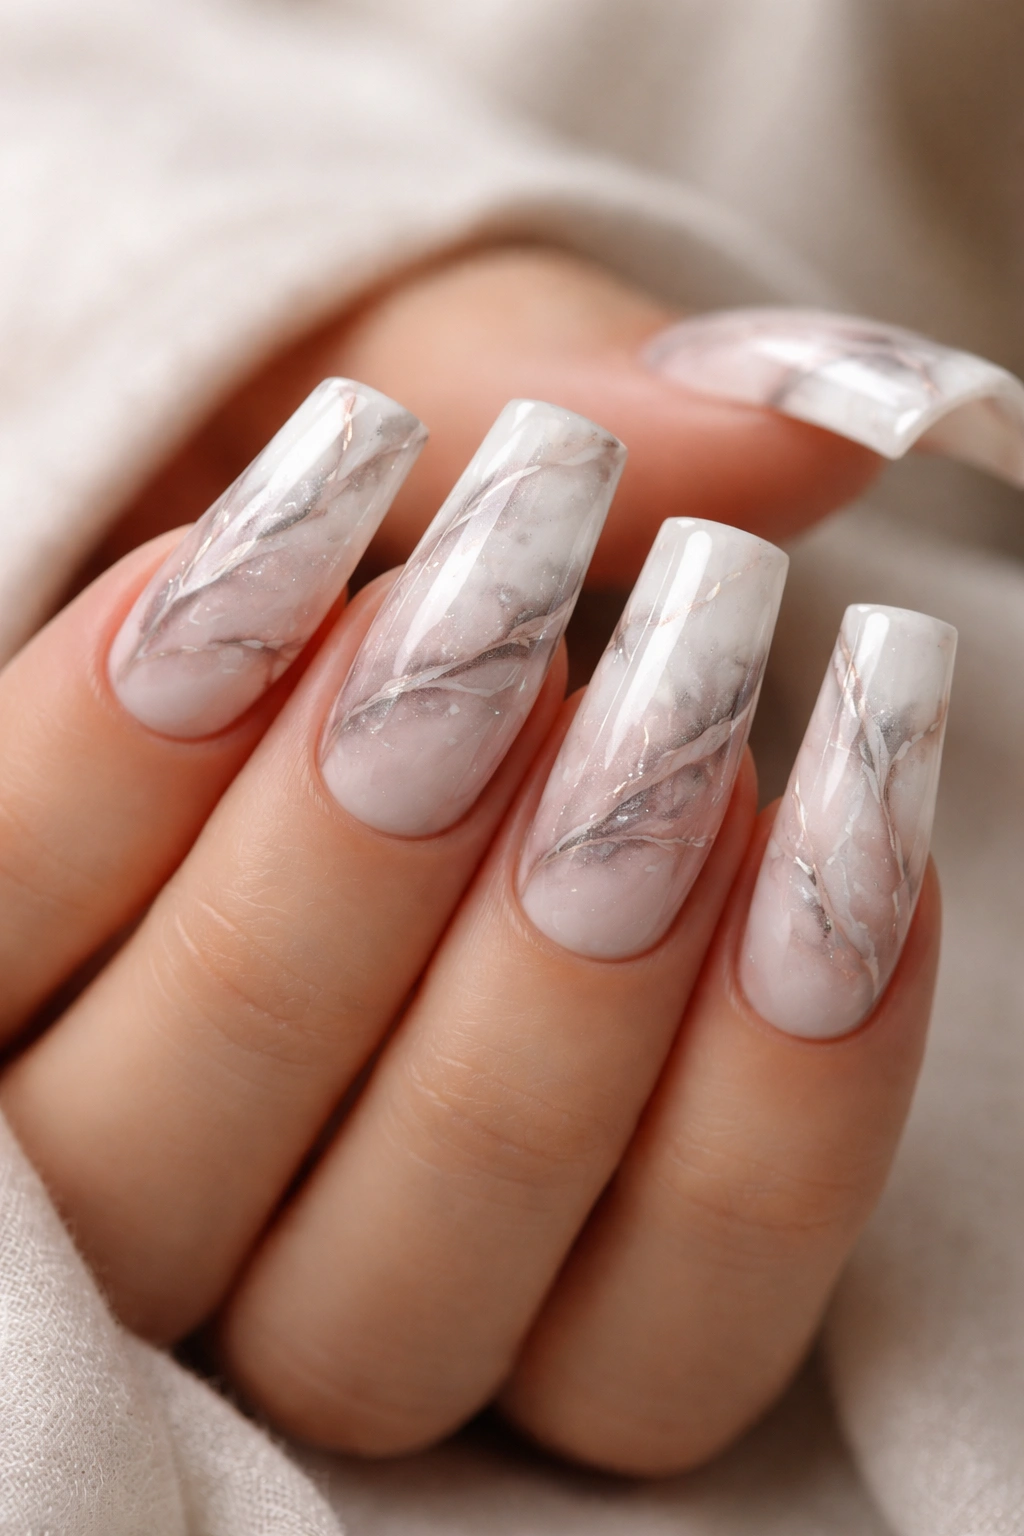
Marble nails have a luxurious, artistic quality that makes them feel high-end despite being completely achievable at home. The marble effect on duck nails is particularly striking because the curved shape creates natural patterns that look like authentic marble veining. This design works with virtually any color combination—classic black and white, soft gray and blush, or bold jewel tones—making it incredibly versatile.
Understanding the Marble Technique
The marble effect mimics the natural veining found in real marble stone by using multiple colors and a dragging or swirling motion to create organic-looking lines. The unpredictability of the technique actually works in your favor because each nail will be slightly unique, and minor imperfections look intentional and artistic. The curved surface of duck nails actually makes marbling easier than on regular flat nails because the three-dimensional shape gives the design natural dimension.
Creating Marble on Your Duck Nails
- Paint a solid light base color (white, cream, or pale gray) on your press-on nail
- While the base is still wet or tacky, use a thin brush or toothpick to drag thin lines of contrasting color (black, dark gray, or deep blue) across the nail in random, vein-like patterns
- Before the polish fully sets, gently drag a clean toothpick or thin brush perpendicular to the lines you just created, softening and feathering them into the base color
- Allow this layer to dry completely, then apply a glossy or matte topcoat depending on the look you want to achieve
The technique takes practice, but the beautiful thing is that you can always start over and try again—there’s no permanent commitment until you’re happy.
Pro tip: Thin your darker polish slightly with a drop of fast-drying medium if it’s too thick, which will make dragging lines easier and create more delicate veining.
4. Nude with Gold Accent Duck Nails
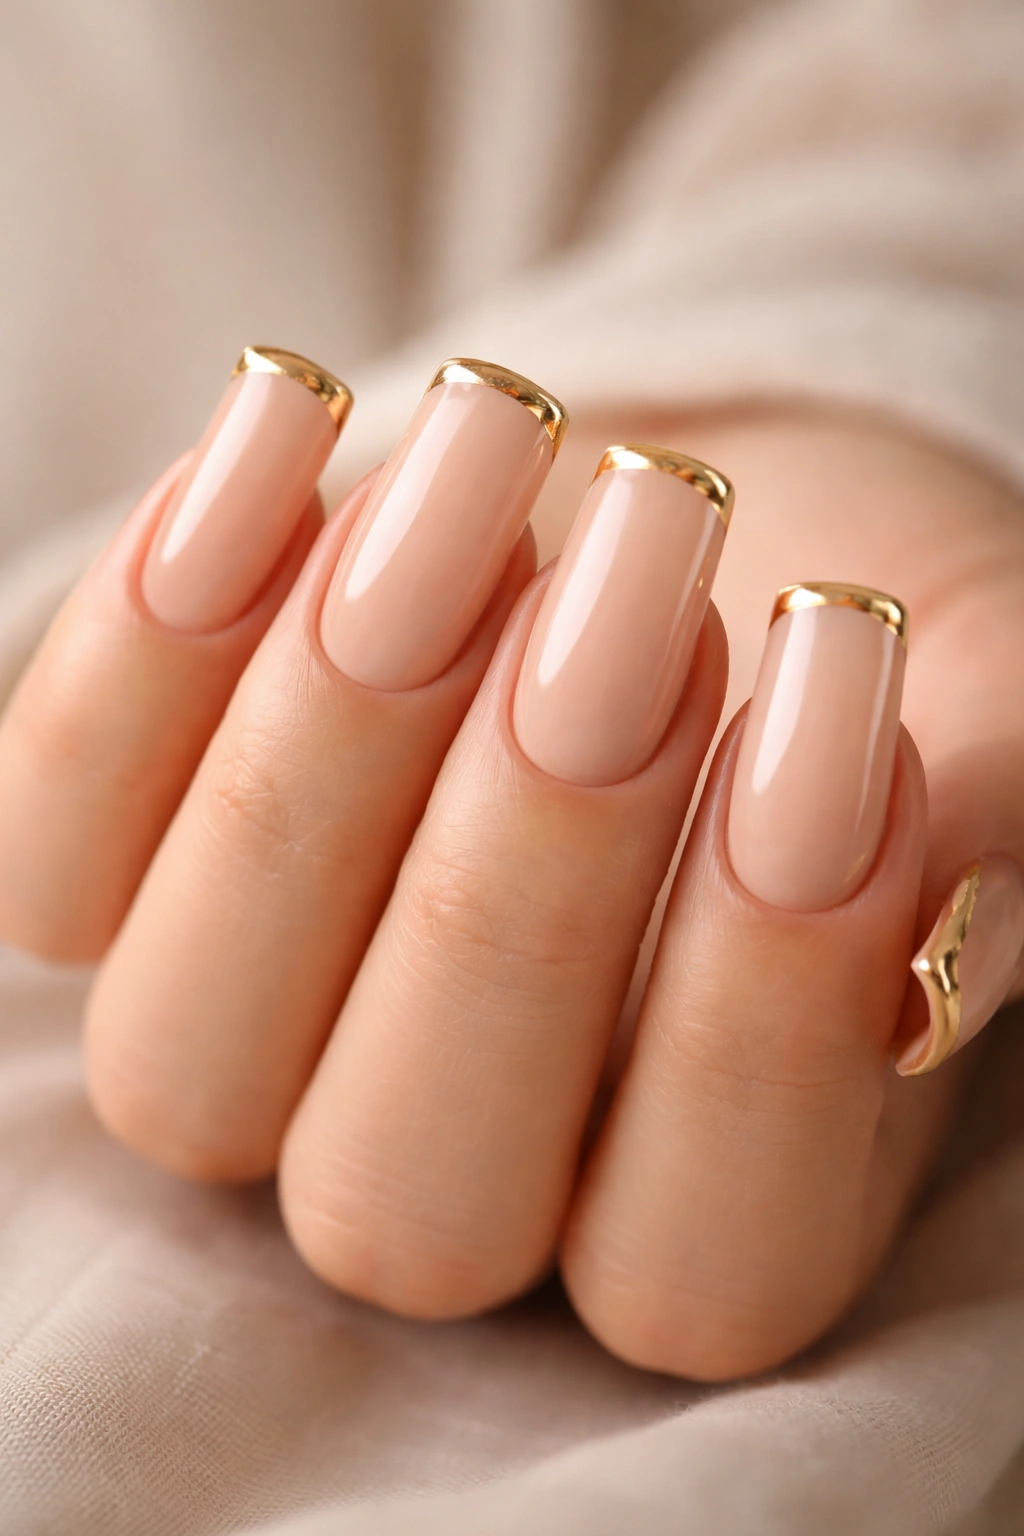
This understated-yet-luxe design is the perfect choice if you want nails that look polished and intentional without being attention-grabbing. A creamy nude base provides the perfect canvas for strategic gold accenting—whether that’s a thin gold line along the edge of the duck curve, a gold leaf detail, or geometric gold shapes. The combination feels elevated and works beautifully in professional settings while still feeling current and stylish.
Why Nude Plus Gold Never Misses
The nude-and-gold combination is timeless because it balances neutrality with a touch of glamour. Gold has a warmth that makes nude tones glow, and the contrast is just enough to draw the eye without feeling loud or overdone. This design also photographs beautifully, which is a bonus if you love documenting your nails on social media or for your own photo memories.
Building Your Nude-and-Gold Design
- Start with a highly pigmented nude base that matches your skin tone or is slightly warmer—apply two coats for even coverage
- Using a thin detail brush, paint a delicate line of liquid gold or gold gel along the curved edge where the duck tip would naturally point
- Alternatively, apply a thin strip of gold foil or gold leaf tape along the same edge, pressing gently to ensure adhesion
- Fill in with a clean topcoat, making sure the gold is fully sealed and protected
- Optional: Add a single tiny gold rhinestone or metal accent at the inside curve of the nail for subtle sparkle
This design is actually perfect for practicing precision because the gold line is thin enough that slight wobbles look natural and hand-painted.
Pro tip: Use a metallic liquid gold rather than gold glitter, which creates a cleaner, more luxurious line and is easier to apply neatly.
5. Pastel Rainbow Duck Nails
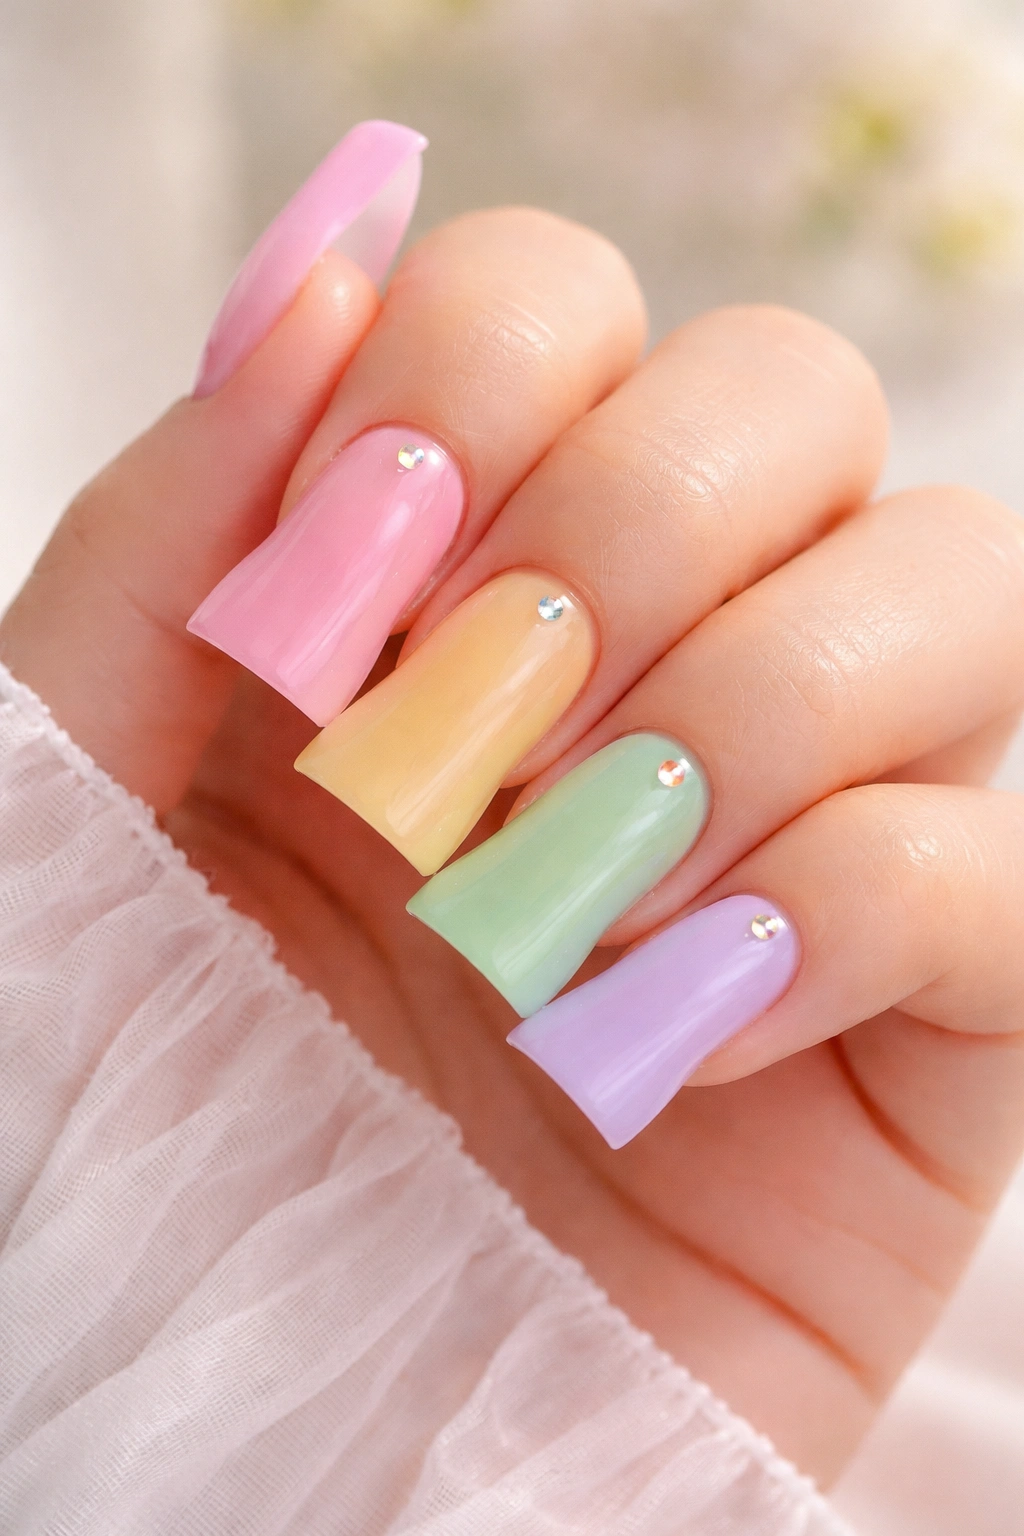
Pastel rainbow duck nails bring instant joy and playfulness to your hands—each nail can be a different soft, dreamy color, or you can create a gradient that flows across all ten nails. The pastel palette keeps the design looking sweet and cohesive rather than chaotic, making it wearable for everyday while still feeling fun and special. This design is perfect for creative people, springtime, or anyone who wants their nails to reflect a more whimsical side of their personality.
The Psychology of Pastel Colors
Pastels work beautifully on duck nails because the soft hues complement the playful, cute shape of the design. Unlike bright, saturated rainbow colors that might feel cartoonish, pastels create a sophisticated whimsy that appeals to a wide range of tastes. The gentleness of pastels also makes the design feel modern and on-trend rather than costume-like.
Painting a Pastel Rainbow Set
- Prepare ten press-on nails (or however many you’re creating) with a clear or white base
- Assign a different pastel color to each nail: soft pink, peach, yellow, lime green, soft blue, lavender, and so on
- Apply two thin coats of each pastel polish to its assigned nail, allowing drying time between coats to avoid streaking
- If creating a full rainbow gradient across all nails: apply the first color to thumb and pinky, the second to index and ring finger, and the third to the middle finger, then repeat on the other hand for balance
- Seal all nails with a glossy topcoat for a smooth, candy-like finish
The pastel rainbow also works beautifully with a matte topcoat if you prefer a softer, less shiny appearance.
Pro tip: Pastel polishes can sometimes be streaky, so patience with multiple thin coats pays off—avoid the temptation to paint thick coats, which often look uneven.
6. Chrome Mirror Duck Nails
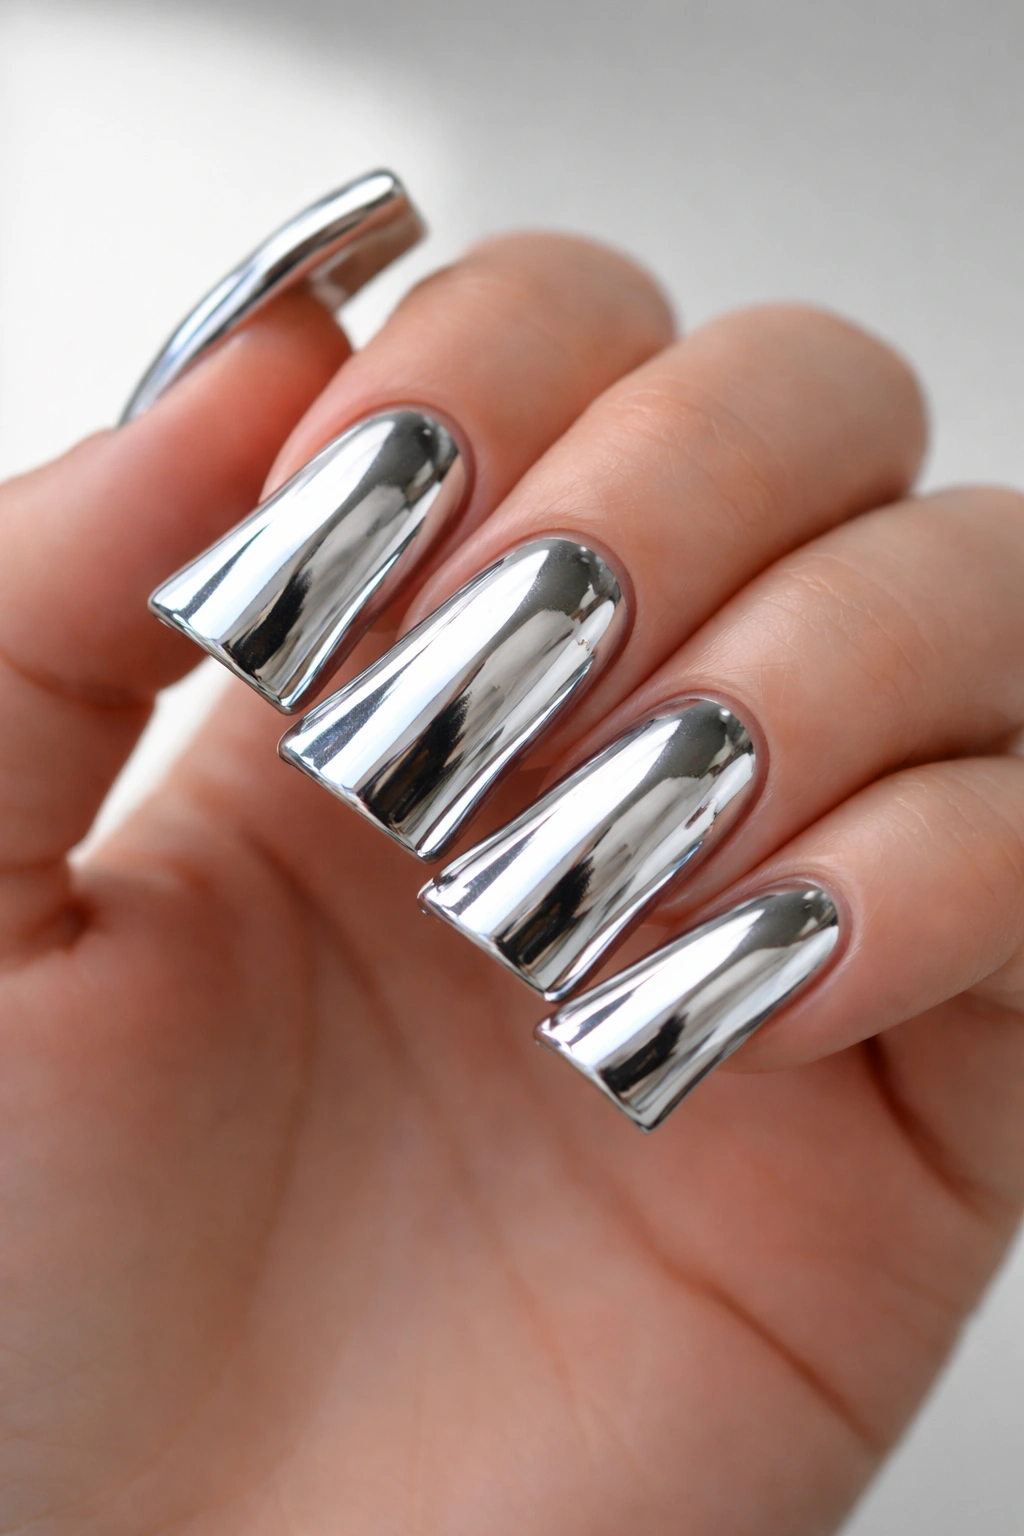
Chrome or mirror nails create an otherworldly, almost futuristic effect that makes duck nails look particularly sculptural and dimensional. The reflective finish catches light in dramatic ways, making your nails shimmer and shift as you move your hands. This is the design to choose if you want maximum impact and are looking for something that will definitely turn heads.
Understanding Chrome Finishes
Chrome powder (or mirror powder) creates that liquid metal effect through a specialized application process that’s actually simpler than you might think. The powder clings to semi-wet gel or topcoat, creating an intense reflective layer that feels luxurious and looks expensive. The curved shape of duck nails shows off the chrome effect beautifully because the three-dimensional surface creates multiple reflection points.
Applying Chrome to Your Duck Nails
- Paint a solid colored base (rose gold, champagne, or nude works beautifully with chrome) and cure or dry completely
- Apply a thick layer of clear gel topcoat or a specialized chrome base coat and leave it tacky but not wet
- Working over a shallow dish or piece of paper to catch excess powder, use a soft brush to apply chrome powder to the entire nail surface, pressing gently and buffing away excess powder
- The powder will adhere to the tacky topcoat and create an instant mirror effect
- Seal with a clear topcoat to lock the chrome powder in place and create a smooth surface
The application takes less than five minutes per nail once you get the hang of it, making this design faster than many others.
Pro tip: Apply the chrome powder in one direction—from the base toward the tip—rather than scrubbing back and forth, which creates a more unified, reflective finish.
7. Matte Black and White Geometric Duck Nails

Geometric designs on duck nails offer a sophisticated, modern aesthetic that feels both artistic and wearable. Pairing matte black with crisp white creates the maximum contrast for clean lines, while the geometric shapes—triangles, stripes, chevrons, or asymmetrical blocks—create visual interest without relying on color or sparkle. This design appeals to minimalists and anyone with a modern aesthetic who wants nails that feel artistic without being overly trendy.
The Power of Geometric Design
Geometric shapes on curved surfaces like duck nails create an optical illusion of dimension and movement. The straight lines and sharp angles provide a striking contrast to the soft curve of the nail shape itself, which creates visual tension that’s pleasing to the eye. Matte finishes make geometric designs feel more artistic and less commercial compared to shiny versions of the same design.
Painting Geometric Patterns
- Apply a crisp white matte base to all nails—use a matte topcoat specifically rather than matte polish, which sometimes looks chalky
- Using a thin detail brush and black polish or gel, paint your chosen geometric pattern: thin stripes across the nail, triangles pointing downward from the tip, a chevron accent on one side, or asymmetrical blocks in one corner
- Work slowly and deliberately—the beauty of this design is in the precision of the lines
- If you make a mistake, clean up with a small brush dipped in rubbing alcohol before the polish fully sets
- Once the black design is dry, apply a matte topcoat to seal everything and unify the finish
You can also use thin black striping tape to create perfectly straight lines if you’re not confident with a brush.
Pro tip: Thin your black polish slightly so it flows smoothly and creates crisp lines without dragging or bunching on the brush.
8. Floral Press-On Duck Nails
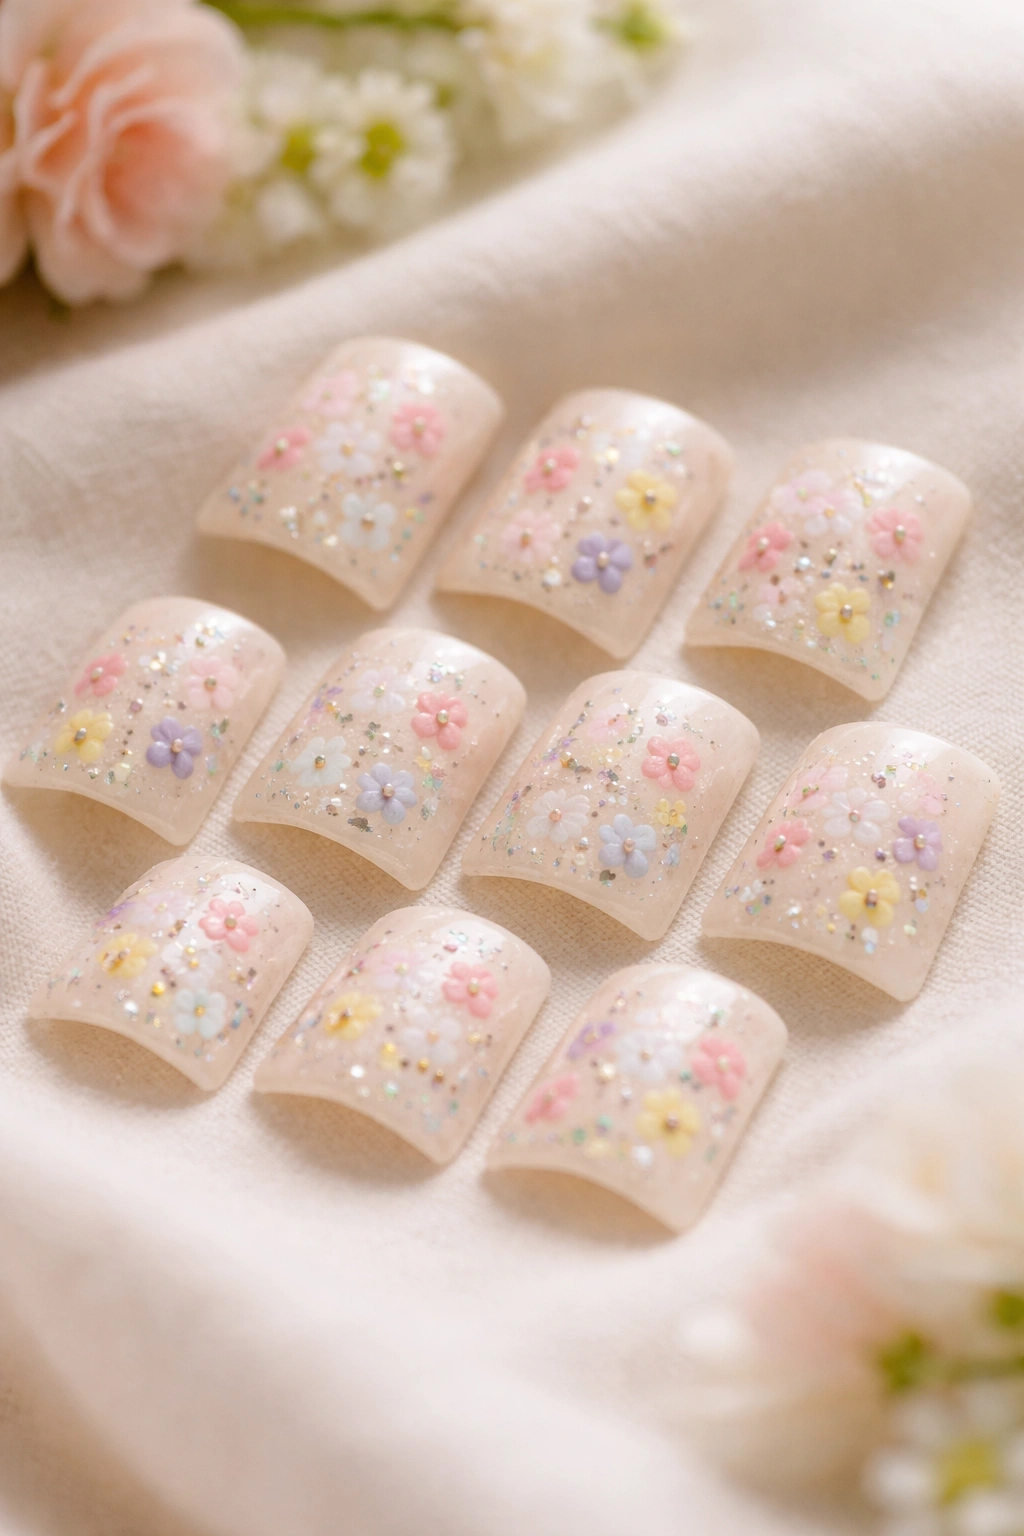
Floral designs bring a romantic, artistic quality to duck nails—delicate flowers scattered across the surface create a garden-inspired look that’s both pretty and sophisticated. Floral designs work beautifully with either a light base (cream, white, pale pink) or a darker one (forest green, deep blue, black), depending on the mood you’re going for. This design celebrates the beauty of nature and works particularly well for spring and summer or for anyone who loves botanical aesthetics year-round.
Painting Delicate Floral Details
Small flowers on duck nails require only a thin brush and steady hand—you don’t need to be an experienced artist to create charming florals. Simple five-petal flowers, tiny rose buds, daisies, or wildflower sprigs all look gorgeous and are achievable with basic painting skills. The curved surface of the duck nail actually helps flowers look natural because the petals can flow with the curvature of the nail.
Creating Your Floral Design
- Paint a pale or neutral base color and allow it to dry completely
- Using a detail brush and contrasting colors (soft pink, coral, lavender, or deeper jewel tones), paint tiny flowers scattered across the nail surface
- Create simple five-petal flowers by dotting the brush at the center, then touching the brush five times around that center point to create petals
- Add thin green stems between or behind the flowers using a very thin brush or toothpick dipped in green polish
- Paint tiny leaf shapes along the stems for a finished, garden-like appearance
- Seal with a glossy topcoat, which makes the flowers look fresh and hydrated
If you’re nervous about freehand painting, you can use nail art stickers or decals as a starting point, then embellish with your own hand-painted details.
Pro tip: Use very little polish on your brush and build color gradually—it’s easier to add more than to remove excess, and thin layers look more delicate than thick ones.
9. Holographic Iridescent Duck Nails
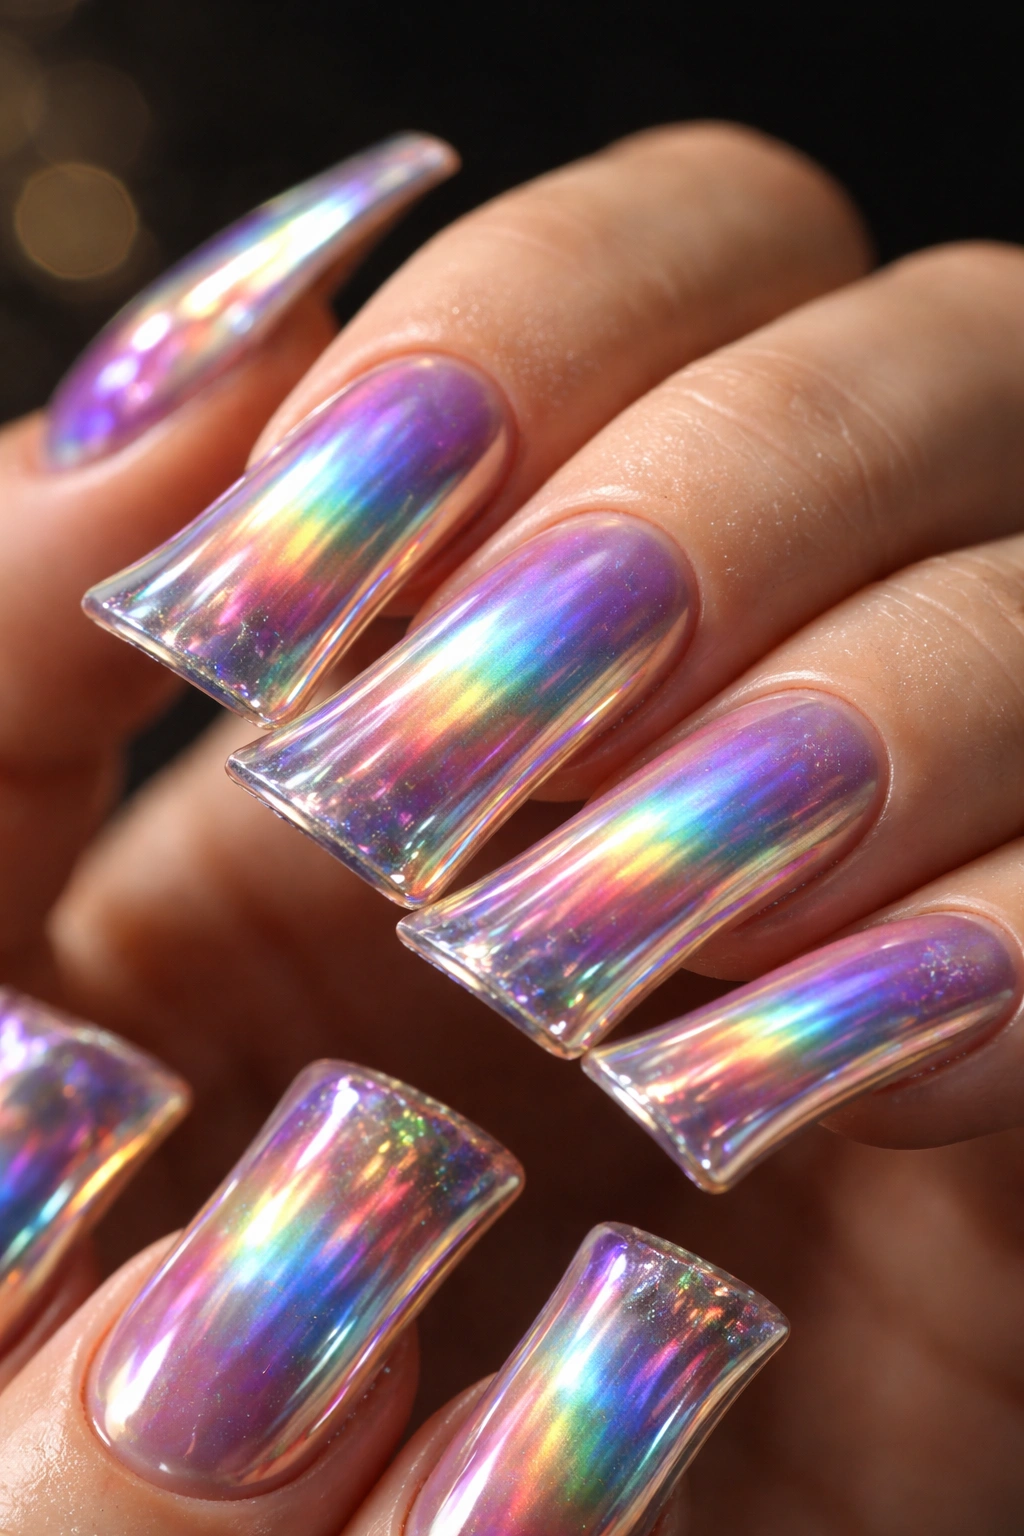
Holographic nails create a magical, shifting effect where the color seems to change depending on the angle and lighting. This design is absolutely mesmerizing and creates an almost mystical appearance that feels special and unique. Holographic finishes work beautifully on duck nails because the curved surface creates multiple angles for the iridescent effect to play across.
The Magic of Holographic Polish
Holographic polish contains tiny reflective particles that bend light in different ways depending on the viewing angle, creating rainbow effects and color shifts. Unlike regular glitter, which sits on the surface, holographic polish is integrated into the polish itself, creating a seamless, sophisticated effect. The result feels futuristic and artistic while maintaining a polished, professional appearance.
Applying Holographic Polish
- Start with a clear or white base coat to help the holographic effect show up more vibrantly
- Apply holographic polish in thin, even coats—this polish is highly pigmented and shows off better in thinner layers rather than thick ones
- Apply at least two thin coats, allowing drying time between coats to avoid streaking or dragging
- The holographic effect will be subtle in dim light and dramatic in natural or bright light—that’s completely normal and part of the charm
- Seal with a glossy topcoat to enhance the reflective quality
Some holographic polishes are best applied vertically (holding your hand straight up and down) to allow the particles to align and create maximum shimmer.
Pro tip: Holographic polishes from premium brands show more dramatic color-shifting than budget versions, so investing in a good holographic polish is worth it for this design.
10. Tortoiseshell Press-On Duck Nails
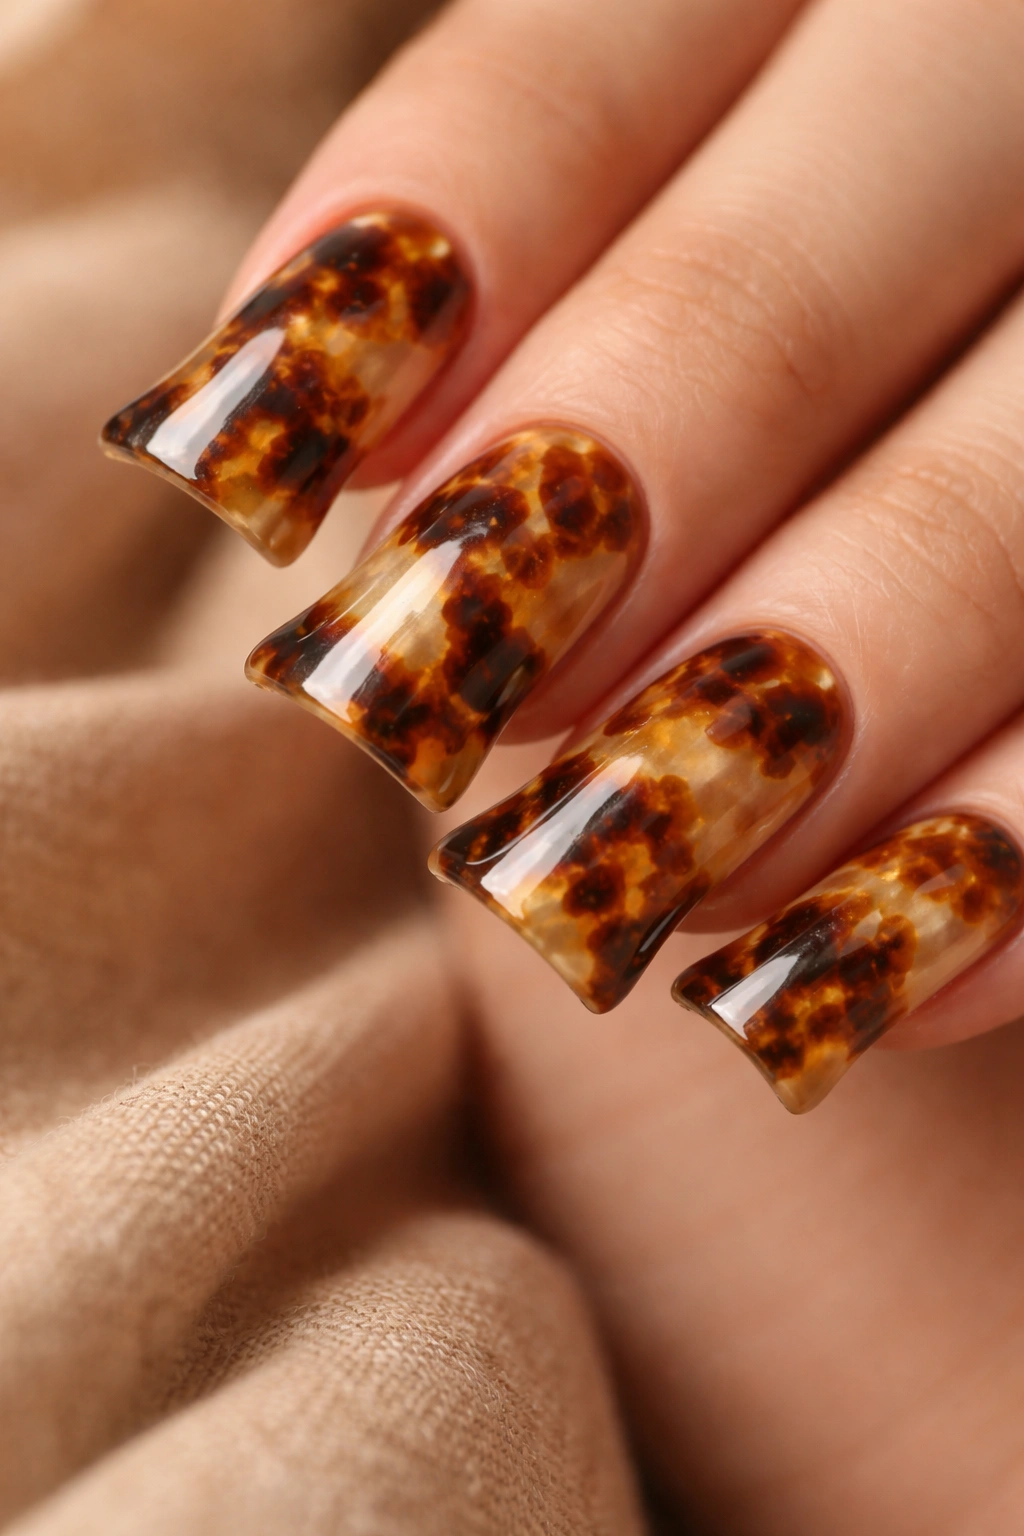
Tortoiseshell is a timeless pattern that brings warmth, sophistication, and a hint of luxury to any nail design. On duck nails, the tortoiseshell pattern—created through layering browns, golds, oranges, and tans—creates a rich, dimensional look that feels both natural and intentional. This design works beautifully as an everyday manicure and transitions seamlessly from casual to dressier occasions.
Capturing Tortoiseshell Authentically
True tortoiseshell relies on color blending and layering rather than strict pattern rules. The beauty of tortoiseshell is that there’s no “wrong” way to do it—the more organic and blended your layers look, the more authentic the effect. The curved surface of duck nails actually showcases tortoiseshell beautifully because the shape creates natural areas for color variation and blending.
Building Tortoiseshell Layers
- Start with a pale tan or cream base coat and allow it to dry completely
- Drop small amounts of golden tan, warm brown, burnt orange, and deep espresso colors onto a palette or small plate
- Using a sponge or small brush, apply these colors to the nail surface in an abstract pattern—no rules here, just layer the colors loosely across the duck curve
- While the layers are still slightly tacky, use a damp sponge or soft brush to blend the colors together at their edges, creating smooth transitions
- The result should look like warm, organic patches of color that flow together rather than distinct stripes or blocks
- Seal with a glossy or matte topcoat—glossy emphasizes the colors, while matte creates a more sophisticated appearance
The sponging technique is perfect for tortoiseshell because it creates natural-looking blending without requiring a steady hand.
Pro tip: Collect tortoiseshell reference photos or images of actual tortoiseshell patterns and have them nearby while you paint for inspiration on color placement.
Final Thoughts
Creating press-on duck nails at home is an accessible, affordable way to explore your creativity and enjoy gorgeous, salon-quality nails without the salon visit. The ten designs covered here represent just the beginning of what’s possible—once you master the basic techniques of base application, color blending, and finishing, you can combine elements from multiple designs to create something uniquely yours.
The beauty of the DIY approach is that there’s zero pressure to get everything perfect on the first try. If a design doesn’t turn out the way you hoped, you can remove the polish and start over, or you can keep wearing it and appreciate the personal, handmade quality. Real human hands created these nails, not machines, and that handmade quality is part of what makes them special.
Start with whichever design calls to you most strongly—whether that’s the elegant simplicity of the pearl gradient, the playful joy of pastels, or the sophisticated shimmer of chrome. Invest in basic supplies: quality press-on tips, good polish or gel, simple brushes, and a few finishing products. Then take your time, let each layer dry completely, and trust that even small imperfections will feel intentional and artistic.
Once you’ve created your first set, wear them confidently knowing that you made them yourself. The compliments will inevitably come, and you’ll have the satisfying knowledge that you created something beautiful with your own hands—and for a fraction of what a salon would charge. That’s the real magic of DIY duck nails.
