

Duck nails have become one of the most sought-after nail shapes for anyone who wants bold, distinctive style without committing to extreme length or sharpness. The appeal lies in their unique geometry—wider at the base with angled sides that taper inward, creating that signature “webbed foot” silhouette that gives the style its name. Wide duck nails in particular offer a generous canvas for creative nail art, allowing you to experiment with designs, textures, and colors that might get lost on narrower nail beds.
The beauty of working with wide duck nails is the sheer versatility they offer. Unlike stiletto nails, which demand sharp, minimalist designs to maintain their edge, or almond nails, which favor delicate, refined looks, wide duck nails practically invite you to go bold. They’re strong enough to handle intricate nail art without looking cluttered, and their distinctive shape becomes part of the design itself rather than fighting against it. Whether you’re drawn to maximalist patterns or prefer understated elegance, the duck nail shape accommodates both with grace.
What makes wide duck nails even more compelling is how they suit different hand shapes and sizes. If you have broader hands or naturally wider nail beds, these nails feel proportional and balanced rather than awkwardly stretched. They’re also surprisingly practical—yes, the shape is dramatic, but they’re less likely to catch on fabric or break during daily activities compared to razor-sharp stilettos. This combination of style, functionality, and genuine versatility has made duck nails a favorite among people who want their nails to make a statement without requiring constant maintenance battles.
1. Deep Jewel Tone Ombre with Gold Accents
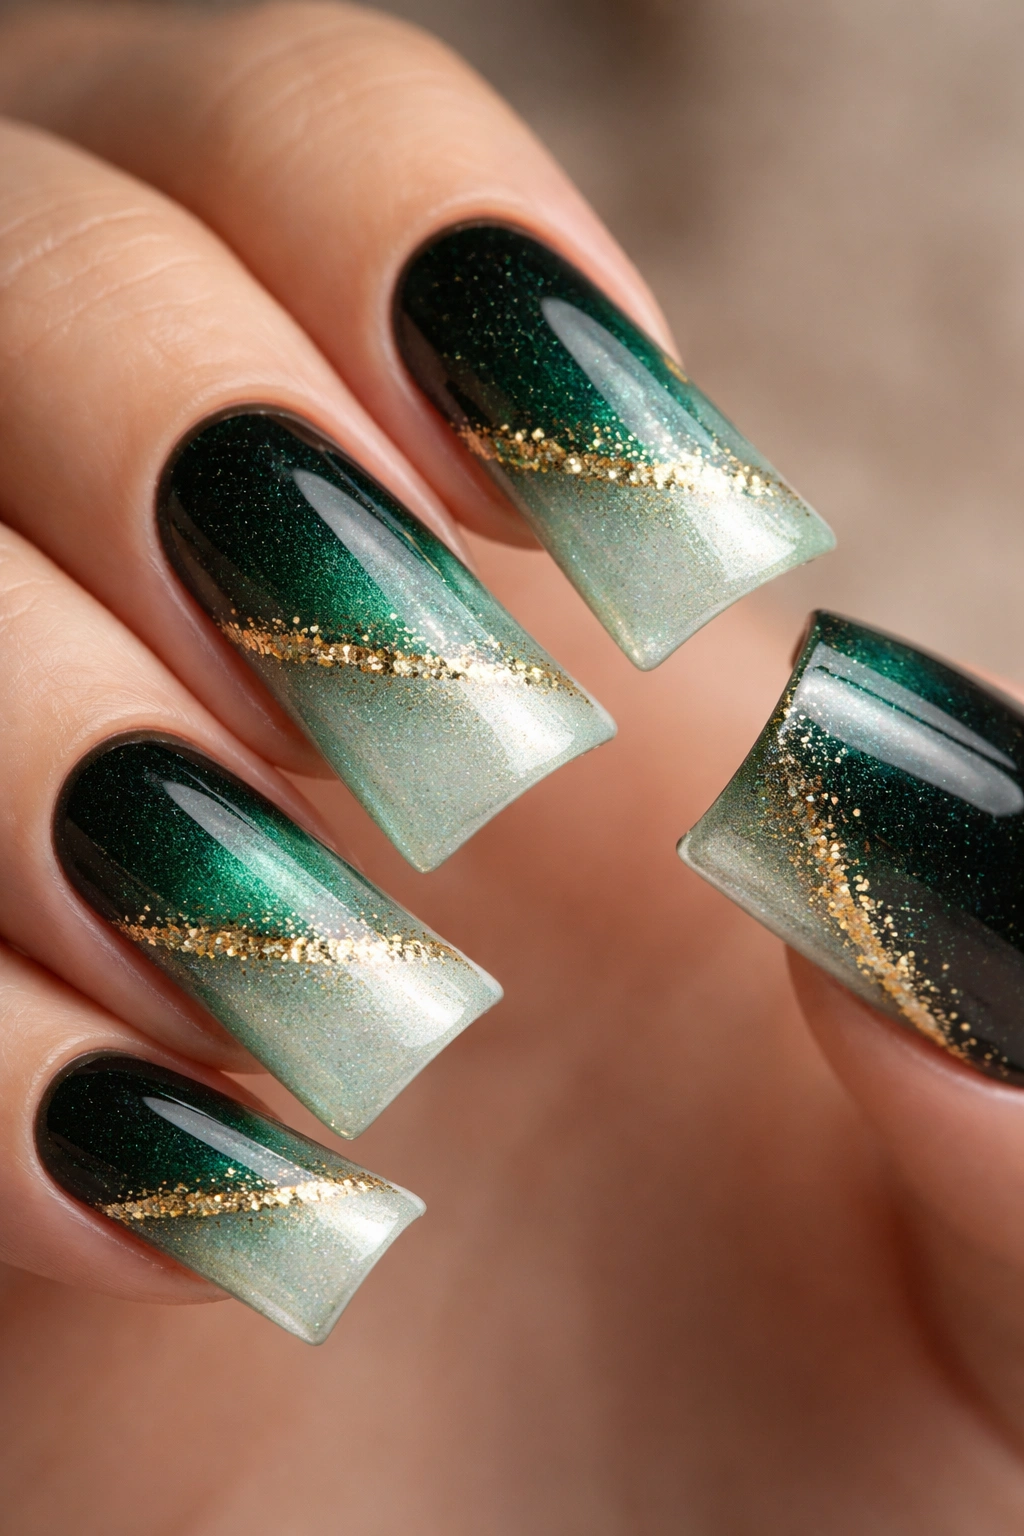
Jewel-toned ombre nails create an instant sense of luxury and sophistication, and wide duck nails are the perfect shape to showcase this gradient’s full drama. Start with a deep emerald, sapphire, or ruby base at the cuticle, then gradually transition through the middle tones before finishing with a lighter, more transparent version of the same color toward the nail tip. The width of duck nails means you get a smoother, more visually interesting gradient line than you’d see on narrower nails—the color shift becomes a feature rather than an afterthought.
Why This Design Works for Wide Duck Nails
The generous surface area of wide duck nails allows the ombre to develop across multiple color stages without looking cramped or rushed. Each color transition has room to breathe, creating a sophisticated depth that catches light differently as your hand moves. The shape itself frames the gradient beautifully, with the outward sweep of the sides creating natural highlight areas where lighter shades seem to glow.
How to Make It Work
Apply a clear base coat, then use a makeup sponge to dab on your ombre shades in overlapping layers—start with the deepest color at the cuticle, then blend progressively lighter shades toward the free edge. Once the base gradient is dry, add thin gold striping along the sides of each nail or create a delicate gold line that follows the contour of the nail shape. Finish with a glossy top coat that’ll make the ombre shimmer with depth, or try a matte top coat for a more understated, jewel-like appearance.
Pro tip: Use three shades of the same color family rather than transitioning between completely different colors. An emerald-to-sage-to-pistachio ombre looks intentional and elegant, while random color jumping can feel chaotic on the wider surface area.
2. Minimalist Geometric Line Art
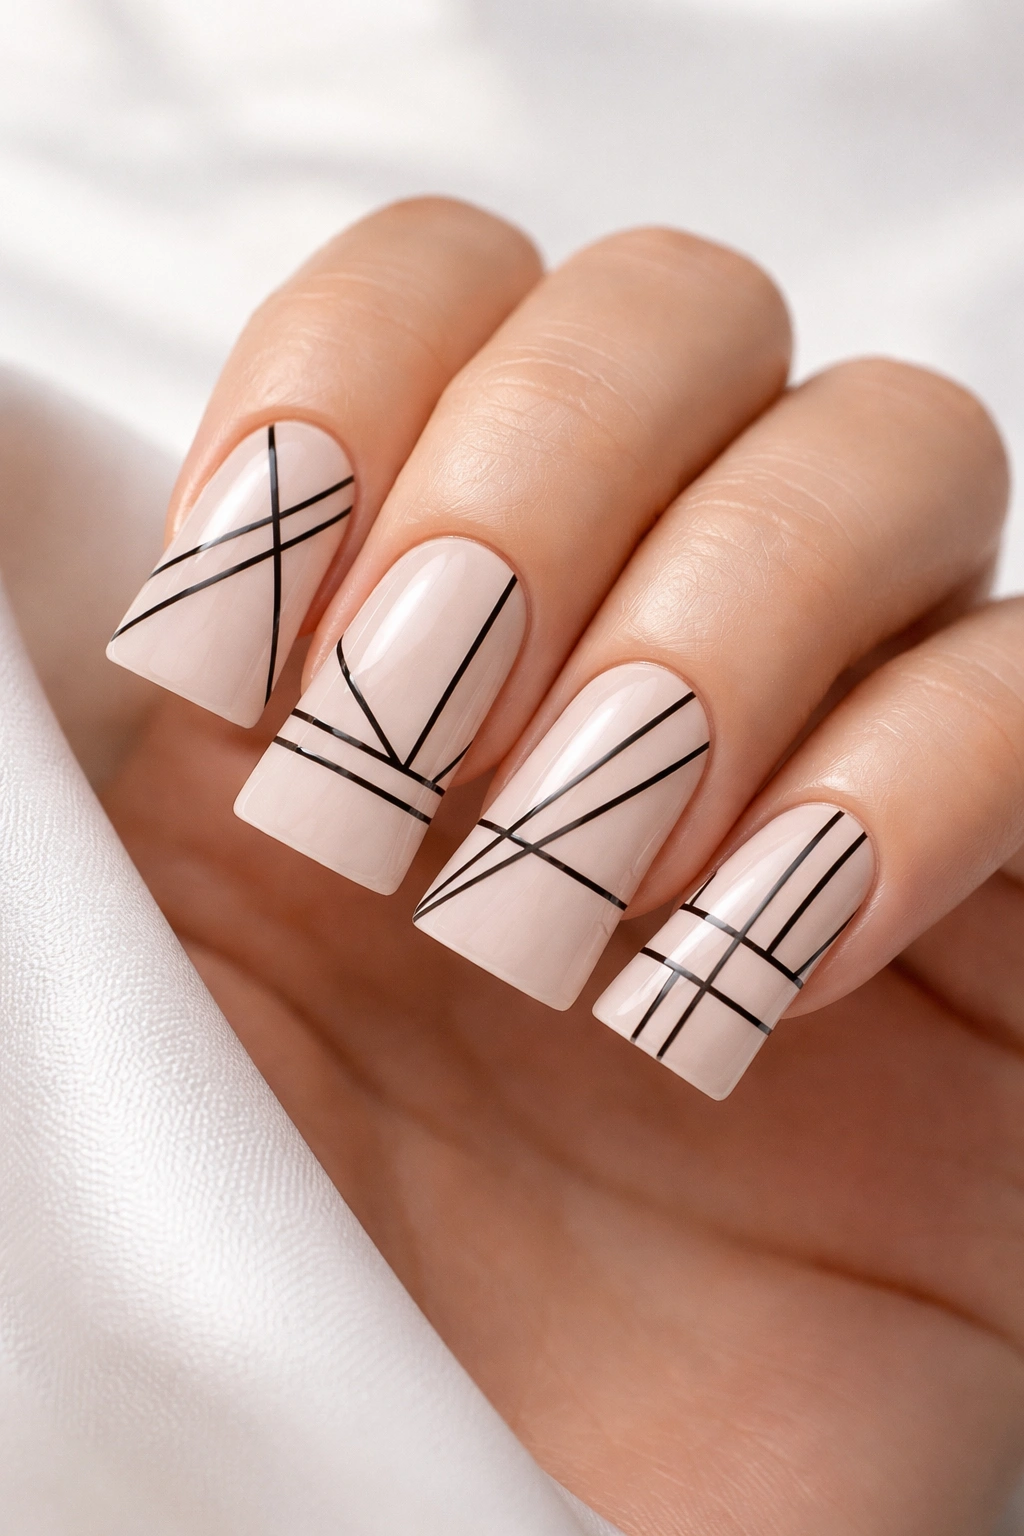
Sometimes the most striking designs are the simplest ones, especially when you’re working with the distinctive silhouette of wide duck nails. Thin, precise lines—whether straight, angular, or curved—create modern, gallery-worthy nail art that puts the focus on geometry rather than fussy detail. Think clean horizontal bands, diagonal asymmetrical lines, or delicate linear patterns that play with negative space.
The Geometry That Suits This Shape
Wide duck nails provide a generous field for geometric exploration without overwhelming the design with too much visual noise. A single clean line running diagonally across the nail, or parallel lines at varying intervals, feels intentional and polished rather than sparse. The width means you can incorporate more complex geometric patterns—hexagons, triangles, or abstract angular shapes—without the design feeling cramped or chaotic.
Execution Tips
Use a thin-tipped nail art brush or a fine-liner nail pen to create your geometric patterns. Start with a neutral base color (cream, soft gray, or pale nude work beautifully), then add your lines in black, deep charcoal, or a contrasting metallic shade. If you’re nervous about freehand precision, use nail striping tape to mark out your pattern before applying color—tape creates crisp, professional-looking lines every time. One line per nail, or a mix of single-line and multi-line designs across your hand creates visual interest without looking overdone.
Pro tip: Use a matte top coat for geometric line art. It eliminates shine and allows the clean lines to pop without the distraction of light reflection—the design becomes the focal point rather than the glossy finish.
3. Negative Space with Metallic Details
Negative space design—the strategic use of bare nail as part of the overall composition—looks particularly stunning on wide duck nails because you can create shapes and patterns that feel intentional rather than accidental. Leave parts of your nail bare, painting only specific sections or shapes, then add metallic accents to tie the design together. This approach feels modern, artistic, and surprisingly sophisticated.
Creating Visual Impact with Emptiness
The contrast between painted and unpainted nail beds creates a striking visual effect, especially when you combine it with metallic finishes. You might paint only the outer edges of each nail in a solid color, leaving the center bare except for a thin gold or silver line running through the middle. Or try painting geometric shapes—triangles, half-moons, or abstract forms—with negative space filling the remaining area. The width of duck nails means these designs read clearly without becoming visually muddled.
Design Approaches to Try
Paint the lower half of the nail in a rich color (burgundy, navy, forest green), then leave the upper half bare with only a delicate metallic accent line where the color meets the negative space. Alternatively, create a cutout effect by painting around the perimeter of the nail shape, leaving a hollow center. Or try painting only the very tip in a contrasting color, leaving the bulk of the nail bare—this creates an almost reverse-French-manicure effect that’s fresh and modern.
Pro tip: Use metallic liquid chrome or foil effects on the negative space areas themselves. This creates an illusion of depth—the bare nail becomes a reflective, jewel-like surface rather than looking simply unfinished.
4. Holographic and Iridescent Gradient
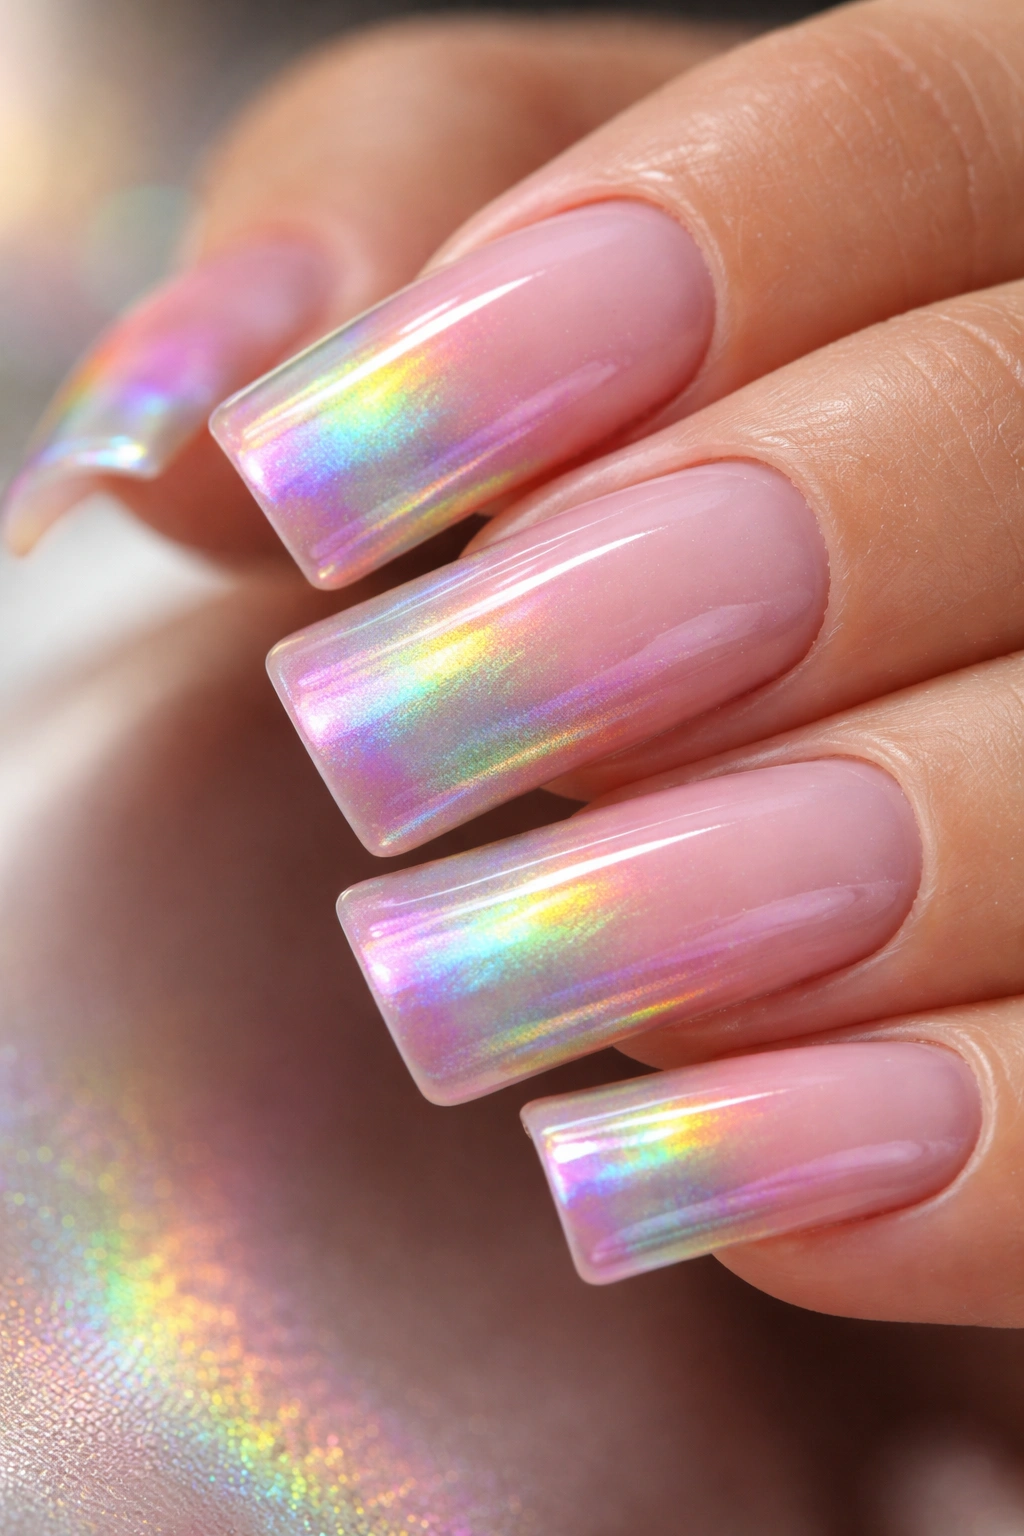
Holographic nail polish has evolved far beyond simple sparkle—modern holographic finishes create a rainbow effect that shifts and changes depending on lighting angle and hand position. On wide duck nails, this shifting color display becomes even more mesmerizing because there’s simply more surface area for the light-play to work its magic. The nail’s width means the holographic effect displays across a larger canvas, making the color-shifting phenomenon more dramatic and visible.
Why Holographic Works on This Shape
The geometry of wide duck nails naturally catches light at multiple angles as you move your hand. A holographic finish amplifies this by creating subtle rainbow reflections that dance across the nail surface. The angled sides and wider center of the duck nail shape mean light hits the surface at varying angles simultaneously, creating more movement and dimension than you’d see on narrower shapes.
Building a Holographic Manicure
Start with a white or pale pink base coat—this maximizes the visibility of the holographic effect rather than muddying it with underlying color. Apply a good holographic polish in thin, even layers (holographics are more visible in thin coats than thick ones). For extra drama, try a gradient approach: holographic color that transitions from intense rainbow at the free edge to more subtle shimmer toward the cuticle. Seal everything with a crystal-clear glossy top coat that enhances shine and makes the holographic effect even more pronounced.
Pro tip: View your finished nails in different lighting conditions—sunlight, artificial indoor light, phone screen light. Holographic finishes display completely differently in each setting, and that’s part of the appeal. Design your manicure knowing it’ll be a color-changing showstopper throughout your day.
5. Floral Designs with Dimensional Petals
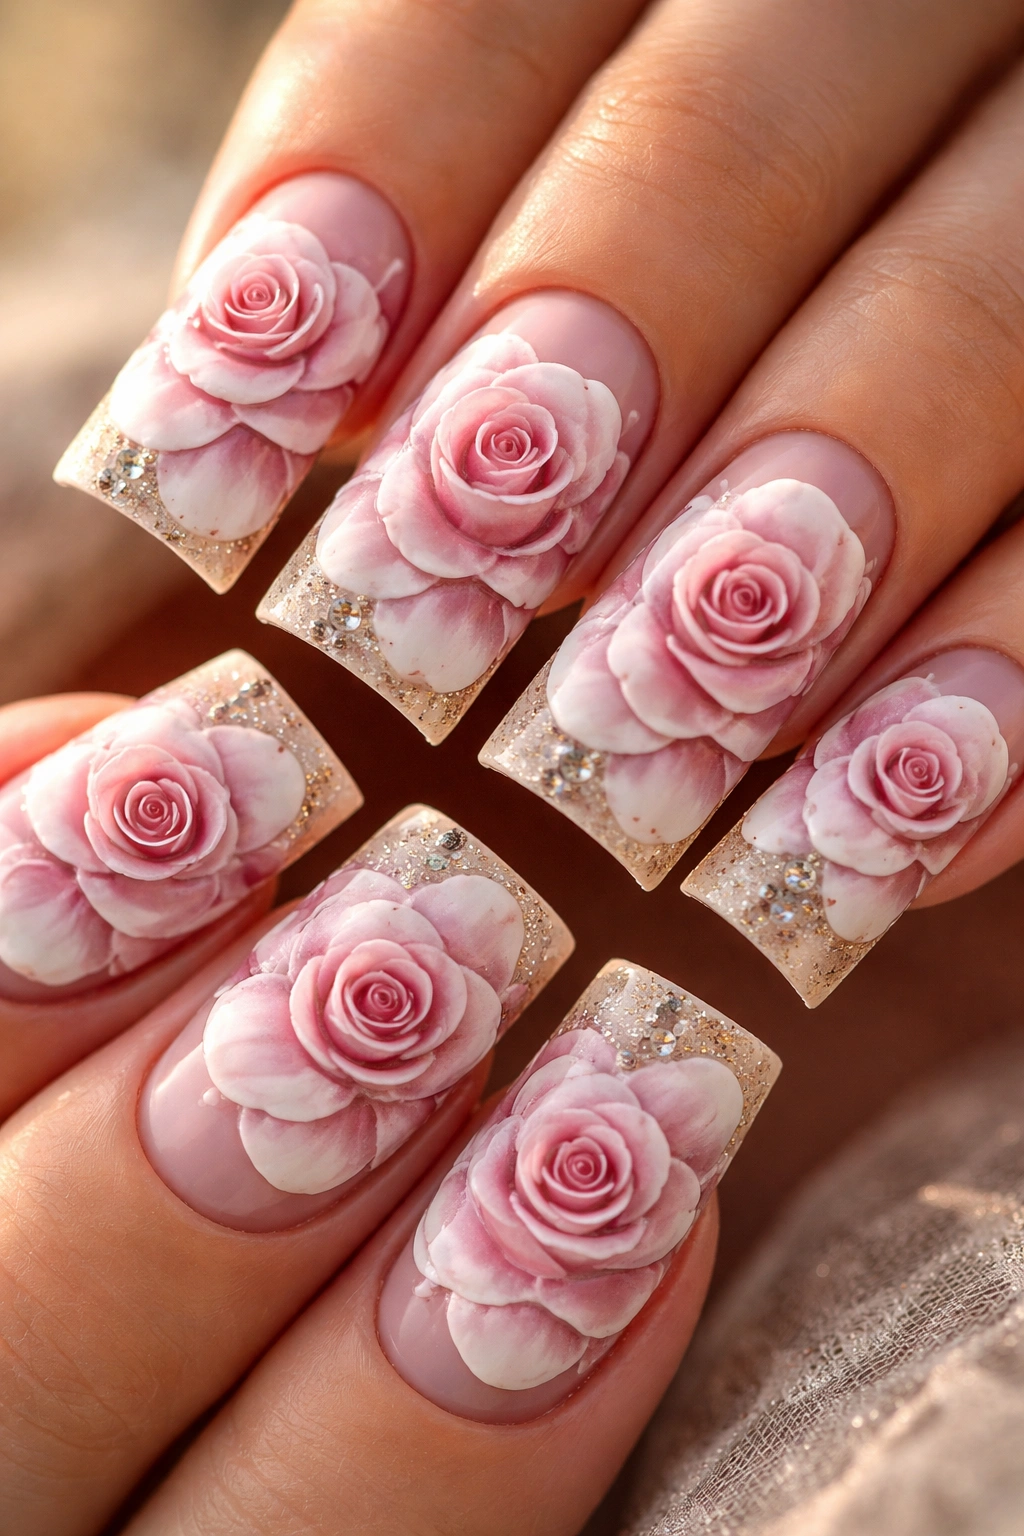
Flowers feel less delicate and more dramatic when painted on wide duck nails, especially if you embrace the width and size of the shape. Rather than tiny, dainty florals, go bold with full blooms—large roses, peonies, or wildflowers that span nearly the entire nail surface. The width means you can include real dimensional detail: layered petals, shading that creates depth, and fine line work that brings each flower to life.
Making Florals Feel Intentional on Wide Nails
The key to making floral designs work on a larger surface is embracing actual dimension and detail rather than painting simplified flowers. A single large rose that takes up most of the nail surface, with shadows, highlights, and individual petal detail, feels intentional and artistic. Adding leaves, stems, and secondary flowers fills any empty space while maintaining a cohesive botanical theme. The width of the duck nail creates natural negative space around the flower, which frames the design beautifully.
Floral Techniques That Work
For realistic florals, use a thin brush and build layers of color—paint petals in the darkest shade, then add lighter tones on the petal edges and highlights. Create depth by using shading and shadowing rather than just outlines. Wildflower designs—looser, less perfectly structured arrangements—actually work better on wide nails than formal, geometric florals. Mix different flower sizes and orientations, let stems curve across the nail surface, and scatter smaller blooms around your main focal flower.
Pro tip: Use a top coat with a matte finish on floral designs. It eliminates gloss, allowing the flower details to look more like actual botanical art rather than glossy nail polish. The matte surface makes the shading and color variations read more clearly.
6. Chrome and Mirror Finish Accents
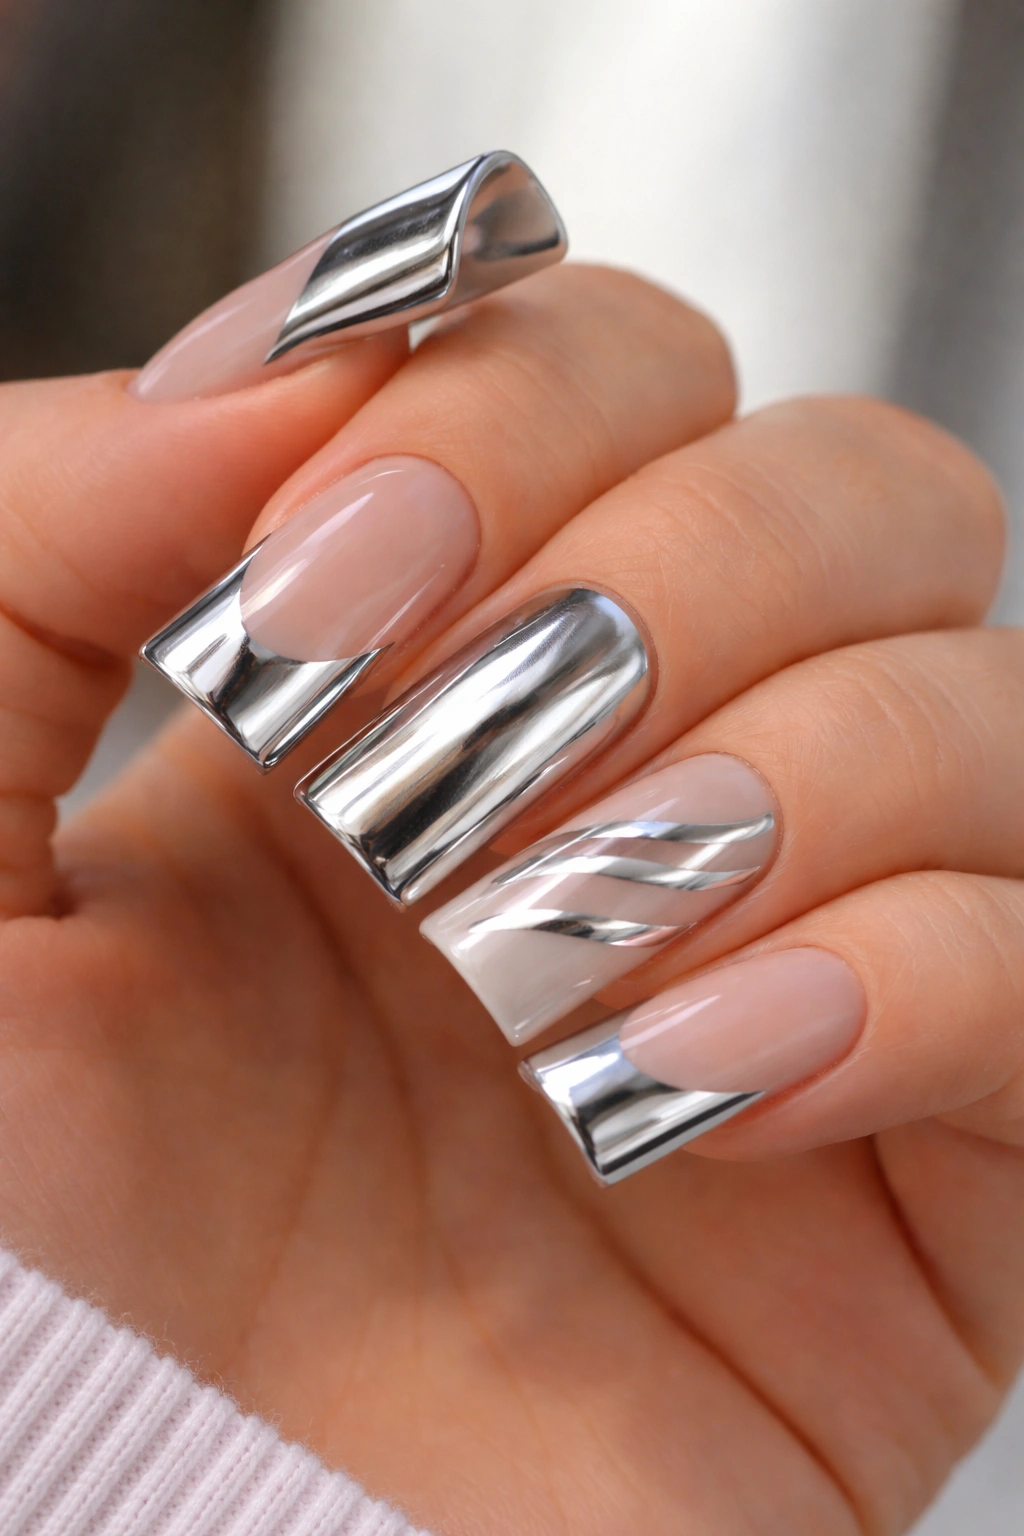
Chrome and mirror finishes represent some of the most eye-catching nail effects available, and they’re particularly stunning on wide duck nails because the metal-like shine displays dramatically across the wider surface. A full chrome nail can feel overwhelming, but strategic chrome accents—a chrome tip, chrome stripes, or chrome geometric shapes on a solid base—create high-impact style with more wearability.
Strategic Chrome Placement
Rather than chroming your entire nail surface, consider a half-chrome design where the upper half is glossy chrome while the lower half remains in a solid color. Or paint chrome stripes that run vertically or diagonally across the nail—the width means these stripes are clearly visible and dramatic without taking over the entire design. Another approach is a chrome ombre, where chrome intensifies from the cuticle toward the tip, creating a gradient from opaque base color to full reflective shine.
Achieving That Perfect Mirror Effect
Chrome powders create the most authentic mirror effect, though they require a slightly sticky base (a gel base or tacky top coat works). Apply your base color first, then while the base is still slightly tacky or using a gel base, apply the chrome powder using a dense brush in a tapping motion. The powder clings to the sticky surface and creates that signature mirror reflection. Seal with a glossy top coat. If powder application feels intimidating, chrome polishes (liquid formulas) are simpler to apply and create a respectable reflective effect, though less intense than powder.
Pro tip: Chrome looks most dramatic in natural daylight. If you’re going for a full-glam effect, plan your chrome nails for days when you’ll be outside—the sunlight makes the mirror finish nearly blinding in the best possible way.
7. Color Blocking with Bold Contrasts
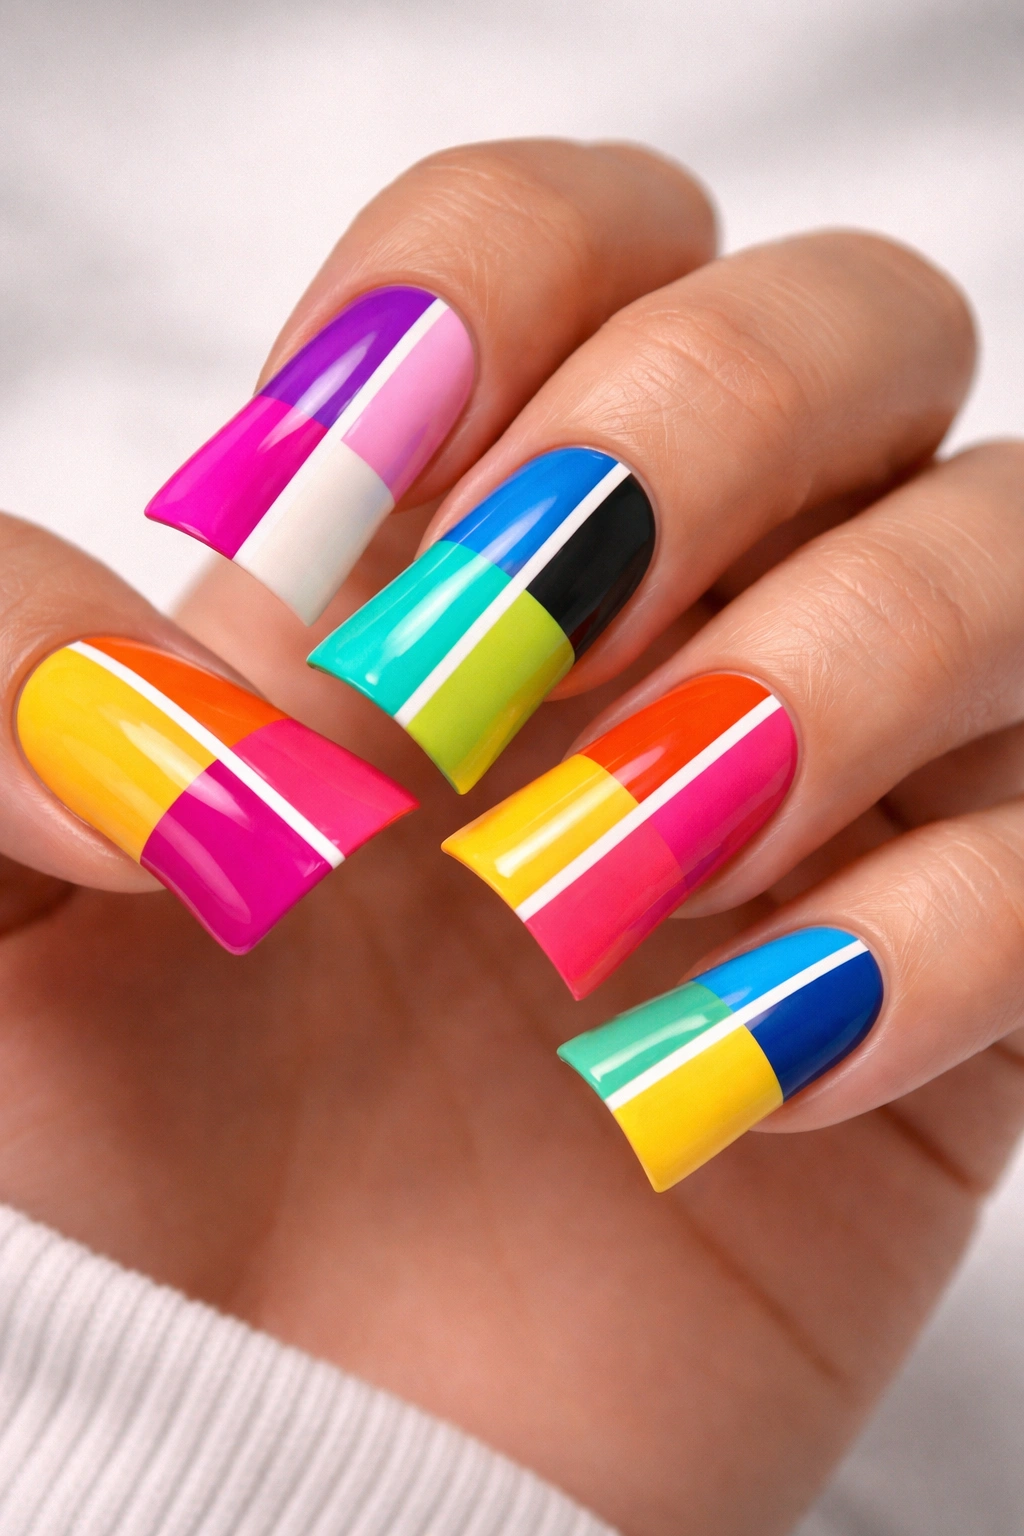
Color blocking—the use of distinct, solid color sections divided by clean lines—translates beautifully to wide duck nails because the shape provides natural zones for different colors. You might paint the upper half one bold color and the lower half a completely contrasting shade, or create vertical color blocks that split each nail into two or three distinct sections. The width means each color section is substantial and clearly visible.
Choosing Colors That Pop
The most effective color-blocking designs use high-contrast combinations: jewel tones against pastels, neon against neutrals, or complementary colors from opposite sides of the color wheel. Navy and bright coral, emerald and gold, deep purple and pale cream—these combinations create immediate visual impact. On wide duck nails, because each color section is larger, the contrast becomes even more striking. A 50/50 color block across the width of a duck nail feels bold and intentional in a way it might feel chaotic on narrower nails.
Layout Ideas for Color Blocking
Vertical split: Paint one half of each nail one color and the other half a contrasting color, with a clean line running down the center. Horizontal split: Color the lower half one shade and upper half another, creating a sunset or earth-tone effect. Diagonal split: A line running from cuticle to tip divides each nail into two triangular sections—this creates extra visual interest because it plays with the nail’s natural angle. Three-color blocking: Divide each nail into three vertical or horizontal sections, each in a different color.
Pro tip: Use matte finishes for color blocking rather than glossy. Matte finishes make the color blocks feel more intentional and graphic, like actual design rather than just polish application.
8. Gradient Glitter Transition
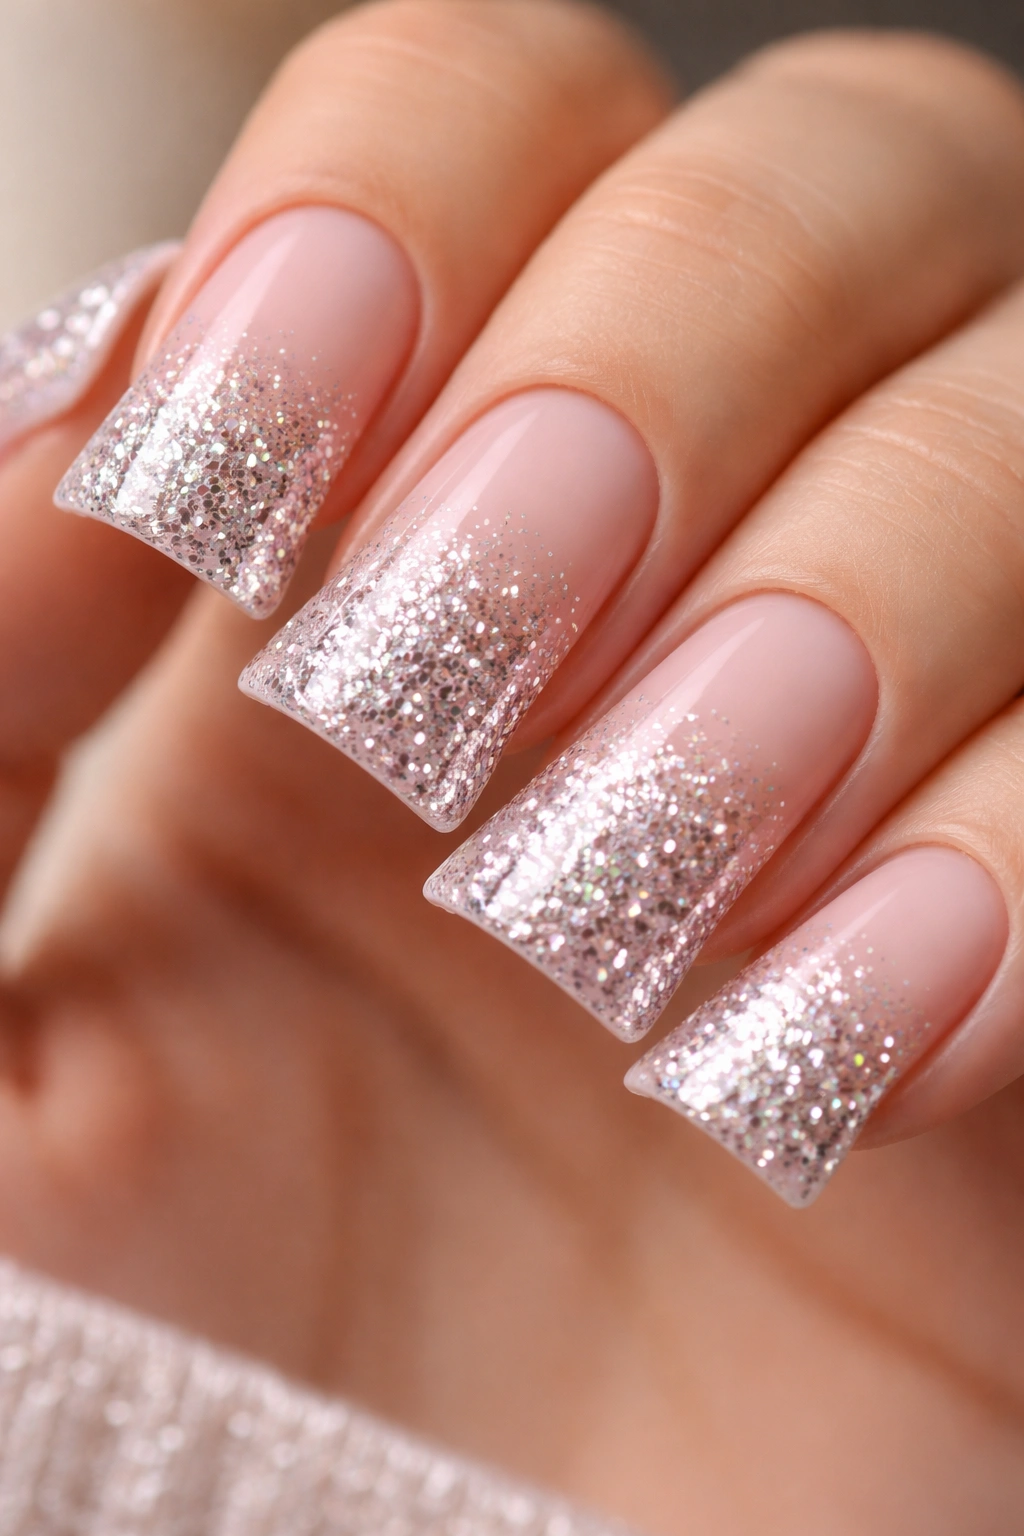
Glitter doesn’t have to mean chaos—a carefully executed glitter gradient creates sophisticated sparkle that builds from subtle to statement-making. Start with a solid base color at the cuticle, then gradually introduce glitter particles as you move toward the free edge, finishing with nearly full glitter coverage at the very tip. On wide duck nails, this transition is visible and gorgeous across the entire surface without feeling overdone.
Building a Glitter Gradient That Works
Rather than mixing glitter into your base color (which creates an all-over sparkle), apply your base color as a solid foundation. Once dry, apply a clear or slightly tinted top coat mixed with progressively more glitter as you work toward the nail tip. You can use a makeup sponge to dab on the glitter layers, or apply them with a thin brush using a stippling motion. The key is making the transition gradual so glitter buildup feels intentional rather than sloppy.
Glitter Choices That Elevate the Design
Fine, multi-colored holographic glitter creates an elegant sparkle that catches light beautifully. Chunky or irregular glitter reads as more playful and bold. Monochromatic glitter in a color similar to your base (say, gold glitter on a champagne base) creates subtle luxury. Contrasting glitter (silver on deep burgundy, or rainbow on nude) creates higher visual impact. For wide duck nails, you can accommodate multiple glitter sizes within a single gradient—smaller sparkles toward the cuticle, larger chunks toward the tip.
Pro tip: Use a glitter adhesive or gel base rather than relying on regular top coat to hold glitter in place. Glitter particles are less likely to shift or migrate, and the gradient line remains crisp and intentional rather than blurring over time.
9. Ombre French Manicure Twist
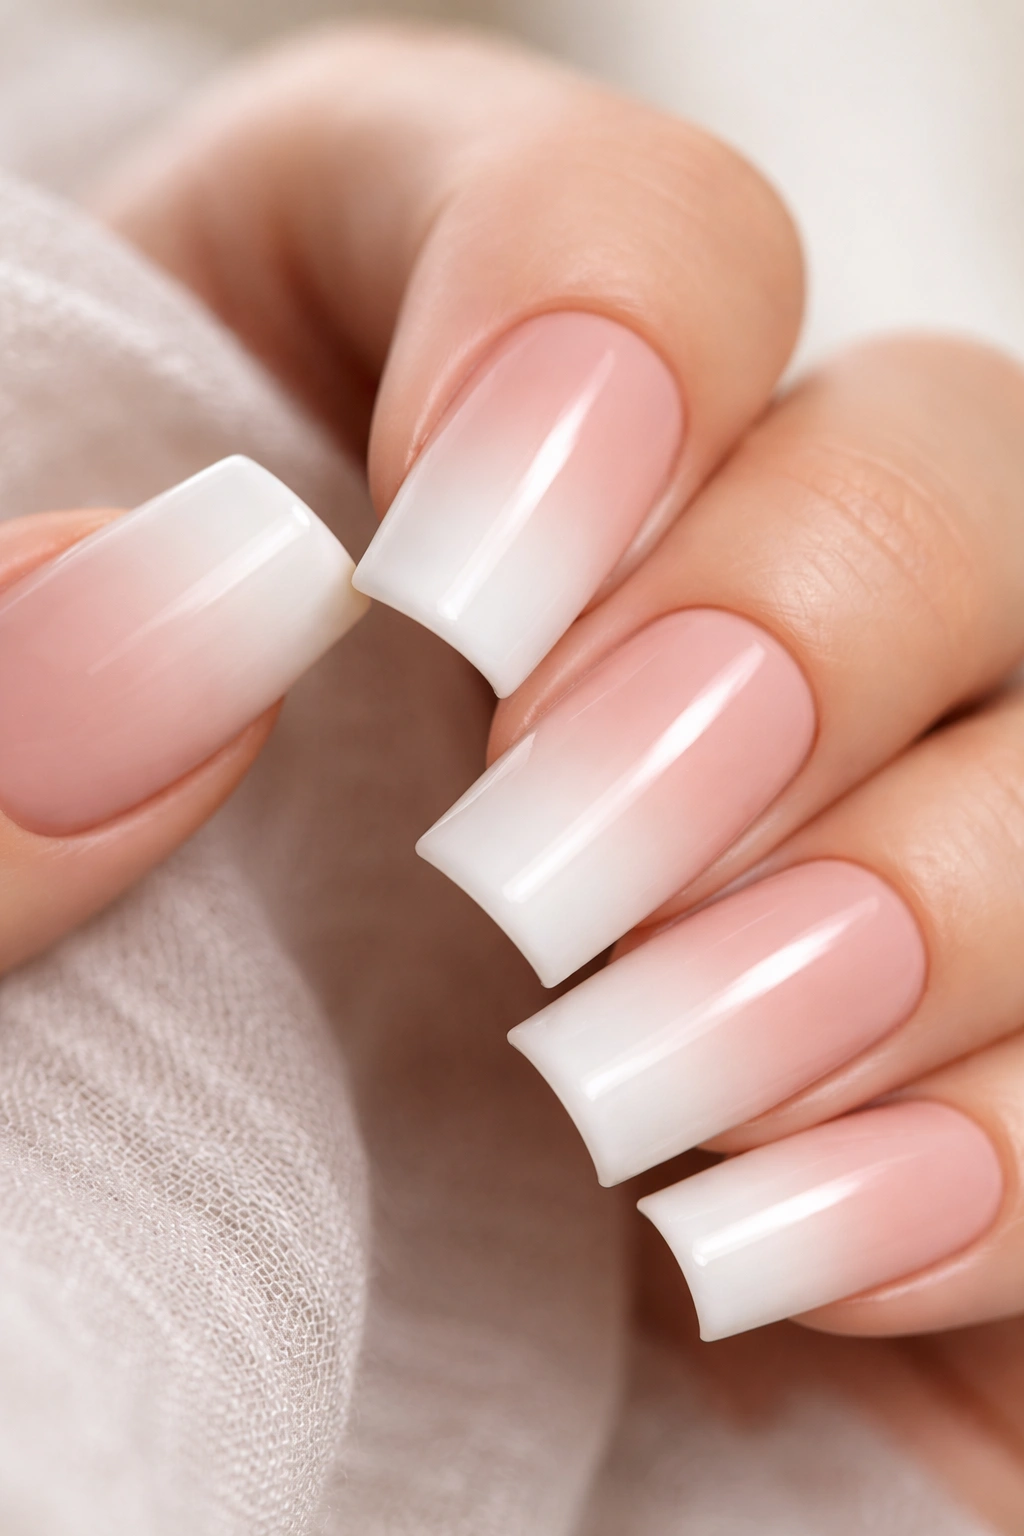
The classic French manicure gets a modern update with an ombre twist: instead of a sharp white-tip contrast, create a gradient where color transitions from your nail bed into a softer, lighter shade at the tip. On wide duck nails, this creates an elegant, updated look that feels fresher than traditional French without being as dramatic as a full-color manicure.
Reimagining French on Wide Nails
Traditional French manicure has always favored narrower nails because the white tip creates a lengthening illusion. Wide duck nails don’t need lengthening illusions—they’re already striking. Instead, use the ombre French concept to create depth and dimension. A deep nude or pale pink base that gradually transitions to white or cream at the tip feels sophisticated and modern. The wider nail surface means the ombre gradient is clearly visible and gradual rather than appearing as an abrupt color shift.
Execution Approaches
Use a makeup sponge to create your ombre effect, dabbing progressively lighter shades of your base color toward the free edge, finishing with white or cream at the very tip. Alternatively, apply your base color fully, then use a sponge to add white or lighter shade only to the tip area, blending the line with a clean sponge. For extra elegance, add a thin gold or rose-gold line where the two shades meet—this creates definition and polish while maintaining the soft gradient effect.
Pro tip: Keep the ombre gradient subtle and gradual rather than obvious. A French ombre should feel like an elegant evolution of the traditional manicure, not a completely different design. The color transition should be so smooth that it takes a moment to realize it’s not a solid color.
10. Watercolor and Ink Wash Effects

Watercolor effects—soft, diffused color that bleeds and blends across the nail surface—create an artistic, almost abstract look that feels completely different from structured nail art. When applied to wide duck nails, watercolor effects take on added dimension because the larger surface area allows for more complex color mixing and blending. The result is a nail art piece that looks like it belongs in a gallery rather than just a beauty salon.
Achieving Watercolor Effects on Nails
Use alcohol-based inks or watercolor nail polish applied with a wet brush to create that diffused, bleeding effect. Apply one color to a wet brush, then touch it to the nail and watch the color spread and blend. Add a second color while the first is still wet, and let them merge naturally. The key is working quickly and allowing the polish to move on its own—you’re not controlling the exact placement, which is what creates that organic, artistic effect. On wide nails, you have room for 2-3 colors to blend without the design becoming visually overwhelming.
Color Combinations for Watercolor Nails
Soft pastels blended together (blush, sage, lavender) create a delicate, dreamy effect. Deep jewel tones (teal, plum, emerald) blended together create moody, sophisticated watercolor. Sunset colors (coral, gold, pink) create warm, romantic vibes. The beauty of watercolor is that even “mistakes” in color mixing look intentional because the technique itself celebrates imperfect blending.
Pro tip: Seal watercolor effects with a glossy top coat to protect the design, but wait until the watercolor layer is completely dry before applying top coat. If you add glossy finish while the watercolor is still damp, it’ll disrupt the blended color patterns.
Final Thoughts

Wide duck nails offer something special that other nail shapes simply can’t deliver—they’re bold enough to make a statement, wide enough to accommodate complex designs, and distinctive enough that any manicure automatically feels intentional and fashion-forward. Whether you’re drawn to minimalist geometric designs, full-glam sparkle effects, or artistic watercolor work, the duck nail shape provides the perfect canvas for turning your nail art vision into reality.
The key to nailing wide duck nail designs is embracing the width rather than fighting it. These nails aren’t trying to be delicate or dainty—they’re making a deliberate statement about self-expression and style. Let your designs reflect that confidence. Go bold with color, lean into dimension and detail, and trust that the shape itself will elevate whatever design you choose. Wide duck nails aren’t just a trend—they’re a commitment to nail art that’s unapologetically you.
