

Duck nails have become one of the most coveted nail shapes in recent years, and for good reason. The slightly elongated, gently curved almond shape creates an elegant yet edgy aesthetic that works beautifully with nearly any design. When you combine this trendy shape with the endless possibilities of rainbow colors, you get a nail style that’s simultaneously bold, artistic, and undeniably eye-catching. Rainbow duck nails allow you to express creativity and personality in a way that feels both fun and sophisticated, whether you’re heading to a festival, a night out with friends, or simply want to brighten your everyday look with something genuinely special.
The beauty of rainbow nail designs lies in their versatility. You can go bold and vibrant with neon shades, soft and dreamy with pastels, or somewhere in between with jewel tones and metallics. Duck nails provide the perfect canvas for these multi-colored designs because their length and shape naturally draw attention and make every detail visible. Whether you’re an experienced nail artist or heading to a salon for professional application, these 20 rainbow duck nail ideas will inspire your next manicure and give you plenty of options to match your mood, outfit, and personal style.
The process of creating rainbow duck nails can seem intimidating at first, but with the right color palette and a little patience (or the help of a skilled nail technician), you’ll achieve stunning results that make a real statement. Each of these designs can be customized to match your skin tone, personal preferences, and the season. The most important thing is choosing colors that make you feel confident and excited every time you look at your hands.
1. Gradient Rainbow with Ombre Effect
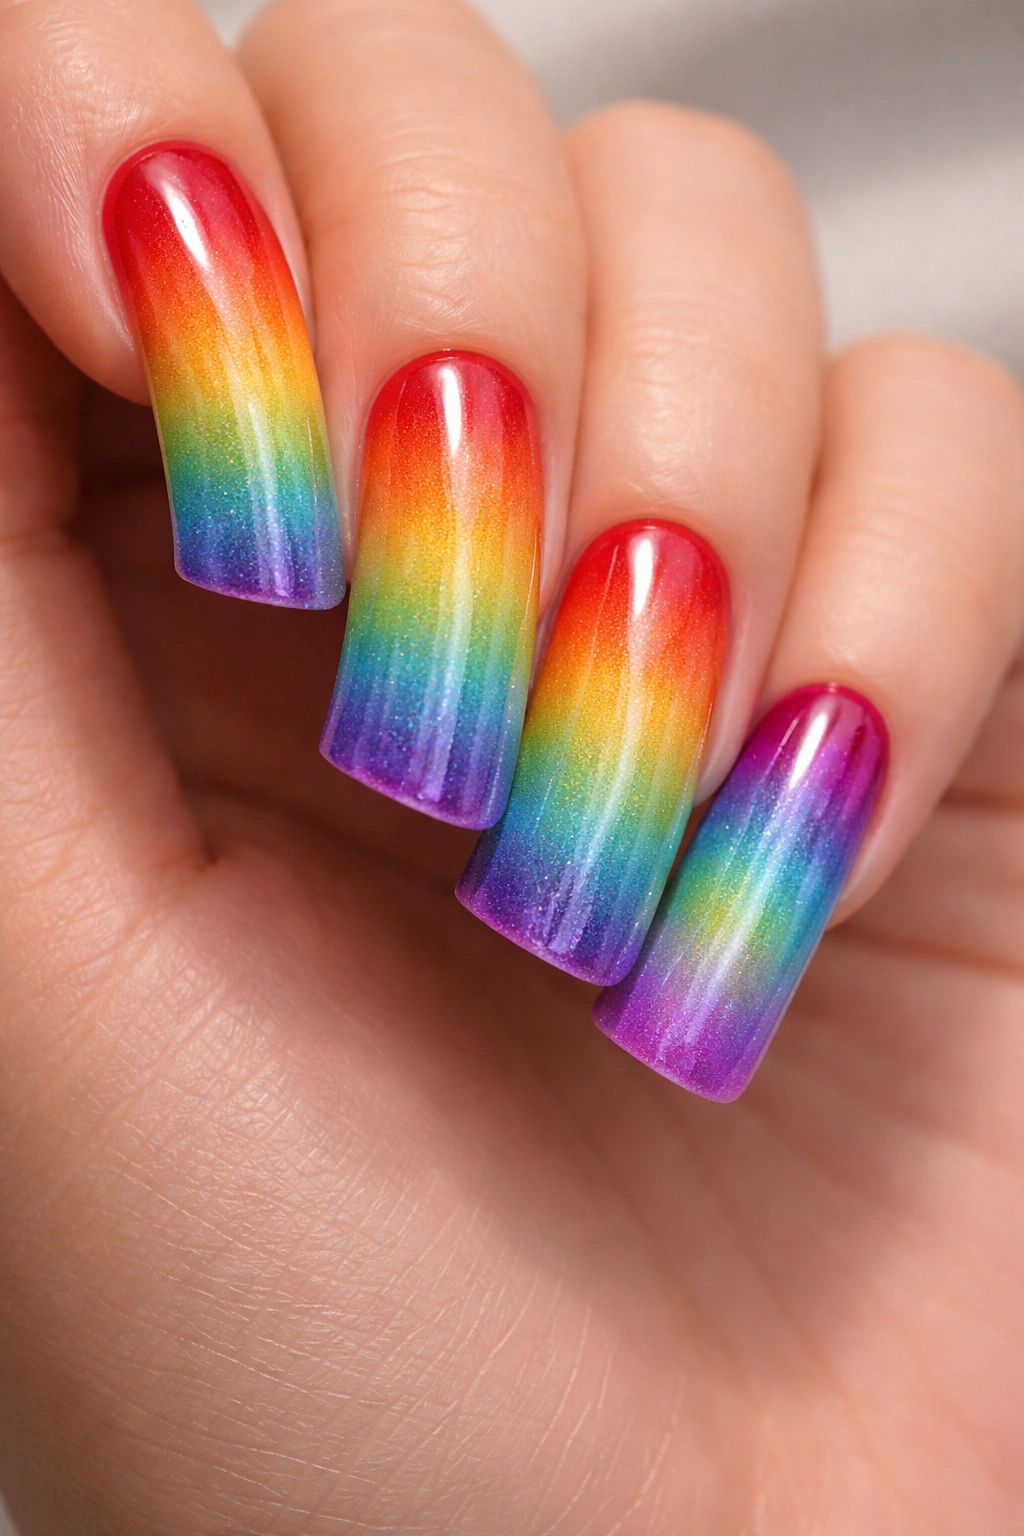
A gradient rainbow ombre on duck nails creates a seamless color transition that flows naturally from one hue to the next, moving across the length of your nail. This design starts with a deep red or magenta at the cuticle and transitions through orange, yellow, green, blue, indigo, and violet toward the tip. The gradient technique requires a sponge and patience, but the payoff is a sophisticated, almost three-dimensional effect that catches light beautifully.
Why This Design Works So Well
The ombre gradient on elongated duck nails creates an elegant, almost watercolor feel that’s both artistic and wearable. Because the colors blend smoothly rather than appearing in separate stripes, the design feels refined rather than chaotic. The length of duck nails means you get to see the full spectrum of the rainbow without colors feeling cramped or muddy together.
Application Tips for Success
- Use a makeup sponge dampened (not soaked) with a setting spray to achieve the best gradient blend
- Apply thin coats of each color to the sponge in the order of the rainbow, slightly overlapping each shade
- Dab rather than swipe the sponge onto your nail for better color integration
- Seal with a thick, high-quality top coat to protect the delicate blend
Pro tip: This design looks especially stunning under natural sunlight, where the color transitions become even more visible and dimensional.
2. Pastel Rainbow Stripes
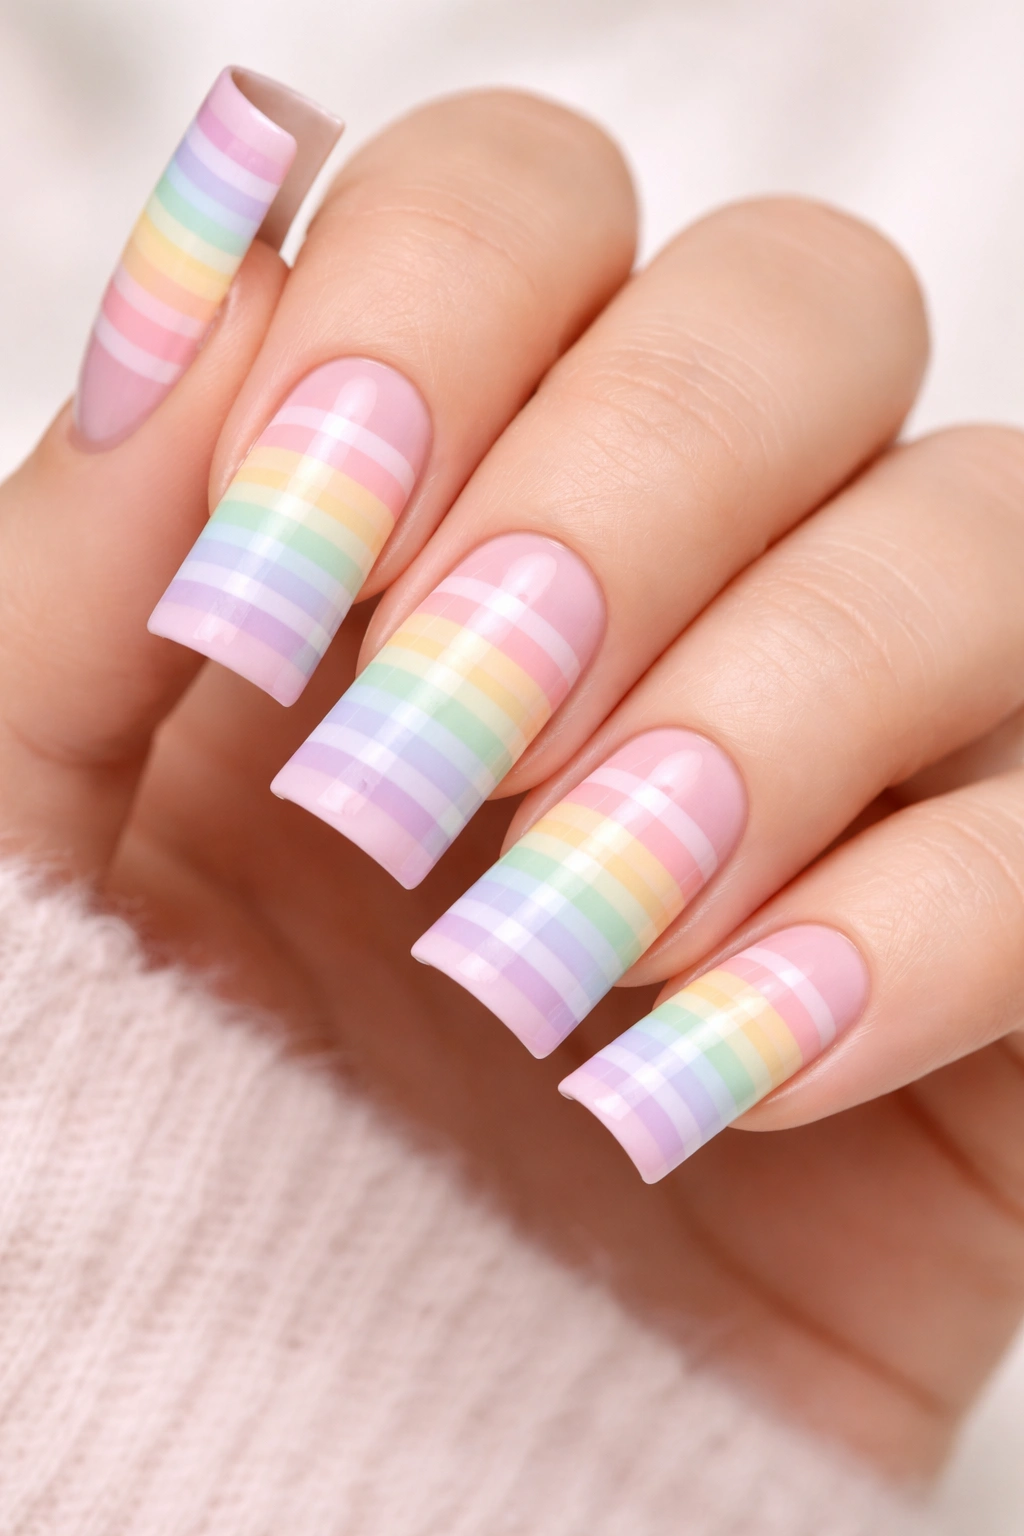
Pastel rainbow stripes on duck nails offer a softer, more romantic take on rainbow nail art. Each nail displays thin, horizontal stripes in pastel pink, peach, yellow, mint green, periwinkle, and lavender. The soft color palette feels less intense than neon but maintains all the visual interest and fun of a traditional rainbow design. This design works particularly well for those who prefer subtle, delicate nail art.
What Makes Pastel Rainbows Different
Pastel shades feel more wearable in professional settings while still making a creative statement. The softer colors create a cheerful, approachable vibe that’s perfect for spring and summer. On elongated duck nails, thin stripes appear more elegant than bold ones, creating a design that feels intentional and artistic rather than overwhelming.
Getting Perfectly Straight Lines
- Use striping tape or thin painter’s tape to create clean, even line boundaries
- Apply thin coats of each pastel shade, allowing drying time between colors
- Remove tape while the topcoat is still wet for the cleanest edges
- Consider using a thin striping brush if you prefer hand-painting over tape
Worth knowing: Pastel polishes often require 2-3 thin coats rather than one thick coat to achieve full opacity and vibrant color.
3. Rainbow Tie-Dye Duck Nails
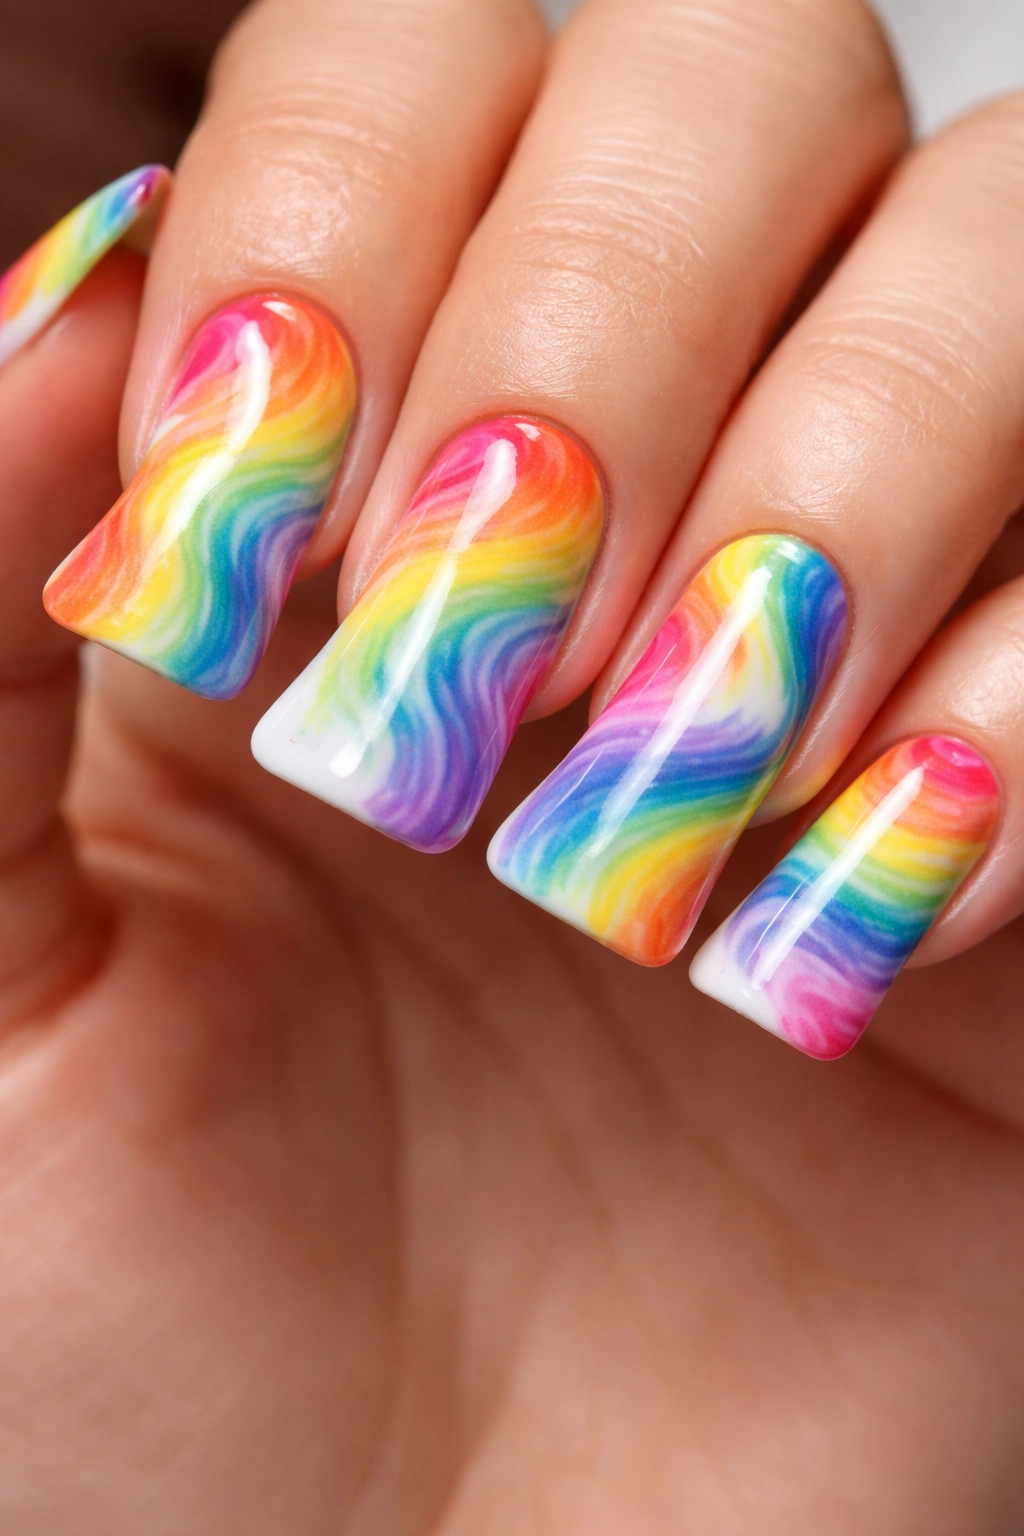
A tie-dye rainbow design on duck nails recreates the artistic, organic look of classic tie-dye fabric. Use a thin detail brush or toothpick to create swirling patterns of red, orange, yellow, green, blue, and purple on a white base. The colors blend and overlap naturally, creating a unique, unpredictable pattern on each nail that feels artistic and one-of-a-kind.
The Art of Rainbow Tie-Dye
Tie-dye design requires embracing imperfection—the best versions feel organic and slightly different on each nail. Start by dropping or brushing one color onto the white base, then add the next color while the first is still slightly wet so they blend at the edges. Use a thin brush or dotting tool to swirl the colors together gently, creating the characteristic tie-dye effect.
Technique Breakdown for Success
- Begin with a smooth white base coat—this serves as your canvas
- Drop or brush small amounts of each rainbow color onto the nail
- Before colors fully dry, use a toothpick or thin brush to swirl them together
- Allow some colors to blend while keeping others distinct for visual interest
- Seal everything with a glossy top coat to prevent smudging
Insider note: The slight tackiness of a semi-wet top coat can actually help you blend colors more smoothly, so apply it before the polish completely dries.
4. Holographic Rainbow Duck Nails
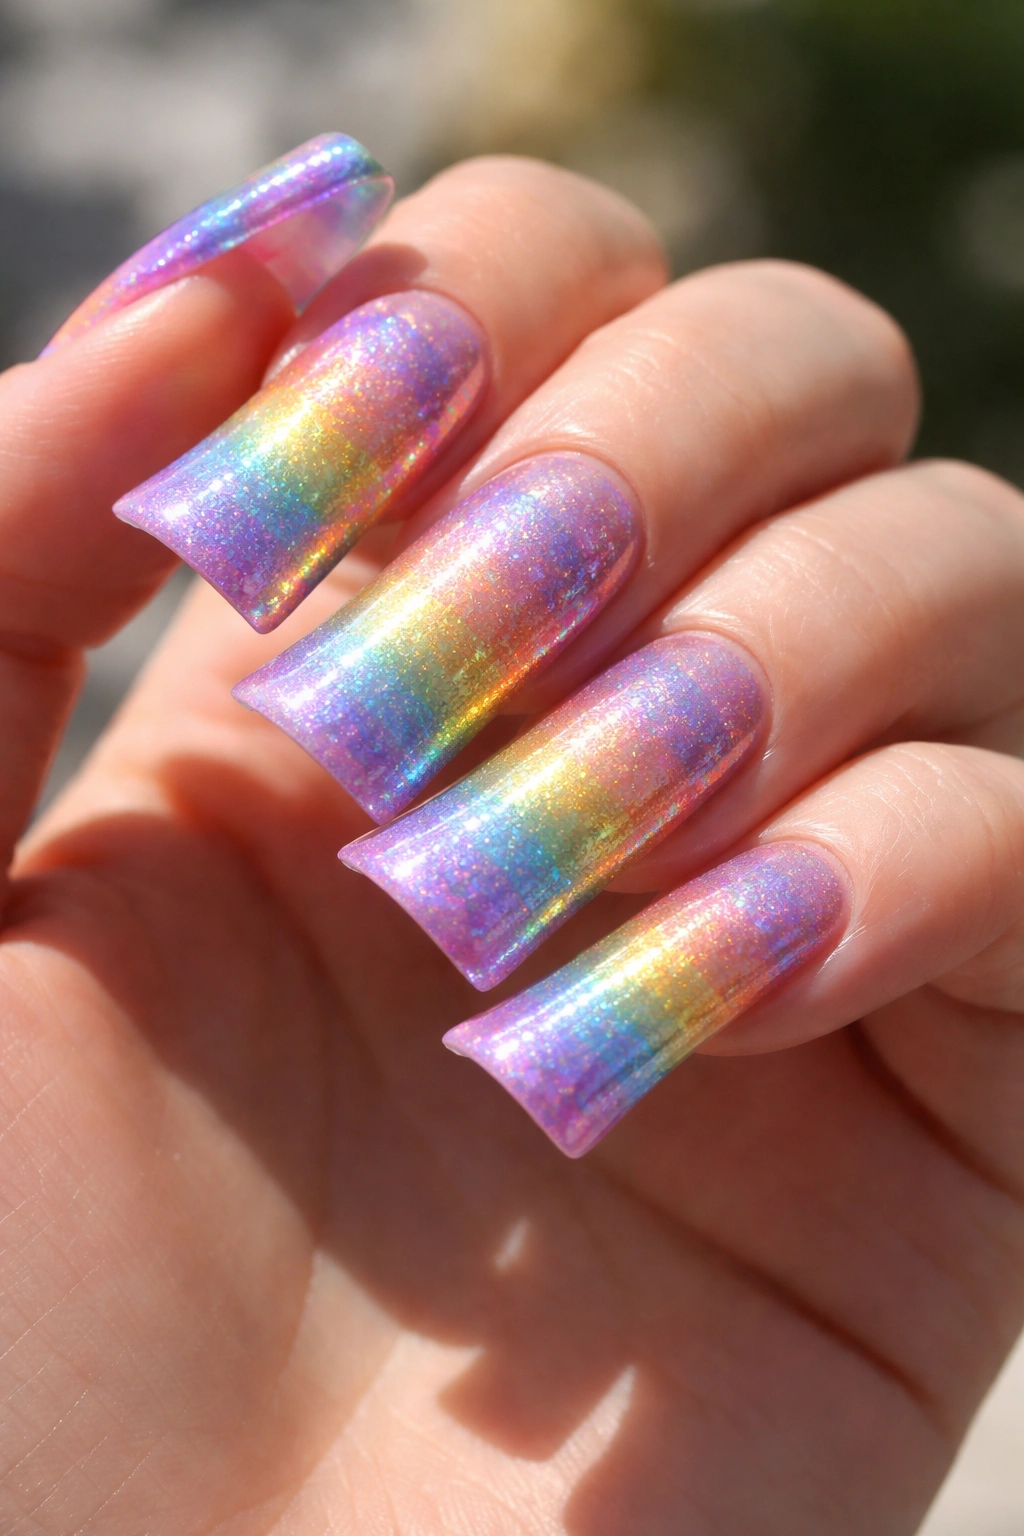
Holographic finishes add an otherworldly shimmer to rainbow duck nails, creating a design that shifts and sparkles from every angle. Either apply a holographic top coat over gradient rainbow colors or use individual holographic polishes in each color of the rainbow. The reflective, multi-dimensional finish makes the design absolutely mesmerizing and photographs beautifully.
Why Holographic Finishes Are Worth the Investment
Holographic polishes contain tiny reflective particles that catch light and create rainbow sparkles across the nail surface. This finish elevates any rainbow design, making it feel more expensive and artistic. On duck nails, the larger surface area means more opportunity for the holographic effect to shine and sparkle with movement.
Achieving Optimal Holographic Shine
- Use a high-quality holographic polish or top coat formulated specifically for this effect
- Apply in bright, natural lighting so you can see the full holographic potential
- Use thin, even coats to prevent the finish from becoming thick or cloudy
- A clear top coat over holographic polish helps intensify the shimmer effect
- These polishes work best under sunlight or bright indoor lighting—the effect may be subtle under dim light
Pro tip: Holographic finishes photograph better in natural daylight, so snap photos near a window to capture the full magical effect.
5. Neon Rainbow with Black Base
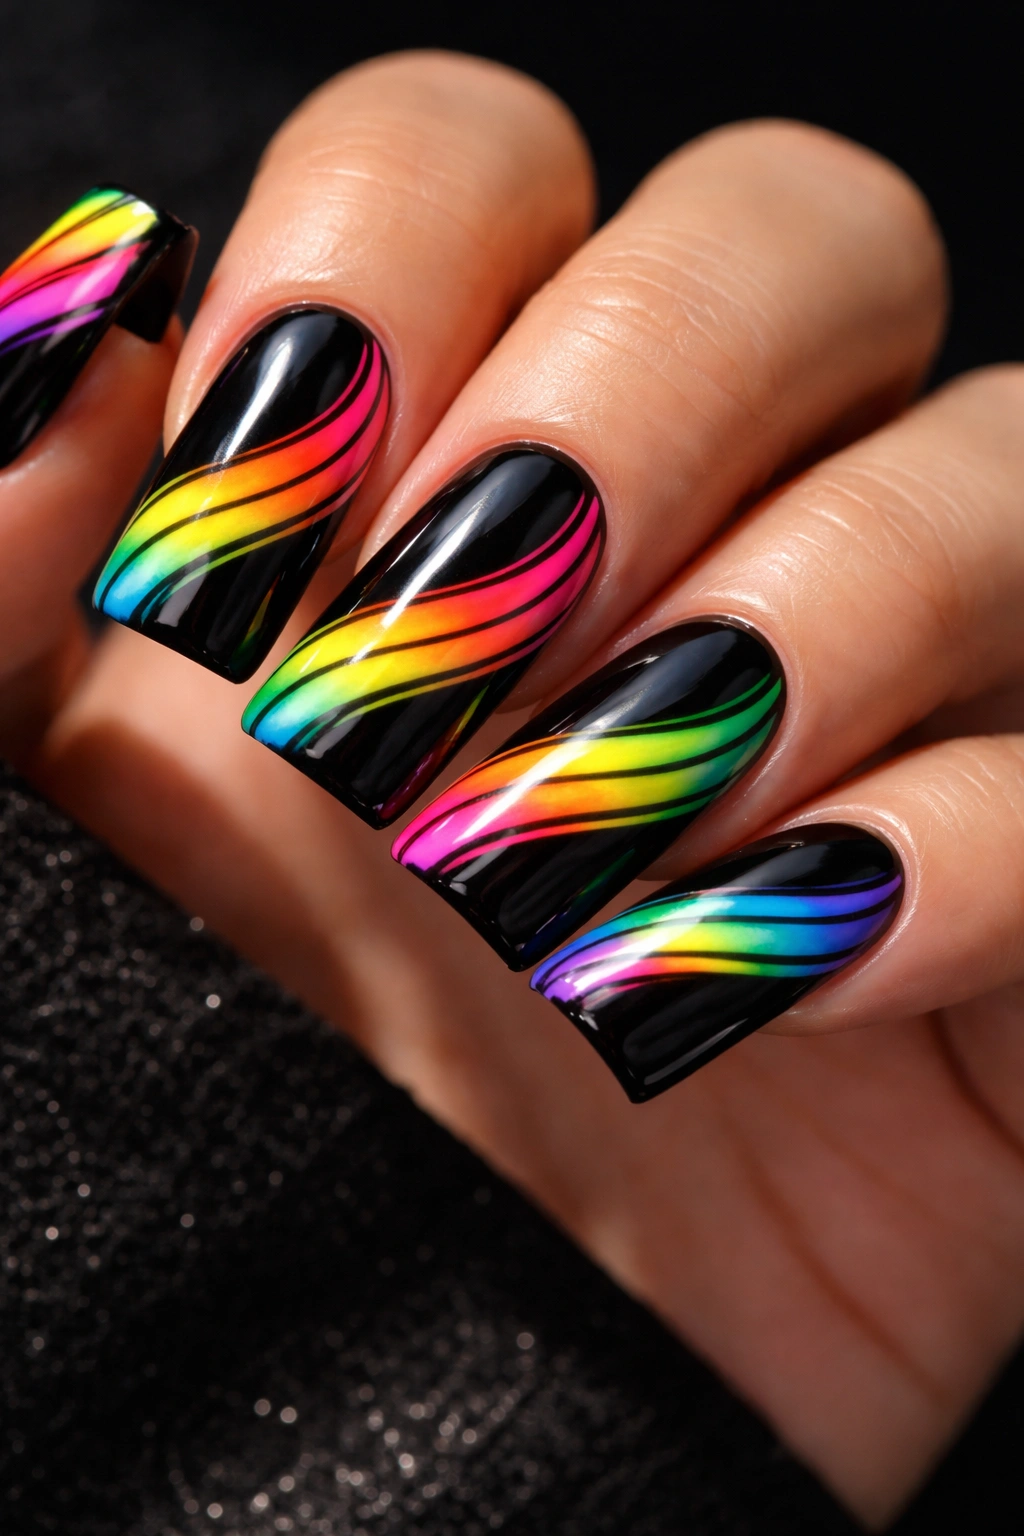
Neon rainbow colors pop dramatically against a jet-black background on duck nails. Paint the base in true black, then add bright neon pink, neon orange, neon yellow, neon green, and neon blue in stripes, geometric patterns, or abstract designs. The high contrast between the black and the vibrant neons creates an edgy, bold look that feels modern and daring.
The Power of Contrast in Nail Design
A black base provides maximum contrast and makes neon colors appear even brighter and more saturated than they would on a nude or white base. This creates an intensely eye-catching design that photographs beautifully and works perfectly for someone wanting to make a bold statement. The darkness grounds the brightness, preventing the design from feeling chaotic or overwhelming.
Working with Neon Colors
- Neon polishes often require 2-3 thin coats for full opacity and true brightness
- Allow extra drying time between coats—neon formulations can be thicker than standard polish
- Always use a UV or LED lamp if your neon polish is gel-based
- A glossy top coat intensifies the brightness of neon colors even further
- Avoid matte finishes with neon colors, as they dull the vibrant effect
Worth knowing: Neon colors can stain lighter nails temporarily, so use a strong base coat and allow it to dry completely before applying neon polish.
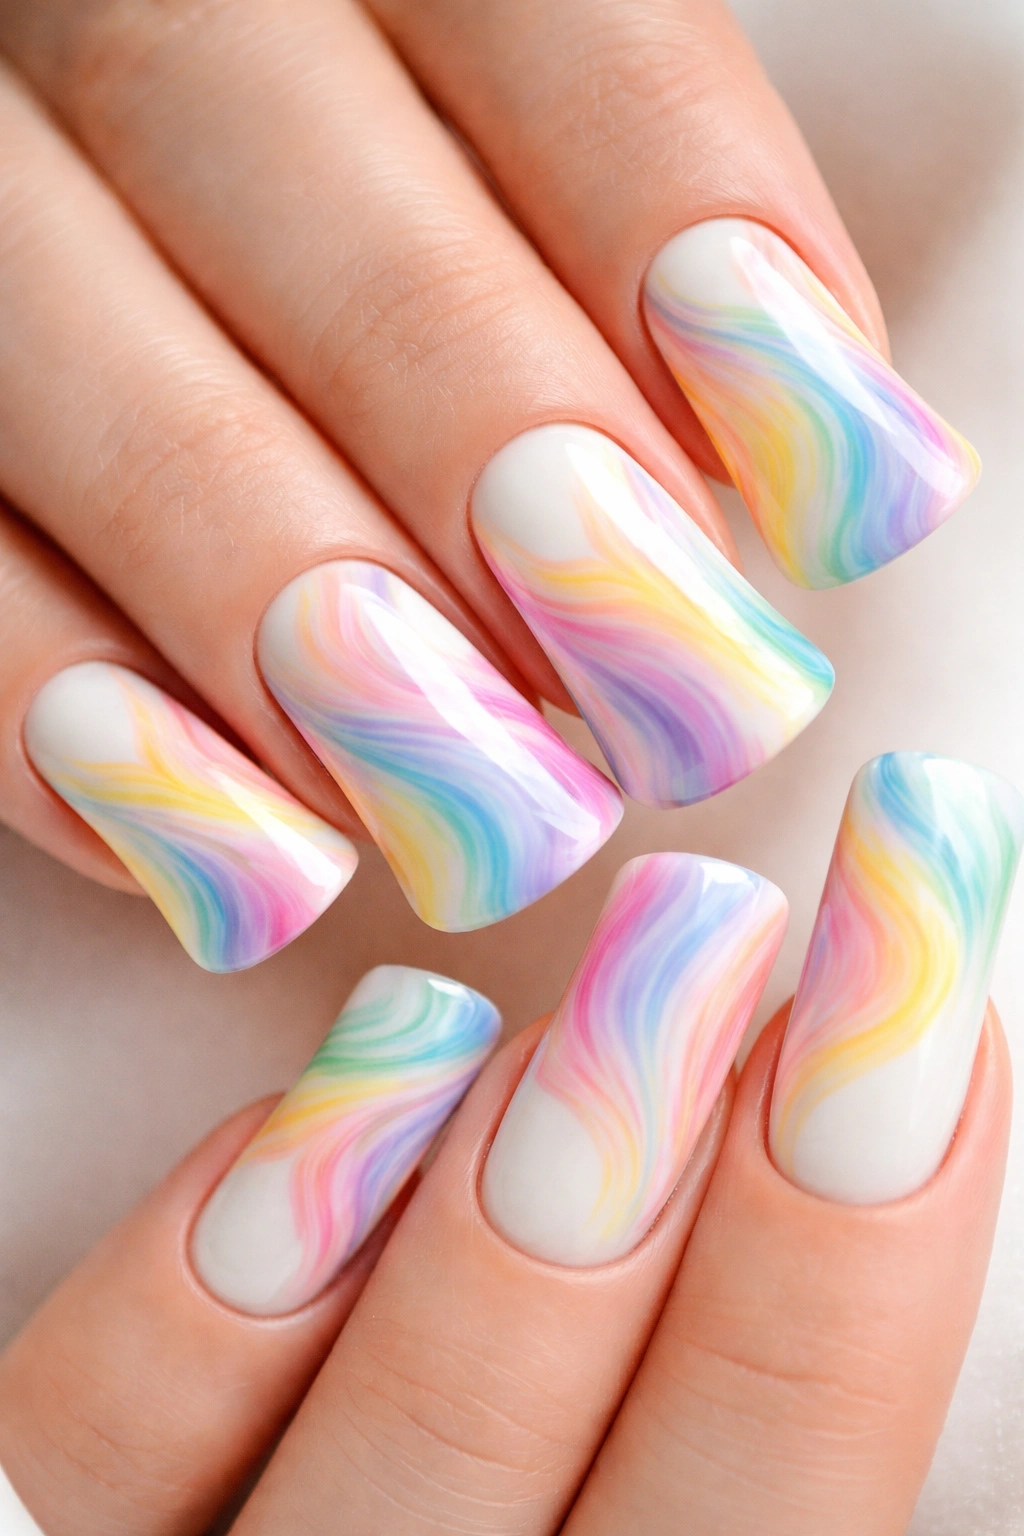
6. Watercolor Rainbow Design

A watercolor rainbow on duck nails mimics the soft, bleeding, organic quality of watercolor paintings. Use thin layers of rainbow colors that blend subtly at their edges, creating a dreamy, artistic effect. The colors appear slightly diluted and transparent, as if you’ve painted with real watercolor pigments. This design feels artistic and sophisticated while maintaining the playful energy of a rainbow.
Achieving Authentic Watercolor Effects
Watercolor nail designs require a lighter touch and patience for blending. Instead of precise lines or solid colors, aim for soft, diffused transitions where colors blend and fade into one another. The effect should feel organic and artistic rather than structured or geometric.
Watercolor Technique Step-by-Step
- Start with a light base—white, cream, or very pale blue works beautifully
- Mix rainbow polishes with clear polish or a specialized nail paint thinner to create diluted shades
- Apply thin layers using a soft, flat brush, allowing colors to blend at their edges
- Use a barely-damp brush to soften edges and create the watercolor effect
- Build up layers gradually—watercolor effects work best with multiple thin applications
- Finish with a matte or satin top coat to enhance the watercolor painting aesthetic
Insider note: A matte finish actually enhances the watercolor effect because it reduces shine and makes the design feel more like actual watercolor art.
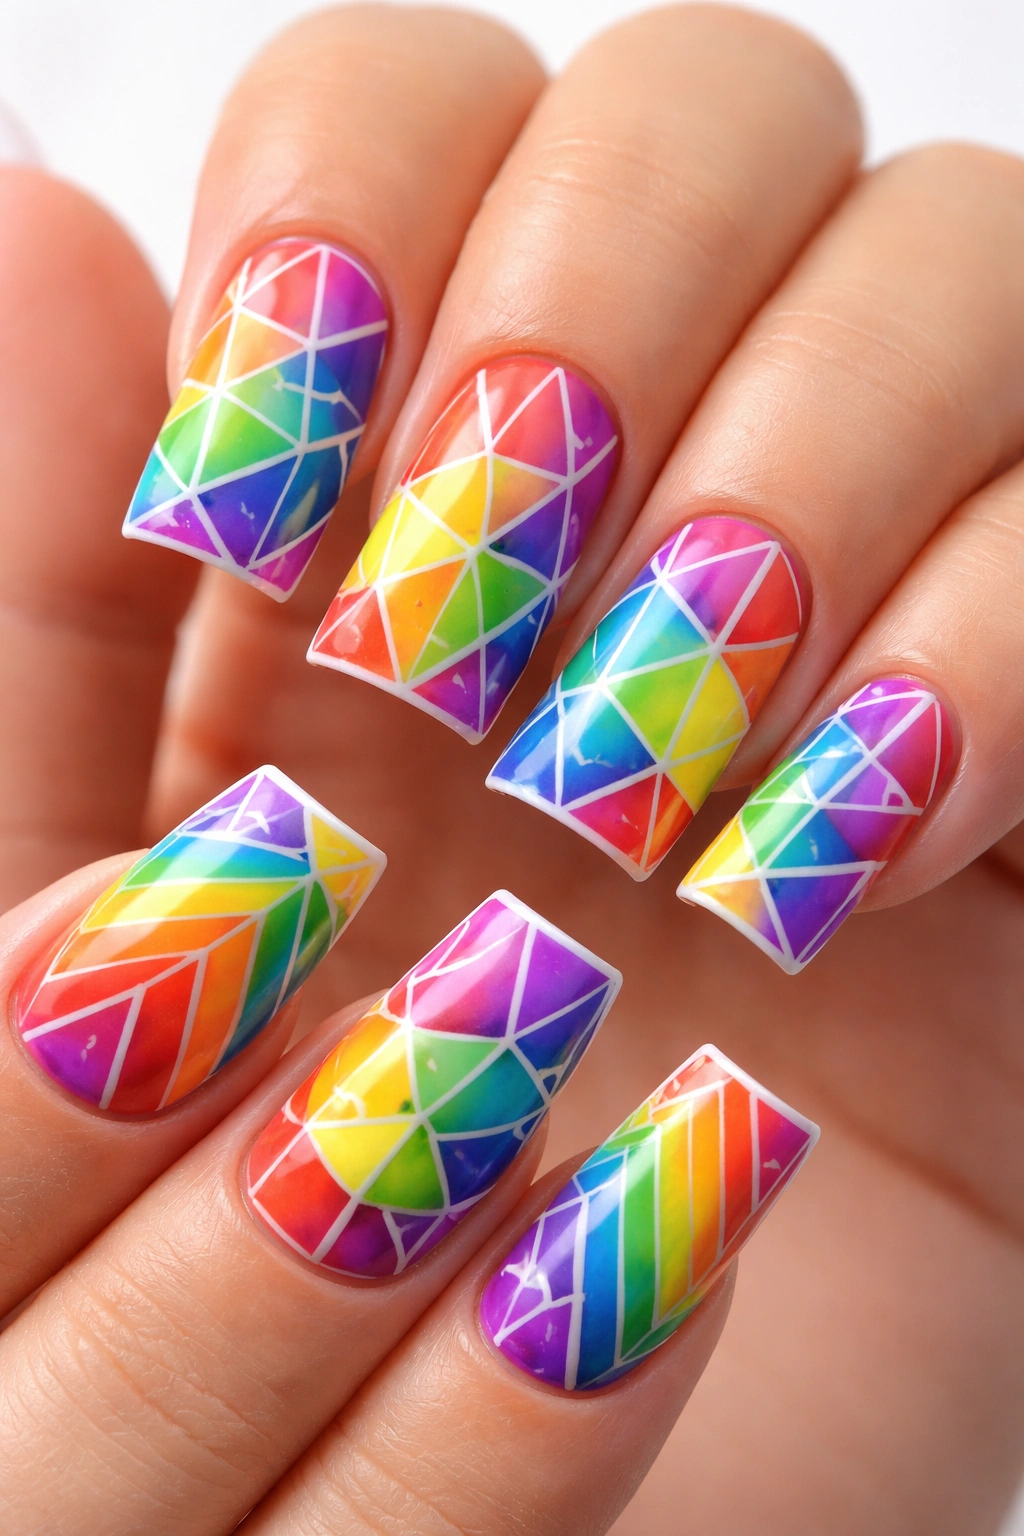
7. Rainbow Geometric Patterns
Geometric rainbow designs on duck nails feature precise shapes filled with different rainbow colors. Create triangles, hexagons, stripes, or abstract angular shapes, assigning a different rainbow color to each section. The clean lines and structured layout create a modern, artistic look that feels intentional and sophisticated. This design appeals to those who prefer precision and geometric aesthetics.
Why Geometric Designs Feel So Modern
Geometric patterns create visual order and rhythm while still incorporating the playful energy of rainbow colors. The precision and structure make the design feel intentional and artistic rather than random or chaotic. On duck nails, geometric patterns appear bold and statement-making without feeling overwhelming.
Creating Clean Geometric Shapes
- Use thin striping tape or painter’s tape to create clean borders between colors
- Apply one rainbow color at a time, allowing each to dry before removing tape and moving to the next
- Consider using a thin striping brush to hand-paint geometric lines for more control
- A magnifying lamp helps with precision when creating small geometric details
- Seal with a glossy top coat to enhance the polished, intentional appearance
Pro tip: Create a simple geometric design on graph paper first to plan your layout before committing to your nails.
8. Metallic Rainbow Duck Nails
Metallic rainbow polish creates a shimmery, luxe interpretation of the classic rainbow. Use metallic pink, gold, copper, metallic green, metallic blue, and purple in stripes or gradient patterns. The shimmer and light-reflection in metallic finishes make the rainbow feel richer and more dimensional. This design offers a sophisticated, celebratory aesthetic that works beautifully for special occasions.
The Luxury Feel of Metallic Rainbow
Metallic finishes add sophistication and glamour to any design, and when applied in rainbow colors, they create an elevated, luxe aesthetic. The shimmer catches light beautifully and makes the colors appear to shift and change, adding depth and dimension to your nails.
Applying Metallic Polishes for Maximum Effect
- Metallic polishes often provide opaque coverage in fewer coats than regular polish
- Apply thin, even coats and allow proper drying time between applications
- Use a high-quality top coat to seal and intensify the metallic shimmer
- Metallic finishes show brush strokes more easily, so use smooth, deliberate application strokes
- These polishes work beautifully with both glossy and matte top coats depending on your desired effect
Worth knowing: Metallic polishes can separate in the bottle, so shake them well before each use to ensure even color distribution.
9. Rainbow French Tips
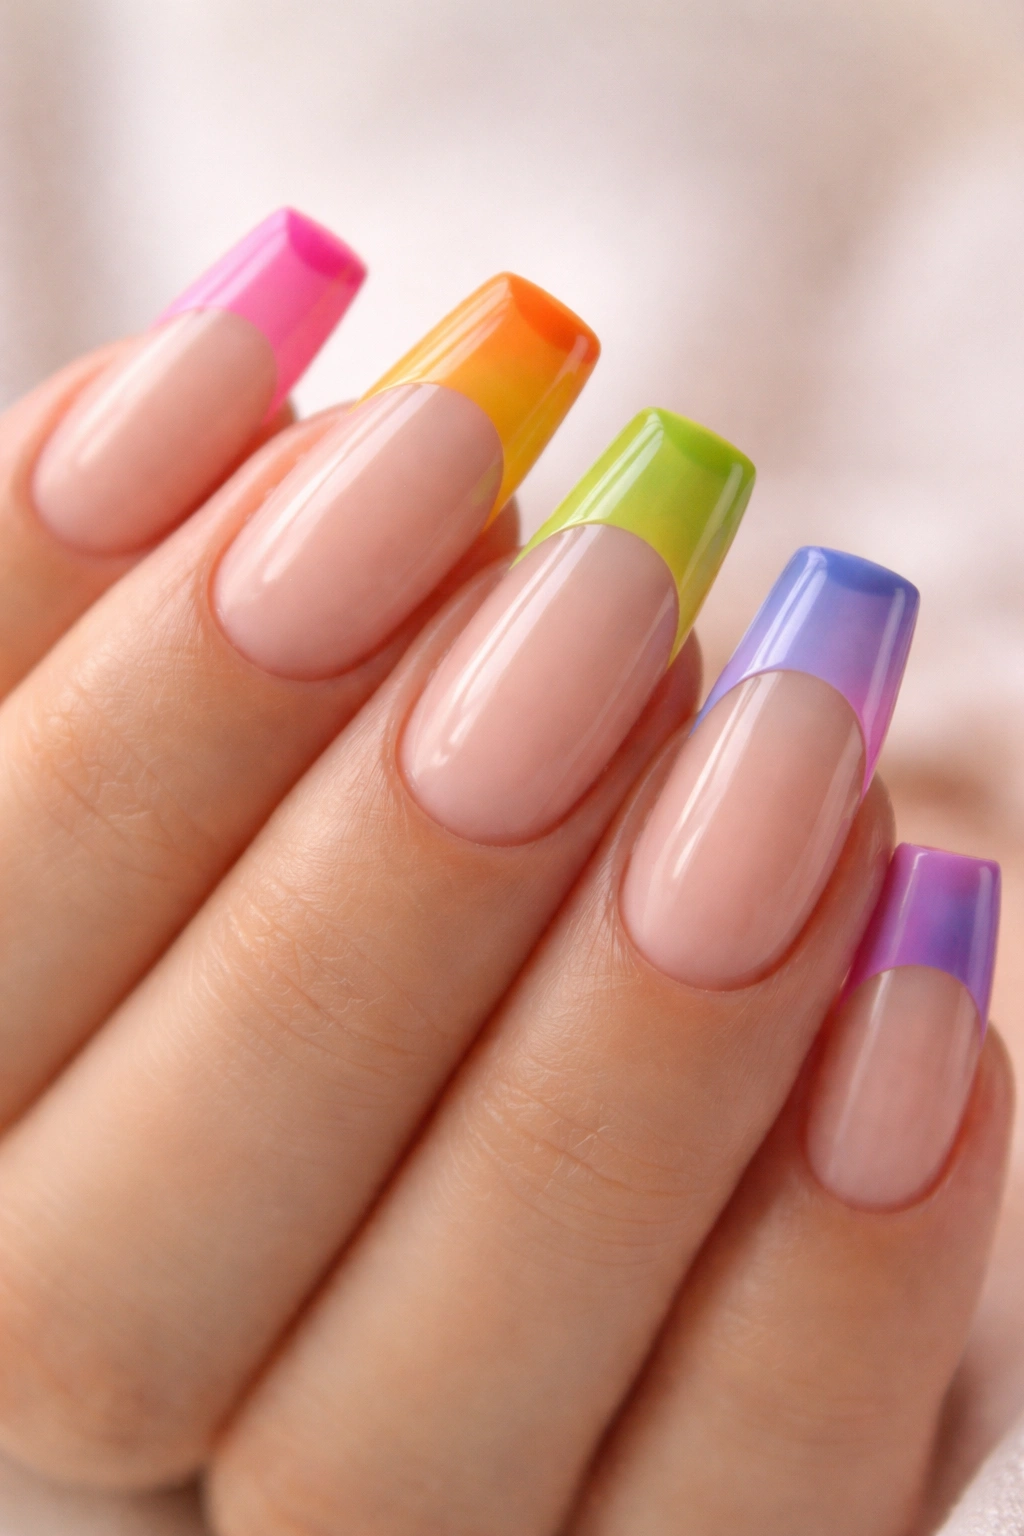
A rainbow French tip design brings a fresh twist to the classic French manicure. Create the traditional French tip shape but replace the white with rainbow colors—red tips on one nail, orange on the next, yellow on the third, and so on through all seven rainbow colors. The base remains nude, pink, or white, keeping the overall look refined while adding playful color and personality.
Reinventing the Classic French Manicure
French tips are timeless and elegant, and substituting traditional white with rainbow colors modernizes the design while maintaining its sophistication. This design works beautifully in professional settings because it feels refined and intentional rather than wild or over-the-top. The rainbow appears subtly in the tips rather than dominating the entire nail.
Creating Perfect French Tip Lines
- Use thin striping tape or a French tip guide to create clean, even tip lines
- The tip should occupy roughly the top third of your elongated duck nail
- Apply the rainbow colors to the tips, one color per nail or alternating colors
- A nude or soft pink base makes the colored tips pop beautifully
- Remove tape carefully while the polish is just set but not completely hard for the cleanest edges
Pro tip: On duck nails, French tips work especially well because the length gives you plenty of space to see the full effect of each colored tip.
10. Sunset to Ocean Rainbow
This design transitions from warm sunset colors (red, orange, yellow) on half the nail to cool ocean colors (blue, teal, purple) on the other half. The transition point falls somewhere in the middle of the nail, creating a striking color contrast. This design tells a visual story and creates a beautiful gradient from warm to cool tones, making it especially eye-catching and meaningful.
The Symbolism and Beauty of Warm-to-Cool Transitions
The transition from sunset to ocean creates a natural, artistic story on your nails. The warm colors represent energy and vitality, while the cool colors represent calm and peace. On duck nails, this design creates a visually balanced, intentional composition that feels both artistic and wearable.
Blending Warm and Cool Tones
- Plan your color transition point—typically the middle of the nail works beautifully
- Apply warm colors (red, orange, yellow) to the bottom half of the nail
- Apply cool colors (blue, teal, purple) to the top half
- Use a damp sponge to blend colors at the transition point for a seamless ombre effect
- The blend should be gradual enough to create visual harmony between the warm and cool sections
Worth knowing: This design works especially well in natural lighting, where the color temperature differences are most visible and striking.
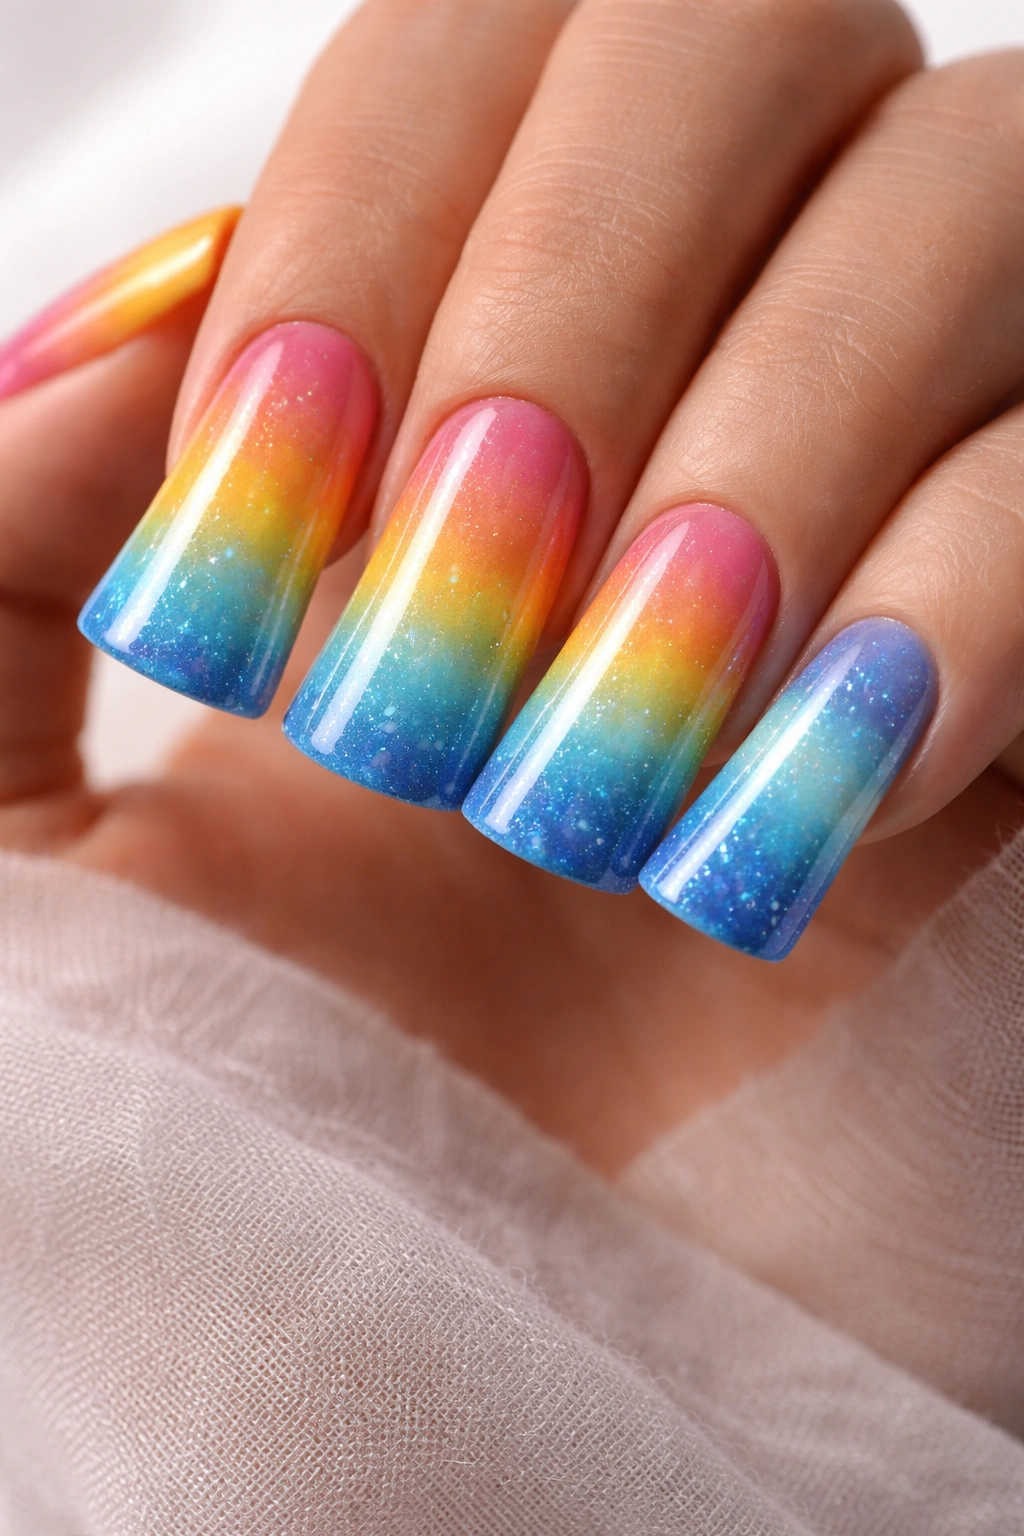
11. Glitter Rainbow Ombre
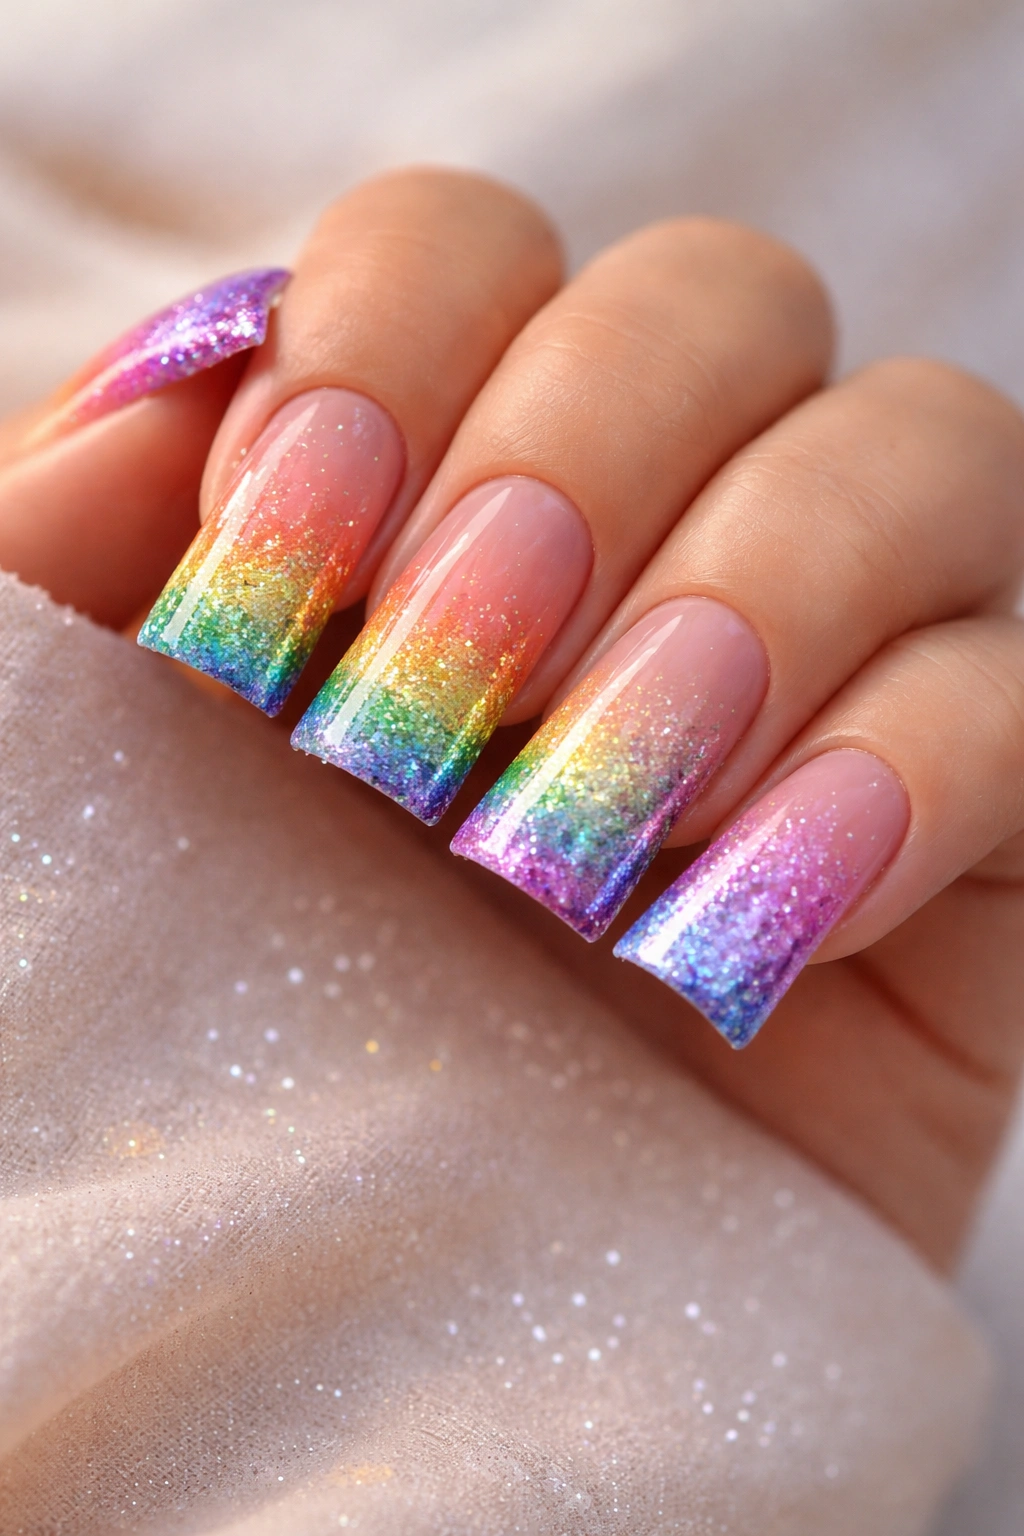
Combine a rainbow gradient base with strategic glitter placement to create dimension and sparkle. Start with an ombre gradient in rainbow colors, then layer fine glitter, chunky glitter, or holographic flakes across the tips or throughout the design. The glitter catches light and adds texture, making the design feel more dynamic and celebratory.
Adding Texture and Sparkle to Rainbow Designs
Glitter elevates a simple rainbow design into something more celebratory and special. The combination of smooth gradient color and textured glitter creates visual interest and makes the design feel multi-dimensional. On duck nails, glitter placement matters significantly—too much can feel overwhelming, while strategic placement creates an elegant, intentional effect.
Glitter Application Techniques
- Create your rainbow ombre base first, allowing it to dry completely
- Apply a thick layer of clear gel or glossy top coat to the nail tips
- Press glitter into the wet gel using a dotting tool or your finger
- For a gradient glitter effect, use more glitter on the tips and less at the cuticle
- Seal with another layer of clear top coat to hold glitter securely in place
- Consider using different glitter sizes and types for added visual interest
Pro tip: A clear top coat over glitter prevents it from snagging on hair or clothing and keeps the design protected throughout wear.
12. Rainbow with Gold Accents
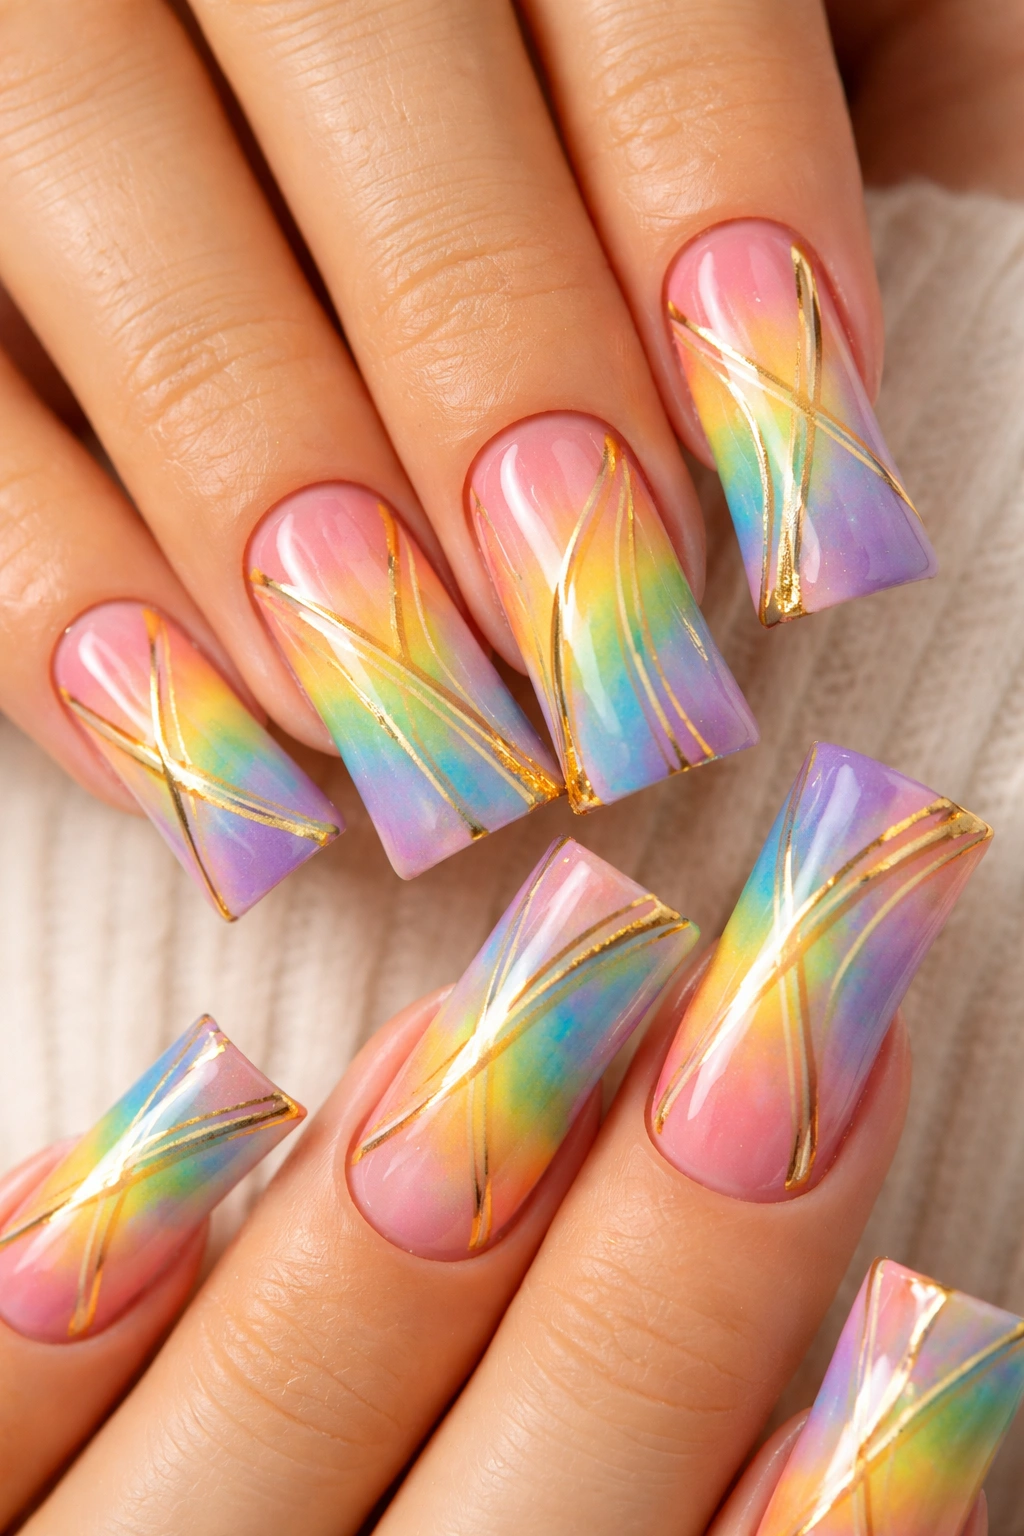
Layer a rainbow design (stripes, ombre, or geometric) with elegant gold accents like metallic lines, gold leaf, or gold foil details. The gold creates a sophisticated, luxe feeling and ties all the rainbow colors together visually. This design balances playful color with refined elegance, making it perfect for someone who wants impact without sacrificing sophistication.
Gold as a Unifying Element
Gold accents have a magical ability to make multicolored designs feel cohesive and intentional. The warmth of gold complements and enhances all rainbow colors, creating a sophisticated, high-end aesthetic. On duck nails, gold details draw attention to specific design elements and add luxury.
Incorporating Gold Details Effectively
- Start with your main rainbow design (gradient, stripes, geometric, etc.)
- Use thin gold striping tape to create gold accent lines between color sections
- Apply gold foil or gold leaf over a gel adhesive layer for a dimensional effect
- Paint thin gold lines using a detail brush for precise control
- A matte top coat over gold accents creates a more refined finish than glossy
Worth knowing: Real gold leaf creates the most authentic, luxurious appearance, though gold foil and metallic gold polish also work beautifully and are easier to apply.
13. Rainbow Marble Effect
Create a marbled rainbow design by swirling multiple rainbow colors together on each nail, creating organic, flowing patterns. The colors blend and interact naturally, creating a unique, unpredictable pattern that feels artistic and high-end. This design feels sophisticated and works beautifully on duck nails because the larger surface area showcases the marble pattern beautifully.
The Artistic Appeal of Marbled Design
Marble designs feel luxurious and artistic while maintaining an organic, natural aesthetic. Each nail becomes unique, even if you’re creating the same marble effect across multiple nails. The swirling colors create movement and interest that draws the eye.
Creating Marbled Rainbow Patterns
- Start with a white or cream base for the clearest color visibility
- Drop or brush rainbow colors onto the nail in small amounts
- Use a thin brush or toothpick to swirl the colors together in flowing, organic patterns
- Don’t overmix—the colors should swirl and blend naturally without becoming muddy
- Each nail will be slightly unique, which is part of the design’s beauty
- Seal with a glossy top coat to enhance the refined, marble-like appearance
Insider note: Swirling colors while they’re still slightly wet creates the best blending effect. If polish dries too quickly, your colors won’t merge naturally.
14. Candy Stripe Rainbow
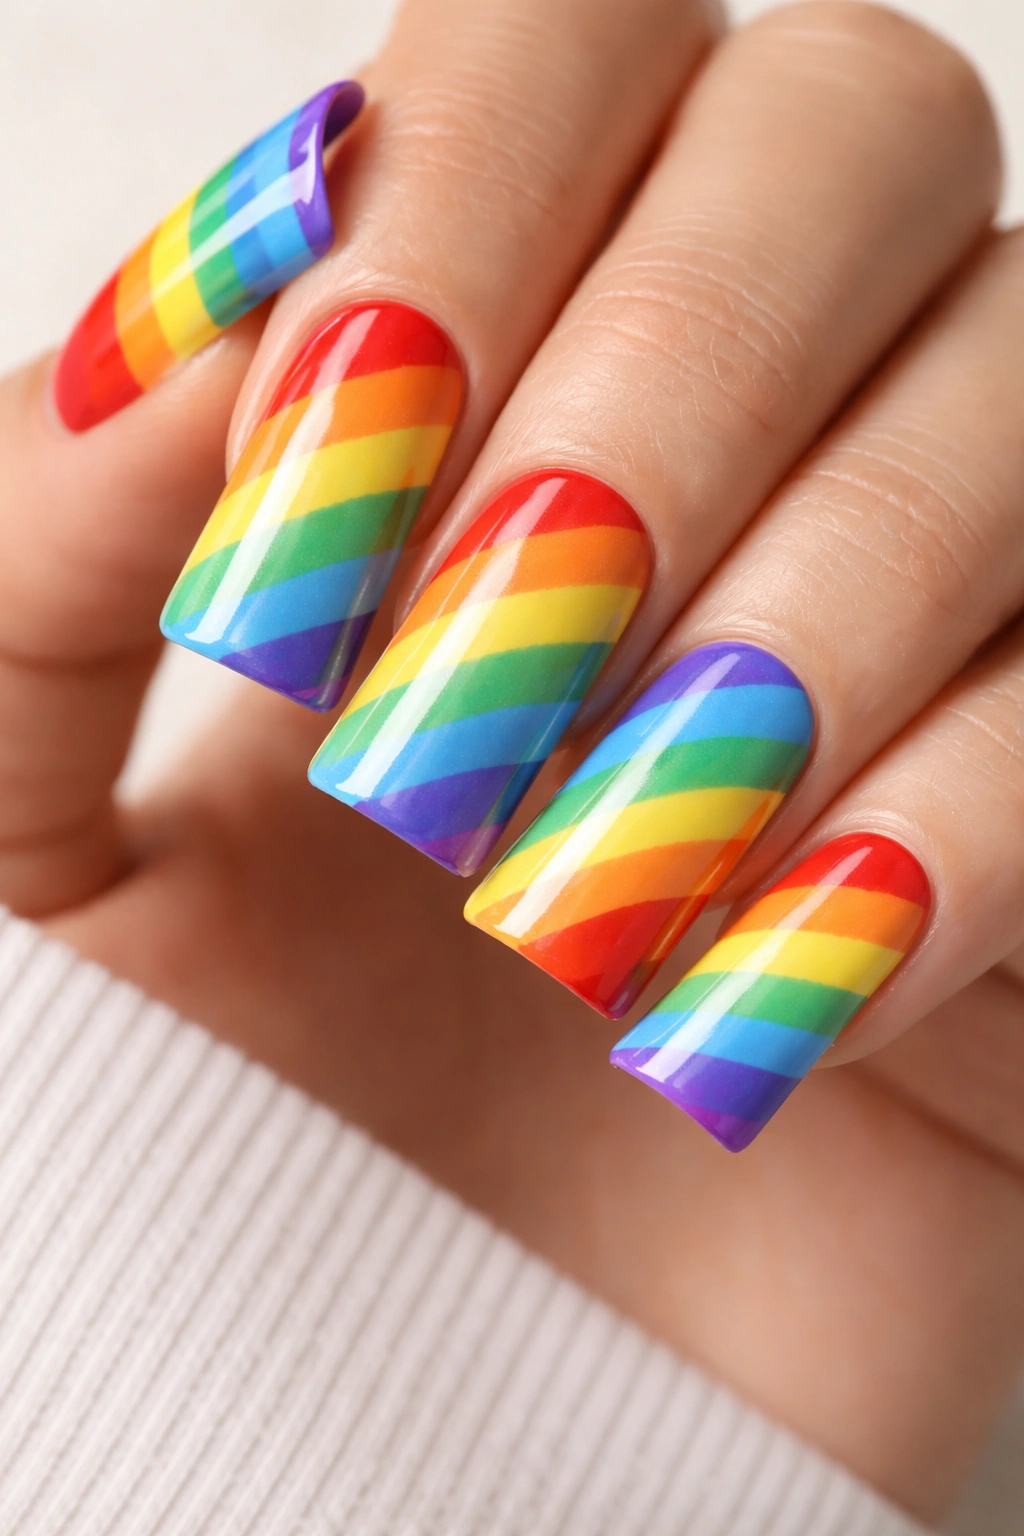
Candy stripe designs feature thick, bold stripes in bright, candy-colored rainbow shades—think red candy, orange sherbet, yellow lemon drop, mint green, blue cotton candy, and purple grape. The stripes are thicker and more structured than delicate thin stripes, creating a bold, playful, fun aesthetic. This design appeals to those who love color and aren’t afraid to make a statement.
Why Bold Stripes Feel Playful and Joyful
Bold, thick stripes create an immediately joyful, energetic aesthetic. The thick color blocks feel confident and fun without being chaotic. On duck nails, bold stripes appear striking without overwhelming the overall look.
Creating Bold, Uniform Stripes
- Use painter’s tape or thick striping tape to establish your stripe boundaries
- Make stripes approximately ¼ to ½ inch wide depending on your nail length
- Apply bold, opaque colors one at a time, allowing drying time between each stripe
- Remove tape while topcoat is just setting for the cleanest edges
- A thick, glossy top coat enhances the candy-bright appearance
- Consider whether you want vertical or horizontal stripes—both work beautifully on duck nails
Pro tip: Vertical stripes naturally elongate the nail, making them an especially flattering choice for duck nail shapes.
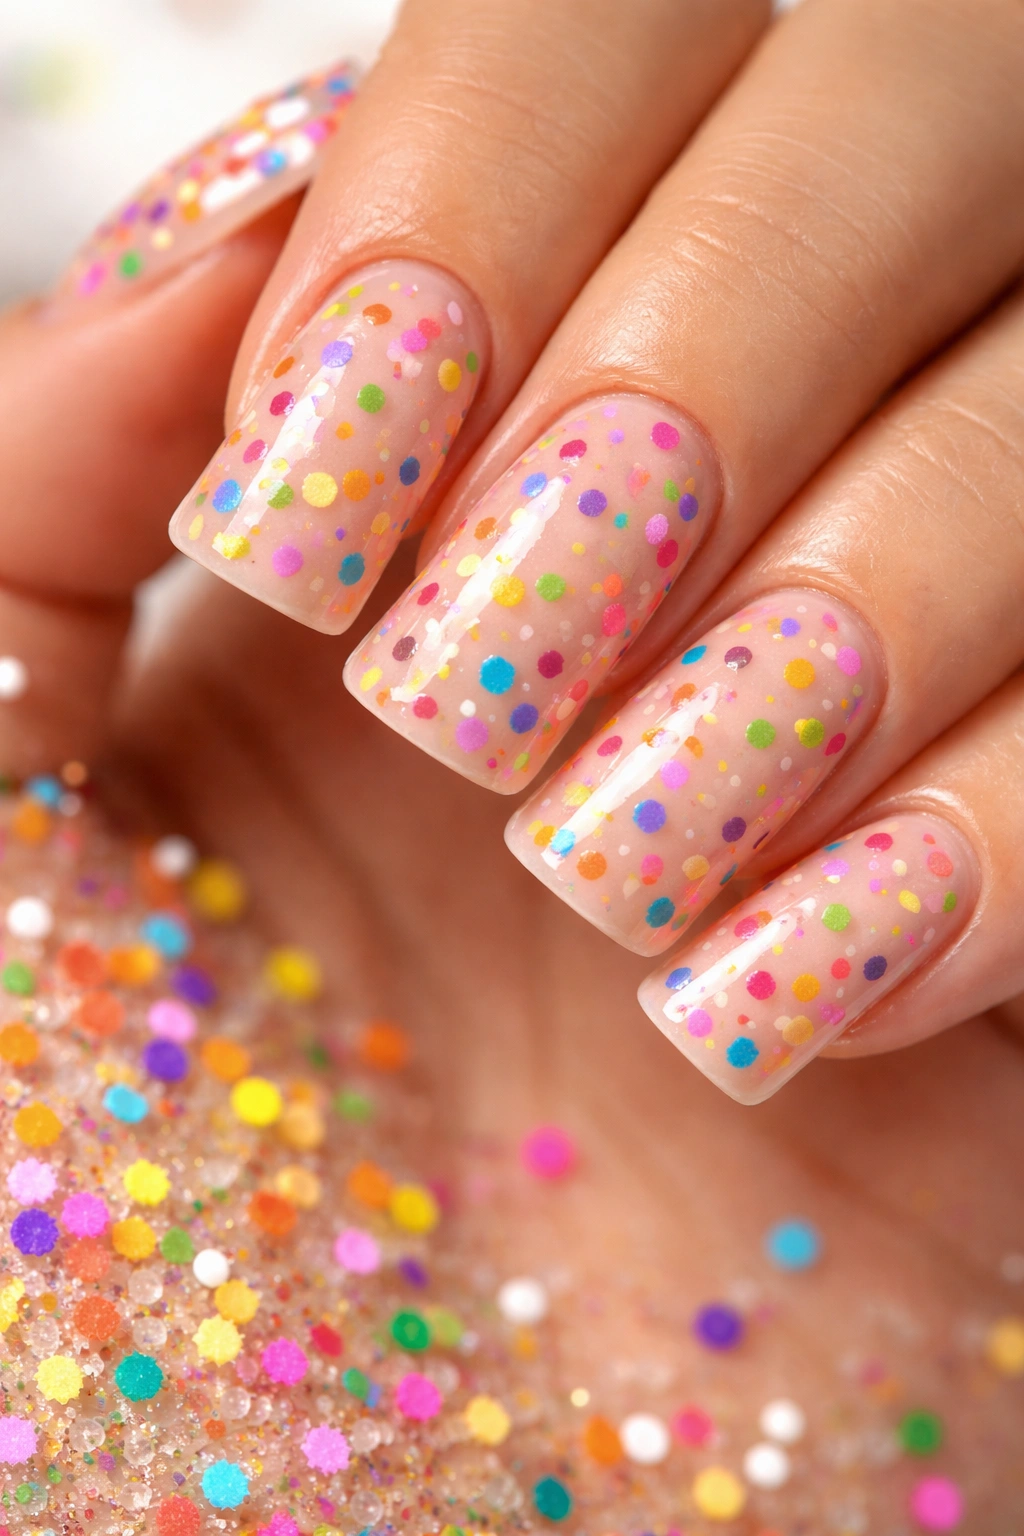
15. Rainbow Confetti Duck Nails
Sprinkle rainbow confetti-style details across a nude, white, or translucent base. Use dots, dashes, and small shapes in every rainbow color scattered randomly across the nail. This design feels celebratory and fun while maintaining a relatively clean, uncluttered aesthetic. The scattered confetti creates visual interest without covering the entire nail with color.
The Celebratory Energy of Confetti Design
Confetti scattered across nails immediately evokes celebration, joy, and festivity. The random placement makes each nail unique while maintaining a cohesive design. This design works beautifully for special occasions, celebrations, or simply wanting to feel joyful.
Creating Confetti Patterns
- Start with a nude, white, or very pale base
- Use a dotting tool to create small dots in each rainbow color scattered across the nail
- Add small dashes and tiny shapes for visual variety—not every piece of confetti should be identical
- Space confetti pieces far enough apart that they don’t feel chaotic or overwhelming
- Concentrate confetti more densely at the tips for a subtle gradient effect
- Seal with a glossy top coat for a polished, finished appearance
Worth knowing: A translucent or jelly base allows the confetti to feel less crowded because you can see through to the skin underneath.
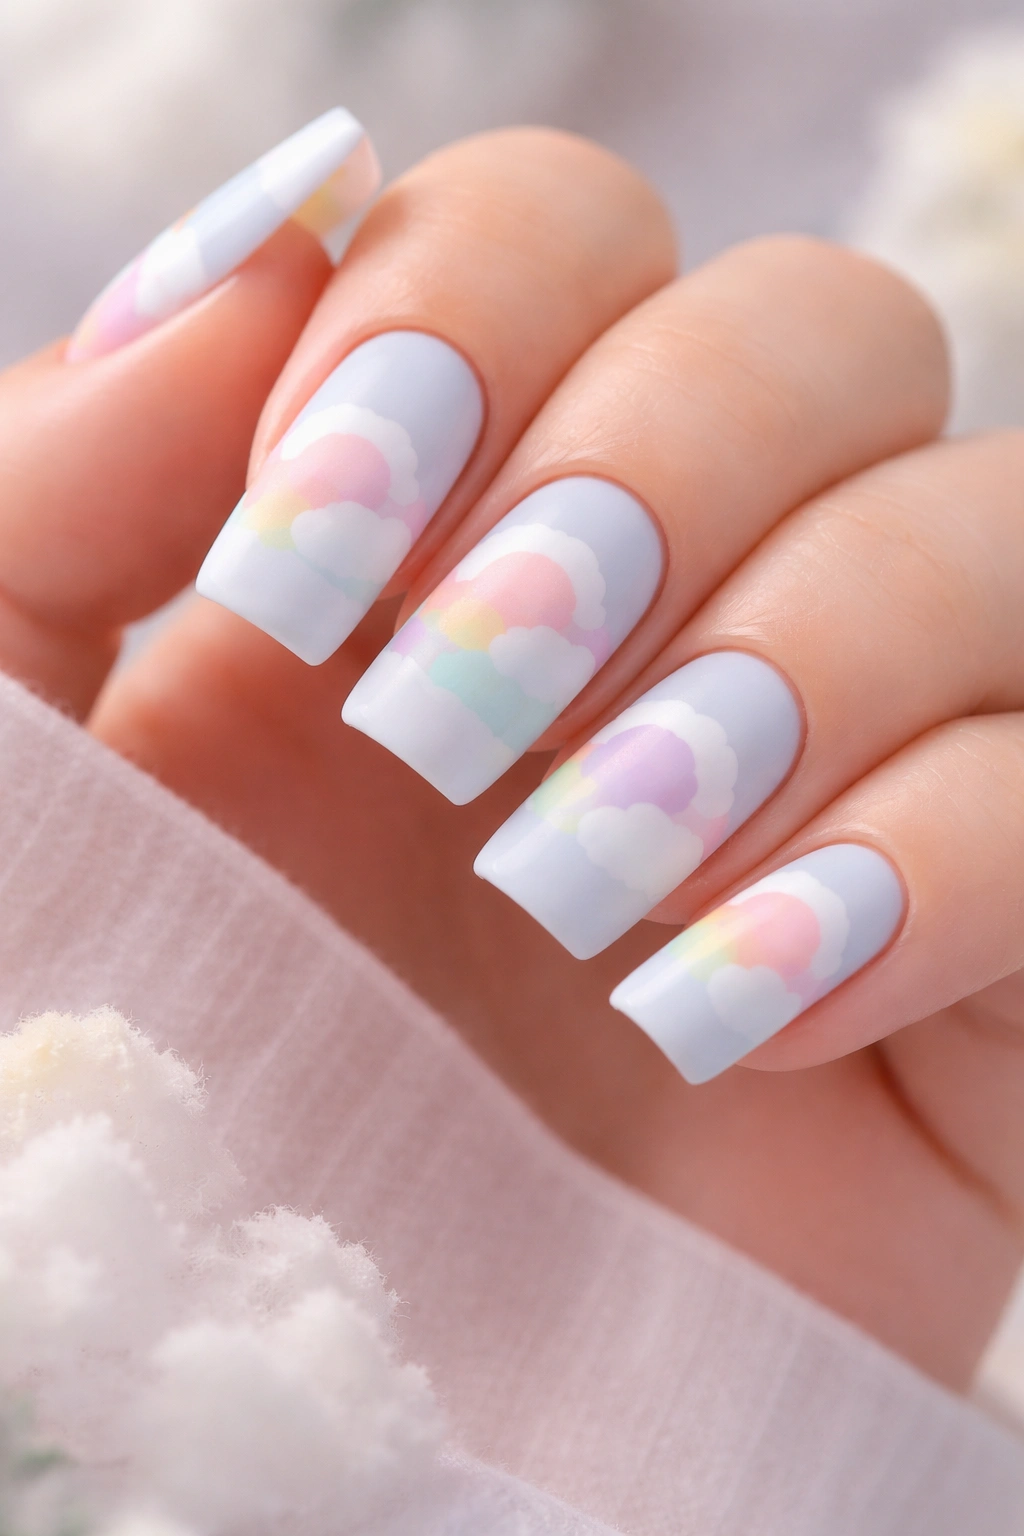
16. Pastel Rainbow Clouds
Create a dreamy cloud design filled with pastel rainbow colors. Paint white clouds across a light blue base, then fill the clouds with soft pastel versions of rainbow colors. The design feels whimsical, romantic, and artistic—perfect for someone who loves gentle, dreamy aesthetics. The elongated duck nail shape provides plenty of space to render detailed cloud shapes beautifully.
Capturing a Dreamy, Romantic Aesthetic
Cloud designs feel soft, gentle, and dreamy. When filled with pastel rainbow colors, they create a magical, artistic effect. This design appeals to those who prefer subtle sophistication over bold statements.
Painting Clouds with Rainbow Fills
- Start with a pale blue or lavender base
- Sketch cloud outlines using a thin brush or white pencil
- Paint white or very light gray clouds, allowing them to dry
- Fill each cloud with a different pastel rainbow color—pink cloud, peach cloud, yellow cloud, etc.
- Soften cloud edges with a barely-damp brush for a more organic appearance
- Add subtle shading within clouds using slightly darker pastel shades
- A matte or satin top coat enhances the soft, cloud-like appearance
Pro tip: Use a makeup sponge slightly dampened with white polish to create softer, more organic cloud edges.
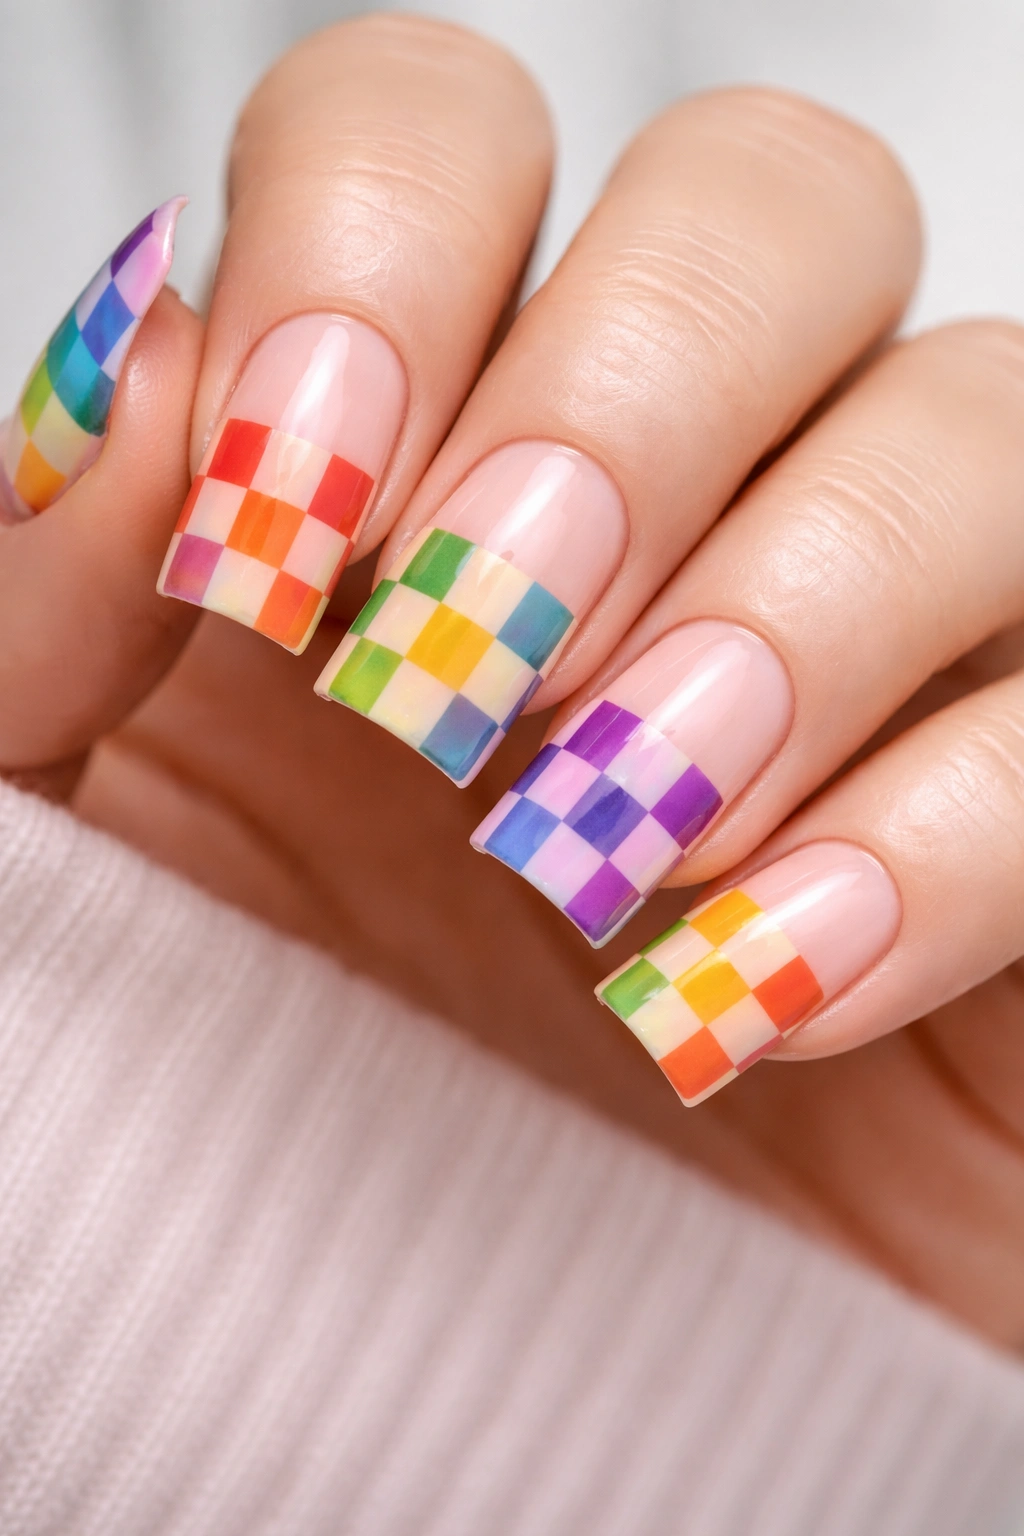
17. Rainbow Checkerboard Pattern
Create a checkerboard pattern using different rainbow colors for each square. This geometric design feels modern, artistic, and precise. On duck nails, you can fit approximately 4-6 squares depending on size, creating a structured, intentional design. The alternating colors create rhythm and visual interest while the structured pattern feels polished and intentional.
The Modern Appeal of Checkerboard Design
Checkerboard patterns feel retro-modern and artistic. The structured repetition creates visual rhythm while the rainbow colors add playful energy. This design appeals to those who appreciate geometric patterns and precision.
Creating Neat Checkerboard Patterns
- Decide on your square size—typically 3mm to 5mm squares work well on duck nails
- Use thin striping tape to create a grid pattern on your nail
- Fill alternating squares with different rainbow colors
- Work systematically—fill one color in all its designated squares, let dry, then move to the next
- Allow each color to dry before removing tape for the cleanest results
- A glossy top coat enhances the structured, modern appearance
Worth knowing: A white or nude base showing through empty squares creates better contrast than filling every single square with color.
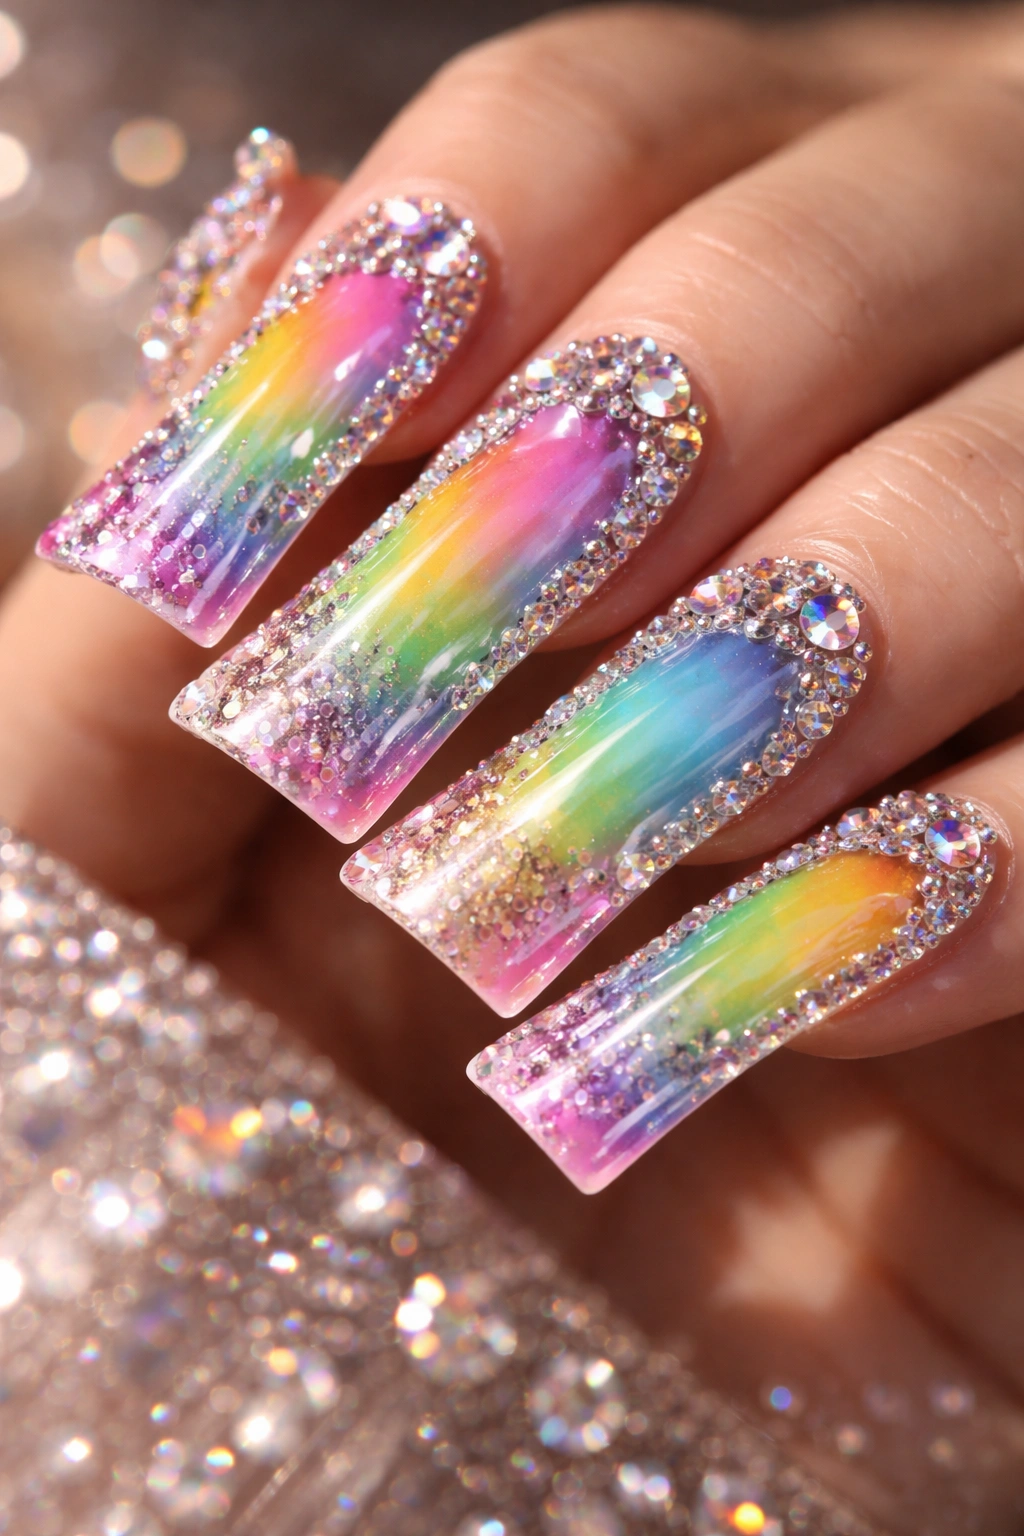
18. Crystalline Rainbow Duck Nails
Add crystal embellishments to a rainbow design for maximum glamour and sparkle. Create any rainbow base design—gradient, stripes, or geometric—then add small crystals, rhinestones, or glass gems in coordinating colors or clear crystals that catch light. The crystalline elements add texture, dimension, and an undeniably luxe aesthetic perfect for special occasions.
Adding Three-Dimensional Glamour
Crystals take any nail design from beautiful to absolutely show-stopping. The way they catch light creates movement and draws attention. On elongated duck nails, strategically placed crystals create maximum visual impact without feeling overwhelming.
Applying Crystals Securely
- Create your rainbow base design first, allowing it to dry completely
- Apply a thick layer of crystal gel or specialized crystal adhesive
- Use tweezers to pick up each crystal and press it into the adhesive at your desired angle
- Larger crystals work better than tiny ones on nails—they’re easier to handle and more visible
- Space crystals strategically—concentrate them at the tips or along one edge for elegance
- Cure with UV/LED light, then seal with a thick layer of clear top coat to hold gems permanently in place
- Ensure gems are fully encased in topcoat so they don’t snag on anything
Pro tip: Invest in quality crystal adhesive specifically formulated for nail art—regular gel or topcoat won’t hold crystals as securely.
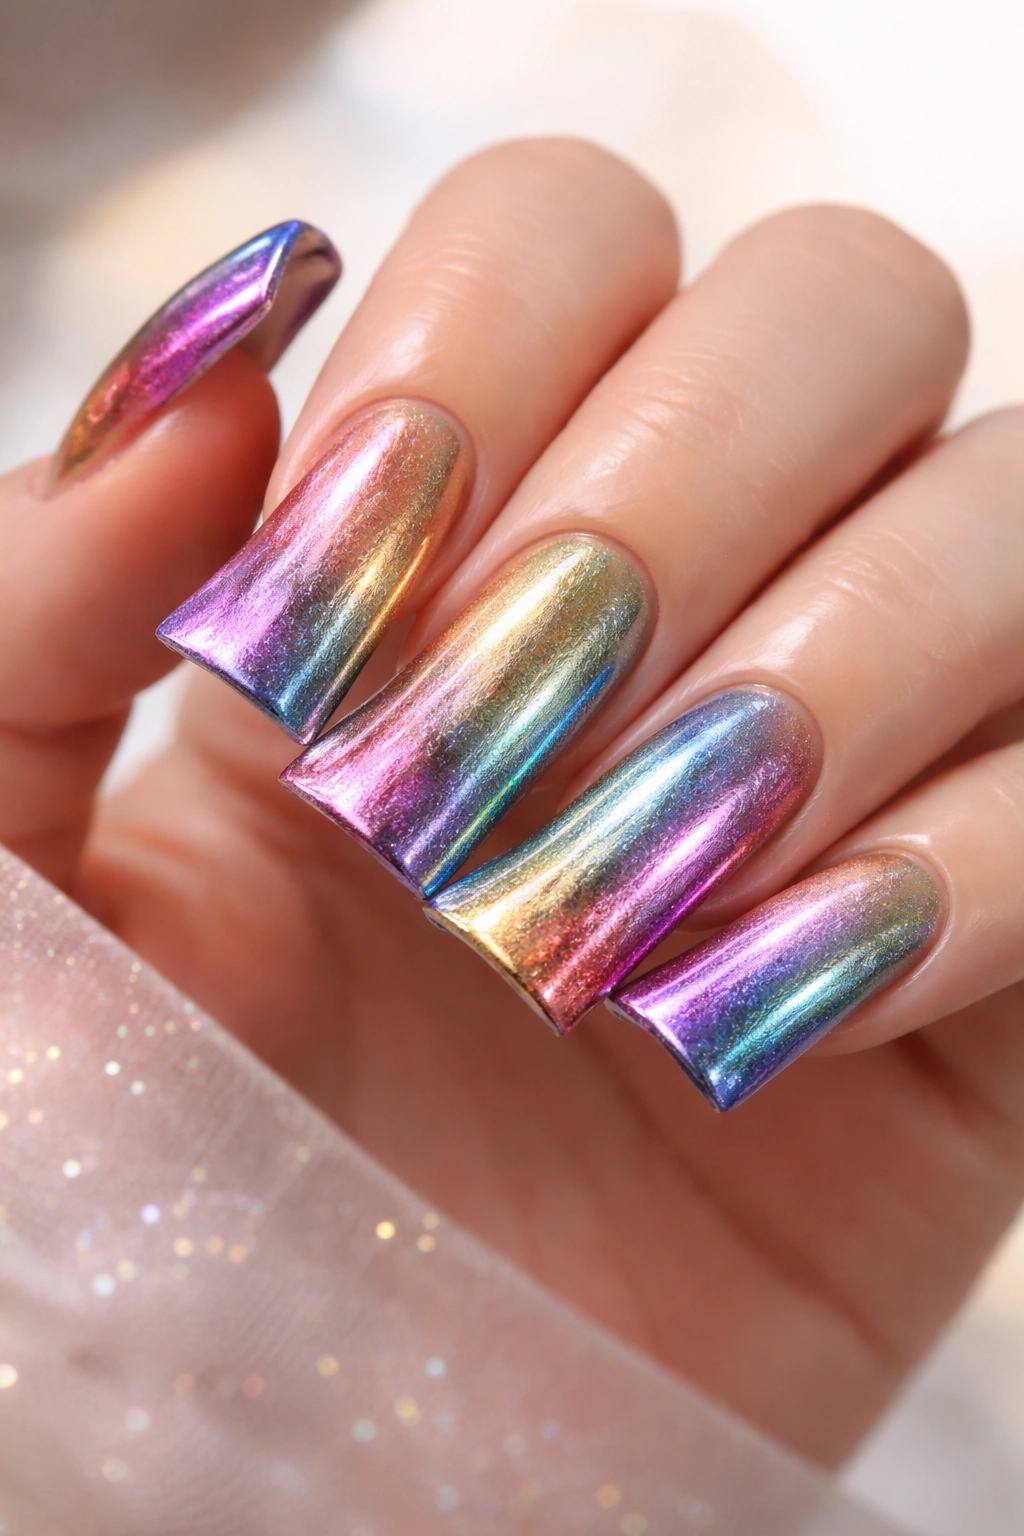
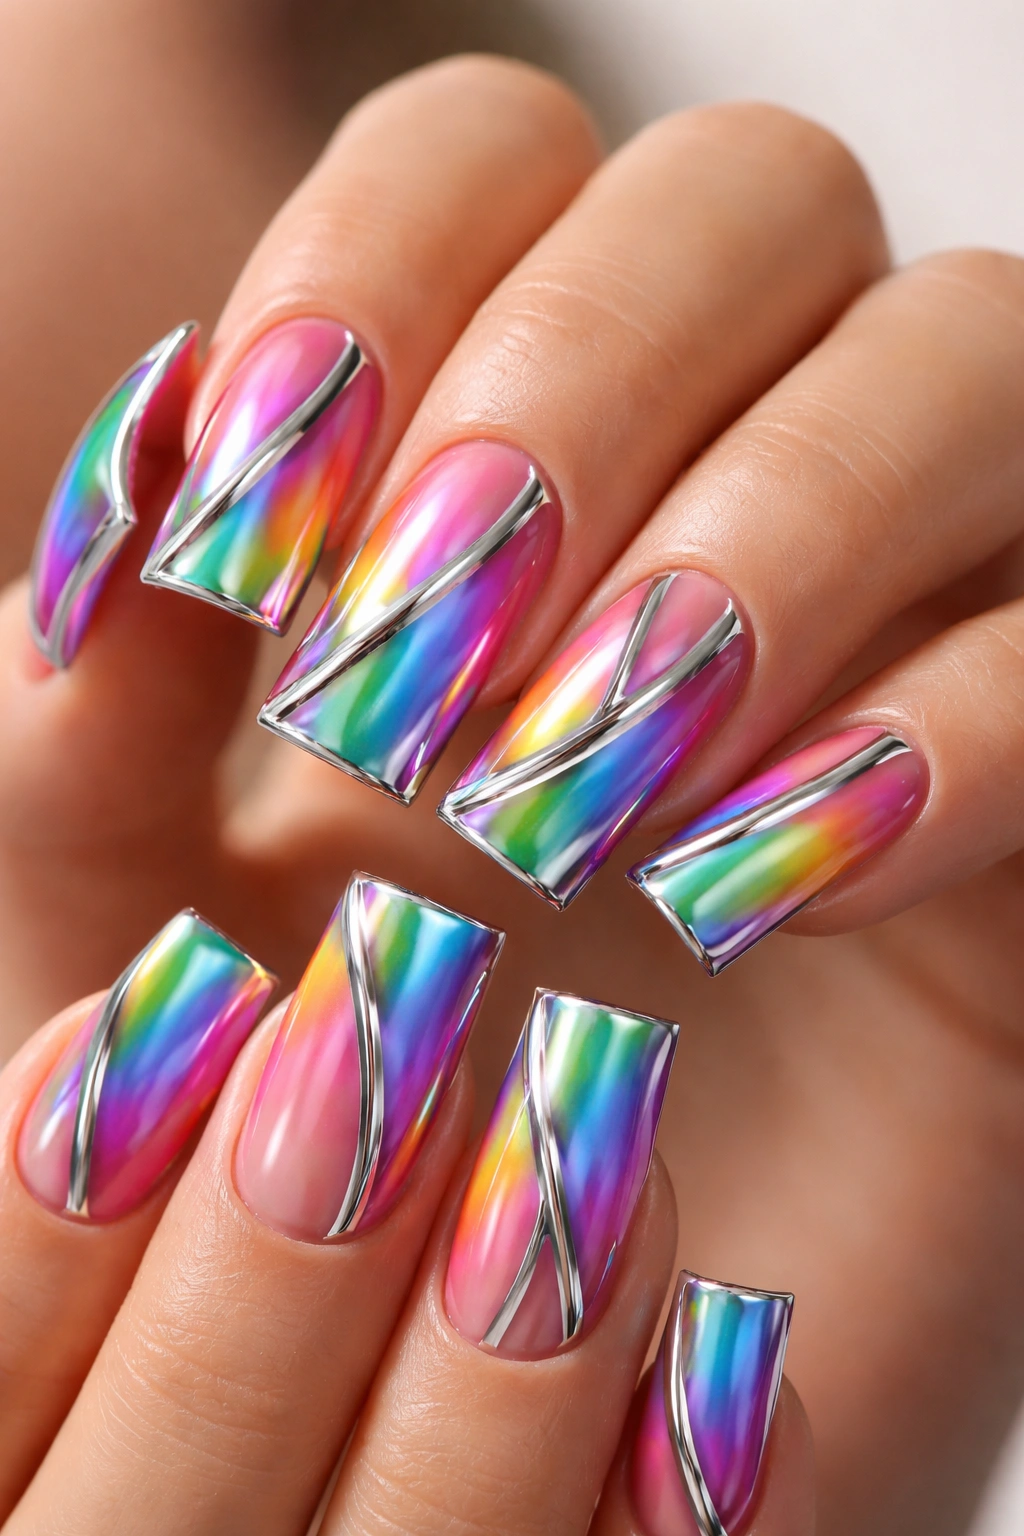
19. Rainbow with Chrome Accents
Apply a rainbow design base, then layer chrome or mirror finish elements on top for an ultra-modern, high-tech aesthetic. The chrome creates reflective, metallic accents that shimmer and shift with movement. This design feels contemporary and luxe—perfect for someone who loves cutting-edge nail art and modern aesthetics.
The Futuristic Appeal of Chrome Elements
Chrome finishes create an otherworldly, reflective quality that makes nails look almost like mirrors. The contrast between smooth rainbow colors and shimmering chrome creates visual interest and technological sophistication. This design feels forward-thinking and fashion-forward.
Incorporating Chrome Elements
- Create your rainbow base design first—stripes, ombre, or geometric all work beautifully
- Apply chrome powder using a specialized applicator brush over a gel adhesive layer
- Chrome looks most striking as accent lines, tips, or geometric shapes rather than covering the entire nail
- The contrast between matte or glossy rainbow base and reflective chrome is what makes this design stunning
- Seal chrome elements with a clear top coat to protect the mirror finish
- Chrome on nails requires very careful handling—avoid touching the chrome surface unnecessarily
Worth knowing: Quality chrome powder makes an enormous difference—invest in professional-grade products rather than cheaper alternatives that may appear dull or uneven.
20. Soft Rainbow Gradient
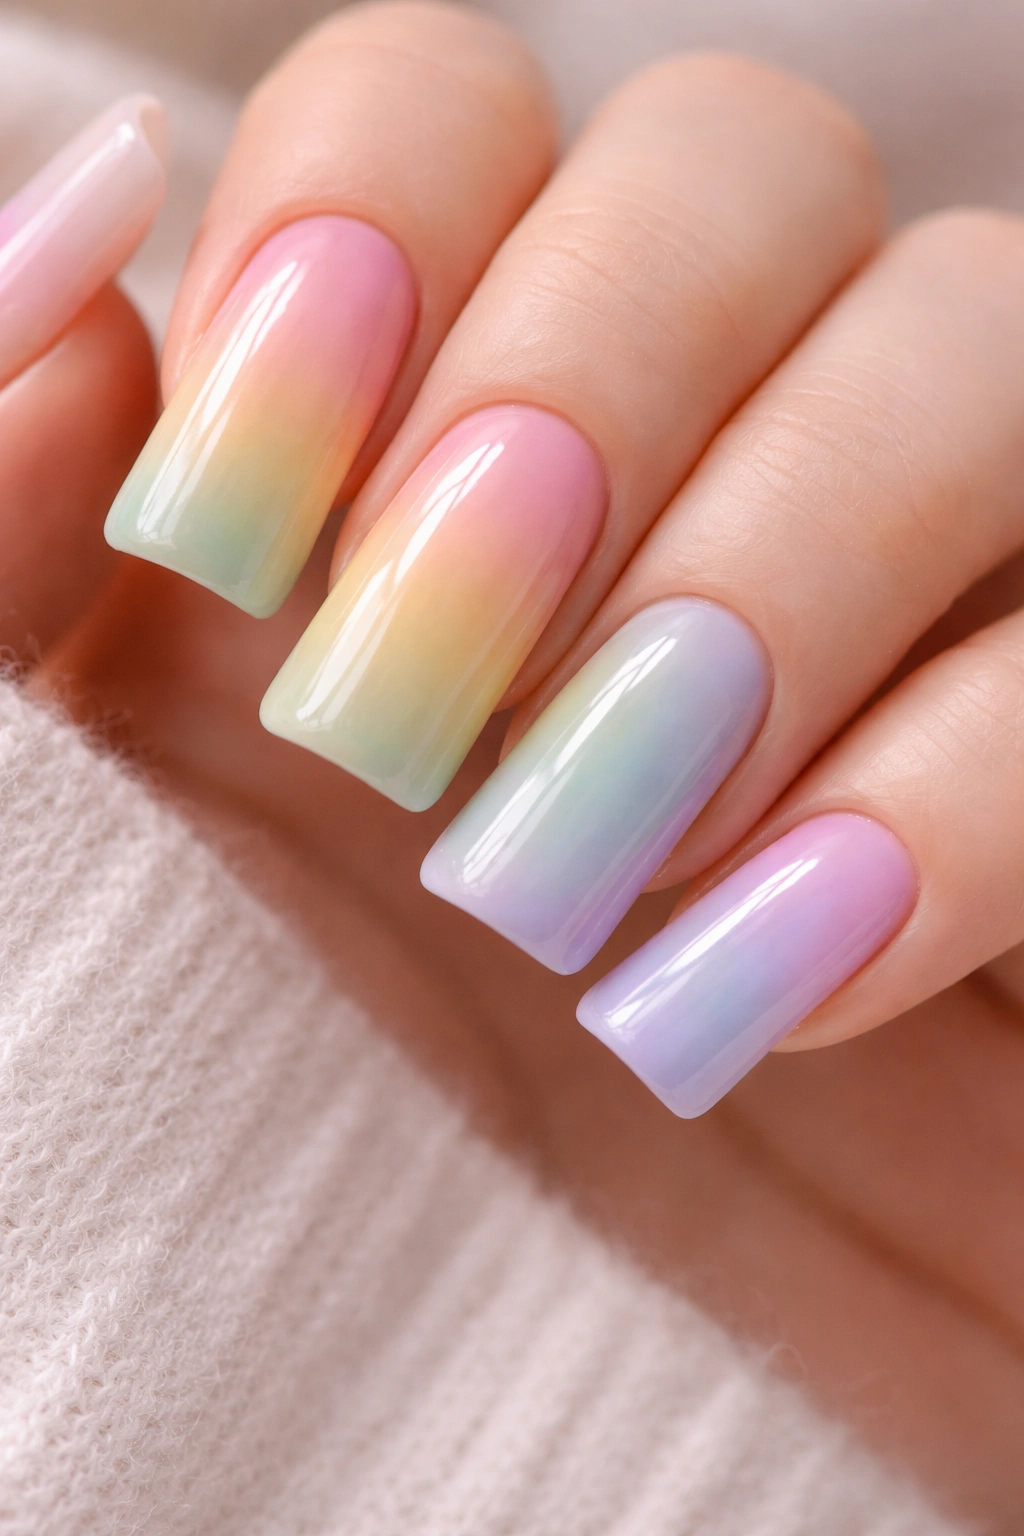
End with a sophisticated soft rainbow gradient that flows gently from one color to the next across the length of your nail. Unlike the bold ombre version, this uses softer, more muted tones of rainbow colors—dusty rose, soft peach, butter yellow, sage green, powder blue, and lavender. The colors blend subtly and smoothly, creating an elegant, artistic gradient perfect for someone who loves color but prefers a subtle approach.
Why Soft Gradients Feel Sophisticated
Soft, muted tones create an elegant, refined aesthetic rather than a bold, statement-making one. The subtle color transitions feel artistic and intentional without being overwhelming. This design bridges the gap between bold rainbow and neutral elegance.
Creating Smooth Soft-Tone Gradients
- Choose muted, dusty versions of rainbow colors rather than saturated, bright ones
- Apply colors to a dampened makeup sponge in rainbow order, slightly overlapping each shade
- Dab the sponge onto your nail using gentle pressure to blend colors smoothly
- Work slowly—soft gradients benefit from patient, careful blending
- Use a barely-damp brush to soften edges and blend color transitions
- Build up the gradient gradually with thin layers rather than applying heavy color at once
- Seal with a glossy top coat that enhances the smooth, polished appearance
Pro tip: This design photographs beautifully in natural light, where soft color transitions become most visible and striking.
Final Thoughts
Rainbow duck nails offer endless creative possibilities, whether you prefer bold, dramatic designs or soft, subtle elegance. The elongated shape creates a stunning canvas for color and artistry, and the versatility means you can express yourself in whatever way feels authentic. From glittery ombres to geometric patterns, metallic accents to dreamy watercolor effects, each design celebrates color and creativity.
The most important part of choosing your perfect rainbow duck nail design is selecting something that genuinely excites you. The designs that photograph best and bring the most joy are the ones that match your personal style and make you feel confident. Whether you’re creating these yourself or working with a skilled nail technician, communicate your vision clearly and don’t hesitate to customize any design to match your preferences.
Remember that nail trends evolve continuously, but rainbow colors will always represent joy, creativity, and self-expression. Your duck nails are a perfect opportunity to brighten your day and show the world a little extra color and personality. Take time to enjoy the compliments, appreciate the artistry, and most importantly, wear your colorful nails with confidence.
