

Duck nails are having a serious moment, and the Y2K aesthetic just took them to a whole new level. If you’re not familiar, duck nails are characterized by that distinctive flat, wide shape that fans out slightly at the tips—think more paddle than traditional pointed nail. The name comes from the resemblance to a duck’s bill, and honestly, once you see it, you can’t unsee it. But here’s what makes them truly captivating right now: that perfect intersection of Y2K nostalgia and contemporary nail artistry.
The beauty of Y2K duck nails is that they capture everything we love about early 2000s design—bold colors, playful patterns, sparkly details, and that unapologetic maximalist vibe—but on a canvas that feels fresh and surprisingly elegant. These nails aren’t just a throwback; they’re a statement that says you understand both retro culture and current trends. Whether you’re drawn to the shimmery metallics, the fun character designs, the nail art that tells a story, or the color combinations that shouldn’t work but absolutely do, there’s a Y2K duck nail style waiting to become your new obsession.
The versatility of duck nails is honestly what makes them so addictive. They work for people who love bold self-expression and for those who prefer subtle sophistication. They’re flattering on different hand shapes and work for various nail lengths. And when you combine that shape with the endless possibilities of Y2K design inspiration, you’ve got a category that genuinely feels endless. Let’s explore 18 stunning Y2K duck nail designs that prove this trend isn’t going anywhere.
1. Butterfly Wings with Iridescent Shimmer
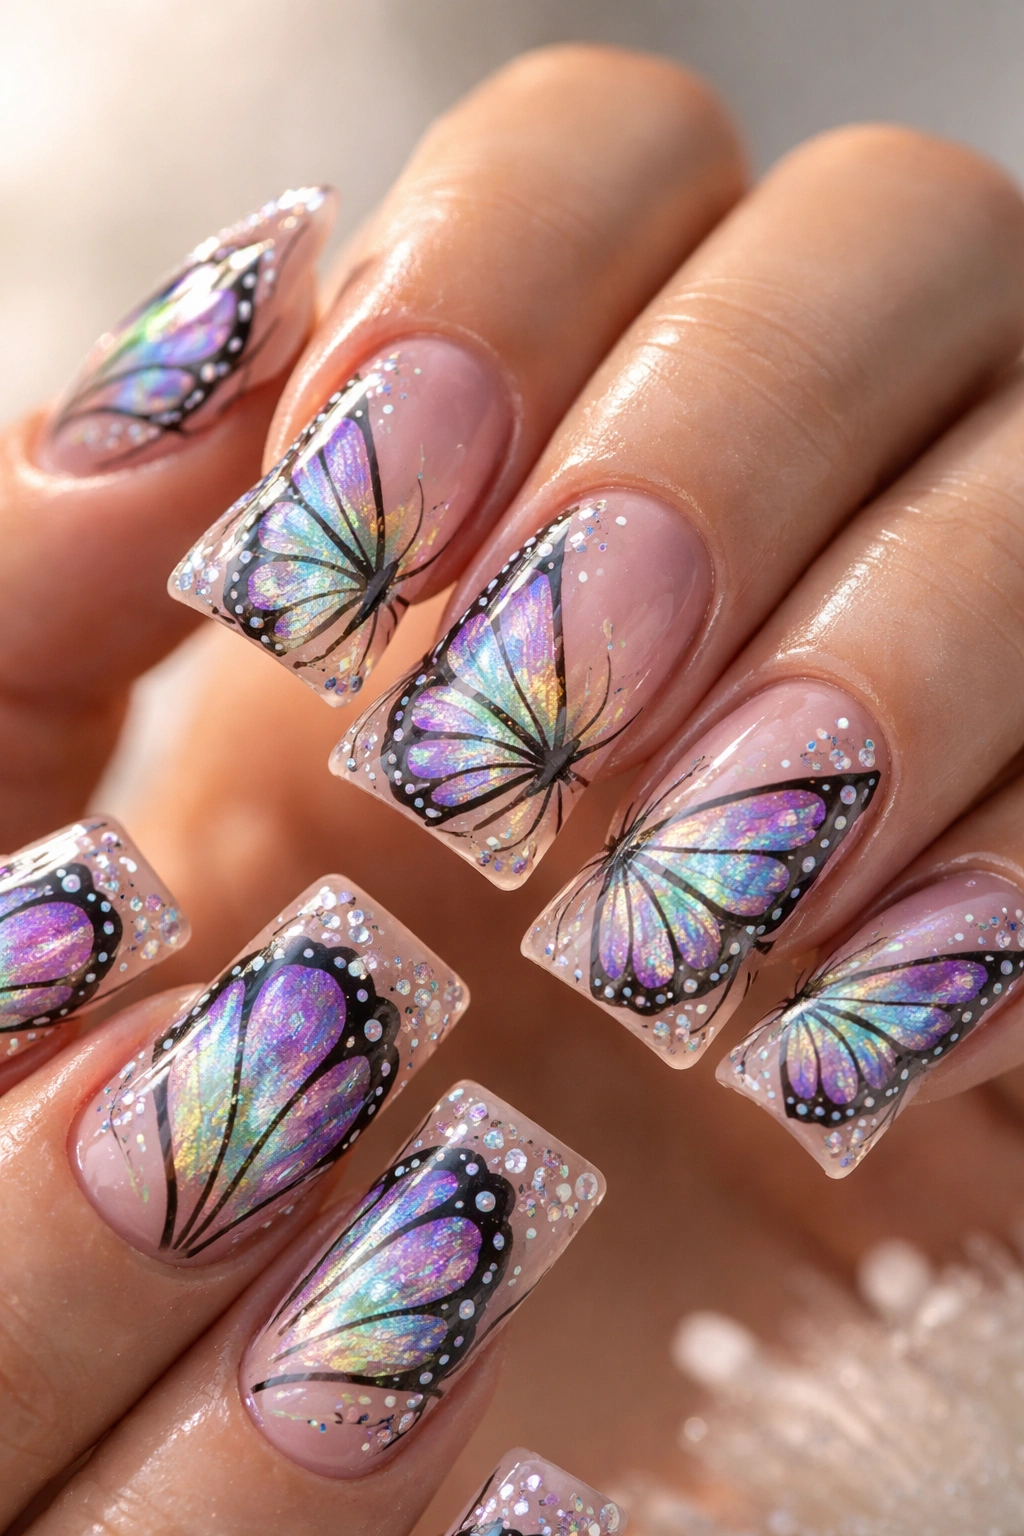
Butterflies were THE symbol of Y2K femininity, and they look absolutely magical on duck nails. Picture a soft nude or pale pink base with delicate butterfly wing designs hand-painted across the surface, then layered with iridescent shimmer that catches the light differently from every angle. The flat, wide canvas of duck nails gives butterfly designs room to truly shine—you can include intricate wing details, tiny antennae, and dimensional shading that would feel cramped on a traditional nail shape.
Why This Design Works So Well
The combination of butterflies and iridescence captures pure Y2K energy while feeling sophisticated enough for any occasion. Butterflies represent transformation and joy, which is exactly the vibe these nails give off. The shimmer adds movement and catches light in ways that make your nails impossible to ignore.
Design Tips to Try
- Layer two or three shades of shimmer—pearl, holographic, and rose gold—for maximum depth
- Add tiny rhinestones on the butterfly bodies for extra sparkle
- Use a peachy or champagne base to complement warmer skin tones, or a lavender base for cooler undertones
- Leave some butterfly designs outlined rather than filled in for a more delicate look
2. Chunky Holographic Glitter with Nude Base
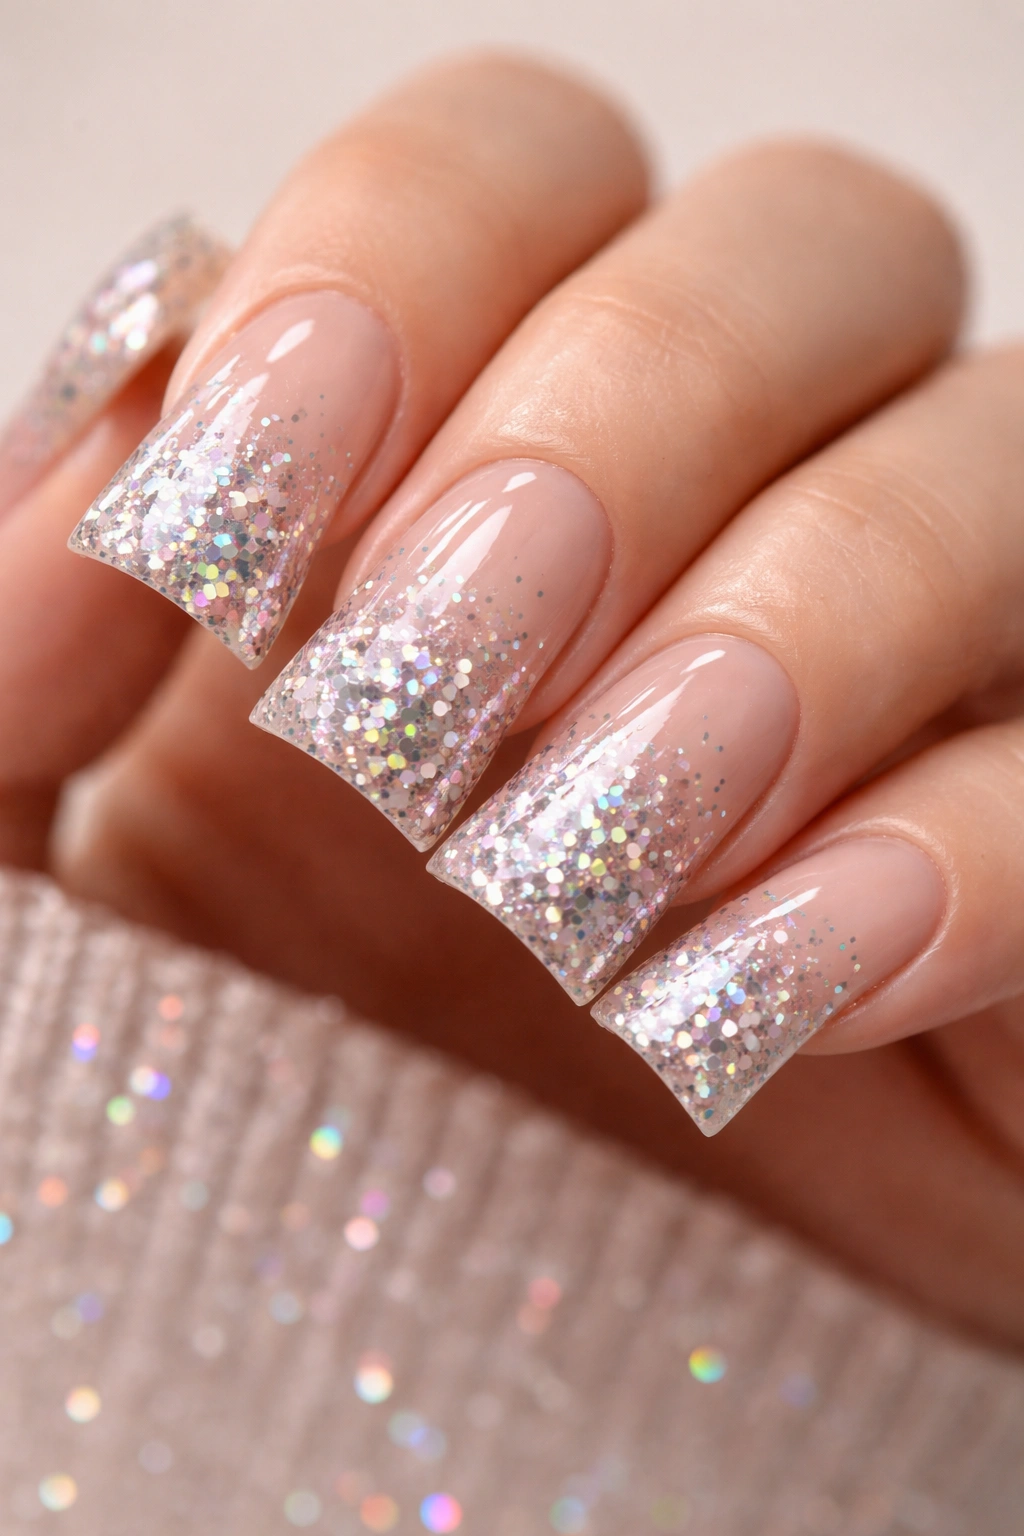
This is the nail equivalent of putting on your favorite low-rise jeans and baby tee combo. Start with a clean, nude or beige base—something that feels almost boring on its own—then layer it with chunky, holographic glitter that catches light like you’re wearing liquid metal on your fingers. The beauty here is that the restraint of the base makes the glitter pop even harder.
What Makes the Sparkle Special
Y2K wasn’t subtle about glitter, and neither should you be. But the trick is using larger, chunkier glitter pieces instead of the fine stuff—they look more intentional, more luxe, and definitely more early 2000s. The holographic finish means the glitter shifts from pink to blue to green depending on the light and angle.
Application and Maintenance
- Apply the base coat and let it fully cure, then apply glitter-packed top coat
- Use a matte top coat over the glitter for a more sophisticated finish, or glossy if you want pure shimmer
- Expect glitter to last about 2 weeks with proper sealing
- Bring a small glitter-removal kit when you travel—these nails shed glitter like it’s their job
3. Baby Pink with Tiny Rhinestone Details
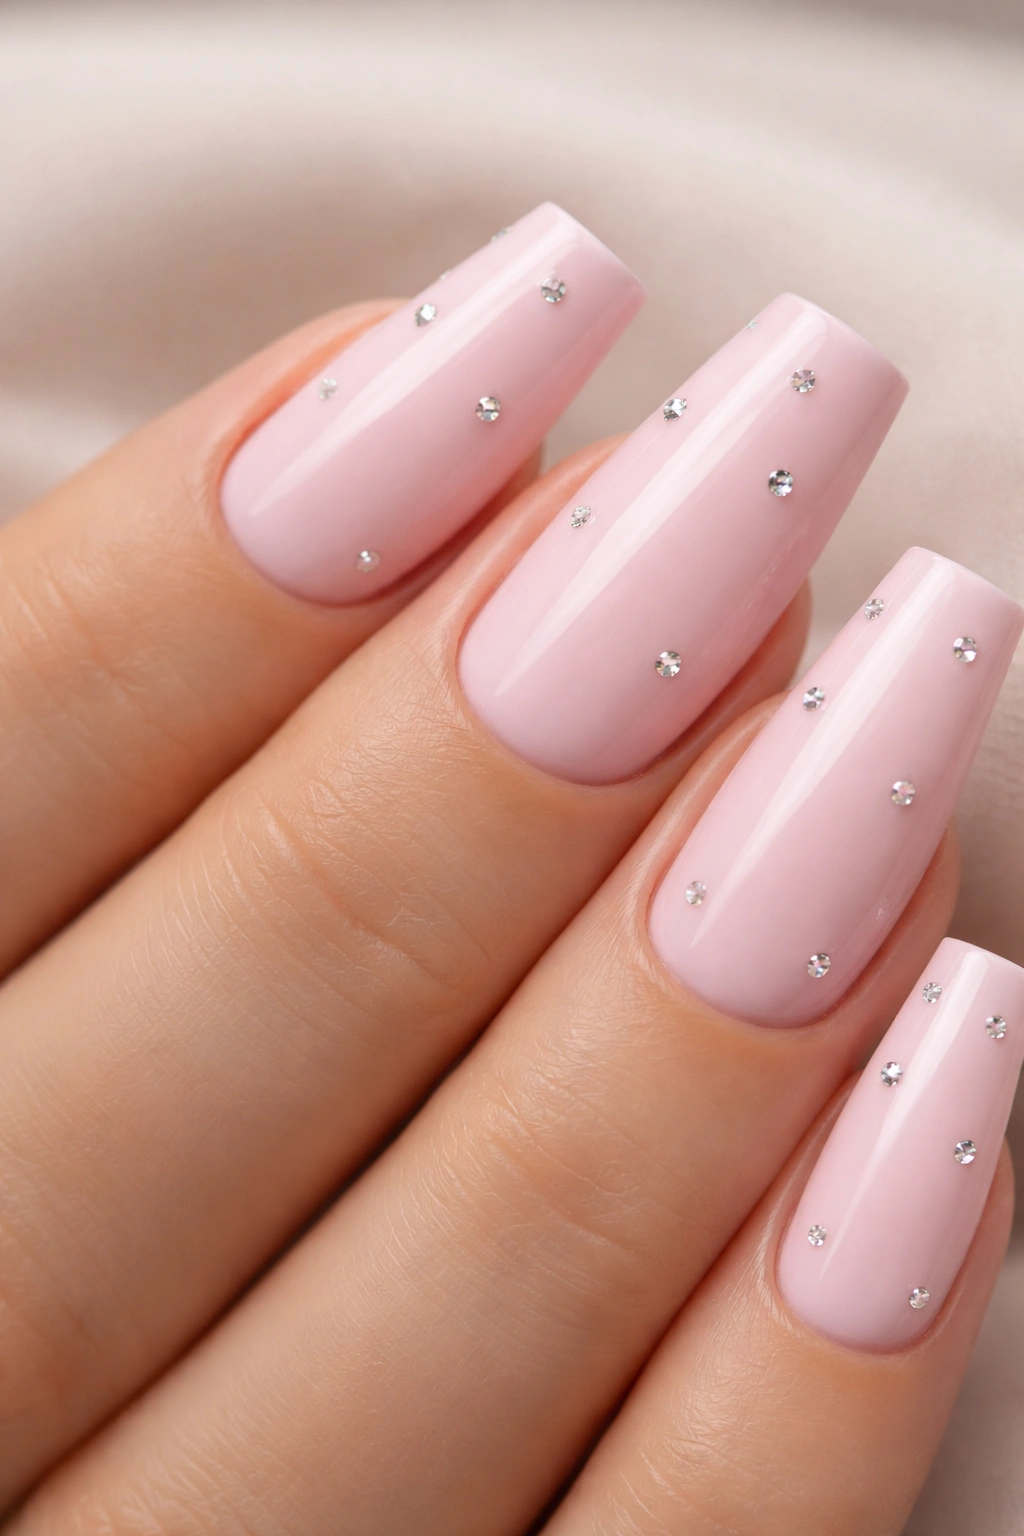
Sometimes the most striking designs are the simplest ones. A pale, bubblegum baby pink base is pure Y2K nostalgia all on its own, and when you add tiny rhinestones scattered artfully across each nail—maybe arranged in a pattern, maybe random, maybe clustered at the tips—you’ve got something that feels both timeless and trendy. Duck nails make the rhinestones look intentional and elegant rather than costume-y.
The Power of Simplicity
This design proves you don’t need complicated nail art to turn heads. The duck nail shape already draws attention; the pastel pink evokes the entire aesthetic of Paris Hilton and early celebrity culture; and the rhinestones add just enough sparkle to feel special. It’s the kind of design that works for a first date, a job interview, or a night out with friends.
Rhinestone Placement Ideas
- Diagonal line from the base to the tip for a subtle detail
- Cluster them all at the cuticle area for a “jewelry” look
- Scatter them randomly for a more playful, carefree vibe
- Create a small crown or tiara shape at the tip
- Place a single large rhinestone at the center of each nail
4. Gradient Ombre in Sunset Colors
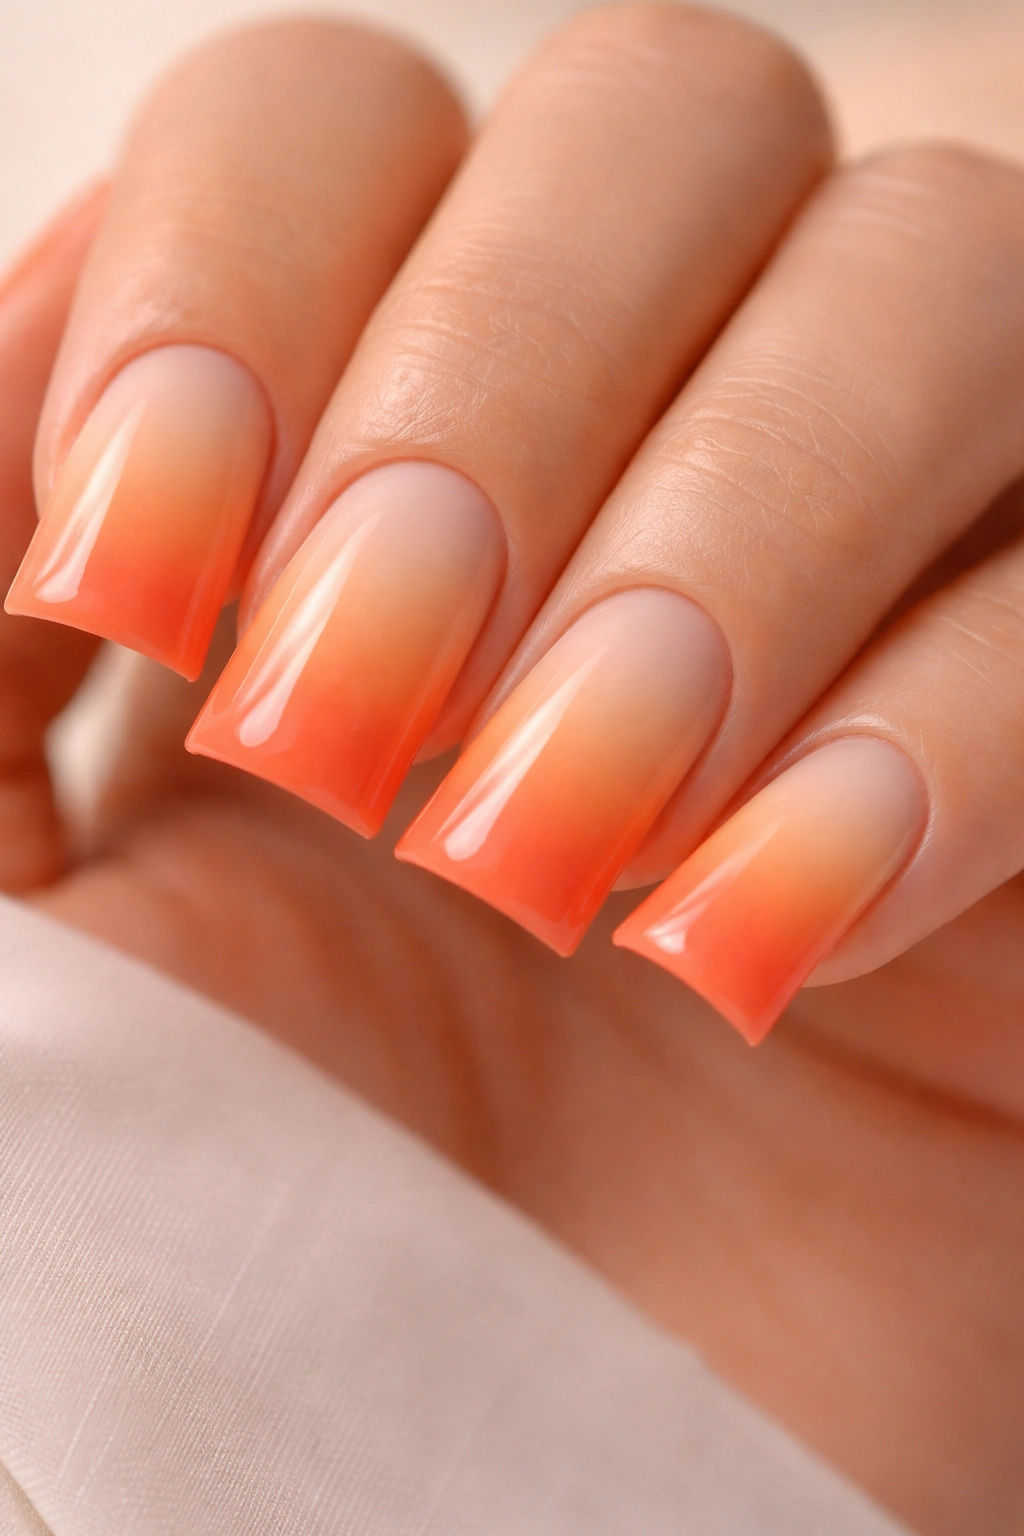
Gradients were the height of Y2K nail fashion, and when done right on duck nails, they look absolutely professional and dreamy. Think a warm ombré that starts with pale peach at the base, transitions to coral in the middle, and deepens to warm orange at the tips. The width of duck nails gives you a gorgeous canvas for smooth color transitions that actually feel like watching a sunset happen on your fingers.
Creating the Perfect Ombre
This design works best with gel polish, which allows you to blend colors seamlessly. You’ll use a sponge or blending technique to create those smooth transitions, building up color gradually so there are no harsh lines. The flat surface of duck nails makes blending easier than it would be on curved nail shapes.
Color Combinations That Hit Hard
- Peach to coral to burnt orange for warmth
- Baby pink to hot pink to magenta for a statement
- Pale yellow to gold to amber for sophistication
- Lavender to purple to deep plum for mystery
- Mint green to teal to navy for cool vibes
5. Y2K-Style Flame Tips with Metallic Gold
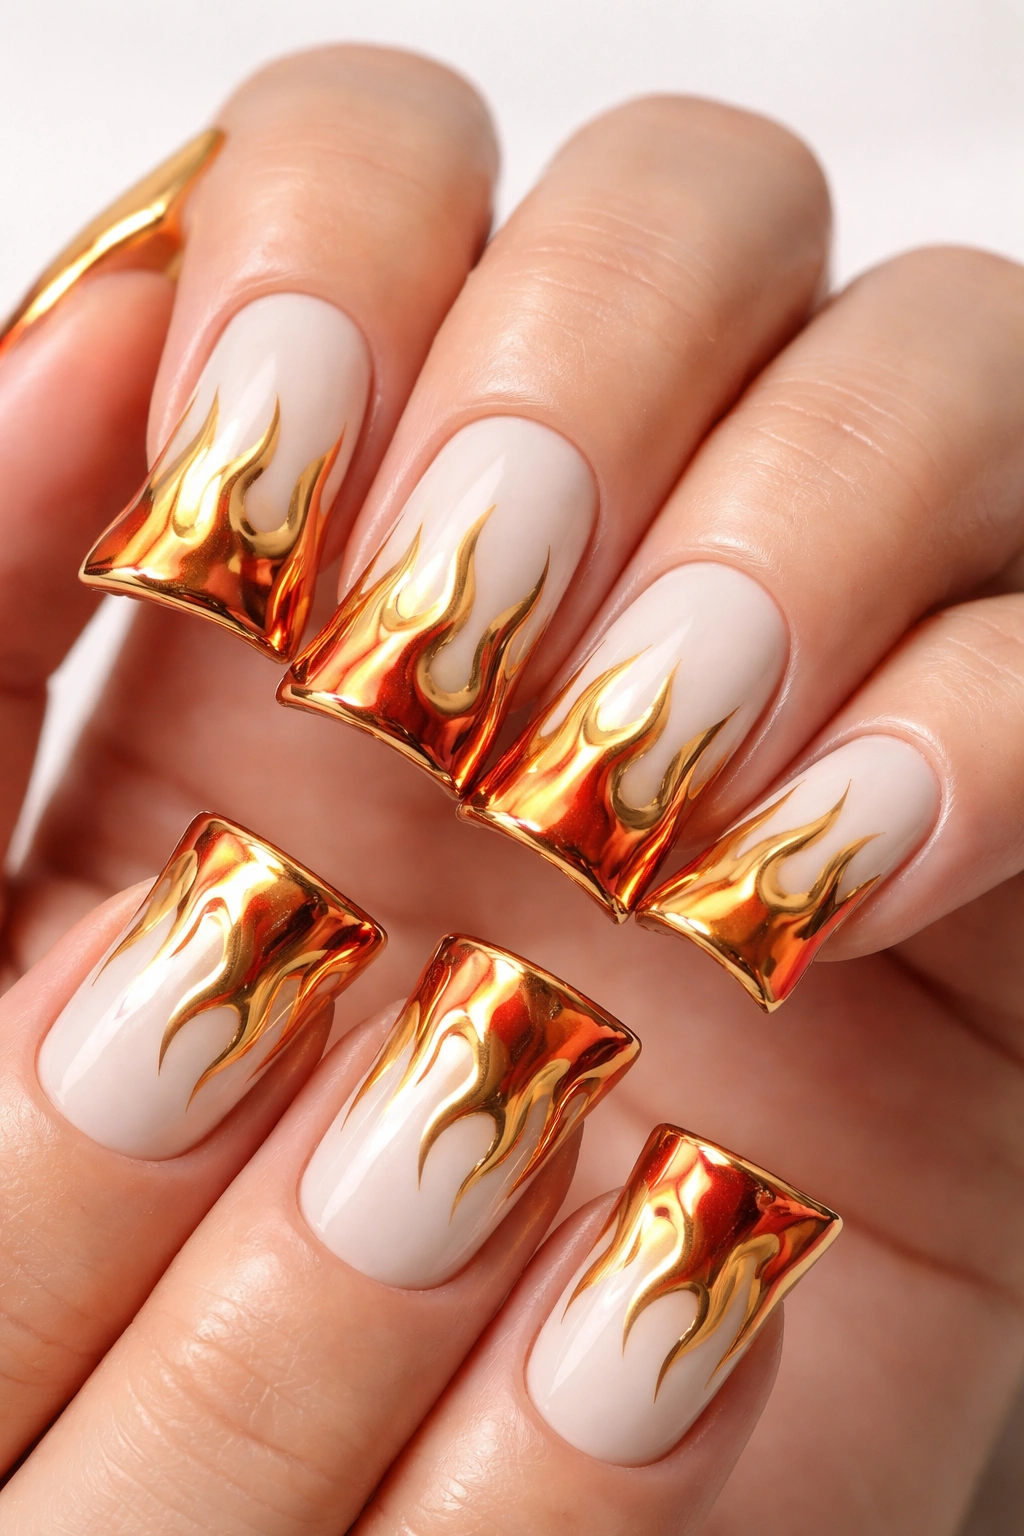
Flames on nails feel like they should be cheesy, but they’re not—especially when executed with the kind of precision that makes them look like genuine nail art rather than a temporary decal. Imagine a clean white or cream base with flame designs in warm golds, oranges, and reds licking up from the tip, maybe with a metallic gold outline that makes the flames pop. On duck nails, these flames have room to be detailed and dramatic.
The Technique Behind Realistic Flames
Instead of trying to freehand flames (which is actually harder than it sounds), many nail artists use thin brushes and create organic, flowing shapes that naturally read as flames. The key is varying the width of each flame and using multiple shades to create depth—some flames in bright orange, some in deeper red, some in golden yellow, with shadows in darker orange or burgundy.
Pro Tips for Flame Designs
- Let each color layer dry slightly before adding the next so you get clean edges
- Use a very thin brush to create fine details and sharp flame points
- Consider adding a subtle glow by using a lighter shade at the base of each flame
- Seal with a glossy top coat so the metallic elements really shine
- Practice on nail wheels before committing to this design on your actual nails
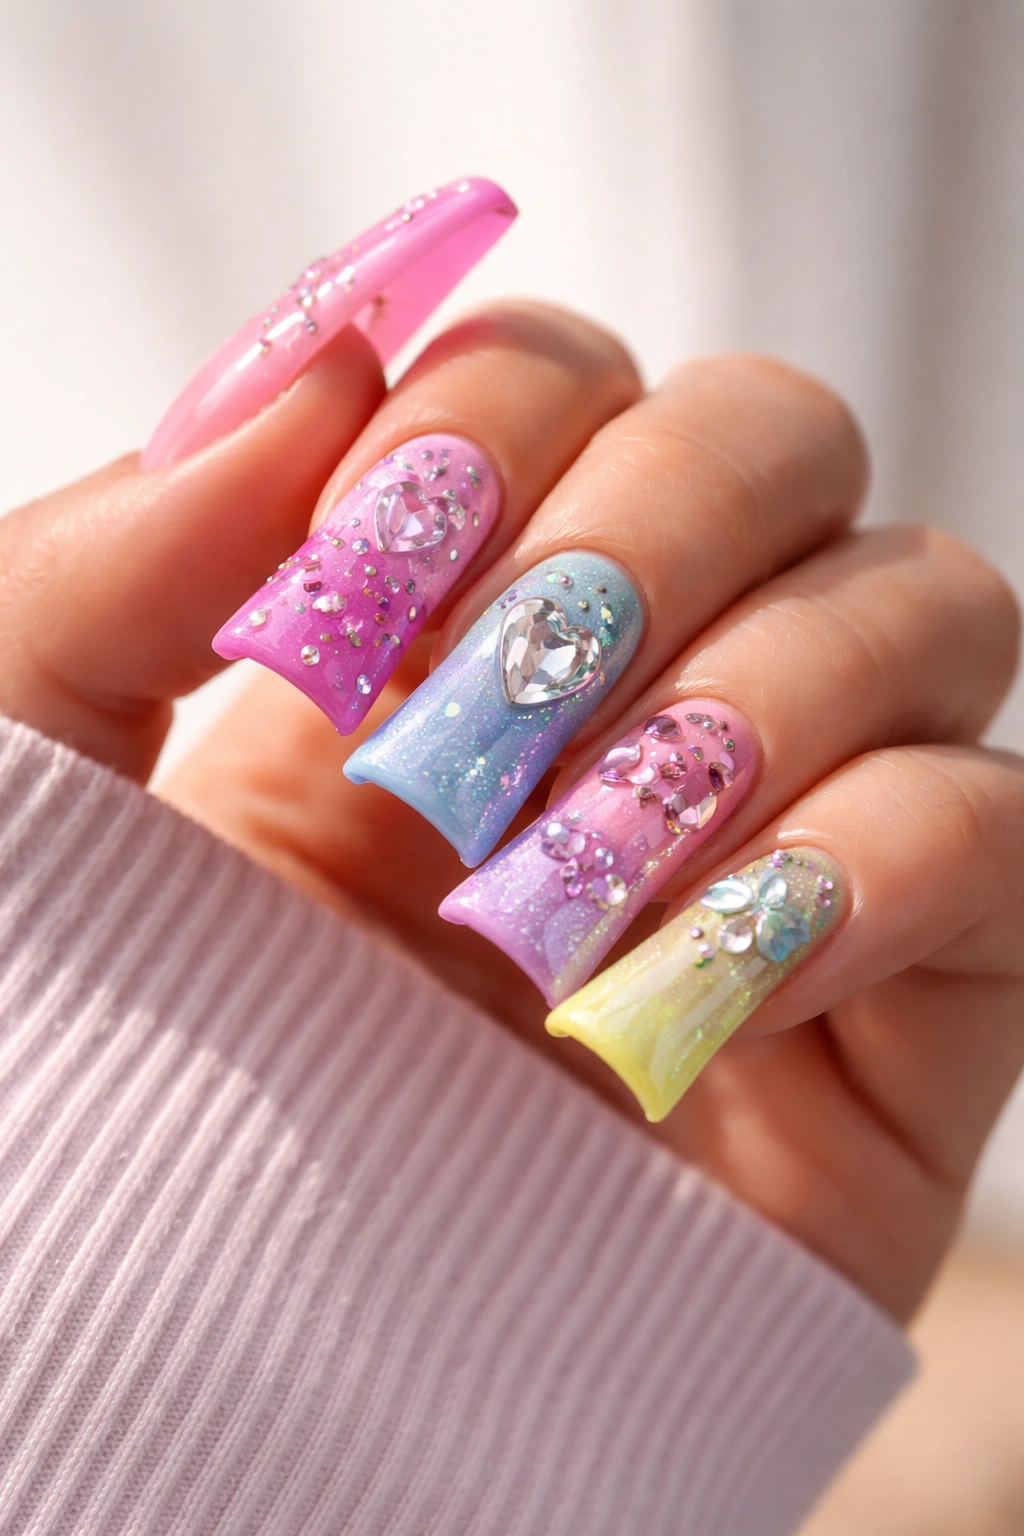
6. Clear Base with Colorful Confetti and Glitter
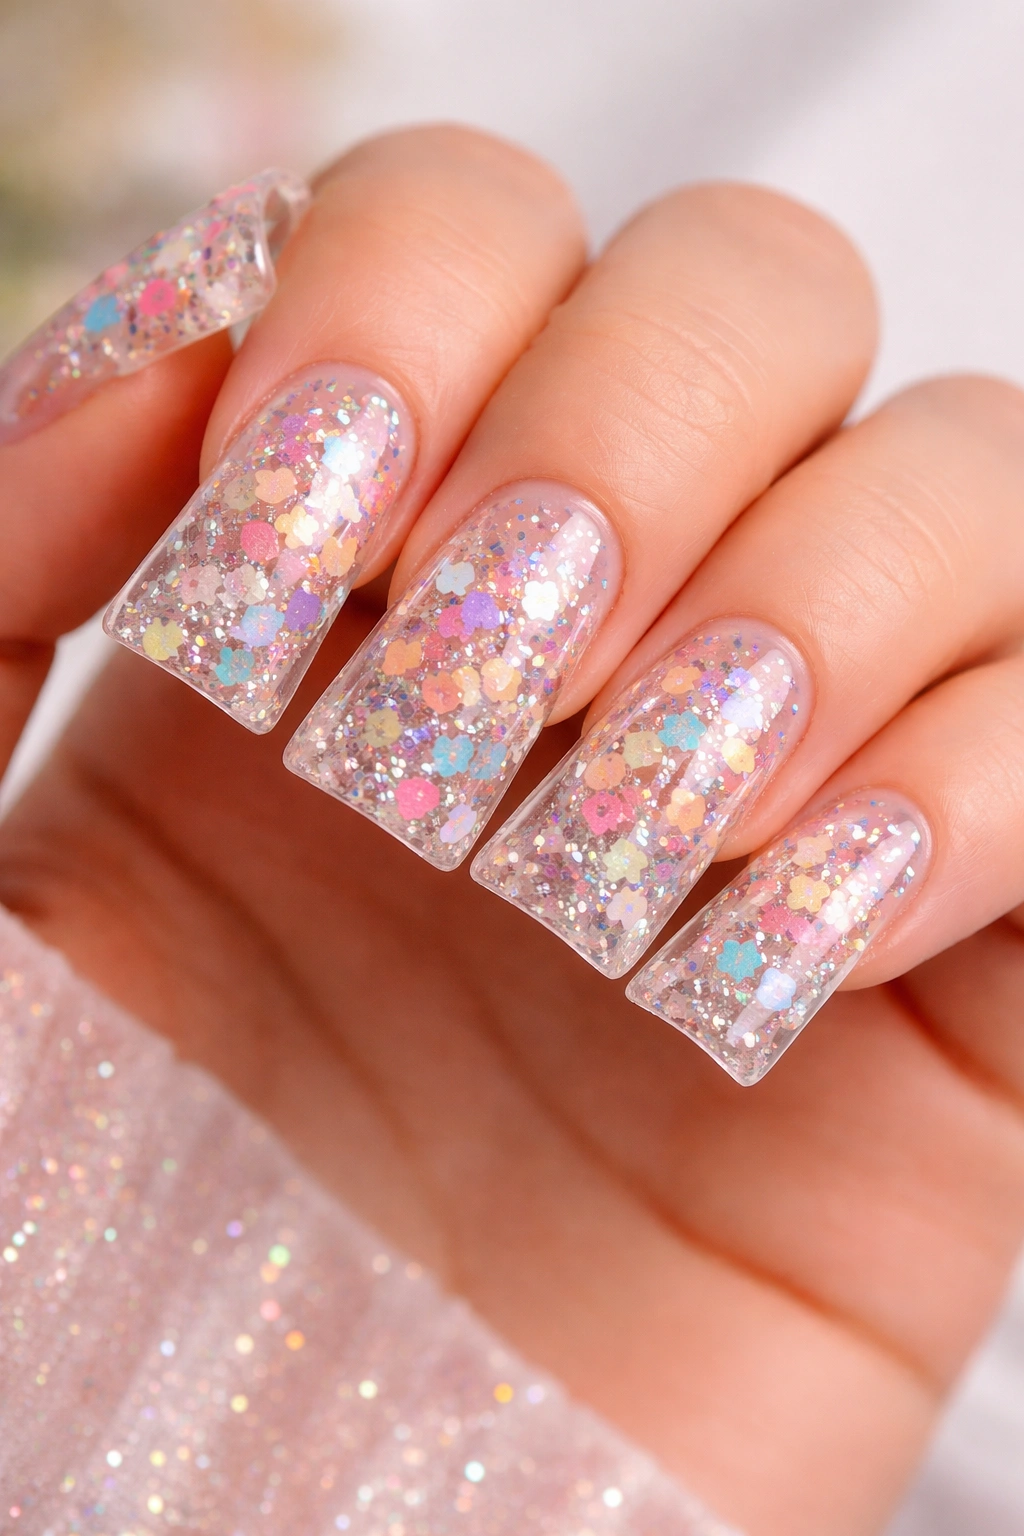
This design is basically celebrating on your nails. Start with a clear or barely-tinted base and pack it with colorful confetti pieces, small glitter particles, and maybe some tiny star shapes in a rainbow of hues. The duck nail’s flat surface means the confetti sits beautifully visible, and you get that luxe “confetti-filled” aesthetic that was all over Y2K manicures without making your nails feel heavy or thick.
Building the Confetti Layer
Rather than hoping confetti stays in place, use a thick base coat or builder gel, place your pieces strategically, and seal everything under multiple layers of gel top coat. This keeps everything suspended beautifully and prevents the confetti from settling or shifting.
Confetti Ideas to Mix and Match
- Rainbow stars in different sizes
- Holographic circles and squares
- Metallic flakes in gold and silver
- Colored glitter in complementary shades
- Tiny heart shapes in contrasting colors
- Star stickers or foil elements
- Even small beads for extra dimension
7. Barbie Pink with Chrome Mirror Finish
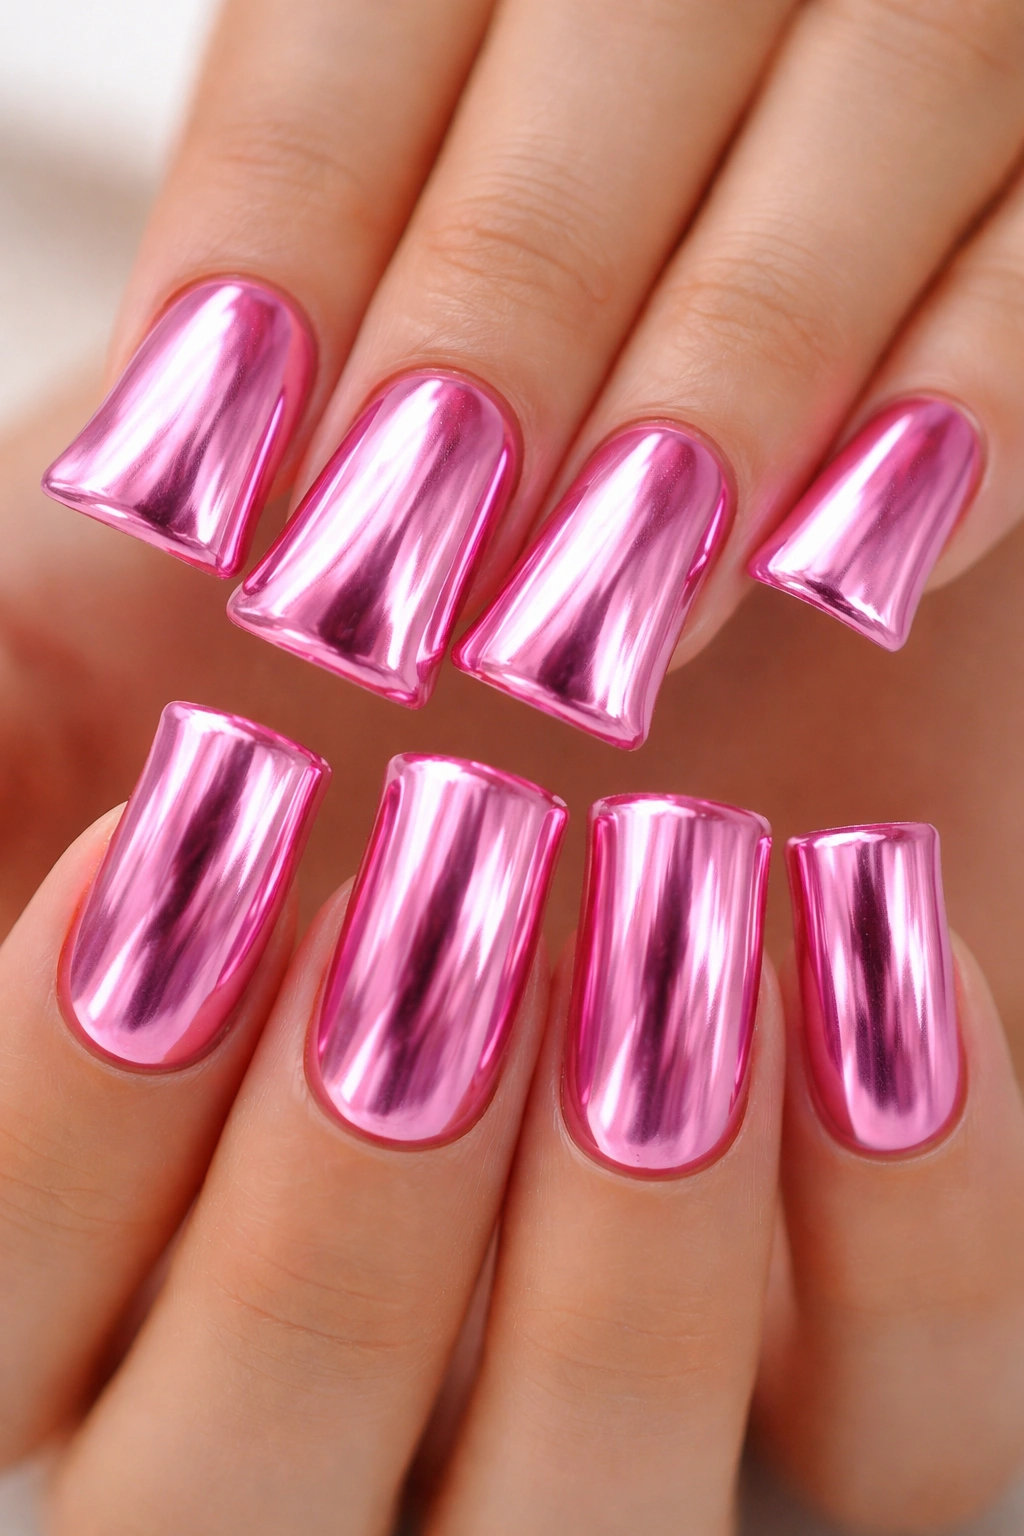
Barbie pink is the ultimate Y2K color, and when you top it with a chrome mirror finish, the result is nothing short of magical. This isn’t just pink—this is the pink that defined an era, the pink that felt luxurious and playful at the same time. The chrome finish gives it this futuristic quality that actually fits perfectly with Y2K aesthetics, which were always looking forward while being thoroughly of their moment.
Understanding Chrome on Duck Nails
Chrome powders create that mirror-like, reflective surface, and they look particularly stunning on the wider surface of duck nails. The powder catches light from every angle, making your nails look like they’re made of liquid metal. Apply it to a sticky base coat, press it on with a soft brush, and seal with a clear top coat for durability.
Styling Ideas Around This Mani
- Wear it with a glossy lip for maximum Y2K energy
- Pair it with silver jewelry to echo the chrome effect
- Let it be the statement on an otherwise neutral outfit
- Combine it with a casual look for an unexpected fashion moment
8. Millennial Pink with Tiny Black Line Details
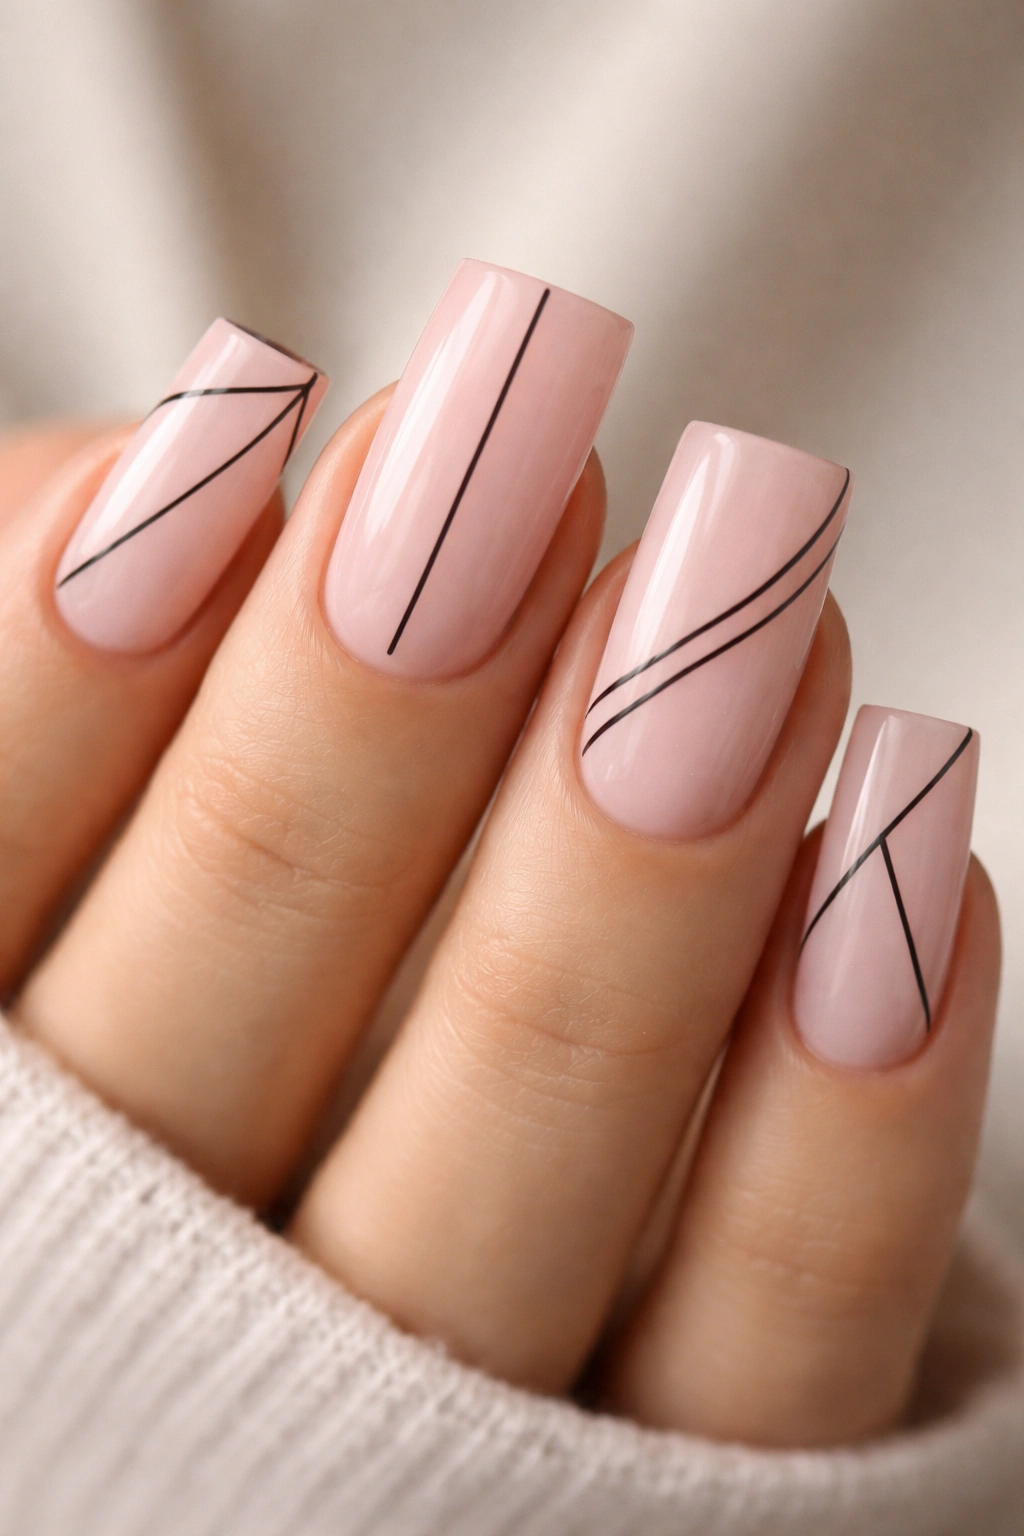
This design is understated but seriously chic. Start with that perfect millennial pink base—the one that’s not quite hot pink, not quite baby pink, but exactly in that Goldilocks zone—and add minimal black line details. Maybe thin lines across the nail in geometric patterns, maybe a tiny line art design near the cuticle, maybe just a single black line running down the middle of each nail. The restraint makes it sophisticated while the pink keeps it playful.
The Art of Minimalist Nail Design
Less is more here, and that’s the whole point. The duck nail shape works beautifully with minimalist designs because the width of the nail becomes part of the design. You’re not cramming details into small space; you’re using negative space intentionally to create a polished, artistic look.
Line Details to Explore
- Geometric triangles or diamonds scattered across
- A single thin vertical line
- Abstract wavy lines
- Tiny constellation patterns
- Minimal faces or character expressions
- Thin horizontal lines at regular intervals
9. Lavender with Silver Stars and Moon Phases
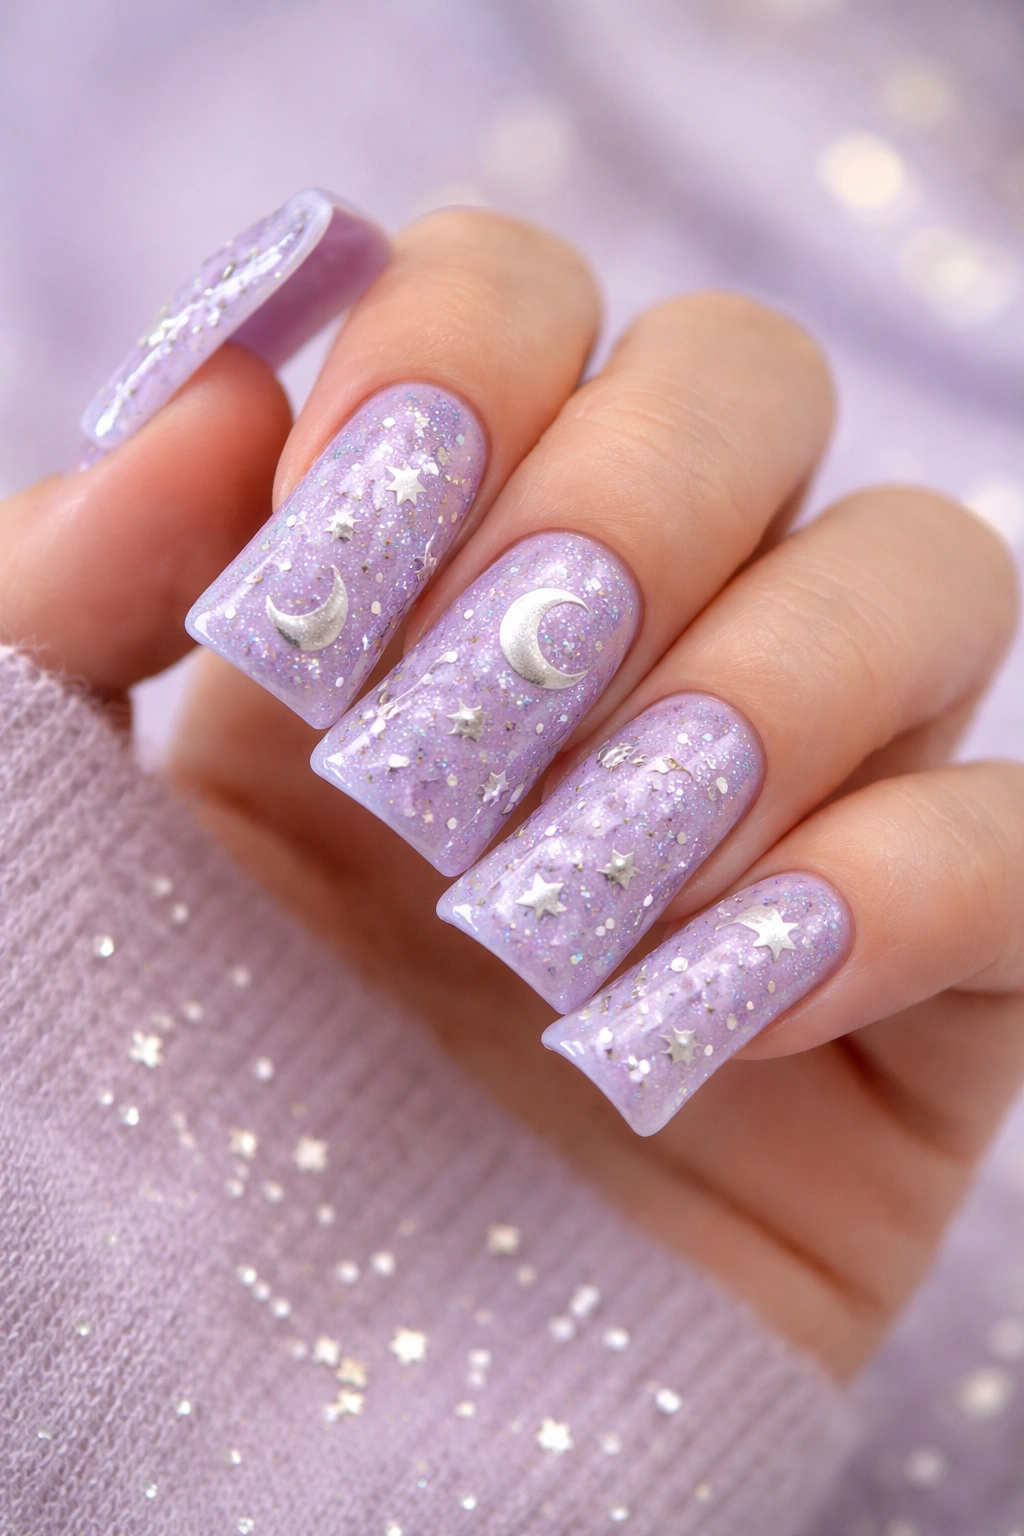
Lavender hit different in the Y2K era, representing both softness and edge depending on how you styled it. Pair a soft lavender base with silver star accents and maybe a few moon phases illustrated across the nails, and you’ve got something that feels dreamy, a little mystical, and totally on-trend. The purple palette is still having a moment, and this design taps into that perfectly.
Creating the Moon Phase Design
Moon phases work beautifully on duck nails because each one can span a single nail, creating a mini narrative across your hand. Use a thin brush and white or silver polish to paint each phase, from new moon (black or just the outline) through waxing crescent, first quarter, waxing gibbous, full moon, waning gibbous, last quarter, and waning crescent.
Color Variations Worth Trying
- Deep purple base instead of lavender for more drama
- White stars instead of silver for a softer look
- Add tiny rhinestones to the full moon for extra sparkle
- Mix lavender and pale pink for a more feminine vibe
- Use navy as the base with silver moons and stars for contrast
10. Nude with Chunky Glitter Tips
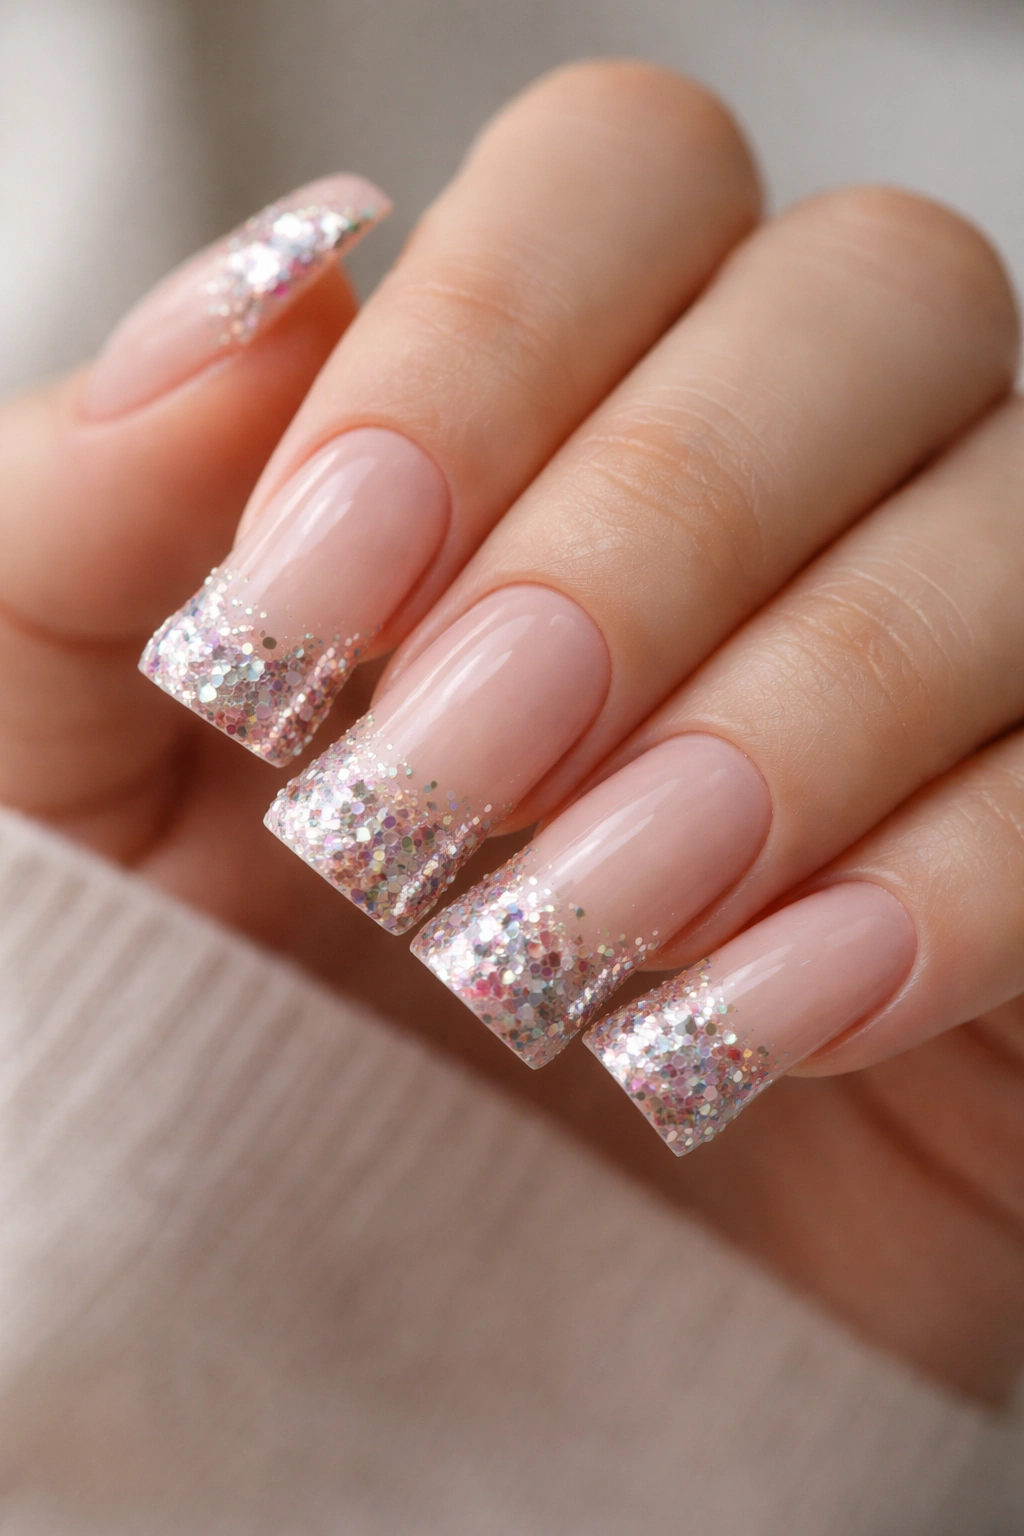
This is the design that walks the line between professional and party-ready. Keep most of the nail in a neutral nude or beige, then load the tips with chunky, multicolored glitter. It’s subtle enough for a work environment but fun enough that everyone will notice and compliment your nails. The duck nail shape makes this transition look intentional and artistic rather than accidental.
Perfecting the Glitter Gradient
Instead of a hard line between the nude and the glitter, create a subtle gradient where the glitter gets progressively more dense as it approaches the tip. This requires layering—start with a sparse amount of glitter at about the halfway point, add more as you move toward the tip, and finish with maximum glitter saturation at the very edge.
Glitter Options to Consider
- Multicolored holographic pieces for maximum shimmer
- Gold or rose gold chunky glitter for warmth
- Rainbow glitter that shifts colors as light hits it
- Mixed sizes of glitter for added texture
- Matte glitter pieces mixed with shiny for contrast
11. Hot Pink with Tiny White Line Art and Smiley Faces
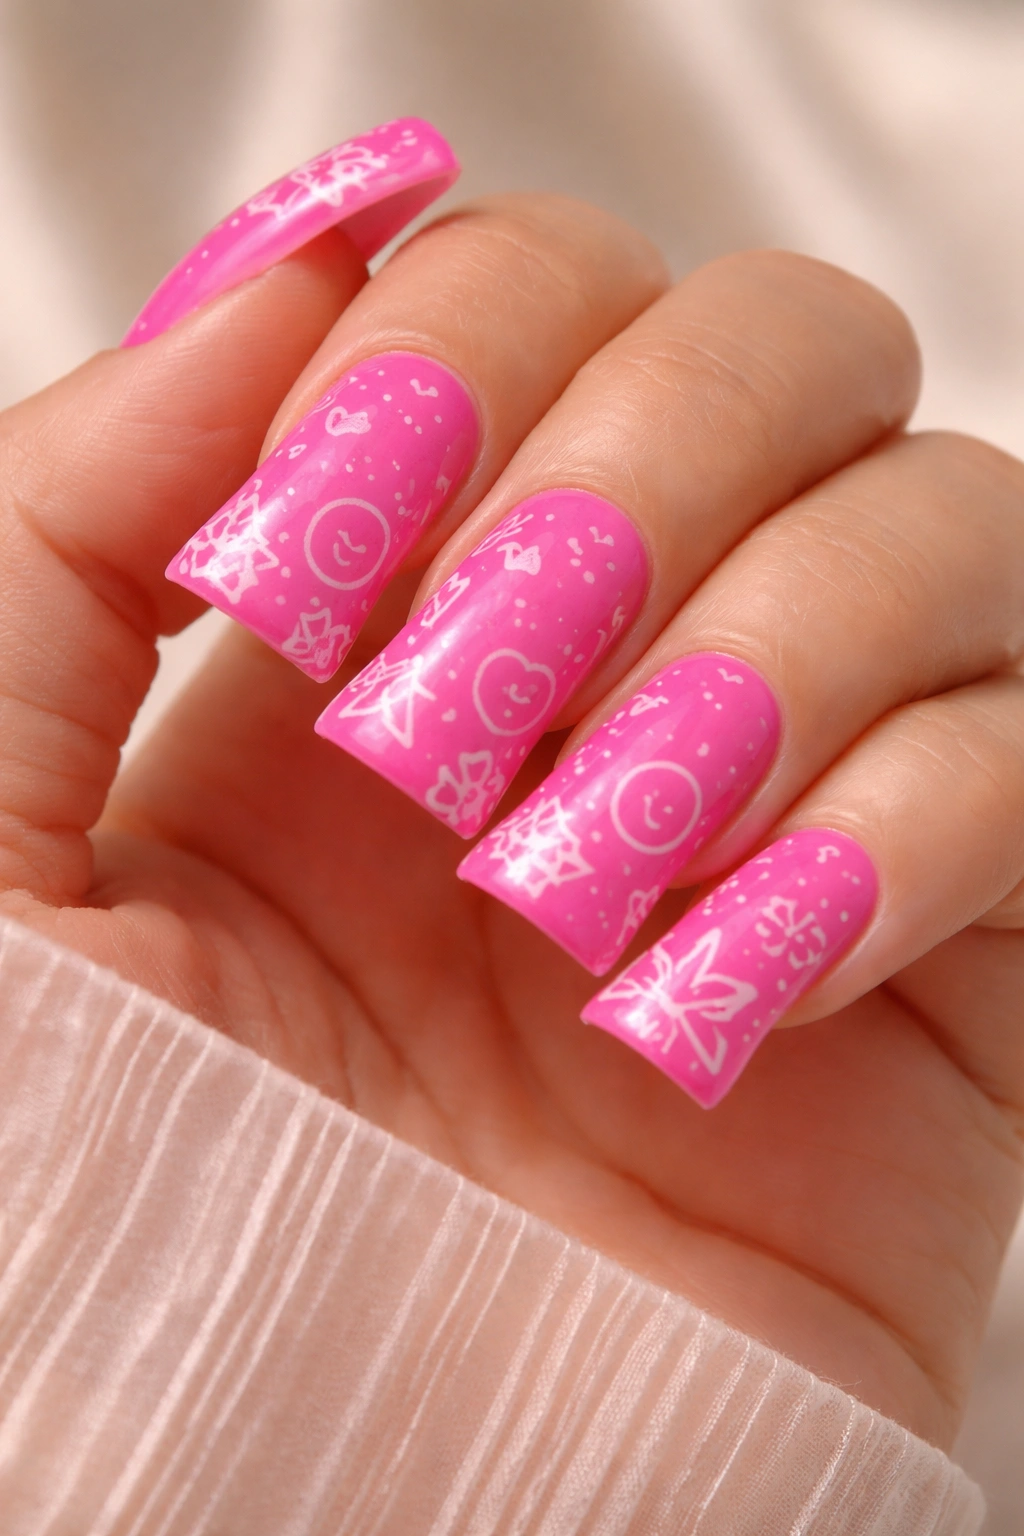
This design is pure joy in nail form. A vibrant, unapologetic hot pink base pairs with delicate white line art—maybe tiny smiley faces, or abstract shapes, or simple designs that look like they belong on a custom MySpace page. The smiley face was the unofficial symbol of Y2K optimism, and putting them on hot pink nails basically screams that you’re happy and you don’t care who knows it.
Executing Simple Line Art
The key to making line art look intentional rather than shaky is using a very thin brush and steady hand, or using a dotting tool for circular elements like smiley face eyes. Don’t overthink it—some imperfection actually adds to the charm of this design.
Line Art Ideas That Work
- Smiley faces in various sizes
- Peace signs scattered across
- Small hearts and stars
- Abstract squiggles and waves
- Tiny clouds or daydream imagery
- Simple flower outlines
- Random dots in patterns
12. Pale Blue with Butterfly Wing Nail Art and Sparkle
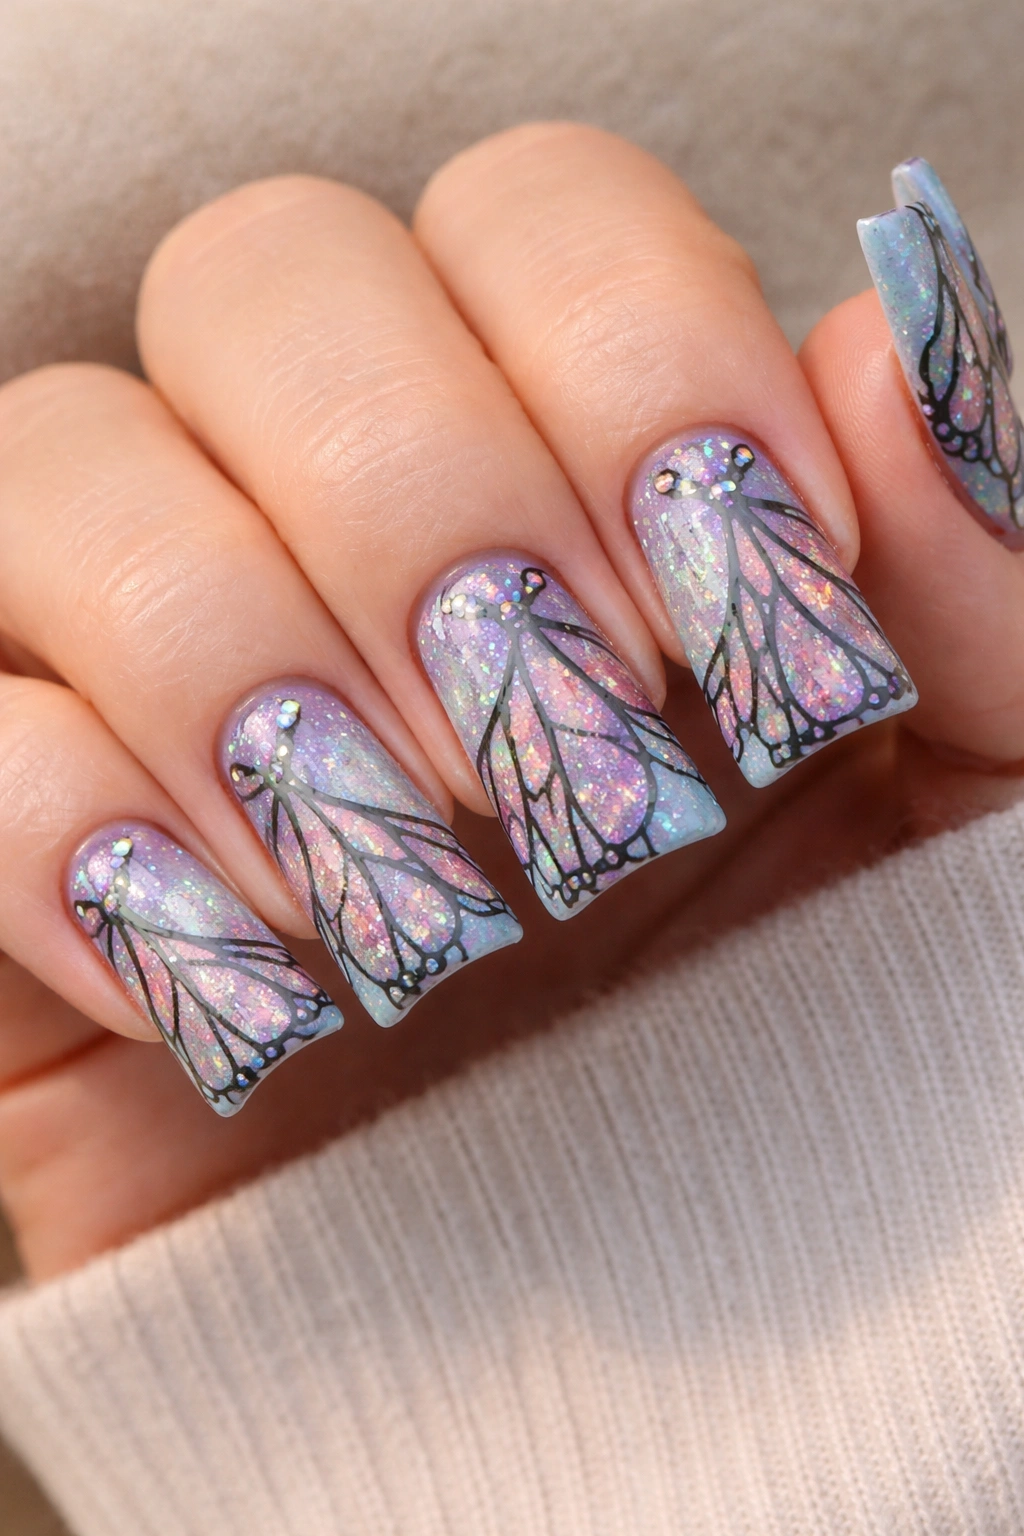
If the first butterfly design was elegant, this one is playful. Pair a pale, barely-there blue base with butterfly designs that actually look like stained glass—using darker outlines and filled-in sections in complementary colors. Add a generous layer of sparkle—not chunky glitter, but a fine shimmer that makes the entire nail glow. The blue creates a summer, vacation-ready vibe that’s totally Y2K.
Creating Stained Glass Effect
This technique involves outlining designs in a darker color, then filling the sections with different colors and patterns. On duck nails, you can get really creative with the butterfly shapes, maybe making them asymmetrical or stylized rather than realistic.
Color Palettes for This Design
- Pale blue with pink, purple, and gold details
- Sky blue with orange, yellow, and red butterflies
- Icy blue with multicolor sparkle layered throughout
- Light blue with silver outlines and holographic fill
13. White Base with Chunky Gold Glitter and Black Outline
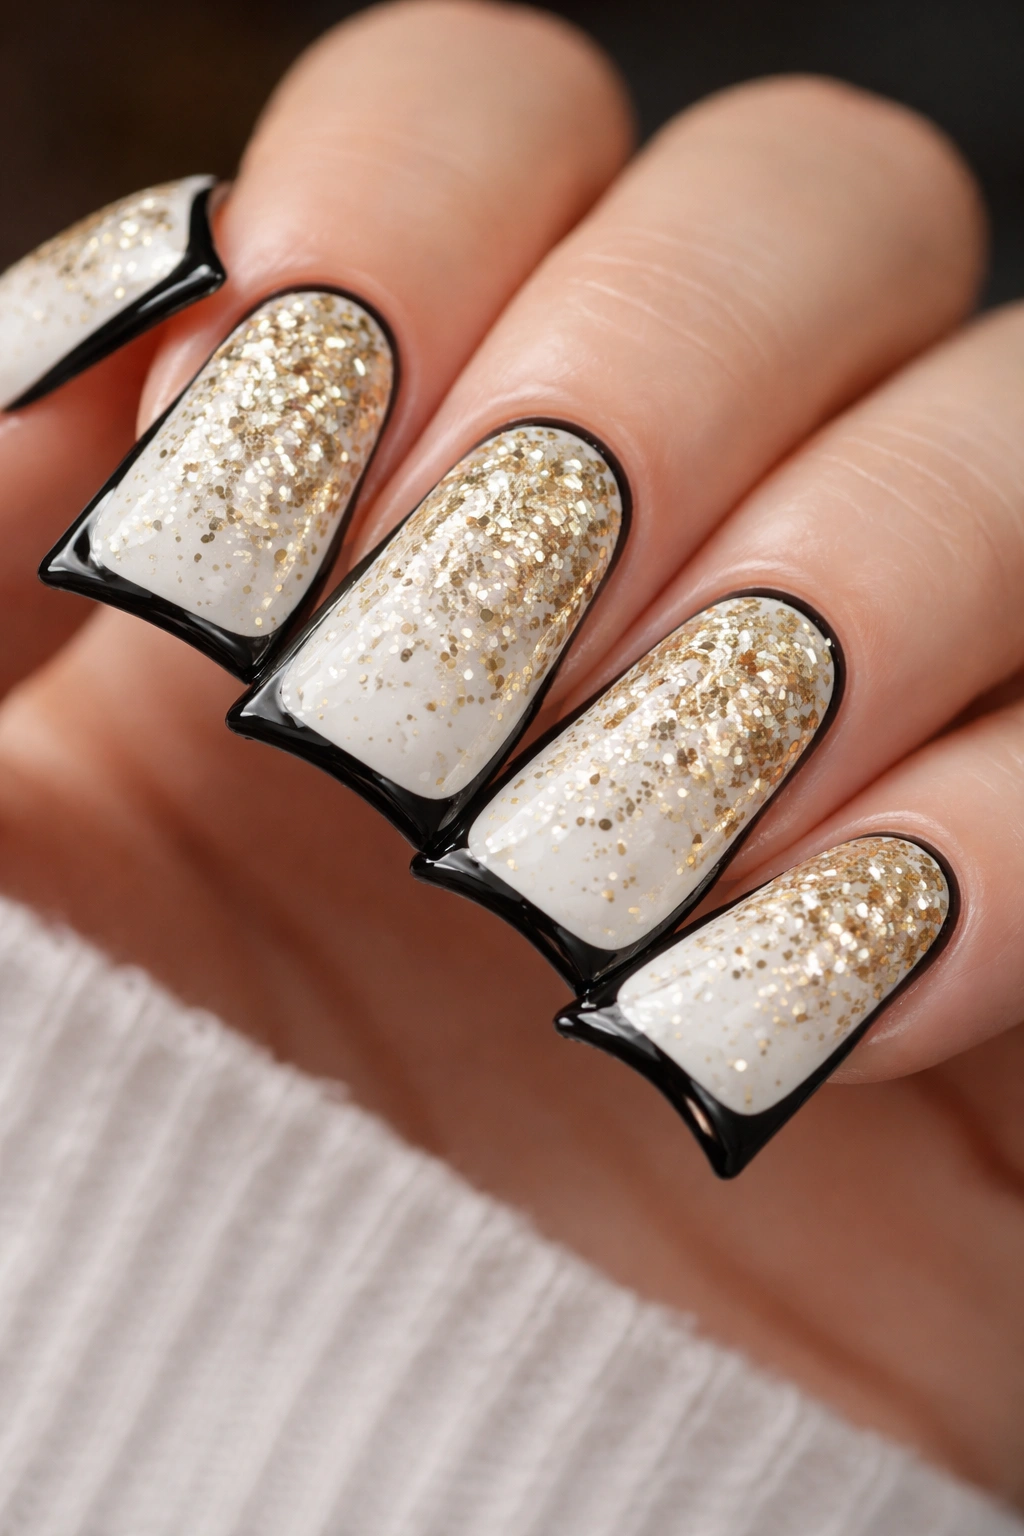
This design is giving luxury, giving bold, giving “I know what I’m doing.” A clean white base creates a blank canvas, chunky gold glitter does the heavy lifting, and a thin black outline around the edge of each nail creates definition and sophistication. The black outline is the secret here—it makes the entire design look more intentional and polished.
The Importance of the Outline
That black outline transforms what could feel random into something clearly designed. It grounds the glitter and creates a frame that makes the duck nail shape even more apparent and striking.
Variations to Explore
- Rose gold glitter instead of yellow gold for a softer look
- Silver outline instead of black for a more ethereal vibe
- Add rhinestones to the glitter sections for mixed sparkle
- Use a thicker outline for more graphic boldness
- Consider a chrome outline for a futuristic twist
14. Gradient from Pale Pink to Deep Magenta with Stars
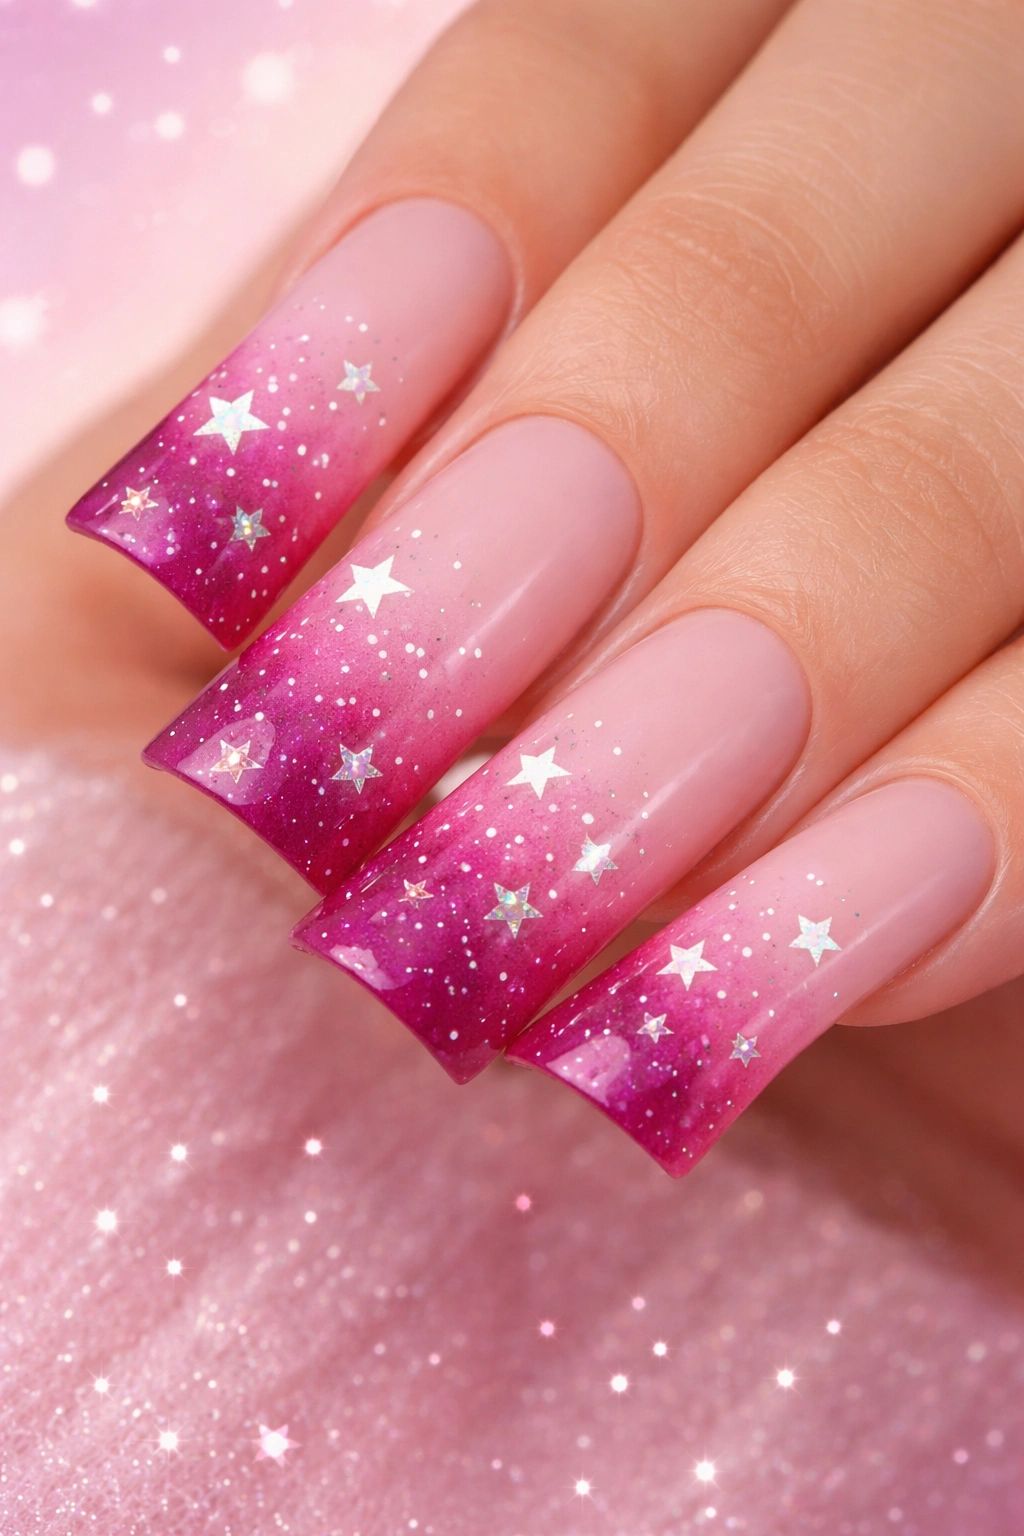
This design combines gradient technique with celestial vibes. Start at the base with barely-there pale pink and deepen the color with each layer until you reach a rich magenta at the tips. Scattered throughout are tiny white or silver stars that make the whole thing feel cosmic and dreamy. It’s moody but still playful, sophisticated but still clearly Y2K-inspired.
Building the Deep Color Gradient
Using gel polish makes this easier, but you can achieve similar results with regular polish by layering carefully. Build up color gradually, making sure each layer is fully dry before adding the next. The key is patience—you want a smooth transition, not obvious lines between color shades.
Star Placement Ideas
- More concentrated toward the tips
- Scattered randomly across the whole nail
- Creating a constellation pattern
- In varying sizes for dimension
- Outlining stars rather than filling them in
15. Clear Pink Jelly Base with Holographic Glitter and Iridescent Sheen
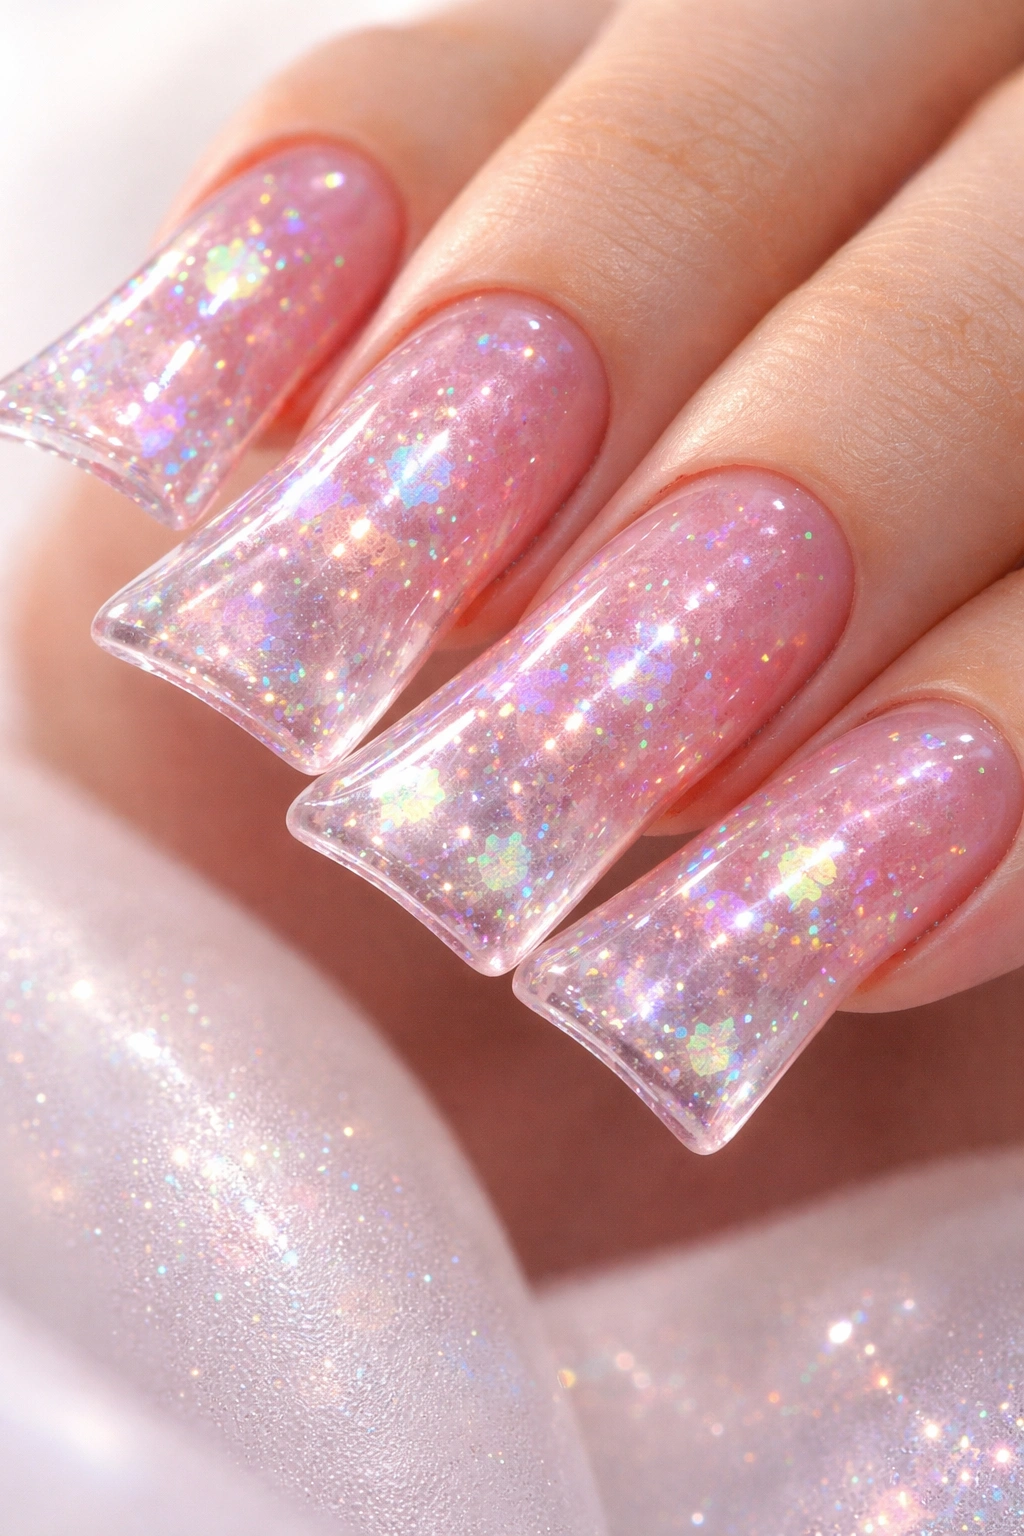
Jelly nails are having a serious comeback, and for good reason—they’re fun, they show off the natural nail underneath (or a colorful base), and they feel youthful without being immature. A clear or very light pink jelly base with holographic glitter suspended throughout creates this luxe, almost candy-like effect. The iridescent sheen makes it shift colors in different light, which is peak Y2K.
Understanding Jelly Polish
Jelly polish is a semi-transparent, thick formula that creates that glass-like effect. It’s different from regular translucent polish because of its consistency. Build it up slowly to get the right level of opacity, and it works beautifully with glitter pieces suspended inside.
Texture Combinations to Try
- Holographic glitter suspended throughout
- Rainbow sparkle in a clear jelly
- Mixed sizes of glitter for depth
- Fine shimmer on top of jelly for extra glow
- Add chrome powder for a mixed-finish effect
16. Baby Blue with Gold Leaf Accents and Rhinestones
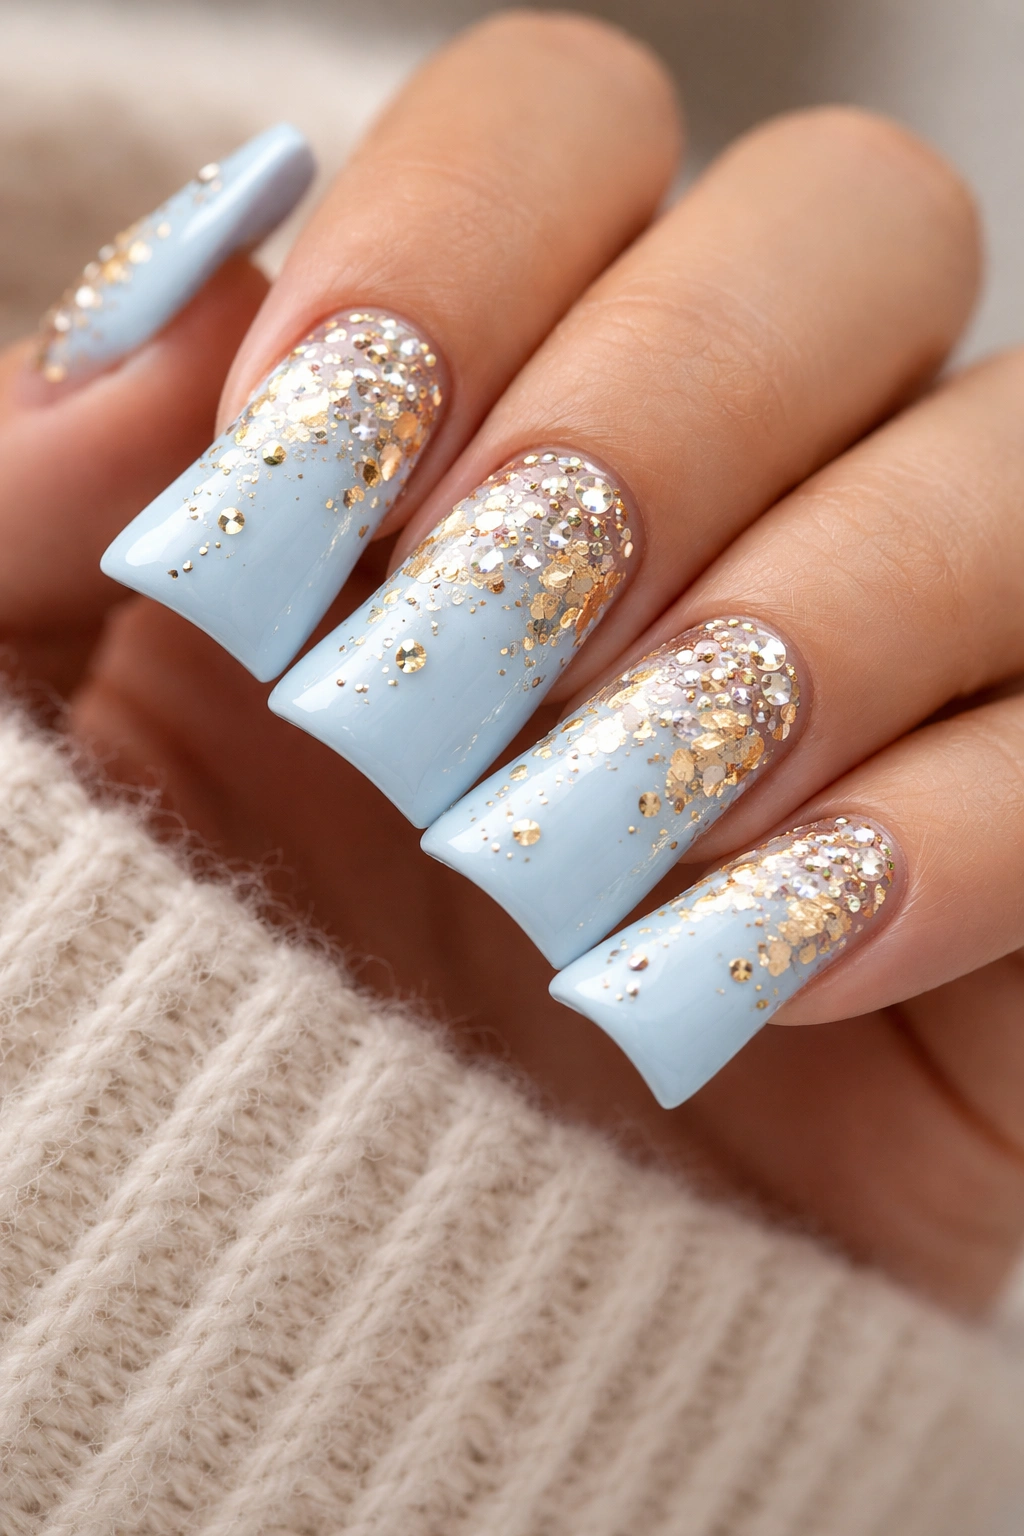
Gold leaf on nails is inherently luxurious, and when you apply it to baby blue duck nails alongside tiny rhinestones, you get something that feels both affordable and expensive—which is honestly the Y2K aesthetic in a nutshell. The gold catches light, the rhinestones sparkle, and the blue keeps everything feeling soft and wearable.
Working with Gold Leaf
Gold leaf needs a sticky base coat to adhere properly. Apply your base color, paint on a sticky top coat in the areas where you want the leaf, carefully press the leaf pieces on, and seal everything with a clear top coat. It’s easier than it sounds and creates impact that belies the simplicity.
Application Methods to Try
- Scattered pieces of leaf across the entire nail
- Concentrated at one corner for an asymmetrical design
- Outlining the edge of the nail
- Mixed with rhinestones for combined sparkle
- Used with other accent colors like pink or white
17. Coral with White Swirl Pattern and Matte Finish
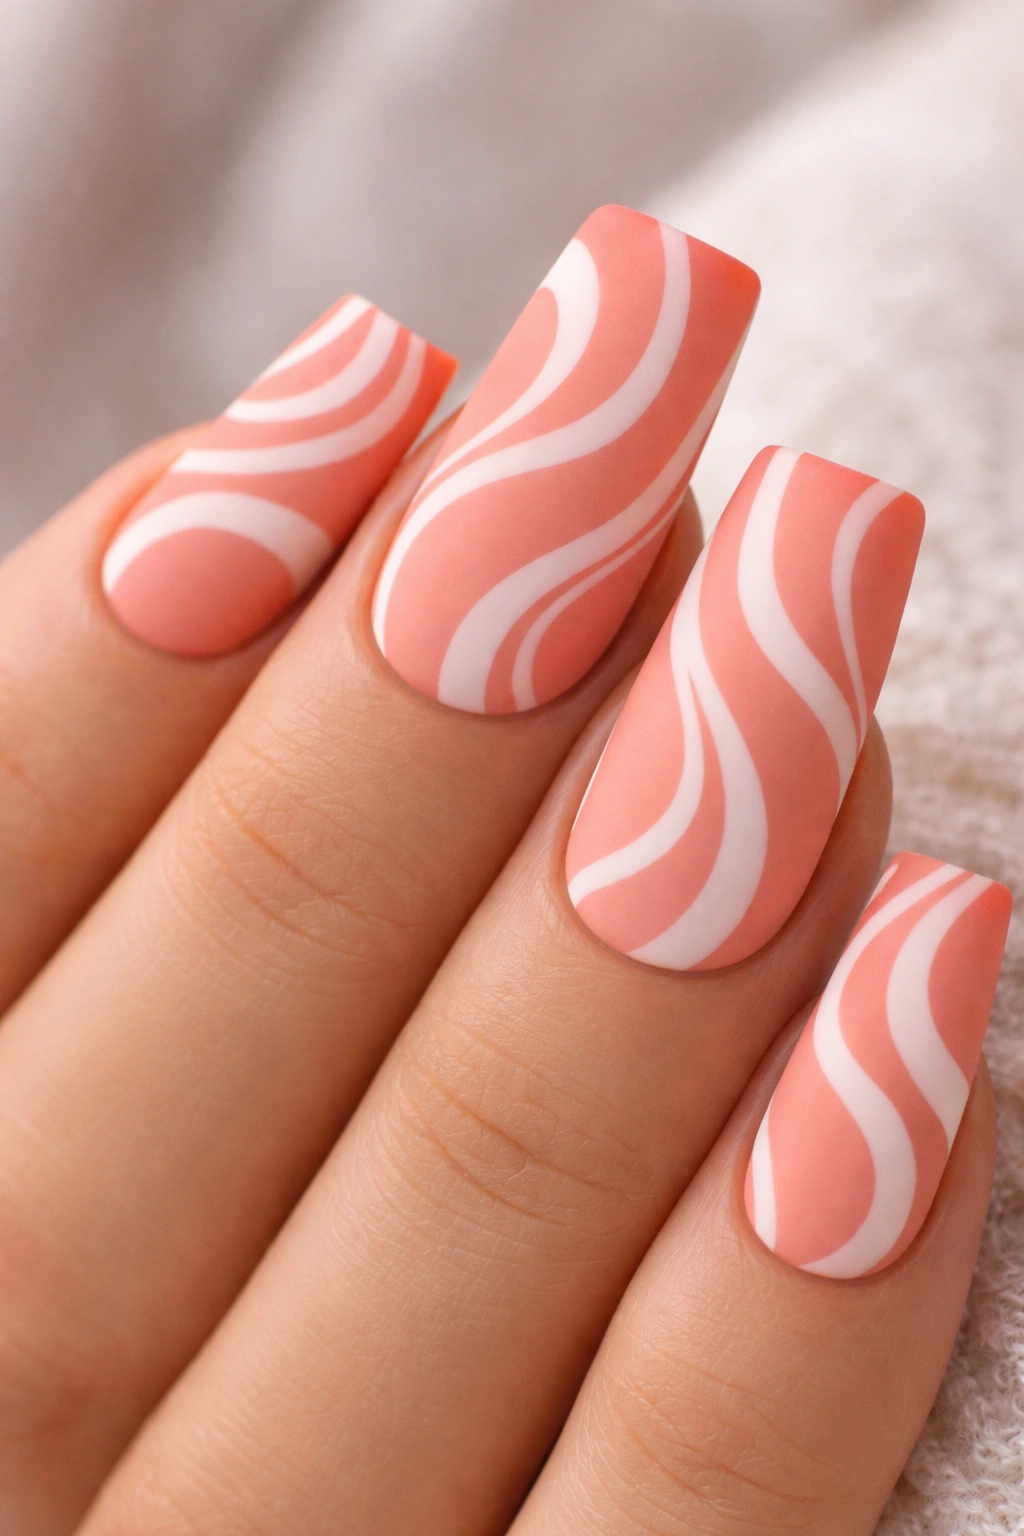
Matte finishes were less common in Y2K nail art, but they absolutely deserve a moment in this lineup because they feel modern while still being nostalgic. A bright, energetic coral base with white swirled patterns and a matte top coat creates something that feels fresh and fashion-forward. The swirls can be chaotic or more organized—both work perfectly.
Creating Swirl Patterns
You can achieve swirls by using a thin brush and moving it across the nail in flowing motions, or by using a toothpick to drag one color through another. On duck nails, the wider surface means your swirls have room to really shine without looking cramped.
Pattern Ideas
- Simple white wavy lines across the surface
- Chaotic, abstract swirls
- Spiral patterns emanating from the center
- Marble-inspired mixing of two colors
- Geometric swirl patterns using clean lines
18. Pale Yellow with Tiny Flower Details and Rhinestone Centers
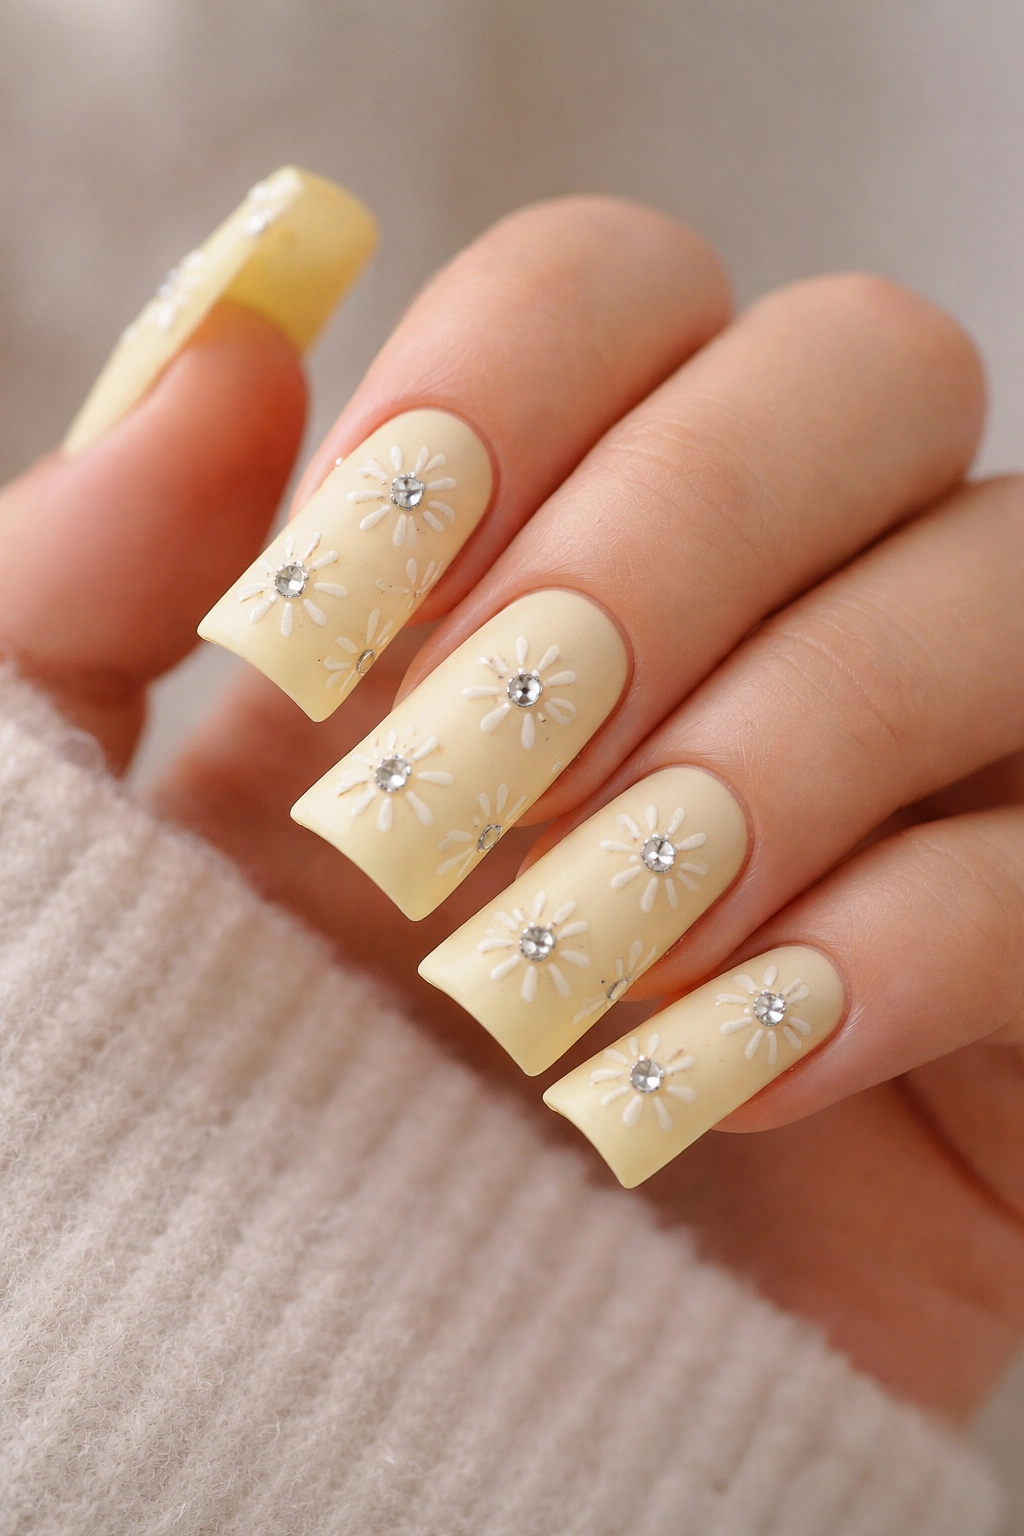
Close out this collection with something cheerful, wearable, and undeniably Y2K. A soft pale yellow base—the color of pale sun, not highlighter yellow—with tiny, delicate flower outlines drawn across the nails. The flowers have little rhinestone centers, creating a focal point that’s both subtle and elegant. This design works for anyone who loves florals without wanting something too busy or overwhelming.
Drawing Delicate Flowers
Tiny flowers don’t need to be complicated. A small circle with four or five petals around it is honestly all you need. The rhinestone center gives them instant sophistication, and the pale yellow background keeps everything feeling soft and approachable.
Flower Design Variations
- Daisies with simple white petals and yellow centers
- Delicate cherry blossoms in pale pink
- Abstract flower shapes that don’t look completely realistic
- Varying sizes of flowers across the nails
- Flowers in different colors on a pale yellow base
- Add tiny green stems for more detail
Final Thoughts
Y2K duck nails are genuinely one of the most fun nail trends because they combine nostalgia with current design sensibilities. Whether you’re drawn to sparkle and shimmer, minimalist line art, bold colors, or celestial themes, there’s a duck nail design that speaks to your personal style. The shape itself flatters most hand types and nail lengths, and the era’s aesthetic gives you creative freedom that feels both boundary-breaking and comforting.
The best part about going for a Y2K duck nail design is that you’re not just following a trend—you’re making a statement about your aesthetic. You’re saying you appreciate the fearlessness of early 2000s fashion while embracing the technical perfection that modern nail art makes possible. Whether you’re getting these done at a salon or attempting them at home, they’re a relatively low-risk way to experiment with your look. You can change designs every few weeks, play with colors you’d never wear on your clothing, and honestly just have fun with it.
Start with whichever design resonates most with you, snap some photos, and get ready for the compliments. Y2K duck nails aren’t subtle, and that’s exactly why they work.
