

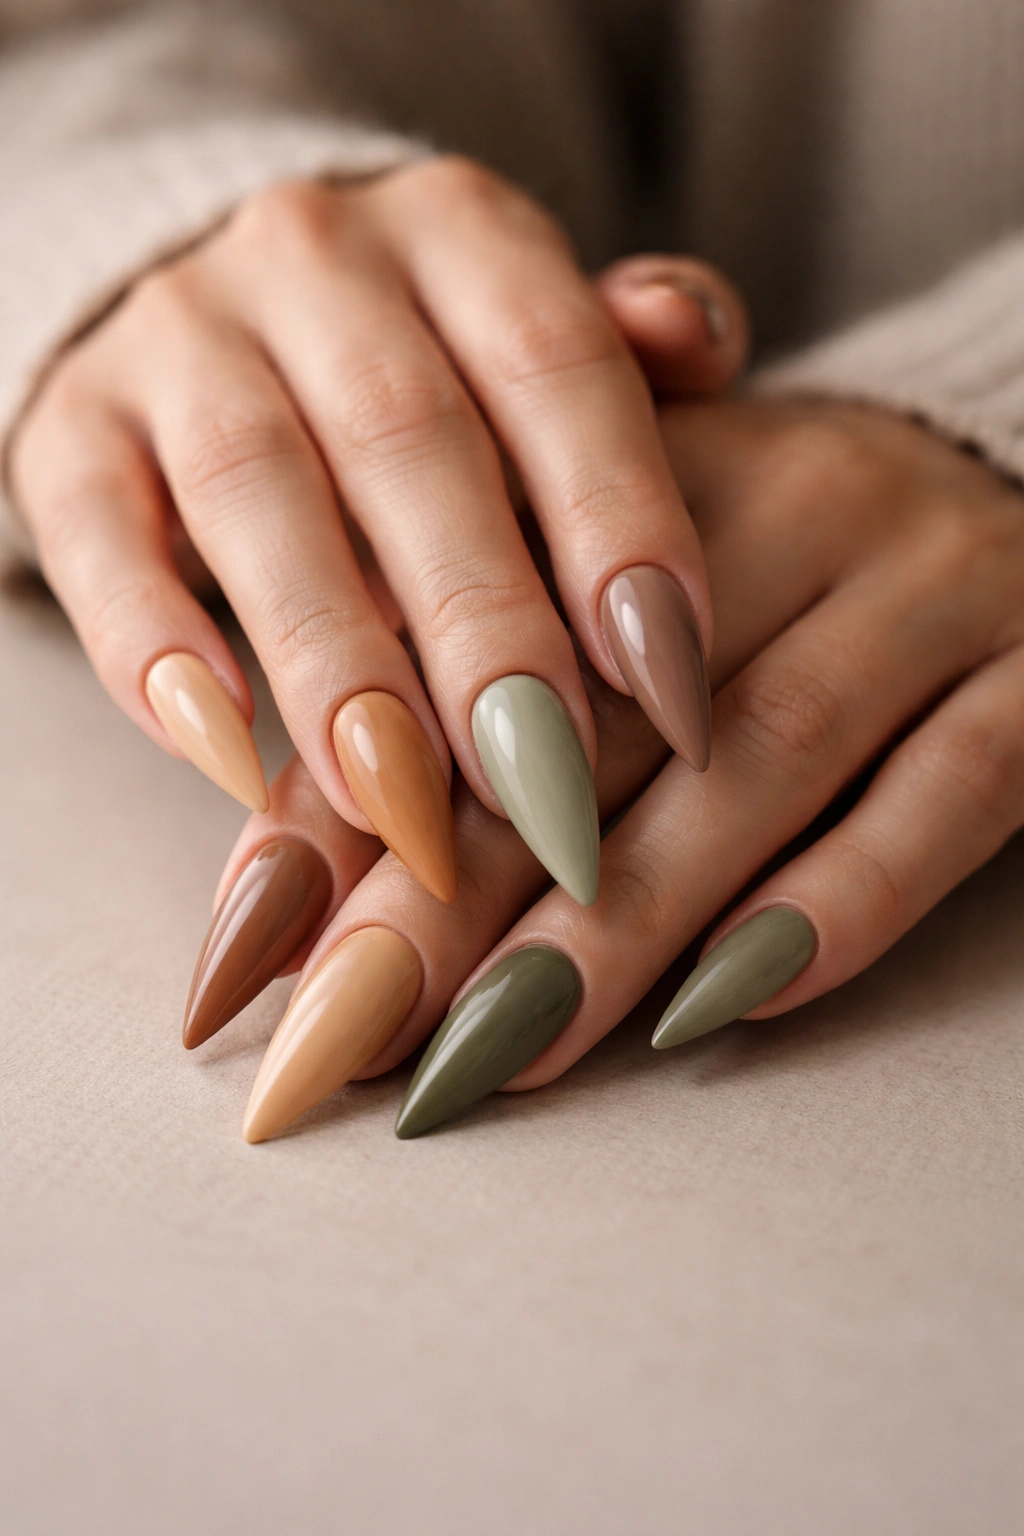
If you’ve been scrolling through nail inspiration and feeling overwhelmed by neons and pastels, earth tone stiletto nails offer something genuinely different—a sophisticated, grounded aesthetic that feels both trendy and timeless. The thing is, most people assume earth tones mean boring, but that couldn’t be further from the truth. These warm, natural shades create an incredibly versatile canvas for texture, metallic accents, minimalist designs, and artistic details that actually stand out without screaming for attention.
Stiletto nails paired with earth tones hit a particular sweet spot because the elongated shape complements warm, muted hues in a way that feels intentional and polished. The tapers and sharp point create drama on their own, so earth tone colors don’t need to be bright or loud to make an impact. Instead, they become a backdrop for what makes your nails genuinely interesting—the finish, the art, the dimension, the details. Whether you’re drawn to creamy beiges, rich chocolates, dusty terracottas, or sophisticated sage greens, there’s an earth tone stiletto nail look that matches your personal style and works for your lifestyle.
This collection covers 18 distinct earth tone stiletto nail ideas, each with specific color combinations, finishes, and techniques you can ask your nail artist about or recreate at home if you’re comfortable with the detail work. You’ll find everything from ultra-minimalist approaches to more intricate hand-painted designs, from glossy metallics to textured mattes. Use these as direct inspiration or as jumping-off points for your own customized version.
1. Warm Taupe with Gold Accents
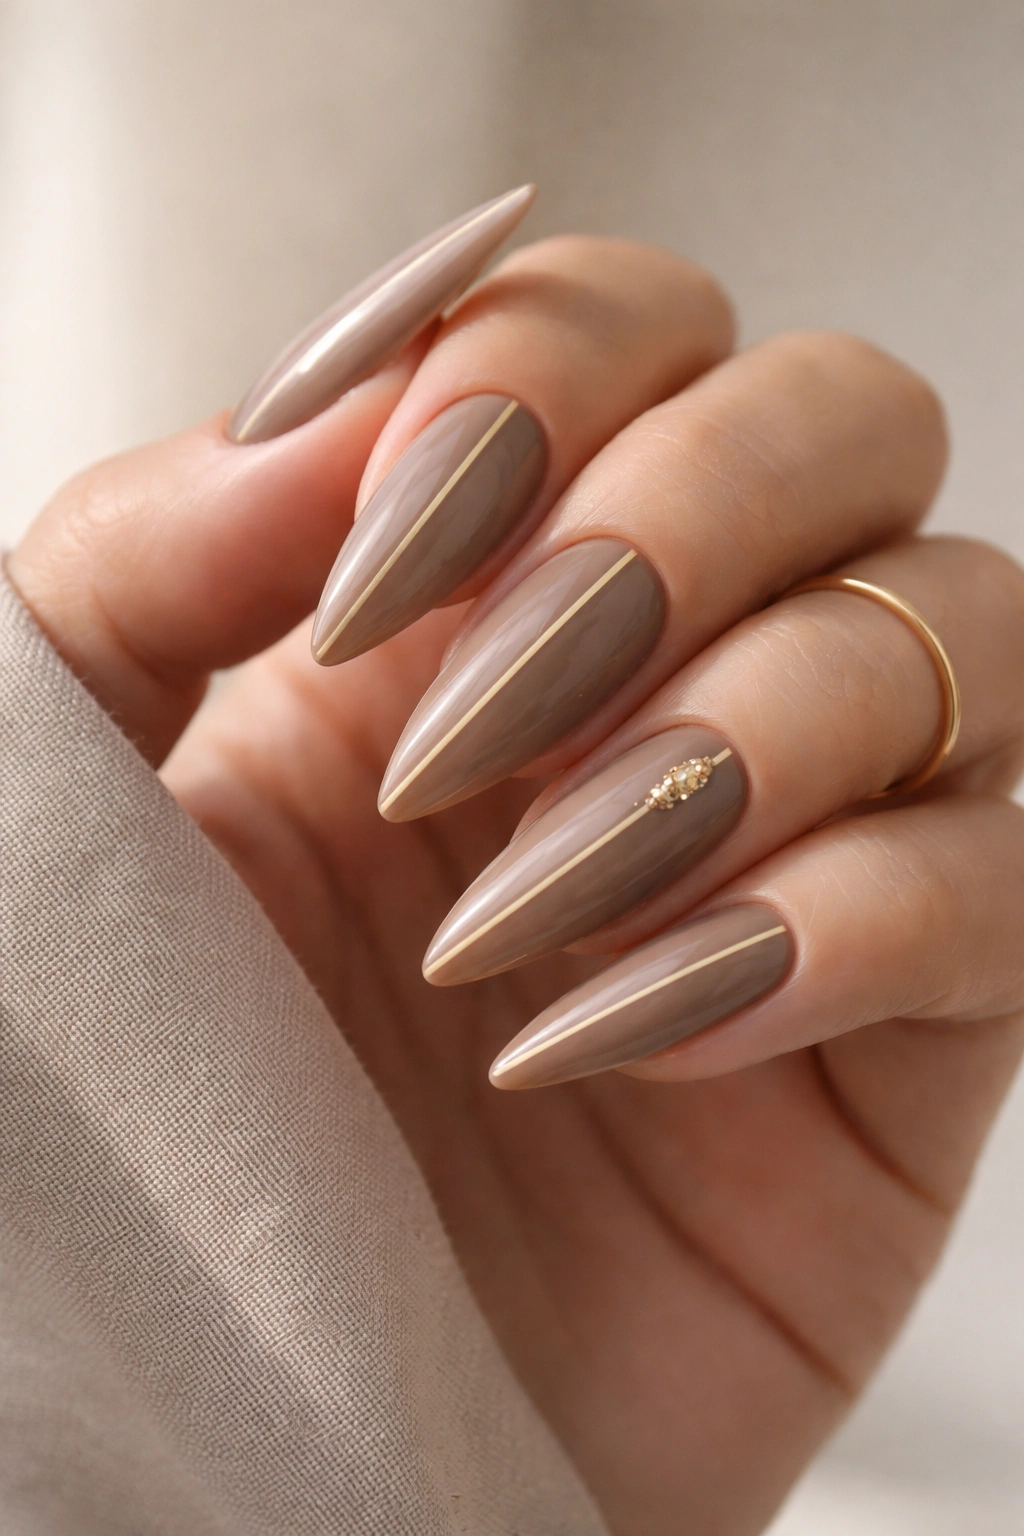
Taupe is the gateway earth tone for anyone nervous about committing to bold color, which is exactly why it’s such a powerful choice for stiletto nails. This warm gray-brown hybrid feels expensive and neutral enough to pair with virtually anything in your wardrobe, yet it’s distinctive enough that it reads as intentional rather than plain. The real magic happens when you layer in subtle gold—either as a thin metallic stripe down the center of each nail, or concentrated as accent details on one or two statement nails.
Why Taupe and Gold Never Disappoint
The combination taps into that luxury minimalism aesthetic without requiring perfect conditions or technical skill to pull off. Taupe photographs beautifully in natural light, and the warmth in the shade means it complements a huge range of skin tones. Gold isn’t just showy—it’s understated in this context, reading more as a thoughtful accent than a statement.
Application and Styling Tips
- Start with a smooth taupe base coat, applying thin layers for even opacity and a refined finish
- Use a thin gold gel pen or striping brush to draw a vertical line through the center of 3-5 nails, or create a delicate accent on your accent nail only
- Seal everything with a high-shine top coat to make the gold pop against the matte taupe
- This look holds up beautifully even as it grows out—no harsh lines to manage
- Pair with warm metallic jewelry or leather accessories to echo the earth tone palette
Pro tip: If gold feels too formal for your daily style, swap it for rose gold or champagne for a softer take on the same idea.
2. Terracotta Gradient
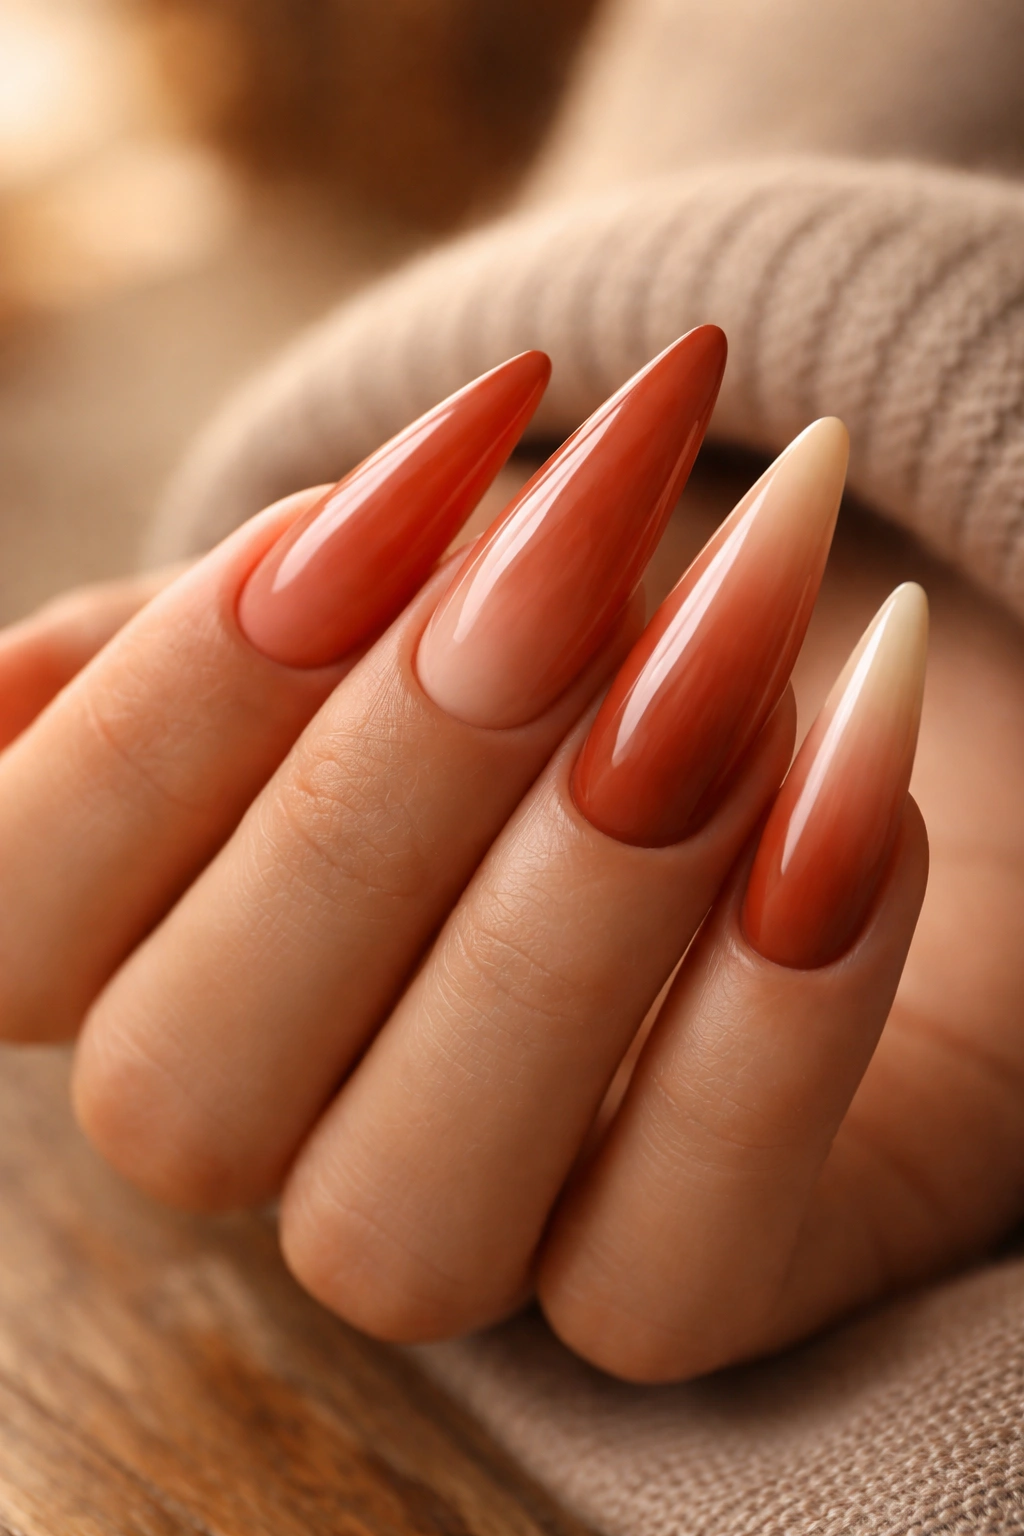
Terracotta—that warm, earthy red-orange clay tone—creates an immediate visual impact on stiletto nails because the color is saturated enough to feel substantial without being overwhelming. A gradient takes this one step further, allowing you to play with the depth and movement of the shade. The most effective approach is a deep terracotta at the base that gradually lightens toward cream or pale peachy-nude at the tips, creating an ombré effect that elongates the already-elongated stiletto shape.
What Makes Terracotta Gradients So Flattering
This specific color sits at the intersection of warm and earthy, which means it actually enhances the natural warmth in many skin tones rather than clashing with them. The gradient technique also allows the color to feel less “flat” and more dimensional, which reads as more intentional and creative than a solid shade. You also get the practical advantage of the lighter tip showing less wear and breakage.
How to Build a Perfect Gradient
- Use a terracotta shade as your base color, applied to the full nail in thin coats until fully opaque
- Select a lighter shade—cream, pale peach, or nude—for the gradient tip
- On a makeup sponge, dab both colors together so they blend slightly, then sponge from the tip upward in a gentle dabbing motion
- Work quickly and don’t over-blend—some visible color separation creates more visual interest than a completely smooth transition
- Seal with a thick, clear gel top coat to smooth out any texture from sponging and create a glossy finish
- The gradient will appear more subtle and refined than jarring or cartoon-like
Worth knowing: Terracotta is forgiving enough that small sponging imperfections actually add to the handmade, artisanal aesthetic.
3. Sage Green with Minimalist Lines

Sage green is the earth tone that feels almost cool rather than warm, but it absolutely belongs in the earth tone family because of its muted, natural appearance—like dried herbs or weathered stone. On stiletto nails, sage works best when paired with restraint. A single sage green base across all nails, then thin white or cream lines creating geometric patterns on one or two accent nails, creates a look that’s both calm and deliberately artistic.
The Appeal of Sage for Minimalist Designs
Sage naturally reads as sophisticated because it’s not a color you see everywhere. The muted quality means even simple line work looks refined rather than plain. This shade pairs beautifully with modern aesthetics, minimalist fashion, and anyone who gravitates toward neutral palettes but wants something slightly more interesting than beige.
Creating Clean Minimalist Line Work
- Apply sage green as your base across all nails, using two thin coats for even coverage and a smooth, professional finish
- Let the base cure fully before attempting any line work—rushing this step leads to smudging and frustration
- Use a thin white or cream gel pen (or a thin striping brush with gel) to draw vertical lines, horizontal lines, or angular geometric shapes on your accent nails
- Thin lines feel more refined than thick ones—aim for delicate, confident strokes rather than heavy coverage
- If you make a mistake, white shows less against sage than other accent colors, making minor imperfections nearly invisible
- Seal with a matte top coat for a modern, understated finish, or use glossy if you prefer the contrast
Pro tip: One vertical line down the center of your pointer fingers and minimal line detail creates maximum impact with minimal effort.
4. Burnt Orange and Bronze Ombré
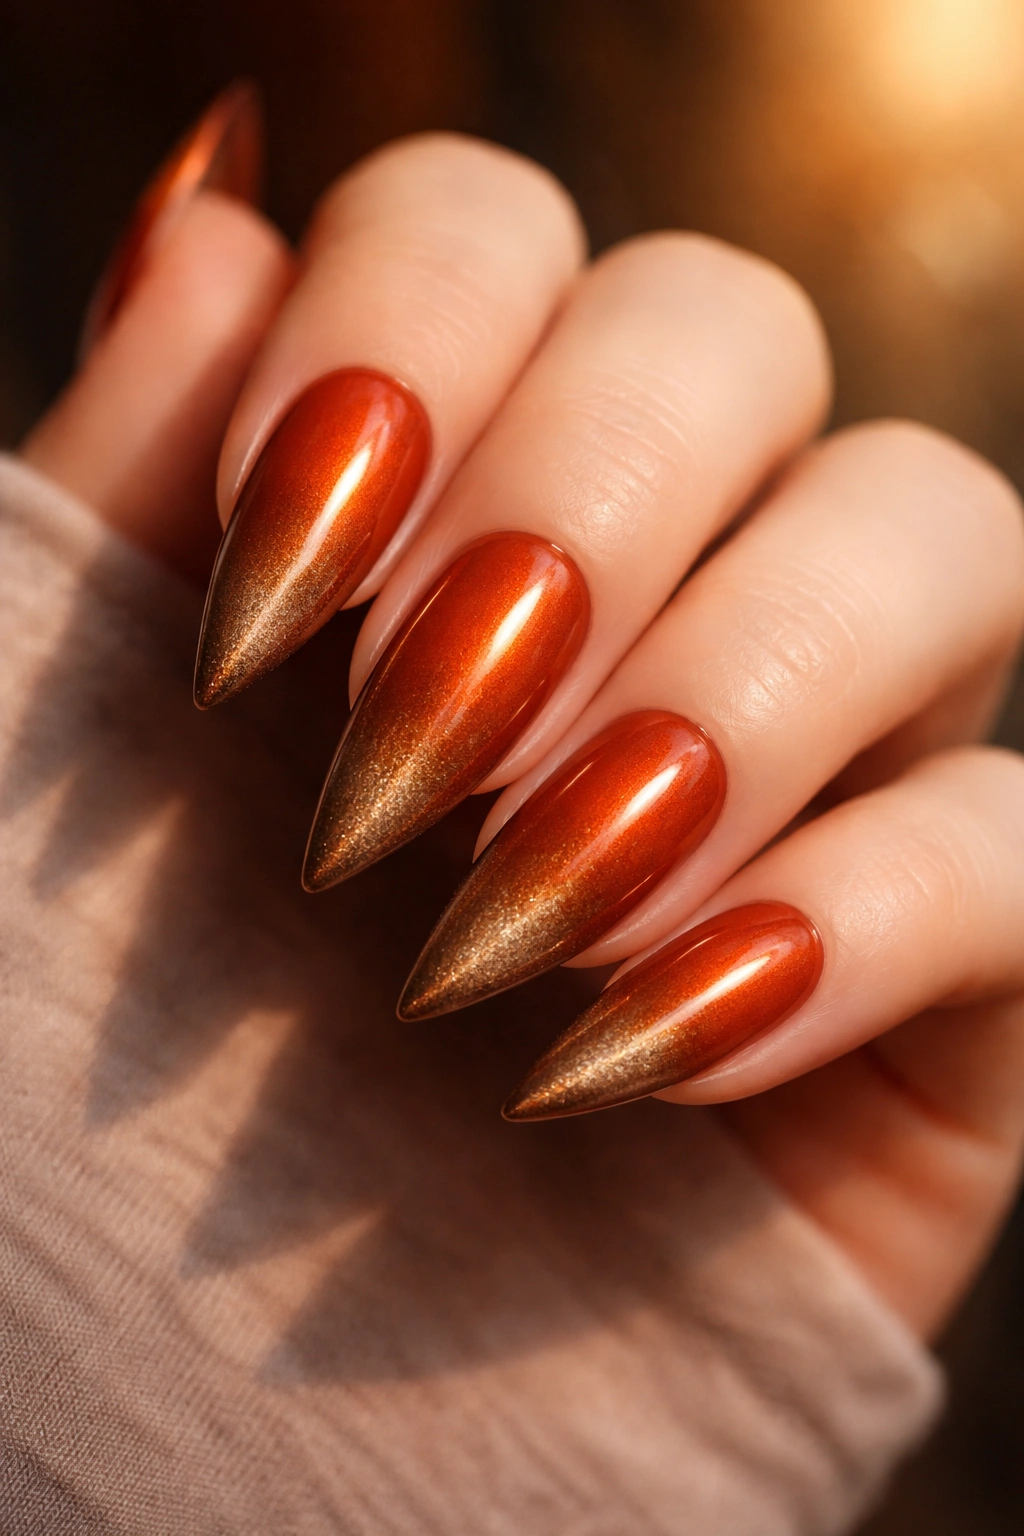
If you love color but still want to stay within the earth tone family, burnt orange is your answer. This warm, muted orange-brown is saturated enough to feel bold while remaining grounded and natural. Pair it with bronze in an ombré effect—moving from deep burnt orange at the base to shimmery bronze at the tips—and you get movement, dimension, and visual interest without veering into neon territory.
Why Burnt Orange Commands Attention Without Screaming
Burnt orange has historical depth and cultural significance that makes it feel more intentional than a random bright orange ever could. Combined with bronze, the look skews luxe and artistic rather than costume-y. The earth tone base means it works with season-appropriate wardrobes rather than demanding specific outfit coordination.
Technique for a Seamless Bronze Ombré
- Apply burnt orange as your base color in thin, even coats until fully opaque and smooth
- Let cure completely before moving to the gradient step
- Choose a bronze shade with visible shimmer or foil elements—this makes the gradient transition more visually dynamic
- Sponge the bronze onto the tips, slightly overlapping the burnt orange rather than creating a harsh line
- Blend the overlap area gently with a clean sponge edge to create a soft transition
- A glossy top coat amplifies the shimmer in the bronze and creates a cohesive, polished appearance
Worth knowing: The warmth in burnt orange means this combination suits warm undertones beautifully, but it also works across all skin tones because of the natural, earthy quality of both shades.
5. Caramel with Pearl Finish
Caramel is an underrated earth tone because it reads as both warm and slightly creamy, creating a soft, sophisticated base that feels less sterile than traditional nude. When you add a pearl or iridescent finish—applied either as a second layer over the caramel or mixed directly into the polish—the nails take on depth and light-catching properties that make them visually interesting from every angle. Stiletto nails with this finish feel expensive and intentional.
What Pearl Finish Brings to Caramel
Pearl isn’t just sparkle for sparkle’s sake. It creates subtle rainbow reflections that shift depending on the light and angle, which means your nails never look quite the same twice. This creates visual interest without loudness. Pearl over caramel also catches light in a way that makes the elongated stiletto shape appear even more refined and dramatic.
Application for Maximum Pearl Effect
- Start with a caramel base in 2-3 thin coats, ensuring you have smooth, even coverage before adding the pearl layer
- Apply a pearl top coat or a pearl-infused gel over the caramel, letting it cure fully
- Alternatively, look for a caramel shade that already has pearl suspended in it, which saves a step and often creates a more integrated effect
- The key is using a thick, generous top coat over the pearl layer to seal it and enhance the reflective quality
- Rotate your hand under different lighting to see how the pearl shifts—this is the whole appeal
- Keep nails clean and shiny to maximize the light-catching effect
Pro tip: Pearl finish shows fingerprints and dust more visibly than solid colors, so keep your nails buffed and clean for the full effect.
6. Clay Nude with Matte Texture
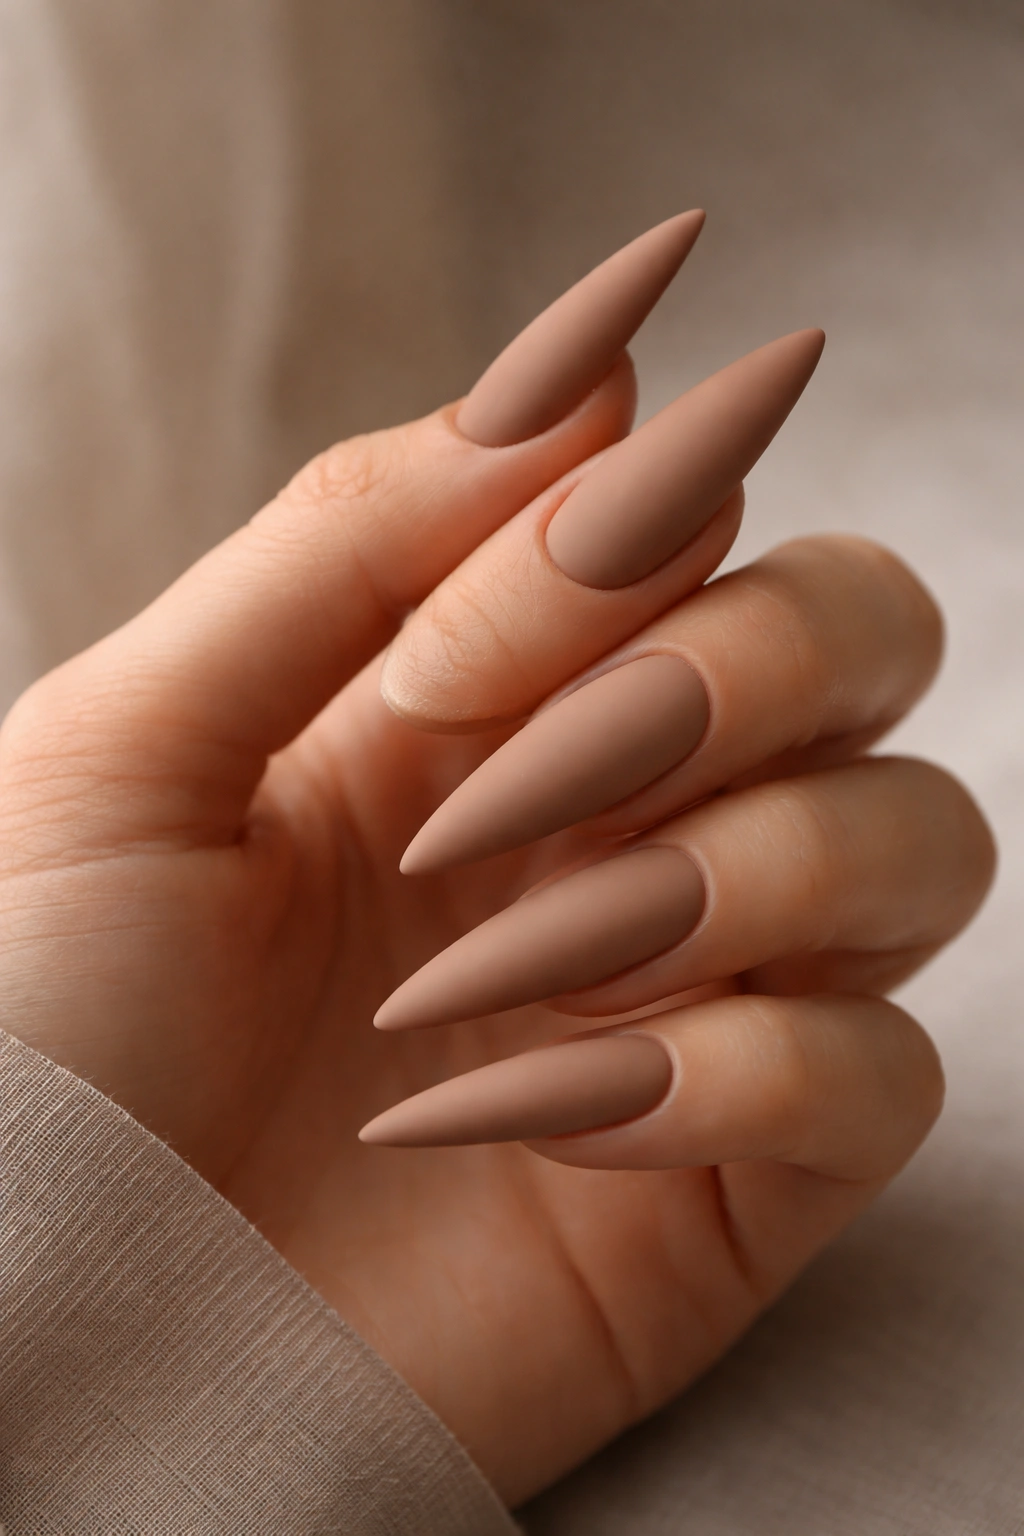
Clay is basically the personified version of an earth tone—it’s literally a natural material with a warm, muted color that feels grounded and substantial. When you recreate that earthy clay tone on nails and pair it with a matte finish, you get something that feels tactile even though it’s not. This approach is perfect for anyone who finds glossy nails impractical or just prefers the modern, understated aesthetic that matte creates.
Why Matte Finishes Transform Earth Tones
Matte actually makes colors read as deeper and more sophisticated than gloss does. Clay nude in particular benefits from matte finish because it emphasizes the warm, natural quality of the shade rather than creating shine that reads as overly polished. The texture also hides minor imperfections and uneven growth better than shiny finishes.
Achieving a Perfect Matte Finish
- Apply your clay or warm nude shade in 2-3 thin coats to ensure even opacity and smooth coverage
- Once the color is fully cured, apply a matte top coat generously to avoid streaking or patchy coverage
- Matte finishes can sometimes feel fragile, so make sure you’re using a high-quality matte seal rather than a cheap version that chips easily
- The matte surface will show smudges more than gloss, but this actually reads as natural and lived-in rather than sloppy
- If you want subtle dimension, you can add a thin glossy line or accent on one nail to create contrast against the matte base
Worth knowing: Matte finishes work particularly well on stiletto nails because the sharp shape alone provides visual drama—the matte finish lets the shape itself be the star rather than competing with shine.
7. Chocolate Brown and Gold Foil

Rich, creamy chocolate brown is one of the most flattering earth tones for virtually any skin tone, which is why it’s a reliable choice for stiletto nails. When you layer gold foil over sections of the chocolate—creating scattered glitter-like flakes across the tips or in a specific pattern—the nails gain luxury and glamour without becoming costume-y. The combination feels both professional and intentionally styled.
The Sophistication of Chocolate and Gold Together
This pairing taps directly into that warm, high-end aesthetic because it echoes classic luxury color combinations. Gold on brown always reads as intentional rather than accidental, which is why it shows up so often in jewelry, fashion, and upscale interiors. On stiletto nails, this combination signals that you’ve thought about your look.
Applying Gold Foil Over Chocolate Brown
- Apply your chocolate brown shade in smooth, even coats until fully opaque and glossy
- Let the color cure completely before touching it with foil—wet polish will shift the foil around uncontrollably
- Choose gold foil in a size that appeals to you—larger pieces create bolder impact, fine glitter-like foil feels more delicate
- Press foil onto the cured chocolate polish using a foil application tool or the sticky residue on your fingers after touching the tacky layer before sealing
- Apply foil to the tips, or scatter it across the chocolate in a pattern that feels balanced rather than random
- Seal everything with a thick clear top coat to lock the foil in place and create a smooth, wearable finish
- The foil will catch light beautifully and make your nails feel dimensional
Pro tip: Chocolate brown with scattered gold foil shows wear in a graceful way—small chips actually look intentional rather than sloppy because of the mixed texture.
8. Olive Green with Geometric Patterns
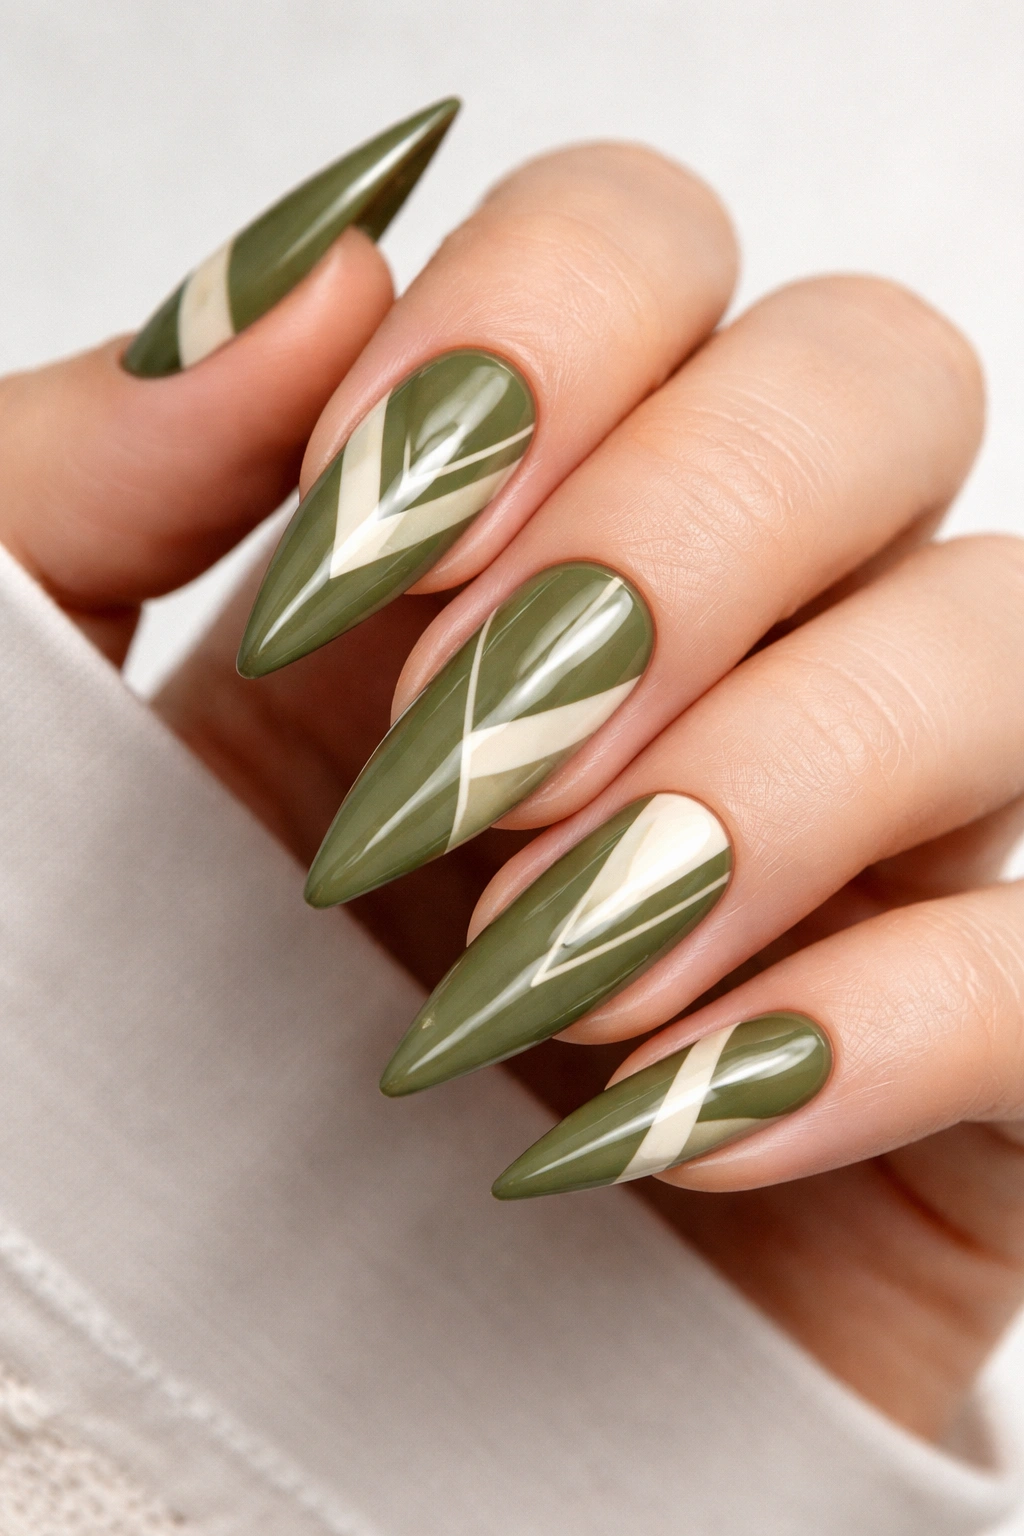
Olive is arguably the most “earthy” of all earth tone options—it’s literally the color of olives and olive leaves, making it feel immediately natural and grounded. On stiletto nails, olive pairs beautifully with geometric patterns because the muted color provides enough visual interest that you don’t need realistic or overly complex designs. Simple angular shapes, color blocks, or linear patterns create a modern, artistic look without overwhelming the base color.
Why Olive Attracts Geometric Design Work
Olive reads as earthy and calm, which means geometric patterns layered over it feel intentional and contemporary rather than chaotic. The color has enough depth that even thin line work in contrasting colors reads clearly. This shade is ideal for anyone who wants their nail art to feel purposeful rather than decorative.
Creating Geometric Patterns on Olive
- Establish your olive base in smooth, even coats—thin layers applied properly will give you better coverage than thick gloopy coats
- Plan your geometric pattern before executing it, either by sketching on the polish with a toothpick or simply knowing the general placement
- Choose a contrasting accent color—cream, white, light tan, gold, or even a different earth tone like terracotta—for maximum clarity
- Use a thin striping brush or gel pen to create your shapes: angular lines, triangles, rectangles, or abstract shapes
- Precision isn’t as critical as you might think—slight irregularities actually add character and prevent a machine-like appearance
- Seal with a glossy top coat to unify the design and create a smooth, professional finish
Worth knowing: Geometric patterns on olive feel exceptionally modern and artistic, so this is a great choice if you want your nails to make a subtle style statement.
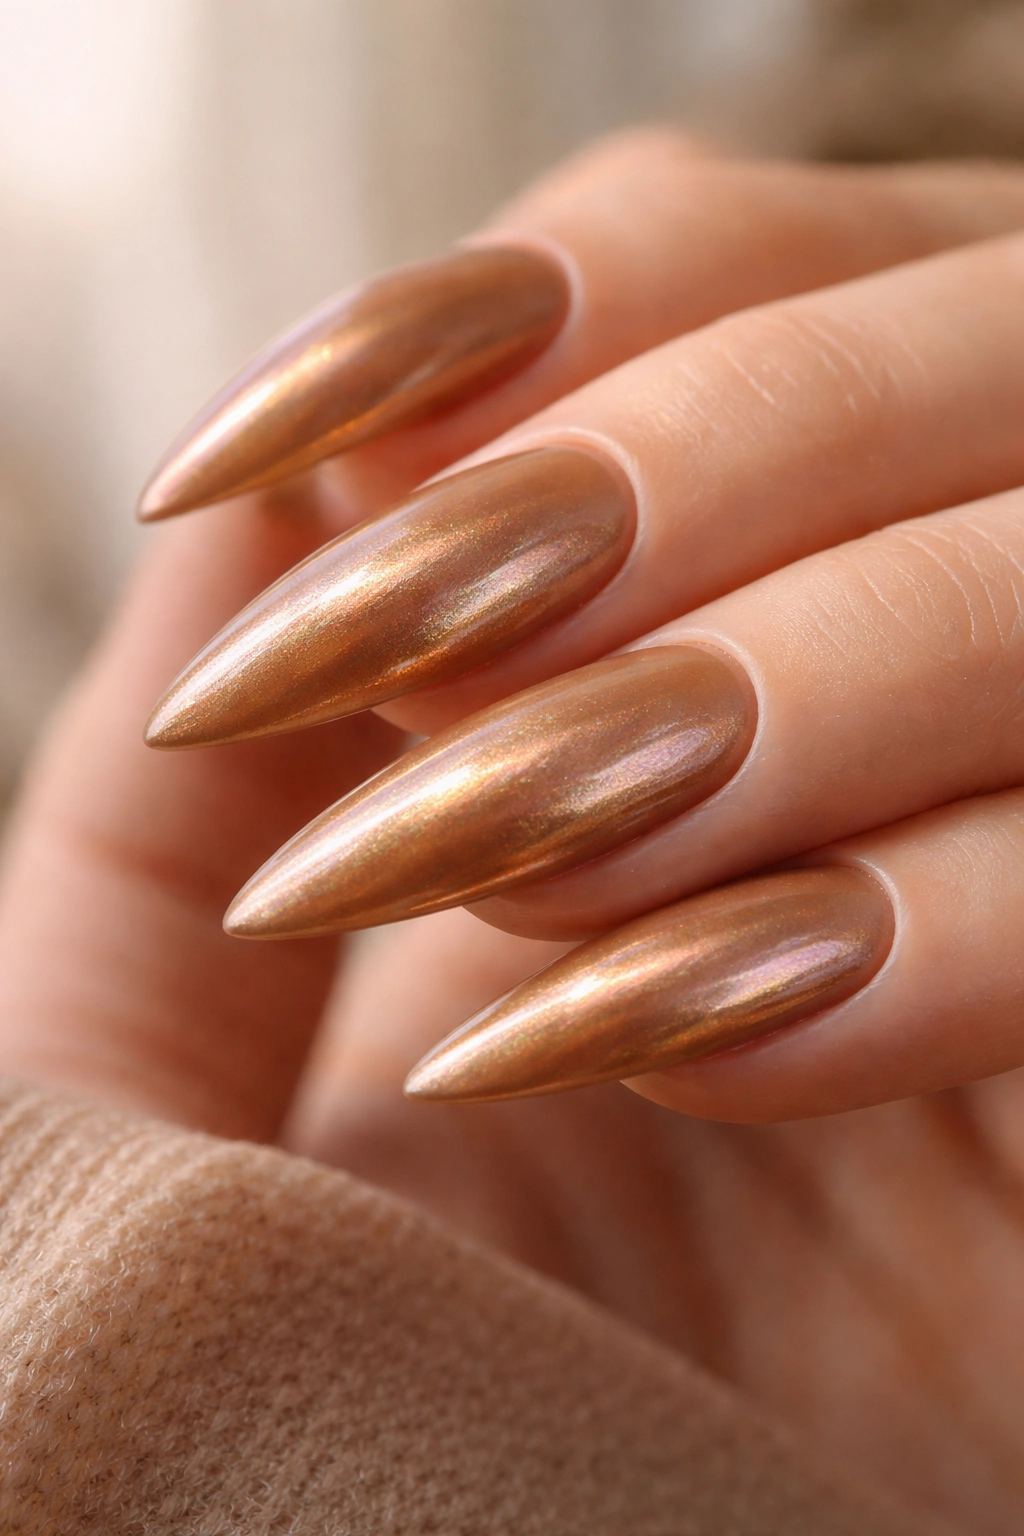
9. Rust and Copper Ombré
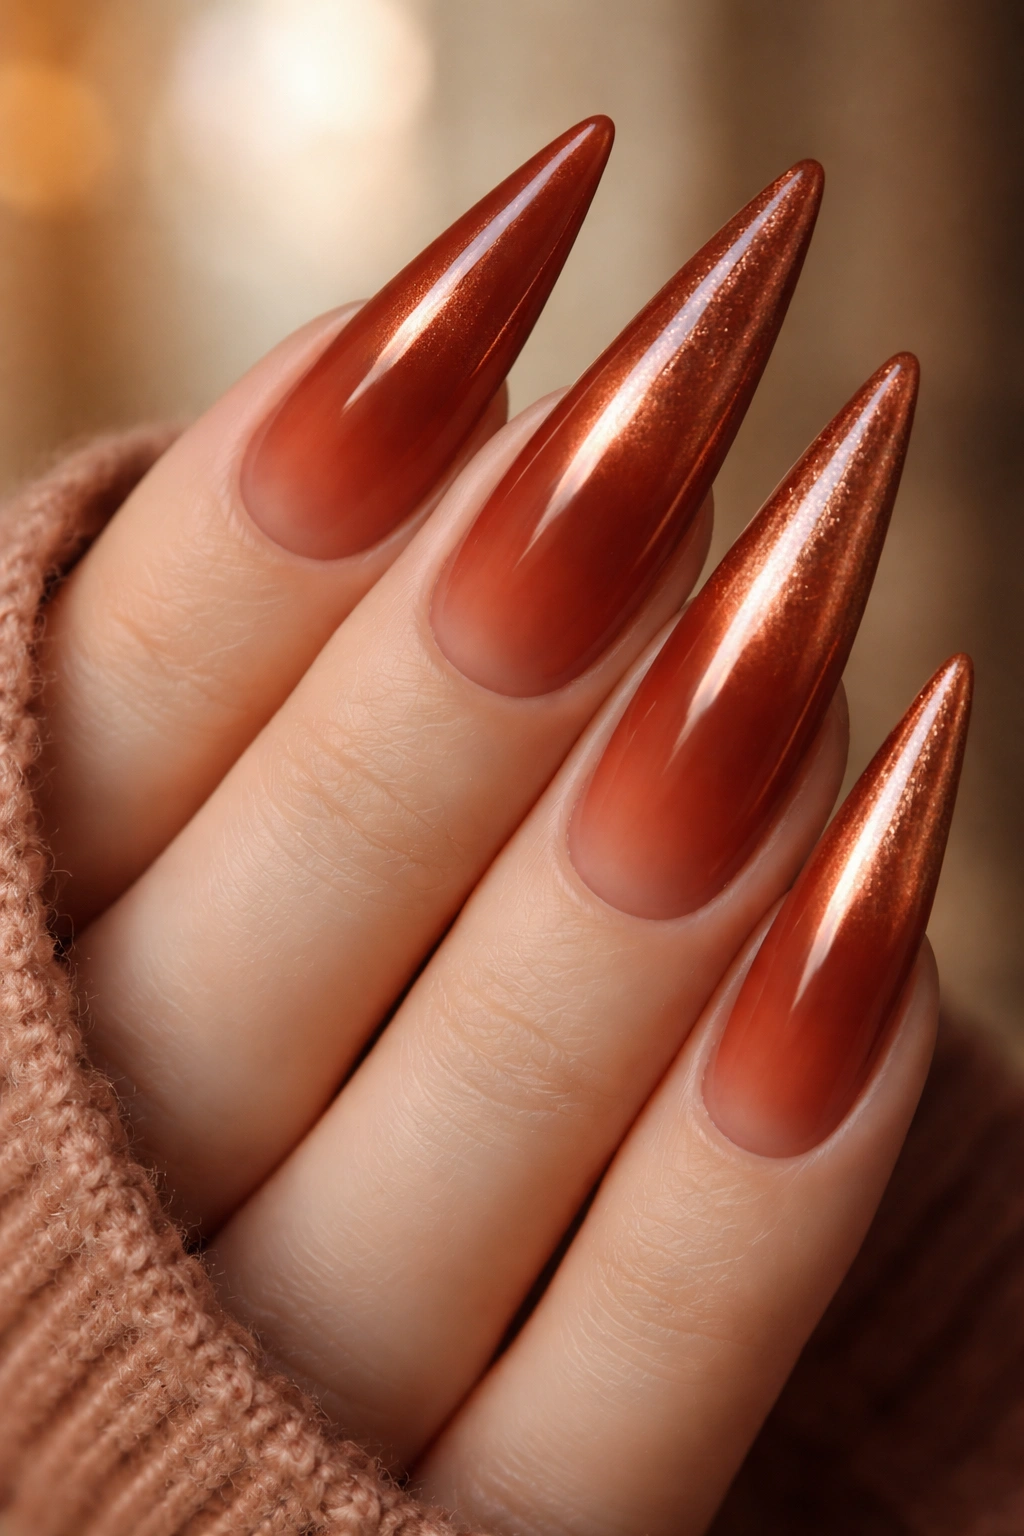
Rust is warm, slightly muted, and deeply earthy—it’s the color of oxidized iron and weathered metal, which gives it inherent character and depth. Combined with copper in an ombré effect, you get a warm gradient that feels both natural and luxe. This look works exceptionally well on stiletto nails because the color movement enhances the sharp shape and creates visual interest from multiple angles.
The Appeal of Rust-to-Copper Movement
This specific color transition feels like it’s moving from warm and heavy to light and shimmery, which creates a sense of sophistication and intentionality. Rust and copper are also colors that appear frequently in autumn palettes and wardrobe staples, so this nail look coordinates beautifully with existing personal style without requiring specific outfit planning.
Executing a Rust-to-Copper Ombré
- Choose a rust shade as your base—something with visible warmth rather than a dull, desaturated brown
- Apply rust in thin, even coats until fully opaque and smooth, then let cure completely
- Select a copper shade that’s noticeably lighter and has visible shimmer or metallic properties
- Using a makeup sponge, apply copper to the tips and sponge upward, allowing it to blend slightly with the rust base
- The blend zone should show both colors slightly, creating a gradient rather than a hard line
- Multiple light passes with the sponge create better blending than one heavy pass
- Seal with a thick glossy top coat to smooth any texture from sponging and enhance the metallic shimmer
Pro tip: This ombré works from base to tip, but you can also reverse it—copper at the base fading to rust at the tips—for a slightly different visual effect.
10. Beige with Negative Space Design
Beige gets criticized for being boring, but on stiletto nails with negative space design, it becomes a sophisticated choice that puts the focus on the artistic work rather than the color. Negative space—where you intentionally leave parts of the nail bare—creates contrast and visual interest without additional color. Think thin lines of bare nail creating geometric shapes, or leaving the tip natural while the base and sides are colored.
Why Negative Space Transforms a Neutral Base
Negative space design elevated beige from bland to intentional because you’re clearly making a deliberate aesthetic choice. The bare nail sections create instant visual interest and complexity without requiring multiple colors or intricate detail work. This approach also feels airy and modern rather than heavy or traditional.
Designing Negative Space on Beige
- Apply beige as your base color, covering the areas you want color while carefully avoiding the negative space sections
- Clean up the bare nail sections with a lint-free wipe and isopropyl alcohol for crisp, clear lines
- Alternatively, paint the entire nail beige, then use a thin brush and acetone to carefully remove color from specific sections, creating negative space patterns
- Thin vertical lines of bare nail running through the center of each stiletto reads incredibly modern
- Geometric shapes like triangles or angular sections of bare nail paired with beige create instant visual interest
- Seal the beige portions with a glossy top coat while leaving the negative space unsealed
Worth knowing: Negative space designs require steadier hands or more patience than solid colors, but they create an almost architectural look that photographs beautifully and reads as intentional rather than simple.
11. Warm Sand with Stone Texture
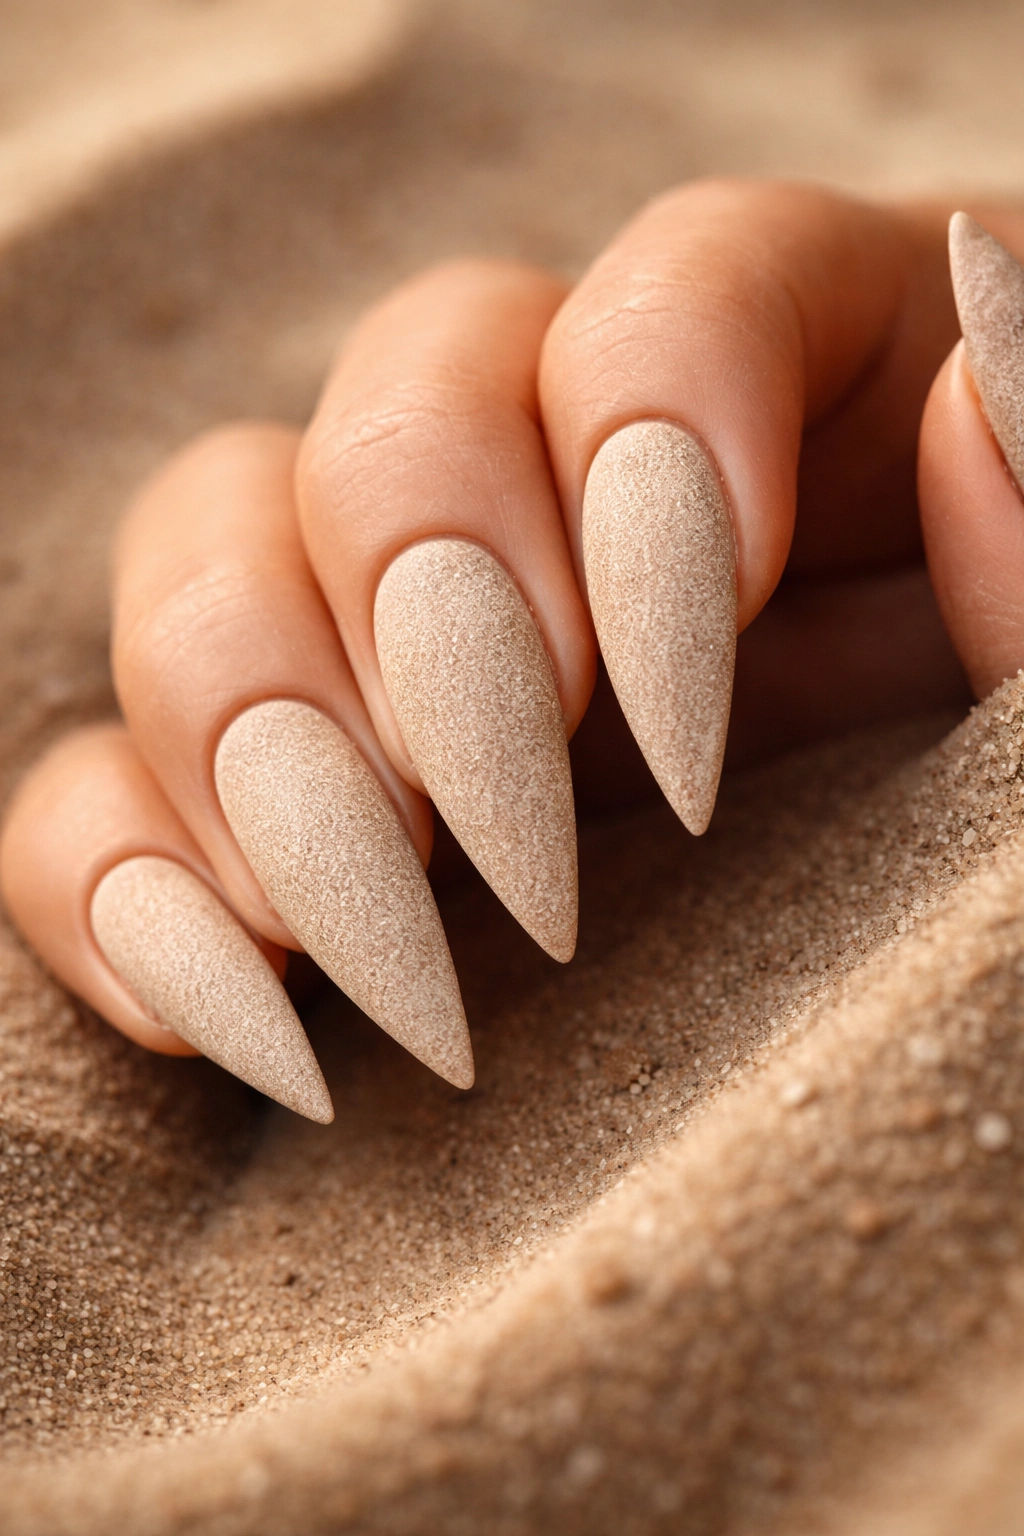
Warm sand—a pale, creamy tan that mimics beach sand—is calming, approachable, and endlessly flattering across skin tones. Layer in a stone texture effect—achieved through specialized textured polishes, gel with small beads or grit, or careful product layering—and the nails become tactile-looking and three-dimensional without being uncomfortable to wear. This creates visual interest through texture rather than pattern, which appeals to anyone who wants subtle sophistication.
What Stone Texture Adds to Warm Sand
Texture creates depth and visual interest that flat color simply cannot achieve. A stone texture looks organic and natural rather than trendy or temporary, making it work across seasons and personal style shifts. The textured finish also hides minor imperfections and uneven growth far better than smooth, glossy finishes, which is a major practical advantage.
Creating a Stone Texture Finish
- Apply warm sand as your base color in thin, even coats—you want full opacity and smooth coverage before adding texture
- Let the base cure completely before applying the textured element
- Purchase a specialized textured polish (often labeled as “stone” or “granite” finish) in clear or a color that complements your sand shade
- Apply the textured polish over the sand base, following package directions for coverage and cure time
- Alternatively, you can purchase a textured gel top coat that adds grit and dimension over any base color
- The texture will feel slightly bumpy to touch but smooth enough to wear comfortably—not scratchy or irritating
- Textured finishes hide dust and skin oils better than glossy finishes, so your nails maintain a freshly-done appearance longer
Pro tip: Stone texture pairs beautifully with matte finishes, or you can seal textured polish with a glossy top coat to create contrast between shiny and textured surfaces.
12. Khaki and Terracotta Marble
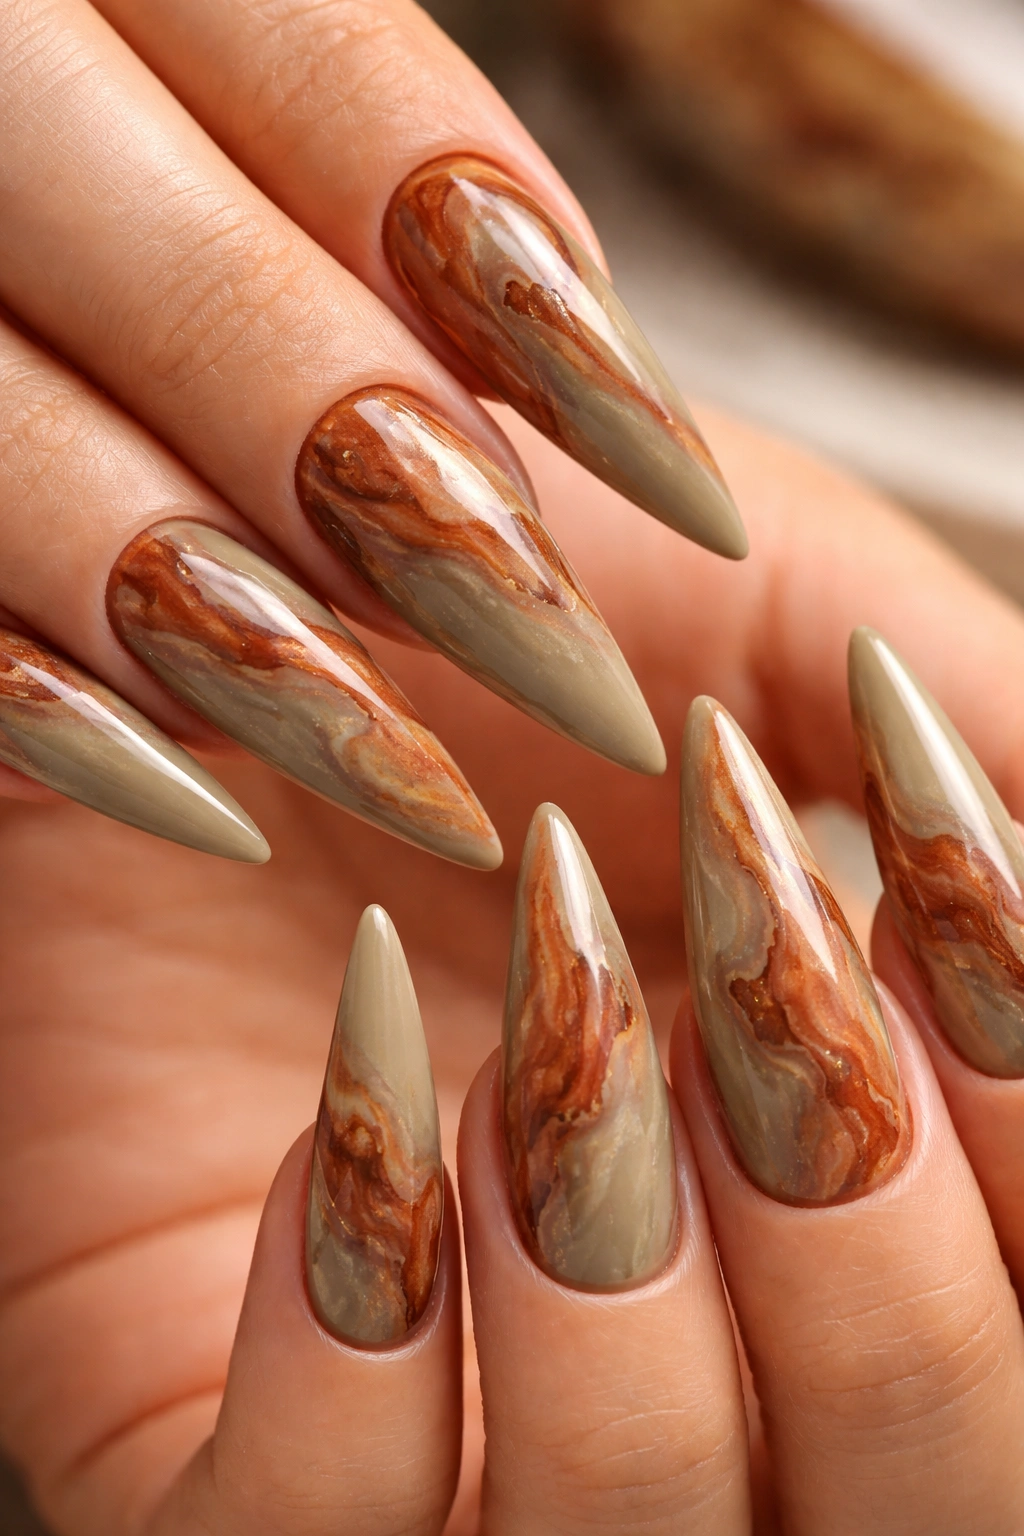
Khaki is a warm, muted tan-brown that works as a sophisticated neutral, and when you add terracotta through a marble or watercolor effect, you create sophisticated dimensionality. Marble design—where two or more colors are swirled together to create irregular, vein-like patterns—feels luxe and artistic. This look works particularly well on stiletto nails because the longer surface provides enough space for the pattern to be visible and intentional without appearing cluttered.
Why Marble Design Elevates Earth Tones
Marble creates instant luxury vibes because marble itself is associated with high-end interiors and prestige. When you recreate that effect on nails using earth tones, you get sophistication without the coldness that marble designs in cooler colors sometimes evoke. The warm color palette ensures the look feels elegant rather than sterile.
Creating a Marble Effect
- Apply khaki as your base color in 2-3 thin coats until fully opaque, then let cure completely
- Create a marble effect by either dropping terracotta polish onto the khaki base and swirling with a thin brush, or using a specialized marble effect gel designed for nail art
- If doing it freehand, work quickly on uncured polish to allow the colors to blend naturally without creating harsh lines
- The pattern should look somewhat organic and random—perfectly symmetrical marble reads as less authentic and artistic
- Once your marble pattern is complete and the polish is cured, apply a thick, smooth top coat to seal and blend the design
- A glossy finish works best for marble because it enhances the depth and luxury feel of the pattern
Worth knowing: Small imperfections in marble design actually enhance the natural, artistic appearance rather than detracting from it.
13. Dusty Rose with Metallic Details
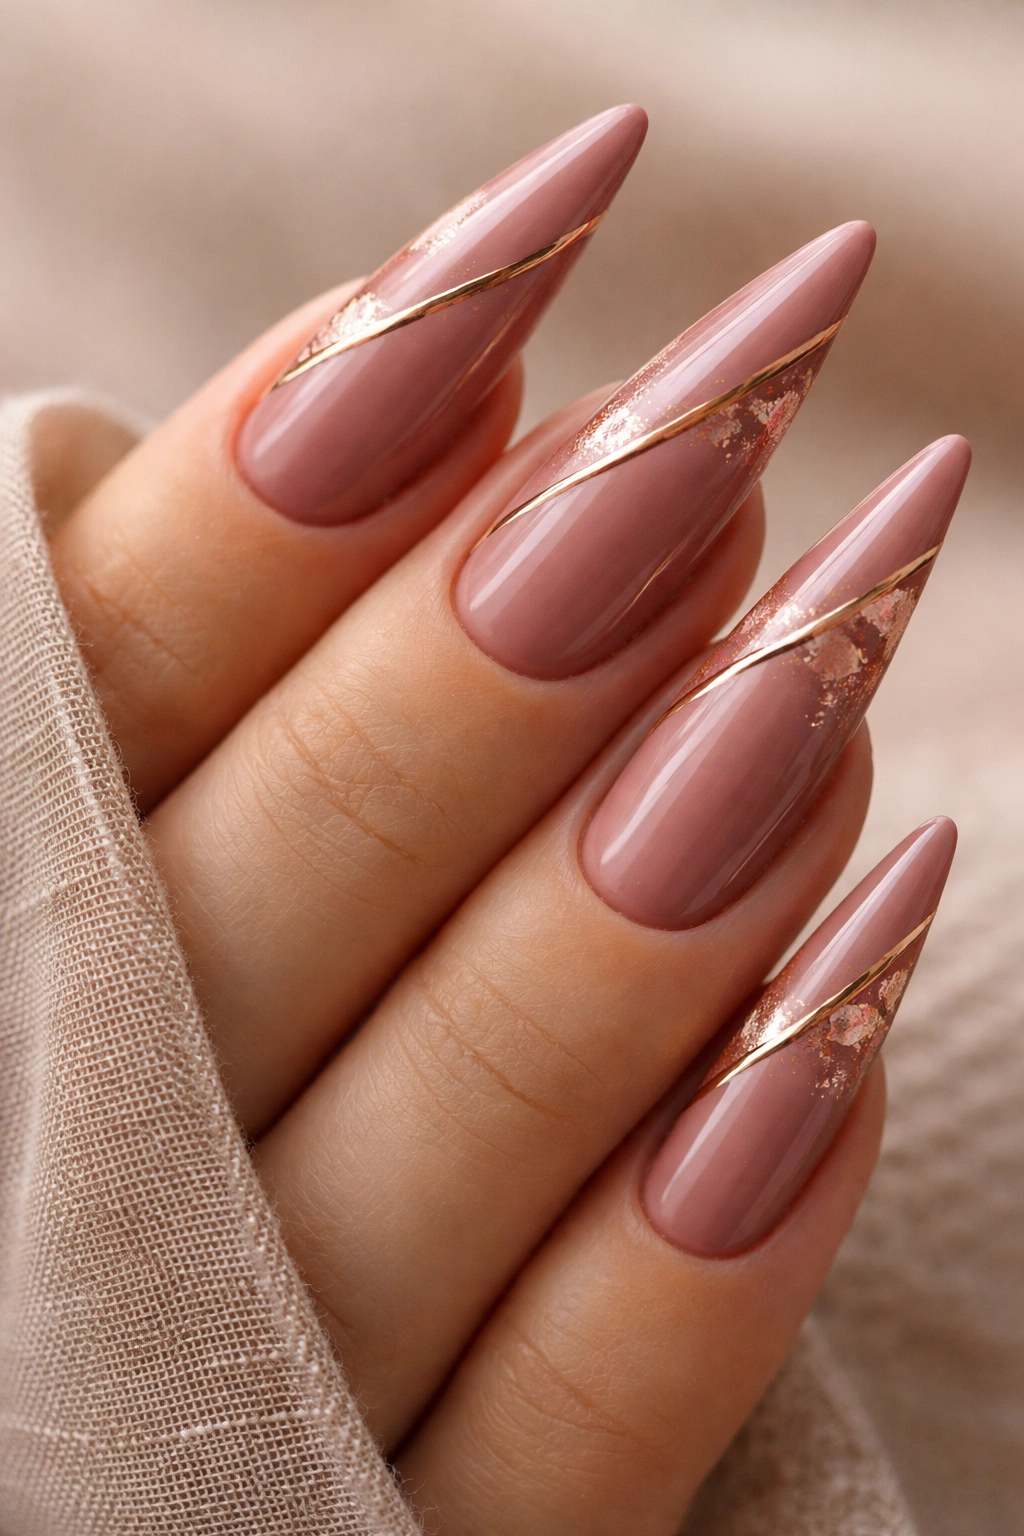
Dusty rose is a warm, muted pinkish-brown that exists on the border between rose and earth tone—it’s earthy enough to belong in this palette while having slightly more personality than pure neutrals. Combined with metallic accents—thin gold lines, rose gold foil, or copper details—dusty rose becomes both romantic and sophisticated. This balance makes it particularly appealing for anyone who wants their nails to feel feminine without being overly sweet or decorative.
The Unique Appeal of Dusty Rose and Metallics
Dusty rose is one of those rare shades that feels both warm and slightly cool simultaneously, which means it adapts beautifully to various skin tones and personal styles. The addition of metallics prevents the look from feeling flat or plain, while the muted rose tone keeps everything feeling grounded and wearable rather than costume-y.
Applying Metallic Details to Dusty Rose
- Establish your dusty rose base in smooth, even coats—this shade often requires 2-3 thin coats for full coverage due to its muted nature
- Let the base cure completely before adding metallic details to prevent smudging
- Apply metallic accents using a thin gel pen in rose gold, gold, or copper—vertical stripes on a few nails, accent details on your ring finger, or scattered elements
- Alternatively, apply metallic foil to uncured top coat, pressing gently to ensure adhesion, then seal with a final clear top coat
- The contrast between matte or satin dusty rose and shimmery metallic creates visual interest without overwhelming the base color
- Glossy finish works best for displaying metallic details, as it creates maximum light reflection
Pro tip: Rose gold metallics paired with dusty rose create a monochromatic, tonal look that feels incredibly cohesive and intentional.
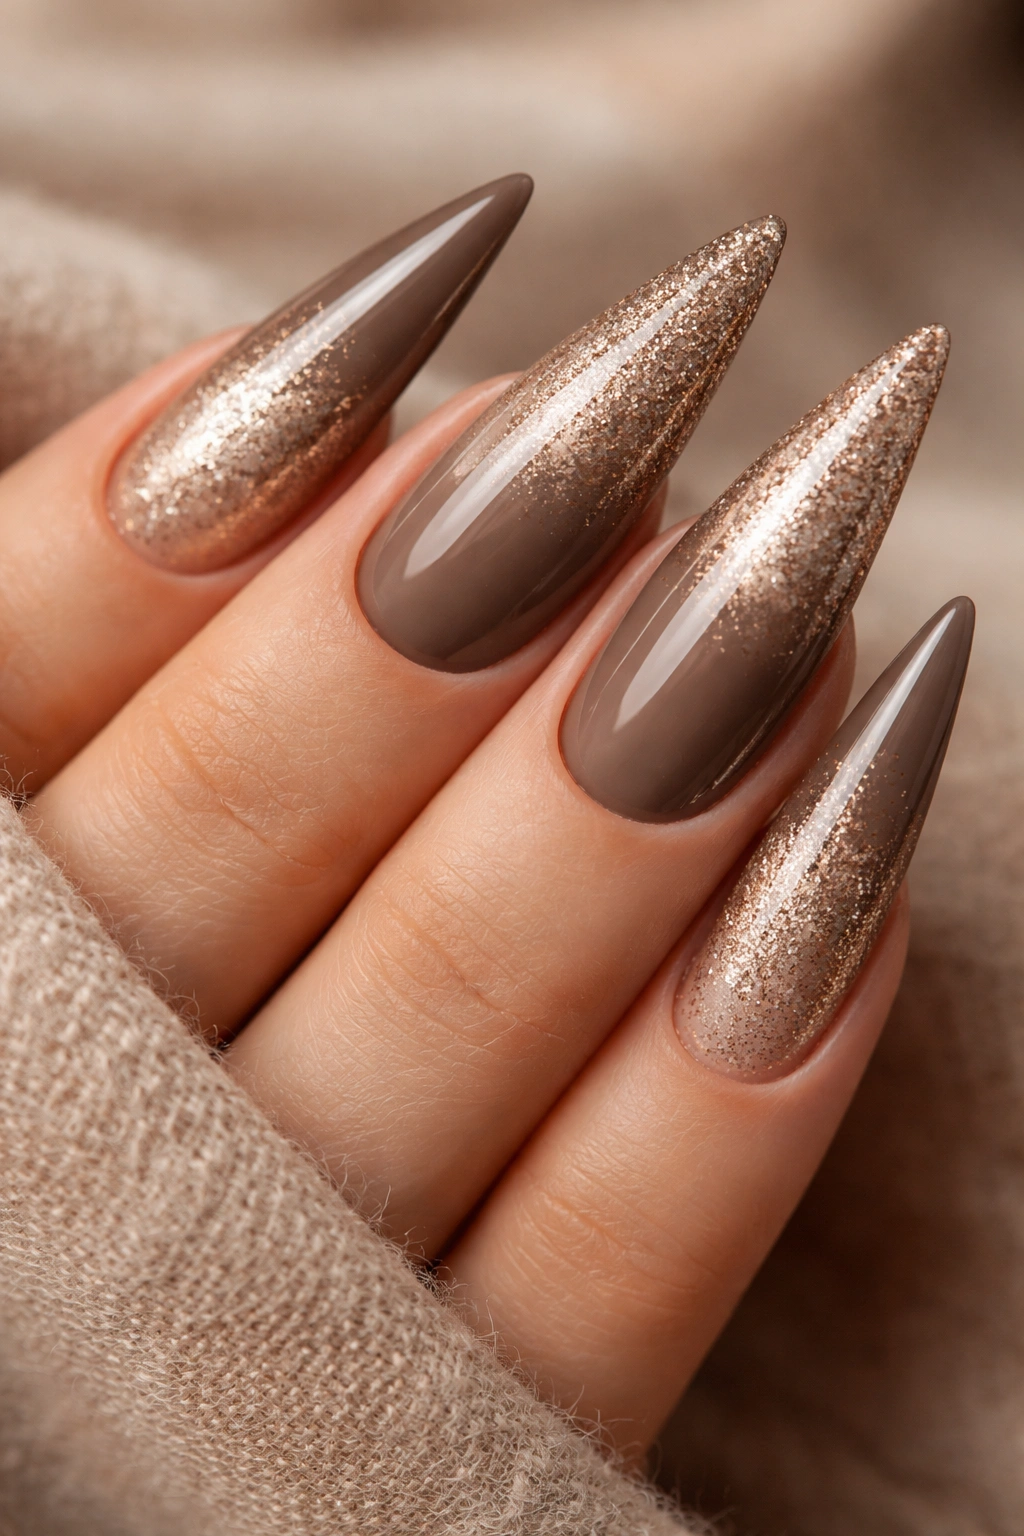
14. Cocoa Brown with Shimmer
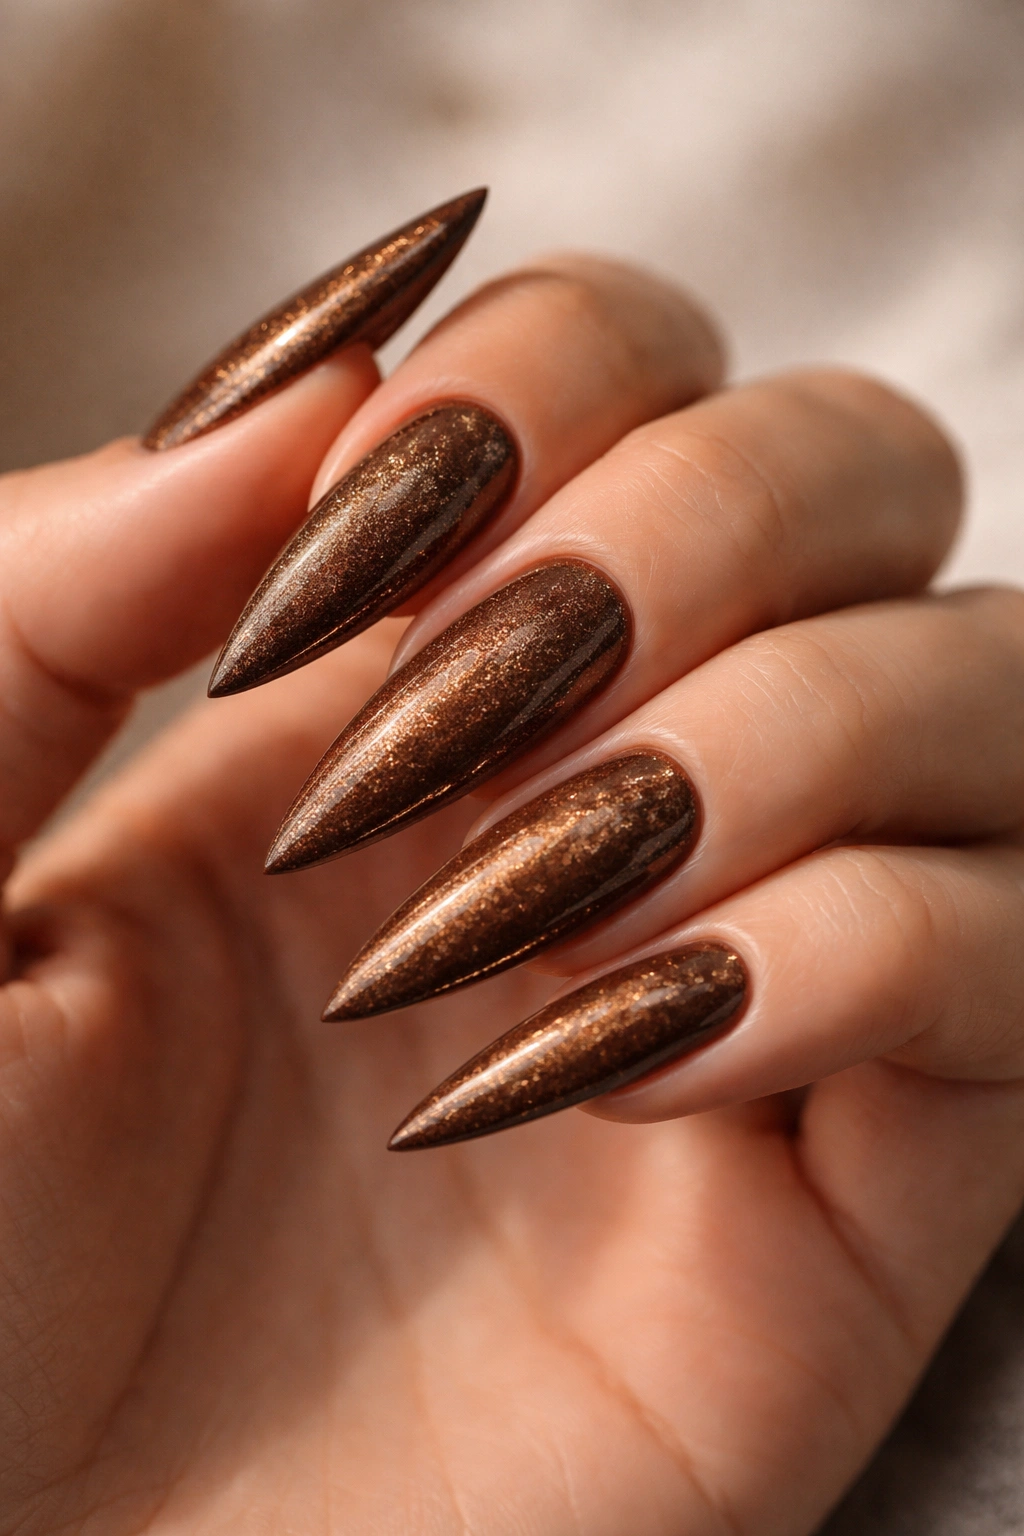
Cocoa brown is richer and slightly darker than caramel—it’s a deep, warm brown that reads as elegant and substantial. Add shimmer to cocoa brown and you elevate it from simple to luxe without changing the fundamental color. The shimmer catches light without transforming the brown into a different shade, which means your nails maintain sophisticated earthy vibes while gaining dimension and visual interest.
Why Cocoa Especially Benefits From Shimmer
Darker browns can sometimes read as flat or heavy, which is why shimmer is the perfect addition. The light-catching quality makes cocoa feel expensive and intentional, and the warmth in both the brown and the shimmer ensure the look feels cozy and sophisticated rather than cold or harsh.
Choosing and Applying Shimmer
- Select a cocoa brown shade with significant depth—avoid anything too light or you’ll lose the richness
- Apply cocoa in 2-3 thin coats for even opacity and smooth coverage, then let cure completely
- Choose a shimmer top coat that enhances rather than changes your brown—a warm-toned shimmer, gold shimmer, or neutral shimmer work best
- Apply shimmer generously to create maximum light-catching effect, then cure
- A thick clear top coat over the shimmer creates a smooth, wearable finish and enhances depth
- The shimmer should be visible in sunlight and under artificial light—if it’s barely noticeable, apply a second layer of shimmer top coat
Worth knowing: Cocoa with shimmer feels particularly wearable in professional settings because the depth of color reads as sophisticated rather than trendy.
15. Warm Stone with Hand-Painted Details
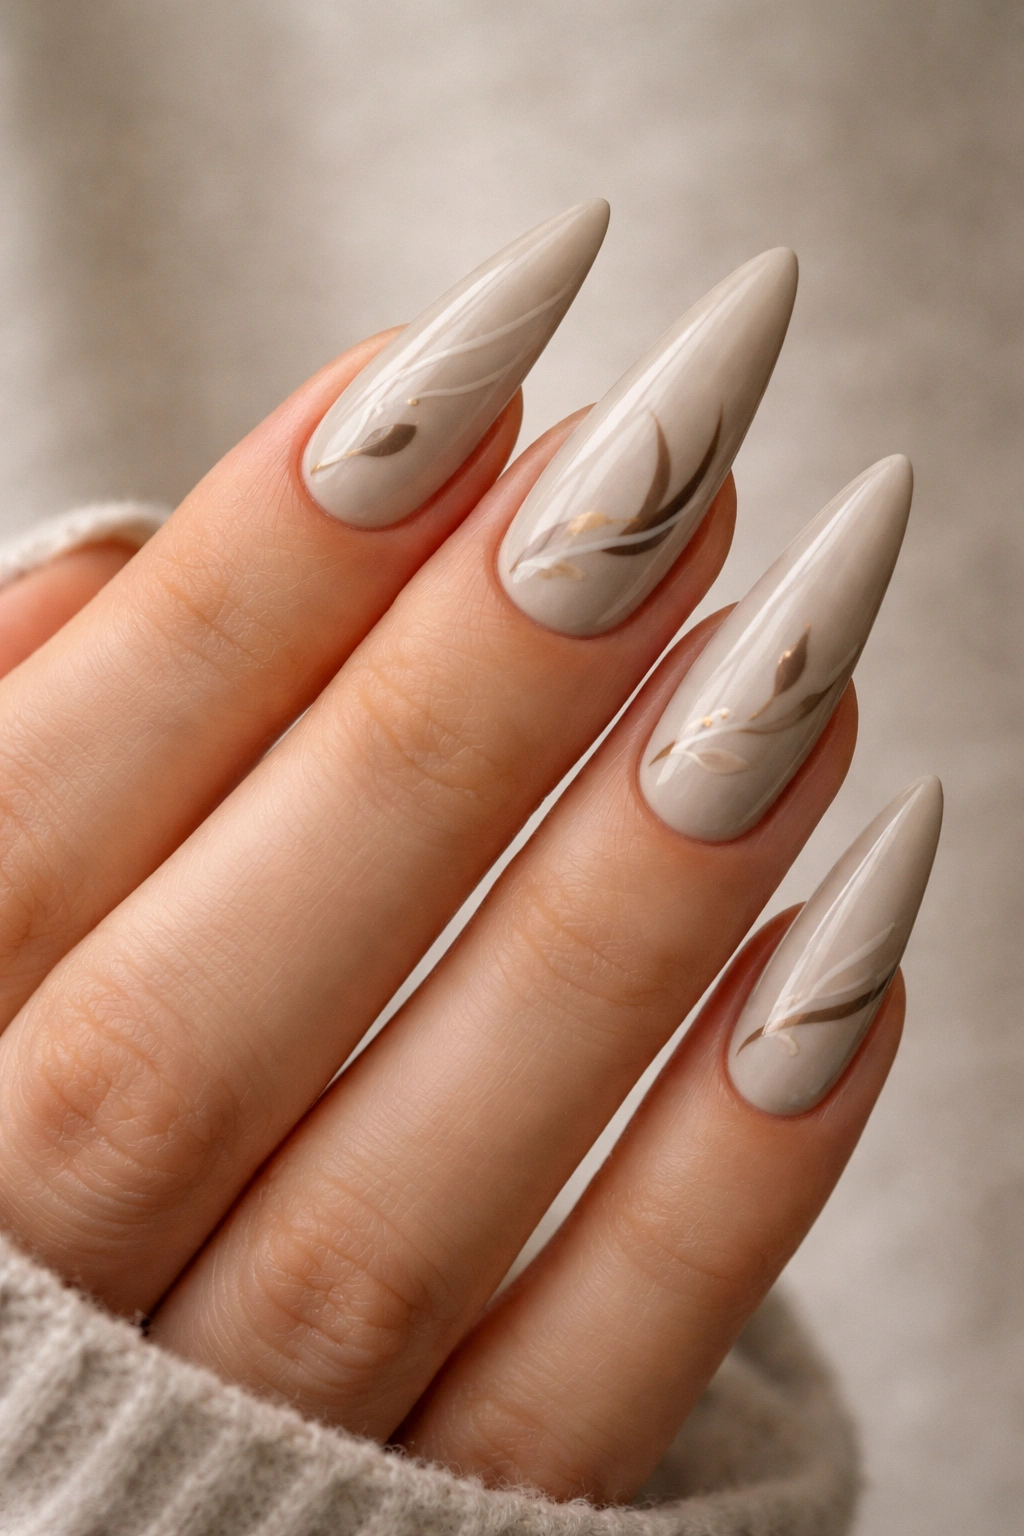
Warm stone is a pale, sophisticated gray-beige that evokes natural stone or concrete. Hand-painted details—whether that’s minimalist line work, small illustrated elements, or organic shapes—transform warm stone from neutral to gallery-worthy. Stiletto nails provide the perfect canvas for hand-painted art because of their length and surface area. Small painted elements feel intentional and artistic rather than random.
What Hand-Painted Details Communicate
Hand-painted nail art signals that you’ve invested time and thought into your look—it’s essentially wearable art. Warm stone as a base ensures the painted details take center stage without the base color fighting for attention. The result feels curated and personal rather than mass-produced.
Approaching Hand-Painted Nail Art
- Start with a warm stone base that’s smooth, even, and fully cured before attempting any painted details
- Plan your design—whether that’s a small landscape, abstract shapes, or line work—before picking up a brush
- Use specialized nail art brushes or thin detail brushes designed for precision work
- Paint details in colors that contrast slightly with your warm stone base—dark brown, deep green, muted terracotta, or even black work beautifully
- Work slowly and deliberately rather than rushing—nail art painting requires patience and steady hands
- Allow each layer to dry before adding subsequent details to prevent muddying colors
- Seal everything with a thick, smooth top coat that doesn’t disturb your painted details—apply the top coat away from the art or use a quick-setting formula
Pro tip: Hand-painted details don’t need to be photorealistic or complex—simple line work, small shapes, or minimalist illustrations actually feel more sophisticated than overly detailed designs.
16. Tan with Minimalist Landscape
Tan is a warm, neutral base that’s slightly darker than beige but still reads as completely approachable. Layer a minimalist landscape—simple line drawings of mountains, sand dunes, or horizon lines—and you create a look that’s both earthy and artistic. The landscape theme reinforces the earth tone aesthetic while adding subtle storytelling to your nails.
Why Landscape Design Works on Earth Tones
Landscapes in muted, natural tones feel coherent rather than random because they connect to the actual earth they’re depicting. A minimalist approach means simple line work rather than complex, time-consuming detail, which makes this design more achievable for DIY nail artists while still looking intentional and thoughtful.
Creating Minimalist Landscape Details
- Apply your tan base in smooth, even coats until fully opaque, then let cure completely
- Choose a contrasting color for your landscape—dark brown, deep green, muted orange, or even black work beautifully
- Use a thin detail brush or nail art pen to create simple line work: a curved line for a mountain or sand dune, a straight line for a horizon, minimal additional detail
- Less detail is actually more effective here—a few confident lines read as more artistic than a heavily detailed scene
- Each nail can have an identical landscape, or vary the design slightly across nails for a cohesive collection effect
- Allow painted details to dry completely before sealing with top coat
- Glossy top coat works best to highlight the line work and create a finished appearance
Worth knowing: Minimalist landscapes on tan feel surprisingly permanent and sophisticated—they read as intentional artistic choices rather than trendy nail art.
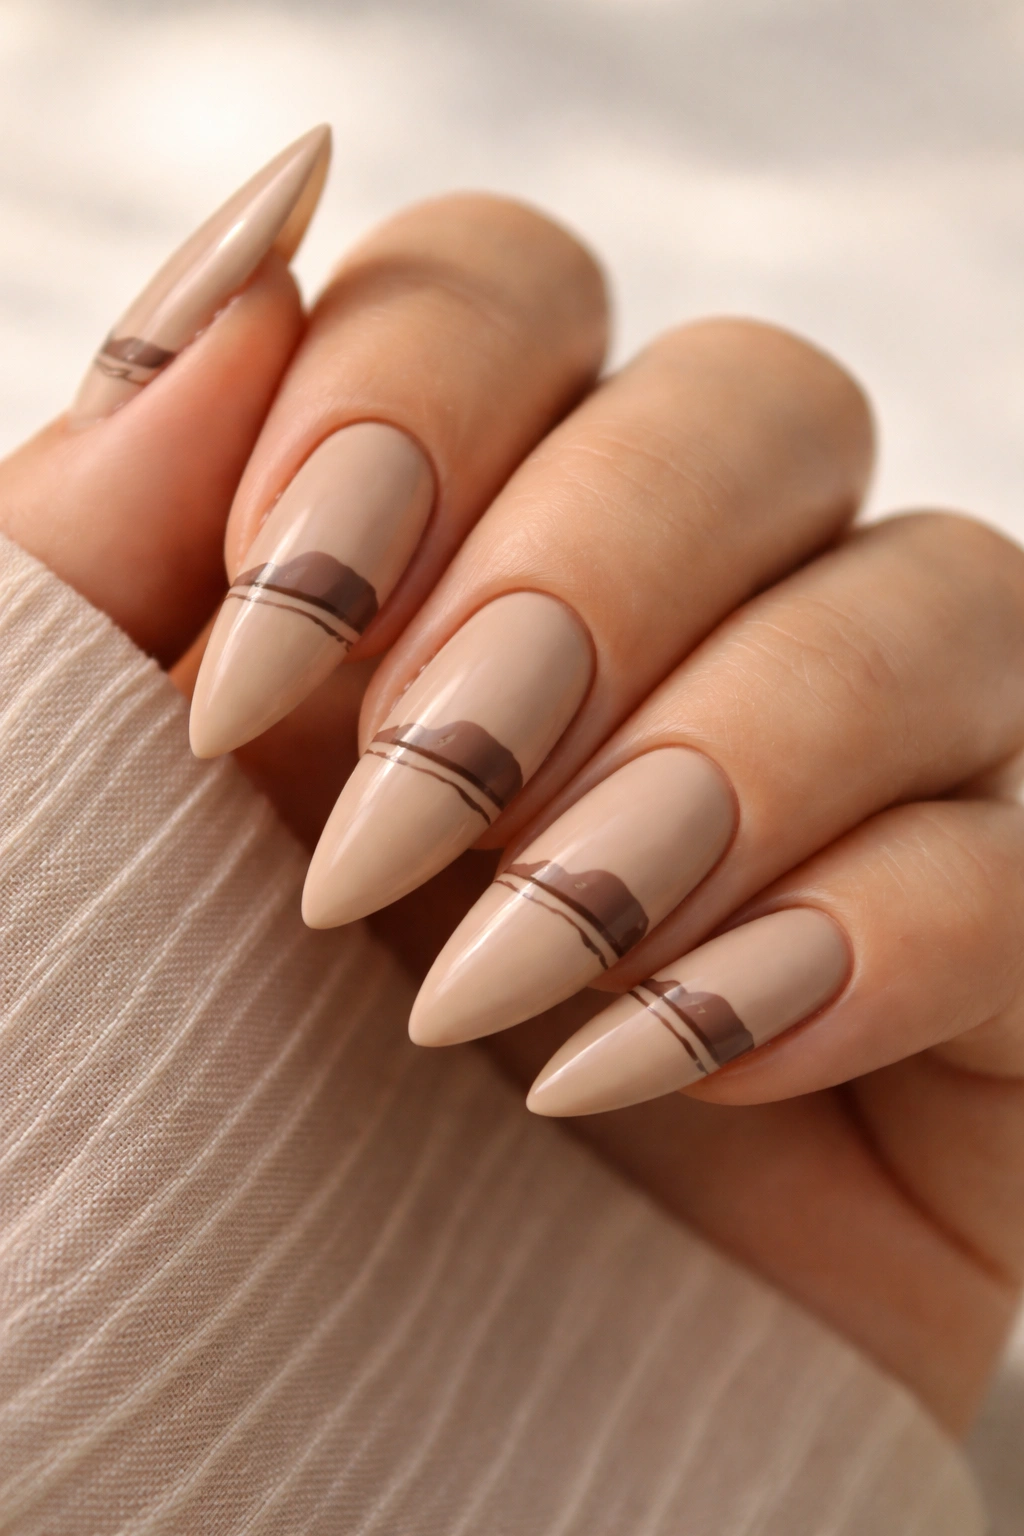
17. Mushroom Brown and Champagne
Mushroom brown is a cool-warm earth tone that sounds more complex than it is—think the subtle color of dried mushrooms, slightly muted and sophisticated. Pair it with champagne—a pale, shimmery peachy-gold—and you create a look that feels both earthy and celebratory. This combination works on stiletto nails because both shades are muted enough to feel refined while the champagne adds glamour without being overwhelming.
The Sophisticated Simplicity of This Pairing
Mushroom and champagne feel like a curated combination—the kind of color pairing that appears in high-end fashion and interior design. The mushroom grounds the look in earthiness while the champagne lifts it into luxury territory. Together, they create something that feels both natural and intentional.
Applying Mushroom and Champagne
- Apply mushroom brown as your base across all nails in 2-3 thin, even coats
- Let the base cure completely before moving to the champagne element
- On your accent nails (ring fingers and thumbs work best), apply champagne as a gradient from base to tip, or as an ombré fading into the mushroom
- Alternatively, apply champagne to the tips in a traditional French-manicure-style band
- If creating an ombré, sponge champagne over mushroom and blend the transition zone gently
- Seal everything with a high-shine top coat to maximize the shimmer in the champagne while making the mushroom appear polished and intentional
Pro tip: This combination particularly suits warm undertones, but the muted quality of both shades means it works across all skin tones.
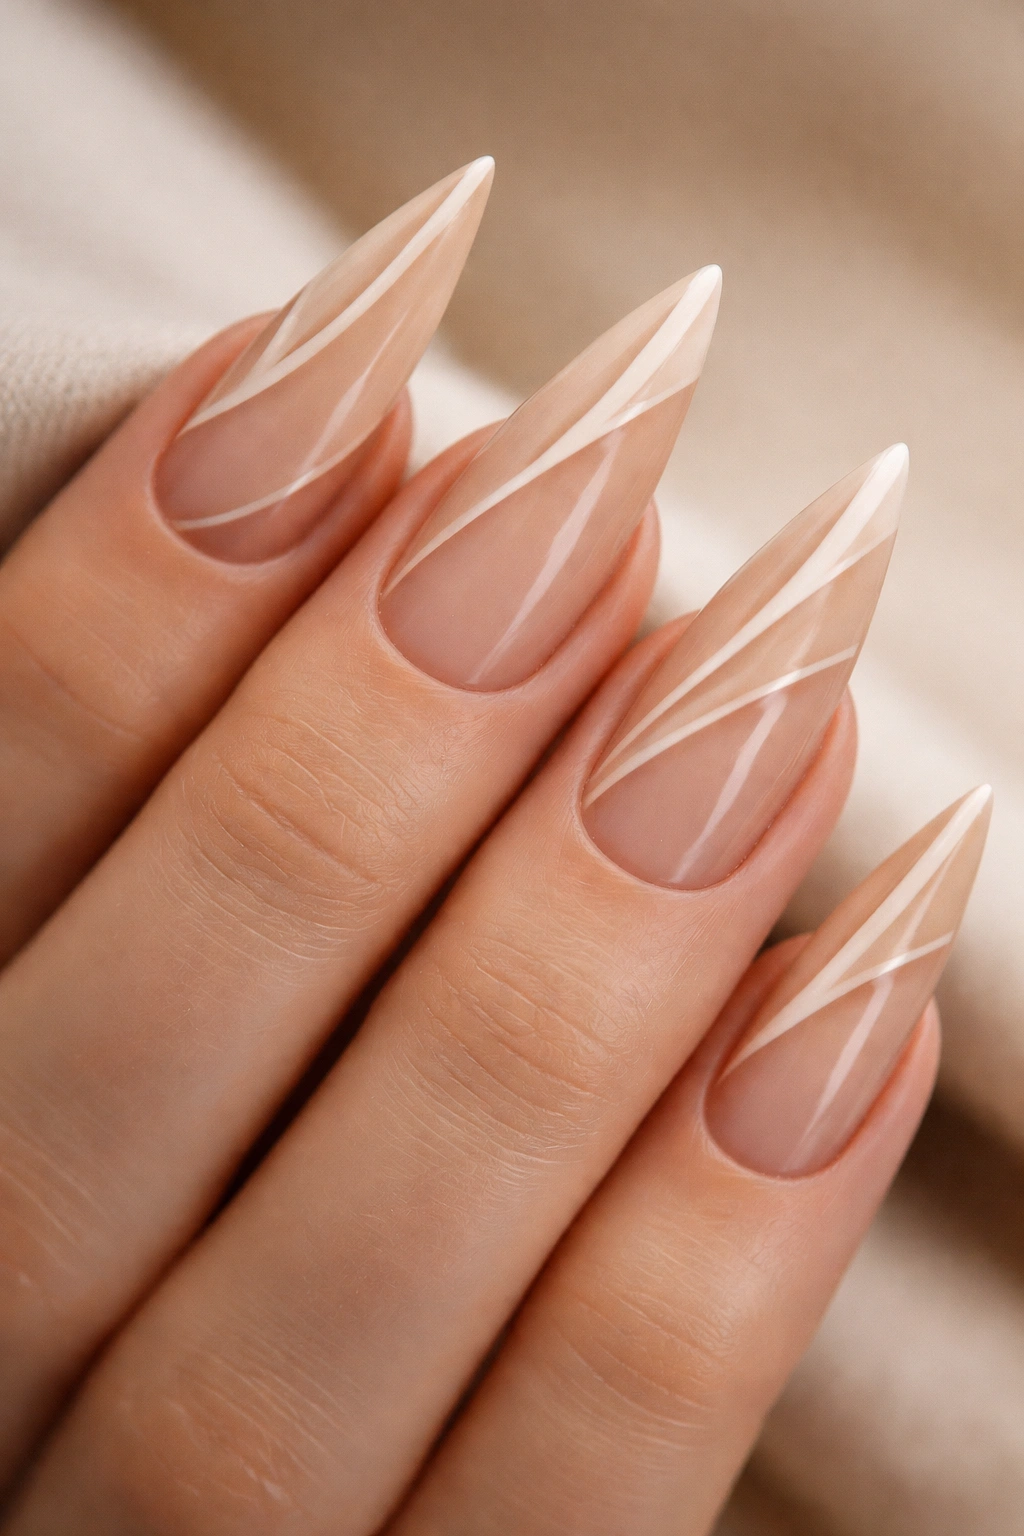
18. Warm Honey with Striping
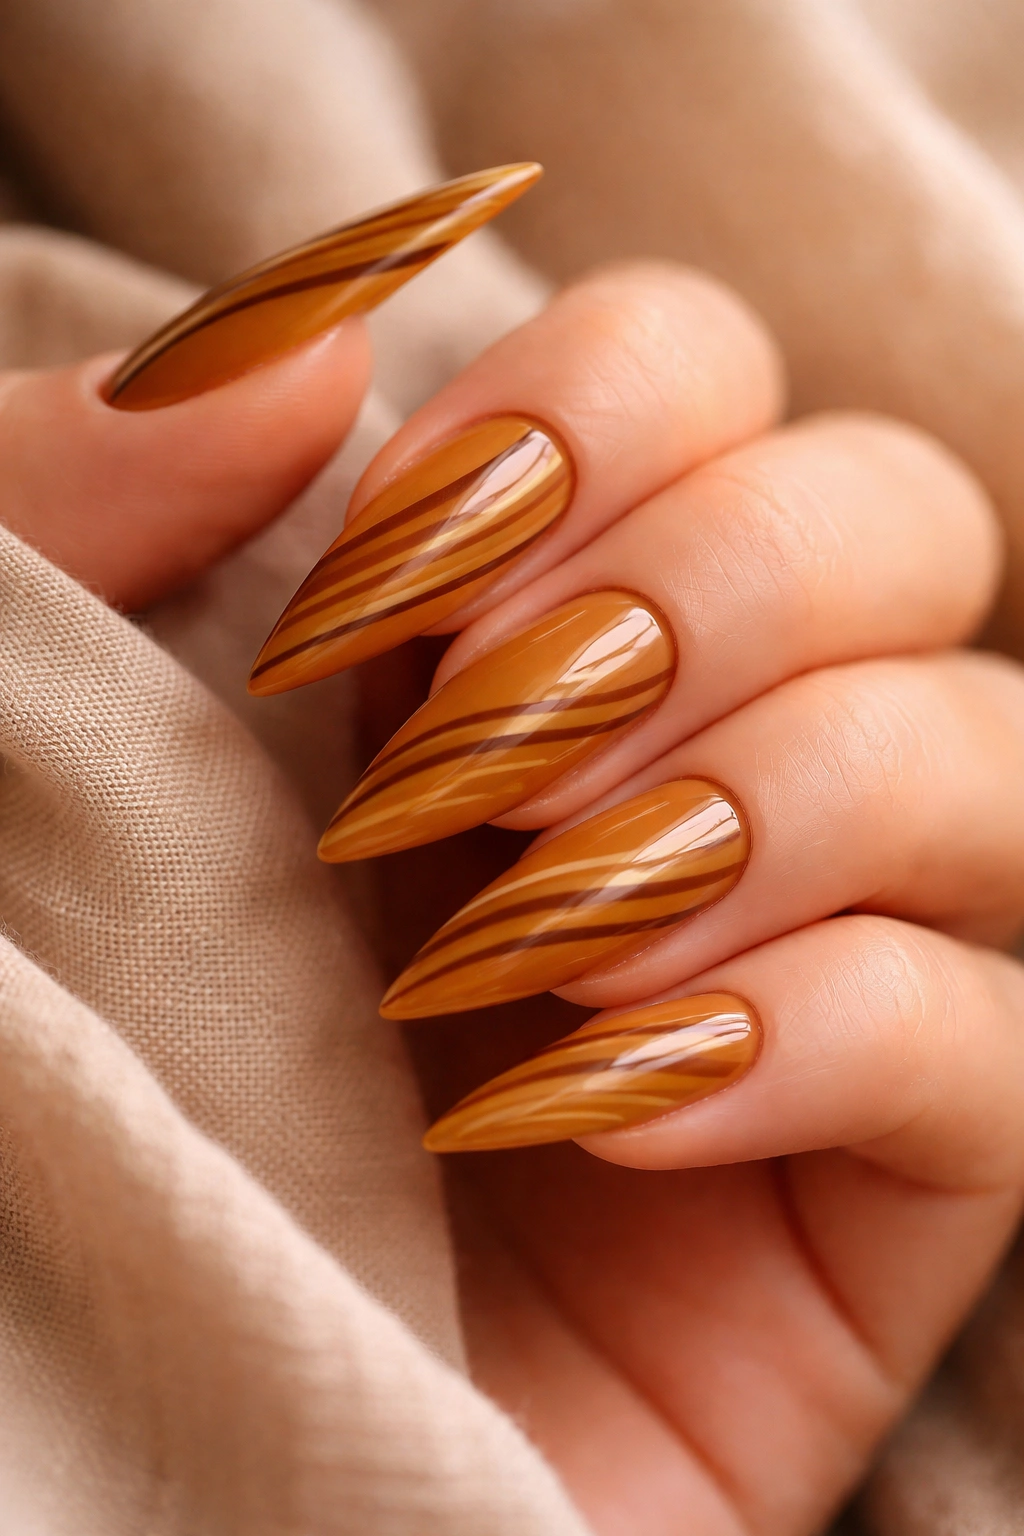
Warm honey is a rich, golden-amber tone that feels expensive and substantial while remaining approachable. Layer thin striping—narrow lines in contrasting colors like chocolate brown, terracotta, or deep olive—and you transform warm honey from a simple base into something with visual movement and sophisticated detail. The striping technique is more forgiving than other nail art approaches, making it achievable even for less experienced DIY nail artists.
Why Striping Enhances Honey Nails
Striping is a time-honored nail art technique because it works—thin lines create visual interest and dimension without requiring complex detail work or artistic skill. Warm honey as a base provides enough color depth that contrasting stripes read clearly without clashing. The result feels curated and intentional rather than plain.
Creating Professional-Looking Stripes
- Apply warm honey as your base in 2-3 thin coats until fully opaque and smooth, then let cure completely
- Choose a contrasting color for your stripes—dark brown reads traditional, terracotta adds warmth, olive adds sophistication
- Use a thin striping brush or gel pen to draw thin vertical lines down the length of each nail
- Lines don’t need to be perfectly straight—slightly wavy or imperfect lines actually feel more artistic and hand-done
- Space your stripes evenly or asymmetrically depending on your aesthetic preference
- Allow stripes to dry completely before applying top coat to prevent smudging
- A glossy, high-shine top coat creates a polished, intentional finish and makes the contrast between colors more pronounced
Worth knowing: Striping works across all nail lengths but is particularly effective on stilettos because the vertical lines echo the vertical elongation of the shape itself.
Final Thoughts
Earth tone stiletto nails work because they embrace both luxury and grounded sophistication—they’re inherently flattering, impossibly versatile, and entirely free from the temporary or costume-like feeling that can sometimes accompany more trendy nail looks. Whether you gravitate toward the creamy warmth of caramel and honey, the cool-warm complexity of sage and olive, or the rich depth of chocolate and cocoa, there’s an earth tone combination here that matches your personal aesthetic.
The real win with earth tones is that they pair beautifully with virtually anything in your existing wardrobe, requiring zero outfit coordination while still feeling intentional and styled. A taupe nail with gold accents works whether you’re wearing business casual or vintage thrifted pieces. Terracotta reads seamlessly from office to weekend. These aren’t nails that demand attention or make a statement at the cost of practicality—they’re nails that signal you’ve thought about the details and chosen something that feels authentically like you.
Start with whichever combination speaks to you most, whether that’s the minimalism of sage with clean lines or the artistry of hand-painted landscapes on warm stone. Any of these 18 looks will photograph beautifully, age gracefully as your nails grow, and remain relevant seasons from now because earth tones are fundamentally timeless. The fact that they’re genuinely flattering is just the bonus.
