

Duck nails are having a major moment, and combining them with delicate floral designs takes the trend to a whole new level of elegance and charm. The elongated, curved shape of duck nails—wider at the base and tapered toward a curved tip—creates the perfect canvas for intricate flower artwork, botanical details, and nature-inspired patterns that simply wouldn’t have the same impact on traditional nail shapes.
What makes flower duck nails so special is the way the curved tip naturally frames and showcases whatever design you choose. A painted rose or blooming peony gets extra drama on a duck nail. Small wildflower clusters look charming scattered across the wider base. Even simple line-drawn botanicals gain sophistication thanks to the unique silhouette. Whether you’re drawn to romantic, delicate florals or bold, graphic flowers, there’s a duck nail design that will speak to your personal style.
The beauty of this combination is that it works for virtually every occasion and aesthetic. These nails feel both artistic and wearable—you can rock them for brunch, the office, special events, or just because. Best of all, you don’t need to be a master nail artist to pull off most of these looks. Many can be recreated at home with steady hands and basic nail art tools, or taken to a talented manicurist who understands your vision.
Let’s explore fifteen stunning flower duck nail ideas that showcase the endless creative possibilities when botanical beauty meets this trendy nail shape.
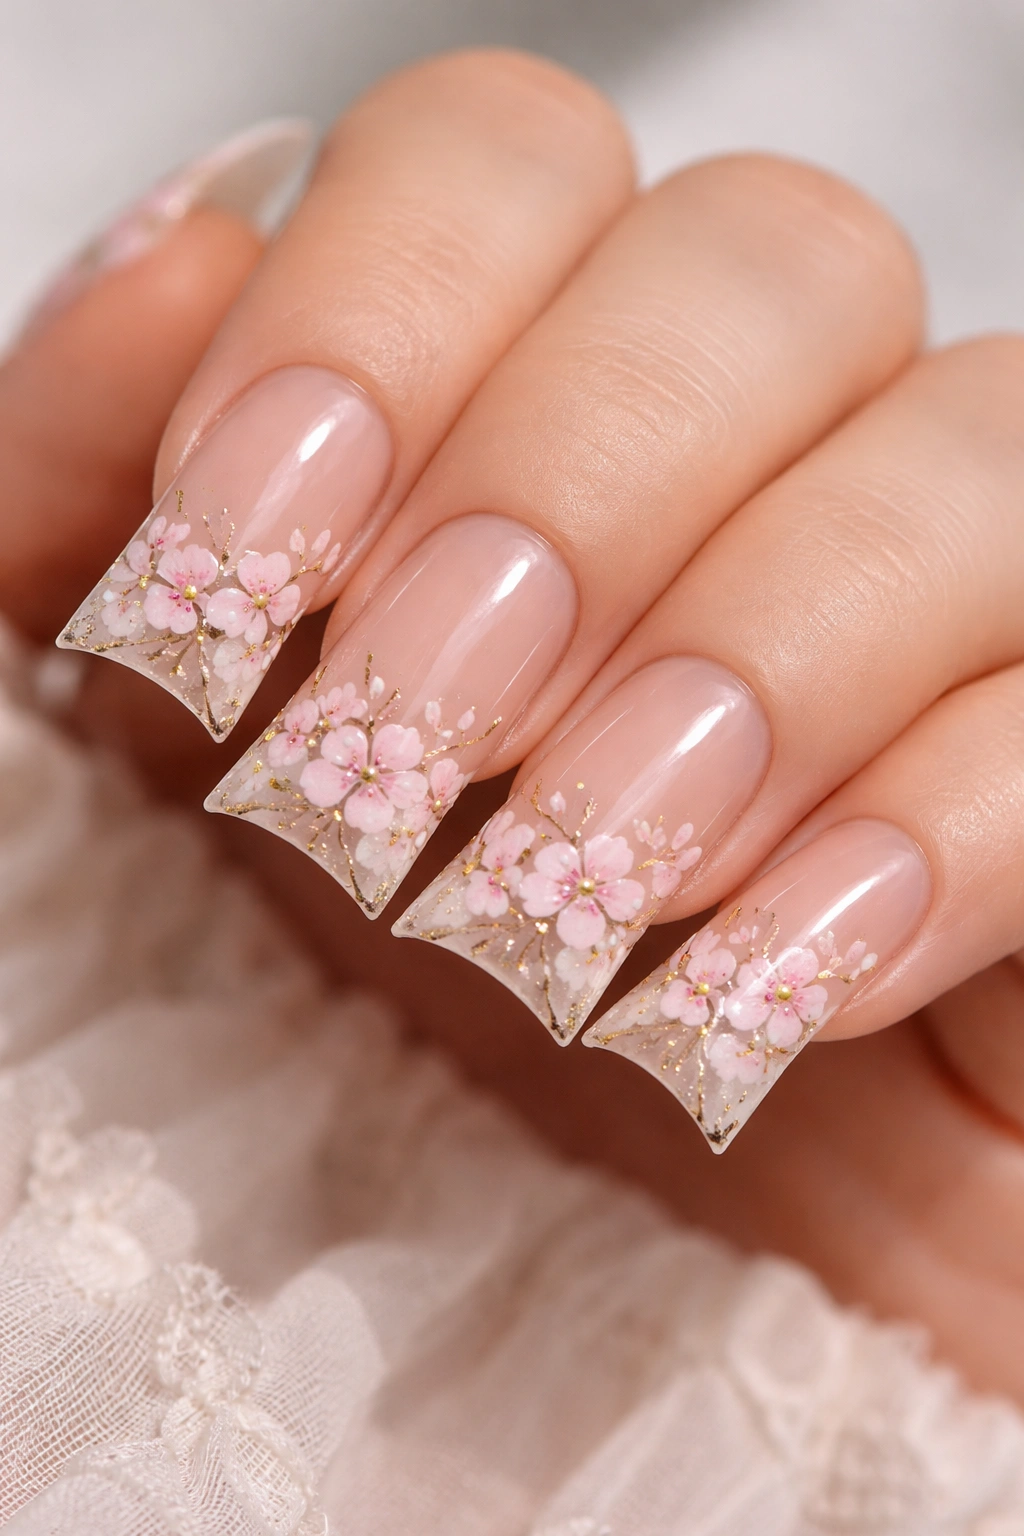
1. Cherry Blossom Pink Duck Nails with Gold Accents
Cherry blossom designs on duck nails capture the essence of delicate spring beauty with their soft pink petals and graceful branches. This design features pale pink and white blossoms clustered along the curved nail tip, with thin gold lines creating the branching structure underneath. The contrast between the sheer, barely-there florals and the warm metallic gold creates an elevated look that feels both romantic and modern.
Why This Design Stands Out
The cherry blossom motif brings an inherently sophisticated, nature-inspired quality to duck nails. What makes this particular interpretation special is the strategic use of negative space—you’re not covering the entire nail in solid color, but instead letting the natural nail color show through between the delicate petals. This approach keeps the design feeling airy and graceful rather than heavy or cluttered. The gold accents add just enough luxury without overwhelming the delicate floral work.
Design Tips for Perfect Results
- Use a very light pink (almost nude) as your base color to let the white petals pop
- Paint individual petals with a thin art brush, using just 3-4 petals per blossom cluster
- Add a tiny dot of gold or contrasting color in the very center of each flower
- Gold branches should be thin and organic-looking, not geometric or perfectly straight
- Seal everything with a glossy topcoat to make the metallics shine and protect the detailed work
Pro tip: If hand-painting feels intimidating, you can find high-quality cherry blossom decals designed specifically for curved nail shapes—these stick on beautifully before topcoat and look completely professional.
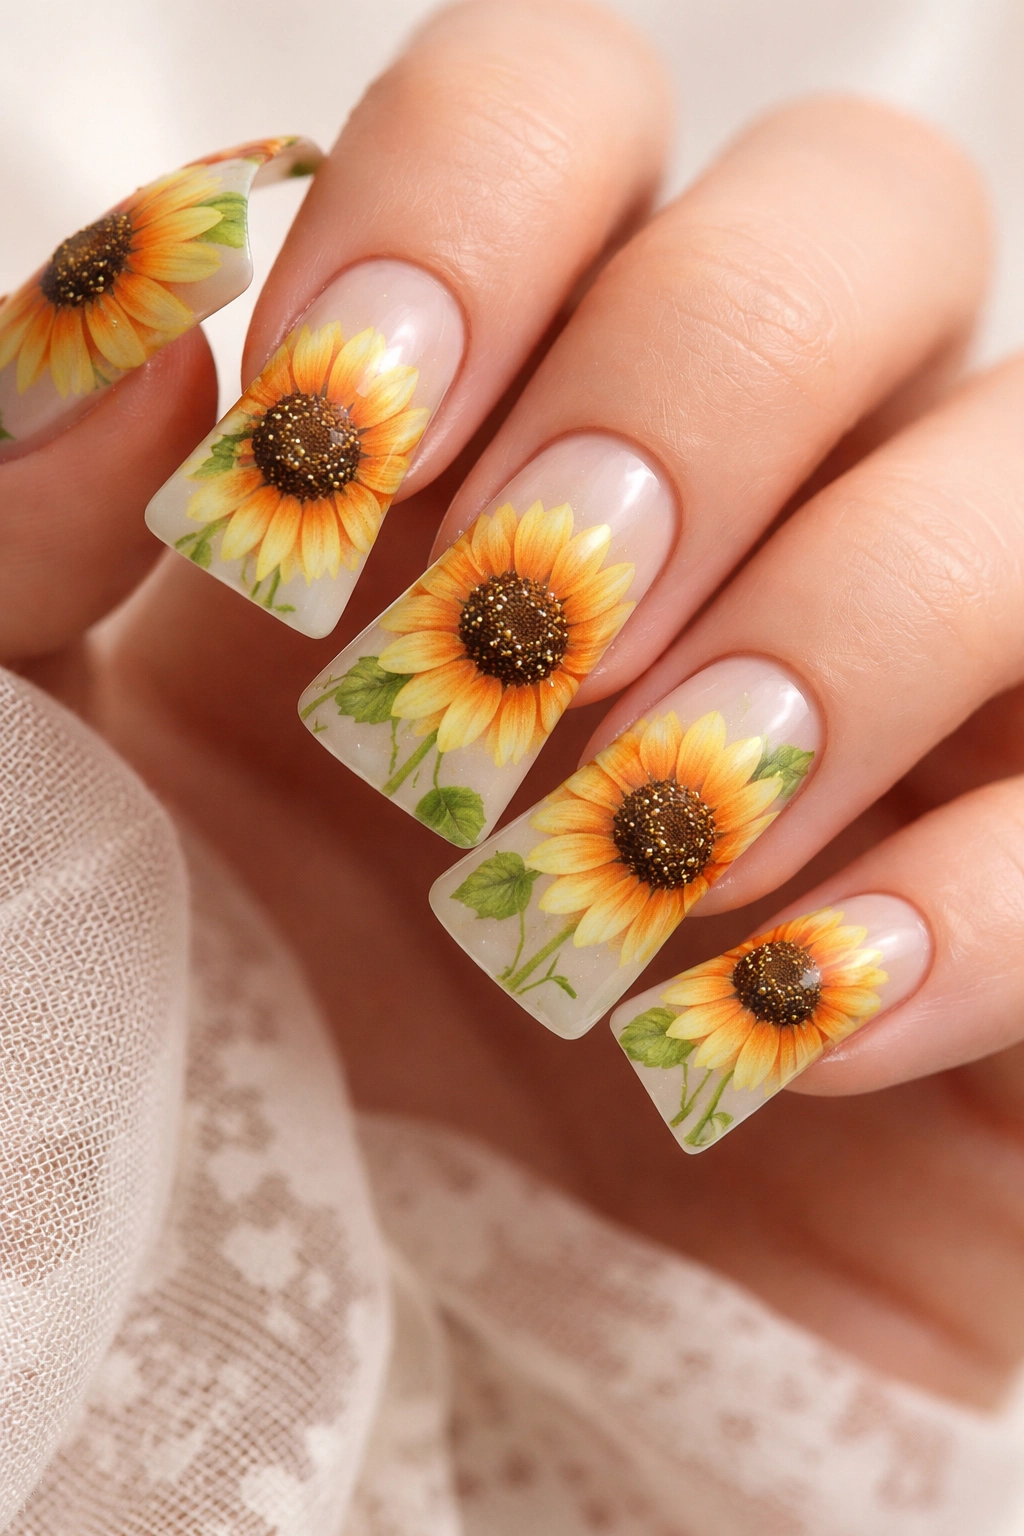
2. Sunflower Yellow Duck Nails with Black Outline
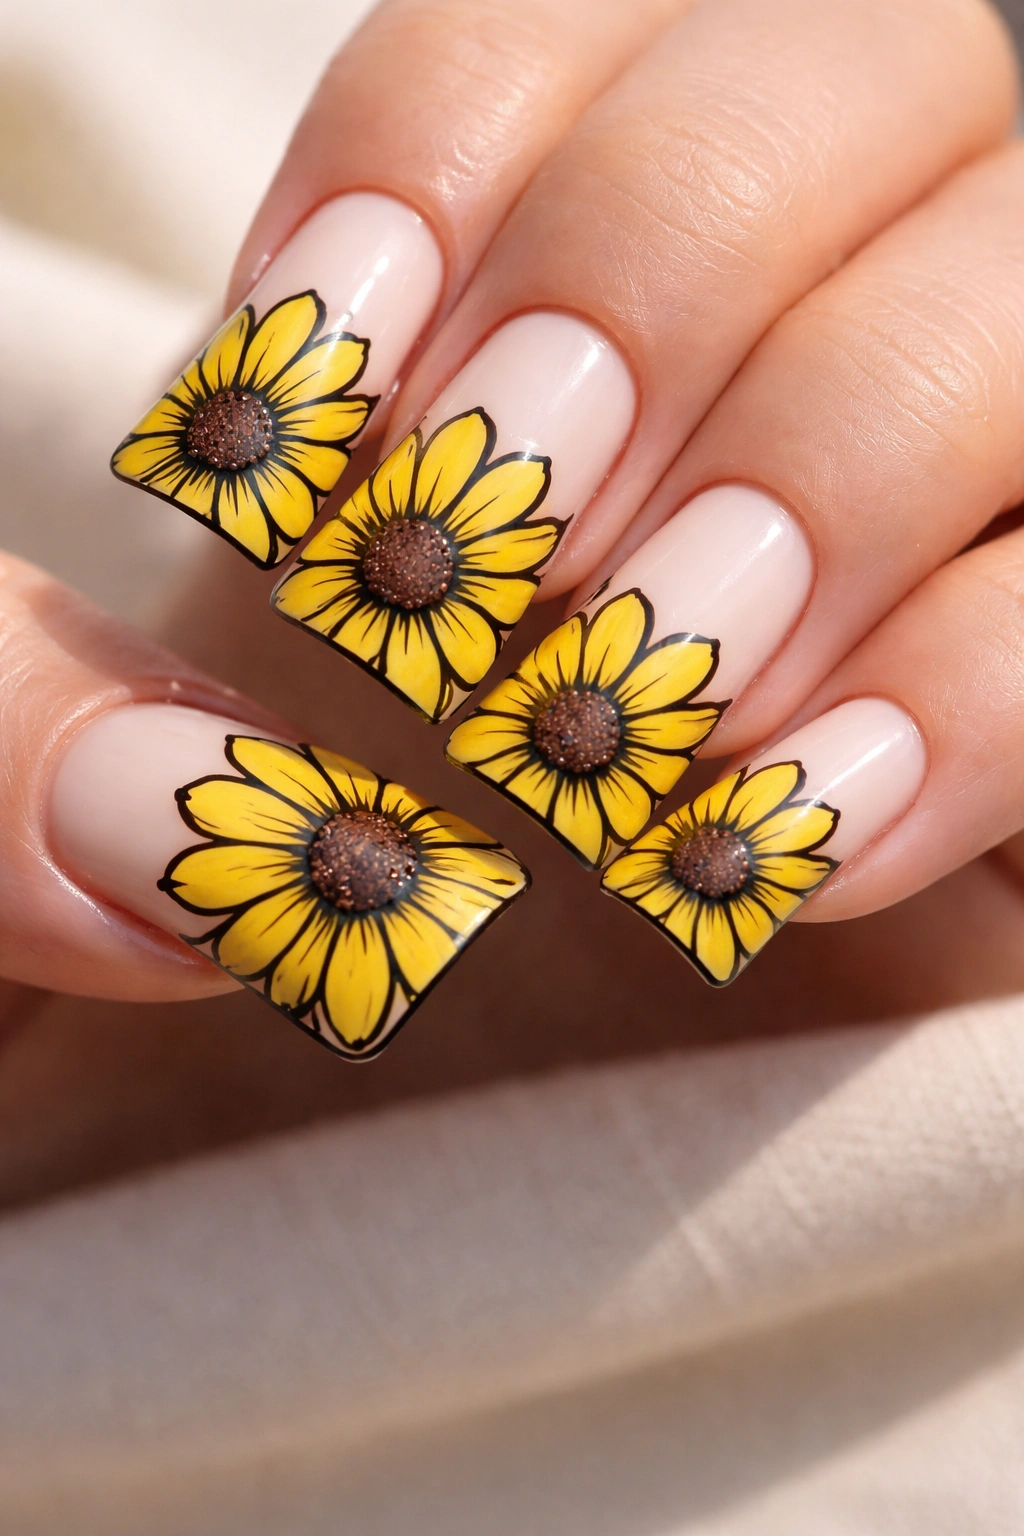
Sunflower designs on duck nails bring instant joy and warmth to any look. This interpretation features cheerful yellow petals radiating from dark brown centers, with bold black outlines that make each flower pop dramatically against a pale cream or white base. The curved duck shape naturally draws attention to the flower design, making sunflowers feel even more striking and eye-catching.
What Makes This Design Different
Sunflowers on duck nails benefit enormously from the extra surface area and unique shape. The outlines aren’t just decorative—they serve a functional purpose by making the design readable from a distance and preventing that blended, unclear look that sometimes happens with softer color transitions. This is a design that photographs beautifully and catches light in all the right ways.
Quick Execution Guide
- Start with a clean, pale cream or ivory base color across all nails
- Sketch sunflower outlines in black using a thin liner brush (or use a black gel pen if you’re steadier with that)
- Fill petals with a vibrant yellow, leaving the black outline visible
- Fill centers with dark brown, adding a tiny black dot for dimension
- Green stems and leaves complete the garden feel
- Finish with a matte or satin topcoat for an artistic, less glossy appearance
Worth knowing: This design actually looks better with a satin or matte topcoat rather than high-gloss—it keeps the vintage botanical illustration vibe without making the design look overly shiny or plasticky.
3. Rose Red Duck Nails with Ombre Background
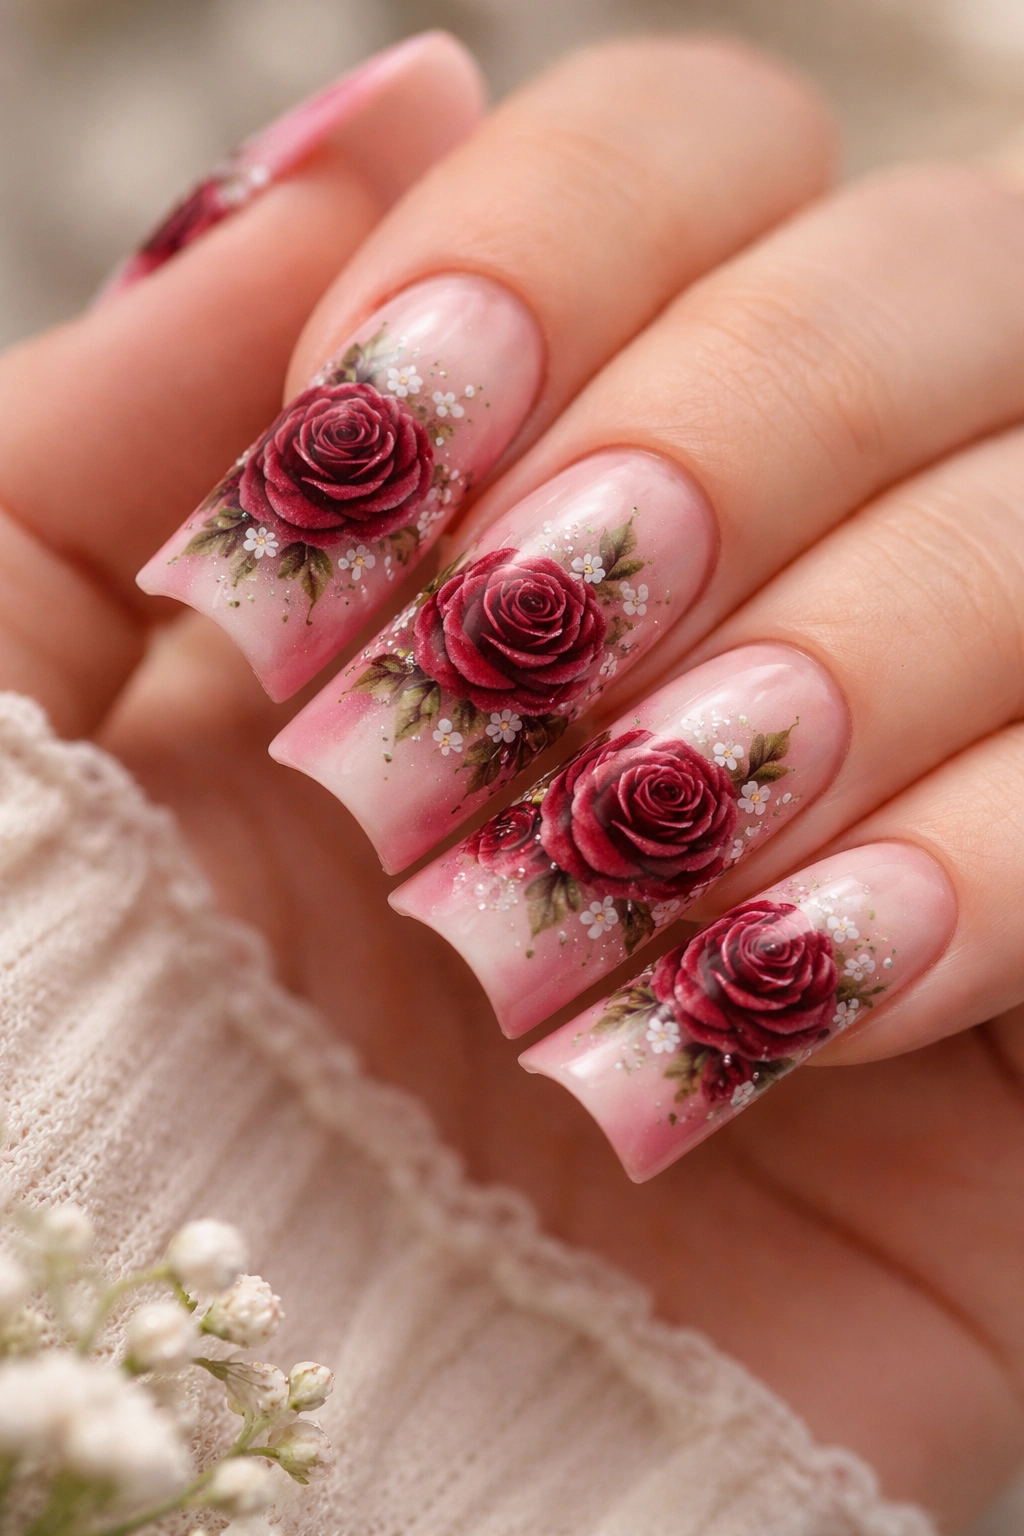
Deep crimson and romantic red roses take on a luxurious quality when paired with an ombre background that shifts from rich wine tones near the tip to pale blush pink closer to the cuticle. On duck nails, this gradient becomes a natural focal point that makes the rose designs feel three-dimensional and almost floating above the nail surface. It’s an undeniably elegant look that suits special occasions perfectly.
The Visual Impact
Red roses are classic for a reason—they’ve symbolized romance and sophistication for centuries. On duck nails with an ombre backdrop, that symbolism becomes even more pronounced. The gradient creates depth that makes the rose designs appear almost sculptural. Your eyes naturally follow from the lighter pink at the base all the way through the red ombre and into the darker roses at the tip.
Step-by-Step Application
- Apply a light blush pink base and allow it to dry completely
- Using a makeup sponge, dab deeper rose and wine tones onto the sponge
- Press the sponge against the nail tip and gently sponge upward, creating a gradient (do this step multiple times to build color gradually)
- Once the ombre is dry, add detailed rose designs using a fine art brush
- Paint individual petals in varying shades of red and burgundy to create dimension within each rose
- Add green leaves and thin stems between roses
- Seal with a glossy topcoat that brings out the depth of the ombre
Insider note: The trick to a flawless ombre on curved duck nails is using a makeup sponge that’s slightly damp (not wet) and doing multiple light layers rather than one heavy application.
4. Lavender Purple Duck Nails with Scattered Blooms
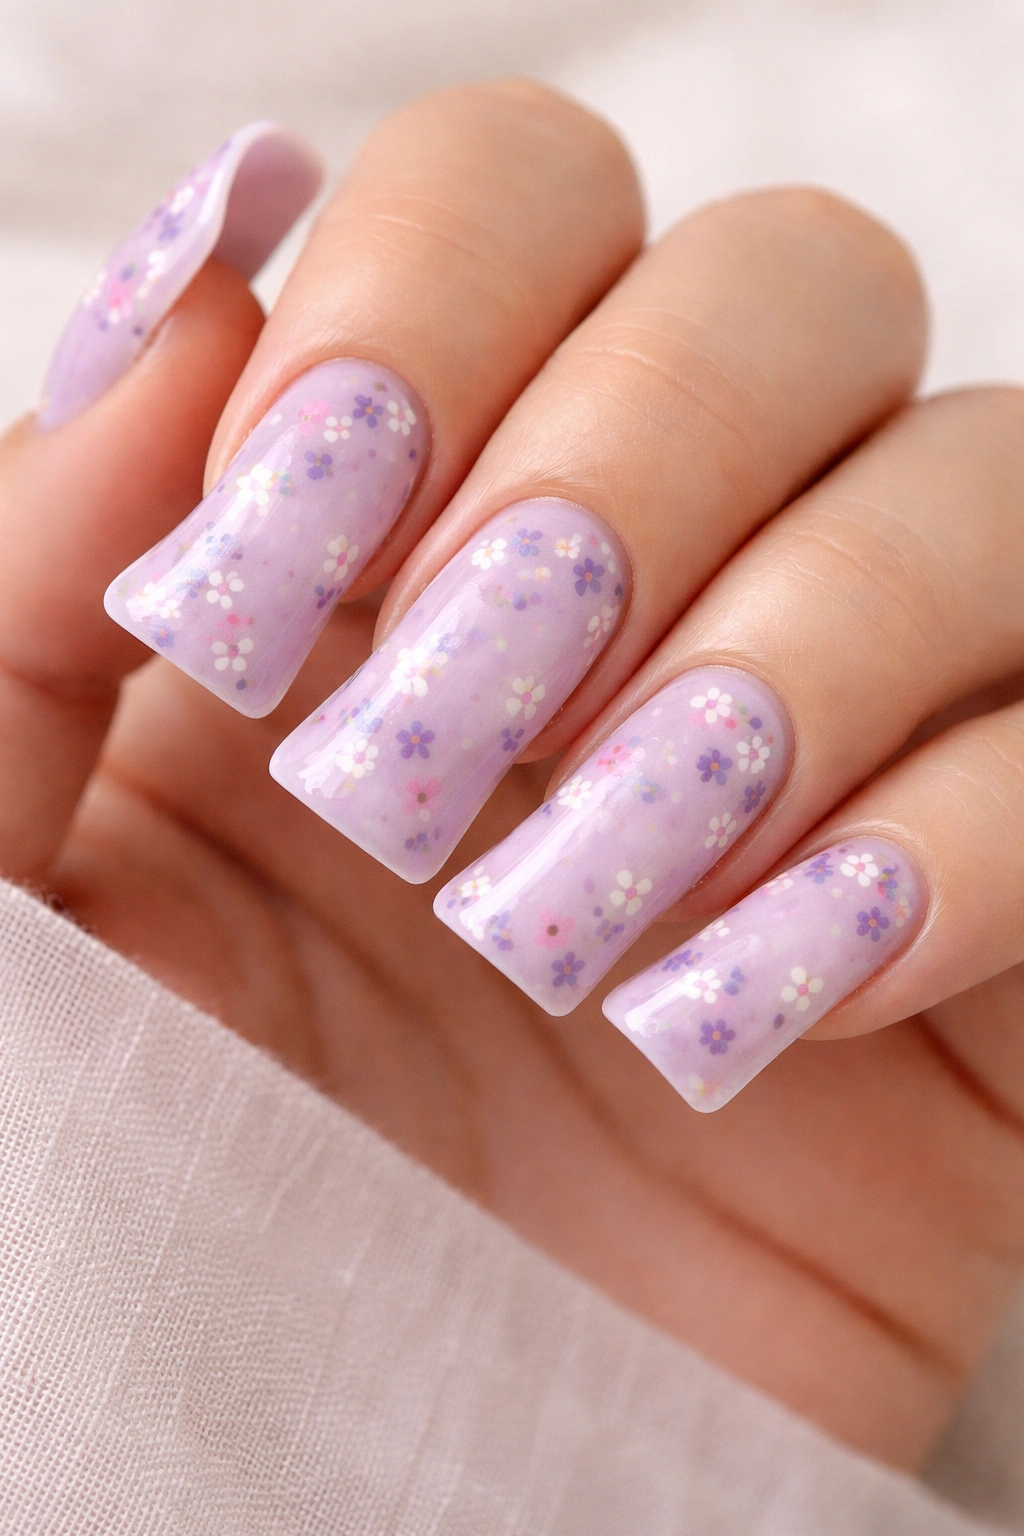
Soft lavender purple duck nails with scattered tiny purple, white, and pink blooms create a dreamy, ethereal aesthetic that feels both romantic and surprisingly modern. This design works beautifully because the scattered approach prevents the florals from feeling too busy—each little flower cluster stands alone as a charming accent rather than overwhelming the nail surface. It’s the kind of design that makes people stop and compliment your nails.
Why Lavender Works So Well
Lavender is having a major resurgence in beauty and fashion, and for good reason—it’s soothing to look at, flattering on nearly every skin tone, and feels both calming and luxurious simultaneously. On duck nails, lavender becomes even more striking because the unique shape allows you to play with negative space, alternating between solid color and detailed florals in a way that feels intentional and artistic.
Design Breakdown
- Paint a creamy lavender base color across all nails
- Decide where you want your flower clusters—typically corners, edges, or scattered randomly
- Create small clusters of 3-5 tiny flowers per grouping using white, pink, and darker purple
- Each individual flower should be small (think the size of a lentil) with just 4-5 petals
- Add a tiny yellow or white center dot to each bloom
- Include wispy green stems and small leaves connecting the clusters
- Use a glossy topcoat to make the whole design feel polished and finished
Pro tip: Painting scattered florals is actually easier than painting one large detailed rose because small flowers forgive minor imperfections—slightly wonky petals just add to the charm.
5. Daisy White and Yellow Duck Nails with Minimal Design
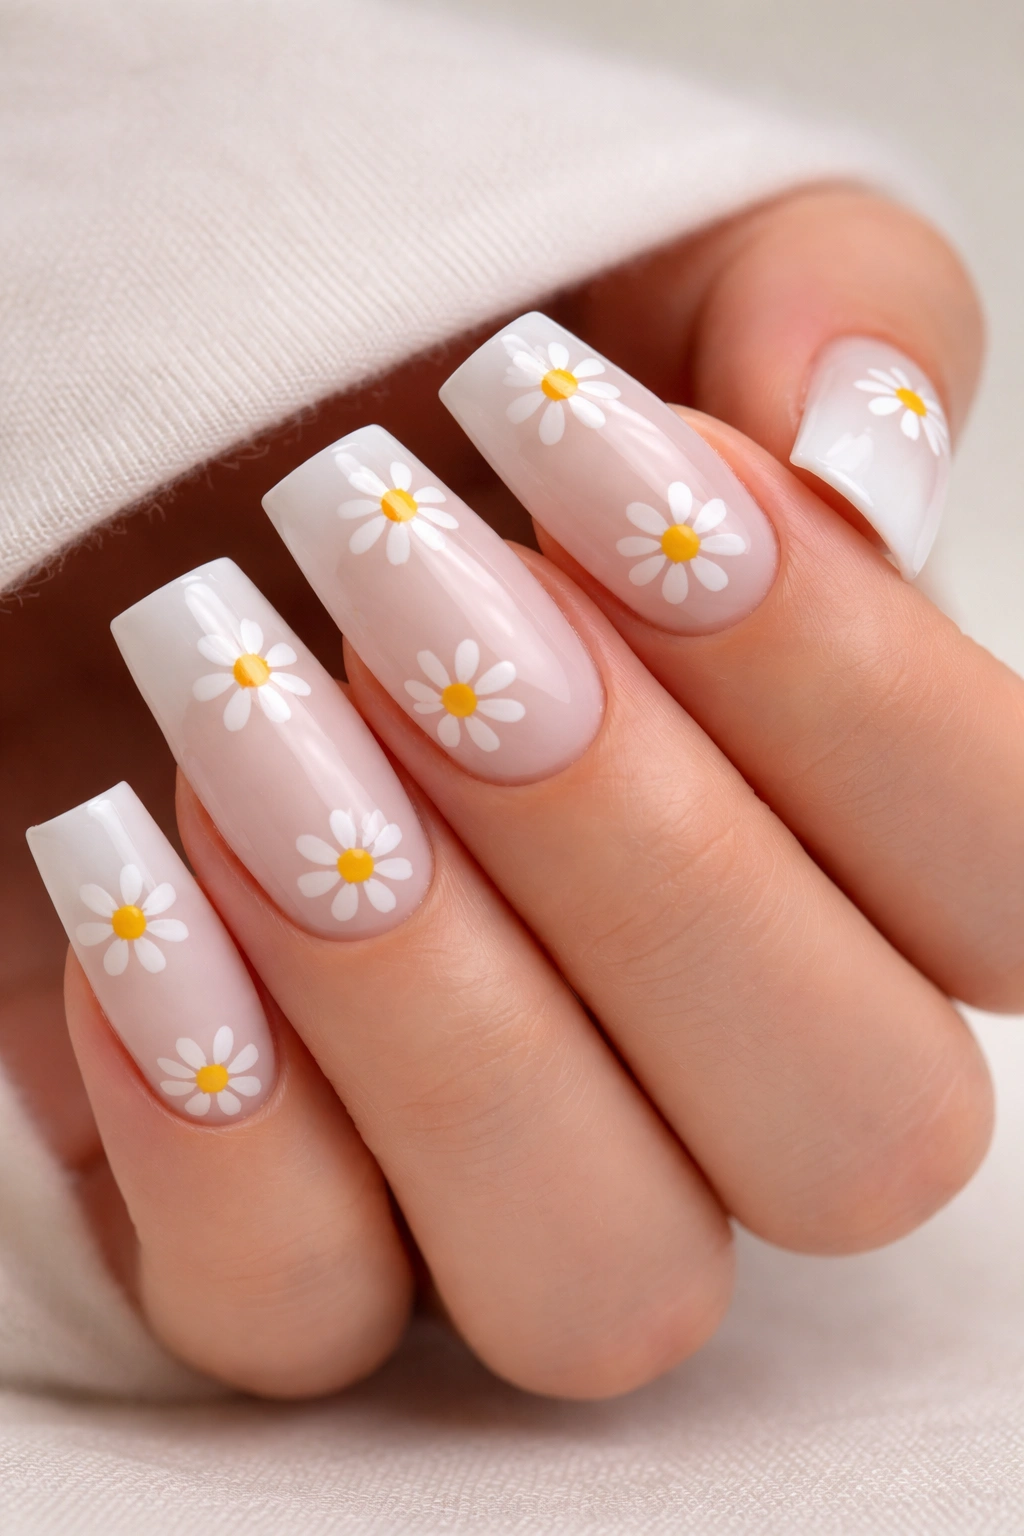
Clean, minimalist daisies on white duck nails create an understated elegance that feels fresh and contemporary. This design features simple white petals radiating from small yellow centers, typically with just one daisy on each nail or a few scattered across the thumb and ring finger. The beauty lies in the simplicity—no gradients, no complicated shading, just pure clean lines and bold color blocking.
The Minimalist Appeal
Minimalist floral designs are perfect for people who love the idea of flower nails but don’t want anything too flashy or complicated. Daisies are also incredibly versatile—they look equally at home on professional, polished nails and on casual, everyday manicures. The white-on-white with yellow accents approach feels modern and slightly editorial, like something you’d see in a high-fashion magazine.
How to Execute the Design
- Start with a pure white or off-white base color
- Use a dotting tool or thin brush to paint simple white petal shapes around a small yellow center (the duck nail shape means you naturally have a focal point at the tip)
- Keep each petal the same size and thickness—uniformity is key to the minimalist feel
- Add thin green stems in a muted sage or olive tone
- Leave plenty of white space unpainted so the design doesn’t feel crowded
- One or two coats of glossy topcoat finish the look
What to know: This design works beautifully on both matte and glossy finishes—if you prefer a more modern feel, try a matte topcoat instead.
6. Tulip Multicolor Duck Nails with Gradient Stems
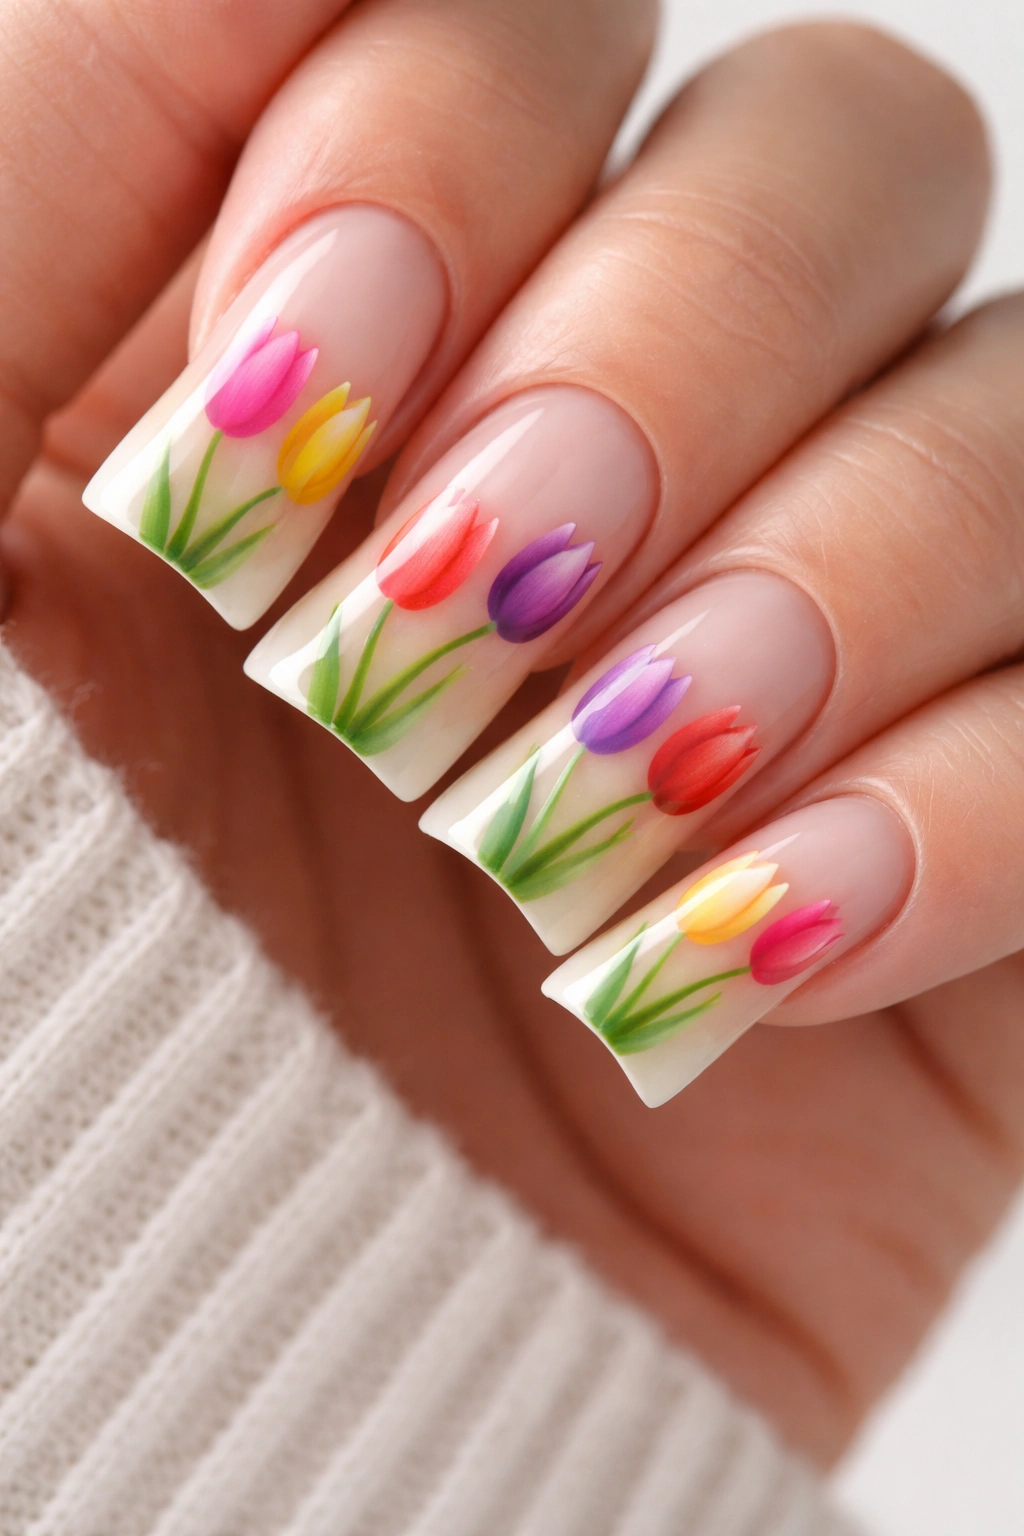
Vibrant multicolor tulips on duck nails create a joyful, garden-inspired look that celebrates color and botanical beauty. This design features tulips in different colors across your nails—perhaps pink on one, red on another, yellow on the next, purple on another—with stems that use gradient color transitions to unify the look. The curved duck shape creates natural separation between each tulip design, making multicolor feel balanced instead of chaotic.
Building a Cohesive Multicolor Design
Multicolor nail designs can easily feel chaotic if not executed thoughtfully. The key to making this work on duck nails is using a neutral or very light base color on all nails, then letting each individual tulip design stand out independently. The stems and leaves act as the connecting element that ties everything together visually. You’re creating a mini garden across your ten nails, with each flower having its own personality.
Detailed Painting Instructions
- Apply a soft white, cream, or pale nude base across all nails
- Choose five or six tulip colors (reds, pinks, yellows, purples, whites)
- On each nail, paint a different tulip: simple cup-shaped petals in your chosen color
- Use an ombre or gradient technique for the stem—start with a light green at the base and transition to darker green as it extends toward the tip
- Add thin leaves on either side of each stem
- Paint every other nail with a tulip (or paint all of them—both approaches work)
- Seal with glossy topcoat that makes the gradient stems really shine
Insider secret: If you’re worried about the gradient stems looking muddy, use a makeup sponge technique—dab lighter green on one end of the sponge and darker green on the other, then lightly press and drag along the stem area.
7. Orchid Glamorous Duck Nails with Rhinestones and Gold
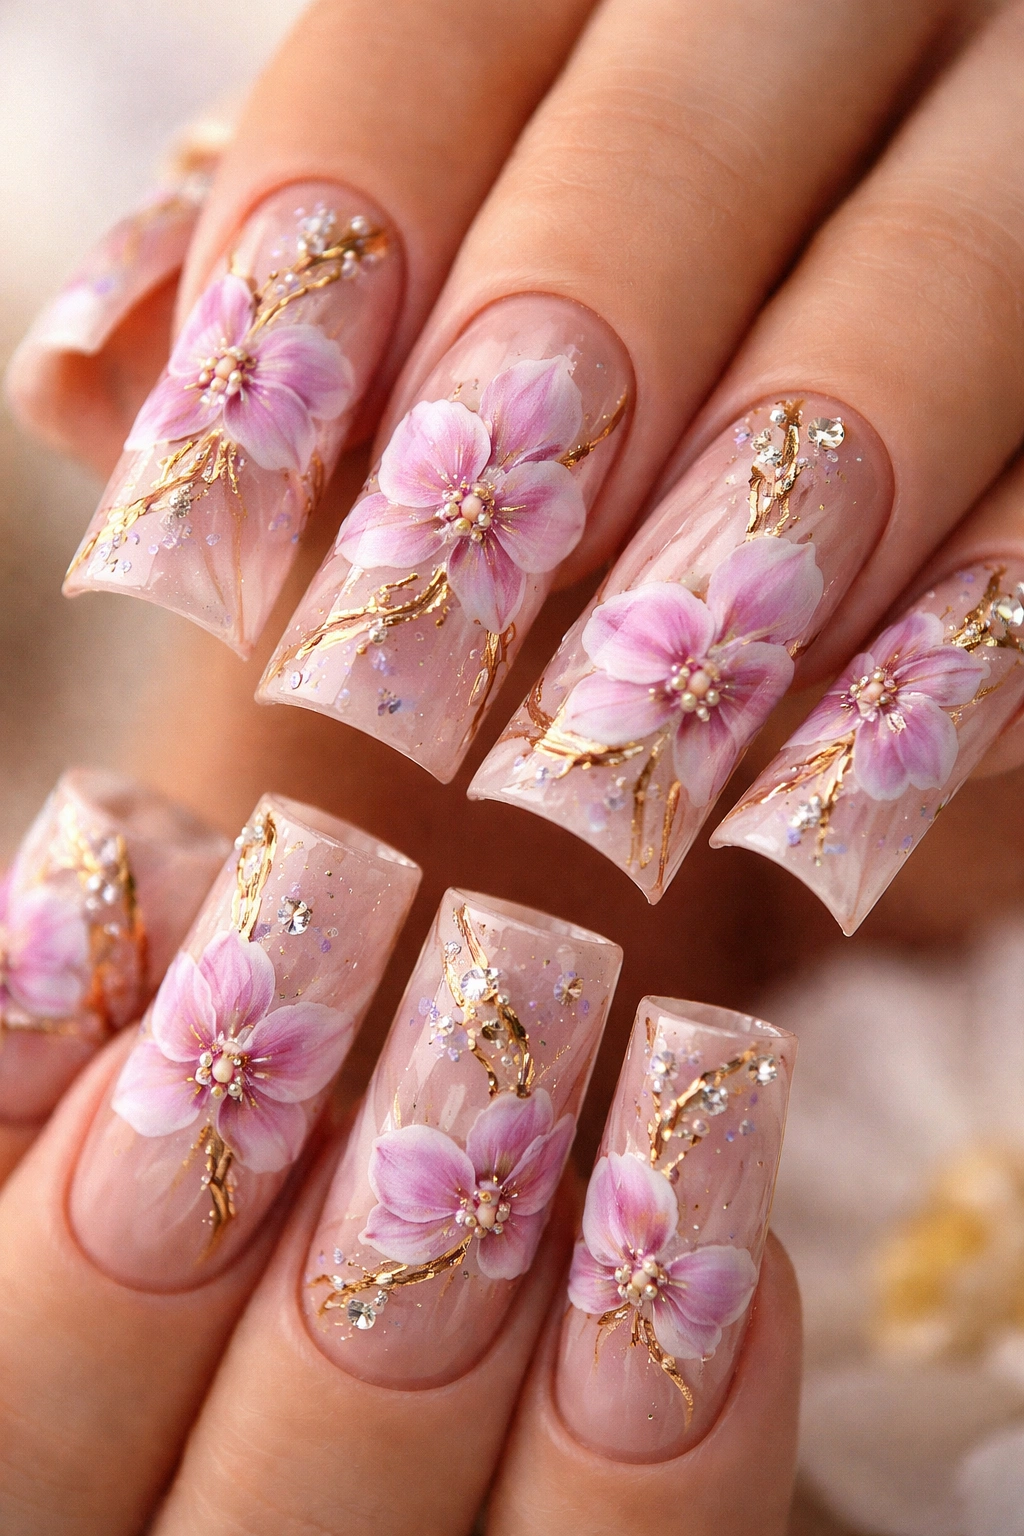
Exotic orchids combined with gold foiling and strategically placed rhinestones create a glamorous, luxury-level nail design that’s perfect for special events. This interpretation features delicate orchid flowers in soft pinks and purples, with gold leaf accents catching the light and small rhinestones placed at the center of each bloom or along the stems. The combination of painting, foiling, and gems takes duck nails from simple to show-stopping.
The Glamour Factor
Orchids are inherently sophisticated flowers—they connote luxury, rarity, and elegance. When you add metallic elements and sparkle to an already-elegant flower, you create something that feels genuinely high-end. This is a design that demands attention and compliments, and it’s perfect for engagements, galas, weddings, or any occasion where you want your nails to be conversation starters.
Creating the Glamorous Look
- Use a soft nude, blush, or pale pink base color
- Paint orchid flowers with delicate petal details in varying shades of pink, purple, and mauve
- Add gold foil to select areas—typically along the stem or as an accent across the base of the flower
- Press small adhesive rhinestones into the wet gel before curing (or onto regular polish before it fully dries)
- Place rhinestones at flower centers or scattered along stem lines
- Top with a thick, glossy gel coat that seals everything beautifully and makes gems sparkle
- Consider adding a touch of glitter gel at the very tip for extra shimmer
Pro tip: If you’re applying gems to regular polish (not gel), do this step within 30 seconds of painting the area while it’s still slightly tacky—the rhinestones will have better hold.
8. Wildflower Scattered Duck Nails with Natural Aesthetic
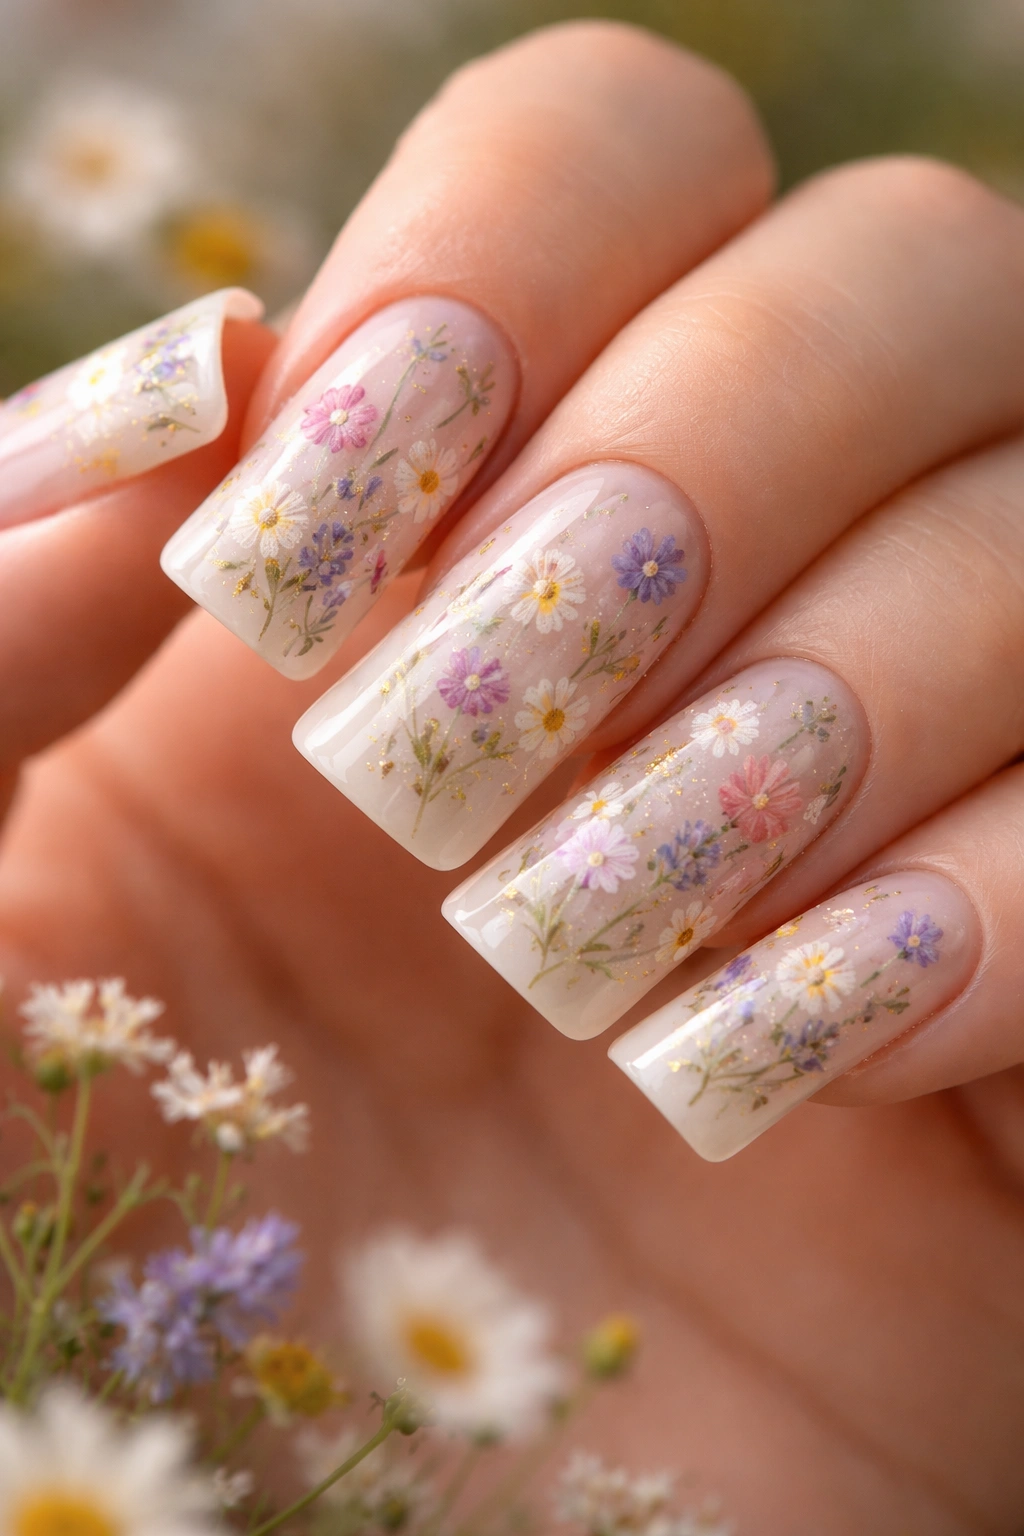
A garden of wildflowers scattered across duck nails in a completely natural, organic way creates a design that feels artistic and intentionally artsy. This isn’t symmetrical—flowers are placed randomly at different angles and in different sizes, creating the impression of a wild meadow across your fingertips. Muted, natural tones and soft watercolor-style blending make this design feel effortlessly beautiful rather than carefully constructed.
The Artistic Appeal
Wildflower designs appeal to people who love nature, art, and nail designs that celebrate imperfection and organic beauty. The scattered approach means you’re not trying to recreate a specific flower perfectly—each bloom can be slightly different, slightly wonky, and that’s exactly the point. This is also one of the easier floral designs to execute because perfection isn’t the goal.
Execution Approach
- Choose a soft, neutral base—pale cream, soft gray, or very light taupe
- Select a variety of muted flower colors: dusty rose, muted yellow, soft purple, cream, pale blue
- Use a small, tapered brush or even a toothpick to create tiny flower shapes scattered randomly across the nail
- Keep individual flowers small (pea-sized or smaller) so many can fit without feeling crowded
- Add thin green stems connecting different flower clusters
- Use watercolor-style blending by applying two colors close together while one is still wet, allowing colors to soften and blend slightly
- Seal with a matte topcoat for a soft, painted, non-glossy finish
Worth knowing: Matte topcoat is actually easier than glossy for this design because it hides minor imperfections and embraces the artistic, hand-painted aesthetic.
9. Lily Minimalist Line Art Duck Nails with Black Lines
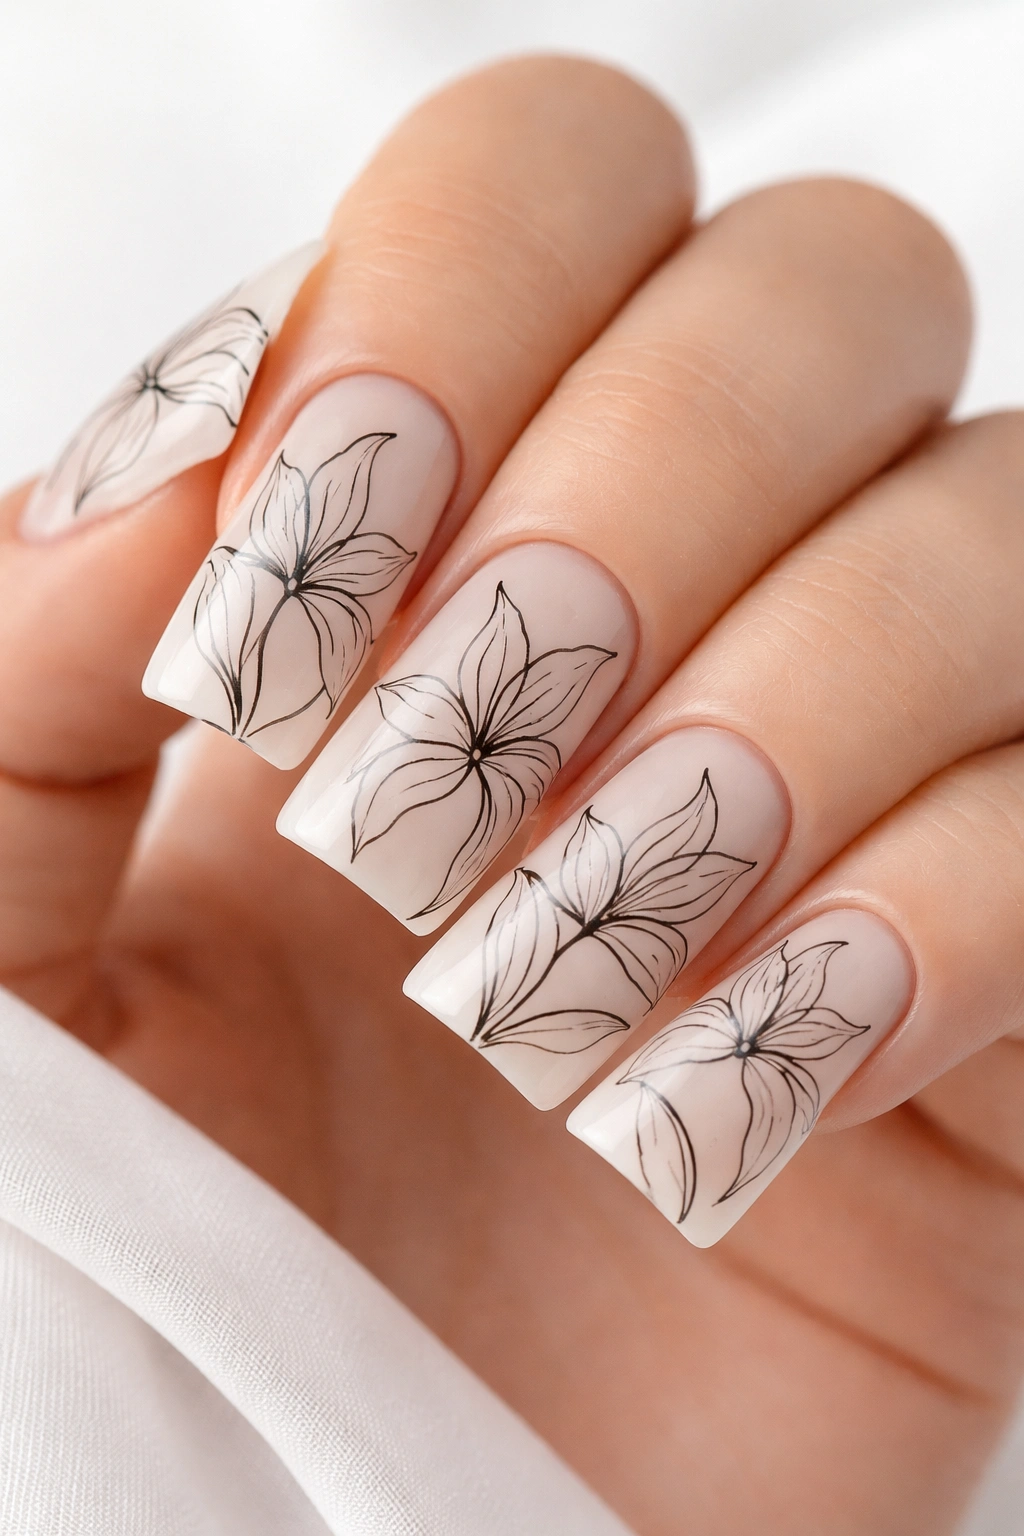
Elegant lily flowers rendered entirely in delicate black line art on nude or white duck nails create a sophisticated, almost tatoo-like aesthetic. This design features simple, continuous line drawings of lilies with all detail conveyed through thin black lines rather than color blocking or shading. The result is surprisingly striking—you’d be amazed at how impactful pure black lines can be on a clean background.
Why Line Art Florals Work
Line art removes the pressure of having to blend colors perfectly or create realistic shading. Instead, you’re focusing on the graceful curves and shapes that define a flower—the petal shapes, the stamen lines, the leaf curves. On duck nails, these line drawings become almost architectural, with the curved nail tip framing the delicate lines beautifully.
Technical Execution
- Apply a clean nude, ivory, or soft white base
- Using a thin black gel liner or regular polish liner brush, draw single lily flowers
- Keep lines thin and delicate—this should look refined, not heavy or bold
- Each lily needs a few petals with curved lines, curved stamen lines extending from the center, and thin leaves
- Space lilies so they’re not touching—one lily per nail or two on larger nails
- Use just black for all linework—no color fill, no shading, no gradient
- Glossy topcoat seals the design and creates contrast between the shiny finish and matte black lines
Insider note: If hand-drawing thin lines intimidates you, ultra-thin striping brushes designed for nail art make this dramatically easier—the brush itself does most of the work for you.
10. Hibiscus Tropical Duck Nails with Sunset Colors
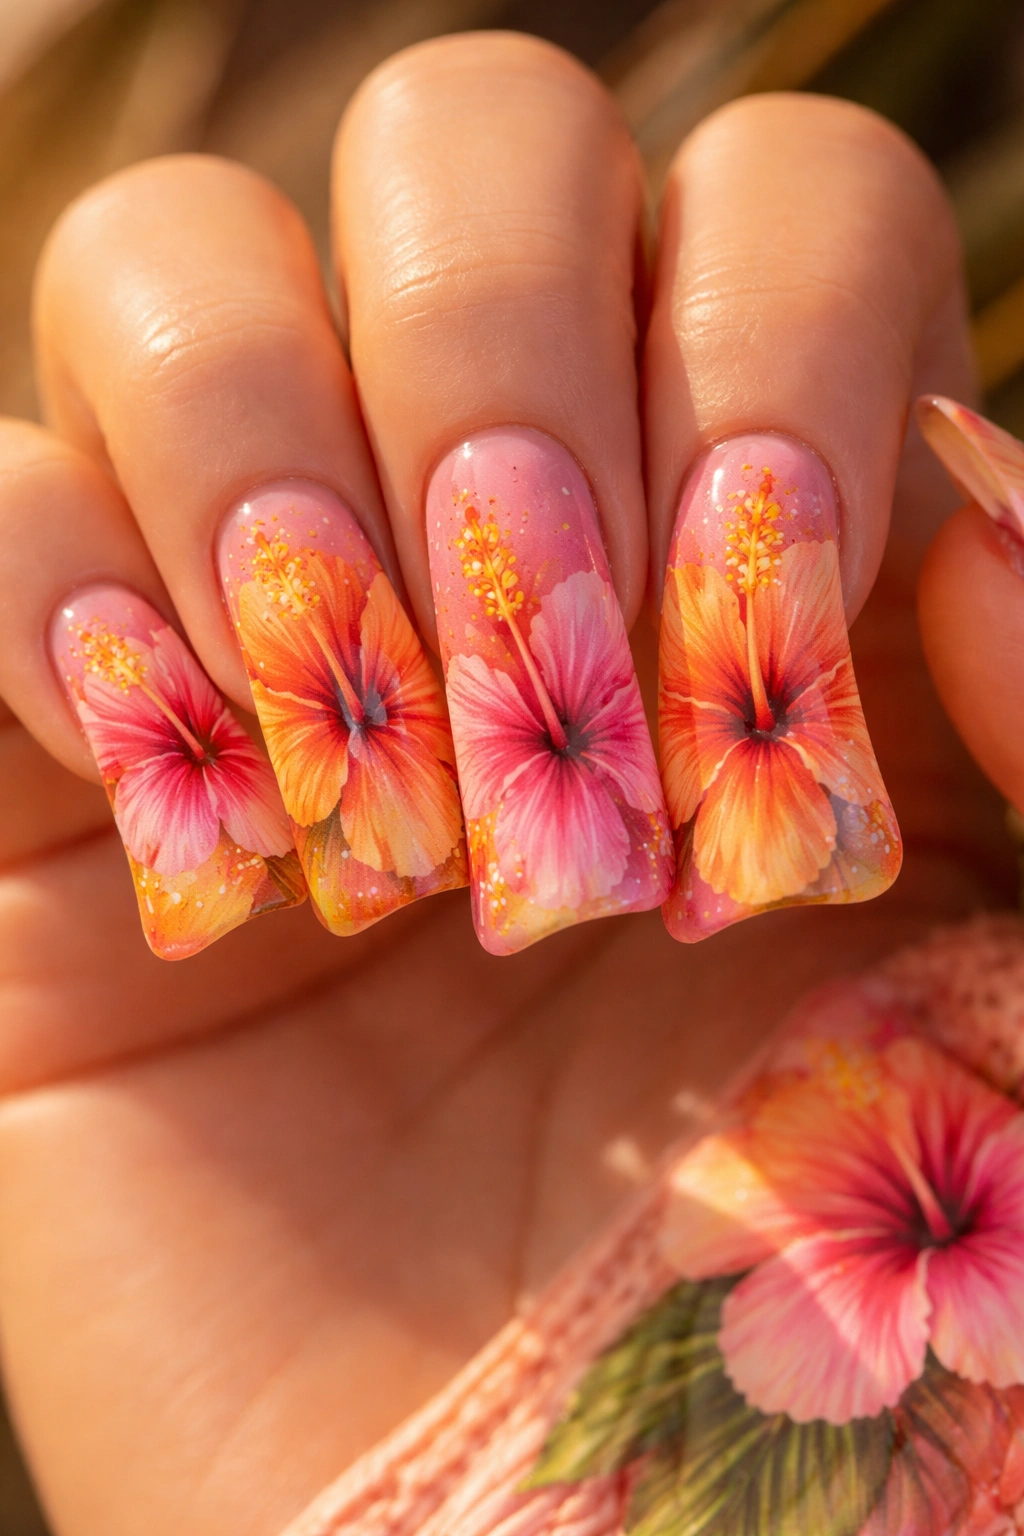
Large, showstopping hibiscus flowers in tropical sunset colors—burnt orange, coral, pink, and gold—create a vacation-vibes nail design that celebrates warmth and tropical beauty. This design features prominent hibiscus blooms with dramatic stamen details, often on a gradient or ombre base that shifts through sunset tones. On duck nails, the larger surface area lets you really showcase the intricate details of these striking flowers.
The Tropical Aesthetic
Hibiscus designs instantly evoke warmth, vacation, and that carefree tropical feeling. They’re perfect for summer, perfect for vacation prep, or simply for bringing tropical energy to your everyday look. The large, dramatic petals of a hibiscus are actually perfect for duck nails—they fill the space beautifully without feeling cramped.
Creating Tropical Beauty
- Apply a gradient base using sunset colors: golden yellow at the cuticle fading to coral in the middle and deep orange or burnt orange at the tip
- Paint large hibiscus petals in coral, pink, or red, with slight ombre within each petal (darker at edges, lighter toward center)
- Add dramatic stamen detail—long black or deep red lines extending from the flower center with a little ball at the tip
- Include green leaves and vines for organic framing
- Consider adding a small sprig of smaller flowers or buds for variety
- Use glossy topcoat to make colors vibrant and luminous
Pro tip: The beauty of tropical colors is that slight color imperfections actually add to the organic, natural feel—this design forgives less-than-perfect blending.
11. Peony Blush Duck Nails with Soft Romantic Vibes
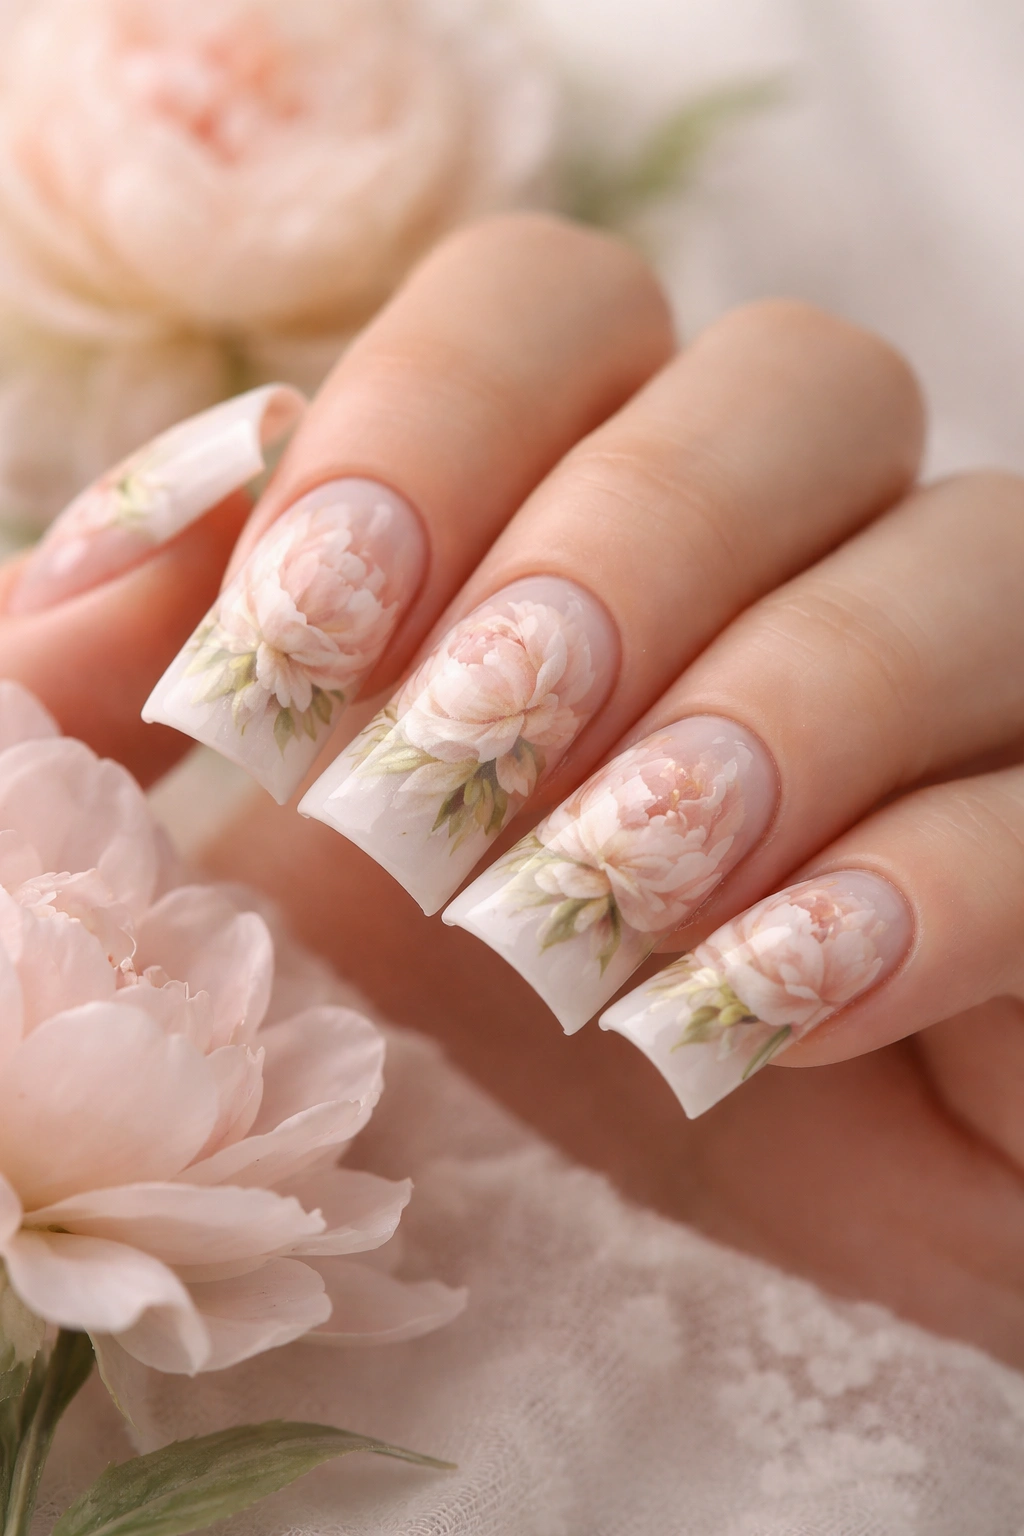
Delicate, ruffled peony flowers in soft blush, ivory, and pale pink create one of the most romantic nail designs possible. Peonies are beloved for their voluminous petals and romantic associations, and on duck nails they become even more dimensional and eye-catching. This design typically features one large peony focal flower on each nail or several smaller clusters, with soft background colors and minimal additional detail.
Why Peonies Feel So Special
Peonies are the flower of romance, celebration, and timeless beauty. They’re a favorite in bridal bouquets and luxury floristry for good reason—their layered petals and soft coloring feel inherently luxurious. On duck nails, peonies look almost three-dimensional because the curved nail shape and various layers of petals create natural depth and shadows.
Detailed Technique
- Use a soft blush or ivory base color across all nails
- Paint peony flowers with multiple layers of petals—start with outer petals, then add inner petals on top
- Each petal should be slightly different shade: some ivory, some pale pink, some deeper blush tone
- Create depth by painting edges of petals slightly darker than centers
- Add thin green stems and leaves in muted sage green
- Some petals should overlap others, creating the ruffled, voluminous appearance peonies are known for
- One or two glossy coats create a soft, romantic finish
- Consider adding a tiny rhinestone or pearl at the very center of the largest peony
What to know: Peony designs take more time than some other florals because of all the layered petals, but the result is absolutely worth the extra effort.
12. Sunflower Ombre Duck Nails with Gradient Petals
A more artistic take on sunflowers features gradient petals that transition from pale yellow at the base to deep golden yellow or orange at the tips. The ombre effect within each petal creates a three-dimensional quality that simple solid-color sunflowers can’t achieve. On duck nails, this gradient technique looks particularly sophisticated and artistic.
The Artistic Technique
This design requires understanding color blending and gradient techniques, but once you master it, you can apply it to virtually any floral design. The effect is that each petal appears to be catching light differently, which makes the flower look incredibly realistic and dimensional.
How to Create the Gradient Petals
- Apply a pale cream or white base
- Using a makeup sponge, create a gradient on each petal area: light yellow on one end, deeper golden yellow or orange on the other
- Work on one petal at a time, not the whole flower at once
- Once the gradient is set, define the petal edges with slightly darker yellow or thin black lines
- Paint the dark brown center with shadowing to look almost three-dimensional
- Add green stem and leaves
- Seal with a topcoat that enhances the dimensional quality
Pro tip: Gel polish works better than regular polish for this technique because you can cure between gradient applications, preventing colors from muddying together.
13. Morning Glory Blue Duck Nails with Delicate Vines
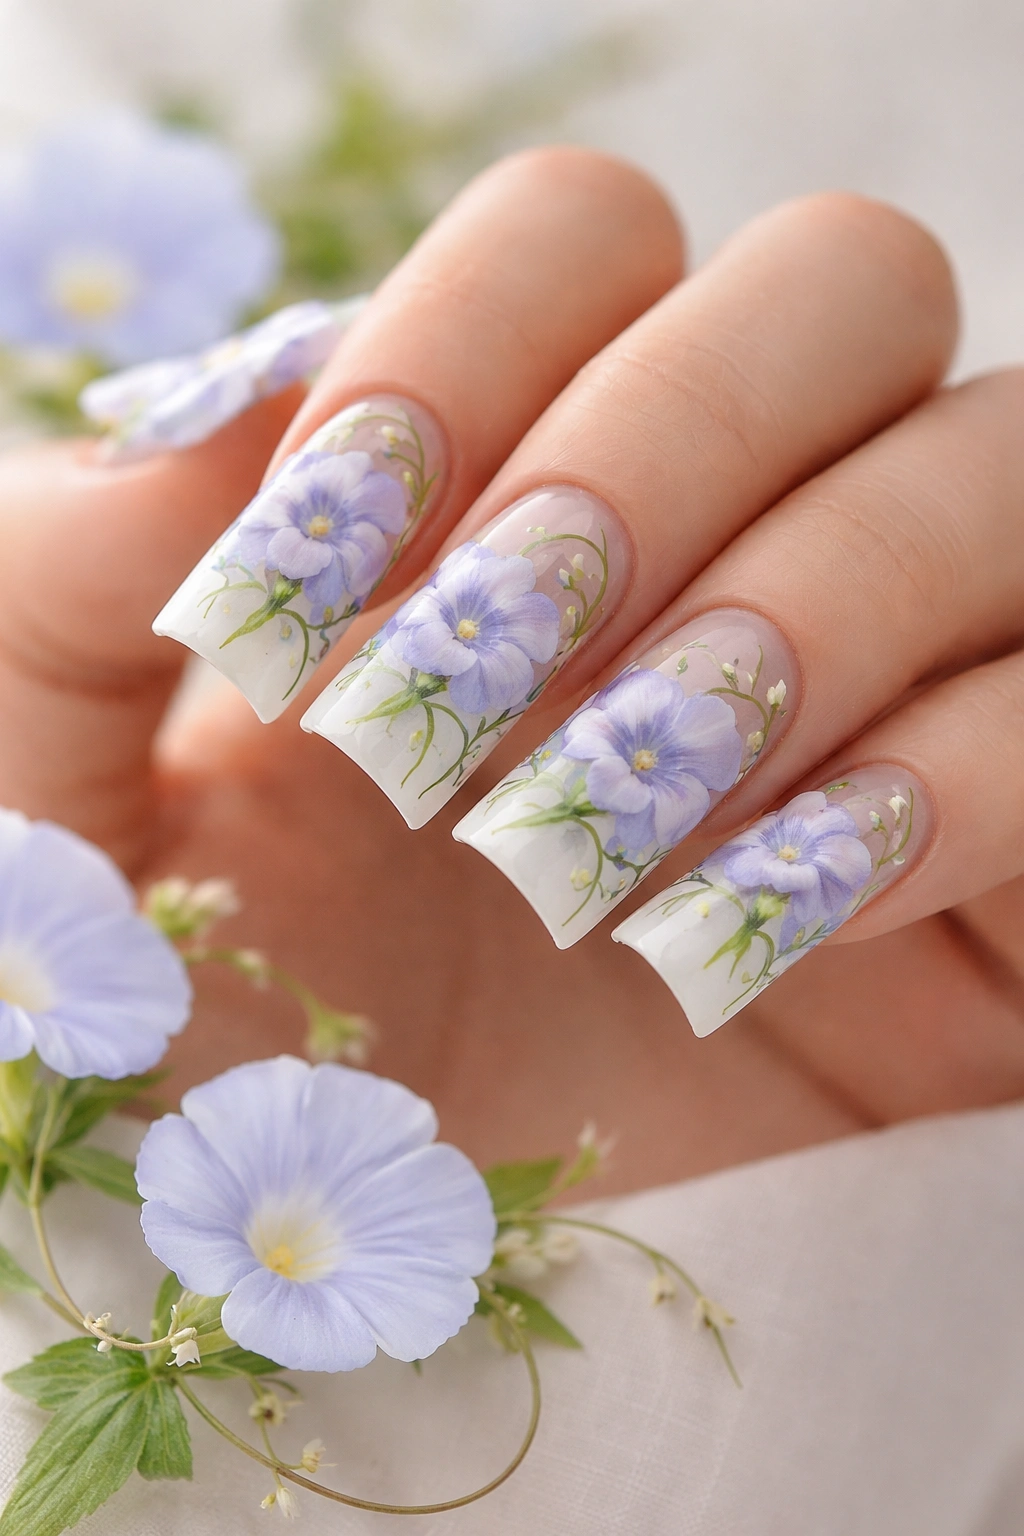
Soft blue morning glory flowers with delicate vining tendrils create an ethereal, romantic design that feels light and whimsical. Morning glories are perfect for duck nails because their trumpet-like shape and trailing vines naturally complement the curved nail silhouette. This design typically features scattered morning glories in soft periwinkle and sky blue with thin, organic vines connecting them.
The Delicate Aesthetic
Morning glories carry associations with gentleness, grace, and new beginnings. The soft blue tones are incredibly soothing and flattering on virtually every skin tone. This is a design that feels springtime and fresh, but works year-round because blue is universally appealing.
Painting the Design
- Use a soft white or pale blue base color
- Paint delicate trumpet-shaped flowers in soft periwinkle blue
- Each flower needs about 5 petals that form the characteristic trumpet shape
- Add a darker blue or purple center to each bloom
- Paint thin, curving vines in muted green that seem to connect the flowers
- Include small leaves along the vines in varying shades of green
- Keep the overall feeling light and airy—not too much color coverage, plenty of white space
- Glossy topcoat finishes the delicate look
Worth knowing: This design is perfect if you’re building confidence in floral nail art—the soft colors forgive small imperfections, and the loose, organic style means nothing needs to be perfectly precise.
14. Poppy Vintage Duck Nails with Art Deco Accents

Romantic red poppies paired with geometric Art Deco design elements create an unexpected fusion of vintage florals and geometric glamour. This design combines loose, painterly poppy flowers with thin gold lines creating geometric shapes, borders, or patterns. On duck nails, the contrast between the organic flowers and geometric elements feels modern and design-forward.
The Vintage-Modern Mix
This design appeals to people who love both botanical beauty and geometric design. It’s inspired by 1920s and 1930s aesthetics where florals and geometric patterns frequently appeared together. On contemporary duck nails, this becomes a fresh take on vintage style.
Building the Design
- Apply a pale ivory or soft beige base
- Paint loose, watercolor-style poppies in red, allowing some areas to be more transparent than others
- Add thin gold lines that form geometric patterns: stripes, triangles, or abstract geometric shapes
- Include delicate poppy leaves in green
- Consider adding gold accents at the cuticle or tip to frame the design
- The gold lines should feel like intentional design elements, not random marks
- Glossy topcoat brings everything together beautifully
Insider secret: This design actually looks more sophisticated if your poppy flowers aren’t perfectly detailed—the loose, painterly approach matches the design aesthetic better than photo-realistic rendering.
15. Iris Metallic Duck Nails with Holographic Finish
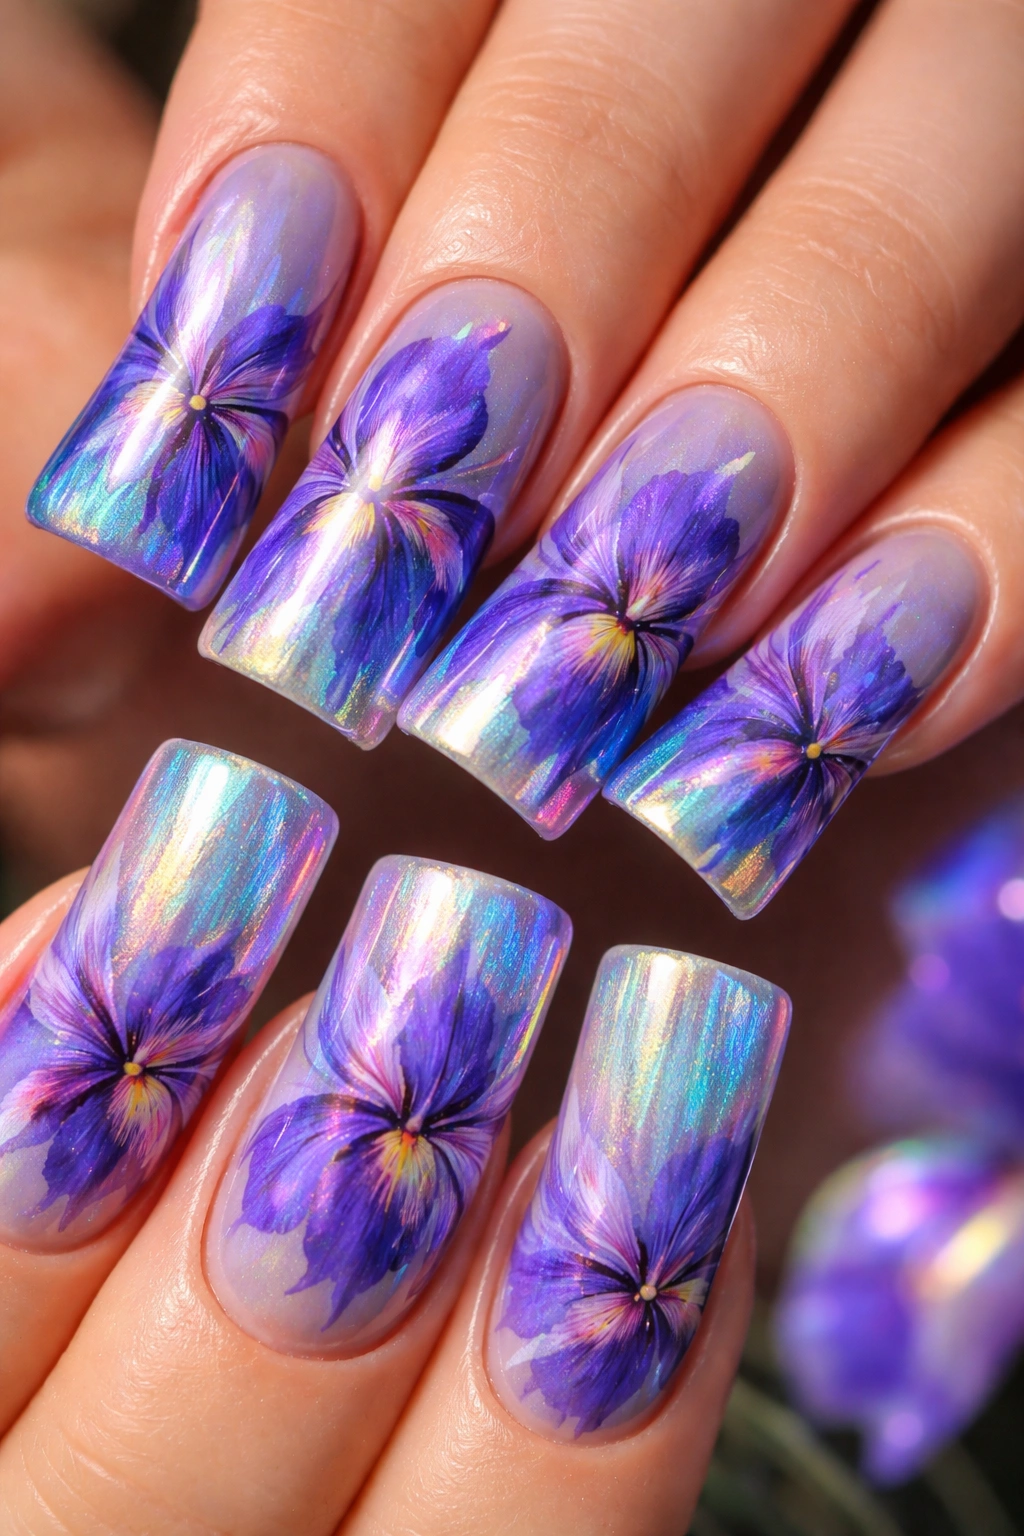
Stunning iris flowers rendered in purple, blue, and violet tones with a holographic or chrome finish create a truly show-stopping design. This is the ultimate special-occasion nail design—it’s complex, beautiful, and captures light in magical ways. Irises are complex flowers with layered, ruffled petals, making them perfect for demonstrating advanced nail art skills.
The Ultimate Statement Design
Iris designs are typically reserved for nail artists with significant experience, but that doesn’t mean you can’t attempt them or have them custom created by a talented technician. The reward is nails that look like wearable art. The holographic or chrome finish adds an extra dimension that makes the design feel almost supernatural.
Advanced Technique Overview
- Use a very pale, almost white base—you want maximum shine from the holographic finish
- Paint iris flowers with careful attention to their distinctive structure: the upright petals, the drooping petals, the fuzzy beard-like texture
- Use multiple shades of purple, blue, and violet to create dimension within the flower
- The petals should appear layered and dimensional
- Apply holographic powder or chrome finish once the flower design is completely dry
- This step reflects light in rainbow colors, making the whole nail sparkle and shift color
- Seal with a thick, glossy topcoat designed to work with chrome or holographic finishes
- Consider adding tiny metallic accents for additional sparkle
Pro tip: Holographic and chrome finishes require specific topcoats and proper sealing techniques—if you’re attempting this at home, research your specific products carefully or trust this design to a professional with experience.
Final Thoughts
Flower duck nails represent the perfect intersection of trendy nail shape and timeless floral beauty. Whether you’re drawn to delicate, minimalist designs or bold, glamorous statement nails, there’s a flower duck nail combination waiting to match your personal style. The curved duck shape is forgiving yet striking, allowing both simple designs and intricate artwork to shine in ways they couldn’t on traditional nail shapes.
The best part about these designs is their versatility. You can wear flower duck nails to a formal event, the office, a casual weekend brunch, or simply for the joy of having beautiful nails on your hands. Many of these designs can be recreated at home with patience and basic nail art tools, while others truly shine when executed by a skilled nail technician. Start with simpler designs like daisies or scattered wildflowers if you’re building your skills, then work toward more complex designs like detailed irises or glamorous orchids as your confidence grows.
Your flower duck nails should make you smile every time you look at your hands—that’s the real measure of success. Choose designs that speak to you, take your time with the application, and don’t hesitate to ask for professional help if you want results that are absolutely flawless. With so many beautiful options available, you’ll never run out of inspiration for your next manicure.
