

Red is the undefeated champion of nail colors—it’s bold, timeless, and instantly elegant. But there’s something uniquely striking about red on duck nails. The tapered-yet-sculptural shape of duck nails (also called ballerina or coffin nails) gives red a sophisticated platform that simple round or square shapes just can’t match. When red catches light along the curved sides and wider free edge of a duck nail, it creates dimension and presence that commands attention without screaming for it.
Duck nails aren’t just a trend that’ll fade next season; they’re a genuinely flattering shape that elongates the finger and works with almost every hand type and lifestyle. The key is finding the red shade and finish that speaks to your personal style—and there are way more options than you might think. Whether you’re drawn to classic simplicity, sparkle and drama, intricate nail art, or unexpected textures, red duck nails can deliver it all.
The beauty of red as your base color is that it’s a blank canvas for experimentation. You can go moody and deep burgundy, bright and vibrant tomato red, or sophisticated wine red. You can layer it with gold, white, chrome, rhinestones, or hand-painted details. The versatility is honestly one of the best reasons to commit to this particular nail shape and color combination.
Let’s dive into ten seriously beautiful red duck nail ideas that’ll give your manicure real character and make you want to show off your hands.
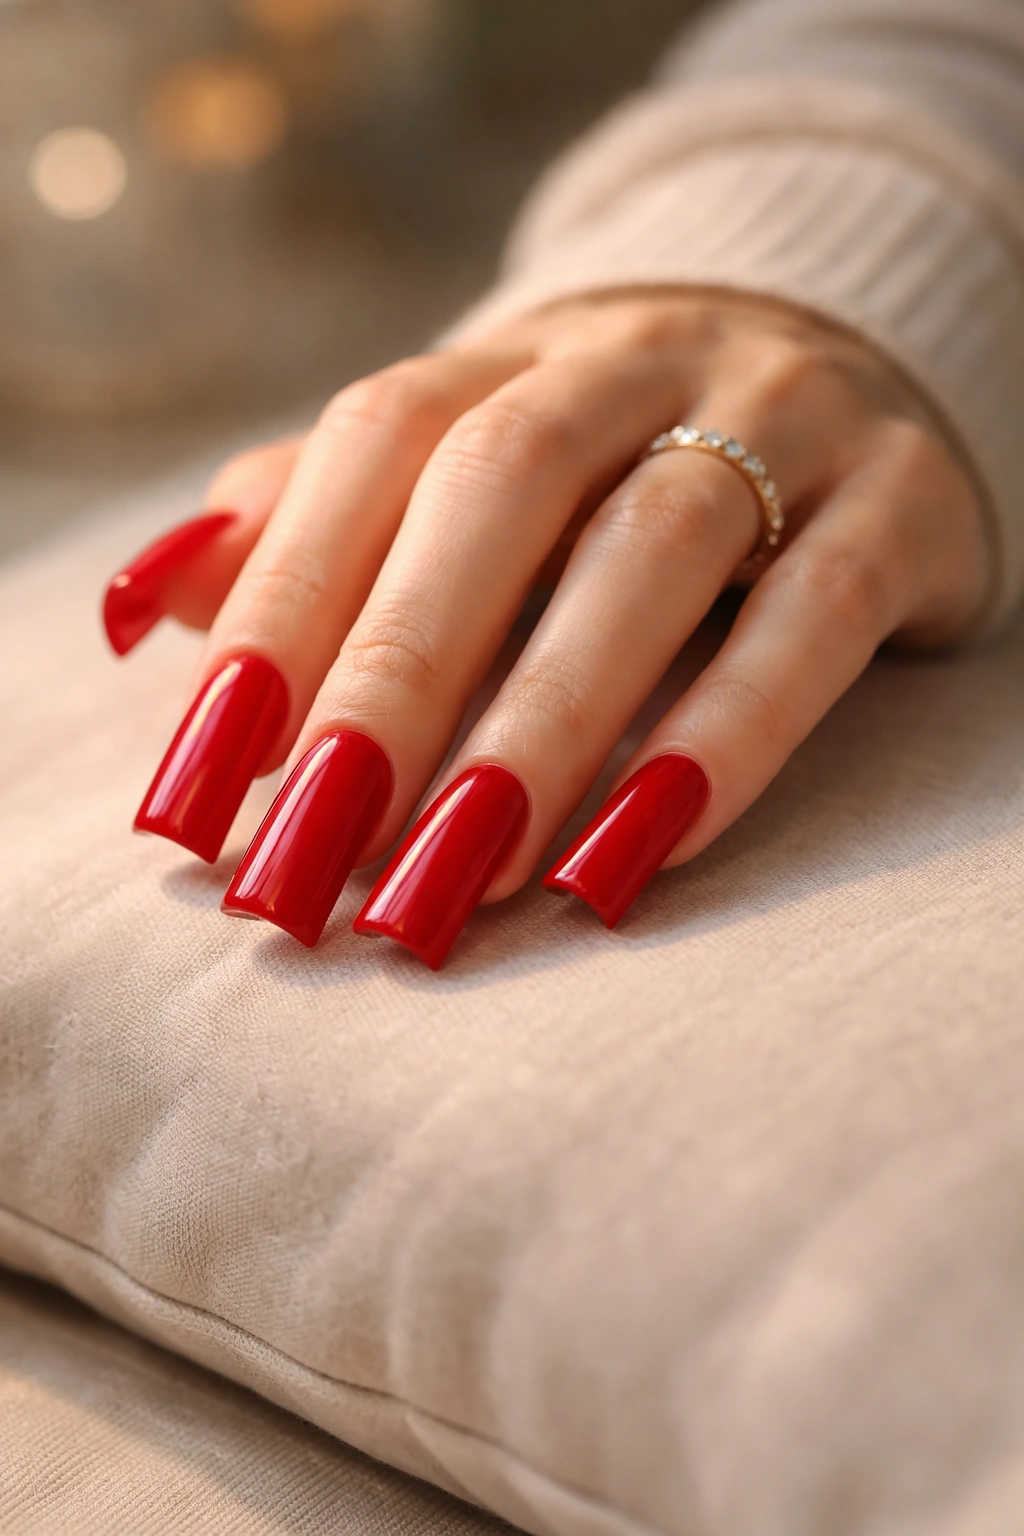
1. Glossy Cherry Red with High Shine
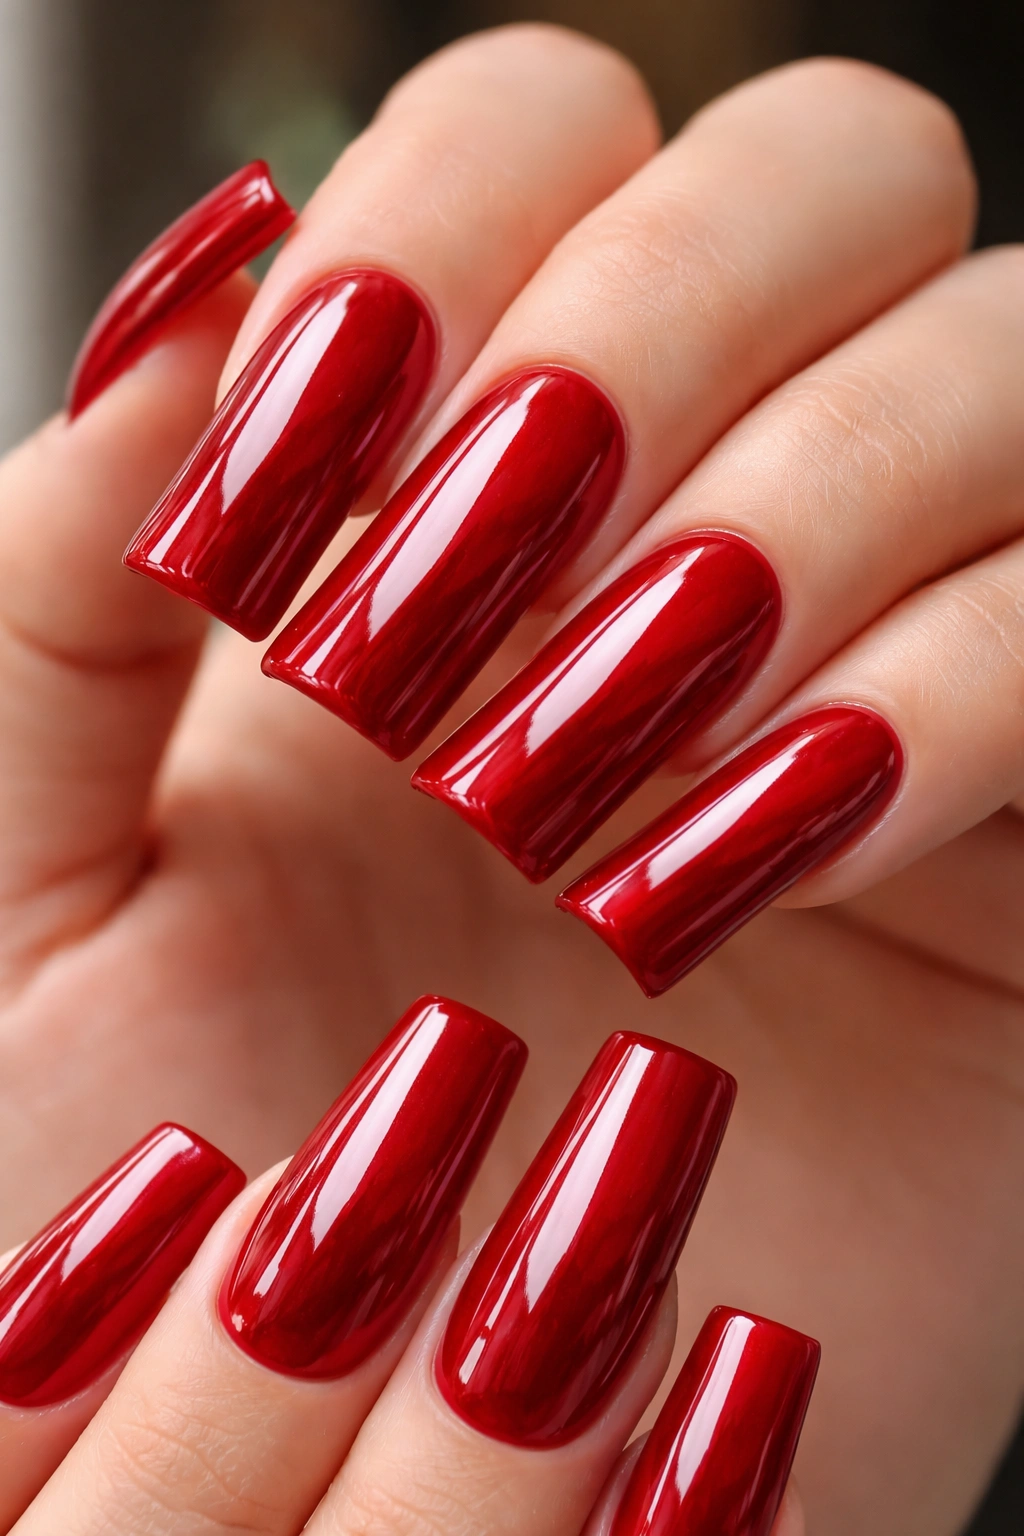
There’s genuine power in simplicity, and a high-shine glossy cherry red on perfectly sculpted duck nails might be the most classic and flattering choice you can make. This isn’t boring—glossy red demands attention because the shine catches light and makes your nails look longer and more defined. The reflective surface emphasizes the elegant duck shape and creates an almost mirror-like finish that feels both polished and modern.
Why Glossy Red Remains Timeless
A glossy finish amplifies the depth of red pigment. Your nail beds appear brighter and more vibrant, and the light reflection creates subtle movement across the nail surface as you move your hands. This is the go-to choice for anyone who wants elegance without complexity, and it photographs beautifully in almost any lighting. You’ll get genuine compliments because this look reads as intentional, well-groomed, and confident.
Application Tips and Maintenance
- A quality gel polish in true cherry red (not too orange, not too blue-toned) is essential—drugstore reds often lean warm or muddy
- Apply in thin, even coats rather than one thick coat; this prevents bubbling and ensures translucent color that builds to opacity
- Use a glossy top coat rated for durability; quality matters because cheaper topcoats can yellow or dull within days
- Plan for touch-ups every 2-3 weeks as micro-chips appear at the edges—glossy finishes make tiny imperfections more visible than matte would
- Keep cuticle oil on hand; well-hydrated cuticles make the entire manicure look more intentional and expensive
Pro tip: Pair this with a simple clear gel or barely-there nude on one accent nail for subtle dimension, or keep all ten nails matching for maximum impact.
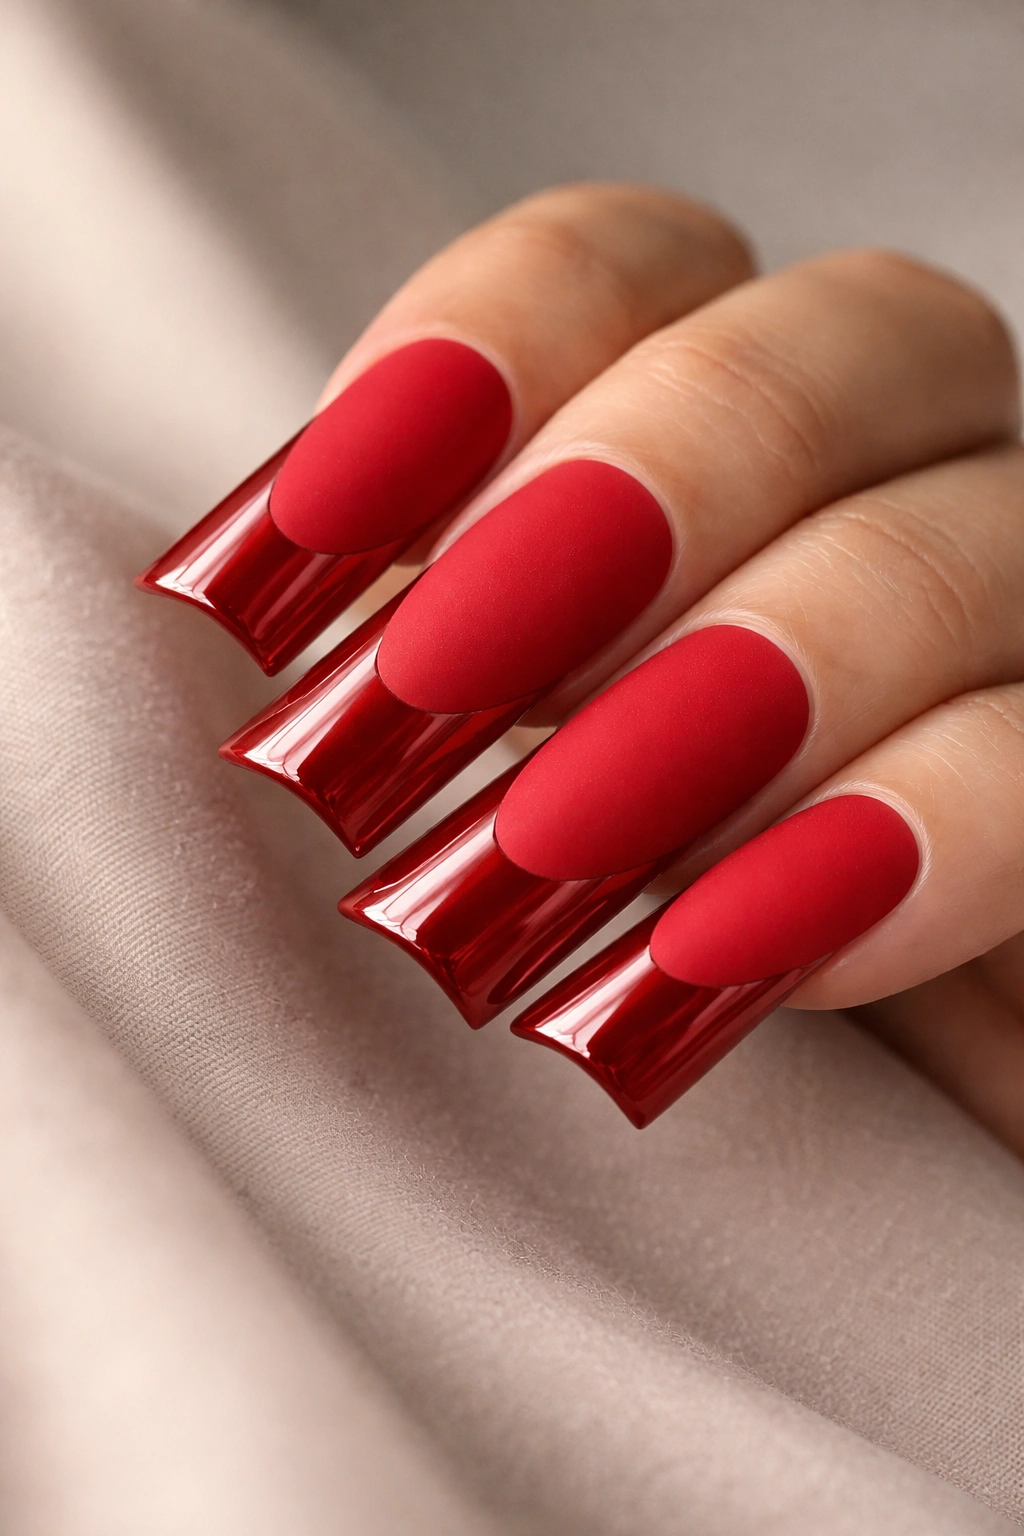
2. Sophisticated Matte Red

Matte red on duck nails hits different than glossy—it’s more mysterious, more modern, more fashion-forward. The non-reflective finish adds texture and depth that makes the color feel almost velvety. Without the shine bounce, matte red appears denser and more saturated, which is why this finish works beautifully on darker or deeper red tones that might feel too heavy in glossy form.
The Modern Appeal of Matte Finishes
Matte red looks intentional and editorial in a way that glossy sometimes can’t achieve. The texture draws focus to the nail shape itself rather than to light reflection, which means the sculptural beauty of duck nails really shines through. This finish photographs with more depth and complexity, especially in natural light. It’s the choice for anyone who wants to feel current and fashion-aware.
How to Get Matte Red That Actually Lasts
- Use a dedicated matte top coat specifically formulated for gel polish—don’t try to sand a glossy finish because it creates an uneven, dusty appearance
- Quality matte topcoats feel slightly thicker than glossy ones and require careful application to avoid pooling at the edges
- Matte finishes are generally more forgiving of minor imperfections because they don’t create the reflective highlighting that glossy does
- Plan for matte-specific maintenance: this finish can feel “dull” when the top coat begins to chip, so you might want touch-ups slightly sooner than glossy nails require
- Layer over a really good red base—you can’t fake color depth with matte finishes the way glossy shine sometimes does
Worth knowing: Matte red shows fingerprints and oil more than glossy does, so if you live with perpetually oily hands, this might not be your best bet.
3. Red Ombre with Gradient Fade
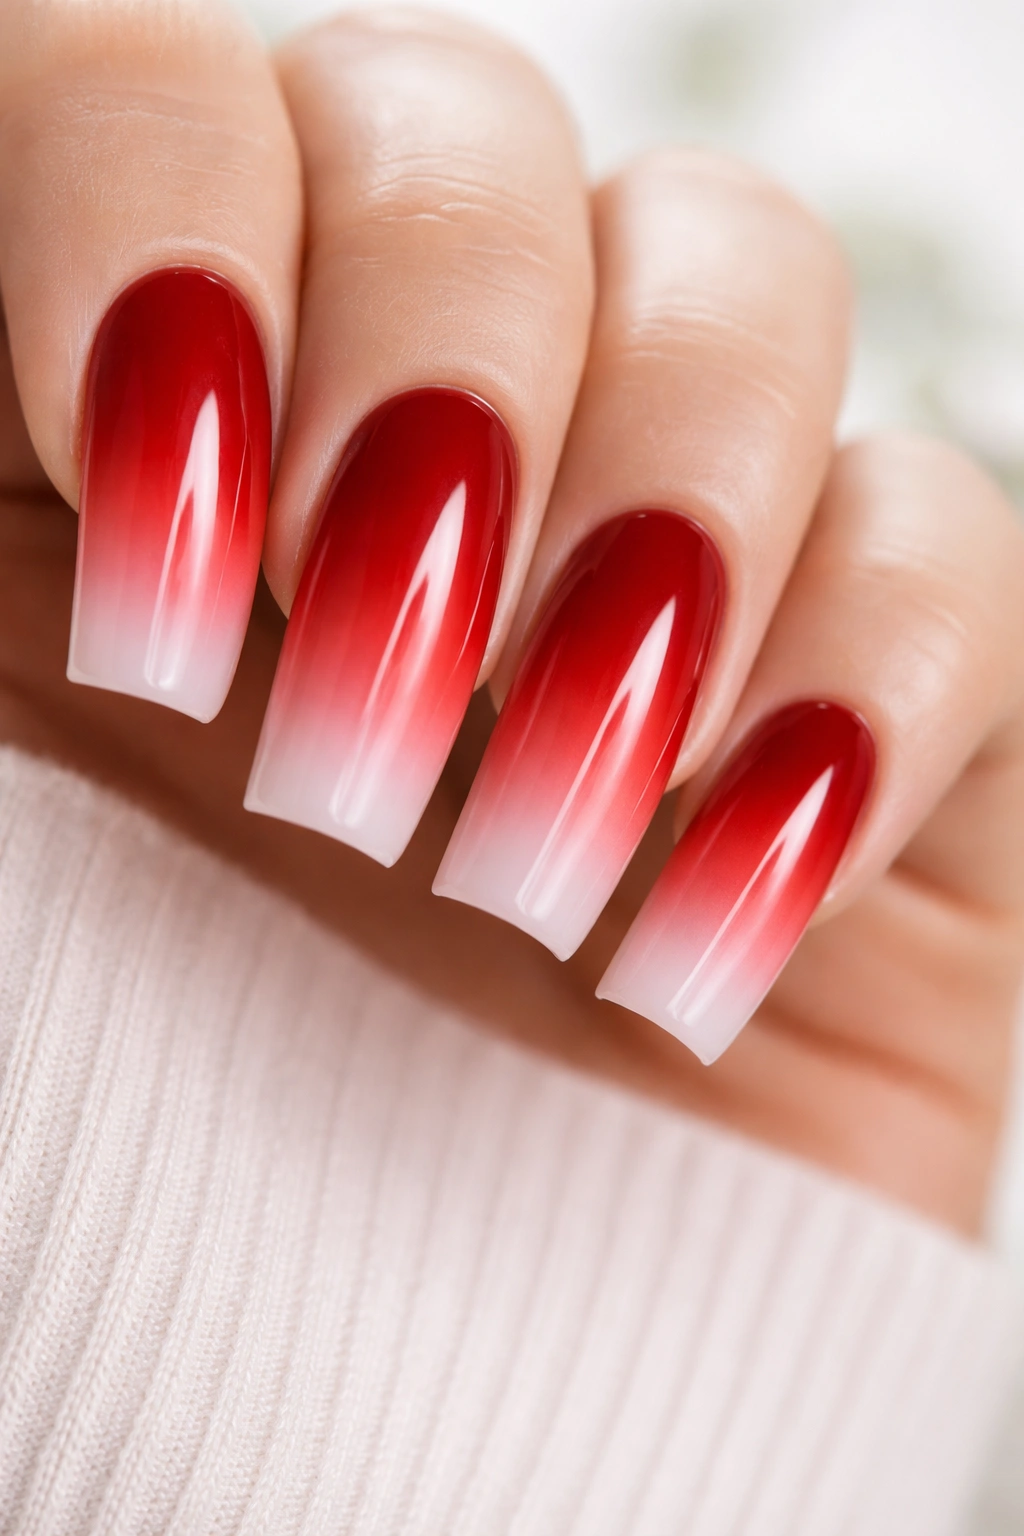
An ombre effect takes red from rich and saturated at the base of your nail to softer and lighter toward the tip, creating an elegant gradient that feels movement-based and artistic. On duck nails, this gradient emphasizes the shape’s natural lines and adds dimension that reads as intentional rather than like color irregularity. The tapered tip of a duck nail is the perfect canvas for an ombre fade.
Why Ombre Works on Duck Nails Specifically
The wider base and tapered point of duck nails naturally guide the eye along the gradient. When executed well, an ombre makes your nails look even longer because the taper is emphasized by the color shift. You can go from deep burgundy at the base to pale rose at the tip, or from bright red to almost-nude blush—the range is genuinely your choice. This technique shows skill and intentionality.
Creating a Flawless Ombre Effect
- Use a sponge application method: apply red polish colors to a makeup sponge in overlapping strokes, then dab and roll the sponge across the nail surface
- Blend the layers while they’re still wet with a soft brush slightly dampened in clear gel—this softens harsh lines
- Create the gradient on multiple nail coats; rushing this in a single application creates harsh edges
- Choose red shades that harmonize: deep burgundy to wine red works. Bright tomato red to pale coral works. Stay within color families rather than jumping between undertones
- Seal with a glossy or matte top coat depending on which finish appeals to you
Pro tip: For maximum impact, keep all nails matching with the same ombre direction and intensity.
4. Red Duck Nails with Gold Metallic Accents
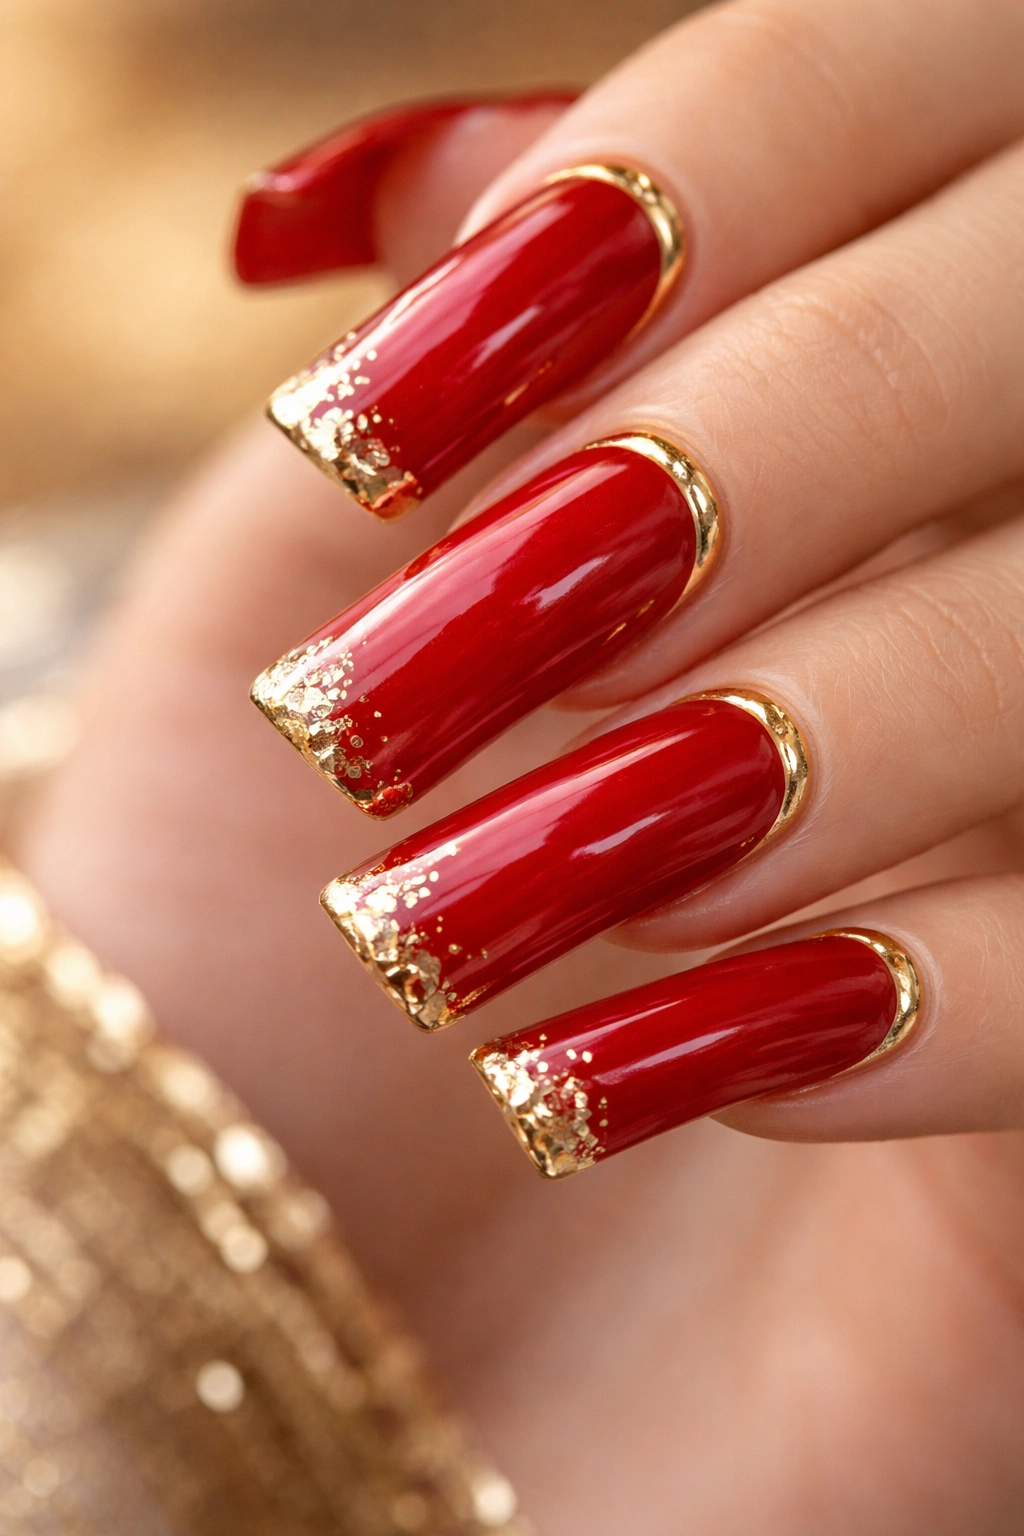
Gold and red together are old-money elegant—think jewelry, think luxury, think intentional style. Adding gold accents to red duck nails can mean a thin gold line along the cuticle, scattered gold foil embedded in gel, gold leaf details, or a delicate hand-painted gold pattern. The metallic warmth of gold amplifies red’s richness and creates a sophisticated, high-fashion aesthetic.
How Gold Elevates Red
Gold accents give red nails a sense of luxury and occasion. Whether you choose a minimal single-line accent or more elaborate gold detailing, the metallic catches light differently than red does, creating visual interest and depth. This combination works for everyday wear or special events—it’s elegant enough for formal occasions but interesting enough to feel current and intentional for daily life.
Gold Accent Application Methods
- Thin gold line at cuticle: Use a thin striping brush and gold gel to paint a delicate line parallel to your cuticle line; this frames the nail and adds sophisticated geometry
- Scattered gold foil: Press small pieces of adhesive-backed gold foil into semi-cured gel on your nail surface, seal with clear gel
- Gold leaf details: Apply leaf-adhesive to specific spots (corners, cuticle, side), press 23-karat gold leaf over it, and seal—creates a luxe, organic look
- Gold hand-painted accents: Paint delicate gold swirls, geometric patterns, or dots using a fine brush and gold gel; this requires a steady hand but allows complete design control
Worth knowing: Metallic finishes can sometimes photograph with a orange cast under certain lighting, so choose your gold tone (warm gold, cooler champagne gold, rose gold) with intention.
5. Red with White Tips or French Ombre
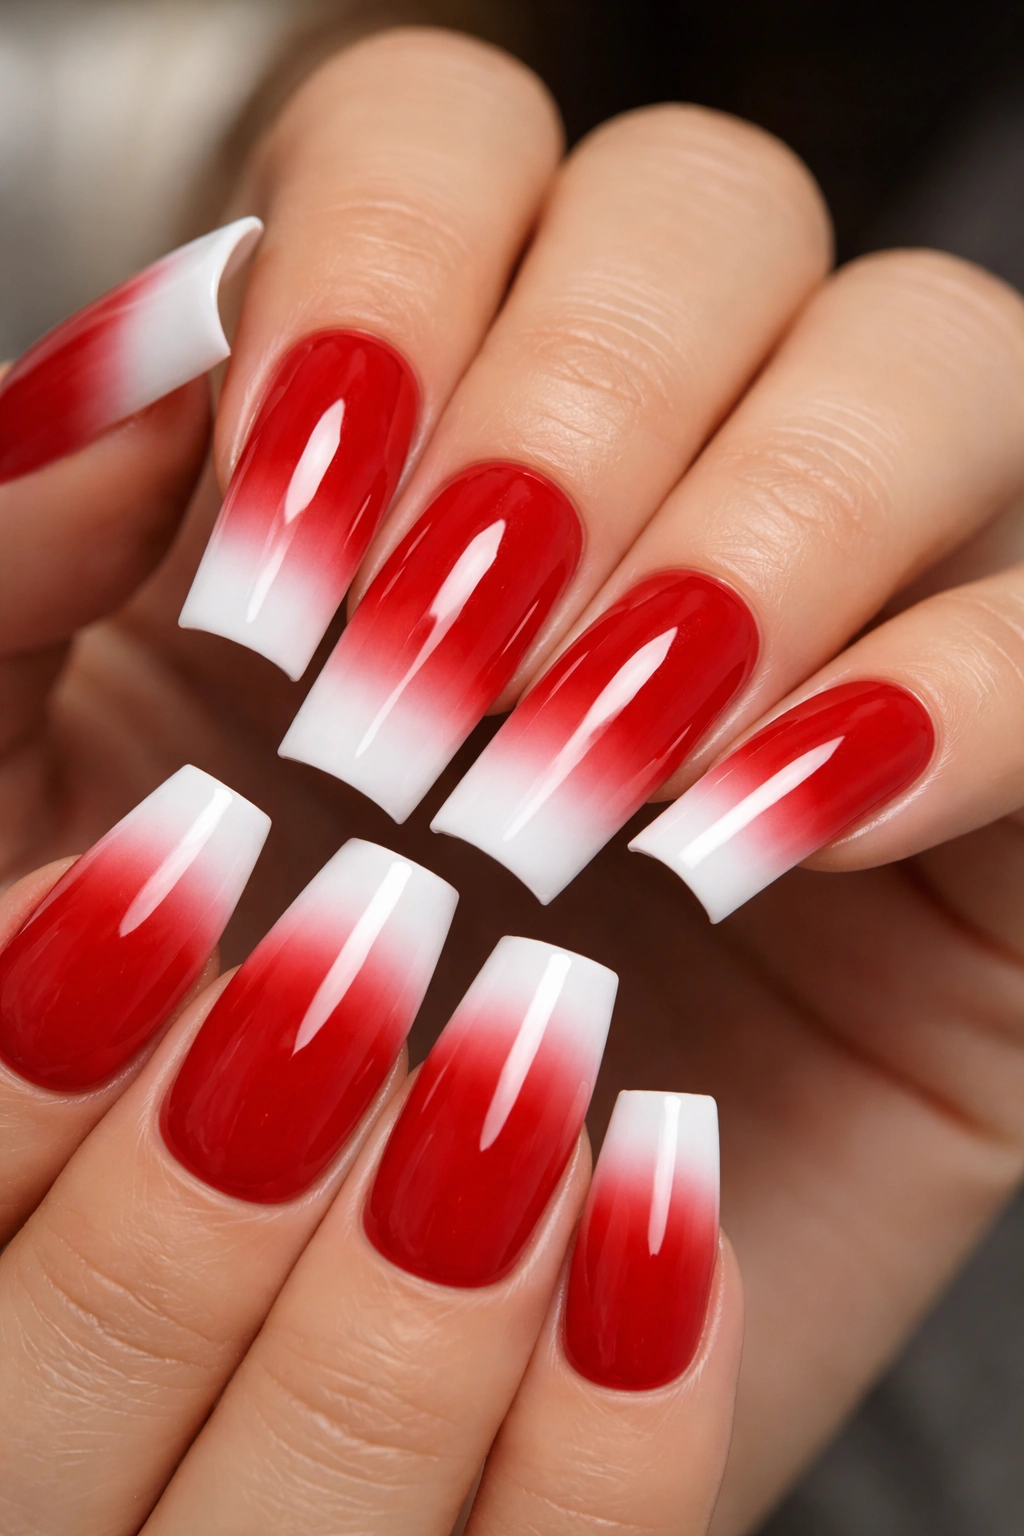
A white tip on red duck nails subverts the classic French manicure and creates a modern, hybrid look that’s both timeless and current. You can execute this as a traditional crisp white tip, a soft gradient from red to white, or a thicker, more abstract white edge. This design works because it adds contrast and visual separation that emphasizes the duck nail shape.
The Modern French Twist
Instead of the delicate pale pink base of a traditional French manicure, starting with bold red changes the entire energy. White tips on red create a strong contrast that photographs beautifully and feels fresh without sacrificing elegance. The white draws focus to the length and shape of your nails, which is exactly what you want with duck nails.
Executing a Sharp or Soft White Tip
- Crisp white edge: Mark your desired tip line with a thin striping brush and guide tape if needed, fill with opaque white gel, seal carefully to prevent the red from bleeding into white
- Soft gradient edge: Apply white gel to the nail tip, use a small damp brush to blend the red and white where they meet while the polish is still curing
- Thicker white design: Create an intentional white block or swoosh along the tip area that breaks up the red; this feels more artistic than a traditional thin-line French tip
- Negative space approach: Paint red, leave white as bare nail at the tip showing your natural nail or a clear base coat; this creates graphic contrast
Pro tip: This combo works especially well if you have a warm undertone to your skin; the red-and-white contrast will make your fingers look longer and more elegant.
6. Red Glitter Gradient or Encapsulation
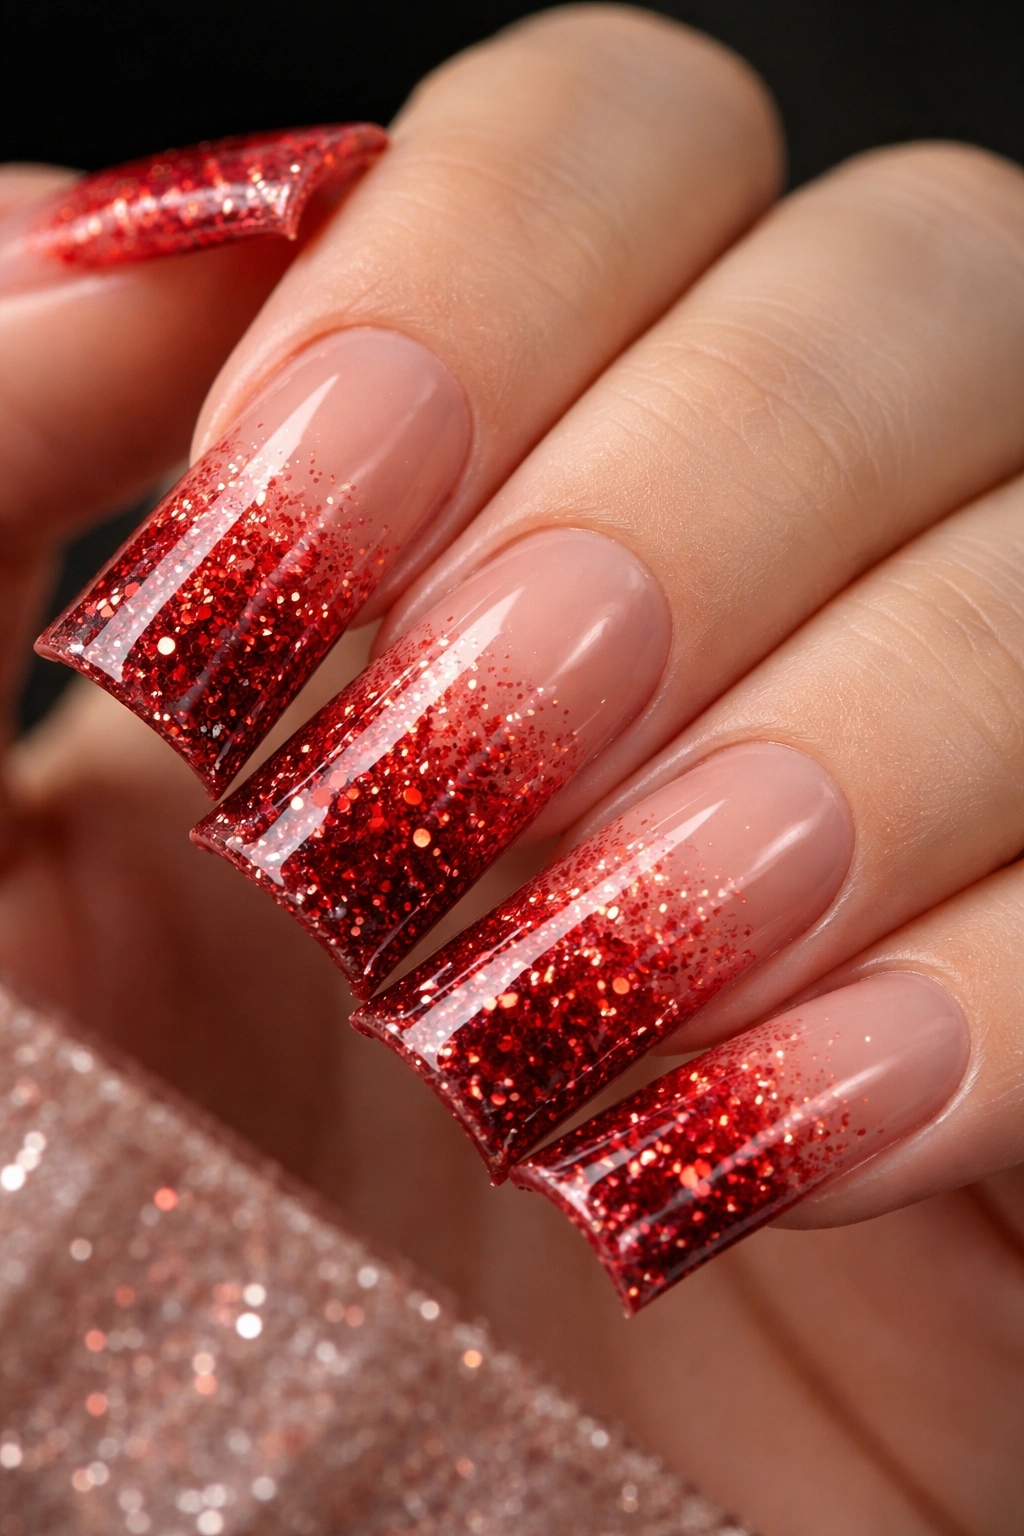
Glitter adds sparkle and texture that catches light in an entirely different way than a solid finish. On red duck nails, glitter works best as a gradient—dense and opaque near the tip, fading to minimal or no glitter near the cuticle—or encapsulated fully within gel layers for a smooth finish that still catches light. Glitter on red reads as celebratory without feeling costume-y.
Why Glitter Deserves a Chance
Glitter tends to get dismissed as overly playful, but on red duck nails with careful application, it reads as sophisticated sparkle rather than glitter-bomb excess. The key is choosing glitter size and density that feels intentional. Fine, multi-colored glitter reads differently than large, chunky holographic glitter—pick one that matches your aesthetic.
Application Techniques for Glitter Red
- Gradient approach: Apply red gel base, then apply a gel layer with glitter mixed in or adhered; concentrate glitter near the tip and feather it lighter toward the cuticle with a clean brush
- Encapsulated glitter: Mix or press glitter into semi-cured gel in the middle layers of your nail (not at the very top), seal completely with clear gel for a smooth, wearable finish; this prevents glitter shedding and catches light beautifully
- Sparse accent approach: Place individual glitter pieces or small glitter clusters strategically rather than covering the entire nail; this feels more refined
- Color-matching glitter: Choose red, gold, or silver glitter that harmonizes with your red base rather than contrasting sharply
Worth knowing: Encapsulated glitter is more durable for daily wear, while surface glitter looks more sparkly but may shed over 1-2 weeks.
7. Red with Rhinestone Embellishments
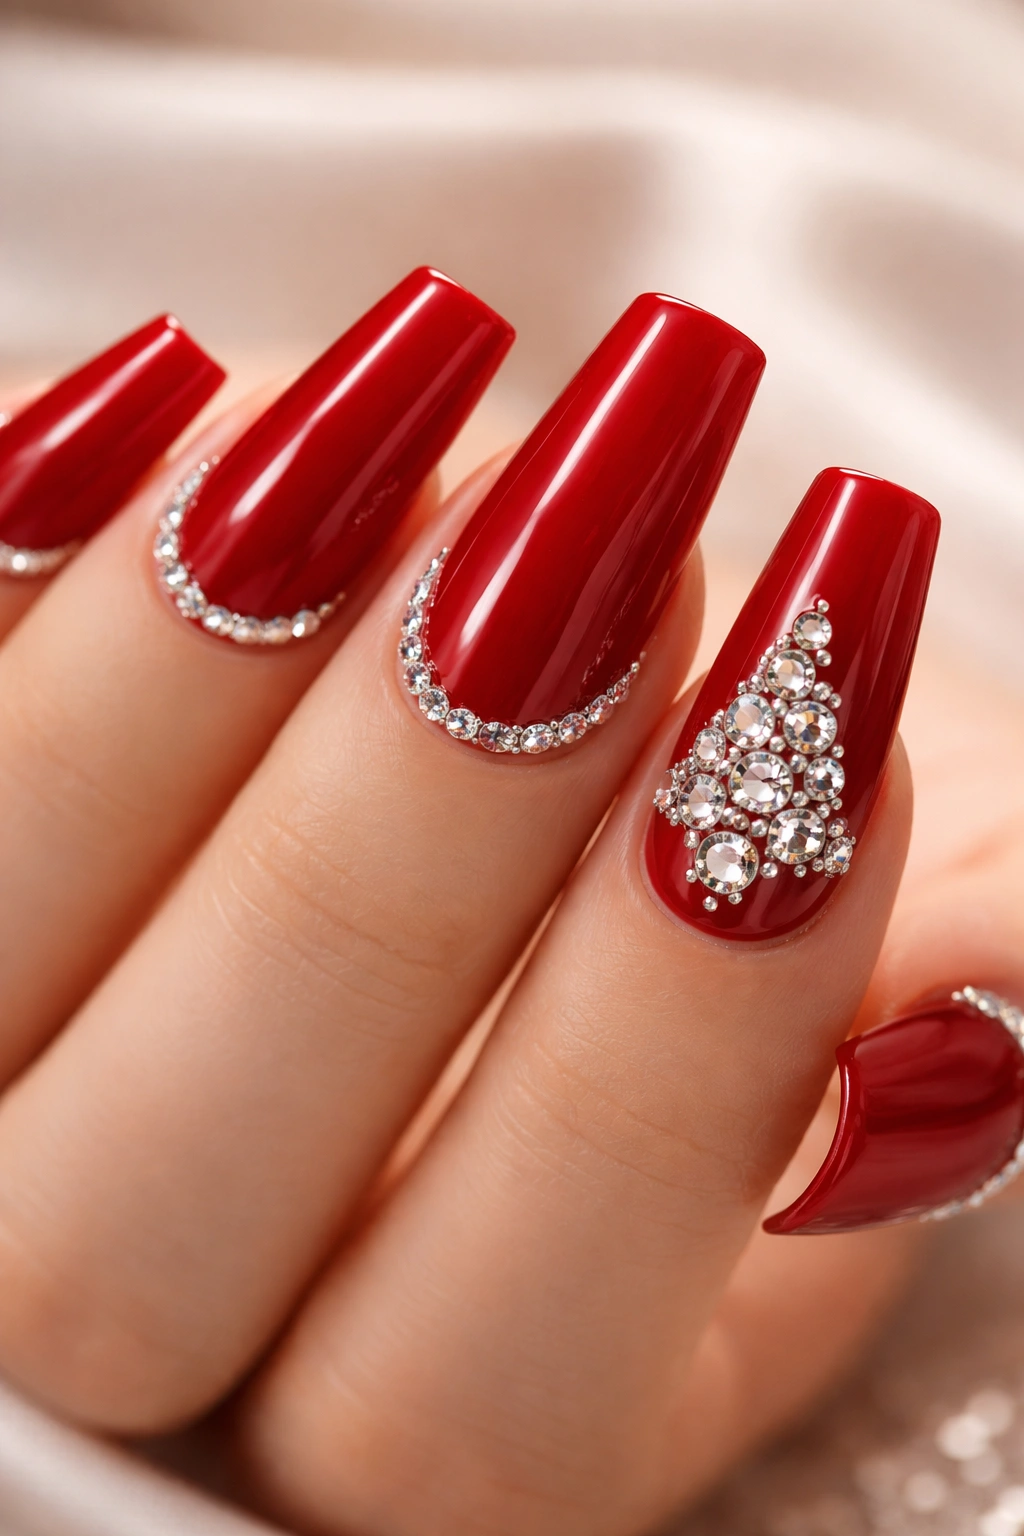
Rhinestones add luxury and intentional glamour to red duck nails in a way that feels deliberate and special. Unlike glitter, which is diffuse, rhinestones create focal points and jewelry-like detail. You can scatter small rhinestones across all ten nails, create a concentrated design on one accent nail, or outline the cuticle with a rhinestone line for a jeweled frame effect.
The Luxury Factor of Rhinestone Details
Rhinestones catch light like actual gemstones and create dimension that reads as upscale and intentional. Red with rhinestones feels celebratory and special—this is the manicure you choose for events, dates, or whenever you want your hands to genuinely turn heads. The key to making rhinestones work is restraint; a few perfectly placed stones read as intentional, while too many read as chaotic.
Rhinestone Application and Design Ideas
- Cuticle line placement: Arrange small rhinestones in a thin line parallel to your cuticle; this frames the nail and creates a jeweled, tiara-like effect
- Accent nail focus: Place all rhinestones on one nail (often the ring finger) with a scattered or pattern-based arrangement; this draws focus and feels intentional
- Corner accent: Place a small cluster of 3-5 rhinestones in the top corner of each nail for subtle sparkle without overwhelming the design
- Mixed stone sizing: Combine large and small rhinestones in an intentional pattern; this creates visual hierarchy and interest
- Application method: Use a gel base that grabs slightly, press rhinestones in with a dotter tool or tweezers, seal carefully with clear gel to secure them permanently
Pro tip: Choose clear, high-quality rhinestones in AB (aurora borealis) or crystal finishes; cheap rhinestones look noticeably dull by comparison.
8. Red with Hand-Painted Nail Art
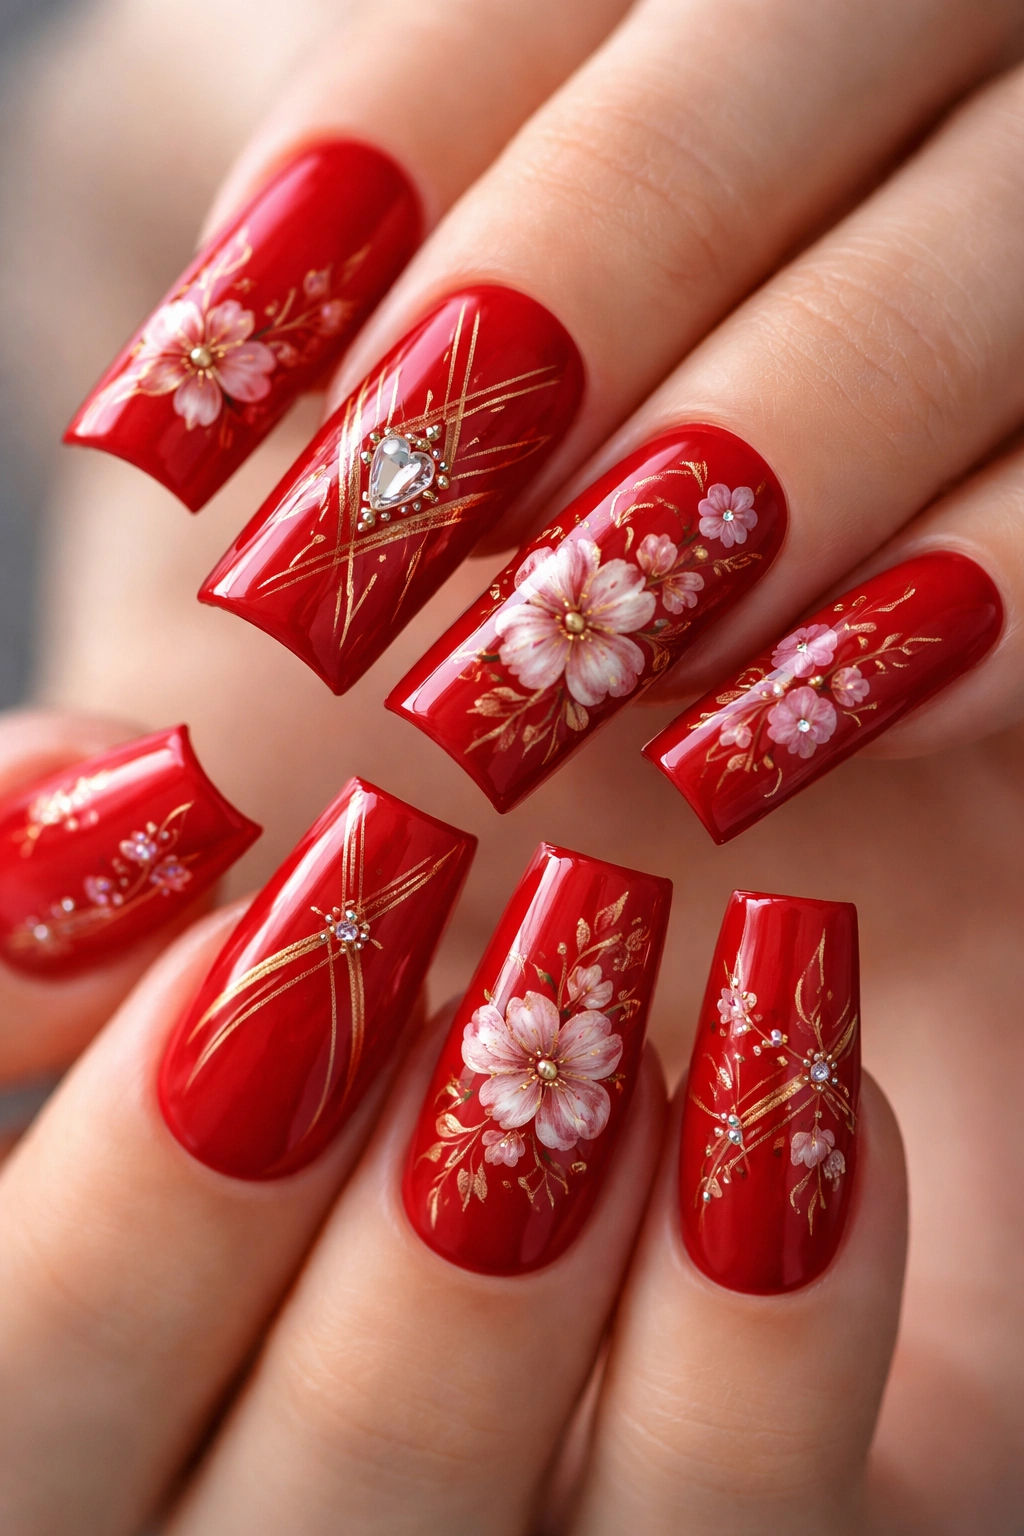
Hand-painted designs on red duck nails allow for genuine artistic expression. You could paint delicate florals, geometric patterns, abstract swirls, tiny portraits, celestial themes, or anything else your imagination conjures. The wider canvas that duck nails provide makes hand-painted art more visible and impactful than it would be on shorter or narrower nails.
What Makes Hand-Painted Art Special
Hand-painted designs create one-of-a-kind nails that can’t be replicated exactly. There’s personality and human touch in imperfection. Whether you paint them yourself or have a skilled nail artist create them, hand-painted designs elevate your manicure from “nice polish” to wearable art. Red provides a bold, sophisticated backdrop that lets intricate designs really stand out.
Design Ideas That Work on Red
- Minimalist florals: Delicate hand-painted flowers in white, gold, or pink on the nail tip or cuticle area; keeps the red visible but adds artistic detail
- Geometric patterns: Thin lines, triangles, or abstract shapes in contrasting colors (white, black, gold) that emphasize the nail shape
- Ombre or sunset art: Hand-painted gradients in complementary colors (red fading to orange to yellow, or red to pink to nude)
- Celestial designs: Tiny moons, stars, or planets in metallic or contrasting colors; perfect for a more whimsical aesthetic
- Negative space art: Paint a design but leave parts of the nail unpainted to show the red underneath; this creates visual rhythm
Worth knowing: If you’re having this done by a nail technician, clear communication with photos is essential—nail artists appreciate reference images.
9. Red Metallic or Chrome Finish
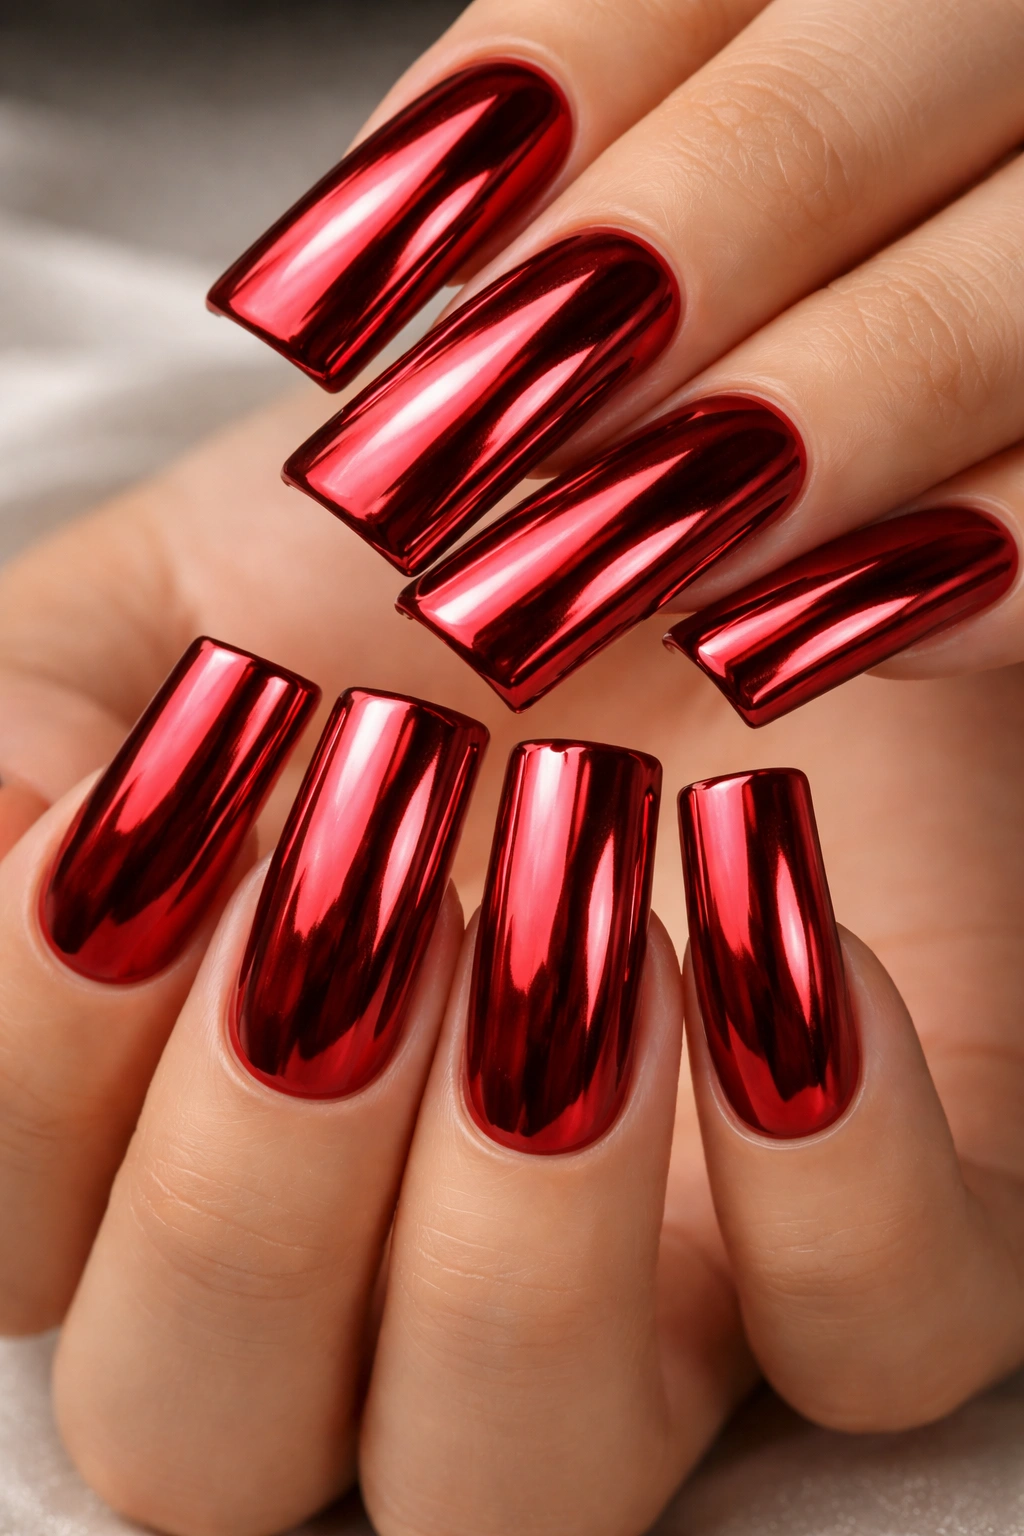
A true metallic red—not glitter, but a smooth, reflective, metal-like finish—creates an avant-garde, fashion-forward manicure that feels modern and slightly edgy. Chrome and metallic finishes have become more refined and wearable in recent years. Red in a metallic finish reads as bold and intentional rather than costume-y or over-the-top.
The Modern Edge of Metallic Red
Metallic red sits somewhere between glossy and matte but with a unique reflective quality that’s almost liquid-looking. This finish emphasizes the duck nail shape beautifully because the metallic quality highlights the curves and angles. It’s the choice for anyone who wants to feel current, artistic, and genuinely distinctive. Metallic red photographs incredibly well because it captures light in unique ways.
Getting a True Metallic Finish
- Metallic gel polish: Look specifically for gel polishes labeled as “metallic” or “chrome” rather than shimmer polishes, which are different
- Chrome powder technique: Apply a tacky base layer, use a chrome powder applicator to press reflective pigment into the gel, seal carefully—requires patience and precision
- Metallic topcoat: Some brands make specialized metallic or mirror topcoats that transform any red base into a metallic effect
- Layering approach: Apply a deep red base, seal with a translucent metallic layer that shifts and reflects
- Maintenance consideration: Metallic finishes can show wear differently than solid colors, so plan for touch-ups slightly sooner
Pro tip: Metallic finishes are absolutely stunning in natural sunlight but can look different under artificial indoor lighting, so consider your environment.
10. Red with Matte and Glossy Mix
A hybrid finish that combines matte and glossy sections on the same nail creates visual interest and modern contrast. You might do a matte red base with a glossy accent stripe, a glossy tip with a matte base, or scattered glossy dots on matte red. This mixed-finish approach feels intentional and current without being overly complicated.
Why Mixed Finishes Feel Fresh
Combining matte and glossy creates visual hierarchy and depth. The contrast draws the eye and creates a manicure that reads as thoughtfully designed rather than coincidental. This technique is perfect if you love red but want something a bit more visually interesting than a solid, single-finish approach. The duck nail shape accommodates both finishes beautifully.
Execution Ideas for Mixed Finishes
- Horizontal split: Apply matte red to the lower half of the nail and glossy red to the upper tip; the line can be crisp or gradient-blended
- Glossy stripe accent: Paint a glossy vertical or diagonal stripe down a matte red nail; this creates movement and interest
- Glossy geometric shapes: Paint glossy triangles, circles, or lines over a matte red base using precise application
- Accent nail approach: Keep most nails matte red and make one or two nails glossy for subtle variation
- Ombre transition: Use matte red at the base, gradually shifting to glossy toward the tip for a subtle sheen increase
Worth knowing: When mixing finishes, ensure both the matte and glossy top coats are high quality and compatible—cheap combinations can feel separated or unrefined.
Final Thoughts
Red duck nails are the perfect intersection of timeless elegance and modern style. The shape is flattering, the color is versatile, and the design possibilities are genuinely endless. Whether you choose stark simplicity with a glossy finish or go all-out with glitter, rhinestones, or hand-painted art, red duck nails work because they feel intentional and well-thought-through.
The key to choosing your red is understanding your own aesthetic. Do you lean toward minimalist sophistication? Go glossy or matte. Do you love sparkle and detail? Rhinestones and glitter are your friends. Do you want to showcase nail art skills? Hand-painted designs are the way. Do you want something that feels current and fashion-forward? Try metallic or a mixed-finish approach. Whatever you choose, you’re committing to nails that genuinely turn heads and make you feel confident every single time you look at your hands.
Red duck nails aren’t a trend—they’re a statement. They say you know what suits you, you’re willing to commit to maintenance and care, and you understand the power of a well-executed, thoughtfully chosen manicure. That’s genuinely worth celebrating.
