

Brown and pink is one of those color combinations that feels simultaneously warm and sophisticated—it works whether you’re going for a cozy autumn vibe or an elegant everyday look. Duck nails, with their distinctive elongated squared-off shape that slightly widens at the tips, provide the perfect canvas for playing with these earthy and rosy tones. The elongated surface area gives you plenty of room to get creative with patterns, gradients, and nail art techniques that might feel cramped on shorter nails.
What makes brown and pink such a compelling pairing for duck nails specifically is how the shape enhances the visual impact of the design. The wider tip creates a natural focal point for color blocking, ombré effects, or detailed artwork. Whether you’re drawn to minimalist elegance, bold geometric patterns, or nature-inspired designs, these two colors can anchor almost any aesthetic. The warmth of brown grounds the softer, more delicate feel of pink, creating a balance that works across different skin tones and personal styles.
The best part about exploring brown and pink duck nail combinations is how flexible they really are. You can lean into the cozy, autumnal side with terracotta and dusty rose. You can go modern and sleek with chocolate and millennial pink. You can even tap into the romantic, feminine energy of the combination by using soft mauve tones paired with warm caramel browns. Each variation tells a slightly different story while maintaining that cohesive, intentional aesthetic that makes people actually remember your nails.
Let’s dive into ten distinct brown and pink duck nail designs that showcase just how versatile this color story can be.
1. Ombré Chocolate to Blush Gradient
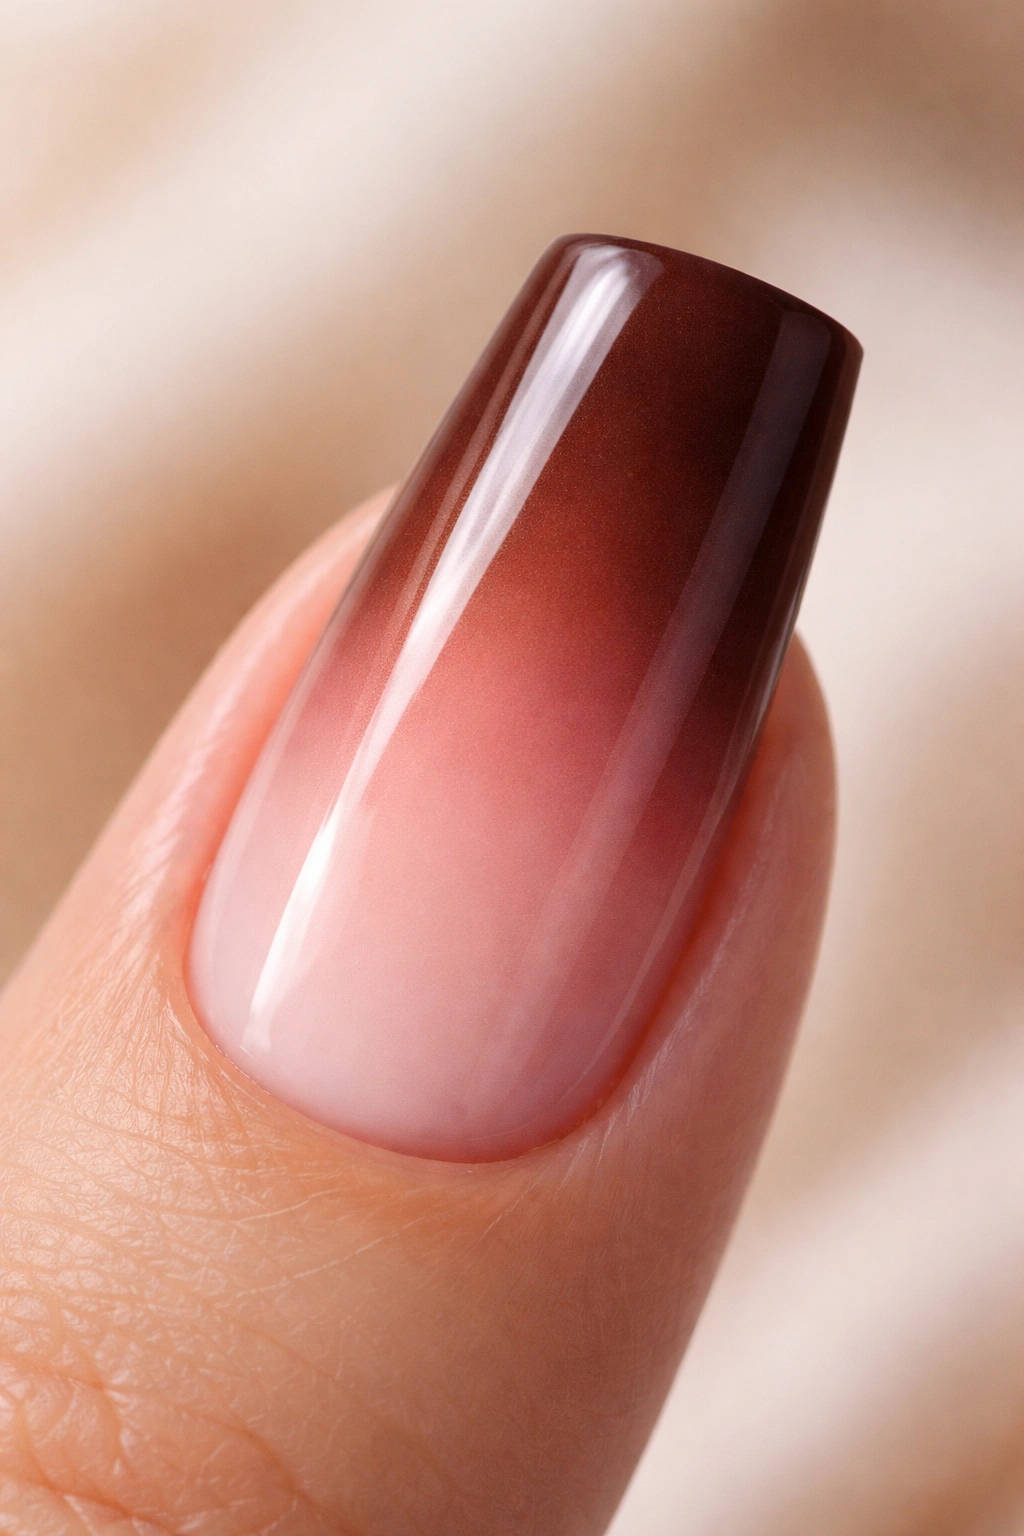
This design takes advantage of the duck nail’s generous surface area by creating a seamless gradient that flows from deep chocolate brown at the base to soft blush pink at the tips. The transition happens gradually across the length of the nail, creating an almost sunset-like effect that feels both sophisticated and effortless.
How the Gradient Creates Visual Flow
The beauty of an ombré design on duck nails is that the wider tip catches light differently than the base, so the color transition doesn’t feel flat—it has depth and dimension. The chocolate-to-blush gradient naturally draws the eye from your knuckles to your fingertips, making the elongated shape feel even more elegant. This design works beautifully for both professional settings and casual wear because the gradient gives it a polished, intentional quality without being loud or busy.
Design Breakdown and Application Tips
- Start with a chocolate brown base color and apply it to the entire nail in two coats for full coverage
- Grab a makeup sponge or a small blending sponge and dab blush pink onto one corner in a curved shape
- Use the sponge to gently dab and blend the pink and brown together, creating a soft transition zone—this is where the magic happens
- The sponging technique creates a natural, organic blend rather than a harsh line, which is why it works so well on longer nails
- Seal everything with a glossy top coat to enhance the gradient effect and add shine
- If you want extra dimension, add a tiny bit of white or nude in the very center of the transition zone before sealing
Pro tip: Do your ombré on one hand at a time so you can fully blend before the polish starts to dry. Rushing through the sponging step will result in a patchy-looking gradient instead of that coveted seamless flow.
2. Geometric Color Block with Gold Dividers
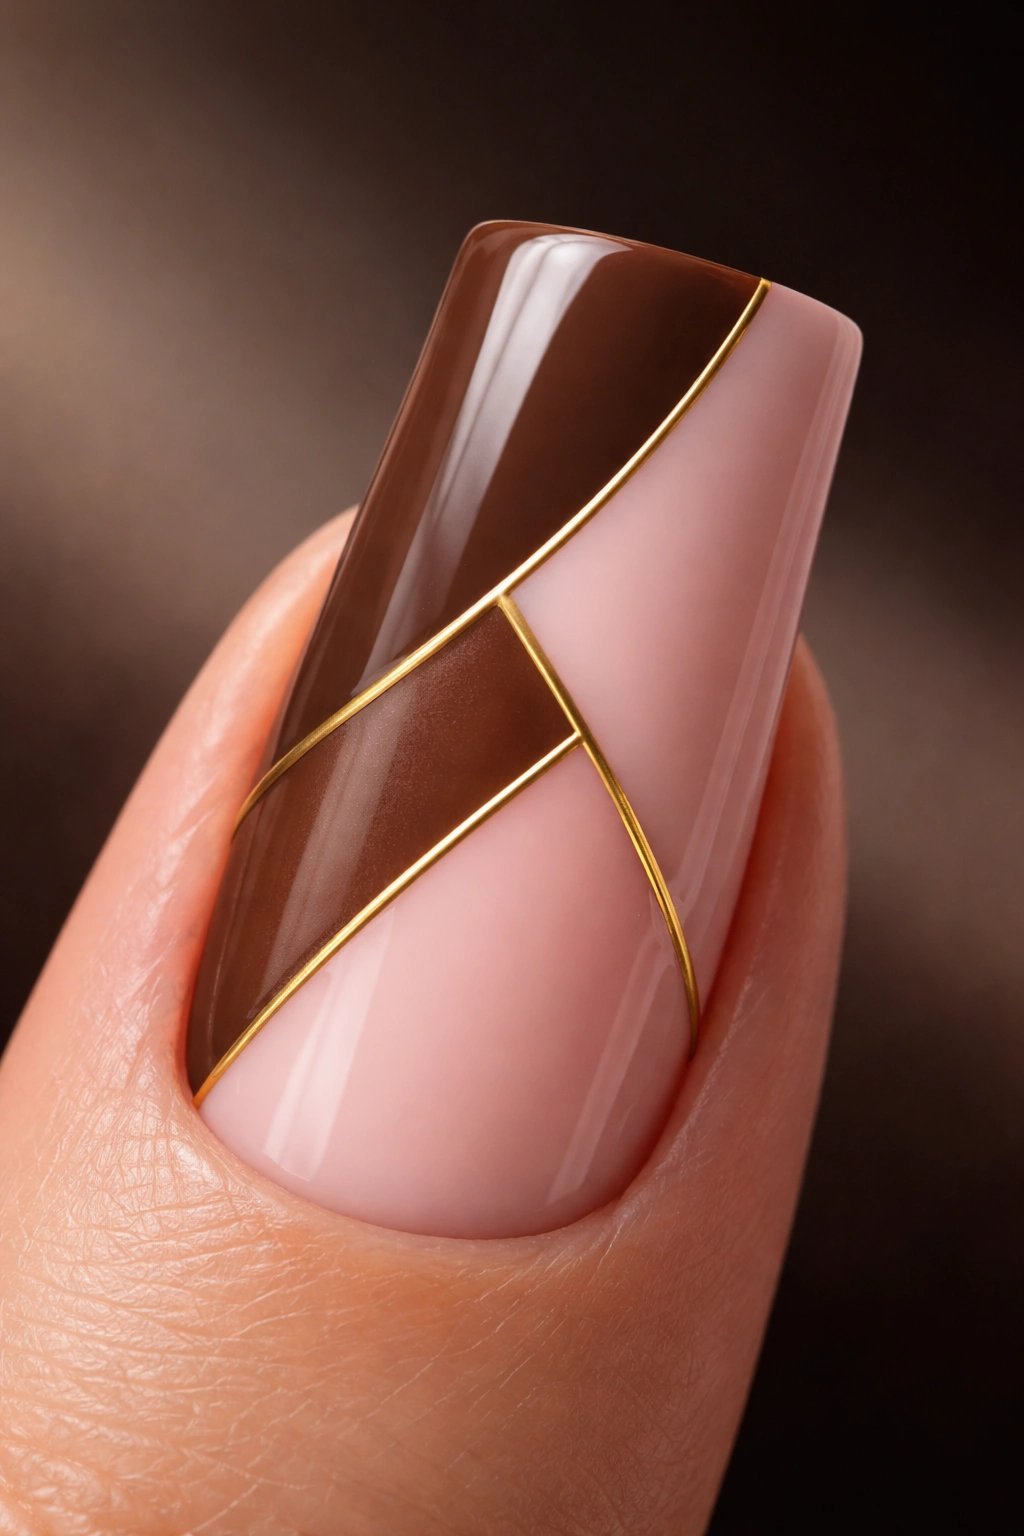
This design plays with modern minimalism by dividing each duck nail into geometric sections of brown and pink, separated by thin lines of gold leaf or metallic gold polish. The color blocks create a striking contemporary look that feels both artistic and wearable—it’s the kind of design that photographs beautifully without demanding attention in an over-the-top way.
Why Geometric Blocking Suits Duck Nails
The squared-off shape of duck nails naturally lends itself to geometric designs because the straight edges and wider tip already create visual structure. When you add intentional color blocks, you’re working with the nail’s natural architecture rather than against it. The gold dividers add a luxe touch that elevates the simplicity of just two colors, making the whole design feel more intentional and carefully considered.
How to Execute Clean Blocks
- Paint a brown base color across the entire nail in two coats—this becomes your foundation color
- Using a thin striping brush or a toothpick, draw thin vertical or diagonal lines with gold gel polish or metallic polish
- Fill the sections alternately with blush pink and leave some sections brown, creating a checkerboard or striped effect
- The key to clean geometric shapes is using painter’s tape if you want perfectly sharp lines—apply tape, paint your pink section, remove tape, and let it dry before moving to the next section
- Add a matte top coat if you prefer a modern, understated finish, or go glossy for extra shine on the metallic gold elements
Worth knowing: If you’re not confident with a striping brush, painter’s tape is your best friend for achieving clean geometric lines. It takes an extra five minutes but guarantees professional-looking results.
3. Speckled Brown Base with Pink Chrome Tips
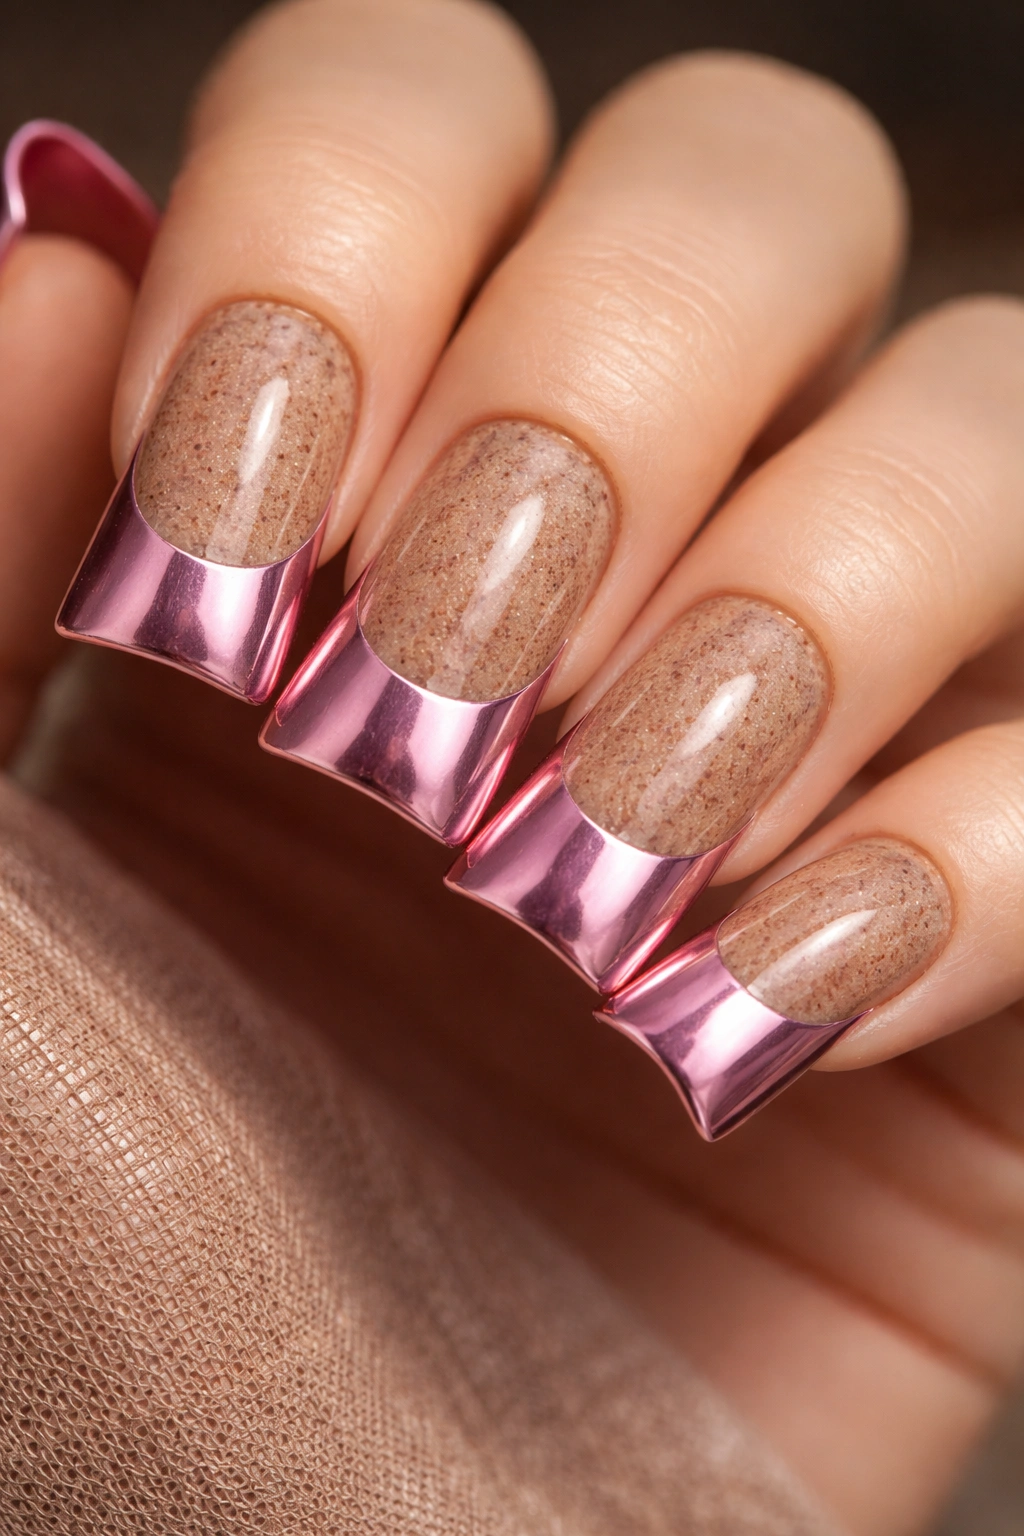
This design combines a textured, speckled brown base with a reflective pink chrome finish on the tips, creating a striking contrast between matte and metallic finishes. The speckles add visual interest and depth to what could otherwise be a simple two-tone design, while the chrome tips catch light from every angle.
The Textured-to-Metallic Contrast
Speckles—created by flicking a toothpick or dotting tool loaded with a darker or contrasting color onto wet polish—add an organic, almost granite-like quality to the base. When you pair this textured foundation with a smooth, reflective chrome finish on the tips, you create a design with real visual complexity. The duck nail’s wider tip is the perfect place to showcase a chrome finish because the expanded surface area makes the reflective effect even more noticeable and impressive.
Creating the Speckled Texture
- Paint two coats of warm chocolate brown base color and let it dry completely
- Load a toothpick with a slightly darker brown, deep burgundy, or even charcoal color
- Flick or dab the loaded toothpick onto the wet top coat in random patterns—don’t overthink the placement; randomness is what makes it look natural
- Let the speckles dry, then apply a glossy top coat to seal them in
- Once everything is completely cured, apply pink chrome powder to the tips using a chrome application tool or sponge
- The chrome adheres best to a tacky top coat, so use a specifically formulated chrome base if you have one, or a sticky top coat will work in a pinch
Insider note: Chrome powder is incredibly pigmented and reflective, so a little goes a long way. Use a light hand and build up the intensity gradually rather than overloading the powder all at once.
4. Brown and Pink Marble Swirl Design
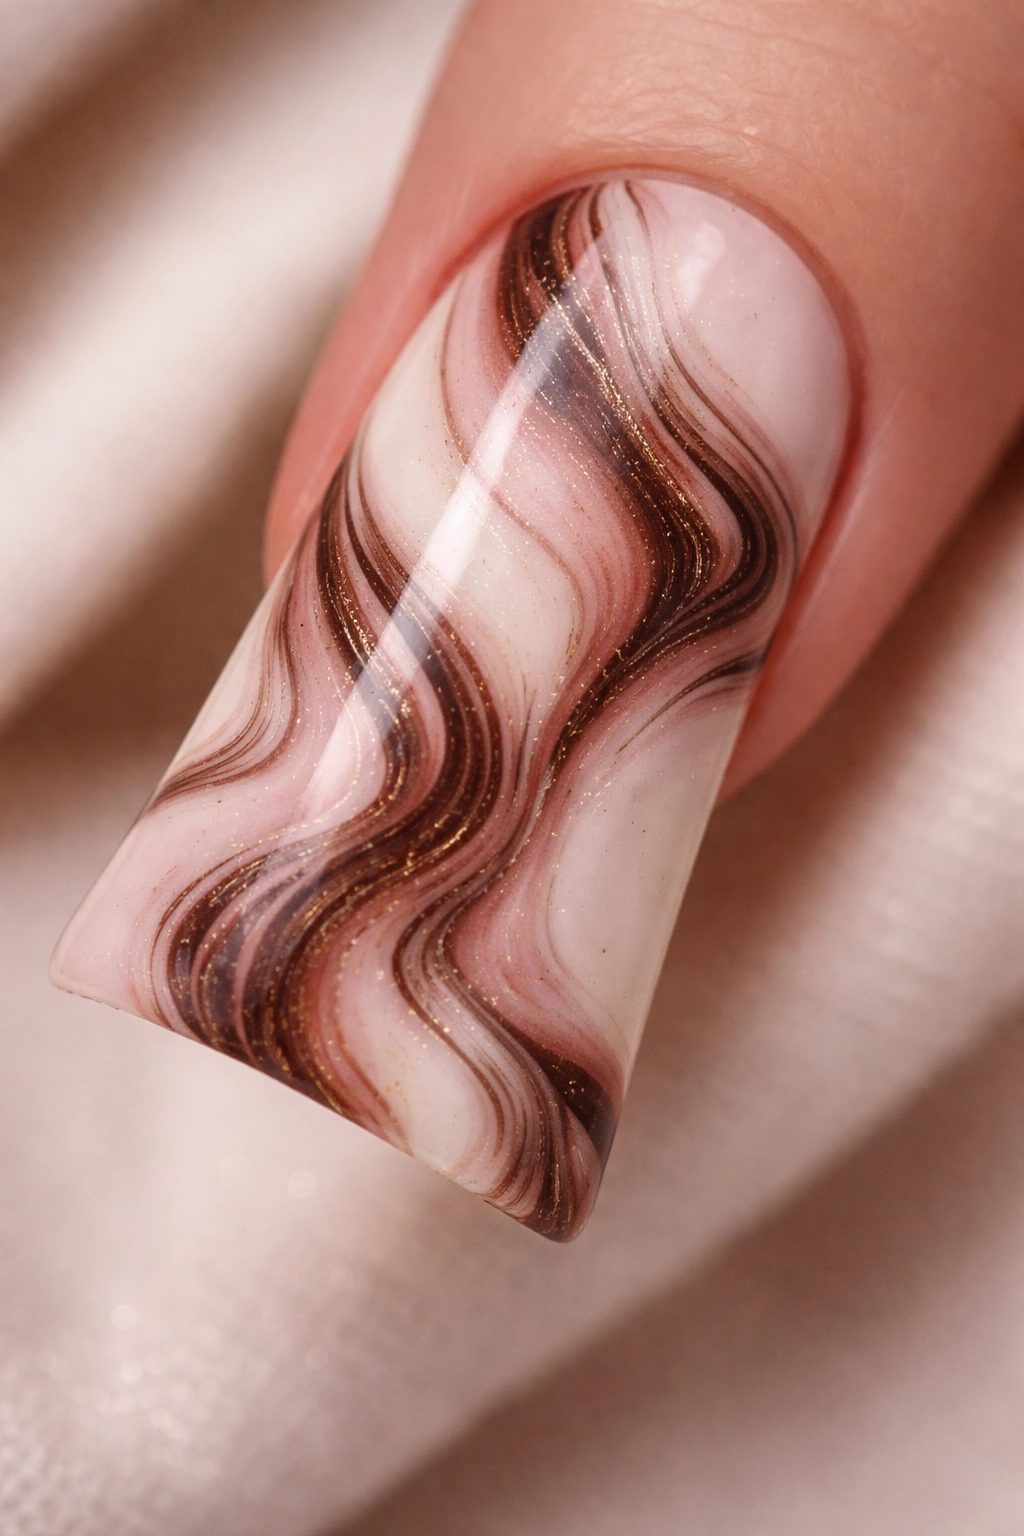
Marble nails create an expensive, artistic look that feels like you’ve had them done at a high-end salon. By using brown and pink as your two primary colors, you get a marble pattern that’s sophisticated rather than trendy, making it feel timeless and refined.
Creating Organic Marble Patterns
Marble designs work beautifully on duck nails because the longer surface gives you more canvas to create actual swirls and veining rather than just splotches of color. The technique involves dropping different colors into a wet base coat and then swirling them together with a thin tool (like a toothpick or striping brush) to create that characteristic marble effect.
Step-by-Step Marble Application
- Paint a white or off-white base coat as your foundation—this makes the marble colors pop and ensures the pattern will be visible
- Drop a small amount of brown polish into the white base and let it spread slightly
- Drop pink polish into another area and let it interact with the brown
- Using a toothpick, gently drag through the colors in curved, vein-like motions to create the marble pattern
- Work relatively quickly before the polish starts to set, and don’t overwork it—sometimes less manipulation creates more beautiful, natural-looking veining
- Seal with a glossy top coat that will enhance the marble effect and make it look more like actual stone
Pro tip: If your first marble attempt doesn’t look perfect, remember that actual marble is irregular and imperfect—authenticity often looks better than symmetry in this design.
5. Duochrome Gradient with Holographic Accents
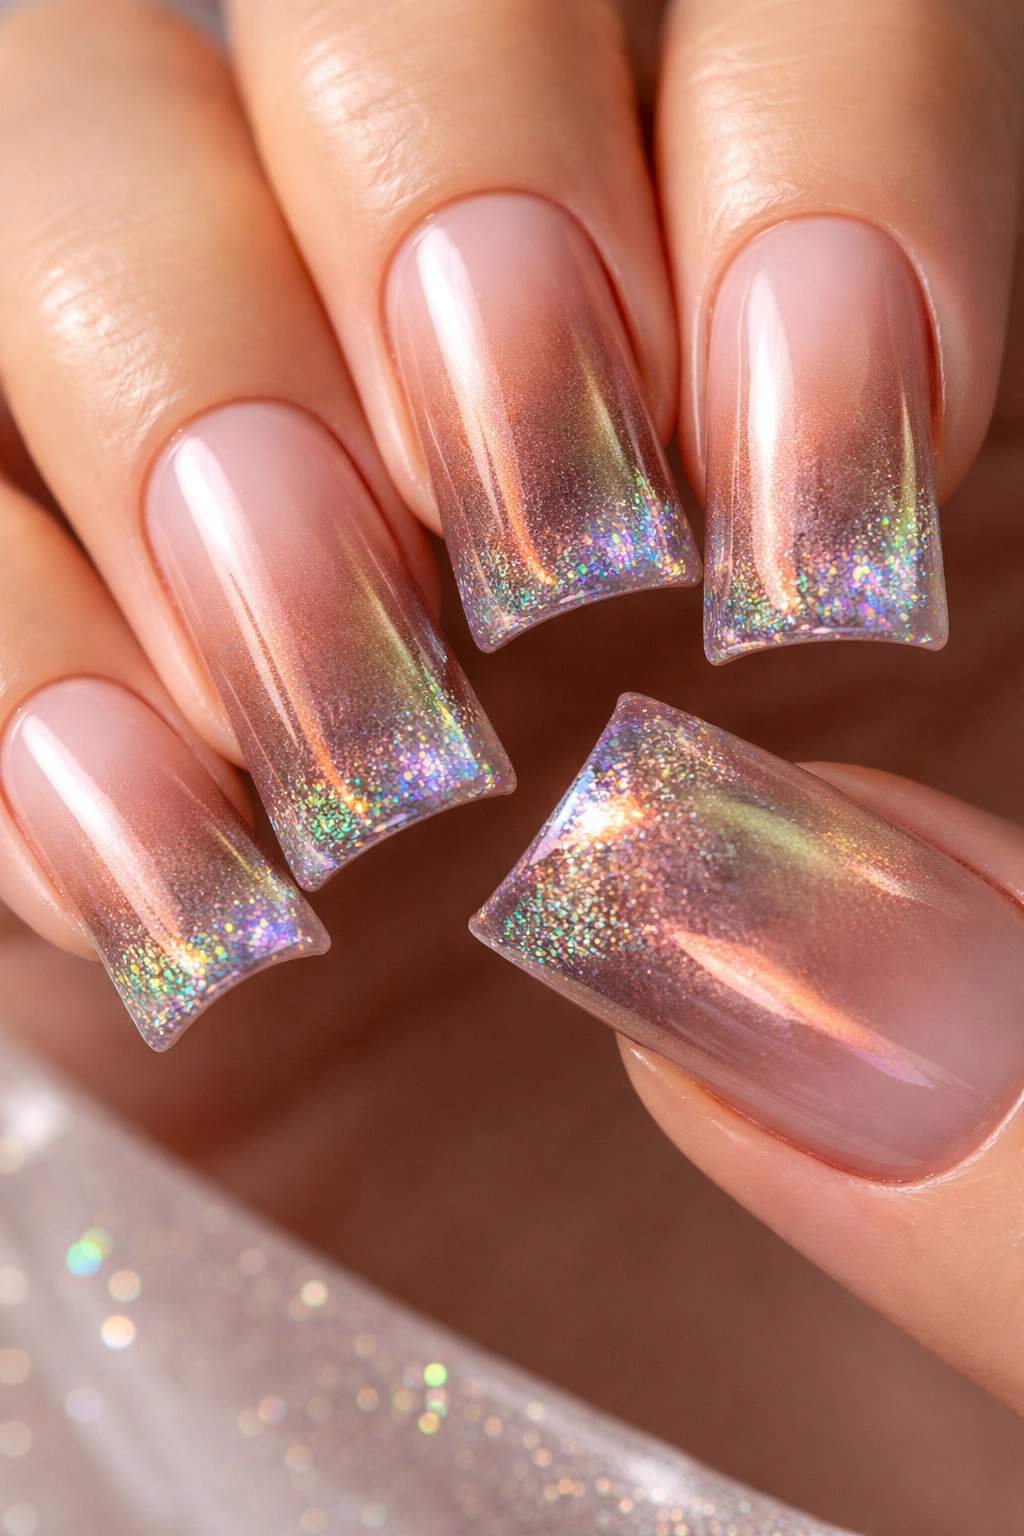
This advanced design uses a duochrome polish that shifts between brown and pink depending on the light and angle, finished with delicate holographic accents on the tips. The effect is mesmerizing because the color literally changes as you move your hand, creating an interactive, light-responsive nail art experience.
Why Duochrome Works on Duck Nails
Duochrome and color-shifting polishes are specifically designed to display different colors from different angles—a property that’s most impressive on a larger surface area. The duck nail’s generous width and length mean the color shift effect is visible and dramatic. As you move your hand, the entire nail appears to shift from warm brown to rosy pink, which is genuinely striking.
Building the Duochrome Effect
- Start with a white or clear base to maximize the duochrome effect
- Apply two thin coats of duochrome polish, letting each coat dry fully—thin coats allow light to pass through and activate the color-shifting property
- Once dry, apply holographic top coat or sprinkle fine holographic powder into a wet top coat on the tips
- The holographic accents add extra sparkle and catch light independently from the duochrome base, creating layers of shimmer
- Seal everything with a glossy, UV-resistant top coat to protect the delicate finishes
Worth knowing: Duochrome polishes can be pricey, but a little goes a long way since you’re applying thin coats rather than thick coverage. One bottle will last through multiple manicures.
6. Negative Space Striping with Nude Base
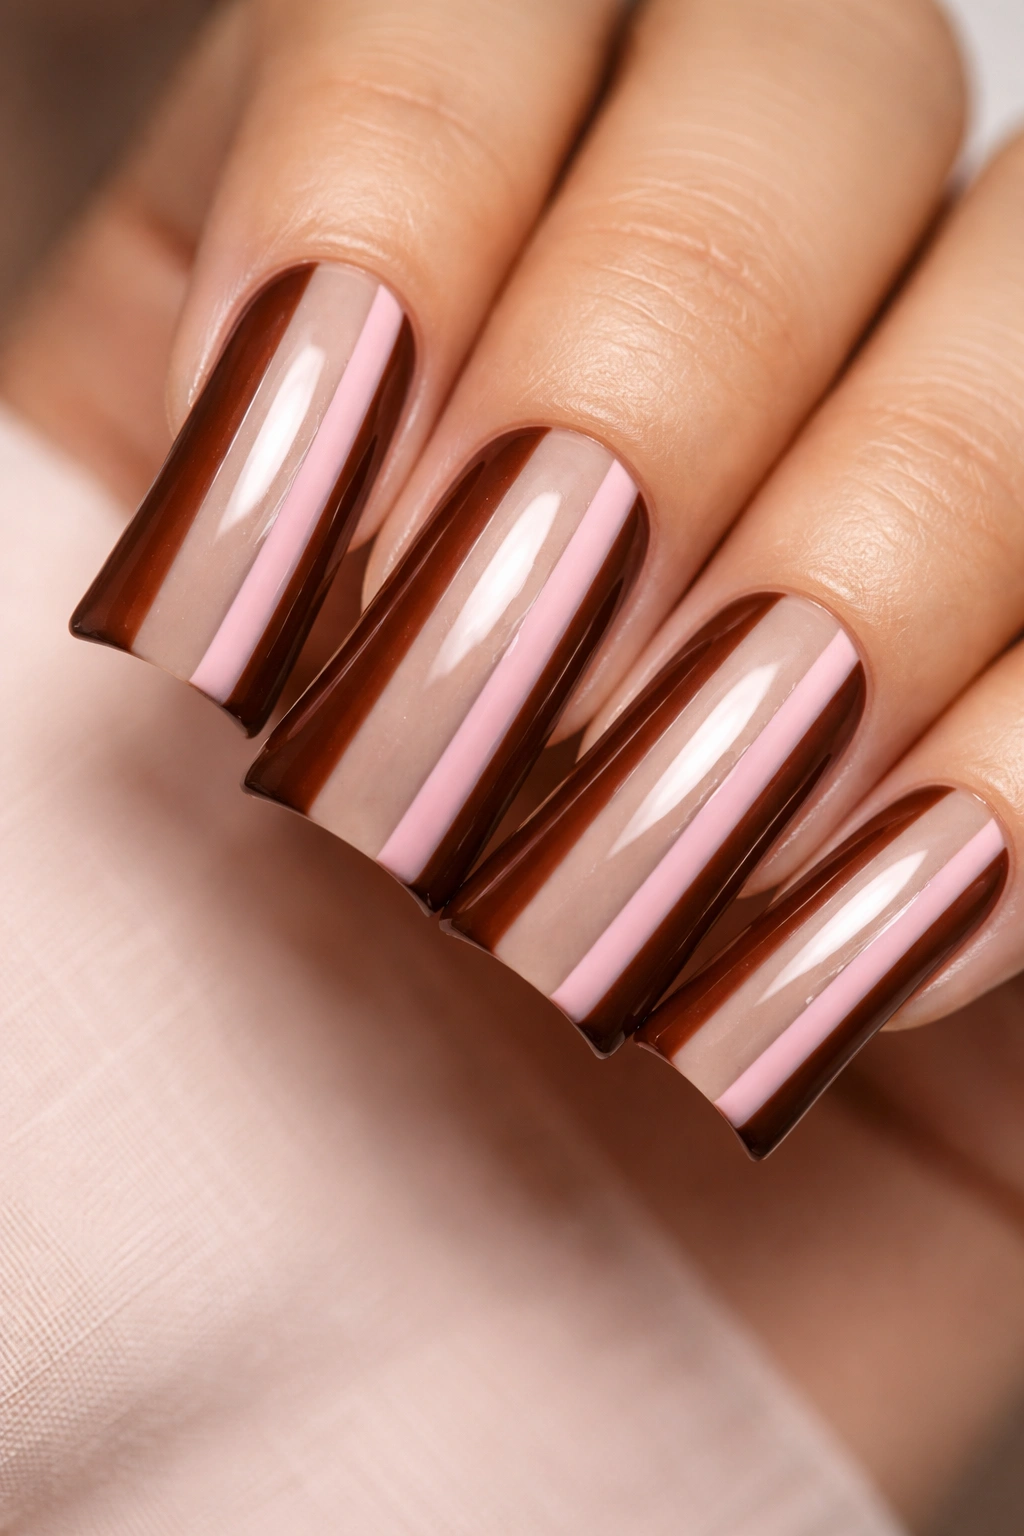
This design uses strategic negative space—leaving areas of the natural nail or a nude base color showing—combined with brown and pink stripes that run vertically or diagonally across the duck nail. The negative space creates breathing room around the striped pattern, making the design feel modern and intentional rather than busy.
How Negative Space Creates Sophistication
Negative space designs work incredibly well on duck nails because the shape itself is already bold and distinctive. By leaving some of the nail bare or in a nude tone, you create a visual contrast that makes the brown and pink stripes pop without overwhelming the eye. This design reads as minimalist and editorial—the kind of nails that appear in high-fashion nail art posts.
Executing Clean Striping with Negative Space
- Paint a nude or translucent base color across the entire nail, or skip this step if you want true negative space showing actual nail
- Using painter’s tape, create vertical or diagonal stripe patterns by applying tape at regular intervals
- Paint brown into alternating stripe sections
- Remove the tape and paint pink into the remaining stripe sections
- The key is leaving gaps between stripes—don’t fill the entire nail with color; let the negative space dominate
- A glossy top coat will enhance the clean lines and make the design feel polished
Pro tip: If painter’s tape is too tedious, you can freehand stripes with a thin striping brush, though tape guarantees sharper edges. For a more artistic, hand-drawn feel, freehand is actually the better choice.
7. Encapsulated Glitter in Brown and Pink Layers
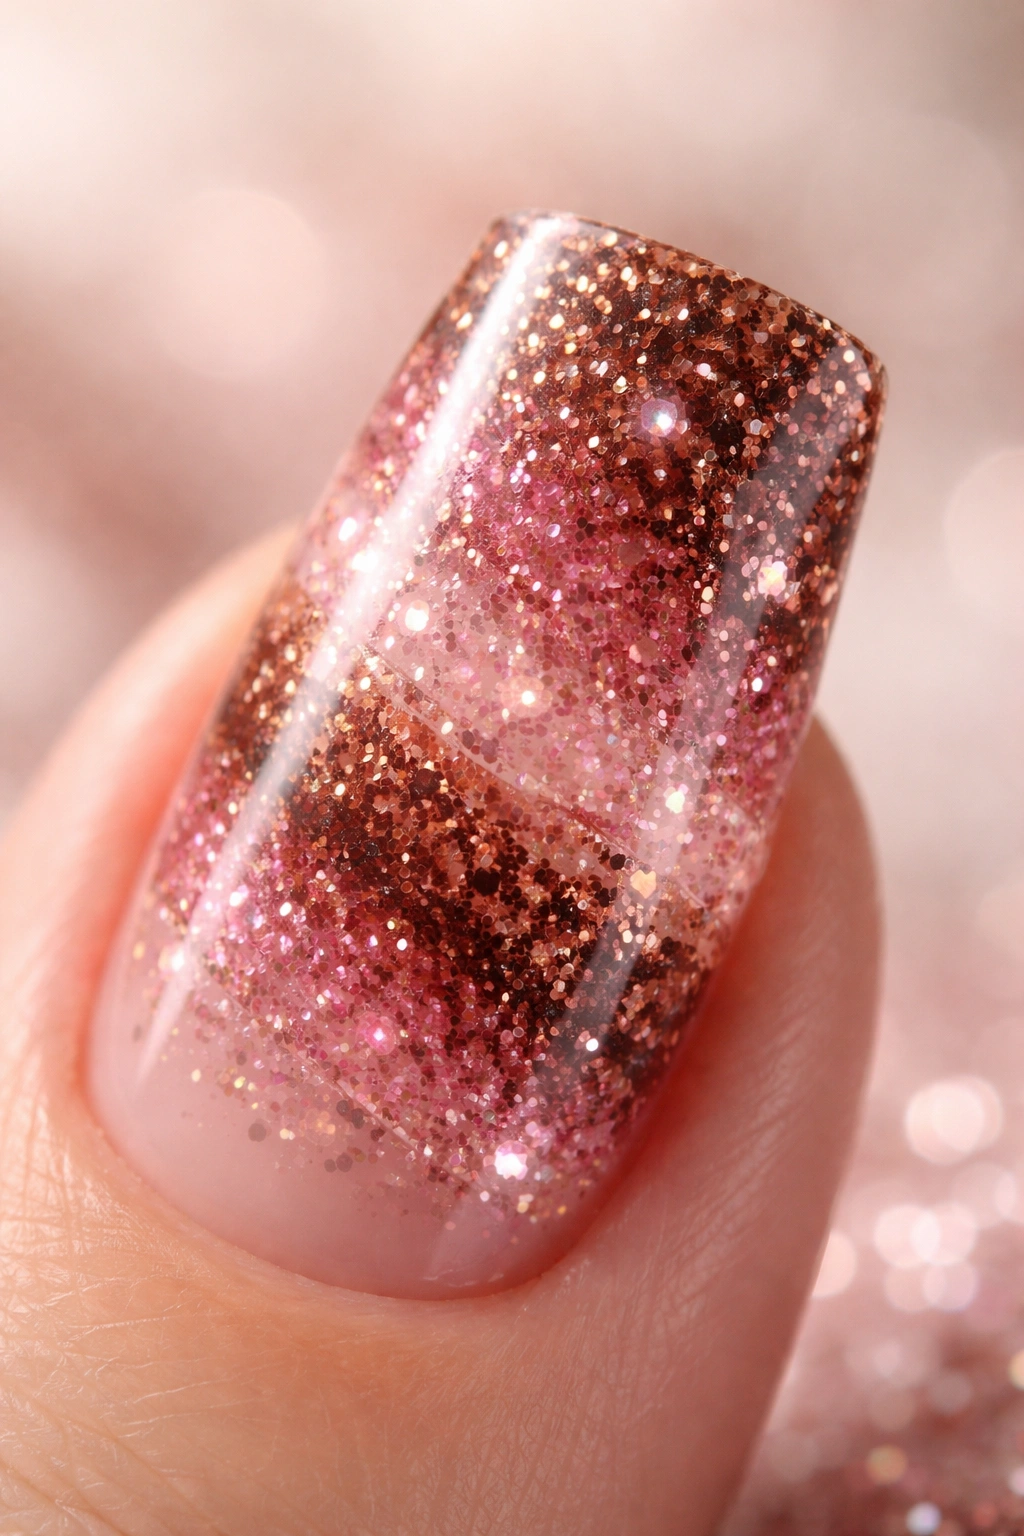
This design creates a magical encapsulated effect by pressing different-colored glitter between two layers of polish within the nail itself. Using brown and pink in alternating encapsulated layers creates a sparkly, dimensional design that catches light from within the nail rather than just on the surface.
The Encapsulation Technique
Encapsulated designs are created by painting a colored base, applying glitter, painting a clear or matching-colored coat over it, then repeating with different colors and glitter shades. The result is multiple layers of shimmer and color sandwiched inside the polish, creating an effect that’s more refined than surface glitter and much more durable.
Building Encapsulated Layers
- Paint a thin base of brown polish
- While wet, sprinkle brown or bronze glitter across the surface
- Paint a thin clear coat over the glitter, sealing it in
- Paint a layer of pink polish on top
- Add pink or rose-toned glitter to this layer
- Seal with another clear coat
- Repeat the process if you want even more layers—you can create three or four layers total for a really dimensional effect
- Finish with a glossy top coat to make everything shine
Insider note: The thinner your base coats, the more transparent and dimensional the encapsulated effect appears. If you use thick coats, the layers become harder to distinguish from one another.
8. Tortoiseshell Effect with Brown and Pink Tones
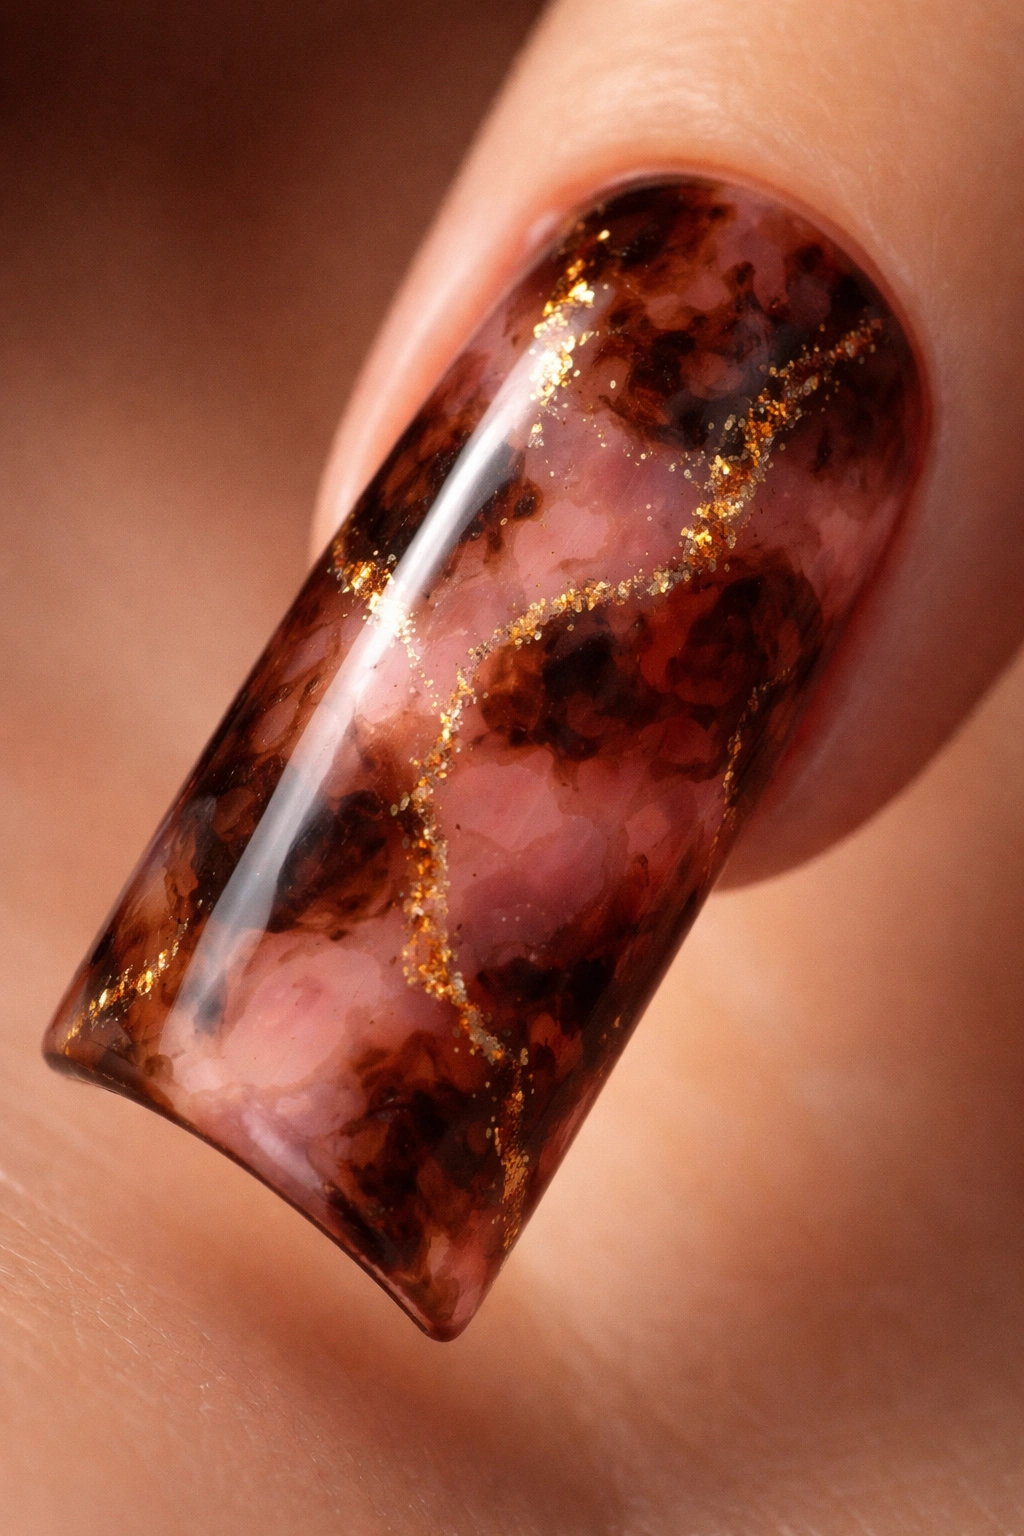
Tortoiseshell nails mimic the natural pattern of tortoiseshell—irregular patches of darker and lighter tones blended together—and when executed in brown and pink, the result is warm, organic, and deeply sophisticated. This design feels especially luxurious on duck nails because the pattern has room to develop with actual visual interest.
Creating Authentic Tortoiseshell
Tortoiseshell isn’t about creating perfect patterns; it’s about layering colors and letting them blend somewhat randomly to mimic natural material. The warmth of brown combined with soft pink creates a tortoiseshell effect that feels more refined than the typical blonde-and-brown versions you might see elsewhere.
The Tortoiseshell Application Process
- Paint a neutral cream or pale nude base as your foundation
- Apply patches of warm brown across the nail in irregular shapes—don’t try to make them symmetrical
- Add patches of soft pink in the remaining spaces, letting some areas overlap slightly with the brown
- Use a sponge or a blending brush to create soft transitions between colors where they meet
- Add thin lines of darker brown or gold to suggest the natural veining and depth found in real tortoiseshell
- The goal is for the pattern to look organic and naturally occurring, not perfectly planned
- Seal with a glossy top coat that will enhance the depth and dimension
Pro tip: Look at actual photos of tortoiseshell material before you start—this will give you a visual reference for the kind of irregular, organic blending you’re aiming for rather than trying to create a symmetrical pattern.
9. Matte Brown with Pink Metallic Geometric Accent
This design pairs a matte chocolate brown base with a geometric metallic pink accent on one or two nails, creating an asymmetrical, fashion-forward look that works beautifully on duck nails. The contrast between the matte and metallic finishes adds sophistication and intentionality to an otherwise simple color story.
Mixing Finishes for Visual Impact
Matte finishes create a velvety, soft-looking base that feels more understated and modern than gloss. By adding a metallic accent in a contrasting color, you create a focal point that draws attention without the entire manicure being shiny or sparkly. On duck nails, an asymmetrical accent design (where some nails are matte and others feature a metallic accent) feels particularly editorial and intentional.
Creating the Matte Base with Metallic Accent
- Paint all nails with two coats of chocolate brown polish
- Apply a matte top coat to create that soft, velvety finish—this is non-negotiable for the look to work
- On one accent nail (usually the ring finger or index finger), apply a geometric shape using metallic pink polish—this could be a triangle, a half-moon, a stripe, or an abstract shape
- The key is making the shape bold and clean so it stands out against the matte brown background
- Seal the metallic accent with a glossy top coat so it shines while the brown remains matte
- The mix of finishes is what makes this design special, so don’t skip the matte coat
Worth knowing: Matte top coat dries differently than gloss, so give it extra time to fully set before applying any additional coats on top.
10. Floral Watercolor with Brown and Pink Palette

This design creates delicate, hand-painted florals using brown stems and leaves paired with pink flower blooms, executed in a watercolor technique that makes the design feel artistic and painterly. On duck nails, there’s enough space to create actual botanical detail rather than just abstract splotches.
Watercolor Technique on Nails
Watercolor-style nail art uses wet, blended pigments to create soft, diffused effects that look less like traditional nail art and more like a painting transferred onto the nail. By using brown for botanical elements (stems and leaves) and pink for flowers, you create a cohesive, nature-inspired design that feels both artistic and wearable.
Painting Watercolor Florals
- Start with a white or cream base that will show off the watercolor effect
- Using a very fine brush or even a hair-thin liner brush, sketch out the basic shapes of flowers, stems, and leaves in pencil on the dry base
- Mix your nail polish with a drop of nail thinner to create a more paint-like consistency—this allows for better blending
- Paint brown stems and leaf shapes first, letting them dry slightly
- Paint pink flower blooms, allowing the colors to blend slightly where they meet the brown stems
- Use very light, feathering brushstrokes for a watercolor effect—don’t paint solid color blocks
- Add details like stamens or petals using even thinner lines for botanical accuracy
- Seal with a gloss top coat, which will enhance the delicate, painted look
Insider note: Watercolor nails require a steady hand and some practice, but the results are so beautiful that they’re worth the effort. Do a practice run on nail tips before committing to your actual nails.
Final Thoughts
Brown and pink on duck nails offers an unexpectedly versatile palette that works whether you’re going for minimalist elegance, bold artistic expression, or anything in between. The real magic is in how the duck nail shape enhances whatever design you choose—the wider tips and elongated canvas give you room to create actual visual interest and complexity that wouldn’t work as well on shorter nails.
What makes these color combinations so special is their staying power. While trendy color combos come and go, brown and pink feels timeless because it works with so many different aesthetics and skin tones. You can pivot from a romantic marble design to a sleek geometric accent depending on your mood without feeling like you’re abandoning a nail trend entirely.
The best approach is to start with the design that excites you most—whether that’s the simplicity of an ombré or the complexity of watercolor florals—and let that guide your nail journey. Duck nails are forgiving enough that even experimental designs tend to look intentional, and brown and pink are colors that encourage creativity without demanding perfection. Your nails are a blank canvas, and these combinations give you endless possibilities to explore.
