

Dark, dramatic, and undeniably bold—gothic stiletto nails are the ultimate statement nail style for anyone who embraces edgy aesthetics and isn’t afraid to make a visual impact. Stilettos are already attention-grabbing with their sharp, elongated shape, but when you combine that architectural drama with gothic design elements like deep blacks, blood reds, lace patterns, and sinister motifs, you get a nail style that commands space and screams confidence. Whether you’re heading to a special event, expressing your personal style daily, or looking for inspiration to push your nail art beyond the basics, gothic stilettos offer endless creative possibilities.
The beauty of gothic nail art on a stiletto canvas is that the style naturally suits the shape’s dramatic flair. The elongated tip amplifies intricate details, gives you space for layered designs, and creates a sleek silhouette that’s pure sophistication mixed with an edge. From minimalist dark geometry to elaborate hand-painted scenes, from delicate gothic lace overlays to chunky 3D embellishments, you can dial the intensity up or down depending on your mood and lifestyle. The combination of the sharp stiletto shape with gothic aesthetics creates visual interest that catches light differently depending on the angle and finish you choose.
What makes gothic stiletto nails so versatile is that they work across multiple color palettes and design approaches. You’re not limited to pure black—deep purples, charcoal grays, dark teals, and rich burgundies all read as deeply gothic and create different moods. The design possibilities span from wearable everyday looks with subtle gothic touches to full-on avant-garde nail art that’s more sculpture than polish. Understanding the core elements—the color foundation, the gothic motifs, the finishes, and the embellishment strategy—gives you the framework to either recreate these designs or customize them to match your personal aesthetic.
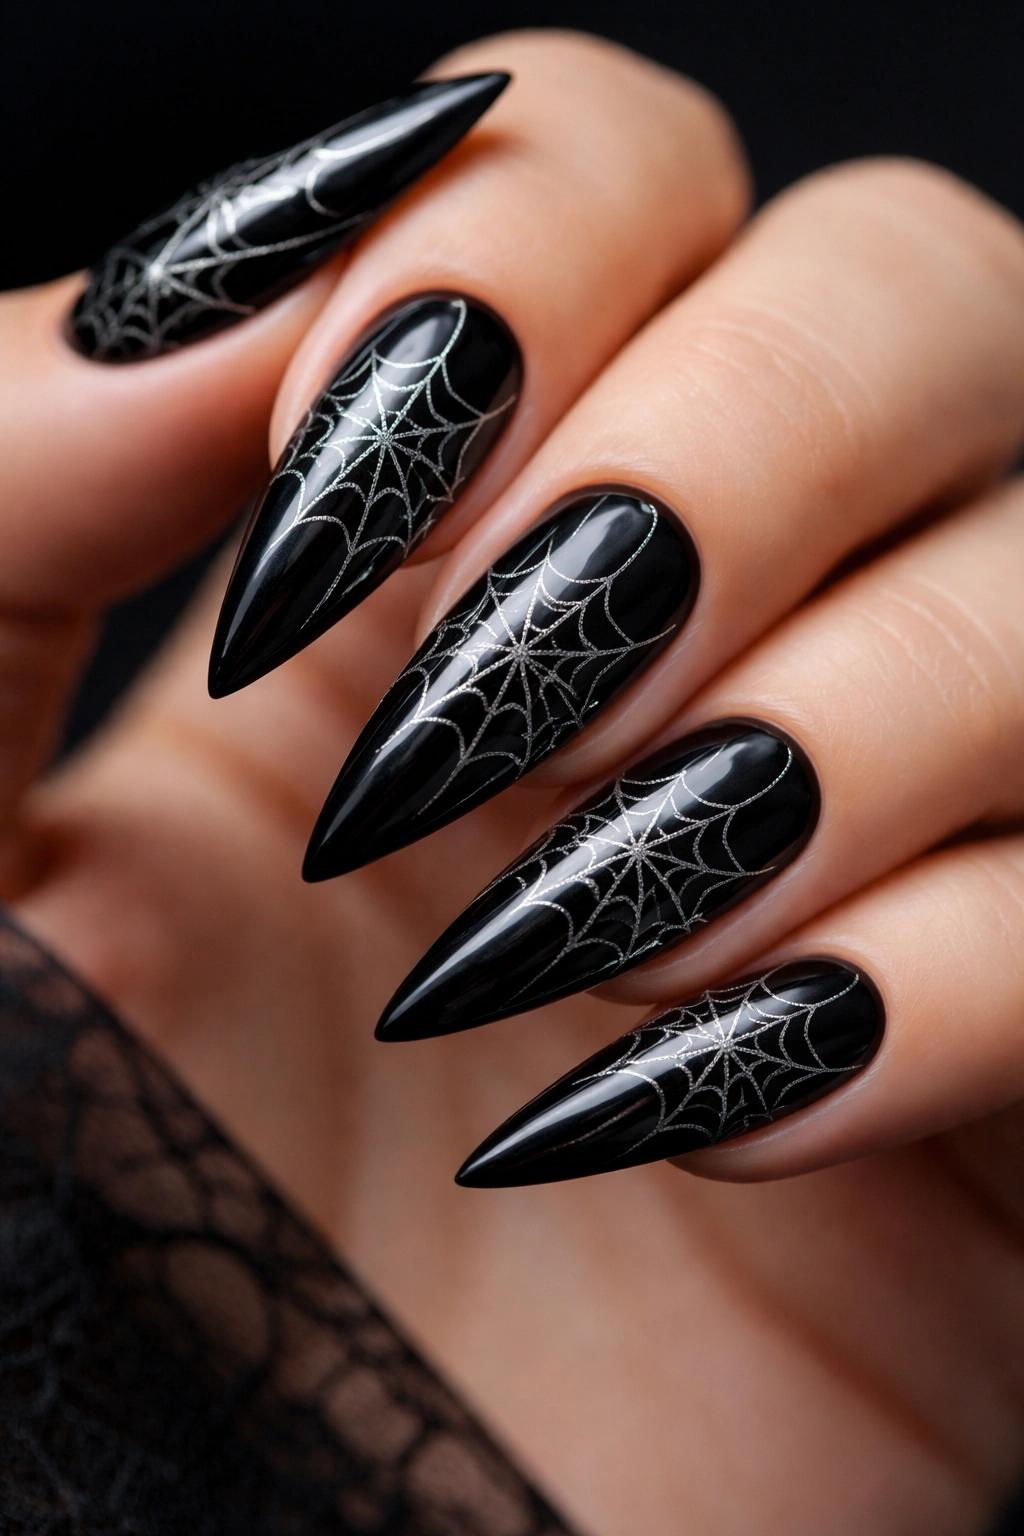
1. Classic Black with Silver Spiderweb
Pure black stilettos form the perfect canvas for a delicate silver spiderweb that crawls across the nail surface, creating an instantly recognizable gothic symbol without being over-the-top. This design uses a fine black base coat, then applies a thin silver gel pen or fine brush to hand-draw the web pattern across the nail—starting from one corner and creating the geometric web structure that immediately signals gothic intent. The contrast between matte or glossy black and the metallic silver makes the spiderweb pop forward visually, and the design works beautifully on multiple nails or as an accent on just one or two nails per hand.
Why This Design Works Year-Round
This is perhaps the most recognizable gothic nail motif because it’s instantly readable and works for countless occasions—from everyday wear to themed events. The elegance of a silver spiderweb elevates it beyond “costume” territory into sophisticated edgy design. It’s bold enough to feel intentional and artistic but not so extreme that it limits when you can wear it.
Design Variations and Application Tips
- Pair matte black base with glossy silver web for maximum contrast and visual interest
- Use metallic silver on a glossy black base for a shinier, more reflective finish
- Add tiny silver dots around the nail to represent dewdrops on the web for extra dimension
- Try drawing asymmetrical webs that cover only half or a corner of the nail for a more subtle approach
- Layer multiple webs across different nails, varying the size and placement to create visual rhythm
Pro tip: Use a fine-tipped gel pen or an ultra-thin brush with steady hands for clean, readable lines. If freehand feels risky, look for nail stamp plates with spiderweb designs—they guarantee precision and save time.
2. Deep Burgundy with Black Lace Overlay
Burgundy stilettos offer a gothic alternative to pure black while maintaining that dark, mysterious aesthetic, and when you layer a delicate black lace pattern over the burgundy base, you create a rich, textured look with serious visual depth. Start with a deep burgundy base (the kind that reads almost blackish-burgundy in certain light), then use a thin black brush or lace nail art stamp to apply intricate lace patterns—think Victorian lace, delicate florals mixed with sharp geometric lace details. The combination feels almost Victorian gothic, with the wine tone adding sophistication while the black lace adds that crucial edge.
The Sophistication Factor
Burgundy-and-black lace is one of the most wearable gothic combinations because it reads as elegant rather than purely edgy. It works for professional settings where pure black might feel too stark, for evening events where you want gothic drama with refined vibes, and for everyday wear if you want dark aesthetic without committing to black-on-black.
Layering Techniques and Finishes
- Use a stamp plate designed for lace patterns to ensure even, precise application across all nails
- Layer the lace densely across the full nail for maximum gothic drama
- Create a concentrated lace band around the edge or middle of the nail for a more subtle approach
- Combine matte burgundy base with glossy black lace for contrast, or use both matte finishes for elegance
- Add a sheer nude or flesh-tone tip outline to define the stiletto shape through the dark colors
Worth knowing: Burgundy shades vary wildly—from true wine red to nearly black. Choose a burgundy that leans darker and cooler-toned for maximum gothic impact; brighter burgundies read more romantic than sinister.
3. Black Stilettos with Blood Drip Effect
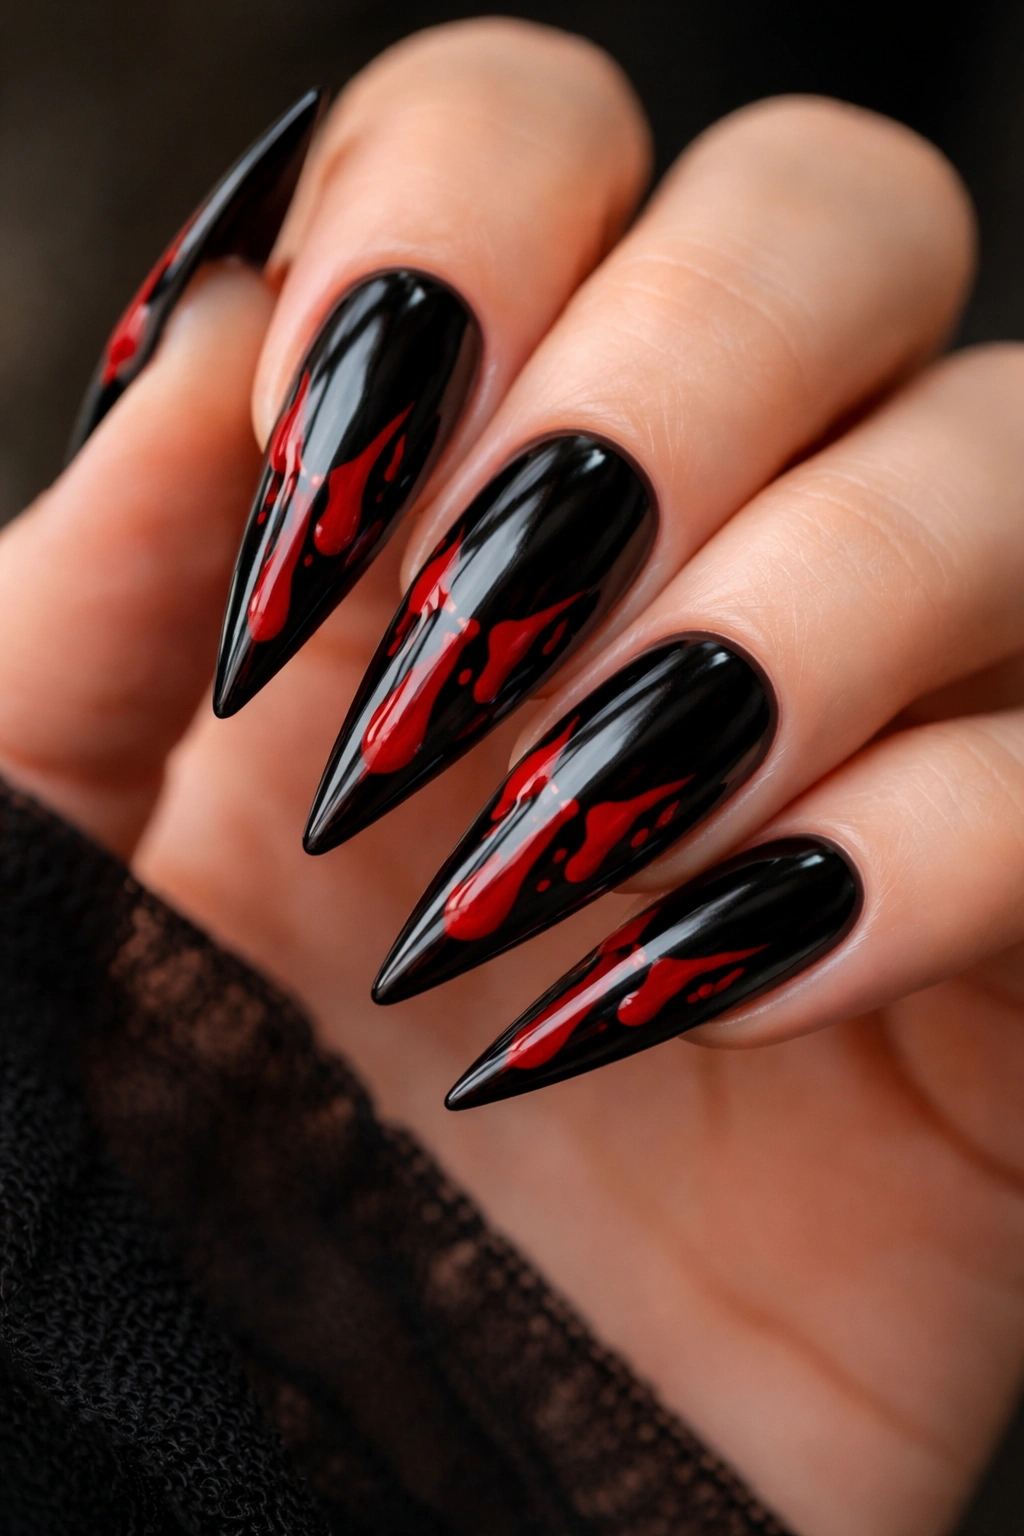
Blood drips are a classic horror movie motif that translates beautifully into nail art—glossy black stilettos with bright red polish dripping downward from the tip or pooling at the base creates an immediate impact that’s theatrical and dramatic. The drip effect uses precise application of glossy red polish over a matte or glossy black base, with the red polish applied strategically to look like it’s literally running down the nail surface. The key to making this look intentional rather than accidental is keeping the drips in a consistent direction (usually downward from the tip, as though gravity is pulling it) and maintaining some symmetry or pattern across the nails.
Creating Genuine Visual Drama
Blood drips work because they immediately tell a story—there’s danger, darkness, and visual interest built into the design. The contrast of bright red against pure black is one of the highest-contrast color combinations possible, making it impossible to ignore. Even from a distance, someone will notice your nails, and up close, the detail and execution become apparent.
Application Methods and Styling Options
- Use a thin brush with glossy red gel or polish to hand-paint drips with steady, controlled strokes
- Create symmetrical drips on each nail for a cohesive look, or vary placement for a more organic, chaotic feel
- Start drips from the tip and let them flow toward the base, or position them dripping from the edges
- Layer the drips thickly and glossy over a matte black base for maximum color contrast and dimension
- Add small splatters or irregular drops alongside the main drips for an even more chaotic, dramatic effect
Insider note: The glossier the red polish relative to the black base, the more it reads as “wet” and visceral. Use ultra-glossy gel polish or add a glossy top coat only to the red portions to enhance the effect.
4. Black with Gold Occult Symbols
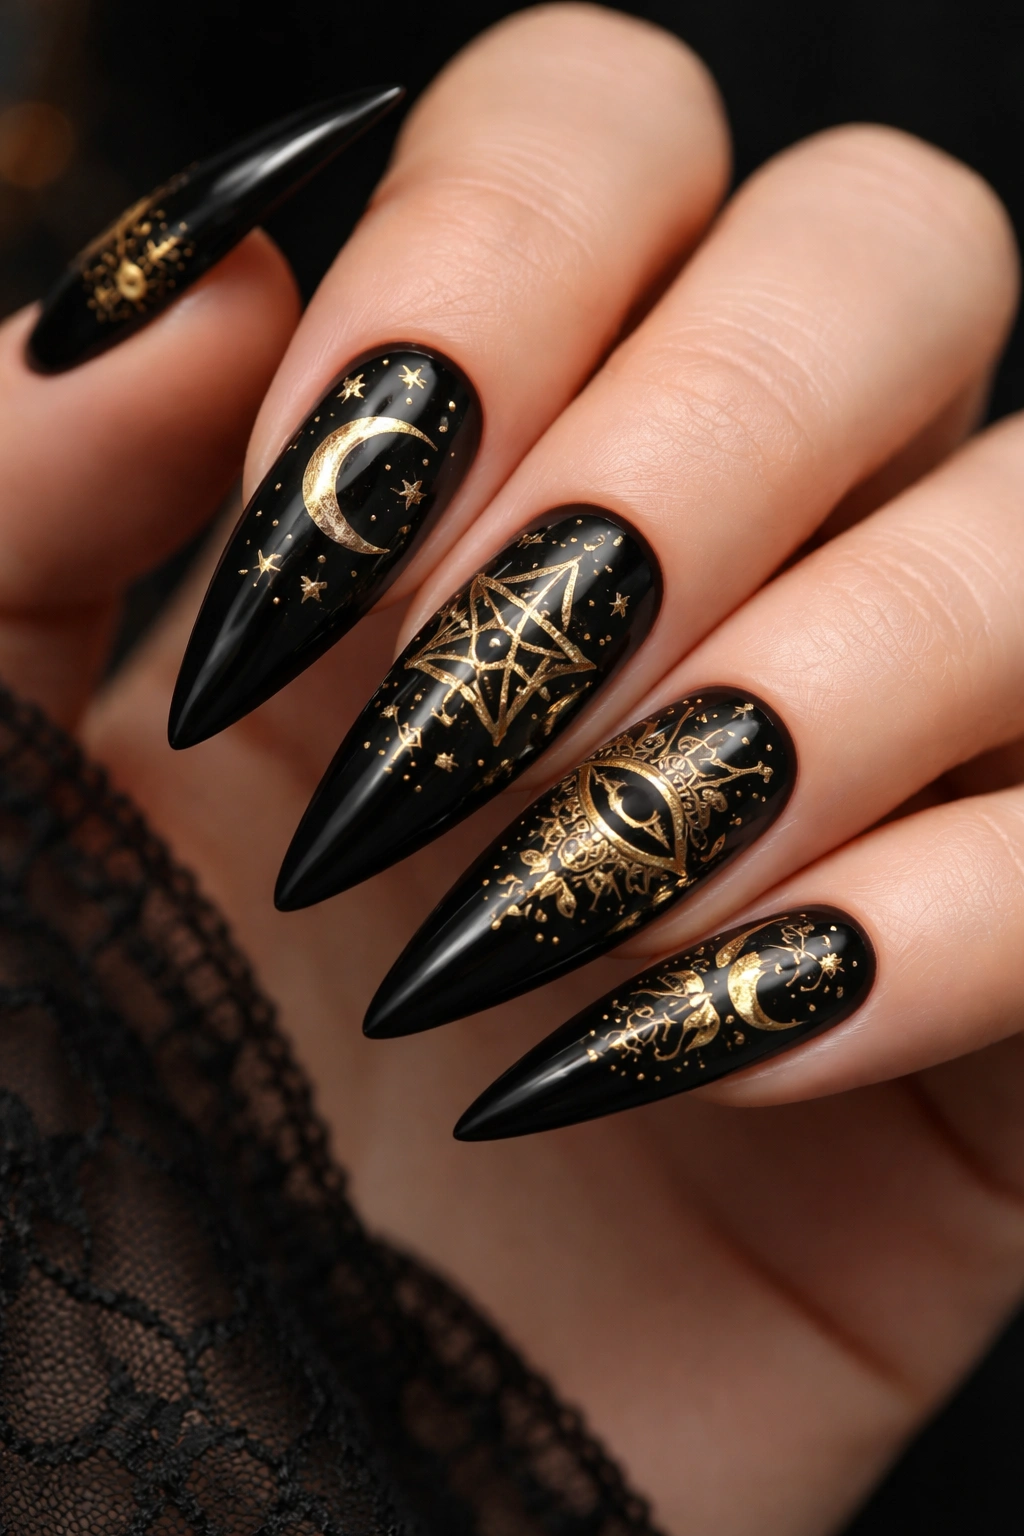
Gold accents on black stilettos create a regal, mystical gothic aesthetic—and when you incorporate occult symbols like moons, stars, pentagrams, or tarot imagery in gold, you’re merging dark aesthetics with spiritual symbolism. Each nail can feature a different gold symbol drawn or stamped onto a glossy or matte black base, creating a collection look that feels curated and intentional. The gold catches light beautifully against dark polish, and the occult symbols add layers of meaning and mystery to an already striking design.
Why Gold Elevates the Gothic
While silver is crisp and metallic, gold feels warmer, more mystical, and more tied to witchy, occult aesthetics. Gold-on-black reads as luxe gothic rather than purely edgy, making it work for formal events, everyday wear, and anywhere you want to telegraph sophistication alongside darkness. The symbols themselves—moons, stars, sacred geometry, tarot imagery—add layers of personal meaning and visual interest.
Symbol Options and Placement Strategies
- Create a moons-and-stars pattern with varying moon phases in gold across multiple nails
- Paint a pentagram on one accent nail with gold details on the rest of the nails in black
- Layer tarot card imagery (the moon card, the tower, the hermit) in small gold details
- Use alchemical symbols, astrology signs, or mystical geometric patterns in gold
- Apply symbols across multiple nails in a repeating pattern, or focus all symbols on one or two accent nails
Pro tip: Fine gold gel pens make precise symbol application far easier than brush work, especially for intricate details. Alternatively, look for nail stamp plates designed specifically for occult or mystical imagery.
5. Matte Black with Holographic Shattered Glass Effect
Matte black stilettos paired with a shattered glass or holographic effect creates a dark-meets-futuristic aesthetic that’s uniquely gothic in a modern, edgy way. The shattered glass effect is created using holographic foil, chrome powder, or metallic glitter applied in a broken, angular pattern that looks like cracked glass across the surface. The contrast between the matte black and the highly reflective, color-shifting holographic elements creates movement and dimension that changes depending on how light hits your nails.
The Modern Gothic Edge
This design bridges classic gothic darkness with contemporary nail art techniques, giving you an aesthetic that feels both timeless and current. The holographic element prevents the design from feeling purely dark or somber—the reflective quality adds visual interest and energy while maintaining the dramatic, edgy vibe.
Creating the Shattered Glass Effect
- Apply a matte black base to all nails, ensuring zero shine or gloss
- Use holographic foil with a special adhesive gel to apply irregular, angular pieces across the nail surface
- Alternatively, apply chrome powder or metallic powder with a special applicator to create a fragmented, mirror-like finish
- Layer the holographic or chrome effect more densely in some areas and sparsely in others to mimic random cracks
- Seal everything with a glossy top coat, or keep sections matte for contrast between matte black and glossy holographic areas
Worth knowing: Holographic foil requires a specific adhesive gel layer and careful application, so this design might be challenging for at-home application—a nail tech familiar with foil and specialty effects is your best bet for a flawless finish.
6. Deep Purple with Black Thorns and Vines
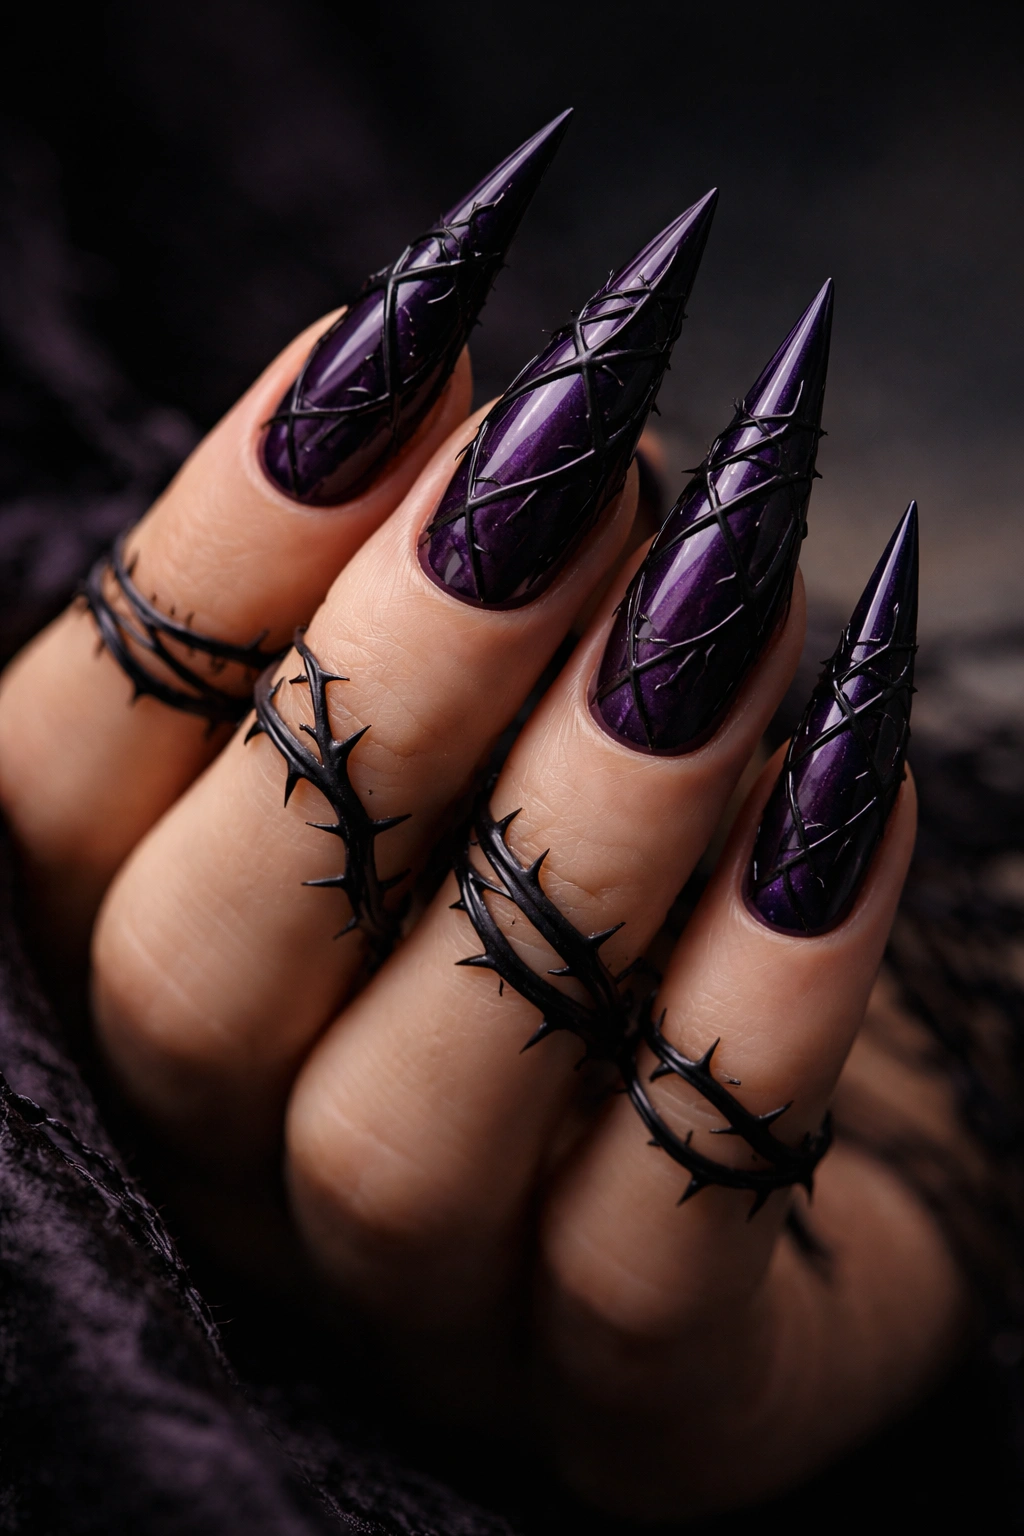
Deep, dark purple offers a gothic alternative to black while feeling slightly less severe, and when you layer black thorns and vine patterns across the base, you create a design that’s both botanical and sinister. Thorny vines wrapping around the nail or spreading from the base upward toward the tip combine nature with darkness—thorns are inherently dangerous and sharp, which echoes the sharp, pointed aesthetic of stiletto nails themselves. The purple-and-black combination reads as mystical and witchy without being purely black.
The Witchy, Mystical Vibe
Purple has long associations with magic, mystery, and the occult, making it a perfect gothic choice. Paired with thorny, dangerous botanical imagery, the overall aesthetic becomes less about death and darkness and more about power, magic, and controlled danger. This design appeals to people who embrace gothic aesthetics from a spiritual or mystical angle rather than purely visual darkness.
Drawing and Layering Techniques
- Use a fine black brush or gel pen to hand-draw thorny vine patterns wrapping around the nail
- Create vines that spiral around the stiletto from base to tip, with small thorns branching off the main vines
- Layer multiple vines across different nails, varying their size and position for natural-looking movement
- Add small leaves or rose blooms among the thorns for complexity and visual interest
- Paint some vines with a matte finish and others with a glossy finish for dimension and texture variation
Insider note: If freehand drawing feels intimidating, look for vine or branch-themed nail stamp plates and modify them by adding hand-painted thorns for a hybrid approach that’s easier to execute.
7. Black Glossy with Tiny Skull Details
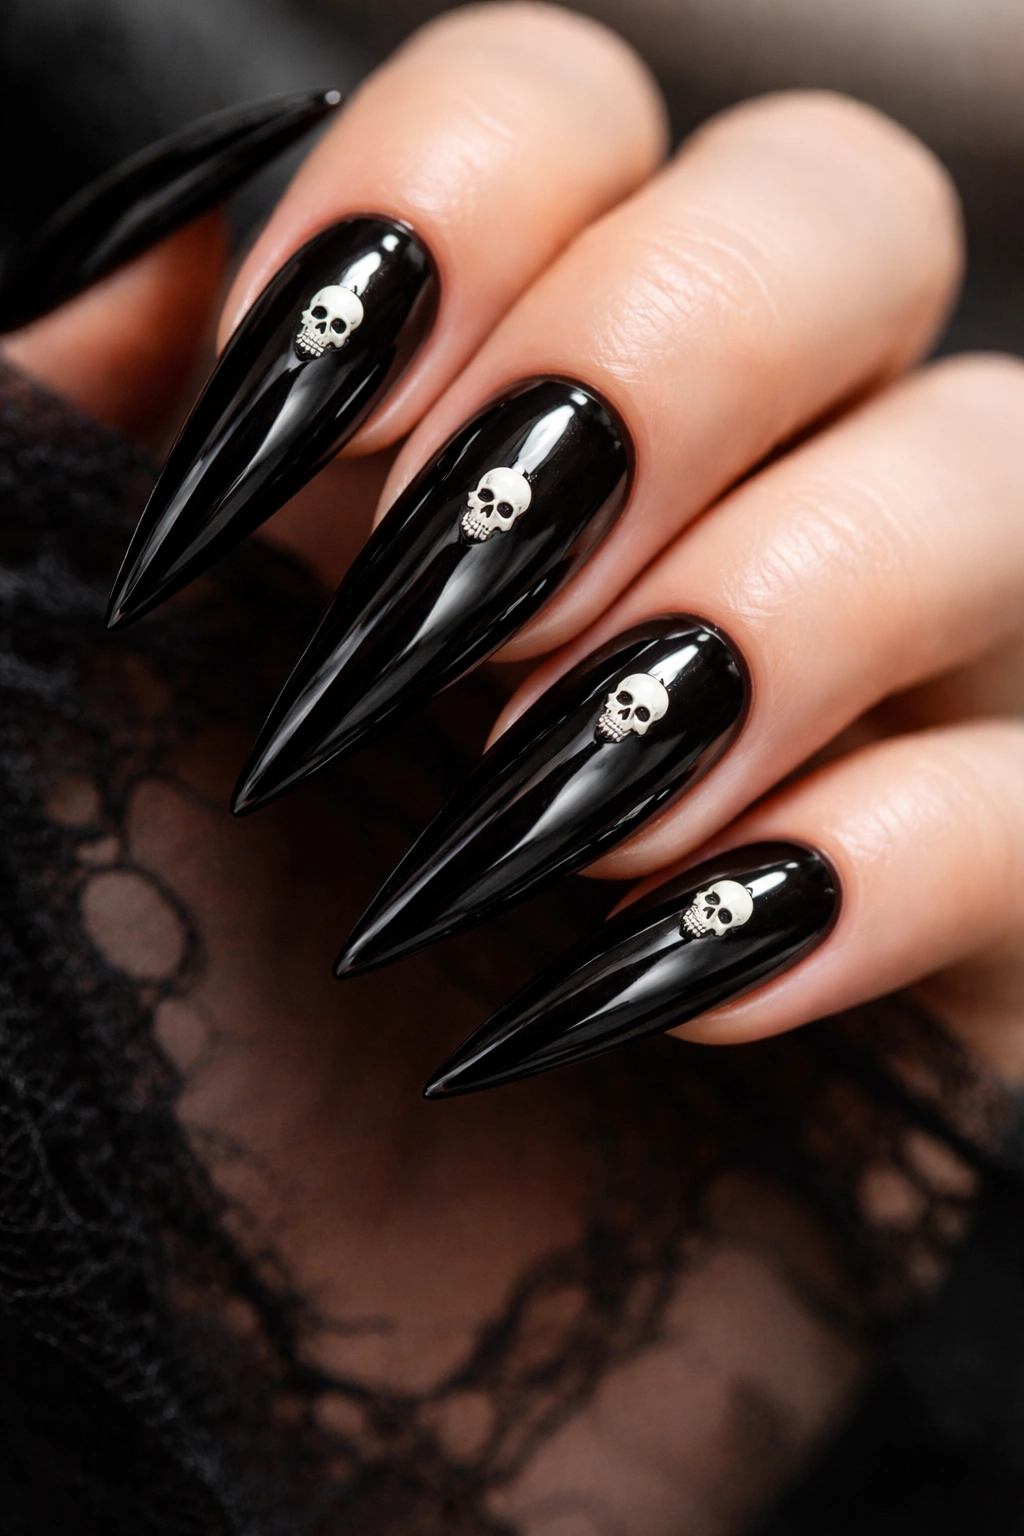
Tiny, delicate skulls distributed across glossy black stilettos create an instantly recognizable gothic motif that’s bold without being overwhelming—especially when the skulls are small and spaced intentionally rather than covering the entire nail. Each nail can feature just one or two skulls positioned in different locations, creating visual interest and balance across the hand. Glossy black makes the subtle skull details stand out more dramatically than matte would, and the shiny finish adds a sleek, polished quality to an inherently edgy design.
Accessibility and Wearability
Tiny skull details are one of the most recognizable gothic symbols while remaining surprisingly wearable. A single small skull on an accent nail or a few scattered across the hand reads as edgy and intentional without feeling costume-like or over-the-top. This design works for people who want clear gothic identity without committing to elaborate hand-painted scenes or extreme nail art.
Sizing, Placement, and Application Methods
- Use a fine brush or toothpick to hand-paint tiny skulls (roughly 2-4mm wide) using white or light gray polish
- Position skulls at different angles and locations—one near the cuticle, one near the tip, one on an edge
- Create variation in skull style: some facing forward, some in profile, some tilted at angles
- Apply skulls to all nails or concentrate them on one or two accent nails for a subtler approach
- Pair with other tiny gothic details like roses, crosses, or spiderwebs for layered complexity
Pro tip: A white gel pen or fine acrylic paint offers more control than polish for tiny detailed work. Alternatively, use nail decals or stamp plates specifically designed for small skull patterns if freehand feels too delicate.
8. Charcoal Gray with Black Ombre Gradient
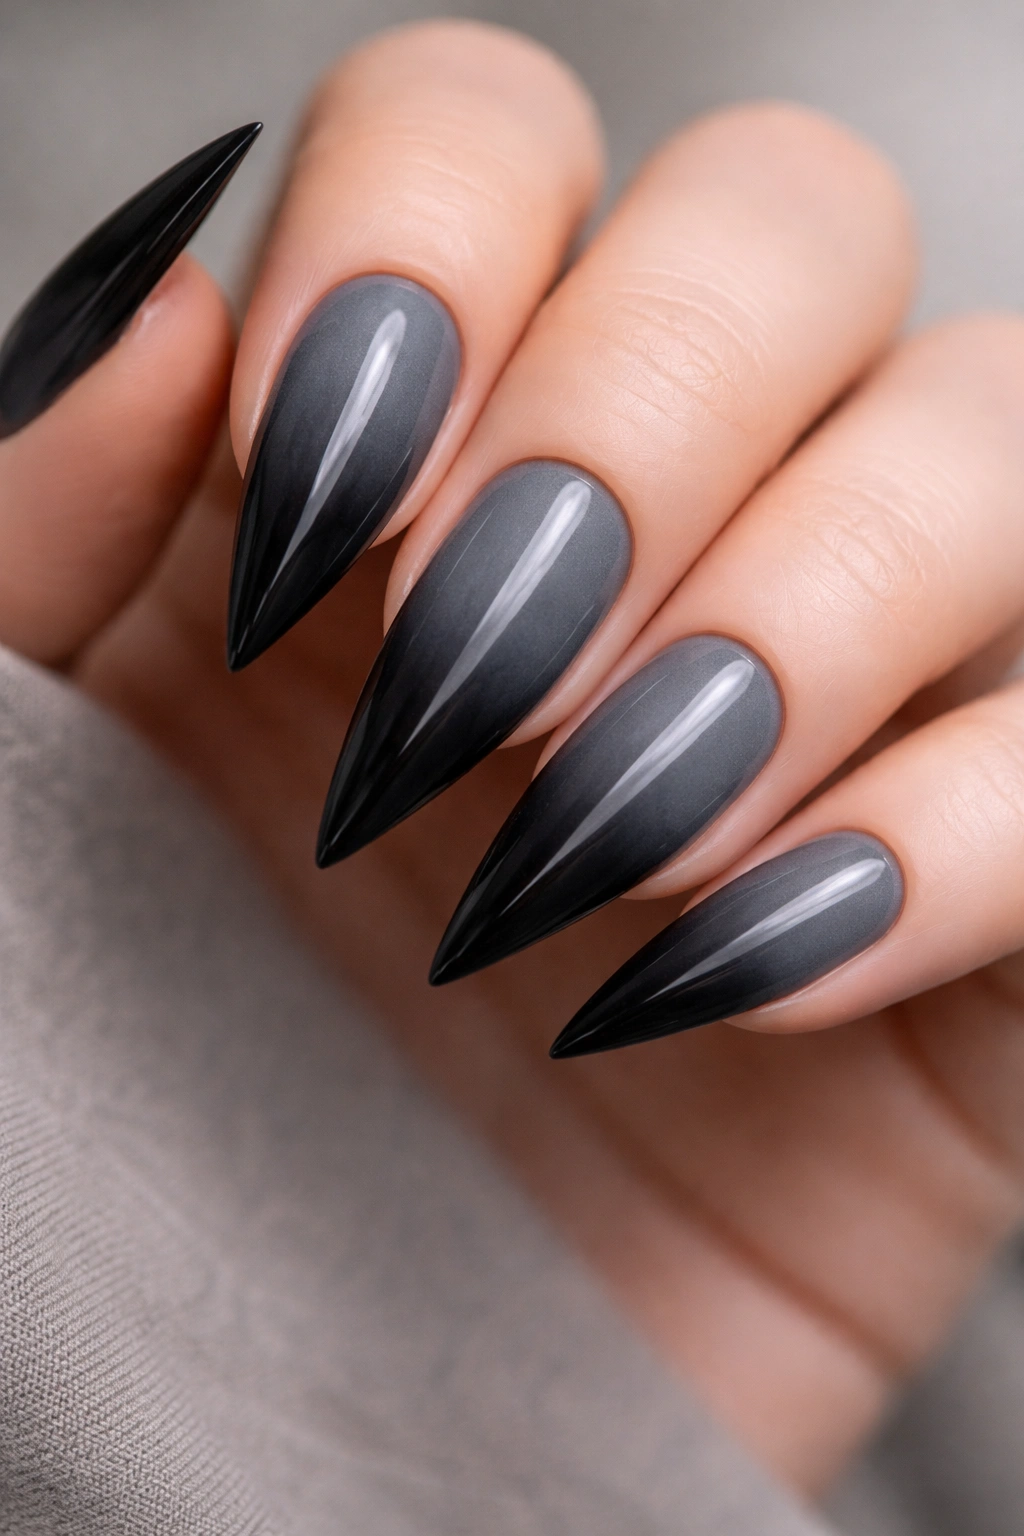
Charcoal gray stilettos with a black ombre gradient flowing from the base toward the tip create a moody, smoky aesthetic that’s gothic without being pure black—offering more visual dimension while maintaining that dark, sophisticated edge. The ombre effect uses a sponging technique or gradient application to blend charcoal gray smoothly into deep black, creating a gradual color shift that adds depth and visual interest. The gradient direction (darker at the tip) emphasizes the sharp stiletto shape and creates an illusion of shadow and depth.
Dimension Through Subtle Color Shifts
While pure black is striking, a charcoal-to-black gradient offers sophistication and visual complexity. The smoky quality of charcoal paired with pure black creates a moody, contemplative aesthetic that reads as gothic without screaming for attention—it’s the kind of design that rewards close examination and appreciation for subtlety.
Creating a Flawless Gradient
- Base all nails with charcoal gray polish or gel as your starting point
- Use a damp cosmetic sponge to dab black polish from the tip area, gradually blending it back toward the base
- Build the black gradually in thin layers, allowing each layer to blend with the charcoal beneath
- Use a glossy top coat to seal and enhance the gradient’s smoothness and continuity
- Alternatively, use a gel gradient technique by curing between layers to build a perfectly seamless transition
Worth knowing: A sponged gradient looks more artistic and hand-made than a perfectly blended gradient, and for gothic aesthetics, that imperfect quality often adds to the appeal. You don’t need a flawless salon-grade gradient to achieve the effect.
9. Black with Delicate Silver Chains and Crosses
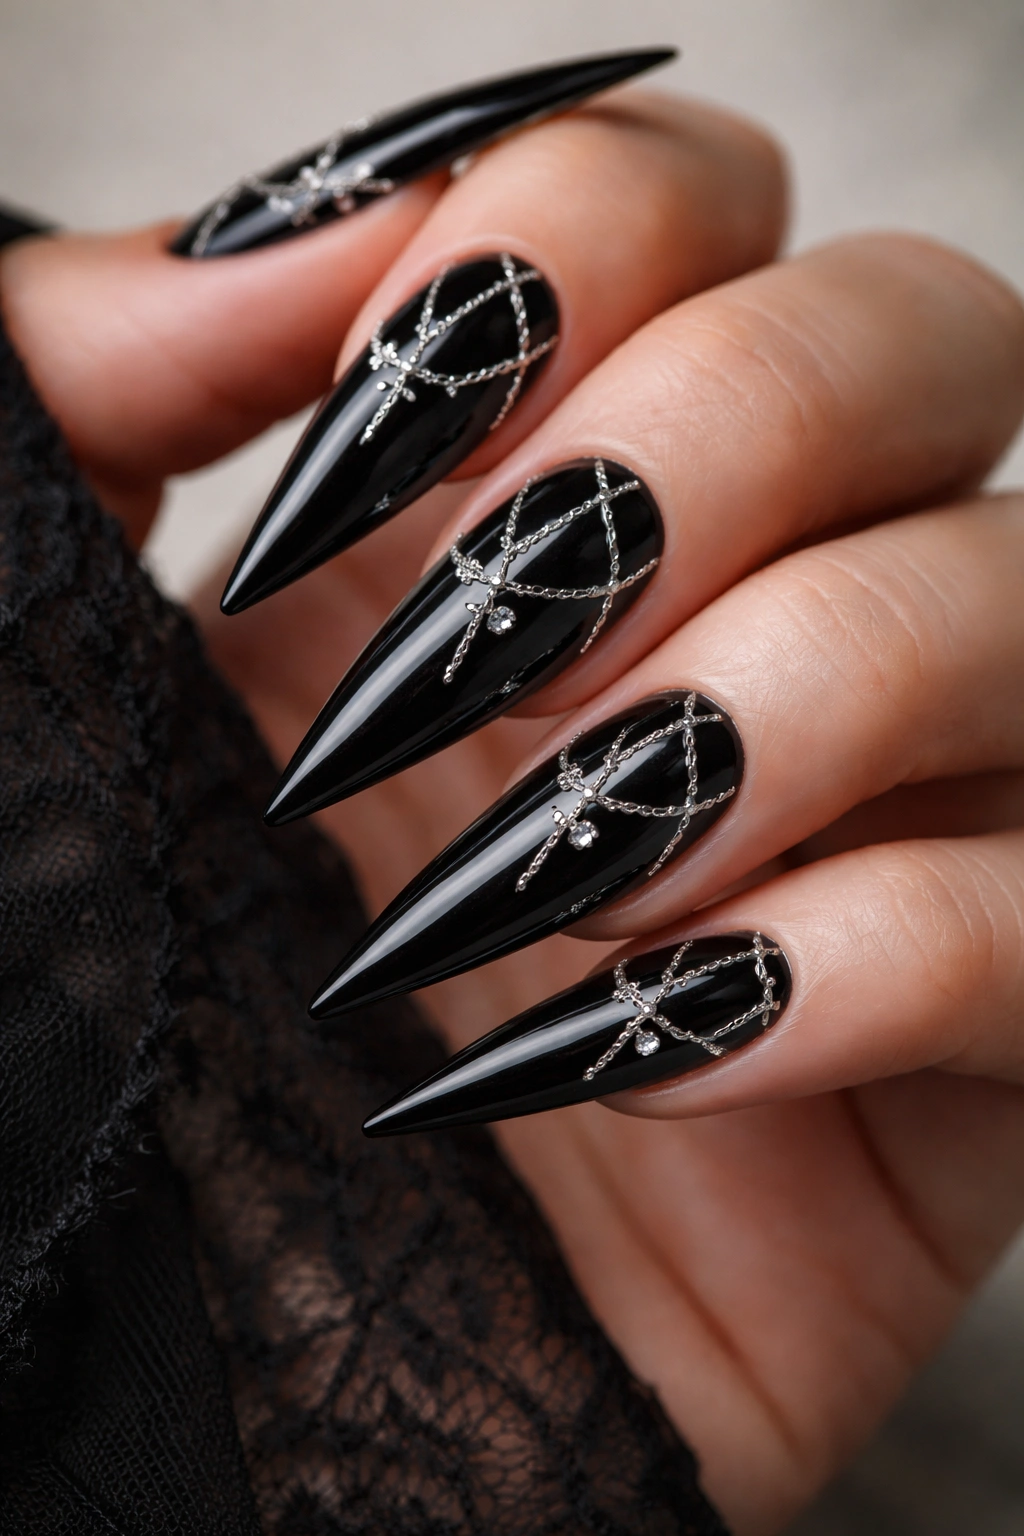
Silver chains or fine cross patterns delicately applied across glossy black stilettos create a jewelry-inspired gothic design that’s elegant and symbolic without being overly dramatic. Fine silver lines representing chain links or small silver crosses scattered across the nail surface add religious/mystical undertones while maintaining sophisticated aesthetics. This design works beautifully as a full-nail pattern or as an accent detail concentrated on one or two nails per hand.
Religious and Mystical Symbolism
Crosses and chains carry multiple symbolic meanings—chains represent restriction or bondage, while crosses carry both religious and gothic associations. Together, they create a design that’s spiritually evocative while maintaining dark aesthetics. The delicacy of thin silver lines prevents the symbolism from feeling heavy-handed or preachy; instead, it reads as personal spiritual expression through visual design.
Applying Fine Silver Details
- Use a silver gel pen or ultra-fine brush with silver gel to hand-draw thin chain links across the nail surface
- Create multiple cross symbols scattered across the nail, varying their size and position
- Layer chains and crosses together for a more complex, jewelry-like appearance
- Keep line work clean and precise—the delicacy of execution is what makes this design elegant rather than crude
- Apply details to all nails in a coordinated pattern, or focus all silver details on one or two accent nails
Insider note: A combination of hand-drawn and stamped elements works beautifully here—stamp the chain pattern and hand-draw small crosses, or vice versa, to combine precision with artistry.
10. Deep Burgundy with Black Rose Details
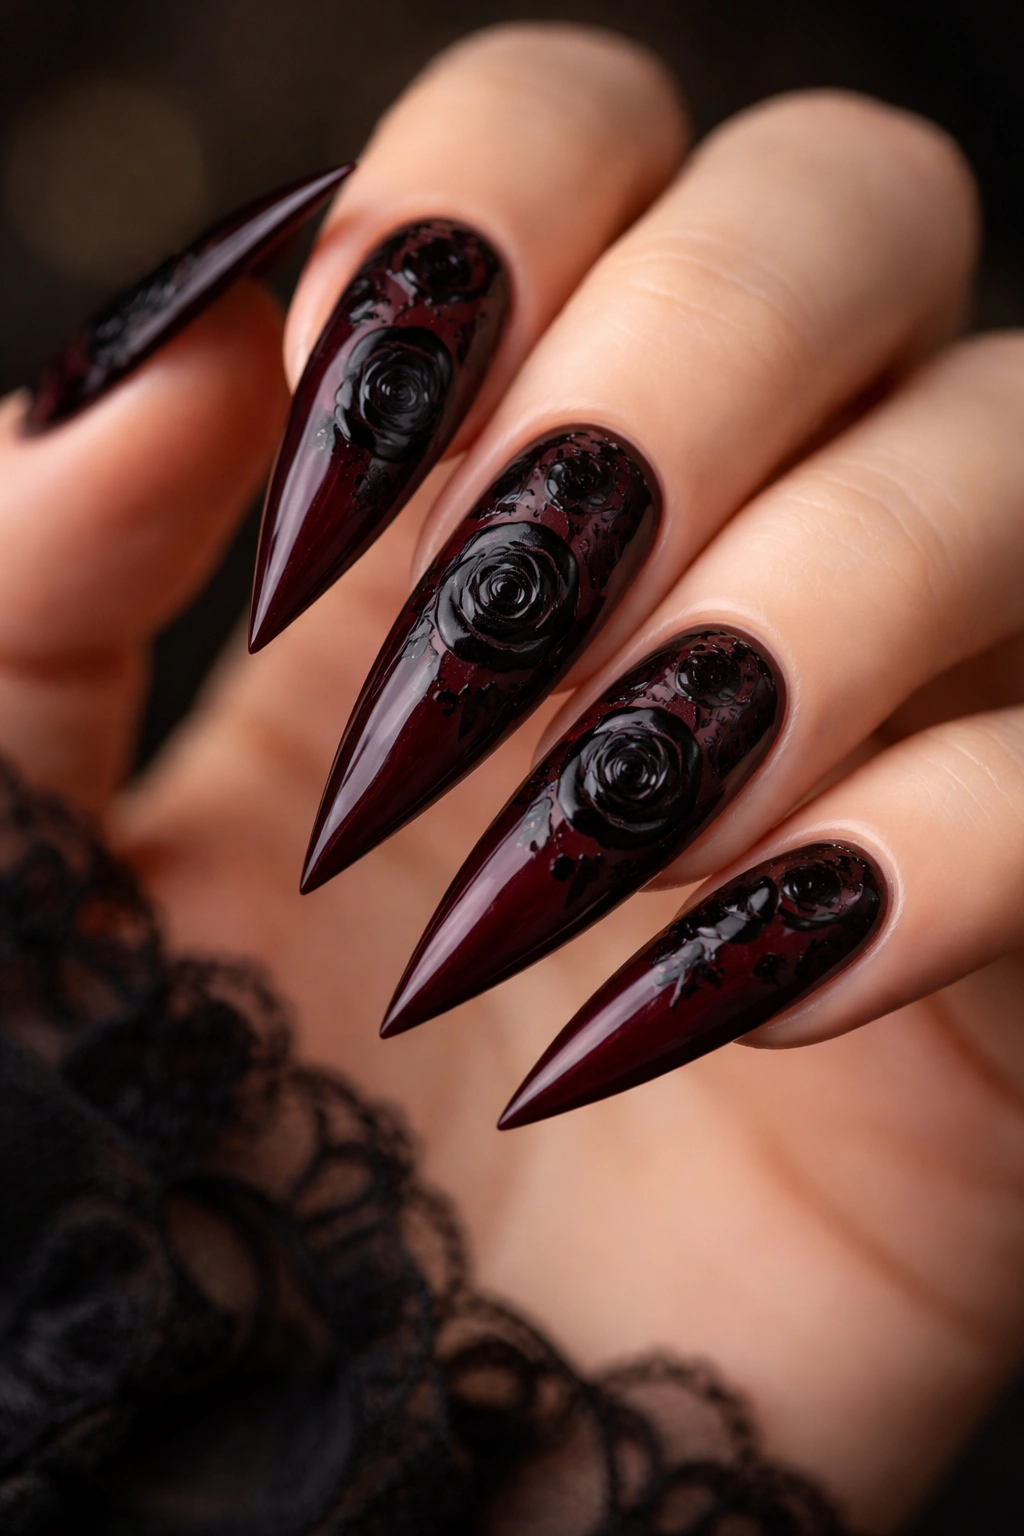
Burgundy stilettos with hand-painted black roses create a romantic-gothic aesthetic that balances darkness with softer, more vulnerable symbolism—roses are beautiful but have thorns, death-associated but still gorgeous. Black roses are gothic by definition, and painted delicately across a deep burgundy base, they create sophistication and artistic complexity. The combination of burgundy (wine-like, deep, rich) with black roses feels luxurious and edgy simultaneously, offering a design that appeals to people who embrace both romance and darkness.
Balancing Beauty and Darkness
Black roses symbolize mortality, loss, and mystery, but they’re also profoundly beautiful—that combination is the essence of gothic aesthetics. Paired with burgundy, the overall aesthetic feels elevated and artistic rather than purely morbid. This design works beautifully for people who want to express darker emotions or aesthetics through beautiful, technically skilled nail art.
Hand-Painting Roses with Precision
- Sketch rose outlines very lightly with a pencil or white gel pen before committing to black polish
- Use a fine brush and black gel to paint rose petals with careful, layered strokes building from the center outward
- Create variation in rose size and detail—some fully detailed, some suggested with loose lines for artistic interest
- Position roses to flow naturally across the nail, perhaps spiraling around the nail or concentrated in the center
- Pair roses with thorny vine details or delicate leaf shapes painted in dark green or black for enhanced botanical realism
Pro tip: If hand-painting roses feels intimidating, apply burgundy base first, then use black nail decals or stamps with rose designs, and hand-paint additional details over top for a hybrid approach that combines precision and artistry.
11. Matte Black with Textured Velvet Powder Finish

Matte black stilettos with a velvet powder finish create an incredibly tactile, visual-first design where the texture becomes part of the aesthetic—the nails look soft and velvety despite being hard polish or gel. Velvet powder creates a unique matte finish that’s more visually interesting than standard matte polish because of its soft, almost fuzzy appearance that catches light differently. This minimalist design relies entirely on texture for impact, making it perfect for people who love gothic aesthetics but prefer understated designs.
Texture as a Design Element
While most nail art relies on color, pattern, or embellishment for visual interest, this design elevates texture itself to primary importance. Matte black velvet nails command attention through their unique tactile quality, and the visual softness contrasts beautifully with the sharp, pointed stiletto shape—a play on opposites that’s visually engaging.
Application and Aftercare for Textured Finishes
- Apply a matte black base coat (regular polish or gel both work)
- Apply velvet powder while the base is still tacky, using even, light pressure with the velvet applicator included in the powder kit
- Seal the powder with a clear top coat, which will add slight shine despite the matte powder—or skip the top coat for pure matte
- Be gentle with textured nails; velvet powder is delicate and can show fingerprints or lint more easily than smooth finishes
- Use a cuticle stick or soft brush to gently clean the nail surface if the powder becomes disturbed
Worth knowing: Velvet powder finishes require gentler handling than regular polish and may not last as long with constant wear. They’re beautiful for special events or short-term wear more than everyday extended wear.
12. Black with Red Reverse Stamped Images
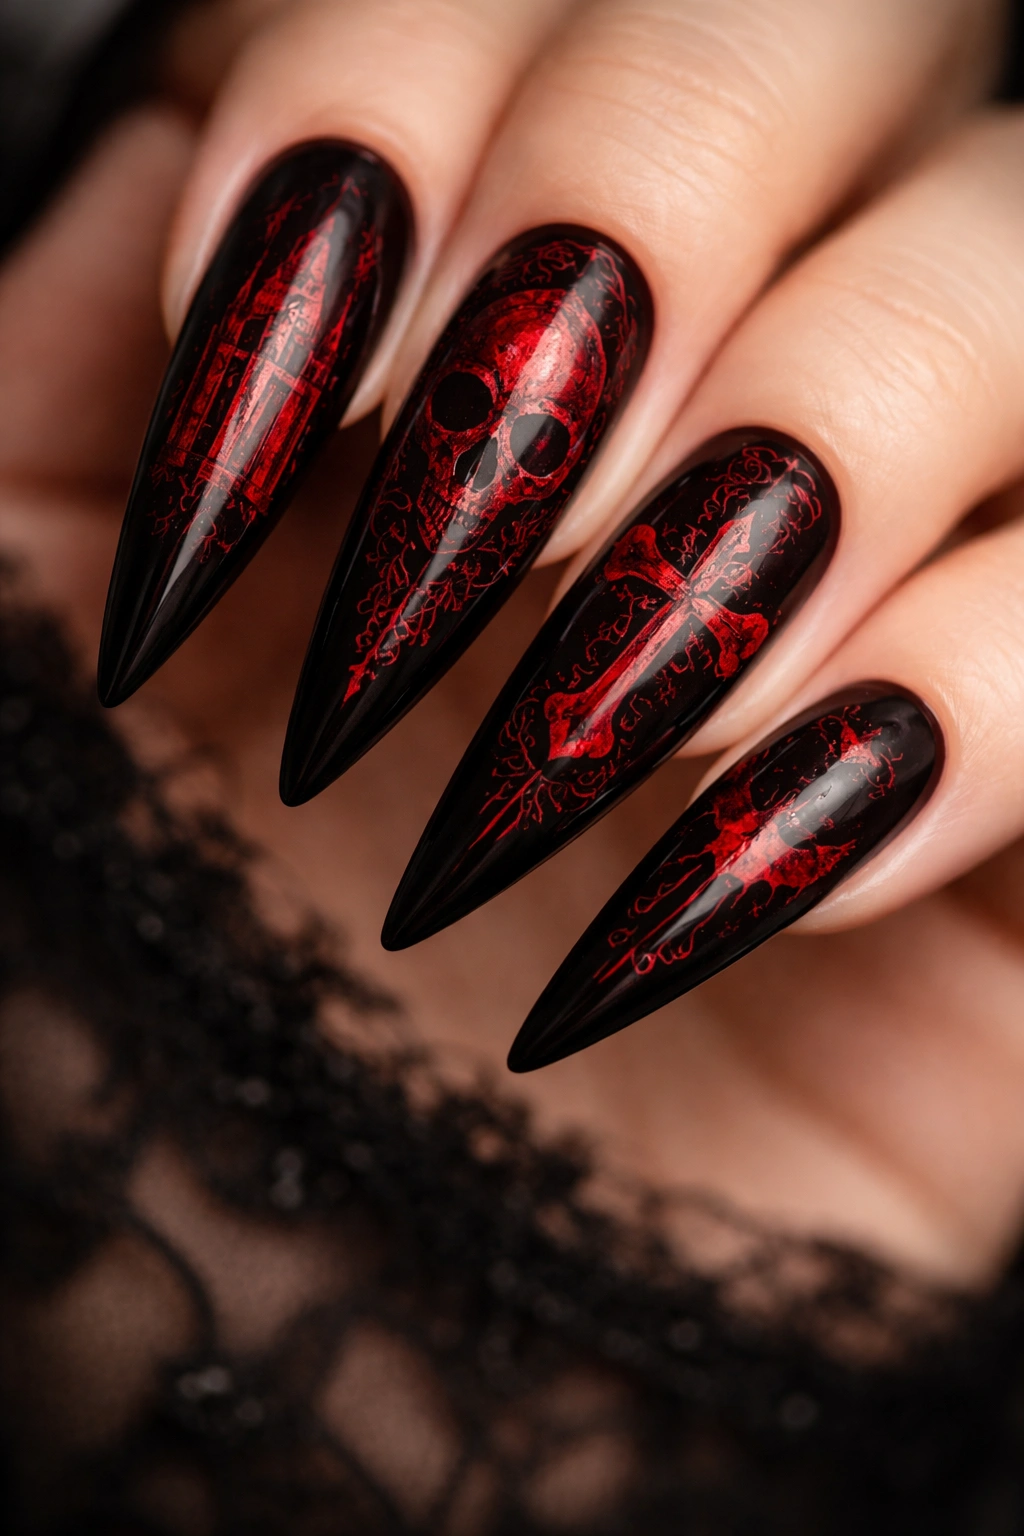
Reverse stamping is a nail art technique where detailed images are applied to the nail in reverse order (painted on a stamper first, then transferred to the nail), allowing for complex, multi-colored designs that would be nearly impossible to hand-paint. Black stilettos stamped with intricate red-and-black reverse stamped images—think gothic landscapes, horror movie scenes, or detailed demon or skull imagery—create a design that reads as professional, intricate, and genuinely impressive. The technique requires specialized stampers and plates but produces results that look significantly more complex than hand-painting alone.
Professional-Looking Detail Without Professional Skill
Reverse stamping eliminates the steadiness and precision challenges of hand-painting by using stamped images transferred to the nail. The technique democratizes complex nail art, making it possible for nail enthusiasts to create designs that would take a skilled hand-painter hours to execute. Black and red is the classic gothic color pairing, and when combined with detailed stamped imagery, it creates impact.
Reverse Stamping Technique and Resources
- Obtain specialized reverse stamp nail art plates featuring gothic imagery (Bunny Nails and other brands create gothic-specific plates)
- Use gel polish or acrylic paint on your stamper as recommended for your specific plate
- Transfer the image to the nail using the stamper’s rolling or pressing motion
- Build the image in layers if multiple colors are needed, curing between layers if using gel
- Seal everything with a glossy or matte top coat depending on your preference
Insider note: Reverse stamping has a steep learning curve for the initial application, but online tutorials from nail artists who specialize in reverse stamping are invaluable. Some nail techs offer reverse stamped designs if you’d rather have a professional execute them initially.
13. Deep Plum with Black Lace and Diamond Details
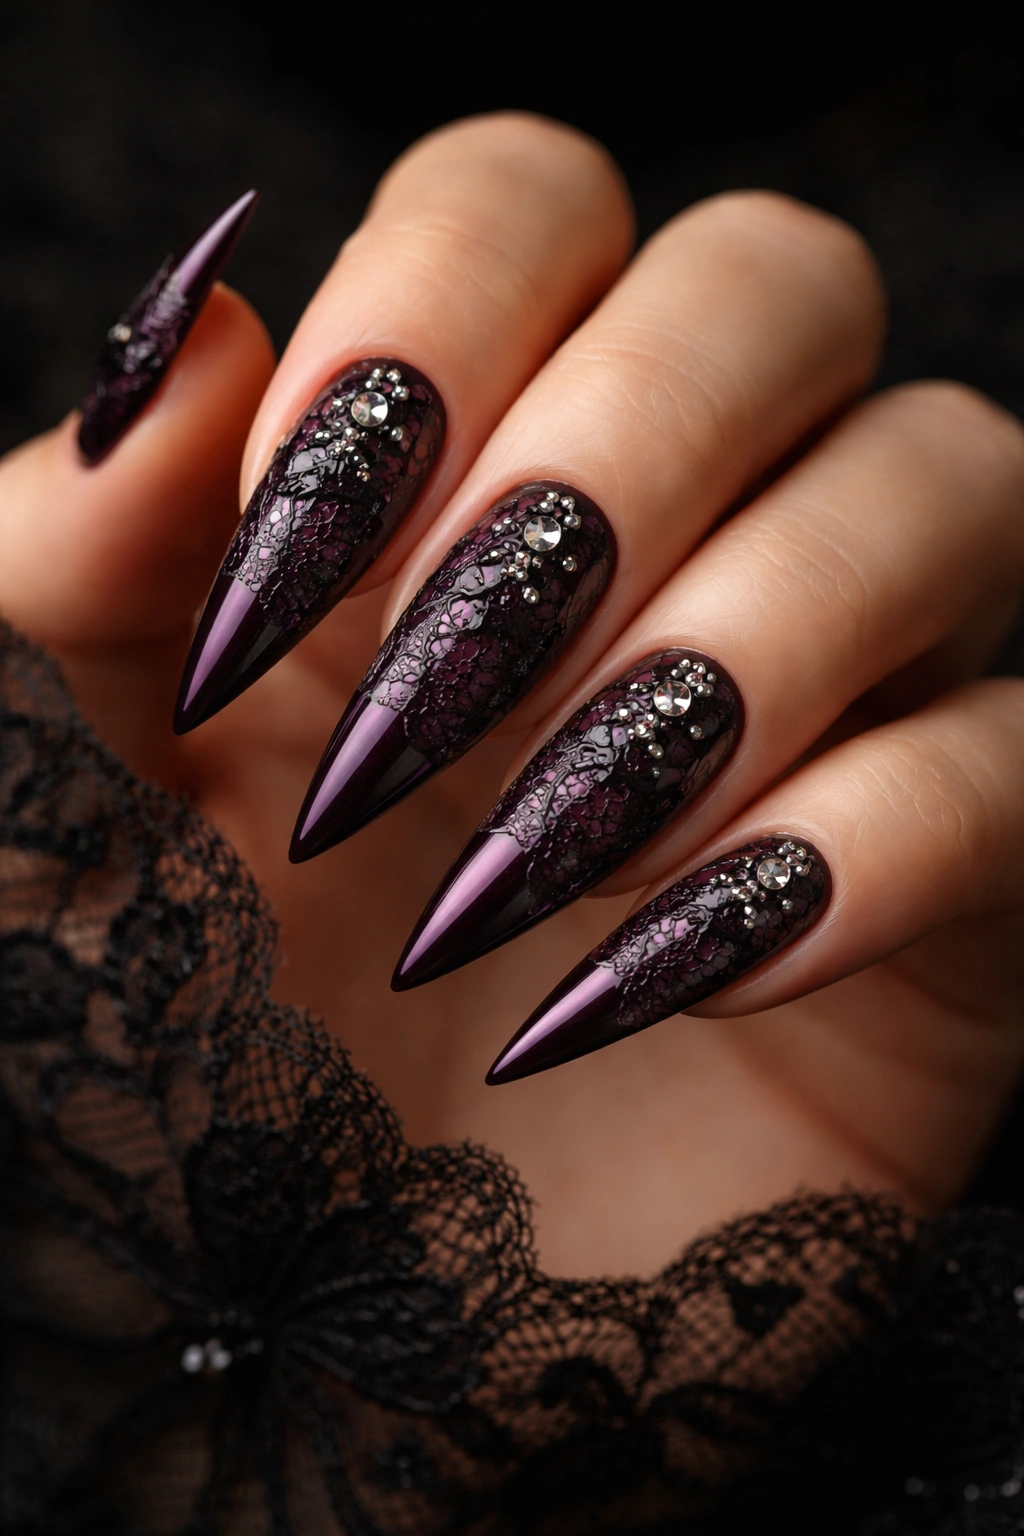
Deep plum stilettos combine the mystical associations of purple with dark sophistication, and when you layer delicate black lace patterns with tiny diamond or rhinestone accents, you create a design that merges gothic with glamorous. The plum base offers a gothic alternative to pure black while the black lace keeps the design dark and edgy. Diamond accents (real rhinestones or diamond-shaped nail stickers) add luxury and sparkle without breaking the gothic aesthetic—the contrast between dark matte/satin lace and brilliant diamonds creates visual tension and sophistication.
Gothic Glamour
This design bridges the gap between purely edgy gothic and glamorous nail designs, appealing to people who want dark aesthetics with luxury elements. The combination of matte lace patterns and sparkling diamonds creates visual depth and catches light in multiple ways depending on movement and angle.
Layering Lace, Colors, and Embellishments
- Apply plum base coat and allow to dry completely
- Use black gel and a lace stamp plate to apply intricate lace patterns across the nail surface
- Once lace is dry and sealed, apply small diamond rhinestones using nail glue or pre-applied diamond decals positioned among the lace details
- Concentrate diamonds in certain areas (cuticle area, diagonal band, tip) rather than distributing them randomly for more intentional design
- Seal everything with a glossy top coat that will enhance the sparkle of diamonds while keeping lace patterns visible
Pro tip: Use tweezers to precisely position individual diamonds; your fingers are too large and clumsy for this level of detail. Small nail art rhinestones (especially crystal AB ones) sparkle far more dramatically than plastic diamond decals.
14. Glossy Black with Tiny Constellation Dots
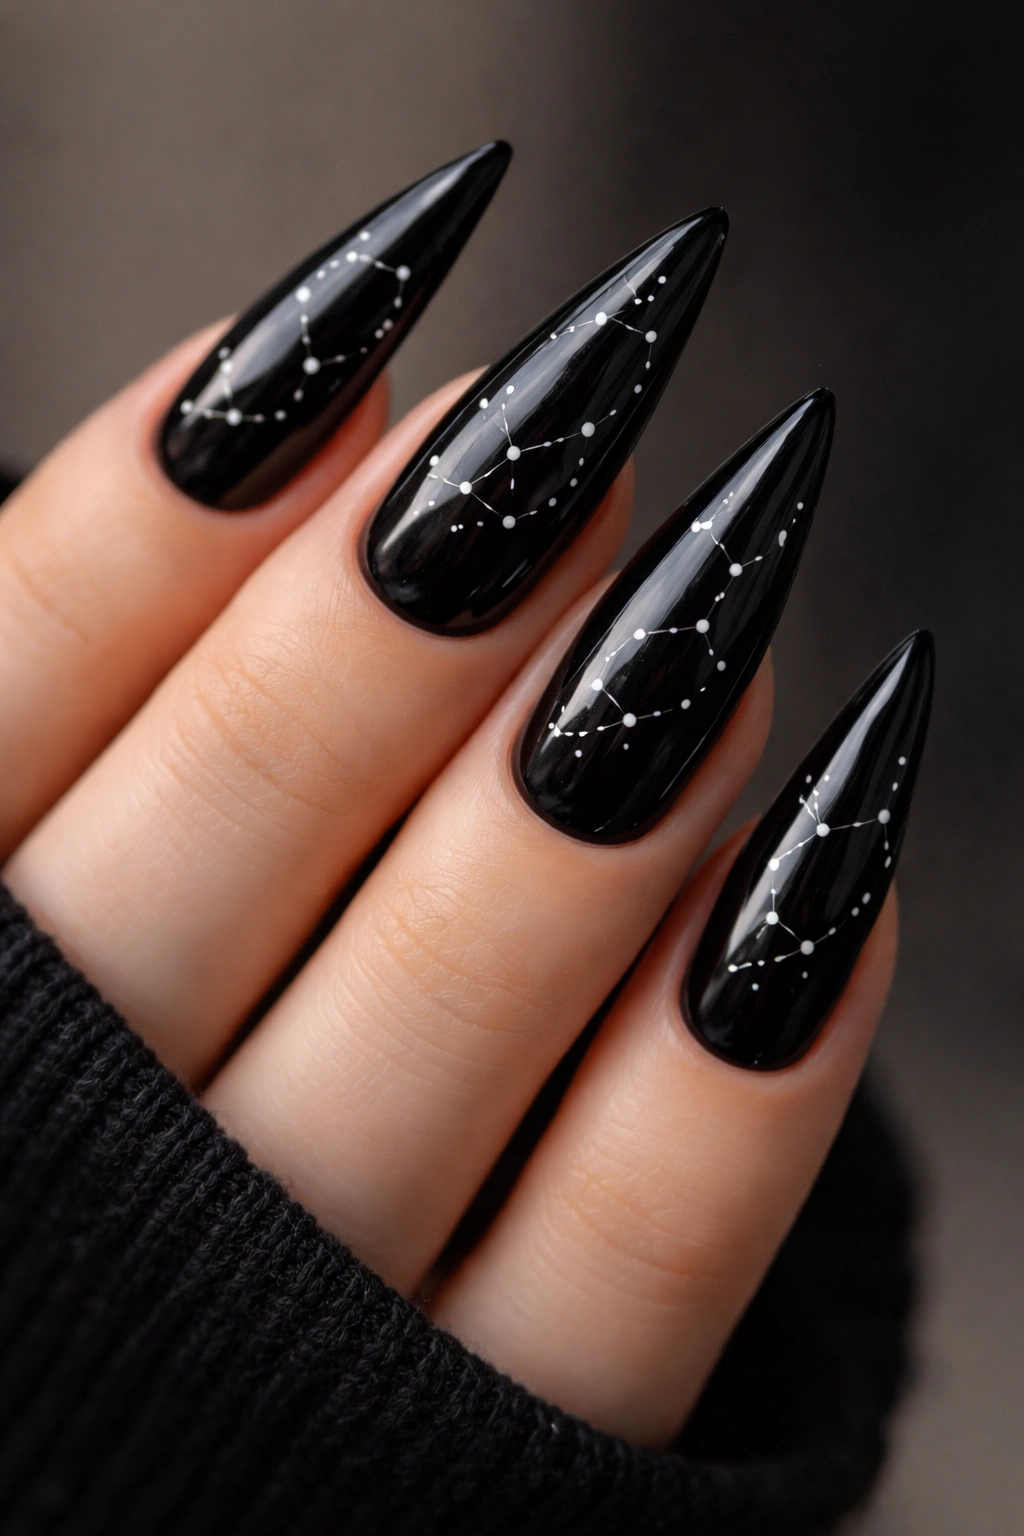
Minimalist gothic styling comes through in glossy black stilettos dotted with tiny white or silver constellation patterns—simplified star maps or constellation representations that create meaning through simplicity. Tiny dots arranged to form recognizable patterns (Orion, the Big Dipper, zodiac signs as dot patterns) add celestial, mystical elements to a matte black base. This design is wearable for everyday wear while maintaining gothic and spiritual undertones, offering dark aesthetics without anything that reads as costume or overly elaborate.
Celestial Spirituality Meets Gothic Minimalism
Stars and constellations carry associations with destiny, navigation, spirituality, and the vastness of the cosmos—combining those cosmic themes with gothic dark base colors creates a design that’s mysterious and sophisticated. The minimalism of dot work prevents the design from feeling juvenile or overly decorative; instead, it reads as intentional, artistic, and contemplative.
Creating Constellation Dot Patterns
- Use a fine white gel pen or toothpick dipped in white gel to apply tiny dots in constellation patterns
- Reference actual constellation maps if you want accuracy, or create your own simplified versions
- Space dots consistently and intentionally; random dots just read as mistakes rather than intentional patterns
- Create different constellation patterns on different nails for a collection feeling across your hand
- Keep dots uniformly tiny (1-2mm diameter) for elegant, cohesive appearance
Worth knowing: If freehand dot work feels too precise, use a dotting tool (a specialty nail art tool with a tiny ball on the end) or a white gel pen with a very fine tip for more control. The tiny scale of this design makes precision worthwhile.
15. Black with Metallic Gold Cobweb Corner Details
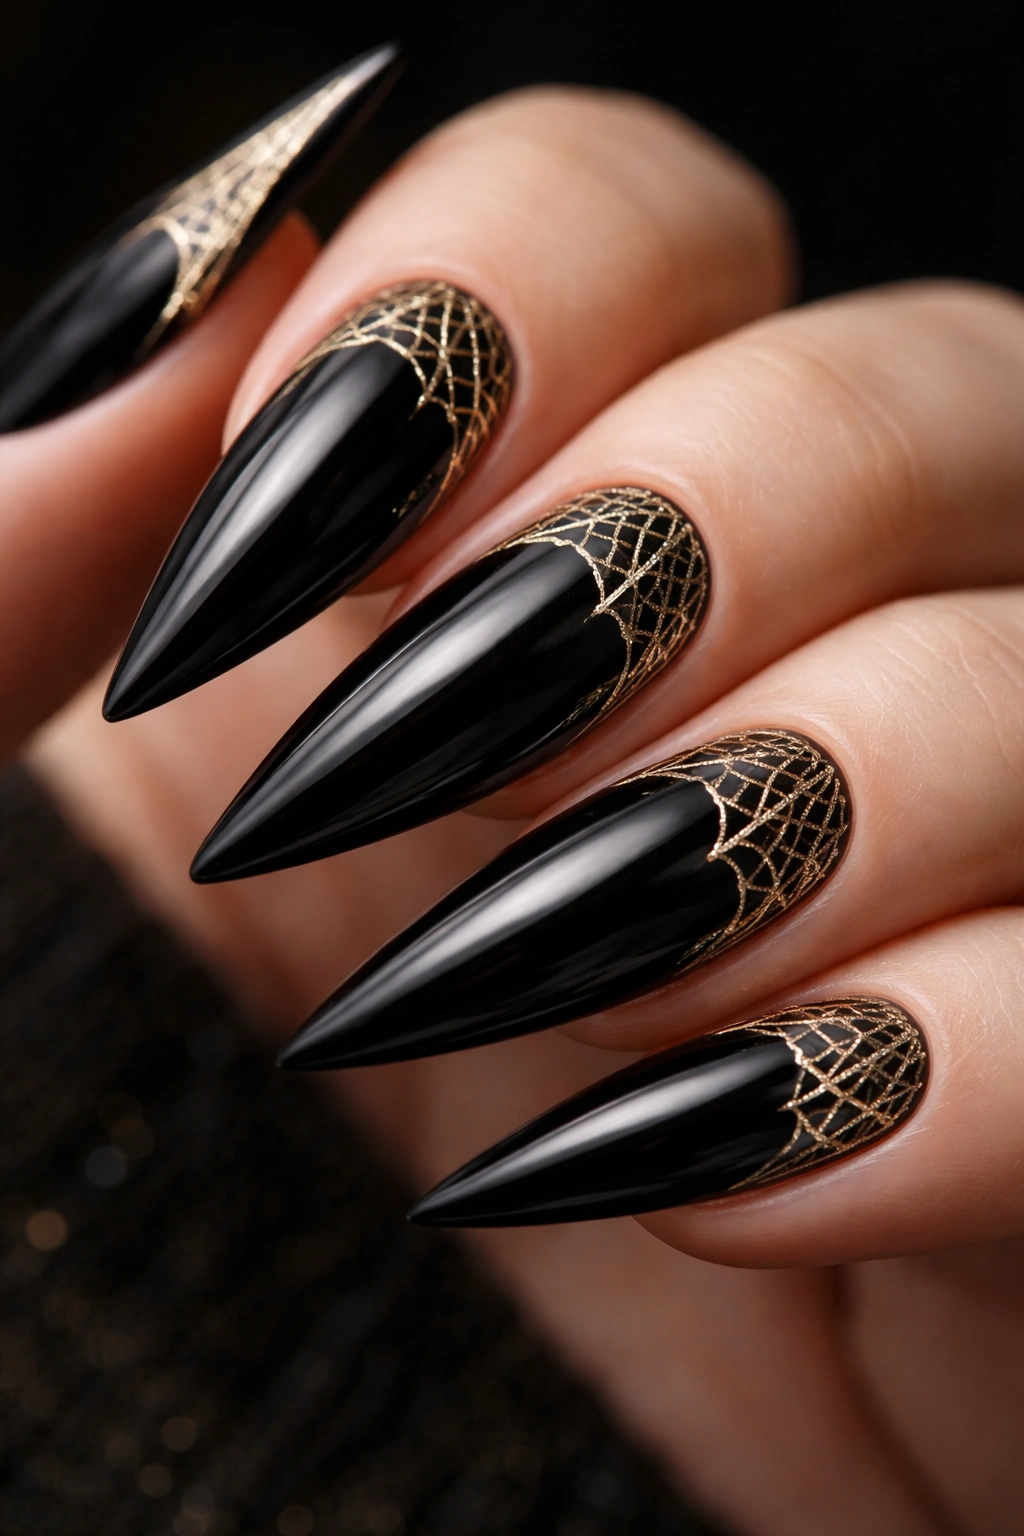
Metallic gold creating delicate, detailed cobwebs in the corners or edges of black stilettos creates a sophisticated take on spiderweb imagery—the gold elevates it from simple web to intricate jewelry-like detail. Rather than covering the full nail, corner cobwebs add gothic details without overpowering the design. The corner-focus approach creates an elegant, balanced look that’s perfect for people who want gothic elements without full-coverage designs. Gold metallic paired with black creates warmth and luxury while maintaining darkness.
Strategic Placement for Maximum Impact
Corner and edge detailing is a sophisticated design approach used in high-end nail art because it creates visual interest without overwhelming the canvas. A simple black nail with intricate gold corner details reads as refined and intentional rather than either minimalist or maximalist—it’s beautifully balanced.
Creating Corner Cobweb Patterns
- Use a gold gel pen or fine brush with metallic gold gel to hand-draw delicate webbing in one or more corners of the nail
- Create intricate, detailed web patterns with fine lines radiating from the corner point toward the nail center
- Vary the complexity of webbing across different nails—some with dense, detailed webs and others with more minimal patterns
- Concentrate all detail in one corner, or create mirror-image webs in opposite corners for symmetry
- Pair corner webs with one or two tiny gold spiders to enhance the cobweb effect
Insider note: This design works beautifully as an accent nail treatment—all nails solid black except for one or two featuring the detailed gold corner cobwebs.
16. Charcoal Gray with Black Geometric Shapes and Negative Space
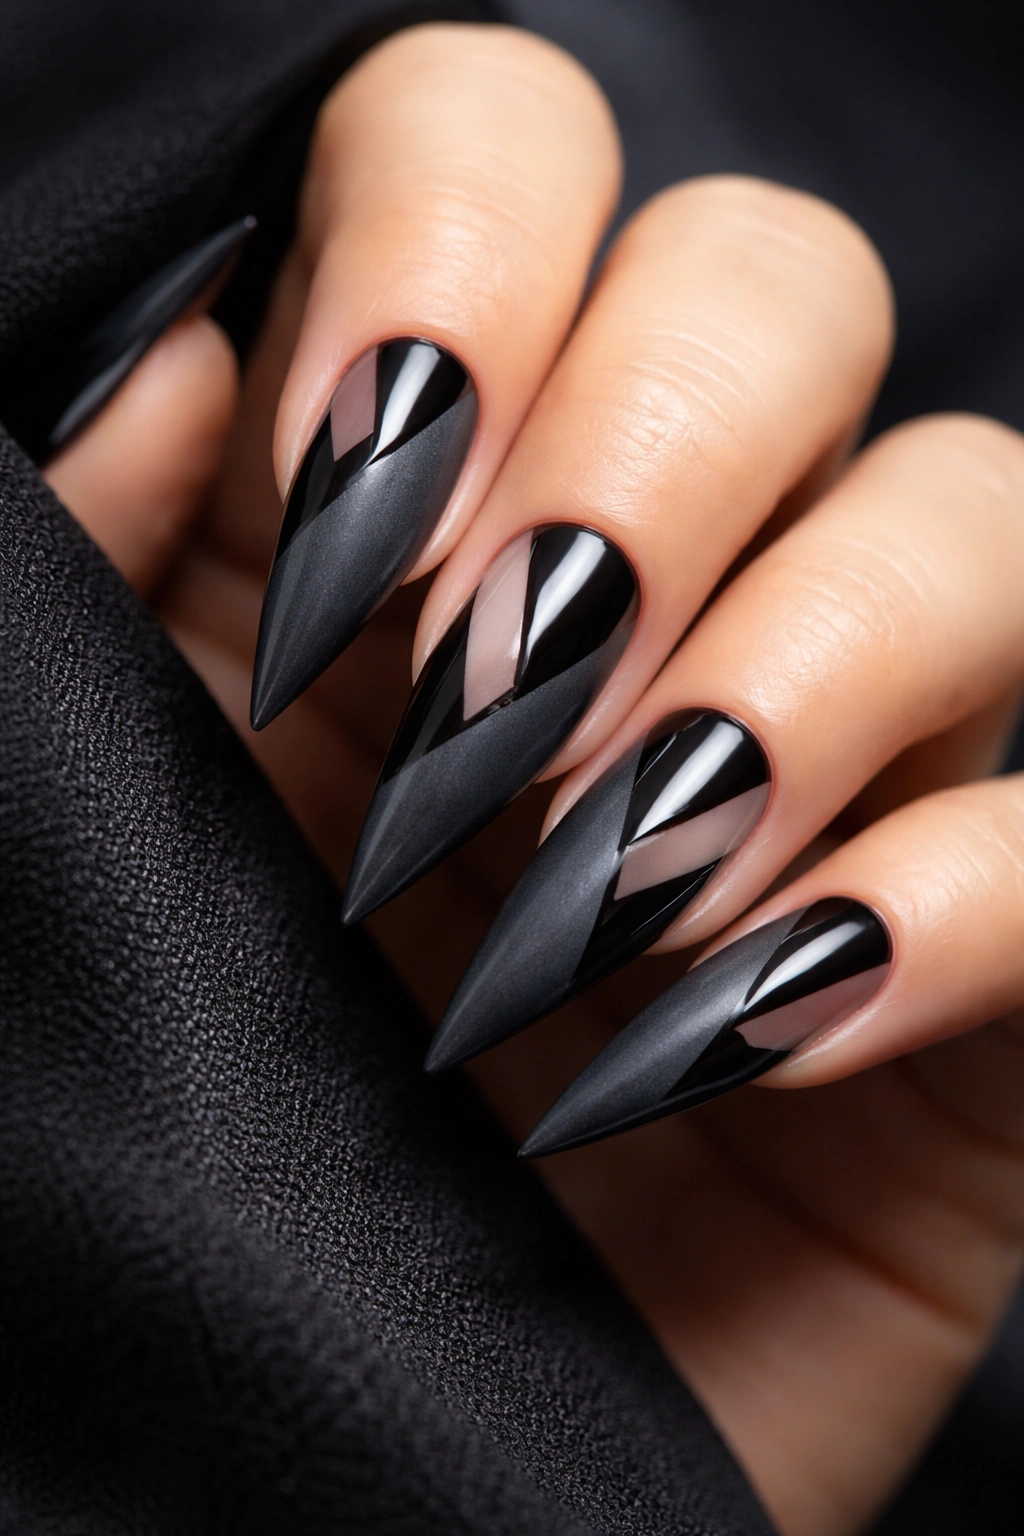
Charcoal gray stilettos with black geometric shapes and strategic negative space (areas left bare or showing skin tone beneath polish) create a modern, architectural gothic design that relies on geometry rather than imagery for visual interest. Angular shapes, lines, and patterns intersecting across the nail create a design that’s edgy and contemporary while maintaining dark, gothic color palettes. Negative space (showing the nail bed or skin tone beneath) adds visual complexity and prevents the design from feeling heavy or overwhelming despite dark colors.
Modern Gothic Through Minimalist Geometry
Geometric design is inherently contemporary and architectural, and when paired with dark gothic colors, it creates a fusion aesthetic that appeals to people who embrace both modern design principles and gothic sensibilities. This design feels intellectually elegant rather than purely dark or mysterious—it’s design-focused rather than imagery-focused.
Creating Geometric Patterns with Precision
- Base all nails with charcoal gray polish or gel
- Use a thin black brush, striping tape, or a gel pen to hand-draw geometric patterns: triangles, lines, hexagons, angular shapes
- Create negative space by intentionally leaving portions of the nail unpainted (charcoal gray showing through without black design overlay)
- Layer patterns across nails—some nails featuring dense geometric coverage and others with minimal, spaced-out patterns
- Use a glossy top coat for a sleek, modern finish that enhances the architectural quality of geometric design
Pro tip: Striping tape (specialty tape designed for nail art) makes creating perfectly straight geometric lines far easier than freehand brush work. Apply tape, paint over it, remove the tape before curing, and the negative space pattern is perfectly precise.
Final Thoughts
Gothic stiletto nails represent a powerful intersection of artistic expression, personal style, and visual drama—the sharp, elongated shape naturally complements dark aesthetics and creates a canvas where intricate details read beautifully and intentional design choices become statements. Whether you’re drawn to classic motifs like spiderwebs and roses, mystical symbols, or contemporary geometric and textured approaches, the versatility of gothic nail design means you can find a style that genuinely reflects your personality and aesthetic preferences.
The sixteen designs above represent different angles on gothic aesthetics—some emphasize pure darkness and contrast, others blend gothic with glamorous or mystical elements, and still others approach darkness through texture, geometry, or minimalist symbolism. You’re not locked into any single style; instead, these designs serve as starting points for personal customization and creative exploration. The best gothic stiletto nails are ones that make you feel confident, reflect something true about how you see yourself, and bring genuine joy every time you glance down at your hands.
If you’re executing these designs at home, invest in quality tools (fine brushes, gel pens, dotting tools, stamper plates), take time to practice precision details without rushing, and embrace imperfection as part of the handmade aesthetic. If you’re working with a nail technician, bring reference images of designs that speak to you and don’t hesitate to request customization that makes the design feel personally meaningful. Gothic stiletto nails are bold, dramatic, and inherently artistic—wear them with the confidence they deserve.
