

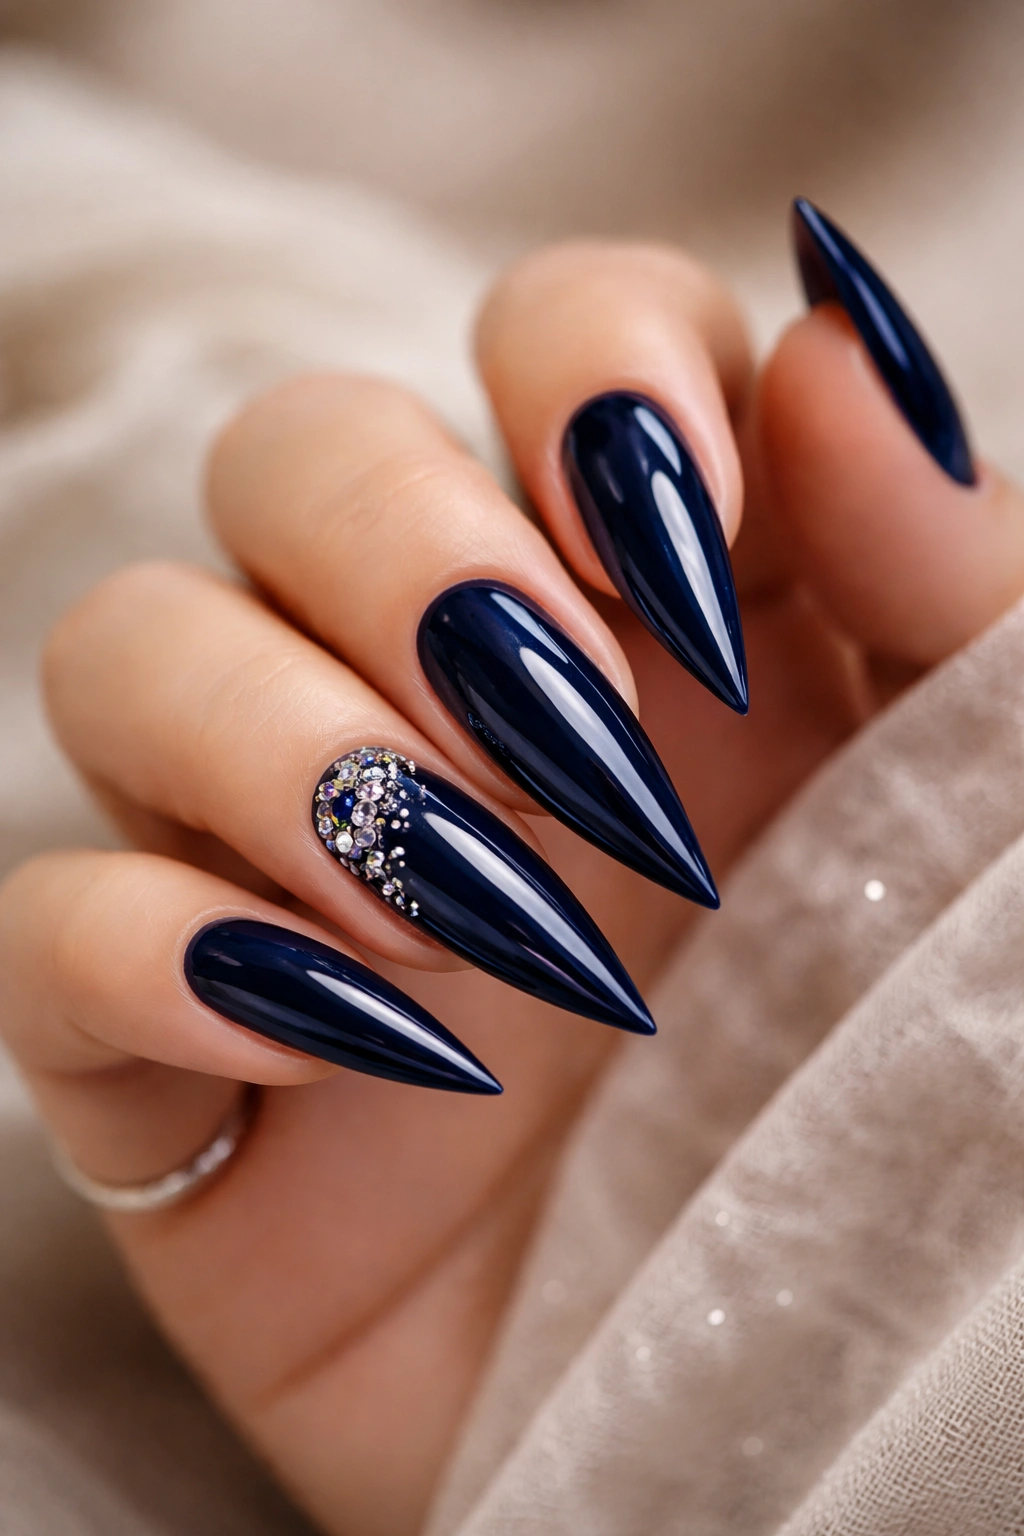
Dark blue stiletto nails represent the perfect intersection of elegance and drama. There’s something inherently sophisticated about deep, rich blue tones—they’re bold enough to make a statement but versatile enough to complement virtually any skin tone or outfit. Whether you’re going for a polished professional look, a glamorous evening aesthetic, or something edgy and experimental, dark blue offers endless possibilities for nail art that goes far beyond a simple manicure.
Stiletto nails themselves are a commitment—they’re statement nails that demand attention and confidence. When you pair that daring shape with a dark blue base, you’re creating something that’s both timelessly chic and utterly captivating. The elongated silhouette of stilettos makes designs pop even more dramatically, giving you a larger canvas for intricate details, metallic accents, and creative embellishments. Dark blue serves as the perfect neutral backdrop that lets those details shine while maintaining an air of refined sophistication.
The versatility of dark blue is part of its enduring appeal. Navy, sapphire, cobalt, indigo, midnight blue—each shade carries its own personality while staying firmly in the deep blue family. You can go minimalist and understated, or you can layer on textures, finishes, and accent colors to create something truly show-stopping. What makes dark blue stilettos particularly special is that they work equally well for everyday wear or special occasions. They’re professional enough for a boardroom yet glamorous enough for a night out.
This guide walks you through 16 stunning dark blue stiletto nail ideas, each with specific techniques, color combinations, and styling tips to help you recreate them or adapt them to match your personal aesthetic. Whether you’re looking for your next salon appointment or DIY inspiration, these designs offer something for every mood and occasion.
1. Navy and Gold Geometric Patterns
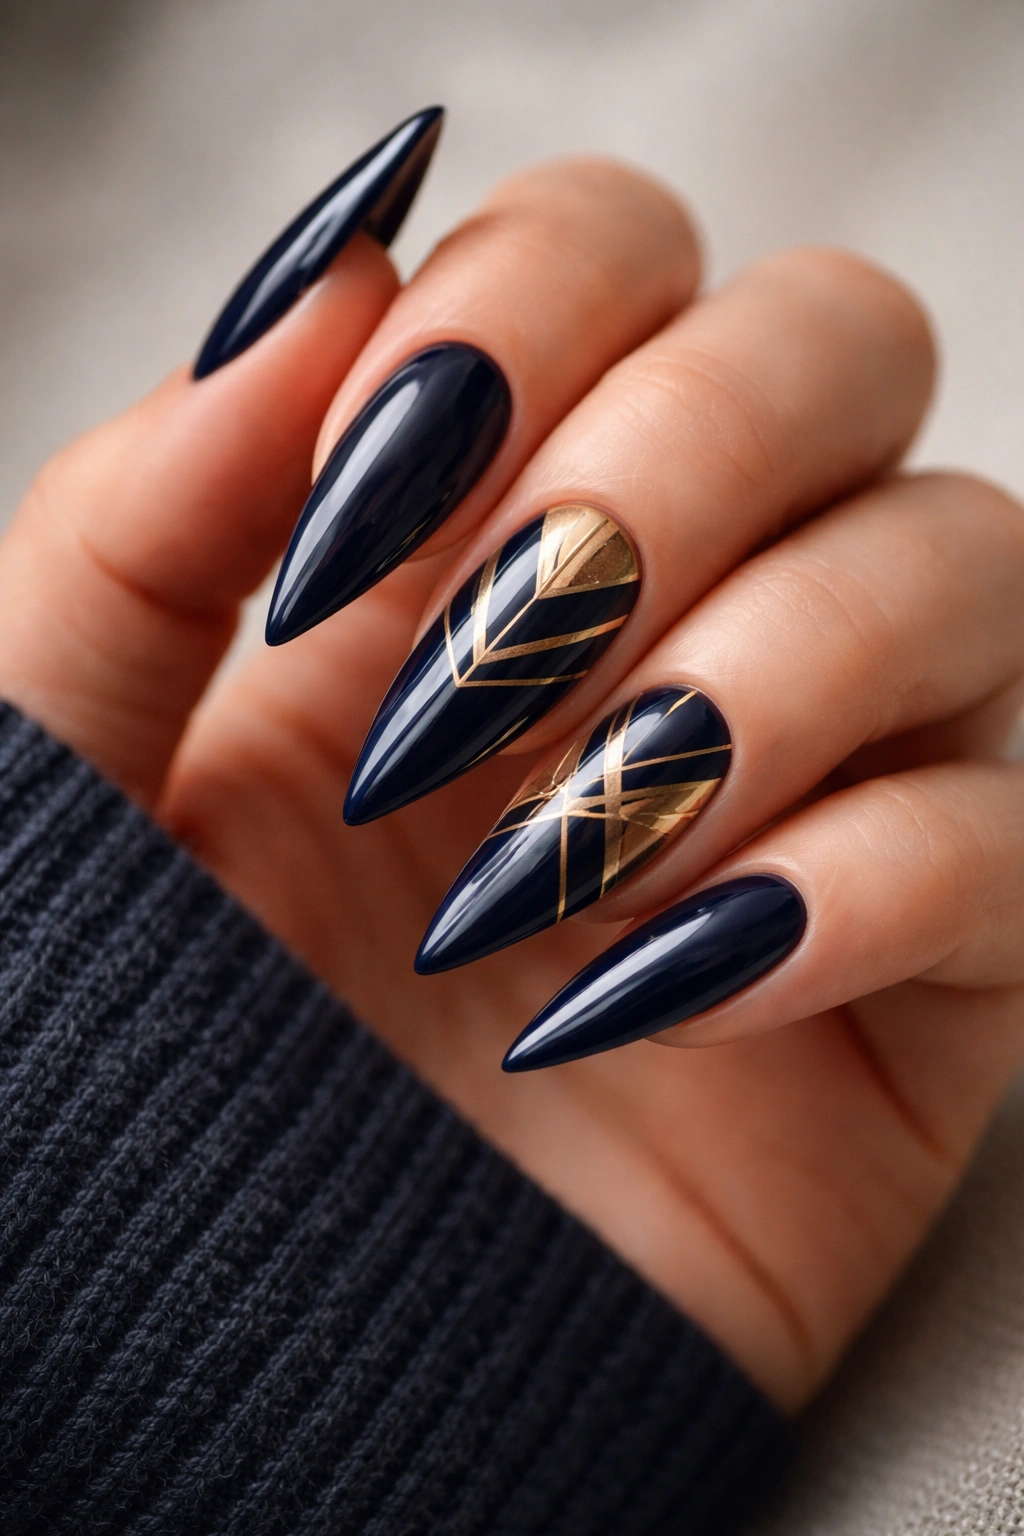
Geometric patterns elevate dark blue stilettos from simple to sophisticated with minimal effort. The contrast between navy and metallicmetals like gold creates an immediately luxurious effect that feels both modern and timeless. This design works beautifully because the geometric shapes give structure to the rich color while the gold accents catch light and add visual interest from every angle.
Why This Design Works So Well
Navy and gold is a color combination deeply rooted in luxury and classic design. Gold brings warmth to the cool tones of navy, creating a balanced palette that feels expensive and intentional. The geometric elements—whether triangles, lines, or abstract shapes—give your nails a contemporary edge that prevents the design from feeling dated. The structured nature of geometric patterns also means you don’t need freehand artistry to pull off something impressive; clean lines and purposeful placement do most of the heavy lifting.
How to Create This Look
- Apply two coats of a rich navy base polish to all nails
- Use a thin detail brush or nail art pen to draw gold lines forming triangles, diamonds, or chevron patterns on 2-3 accent nails
- Alternatively, use striping tape to create perfectly clean geometric divisions and fill sections with gold or metallic polish
- Seal everything with a glossy topcoat for shine and durability
- For extra dimension, add a single gold rhinestone at the point where geometric lines meet
Pro tip: Let your navy base dry completely between coats—this prevents the second coat from streaking and gives you a smooth canvas for gold detailing. If gold freehand feels intimidating, gold striping tape creates the same effect with zero artistic skill required.
2. Deep Blue Ombré Fade
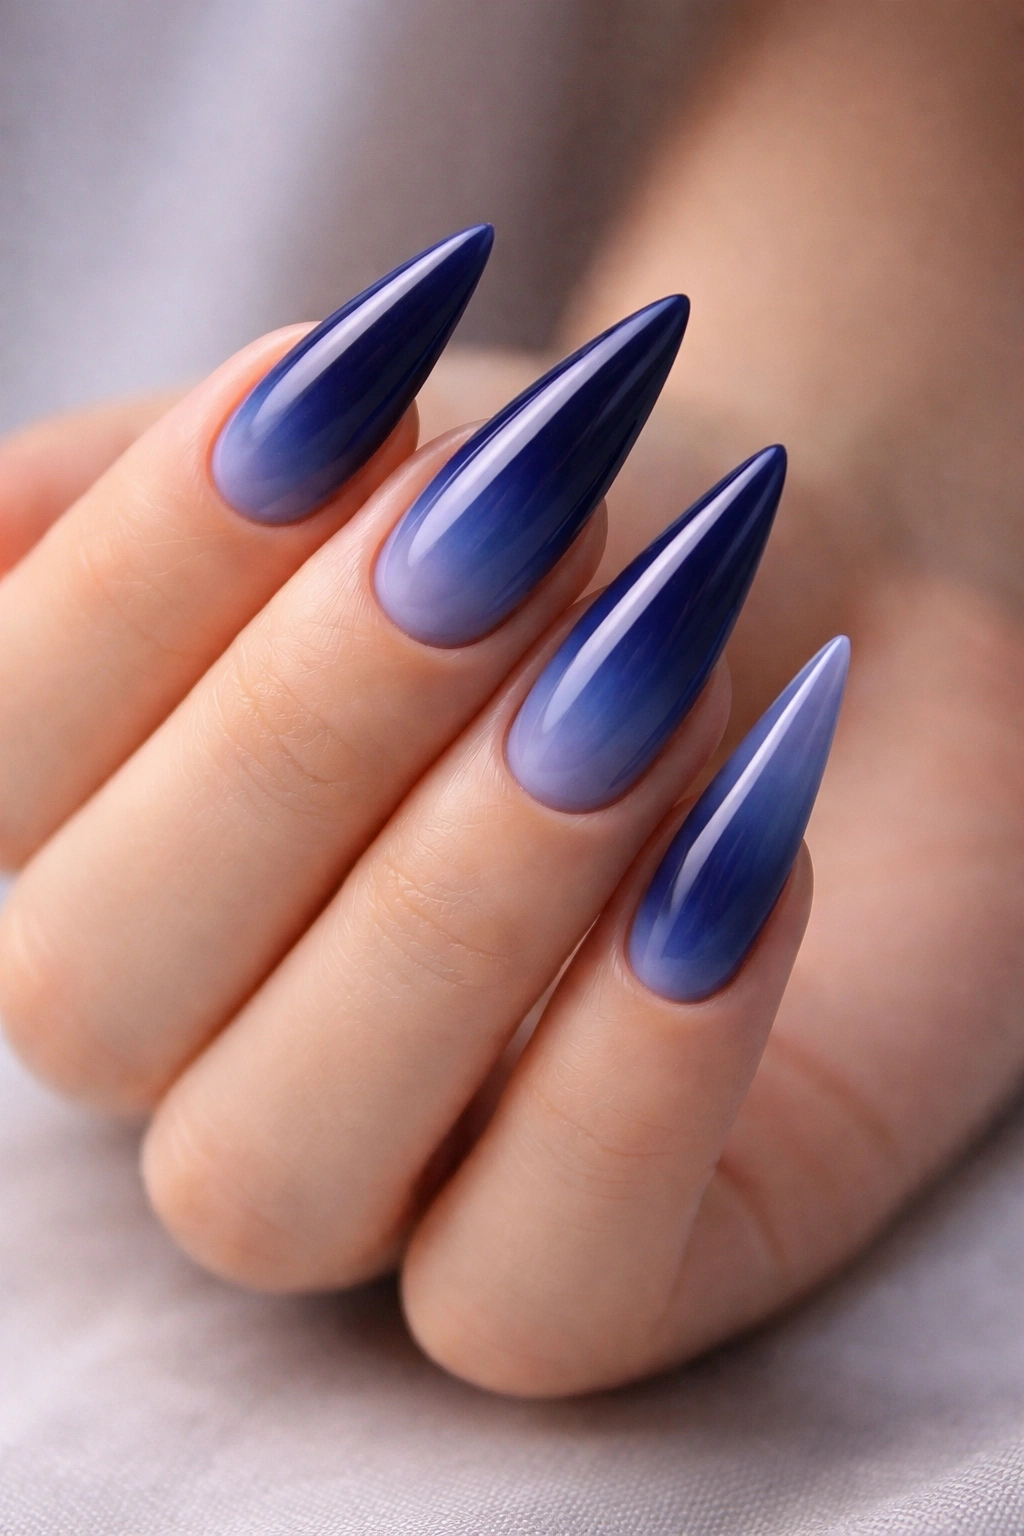
Ombré nails create a sophisticated gradient effect that feels effortlessly chic. With dark blue, an ombré from navy to a lighter periwinkle or even to white creates visual depth and movement that makes stiletto nails look even more elongated and elegant. This gradient technique is easier to achieve than most people think and always looks like you’ve just left a high-end salon.
The Technique Behind the Gradient
An ombré effect works by layering slightly different shades of polish or by using a sponging technique to blend colors seamlessly. With dark blue stilettos, you want the deepest navy at the base (near the cuticle) and the color fading to lighter as it reaches the tip. This mimics how light naturally falls on rounded surfaces and creates an incredibly flattering lengthening effect on stiletto nails.
Step-by-Step Application
- Paint your entire nail with the deepest navy shade as your base
- Mix two shades: your navy and a lighter blue or periwinkle
- Apply dots of each shade onto a makeup sponge in alternating pattern
- Gently dab the sponge onto the nail in a rolling motion from base to tip multiple times to blend
- Repeat until the gradient looks smooth and gradual
- Finish with a clear topcoat to seal and create glossy shine
Worth knowing: The sponge texture leaves a slightly matte finish that often looks artistic and intentional. If you prefer glass-smooth polish, apply one final coat of clear gel topcoat and cure under UV light for a salon-quality finish that lasts weeks.
3. Dark Blue with Silver Starbursts
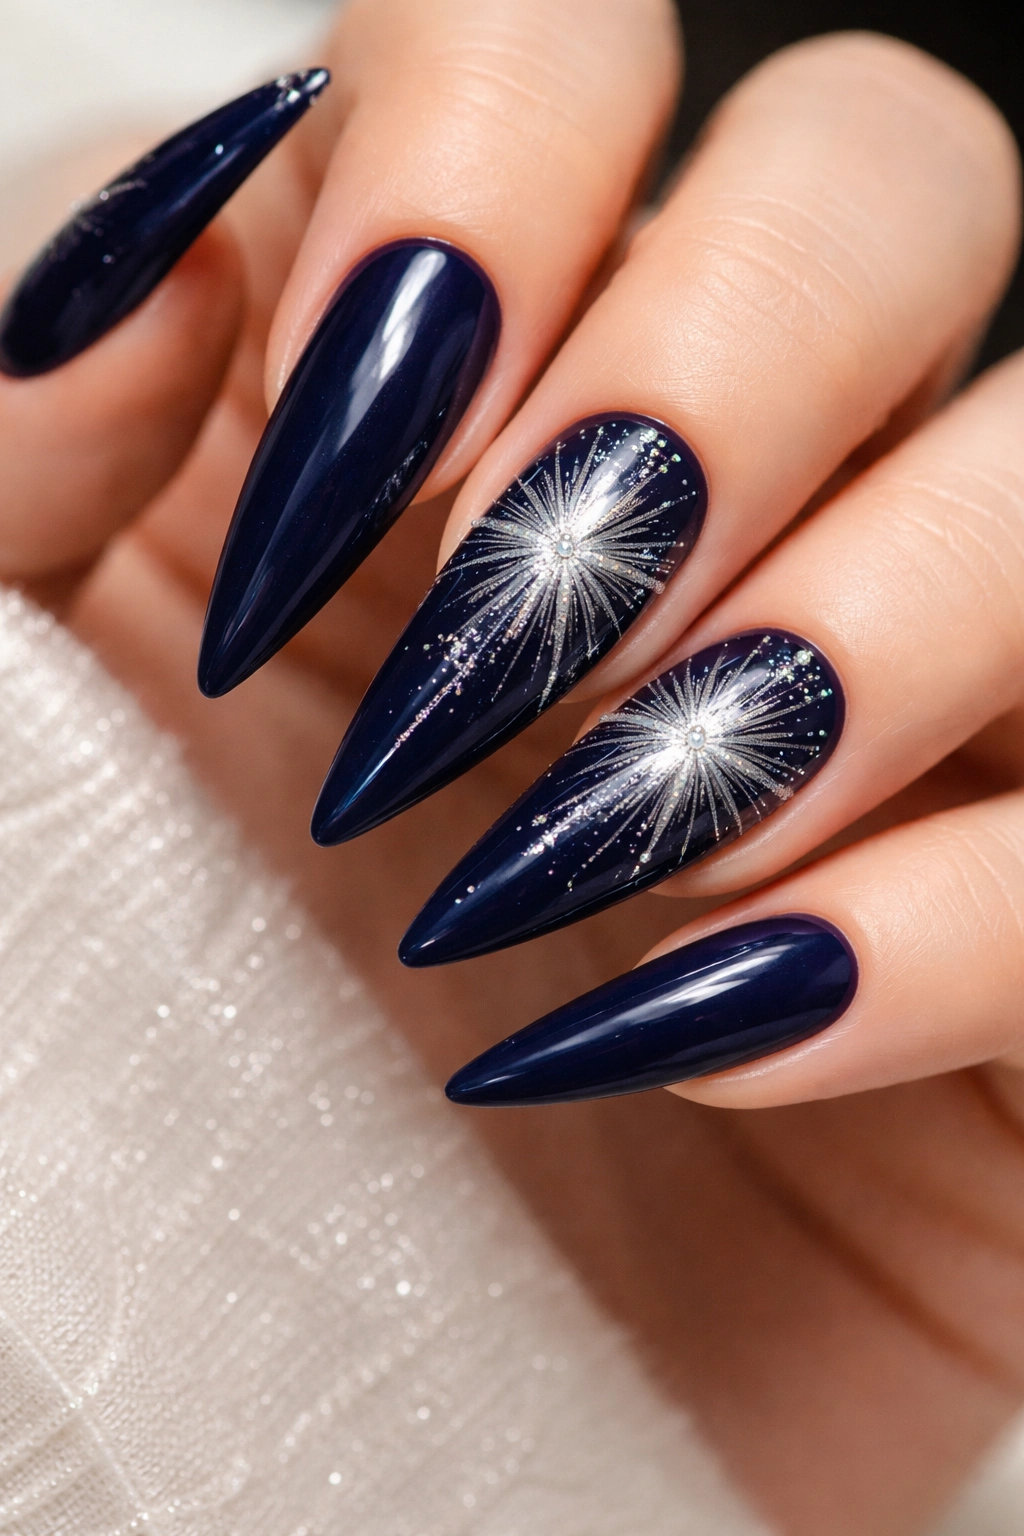
Silver starbursts scattered across dark blue nails create a dreamy, celestial vibe that feels both whimsical and elegant. This design is particularly striking on stilettos because the elongated shape gives you room to arrange multiple starburst patterns without overcrowding the nail. The contrast between cool navy and reflective silver creates a dynamic visual effect.
Creating the Starburst Effect
A starburst is simply a collection of thin lines radiating from a central point, like rays of light. On dark blue stilettos, these bursts become eye-catching focal points. You can create starbursts using metallic gel paint, a thin detail brush, or even silver nail art pens. The beauty of this design is that imperfect starbursts actually look more intentional and artistic than perfectly symmetrical ones.
Design Placement Strategy
- Concentrate starbursts on the tips of 2-3 nails for a balanced, not overwhelming look
- Scatter smaller starbursts across remaining nails for visual continuity
- Vary the size of starbursts—mix large focal starbursts with tiny accent ones
- Optional: place a small silver rhinestone at the center of each starburst for extra glamour
- Use matte navy as your base for maximum contrast with silver
Insider note: Silver starbursts pop even more dramatically on matte navy than on glossy navy. The flat finish creates contrast with the reflective metallic paint, making your design look three-dimensional and carefully thought out.
4. Midnight Blue French Tips with Rhinestones
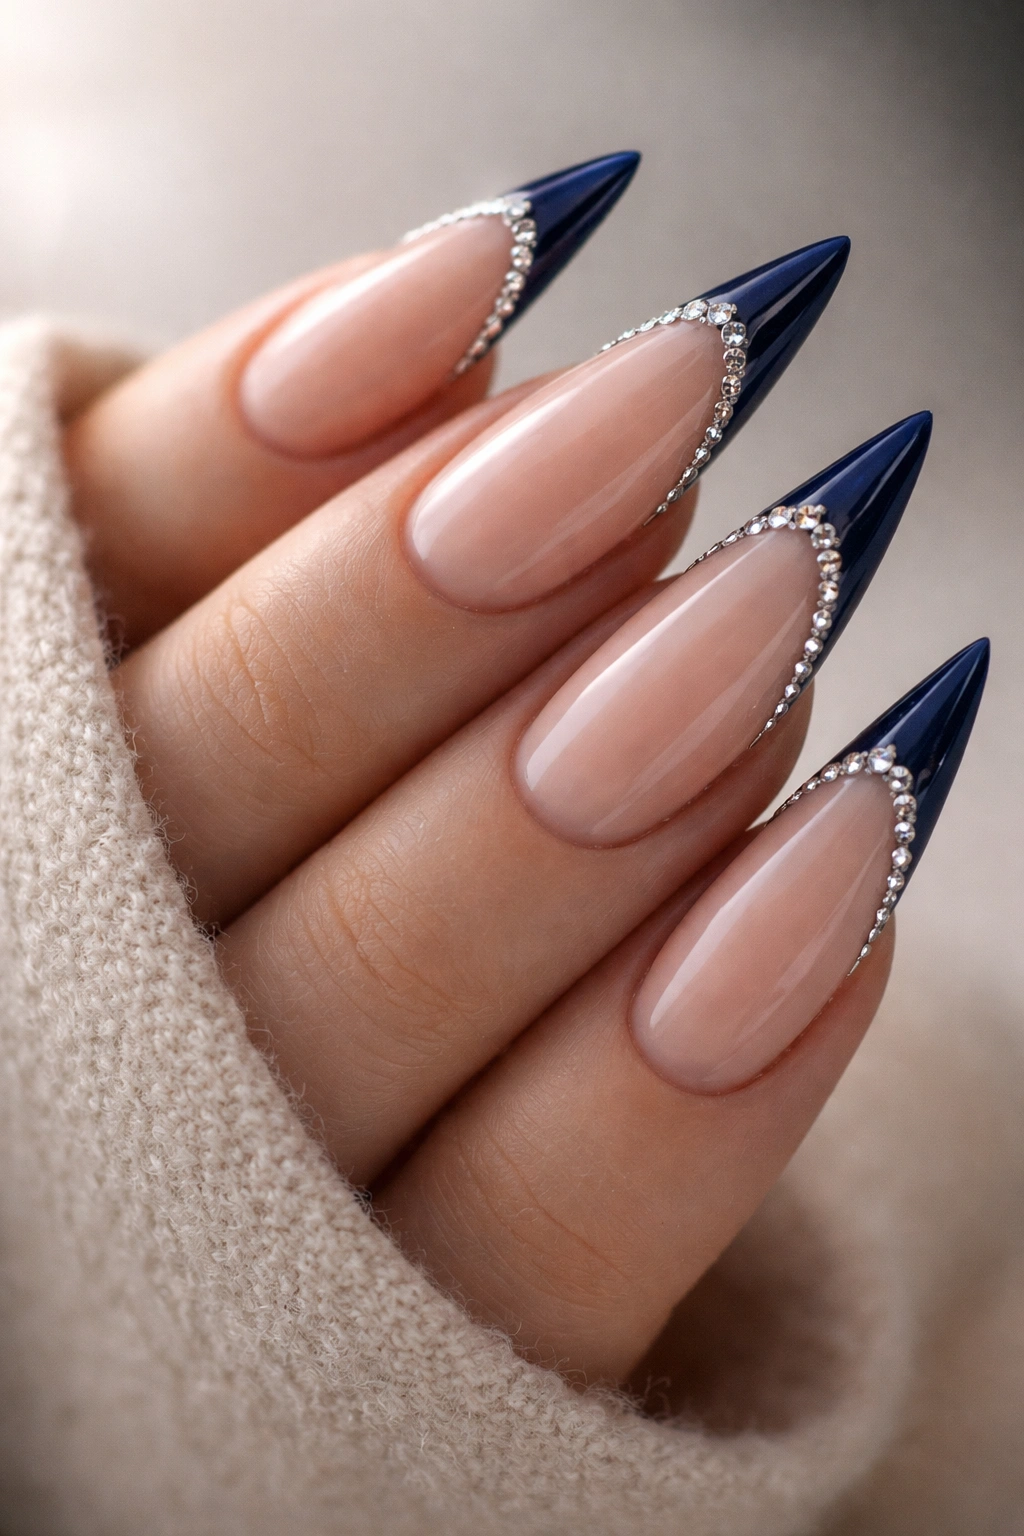
A French tip design modernized with midnight blue and rhinestones takes the classic French manicure and makes it distinctly yours. Instead of traditional white tips, substitute a deep midnight blue—this creates an elegant, unexpected twist on a timeless style. Rhinestones along the blue tip line add just enough glamour without feeling over-the-top.
Why French Tips Work on Stilettos
The sharp, angular shape of stiletto nails actually enhances French tip designs. The pointed tip naturally draws the eye to the colored portion, making your French tip the main focal point. On stilettos, a French tip looks editorial and high-fashion in a way that traditional shapes can’t quite achieve. The negative space of the nail bed showing through also prevents the design from feeling heavy.
Execution Details
- Apply a pale nude or natural base color to the entire nail
- Use a French tip guide or freehand a straight or slightly curved line across the nail approximately one-third down from the tip
- Fill the tip section with midnight blue polish—apply two thin coats for opacity
- Once fully dry, apply a thin line of clear nail glue along the blue-and-nude border
- Place individual rhinestones or a thin rhinestone chain along this border line
- Finish with a protective topcoat that encapsulates the rhinestones
Pro tip: A matte finish on the midnight blue tips creates more visual separation from the shiny nude base, making the French tip design even more defined and striking.
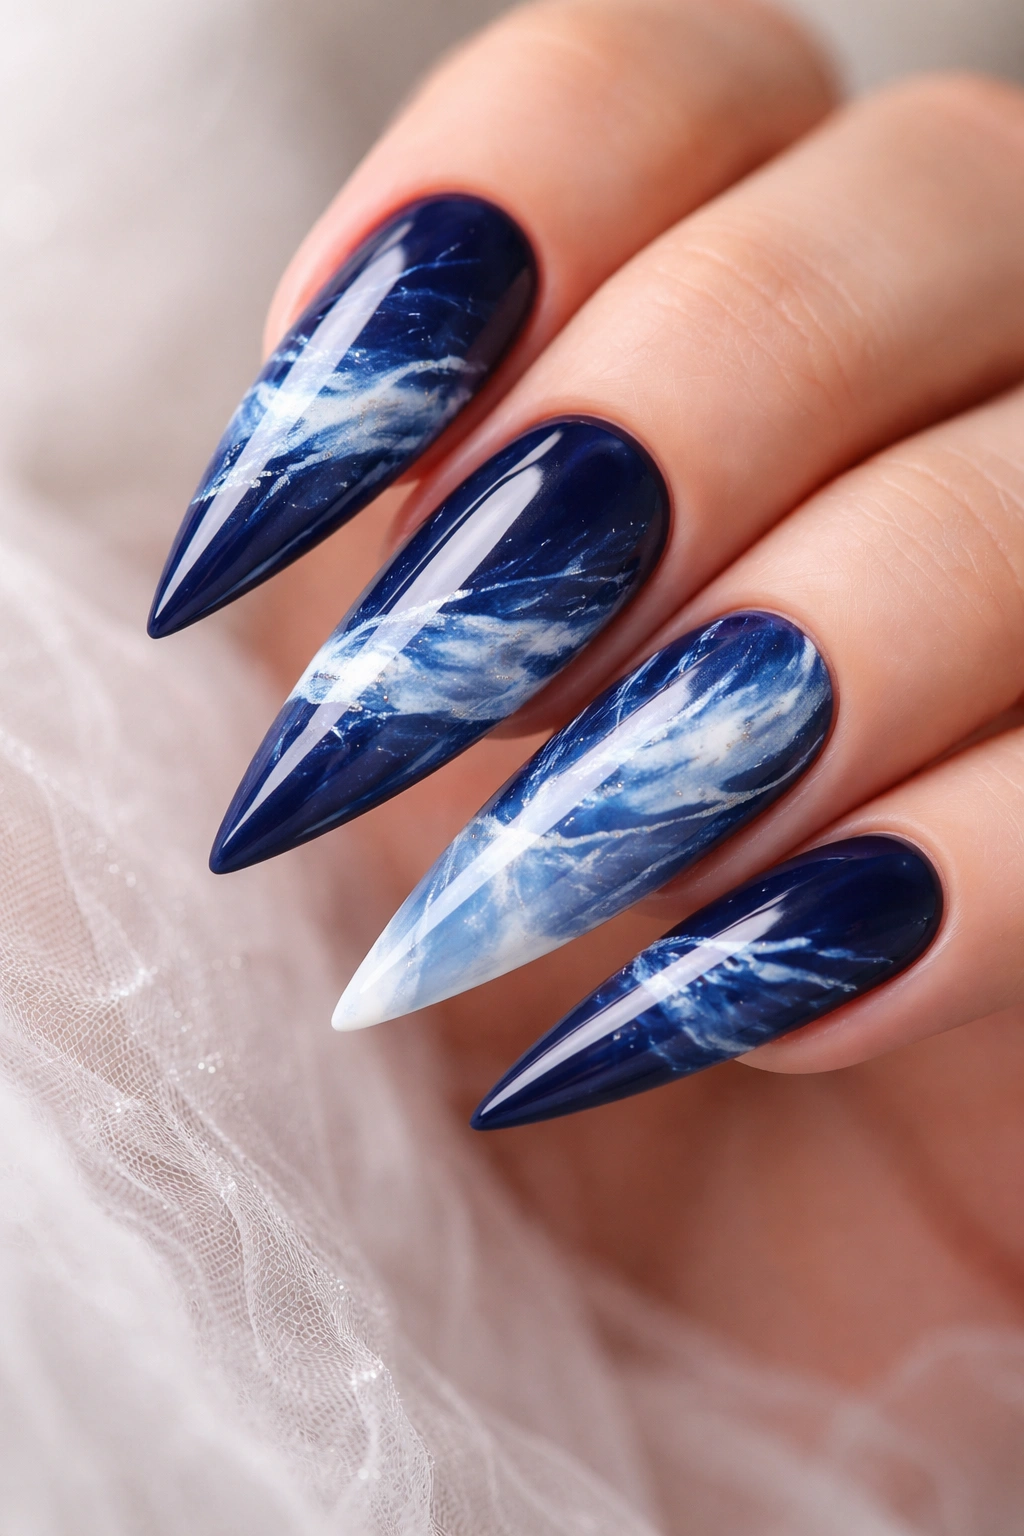
5. Sapphire Blue Marble Effect
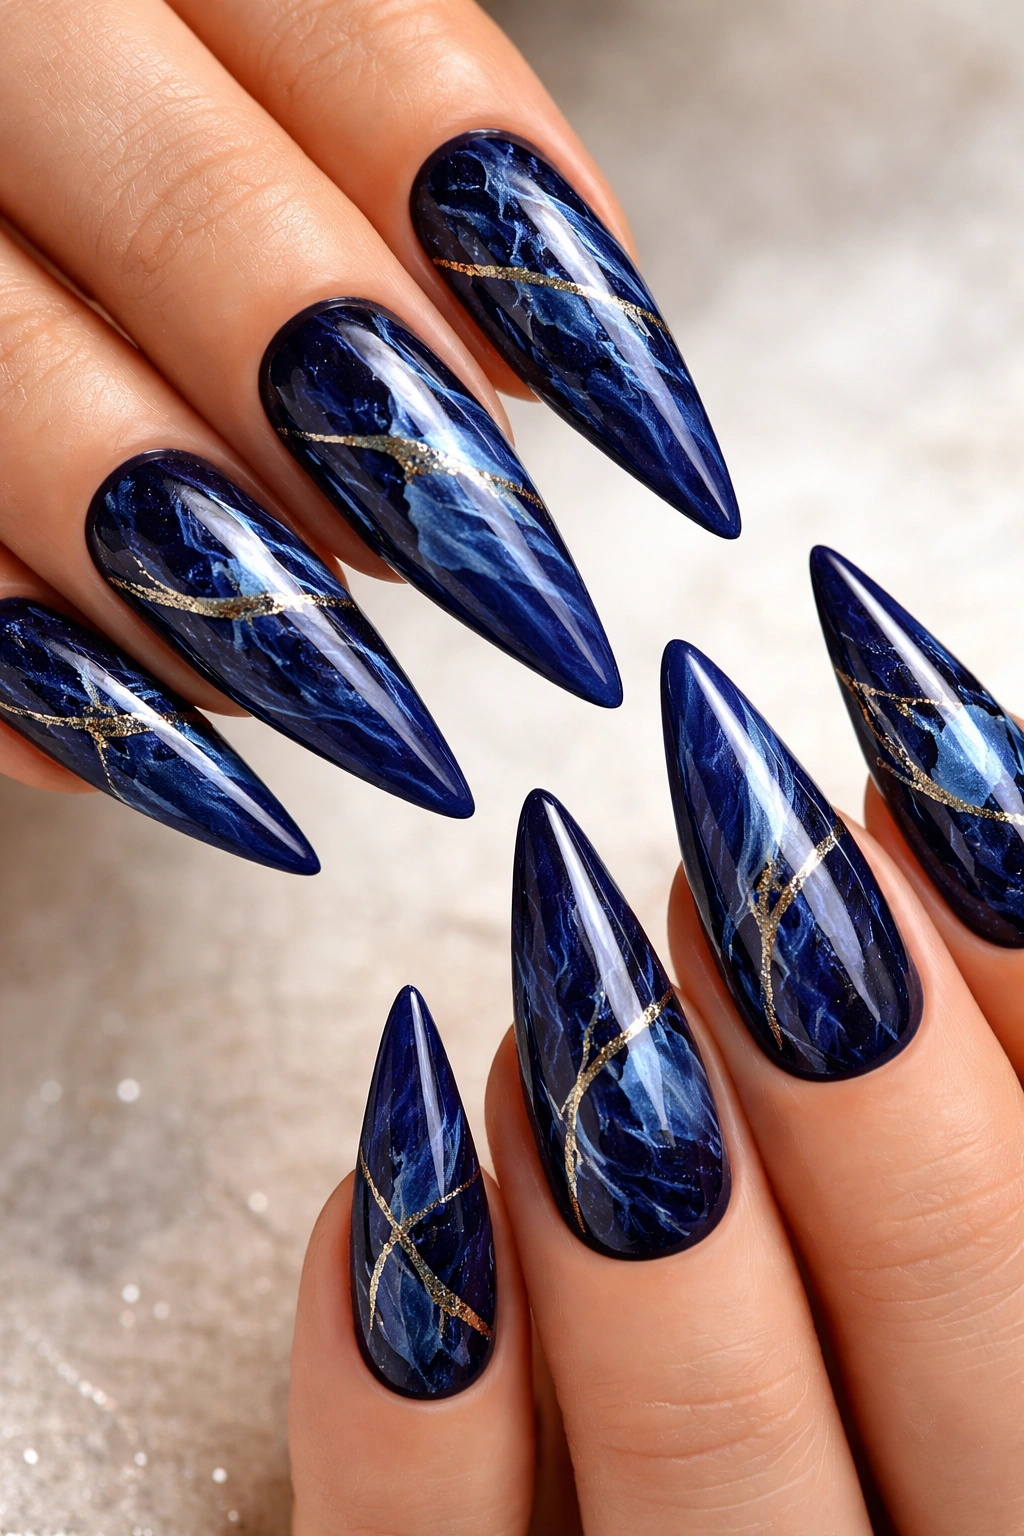
Marble nails create an intricate, natural-looking pattern that feels organic and artistic. When you apply a marble technique using sapphire blue, you get swirling patterns that mimic real gemstone veining. On stilettos, this creates a luxurious look that catches the eye from every angle and reads as intentional nail art rather than accidental design.
The Water Marbling Technique
Traditional water marble uses a bowl of room-temperature water, polish drops, and a toothpick to create intricate patterns. The technique requires some practice but delivers stunning, unique results every time. For dark blue marble, drop sapphire blue, navy, and a metallic gold or silver polish into water, swirl the pattern with a toothpick, then dip your nail into the design.
Alternative Dry Marble Method
- Apply sapphire blue base to all nails
- Drop darker navy and lighter periwinkle onto the nail in random spots
- Use a fine detail brush or toothpick to drag and swirl the dropped colors across the surface
- Work quickly before polish sets—the effect should look natural and flowing, not rigid
- Apply topcoat to seal the marbled pattern
- The result looks like you’ve got tiny gemstones embedded in your nails
Worth knowing: The dry marble method is more forgiving than water marbling and actually looks more intentional on stilettos because you can control the pattern placement better. You’re not fighting water surface tension; you’re creating the pattern exactly where you want it.
6. Dark Blue and White Striped Design
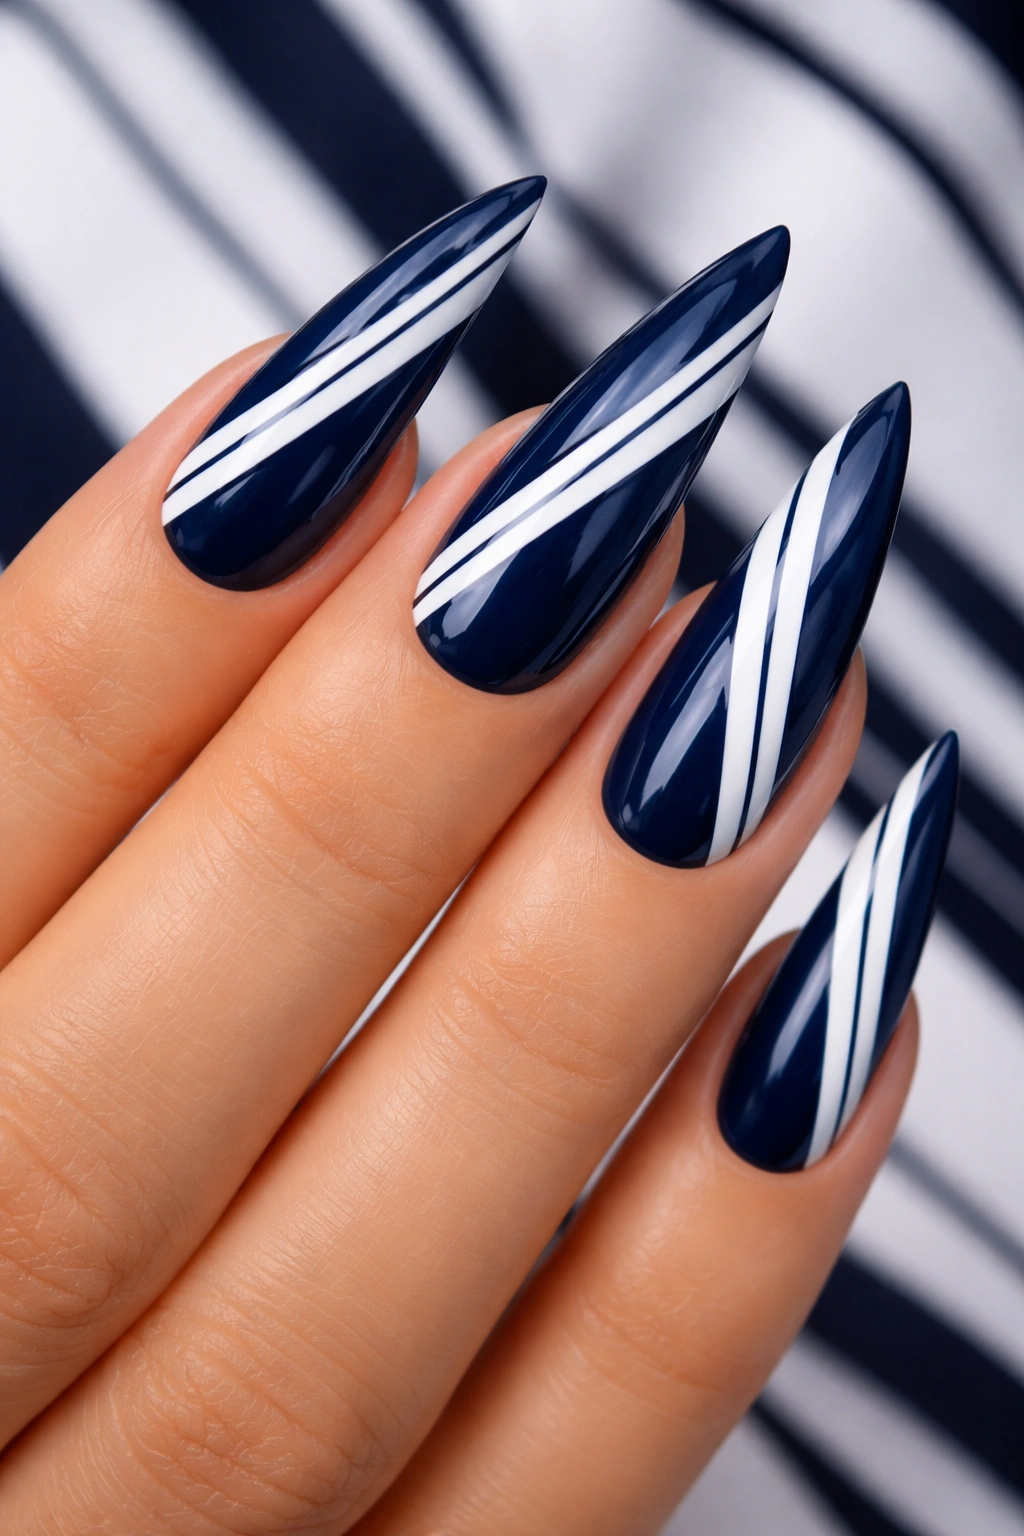
Striped designs are bold, graphic, and undeniably chic. Dark blue and white stripes create striking contrast that makes the stiletto shape even more pronounced. This design is clean and modern—perfect for anyone who wants statement nails that read as intentional and fashion-forward rather than playful or cutesy.
Stripe Variations for Visual Interest
Thin, evenly spaced stripes create a classic, polished look. Thick stripes feel more modern and edgy. Diagonal stripes add movement and dynamism. Vertical stripes elongate the nail visually. Mix stripe widths on different nails—thick stripes on some, thin on others—for a cohesive design that doesn’t feel repetitive.
Creating Perfect Stripes
- Apply two coats of dark blue base to all nails
- Use striping tape (available at any beauty supply store) to create clean lines where white and blue will meet
- Apply white polish over the taped areas in thin, even strokes
- Remove tape while polish is still slightly tacky for the cleanest lines
- Seal with glossy or matte topcoat depending on your preference
- For an extra dimension, add one matte coat on top of gloss for a layered finish effect
Pro tip: Gold or silver striping tape creates the same clean effect as white while adding subtle glamour. You can also skip the tape entirely and use a thin striping brush for a more artistic, hand-painted look that still feels intentional.
7. Deep Navy with Holographic Accents
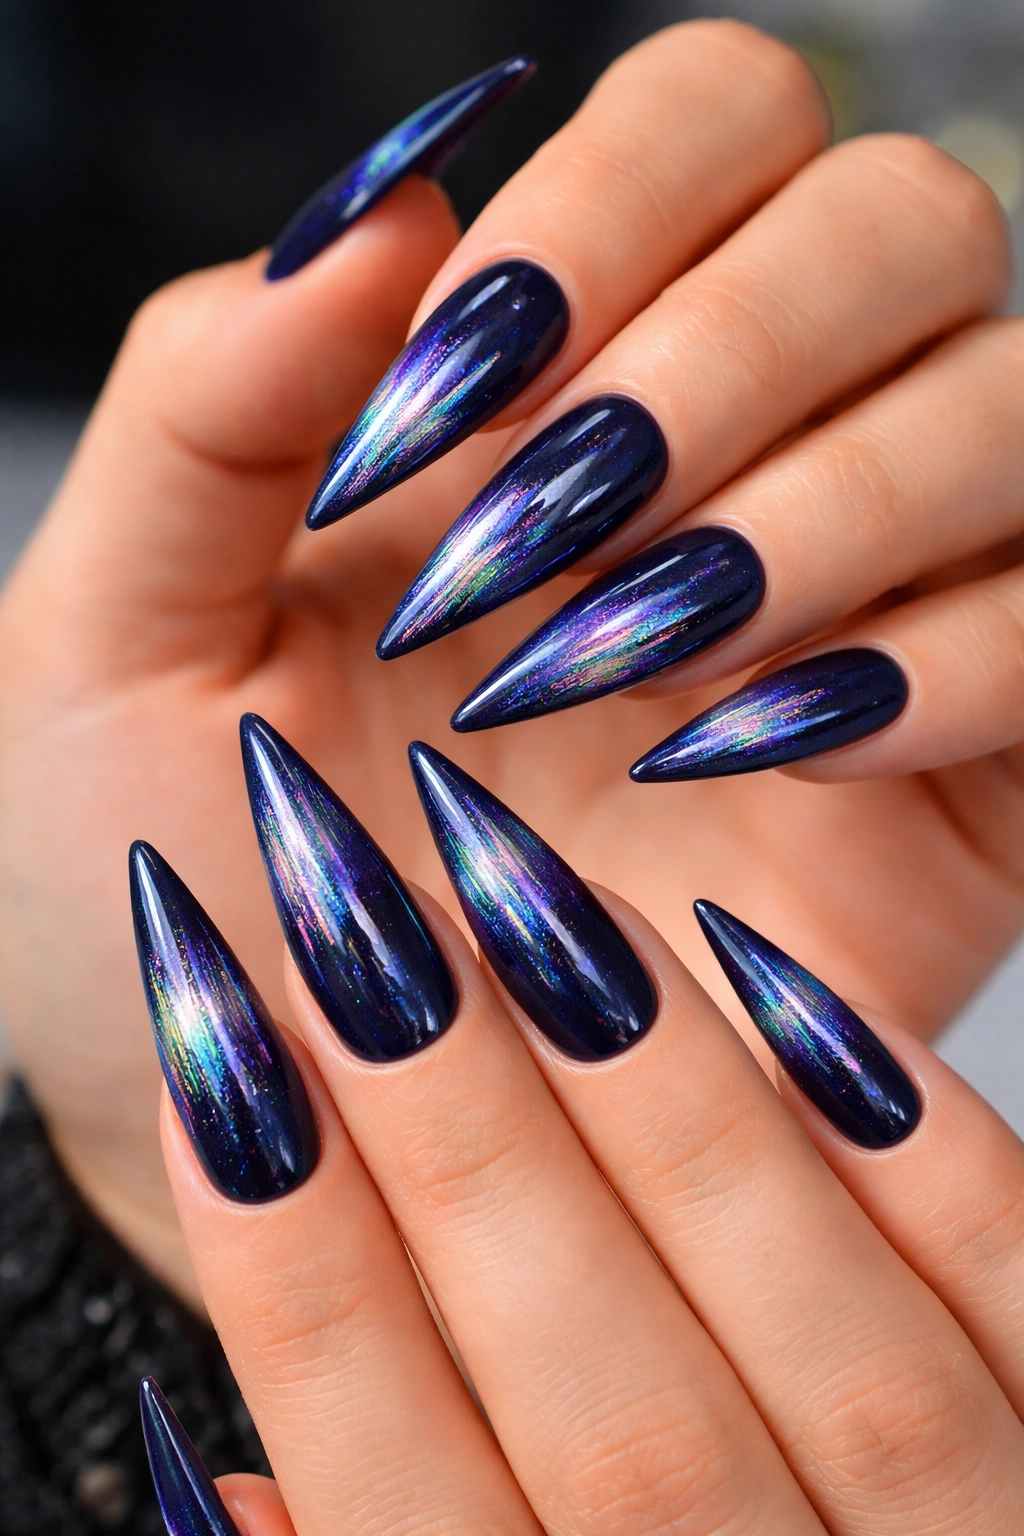
Holographic accents transform dark navy stilettos into something otherworldly and absolutely captivating. Holographic powder catches light at different angles, creating shifting rainbow effects that are impossible to achieve with regular polish. Even small amounts of holographic accent create maximum visual impact on stiletto nails.
Where to Apply Holographic Effects
Apply holographic accents to:
- A gradient from the nail tip fading into navy base
- Accent nails only (one or two nails per hand)
- A French-tip style where only the tip has holographic effect
- A strategic placement across the nail, like along the center or around the edges
- The effect is even more stunning under natural daylight or UV light where the holographic shimmer really shows
Application Process
- Paint deep navy base and let it cure fully (especially important for gel polish)
- Mix holographic powder with clear gel or base coat to create a workable paste
- Use a detail brush to apply the holographic mixture to your chosen areas
- Apply thin layers rather than one thick coat—multiple thin layers look more professional
- Cure or dry completely, then seal with topcoat
- The holographic shimmer should be visible but not overwhelming
Insider note: Holographic effects look most impressive on matte navy bases rather than glossy ones. The matte finish creates contrast with the reflective shimmer, making the effect pop even more dramatically.
8. Cobalt Blue Metallic Gradient
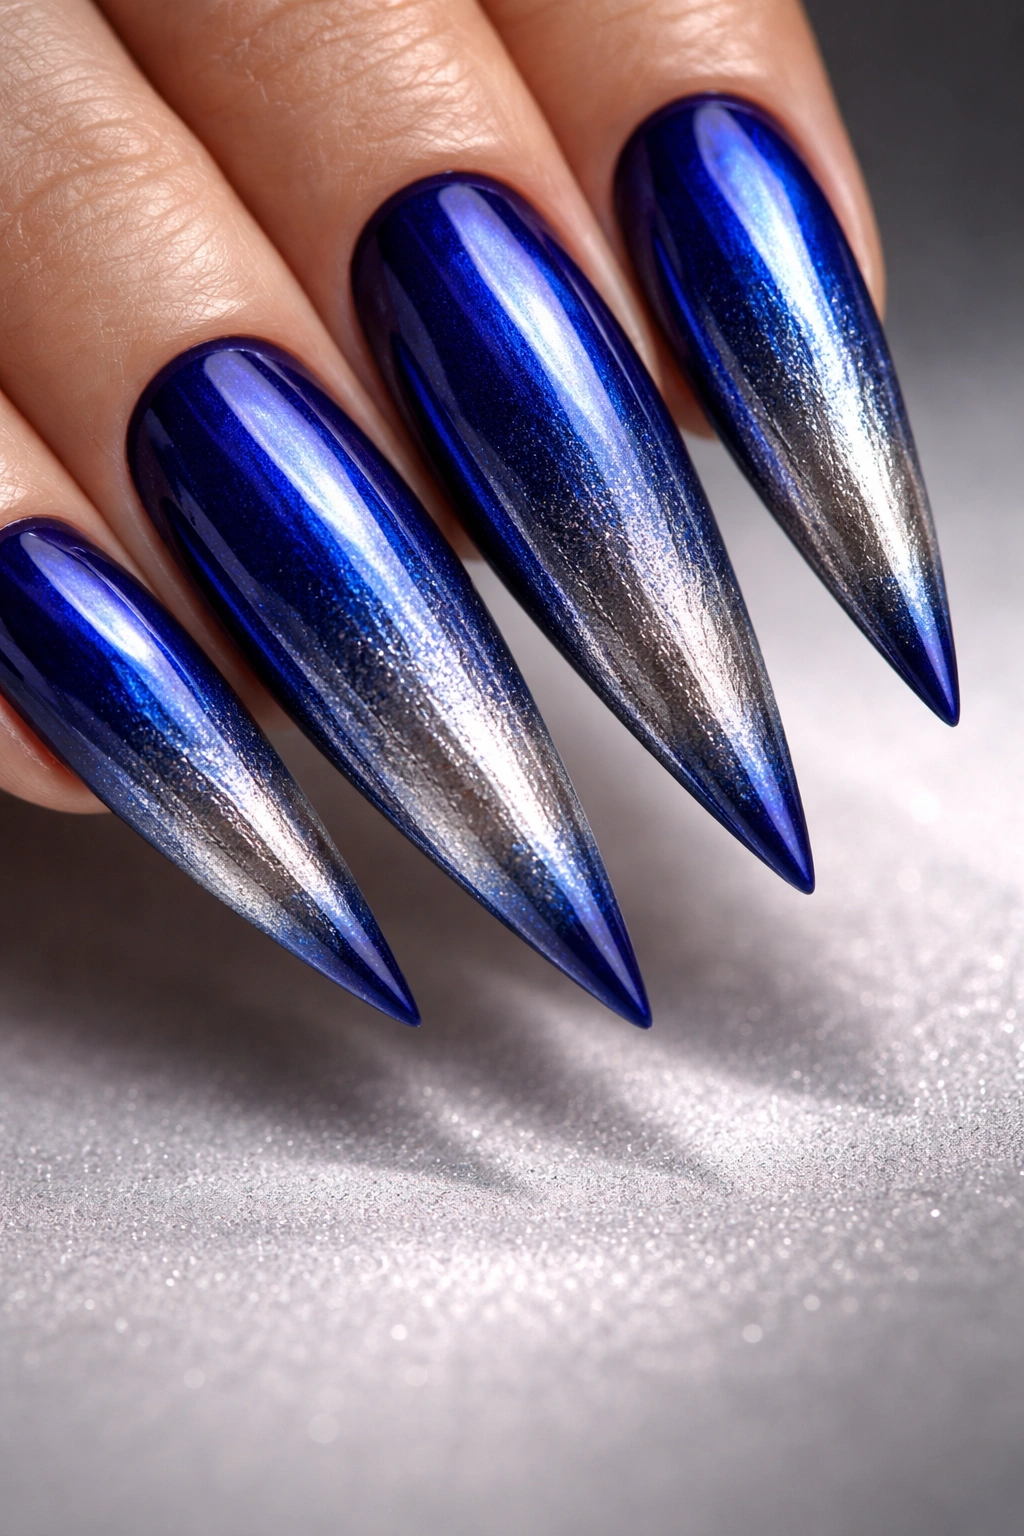
A metallic gradient combines the elegance of gradient nails with the eye-catching shine of metallic polish. Cobalt blue transitioning to silver or gold creates a luxurious effect that feels sophisticated and intentional. The metallic element catches light beautifully, making your nails look expensive and carefully curated.
Building the Metallic Gradient
- Apply a rich cobalt blue base to all nails
- Mix cobalt blue with a metallic silver or gold—adjust the ratio to create intermediate shades
- Apply the metallic base shade to create a second layer of shimmer
- Use a sponging technique to blend where the pure cobalt meets the metallic version
- The result: a smooth transition from deep cobalt to shimmering metallic blue-silver or blue-gold
Professional Polish Selection
High-quality metallic polishes contain finer pigments that blend more smoothly than budget brands. If you’re investing in a metallic gradient, spending a bit more on premium polish pays dividends in the final look. Gel polish also creates a more seamless gradient than traditional polish because it cures between layers, allowing perfect blending.
Worth knowing: Let each layer cure or dry completely before applying the next—wet-on-wet blending works for traditional polish but creates muddy colors. Layering thin coats over fully set base creates the cleanest, most professional-looking gradient.
9. Dark Blue Velvet Matte Finish
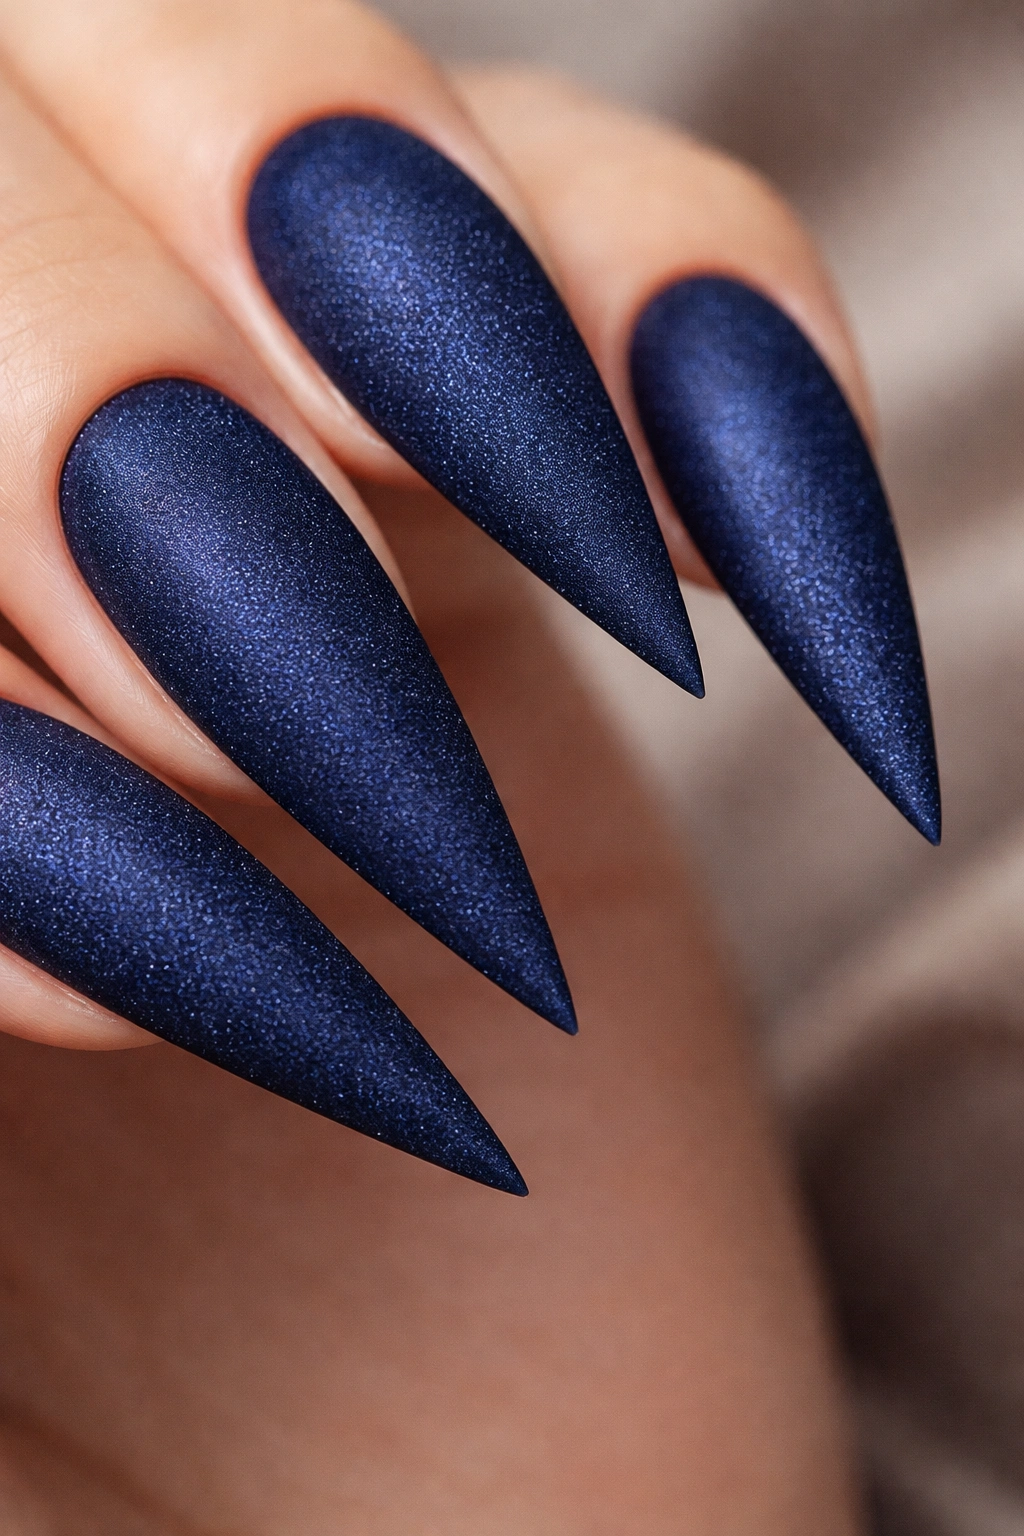
Velvet nail polish creates a unique textured finish that feels luxurious and looks incredibly sophisticated. Dark blue velvet has an almost velvety, touchable quality that looks rich and intentional. The matte finish eliminates any glossiness, creating a modern, refined aesthetic that’s entirely different from traditional shiny polish.
Understanding Velvet Polish
Velvet polish contains fine microbeads or flocking that create the soft, matte texture. The finish is slightly raised rather than smooth, giving your nails a three-dimensional appearance. On stilettos, the velvet finish makes the nail shape itself become part of the design—the geometry of the stiletto stands out even more prominently against the flat velvet color.
Application and Maintenance
- Apply velvet polish as you would traditional polish—two coats for full opacity
- Do NOT apply glossy topcoat over velvet polish; it destroys the matte effect
- If you want to seal velvet polish for durability, use a matte topcoat specifically designed for velvet finishes
- The velvet texture does show fingerprints more readily than glossy nails, so you might need to touch up the matte look more frequently
- This finish is particularly stunning paired with metallic accents like gold or silver
Pro tip: Combine dark blue velvet on most nails with one or two accent nails in glossy metallic blue for contrast. The mix of matte and glossy finishes creates visual interest and prevents the design from feeling flat or one-dimensional.
10. Navy with Glitter Gradient
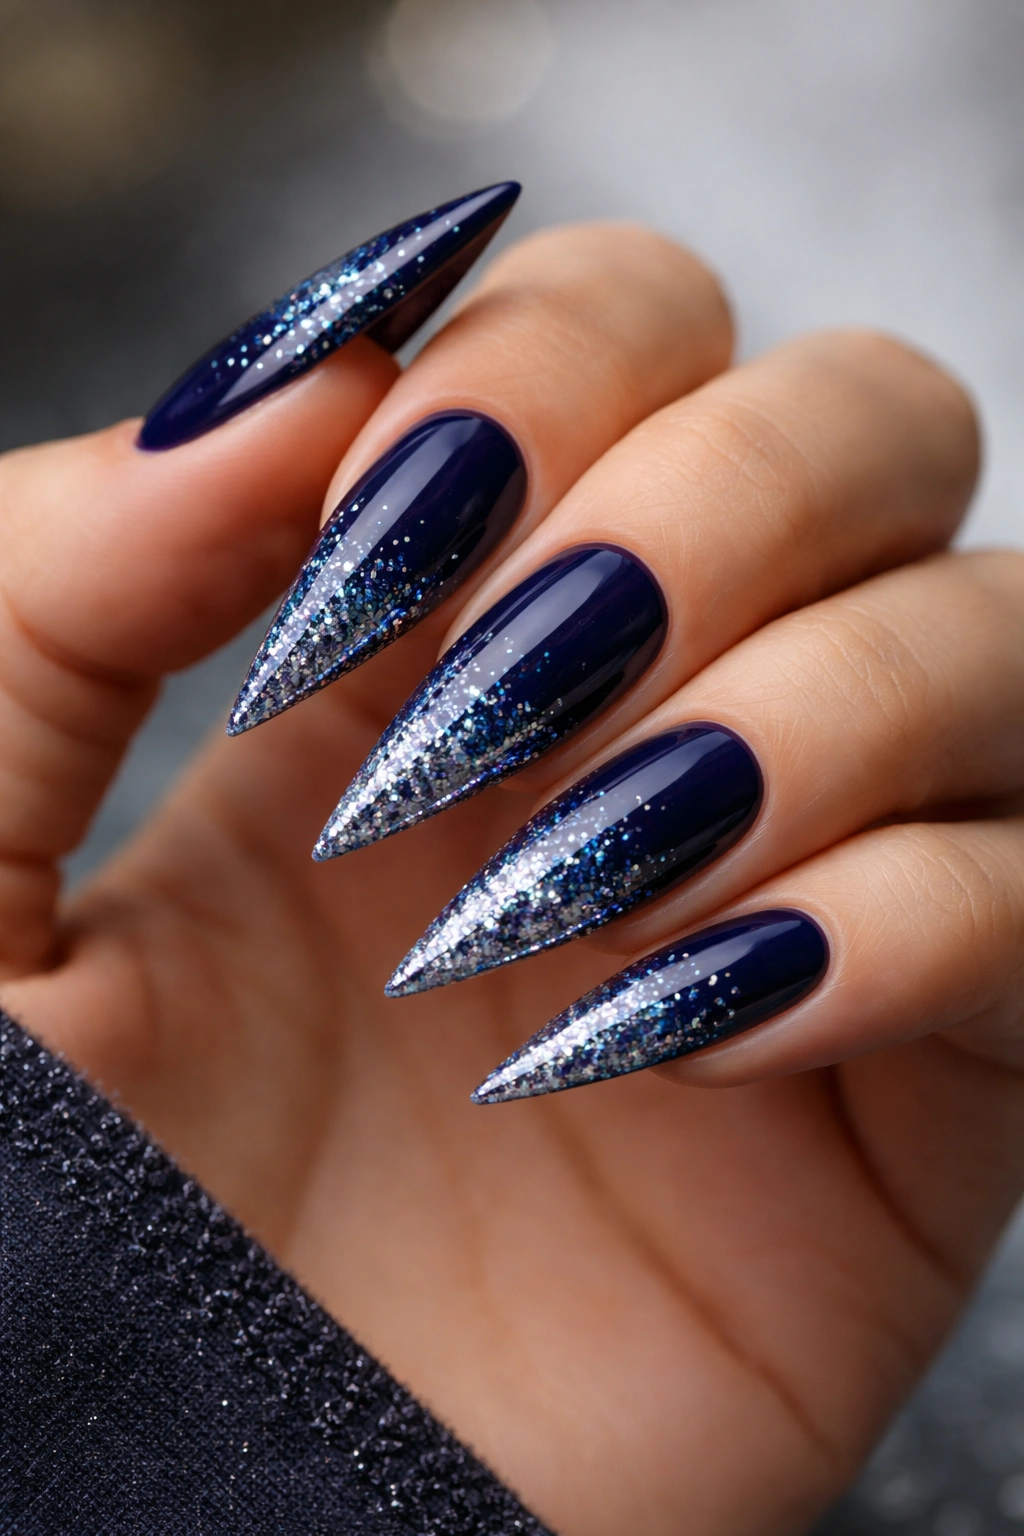
A glitter gradient moving from navy to a concentrated sparkly tip creates eye-catching glamour that’s perfect for special occasions or anyone who loves a bit of sparkle. The gradient technique distributes glitter gradually, so you go from sophisticated navy to show-stopping glitter—the best of both worlds.
Glitter Gradient Technique
- Paint navy base and let it dry completely
- In a small dish, mix navy polish with varying amounts of loose glitter or pre-mixed glitter polish
- Create three mixtures: pure navy (no glitter), navy with light glitter, navy with heavy glitter
- Apply these in gradient progression from base to tip using a sponge
- The result: a seamless transition from solid navy to glitter-packed tip
Choosing Your Glitter
Fine cosmetic glitter creates a more refined, elegant effect than chunky glitter. Holographic or iridescent glitter adds shimmer and dimension. Size variation actually looks more intentional on stilettos—mixing fine glitter with occasional larger sparkles creates a more high-fashion appearance than uniform glitter size.
Worth knowing: Pre-mixed glitter polish is easier to work with than loose glitter, especially if you’re new to nail art. The glitter is already suspended in polish, so you get consistent color and particle distribution without the mess of loose glitter management.
11. Dark Blue and Rose Gold Combination
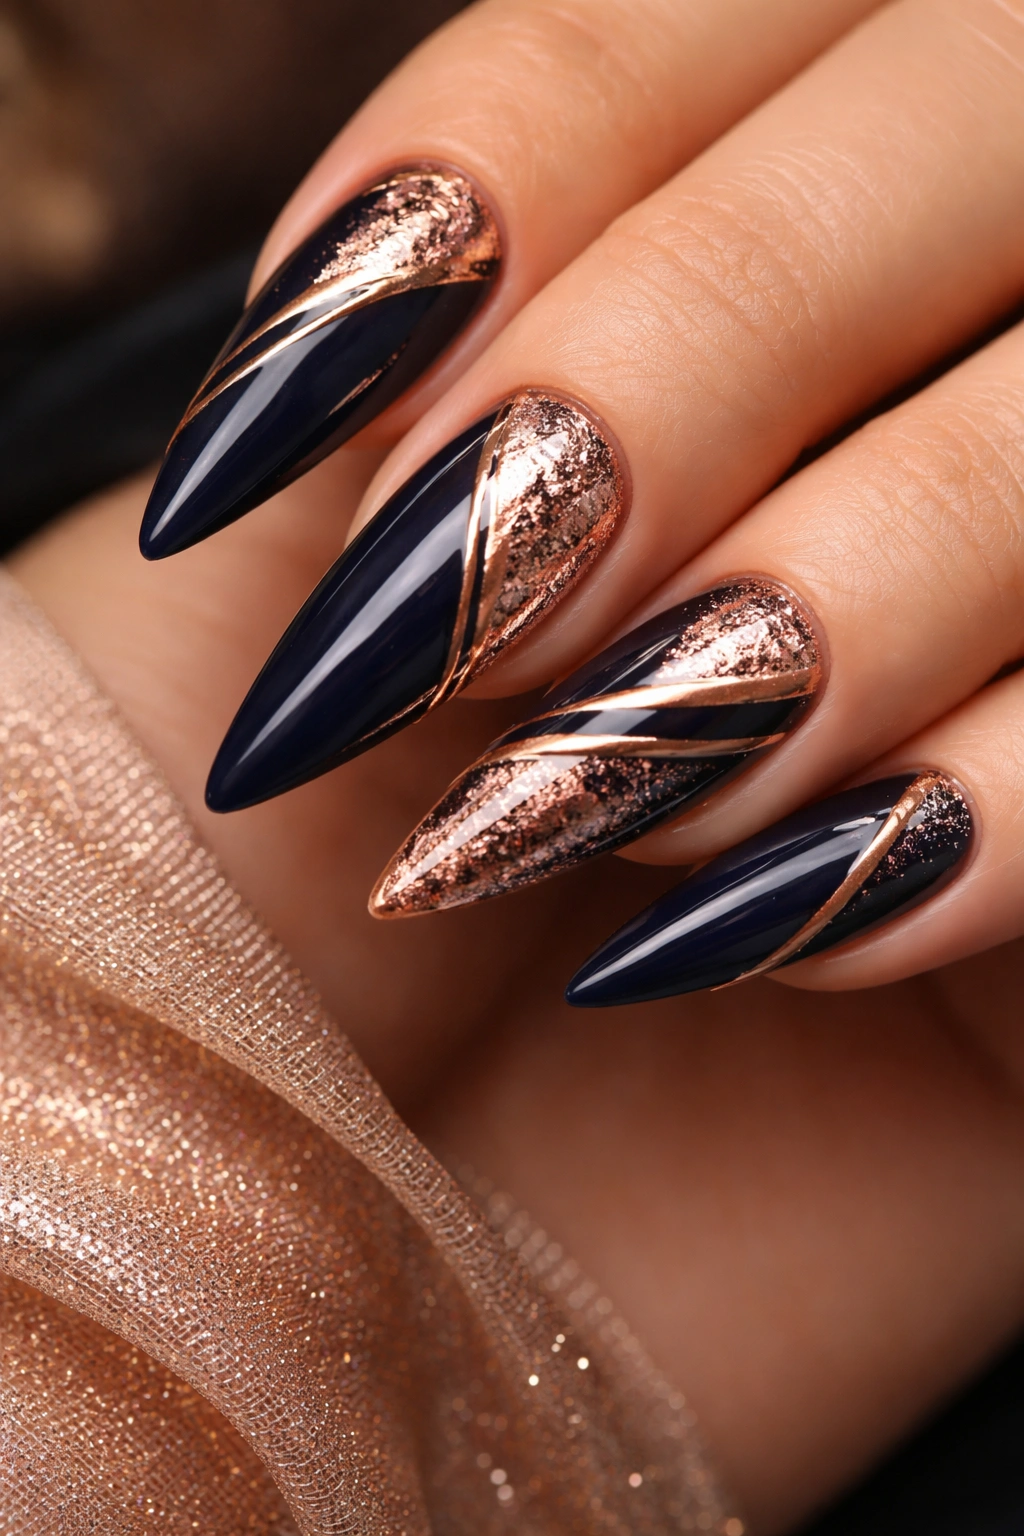
Rose gold has become a go-to accent metal for nail design, and paired with dark blue, it creates a warm, elegant, slightly romantic aesthetic. The contrast between cool navy and warm rose gold creates visual interest while maintaining sophistication. This combination is particularly flattering on warm skin tones but works beautifully on everyone.
Rose Gold Application Methods
Create rose gold accents by:
- Painting thin rose gold stripes or geometric shapes across navy base
- Creating a rose gold ombré fading into navy
- Using rose gold glitter or shimmer as accent nail polish
- Applying rose gold leaf or metallic foil accents to select areas
- Combining matte navy with glossy rose gold for textural contrast
Balance and Proportion
The key to this combination is not overwhelming the navy base with too much rose gold. Use rose gold as an accent that enhances rather than dominates. A single rose gold stripe down the center of each nail, or rose gold tips, or rose gold accents on just one or two accent nails per hand maintains the dark blue as the primary color while letting rose gold shine as the supporting actor.
Insider note: Rose gold looks most luxurious when it’s slightly textured or matte rather than pure mirror shine. A rose gold with subtle sparkle or shimmer creates more visual interest than flat rose gold metallic.
12. Indigo with Chrome Mirror Powder
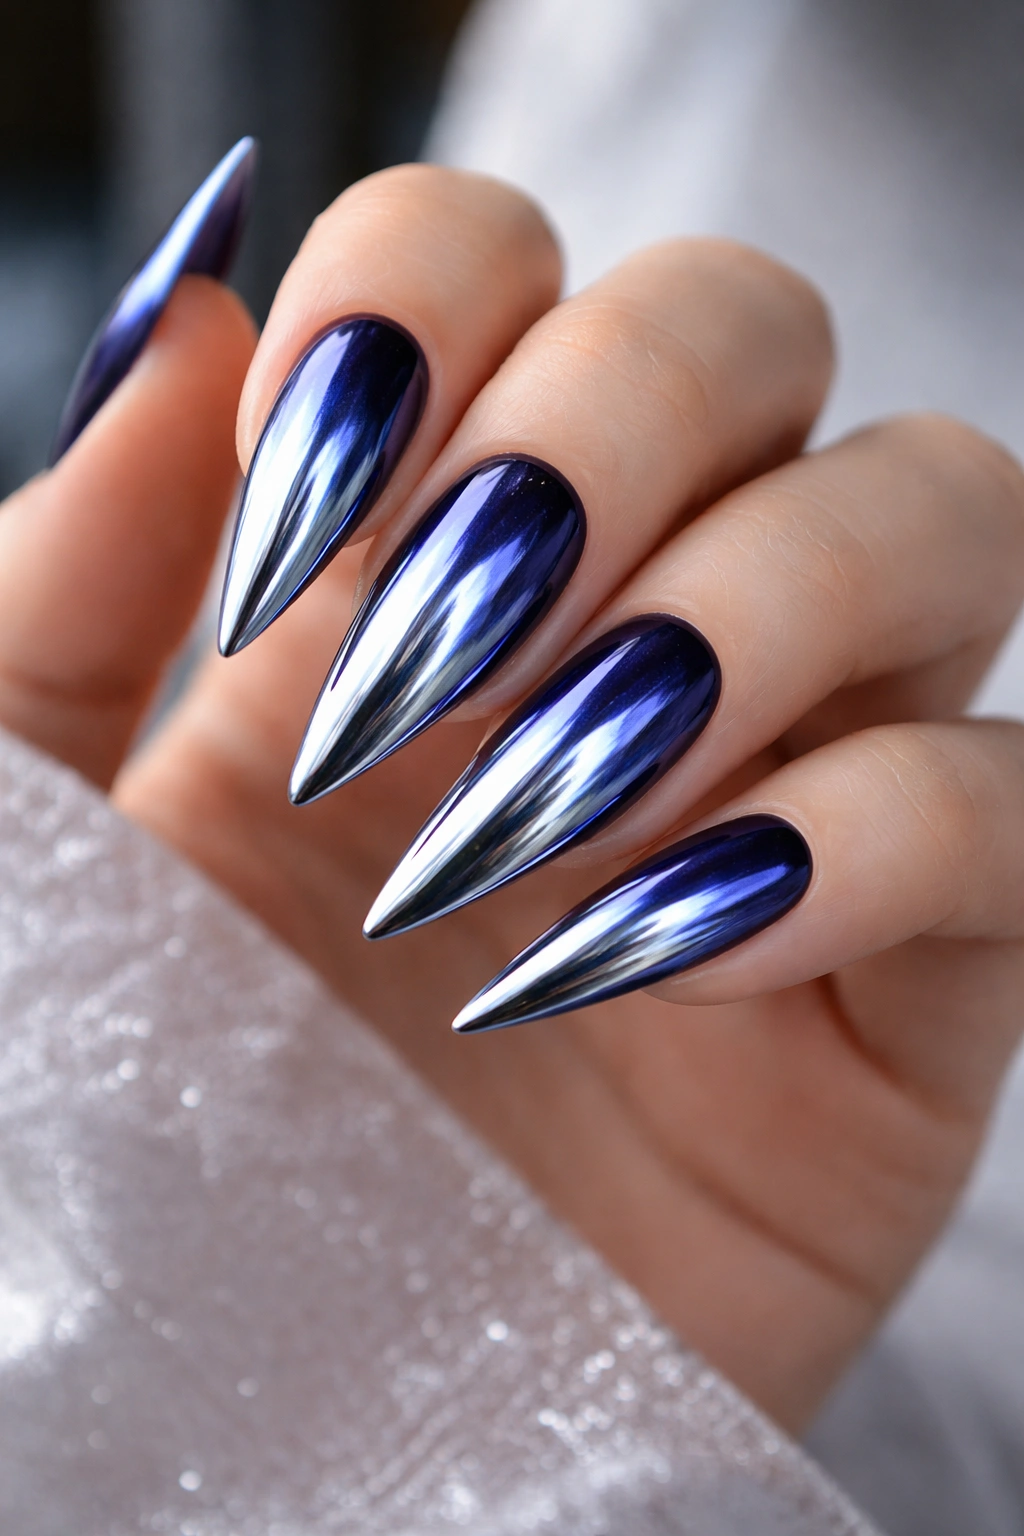
Chrome mirror powder creates an insanely reflective, mirror-like finish that looks like liquid metal on your nails. When applied over indigo base, chrome powder creates a stunning effect that shifts between deep blue and silver depending on the light and viewing angle. This is an advanced technique that delivers restaurant-quality, jaw-dropping results.
Understanding Chrome Powder Application
Chrome powder requires a sticky base—either a tacky gel polish or a specialized chrome base. The powder particles are incredibly fine and cling to the sticky surface, creating that mirror effect. On indigo, the chrome powder sits over the blue base, creating a layered effect where you can see the color beneath the reflective surface.
Professional Application Steps
- Apply indigo gel base and cure under UV light
- Apply a thin layer of clear sticky gel (or specialized chrome base) over the indigo
- Using a applicator or soft brush, press chrome powder onto the sticky surface
- Work in sections, applying powder until the mirror effect appears
- Gently brush away excess powder with a soft brush
- Seal with clear topcoat and cure
Pro tip: Chrome powder effects last longest when applied to gel polish and sealed properly. Traditional nail polish doesn’t hold the powder as securely, and the reflective effect diminishes faster with regular use and hand washing.
13. Dark Blue Floral Nail Art
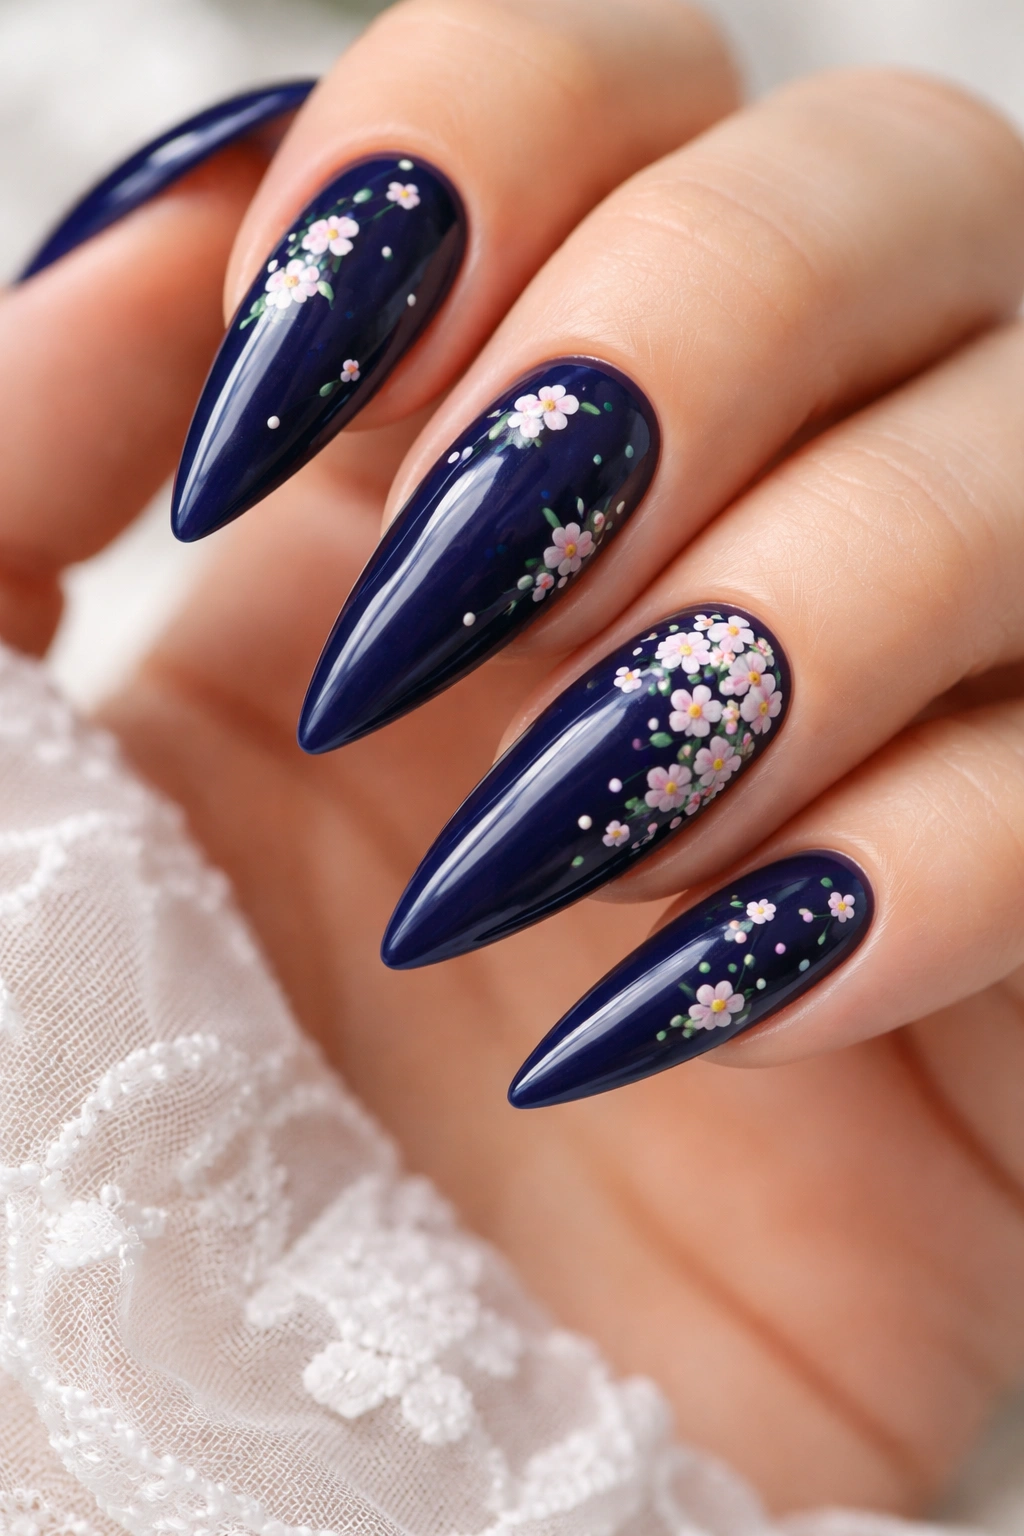
Floral designs bring elegance and femininity to dark blue stilettos. Small hand-painted flowers scattered across the nail, or a concentrated floral accent on one or two nails, create an artistic look that feels both refined and intentional. Dark blue provides a rich background for floral colors to pop—white flowers, pink flowers, gold flowers all read beautifully against navy.
Floral Design Options
Simple tiny flowers (dots with thin petal lines) are achievable even for nail art beginners. Larger, more detailed flowers require some painting skill but deliver more dramatic impact. Scattered small flowers feel whimsical. Concentrated floral arrangements on one or two accent nails feel more intentional and high-fashion.
Creating Hand-Painted Florals
- Start with dark blue base coat and let it dry completely
- Use a thin detail brush and white or light-colored polish to create simple flower shapes
- Create flowers by painting a center dot and surrounding petals radiating outward
- Add thin green stems using a striping brush
- For more complex flowers, layer petals and add shading with slightly different colors
- Seal everything with glossy topcoat to protect the artwork
Worth knowing: You don’t need advanced artistic skill to paint beautiful florals on nails. Simple flowers (five dots arranged in a circle with a center dot) look elegant and intentional. The dark blue background actually makes even basic flowers look sophisticated and carefully designed.
14. Midnight Blue with Pearl Accents
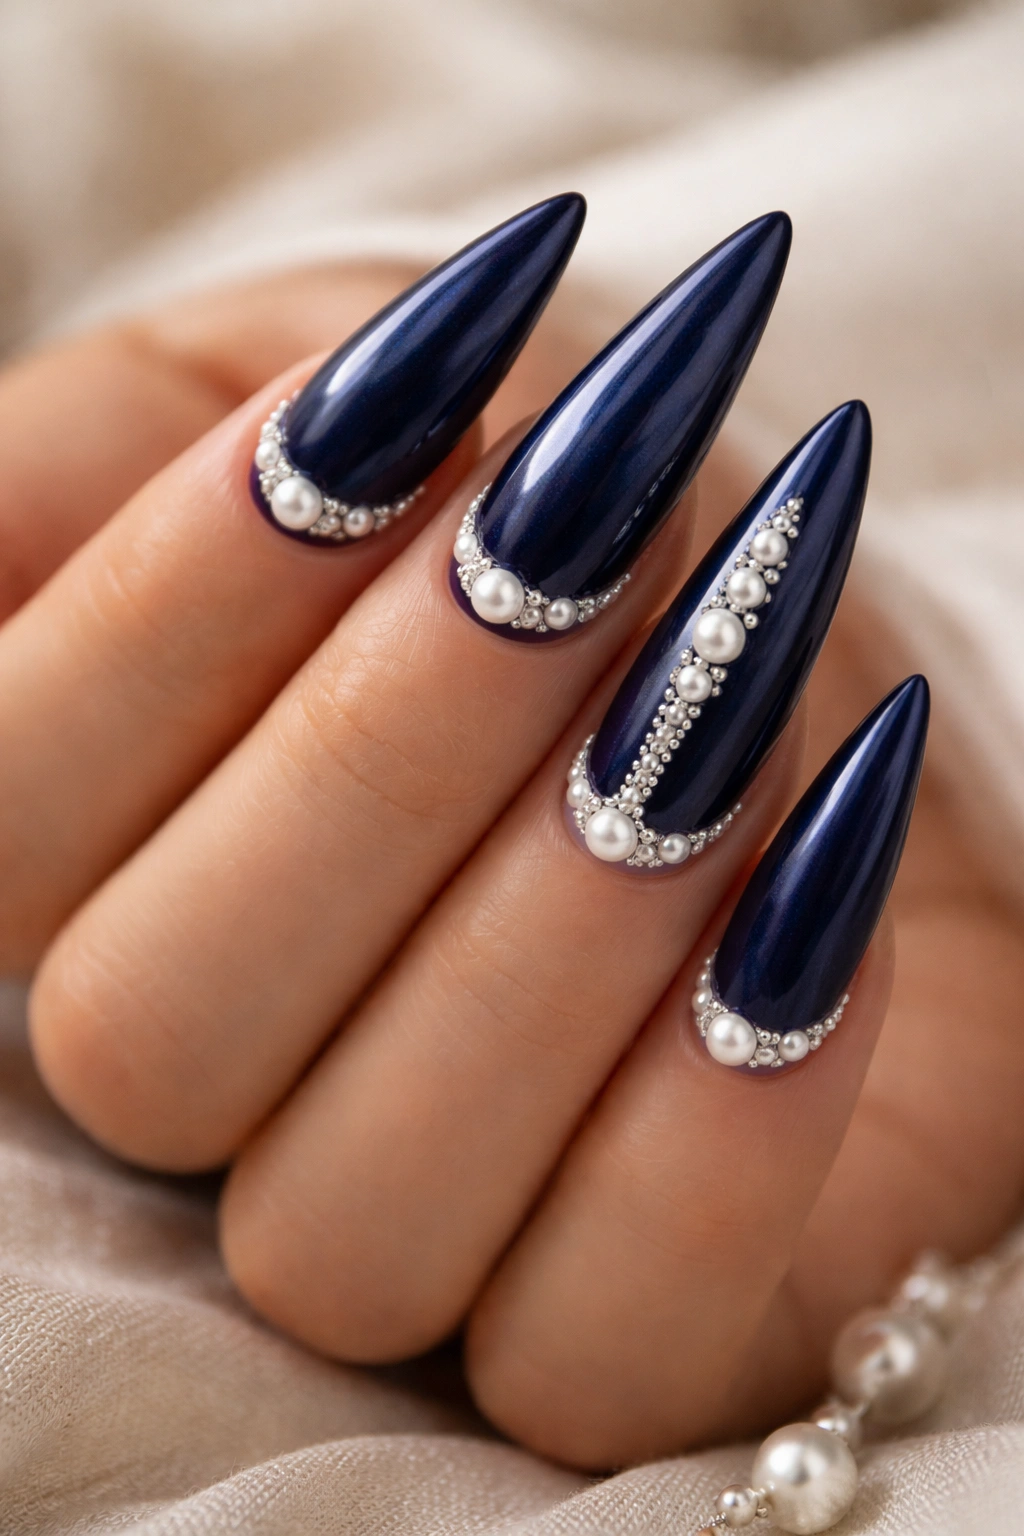
Pearl accents add understated luxury to midnight blue stilettos. Pearls create a soft, luminous quality that contrasts beautifully with deep, dark navy. This is a sophisticated, grown-up design that reads as elegant and refined rather than playful or youthful. Pearl accents are perfect for professional settings, evening events, or anyone who prefers subtle luxury.
Pearl Accent Placement
Apply pearl accents by:
- Creating a pearl tip (half-moon shape at the tip of the nail with concentrated pearl glitter or pearl polish)
- Scattering individual pearl rhinestones across the midnight blue base
- Creating a pearl stripe down the center of the nail
- Applying a pearl gradient fading into midnight blue
- Using pearl foil or shell fragments for a more organic, textured pearl effect
Creating Pearl Effects
Real pearl accents use:
- Pearl-finish polish with subtle shimmer
- Individual pearl rhinestones set into clear topcoat
- Crushed pearl pieces mixed into clear polish
- Pearl nail foil pressed into sticky gel base
- Each method creates a slightly different effect—experiment to find your preference
Pro tip: Matte midnight blue provides the most sophisticated backdrop for pearl accents. The matte finish makes the luminous pearls stand out even more dramatically, creating a high-contrast, high-fashion look.
15. Deep Blue Abstract Watercolor Design
Abstract watercolor designs feel artistic and unique—no two watercolor nails look exactly the same. Applied over deep blue base, watercolor technique creates soft, flowing patterns with organic movement. This design works beautifully on stilettos because the elongated shape gives you plenty of space for the watercolor patterns to flow naturally.
Creating Watercolor Effects
- Paint deep blue base and let it dry completely
- Dip a damp brush into complementary polish colors (white, light blue, purple, or gray work beautifully with deep blue)
- Touch the damp brush to the nail and let the polish diffuse and spread naturally
- The water on the brush creates soft edges and organic color blending
- Work quickly before polish dries
- The result: soft, artistic, one-of-a-kind patterns
Color Combinations for Watercolor
Deep blue + white creates a sophisticated, coastal aesthetic. Deep blue + gold or silver adds glamour. Deep blue + pink or purple creates a more artistic, creative feel. Deep blue + gray creates a moody, contemporary look. Each color combination tells a different story while maintaining the artistic watercolor aesthetic.
Worth knowing: Watercolor techniques look more intentional on stilettos because the shape itself already reads as fashion-forward. The abstract nature of the design prevents any sense of imperfection—irregular, organic patterns are exactly the point with watercolor art.
16. Dark Blue Glitter Bomb Nails
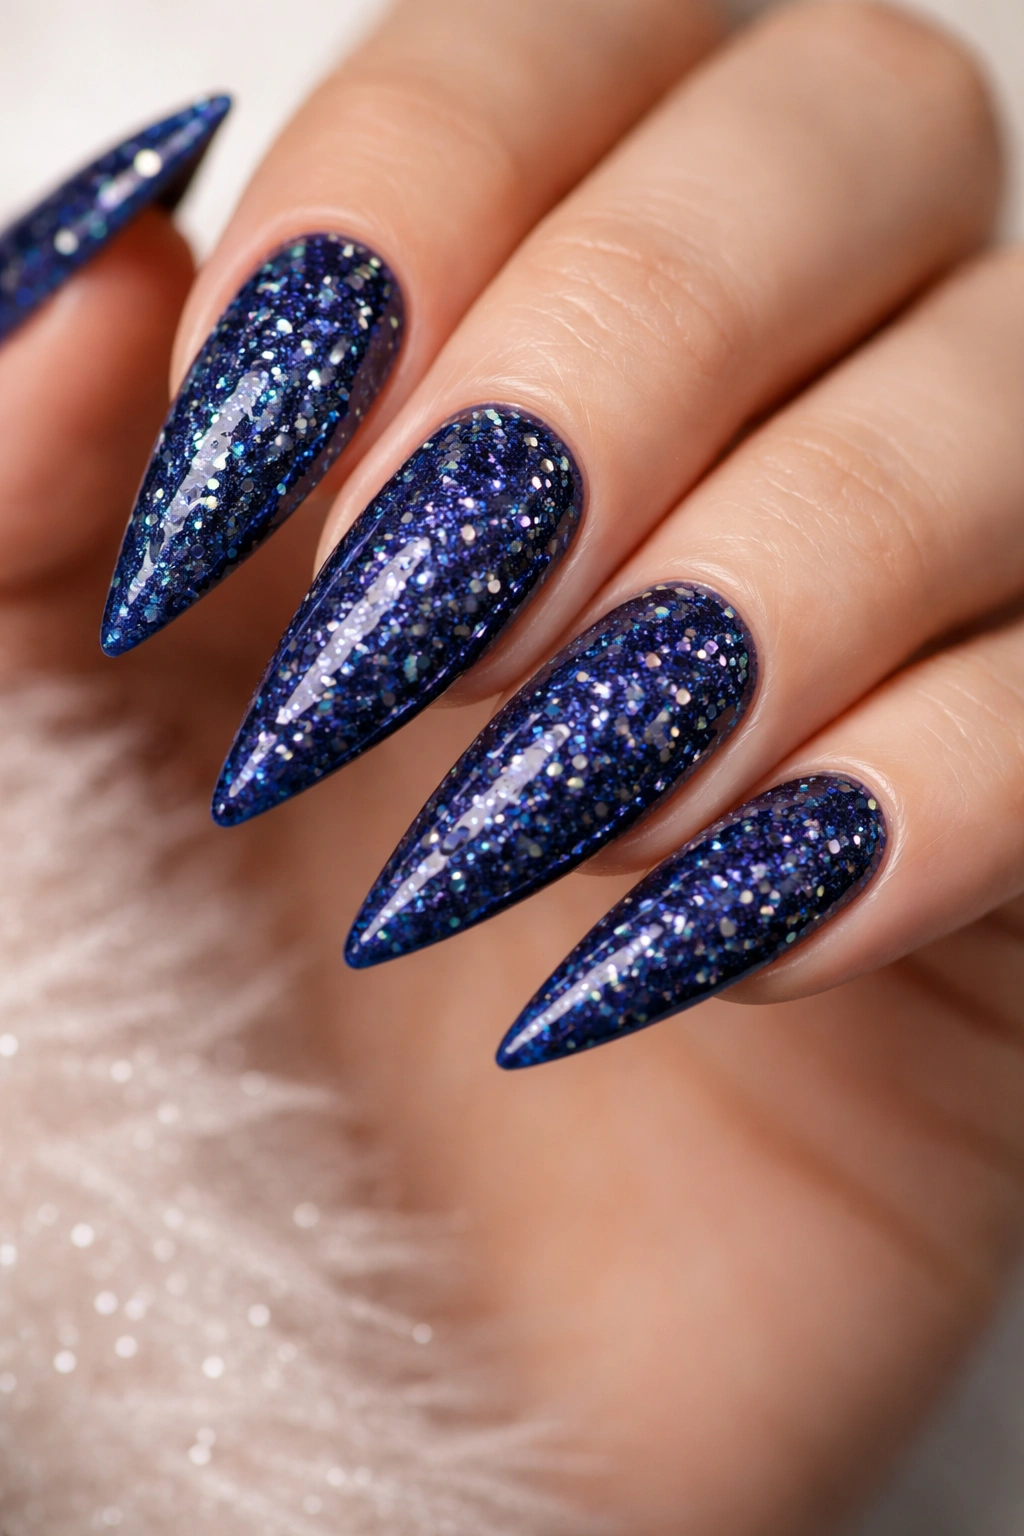
Go big or go home with a full glitter coverage design. Dark blue glitter bomb nails are pure glamour—perfect for celebrations, special occasions, or anyone who loves unapologetic sparkle. On stilettos, glitter coverage is even more impactful because the elongated nail provides a larger sparkly surface that catches light from every angle.
Glitter Application Strategies
Full coverage glitter nails require building the glitter in layers. Apply a sticky base (clear gel or nail glue), then layer glitter polish or loose glitter mixed with clear polish. Multiple thin layers look better than one thick layer. Vary glitter sizes and colors—mix fine glitter with larger sparkles, combine holographic glitter with regular glitter—for maximum visual impact.
Glitter Coverage Options
Complete coverage with uniform glitter color creates a cohesive, streamlined look. Mixed glitter sizes and finishes create more visual interest and depth. Ombre glitter fading from dark blue base to concentrated glitter at the tips creates a balance of glamour and sophistication. Glitter concentrated on tips with navy base creates glamorous French-tip effect.
Application and Durability
- Apply dark blue base coat
- Apply sticky topcoat or specialized glitter base
- Mix loose glitter with clear polish or use pre-made glitter polish
- Apply glitter mixture in thin coats, layering until desired coverage is achieved
- Seal everything with strong, clear topcoat
- Gel polish with glitter lasts significantly longer than traditional polish
Pro tip: Glitter removal requires patience. Soak nails in warm water mixed with a small amount of rubbing alcohol for 5-10 minutes to soften the glitter, then gently peel away. Rushing the removal process damages your natural nails. Planning for removal time is part of committing to glitter bomb glamour.
Final Thoughts
Dark blue stiletto nails offer versatility, sophistication, and endless creative possibilities. Whether you prefer minimalist geometric designs, dramatic glitter statements, or artistic watercolor patterns, dark blue serves as the perfect foundation for nail art that feels both intentional and personal. The depth of dark blue—whether navy, sapphire, cobalt, indigo, or midnight—means your nails read as refined and elegant while remaining boldly expressive.
The stiletto shape itself amplifies whatever design you choose. The elongated silhouette naturally draws attention to your hands and gives you extra real estate for intricate details. Combining that commanding shape with a rich dark blue base creates nails that feel powerful, polished, and distinctly you. Each of these 16 ideas provides a starting point, but the real magic happens when you adapt them to match your personal style—mix techniques, swap color accents, layer finishes in ways that feel authentic to you.
The investment in stunning nail art—whether you visit a salon or DIY at home—pays dividends in confidence and self-expression. Dark blue stilettos aren’t just nails; they’re a statement about how you want to move through the world. They’re bold without being reckless, sophisticated without being boring, and glamorous without apologizing for it. Whichever design speaks to you, commit fully to the look, wear it with confidence, and enjoy the way it makes your hands feel like the absolute best version of themselves.
