

Duck nails have become a bold statement in the nail world, and pairing them with the textured, eye-catching croc print pattern creates an absolutely striking look that turns heads. If you’ve ever scrolled through nail inspiration and felt drawn to that chunky, reptilian texture combined with the dramatically widened tip of a duck nail, you’re not alone — this combination has become a go-to for anyone who wants a manicure that announces their arrival.
The magic of croc print duck nails lies in the contrast between the edgy, modern duck shape and the organic, naturalistic pattern of crocodile skin. The croc texture adds depth and dimension that a flat color simply can’t achieve, and when you apply it to the distinctive silhouette of a duck nail, you get something that feels both fashion-forward and genuinely wearable. What makes this pairing so versatile is that croc print translates beautifully across color palettes — from classic neutrals to wild neons, jewel tones to pastels.
The challenge with croc print on duck nails isn’t the concept; it’s executing it in a way that feels intentional and fresh. You could go full-coverage reptile texture, or you could strategically place it as an accent. You could pair it with solid colors, gradients, or negative space. You could make it the entire show, or let metallic accents steal some of the spotlight. This is where creativity meets technique, and where your manicure becomes truly one-of-a-kind.
Here are fourteen croc print duck nail designs that showcase just how versatile and stunning this combination can be.
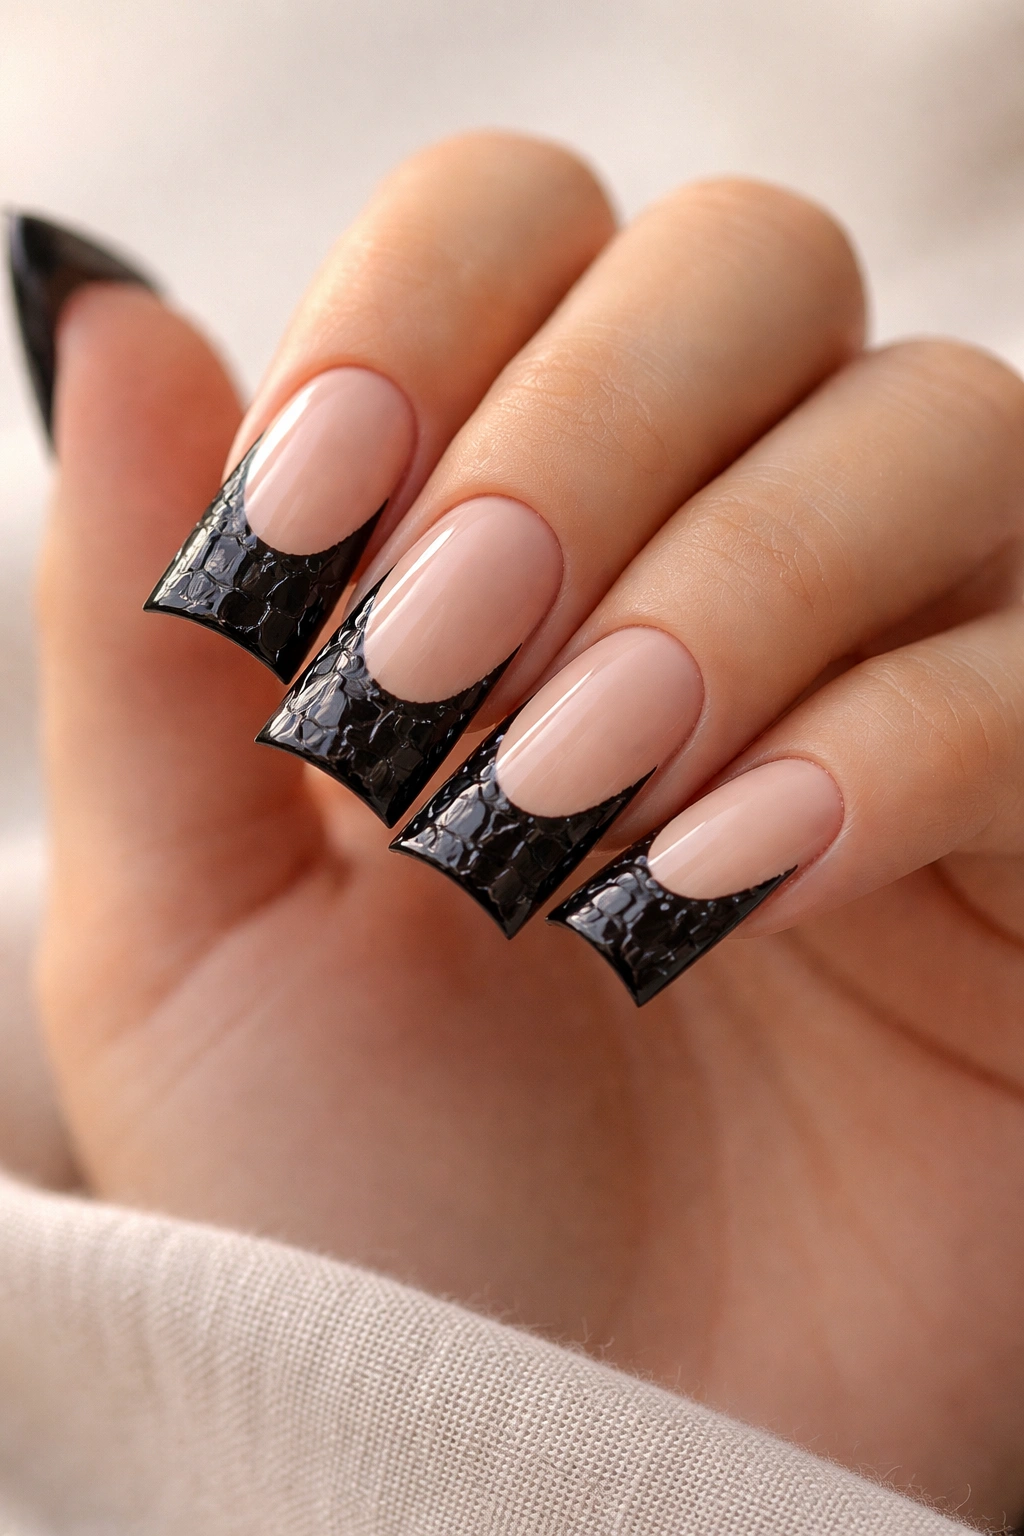
1. Classic Black Croc on Nude Base
A timeless approach to croc print duck nails starts with a warm, creamy nude base that lets the texture do all the talking. The contrast between the soft background and the bold black crocodile pattern creates an elegant look that works everywhere — from the office to a night out. This design reads sophisticated rather than trendy, which means it ages well and never feels out of place.
Why This Works for Every Occasion
Black croc print on a nude base creates an instant visual anchor that draws the eye without overwhelming it. The neutral background ensures that the textured pattern remains the focal point, and the black adds a sharp contrast that makes every scale visible. This combination works because it’s polished enough for professional settings while still feeling current and intentional.
How to Achieve This Look
Start with two coats of a creamy nude polish — something in the warm beige or light tan family. Once fully dry, use a thin stamping plate or freehand the black croc texture with a detail brush. If you’re not confident in freehand work, stamping plates designed specifically for reptile textures are your best friend. Seal everything with a high-shine top coat that emphasizes the texture beneath.
Pro tip: Use a glossy top coat rather than matte to make the black croc scales appear shiny and dimensional — matte finishes can flatten the effect and make it look less intentional.
2. Holographic Green Croc with Gold Accents
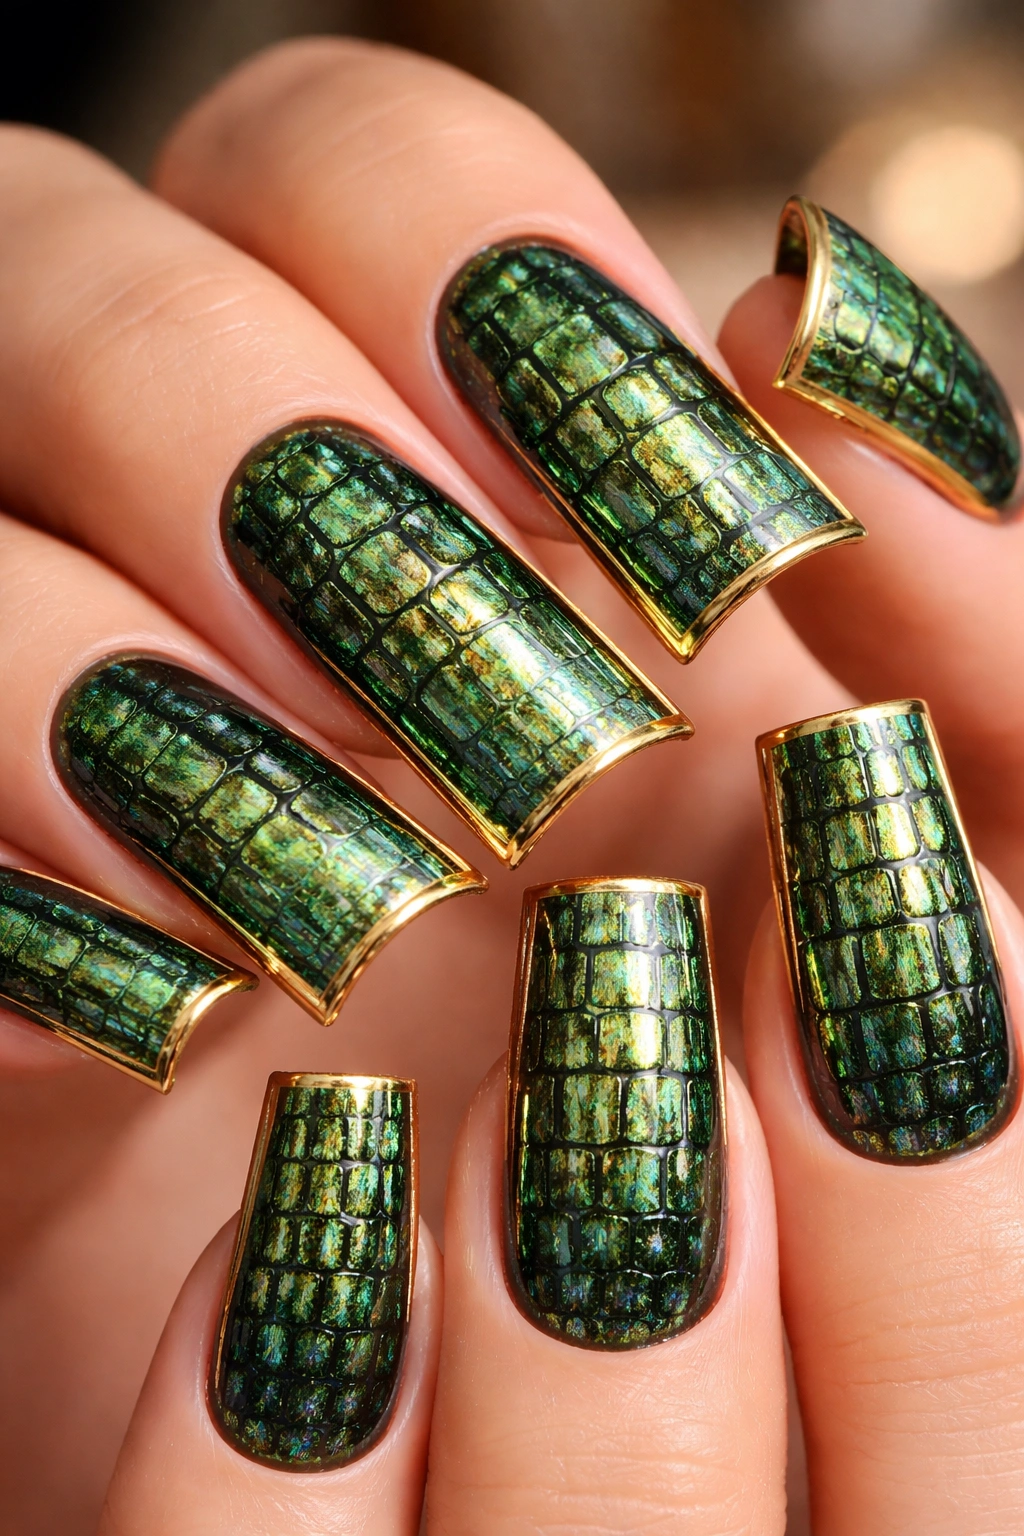
If you want your duck nails to literally catch the light, holographic green with croc print is the answer. The iridescent shifts combined with the textured pattern create a mesmerizing effect that changes as you move your hand. Add thin gold striping along the duck tip edges or as accent lines, and you’ve got something that feels both natural and magical.
The Visual Impact of Holographic Reptile Texture
Holographic polish already has dimension built in, but croc print amplifies that effect exponentially. As the holographic base shifts through shades of green, cyan, and blue, the croc texture becomes multidimensional. The black lines of the pattern hold steady while the background dances, creating visual interest from every angle.
Building the Design Step by Step
Apply two generous coats of holographic green polish, making sure coverage is even and smooth. Once dry, stamp or paint the croc pattern in deep charcoal or black — the darker lines will pop beautifully against the shifting background. After the pattern sets completely, use a thin striping brush and gold polish to add vertical lines along the outer edge of each duck nail tip, or create geometric gold accents on the sides.
Insider note: Holographic polishes work best in natural light or bright artificial light — dim environments will dull the effect, so consider this when planning to wear this design.
3. Tortoiseshell Meets Croc Print Hybrid
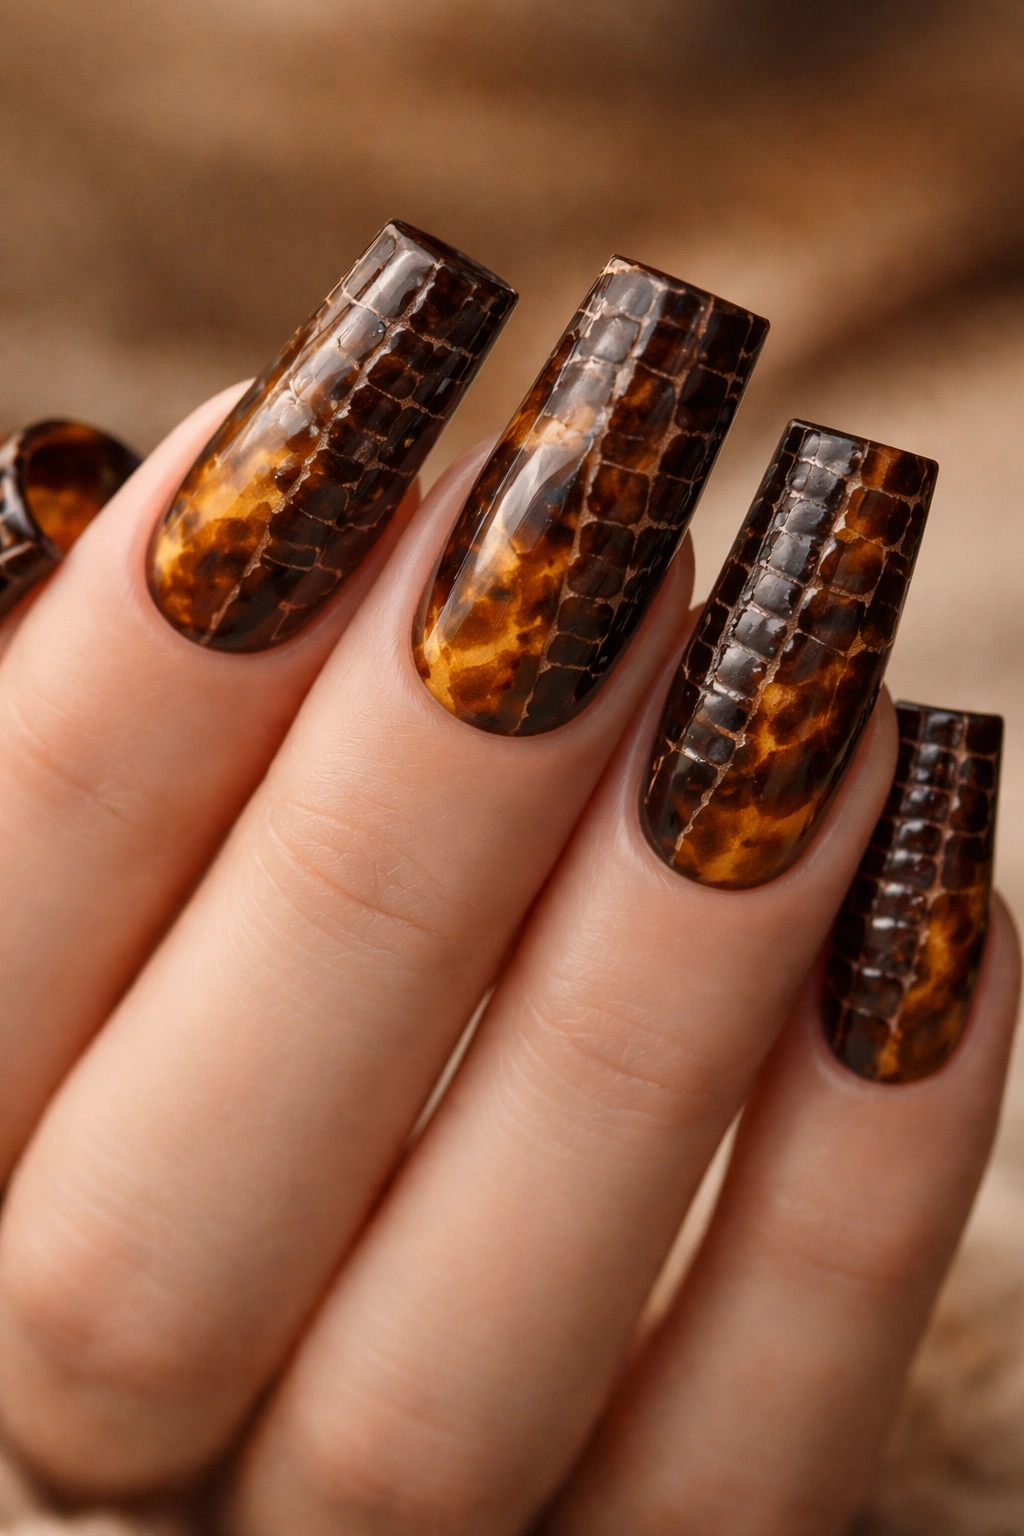
Blend two textured patterns into one sophisticated design by combining tortoiseshell coloring (browns, golds, burnt orange, and amber) with croc print details. Instead of covering the entire nail with croc texture, use it strategically as an overlay or create a split design where tortoiseshell dominates one half and croc print sits on the other. This creates a layered, intentional look that feels editorial.
Why Mixing Patterns Works
Tortoiseshell is warm and organic, while croc print is structured and scaled. When you layer them thoughtfully, they complement each other rather than compete. The warm tones of tortoiseshell provide a backdrop that makes the croc texture feel more pronounced, while the croc lines add definition to the softer tortoiseshell pattern.
Execution Strategy
Create your tortoiseshell base using a sponge technique with multiple shades — dab on browns, golds, and burnt orange in an irregular pattern. Once fully dry and sealed, add the croc print using a thin brush or stamping plate. You can apply it over the entire tortoiseshell background for a dense, layered effect, or isolate it to specific zones (the nail tip, the center, or one half of the nail). Use black or dark brown for the croc lines so they blend slightly with the warm tortoiseshell tones.
Worth knowing: This design looks more cohesive if you keep the croc print slightly smaller and less aggressive than the tortoiseshell pattern — let tortoiseshell be the dominant texture and croc print be the supporting detail.
4. Matte Black Croc with Chrome Duck Tips
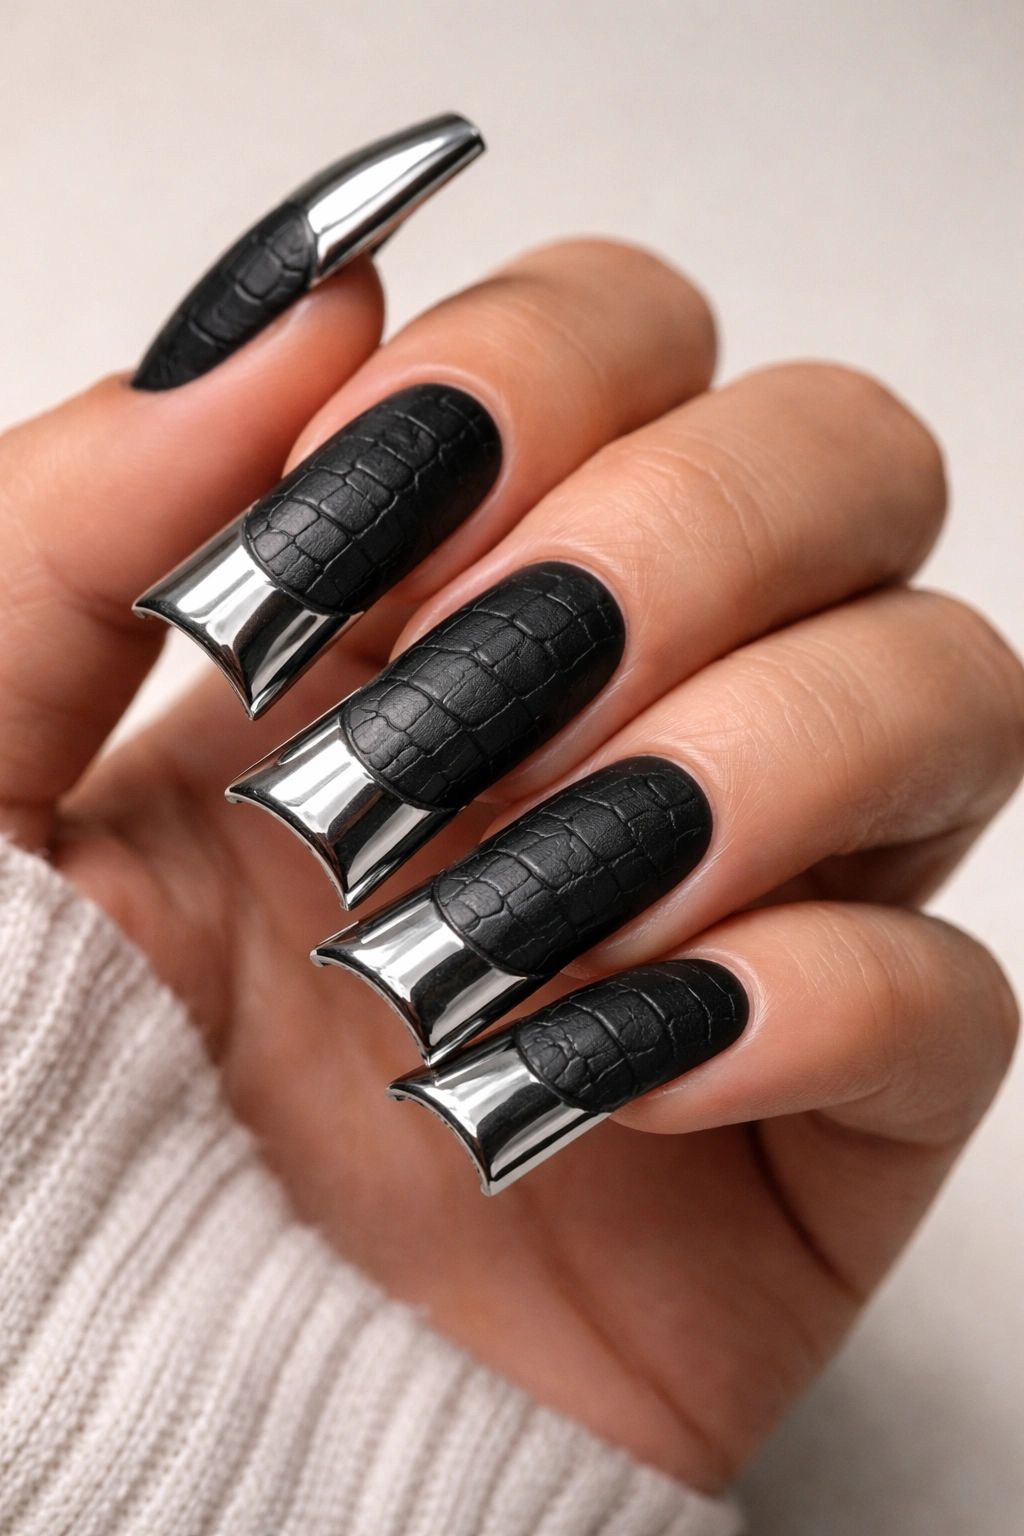
Create dramatic contrast by pairing a matte black croc print base with a reflective chrome finish on just the extended duck tip. The matte texture of the croc pattern grounds the nail, while the metallic chrome at the tip catches light and adds an ultra-modern edge. This design feels both edgy and refined.
Playing with Finish Contrasts
Matte and chrome are at opposite ends of the finish spectrum, and that’s precisely what makes them work so well together. The matte croc creates a soft, almost velvety surface that feels tactile and organic, while the chrome reflects light in an almost mirror-like way. The transition between them becomes part of the visual interest.
Creating This Two-Finish Design
Paint the main nail bed with black polish and allow it to dry completely. Using a croc print stamping plate or freehand work, apply the texture pattern to the black base. Once that’s set, apply a matte top coat to seal just that section. For the duck tip (the extended part), use chrome powder applied over a sticky base coat or chrome polish, and seal that area separately with a high-shine glossy top coat. The line between matte and chrome should be slightly gradated rather than a harsh edge — use a fluffy brush to blend them slightly where they meet.
Pro tip: Chrome powder can be delicate, so avoid touching the tips for at least an hour after application, and consider applying a thin glossy top coat over the chrome area only for extra durability.
5. Burgundy Croc with Negative Space Geometric Accents
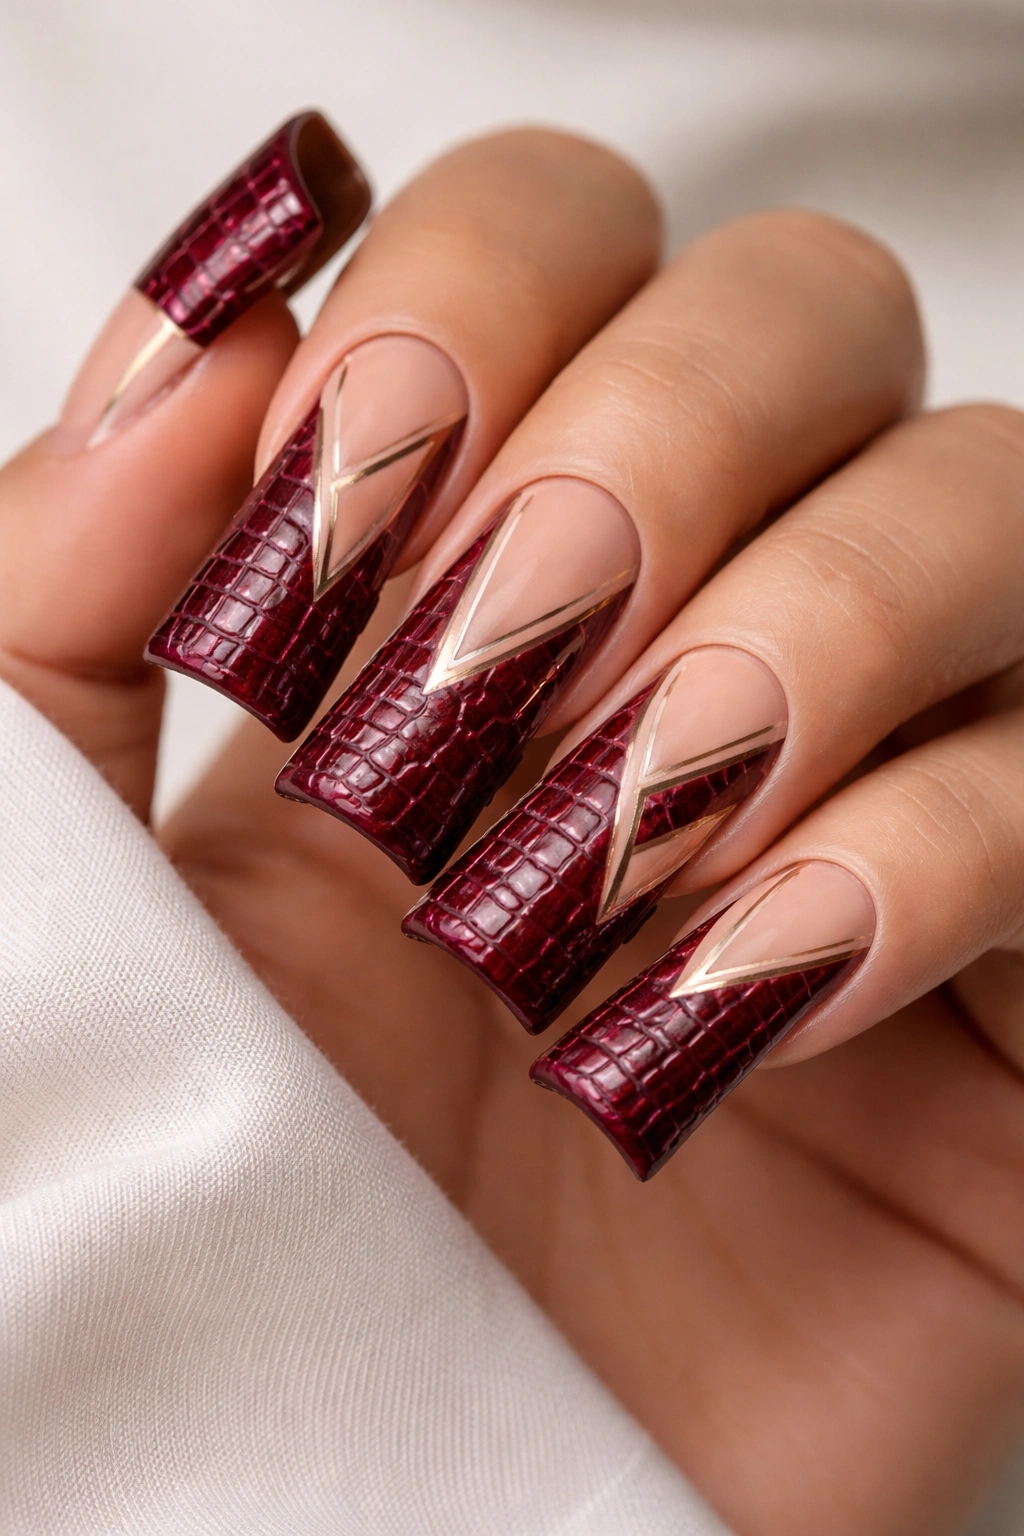
Go sultry and sophisticated with a deep burgundy croc print pattern, then carve out negative space — areas of bare nail or nude base showing through — in geometric shapes. Paint thin lines or triangles of negative space that break through the burgundy, creating an architectural contrast. This feels contemporary and designer-level.
Why Negative Space Elevates Croc Print
Croc print is naturally busy and textured, so negative space gives your eye a place to rest. Instead of every inch of the nail being visually active, these bare or neutral zones create breathing room. The geometric shapes you cut out become part of the design rather than accidental empty space.
The Technique for Clean Negative Space
Apply a base coat of nude or sheer pink first — this will show through your negative space areas and keep the nail from looking raw. Once dry, apply burgundy polish in one or two coats. Using a thin striping brush and a bit of nail art precision, paint croc print texture across most of the nail surface, being careful to leave specific geometric zones untouched. Alternatively, create the croc pattern first, then use a fine brush and your base color to paint over specific areas in geometric shapes — triangles pointing toward the center, vertical lines, or scattered shapes across the surface. Seal with a matte or satin top coat for a more modern feel.
Insider note: This design looks most striking with just enough negative space to feel intentional but not so much that it fragments the overall pattern — aim for roughly 20-30% bare space and 70-80% covered pattern.
6. Sunset Ombre Croc Print
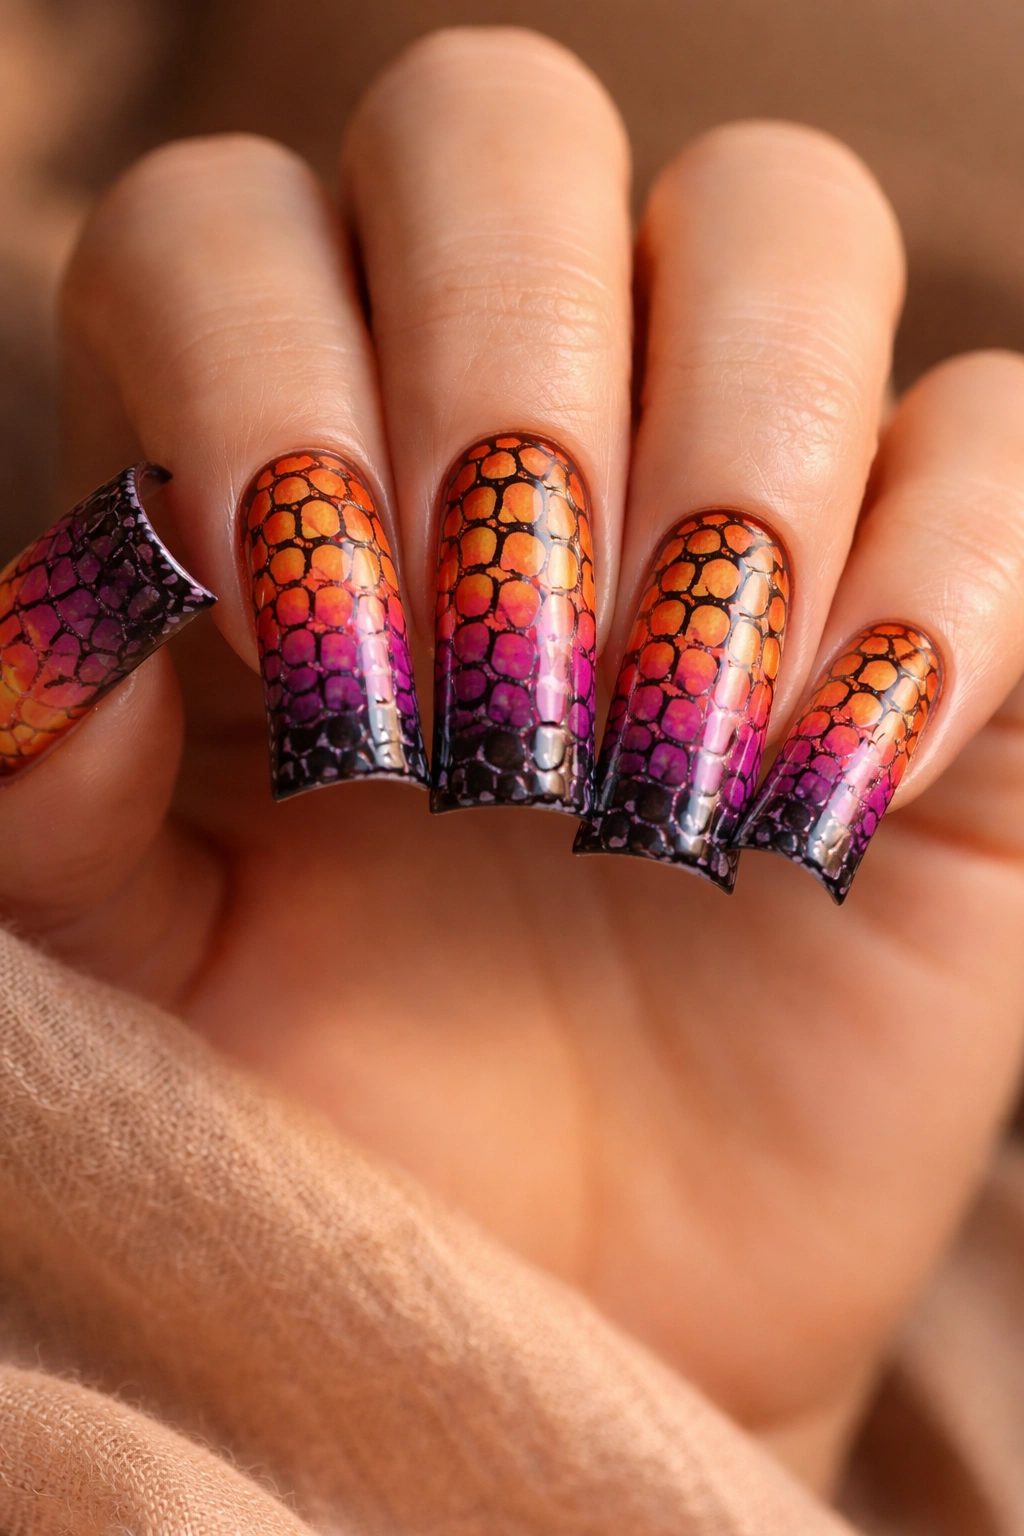
Layer a sunset gradient (coral to orange to pink to purple) across your duck nails, then apply croc print texture in black or deep brown over the gradient. The warmth of the sunset colors against the cool structure of the croc pattern creates a balanced, beautiful design that feels both natural and artistic.
Creating Seamless Ombre with Croc Details
An ombre effect requires patience and a good sponge technique. Create your gradient by sponging multiple polish shades across each nail, blending them where they meet. The gradient should feel smooth and intentional, with clear color zones but soft transitions between them. Once this base is fully dry and sealed, the croc print acts as a top layer that unifies the whole design.
Application Process
Using a makeup sponge or makeup wedge, dab your sunset colors onto the nail in zones — coral at the base, orange in the middle, pink toward the tip, and hints of purple at the very edge. Tap the sponge repeatedly to blend where colors meet, and build up the gradient gradually across multiple passes. Once you’re happy with the ombre effect and it’s completely dry, use a stamping plate or thin brush to add black croc texture over the entire surface. The texture will sit on top of the gradient, creating visual depth.
Pro tip: A glossy top coat will make the ombre colors appear more saturated and the croc texture more three-dimensional.
7. Nude Croc with Micro Rhinestone Details
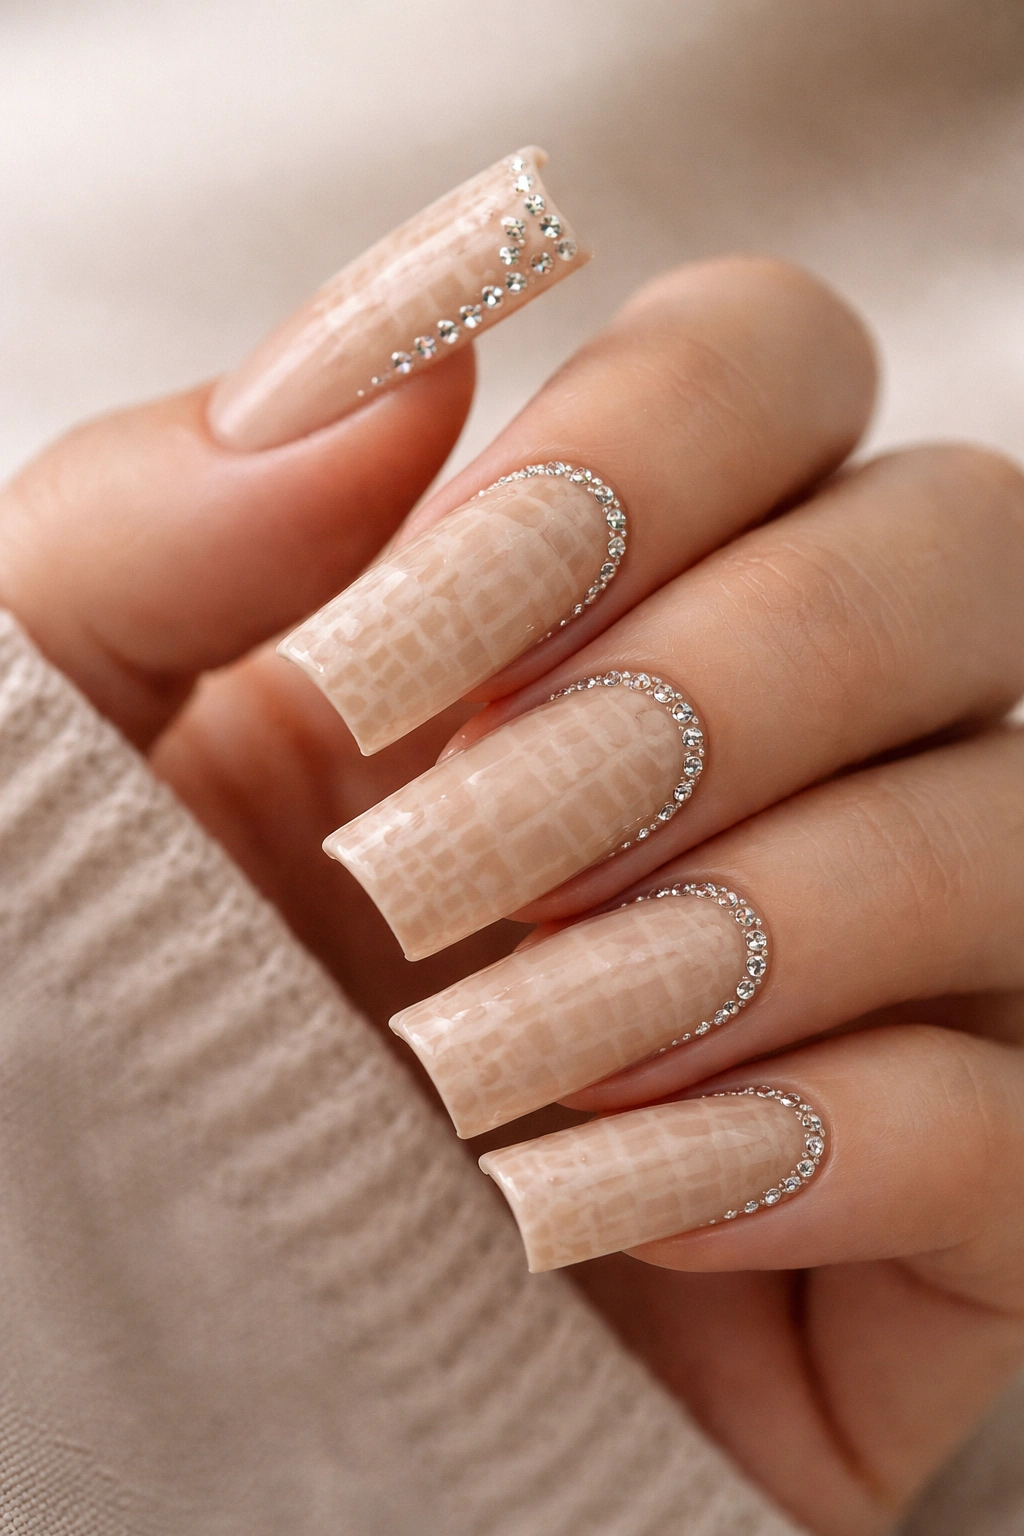
Keep the main design simple with a warm nude base and subtle croc print in a lighter tan shade, then elevate it with tiny rhinestones placed strategically around each duck nail. A few stones clustered at the base of the duck tip, or scattered along the outer edge, add sparkle without overwhelming the delicate pattern.
The Elegance of Minimalist Embellishment
Rhinestones can feel overwhelming if they’re everywhere, but in small, intentional clusters they add luxury and shine. The nude and tan palette keeps the look wearable and professional, while the stones add just enough glamour to make it special.
Placement and Application Strategy
Apply your nude base polish in two coats, then use a lighter tan shade and a stamping plate (or careful freehand work with a thin brush) to add croc texture across the nail. Once completely dry and sealed, use a dotting tool or fine brush to apply a tiny dot of clear gel or nail glue wherever you want to place a rhinestone. Set the stone firmly and allow the adhesive to set. You can use flat-back rhinestones in small sizes (SS6 or SS8) for a delicate effect, or mix sizes for subtle visual interest. Seal the rhinestones with a final layer of top coat, being gentle so you don’t dislodge them.
Worth knowing: Rhinestones are most secure when you apply a thin layer of clear gel and cure it before placing the stone, then apply another layer of gel over the stone and cure again for maximum hold.
8. Ocean Blue Croc with Gradient Fade
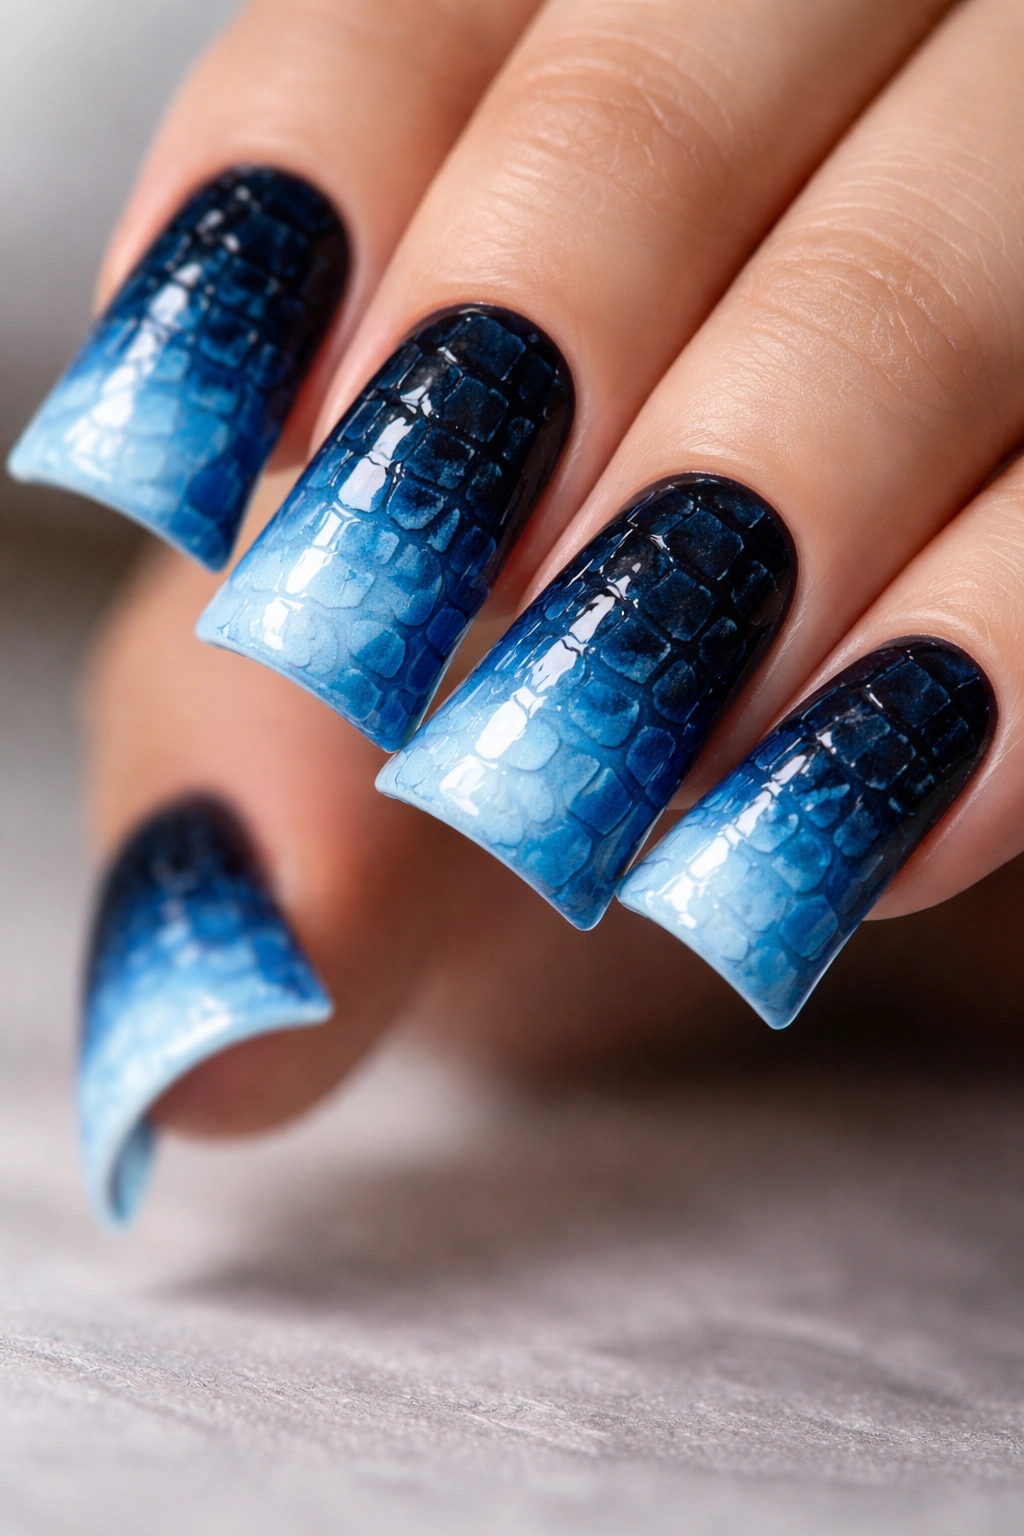
Paint duck nails in a deep ocean blue, apply croc print across the main nail, then create a gradient fade from the textured croc pattern to a lighter blue (or even white) at the very tip of the duck extension. This design captures the feeling of diving into ocean depths and rising toward the surface.
Creating a Gradient Fade Over Texture
The challenge here is making a smooth gradient when there’s already a textured pattern underneath. The solution is layering your fade on top of the texture rather than trying to blend it into the croc lines. The texture becomes part of the depth, and the gradient adds a light-to-dark flow across the nail.
Step-by-Step Application
Start with a dark ocean blue base (two coats). Apply your croc print pattern in black or deep teal using a stamping plate or freehand technique. Once this is completely dry and sealed, use a makeup sponge or gradient tool to create a fade from that blue toward white or light blue at the duck tip. Dab the lighter color repeatedly, building it up gradually so the transition feels smooth. The croc texture will show through this gradient, creating dimensional interest. Finish with a glossy top coat.
Pro tip: If the gradient overpowers your croc texture, you can redraw some of the croc lines more prominently after the gradient is dry — use a thin brush and matching dark polish to enhance key parts of the pattern that got lost in the gradient.
9. Leopard Print Meets Croc Hybrid Pattern
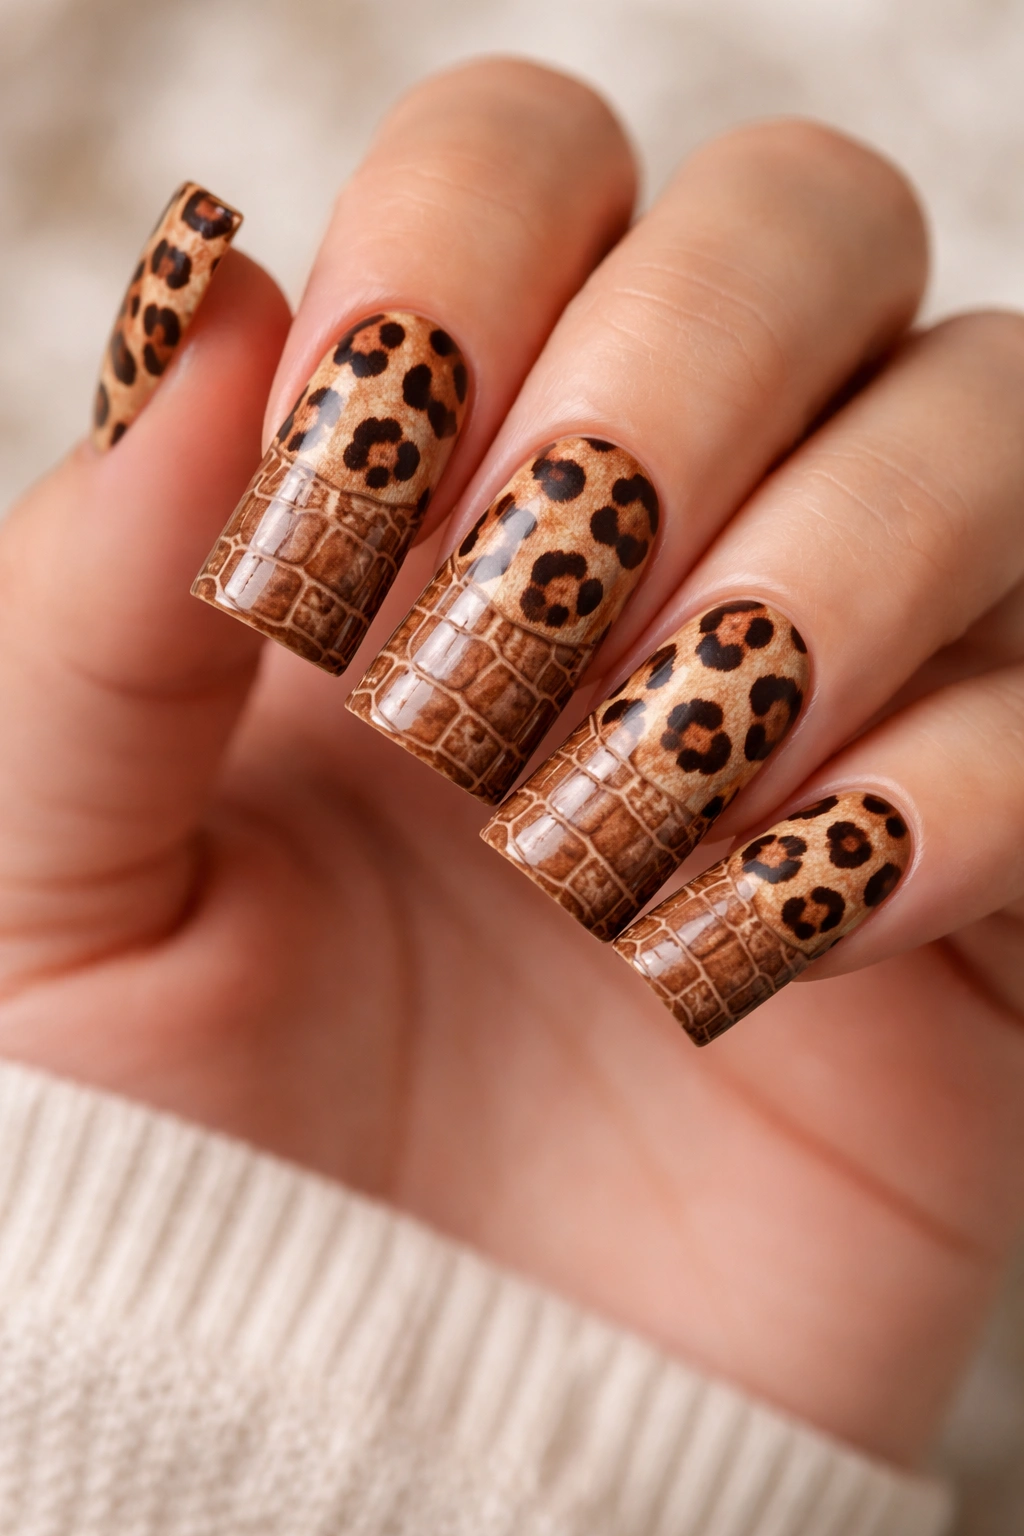
Instead of traditional croc scales, create a hybrid pattern that combines leopard spots with croc texture. Use a warm base color (tan, camel, or blush), then add both irregular leopard spots in brown and structured croc lines in a complementary shade. The two patterns create visual complexity that feels intentional rather than chaotic.
Balancing Two Patterns Without Chaos
The key is maintaining distinct visual zones — designate roughly 60% of the nail for croc texture and 40% for leopard spots, or alternate them in distinct areas. This keeps the design readable rather than feeling muddy or overly busy.
Creating the Hybrid Pattern
Apply your warm base color in two coats. Using a thin brush, outline irregular leopard spots in brown and fill them loosely (don’t fill them completely — let them feel organic and slightly transparent-looking). Once these are dry, use a stamping plate or careful freehand work to add the croc pattern in complementary colors. You can layer the croc over the leopard spots for dense coverage, or keep them in separate zones on each nail. The combination of organic leopard shapes and geometric croc scales creates visual interest.
Insider note: This pattern works best with warm, natural color palettes — camel and chocolate, blush and taupe, or nude and bronze all work beautifully. Cool-toned combinations tend to feel less cohesive.
10. Metallic Purple Croc with Matte Accent Stripes
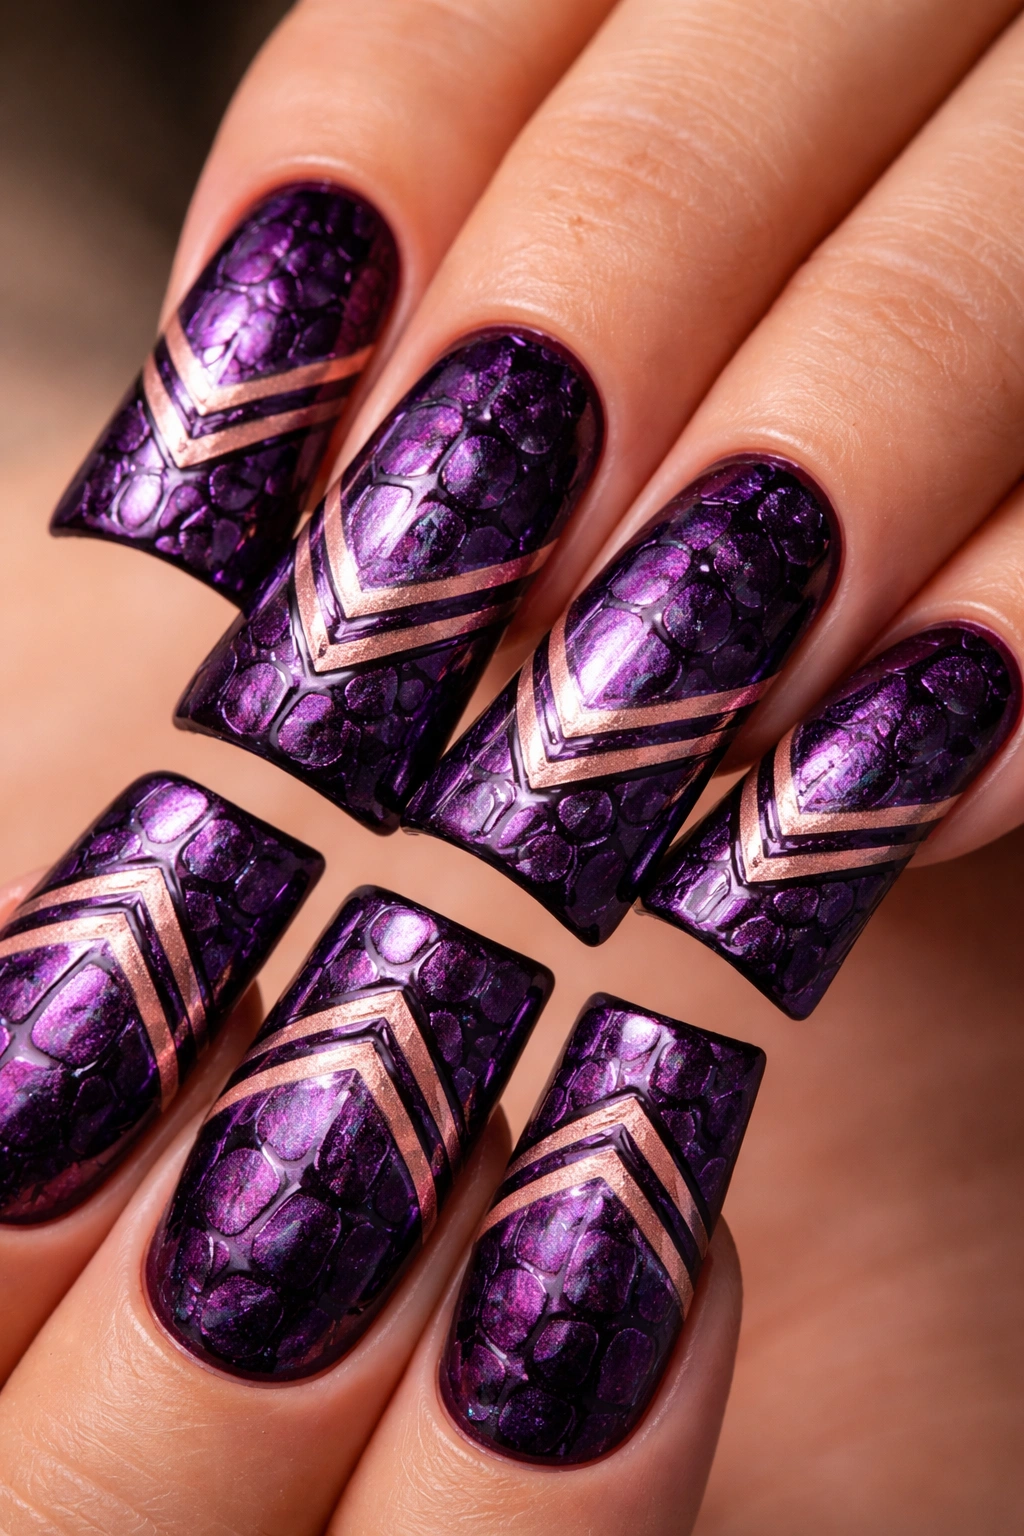
Apply a shimmering metallic purple polish as your base, create croc texture across the nail in black or dark purple, then add matte accent stripes (vertical, diagonal, or geometric) in a contrasting metallic shade like rose gold or champagne. The combination of shimmer, texture, and matte accents creates a multi-dimensional design.
Layering Different Finishes Intentionally
Metallic finishes and matte finishes are natural opposites, and they’re even more striking when paired with texture. The metallic base catches light, the matte stripes ground the design, and the croc texture adds tactile interest throughout.
Building the Multi-Finish Design
Apply metallic purple polish in two coats and let it cure completely. Add your croc texture in black or dark purple using your preferred method (stamping or freehand). Once that’s set and sealed, use a thin striping brush to paint matte accent stripes. These can be vertical lines running the length of the nail, diagonal lines creating movement, or geometric shapes. Use a metallic polish in rose gold or champagne and apply it in thin, precise strokes. You can seal just the metallic accents with a matte top coat while leaving the main nail glossy, or apply a unified matte top coat across the entire nail for a cohesive velvety finish.
Pro tip: Matte top coats can sometimes dull metallic polish’s shine — test on a practice nail first to see if you prefer the look before committing.
11. Baby Blue Croc with Neon Pink Negative Space
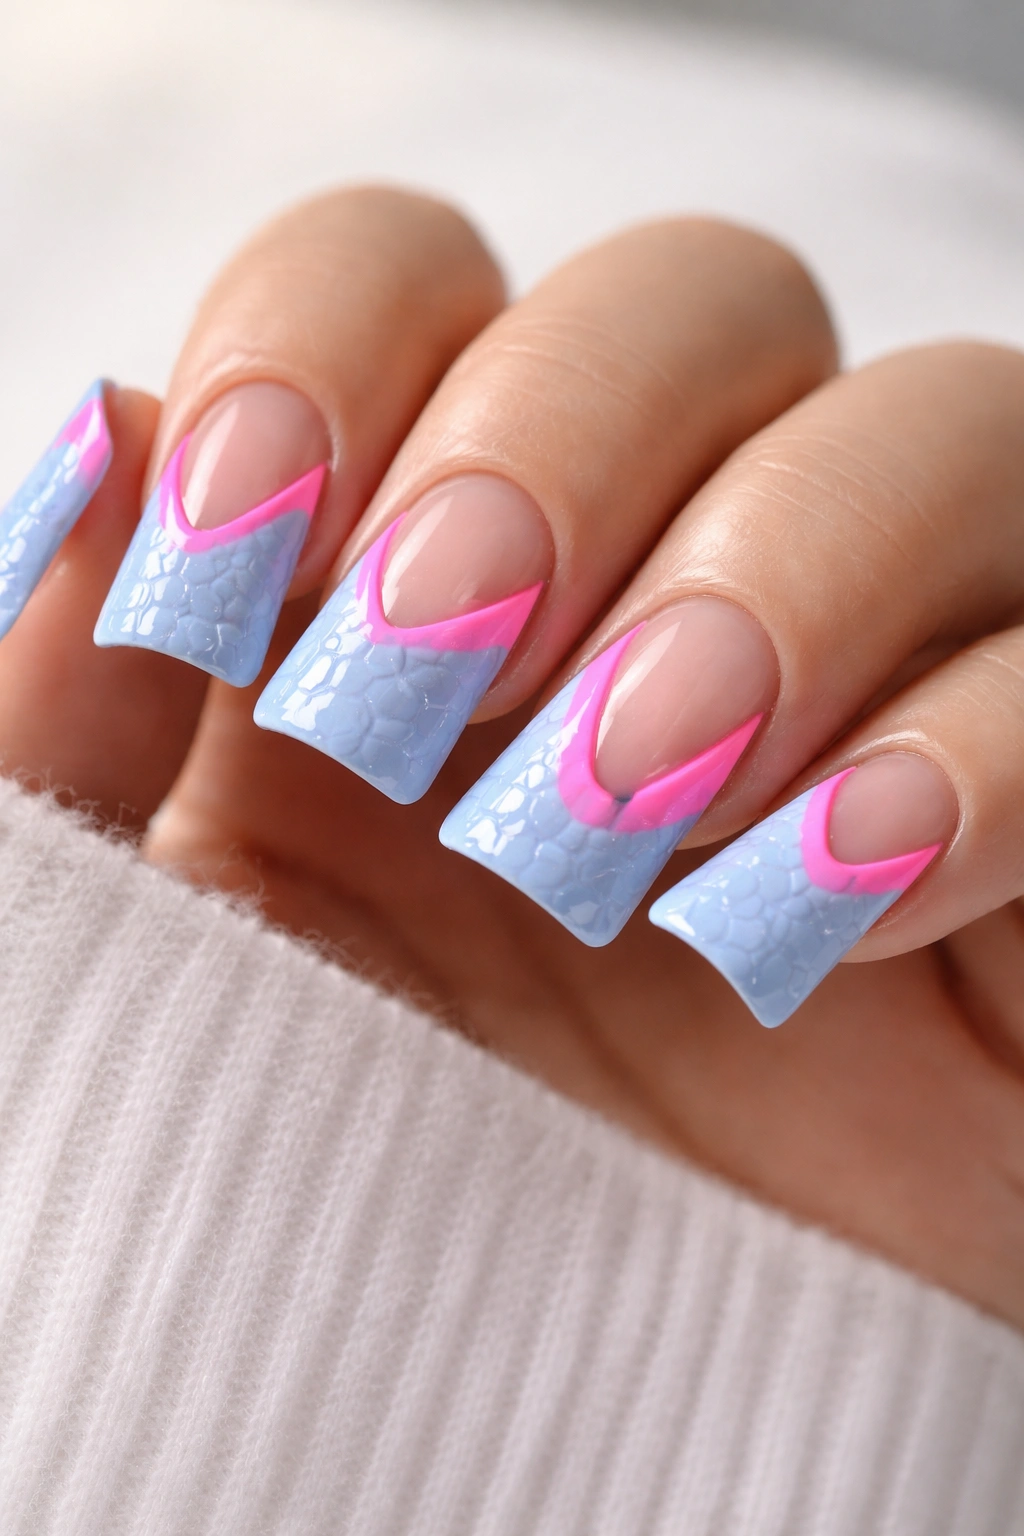
Pair a soft, delicate baby blue with croc texture, then carve out bold neon pink negative space in geometric or freeform shapes. The contrast between the gentle baby blue and the shocking neon pink creates a fun, contemporary feel that’s perfect for anyone who loves playful nail art.
Balancing Delicate and Bold
Baby blue is calming and soft, while neon pink is aggressive and attention-grabbing. Together, they’re unexpected but somehow balanced — the gentle color keeps the neon from feeling chaotic, and the neon gives the soft blue enough edge to feel modern.
The Execution
Apply baby blue polish as your base (two coats, fully dry). Using a stamping plate or freehand work, apply croc texture in gray or medium blue tones to blend subtly with the base. Once that’s sealed, use a thin brush and neon pink polish to paint geometric negative space — try triangles, lines, or irregular shapes — over the top. You want these shapes to actually erase part of the visual pattern and create breathing room. The neon will pop dramatically against the baby blue and the croc texture.
Worth knowing: Neon pink shows best over lighter base colors, so if you wanted this design with a darker blue, you’d need to use a white base under your neon shapes to make them truly vibrant.
12. Sage Green Croc with Soft Gold Detailing
Create a calming, sophisticated look with sage green as your base, subtle croc texture in a slightly darker green shade, and delicate gold detailing along the duck tip edges or scattered across the design. This palette feels earthy and luxurious at the same time.
Why Sage Green Works So Well with Croc
Sage is a complex, muted green that has naturalistic undertones. Croc texture, being inspired by reptilian skin, pairs beautifully with nature-inspired colors. Add gold to bring in warmth and shimmer, and you’ve got a design that feels both grounded and elegant.
Application Strategy
Paint sage green as your main color (two coats). Add croc texture in a slightly deeper green using a stamping plate or freehand work — you want it visible but not aggressively contrasting. Once dry and sealed, use a thin brush or striping tool to apply gold polish along the outer edge of each duck tip, creating delicate lines. You can also scatter small gold accents or create a geometric gold pattern across the nail. A final glossy top coat will make the gold shine beautifully.
Pro tip: If you want the gold to feel more luxe, use a gel polish with gold flakes or metallic particles rather than solid gold — the shimmer will catch light beautifully over the green base.
13. Milk White Croc with Blackout Geometric Sections
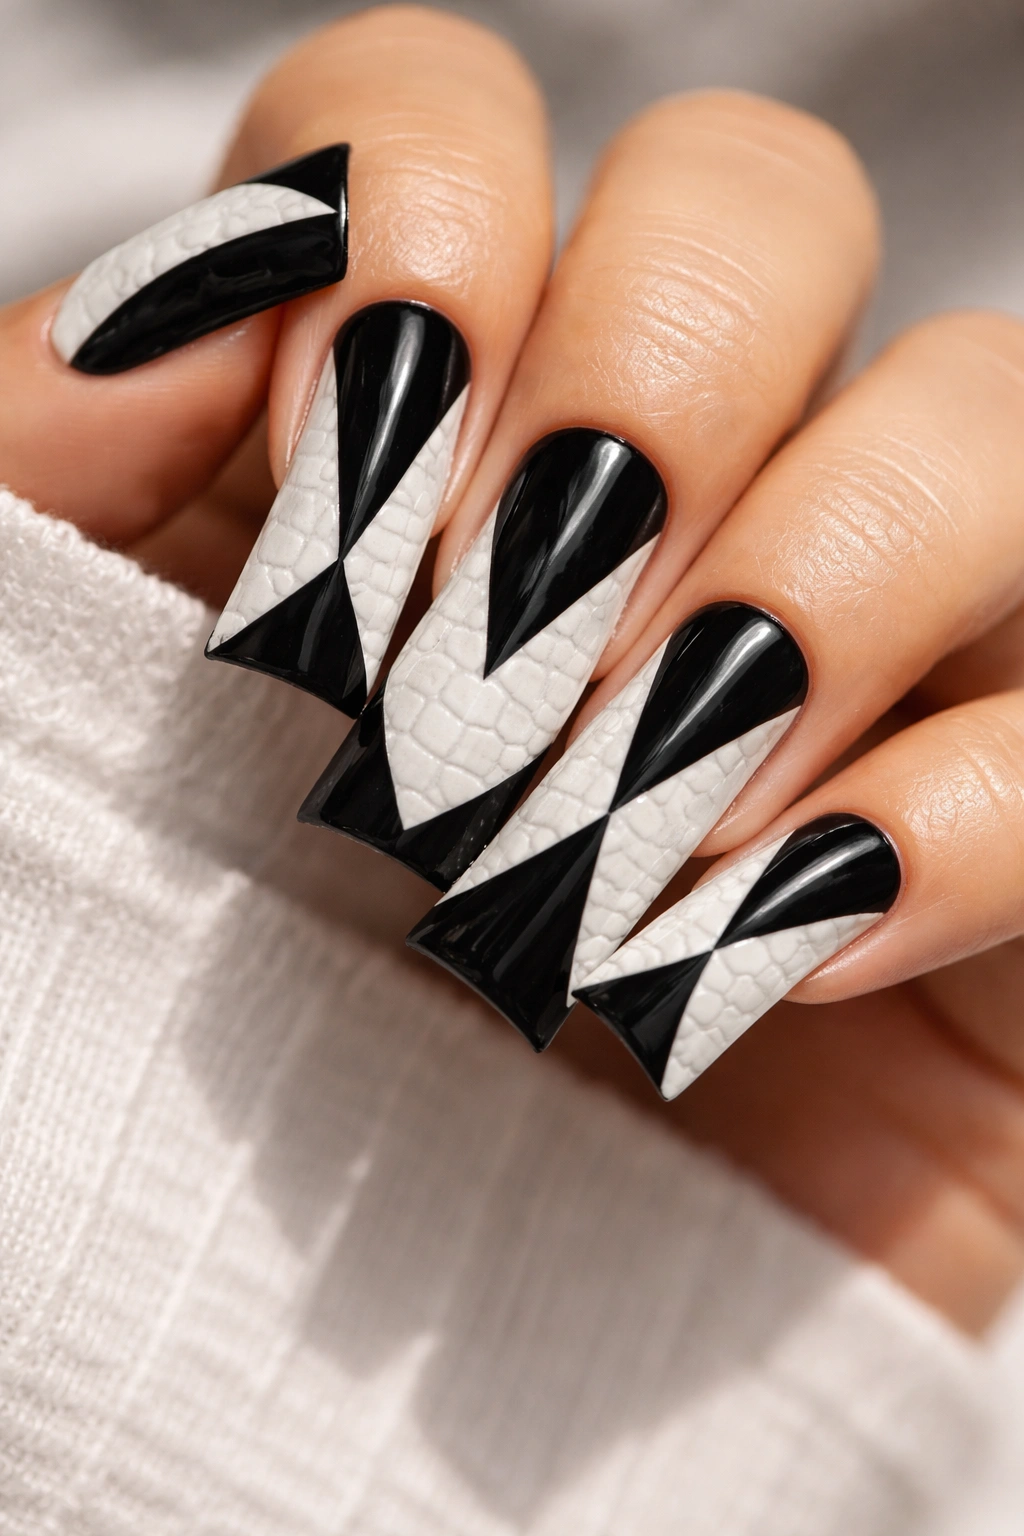
Go bold and graphic by using milk white as your main color with croc texture throughout, then create solid blackout sections in geometric shapes — triangles, lines, or abstract shapes — that are completely opaque black. The negative space created by these black sections makes the croc texture in the white areas feel more prominent.
Creating Impact Through Stark Contrast
Milk white and black are the most basic, most striking color contrast possible. When you add the geometric blackout sections, you’re essentially creating a graphic design element that pulls the eye while letting the croc texture shine in the white zones.
The Design Process
Apply milk white polish as your base (two coats). Create your croc texture across the entire nail using light gray or cool white (a slightly tinted version of the base) so the pattern is visible but subtle. Once sealed, use a thin brush and pure black polish to paint geometric sections — perhaps a triangle pointing from the duck tip toward the base, or vertical lines that divide the nail into zones. Keep the black sections opaque and clean-edged for maximum graphic impact.
Insider note: This design reads more modern and editorial than decorative — it works especially well for people with a more minimalist personal style.
14. Jewel-Tone Ombre Croc with Holographic Dust
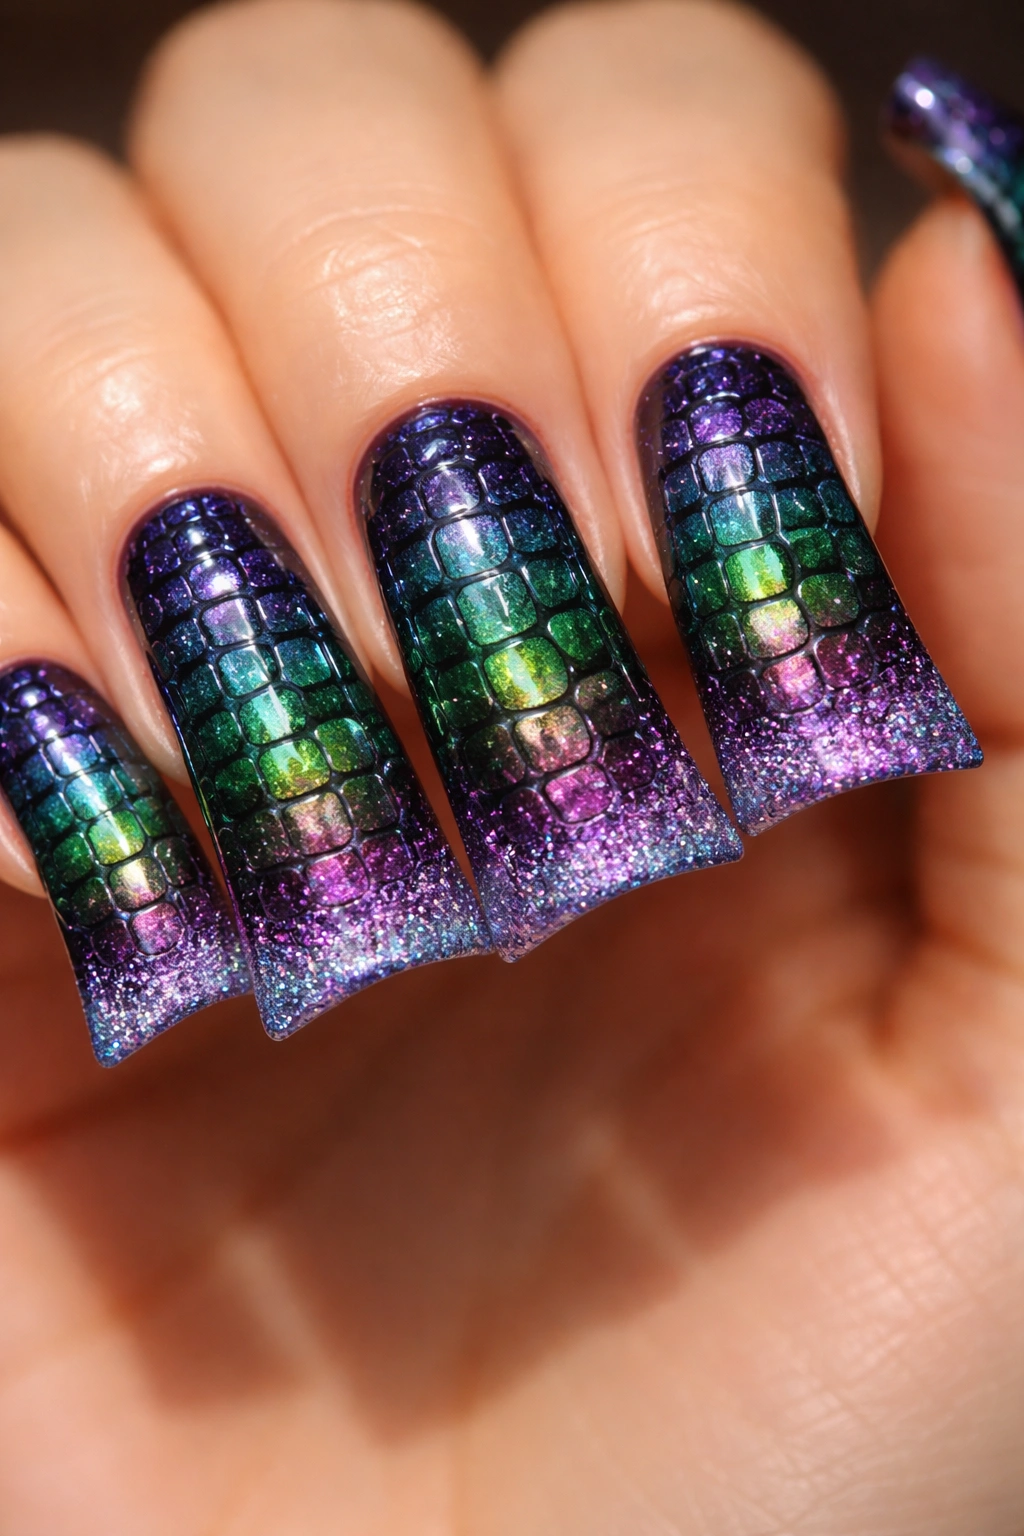
Layer a jewel-tone ombre (sapphire to emerald to amethyst) across your duck nails, apply croc texture in black or deep charcoal, then finish with a light dusting of holographic glitter or chrome dust across the tips. This design feels luxurious, complex, and absolutely show-stopping.
Bringing Everything Together in One Grand Design
This design uses color, texture, and shine in perfect balance. The ombre creates gradient movement, the croc adds organic texture, and the holographic dust adds sparkle without dominating. It’s the kind of nail art that stops people mid-conversation.
Building This Multi-Layer Masterpiece
Create your jewel-tone ombre by sponging sapphire blue, emerald green, and amethyst purple across each nail in smooth transitions. Use a makeup sponge and tap repeatedly to blend where the colors meet. Once fully dry and sealed, apply your croc texture in black or deep charcoal using a stamping plate — this dark pattern will sit beautifully over the jewel tones. After everything is dry, very lightly dust holographic chrome powder or holographic glitter across just the duck tips and upper portions of the nail. Use a fluffy brush and apply the dust sparingly — you want it to catch light without overwhelming the pattern underneath. Seal with a high-shine glossy top coat.
Pro tip: Holographic dust is more durable when sealed with a glossy top coat immediately after application, and more fragile than a solid polish, so be gentler with nails sporting this design.
Final Thoughts
Croc print duck nails succeed because they combine structural boldness with genuine visual interest. Whether you’re drawn to minimalist elegance or maximalist glitter, classic color palettes or experimental combinations, this pairing offers endless possibilities for creative expression. The duck shape gives you a canvas that commands attention, and the croc texture fills that canvas with detail and sophistication.
The beauty of these designs is that none of them require advanced nail art skills — most can be achieved with a good stamping plate, a steady hand, and a bit of patience. You don’t need certification or professional equipment; you just need the willingness to try and the confidence to wear something distinctive. Start with a design that speaks to your personal style and comfort level, whether that’s the timeless black-and-nude classic or the adventurous jewel-tone ombre with holographic dust.
Croc print duck nails have staying power because they feel simultaneously trendy and timeless. They’re bold without being garish, detailed without being chaotic, and creative without being impractical for everyday life. Your duck nails can work at the office, at the gym, on a night out, or anywhere you want to feel confident and a little bit special. That’s the real magic — a manicure that isn’t just pretty, but genuinely makes you feel like yourself.
