

Duck nails have become a signature look in gyaru culture, and if you’re looking to elevate your nail game with some seriously bold, eye-catching designs, you’re in exactly the right place. The flared, squared-off shape that defines duck nails provides the perfect canvas for the vibrant colors, glitter, gems, and over-the-top embellishments that make gyaru nail art so instantly recognizable and utterly fun. The beauty of this nail shape is that it commands attention — there’s nowhere to hide when you’re rocking nails this dramatic, which means your design choices become even more important.
Gyaru culture celebrates maximalism, self-expression, and pushing boundaries, and that philosophy absolutely translates to nail art. These designs are unapologetically bold, playful, and unafraid to combine multiple textures, colors, and effects on a single nail. Whether you’re drawn to neon brights, soft pastels, metallic finishes, or intricate nail art techniques, duck nails give you the real estate to make a real statement. The extended shape also makes application easier for intricate details — you’ve got more surface area to work with, so tiny rhinestones, gradient transitions, and precise nail art actually look intentional and polished rather than cramped.
Let’s dive into ten seriously gorgeous gyaru duck nail ideas that capture the essence of this bold aesthetic. Each one offers something different, whether you’re a nail art beginner looking for relatively simple designs or an experienced nail artist ready to layer multiple techniques into one show-stopping look. The best part? Most of these designs can be customized to match your personal style, wardrobe, and vibe. You don’t have to recreate them exactly — think of these as inspiration that you can make entirely your own.
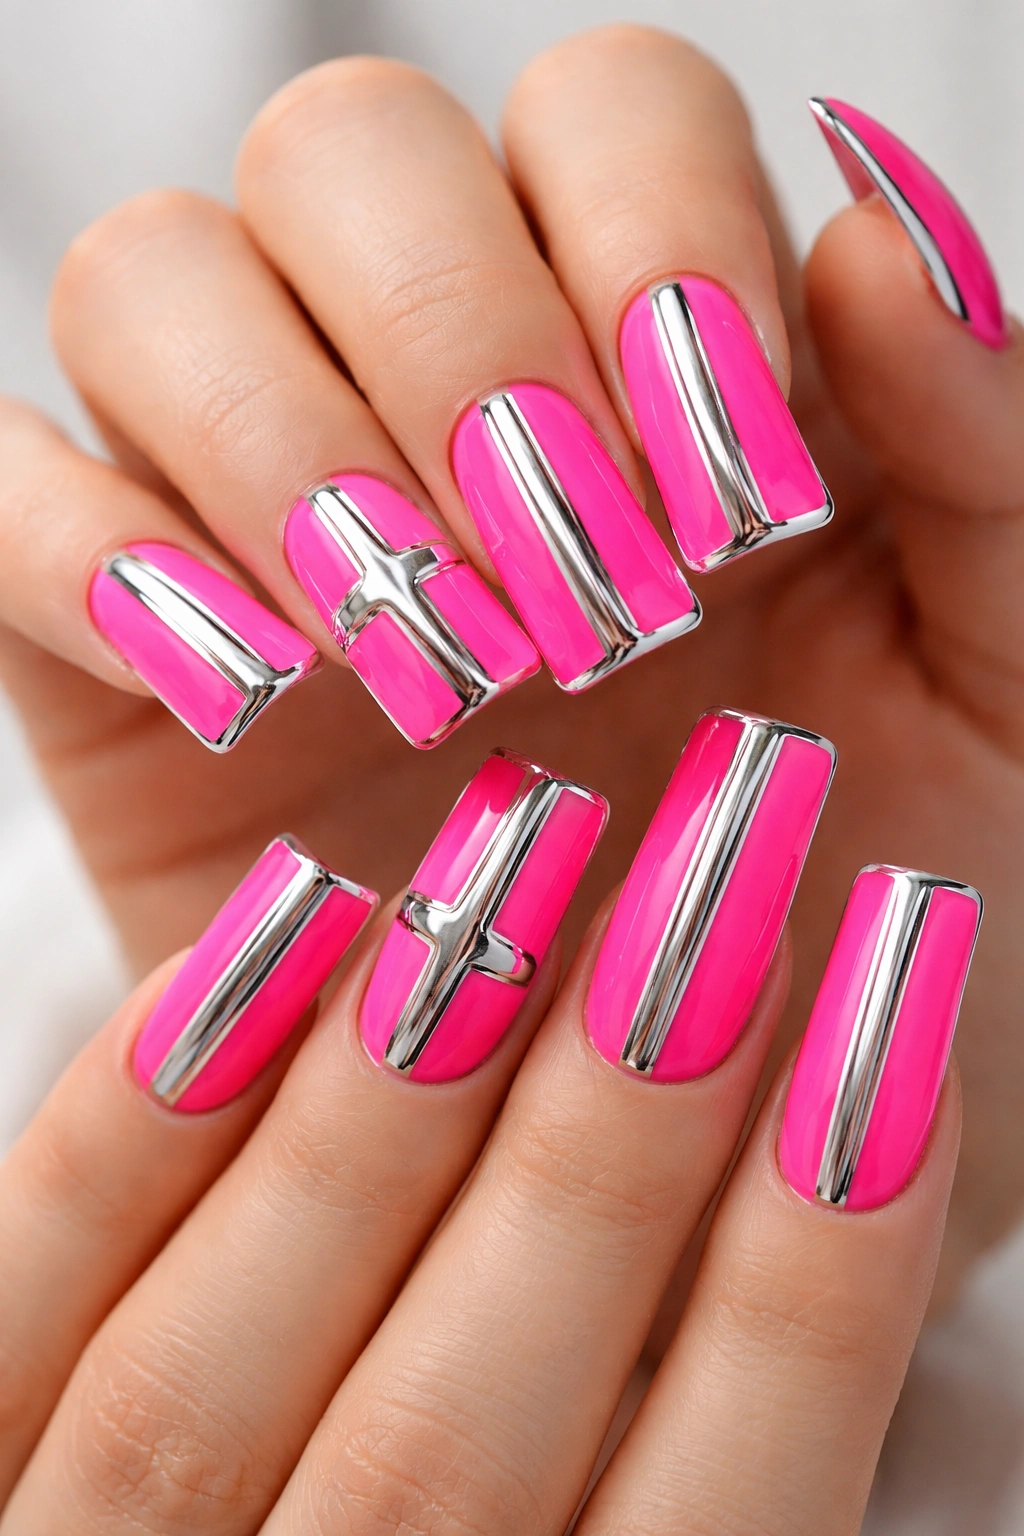
1. Neon Pink Duck Nails with Chrome Details
Neon pink is basically the unofficial official color of gyaru fashion, and when you pair it with chrome accents, you’ve got a design that screams confidence and playfulness. The hot, almost electric pink base creates an immediate impact — this isn’t a subtle look, and that’s precisely the point. The chrome detailing works best applied as strategic stripes, accent nails, or geometric sections that catch the light and create a futuristic, almost liquid-metal effect against the matte or glossy pink base.
Why This Design Stands Out
This combination taps into the core of what makes gyaru nail art special: bold color choices paired with high-shine finishes that create movement and dimension. The chrome elevates what could be a simple neon manicure into something far more sophisticated and visually interesting. The reflective quality of chrome polish catches light from every angle, meaning your nails literally shimmer and glow as you move your hands. It’s the kind of design that photographs beautifully but looks even better in person, where the dynamic shine is fully visible.
Quick Application Guide
- Start with a bright neon pink base coat — apply two thin layers for even coverage and maximum vibrancy
- Allow the base to dry completely (this prevents the chrome from dragging and creating streaks)
- Use a thin detail brush or chrome pen to apply metallic chrome polish to your chosen areas (edges, diagonal stripes, half-moon shapes at the cuticle, or random geometric sections all work beautifully)
- Seal everything with a glossy top coat to amplify the shine and protect your design
- For extra dimension, try combining chrome with matte sections by using a matte top coat on some nails and gloss on others
Pro tip: Chrome polish has a reputation for being tricky to apply, but the key is using a firm pressing motion rather than stroking — almost like stamping the chrome onto the nail rather than painting it. This creates a more even, seamless finish and prevents streaking.
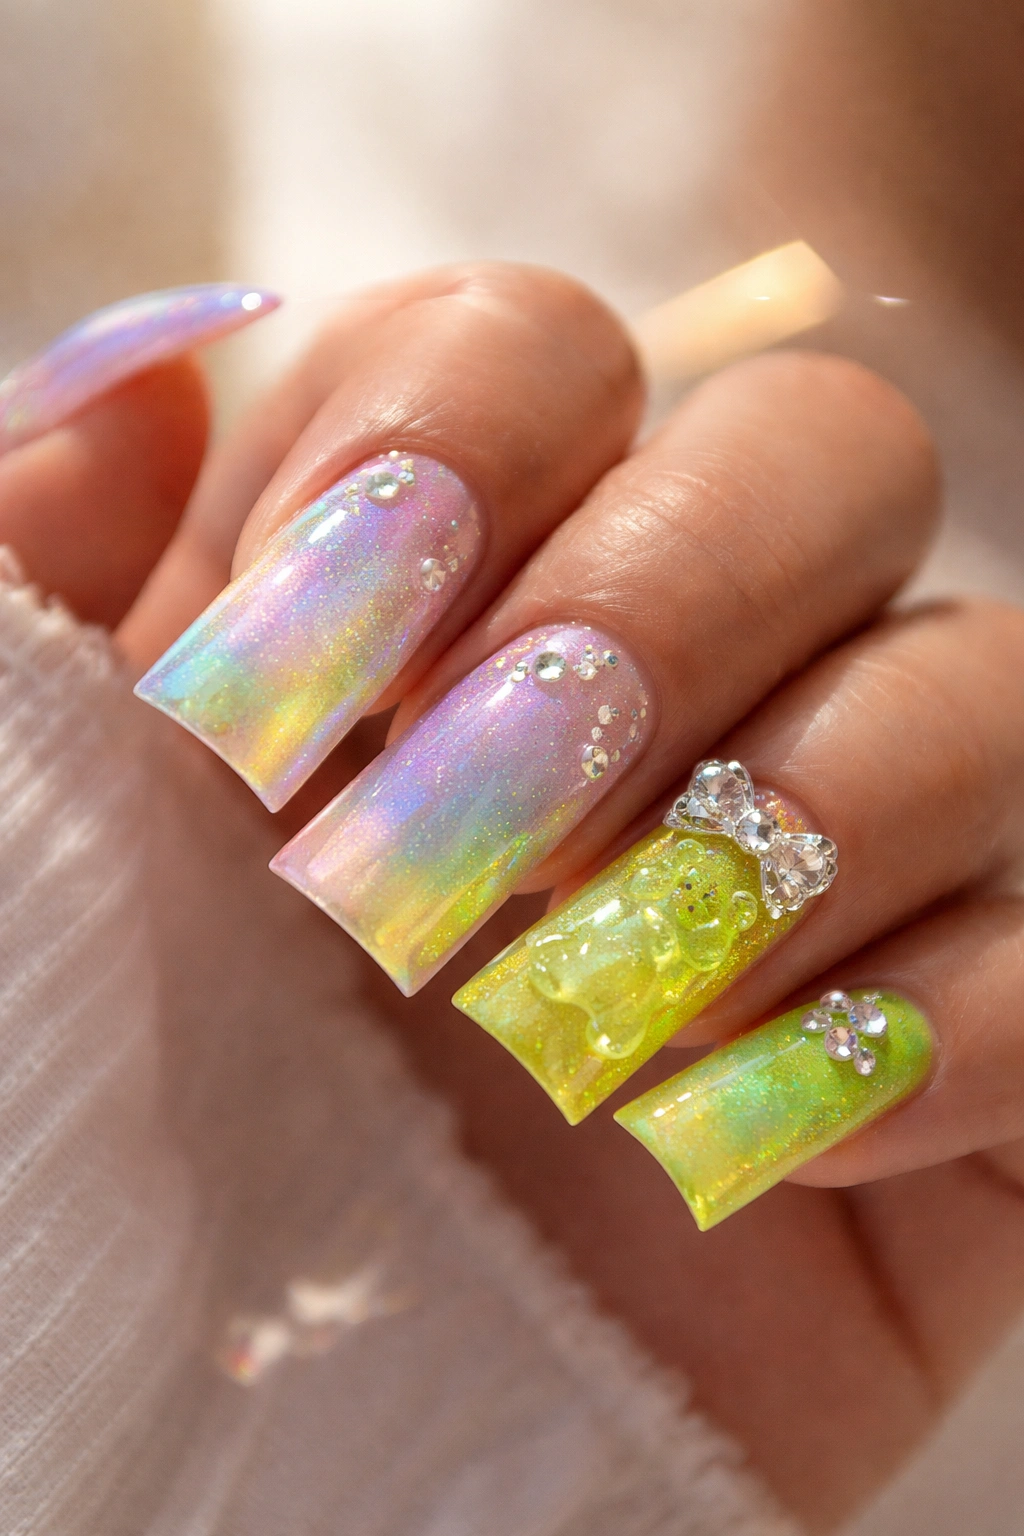
2. Holographic Gyaru Duck Nails
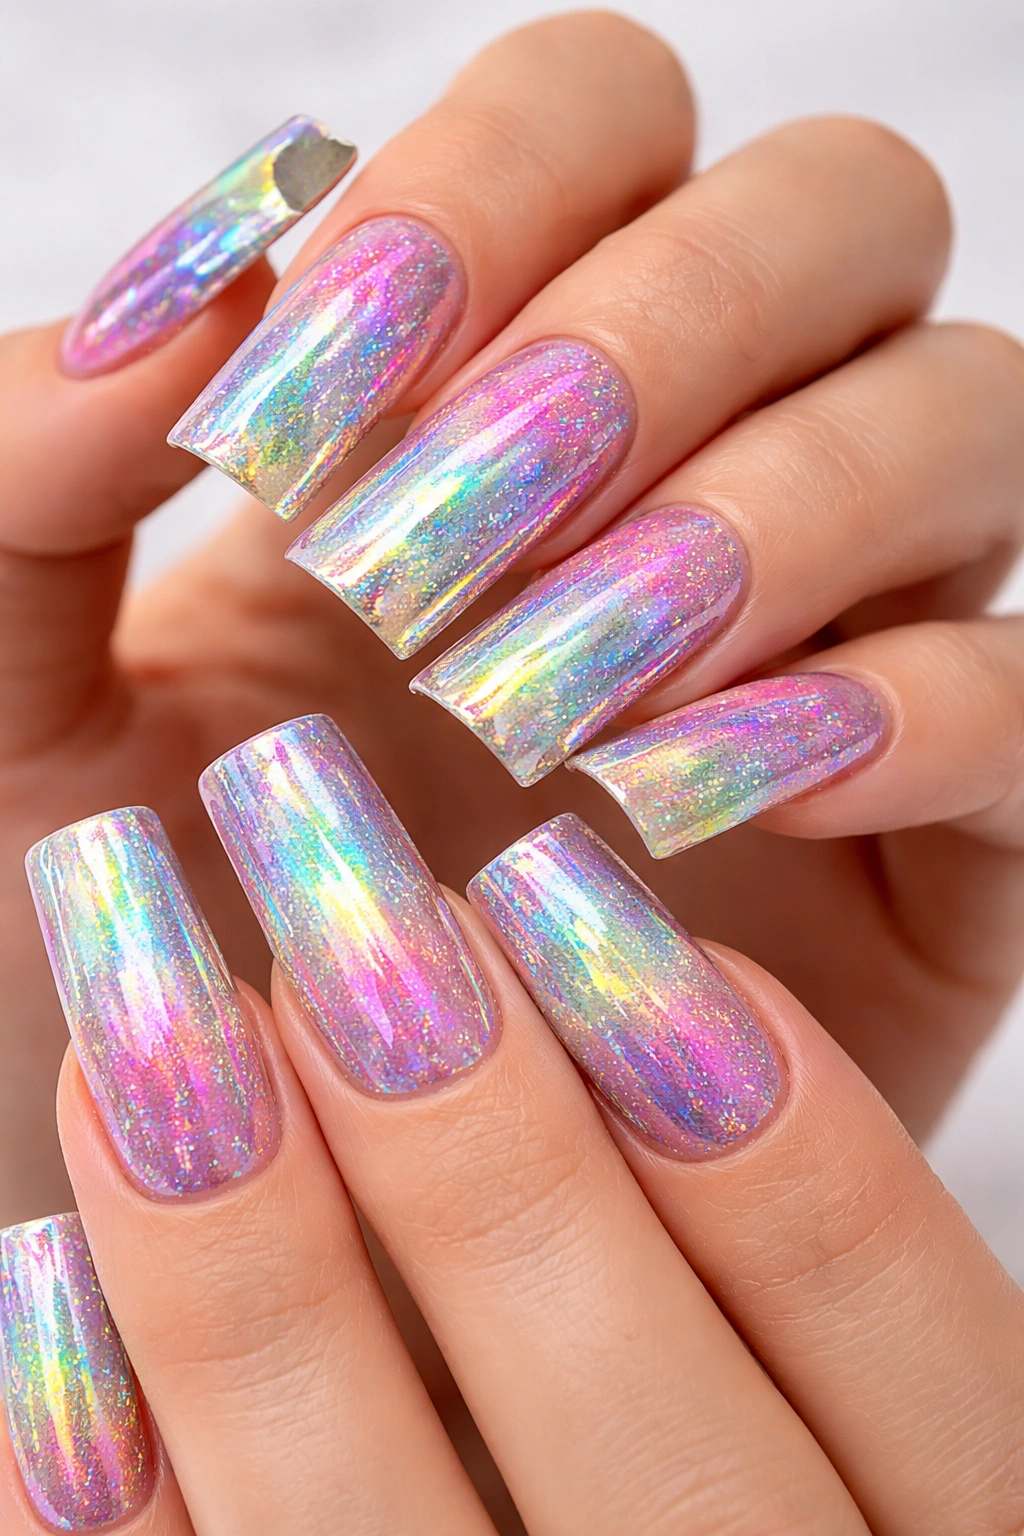
Holographic nail effects create an absolutely mesmerizing look, especially on the elongated surface of duck nails. Unlike chrome, which is silver and reflective, holographic polish creates a rainbow prismatic effect that shifts through multiple colors depending on the angle and lighting. This design works beautifully as a full manicure where every nail has the same holographic finish, or as an accent nail situation where one or two nails showcase the effect while others in complementary colors provide balance.
Why Holographic Finishes Are Perfect for Gyaru Nails
Holographic effects embody the playful, attention-grabbing aesthetic that gyaru culture celebrates. The way these polishes refract light into rainbow patterns feels almost magical and definitely futuristic — very on-brand for the bold, boundary-pushing gyaru look. The effect is strongest in bright, natural light, but even in indoor lighting it’s distinctly visible and stunning. What makes this design particularly gyaru-friendly is how unapologetically extra and noticeable it is. There’s no subtlety here, which is exactly the point.
Getting the Holographic Effect Right
- Choose a holographic top coat or full holographic polish (brands vary in intensity, so patch test if you’re trying a new one)
- If using holographic as a top coat over a base color, apply your chosen base color first in two thin layers and let it dry completely
- Apply the holographic top coat in thin, even layers — holographic effects work best when the coat isn’t too thick, which can make the rainbow effect less visible
- Apply a regular glossy top coat over everything to seal and magnify the holographic sparkle
- For maximum effect, wear this design in natural daylight where the holographic shift is most dramatic
Worth knowing: Holographic effects are most visible in bright natural light and outdoors. In dim indoor lighting, they’ll still be present but less dramatic, so if you’re planning to wear this design somewhere you’ll be mostly indoors, keep that in mind.
3. Gradient Ombre Duck Nails
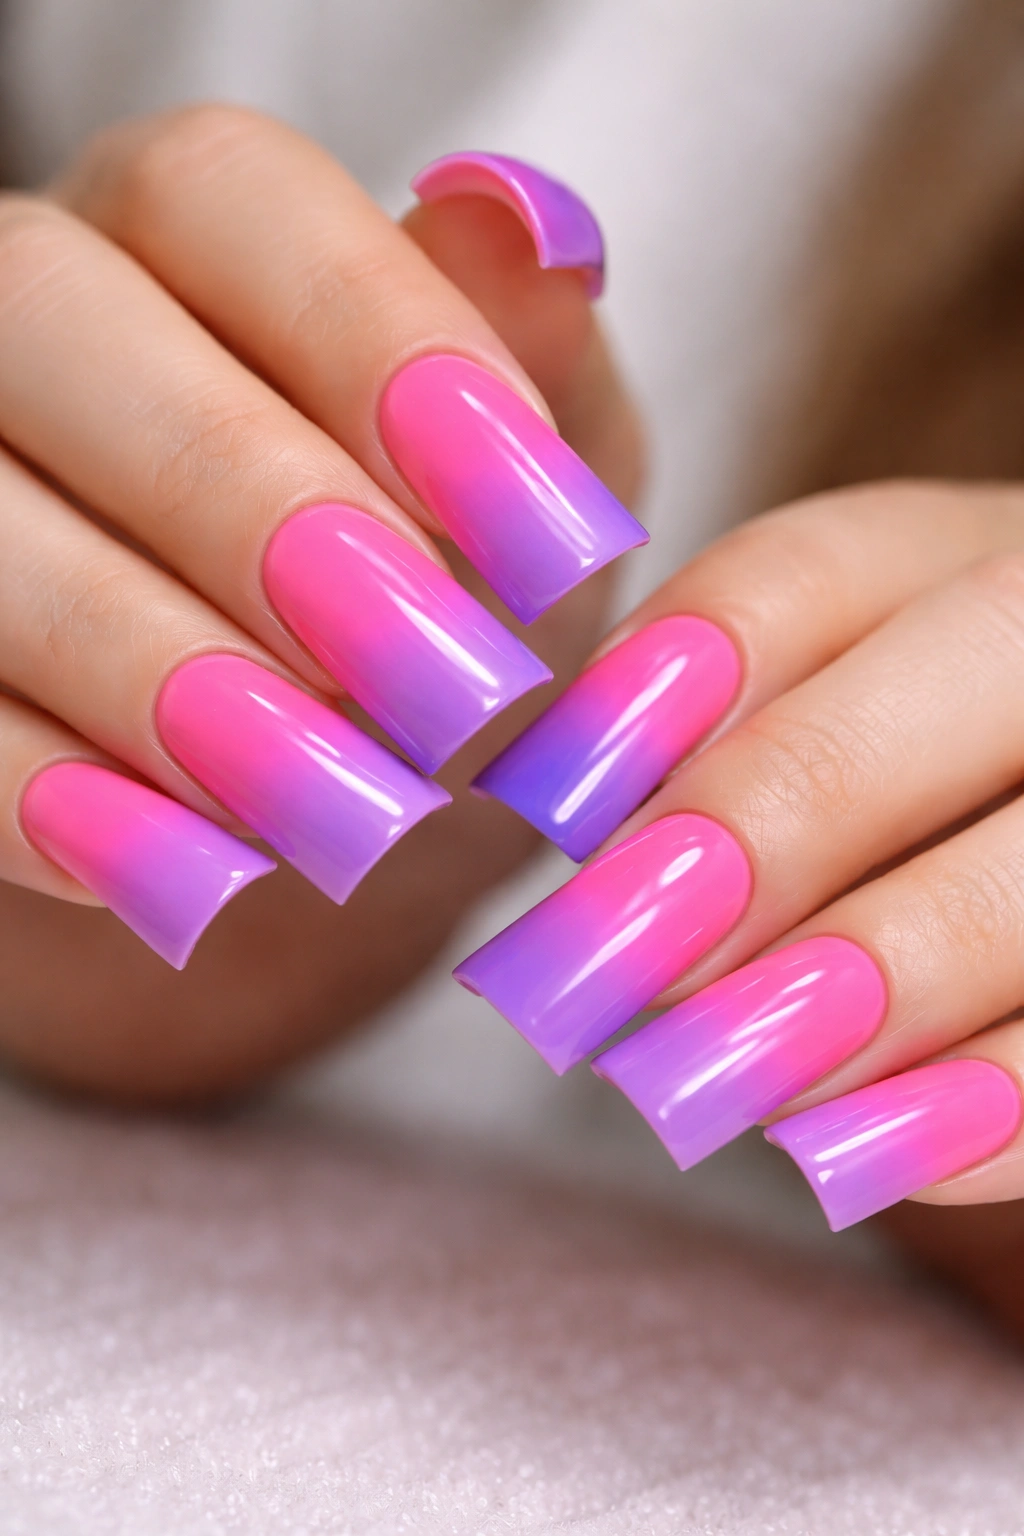
Gradient or ombre designs create a sophisticated, artistic look that still fits perfectly within the gyaru aesthetic — especially when you choose bold, unexpected color combinations. An ombre design transitions smoothly from one color to another across the surface of the nail, creating depth and visual interest. For gyaru duck nails, you might do a gradient from hot pink to purple, vibrant yellow to orange, or even pastels that blend seamlessly from baby blue to lavender.
What Makes Gradient Designs Stand Out
Ombre nails work because they’re technically impressive while still being visually balanced and elegant. The gradient technique shows off skill and precision — it’s not as simple as painting a solid color, which signals that this is a deliberate, carefully crafted design. On duck nails, the larger surface area gives you plenty of space to create smooth, visible color transitions. The effect is more refined than a simple solid color, but still plenty bold and gyaru-appropriate, especially when you choose colors with serious personality and pair the gradient with other embellishments like glitter or rhinestones.
Gradient Application Techniques
- Apply a base coat and let it dry completely
- Choose your two (or three) colors — they should blend well together (analogous colors work better than colors that clash)
- Apply the lighter or first color to about half of the nail
- While the polish is still slightly wet, apply the darker or second color to the other half, slightly overlapping with the first color
- Use a dry makeup sponge or gradient sponge to gently tap and blend where the colors meet, creating a smooth transition (this requires a gentle touch — you’re not painting, you’re tapping)
- Allow to dry and seal with a glossy top coat
Pro tip: The key to a smooth gradient is working quickly before the polish dries, keeping a wet edge where the colors meet, and tapping rather than wiping with your blending tool. Practice on a nail wheel or test nail before committing to your full manicure if this is your first time.
4. Metallic Gold Duck Nails with Rhinestones
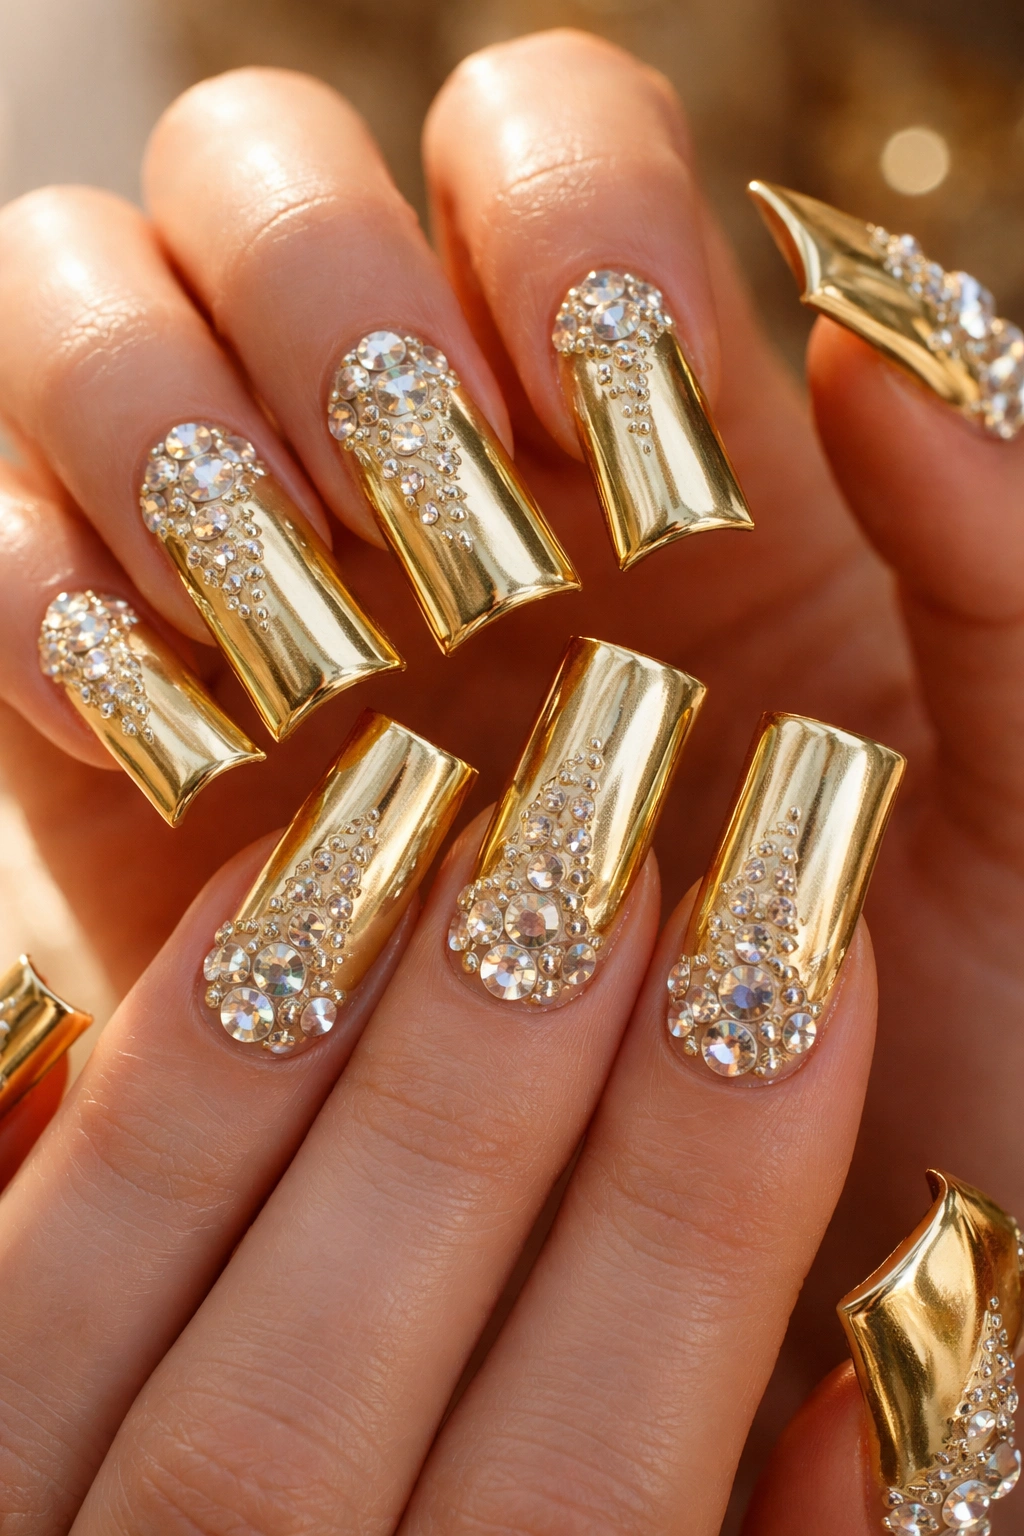
Gold metallic nails dripping with crystals and rhinestones are basically the definition of gyaru glamour. The warm, luxe quality of gold polish pairs beautifully with the sparkle and dimension of embedded gems. You can create a design where the entire nail is gold and then strategically place rhinestones in patterns — down the center, clustered at the tips, arranged in geometric shapes, or scattered for a more organic, lavish look. The contrast between the smooth metallic finish and the faceted brilliance of the stones creates a genuinely luxe appearance.
Why Gold and Rhinestones Work So Well Together
Gold is inherently glamorous and eye-catching, but it reads as luxe rather than chaotic. When you add rhinestones to gold nails, you’re layering textures and creating dimension without things feeling overwhelming. The stones catch light differently than the polish, so your nails literally sparkle from multiple sources. This combination hits that sweet spot where the design is unmistakably bold and ostentatious — perfectly gyaru — but still looks intentional and beautiful rather than just cluttered. It’s the nail art equivalent of a statement piece of jewelry: intentional, confident, and absolutely meant to be noticed.
Application and Placement Strategy
- Apply two coats of metallic gold polish, allowing each coat to dry fully
- Apply a glossy top coat but do not let it dry completely — you want it to be slightly tacky
- Use a rhinestone picker tool or a dotting tool with a small amount of clear gel adhesive on the tip to pick up rhinestones and place them precisely on the still-tacky top coat
- Place stones in your chosen pattern (a centered line, scattered clusters, a gradient from base to tip, or geometric arrangements all look stunning)
- Once all stones are placed, apply another thin layer of clear top coat over everything to seal the stones in place and smooth out the bumpy texture
Worth knowing: The tackiness of the semi-dry top coat is what holds the rhinestones — if it dries completely before you add the stones, they won’t stick. If it’s too wet, they’ll sink in and the placement will be sloppy. Timing is everything, so test on one nail first to get the moisture level right.
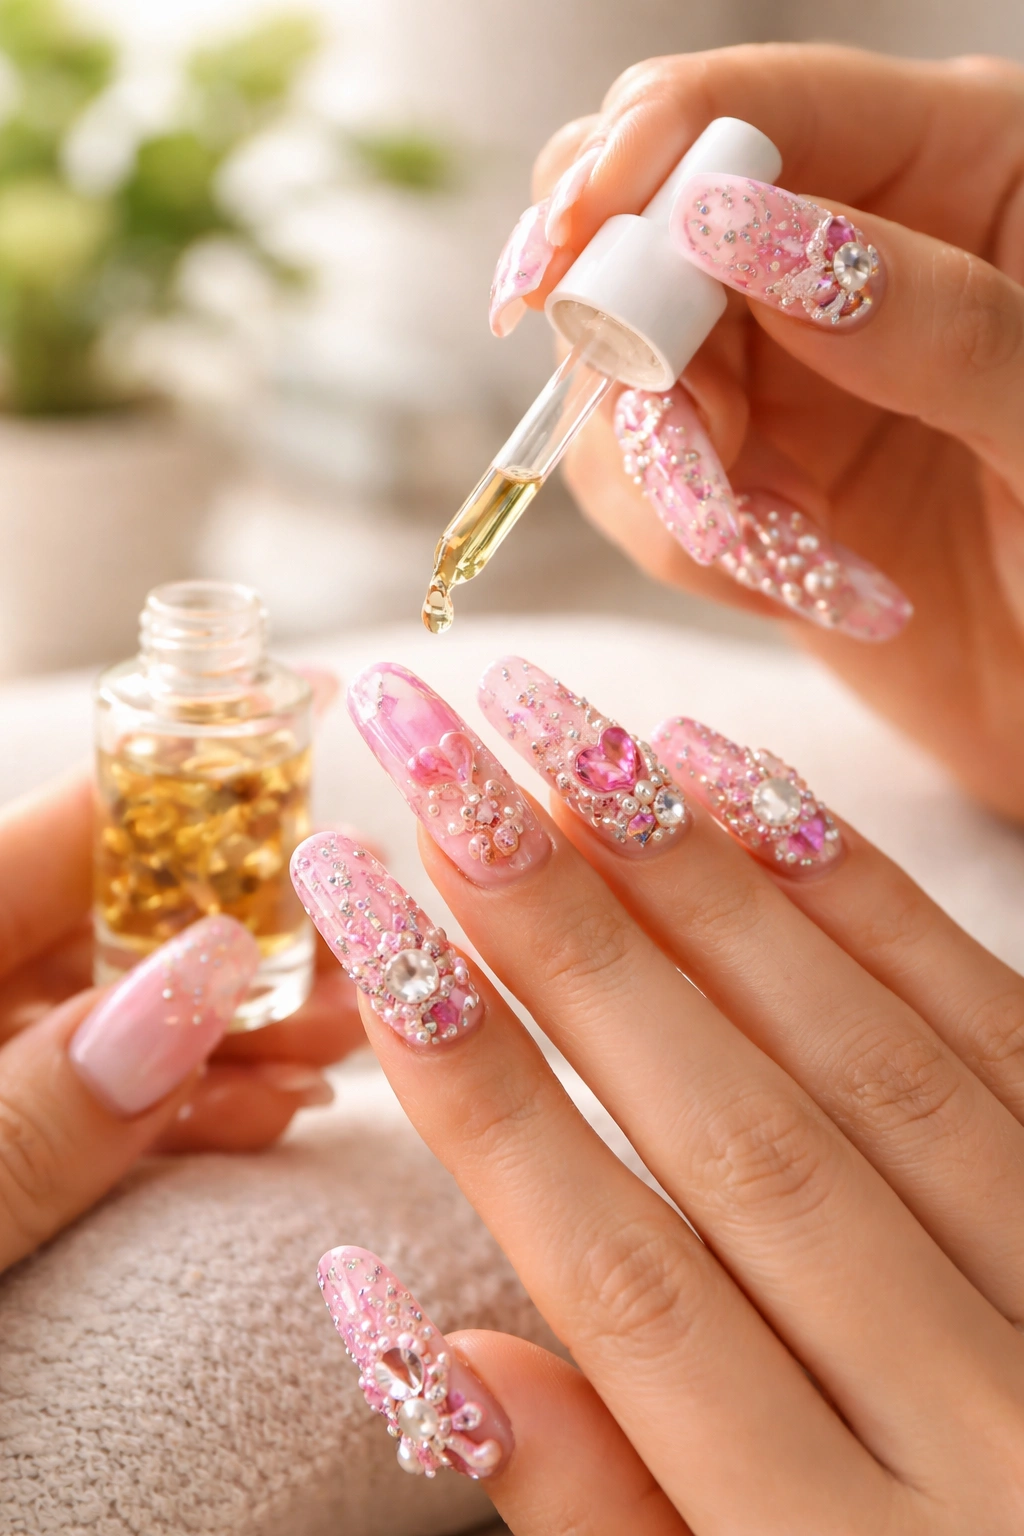
5. Glitter-Laden Duck Nails with 3D Elements

Glitter and dimensional embellishments are the bread and butter of gyaru nail art, and duck nails provide the perfect platform for going completely over the top with texture and sparkle. You can layer different types of glitter — fine shimmer, chunky flakes, holographic sparkle — on a solid base, or build an entire design with layered textures. Adding 3D elements like tiny bows, studs, metallic charms, or nail art stickers on top of the glitter creates a look that’s almost sculptural in its dimensionality.
Why Glitter and Texture Create Instant Impact
There’s something irresistibly fun about nails that literally sparkle and shine from multiple angles and surfaces. Glitter catches light in ways that solid polish can’t — it reflects and refracts, creating movement and energy even when your hands are still. Adding 3D elements on top of the glitter takes the design from “sparkly nails” into “genuine nail art” territory. It shows creativity, commitment to the aesthetic, and a willingness to embrace the maximalist gyaru philosophy. This is the kind of design that makes people stop and ask about your nails, because it’s just visibly unique and statement-making.
Layering Glitter and 3D Elements Effectively
- Start with a base color (bright, bold colors work best as a canvas for glitter, though nude or white bases can work too)
- Apply a thick layer of clear gel or a glitter base coat
- Sprinkle your chosen glitter while this layer is still tacky, using multiple types for visual interest (fine shimmer + chunky flakes + holographic sparkle creates maximum dimension)
- Cure with a UV or LED lamp (if using gel products) or let dry completely
- Apply a smooth top coat to seal the glitter in place
- While the top coat is still slightly tacky, place your 3D elements using a precision tool or forceps, pressing gently to embed them
- Apply a final thin top coat to seal everything
Pro tip: The most visually interesting glitter designs use at least three different types of glitter at different sizes and finishes — this prevents the look from feeling one-dimensional or boring, even with all the sparkle.
6. Two-Tone Duck Nails in Bold Contrast
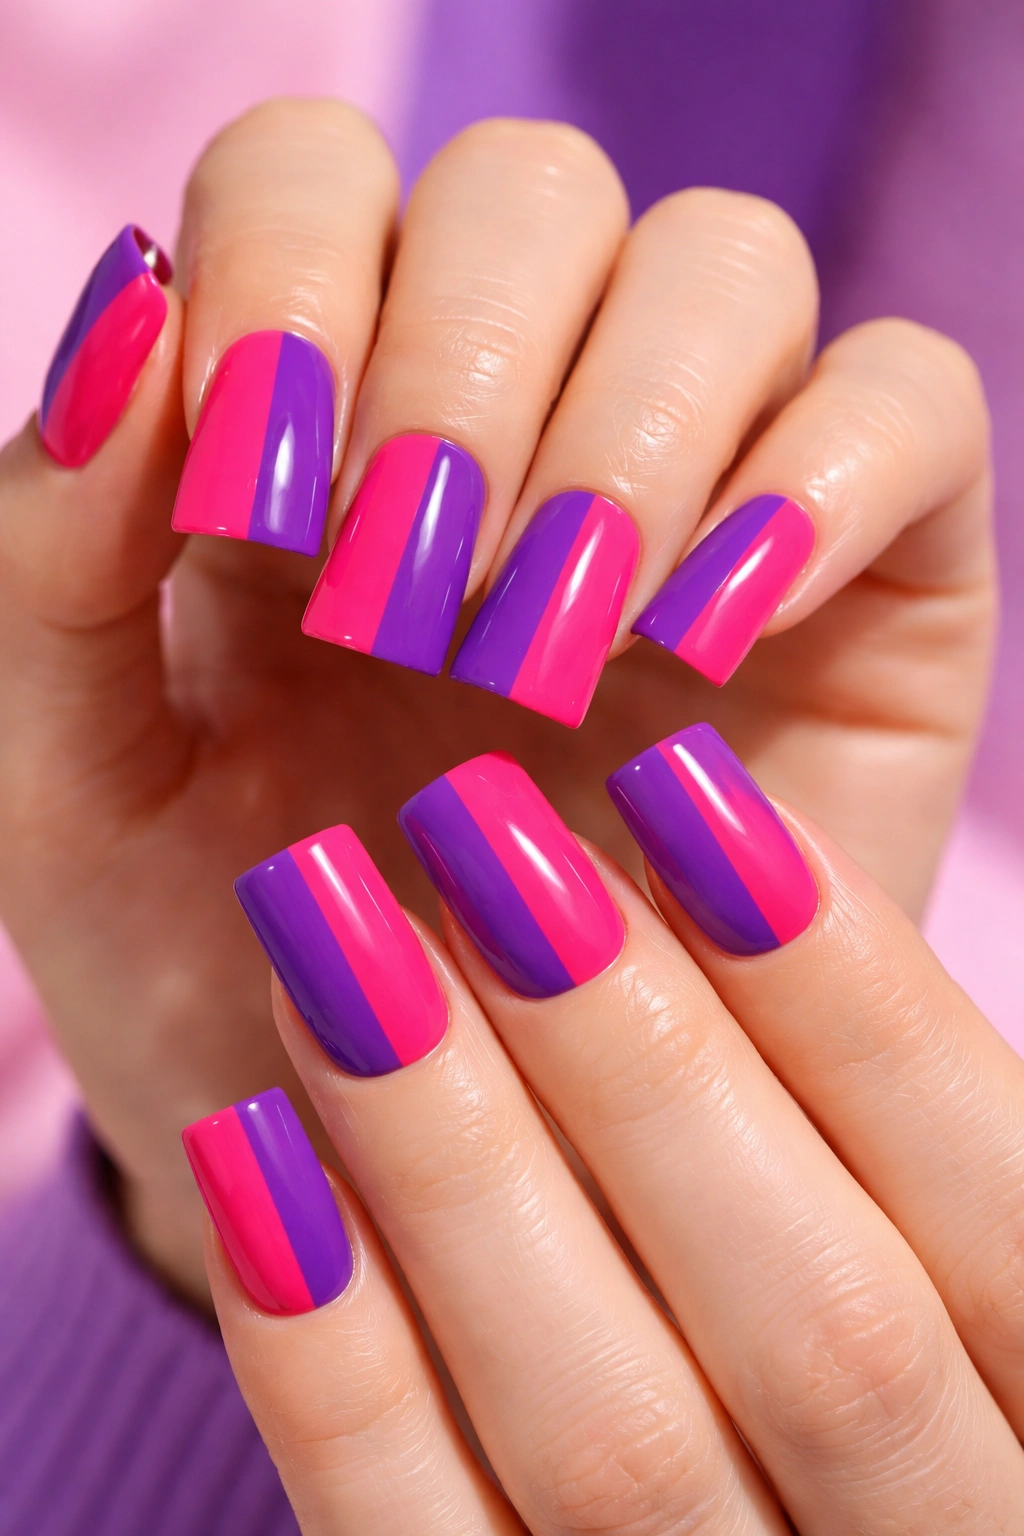
Two-tone nails — where contrasting colors are split or sectioned across the nail design — create a graphic, eye-catching look that’s less detailed than some other designs but equally impactful. You might do a vertical split of hot pink and electric purple, a diagonal line dividing neon yellow and lime green, or horizontal sections that create a striped effect. The key is choosing colors that have genuine contrast so the split design reads clearly and dramatically.
What Makes Bold Color Blocking Stand Out
Sometimes the most striking designs are the simplest ones — and a well-executed two-tone split proves this perfectly. There’s something visually satisfying about the clean geometry of a color-blocked design, and on duck nails, the extended shape emphasizes the lines even more. The contrast between two bold colors naturally draws the eye and creates visual interest without requiring intricate detail work. This design celebrates the power of color itself, which is absolutely in line with gyaru aesthetics. It’s bold, confident, and unmistakably intentional.
Executing Clean Two-Tone Designs
- Apply a base coat and let it dry
- Apply your first color to one half of the nail (for a vertical split, paint the left or right side; for diagonal, create an angled line; for horizontal, paint the top or bottom)
- Let the first color dry completely to ensure a clean line
- Using painter’s tape placed precisely along where the two colors meet, apply your second color to the remaining section (this tape prevents the colors from bleeding into each other)
- Remove the tape while the second color is still slightly wet for a perfectly clean line
- Apply top coat and seal
Worth knowing: The precision of your line determines how striking this design looks, so take your time with placement and tape positioning. A slightly messy or uneven line can read as intentionally artistic rather than sloppy, but a truly clean line reads as professional and polished.
7. Marble Pattern Duck Nails
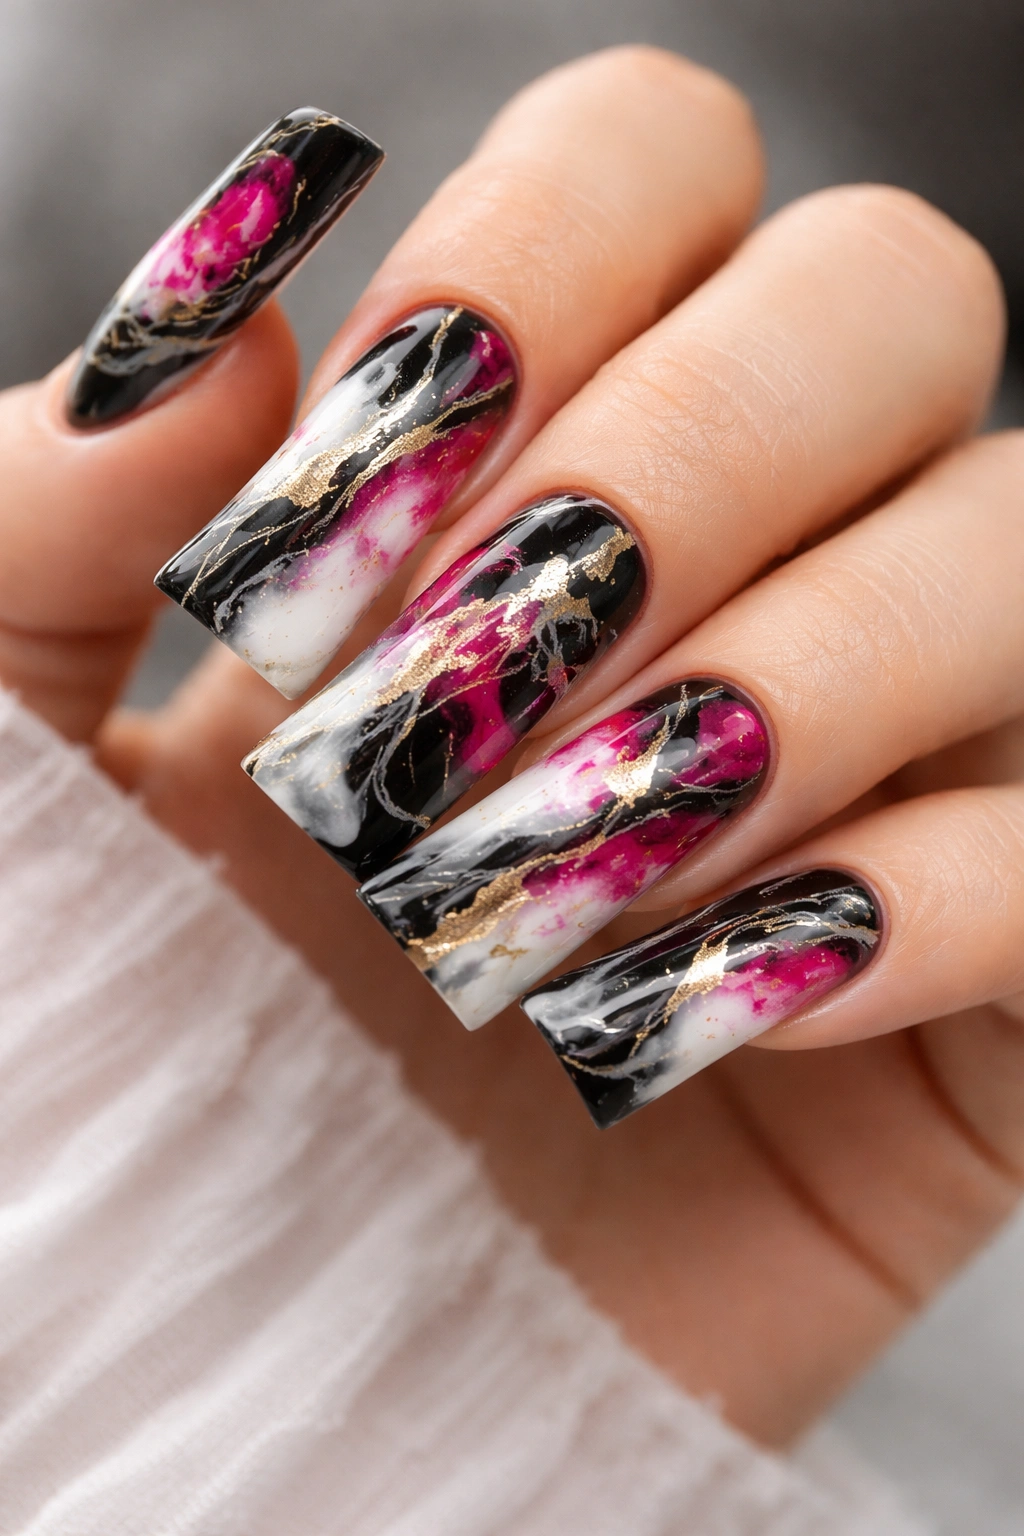
Marble nail designs create an artistic, sophisticated look that feels less immediately “glam” than rhinestone-heavy designs but is absolutely beautiful and gyaru-appropriate. Marble effects mimic the natural veining of marble stone, creating organic-looking patterns using typically two or three colors combined with thin, flowing lines. You can create marble effects in dramatic color combinations — black and white, hot pink and gold, or purple and lavender — that still feel bold while being visually intricate and interesting.
Why Marble Effects Feel Elegant and Modern
Marble nails work because they’re artistic without being cutesy — they show off technical skill and a sophisticated color sense. The organic, naturalistic patterns feel like wearable art rather than just “decorated nails.” On duck nails, the larger canvas allows you to create more detailed, intricate marble patterns that really showcase the full effect. Marble designs bridge the gap between classic nail art and the bolder aesthetics that gyaru embraces, making them perfect if you want to feel dramatic and artistic without going full rhinestone-and-glitter.
Creating Marble Patterns
- Apply a base coat and then your lightest color as a full base (two thin coats)
- Let dry completely
- Using a thin brush or nail art pen, draw thin, flowing lines in your second color (typically black, dark brown, or a deep jewel tone)
- While these lines are still wet, soften them by dragging a dry brush or toothpick through the lines, creating organic, feathered edges
- Add additional lines and feathering in a third color if desired (this creates depth)
- Seal with a glossy or matte top coat depending on your preference
Pro tip: Marble designs look best when the veining lines follow an organic, non-repetitive pattern — study actual marble stone for inspiration rather than trying to create perfectly symmetrical designs.
8. Pastel Gyaru Duck Nails with Charm Details
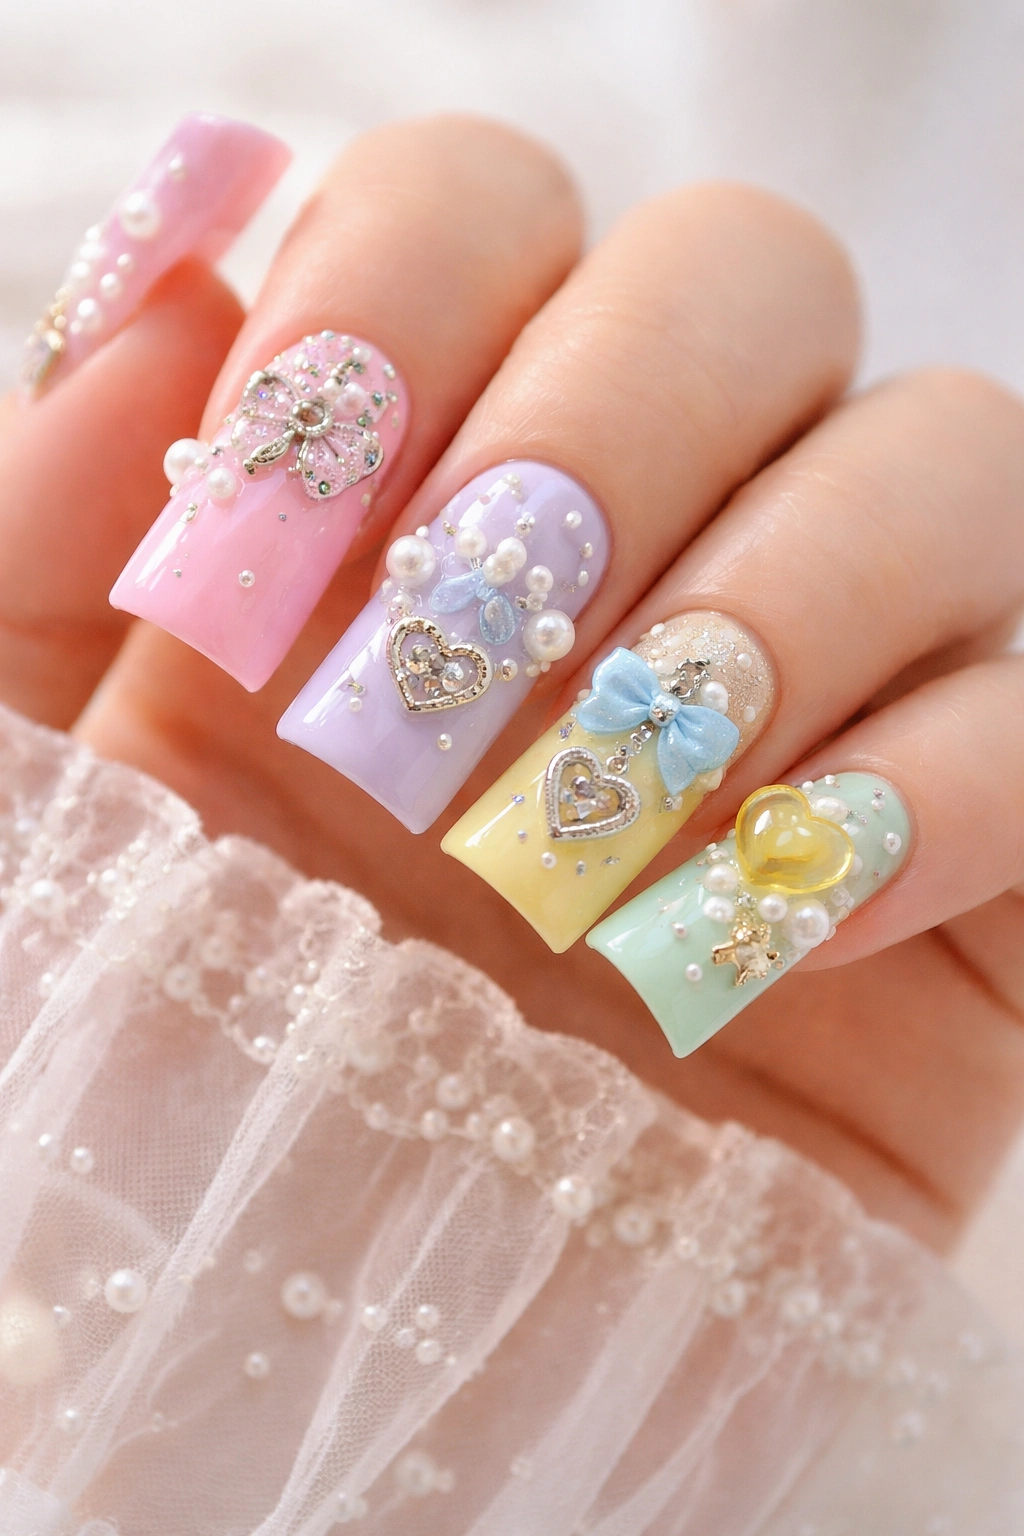
While gyaru aesthetics are often associated with neon brights, pastel versions of this look are absolutely valid and gorgeous. Soft pink, lavender, baby blue, light yellow, and mint create a more delicate canvas than neon alternatives, but when you add charm details — tiny pearls, metal charms, stickers, or hand-painted accents — the look becomes distinctly playful and gyaru. The contrast between the soft, gentle base colors and the embellished details creates visual interest and personality.
Why Pastels Work for Gyaru Duck Nails
Pastels allow you to explore the playful, expressive side of gyaru aesthetics without the visual intensity of neons. This approach appeals to people who love the attitude and confidence of gyaru style but want something slightly softer or that works better with their personal wardrobe. Pastel duck nails still command attention, but they do so with a slightly more approachable energy. The added charms and details provide the glam and maximalism that makes it distinctly gyaru — it’s just dialed down a notch in terms of color intensity.
Creating Pastel Designs with Embellishment
- Apply two coats of your chosen pastel color, letting each dry fully
- Apply a glossy base top coat that’s slightly tacky (you want adhesive to hold your charms)
- Place your chosen charms, pearls, or stickers using a precision tool while the top coat is still slightly wet
- You can arrange them in patterns (a line down the center, clustered at the tips, scattered across the nail) or create more random, whimsical placements
- Apply a final clear top coat to seal everything in place
- For hand-painted details, use a thin brush and contrasting colors to add small dots, lines, or simple designs
Worth knowing: Pastel colors can show dust, debris, and fingerprints more easily than darker shades, so be extra diligent about keeping the design clean during application and sealed well afterward.
9. Geometric and Striped Duck Nails

Geometric designs — using lines, triangles, squares, hexagons, and other shapes — create a modern, graphic aesthetic that feels contemporary while still honoring the bold, eye-catching qualities that gyaru style celebrates. Striped designs, in particular, create instant visual impact and work beautifully on duck nails where the extended shape gives you plenty of room for multiple stripes. You can do thin, precise stripes or wider bands, and you can work with bold contrast or more subtle color combinations.
What Makes Geometric Designs Visually Striking
Geometry creates order and precision that reads as intentional and sophisticated. When executed well, geometric designs feel modern and artistic rather than chaotic. On duck nails, geometric patterns are easy to see and appreciate — the shapes don’t get lost on a small nail surface. This design philosophy appeals to people who love the confidence and boldness of gyaru style but want something that feels structured rather than free-form. It’s bold without being glittery or rhinestone-heavy, which makes it a different flavor of gyaru glamour.
Executing Clean Geometric Patterns
- Apply your base color (typically a bright, bold shade or even white/nude for maximum contrast with geometric elements)
- Use painter’s tape to create geometric sections — place tape in lines to create stripes, triangles, or other shapes
- Paint your second color in the exposed sections
- Remove tape while the polish is still slightly wet for cleanest edges
- For more intricate designs, use a thin brush and nail art pen to draw geometric shapes freehand
- Seal with a glossy top coat
Pro tip: The precision of your painter’s tape placement and removal determines how clean and impressive your geometric design looks, so take your time and use good quality tape that won’t bleed.
10. French Tip Duck Nails with Gyaru Flair
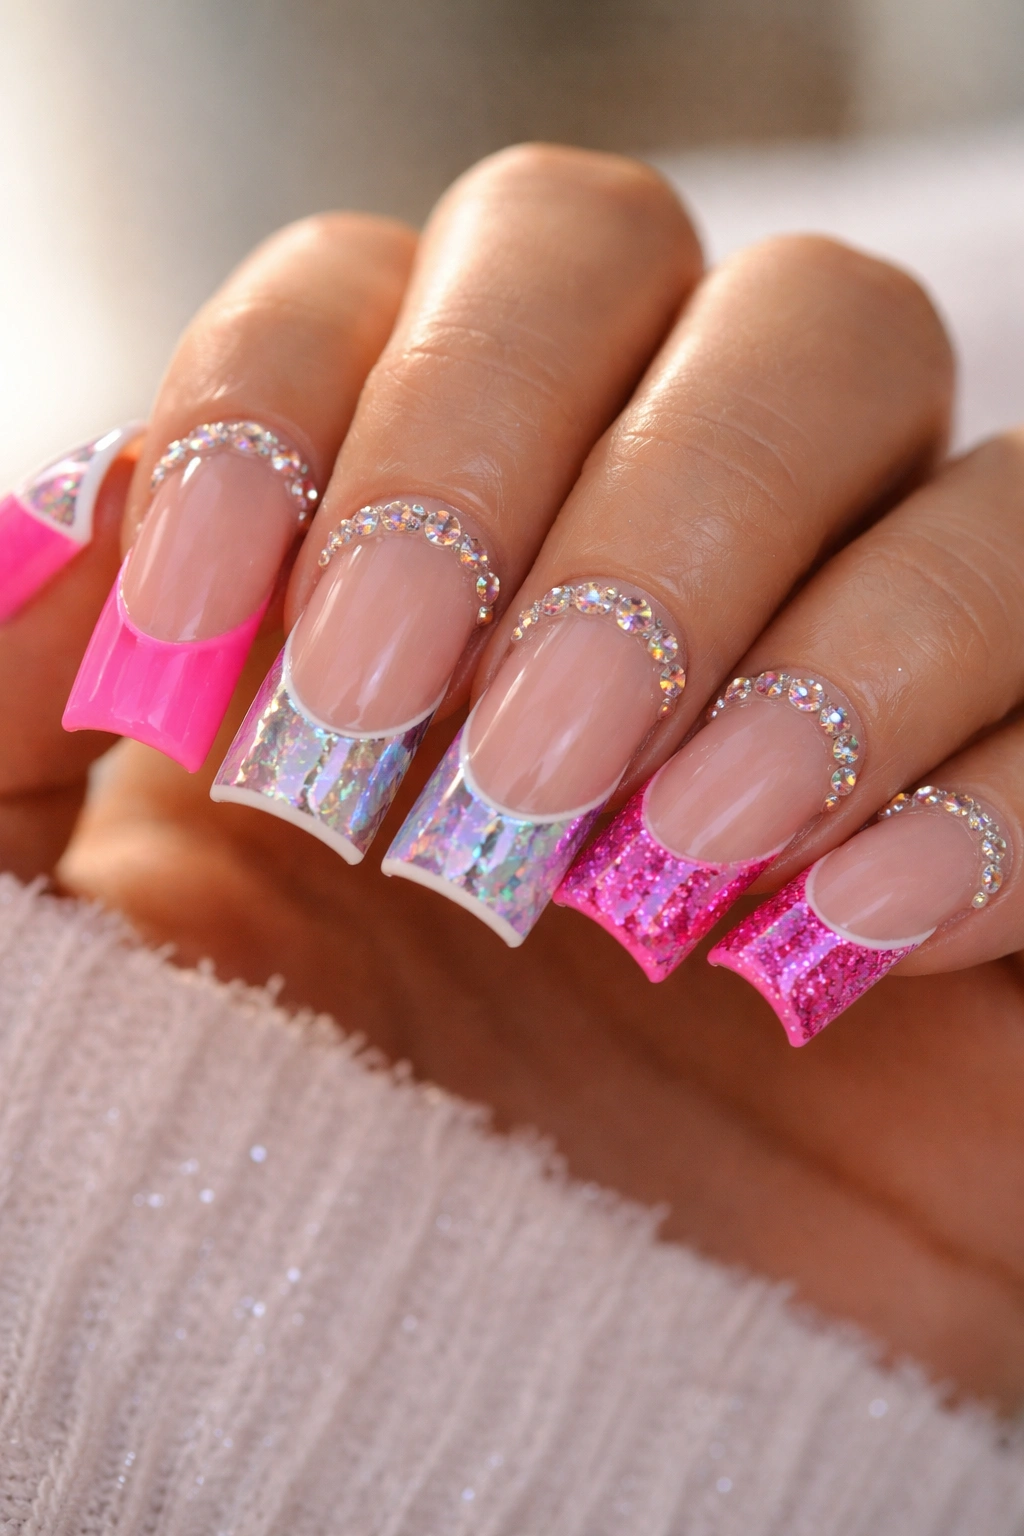
French tips — the classic white tips combined with a nude or pale base — might seem too sophisticated or subtle for gyaru style, but when you amp up the color, add embellishments, or use creative tip variations, you’ve got a look that’s both elegant and undeniably bold. Instead of classic white tips, try neon pink tips, holographic tips, or tips covered in glitter. You can also add rhinestones along the tip line, use ombre transitions from the base to the tip, or incorporate metallic accents.
Why Elevated French Tips Feel Fresh for Gyaru
French tips are instantly recognizable and familiar, which creates a great foundation for playful experimentation. By taking this classic design and making it decidedly un-classic through bold color choices and embellishments, you’re creating something that feels both sophisticated and daring. It’s a perfect design choice if you want something that looks intentional and polished but still absolutely reads as gyaru through your color and embellishment choices. This design shows that gyaru style isn’t just about maximum sparkle — it’s about attitude and creativity.
Creating Elevated French Tip Designs
- Apply two coats of your chosen base color (pale pink, nude, white, or even a pastel shade)
- Let dry completely
- Create a line where your French tip will begin using painter’s tape placed across the nail at an angle or straight line
- Apply your chosen tip color (bold, metallic, glitter, or holographic all work beautifully) to the exposed tip section
- Remove the tape while still slightly wet for a clean line
- Add embellishments to the tip if desired (rhinestones along the line, glitter mixed into the polish, or metallic accents)
- Seal with a glossy top coat
Worth knowing: The angle and thickness of your French tip determines how modern versus classic the design reads — wider, more pronounced tips feel more contemporary, while thinner, more subtle tips feel more classic.
Tips for Perfect Gyaru Duck Nail Application
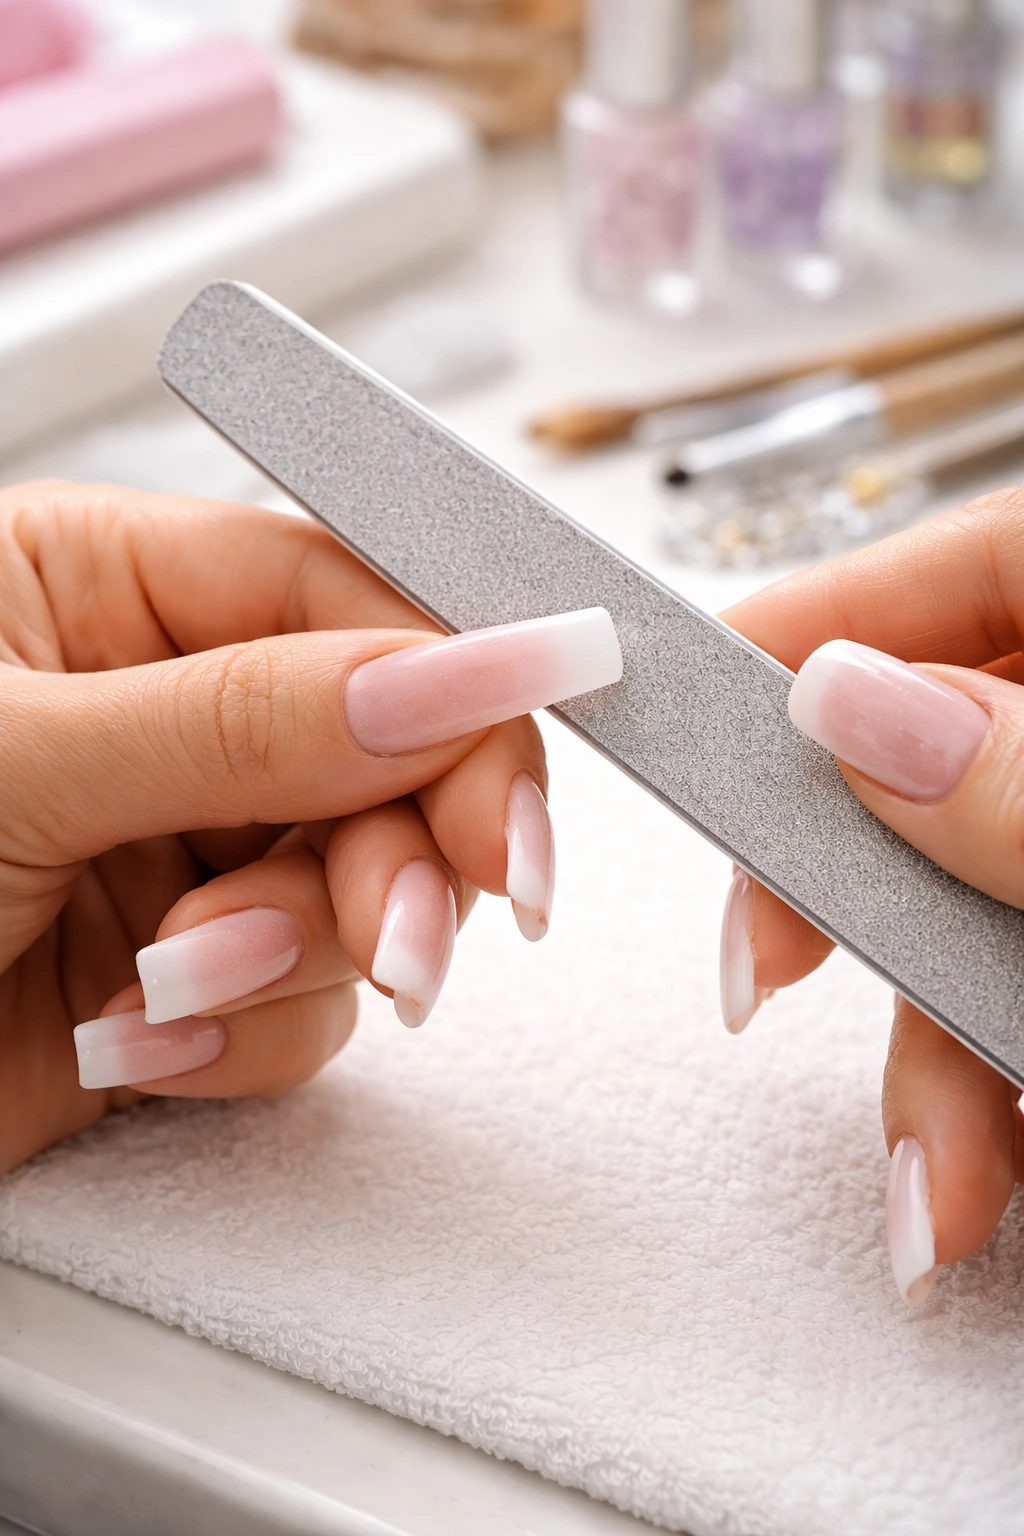
Getting the shape right is the foundation of any successful duck nail design. The characteristic squared-off, slightly flared shape requires proper filing and shaping — use a straight edge file and work deliberately from the sides toward the center, creating that distinctive blunt, squared tip. Avoid over-filing, which thins the nail and makes it fragile. The sides of the nail should be relatively straight rather than curved, which is what creates that signature duck-like appearance.
Base preparation is genuinely important, even though it’s not the most exciting part of nail art. Push back your cuticles gently, file your nails into the duck shape, and buff the surface lightly to remove shine (this helps polish adhere better). Apply a base coat to protect your natural nails and provide a smooth surface for polish application. This single step reduces chipping and makes your manicure last significantly longer.
When applying polish, remember that thin coats are better than thick ones — you’ll get more even coverage with two thin coats than one thick coat. Thick polish tends to pool, bubble, and chip more easily. Let each layer dry completely before applying the next one (or follow the drying times specified if you’re using gel products). Rushing through drying is one of the most common mistakes, and it usually results in a manicure that chips within days.
Quality products make a genuine difference in the final result. Invest in good polish brands, top coats that actually seal and protect, and nail art supplies designed for precision work. Cheap polish often has poor pigmentation, streaks easily, and chips quickly. Good quality supplies might cost more upfront, but they’ll save you money and frustration in the long run because your manicures will last longer and look better.
Maintaining Your Duck Nails Between Appointments
Duck nails require a bit more care than shorter nail shapes because the extended length means more surface area exposed to potential breakage. Moisturize your cuticles daily with cuticle oil or hand cream — healthy cuticles support healthier, stronger nails. Wear gloves when cleaning, doing dishes, or gardening to protect your nails from water damage and harsh chemicals.
Top coat is your friend — apply a fresh layer of top coat every few days to keep your design sealed and protected. This simple step can extend the life of your manicure by a week or more, and it keeps colors looking fresh and vibrant. If you notice any chipping or wear, resist the urge to pick at it (I know, I know, it’s tempting). Instead, gently file the rough edge and apply more top coat to prevent further damage.
Sleep on a silk or satin pillowcase if possible — cotton pillowcases can catch and break long nails, while smooth fabrics let your nails glide without friction. It sounds fancy, but quality silk or satin pillowcases are surprisingly affordable and they’re genuinely good for your nails, hair, and skin.
Choosing Colors and Designs That Work for Your Style
The absolute best gyaru duck nail design is the one that makes you feel confident and excited when you look at your hands. These ten ideas are starting points, not rules. Customize them based on your personal preferences — if you love holographic effects but prefer pastels to neons, combine those elements. If you love rhinestones but prefer minimalist designs, use them more sparingly. The gyaru aesthetic is fundamentally about self-expression and confidence, so your nails should reflect your personality and taste.
Consider your lifestyle when choosing designs too. If you work somewhere with conservative dress codes, you might gravitate toward the marble or elevated French tip designs, which are visually interesting and artistic without being immediately shocking to conservative eyes. If you’re wearing your gyaru nails to a concert, festival, or social event where bolder is better, go for the glitter, rhinestones, and neon combinations that make a real statement.
Build a collection of nail polish colors and embellishments over time so you have options when inspiration strikes. A good gyaru collection should include multiple neon shades, metallics, holographic options, some pastels for variety, and basics like black, white, and nude. Having this range on hand means you can create almost any design combination without needing to run to the store.
Final Thoughts
Duck nails paired with gyaru-inspired designs are genuinely fun to create and even more fun to show off. Whether you choose the bold neon and chrome combination, the delicate elegance of pastel charms, the artistic precision of geometric patterns, or any of the other designs covered here, you’re celebrating a style philosophy that’s all about confidence, creativity, and refusing to play it safe. These nails are meant to be noticed, admired, and appreciated for the thought and effort that goes into them.
The most important thing is that you’re choosing designs that genuinely excite you and that make you feel good when you look at your hands. Nail art is temporary, relatively inexpensive to change, and endlessly customizable — which means you get to experiment, play around, and discover what variations feel most authentically you. Start with one of these ten designs, make it your own, and have fun with it. Your gyaru duck nails should make you smile every time you catch a glimpse of them in the sunlight.
