

Duck nails have become a bold canvas for creative nail art, and combining them with animal prints elevates the trend to an entirely new level of visual impact. The extended, curved silhouette of duck nails naturally draws attention to intricate details, making animal print patterns pop with dimension and personality. Whether you’re drawn to leopard spots, zebra stripes, tiger patterns, or more unconventional animal designs, duck nails offer the perfect platform to showcase these fierce, eye-catching aesthetics. The shape itself adds a playful edge to traditionally wild prints, creating a contrast that’s both sophisticated and daring.
What makes animal print duck nails so versatile is their ability to work across different moods and occasions. You can go ultra-feminine with a delicate cheetah pattern in soft pastels, channel pure confidence with a bold tiger stripe design, or experiment with unexpected combinations like snake print ombré or leopard spots with metallic accents. The key to pulling off any animal print duck nail design is understanding how to balance the print’s intensity with complementary colors, finishes, and embellishments that enhance rather than overwhelm the overall look.
The following 18 designs showcase the incredible range of animal prints and styles possible on duck nails, from classic patterns given a modern twist to completely unexpected animal-inspired combinations. Each design offers specific techniques, color recommendations, and styling tips you can adapt to match your personal aesthetic. Whether you’re prepping for a special event, looking to refresh your everyday look, or simply wanting to express your bold, adventurous side, these animal print duck nail ideas deliver inspiration for every skill level and preference.
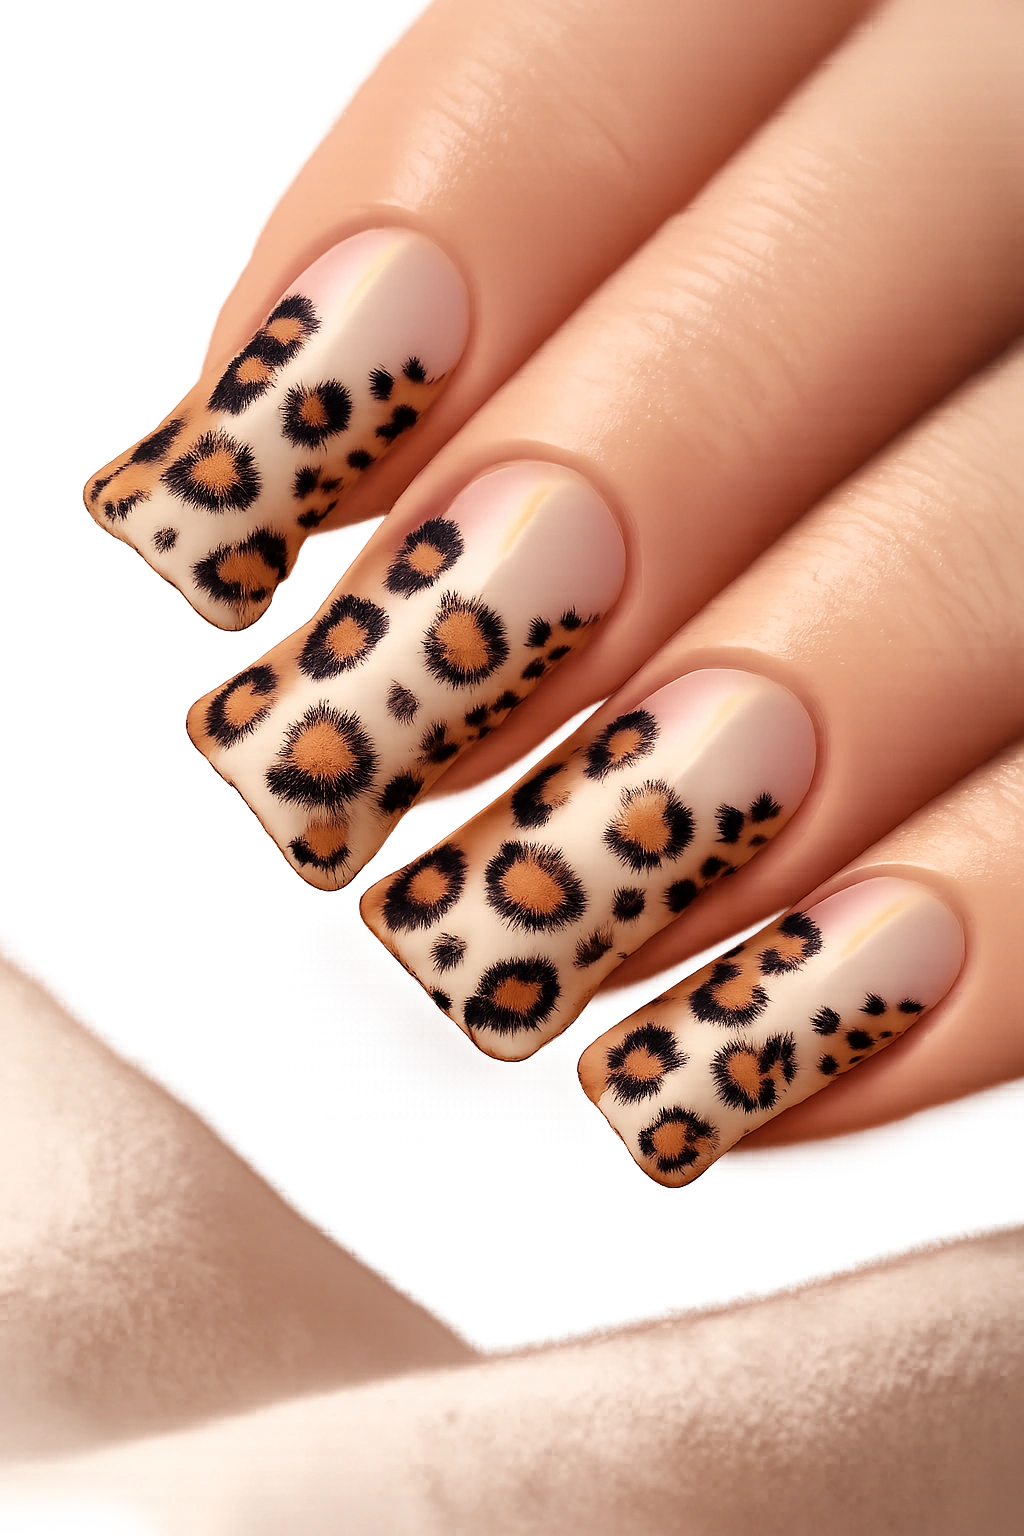
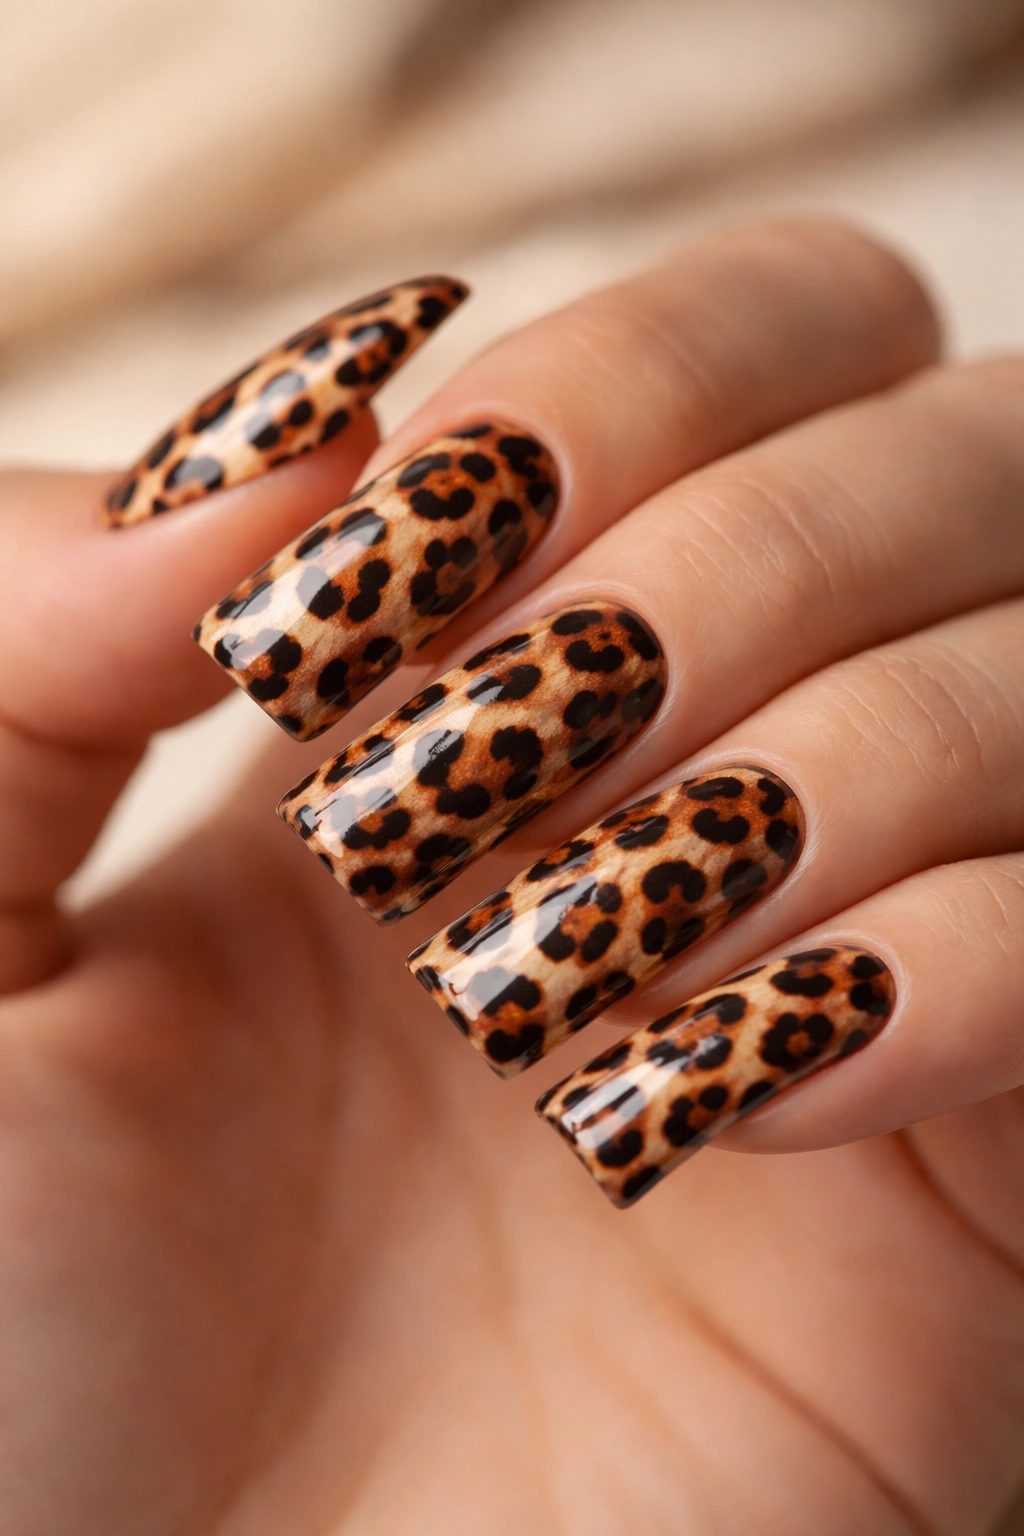
1. Classic Leopard Spot Pattern
The iconic leopard print never goes out of style, especially when translated onto the dramatic canvas of duck nails. This design features scattered, irregular spots in warm browns, golds, and blacks that create a luxe, timeless aesthetic. The beauty of a classic leopard design is its flexibility—you can keep spots larger and more spaced out for a cleaner look, or cluster them densely for maximum impact. The spotted pattern actually suits the curved surface of duck nails beautifully, as the spots follow the natural contour of the nail shape.
Why This Design Works So Well
Leopard spots are forgiving to create because perfect symmetry isn’t the goal—in fact, natural-looking imperfection is what makes animal prints believable. The warm brown and gold color palette complements virtually any skin tone and transitions seamlessly between seasons. Duck nails give you enough surface area to play with spot size and density, allowing you to create visual depth and movement across the nail.
Application Techniques and Tips
- Use a thin dotting tool or the tip of a toothpick to create individual spots rather than trying to paint them freehand with a brush
- Start with a cream or nude base, then apply dark brown spots while wet for softer edges
- Layer a second, lighter brown or tan for some spots to create dimension and shadow effects
- Seal with a glossy top coat for that polished, professional finish
- Consider adding a subtle gold shimmer around the nail edges to enhance the luxury feel
Pro tip: Apply your base coat in two thin layers to ensure an even surface—leopard spots show every imperfection underneath, so smoothness matters.
2. Minimalist Zebra Stripe Design
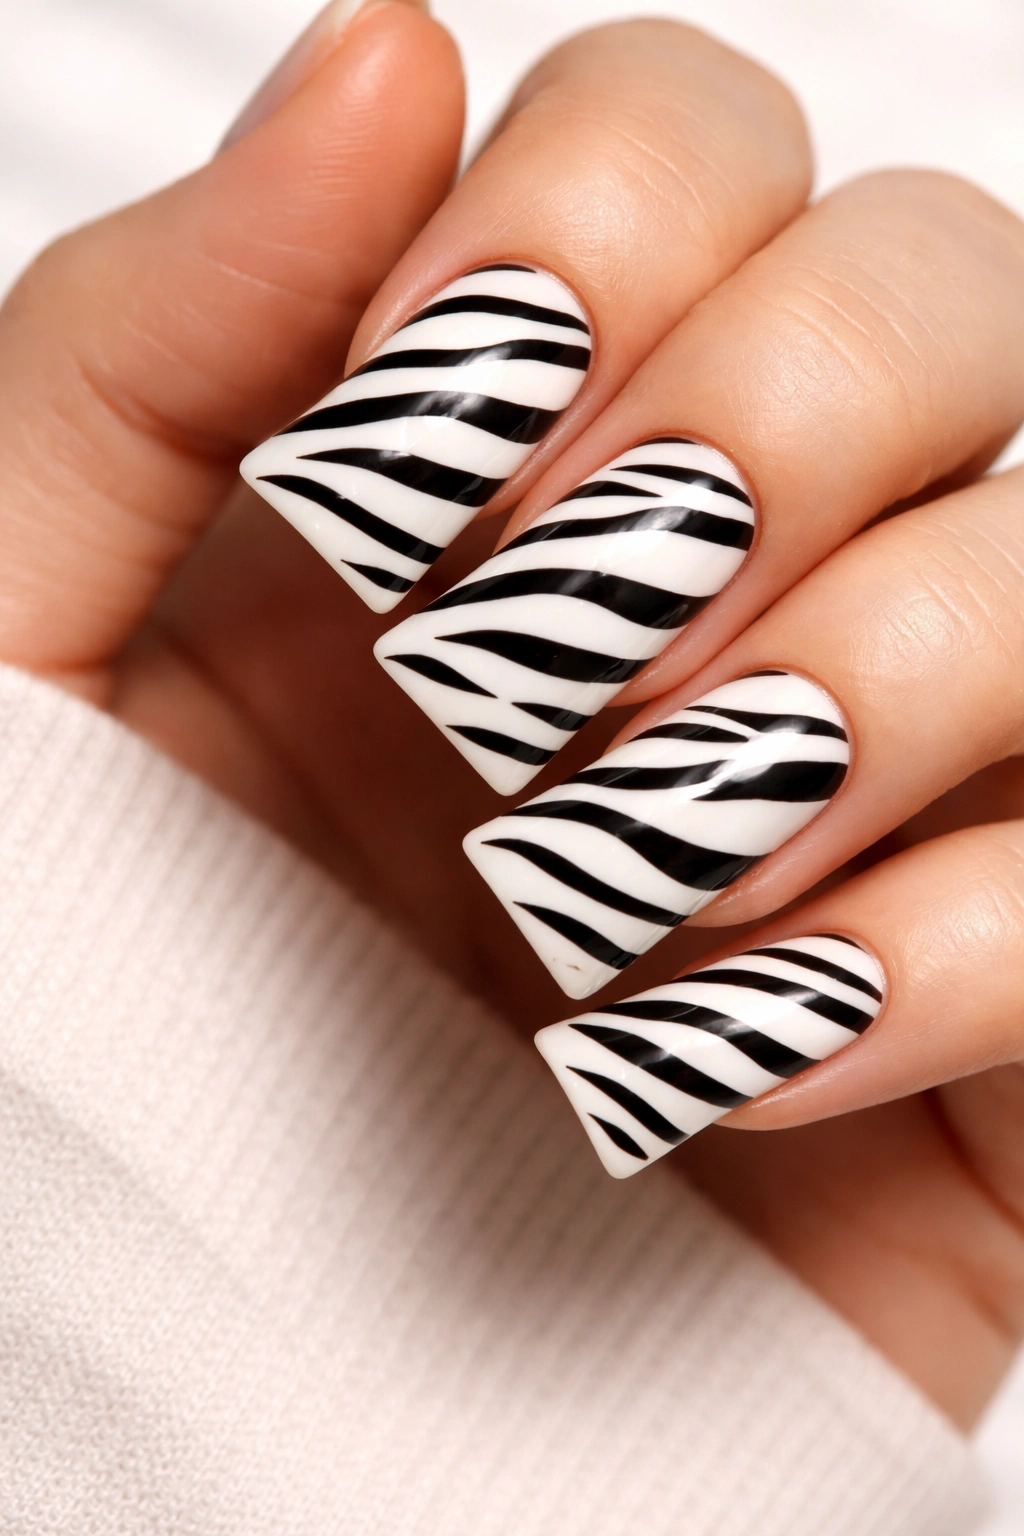
Zebra stripes bring bold linear energy to duck nails while maintaining a clean, graphic aesthetic. This minimalist version uses just black lines on a white or cream base, creating high contrast that photographs beautifully and works with virtually any outfit. The key to a successful zebra design is keeping stripes somewhat irregular rather than perfectly parallel—real zebra stripes vary naturally, and mimicking that irregularity makes the design feel authentic rather than geometric.
The Power of Negative Space
Zebra stripes actually benefit from simplicity because the bold contrast does all the work for you. You don’t need to fill every millimeter of the nail or add additional embellishments—the pattern itself is the statement. On duck nails, broad confident stripes create a striking visual that’s visible even from a distance, making this design perfect if you want your nails to be noticed.
Creating Clean, Confident Lines
- Use a thin striping brush or even a fine-tipped eyeliner (dedicated to nails only) to draw black lines
- Don’t worry about perfect symmetry; slightly wavy or slightly-off-angle lines look more natural and interesting
- Leave some nails with stripes in one direction and vary the angle on others for a more dynamic look
- Apply matte top coat for a more modern, graphic feel, or glossy for something more polished
- Consider leaving white space undecorated on some nails to break up the pattern
Worth knowing: Thin lines require steady hands, but practice makes perfect—use a quick dry top coat between attempts so mistakes don’t ruin your base color.
3. Cheetah Print in Rose Gold
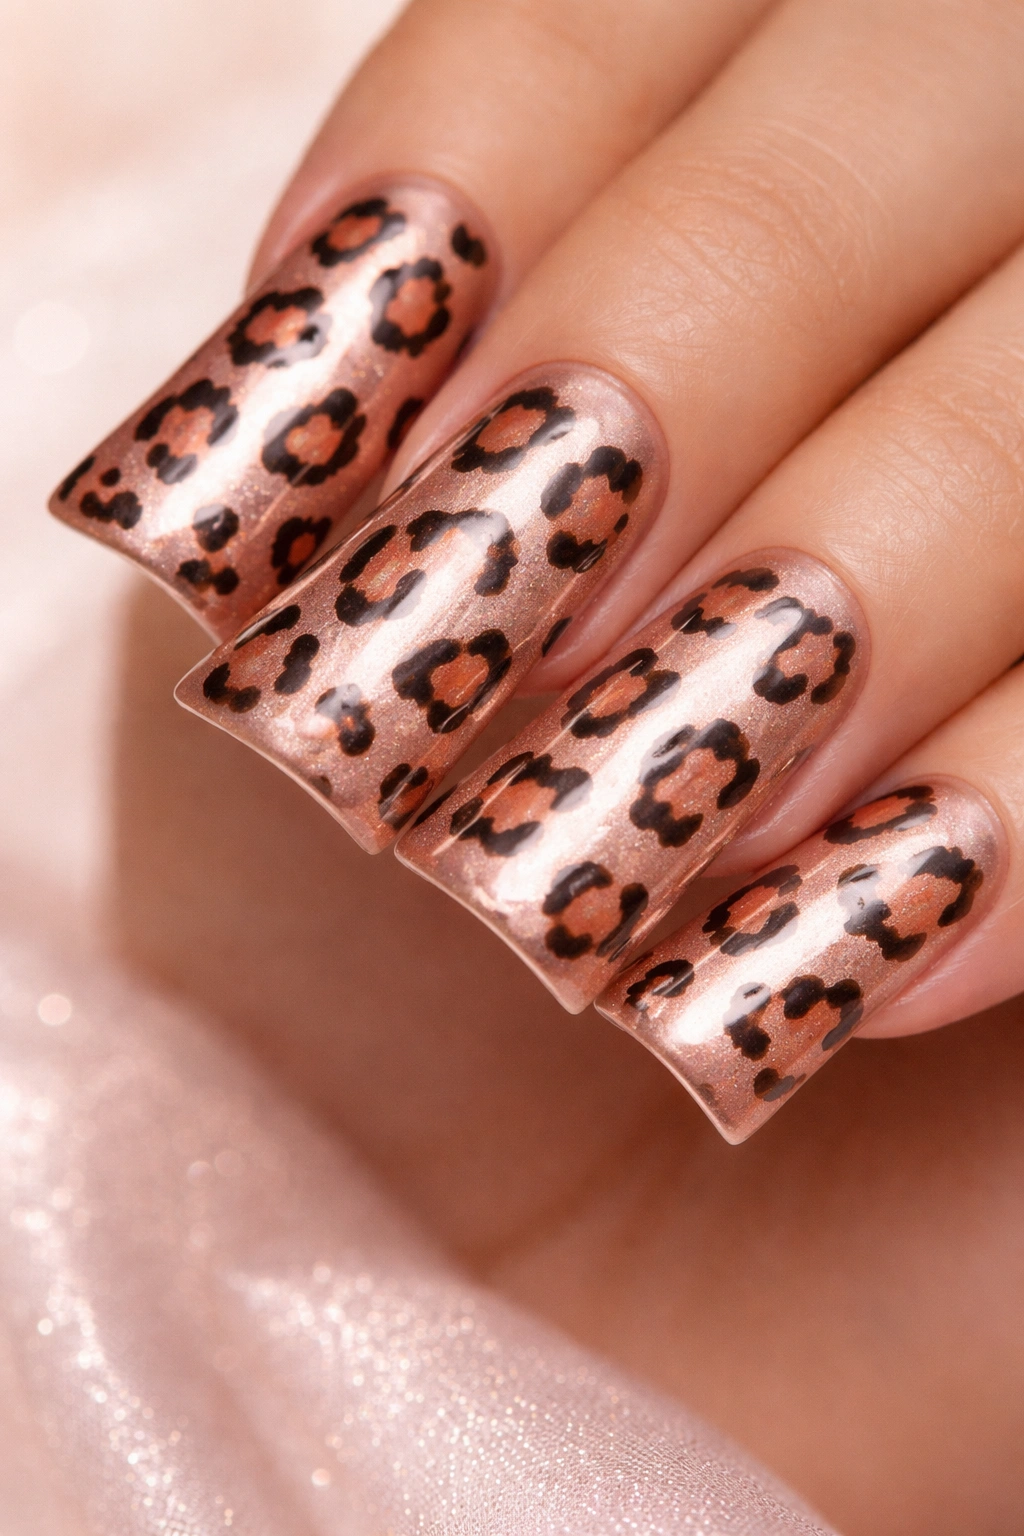
Soft, romantic colors completely transform how we perceive animal prints, and this cheetah design in rose gold is proof. The design features warm rose gold base with peachy-brown and black spots, creating a feminine, elegant aesthetic that reads more “sophisticated nail art” than “wild and fierce.” This version works beautifully for weddings, formal events, or anyone who wants to wear a bold print without the intensity of darker colors. The metallic rose gold adds luxury and catches light as you move your hands.
Balancing Femininity with Pattern
Rose gold is forgiving because it’s warm and universally flattering, but it also requires intentional spot placement to avoid looking muddy. The cheetah spots in this design should be clearly defined against the glowing rose gold base, so darker browns and blacks create proper contrast. Layering metallics with matte accents adds depth that elevates the entire design from casual to elevated.
Rose Gold Cheetah Technique
- Start with a rose gold metallic base coat (two coats for opacity and shine)
- Mix a slightly darker rose bronze tone for the main cheetah spots
- Use tiny flicks and curves to form the characteristic cheetah spot shapes—they’re more like broken rings or curved lines rather than perfect circles
- Add darker brown or black accents inside some spots for depth
- Finish with a shimmery clear top coat to amplify the rose gold glow
Insider note: If your rose gold base is too light, the spots won’t show—test your spot color on a practice nail first to ensure proper contrast.
4. Tiger Stripe with Orange and Black Ombré
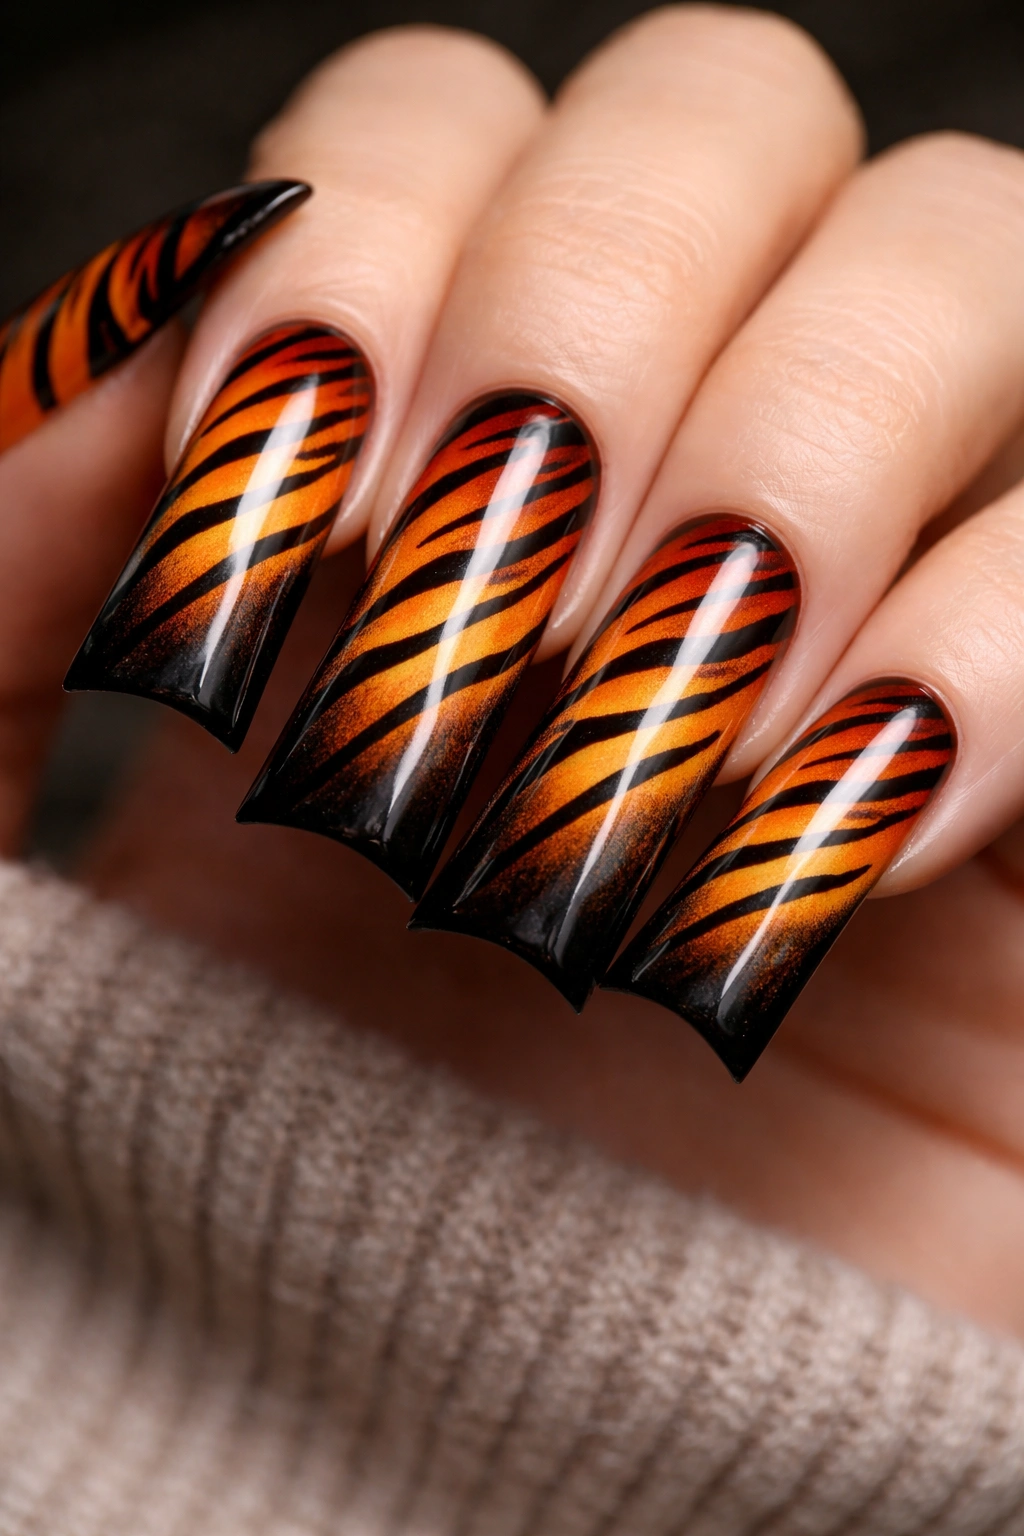
Tiger stripes demand confidence and commitment, and this bold orange-to-black ombré version delivers maximum impact. The design features orange as the primary color, melting into deep amber and black through the center of each nail, with sharp black stripes painted over top. The ombré gradient creates visual depth while the tiger stripes add texture and movement. This design works especially well on longer duck nails because you have space to develop the gradient properly and make stripes look intentional rather than accidental.
Creating a Convincing Ombré Base
An ombré gradient requires a sponge and patience, but it’s easier than it looks. The gradient moves from bright on the sides to dark in the center, simulating how light hits a real tiger’s face. Black stripes then overlay this gradient in organic, flowing patterns that follow the shape of the nail. The result is dimensional and visually stunning.
Ombré and Stripe Execution
- Apply your brightest orange to the outer edges of the nail
- Dab a sponge (or pieces of sponge) in amber, then dark orange, building color gradually toward center
- Use a thin brush to paint black stripes in loose, curved lines following the gradient direction
- Make stripes vary in width and spacing for authenticity
- Add a matte top coat to tone down shine and make the stripes appear more integrated
- Consider a single stripe of glitter down the center for added flair
Pro tip: Practice your ombré on a practice wheel first—sponging takes feel and timing to master, but once you’ve done it once or twice, it becomes much easier.
5. Dalmatian Spots in Black and White

Dalmatian spots are essentially large, irregular black circles on a white base—simpler than leopard print because the shapes are more defined and require less detail work. This design appeals to anyone who loves statement nails but feels intimidated by the intricacy of traditional animal prints. The high contrast between black and white is graphic and modern, working equally well with minimalist outfits or maximalist fashion statements. The spots can be as large or small as you prefer, giving you complete creative control over how bold the design reads.
Why Dalmatian Spots Feel Fresh
Dalmatian print has a retro-cool quality that feels nostalgic without looking dated. On duck nails, oversized spots create a playful, almost whimsical effect that’s less “fierce predator” and more “stylish statement.” The white base is clean and crisp, providing a neutral canvas that coordinates with virtually any color scheme. This design works year-round and transitions easily between casual and dressy contexts.
Painting Perfect Dalmatian Spots
- Start with a bright white base coat (use white specifically, not clear over nude—brightness matters)
- Use a dotting tool or toothpick dipped in black polish to create individual spots
- Vary spot size naturally, making some larger and some smaller for authenticity
- Space spots naturally across the nail without overthinking placement
- Leave some white space showing to keep the design from feeling crowded
- Seal with high-shine top coat for that polished, professional look
Worth knowing: Black polish over white can sometimes look slightly bluish—if this bothers you, add a tiny drop of dark gray to your black to warm the tone.
6. Snakeskin Print with Metallic Accents
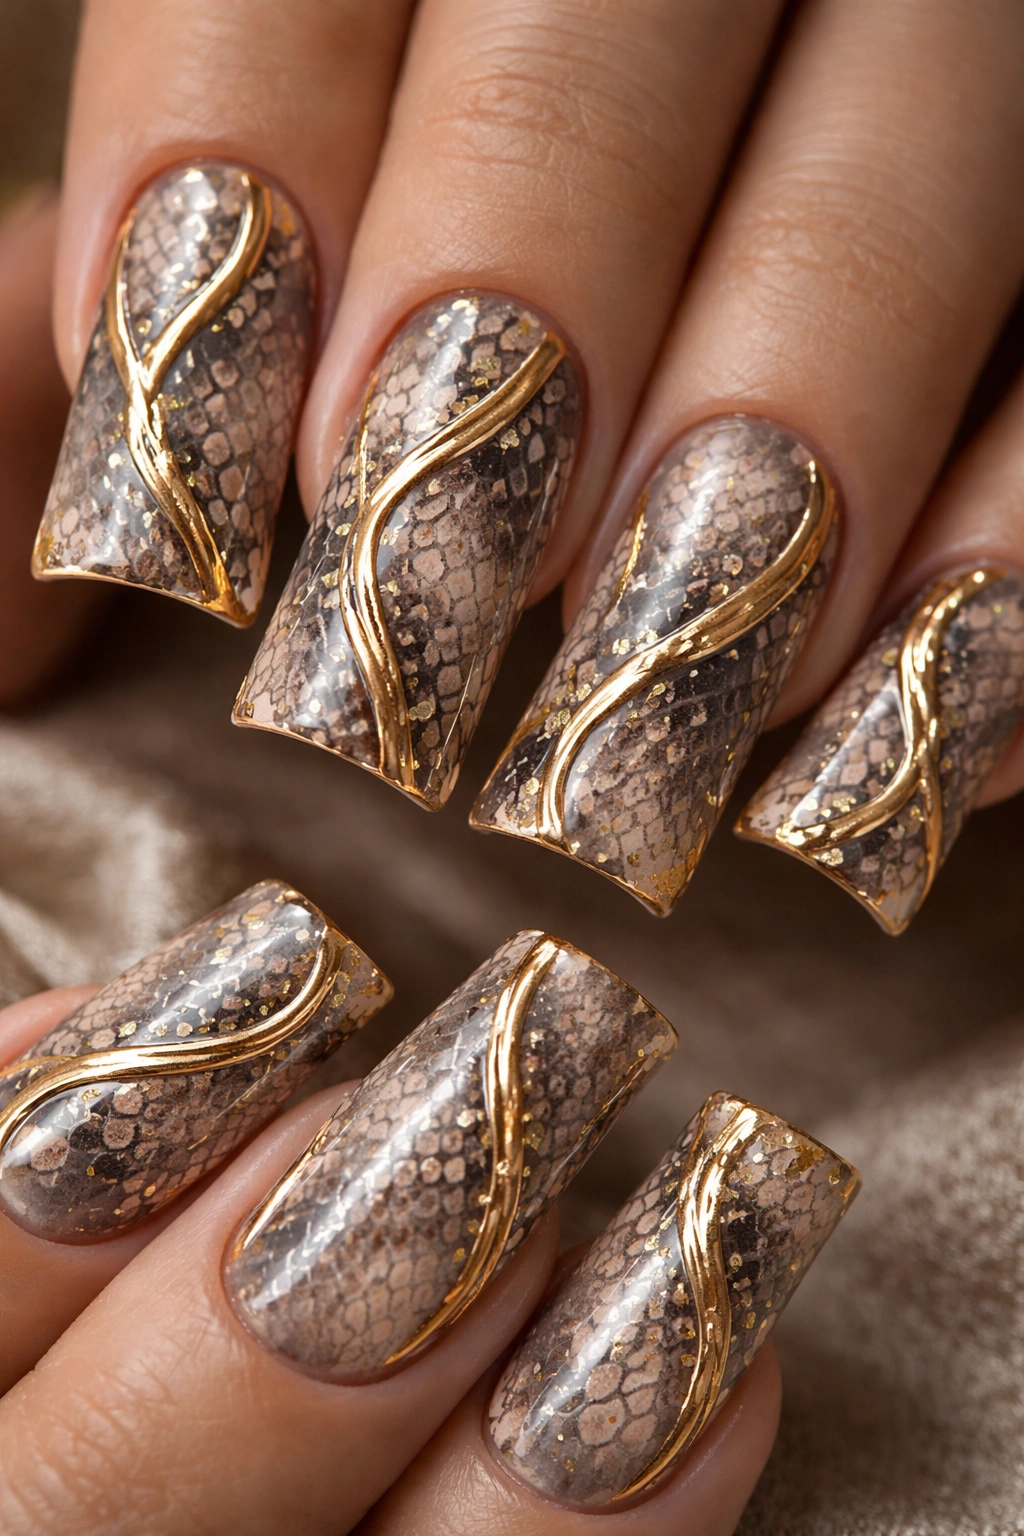
Snakeskin prints are underrated in nail art because people assume they’re complicated, but they’re actually just layers of overlapping curved lines creating a scaled effect. This version combines traditional snakeskin patterning in muted taupes and creams with metallic gold accents that catch light and add luxury. The pattern is organic and flowing, following the shape of the duck nail naturally. The metallic elements prevent the design from reading as purely reptilian—instead, it becomes an elegant, textured aesthetic that’s genuinely sophisticated.
The Art of Snakeskin Texture
Real snakeskin has overlapping scales that create shadow and dimension through layering. On nails, you can replicate this by painting curved lines, adding color variation between scales, and using metallic details to emphasize certain areas. The beauty of snakeskin is that it forgives imperfection—actual snakes don’t have perfectly uniform scales, so your hand-painted version won’t either, and that’s exactly right.
Building Your Snakeskin Design
- Apply a warm taupe or greige base coat as your foundation
- Use a thin brush to paint curved lines in a slightly darker shade, creating the scale outline pattern
- Fill some scales with a slightly lighter color for dimension and shadow
- Add thin metallic gold lines along certain scale edges to emphasize texture
- Layer in some cream and pale yellow tones for realistic color variation
- Finish with matte top coat to enhance the textured, scaly appearance
Pro tip: Work on one small section at a time rather than trying to fill the entire nail at once—this gives you better control and prevents colors from mixing.
7. Leopard Print with Holographic Shimmer
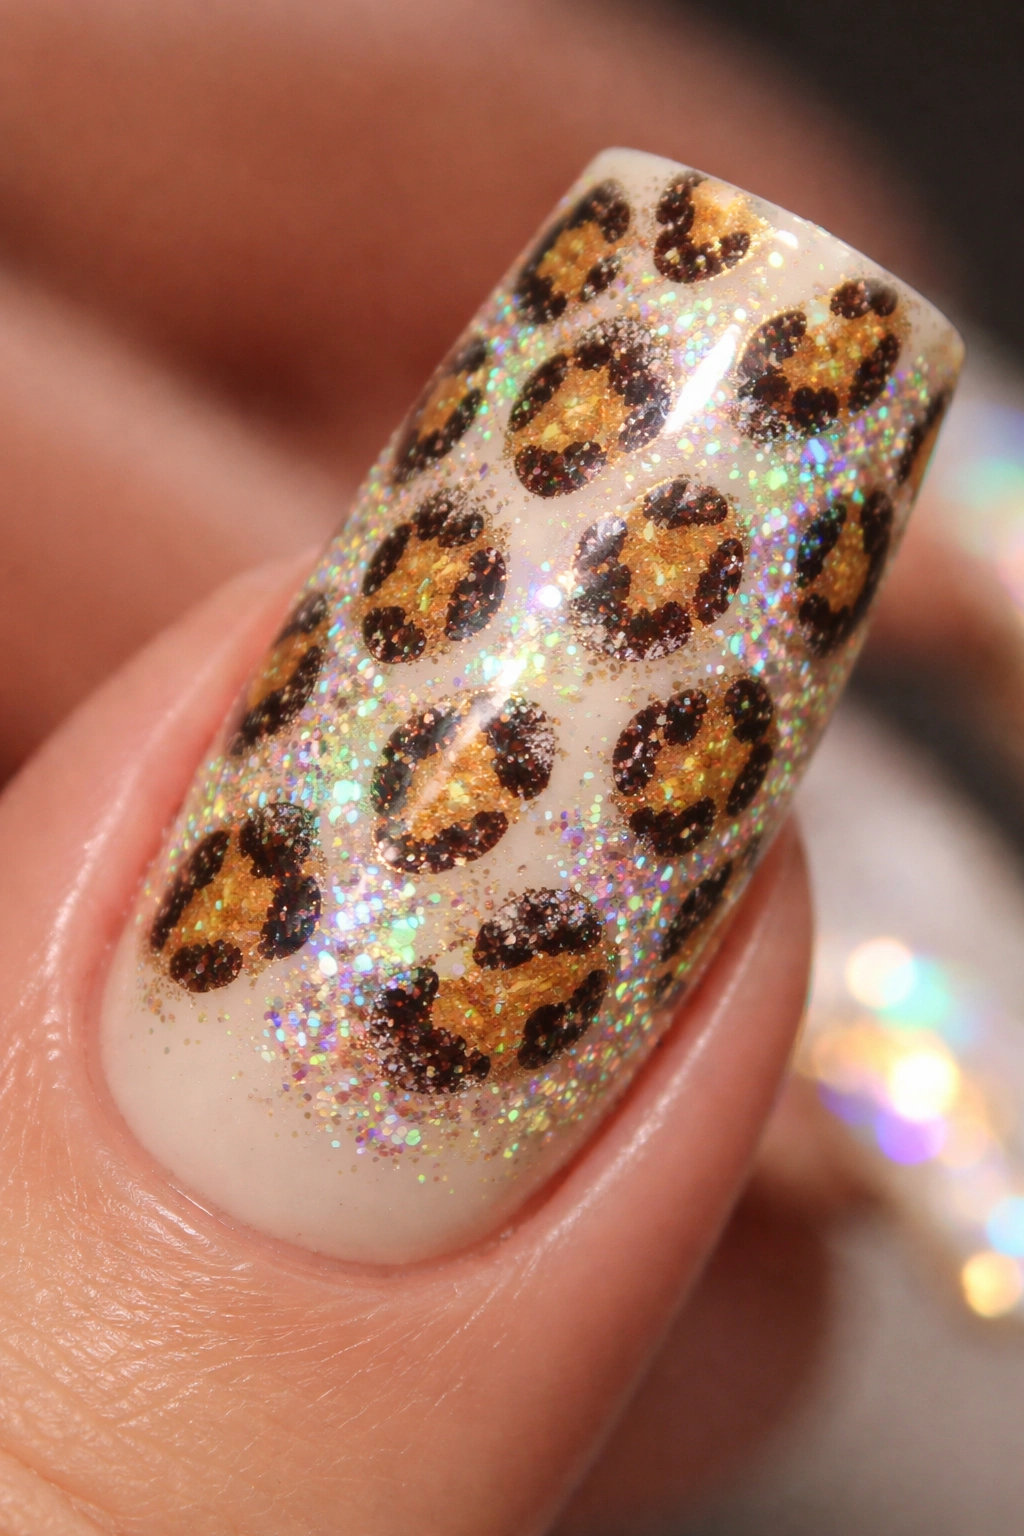
Taking a classic leopard design and adding holographic shimmer creates a print that’s both timeless and contemporary. This version features traditional leopard spots in gold and brown over a cream base, but with holographic accents that create rainbow light-catching effects. The iridescent element transforms a traditionally warm color palette into something playful and light-catching. It’s the perfect design for anyone who loves animal prints but wants something with a little extra magic and shimmer.
Combining Traditional and Modern Elements
Holographic accents work best when applied selectively rather than covering the entire nail. The idea is to add sparkle to specific spots or create a halo effect around certain leopard circles, allowing the classic pattern to remain the star of the show. The holographic element should enhance rather than compete with the leopard design. This balance is what makes the manicure feel cohesive and intentional rather than glittery-for-glitter’s-sake.
Layering Leopard with Holographic Effects
- Paint your standard leopard spots in gold and brown over a cream base
- Allow spots to dry completely before adding shimmer
- Use a holographic topper or shimmer polish applied selectively to certain spots
- Create a subtle halo or rim of holographic shine around some leopard circles
- Alternatively, apply holographic shimmer to just the “ring” part of the leopard spot, leaving the center matte
- Layer with a clear glossy top coat to seal everything smoothly
Worth knowing: Holographic products work best in bright light—this design truly shines in sunlight or bright indoor lighting, so it’s perfect for social events or outdoor occasions.
8. Giraffe Print in Mustard and Brown
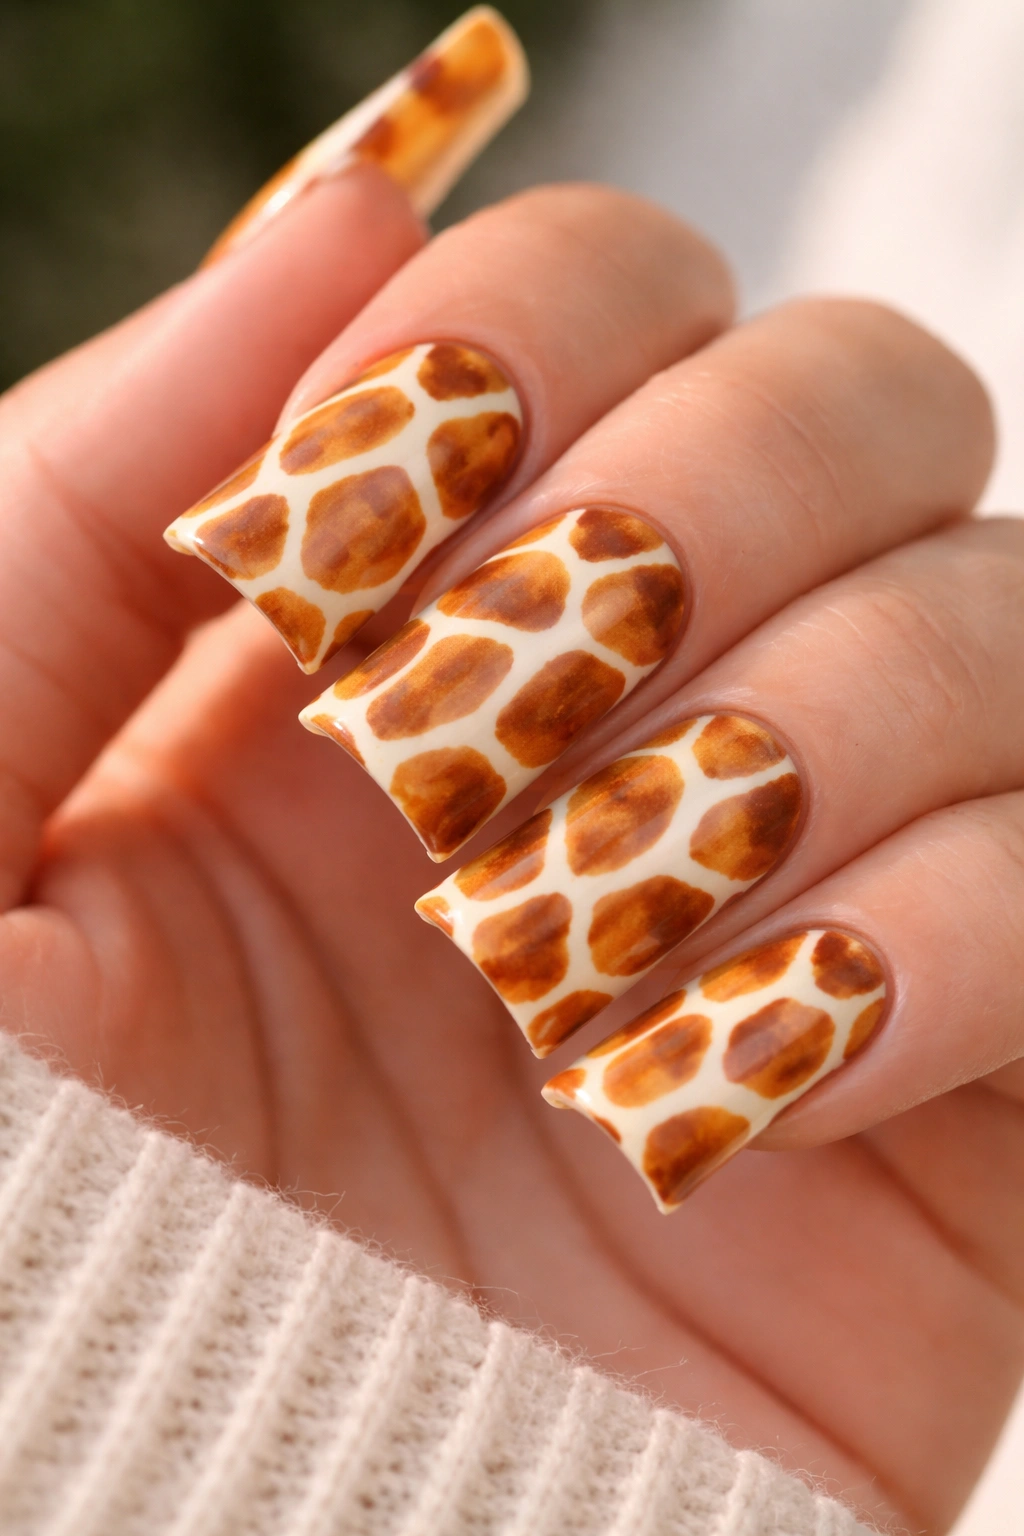
Giraffe print feels less fierce than leopard or tiger, making it perfect for anyone who wants animal print appeal with a softer edge. This design features irregular geometric patches in warm mustard yellow and rich brown tones, creating a warm, earthy palette that’s versatile and nature-inspired. Giraffe spots are less about precise dots and more about organic, irregular shapes that form natural patterns. On duck nails, this print creates visual interest without the sharp intensity of predator prints.
The Warmth of Giraffe Print
Giraffe print immediately evokes safari, adventure, and nature, but in a friendly rather than dangerous way. The warm golden and brown tones complement all skin tones and transition beautifully from summer to fall. This design works on various nail lengths, though duck nails specifically amplify the visual impact of the irregular patches. The color palette is neutral enough to pair with virtually any outfit while still making a clear statement.
Creating Authentic Giraffe Patches
- Apply a warm cream or light tan base coat
- Use a small brush to paint irregular polygon shapes in mustard yellow
- Fill in the negative space with rich brown tones
- Vary patch size and don’t aim for symmetry—natural irregularity is key
- Add thin tan or cream lines to define some patch edges
- Consider a matte finish to enhance the earthy, natural feel
Pro tip: If your patches start looking too geometric or perfect, add some curved lines to break up the hard edges—real giraffe spots are more organic than geometric.
9. Cow Print in Black and White with Matte Finish
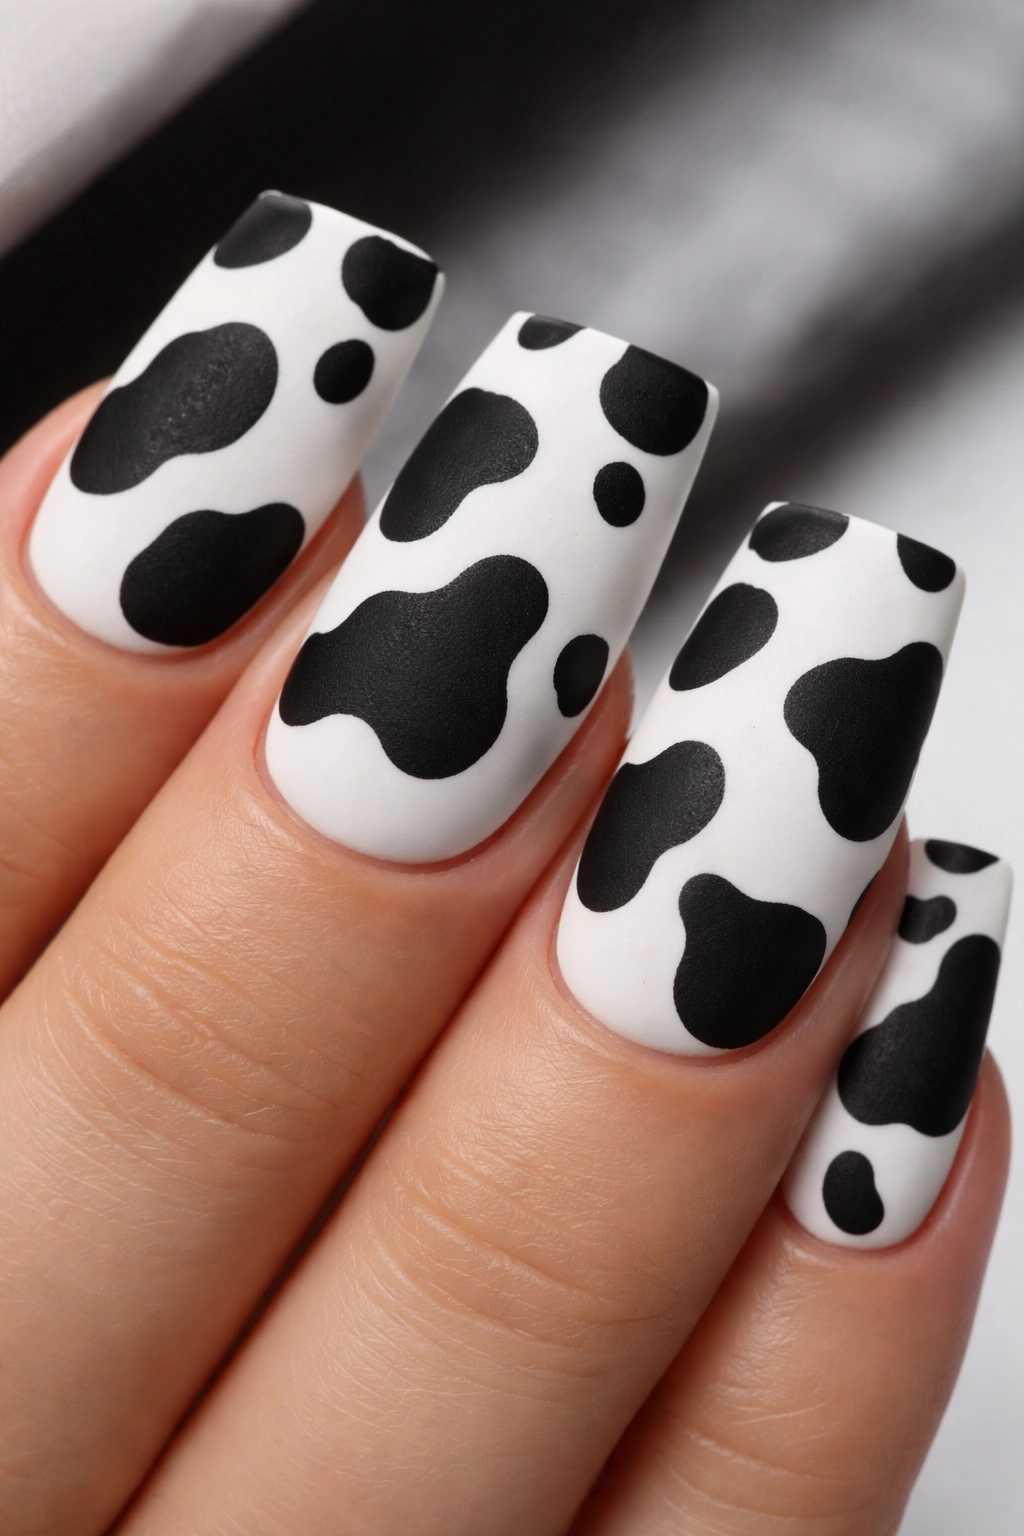
Cow print might seem unexpected for nails, but it’s bold, graphic, and instantly recognizable. This design features irregular black patches on a white base with a matte top coat for maximum graphic impact. The beauty of cow print is its graphic simplicity—you’re working with just two colors and an organic shape that doesn’t require precision. A matte finish enhances the graphic, almost artistic quality of the design, making it feel more like intentional art than cute animal reference.
The Unexpected Edge of Cow Print
Cow print has a fun, unexpected quality that shows personality and humor in your nail choices. It’s bold without trying to be fierce, playful without being childish, and genuinely striking in person. The matte finish elevates what could feel cartoonish into something genuinely artistic and sophisticated. This design appeals to anyone with a strong personal style who isn’t afraid of standing out.
Painting Convincing Cow Patches
- Start with a bright white base (not off-white or cream—true white creates maximum contrast)
- Use a black polish and a small brush to paint large, irregular shapes across the nail
- Some patches should touch the nail edge, some should float in white space—vary the composition
- Make patches different sizes and avoid any sense of pattern or symmetry
- Leave generous white space between patches for the graphic look
- Finish with a completely matte top coat and don’t seal with gloss
Worth knowing: Matte top coats can sometimes dull the brightness of the white base—test on a practice nail first to see if you want to adjust your white shade.
10. Ombre Leopard Fade
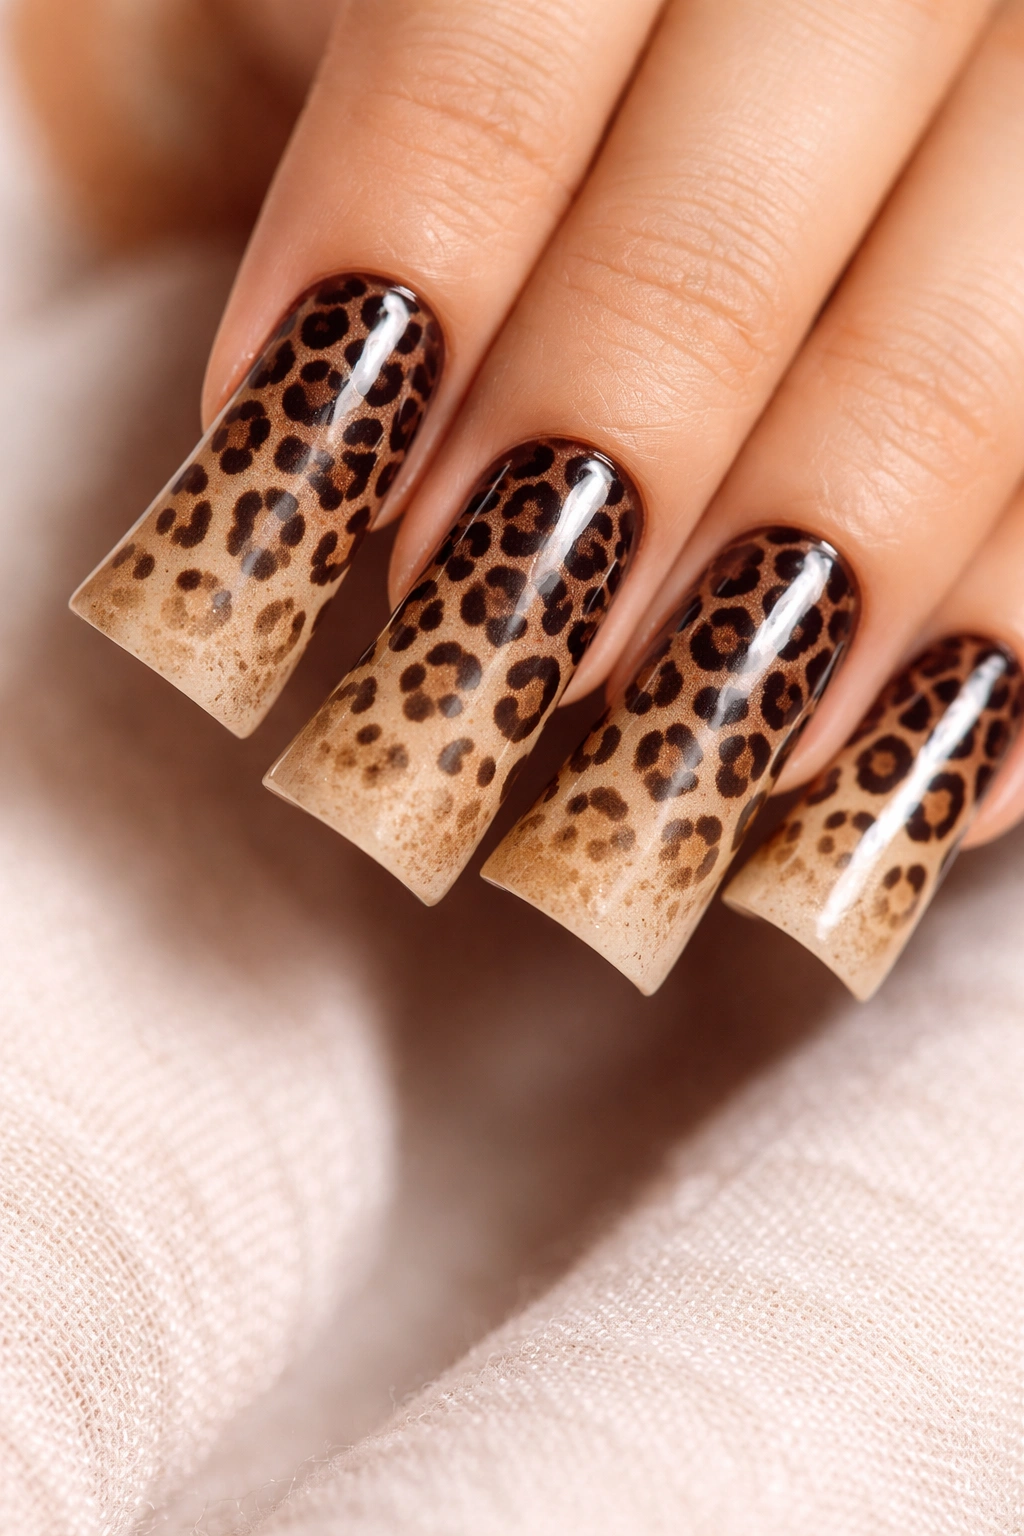
This design bridges leopard spots and ombre gradient by creating leopard spots that fade in density and color across the nail. The design starts with intense spotted leopard at the cuticle end in darker browns and blacks, gradually fading to sparser spots in lighter tans and golds toward the tip. This creates visual movement and depth while maintaining the recognizable leopard pattern throughout. It’s a sophisticated variation on classic leopard that adds complexity and elegance.
Creating Gradient Within Pattern
The challenge of ombre leopard is maintaining pattern integrity while varying color and density. This requires applying spots in layers—dark spots first, then lighter spots in the transition zone, and the lightest spots near the tip. The overall effect should feel intentional rather than like you just ran out of spots as you reached the end of the nail. Proper planning and layering make the difference between a gorgeous design and a half-finished one.
Building Your Ombre Leopard Design
- Plan your color progression: dark brown and black at cuticle to tan and gold at tip
- Apply spots in the darkest colors first at the nail base
- Gradually introduce lighter brown spots as you move toward the center
- Thin out spot density as you progress toward the tip
- Add golden and peachy-toned spots near the nail end
- Consider leaving the very tip mostly white or cream for a clean finish
- Seal with glossy top coat to enhance the sophisticated gradient effect
Pro tip: Use very thin coats of spot colors so you can build complexity without making the nail feel thick or unbalanced.
11. Tortoiseshell Print in Warm Tones
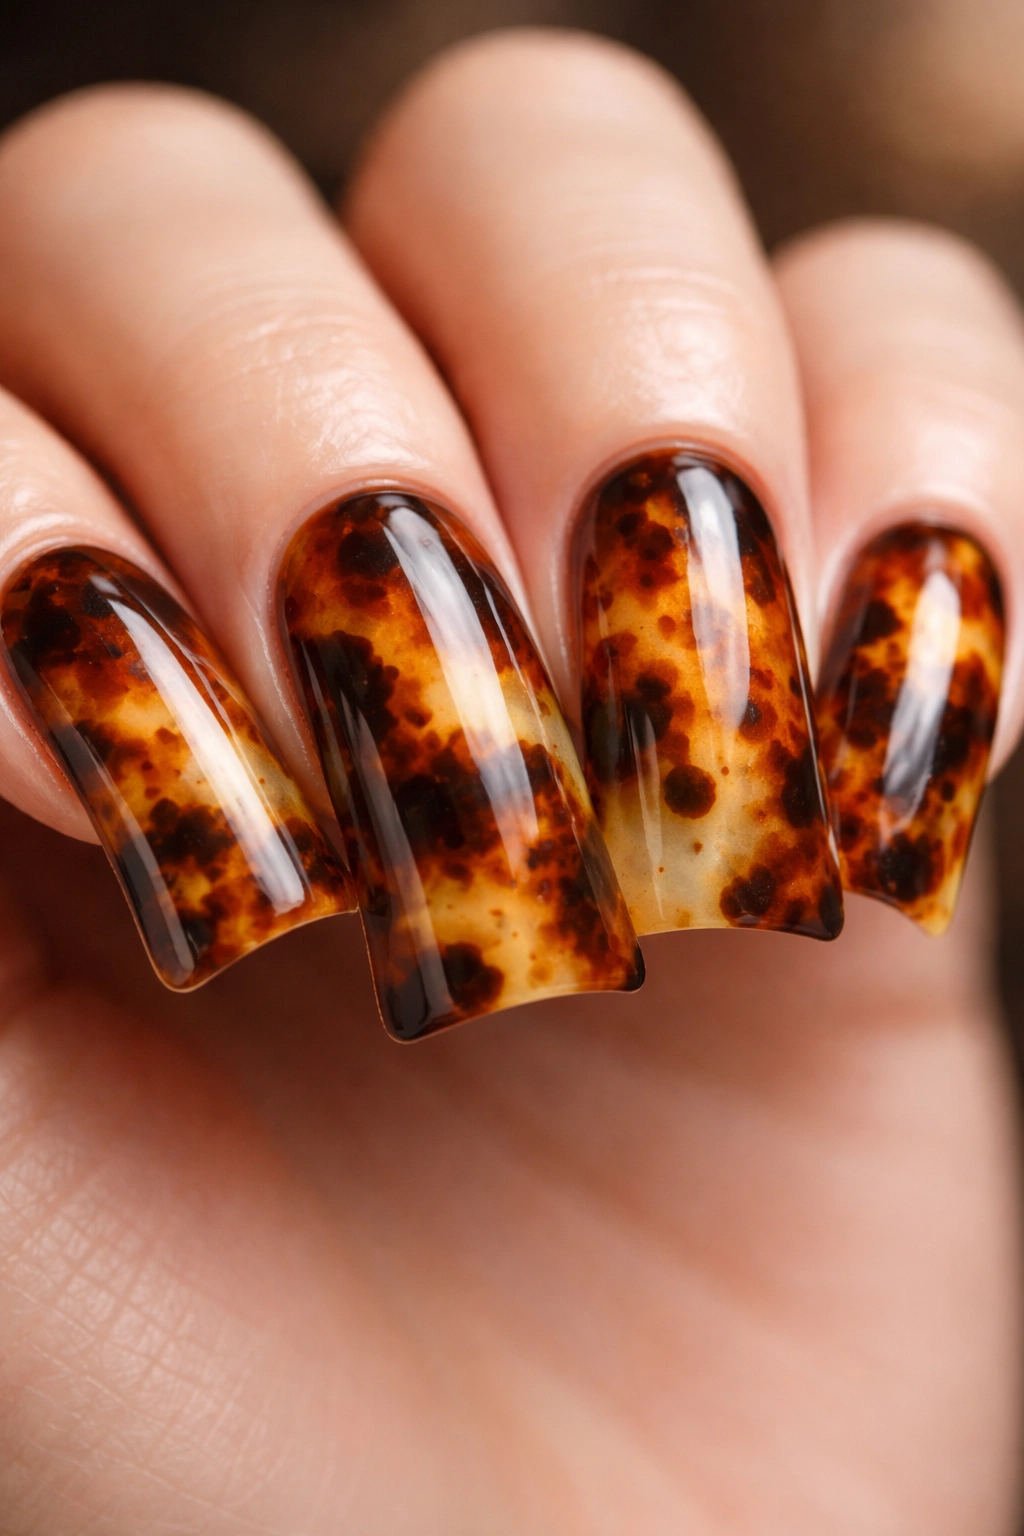
Tortoiseshell creates an organic, flowing aesthetic that feels natural and artisanal rather than literally animal-inspired. This warm-toned version uses burnt orange, golden yellow, deep brown, and tan in abstract, blended patterns. Unlike spots or stripes, tortoiseshell is more about color blending and organic shapes, making it feel artistic and unique. On duck nails, tortoiseshell print creates beautiful visual depth through color layering rather than line work. The warm palette is universally flattering and works across seasons.
Tortoiseshell as Elevated Animal Print
Tortoiseshell sits in a unique space—it’s inspired by nature and texture, but it reads more as sophisticated art than literal animal recreation. The blend of warm tones creates luxury and warmth, making this perfect for professional settings that still allow personal style. The organic, hand-painted nature of tortoiseshell means no two designs are exactly alike, adding exclusivity to your manicure.
Creating Your Tortoiseshell Blend
- Apply a creamy tan or golden base coat
- Use various warm colors (burnt orange, golden yellow, deep brown, copper) and apply them in irregular patches
- Use a damp sponge or soft brush to gently blend colors where they meet, creating gradients
- Don’t aim for complete blending—some color separation creates visual interest
- Layer slightly darker shades in certain areas for shadow and dimension
- Add thin lines of a slightly darker shade to define some color sections
- Finish with glossy or matte top coat depending on your preferred aesthetic
Worth knowing: Tortoiseshell forgives imperfection by design—the blended, organic nature means happy accidents actually enhance the design.
12. Butterfly Wing Pattern with Metallic Edges
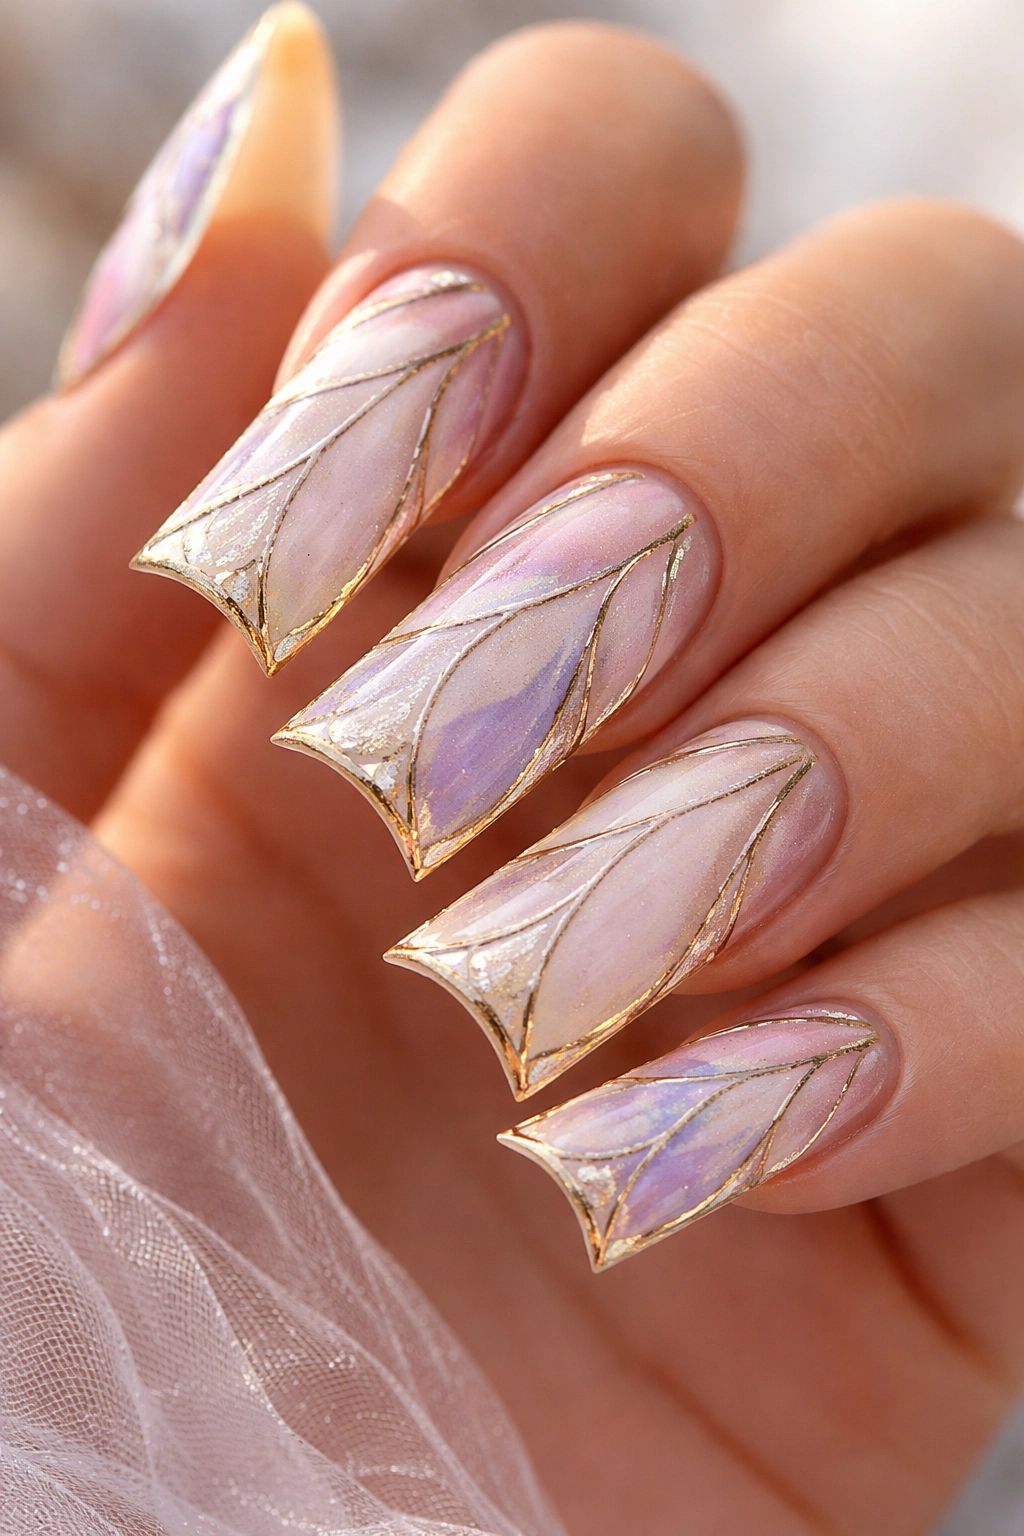
This design takes cues from butterfly wing patterns, featuring geometric sections in soft pastels—soft pink, lavender, and cream—with intricate metallic gold line work creating the “vein” structure of wings. While butterflies aren’t typically considered an animal print pattern, their wings feature structured, beautiful patterns that translate gorgeously onto nails. The geometric precision combined with the metallic accent creates a design that’s simultaneously delicate and striking. This works especially well on duck nails because the extended shape can accommodate the wing structure naturally.
Translating Natural Patterns into Nail Art
Butterfly wing patterns are beautiful because they combine geometry with organic flow. On duck nails, you can create distinct sections that follow the natural shape of the nail, making it seem like you’ve captured an actual wing. The metallic gold adds luxury without overwhelming the delicate color palette. This design is perfect for anyone who loves nature-inspired aesthetics but wants something less literal than traditional animal prints.
Building Your Butterfly Wing Design
- Apply a soft cream or champagne base coat
- Divide the nail into sections using very thin metallic gold lines
- Fill sections with soft pastels—pale pink, soft lavender, peach, creamy yellow
- Add slightly darker versions of these colors in certain sections for shadow
- Layer metallic gold detail lines throughout to create fine “vein” patterns
- Consider adding tiny metallic dots to create additional texture
- Finish with a glossy top coat that shows off the metallic details
Pro tip: This design requires a steady hand and thin brushes—if you’re not confident with fine details, use metallic striping tape to create perfectly straight gold lines.
13. Leopard Print with Nude and Blush Tones

This extremely wearable variation uses nude and blush tones instead of traditional browns, creating a soft, sophisticated aesthetic. The spots blend almost imperceptibly into the base, creating a design that reads more as “elevated subtle nail art” than “wild animal print.” Nude tones with lighter peachy and pink accents work beautifully for professional settings, special events, or anyone who wants animal print appeal without maximum boldness. The soft color palette makes this design feel elegant and timeless rather than trendy.
Sophisticated Subtlety
Animal prints don’t have to be loud to be effective. By using tones that are closer to the base color—nude with blush, peach, and mauve accents—you create a design that’s visually interesting while maintaining elegance and restraint. On duck nails, this softer version creates texture and visual interest without screaming for attention. It’s perfect for anyone who wants personal style while maintaining a professional, polished appearance.
Soft-Tone Leopard Application
- Start with a warm nude base that matches or closely approaches your skin tone
- Use very soft peachy-brown and mauve tones for most spots
- Create spots in slightly varied sizes and spacing
- Add tiny spots in rose gold for subtle sparkle
- Use a warm taupe for some spots to create shadow and definition
- Make sure spots are clearly visible—use slightly darker tones than your base
- Seal with a slightly warm-toned glossy top coat
Worth knowing: Nude-on-nude leopard prints show every imperfection, so ensure your base coat is perfectly smooth and even before adding spots.
14. Tiger Stripe in Jewel Tones
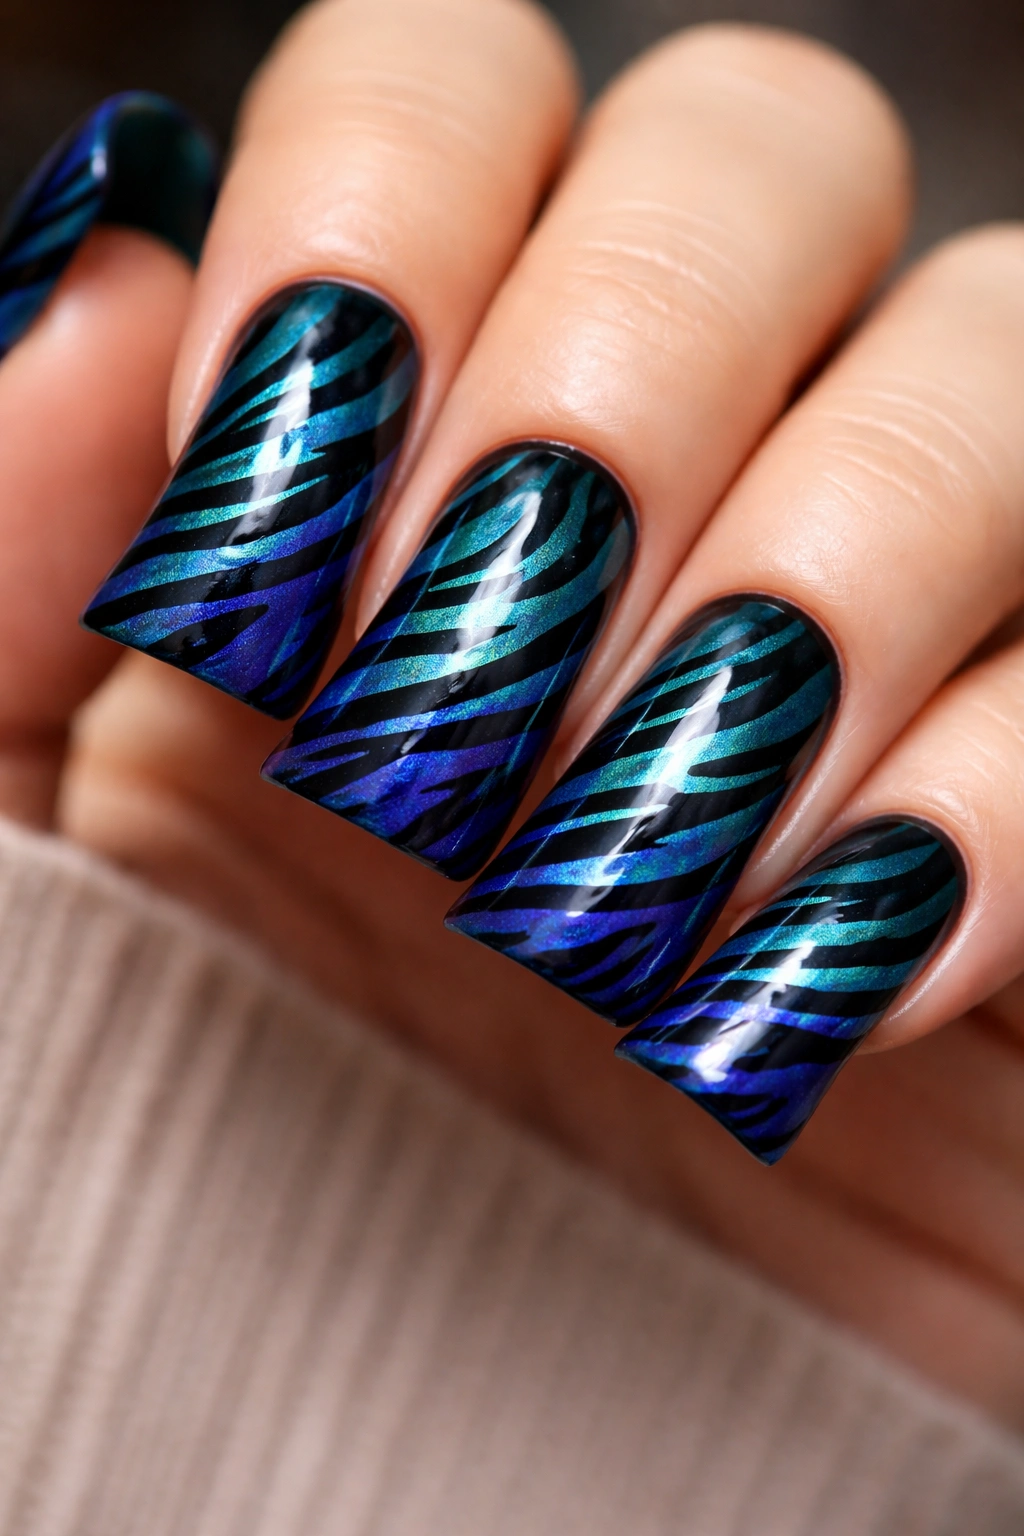
Moving away from traditional tiger orange, this version uses jewel tones—deep teal, sapphire blue, and emerald—with black stripes for a completely unexpected take on tiger print. The rich, luxurious colors feel modern and artistic while maintaining the recognizable stripe pattern. On duck nails, jewel-toned tiger stripes create visual richness and depth, working beautifully in lighting because the colors have depth and don’t flatten. This design appeals to anyone who loves bold nails and isn’t afraid of color.
Unexpected Color Choices Elevate Animal Prints
Tiger print is so associated with orange that using jewel tones instead feels fresh and contemporary. The combination of deep teal and sapphire creates a sophisticated base that actually makes black stripes pop more dramatically than orange would. This design works wonderfully for evening events, creative professionals, or anyone with a strong artistic sensibility. The colors are bold without feeling costume-like because of the refined jewel tone palette.
Creating Your Jewel-Tone Tiger Design
- Apply a base of deep teal or sapphire blue (two coats for depth)
- Paint black stripes in bold, curved lines following the nail shape
- Add thinner stripes in slightly lighter blue or teal for dimension
- Consider adding stripes in metallic gold on some nails for variation
- Vary stripe thickness and spacing for organic authenticity
- Add a glossy top coat to make the jewel tones glow
Pro tip: Jewel tones photograph beautifully, so this design is perfect if you enjoy sharing your nails on social media or in bright environments.
15. Zebra Stripe with Gradient Center
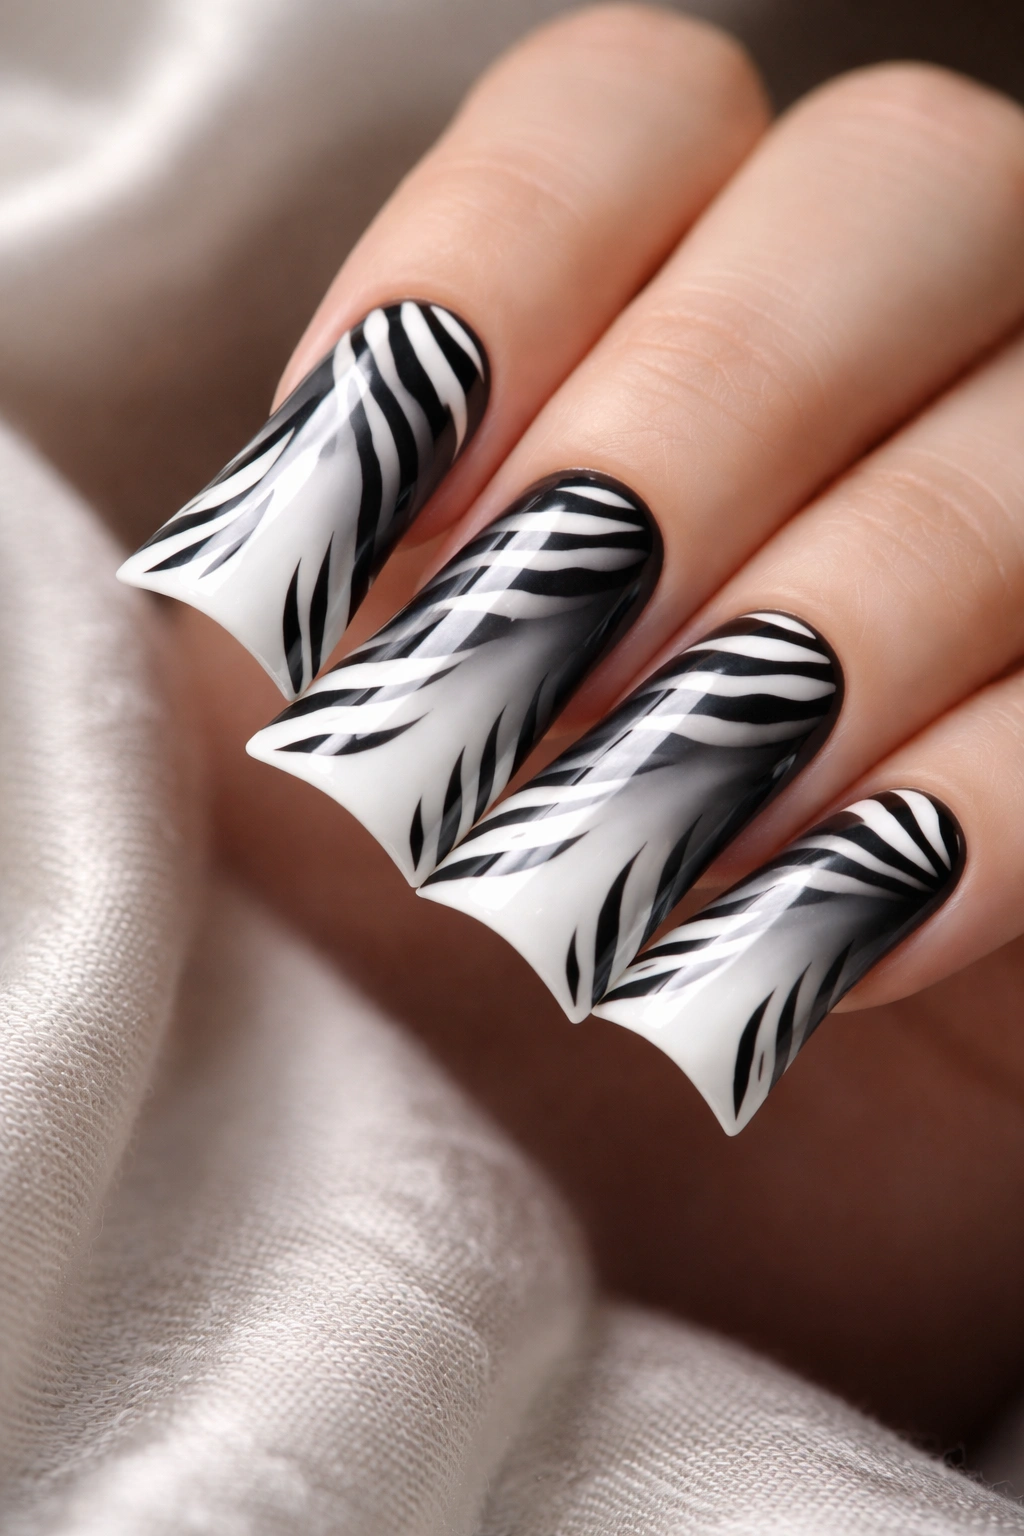
This design combines classic zebra stripes with an ombré gradient down the center of the nail, creating stripes that transition from bold and crisp at the sides to softer and blended at the center. The gradient typically moves from black to gray to white, creating dimension that makes the nail pop. This version appeals to anyone who loves both geometric patterns and gradient designs, essentially combining two trends into one cohesive look. On duck nails, the gradient in the center creates visual focus while the stripes maintain movement across the entire surface.
Combining Multiple Design Elements
When combining patterns and gradients, balance is essential. The stripes should remain the dominant visual element, with the gradient functioning as a supporting player that adds depth. The gradient should fade enough that stripes remain clearly visible at the center—if the gradient is too pronounced, it overwhelms the stripe pattern. Proper layering and opacity management ensure both design elements shine.
Layering Stripes with Gradient
- Apply a white base coat
- Paint black zebra stripes across the entire nail
- Use a sponge to apply a subtle black-to-white gradient down the nail center
- The gradient should be softer and more diffused than typical ombré—this is about adding shadow, not creating a bold gradient
- Allow the black stripes to show through the gradient
- Consider adding white or light gray stripes on top of the gradient for additional contrast
- Finish with matte top coat for a graphic, artistic look
Worth knowing: Getting the gradient opacity right takes practice—you want subtle shadow, not a pronounced fade that hides your stripes.
16. Leopard Print Negative Space
This modern design uses negative space strategically, creating leopard spots only in certain areas while leaving portions of the nail bare to show the natural nail underneath or a sheer base. This could mean spots only in the center of the nail with clear edges, spots only on the tips, or spots scattered randomly with significant white space showing. Negative space makes any design feel more contemporary and artistic, and it’s a fantastic approach for anyone who loves the look of animal prints but wants something more minimalist and refined.
Minimalism Through Negative Space
Negative space automatically makes designs feel more intentional and artistic. By limiting the amount of the nail covered with pattern, you create visual breathing room that makes the spots more striking. On duck nails, this approach prevents the design from feeling overwhelming while maintaining full impact. The result is sophisticated and modern, appealing to minimalist aesthetics and contemporary sensibilities.
Strategic Spot Placement
- Apply a sheer natural or nude base, or leave natural nails showing
- Paint leopard spots in only specific areas (center circle, lower half, scattered placement)
- Keep spots larger and fewer than you would in a full leopard print
- Make sure spots are clearly defined against the background
- Leave at least 40-50% of the nail undecorated for proper negative space effect
- Use warm gold and brown tones for spots to ensure visibility
- Seal with a clear glossy top coat
Pro tip: Negative space designs photograph incredibly well and often feel more expensive and curated than fully covered nails.
17. Snake Scales with Glitter Gradient
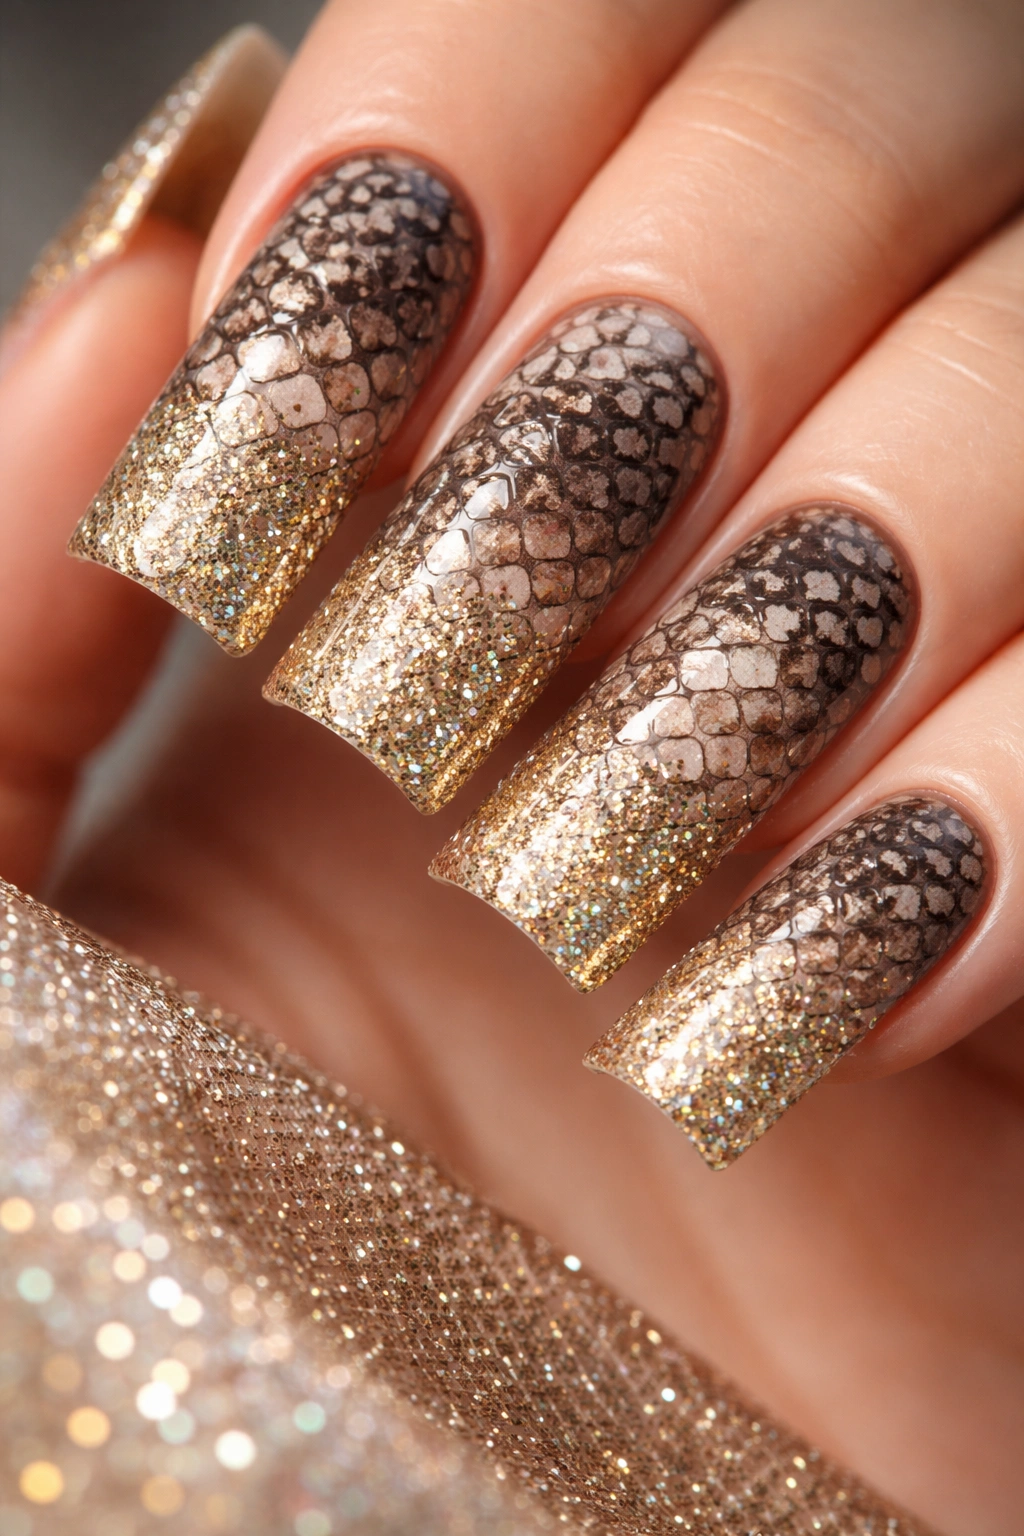
This luxe design combines snakeskin scale patterns with a glitter gradient, creating an elegant, high-impact aesthetic. The scale pattern remains consistent across the nail in muted neutrals or jewel tones, while glitter gradually intensifies from cuticle to tip. The glitter might start as scattered particles at the base and build to dense glitter at the tip, or it might shift colors in the gradient while maintaining consistent glitter density. This design is perfect for special occasions and anyone who loves the combination of texture and sparkle.
Texture Meets Shine
Scale patterns provide visual interest through texture and line work, while glitter adds glamour and light-catching properties. Together, they create a design that’s genuinely stunning in person and photographs beautifully in various lighting conditions. On duck nails, the extended surface area allows both the scale pattern and glitter gradient room to develop fully. This design works for evening events, celebrations, and anyone who embraces maximalist aesthetics.
Building Your Scale and Glitter Design
- Apply a neutral or jewel-tone base coat
- Paint snakeskin scale pattern using slightly darker shades (described in previous snake print section)
- Allow scale pattern to dry completely
- Apply a clear top coat
- Use a cosmetic sponge dipped in fine glitter to create a gradient starting at the cuticle
- Build glitter density gradually moving toward the tip
- Consider adding holographic or color-shifting glitter for additional depth
- Seal everything with glossy top coat
Worth knowing: Glitter over textured patterns requires careful layering so glitter particles adhere properly—a sticky base coat between pattern and glitter helps significantly.
18. Abstract Animal Print Mosaic

This final design celebrates creative freedom by combining multiple animal print elements in an abstract, artistic composition. You might feature leopard spots in one section, zebra stripes in another, and cheetah prints elsewhere, creating a unique mosaic that celebrates your love of all animal prints. Alternatively, you could create an abstract pattern that’s inspired by animal print aesthetics without literally recreating any specific animal. This design is perfect for anyone with an artistic spirit who wants to create something completely unique and personally meaningful.
Personal Expression Through Pattern
This design prioritizes creative freedom and personal preference over literal animal recreation. There are no rules—you decide which elements appear, how they’re colored, and how they interact. Some sections might be bold and dense while others are sparse and geometric. The composition is entirely up to you, making this the most customizable animal print design possible. It’s genuinely one-of-a-kind, reflecting your individual style and artistic sensibility.
Creating Your Abstract Composition
- Divide your nails into sections or create a flowing composition across all nails
- Incorporate your favorite animal print elements—leopard, zebra, tiger, cheetah, snake
- Use a consistent color palette to tie disparate elements together
- Vary pattern density and detail level across sections for visual interest
- Include some solid color sections to balance intricate patterns
- Consider metallic accents or negative space to enhance the composition
- Experiment freely—there’s no “wrong” way to create abstract art
- Seal with glossy top coat to finish professionally
Pro tip: Take inspiration from actual abstract art pieces—studying color composition and visual balance in paintings can elevate your nail art design.
Final Thoughts
Animal print duck nails offer an incredible canvas for expressing boldness, creativity, and personal style through nail art. Whether you’re drawn to classic leopard spots, dramatic tiger stripes, unexpected color palettes, or completely abstract interpretations of animal-inspired patterns, duck nails elevate any design through their extended, eye-catching shape. The key to pulling off any animal print successfully is understanding that authenticity and intentionality matter more than perfect precision—slightly imperfect spots and organic-looking stripes actually enhance the believability and artistic quality of your design.
The 18 designs covered here represent just the beginning of what’s possible when you combine animal prints with duck nails. Many of these designs can be mixed and matched, modified with different colors, enhanced with glitter or metallics, or simplified and adapted based on your skill level and preferences. Don’t be afraid to experiment with unexpected color combinations, combine multiple patterns on the same nail, or add your own embellishments that reflect your personal aesthetic.
Taking time to practice on nail wheels or practice tips before committing to your actual nails builds confidence and ensures your finished design looks intentional and polished. Whether you’re visiting a professional nail artist or creating these designs yourself, the creativity and personality you bring to your manicure choices is what makes them genuinely special. Animal print duck nails are bold, unapologetic, and absolutely worth the attention they’ll receive.
