

There’s something undeniably charming about combining two nail art trends that shouldn’t work together—yet they absolutely do. Duck nails with stars merge the bold, elongated silhouette of a curved duck nail shape with celestial flair, creating a design that’s simultaneously edgy, whimsical, and genuinely eye-catching. Whether you’re drawn to sparkly constellations, minimalist star outlines, or cosmic-inspired artwork, this fusion offers endless creative possibilities that work for everything from a night out to everyday wear that happens to look extraordinary.
The beauty of star duck nails is their versatility. A simple gold star on a neutral base reads as understated elegance, while a galaxy-covered duck nail with holographic accents becomes a conversation-starting statement piece. The curved shape actually gives you more canvas space than traditional nails, making it perfect for intricate star designs, star clusters, and gradient backdrops. Plus, because the trend combines two current favorites, you’ll find tons of inspiration and nail tutorials that make recreating these looks totally achievable—even if you’ve never attempted nail art before.
Let’s dive into 16 specific star duck nail ideas that range from minimalist and wearable to bold and utterly magical.
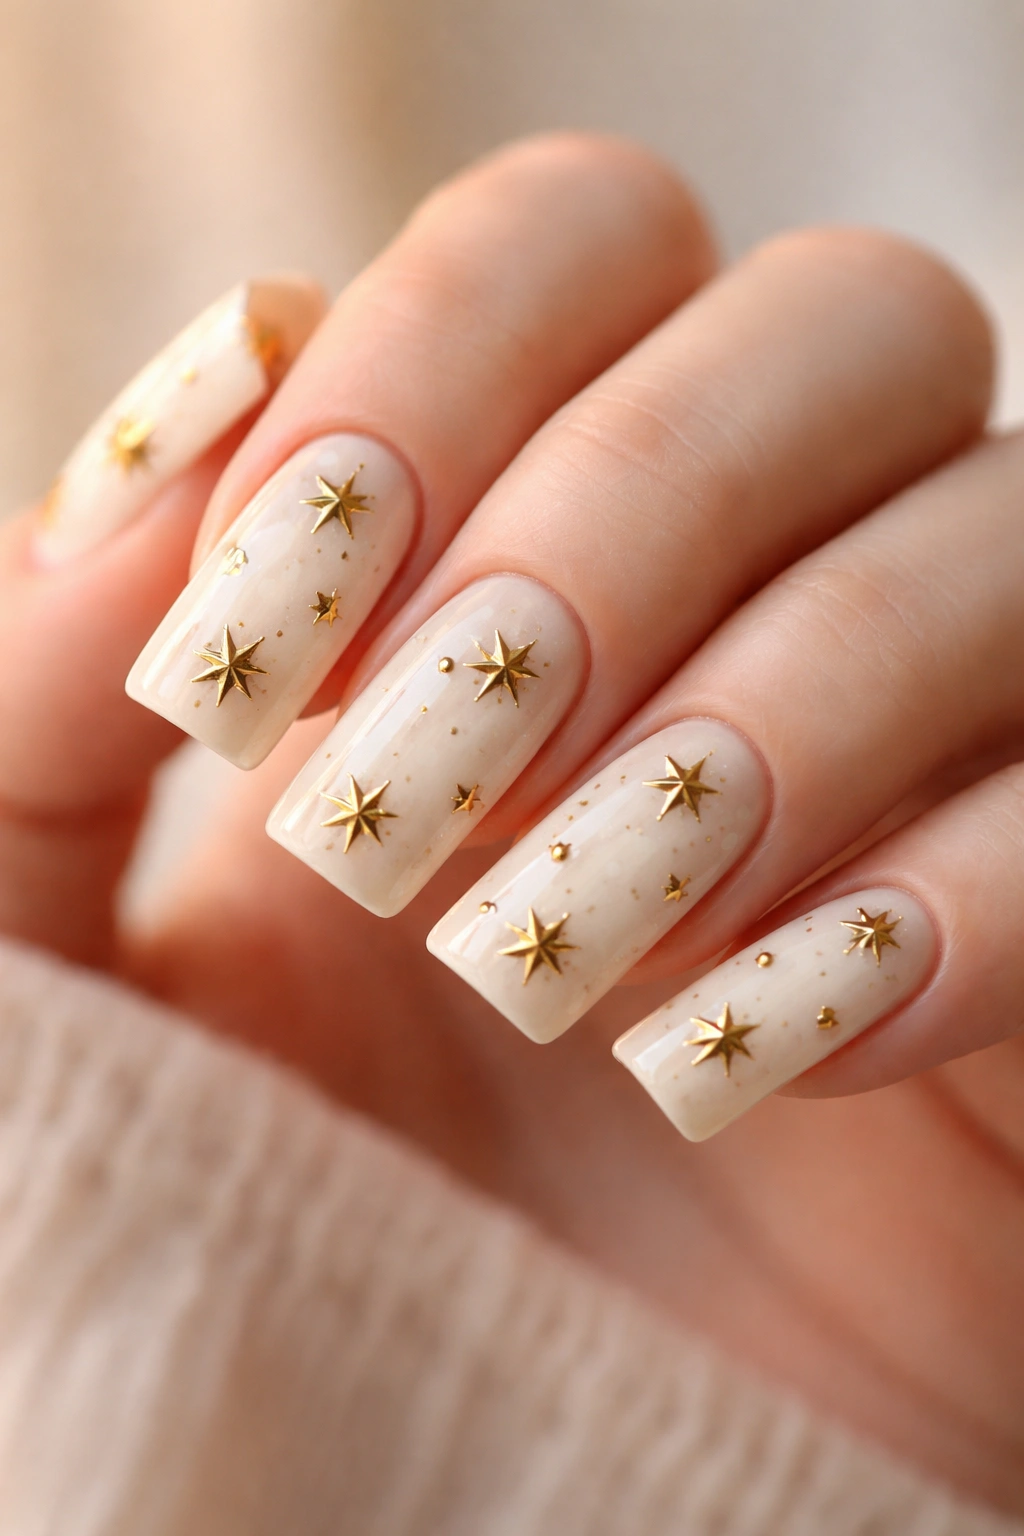
1. Classic Gold Stars on Cream
This is the design you’ll reach for when you want something sophisticated without being over-the-top. A soft cream or ivory base provides the perfect neutral canvas, while small to medium-sized gold stars scatter across the nail in a seemingly random but actually balanced pattern. The cream creates an almost candlelit backdrop that makes gold shimmer beautifully without looking harsh.
Why This Design Works So Well
The cream-and-gold combination has timeless appeal because it feels dressy enough for professional settings but relaxed enough for casual wear. Gold doesn’t compete with any outfit, and the cream base elongates the appearance of your fingers. The duck nail shape gives you plenty of space to spread out your star placements, so even a few stars create visual impact without feeling cramped.
How to Create It
- Paint your duck nails with 2-3 coats of cream gel or regular polish
- Use a thin gold gel pen or a dotting tool dipped in gold gel to draw small stars (five-pointed or six-pointed, your choice)
- Space them at least ¼ inch apart and vary their sizes slightly for a more organic look
- Seal with a glossy top coat for subtle shine
Pro tip: If you’re worried about steady hands, use star stickers or nail stamps instead—they’re equally elegant and require zero artistic skill.
2. White Stars on Deep Navy Blue
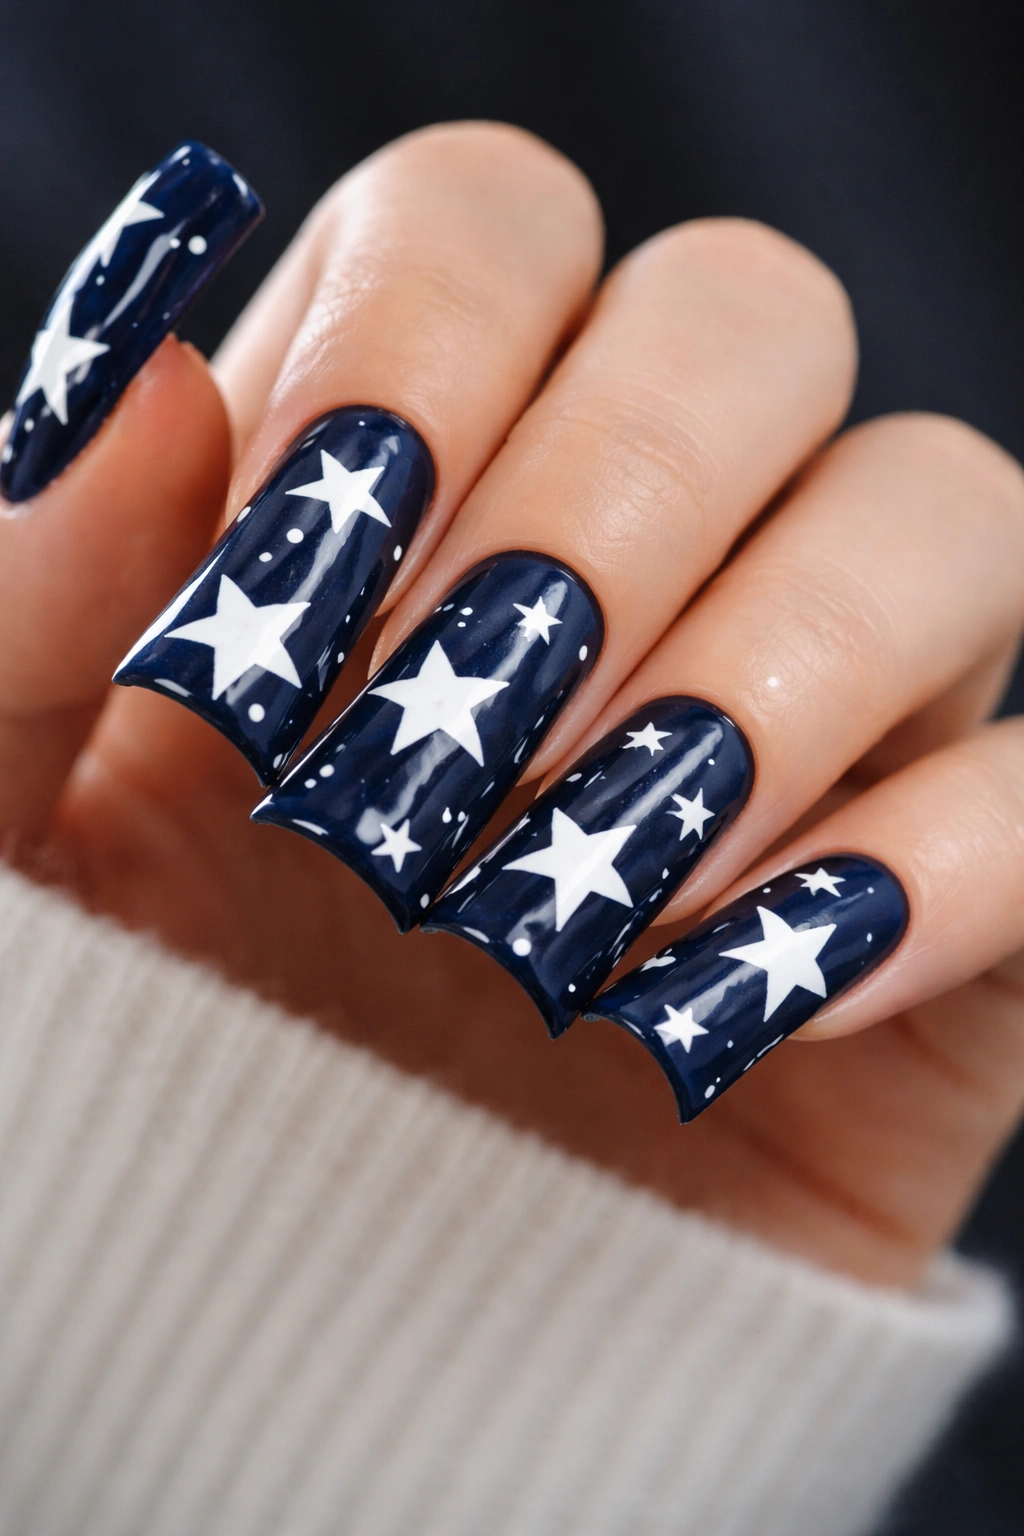
Navy blue is the cool, sophisticated cousin of black, and it pairs beautifully with white stars for a look that feels both classic and current. The contrast between the deep blue and crisp white creates definition and visual pop without being as stark as black-and-white. This design reads as elegant coastline vibes—very “upscale resort aesthetic.”
The Appeal of Navy-and-White Contrast
This combination evokes nautical themes, midnight skies, and timeless elegance simultaneously. White stars stand out crisply against navy without any need for glitter or shimmer, so the design stays clean and wearable. The darker blue also gives you a darker canvas that won’t show dust or daily wear as quickly as lighter bases, making this a practical choice for long-lasting manicures.
Application Technique
- Start with 2-3 thin coats of navy gel or polish (thin coats prevent that thick, plasticky appearance)
- Allow the navy to fully cure or dry
- Use white gel or white polish with a thin brush to hand-paint stars, or use white star nail stamps
- Try mixing star sizes—use one large focal star on the thumb, smaller ones on other nails
- Top with a glossy or matte topcoat depending on your preference
Worth knowing: If hand-painting feels intimidating, white striping tape can help you create perfect five-pointed stars by laying down tape in a star shape, painting over it, then removing the tape.
3. Sparkly Multicolored Stars on Nude Base
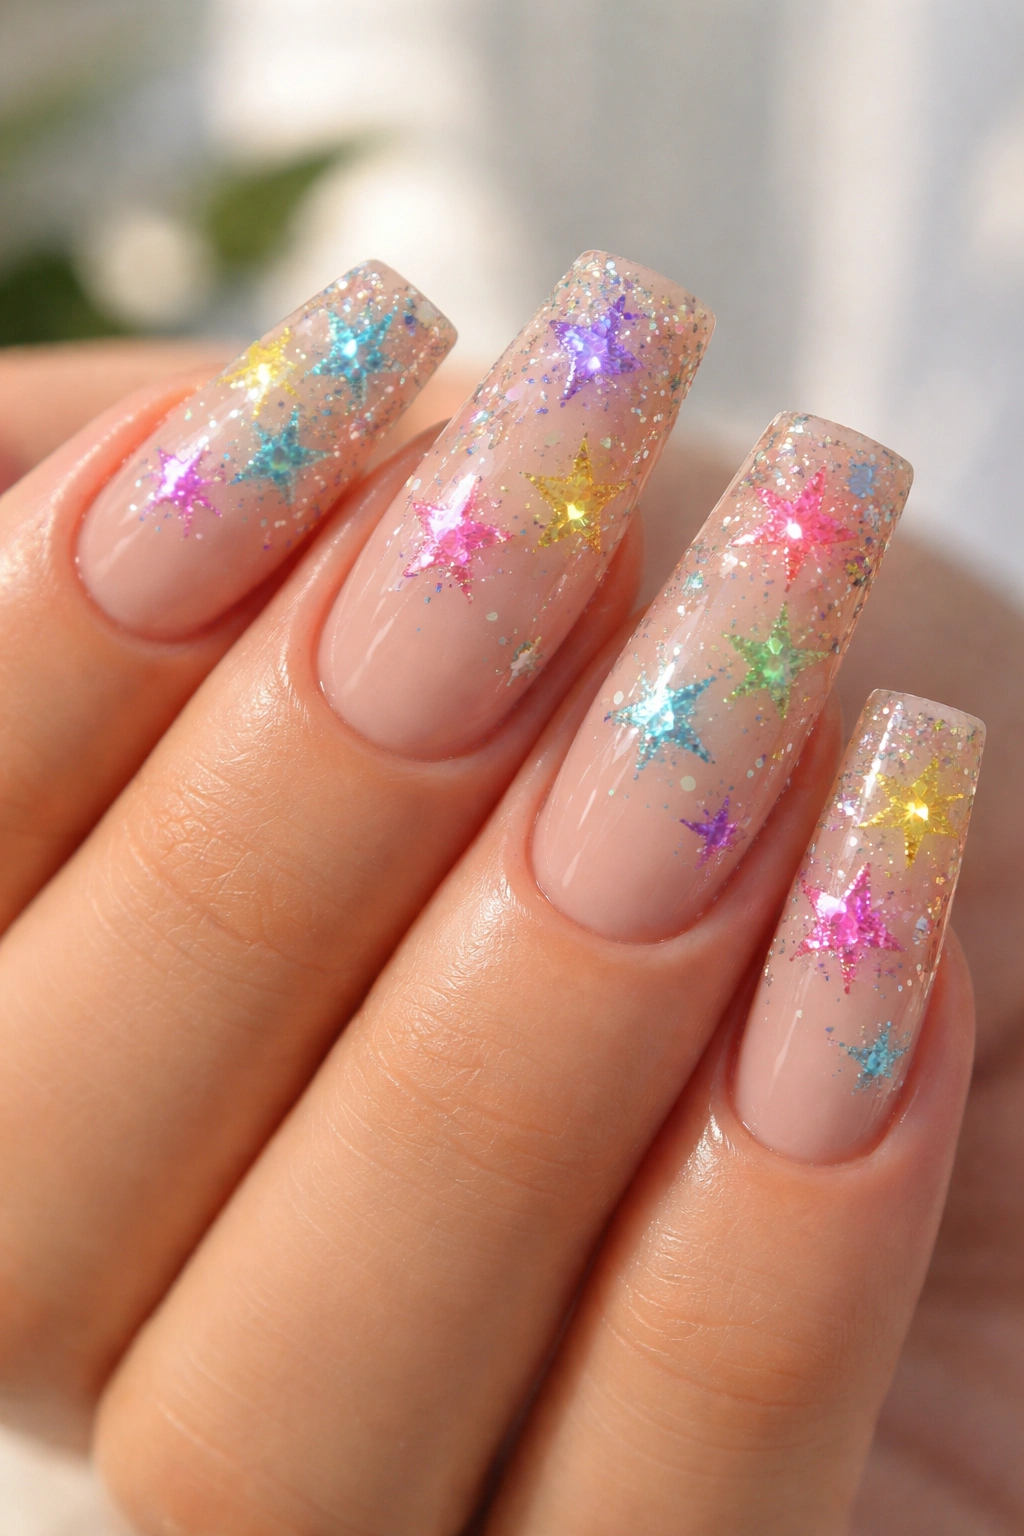
This design embraces maximum fun without sacrificing wearability. A nude or beige base—chosen to match your actual skin tone—keeps things grounded, while multicolored sparkly stars (think iridescent, holographic, or chrome effects) create a subtle rainbow effect that catches light beautifully. The nude base makes the stars the absolute hero of the design.
Why Sparkly Stars Pop Against Nude
Nude nails are the ultimate blank canvas. When you add glittery, shimmery, or holographic stars against this neutral backdrop, every single star becomes a tiny light show. The neutrality of the base means the design works with literally any outfit, making it endlessly versatile. Plus, nude elongates your fingers visually, and the duck shape means your stars get maximum visibility.
Creating the Sparkly Star Look
- Paint your duck nails with a nude shade that matches your undertone (warm nudes for golden undertones, cool nudes for rosy or pink undertones)
- Let the base fully cure
- Use multicolored sparkly gels, pressed glitter, or holographic foil stars to create your design
- You can apply these with a dotting tool, use star-shaped rhinestones, or stamp holographic patterns
- Seal everything under a thick, clear gel topcoat to keep the glitter from shifting
Insider note: Layer different colored sparkles—place a holographic star right next to a rose-gold glitter star and a rainbow chrome star—for depth and complexity that looks intentional, not chaotic.
4. Black Stars on Bright White

This is the high-contrast, bold option that makes a statement. Jet-black stars on a pristine white base create pure visual drama—very graphic, very modern. The duck nail shape amplifies the boldness because you’ve got more space to play with your star placement and sizing.
The Power of Maximum Contrast
Black and white is literally the highest contrast available in design, which is exactly why this works so brilliantly. The design reads as intentional and artistic rather than accidental. There’s something inherently chic about graphic simplicity, and stars feel geometric and modern rather than whimsical when rendered in pure black.
Execution Tips
- Paint three coats of pure white gel polish, making sure coverage is completely opaque
- Use black gel or gel pen to hand-paint stars, or use black star stamps
- Create a focal design on the thumb with a larger star, smaller stars scattered on other nails
- Consider adding a few small black dots or accent lines to create a constellation feel
- Finish with glossy topcoat for a clean, graphic appearance
Pro tip: Add a thin black line connecting some of your stars to create an actual constellation pattern—it adds sophistication and makes the design feel intentional and themed.
5. Pastel Rainbow Stars on Soft Lavender
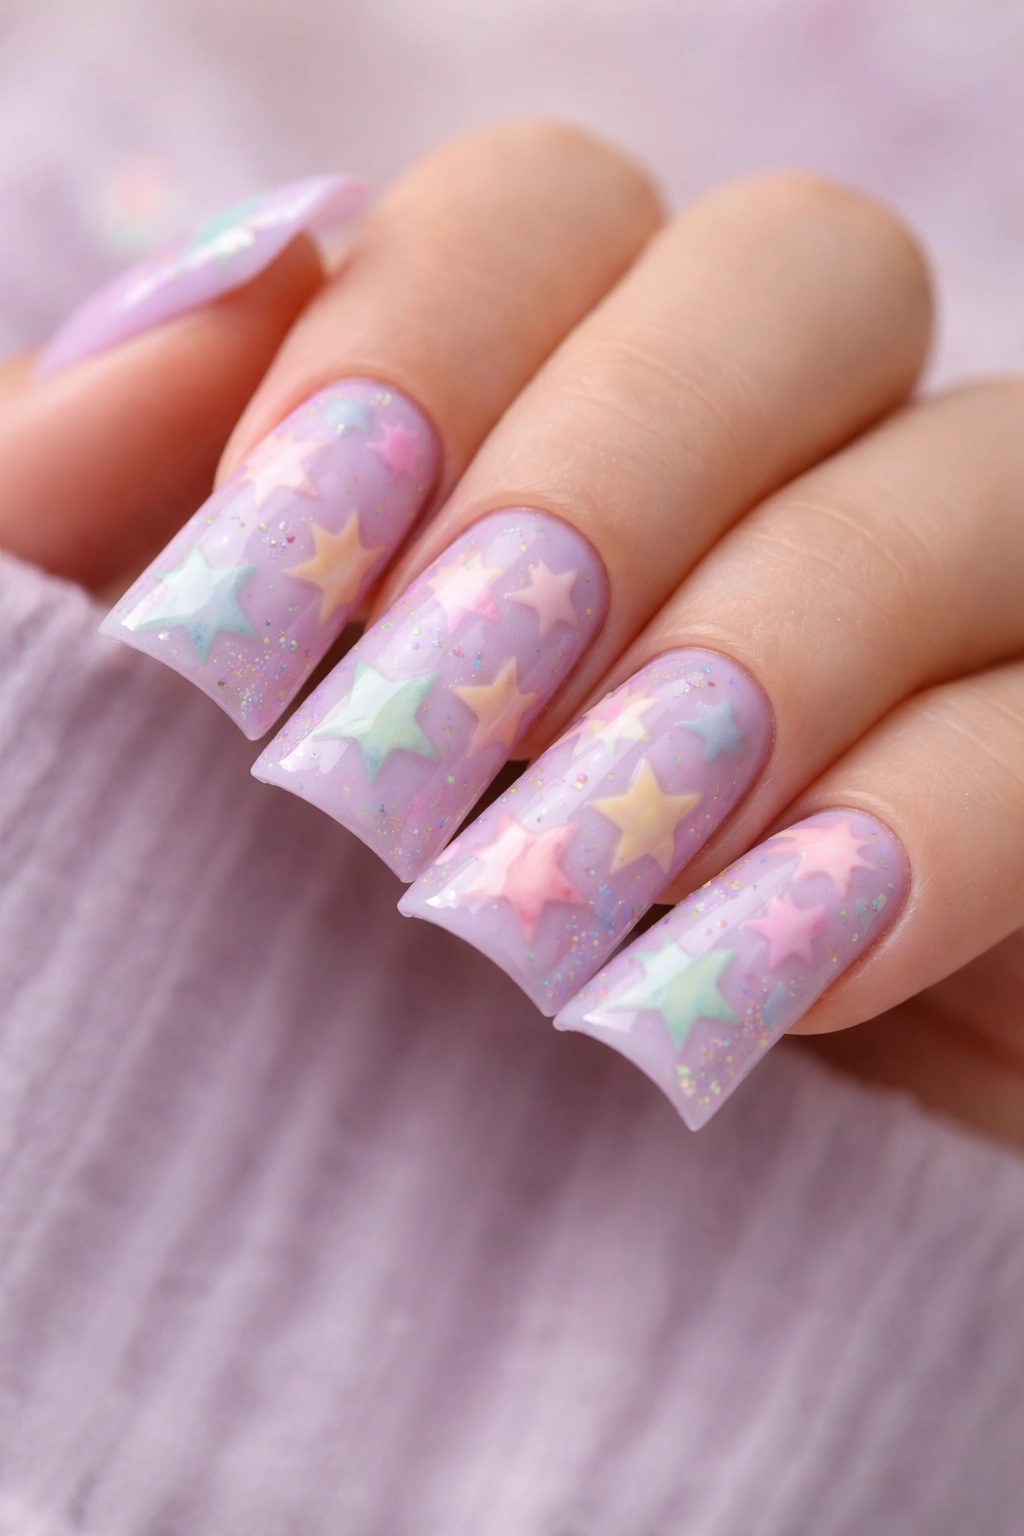
This design leans into dreamy, romantic vibes while still feeling modern. A soft lavender base—not purple, but that lighter, almost gray-tinted violet—provides a calming backdrop for pastel stars in multiple soft colors. Think pale pink, soft yellow, mint green, powder blue, and pale peach stars scattered across the lavender.
Why Pastels on Pastel Works
When all your colors exist in the same light, muted value range, nothing feels jarring or chaotic. Instead, you get a harmonious, almost watercolor effect. The lavender base is trendy enough to feel current but neutral enough to wear with almost anything. Duck nails in pastels feel soft and feminine without being saccharine—there’s actual sophistication in the restraint.
Creating Pastel Harmony
- Start with a creamy lavender base (not opaque purple—you want that lighter, washed-out tone)
- Allow it to fully cure
- Use pastel gel polishes or watercolor techniques to add small stars in soft coordinating colors
- Keep stars evenly distributed but not in rigid rows
- Layer a few of the same color (like three pale pink stars and three mint stars) for cohesion
- Seal with a soft matte topcoat for that watercolor finish, or glossy if you prefer shine
Worth knowing: If you want maximum softness, try using a very light hand and slightly translucent pastel colors—they’ll blend into the lavender base rather than sitting stark on top, creating an ombré effect.
6. Gold Constellation Map on Black
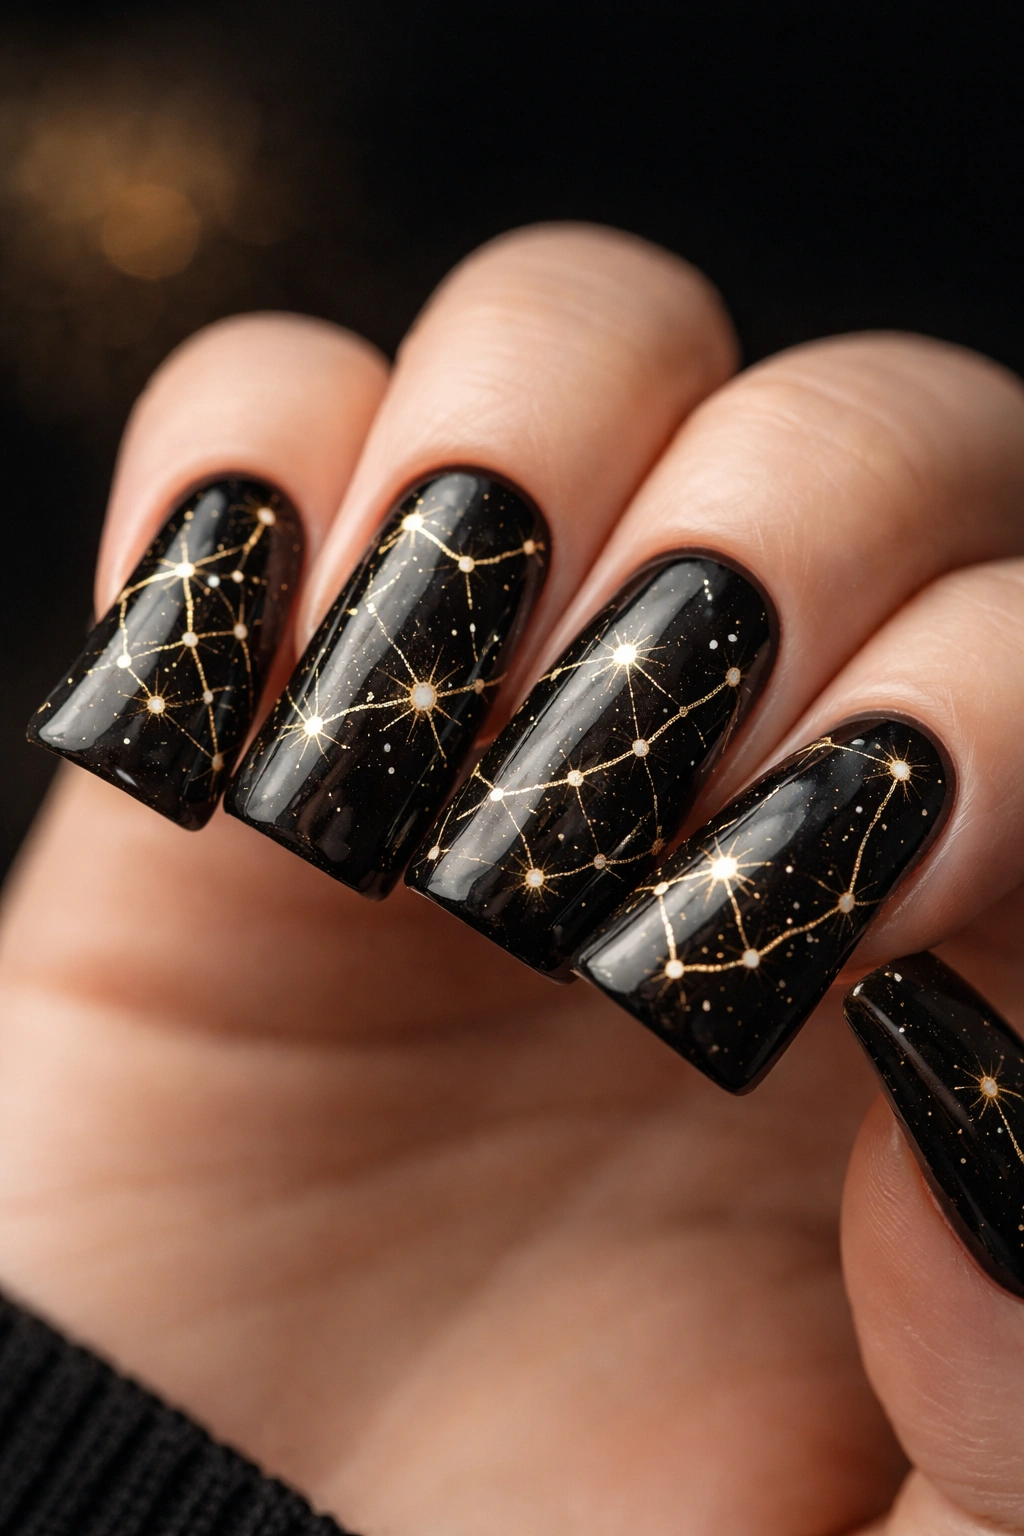
This is the sophisticated celestial option for anyone who loves actual astronomy or just loves the idea of it. Instead of scattered random stars, create an actual constellation pattern on a black base using gold lines and dots. This could be the Big Dipper, Cassiopeia, Orion—whatever constellation speaks to you.
The Astronomy Angle
Creating a recognizable constellation transforms your nails into a personal statement of something meaningful. Whether you were born under a certain zodiac sign, or the constellation marks a special moment in time, this design carries intention and story. It’s artwork and memoir simultaneously. The black background makes the gold lines practically glow, enhancing the “nighttime sky” aesthetic.
How to Paint Constellation Maps
- Apply a deep black or very dark navy base
- Allow it to fully cure
- Use a very thin gold gel pen or brush to draw the lines of your constellation—these connect your stars
- Place tiny gold dots along those lines to represent stars
- Add a few additional unconnected stars around the constellation for atmosphere
- Seal with glossy topcoat to make the gold shimmer
Pro tip: Look up the actual shape of your chosen constellation on your phone before painting—having a reference makes the whole process infinitely easier and ensures your constellation is recognizable.
7. Gradient Galaxy Stars on Purple-to-Pink Ombre
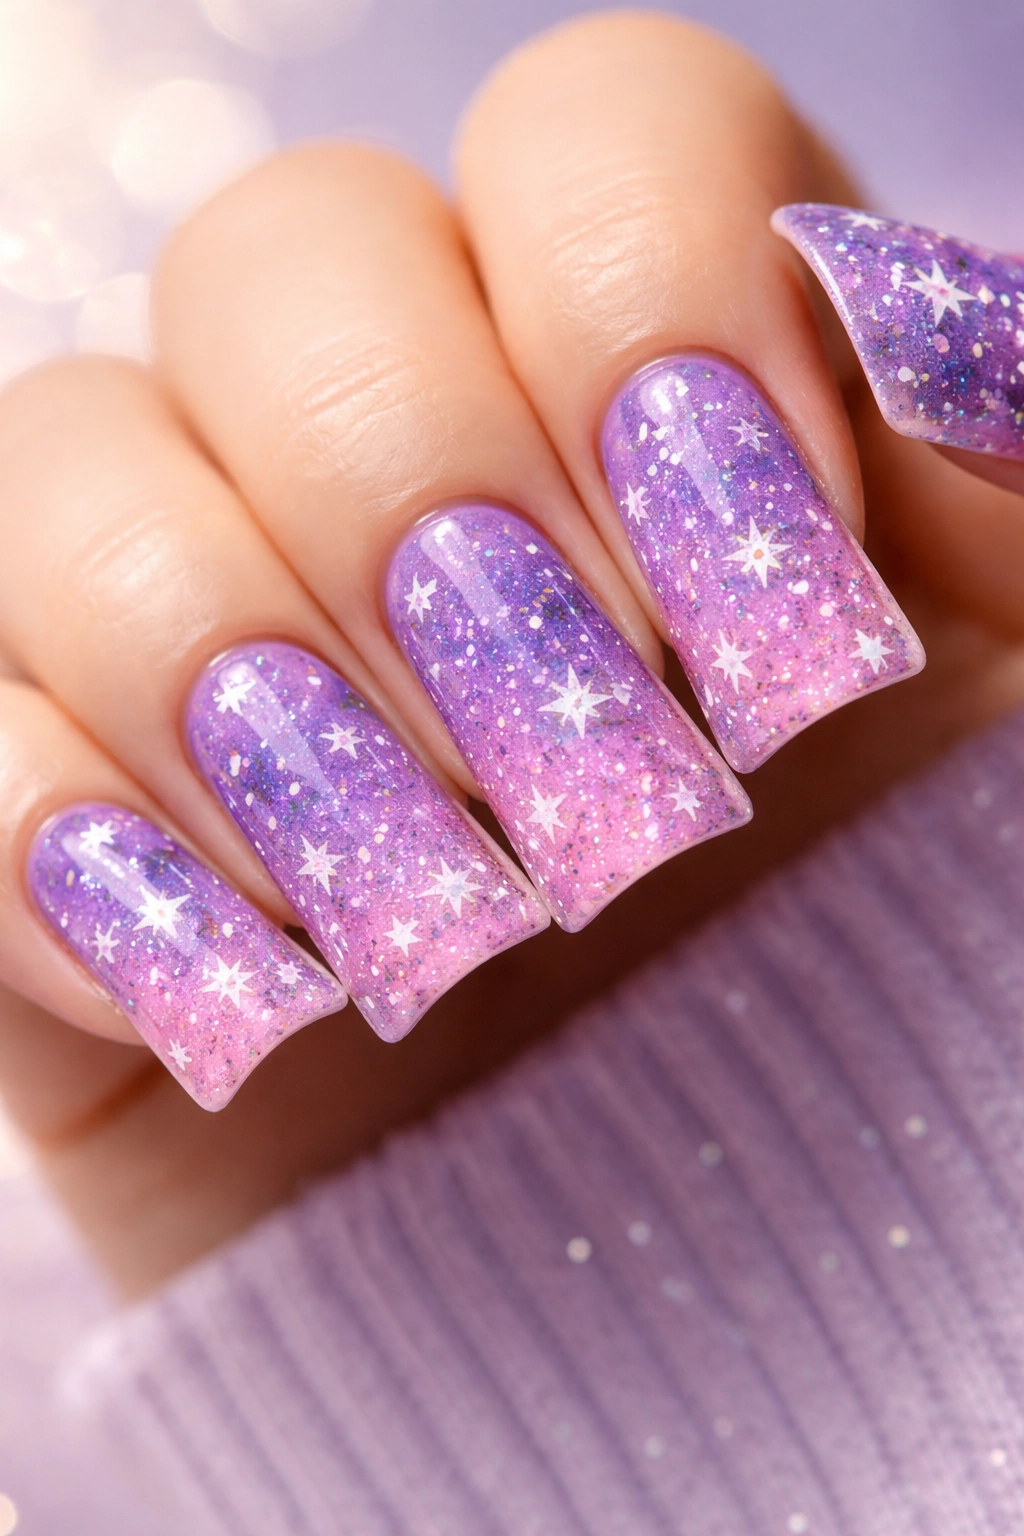
This design captures that dreamy galaxy aesthetic with a gradient that shifts from deep purple to hot pink across the nail, with white or holographic stars scattered throughout. The ombre creates a sense of movement and cosmic energy, while the stars feel like they’re floating through space.
Why Ombre Gradients Create Depth
When you layer a gradient across your nail, you create an illusion of three-dimensionality and motion. Adding stars on top gives those stars a sense of floating in actual space rather than sitting flat on a simple background. The purple-to-pink gradient is especially popular because it feels both cool and warm simultaneously—moody and romantic at once.
Creating the Gradient Galaxy Effect
- Start with a purple base on one side of your nail
- Blend it into pink on the other side using a makeup sponge—dab the sponge with both colors and press it onto the nail in the middle
- Allow to fully cure
- Add holographic, white, or translucent stars on top using gel and a dotting tool
- Consider adding a few tiny rhinestones for extra glitter
- Seal with glossy topcoat to enhance the depth
Insider note: For maximum galaxy effect, add a few tiny dabs of white gel randomly across the ombre before adding your stars—these create nebula clouds and make the design feel even more cosmic.
8. Midnight Blue with Silver Glitter Stars
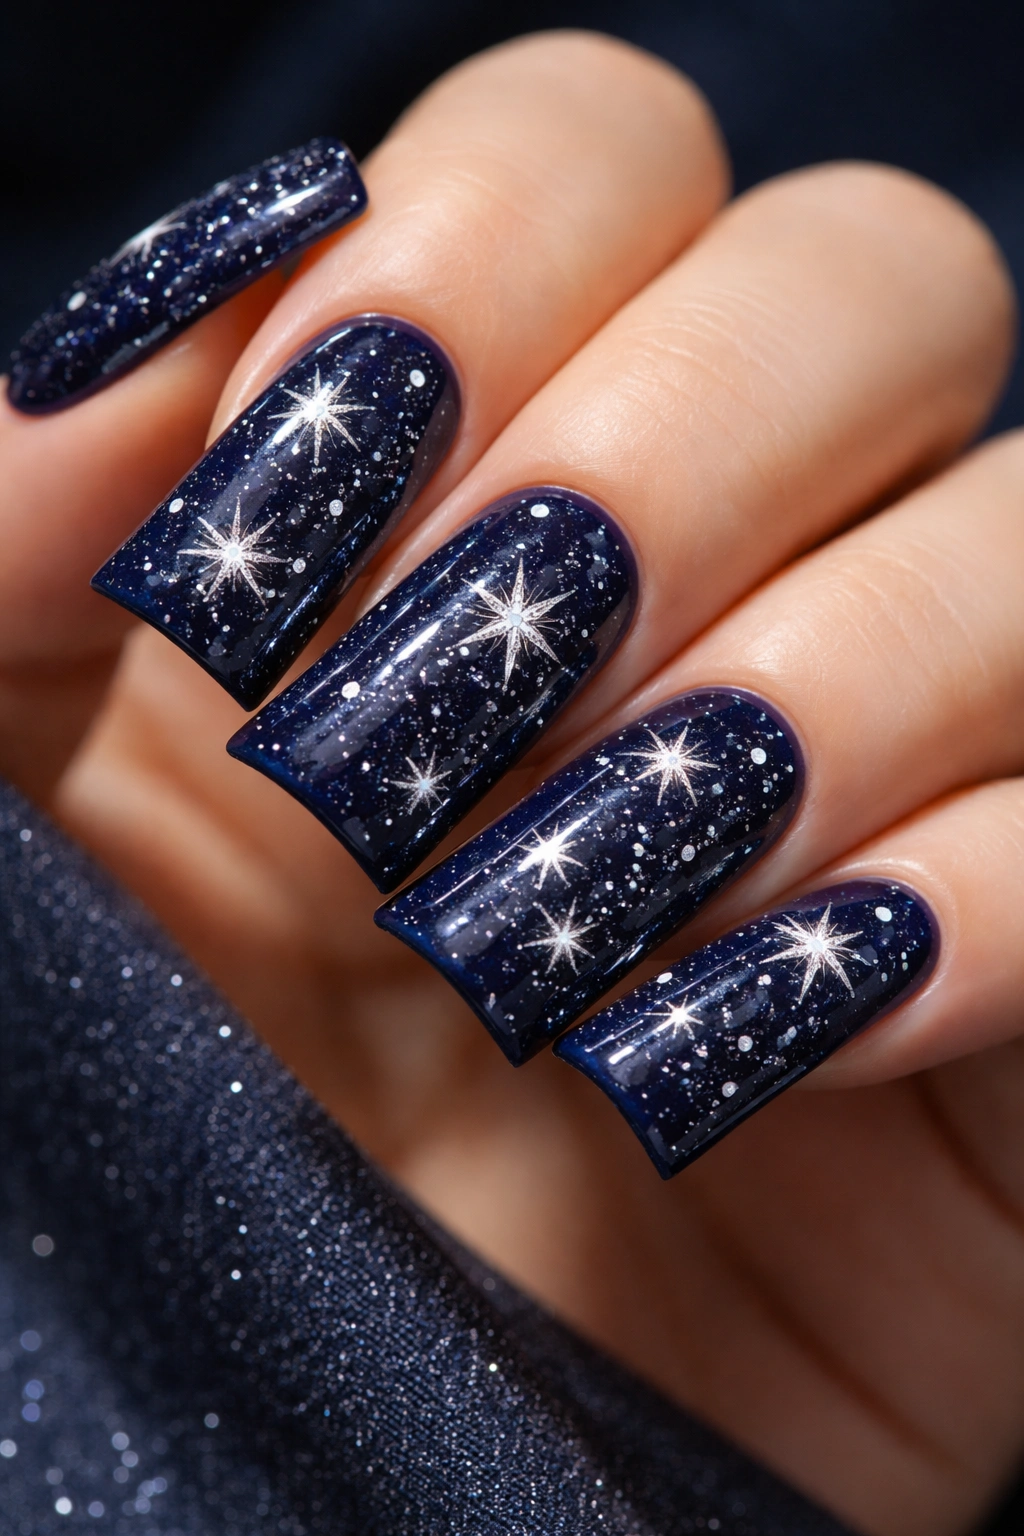
The difference between this and multicolored glitter is the specificity: silver glitter stars on a deep midnight blue create a cohesive, elegant look that feels intentional. Silver is cooler and more sophisticated than gold, and it pairs beautifully with the jewel-tone depth of midnight blue.
Silver’s Cool Elegance
Silver has a distinctly different energy than gold. It reads as modern, cool, and slightly edgy rather than warm and traditional. The midnight blue base is dark enough to showcase silver sparkle dramatically, but not so dark that it feels heavy. This combination is perfect for someone who wants sophistication with a subtle edge.
Application Steps
- Paint your duck nails with deep midnight blue gel or polish (make sure it’s truly dark, not a medium blue)
- Allow to fully cure
- Mix silver holographic glitter with clear gel, or apply silver glitter stars individually
- Use a dotting tool to place stars in a balanced but organic pattern
- Alternatively, use silver star-shaped rhinestones glued to the nail with gel adhesive
- Finish with a thick, protective topcoat to secure all the sparkle
Worth knowing: If you choose loose glitter, seal it really well with multiple thin layers of topcoat—loose glitter will shed all over everything if it’s not completely encased.
9. Pink Stars with White Accents on Nude
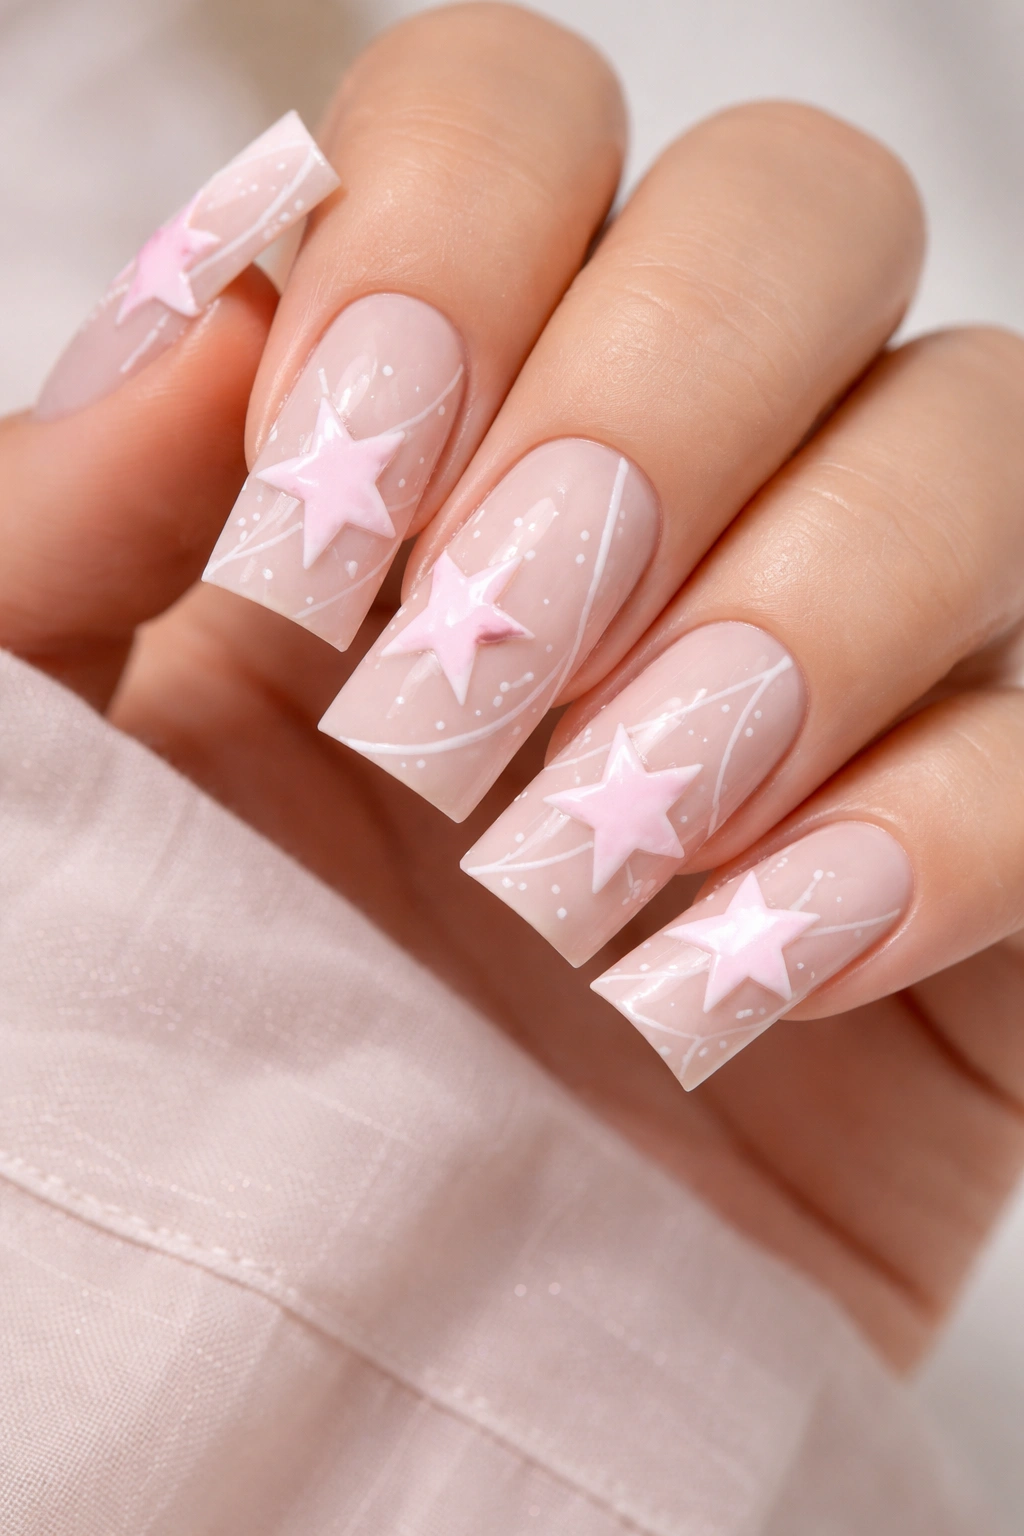
This design is the sweet spot between girly and sophisticated. A nude base (chosen to match your skin tone), pale pink stars, and thin white accent lines create a design that’s detailed enough to feel special but minimal enough to work in professional settings. It’s the grown-up version of a princess aesthetic.
Balancing Pink and Nude
Pink and nude together create an elongated, flattering look because the similar undertones don’t create harsh contrast—instead, they create a gentle gradient. White accent lines (think a small white dot inside each star, or white lines connecting the stars) add definition without adding chaos. The overall effect is elegant and intentional.
Creating the Design
- Paint your duck nails with a nude shade that precisely matches your undertone
- After it fully cures, use a thin brush and pale pink gel to paint five-pointed stars across the nail
- Add small white dots in the center of each star, or use white to create thin connecting lines
- Space your stars evenly but organically—not in rows, but with visual balance
- Seal with glossy topcoat for a polished finish
Pro tip: Use a thin liner brush (the kind used for eyeliner) to paint your white accent lines—it gives you more control and creates cleaner lines than a regular nail brush.
10. Holographic Star Field on Translucent Nude
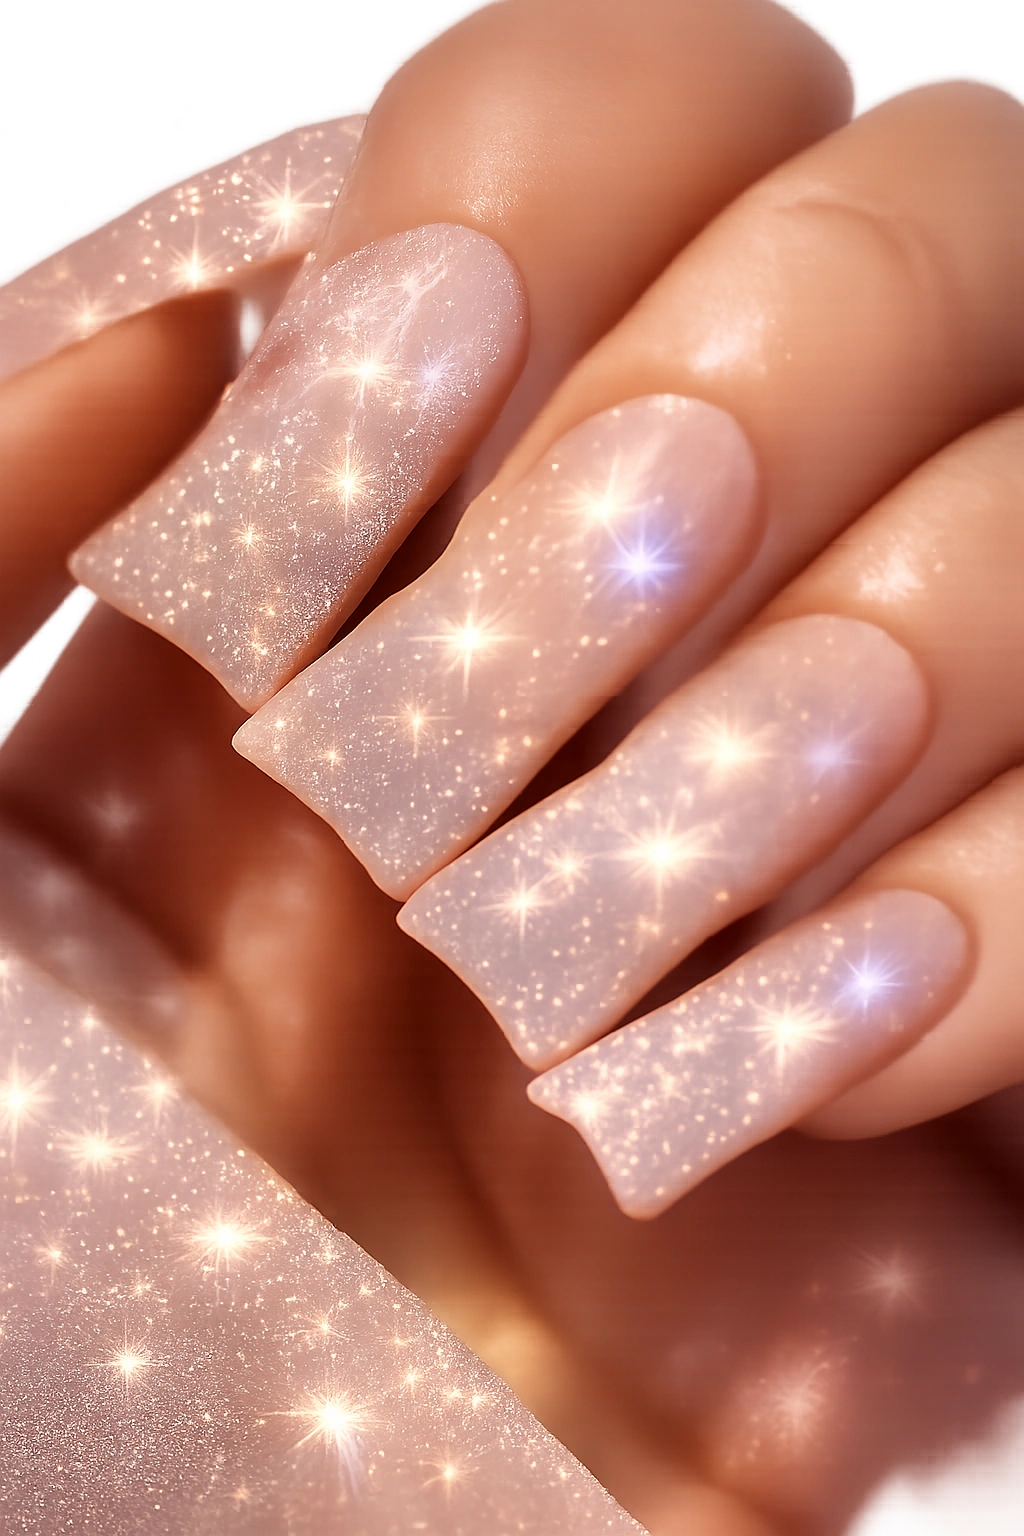
This is the subtle-but-stunning option that catches light with every movement. Use a translucent or barely-there nude base (almost like a sheer veil over your natural nail), then add holographic star dust or tiny holographic foil stars that sparkle with rainbow colors when they move. The translucency means your natural nail shows through slightly, creating an ultra-wearable, barely-there aesthetic.
Why Translucence Feels Modern
Sheer, barely-there nail designs feel contemporary and minimalist—it’s like wearing no polish but clearly you’ve put intentional thought into your nails. The holographic elements add “wow factor” without making the overall look heavy or opaque. This is the design for someone who loves sparkle but also loves subtlety.
Applying Holographic Elements to Translucent Base
- Paint one thin layer of translucent nude gel (you should still see your nail bed clearly underneath)
- Allow to cure
- Mix holographic glitter or foil fragments with clear gel and apply in a scattered pattern
- Or use a fine holographic powder and press it onto the surface with a clear gel
- You can also use nail foils cut into tiny star shapes and adhered with gel
- Seal with clear topcoat
Worth knowing: Holographic effects work best in natural light and in movement—they won’t be as visible indoors under fluorescent lighting, but in daylight they’re absolutely magical.
11. Navy and White Stars with Gold Trim
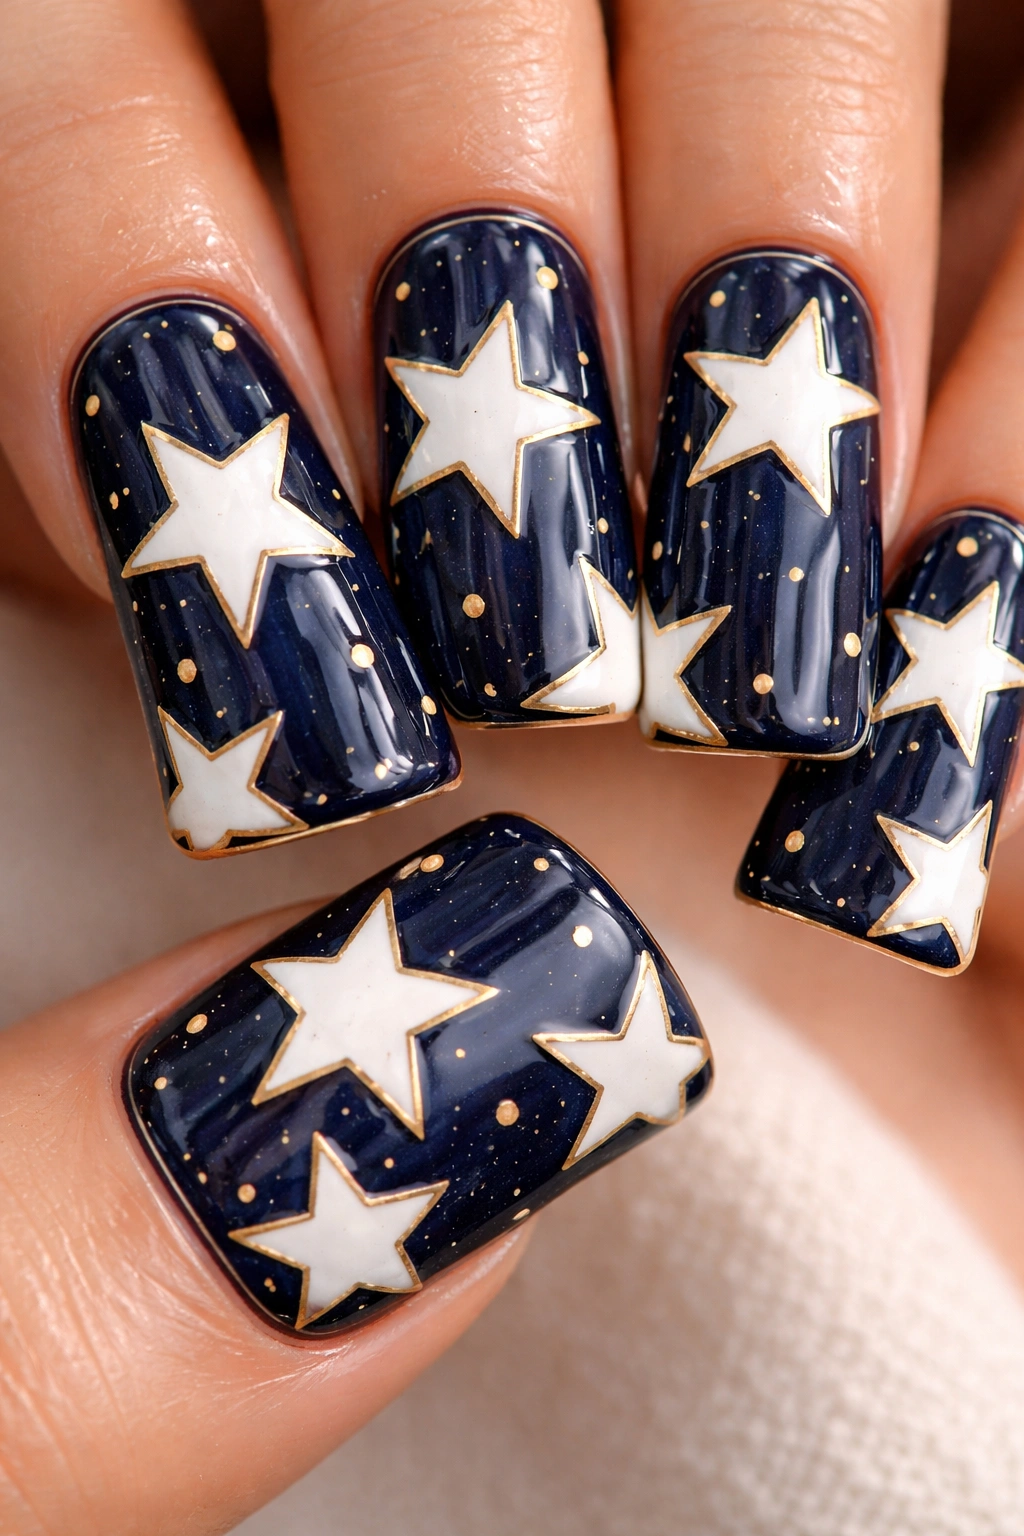
This design elevates the classic navy-and-white combination by adding a thin gold outline or accent to each star. It’s sophisticated, detailed, and feels like jewelry for your nails. The three-color combination might sound complicated, but the gold is used sparingly—just as a border—so it reads as an elegant detail rather than color chaos.
The Power of Gold Accents
Gold trim adds luxury and intentionality to a design. When you outline white stars with thin gold lines on a navy base, you create an elevated, almost vintage-inspired look that feels deeply intentional. This is the design equivalent of adding a gold trim to a picture frame—it transforms “nice” into “heirloom.”
Creating Gold-Trimmed Stars
- Paint your duck nails with navy gel or polish (2-3 thin coats for opacity)
- Allow to fully cure
- Use white gel to paint or stamp medium-sized five-pointed stars
- Once the white is cured, use a thin gold gel pen or very fine brush to outline each star
- The gold should just kiss the edge of each white star, not cover it entirely
- Seal with glossy topcoat to make the gold shimmer
Insider note: If hand-painting gold lines feels too detailed, use a white star stamp, then carefully paint only a tiny gold dot at each of the star’s five points—this creates accent without requiring perfect outline work.
12. Ombre Pink Stars on White Base
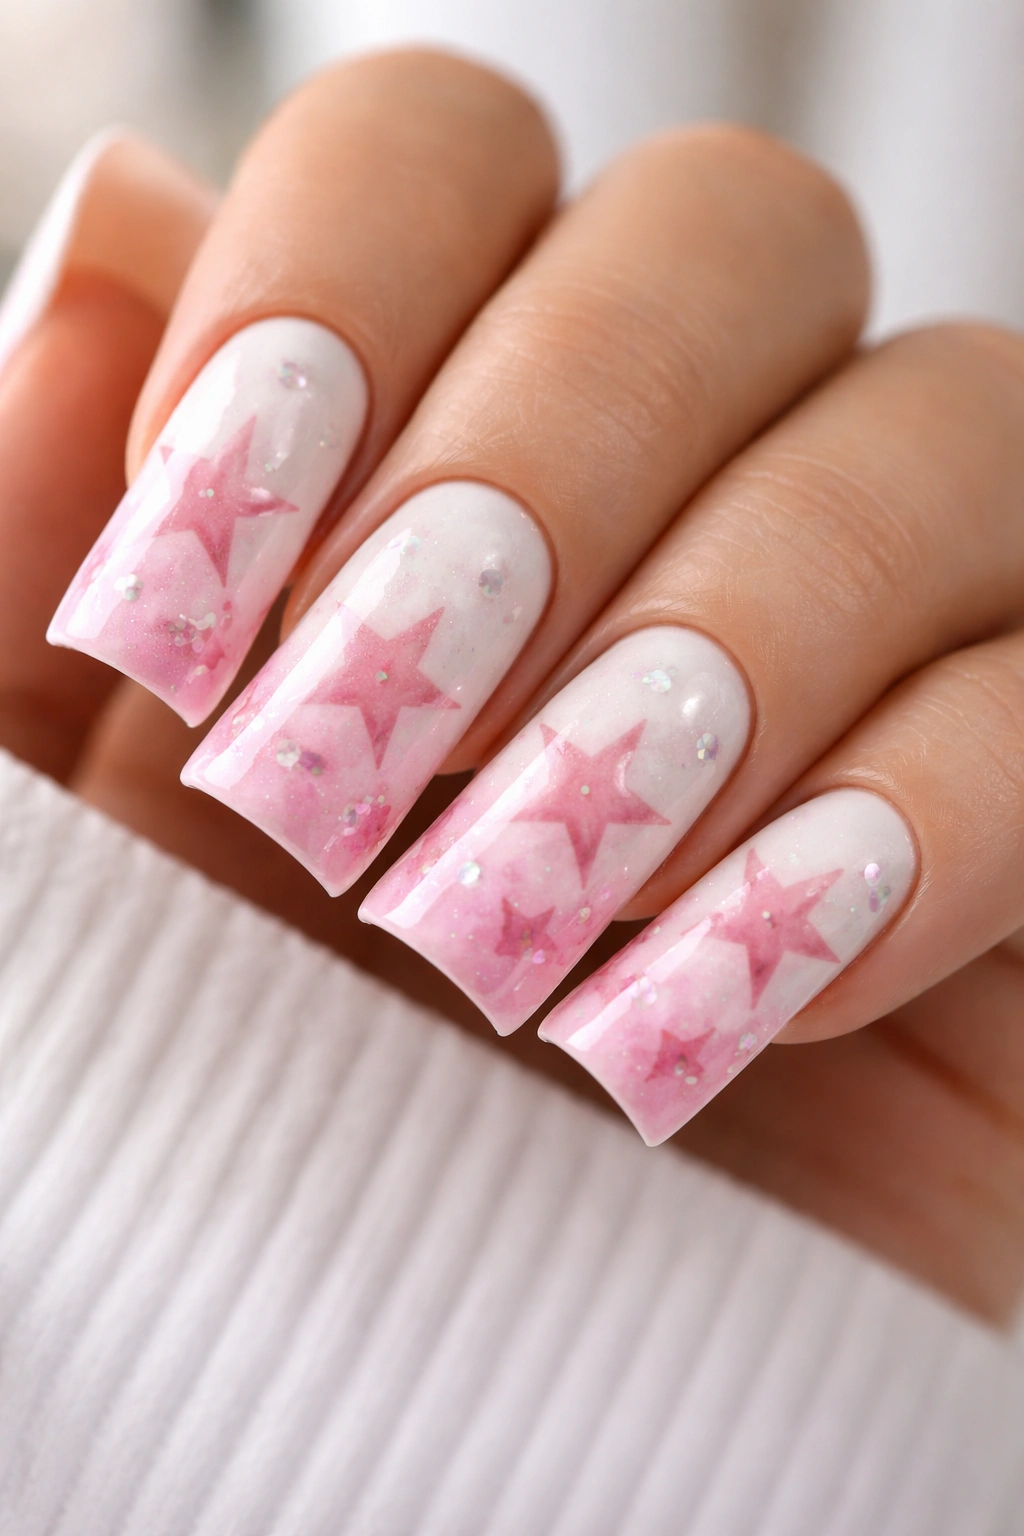
This design uses a color-gradient technique on the stars themselves rather than on the background. Your base is clean white, and your stars transition from pale pink at their points to deeper rose at their centers. It’s like each star is its own tiny ombre masterpiece.
Creating Dimension Through Star Gradients
By making each star a gradient instead of a solid color, you create visual complexity and depth without adding more colors to the overall palette. The effect is painterly and artistic—it looks like you spent hours on your nails, even if the technique is actually pretty straightforward. The white base keeps everything clean and lets those gradient stars be the undisputed stars (pun intended).
Technique for Gradient Stars
- Paint a pure white base with 2-3 coats
- Allow to fully cure
- Mix pale pink and deeper rose gel on a palette or mixing surface
- Use a small round brush to paint stars, starting with the pale pink in the center of each point and blending into the darker rose toward the edges
- The blending happens right on the nail as you paint—no need for separate steps
- Seal with glossy topcoat
Pro tip: Practice this blending technique on a nail wheel or piece of plastic first—it’s easier once you get the hang of how the colors blend on a curved surface.
13. Black Stars with Rainbow Outline on Nude
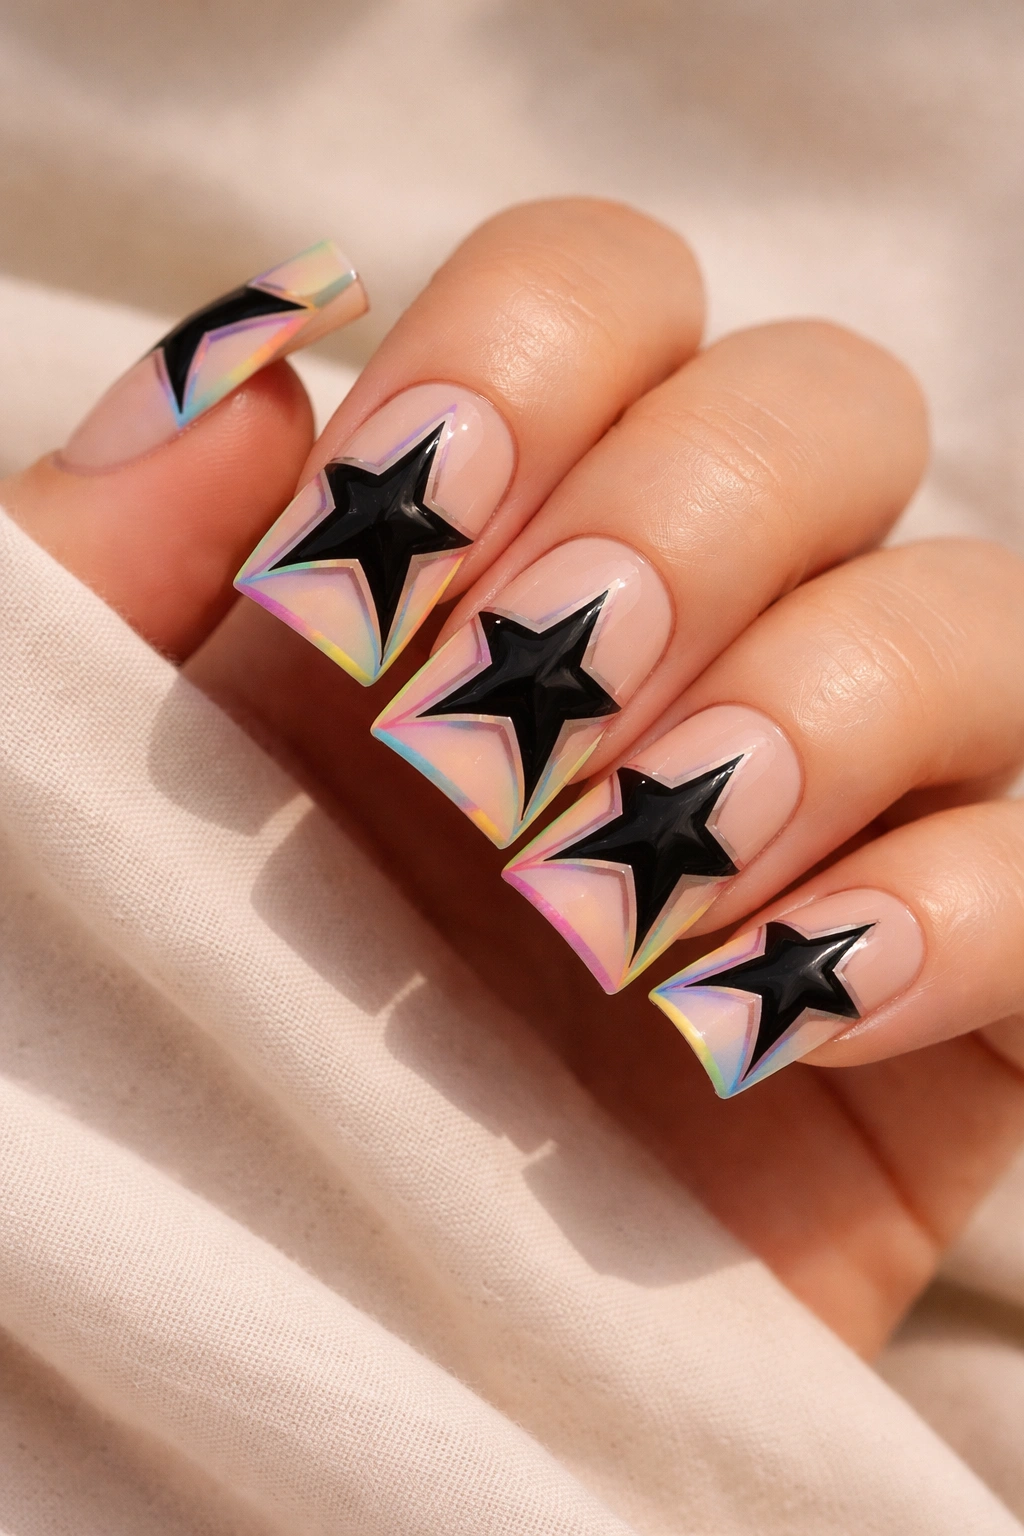
Here’s a design that’s bold but still wearable: black five-pointed stars outlined in thin rainbow lines on a nude base. The rainbow outline is subtle but visible, creating personality without overwhelming the design. It’s bold-meets-minimalist in the most charming way.
The Magic of Rainbow Outline Details
Using rainbow colors as just an outline (rather than as the main fill) is a brilliant design trick. It adds color and playfulness without making your nails look chaotic. The black star remains the visual anchor, and the rainbow becomes a secondary design element that adds depth when you look closely.
Creating Rainbow-Outlined Stars
- Paint a nude base that matches your undertone
- Once cured, use black gel to paint medium-sized five-pointed stars
- Once the black is cured, use a very thin brush or gel pen to outline each star in rainbow colors (ROYGBIV order around the star’s perimeter)
- You only need one thin line per star—it’s a detail, not a major element
- Seal with glossy topcoat
Worth knowing: Thin outlines are easier to execute if you practice keeping your hand very still—rest your hand on a manicure pillow and use your whole arm to move instead of just your fingers, which keeps lines more stable.
14. White Stars with Glitter Gradient on Silver Base
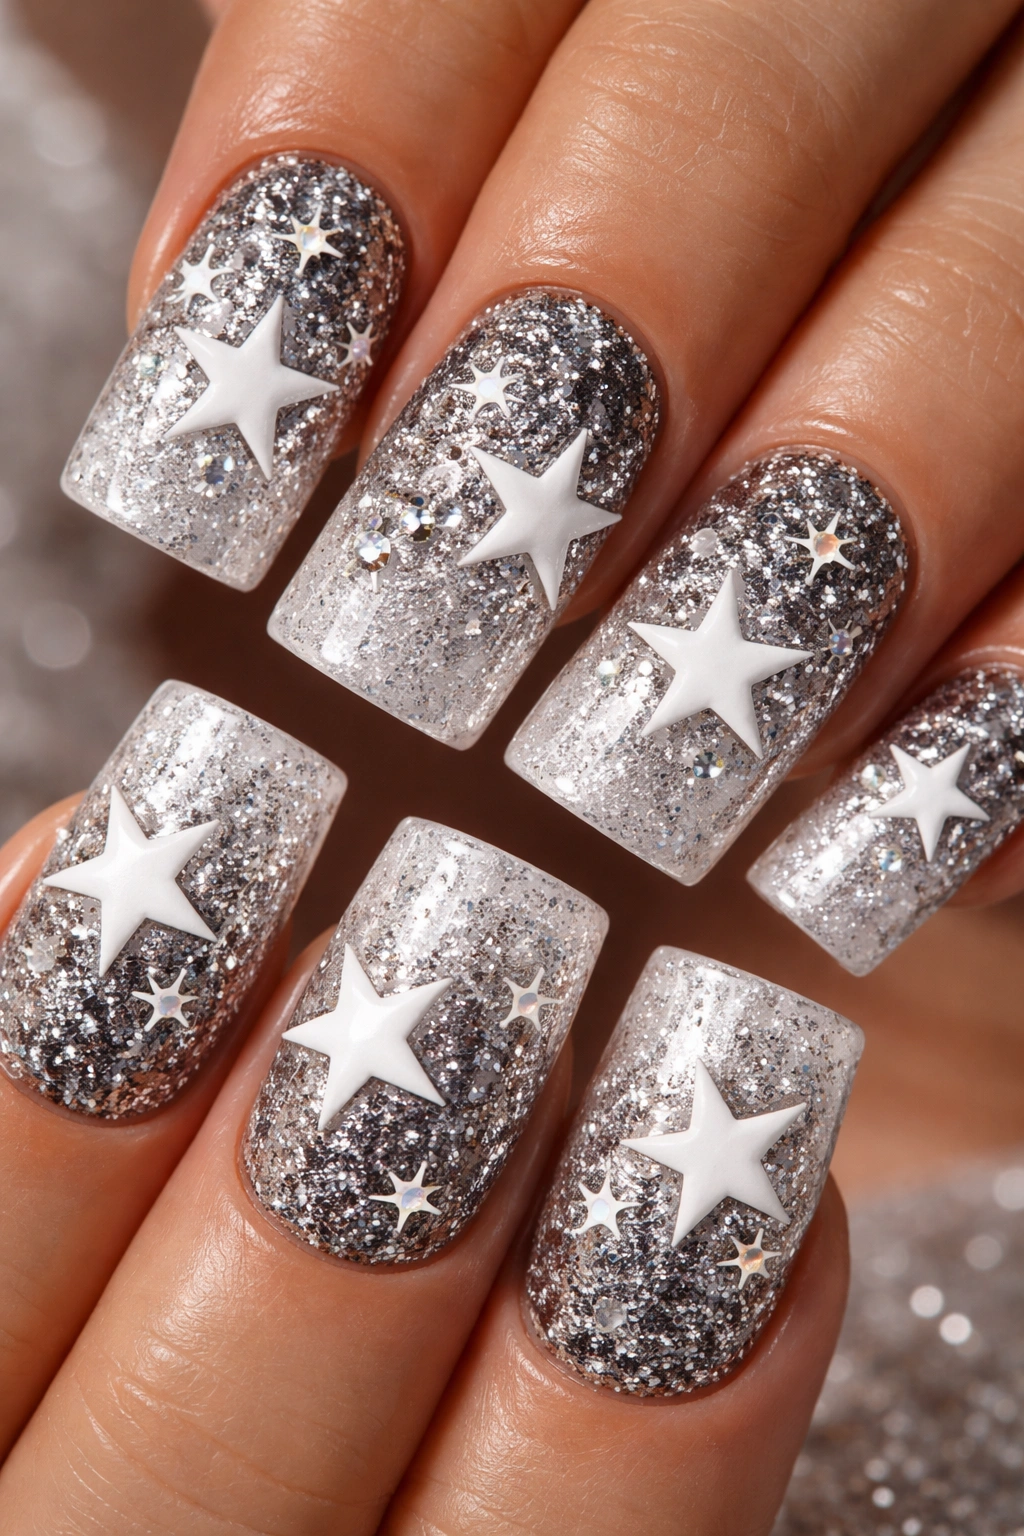
This design combines shimmer with sparkle: a silver glitter base that fades from dark silver to light silver, topped with white stars and small crystal rhinestones. The effect is incredibly glamorous and catches light from every angle.
Layering Shimmer and Sparkle Effectively
When you layer glitter (in the base) with solid shapes (stars) and additional sparkle (rhinestones), you create a visual hierarchy. Your eye reads the white stars first, then notices the sparkle, then the shimmery base. Nothing feels overwhelming because each element serves a purpose.
Building the Glitter Gradient Base
- Create a silver ombre base: apply silver glitter gel to the full nail, then use a cosmetic sponge to dab a lighter silver glitter onto just the tips for gradient effect
- Allow to fully cure (thick layers take longer)
- Paint white stars on top using white gel and a dotting tool
- Place tiny crystal rhinestones (like ABs or clear sparkles) at the points of each star
- Seal with a thick protective topcoat
Pro tip: Use tweezers with a slightly sticky rubber tip to pick up small rhinestones and place them exactly where you want them—it’s much easier than trying to position them with your fingers.
15. Minimalist Gold Star on Each Nail (Different Placement)

Sometimes less is more. This design features one simple gold star on each duck nail, but each star is positioned differently—one on the tip, one centered, one on the side, one near the cuticle. The variation in placement creates visual interest while maintaining a minimalist aesthetic. The base can be any nude, white, or light color you choose.
The Sophistication of Minimalism
A single element on each nail reads as intentional and refined. Because you’re only working with one star per nail, you can make it slightly larger and more perfectly rendered than you could with multiple stars. The placement variation turns what could be boring into something genuinely interesting—it’s minimalist but not static.
Executing Single-Star Placement Variation
- Paint all your duck nails with your chosen base color
- Allow to fully cure
- On the first nail, paint a gold star centered on the tip area
- On the second nail, position the star center-nail
- On the third nail, place it toward the side
- Continue varying placement across all nails
- Make sure each star is the same size and style for cohesion
- Seal with glossy topcoat
Insider note: This design works beautifully as a professional manicure because it’s refined without being over-the-top, and the minimal design means it’ll look fresh for weeks without needing touch-ups.
16. 3D Rhinestone Constellation on Matte Black
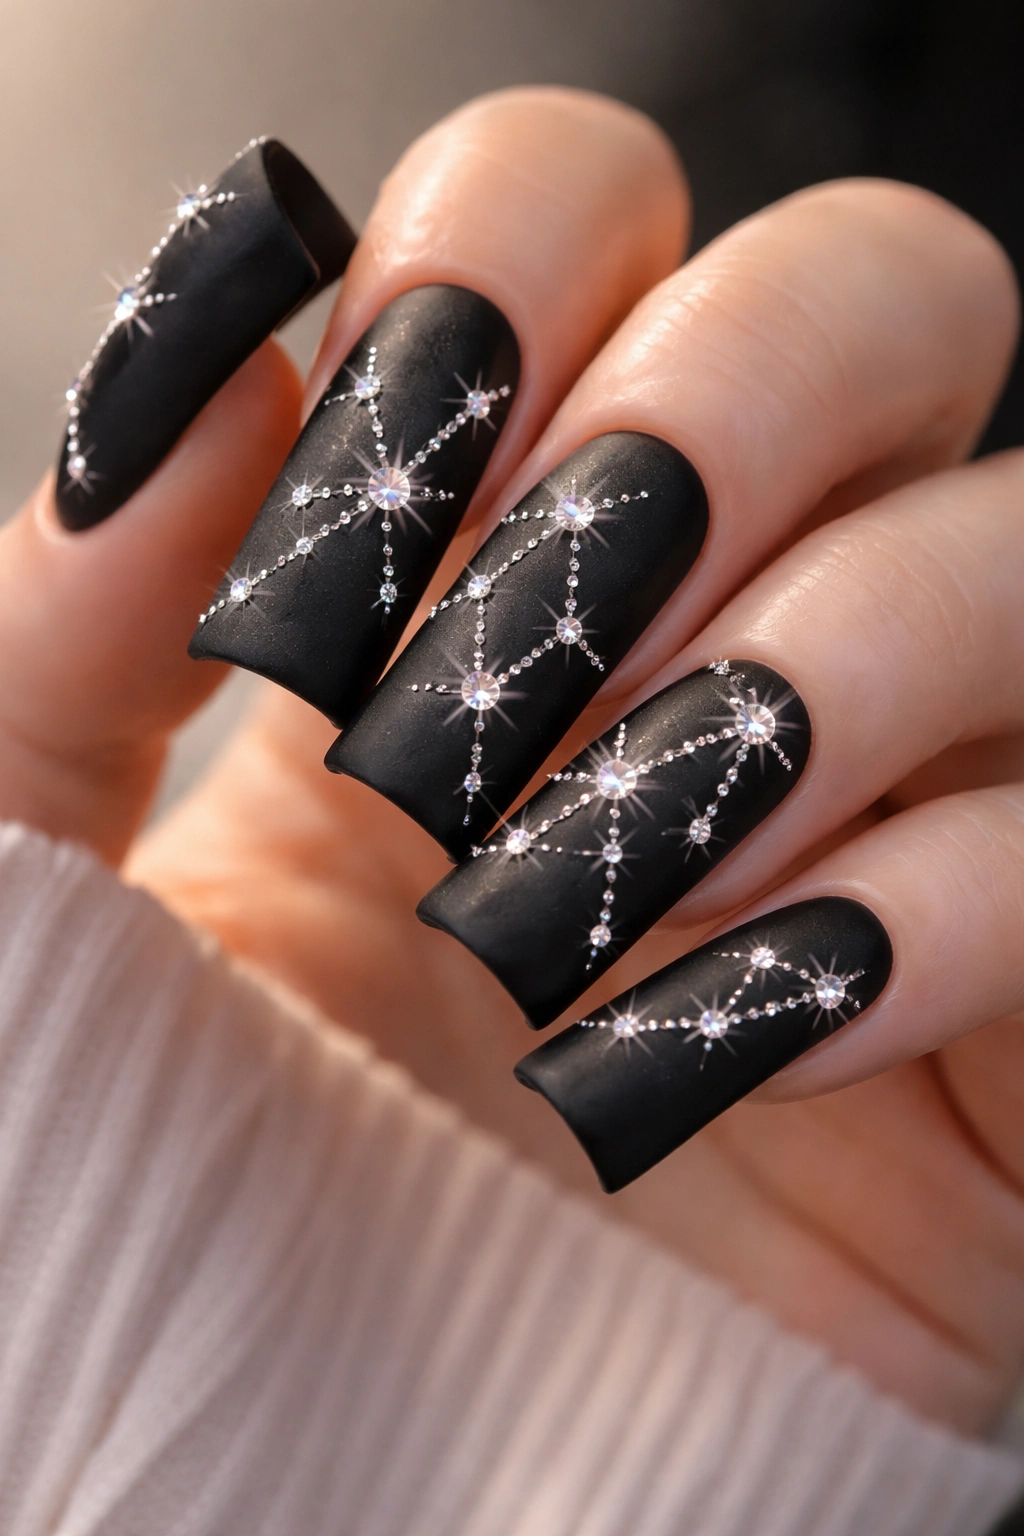
This is the statement-making, truly special option: a matte black base with constellation stars created from crystal rhinestones in varying sizes (large focal stones with smaller rhinestones forming lines). The matte finish makes the sparkle even more dramatic by contrast.
Why Matte Black Elevates Rhinestones
Matte finishes are having a major moment, and they’re sophisticated beyond measure. When rhinestones sit on matte black, they practically glow—the lack of shine in the background makes the sparkle absolutely pop. This design reads as high-end and intentional rather than chaotic.
Creating 3D Rhinestone Art
- Paint all your duck nails with matte black gel polish
- Allow to fully cure
- Plan your constellation (choose a real constellation or create your own pattern)
- Use a gel adhesive (the kind designed for nail art) to glue larger rhinestones in key positions
- Connect them with smaller rhinestones, creating your constellation pattern
- Seal everything with a clear gel topcoat to protect the stones from snagging
- Allow extra time for this design to cure completely
Worth knowing: Rhinestone designs are more prone to snagging on fabrics, so make sure stones are completely sealed under topcoat. Also, rhinestones tend to catch on things like hair, so you’ll need to be more careful during daily activities—this is more of a special-occasion design than an everyday wear option.
Final Thoughts
Star duck nails offer the perfect intersection of trendiness and personal expression. Whether you’re drawn to the minimalist elegance of single gold stars on cream, the bold drama of black stars on white, or the absolute glamour of rhinestone constellations on matte black, there’s genuinely a design here that matches your style and your comfort level with nail art.
The beauty of the duck nail shape is that it gives you space to be creative without the design feeling cramped or overwhelming. Even the most detailed star designs benefit from that extra canvas. If you’re new to nail art, start with something like the classic gold stars or the white-and-navy combination—those work beautifully whether you hand-paint or use stamps and stickers. Once you’re comfortable, branch into gradients, ombre effects, and more complex designs.
Remember that the “right” design is the one that makes you feel confident and happy when you look at your nails. Some days that’s understated minimalism; other days it’s maximum sparkle and 3D detail. Mix and match these ideas, adjust colors to suit your wardrobe, and don’t be afraid to combine elements from different designs to create something uniquely yours.
