

Duck nails have taken over the nail world, and there’s a reason why. That perfectly curved, elongated shape creates an illusion of length and elegance that works especially well on shorter nail beds. Pink remains the ultimate choice for duck nails — it’s feminine, forgiving, and flatters every skin tone. If you’ve been thinking about trying this trend but worry that short nails won’t pull off the look, you’re about to discover that short nails can actually be the perfect canvas for duck nail designs. The key is choosing the right shade of pink and pairing it with design elements that enhance rather than overwhelm the shorter length.
What makes duck nails so appealing is their unusual silhouette. The sides taper inward toward your nail bed, then the free edge flares out dramatically at the tip — creating that distinctive duck’s bill shape. On short nails, this geometry is actually easier to execute than you might think, and pink is the universal shade that makes every variation look sophisticated and intentional. Whether you prefer soft ballet pink, vibrant hot pink, or something in between, there’s a duck nail design waiting to become your new obsession.
The designs in this collection range from minimalist and understated to bold and ornate, giving you plenty of options regardless of your personal style. Each design works beautifully on nails that are shorter than traditional stiletto or coffin shapes. You’ll discover how to add dimension with nail art, what finishes look best for duck nails, and which pink undertones work for different skin tones. Let’s dive into the specific designs that will make you want to book that nail appointment immediately.
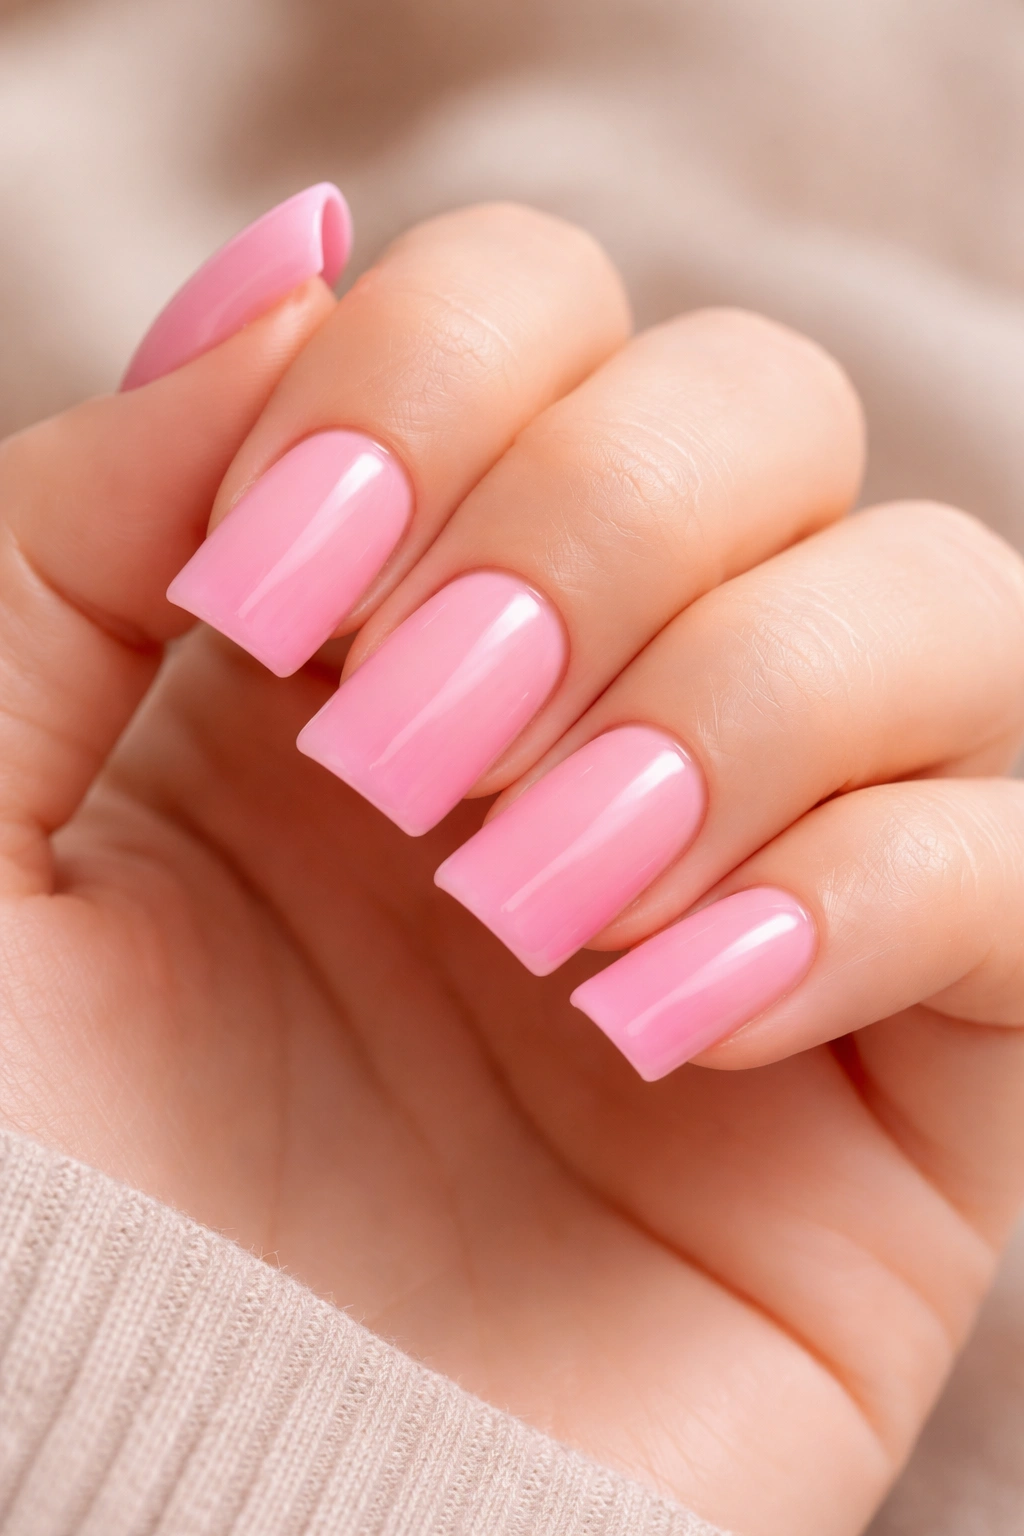
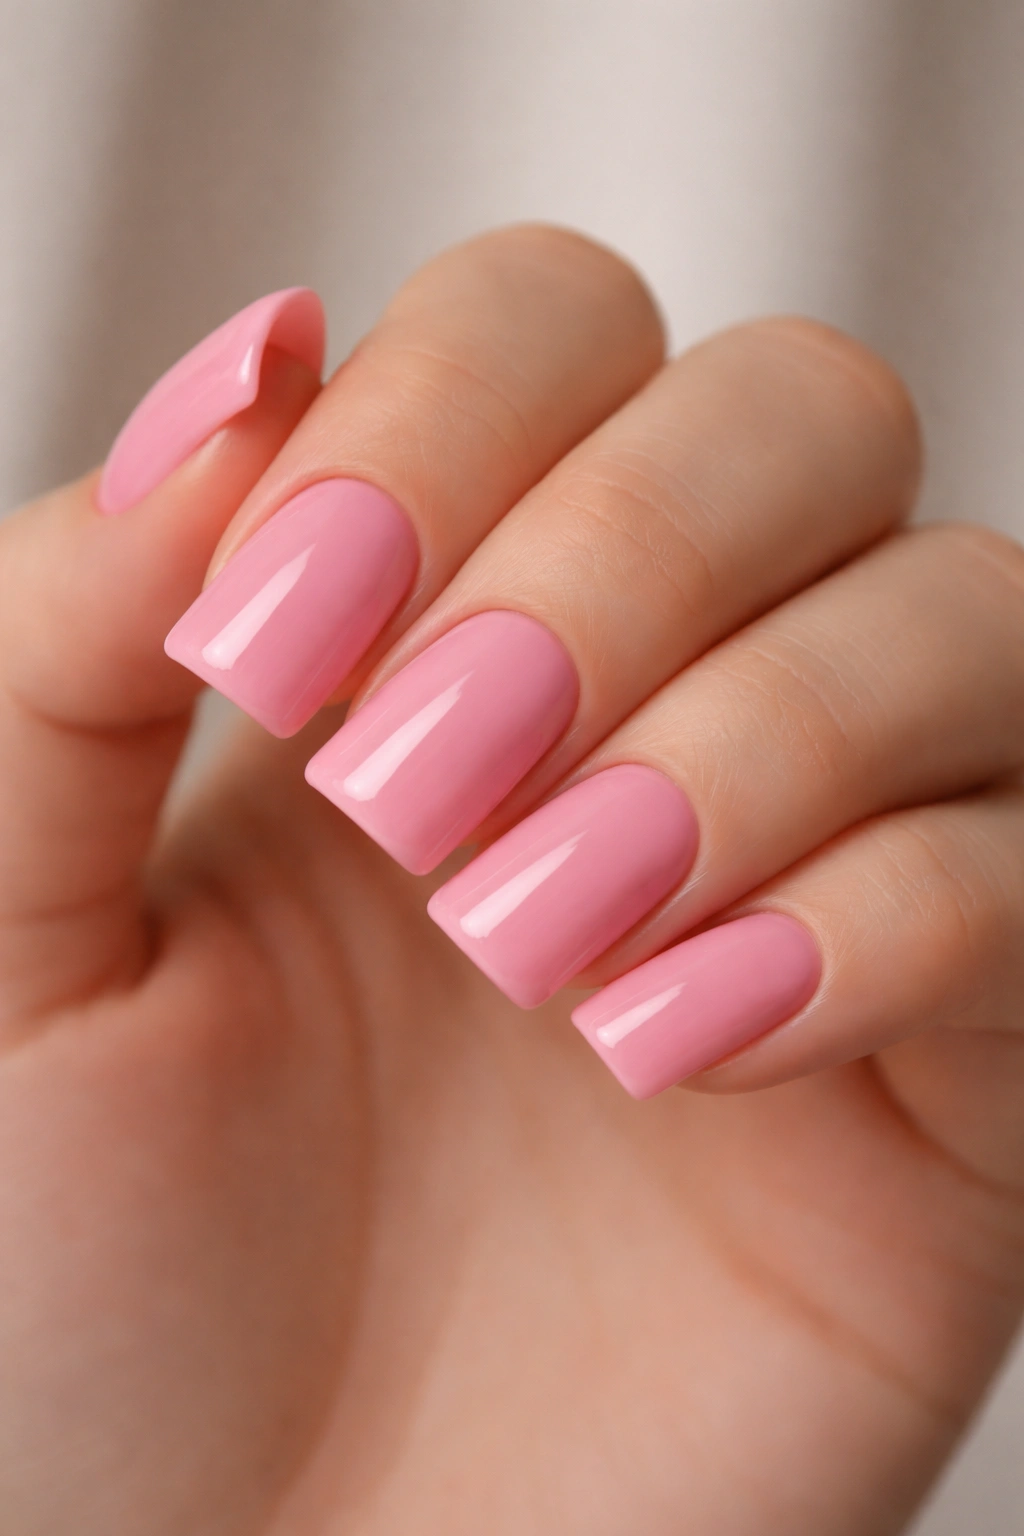
1. Classic Solid Pink Duck Nails
There’s something undeniably chic about keeping things simple and clean. A solid pink duck nail is the foundation of everything else on this list — it’s the look you return to again and again because it works. The beauty of this design is that it lets the nail shape do all the talking. You’re not competing with patterns, glitter, or complicated art; you’re showcasing the elegant geometry of the duck nail silhouette itself.
Why Solid Pink Works for Short Nails
On shorter nail beds, a solid color creates an uninterrupted line from your cuticle to the tip, which actually makes your nails appear longer than they are. The duck shape’s curved sides and wide flare at the free edge become more prominent when there’s no visual distraction. A single, well-chosen pink shade can transform your entire hand in seconds.
How to Perfect This Look
- Choose a pink with blue undertones (cool pink) for pale or fair skin, or a pink with warm undertones (salmon or rose pink) for deeper skin tones
- Apply a base coat, two thin coats of color, and a glossy top coat for a mirror-like finish
- Use a high-quality gel or regular polish formulated for long-lasting wear
- File your nails into the duck shape first, then shape each side with precise angled strokes
- Seal the edges by painting around the entire free edge, not just the top surface
Pro tip:
Use a quick-dry top coat or LED lamp setting (if using gel) immediately after applying solid pink. This prevents any smudging and ensures your clean edges stay razor-sharp.
2. Pink Ombré Duck Nails
Ombré is where you transition smoothly from one shade to another across the nail. For duck nails, an ombré effect using different shades of pink creates depth and visual interest while staying in the same color family. This design works particularly well on short nails because it creates a subtle gradient that makes nails appear more elongated than a flat single color.
The Ombré Effect on Shorter Nail Beds
When you layer lighter pink at the base transitioning to deeper pink at the tip, you’re using color psychology to your advantage. Darker tones recede visually, so that darker pink at the tip makes the free edge feel like it extends further. The gradient also adds sophistication and prevents the look from feeling too simple.
Application Techniques for Success
- Use a makeup sponge and dab pink shades (from light to dark) onto the sponge, then press onto each nail
- Alternatively, use a soft brush to blend two or three pink shades directly on the nail surface
- Start with the lightest pink as your base coat
- Blend the darker pink into the free edge using gentle feathering motions
- Seal with a top coat to blend the transition even further
- For the smoothest result, use gel polish or acrylic — traditional polish can be more difficult to blend seamlessly
Quick Facts
- Ombré designs hide imperfections better than solid colors because the gradient masks uneven pigmentation
- Lighter pinks (blush, baby pink) work best for the base when you’re darkening toward the tip
- The shorter your nails, the softer your ombré transition should be — avoid too much contrast
- Ombré pairs beautifully with a matte finish for a more modern, editorial look
Worth knowing: The sponge method requires patience. Press lightly and let the sponge do the work rather than rubbing aggressively, which can damage your base coat.
3. Pink Duck Nails with Gold Foil Accents
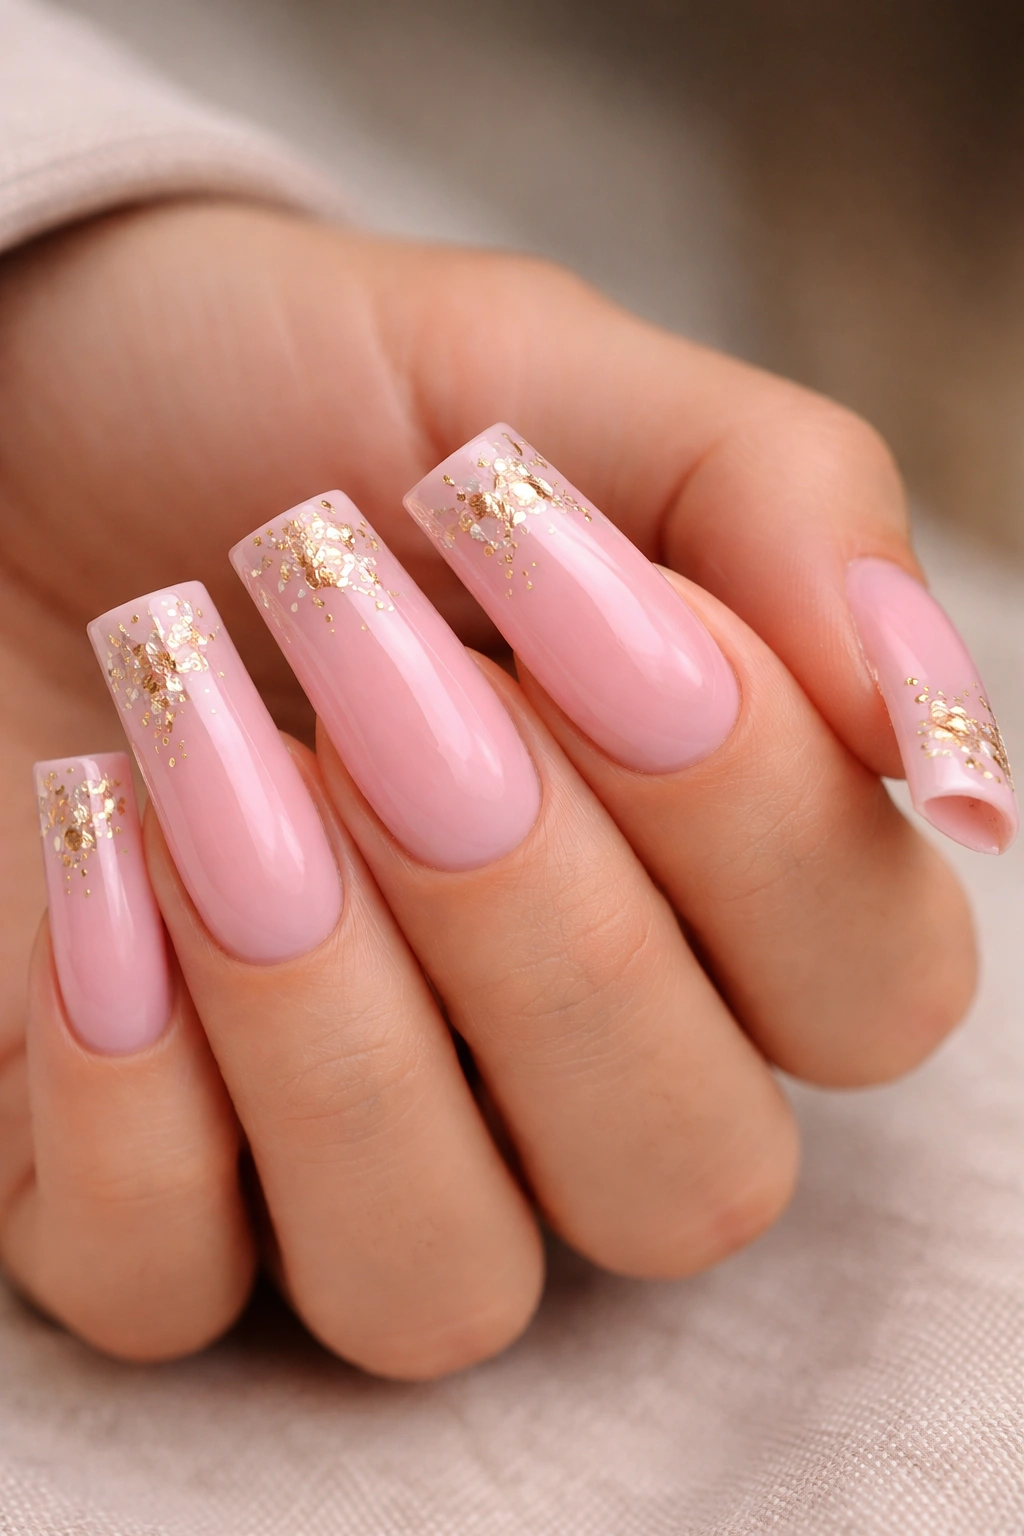
Gold foil brings immediate luxury and glamour to any nail design. When applied to pink duck nails, it creates a eye-catching contrast that elevates the whole look without requiring complicated nail art skills. Gold foil pieces catch light beautifully and make your hands look intentional and polished.
Why Gold Works With Pink
Gold and pink are a naturally complementary pair. Gold has warm undertones that make pink appear richer and more saturated. Whether you’re using pale pink or hot pink, a touch of gold foil transforms the design from everyday to special-occasion-worthy in seconds.
How to Apply Gold Foil Like a Pro
- Paint your duck nails with your chosen pink shade and allow it to dry completely
- Apply a thin layer of foil adhesive (also called foil glue) across the tip or in geometric patterns
- Wait exactly 30 seconds — not longer, not shorter — for the adhesive to become tacky
- Press small pieces of gold foil onto the adhesive using a soft brush or your fingertip
- Gently peel away the foil sheet; the foil should stick to your nail where the adhesive was
- Seal with a top coat to protect the foil and prevent peeling
Quick Facts
- Gold foil works best on matte pink bases — it doesn’t adhere as securely to glossy surfaces
- Apply foil to the tip only for a subtle look, or create geometric patterns like triangles or stripes
- Foil tends to peel at the free edge on shorter nails, so seal extremely carefully with top coat
- Choose between loose foil pieces (more dramatic) or adhesive foil sheets (more convenient)
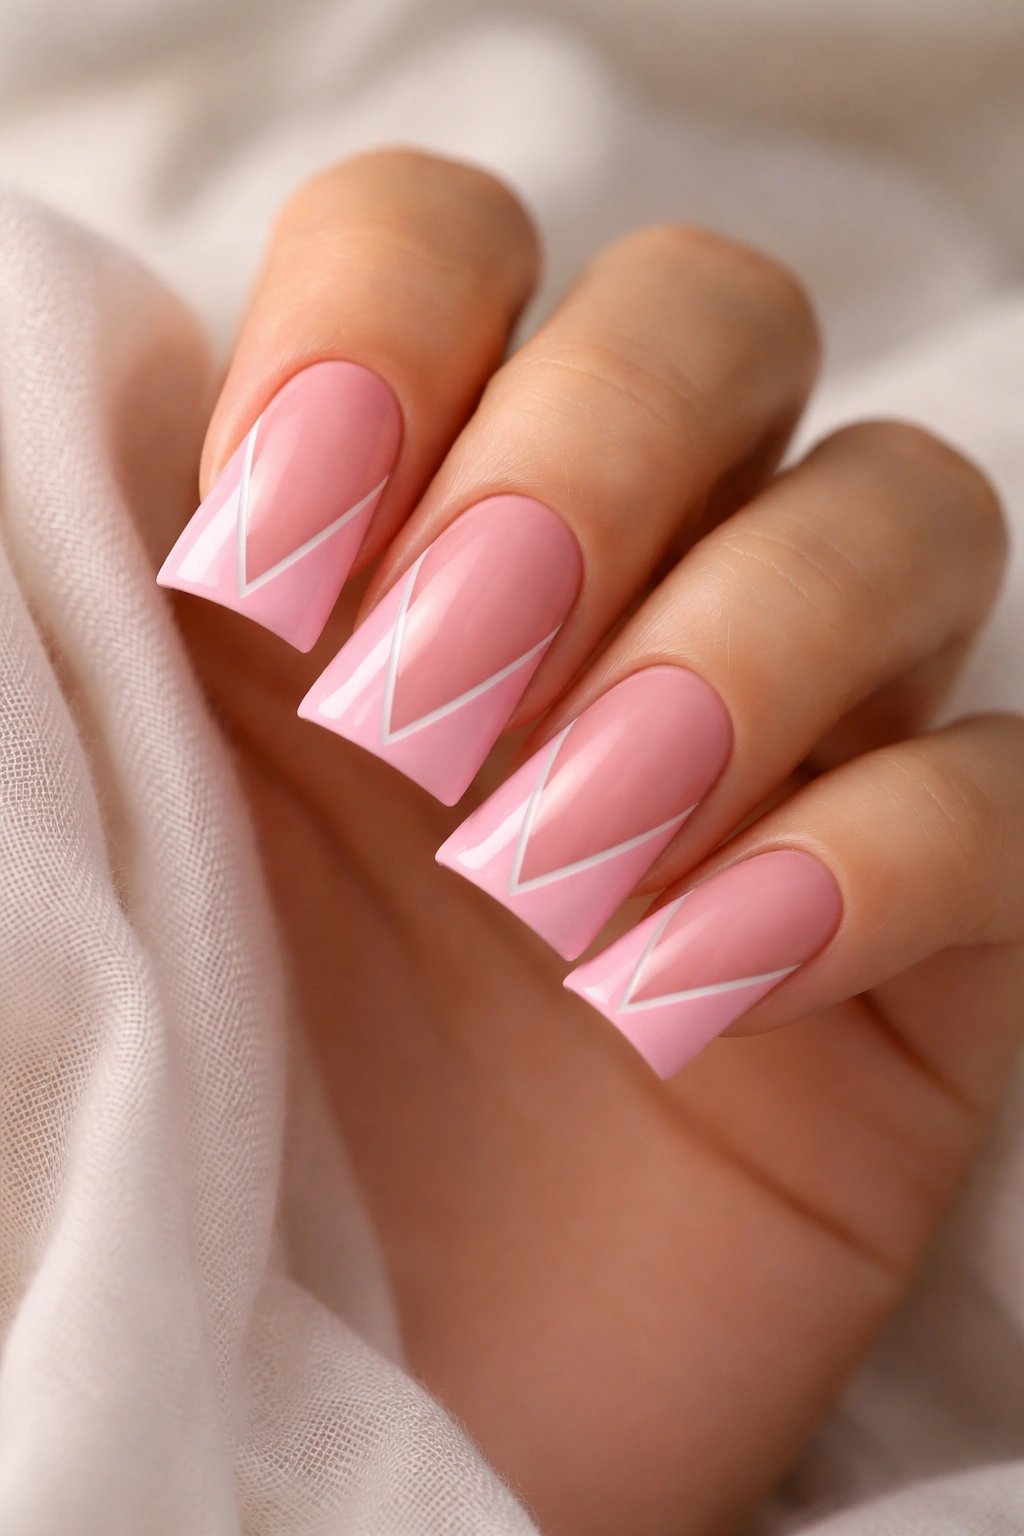
4. Pink Duck Nails with White Reverse French
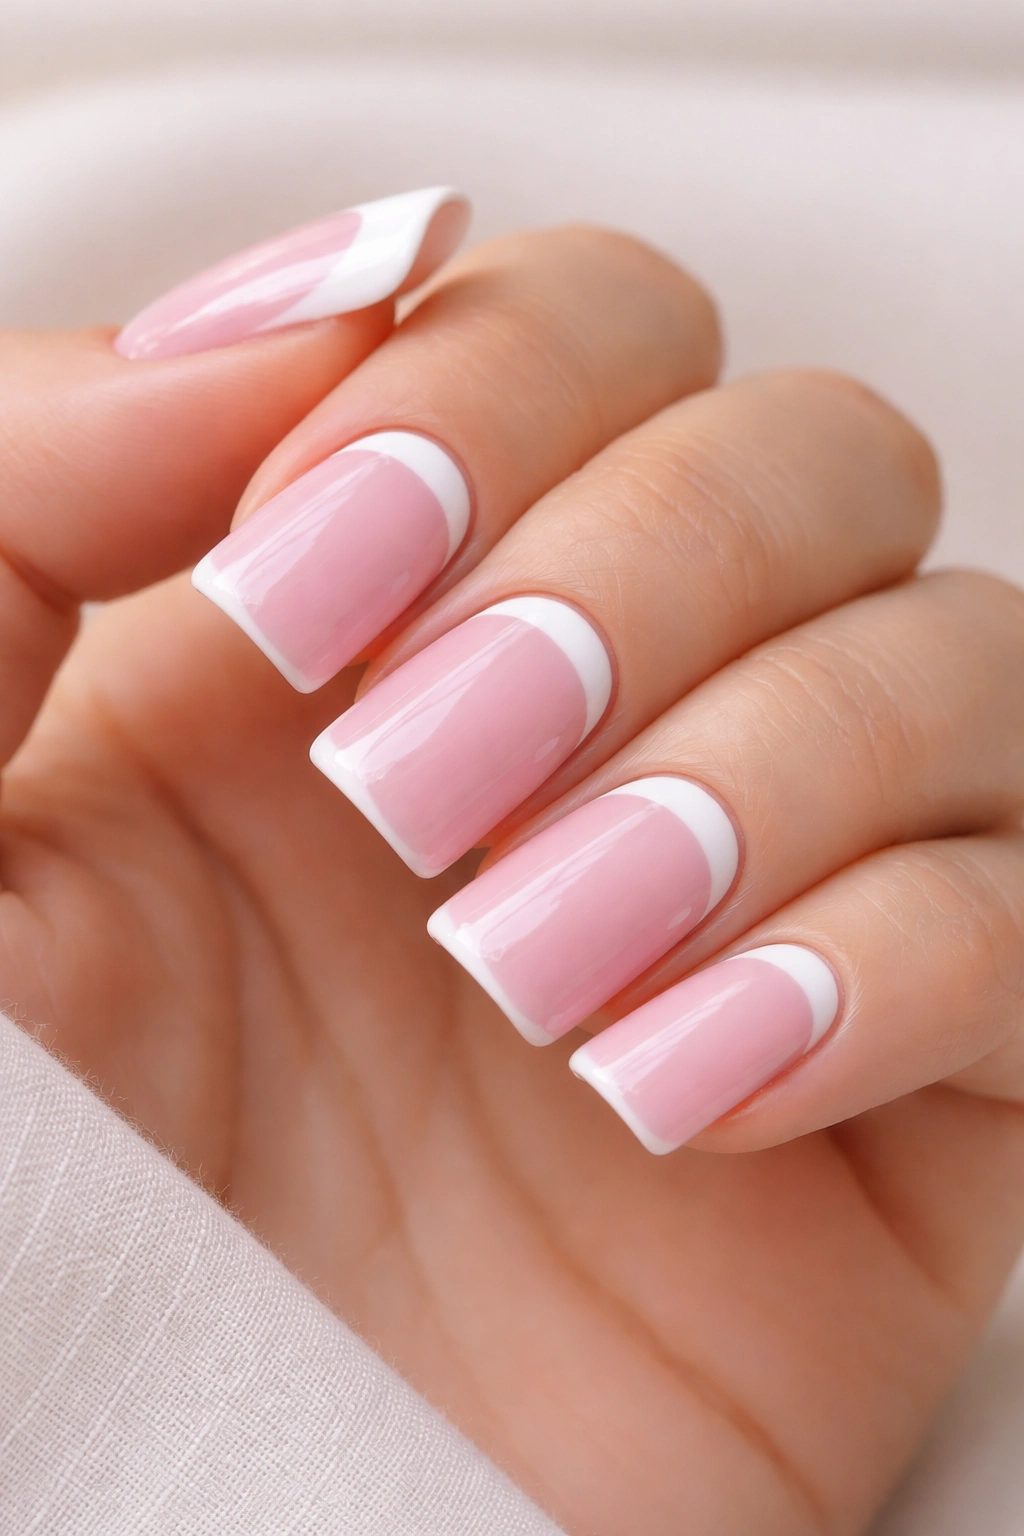
A reverse French manicure flips the traditional design — instead of a white stripe across the tip, the white sits at your cuticle line, and your pink extends all the way to the tip. On duck nails, this creates a modern, architectural look that’s perfect for anyone who loves contemporary nail art without going too bold.
The Modern Reverse French on Short Nails
The reverse French works particularly well on duck nails because the wide flare at the tip becomes a prominent showcase for your chosen color. The white at the base creates visual balance and prevents the shorter length from appearing stubby. This is a design that photographs beautifully and suits both casual and formal occasions.
Execution Steps
- Start with a white base coat as your foundation
- Once dry, paint your pink shade over the entire nail except for a ¼-inch white stripe at your cuticle
- Use a thin striping brush or angled brush to create a clean, straight line
- If you make mistakes, use a thin brush dipped in nail polish remover to clean up the edges
- Finish with a glossy top coat for sharp definition
Quick Facts
- The white cuticle stripe should be thin and precise — thicker stripes can make short nails look even shorter
- Bright white offers maximum contrast; off-white or cream creates a softer, more subtle effect
- This design suits both matte and glossy finishes
- The reverse French pairs beautifully with nude, blush, or hot pink — all three work wonderfully
5. Pink Duck Nails with Glitter Gradient
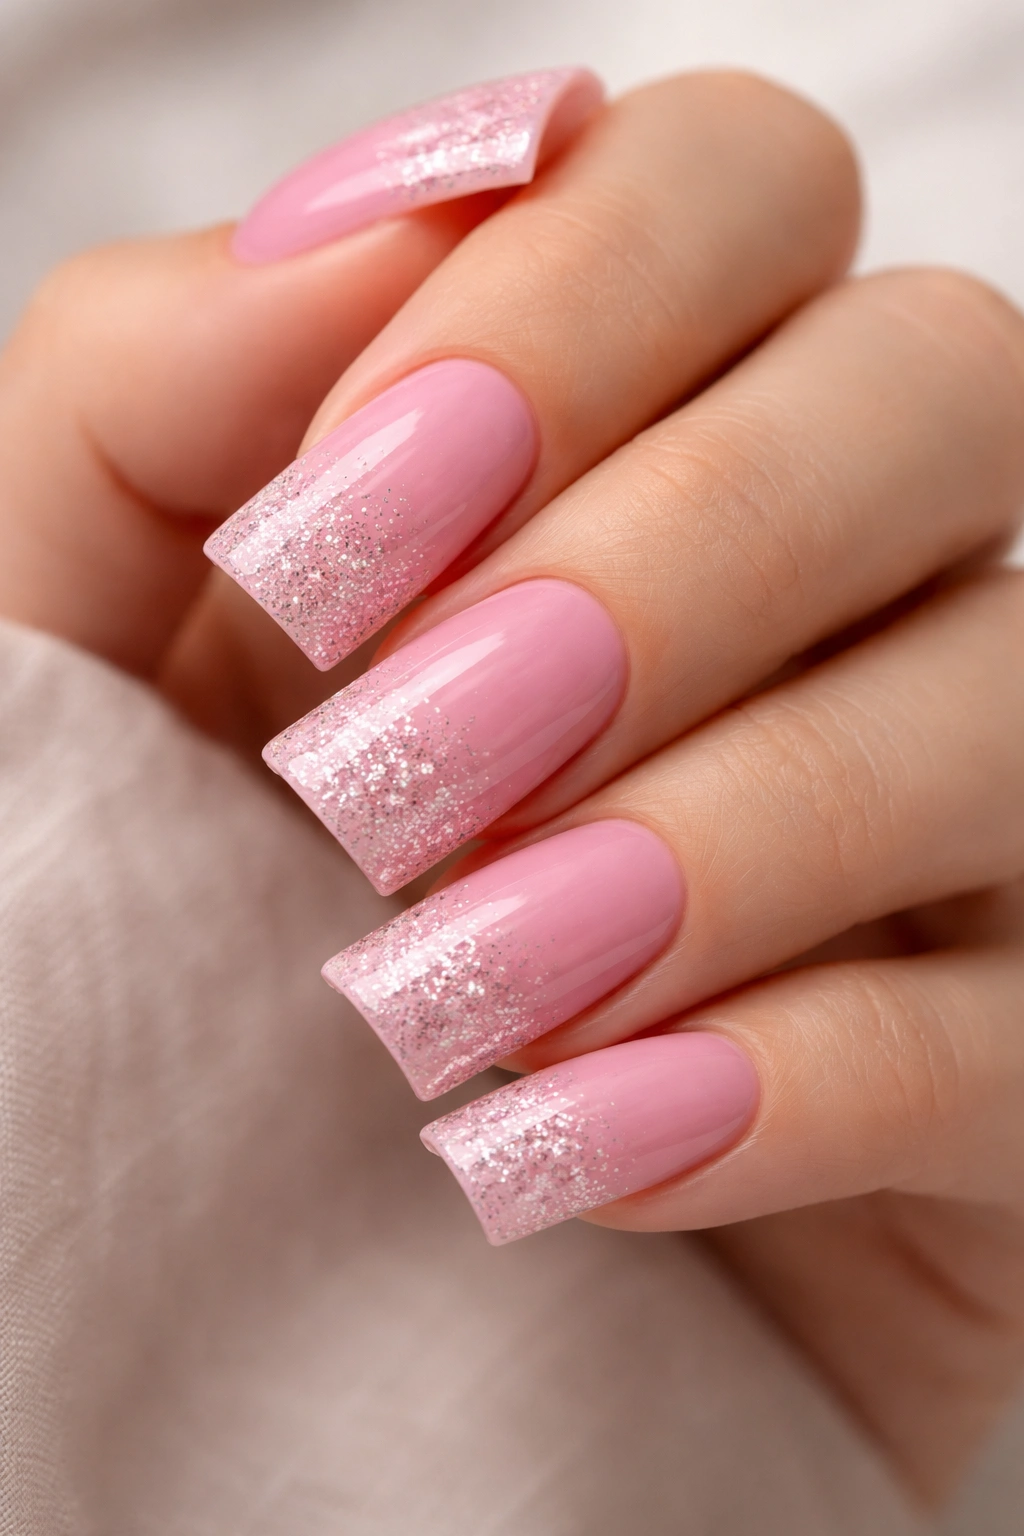
Glitter gradient combines subtle sparkle with the soft elegance of pink, creating a design that catches light without screaming for attention. On short duck nails, a glitter gradient is sophisticated rather than over-the-top. The gradient effect makes the nails appear longer because the eye follows the sparkly transition from base to tip.
Glitter Gradient Design Breakdown
A true glitter gradient means you’re starting with solid pink at your base and gradually increasing glitter concentration toward the tip. This requires layering, but the result is absolutely worth it. The effect is especially stunning under natural light and in photographs, making your short duck nails look intentional and expertly designed.
How to Build the Glitter Gradient
- Apply your pink base coat in two coats; let it dry completely
- Create a “glitter mix” using clear gel or glitter suspension medium mixed with fine glitter
- Apply the glitter mix in increasing concentration: lighter near the base, heavier at the tip
- Use a thin brush to feather the edges where the glitter density changes, blending gently
- For the densest sparkle at the tip, use a damp brush to pack glitter into your clear topcoat
- Cure under LED light between each layer; seal with a final glossy top coat
Quick Facts
- Fine glitter works better than chunky glitter on short nails — it won’t make the tips feel too heavy
- Rose gold glitter complements cool pinks; warm gold glitter suits warm pinks
- Glitter gradients are easier with gel polish than traditional polish
- This design lasts longer on shorter nails because there’s less surface area for the glitter to catch and chip
6. Pink Duck Nails with Negative Space Design
Negative space means intentionally leaving parts of your nail bare (showing your actual nail or a neutral base). Combined with pink duck nails, negative space creates a modern, minimalist look that’s surprisingly striking. This design is perfect for short nails because the geometric patterns created by negative space make your nails appear more structured and intentional.
The Power of Negative Space on Shorter Nails
Negative space designs break up the visual space of your nail, creating the illusion of more dimension and length. On shorter nail beds, this psychological trick is incredibly effective. The contrast between the pink and the bare nail (or neutral background) adds visual interest without requiring complicated freehand art skills.
Negative Space Patterns That Work
- Create a triangular bare section at the tip with pink filling the rest
- Paint geometric stripes (vertical or diagonal) with bare space between each stripe
- Design a “half-moon” at your cuticle using negative space instead of a traditional half-moon shape
- Paint just the outer edges of your nail pink, leaving the center bare for an outline effect
- Create a “shattered glass” effect by painting random angular shapes with pink and leaving space between
Quick Facts
- Use painter’s tape or nail stickers to create perfectly clean negative space lines
- Negative space works on both matte and glossy finishes
- This design photographs beautifully and looks more expensive than its actual difficulty level
- Short nails make negative space designs easier because there’s less area to mask off
7. Soft Pink Duck Nails with Rhinestone Embellishments
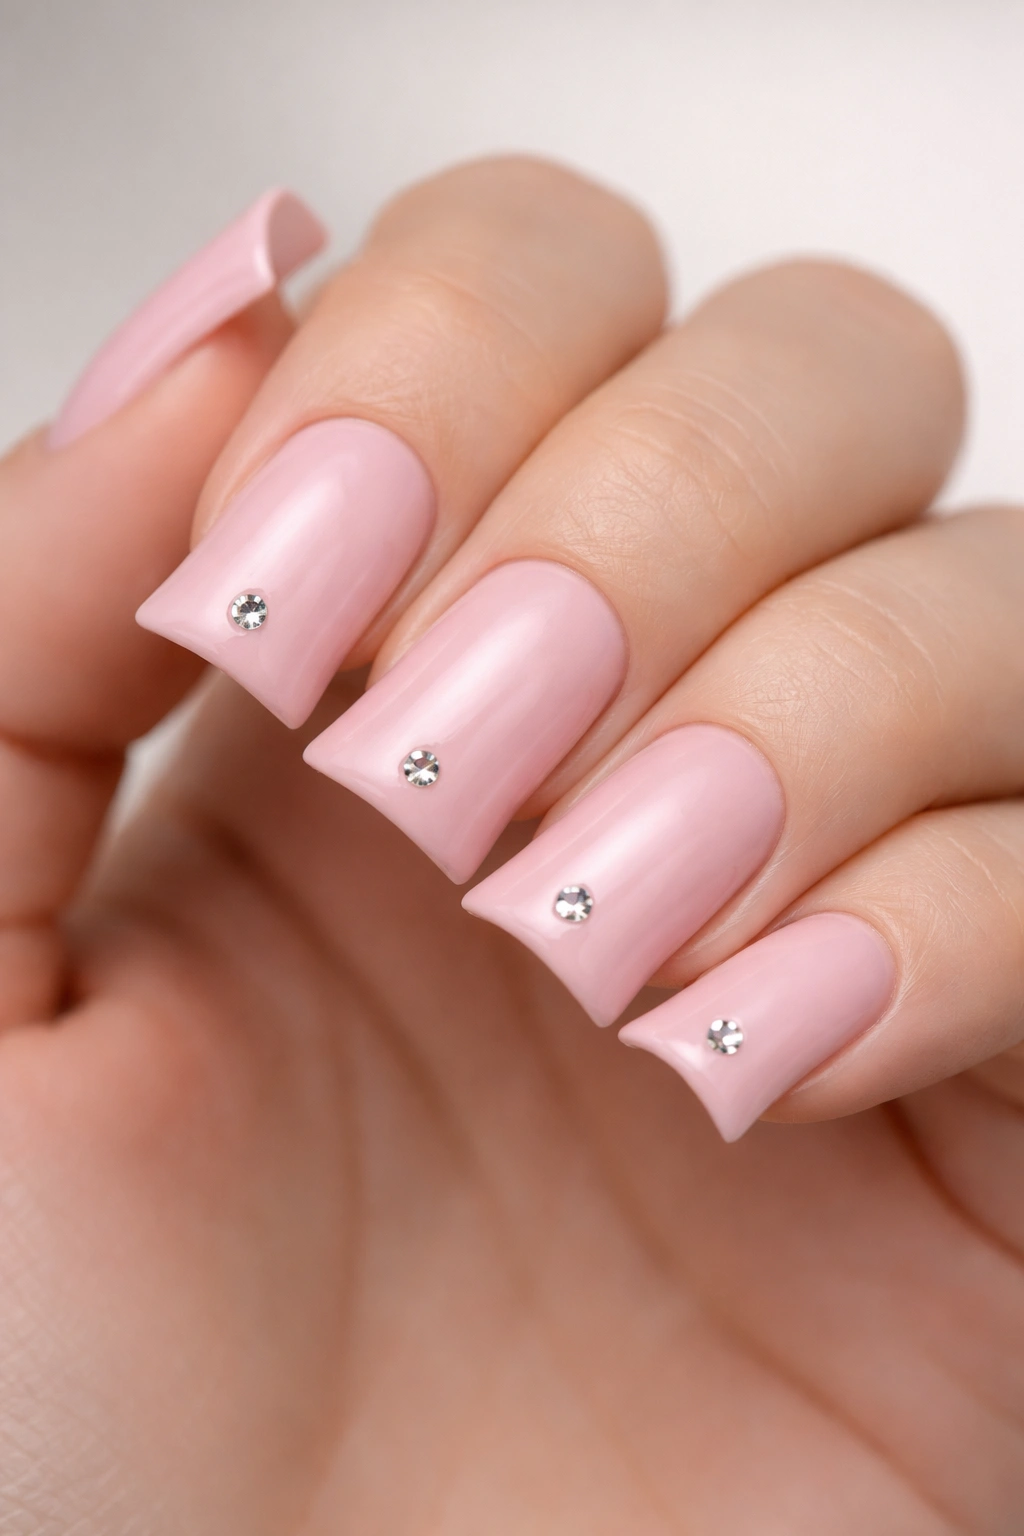
Rhinestones add instant glamour and sparkle to any nail design. On soft, barely-there pink duck nails, strategically placed rhinestones create an elegant, feminine look that’s perfect for special occasions or anyone who loves a little extra sparkle. The key to success is restraint — a few perfectly placed gems look luxurious; too many look chaotic.
Choosing the Right Rhinestones
Not all rhinestones are created equal. High-quality crystal rhinestones in clear or AB (aurora borealis) finish catch light beautifully and last longer without peeling off. On soft pink, these understated sparkles create a cohesive, sophisticated look rather than a costume-y appearance.
Rhinestone Placement Strategies
- Place a single large rhinestone at the center of each nail’s tip for an understated look
- Create a diagonal line of progressively larger rhinestones from cuticle to tip
- Cluster small rhinestones at the outer corner of each nail for a modern accent
- Use tweezers to pick up each rhinestone and place it precisely on a drop of nail glue or sticky top coat
- Press gently and allow the glue to set for 24 hours before rinsing your hands
Quick Facts
- Nail glue lasts longer than sticky top coat for rhinestone application
- Clear and AB rhinestones work with all shades of pink
- Place rhinestones only on the top coat layer, not on bare nail, for better longevity
- On short nails, keep rhinestones toward the tip rather than distributed across the entire nail
8. Pink Duck Nails with Marble Design

Marble designs create an artistic, sophisticated look that works beautifully on pink duck nails. The swirled, organic pattern of marble gives you visual interest without requiring freehand art skills. This design is trendy, elegant, and surprisingly forgiving because the imperfect, natural nature of marble means slight variations actually add to the authenticity.
Creating Marble on Your Duck Nails
Marble requires water marbling or a special marble powder — both techniques are achievable at home with practice. The water marbling method involves dropping polish colors into water, creating a pattern, then dipping your nail to pick up the design. Marble powder creates a similar effect by sprinkling the powder onto wet polish.
Step-by-Step Marble Technique
- Apply a white or light pink base coat as your foundation
- Use thin striping brushes dipped in contrasting polish (darker pink, burgundy, or black) to create swirling lines
- Use a dry, clean striping brush to drag through the lines, creating the marble effect
- Work quickly before the polish dries completely
- Apply top coat to seal and smooth any texture
- Alternatively, use marble powder — sprinkle onto tacky gel or polish and brush away excess before curing
Quick Facts
- Marble designs hide imperfections because the pattern is meant to be organic and irregular
- Contrasting colors work better than similar shades for visible marble effect
- Seal marble designs carefully because the texture can catch on things more easily
- This design photographs beautifully and looks more expensive than traditional solid colors
9. Ballet Pink Duck Nails with Nude Base
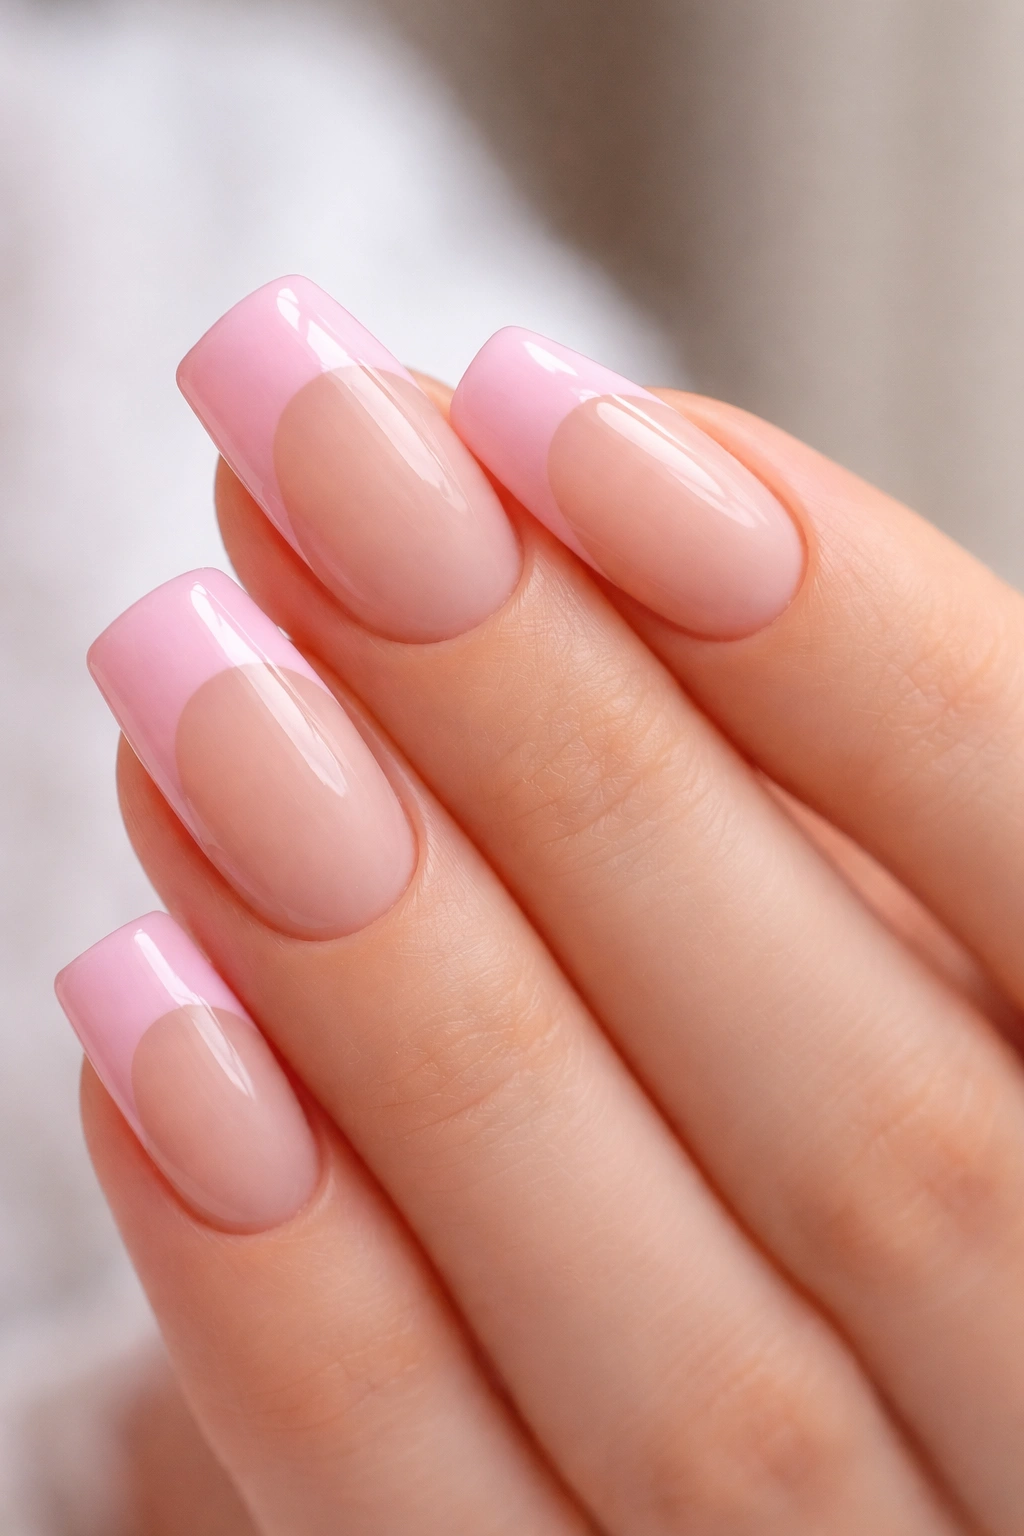
This design pairs the most universally flattering nail color (ballet pink tips) with a nude or skin-tone base to create an elongating effect. This is essentially a modern, softer take on the classic French manicure. On short duck nails, this color combination is incredibly flattering because it creates an unbroken line of color from your skin to your nail tip.
Why Ballet Pink and Nude Work Together
Ballet pink is that perfect pale, cool-toned pink that flatters every skin tone. When paired with a nude base that matches your skin tone, it creates the illusion of longer nail beds because there’s no visual interruption where your skin ends and your nail begins. This is a subtle but powerful optical trick that makes short nails appear more elongated.
Choosing Your Nude Shade
- For fair skin: choose a nude with cool undertones, almost translucent
- For medium skin: select a warm taupe or honey nude
- For deep skin: go with a rich caramel or warm mahogany nude
- Test your chosen nude next to your actual skin to ensure a good match
Application Process
- Apply your nude base coat in thin, even layers — two to three coats for full coverage
- Allow the nude to dry completely
- Using a thin angled brush, paint your ballet pink across just the tip, maintaining the duck nail’s curved shape
- Create a soft gradient where the colors meet by feathering the edge slightly
- Seal with a glossy top coat for clean definition
Quick Facts
- This design is ideal for professional settings because it looks polished without being too bold
- The nude base requires careful color matching — test before committing
- Ballet pink lasts longer on short nails because there’s less free edge to chip
- This look works in any season and suits both casual and formal occasions
10. Hot Pink Duck Nails with Chrome Accents
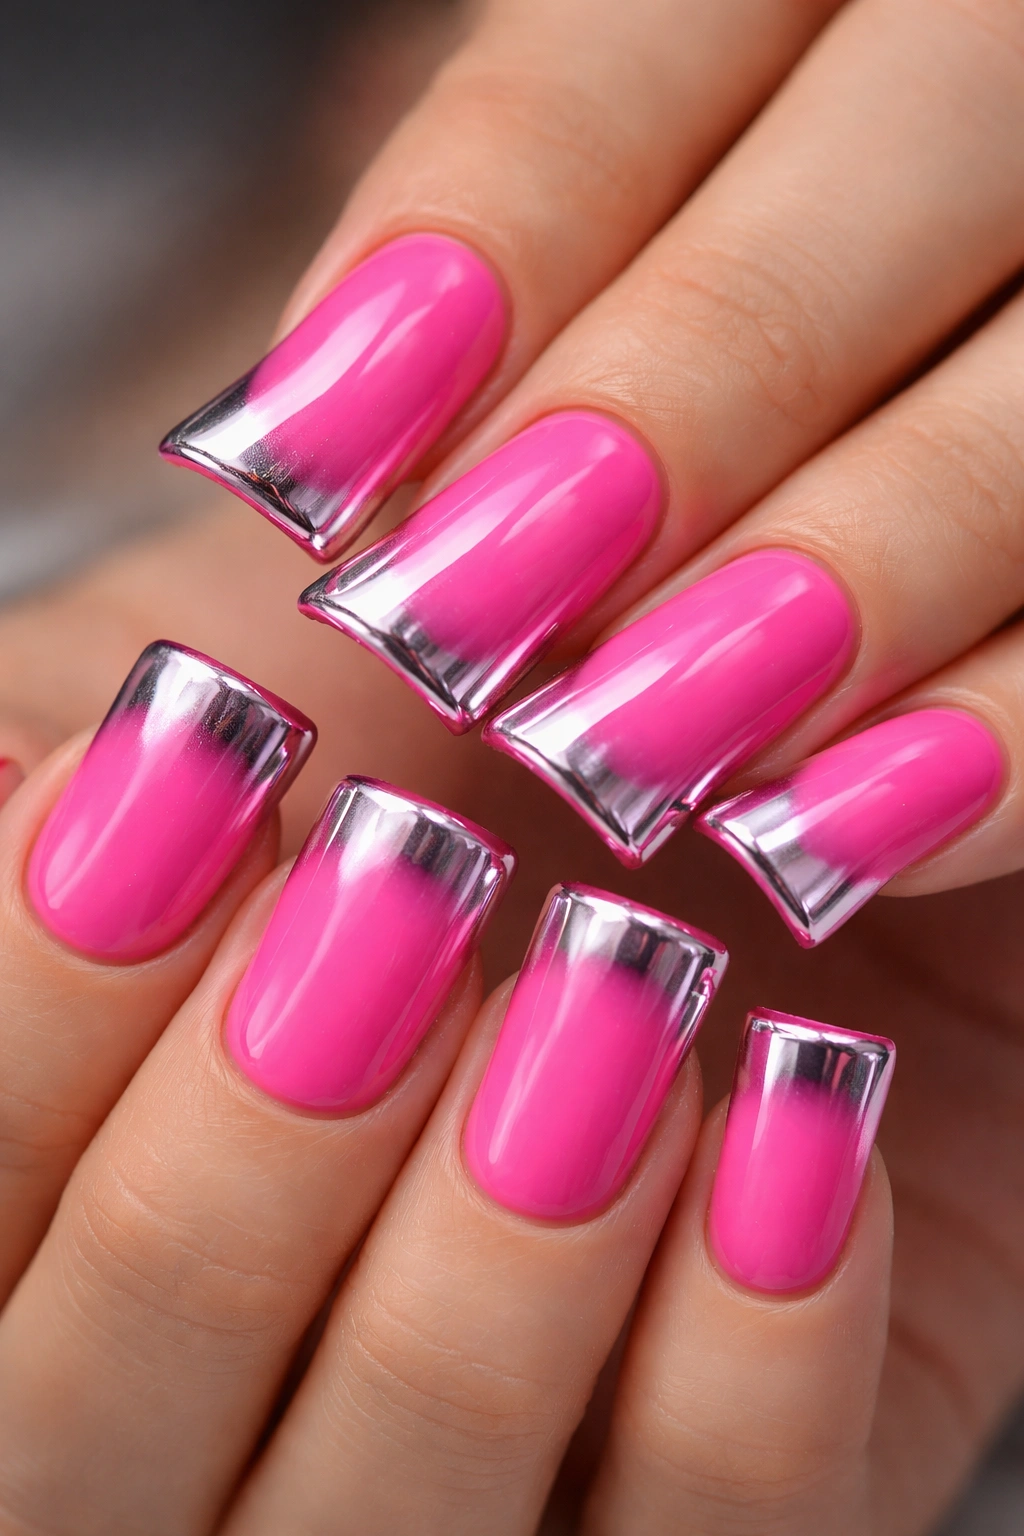
For anyone who loves a bold statement, hot pink duck nails with chrome accents are the ultimate choice. Chrome powder creates a mirror-like, metallic finish that’s incredibly eye-catching and modern. Combined with vibrant hot pink, chrome creates a design that’s simultaneously elegant and daring.
Understanding Chrome on Duck Nails
Chrome powder reflects light so dramatically that it appears to glow. When applied to just the tips or in geometric patterns on hot pink nails, it creates a futuristic look that’s perfect for anyone who wants their nails to be the conversation starter. On short duck nails, chrome works because the bold color means you don’t need length to make an impact.
How to Apply Chrome Powder
- Start with a vibrant hot pink gel polish as your base; cure under LED light
- Brush a thin layer of chrome powder across the tips using a special applicator brush
- Work on one nail at a time and apply immediately after painting
- Brush away excess chrome powder with a soft, clean brush
- Cure under the LED lamp; the chrome will appear to “activate” and become mirror-like
- Seal with a glossy top coat
- Alternatively, apply chrome powder to geometric shapes by using stencils or freehand design
Application Tips and Tricks
- Use a windowed chrome powder (one with tiny sparkles mixed in) for less intense reflection if pure mirror chrome feels too bold
- Apply chrome to just the very tip for subtlety, or cover half the nail for maximum impact
- Combine chrome with matte hot pink for contrast — the shiny chrome against matte pink creates visual dimension
- Use chrome stencils to create patterns like stripes, triangles, or half-moons rather than covering the entire tip
Quick Facts
- Chrome powder application requires a steady hand and careful technique — it’s easier than freehand art but requires practice
- Hot pink provides enough visual weight to balance chrome’s intensity
- This design photographs incredibly well and looks stunning in natural light
- Chrome tends to dull slightly over time, so seal and top coat regularly to maintain the mirror effect
Final Thoughts
Pink duck nails on shorter nail beds are entirely achievable and genuinely stunning once you understand how the shape and design work together. The curved, tapered sides of duck nails create an elegant silhouette that’s flattering on shorter lengths, and pink is the perfect shade because it suits every skin tone and occasion. Whether you prefer a simple, classic solid pink or want to experiment with glitter, marble, chrome, or rhinestones, there’s a design here that matches your style perfectly.
The key to success with duck nails isn’t actually having very long nails — it’s having a shape that’s well-executed and a color that makes you feel confident. Each of these ten designs demonstrates that short duck nails can look just as polished and intentional as longer lengths. Start with whichever design speaks to you first, and remember that even if your first attempt isn’t perfect, duck nails are incredibly forgiving because the unique shape itself is what draws attention, not flawless perfection.
Your next step is to choose the design that genuinely excites you and either book a professional appointment or gather your tools if you’re doing this at home. Either way, these designs are absolutely worth trying. You’re about to discover why duck nails have become such a beloved trend — they’re elegant, surprisingly wearable, and they work beautifully on short nails when you know exactly how to style them.
