

Short nails don’t have to limit your nail art ambitions — especially when you’re drawn to the elegant drama of black duck nails. The duck nail shape, with its distinctive curved sides that taper to a tapered, slightly rounded apex, has become a favorite among nail enthusiasts precisely because it works beautifully on short nails. Unlike coffin or stiletto nails that require length to showcase their drama, duck nails achieve their signature look through strategic shaping and visual illusion, making them absolutely perfect for anyone who prefers shorter nail beds.
Black is the ultimate backdrop for duck nail designs because it provides stark contrast for any accent details, creates instant sophistication, and serves as a neutral canvas that complements virtually any outfit or occasion. Whether you’re looking for minimalist elegance, bold geometric patterns, delicate embellishments, or artistic expressions, black duck nails on short nails deliver serious impact without the commitment of growing out length. The compact size actually works in your favor — the design sits closer to your fingertip, making intricate details more visible and the overall aesthetic feel intentional rather than showy.
What makes black duck nails particularly versatile is their ability to transition seamlessly from professional settings to weekend fun. A simple black duck nail in a matte finish reads as polished and modern in any environment, while the same shape adorned with rhinestones, glitter, or metallic accents becomes a statement piece for evening. Short nails also mean faster application, quicker drying time, and less concern about breakage — meaning you can actually enjoy your manicure rather than baby it.
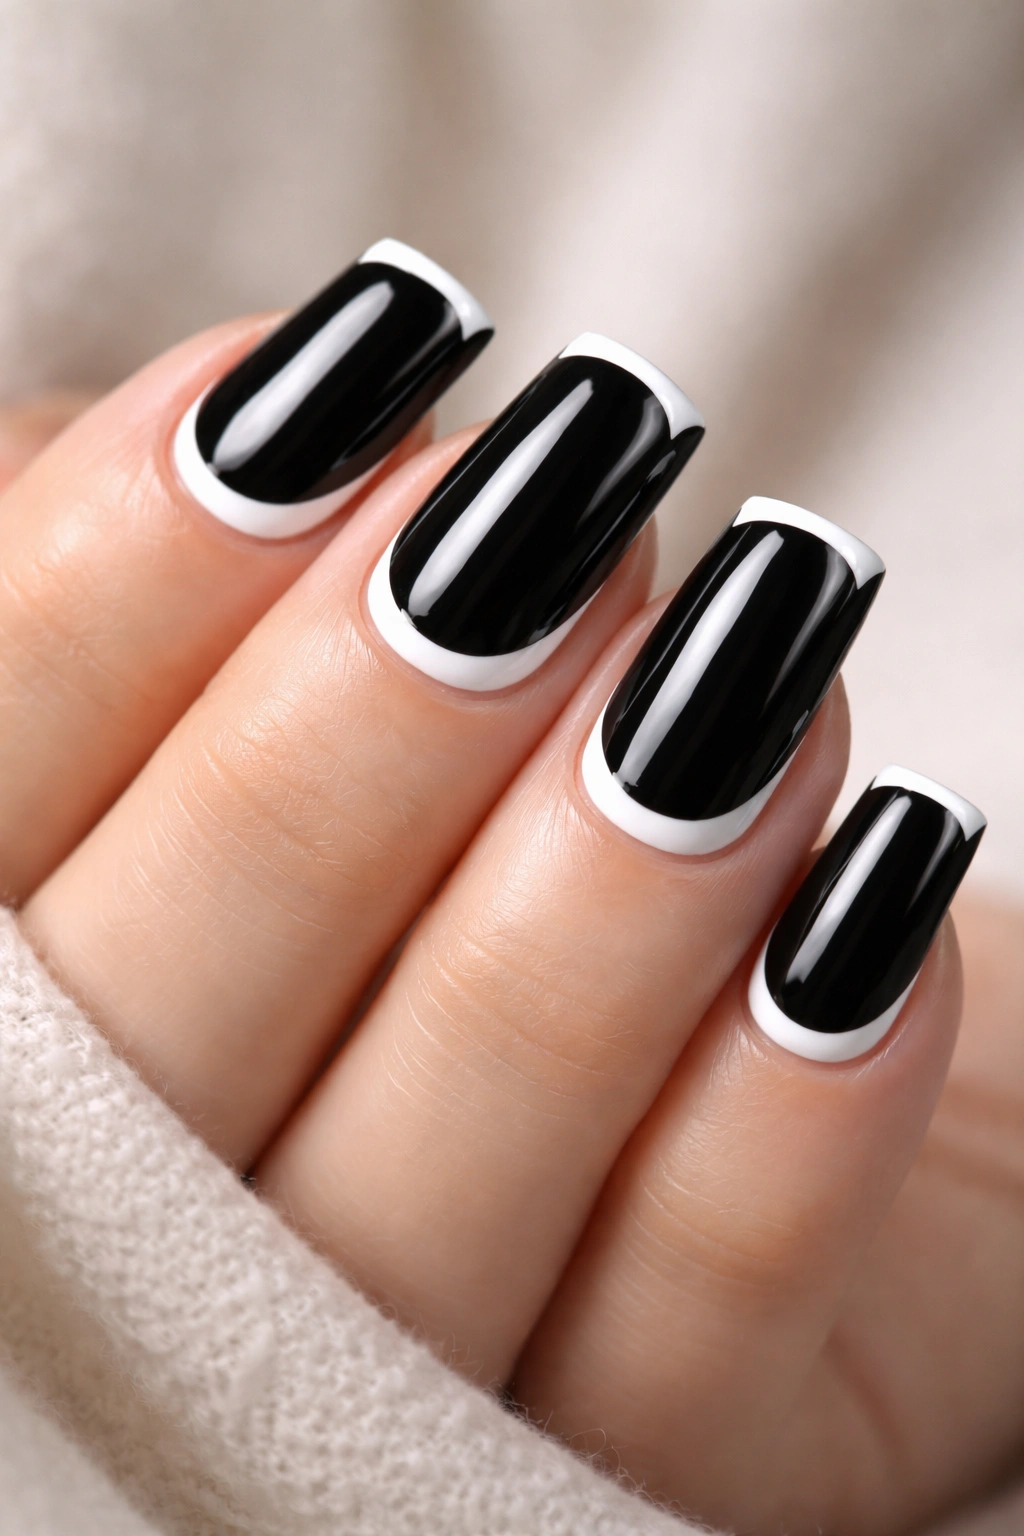
1. Classic Black Glossy Duck Nails with White Reverse Smile Line
The reverse smile line is essentially the inverse of a classic French manicure — instead of white on the tips, you’re painting the negative space between your nail’s edge and a curved line in white, creating the illusion of even more length and lift. On short duck nails, this technique is particularly striking because the curved white line mirrors the natural curve of the duck shape, amplifying that signature tapered silhouette. The high-gloss black base provides the perfect contrast for the crisp white arc, and the overall effect feels both classic and modern simultaneously.
Why This Design Works on Short Nails
The reverse smile line creates an optical illusion that makes shorter nails appear lifted and elongated because your eye follows the upward curve of the white line rather than focusing on the actual nail length. This technique works with the duck shape’s natural architecture rather than against it.
Application Tips
- Use a white gel or polish with excellent opacity — you’ll typically need two coats to achieve that clean, bright white against black
- Paint the curved line freehand using a thin detail brush, or use a curved nail art stencil for perfect consistency across all five nails
- The line should sit approximately 2-3mm from the edge of your nail, creating that distinctive floating effect
- Seal everything with a glossy top coat for maximum shine and protection
Pro tip: If white feels too stark, try a soft cream or pearl white for a slightly softer interpretation that still provides plenty of contrast against the black.
2. Black Duck Nails with Delicate Gold Filigree
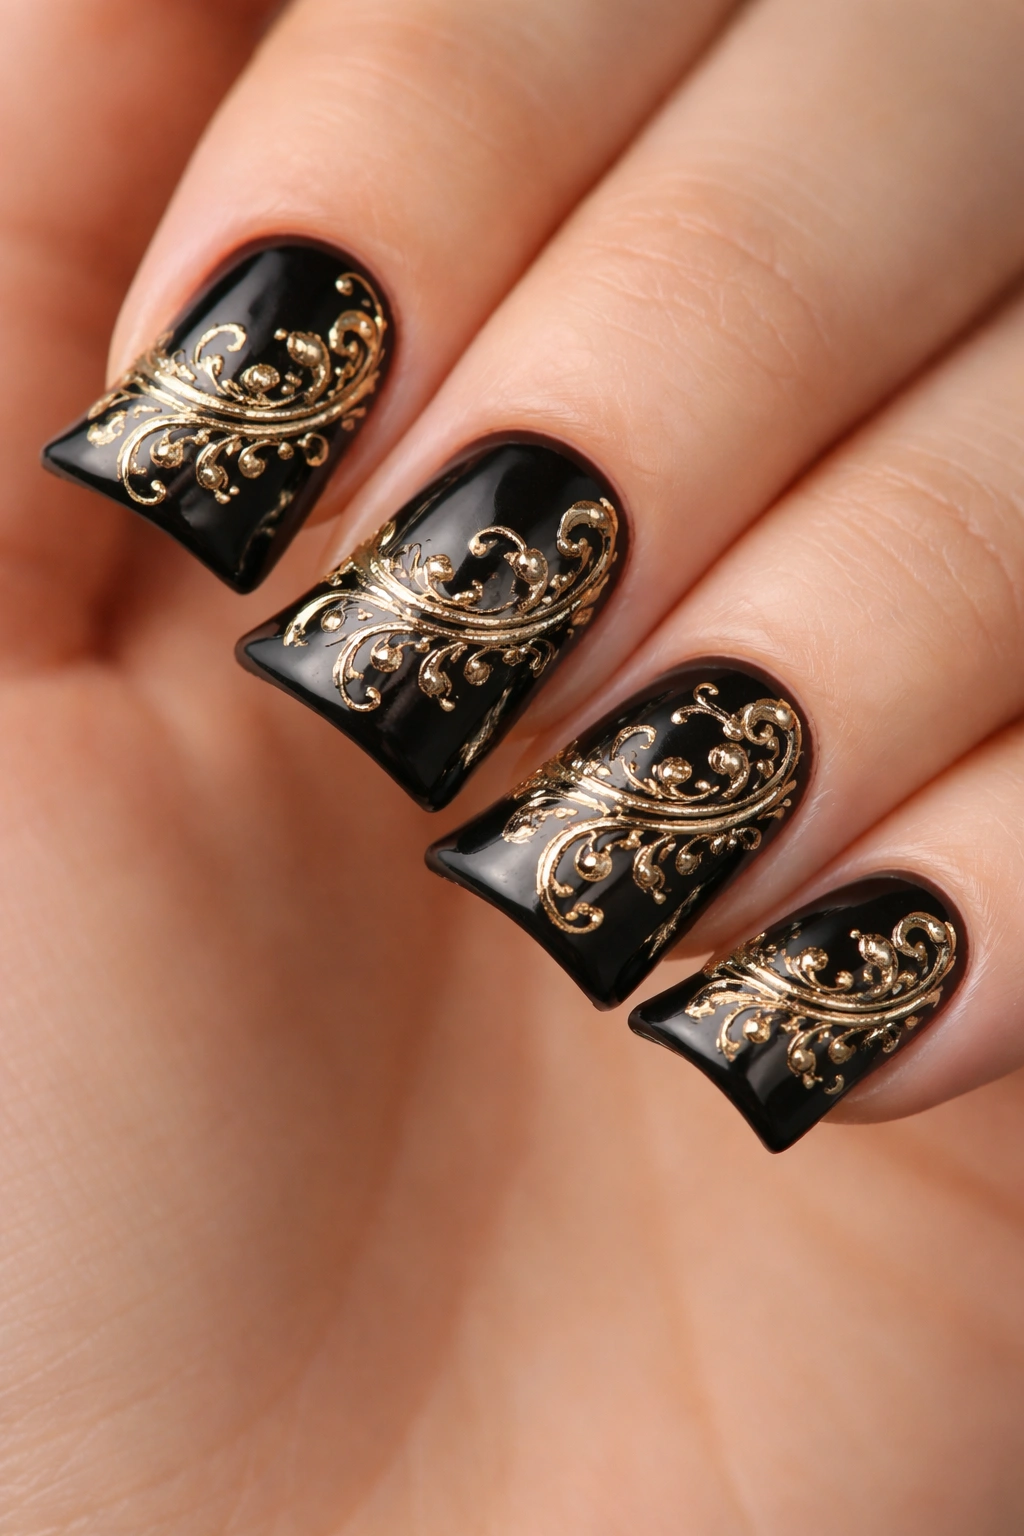
Filigree is an intricate decorative pattern that looks like fine metalwork, and translating it into nail art creates an unexpectedly feminine energy on short black duck nails. Using thin brushes or a filigree nail stamp, you can create delicate scroll work, vine patterns, or ornate geometric designs in shimmering gold across the black base. The fine lines of the filigree contrast beautifully with the solid black, creating a design that’s simultaneously dramatic and delicate — perfect for anyone who wants elegance without loudness.
What Makes Filigree Special
Gold filigree against black creates a luxury aesthetic that feels far more expensive and intentional than simpler designs. The intricate detailing draws the eye and suggests careful artistry, making even short nails feel elevated and precious. This design works particularly well for formal events, professional settings, or anyone who loves vintage-inspired aesthetics.
How to Execute It
- Paint your base in a rich black gel or polish and cure thoroughly
- Use a gold gel with a thin detail brush to carefully hand-paint delicate scrolls, or invest in a filigree-specific nail stamp for repeatable patterns
- If you’re not confident in freehand work, many nail supply companies sell filigree stamping plates with various designs — simply stamp, cure, and seal
- Apply a matte or satin top coat over the design for an antique look, or keep it glossy for modern contrast
Worth knowing: You can also use gold striping tape to create straight filigree elements if curved freehand work intimidates you — just apply strips at angles and cure between applications.
3. Matte Black Duck Nails with Glossy Tips
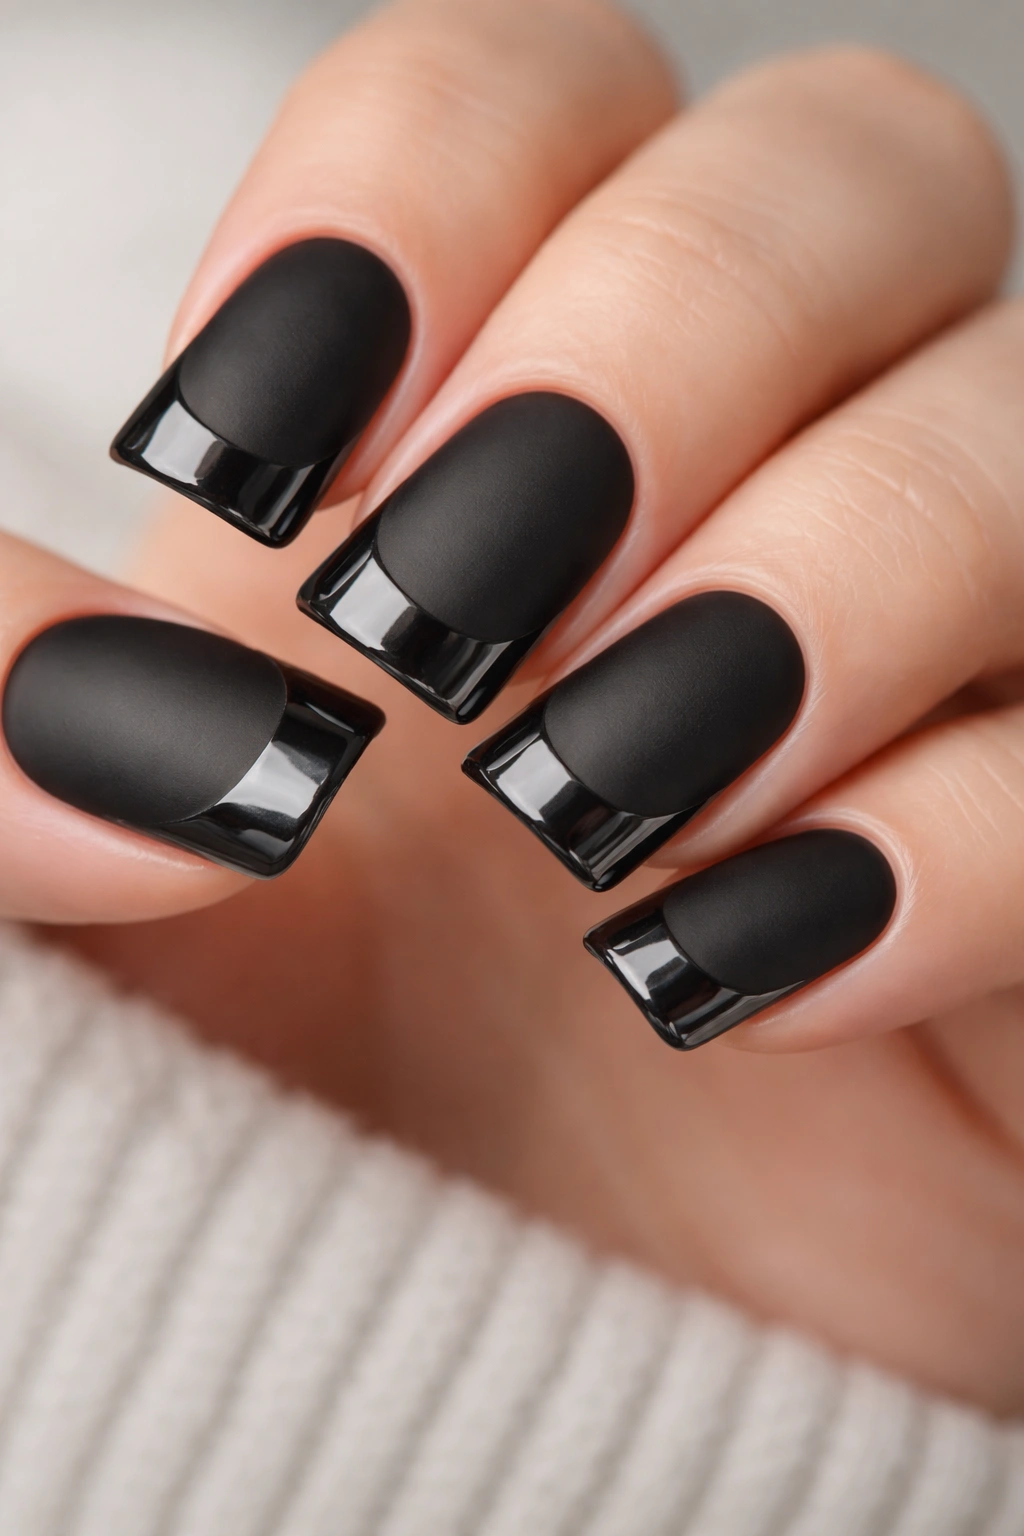
The textural contrast between matte and glossy finishes creates visual interest and dimension even with a solid-color design. Paint your entire duck nail with matte black gel or polish, then define just the tapered tip with a glossy top coat or clear gloss layer. The matte finish modernizes the shape while the glossy tip adds a subtle highlight that catches light and draws attention to the duck’s signature tapered point — essentially enhancing the shape’s most distinctive feature.
Why Texture Matters on Short Nails
When you’re working with less surface area, playing with finishes becomes especially important because it creates the illusion of more detail and sophistication. The matte finish grounds the design in understated elegance, while the glossy tip prevents it from feeling completely flat or dull. This combination is also incredibly practical for anyone who needs professional, office-appropriate nails but wants something more interesting than a standard manicure.
Execution Guide
- Apply two coats of matte black gel, curing between coats
- Before applying your final top coat, use a glossy gel or shine topcoat and carefully paint only the very tip portion — roughly the tapered third of your nail
- Create a subtle, uneven line between matte and glossy by feathering the transition slightly
- Cure and finish with a standard topcoat
Insider note: If you want even more dramatic texture contrast, try combining matte black with a chrome or metallic gloss tip for a more futuristic, edgy feel.
4. Black Duck Nails with Tiny Diamond or Pearl Accents
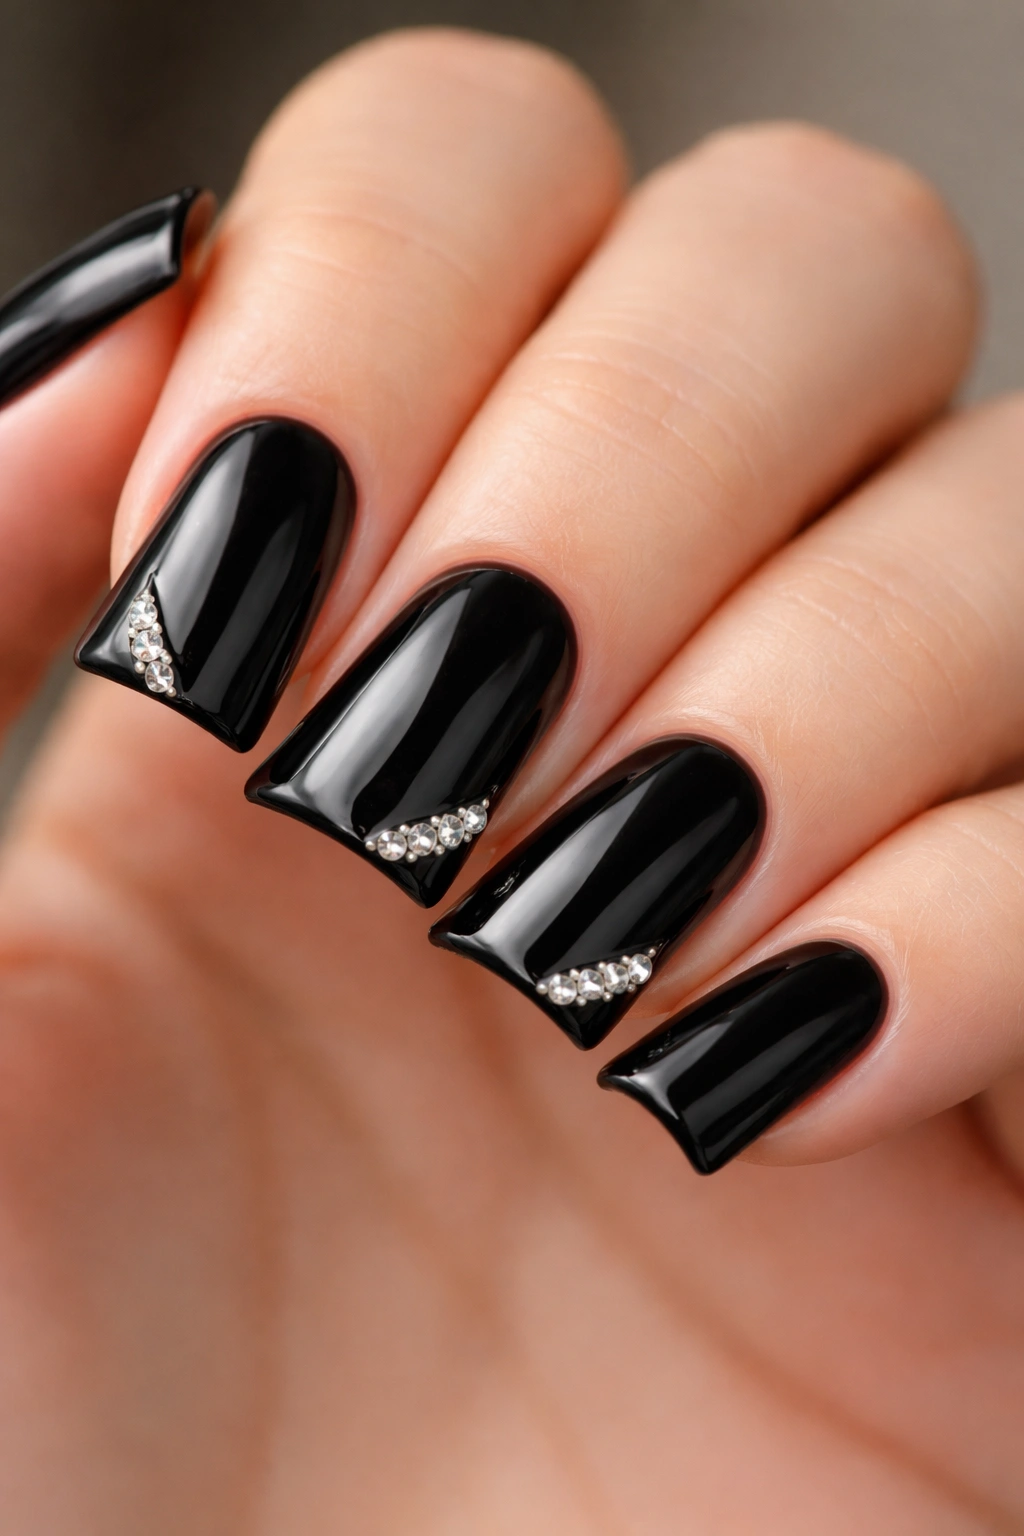
Rhinestones and pearls create instant glamour, and on short duck nails, strategic placement makes every stone count. Rather than covering the entire nail, select 2-4 high-quality diamonds or pearls and position them along the tapered point or in a small cluster near the center or cuticle area. This restraint creates sophistication because it showcases individual stones rather than hiding them in busy patterns. The black base amplifies their sparkle, making even modest-sized stones feel impactful.
Choosing Your Stones
High-quality rhinestones catch light dramatically and maintain that sparkle wash-day after wash-day, while cheaper alternatives can look dull or lose their coating quickly. For short nails, opt for slightly smaller stones — 2-3mm diameter stones will feel substantial without overwhelming the small surface area. Pearls in cream, white, or iridescent finishes create a sophisticated, luxury-brand aesthetic against black.
Application Process
- Paint your black base and cure completely
- Using nail glue or a sticky gel topcoat, place individual stones exactly where you want them — take your time because repositioning is difficult once glued
- For a secure, long-lasting application, apply a thin layer of gel topcoat over each stone to seal it in place
- Seal everything with a final layer of glossy topcoat
Pro tip: Position larger statement stones at the tip and smaller accent stones at the cuticle to create visual balance and draw the eye downward, which makes shorter nails appear longer.
5. Black Duck Nails with Holographic Glitter Ombre
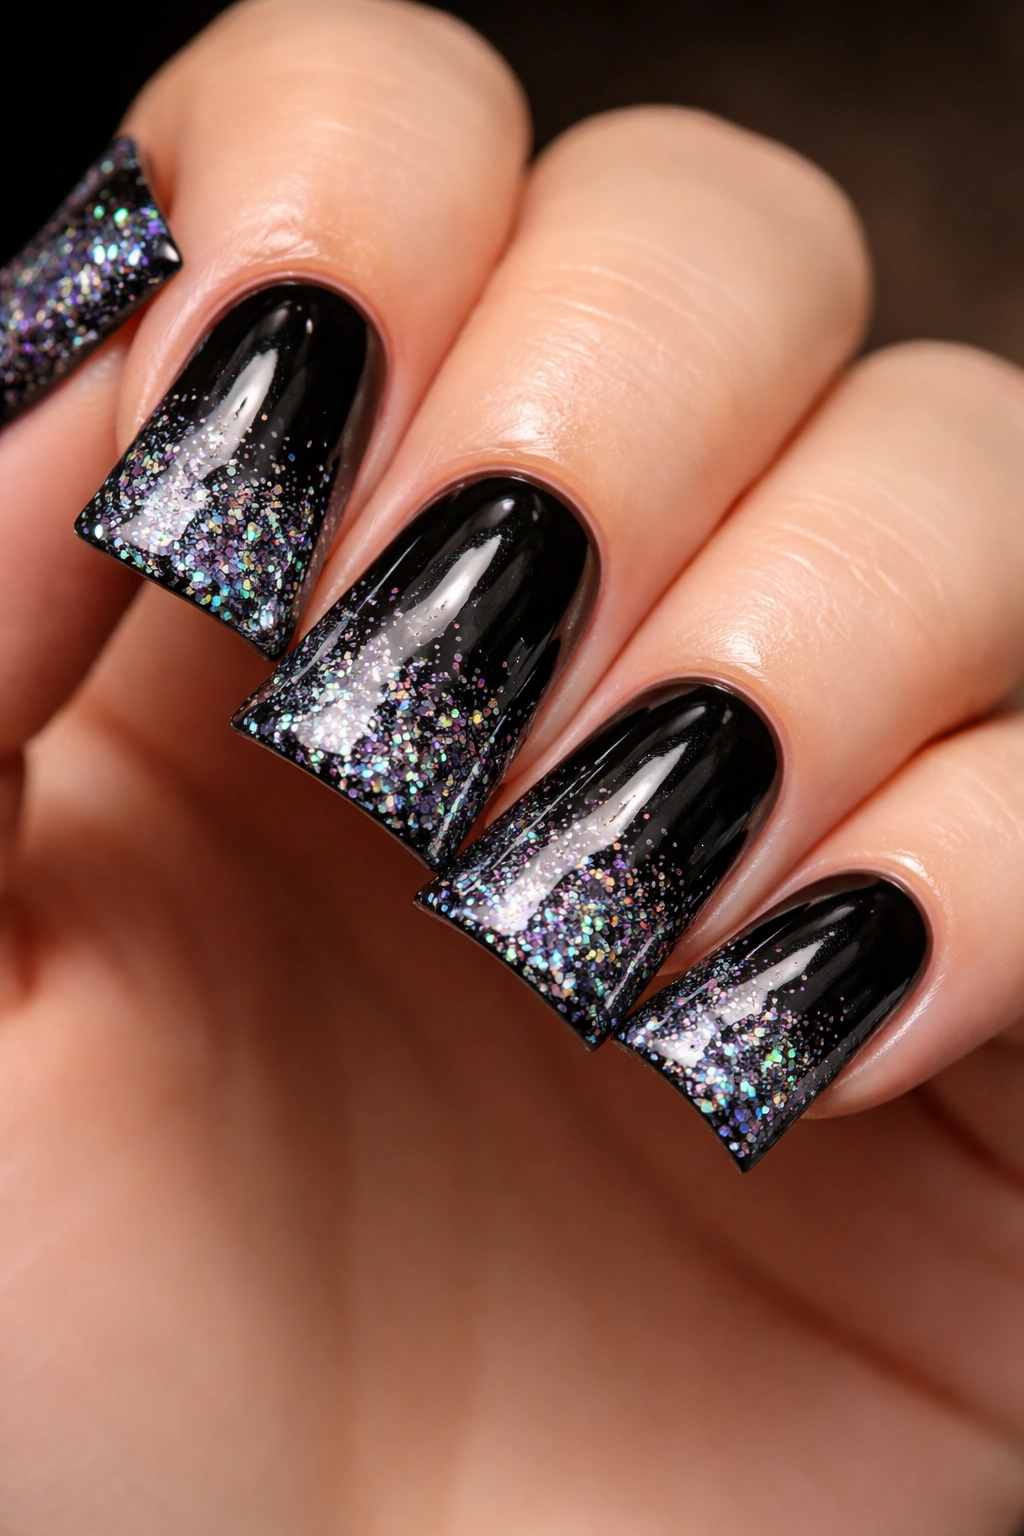
Holographic glitter creates rainbow sparkle that shifts and changes depending on light and angle, adding dimensionality that keeps the design interesting to look at. Create an ombre effect by concentrating holographic glitter particles heavily near the tapered tip and gradually decreasing their density toward the cuticle. Against the solid black base, the holographic particles create an almost cosmic effect — like you’ve got tiny stars at your fingertips.
Building the Ombre Gradient
Start by painting your solid black base and curing it completely. Then mix holographic glitter pieces with a clear gel topcoat to create your ombre medium. Apply this mixture most densely at the tip, then use a clean gel brush with no glitter to drag and blend the particles backward toward the cuticle, creating a gradual fade. The goal is a smooth transition from glitter-packed tip to clean black at the base.
Technique Details
- Use relatively large holographic glitter flakes (1-2mm pieces) rather than dust so they catch and reflect light noticeably even on short nails
- Work with a clear gel base rather than topcoat so you have control over glitter placement and can blend before curing
- Cure between layers if building multiple glitter densities
- Seal with a thick glossy topcoat to protect the glitter and create a smooth, professional finish
Worth knowing: Holographic glitter reads differently under various lighting — fluorescent office lights, natural daylight, and evening indoor light will all bring out different color shifts. This unpredictability is actually part of the fun, making the design feel like it has hidden depth.
6. Minimalist Black Duck Nails with Single Gold Line
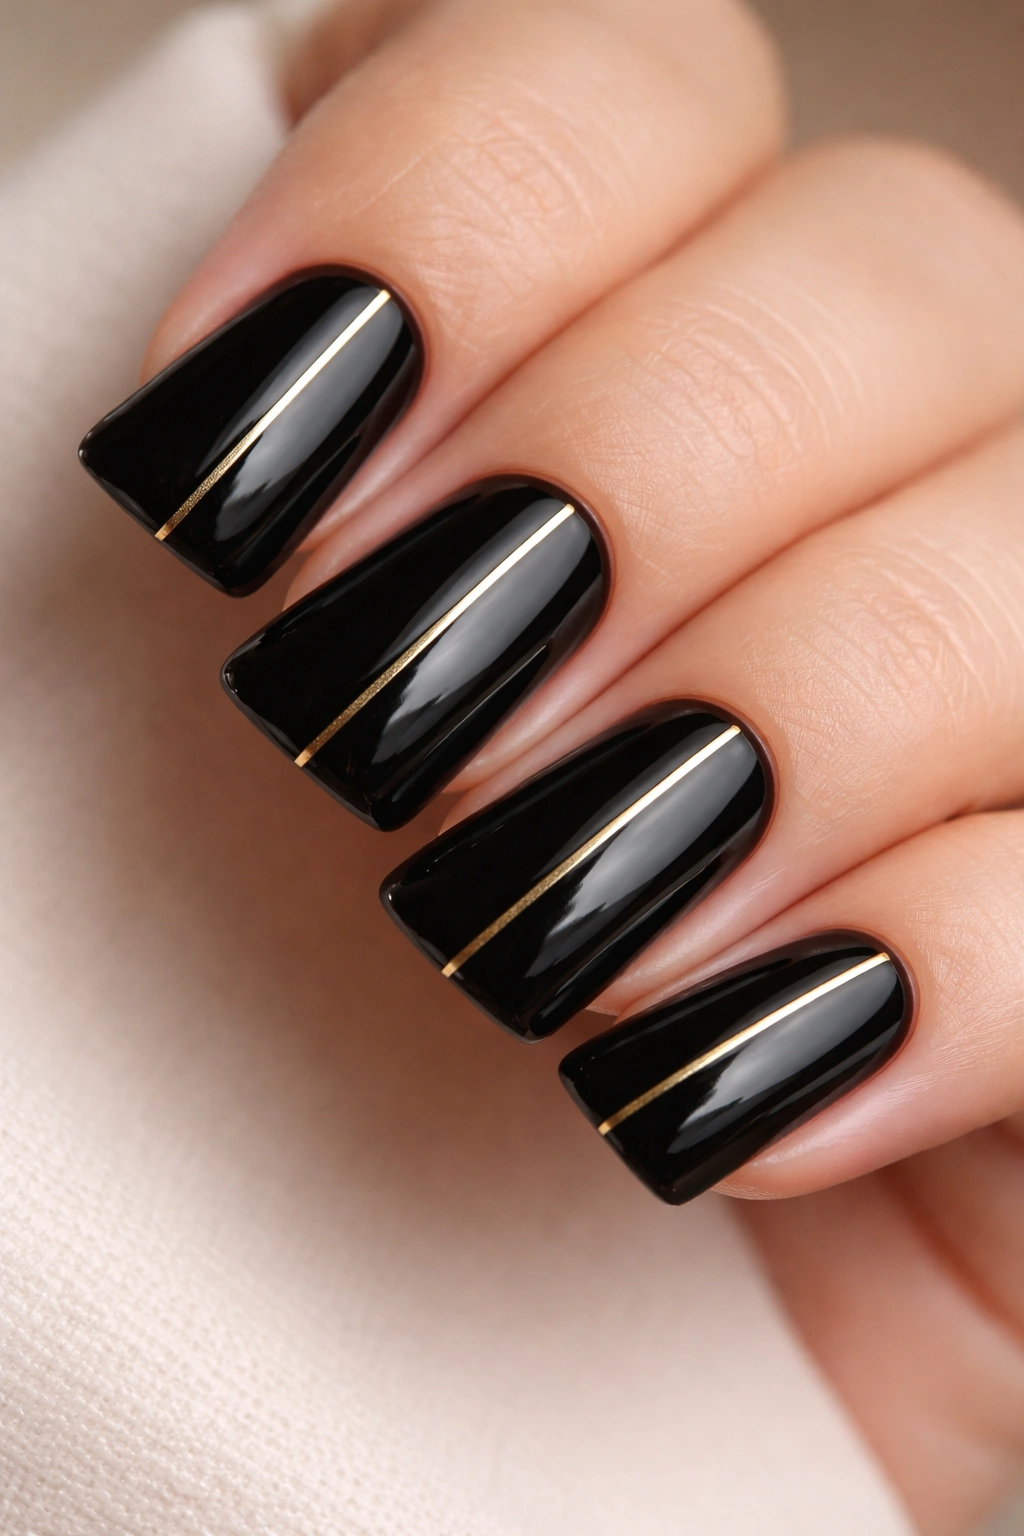
Sometimes the most sophisticated designs are the simplest ones. Paint your duck nails in solid glossy black, then use a thin gold striping brush or gold striping tape to create a single curved or straight line running vertically down the center of your nail. This singular accent line is intentional, editorial, and effortlessly chic — the nail art equivalent of a white button-up shirt and tailored blazer.
Why Minimalism Works
Minimal designs feel refined and intentional because they require confidence and restraint. A single gold line against black commands attention through its precision rather than its volume. For short nails, this approach maximizes impact while respecting the scale — nothing feels cramped or cluttered because there’s actual breathing room. This design works for virtually any occasion and pairs well with any wardrobe.
Creating the Line
- Paint two coats of glossy black gel, curing between applications
- Using a thin striping brush and gold gel, carefully paint a thin, even line from cuticle to tip (or use pre-made gold striping tape for perfect consistency)
- Keep the line straight and centered, or create a subtle curve that echoes the duck shape — both approaches work beautifully
- Seal with a glossy topcoat
Pro tip: For maximum impact with minimal effort, use self-adhesive gold striping tape rather than painting. It’s foolproof and looks professionally executed without requiring hand-steadiness.
7. Black Duck Nails with Negative Space Moon Design
Negative space designs use the natural nail color to create intentional patterns, giving the illusion of carved-out sections. On black duck nails, paint the main shape of a crescent moon using your natural nail color (or white, or nude), leaving a curved section unpainted. This creates a striking contrast — the black becomes the accent rather than the main event, and the negative space design feels modern and gallery-like.
Designing Your Moon Shape
The crescent moon shape naturally complements the curved architecture of the duck nail, making this design feel like it was created specifically for this shape. The moon can sit at the tip, curve around the side, or nestle near the cuticle — different placements create different visual effects. Near the tip, the moon becomes the focal point; near the base, it creates a subtle accent that frames your nail bed.
Execution Method
- Paint your solid black base and cure completely
- Use painter’s tape or a specialized nail stencil to mask out your crescent moon shape
- Paint or apply your nude, white, or natural nail color to the exposed area
- Remove the tape while the gel is still slightly tacky for the cleanest edge
- Cure and seal with a glossy topcoat
Insider note: For ultra-clean negative space work, many professionals use vinyl stencils designed specifically for nail art — they’re reusable, precise, and cost very little for the professionalism they add.
8. Black Duck Nails with White Polka Dots
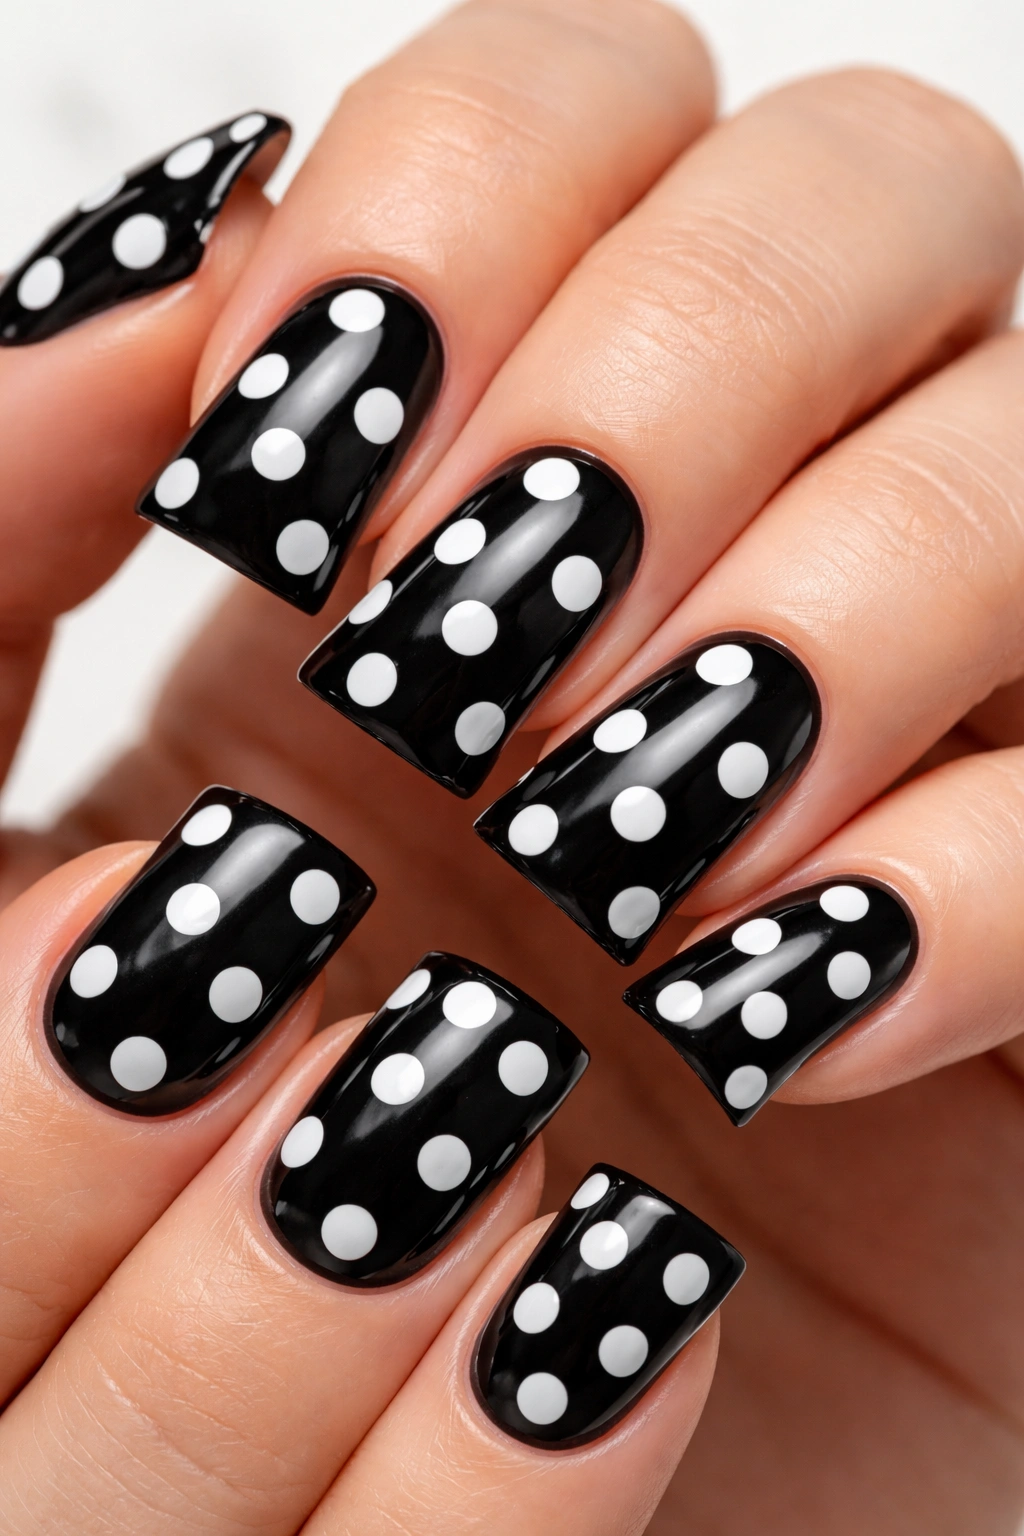
White polka dots against black create a playful, graphic energy that feels both vintage and contemporary. The key is spacing — rather than covering your entire nail with dots, create a deliberate, organized pattern with consistent spacing. Small dots (2-3mm) placed in a scattered pattern feel organic and modern, while dots arranged in specific formations (like a gradient that intensifies toward the tip) feel more intentional and designed.
Dot Placement Strategies
- Scattered random dots suggest casualness and organic placement
- Dots clustered only near the tip create a gradient effect
- Dots arranged in straight lines create geometry and structure
- Dots placed only at the edges frame the nail beautifully
Choose one pattern approach and repeat it consistently across all five nails for a cohesive manicure. The repetition makes even a simple design feel planned and professional rather than accidental.
Creating Perfect Dots
- Use a dotting tool (a small metal rod with a round end) dipped in white gel or polish
- Practice on a practice wheel or spare nail until you achieve consistent dot size
- Cure between applications if using gel
- Alternative: Use white gel pens or white nail polish markers for maximum control
Pro tip: If freehand dots feel intimidating, use a small round makeup sponge to dab white polish onto your black base — you’ll get natural-looking dots with less precision required.
9. Sleek Black Duck Nails with Rose Gold Metallic Edge
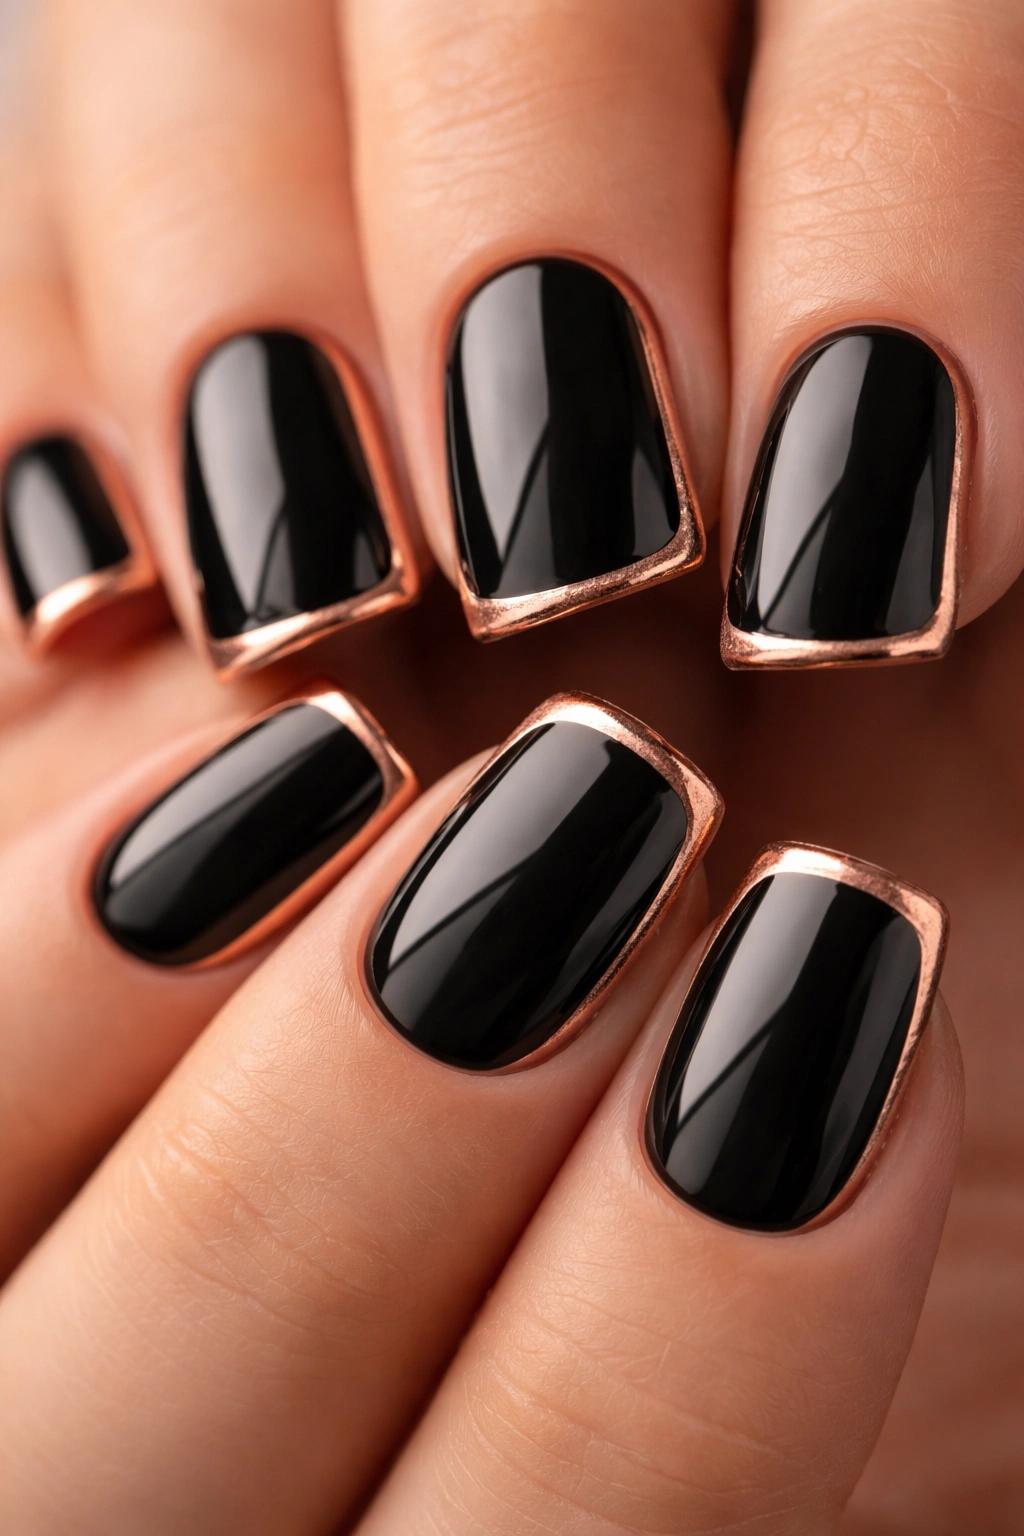
A metallic edge transforms the duck nail’s tapered point into a gilded focal point, creating luxury-brand energy. Using rose gold gel or metallic paint, carefully define the very outer edge of your duck nail — essentially tracing the perimeter of the tapered shape. This thin metallic outline creates definition and draws the eye to the shape itself, while rose gold provides warmth against cool black, creating a sophisticated color combination that works across skin tones.
Why Rose Gold Against Black Works
Rose gold sits in the warm metallic spectrum, making it feel more approachable and wearable than cool silvers while still delivering shine and glamour. Against black, it appears almost luminescent — the contrast makes the rose gold glow. This combination feels modern and fashion-forward without being trendy in a way that will feel dated quickly.
Application Steps
- Paint your black base and cure completely
- Using a thin striping brush or metallic gel pen, carefully trace the outer edge of your nail shape
- Work slowly and steadily — this isn’t a freehand design where imperfection adds character; you want clean, defined edges
- If you make a mistake, use a small detail brush with black gel to clean it up before curing
- Seal with a glossy topcoat to protect the metallic and provide shine
Worth knowing: Rose gold metallics sometimes benefit from a glossy topcoat rather than a standard sealant — the extra shine amplifies the metallic effect and creates depth.
10. Black Duck Nails with Tiny White Crosshatch Pattern
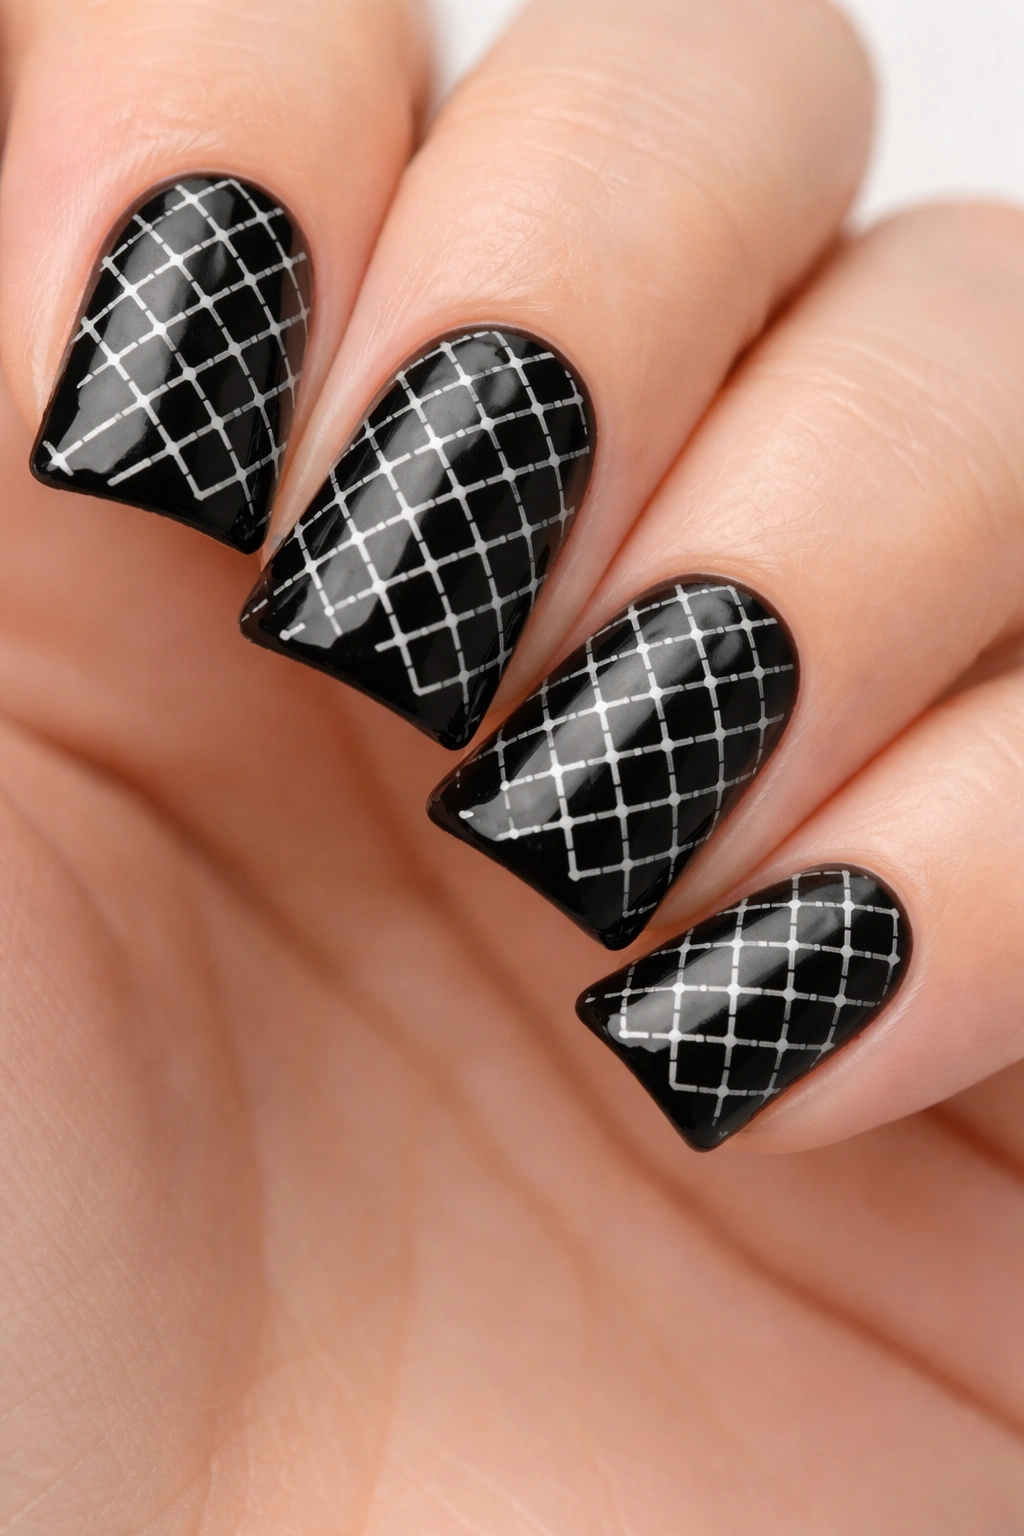
Crosshatch patterns create visual texture and graphic interest through geometric line work. Using a white gel or ultra-fine brush, create thin crossing lines at angles to form a diamond or crosshatch pattern across your duck nail. The pattern can cover the entire nail or concentrate on just the tapered tip. The linear quality creates an almost woven appearance, adding dimensionality that makes the design feel more complex than it actually is.
Executing a Crosshatch Pattern
- Paint your solid black base and cure completely
- Using a thin white striping brush or gel pen, draw parallel lines at approximately 45-degree angles
- Then draw parallel lines in the opposite direction, crossing the first set to create your diamond shapes
- Spacing is key — aim for consistent spacing (approximately 2-3mm) between lines for a professional, intentional appearance
- Cure and seal
Insider note: If freehand crosshatch feels impossible, you can use a specialized nail art stamping plate designed for geometric or crosshatch patterns — stamp, cure, and you’re done.
11. Matte Black Duck Nails with Velvet Powder Effect
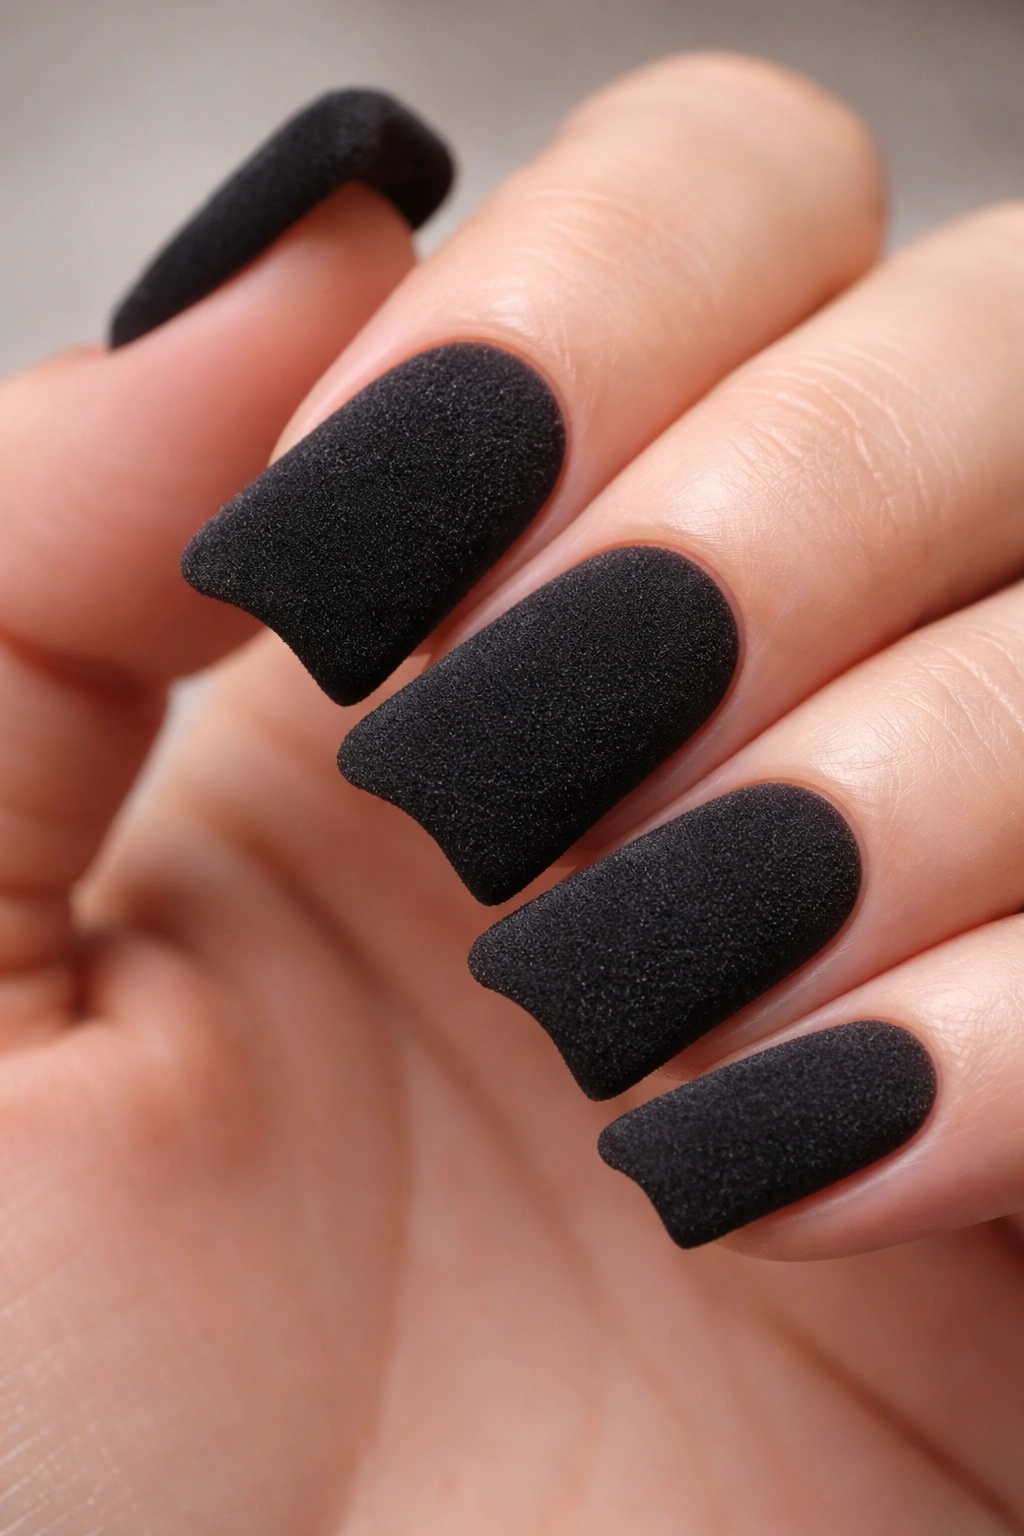
Velvet powder creates a soft, velvety texture that feels almost plushy against the matte finish. The result is an unusual tactile quality that creates immediate interest — people want to touch your nails to feel that soft texture. Apply matte black gel as your base, then dust a layer of velvet powder over the entire nail before curing. The powder adheres to the sticky gel, creating that signature plush finish.
Velvet Powder Application
- Paint your base coat of matte black gel and cure
- Dust velvet powder generously over your nail using a brush or applicator
- Tap off any excess powder
- Seal immediately with a glossy topcoat — this locks the powder in place and prevents it from rubbing off
- Cure thoroughly
The finished result is a nail that has striking matte texture in daylight and subtle shine when the light hits it, creating an almost 3D effect. The velvet texture also provides grip, which makes the nail feel purposeful rather than purely decorative.
Pro tip: Velvet powder comes in various colors — try it in shades of gray or dark blue over black for more subtle color variation, or use contrasting colors on just the tips for an ombre effect.
12. Black Duck Nails with Silver Gradient to Tips
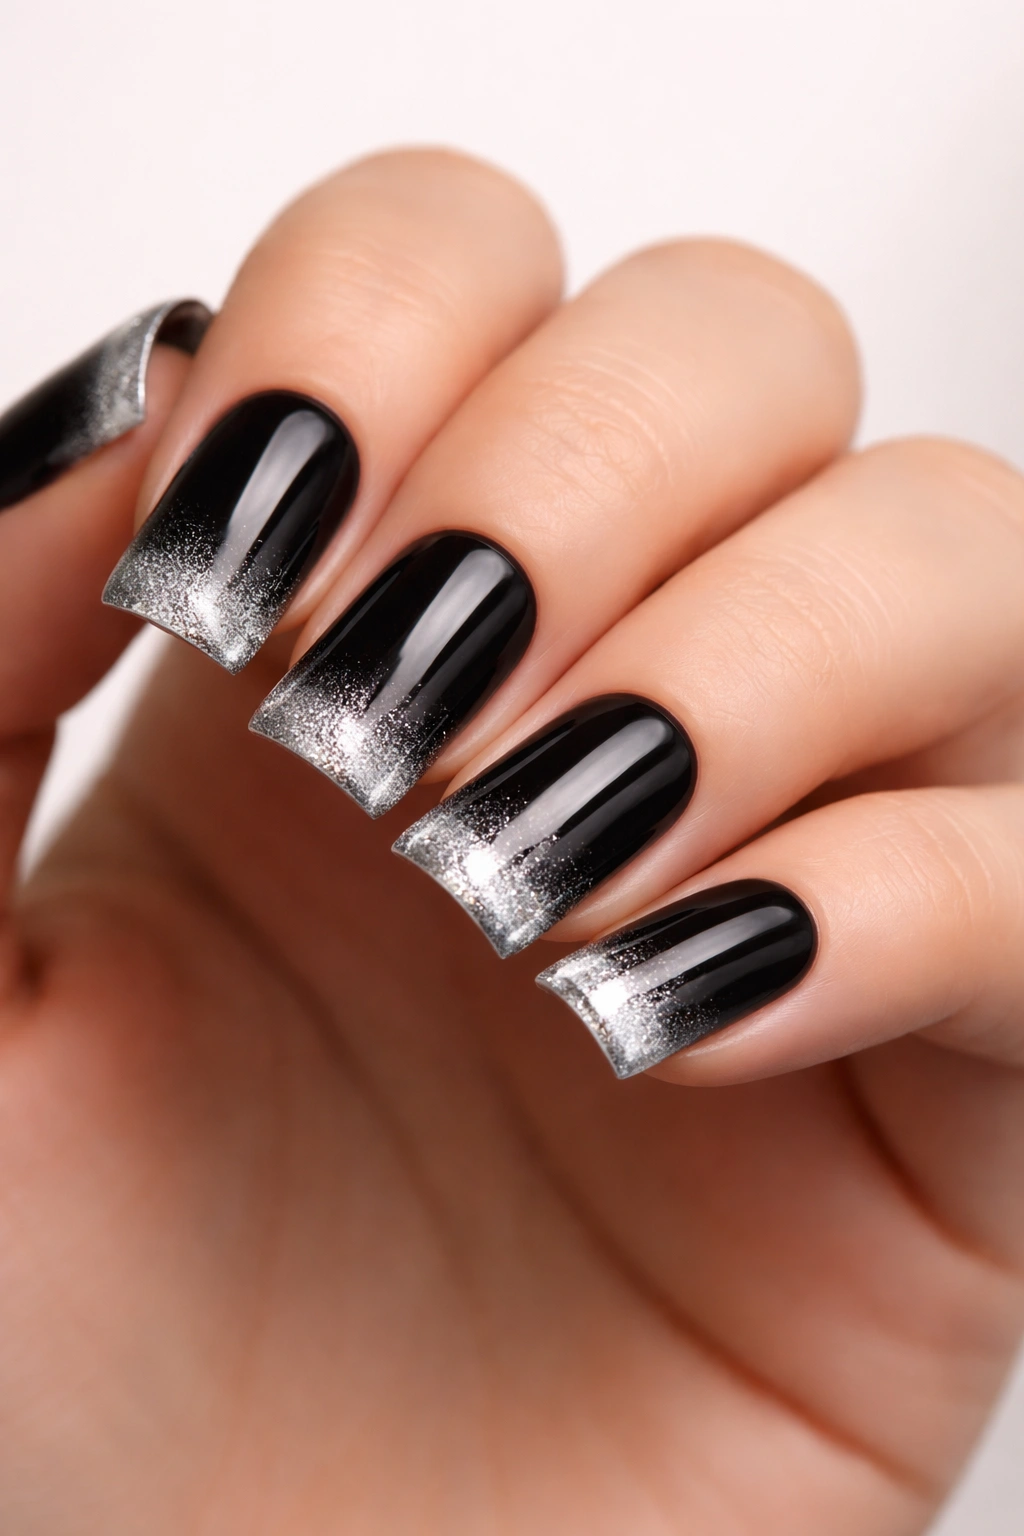
A silver gradient creates the illusion of light and dimension by transitioning from darker black to brighter silver. Paint your duck nails in solid black at the cuticle area, then gradually introduce silver gel or polish, blending the two shades until the tips are predominantly silver. The gradient reads almost like light hitting the tapered point, creating a three-dimensional effect.
Creating a Smooth Gradient
- Paint your solid black base and cure
- Apply silver gel to the tip area
- Use a clean gel brush or sponge to blend where black and silver meet, feathering the transition
- Build the gradient gradually over 2-3 applications, curing between layers as needed
- The goal is smooth blending with no harsh line between the two colors
Alternatively, mix black and silver gels in varying proportions to create middle-tone shades, then apply these blended shades in the transition area to smooth the gradient. This approach gives you more control over the transition and creates a more seamless effect.
Worth knowing: Gradient work requires patience and isn’t a one-coat situation — plan for at least 15-20 minutes of application and curing for a truly professional-looking gradient on five nails.
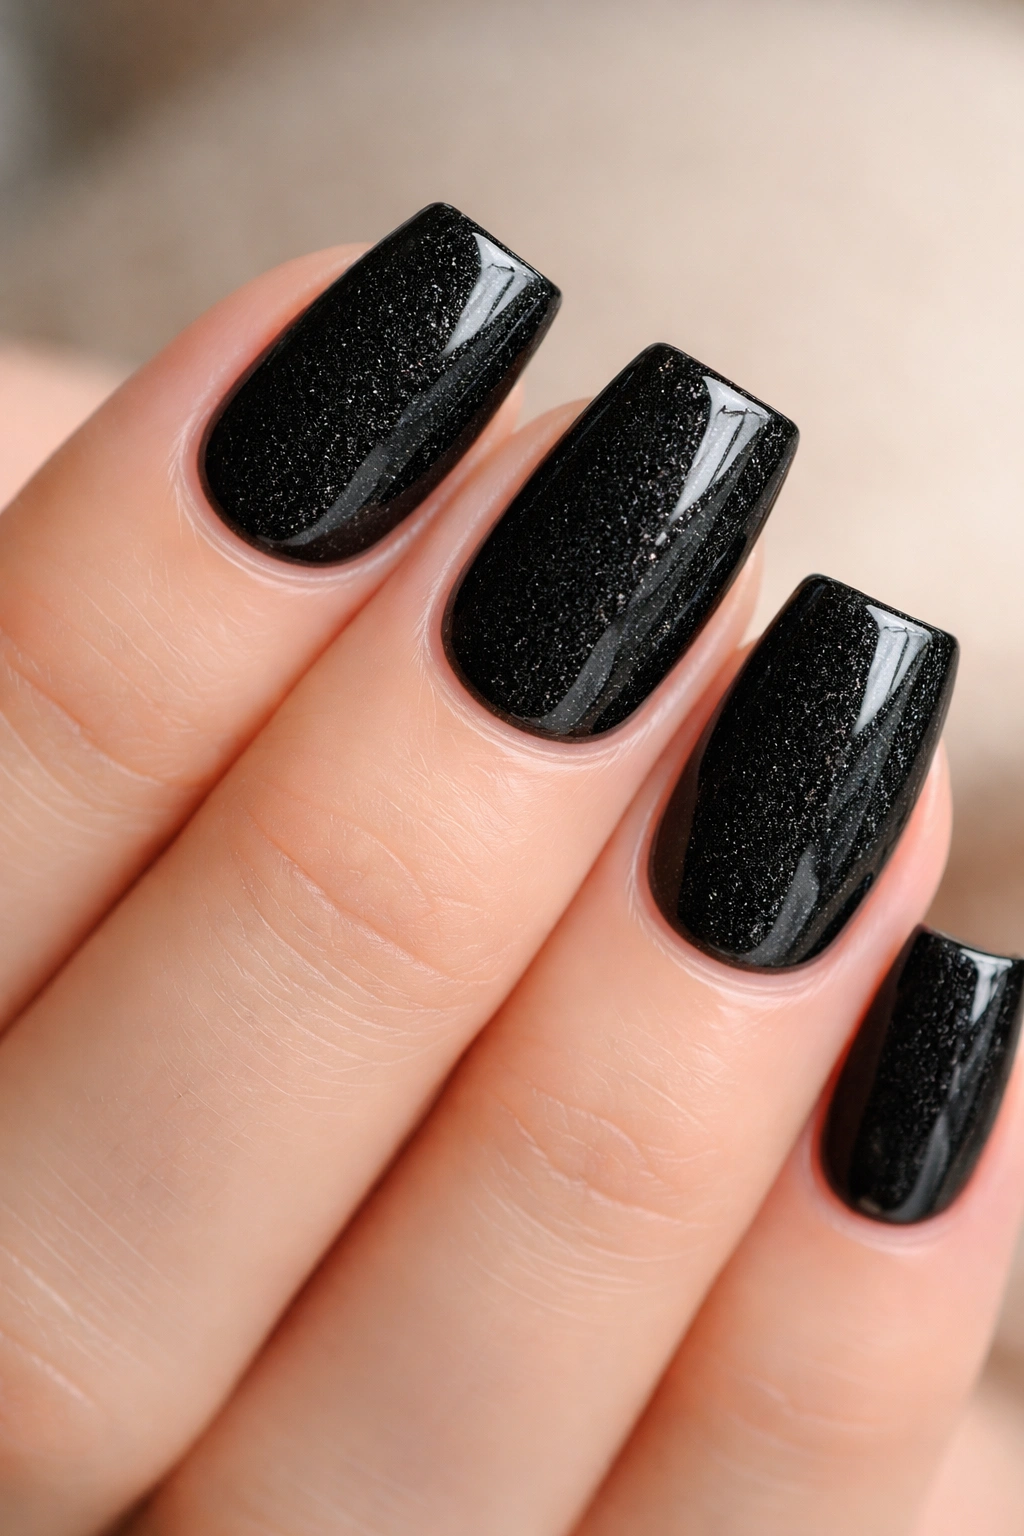
13. Black Glossy Duck Nails with Tiny Confetti Flecks
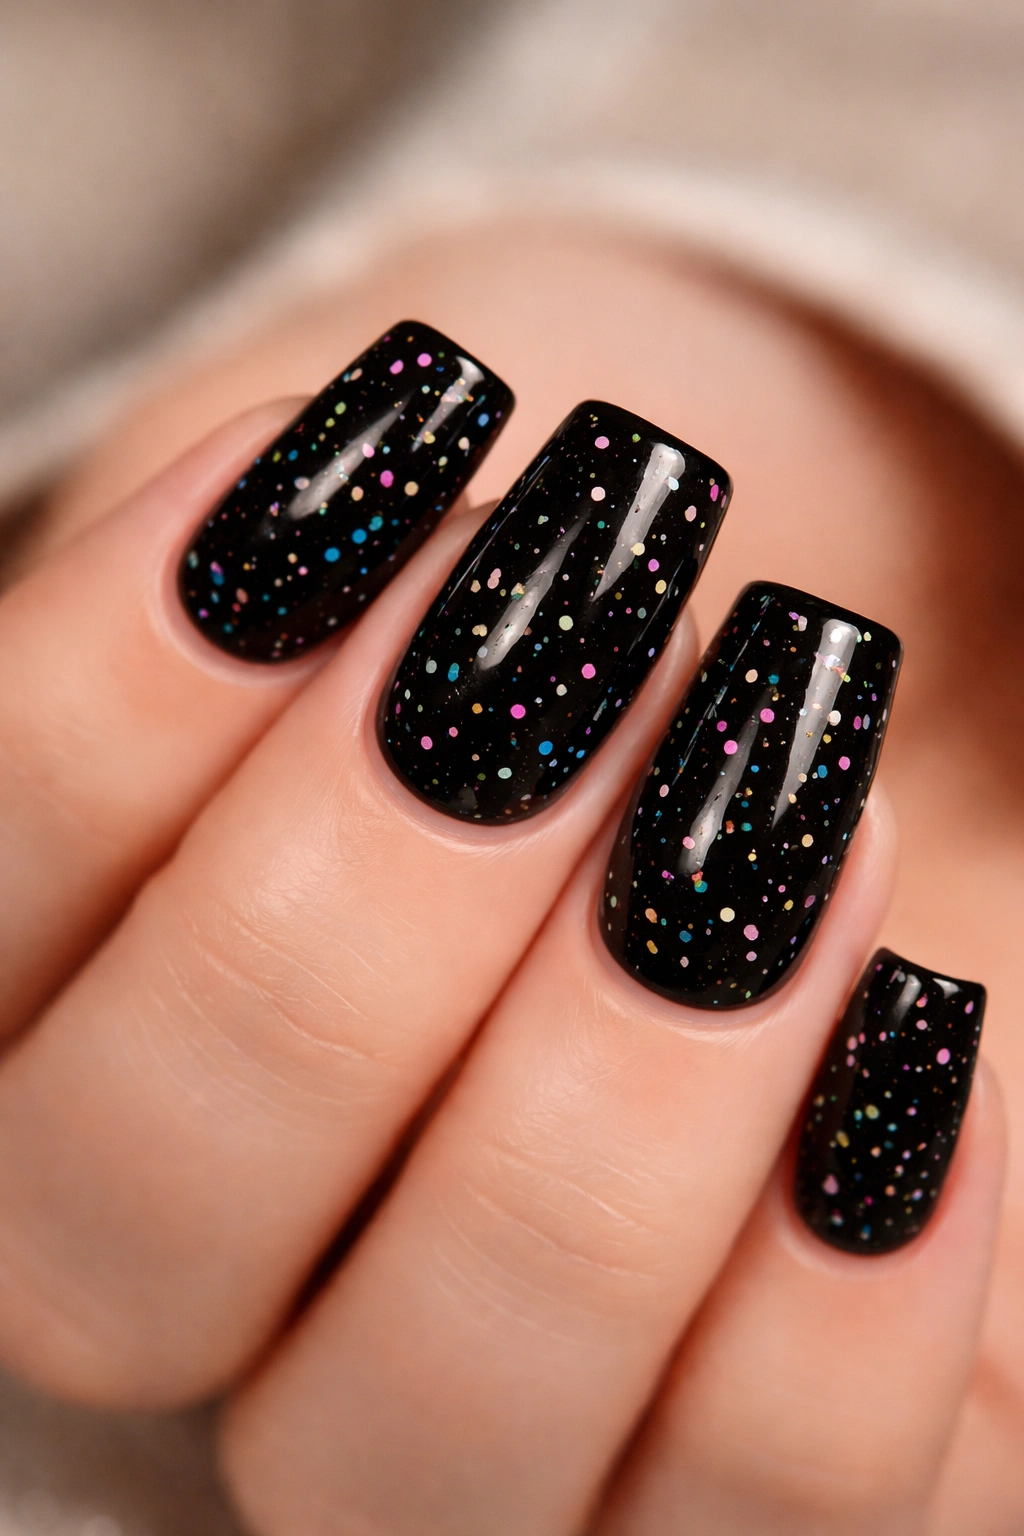
Confetti fleck designs use tiny scattered pieces of mixed colors, creating a festive, celebratory aesthetic against the formal black base. Rather than creating a pattern, you’re essentially sprinkling tiny pieces of color across the black — multicolored glitter, metallic flakes, or colored dust particles. The design reads as playful and intentional without being overwhelming because of the solid black anchoring the chaos.
Building Your Confetti Look
- Paint your solid glossy black base and cure completely
- While your final topcoat layer is still sticky (before curing), use a brush to sprinkle tiny confetti, glitter flakes, or colored dust particles across your nails
- You control the density — go light for a subtle effect or generous for a more playful appearance
- Cure to seal the confetti in place
- Apply a final glossy topcoat to smooth everything out
The scattered quality gives the design personality — it’s intentionally imperfect. The black base ensures nothing feels chaotic or childish, instead creating a sophisticated party energy that works for celebrations, nights out, or anyone who wants to express joy through their nails.
Pro tip: Mix your confetti approach — use larger multicolored flakes near the tips and finer glitter dust near the cuticle for a graduated intensity that keeps the eye moving across your nail.
14. Black Duck Nails with Fine Feather Detailing
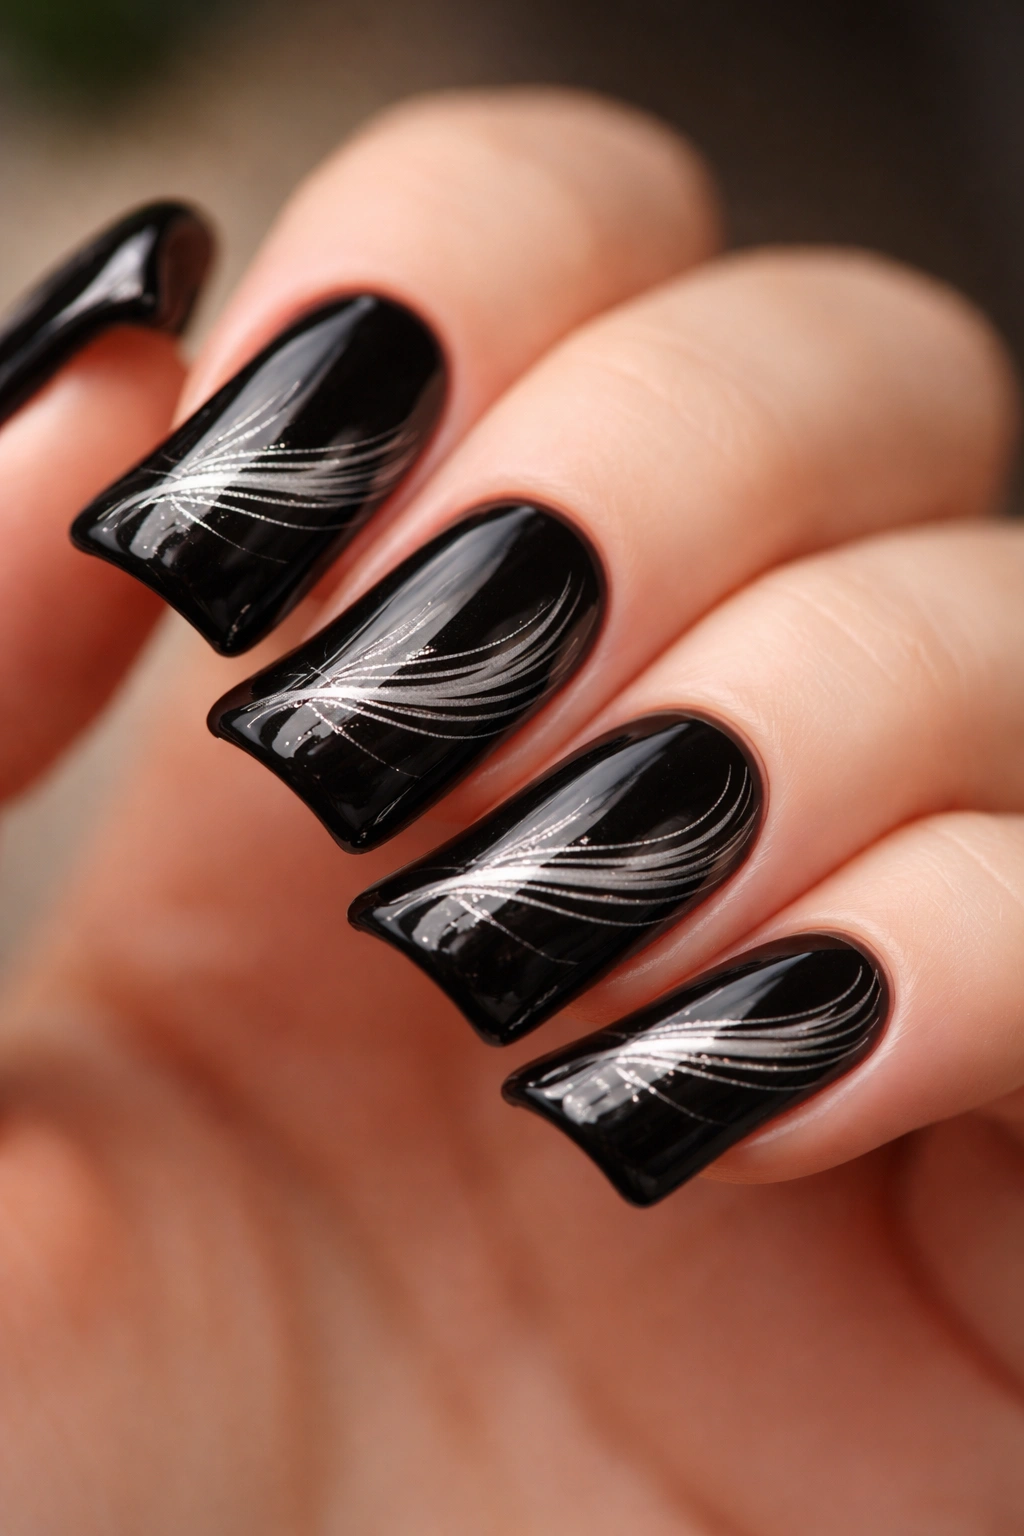
Feather designs create organic, flowing lines that echo the duck nail’s natural curved shape. Using a very thin brush and white, gold, or silver gel, paint delicate feather-like strokes that begin at the cuticle or side and flow toward the tip. The feathers can be structured and geometric or loose and organic — both approaches work beautifully. The flowing quality of feathers adds movement and elegance without requiring a large surface area to showcase the design.
Creating Feather Strokes
- Paint your solid black base and cure completely
- Using your chosen metallic or white color and a very thin detail brush, start each feather with a thin central line
- Add smaller strokes branching off at angles to create the feathered effect
- Work from one side of your nail or create a scattered pattern across the surface
- Keep feathers delicate and refined — thin, precise strokes read as elegant while heavy strokes read as clumsy
Feather designs work especially well on the tapered point of duck nails because the natural narrowing of the shape mimics a feather tapering at its end. Position your feathers to emphasize this natural architecture.
Insider note: Feather designs are particularly effective on matte black nails because the metallic strokes pop against the flat finish without competing with shine.
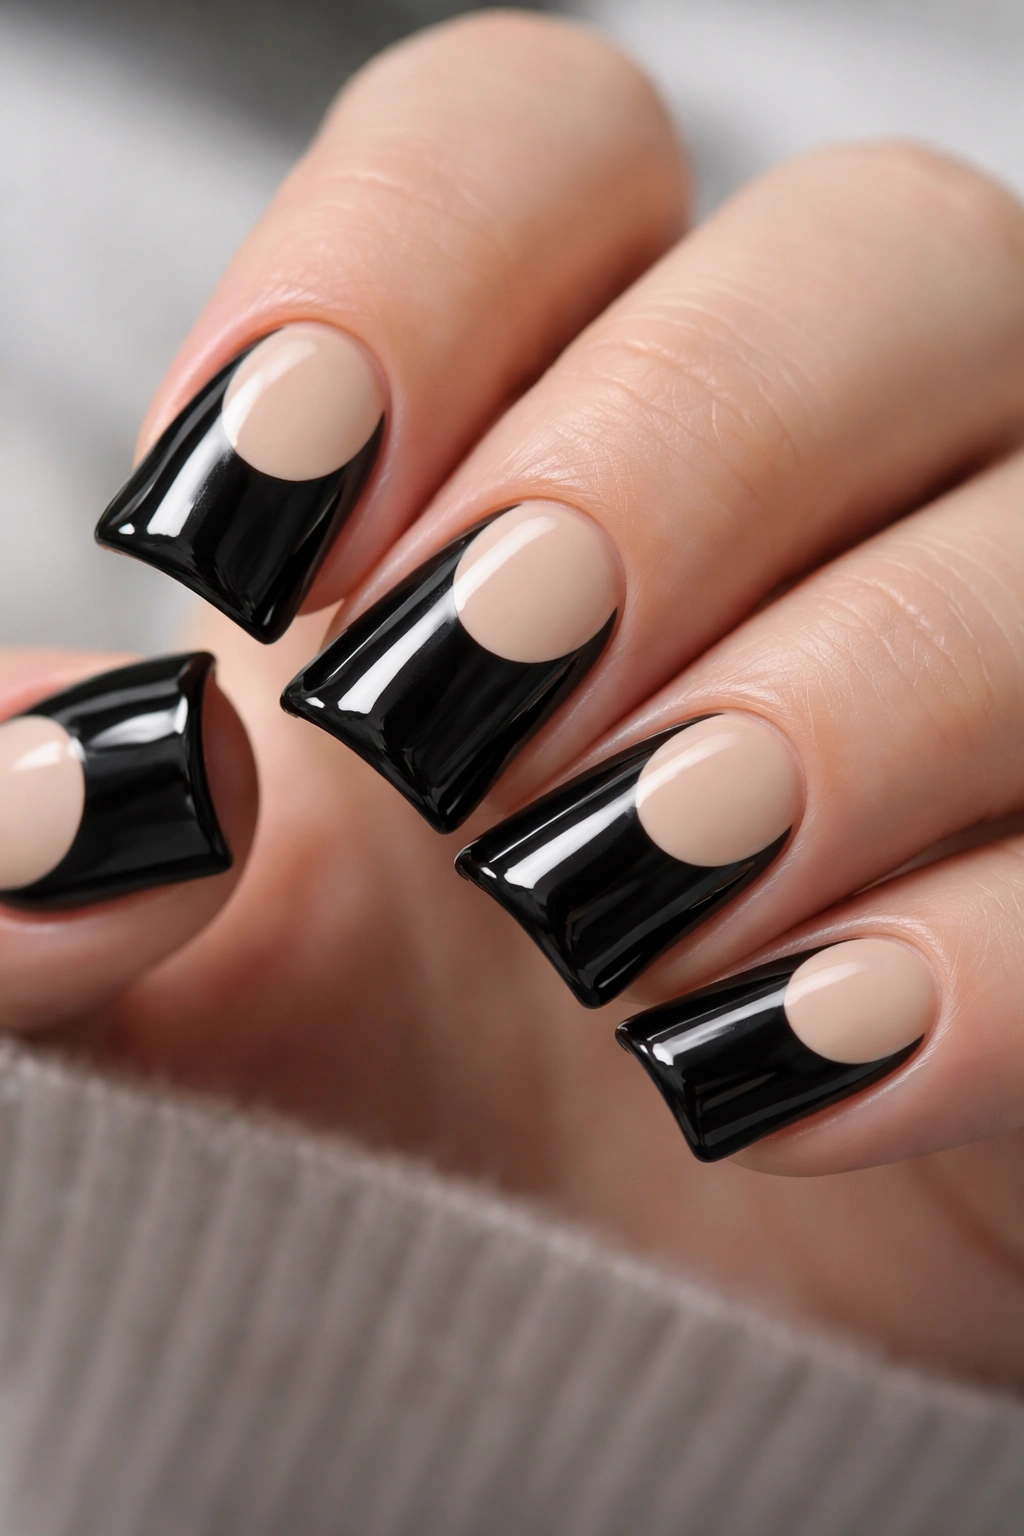
15. Black Duck Nails with Nude or Cream Color Block
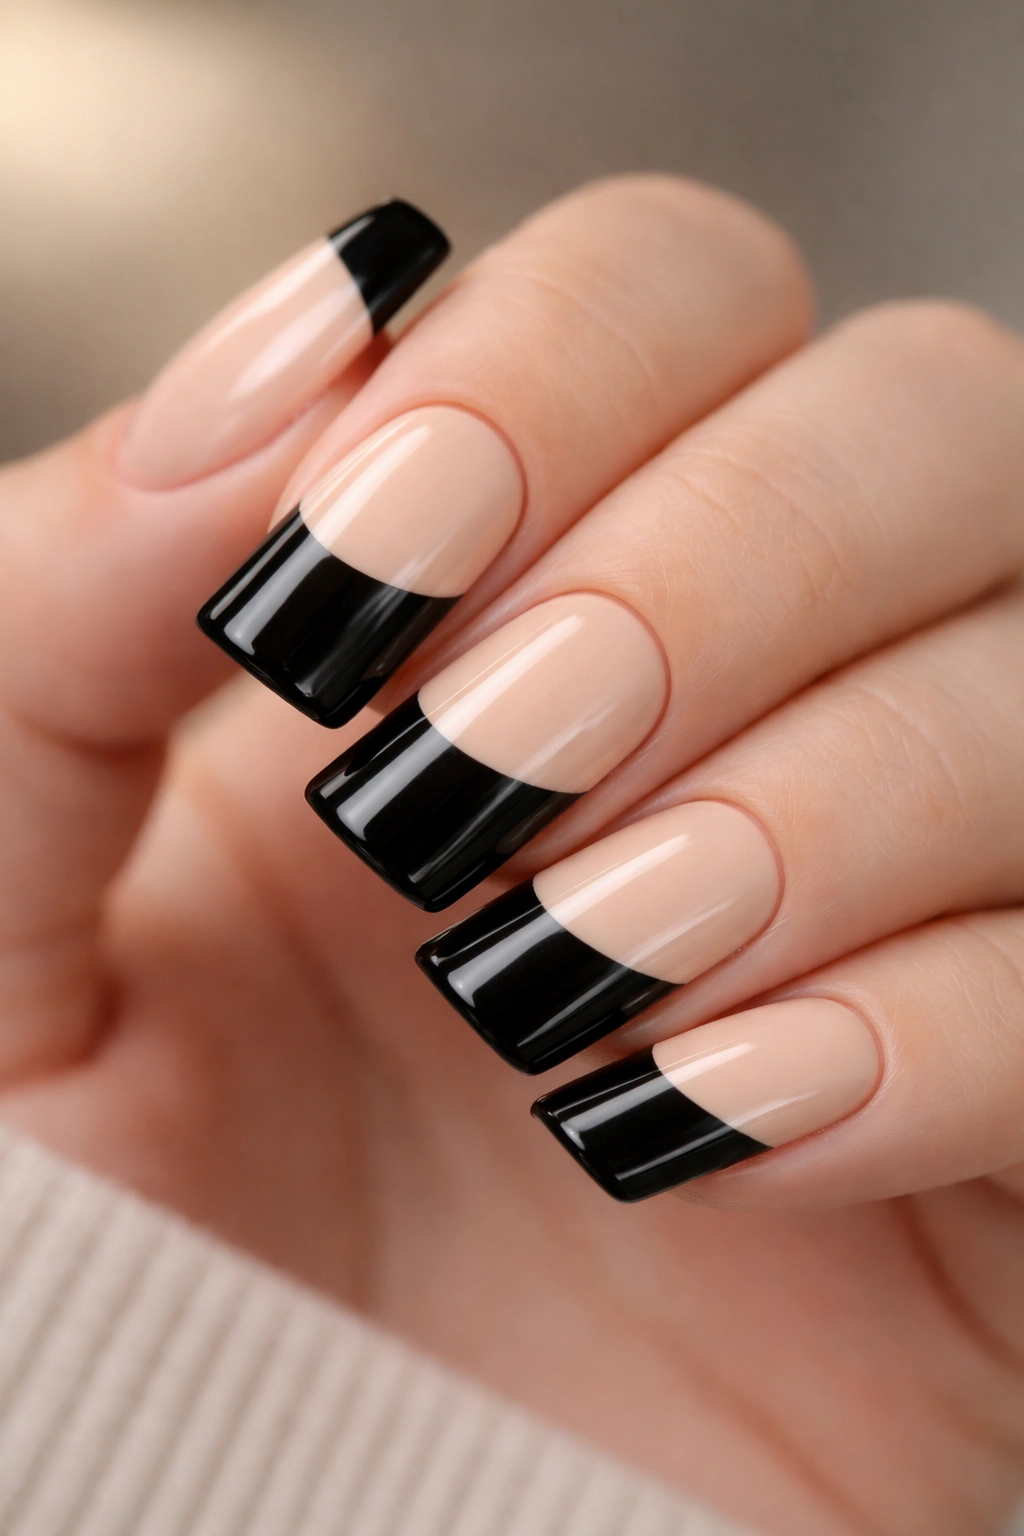
A color block design uses a contrasting solid color to create a striking geometric division on your black nail. Paint the bottom two-thirds of your nail in solid black, then the top third (the tapered section) in contrasting nude, cream, or pale pink. This creates a clean color division that emphasizes the duck shape’s most distinctive feature — the tapered point. The neutral secondary color ensures the design reads as sophisticated rather than playful.
Executing Clean Color Blocks
- Paint your entire nail in your black base color and cure
- Using painter’s tape or a nail stencil, mask off the section where your color block will begin
- Paint your second color over the exposed area
- Remove the tape while the gel is still slightly tacky for the crispest edge
- Cure and seal
The resulting effect is bold and graphic — it’s a design that reads immediately and creates impact through simplicity. On short nails, the color block approach maximizes the visual impact of your duck nail shape because the contrast emphasizes the tapered geometry.
Pro tip: Try unexpected color combinations — black with blush pink, black with warm caramel, or black with icy blue creates different moods while maintaining sophistication.
16. Matte Black Duck Nails with Chrome Tips
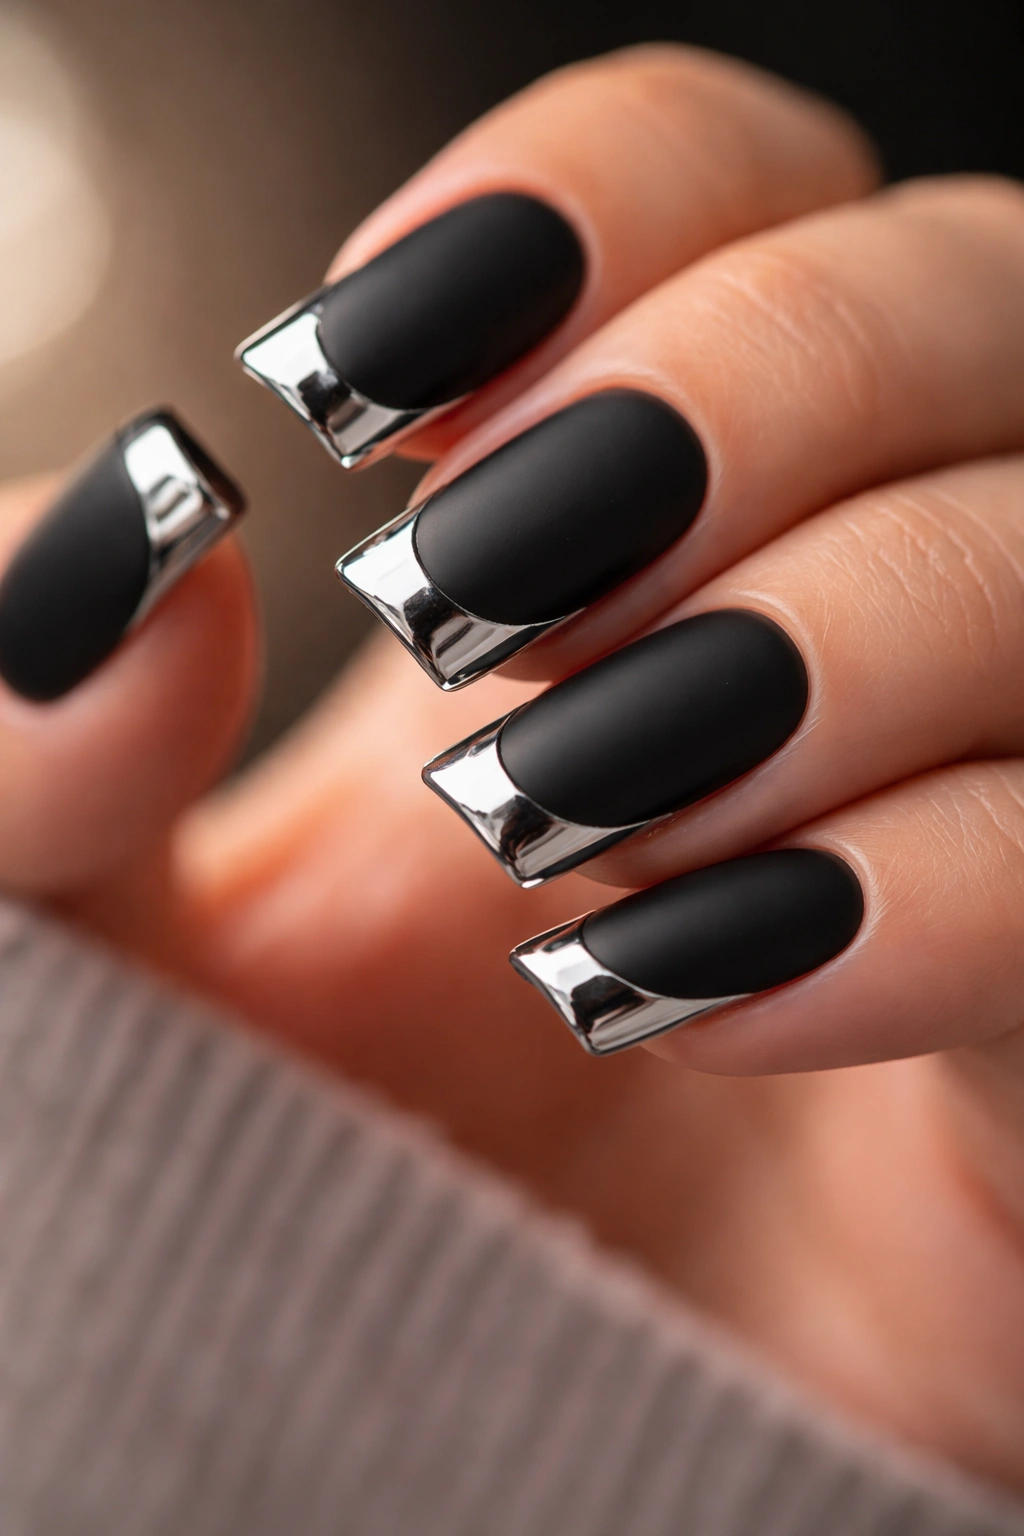
Chrome creates an almost mirror-like metallic shine that catches light dramatically, making it perfect for accent work. Paint your duck nails in matte black, then apply chrome powder or chrome gel specifically to the tapered tips. The contrast between the soft, flat matte finish and the liquid, reflective chrome is stunning — the chrome tips appear to glow or shimmer against the matte black.
Applying Chrome Effectively
- Paint your matte black base and cure completely
- Using a chrome gel or specialized chrome polish, carefully paint just the tip portion of your nail
- Cure the chrome
- Alternatively, use chrome powder: apply a sticky topcoat to your tips, dust with chrome powder, and seal with a clear topcoat
- The finished effect should have a sharp line between matte and chrome (or a slight gradient transition if you prefer softness)
Chrome is attention-getting and works for anyone who loves high-impact nails. The reflective quality means your nails catch light constantly, making even short nails feel prominent and statement-making. This design is perfect for events, nights out, or anyone who loves futuristic, edgy aesthetics.
Worth knowing: Chrome powders require a sticky gel topcoat for application and can be finicky if you’re not familiar with the technique — consider purchasing a chrome-specific gel that’s designed to work more predictably.
17. Black Duck Nails with Subtle Texture and Topcoat Shine
Create texture using specialized textured gels or by applying matte black gel and dusting it with fine texture powder before curing. The texture creates micro-patterns that catch light subtly, adding depth and interest. Seal everything with an ultra-glossy topcoat that provides shine — this contrast between the textured base and glossy seal creates dimension and makes even a solid-colored design feel intentional and designed.
Building Texture Depth
- Apply your base black gel and cure
- While the surface is still slightly sticky, dust with texture powder (leather texture, matte texture, sugar texture) using a soft brush
- Tap off excess powder
- Cure thoroughly
- Seal with a thick, glossy topcoat that fills in the texture and provides high shine
The result is a nail that shifts between matte and glossy depending on how light hits it, creating visual interest without additional color or design. This approach is perfect for minimalists who want more than solid color but prefer understated elegance.
Pro tip: Different texture powders create different effects — leather texture creates a sophisticated, fine grain pattern, while sugar texture creates a sparkly appearance without using glitter.
18. Black Duck Nails with Dual-Tone Ombre to Silver
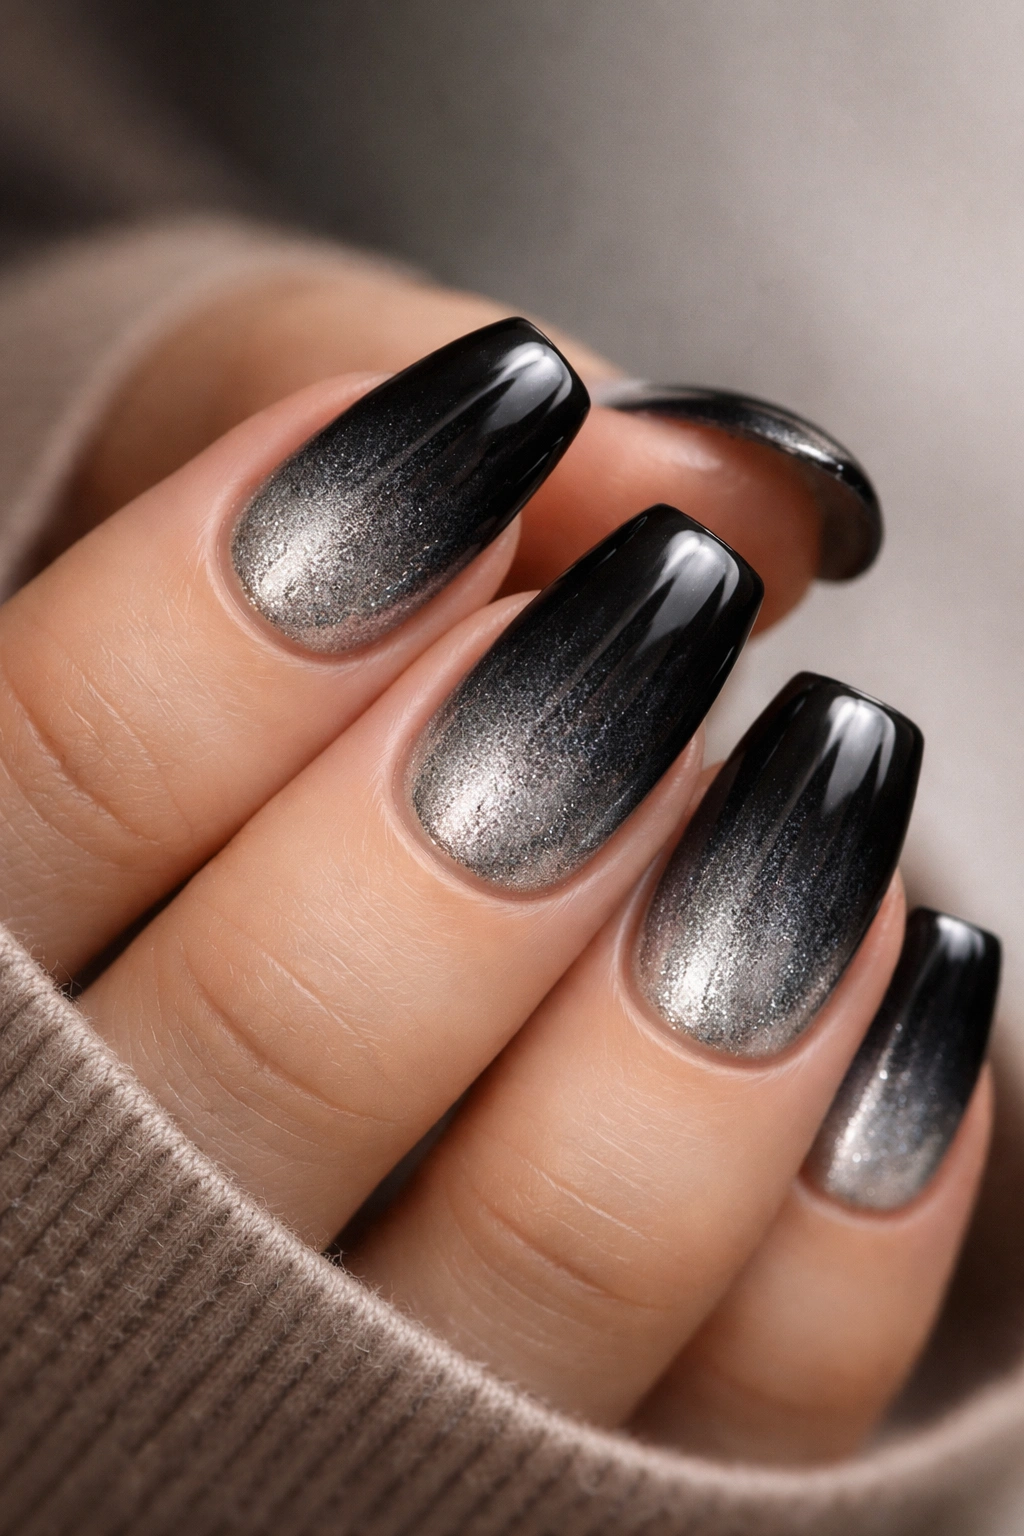
An ombre that transitions from black at the base through dark gray in the middle to bright silver at the tips creates sophisticated dimensionality. This gradient requires layering but delivers a luxurious, multidimensional effect that makes short nails appear to have more depth and complexity. The silver tips naturally emphasize the duck nail’s tapered point, drawing the eye to the shape’s most distinctive feature.
Creating a Dual-Tone Ombre
- Paint your solid black base and cure completely
- Apply a layer of dark gray gel to the middle portion of your nail and blend with black using a clean brush
- Apply silver gel to the tips and blend with the gray using a sponging or brushing technique
- Build the gradient gradually over 2-3 applications, curing between layers
- The goal is no harsh lines — smooth, seamless transitions between each shade
Ombre work is time-intensive but creates undeniable impact. The gradual color transition catches light at different angles, creating an almost holographic effect. This design works beautifully for formal events or anyone who loves the look of high-fashion nails without the commitment of complicated art.
Worth knowing: An easier shortcut is to purchase pre-made ombre gel collections that are specifically designed to blend smoothly — they require less blending skill than mixing your own shade variations.
Final Thoughts
Black duck nails on short nails prove that impactful nail design isn’t about length — it’s about intentional shaping, confident color choices, and thoughtful accents. Each of these designs demonstrates that the duck nail shape’s curved, tapered geometry works beautifully at any length, and black serves as the perfect backdrop for nearly every aesthetic and occasion you can imagine.
Whether you’re drawn to minimalist elegance with a single accent line, luxurious texture through velvet powder, or playful energy with scattered confetti, there’s a black duck nail design that matches your personality and lifestyle. The short nail length actually becomes an advantage — these designs apply faster, hold up longer without the breakage concerns of extended nails, and feel more wearable in professional or conservative environments.
Start with one design that resonates with you, master that technique, then gradually expand your repertoire. The beauty of the duck nail shape is its versatility — you can wear it casually with a simple matte finish or dress it up with rhinestones and metallics depending on where life takes you. Your short nails just became your blank canvas for sophisticated nail art.
