

Pink ombre stiletto nails are the perfect fusion of elegance and edge. The soft gradient of pink tones combined with the sharp, elongated stiletto shape creates a manicure that works for everything from everyday confidence to special occasions. Whether you’re drawn to subtle, barely-there blushes or dramatic, moody gradients that transition from champagne to deep rose, there’s a pink ombre stiletto design that matches your style and personality.
The beauty of this particular nail trend is its versatility. Pink ombre isn’t one-note — it’s a spectrum of possibilities. You can lean into romantic femininity, rock a modern minimalist vibe, or go full glamour with embellishments and metallic accents. The stiletto shape amplifies the effect, making even a simple gradient look sophisticated and intentional. And because ombre is inherently forgiving, it actually hides minor imperfections better than solid colors, making it a smart choice whether you’re getting a professional manicure or trying this at home.
What makes pink ombre so enduring is that it flatters virtually every skin tone and works across seasons. In warmer months, lighter peachy-pink gradients feel fresh and breezy. As the year progresses, deeper mauve and rose tones take on a more luxe, moody energy. The color palette is naturally soothing yet undeniably stylish — you get the visual impact of a statement manicure without the commitment of a bold, vibrant hue.
Let’s explore 15 stunning pink ombre stiletto nail designs that range from understated elegance to bold, eye-catching artistry.
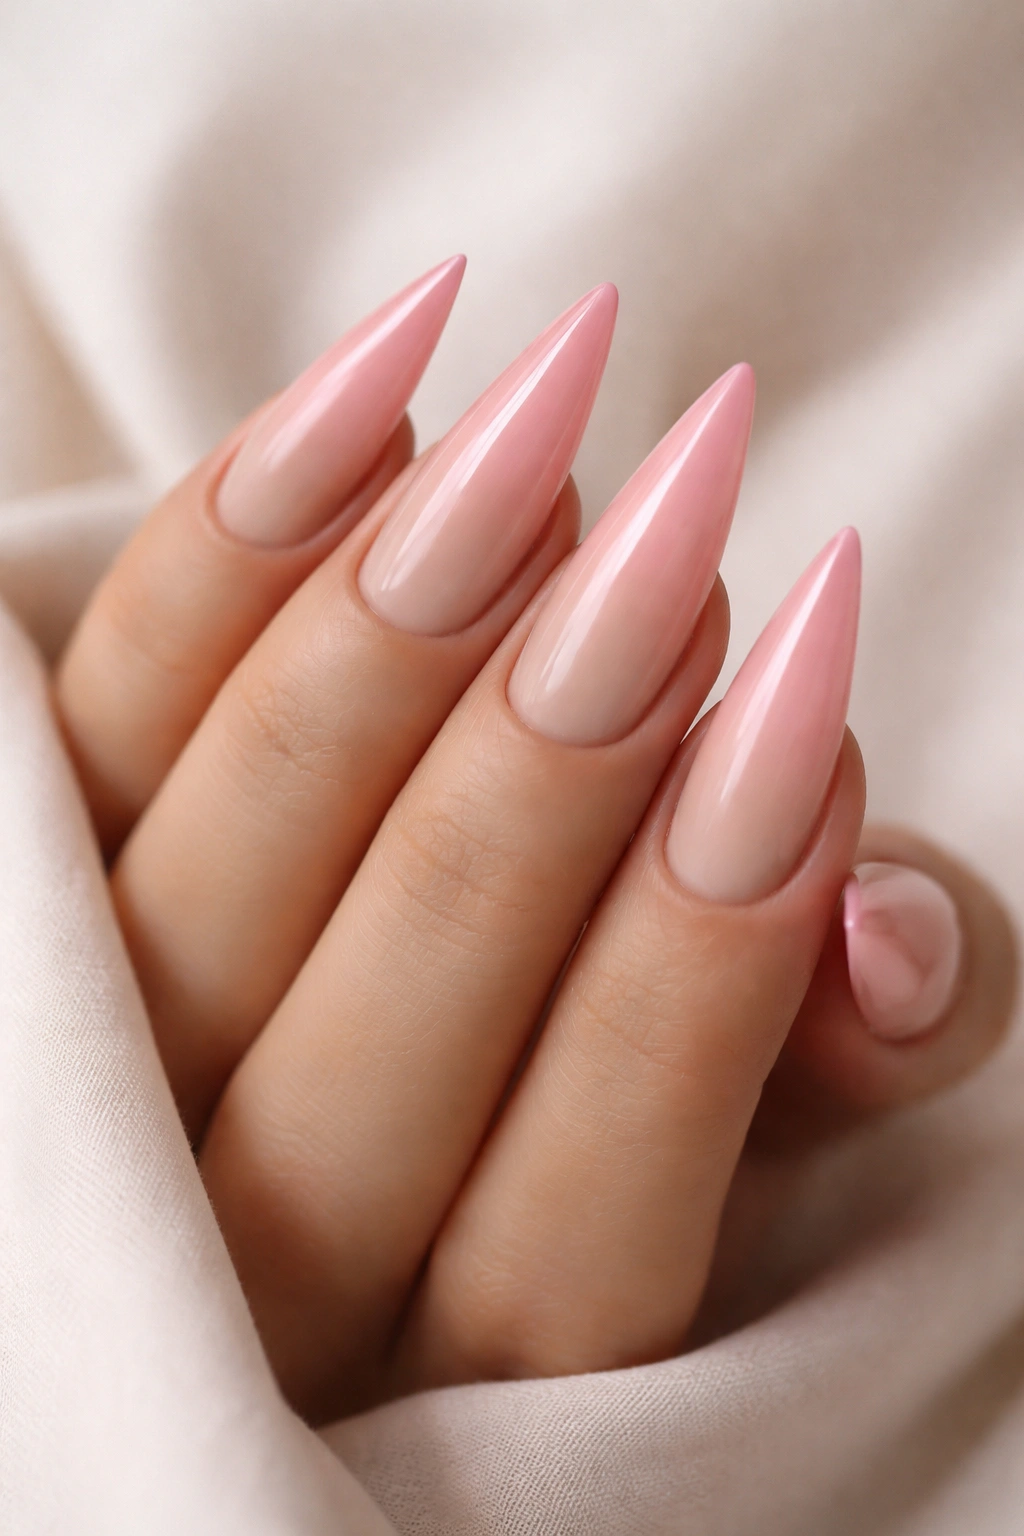
1. Soft Peachy-to-Blush Gradient
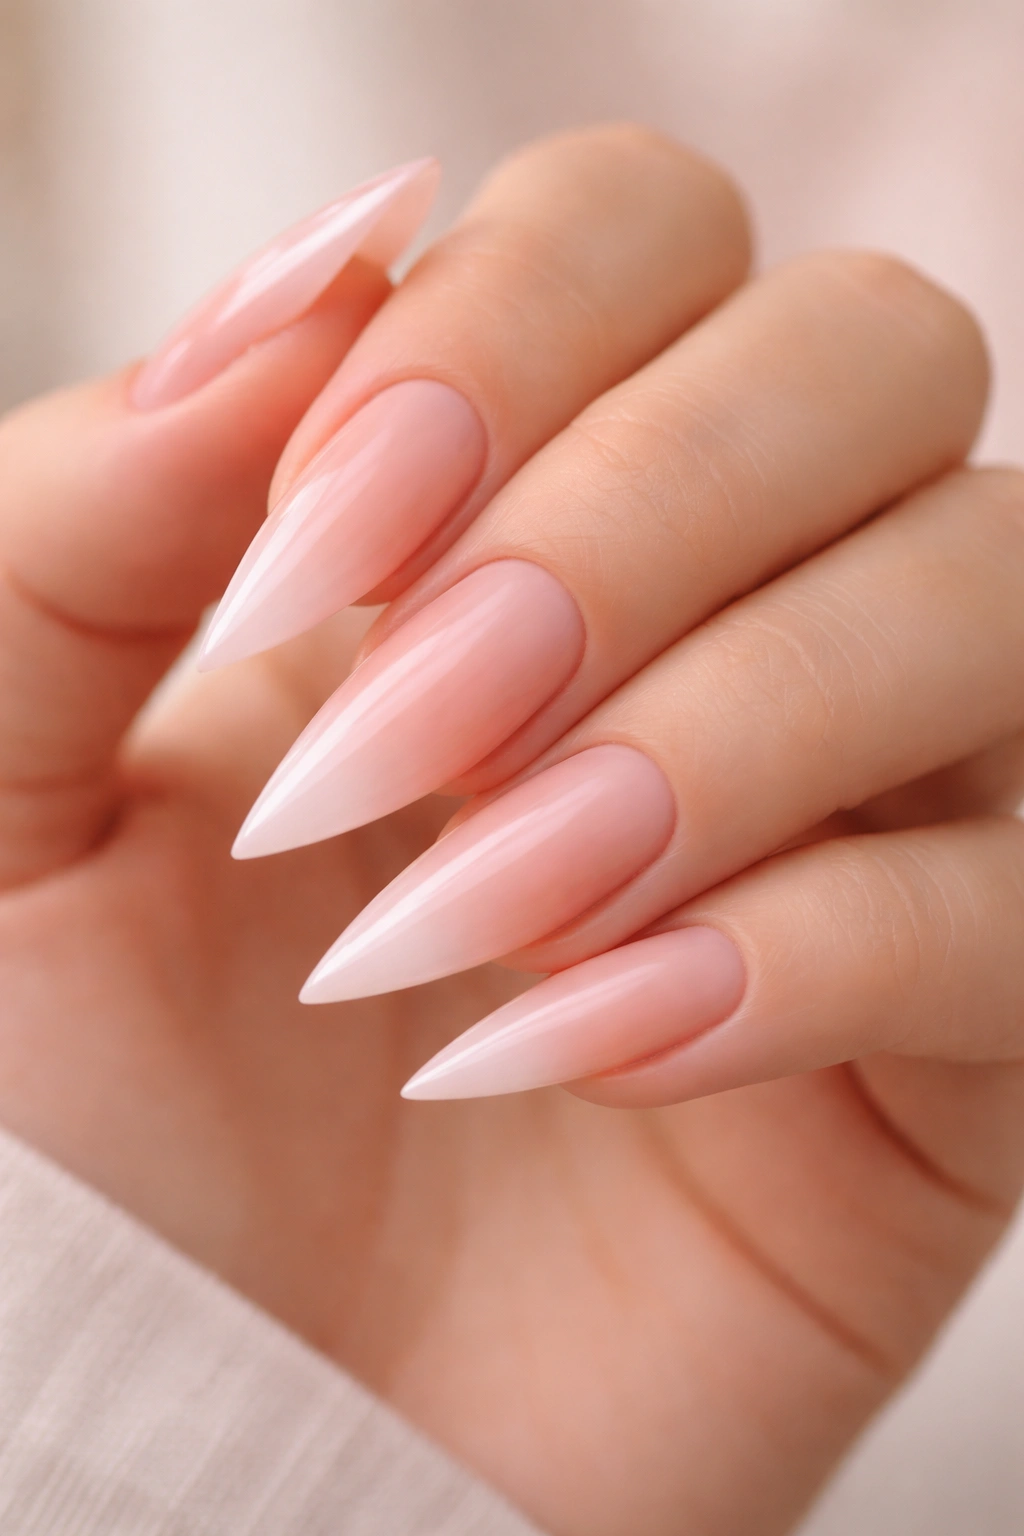
This design captures the essence of subtle femininity with a barely-there gradient that moves from a warm peachy tone at the base to a delicate blush pink at the tip. The stiletto shape elongates the nail, giving even a soft color palette a refined, upscale appearance. The gradient is so gentle it almost looks like a natural ombré of skin tone, making it perfect for professional environments where you want polish without obvious drama.
Why This Design Stands Out
The peachy-to-blush transition flatters warm undertones beautifully while remaining understated enough for any setting. Because the color shift is so subtle, the focus stays on the nail shape itself, which is the real statement-maker here. This design proves that stiletto nails don’t require bold color to command attention — the architectural silhouette does the heavy lifting.
Best Application Techniques
- Use a makeup sponge dabbed with two shades of pink to create the gradient on each nail individually before sealing with topcoat
- Apply the lighter shade as a base first, then layer the slightly deeper tone while the first coat is still tacky for seamless blending
- The sponge technique prevents harsh lines and creates that coveted soft-focus ombré effect
- Finish with a glossy topcoat to add dimension and catch light across the gradient
Pro tip: If you’re doing this at home, apply the gradient to just the tips rather than trying to blend across the entire nail — it’s easier to control and still creates the coveted ombre effect.
2. Deep Rose-to-Champagne Ombré
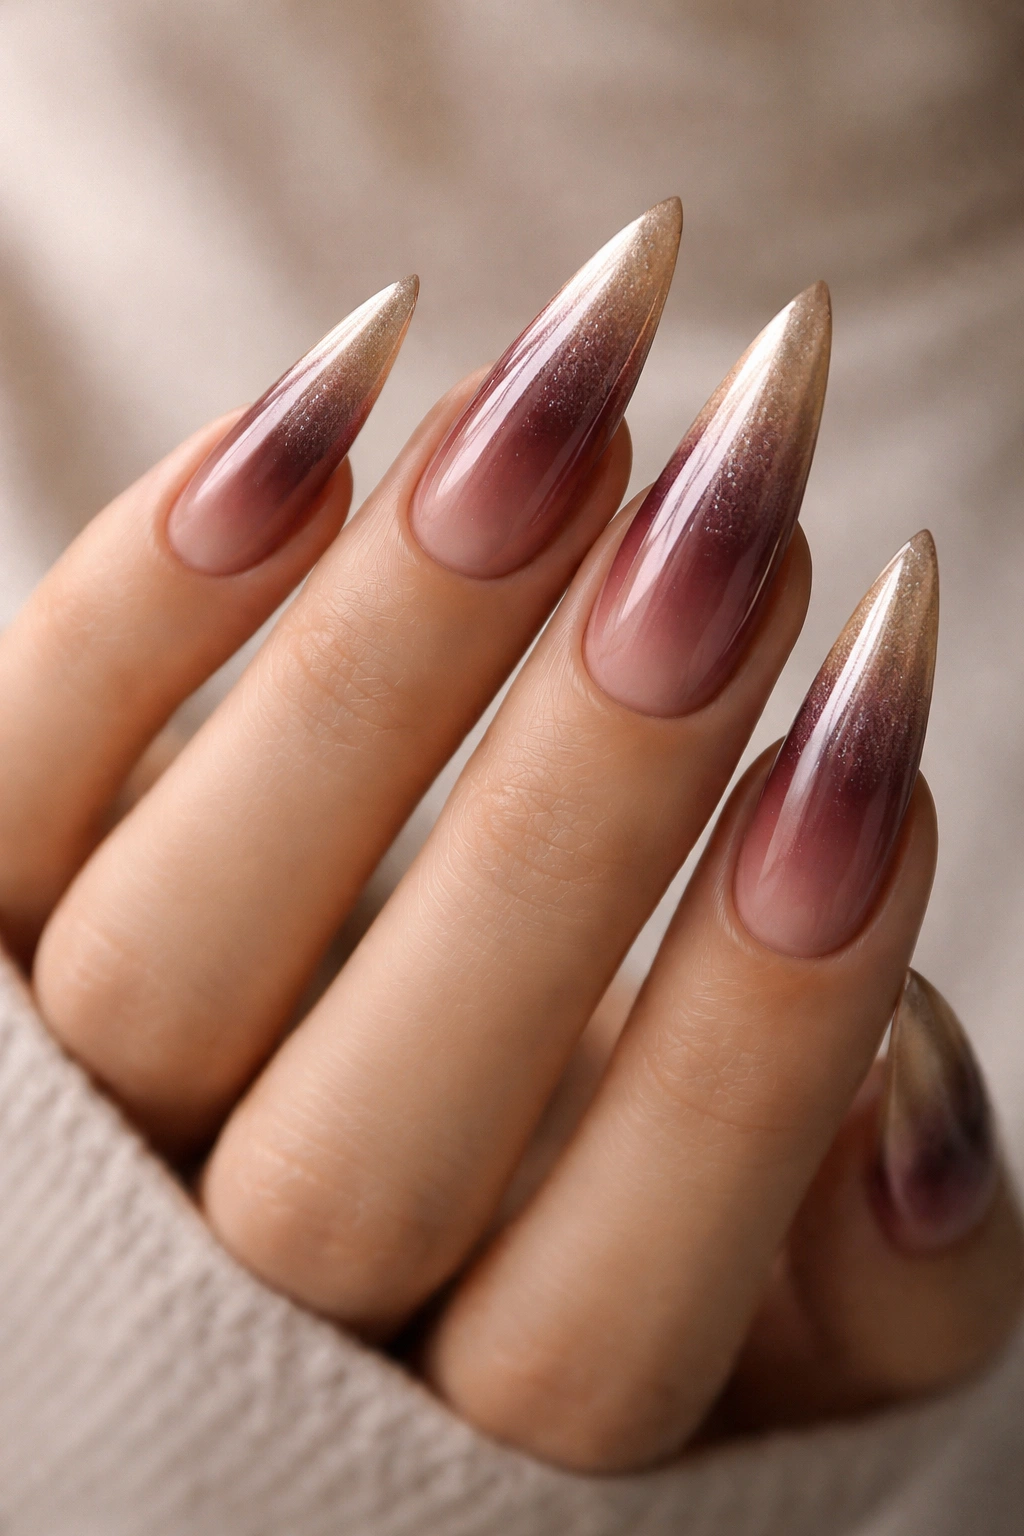
This design flips the script by starting with a deeper rose or mauve tone at the base and transitioning to a luminous champagne or pale gold at the tip. The combination feels sophisticated and unexpected — the depth at the base grounds the manicure while the champagne tip catches light and adds sparkle. Stiletto nails elongate this gradient beautifully, creating an almost liquid-like flow of color.
What Makes This Combination Special
The rose-to-champagne pairing walks the line between romantic and editorial. It’s dramatic enough to feel intentional but refined enough for upscale settings. The metallic undertones in champagne catch light in ways that pure pink can’t, adding an extra dimension of visual interest. This is the ombré for someone who wants polish to be noticed but in an understated, “I woke up like this” kind of way.
How to Achieve This Gradient
- Start with a rich rose or dusty mauve as your base color
- Apply champagne or pale gold as your accent color using the sponge method on the tip half of the nail
- Blend the two colors while they’re still wet, or wait for slight drying for a more distinct gradient line
- Use a nude or clear polish to soften any harsh transitions if needed
- Layer with a topcoat that has subtle shimmer for extra luminosity
Worth knowing: This gradient actually hides imperfections exceptionally well because the varying tones and metallic elements distract from any minor unevenness in application.
3. Millennial Pink Ombré with Matte Finish

Millennial pink — that iconic dusty rose-mauve hybrid — takes on new life when rendered as an ombré on stiletto nails and finished with a matte topcoat instead of the typical gloss. The matte finish makes the color feel more modern and artistic, almost like a watercolor painting on your nails. The gradient works from a lighter millennial pink at the base to a deeper, more saturated version at the tip, creating subtle depth without shine.
Why Matte Changes Everything
A matte finish on pink ombré feels editorial and intentional in a way that gloss sometimes can’t achieve. The flat surface emphasizes the color gradient itself rather than light reflection, making the ombré transition the absolute star of the show. This is the design for minimalists who still want visual interest and for anyone who loves the Instagram aesthetic of soft, artistic beauty.
Creating the Matte Ombré Effect
- Apply your gradient as usual using the sponge method with two shades of millennial pink
- Once the gradient is complete and fully dry, apply a matte topcoat (not a shiny one)
- The matte coat should go on smoothly without creating a plastic-like finish — quality matters here
- If you want extra dimension, add matte topcoat to most of the nail but leave a tiny glossy strip at the very tip for subtle contrast
- The matte finish shows every imperfection, so take extra care with your gradient application
Insider note: Matte finishes are more prone to chipping than glossy ones, so this design is best suited for those willing to do touch-ups every 10-14 days or opting for gel polish.
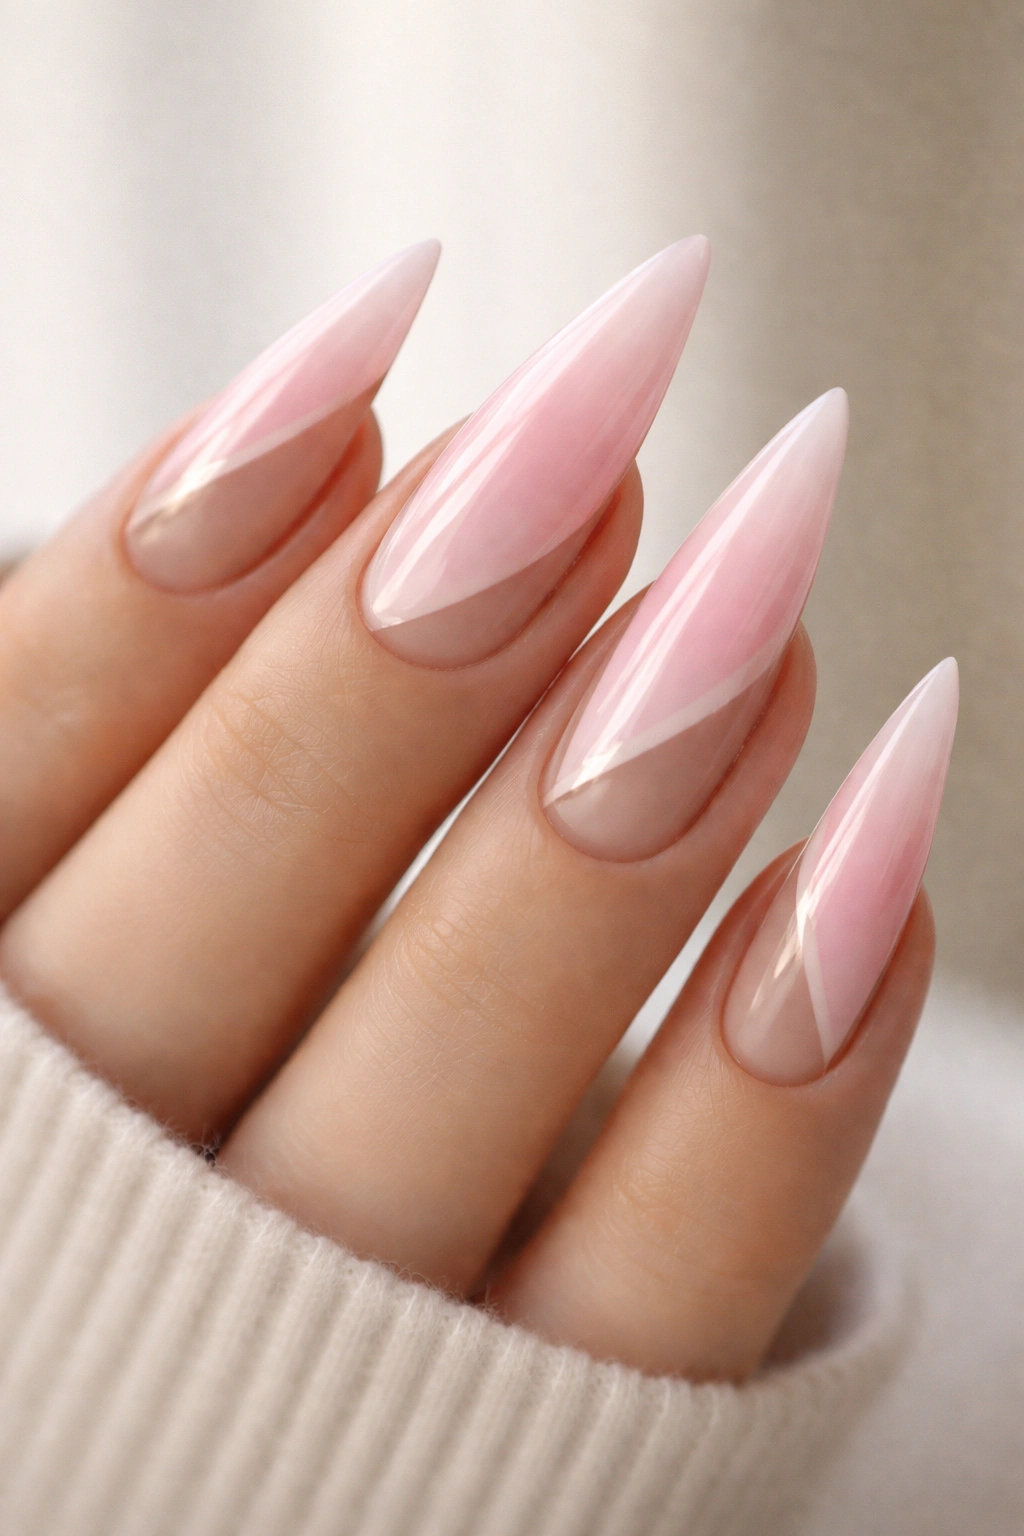
4. Blush-to-Nude Gradient with Reverse Ombré
Instead of a traditional base-to-tip gradient, this design reverses the usual direction — the deepest blush tone sits at the tip of the stiletto nail, while it fades to a barely-there nude at the base and cuticle area. This creates the illusion that your natural nail is showing through, which is surprisingly flattering and creates an ultra-refined, almost “no-makeup makeup” aesthetic. The stiletto shape amplifies the effect by giving plenty of real estate for the gradient to develop.
The Psychology Behind Reverse Ombré
A reverse ombré actually makes your nails appear longer because the deeper color at the tip creates visual weight and draws focus to the nail’s length. This technique is particularly effective on stilettos because the shape already emphasizes length — the gradient simply enhances what the shape is already doing. It’s also more forgiving for shorter nails, as it creates the illusion of extra length even if you haven’t committed to super-long tips yet.
Application Tips for Reverse Ombré
- Start with a nude or skin-tone base color applied to the entire nail
- Apply blush pink to just the tip section, gradually blending it back toward the middle
- Use a dry sponge for the second coat to create softer blending — moisture can spread the color too far
- Apply the blush color in thin layers, building depth gradually rather than trying to achieve full opacity in one pass
- Seal with a glossy topcoat for an elegant, finished appearance
Pro tip: This design actually photographs beautifully for social media because the gradient reads clearly in both natural and artificial light.
5. Coral-Pink Gradient with Geometric Lines
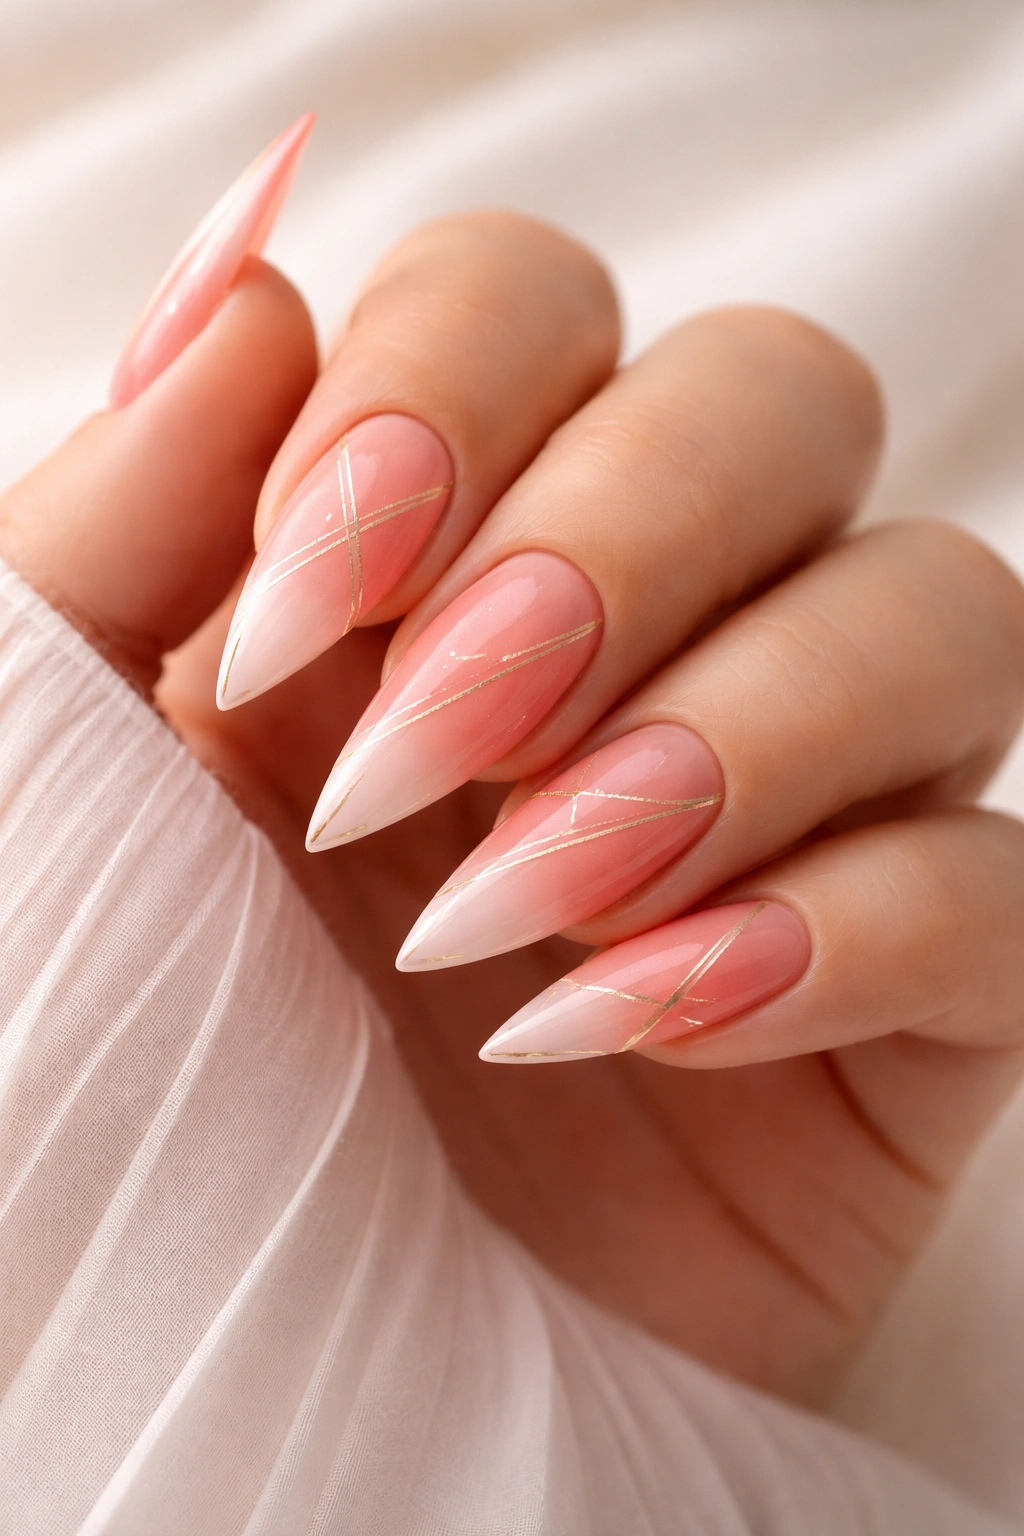
This design takes the classic pink ombré and adds architectural precision with thin geometric lines in white, gold, or nude running vertically or diagonally across the nail. The stiletto shape provides the perfect canvas for these linear elements — they echo the nail’s elongated form and add a modern, editorial edge to what could otherwise be a purely romantic design. The coral-to-pink gradient sits as the base while the geometric overlay creates visual interest and complexity.
Why Geometric Details Elevate Ombré
Geometric elements prevent ombré from feeling too soft or overly feminine. They add structure, intentionality, and a contemporary art vibe that appeals to anyone who loves both color and clean design. The lines can be thin and minimal or bolder and more statement-making depending on your mood and the occasion. This is the design for people who want beauty but also sophistication and edge.
Executing Geometric Precision
- Complete your coral-to-pink ombré gradient first and let it dry completely
- Use a thin nail art brush or nail pen to add geometric lines — straight lines, diagonal stripes, or angular shapes
- Gold or white lines create the most contrast and show up cleanly against pink tones
- Keep lines thin and confident rather than thick and hesitant — one clean line looks intentional, a shaky thick line looks accidental
- Add a glossy topcoat over everything to seal the design and add shine to both gradient and geometric elements
- If you’re not confident hand-painting, striping tape can create perfectly straight lines with minimal effort
Worth knowing: The geometric elements actually make this design more forgiving of imperfect gradient blending because the eyes follow the lines rather than scrutinizing the color transition.
6. Dusty Rose Ombré with Pearl Accents
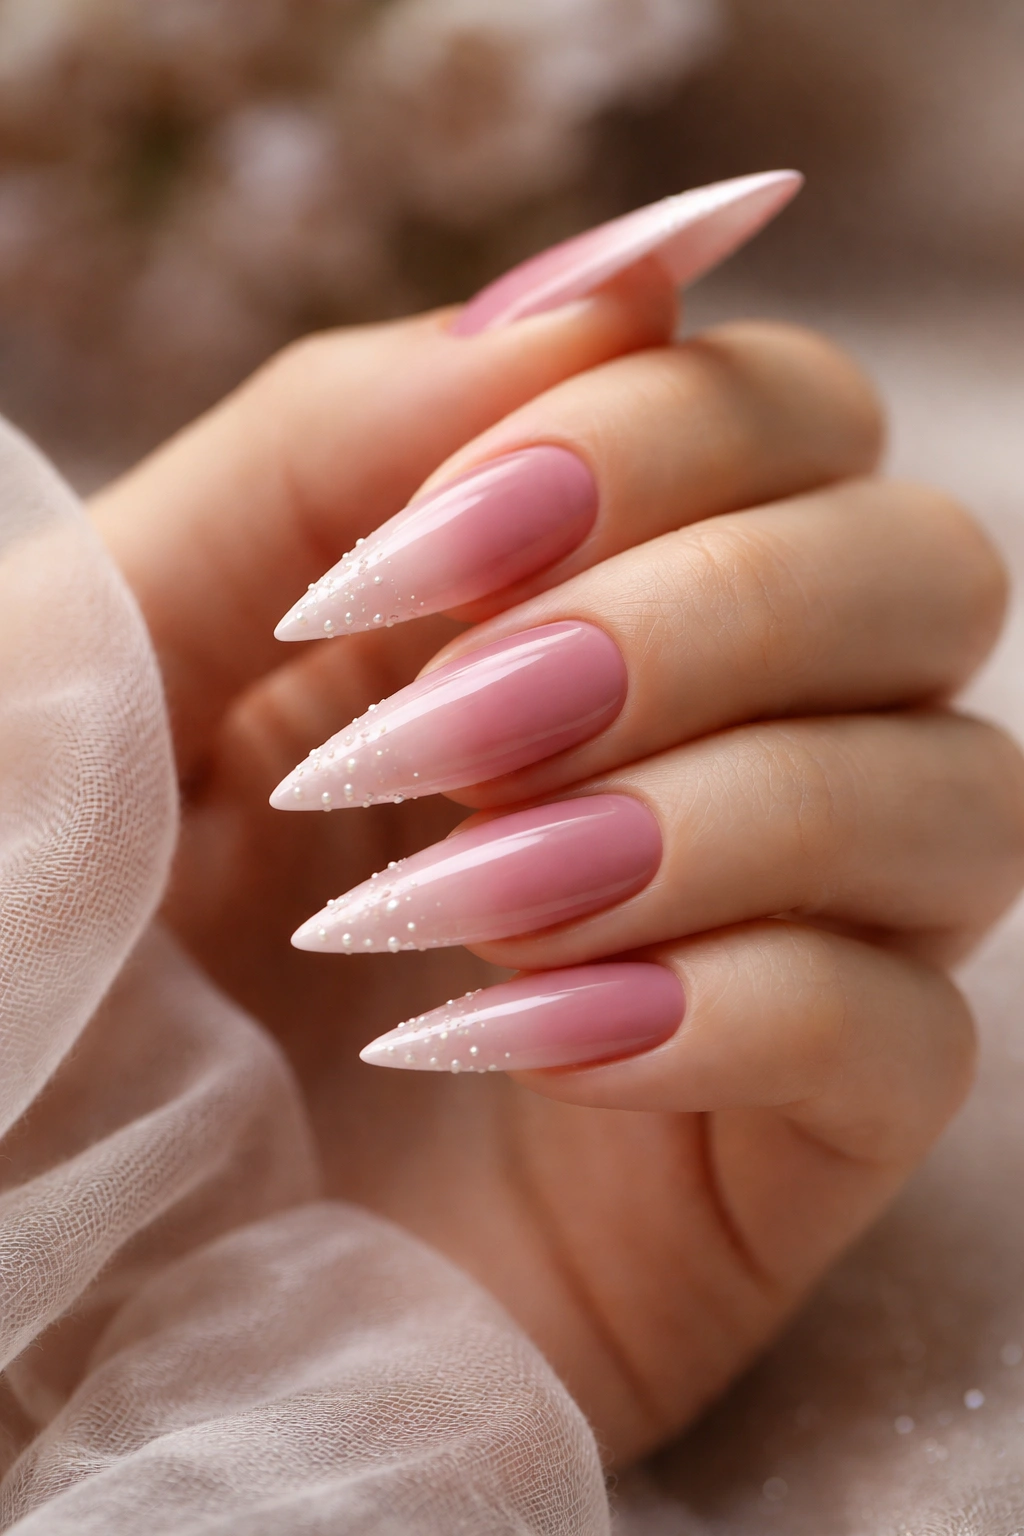
This ultra-feminine design combines a dusty rose ombré with strategically placed pearl accents — either pearl dust mixed into the topcoat or individual pearl nail art elements positioned along the tip or side of the stiletto nail. The combination is romantic without being overly girly, elegant without being uptight. Dusty rose is one of the most universally flattering pink tones, and pearls add just enough shine and texture to elevate the look.
The Elegance of Subtle Embellishment
Pearl accents add dimension without overwhelming the ombré gradient. They catch light and create focal points while the soft pink ombré provides a calming, cohesive base. This design works beautifully for events like weddings, bridal showers, or date nights where you want to feel extra polished. The pearls also add a tactile element — there’s something satisfying about the slight texture they create.
Adding Pearls to Your Ombré Design
- Complete your dusty rose ombré gradient and allow it to cure fully under UV light (if gel) or air dry completely (if traditional polish)
- Apply a thin layer of clear topcoat or adhesive base to the area where you want pearls to sit
- Place individual micro-pearls using a dotting tool, positioning them while the base is still tacky
- Alternatively, mix pearl dust into your topcoat for a more subtle, all-over sparkle effect
- Seal everything with a final coat of clear topcoat, pushing it up and over the pearls to secure them thoroughly
- If using gel polish, cure under UV light after each layer
Pro tip: Placing pearls only on every other nail or only on the accent finger creates a more sophisticated, less costume-like appearance than fully covering all nails.
7. Hot Pink-to-Blush Ombré with Glitter Fade
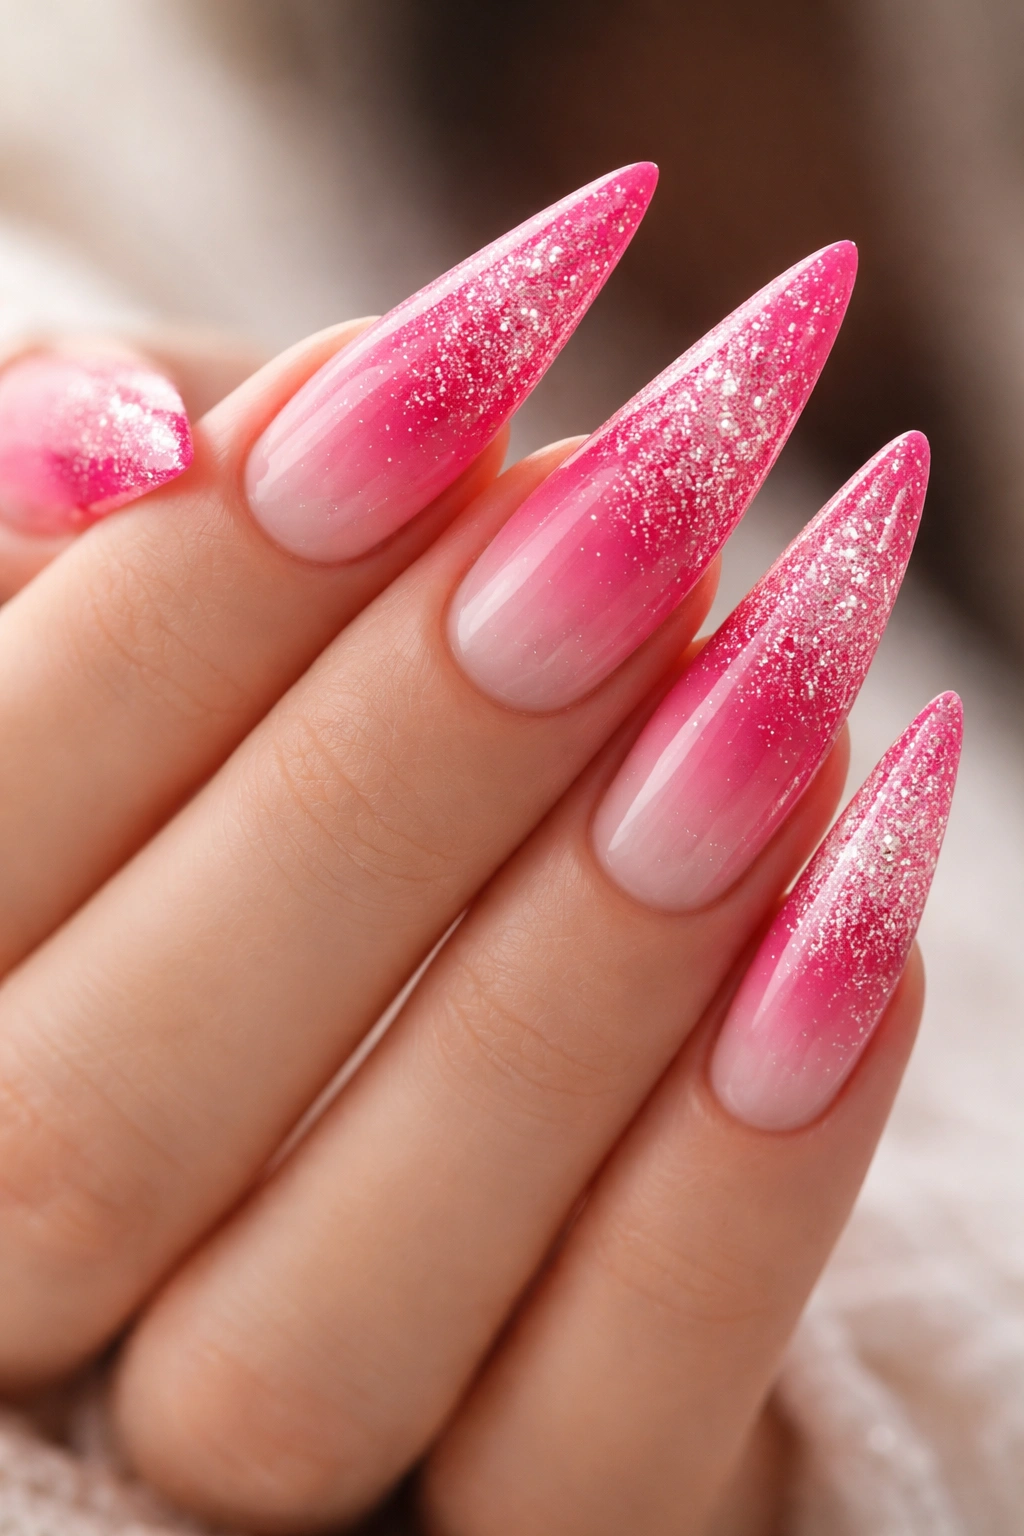
This design goes bolder with a hot pink or fuchsia base that gradually fades into blush pink at the tip, and the transition is studded with a fine glitter that also fades in density. So the glitter is heavy and prominent where the hot pink is darkest, gradually becoming sparser and more delicate toward the blush tip. This creates a sophisticated glitter fade rather than a simple glitter-dusted design. Stiletto nails give the glitter room to create a true gradient effect.
When Bold Glitter Makes Sense
A glitter fade is the sweet spot between understated and party-ready. It catches light and creates movement without looking costumey or over-the-top. The fading technique is key — it prevents the glitter from feeling flat or one-dimensional. This design works beautifully for festive occasions, nights out, or anyone who loves a little sparkle but doesn’t want obvious drama.
Executing a Professional Glitter Fade
- Apply your hot pink base color to the entire nail and let dry
- Apply blush pink to just the tip area, blending it gently with a sponge while wet
- While the gradient is still tacky, apply fine glitter to the hot pink areas using a brush — be generous here
- Apply the same glitter more sparingly to the middle transition area
- Apply just a tiny amount of fine glitter to the blush tip for that delicate fade effect
- Seal with a glossy topcoat, making sure it encapsulates all the glitter without creating a lumpy, thick finish
- A thin-formula topcoat works better than a thick gel for a sleek final look
Worth knowing: The key to a professional glitter fade is restraint and layering — multiple thin coats of glitter create better results than one heavy application.
8. Pastel Pink Ombré with Negative Space Design
This modern, minimalist design features a traditional pastel pink ombré but with a twist — a section of the nail is left bare or polished in a nude tone, creating negative space that breaks up the color. The negative space often takes the form of a geometric shape (triangle, stripe, or chevron) along one side of the stiletto nail. This creates visual interest through what’s not there as much as what is.
The Appeal of Negative Space
Negative space adds architectural interest to an otherwise soft, romantic design. It’s a sophisticated way to incorporate minimalism into a manicure that could otherwise feel too delicate. The bare or nude sections actually make the pastel pink ombré feel more intentional and editorial. This design appeals to anyone who loves clean aesthetics and modern nail art.
Creating Negative Space Without Mess
- Plan your negative space area before you start — sketch it out or use nail guides to mark where it should be
- Apply your pastel pink ombré gradient to the areas that will be colored
- Use striping tape or nail stencils to protect the negative space area while you apply color
- Remove the tape while the polish is still slightly wet for clean edges
- Alternatively, apply the full gradient first, then paint over the negative space area with nude or clear polish once everything is dry
- Seal with topcoat, making sure it covers both the ombré and the negative space evenly
Pro tip: A thin white or nude line can define the edge of the negative space and make it look even more intentional and design-forward.
9. Pink Ombré Stiletto with Chrome or Mirror Finish Tips
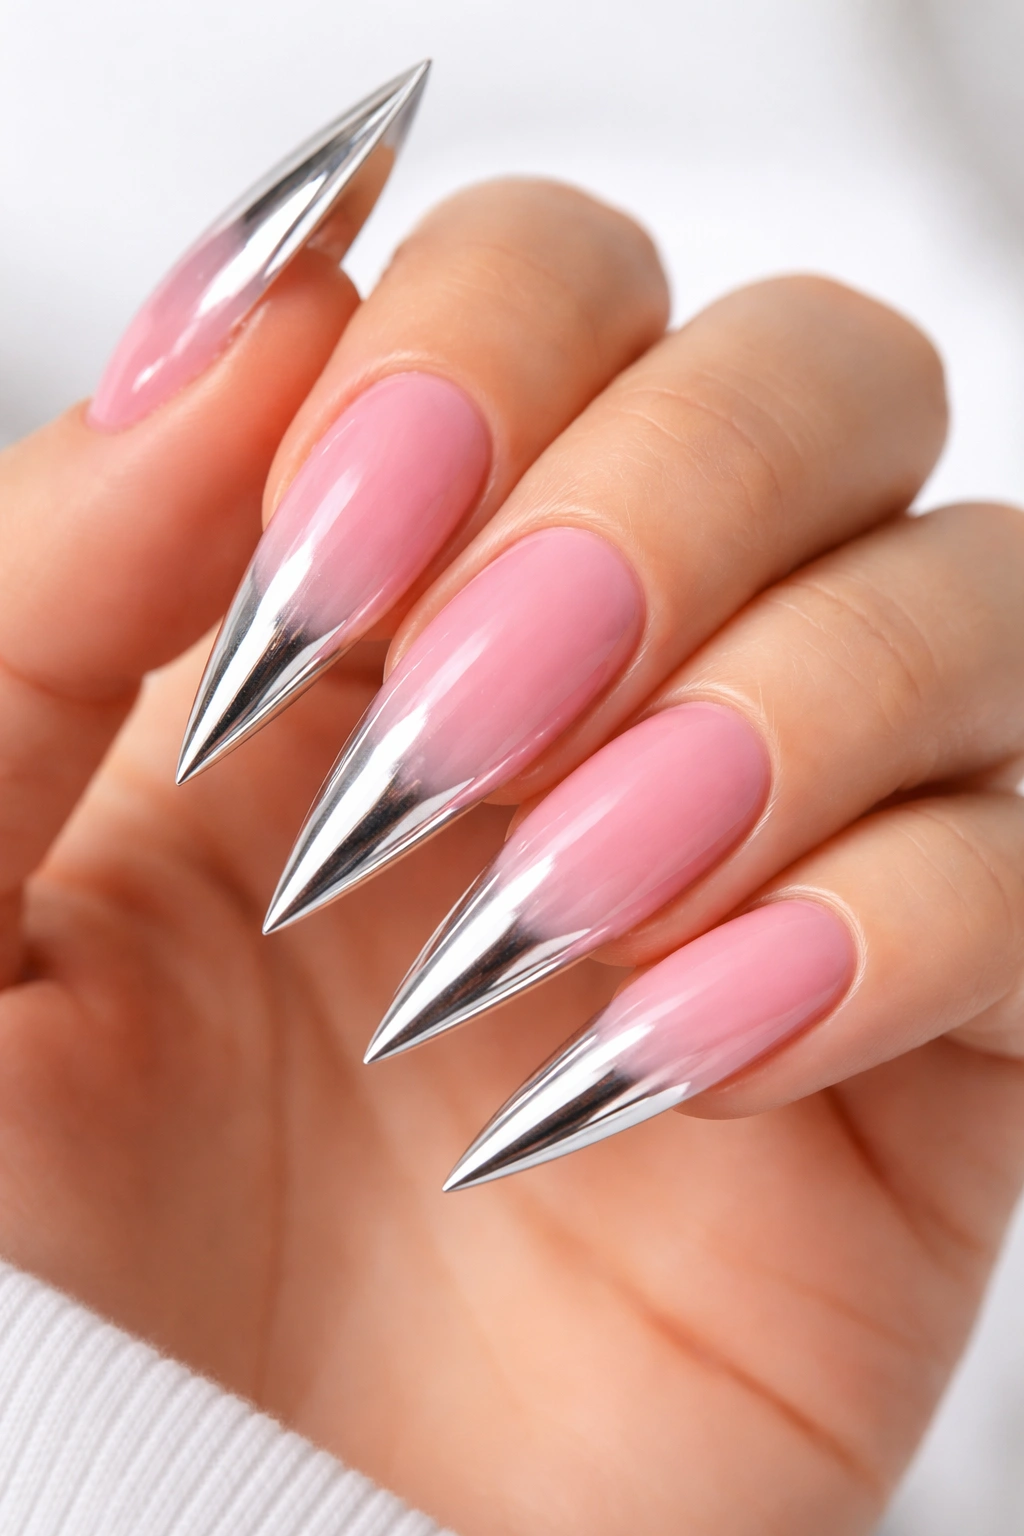
This eye-catching design combines a traditional pink ombré base with chrome or mirror-finish tips. The ombré creates the gradient from a deeper pink at the base, and the transition point marks where the chrome effect takes over. Chrome creates an otherworldly, almost holographic appearance that transforms the stiletto nail into something futuristic and statement-making. The contrast between the soft ombré and the reflective chrome is visually stunning.
The Power of Chrome and Metallic Effects
Chrome and mirror finishes are one of the hottest trends in nail art because they photograph exceptionally well and create an unforgettable visual impact in person. Combined with a pink ombré, they’re edgy enough to prevent the design from feeling too feminine while still celebrating the softer color palette. This design announces “I’m intentional about my beauty choices” in the best way possible.
Achieving Chrome Tips Over Ombré
- Complete your pink ombré gradient and allow it to dry completely
- Apply a thin coat of clear or nude topcoat to seal the ombré
- Using a chrome powder (usually comes with an applicator), rub the powder over the tip area in gentle, sweeping motions
- Chrome powder requires a special adhesive or a tacky topcoat base — check your specific product’s instructions
- Work in sections and be gentle; chrome powder can be tricky to apply evenly, but that imperfect, reflective quality is actually part of its charm
- Seal everything with a non-sticky topcoat to protect the chrome finish
Worth knowing: Chrome finishes are temporary and will gradually wear and dull with time, but that’s part of their appeal — you can refresh them regularly without commitment.
10. Lavender-Rose Ombré Stiletto with Tiny Diamond Accents
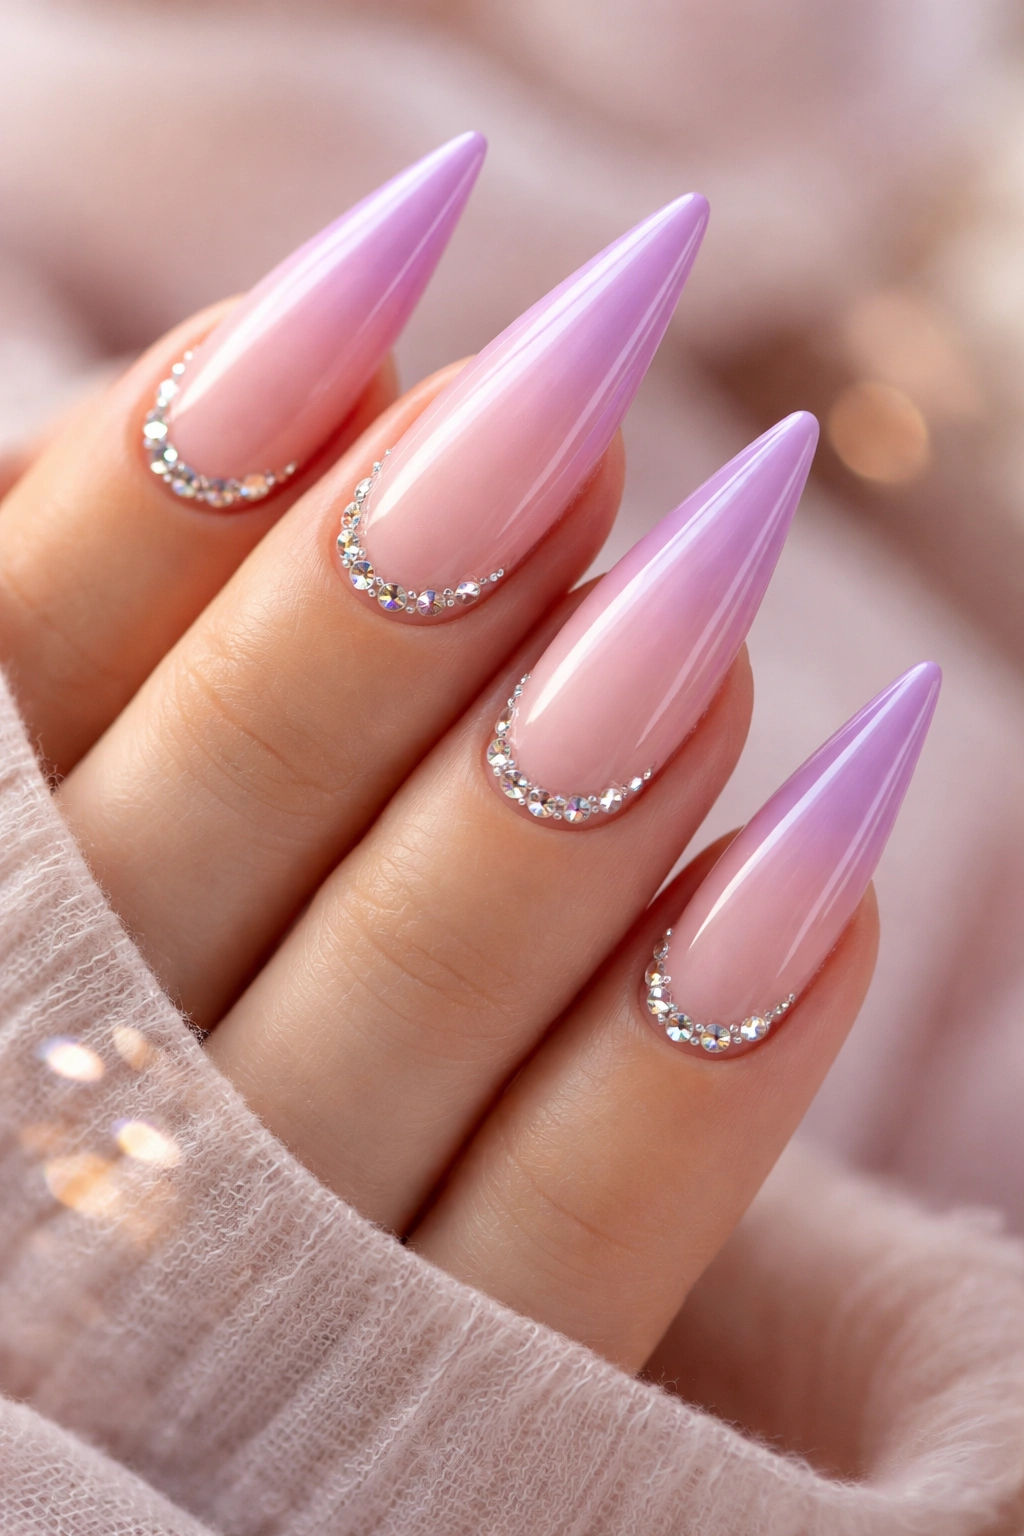
This romantic, slightly unexpected design blends lavender and rose tones together in an ombré that creates a cooler-toned, almost mauve-leaning pink. Tiny diamond-shaped studs or rhinestones are placed strategically down the center of each nail or scattered across the tip area, adding luxury and sparkle without overwhelming the delicate color palette. The combination feels bridal and elegant but modern enough for everyday wear if you’re bold.
Why Lavender Shifts the Pink Narrative
Adding lavender to a pink ombré creates a unique color story. The cooler undertones feel fresh and slightly unexpected while still maintaining the softness and romance of pink. Lavender-pink is universally flattering and works beautifully on all skin tones. It’s sophisticated without being stuffy, and the small diamond accents add just enough glamour to elevate the manicure from pretty to actually notable.
Placing Diamond Accents for Maximum Effect
- Complete your lavender-rose ombré gradient and let it cure fully
- Mark where you want diamonds to sit — either in a vertical line down the center or scattered across the tip
- Apply a small drop of clear adhesive or tacky topcoat to each spot
- Use a dotting tool to pick up individual diamonds and place them on the adhesive
- For oval or elongated diamonds on stiletto nails, orient them vertically to echo the nail shape
- Press gently to secure, then seal with a thin layer of clear topcoat
- Cure under UV light if using gel polish
Pro tip: Placing diamonds only on your accent nail (usually the ring finger) creates a more sophisticated, less costume-like appearance.
11. Ombré Pink Stiletto with Encapsulated Gold Foil
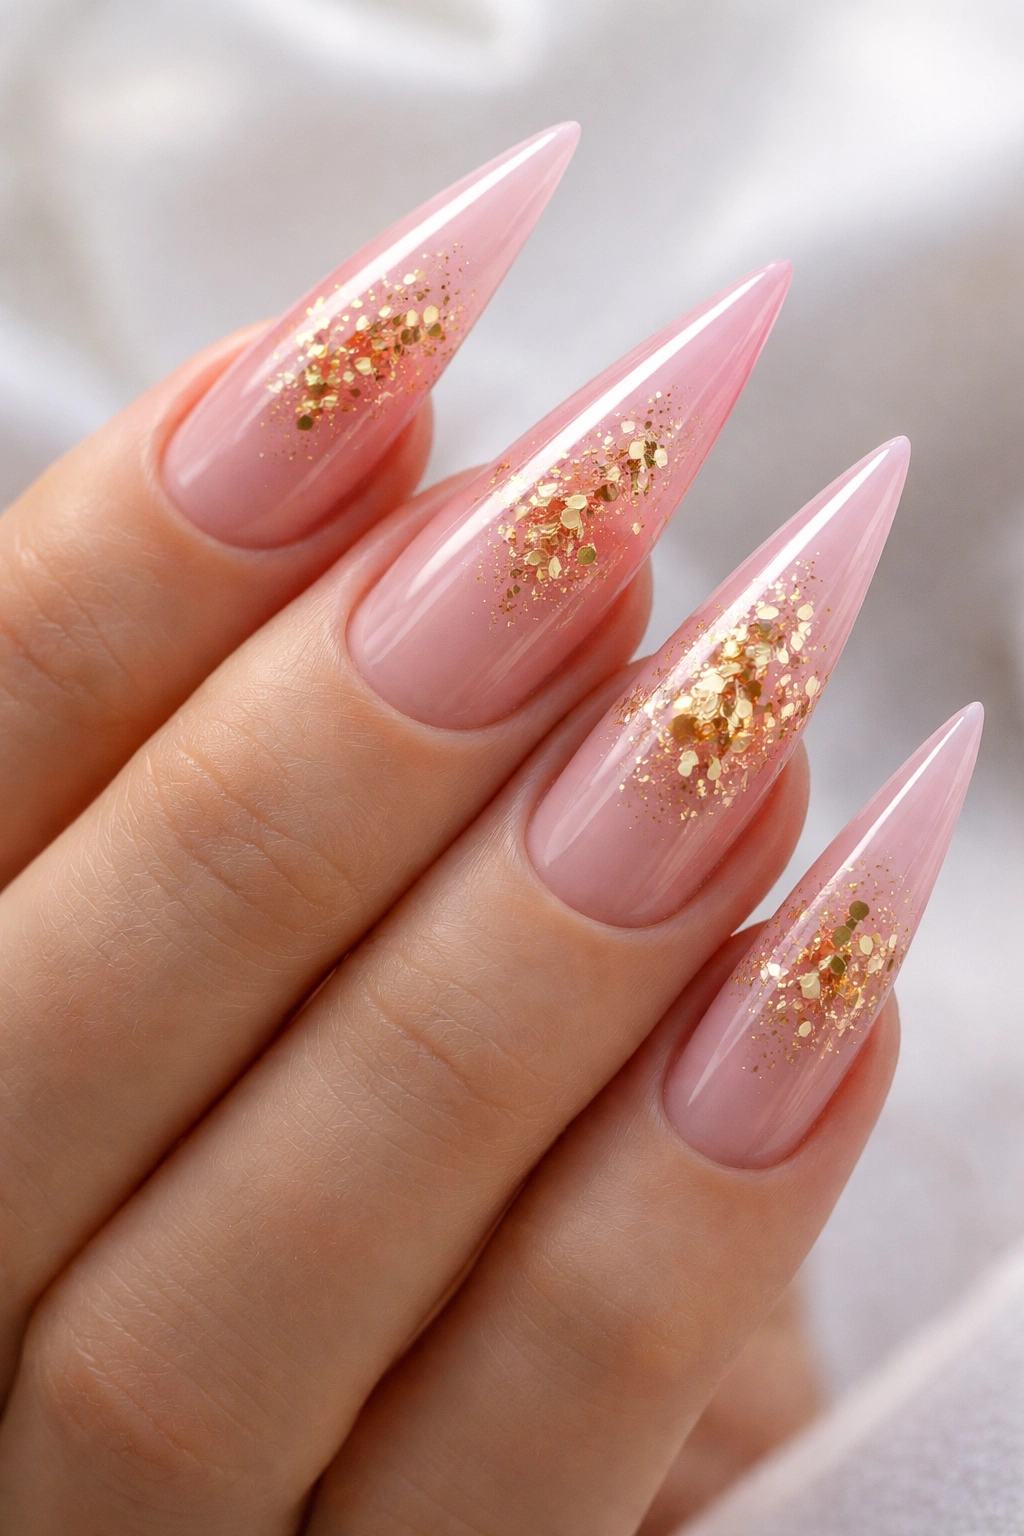
This luxe design features a pink ombré base with encapsulated gold foil suspended within or on top of the polish layers. The foil catches light and creates depth, making the manicure feel three-dimensional and textured. Gold foil works beautifully with all shades of pink — it can be placed heavily for a bold effect or sparingly for something more delicate. The stiletto shape gives plenty of room for the foil to create visual interest.
The Depth That Encapsulation Creates
Encapsulated foil is different from surface-level foil because it’s sealed within the polish, creating a polished, intentional look rather than a flaky, craft-project appearance. The result feels high-end and artistic. Foil adds warmth to cool-toned pinks and creates a richness that solid color alone can’t achieve. This is the design for anyone who loves luxury nail art and doesn’t mind investing a bit more effort.
Encapsulating Gold Foil in Your Ombré
- Complete your pink ombré gradient on the base layers
- While the gradient is still tacky, apply small pieces of gold foil using a foil applicator tool or tweezers
- Press the foil gently into the polish so it adheres
- Apply a thin layer of clear topcoat over the foil sections to encapsulate them
- The foil should look like it’s floating within the polish, not sitting on top
- For a more subtle effect, place foil only along the tip or in scattered spots rather than covering the whole nail
- Cure under UV light if using gel polish
Worth knowing: The key to professional-looking encapsulated foil is working with very small pieces and ensuring each piece is fully sealed beneath the topcoat.
12. Ombré Pink Stiletto with Hand-Painted Watercolor Details
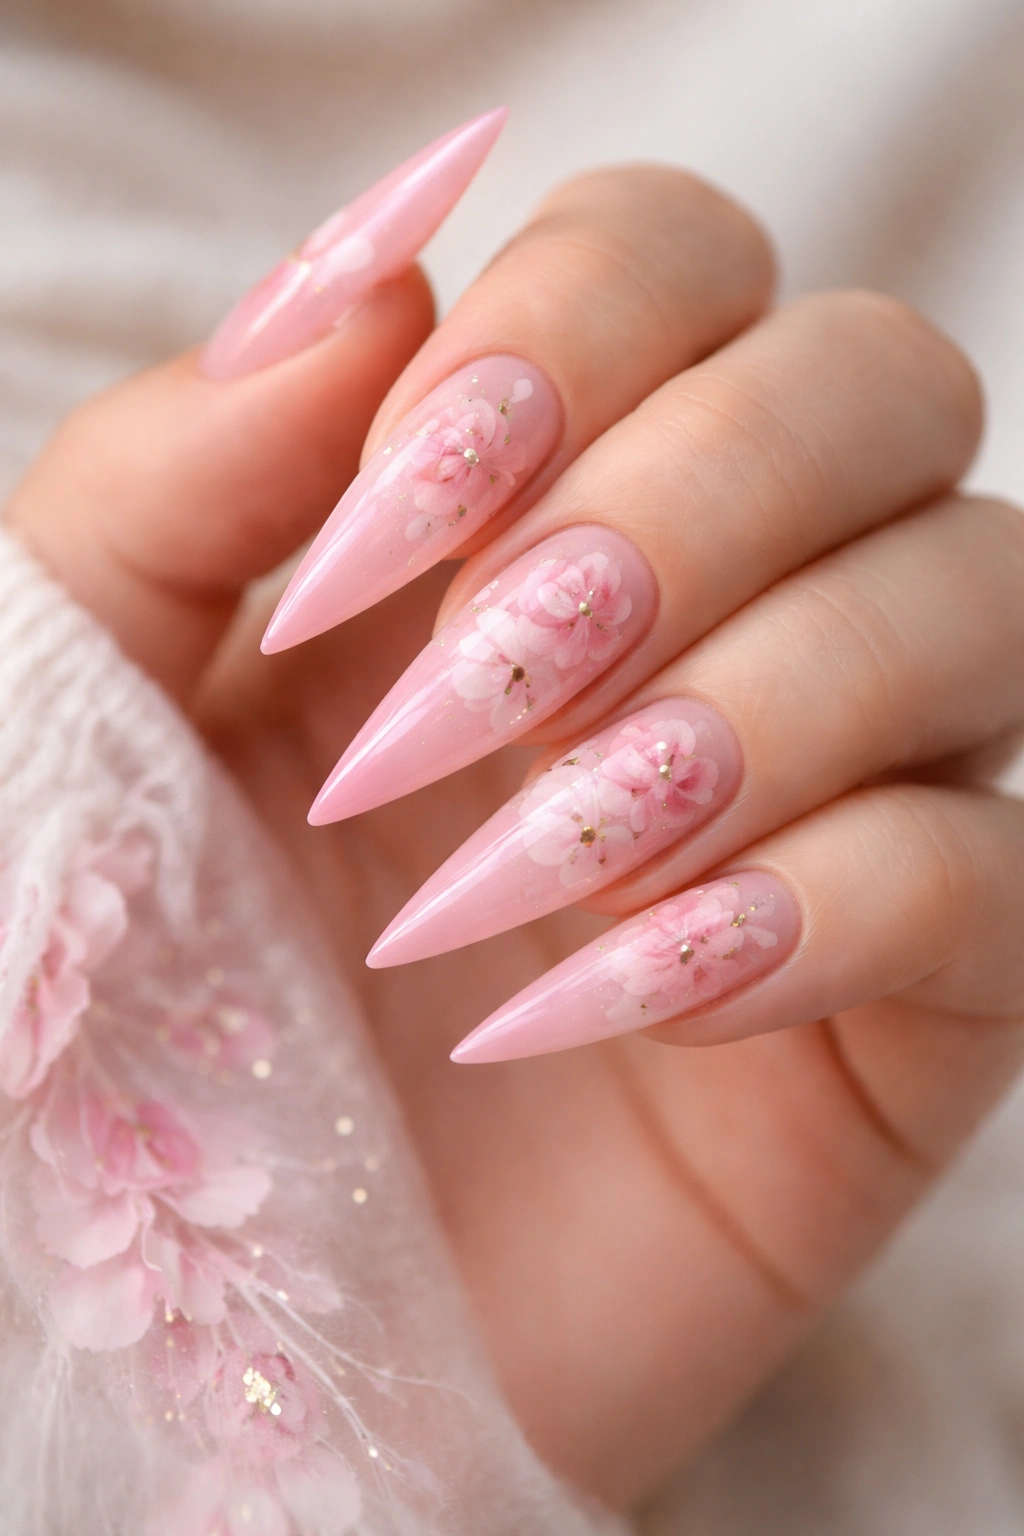
This artistic design combines a pink ombré gradient with delicate, hand-painted watercolor-style details — perhaps tiny florals, abstract brushstrokes, or landscape elements in complementary colors. The watercolor technique creates an organic, artistic quality that contrasts beautifully with the clean geometric shape of the stiletto nail. This design requires steady hands and some artistic skill, but the result is utterly unique and conversation-starting.
When Nail Art Becomes Wearable Art
Hand-painted watercolor details elevate a manicure from pretty to genuinely artistic. Each nail becomes a tiny canvas, and because they’re hand-painted rather than stamped or stenciled, no two nails are exactly alike — which is part of the beauty. This is the design for creative people who see their nails as a form of self-expression and aren’t afraid of unique, slightly bohemian aesthetics.
Adding Watercolor Details to Your Ombré
- Complete your pink ombré base and let it dry completely
- Using ultra-thin nail art brushes, paint your watercolor details with acrylic nail paint or gel
- Watercolor effects work best when you use watered-down acrylic paint or special watercolor nail paint designed to have translucent, flowing properties
- Paint loose florals, abstract shapes, or small landscapes — the key is keeping lines soft and allowing colors to blend where they meet
- Let each detail dry slightly before adding the next layer to prevent muddiness
- Seal everything with a glossy topcoat to protect your artwork
- If using acrylics, cure under UV light after the topcoat application
Pro tip: Practice your watercolor designs on paper first before attempting them on nails — even experienced nail artists do this for intricate designs.
13. Deep Mauve-to-Pink Ombré with Matte and Glossy Mix
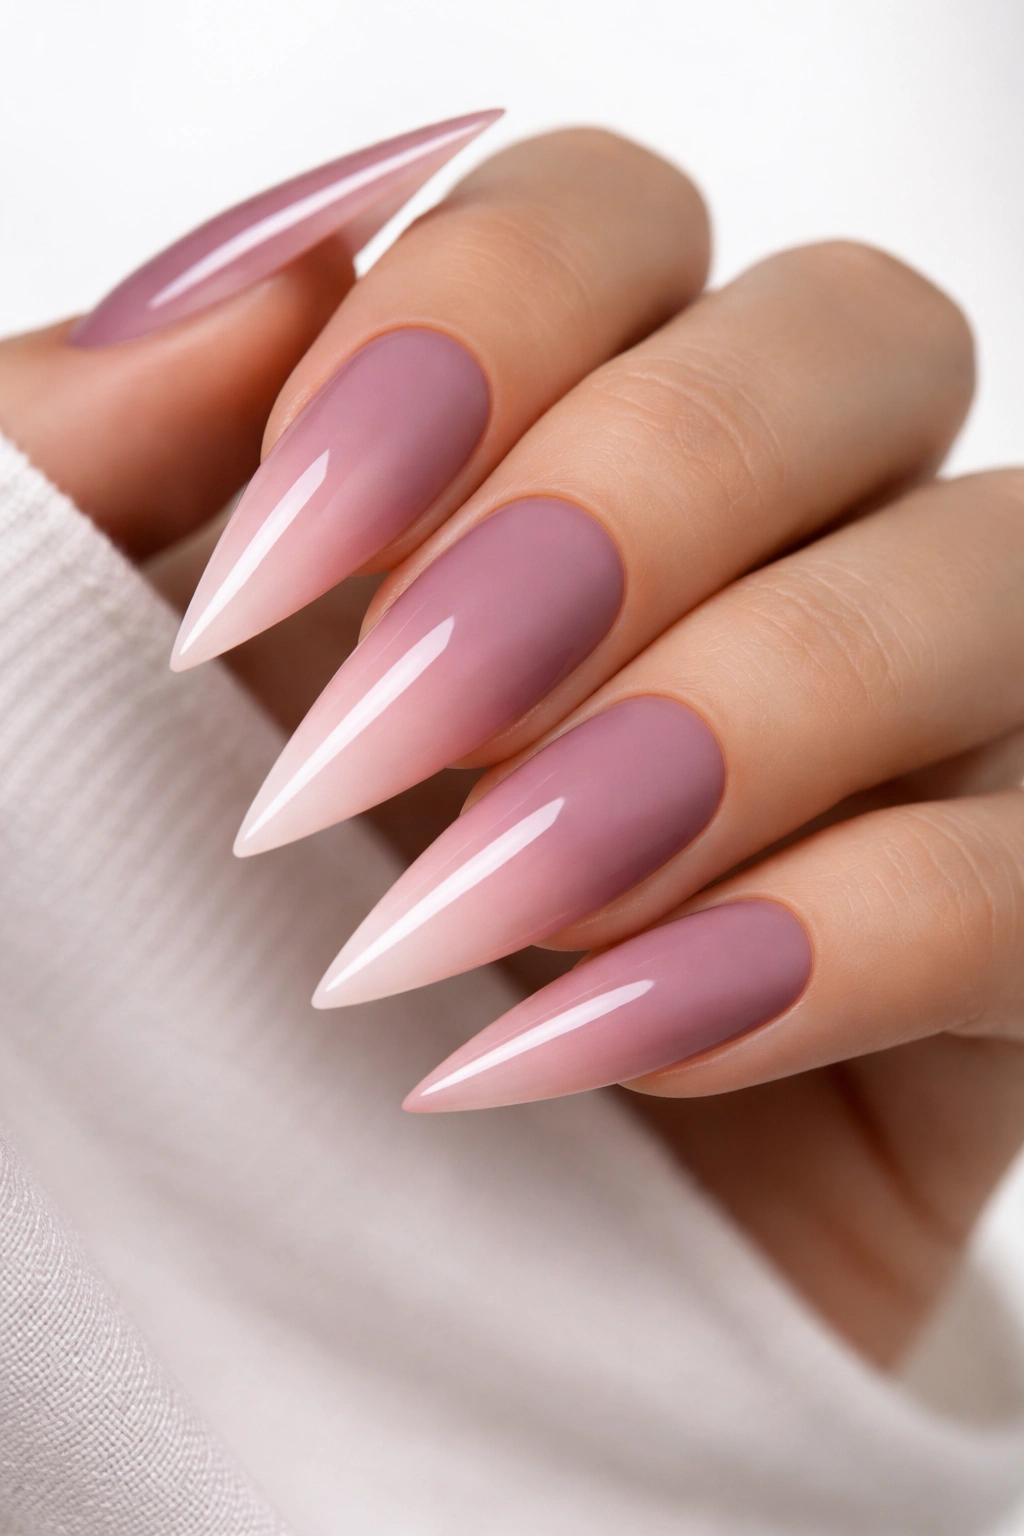
This design plays with finishes by combining a deep mauve-pink ombré with a strategic mix of matte and glossy topcoat application. Perhaps the base is matte while the tip is glossy, or specific sections alternate between matte and glossy. This creates visual depth and texture through finish variation rather than additional color or embellishment. The contrast between matte and glossy is subtle but sophisticated, adding dimension that keeps the eye engaged.
Texture as Design Element
Using different finishes on the same nail is a designer-level trick that creates visual interest without adding complexity. Matte areas appear to recede while glossy areas seem to pop forward, creating an almost three-dimensional effect. This technique works beautifully on stiletto nails because the elongated shape provides enough real estate for the finish differences to be visible and impactful.
Creating the Matte-and-Glossy Mix
- Complete your deep mauve-to-pink ombré gradient and let it dry or cure fully
- Apply matte topcoat to specific areas — either the base section, or in stripes or sections that create an intentional pattern
- Apply glossy topcoat to the remaining areas
- The key is letting each topcoat layer dry completely before applying the next one to prevent them from blending together
- Make sure your topcoat applications are smooth and even; any bumps or uneven application will be visible due to the finish contrast
- Cure under UV light if using gel polish
Worth knowing: This design requires patience and precision because any imperfection in topcoat application will show due to the finish contrast.
14. Coral-Salmon-to-Peachy Ombré with Reverse Fade Glitter

This warm-toned ombré moves from coral at the base through salmon in the middle to peachy-blush at the tip, and the glitter pattern reverses — dense glitter at the peachy tip that fades down toward the coral base. So the glitter is heaviest where the color is lightest, creating a visual balance between color intensity and glitter density. The result is a design that feels both cohesive and dynamic.
Why Warm Tones Photograph Beautifully
Coral and salmon tones are incredibly photogenic and flattering in almost all lighting conditions. They work beautifully on warm and cool skin tones alike, making this a universally wearable design. The reverse-fade glitter adds movement and sparkle without overwhelming the warm, natural color palette. This design works for anyone who loves color but prefers warm tones over cool pinks and purples.
Building Your Reverse-Fade Glitter Ombré
- Apply your coral base color and let it dry
- Apply salmon to the middle section, blending with coral while slightly wet
- Apply peachy-blush to the tip and blend the transition
- Once the ombré is fully dry, apply fine glitter heavily to just the tip area while a thin coat of clear polish is still tacky
- Gradually apply less glitter as you move toward the middle
- Apply minimal or no glitter to the coral base area
- Seal with glossy topcoat, using thin layers to avoid a thick, clumpy finish
- Cure under UV light if using gel
Pro tip: The reverse fade glitter works best with very fine glitter in silver or clear tones that complement warm colors without competing with them.
15. Ombré Pink Stiletto with Minimalist Line Nail Art
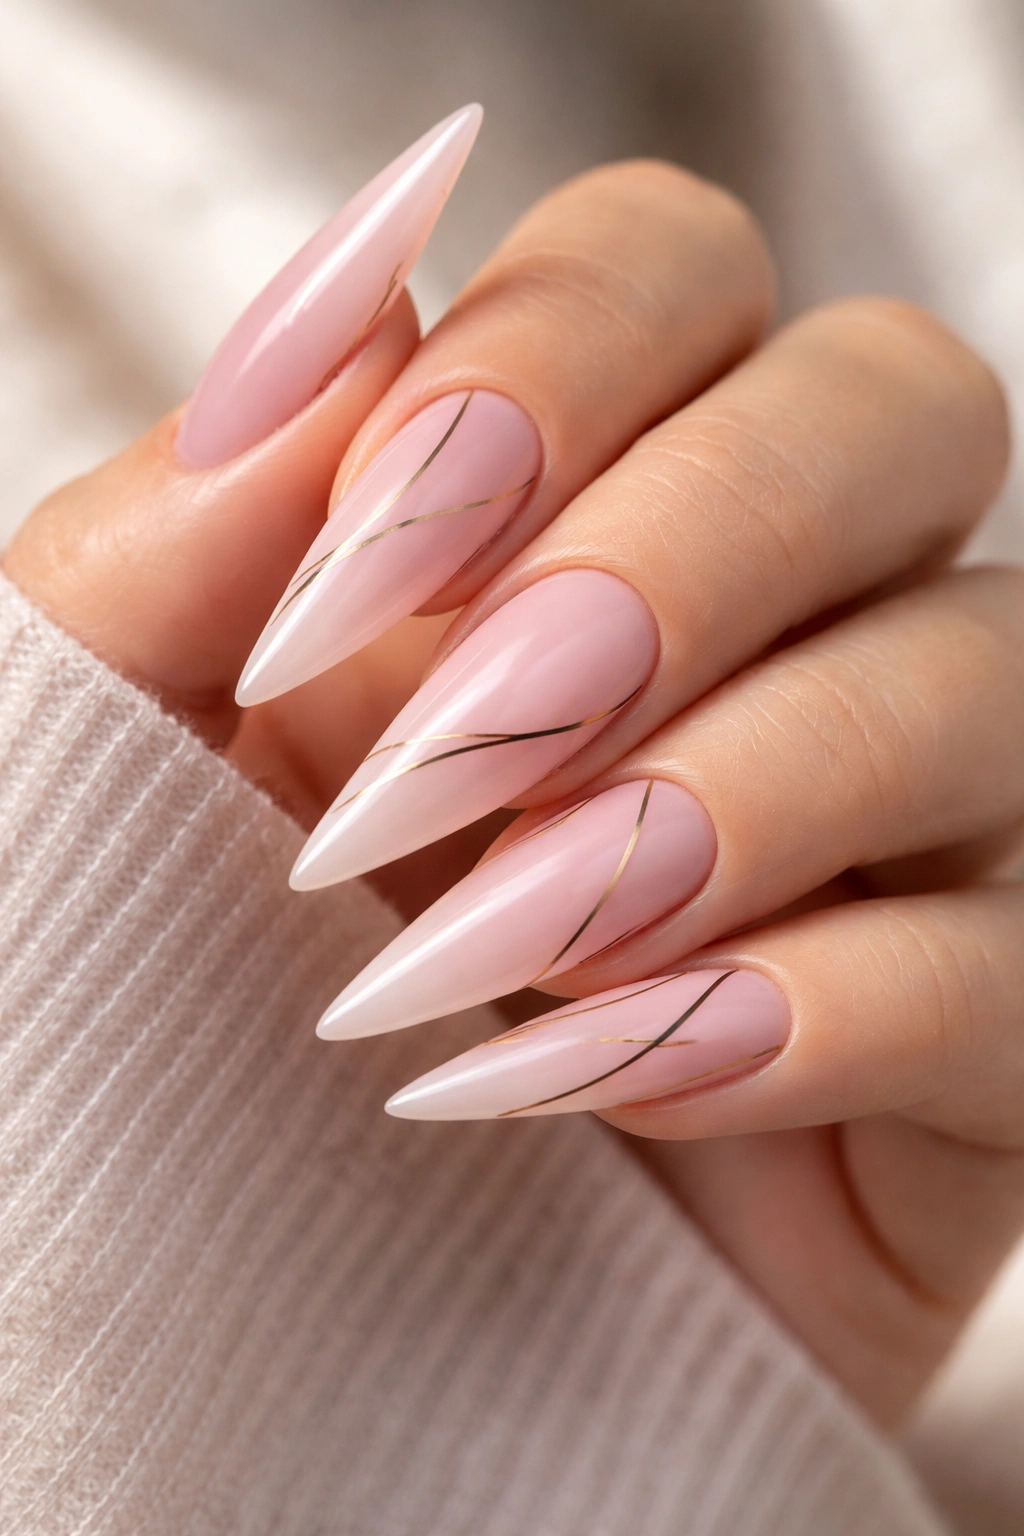
This refined, gallery-approved design features a subtle pink ombré as the base with one or two minimalist lines in black, gold, or nude running across or down the nail. The lines might represent a horizon, a single accent stripe, or an abstract geometric element. The minimalism keeps the focus on the ombré while the lines add intentional design and visual sophistication. This appeals to anyone who loves clean aesthetics and modern art-inspired beauty.
Elegance Through Simplicity
Sometimes the most sophisticated designs are the simplest ones. A single, perfectly executed line is infinitely more refined than busy embellishment. This design proves that you don’t need glitter, pearls, or elaborate details to make a statement. The pink ombré does the heavy lifting in terms of color and romance, while the minimalist line adds modern edge and intentionality.
Executing Minimalist Line Art
- Complete your pink ombré gradient — any shade works beautifully with this approach
- Let the ombré dry completely
- Using a thin nail art brush or striping brush, paint one or two clean lines in your chosen color
- A horizontal line across the middle or lower nail creates a modern, almost zen aesthetic
- A vertical line down the center echoes the nail’s elongated shape
- A diagonal line creates movement and energy
- Keep lines thin and confident — precision matters more than perfection here
- Let the line dry, then seal everything with clear topcoat
- For maximum polish, use nail guides or striping tape to ensure perfectly straight lines
Pro tip: Black lines create maximum contrast and impact, while nude or gold lines are more subtle and sophisticated. Choose based on how statement-making you want the design to be.
Final Thoughts
Pink ombré stiletto nails offer something rare in the world of nail design: they’re sophisticated enough for professional settings, creative enough for artistic expression, and versatile enough to suit virtually any occasion or personal style. The beauty of this particular combination lies in its range. You can go barely-there with a peachy-to-blush gradient, or you can go bold with glitter, chrome, or hand-painted details. You can keep it romantic with pearls and delicate embellishments, or you can add edge with matte finishes and geometric lines.
The key to choosing your perfect pink ombré stiletto design is considering not just the aesthetic you love, but also how much maintenance you’re willing to commit to. Designs with embellishments or special finishes require more careful daily handling and more frequent touch-ups. Simpler gradients are easier to maintain but every bit as elegant. Consider, too, your lifestyle and the impression you want to make — a glitter fade sends a different message than a minimalist line design, even though both are undeniably beautiful.
Whatever direction you choose, remember that your nail design should make you feel confident and genuinely like yourself. The most stunning manicure in the world is the one that feels authentic to who you are. Pink ombré stilettos are versatile enough to accommodate any version of your style.
