

Prom deserves nails that make a statement, and stilettos are the perfect canvas for the kind of bold, sophisticated designs that photograph beautifully and last through the entire night. Whether you’re going for classic elegance, trendy artistry, or something that commands attention the moment you walk in, stiletto nails offer the length and dramatic shape that elevates any design from pretty to unforgettable. The elongated pointed tip literally frames your hands like little works of art, making even simple color choices feel luxe and intentional.
The thing about prom nails is that they need to work across multiple dimensions—they need to complement your dress, photograph well (because there will be photos), feel comfortable to wear for hours, and most importantly, make you feel confident and beautiful. Stilettos deliver on all counts because the shape itself is inherently glamorous. You’re not just wearing nail polish; you’re wearing an architectural statement that says you showed up ready.
Here’s what makes these 10 designs perfect for prom: they balance wearability with impact, they work with virtually every dress color, and they’re all achievable whether you’re getting them done professionally or attempting them at home with some patience. From quiet luxury to full-on sparkle, you’ll find a design that fits exactly who you are and how you want to feel on your big night.
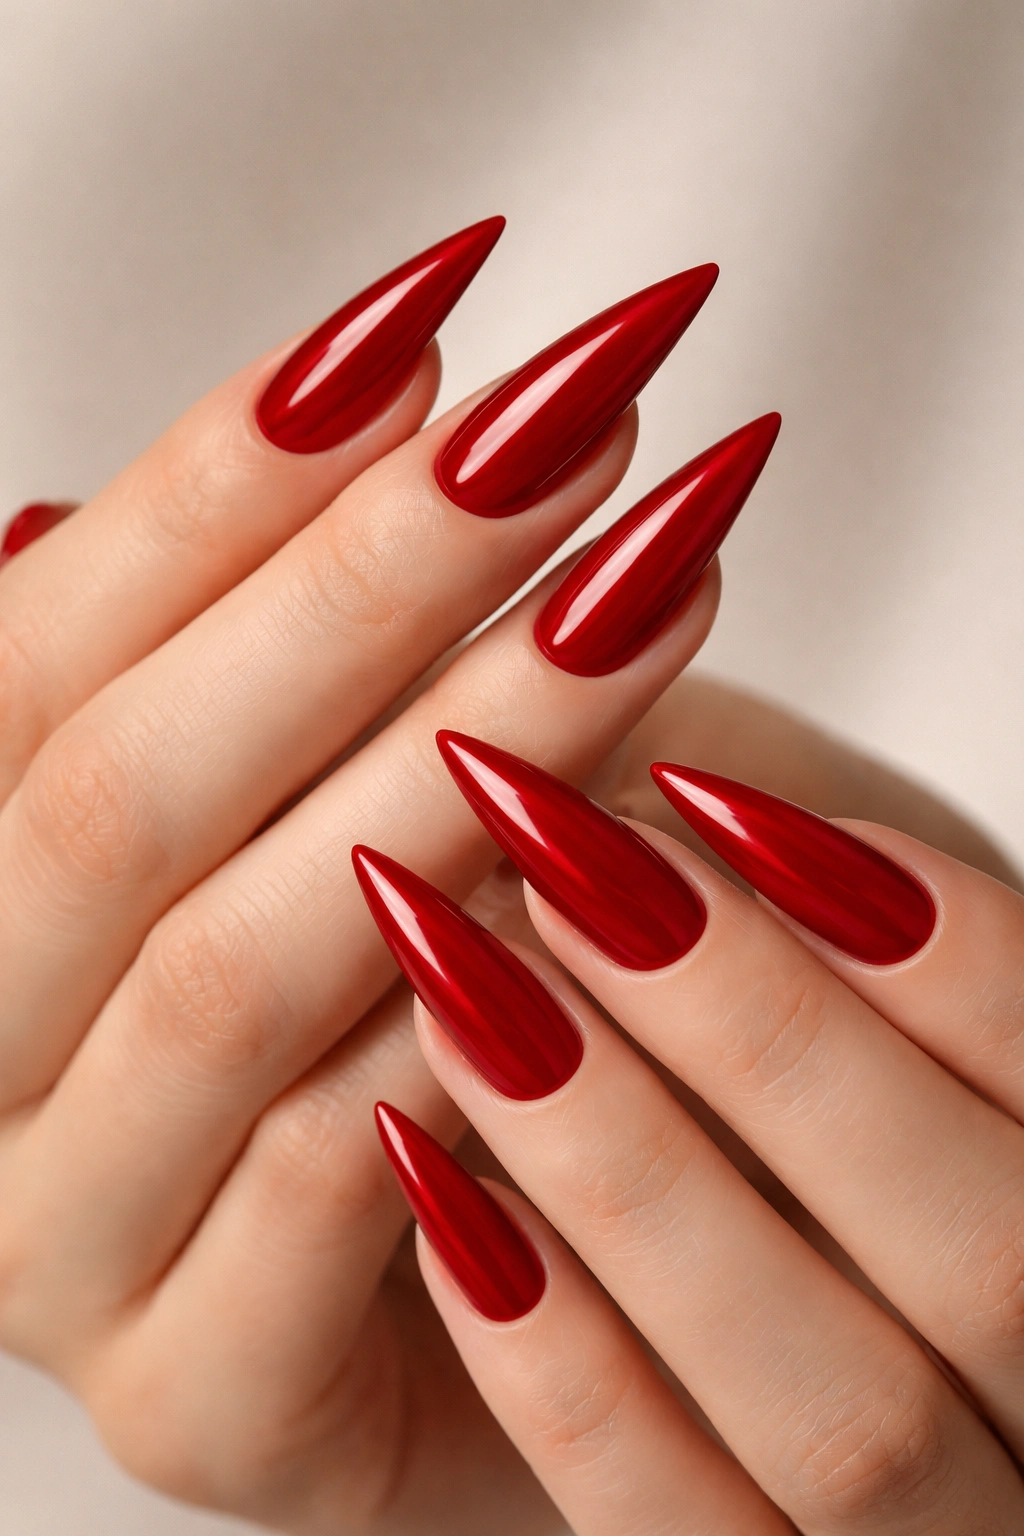
1. Classic Red Stiletto Drama
Red nails are the prom equivalent of a black-tie dress code—they’re timeless, they photograph like absolute magic, and they instantly elevate your entire look. But here’s the secret: a true crimson red with a slightly glossy finish reads as more sophisticated than a flat matte finish, and the depth of the color matters far more than the finish. You want a red that’s genuinely red, not orange-leaning or blue-leaning, because those undertones can make your skin tone look off if they don’t match your undertones perfectly.
The beauty of red stilettos is how they work as a neutral in your overall look. Your dress can be literally any color—white, black, gold, navy, pastels—and red nails act like the punctuation mark that ties your whole aesthetic together. They say confidence without saying anything at all.
Why Red Works for Prom
Red has been the ultimate prom nail color for generations, and it remains undefeated for one reason: it commands attention in the best possible way. The color draws the eye to your hands without feeling costume-y or overdone, even on a pointed stiletto shape. Red photographs beautifully under all lighting conditions—indoor gym lighting, outdoor photos, flash photography—because the pigment is strong enough to show true color in every scenario.
Application and Longevity Tips
- Use a high-quality red base coat to prevent the color from staining your nail bed (some reds can stain surprisingly fast, especially if you skip the base)
- Apply thin coats of polish rather than one thick coat—two thin layers of true red often photograph richer than one heavy coat
- A glossy top coat amplifies the depth of the red and makes it look like a professional manicure
- Red chips and shows wear more visibly than other colors, so plan for a polish refresh on prom night if your nails are done more than 2-3 days before
- Seal the edges of the stiletto tip with color so chips aren’t immediately visible
Pro tip: If you’re doing this yourself and want flawless edges on stiletto tips, apply a thin base coat first, then paint your color while the base is still slightly tacky—it helps the polish grip the sharp edge instead of pooling.
2. Nude with Gold Foil Accent
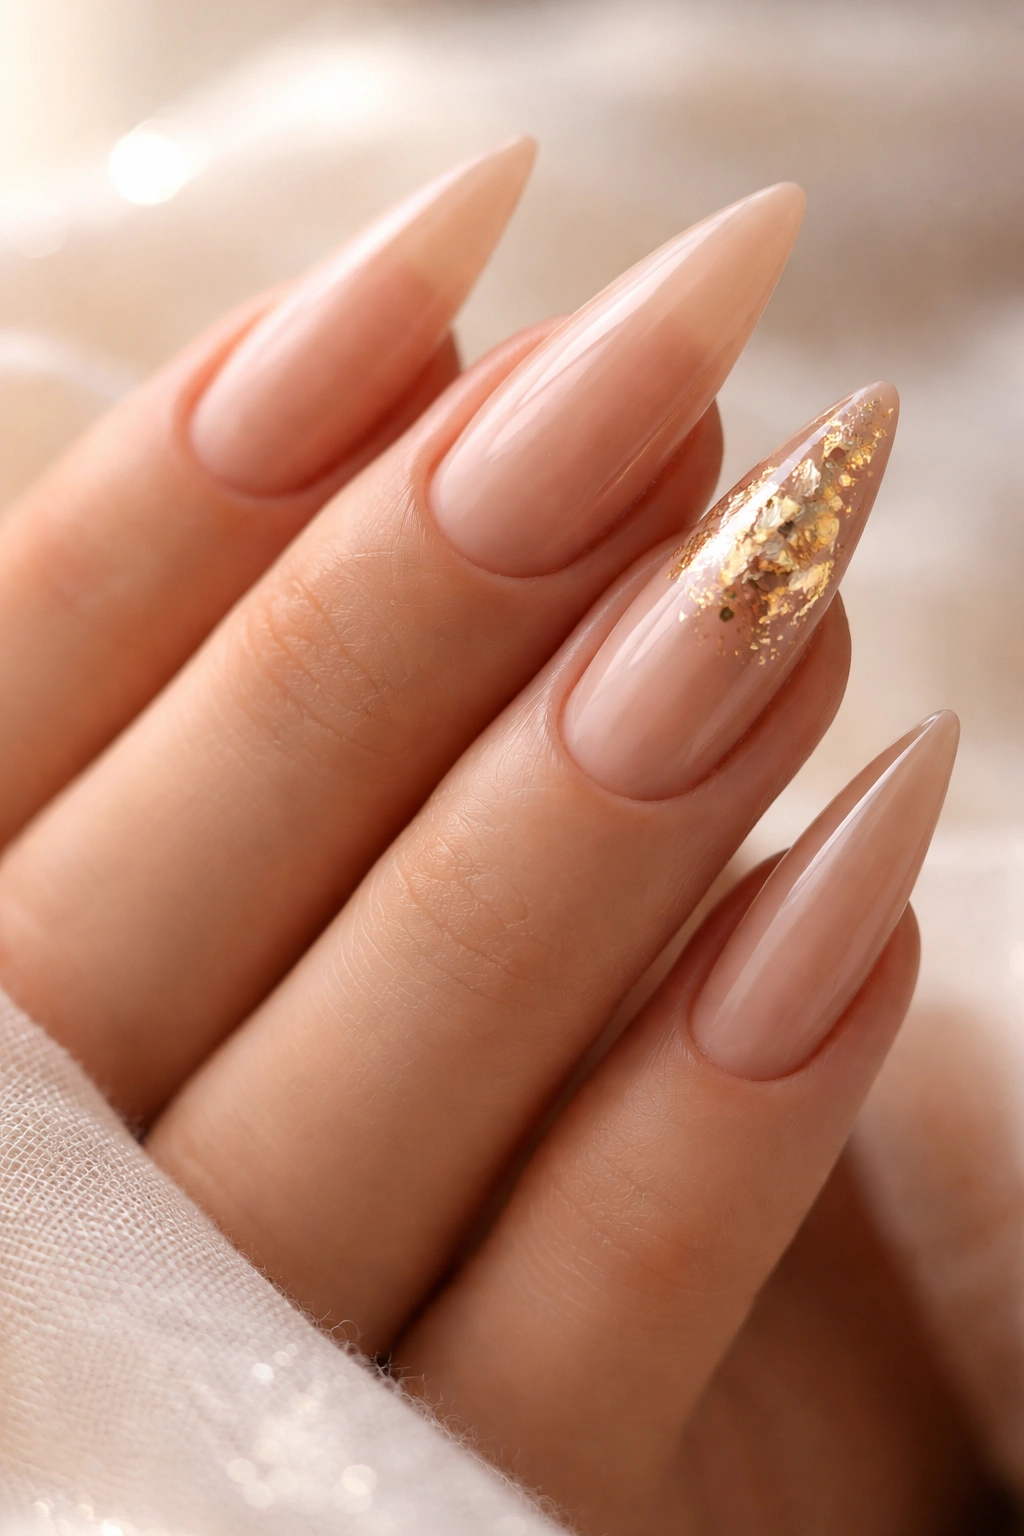
This is the design for anyone who wants sophistication without screaming for attention. A warm, creamy nude base paired with delicate gold foil accents on one or two nails creates an effect that reads as expensive, intentional, and endlessly elegant. The nude-and-gold combination works because gold is a warm metal that harmonizes beautifully with most skin tones, and it doesn’t compete with your dress or makeup—it complements them.
What makes this design special is the restraint. You’re not covering every nail in glitter. Instead, you’re using gold foil—actual crushed gold leaf or high-quality gold flake—on just the accent nail or the tips, which makes the gold feel like a deliberate design choice rather than a “more is better” situation.
Why Nude and Gold Reads as Luxury
Nude nails alone can look a bit plain, but the moment you introduce a metallic accent, the entire design shifts. Gold foil catches light in a way that regular polish can’t, creating depth and dimension that makes your nails look professionally designed. The combination is subtle enough that it won’t distract from your dress or makeup, but distinctive enough that people will notice and compliment your nails specifically.
Achieving the Perfect Nude-Gold Look
- Choose a nude shade that’s one shade lighter than your skin tone for maximum elongation (nudes that are darker than your skin can actually shorten the appearance of your fingers)
- Apply nude base to all nails, then use a thin brush or the edge of a small brush to apply sticky base coat only where you want the gold foil
- Press gold foil onto the sticky base immediately—foil adheres only to wet, sticky surfaces, so timing matters
- Seal everything with a high-quality top coat to prevent the foil from peeling
- If foil isn’t available, try a gold gel-based polish or a fine gold shimmer polish brushed on with a detail brush instead
Worth knowing: Real gold foil is more durable and looks more refined than gold glitter, but it requires a specific sticky base layer to adhere. If you’re getting this done professionally, ask for foil rather than powder or flake for the most polished result.
3. Black Cat-Eye Stiletto Elegance
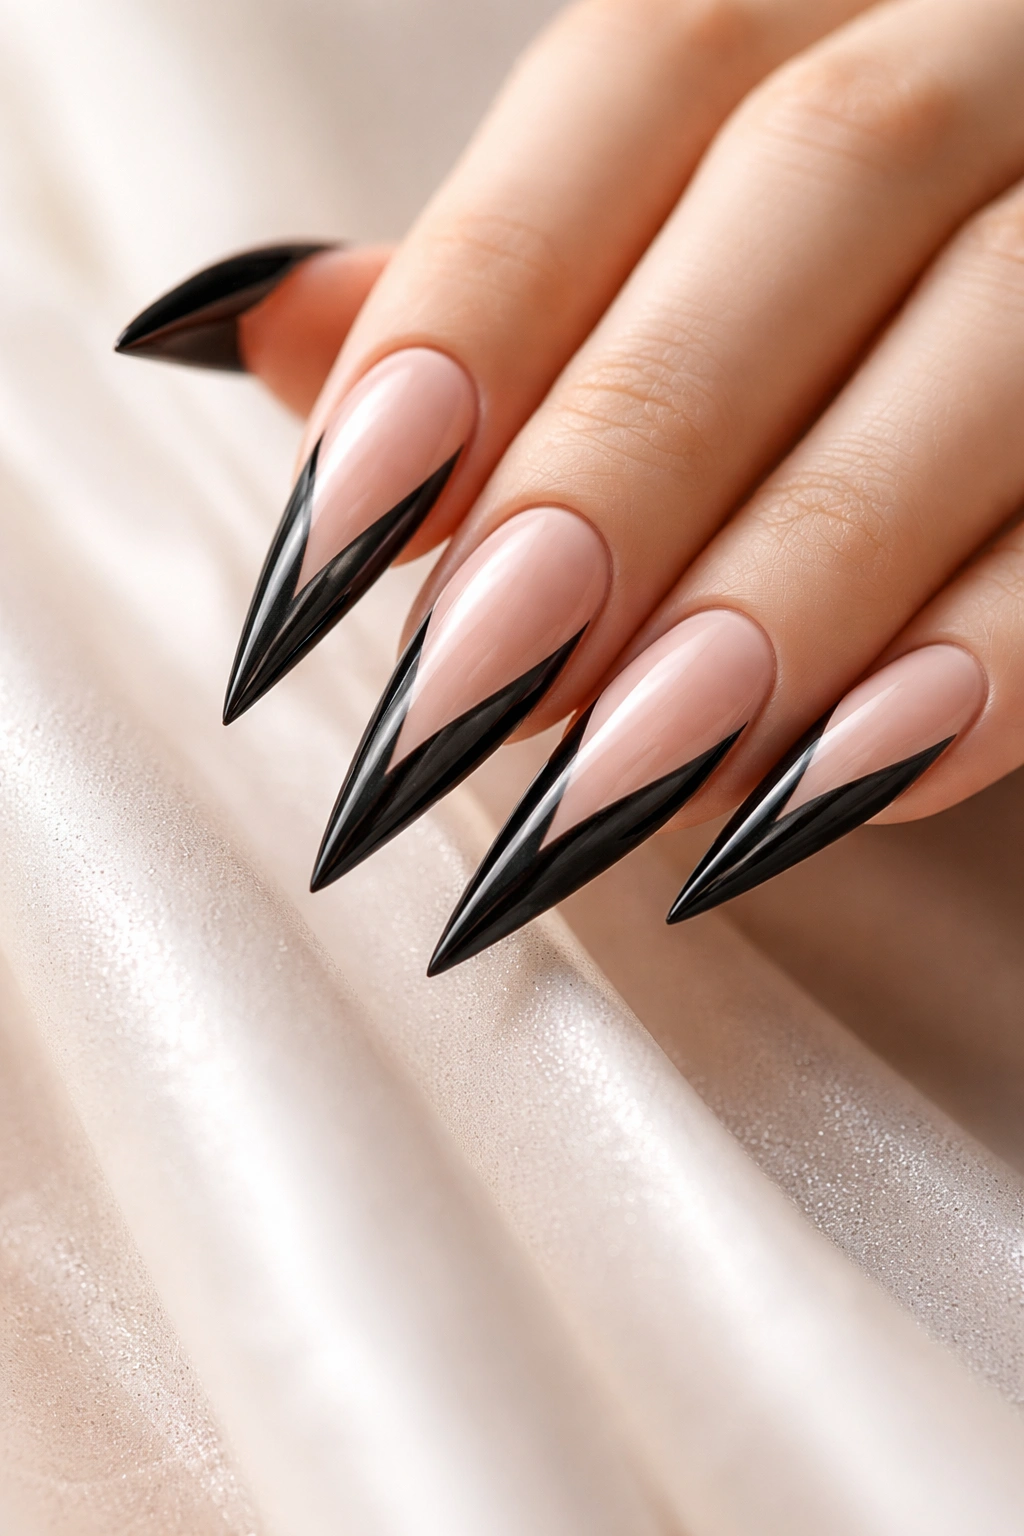
A black cat-eye design on stiletto nails is pure drama done right. The cat-eye effect—those sharp, angled lines that create a winged look—mimics the sharp, angular shape of the stiletto itself, which means the design and the nail shape work in perfect harmony. This isn’t just nail art; it’s architectural design that makes your entire hand look intentional and edgy.
The cat-eye works best with a nude or soft pink base layer, which makes the black lines pop without the whole nail being black. The contrast between the soft base and the dramatic black lines creates movement and visual interest, and when you angle your hands in certain directions, the effect is genuinely striking.
The Psychology of the Cat-Eye
Black cat-eye nails say confidence and sophistication. They’re bold without being overwhelming, artistic without being costume-y, and they photograph absolutely beautifully. The angled lines draw the eye along the length of your stiletto, making your nails appear even longer and more dramatic than they already are. This is a design for someone who wants to make a statement but do it elegantly.
Creating the Cat-Eye on Stiletto Tips
- Start with a nude, blush, or soft pink base—this creates the contrast needed for the cat-eye to show up crisp and clean
- Use a thin liner brush or a gel liner pen to draw the cat-eye shape (one line along the outer edge, one line creating the point at the tip)
- If you’re using regular polish, let it dry completely before adding the top coat, or the lines will drag
- For a gel manicure, cure between the base and the design layer to prevent smudging
- The key is steady hands and thin lines—thicker lines look less polished than delicate ones
- Practice the angle on paper first if you’re doing this yourself; the line should extend from approximately the center of the nail outward to the tip
Insider note: Professional nail artists often use guides or stencils for cat-eye designs to ensure symmetry. If you’re doing this at home, try painter’s tape cut at an angle as a guide—it’s not cheating; it’s smart.
4. Pastel Pink with Pearl Details
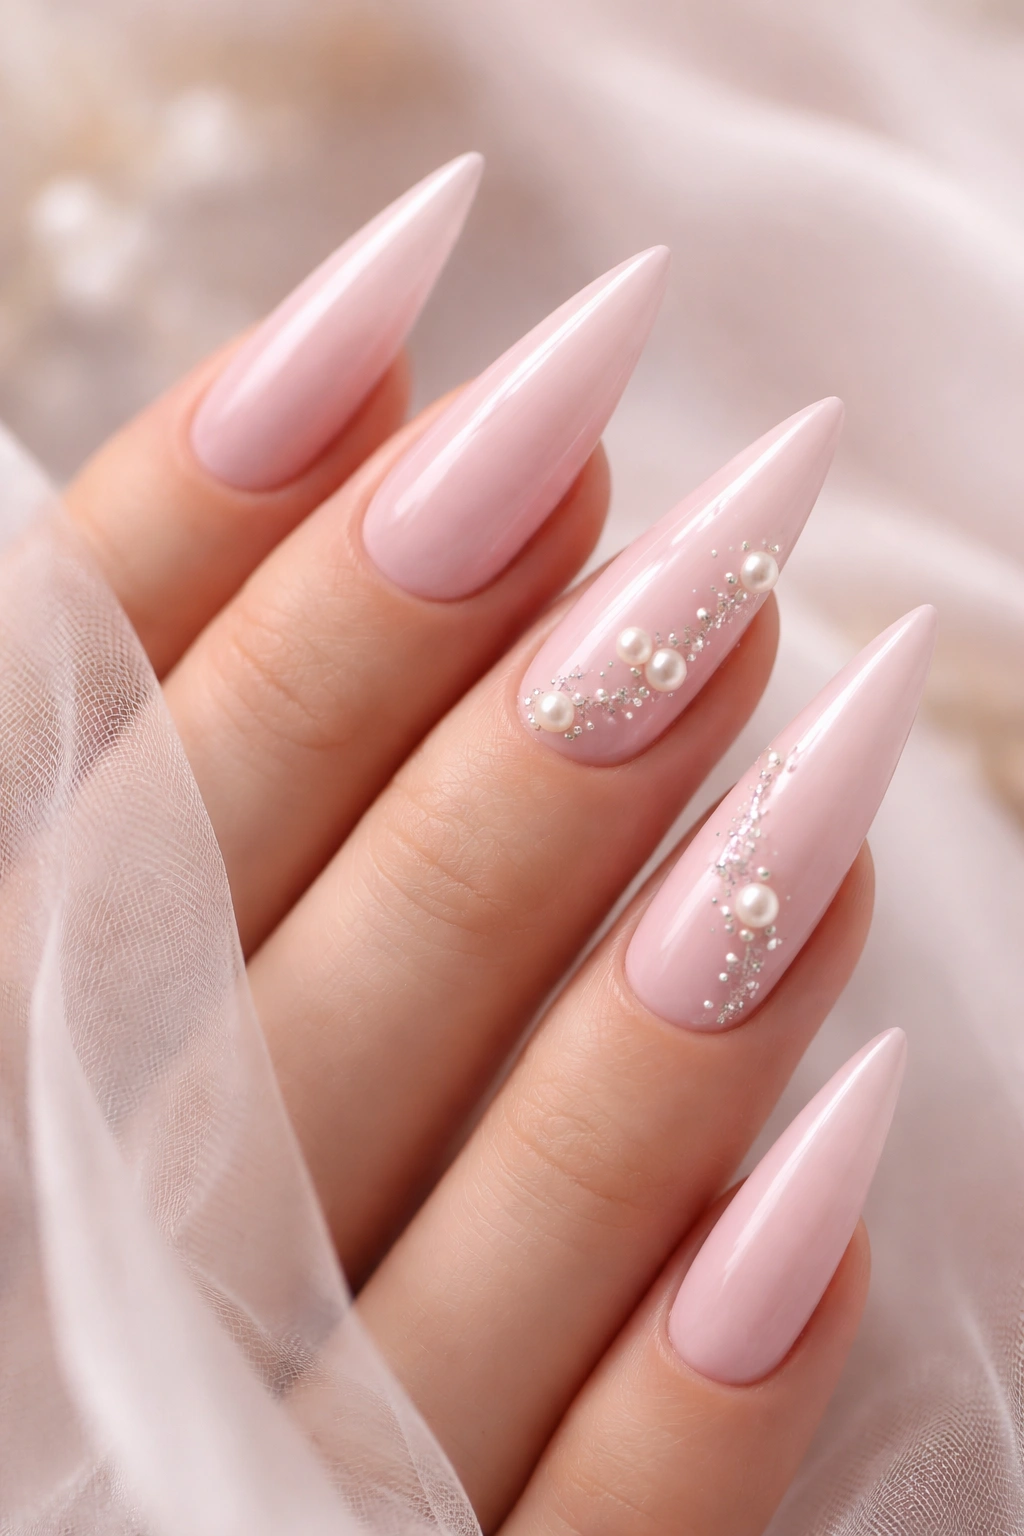
This is the design that screams romantic elegance without being cutesy or overdone. A soft, warm pastel pink (think ballet slipper pink or dusty rose rather than hot pink) paired with tiny pearl accents creates a look that’s feminine, sophisticated, and absolutely perfect for prom. Pearls add instant luxury and dimension—they catch light, they photograph beautifully, and they elevate the entire design.
The pastel pink base is forgiving to apply, flattering on almost every skin tone, and pairs with virtually every dress color you can imagine. Gold, silver, white, blush, navy, black—pastel pink works as a beautiful neutral that complements rather than competes.
Why Pearls Make This Design Special
Pearls have been a symbol of elegance for centuries, and for good reason. They’re naturally lustrous, they catch light in a subtle way that’s more sophisticated than glitter, and they read as intentional and high-quality. When you use real pearl beads (tiny ones, not chunky costume pearls), they sit on top of the nail, creating actual texture and dimension. Under prom lighting, they’ll catch light and sparkle subtly every time you move your hands.
Applying Pastel Pink with Pearl Accents
- Choose a true pastel pink rather than a baby pink—baby pink can look washed out and cheap, while a slightly warmer pastel reads as more intentional
- Apply two thin coats of pastel pink for full opacity and even color
- While the second coat is still slightly wet or tacky, place tiny pearl beads using a detail brush or the pointy end of a dotting tool
- Press gently so the pearls adhere to the sticky polish
- Seal with a thick top coat that covers the pearls completely—this protects them and keeps them from catching on anything
- You can place pearls in a line near the cuticle, scattered across the nail, or just on the accent nail, depending on your preference
Pro tip: If you don’t have actual pearl beads, you can achieve a similar effect by using a pearl-finish nail polish (which has tiny pearl particles built into the polish) instead of a plain pastel, but real pearls photograph more beautifully and feel more luxe.
5. Deep Purple Ombre Transition
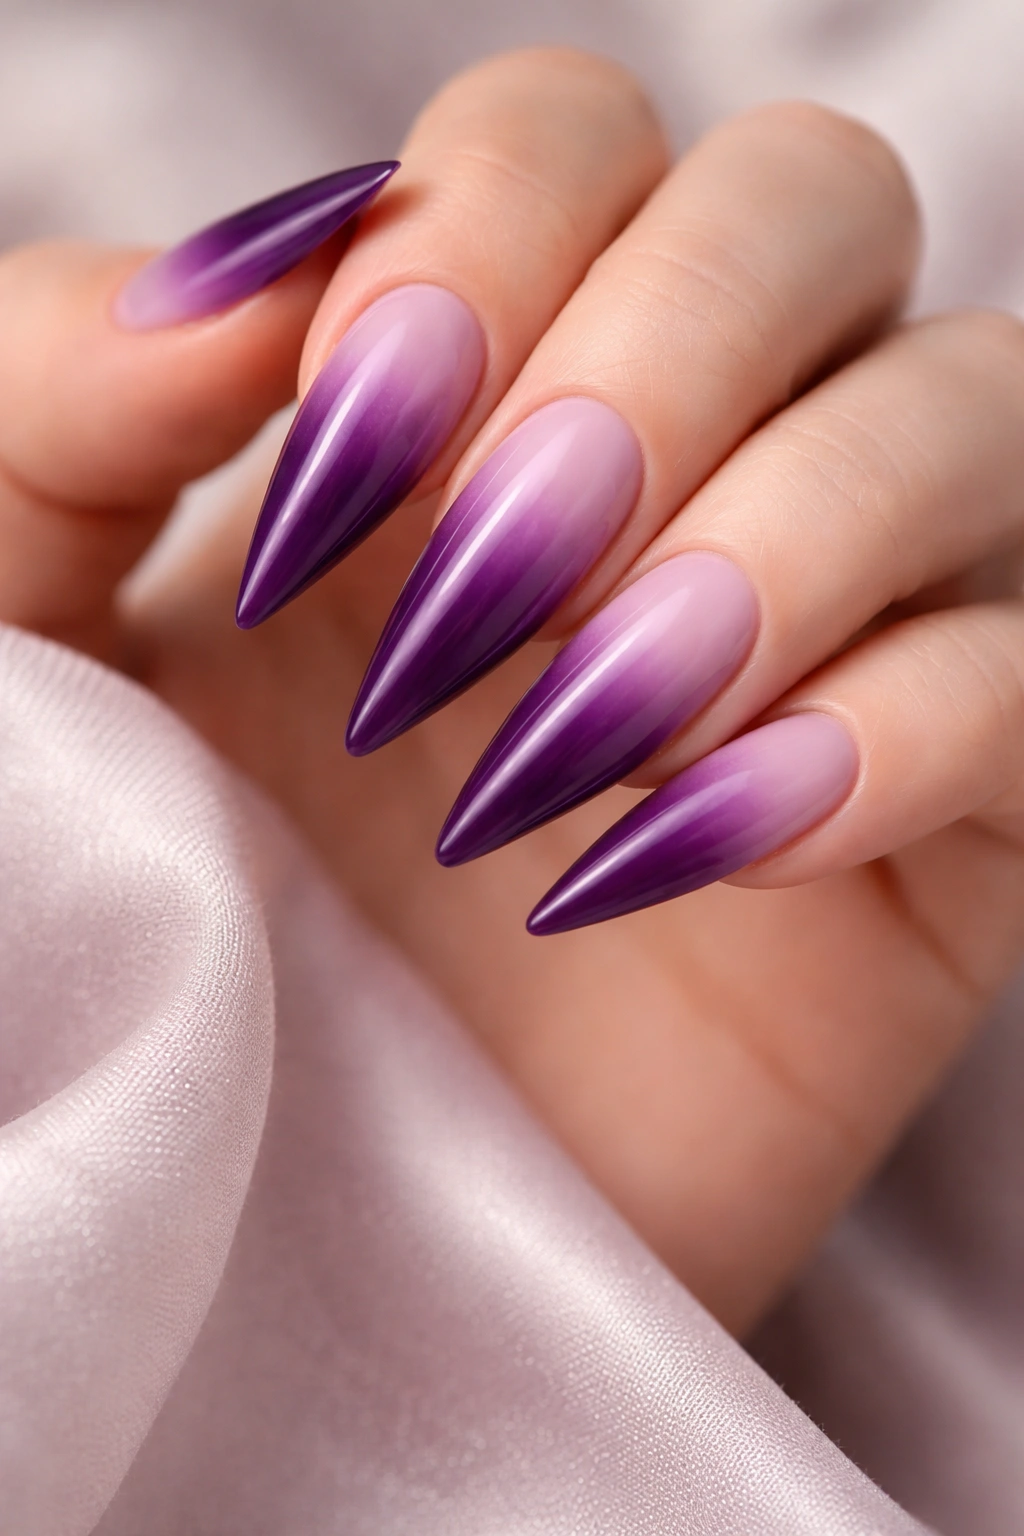
An ombre design on stiletto nails creates an effect that’s both gradient-smooth and dramatically dimensional. A deep purple (like eggplant or grape) that transitions to a lighter lavender or even blush at the tips feels artistic and intentional, and it’s one of the few designs where the ombre actually emphasizes the length of the stiletto naturally.
Purple is having a major moment in fashion and beauty, and a deep purple ombre is sophisticated enough for prom without feeling trendy in a way that dates the design. The gradient effect makes your nails appear longer because the color shift draws the eye down the nail toward the tip, creating an optical lengthening effect.
How an Ombre Reads on Stiletto Shape
The pointed tip of a stiletto is the perfect shape to showcase an ombre because the narrowing point naturally mirrors the color transition—deep at the base, fading toward light at the tip. It’s almost as if the color is following the shape of the nail. This is a design where the shape and the art are in perfect conversation with each other, which is what makes it feel so polished and intentional.
Achieving a Flawless Ombre on Stilettos
- Apply a base coat and let it dry completely
- Paint your deep purple color on the entire nail—this is your base layer
- In a small mixing dish or palette, add a tiny bit of light purple or lavender to your original purple to create a slightly lighter shade
- Using a makeup sponge or a stippling brush, dab the lighter shade onto the tips of your nails, blending slightly where the colors meet
- Add an even lighter shade (or pure lavender) to the very tips and repeat the stippling motion
- Use a clean, damp makeup sponge to gently blend where the colors transition—the key is soft, feathered transitions rather than harsh lines
- Seal with a glossy top coat to unify the colors and add shine
Worth knowing: Ombre designs are more forgiving than you might think because the blending is intentional—you’re not aiming for a perfectly clean line. A slightly blurry transition actually looks more professional than a harsh demarcation.
6. White with Delicate Lace Design
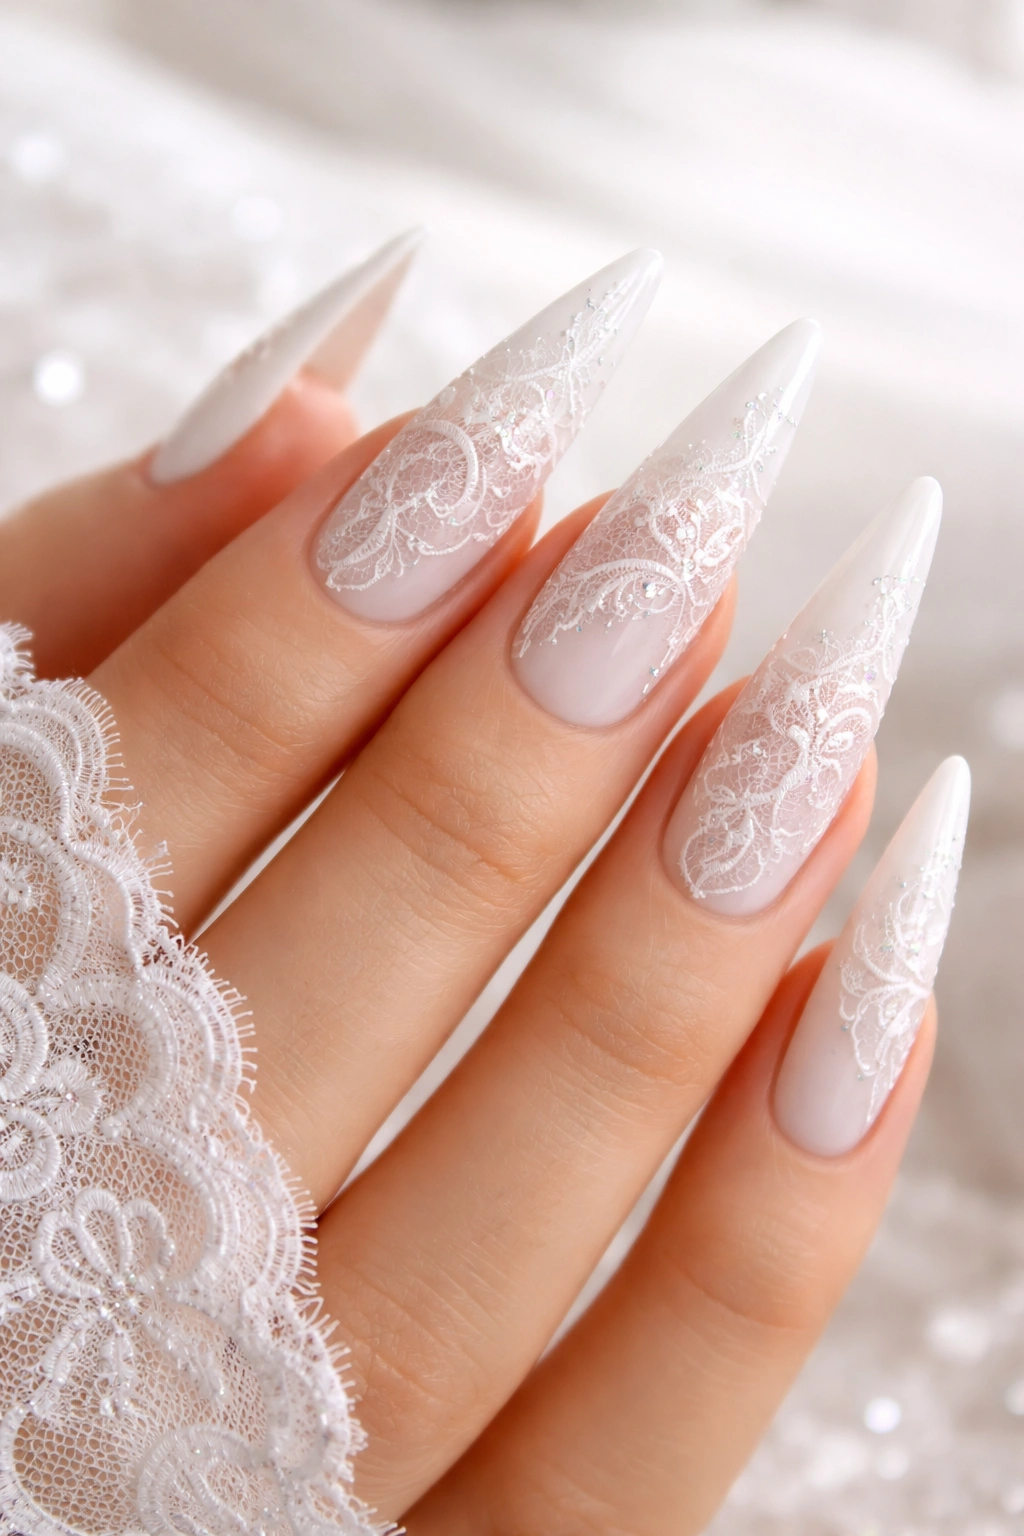
White stiletto nails paired with delicate lace detailing is the definition of bridal elegance, and it works beautifully for prom whether you’re going for a romantic aesthetic or something more architectural and modern. A crisp, clean white base (high-quality white shows as pure white rather than cream or off-white) paired with thin, intricate lace lines creates an effect that’s both feminine and sophisticated.
The lace design doesn’t have to be relegated to romantic vibes either—depending on the pattern you choose, you can create a lace design that’s geometric, edgy, or bohemian. The lace is just the delivery system for whatever vibe you’re going for, and white is the perfect neutral canvas to show off detailed artwork.
The Elegance Factor of Lace Details
Lace has an inherent sophistication because it requires precision to create—it’s not a shape a child could draw, and that technical difficulty reads as luxury to the observer. Lace also has an interesting cultural association with formality and special occasions, which makes it perfect for prom. Every element is working together to say “this is an important event and I dressed accordingly.”
Creating Lace Designs on White Nails
- Start with a pristine white base—apply three thin coats to achieve true white opacity (white can be surprisingly transparent, so don’t skimp on coats)
- Let the white cure completely before adding any design work
- Use a very thin liner brush (size 000 or 0000) and a contrasting color (black, navy, or a dark color that stands out against white)
- Draw delicate lace patterns freehand, or if you’re less confident with detail work, use a lace stencil (these are available online and at nail supply stores)
- Thin lines are infinitely more elegant than thick ones—if your lines feel heavy, you’re using too much paint on your brush
- Seal with a glossy top coat that doesn’t yellow (some top coats can give white a slightly yellowed appearance, so choose your brand carefully)
Pro tip: If lace freehand feels impossible, try a lace-look gel polish or a white with embedded lace pattern, then add your own extra details on top. The advantage of professional execution here is that lace is unforgiving—one wobbly line shows immediately against the stark white background.
7. Metallic Silver High-Shine Glam
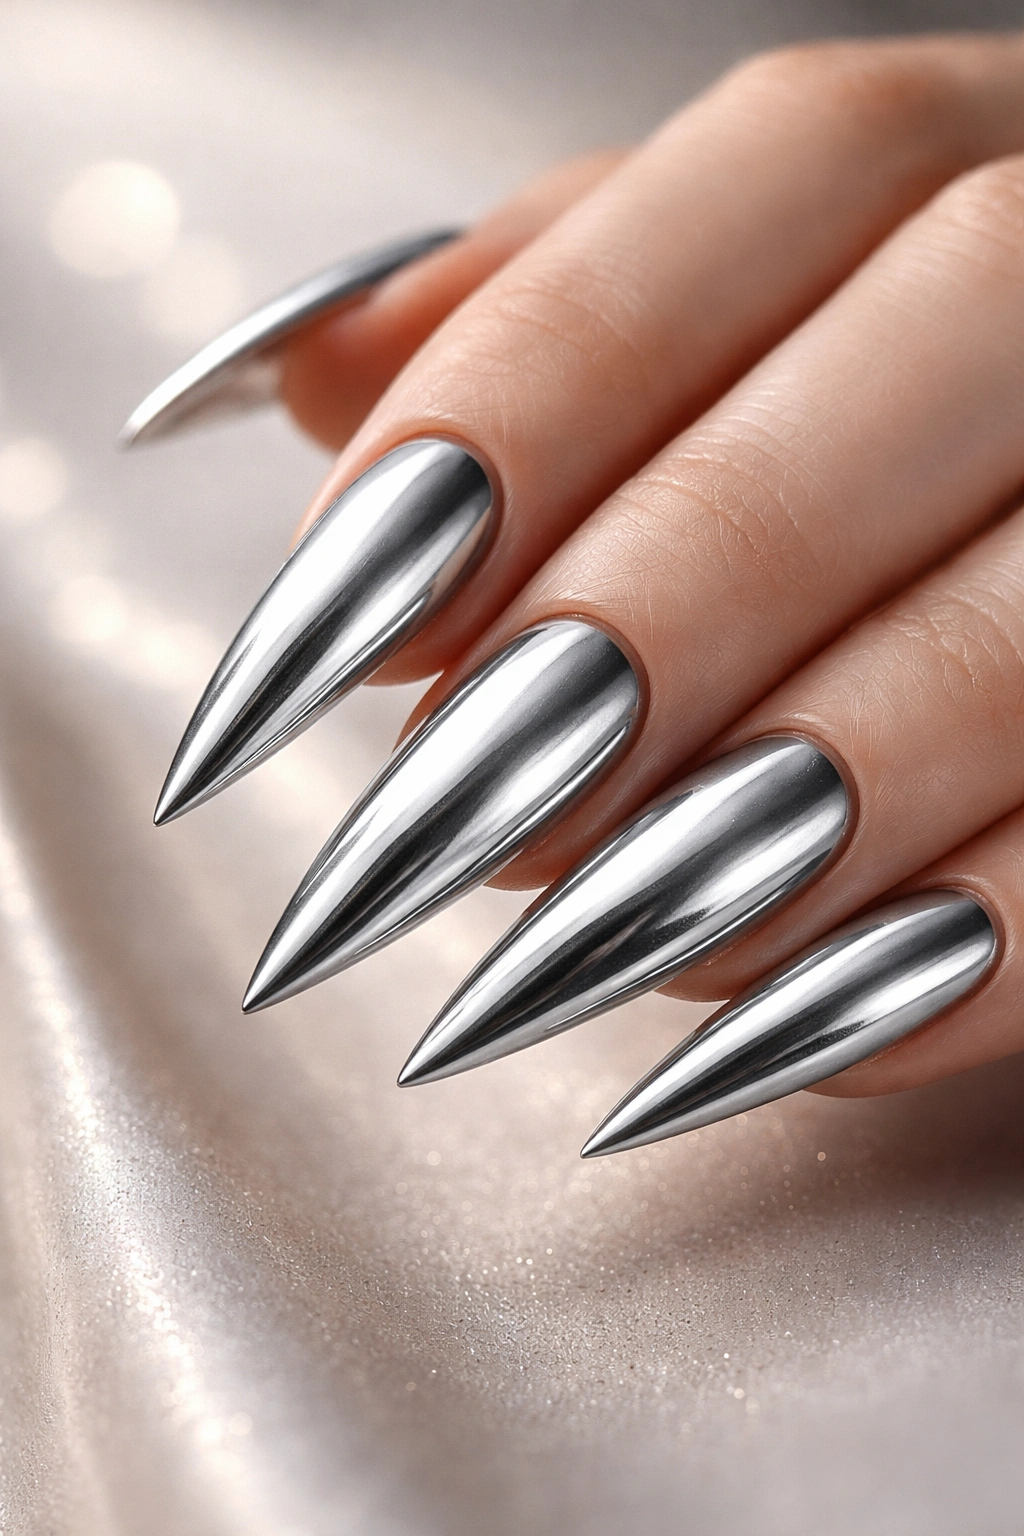
Metallic silver on stiletto nails is pure glamour without apology. Unlike chrome, which has a mirror-like quality, silver metallic is smooth, luxurious, and catches light in a way that reads as intentional and elegant rather than costume-y. A full chrome or mirror effect can sometimes feel too novelty-forward for prom, but a true metallic silver feels appropriately dressy and special occasion.
Silver works beautifully with literally every dress color imaginable—it’s the universal cool-tone metal that complements everything from pastels to jewel tones to neutrals. You can wear silver with confidence knowing it’ll harmonize with whatever you’re wearing.
Why Silver Outshines Other Metallics
Silver has been the metal of formal occasions for centuries, which means it carries an inherent sense of occasion and formality. It’s not trendy in the way that rose gold or chrome sometimes feel—it’s classic. A high-shine silver finish on a stiletto creates visual interest through the light-catching quality without requiring any additional detail work. Sometimes the design is the finish.
Applying Metallic Silver for Maximum Shine
- Use a high-quality metallic silver gel or polish specifically formulated for shine and opacity (budget metallics can look dull and patchy)
- Apply a base coat and let it cure or dry completely
- Apply two to three thin coats of metallic silver, curing or drying between each coat
- Metallic finishes show every imperfection, so work methodically and avoid pooling at the cuticle or on the sides of the nail
- Finish with a shiny top coat that amplifies the metallic quality—a matte top coat would completely ruin the effect
- If you want added dimension, consider applying silver on all nails and adding a tiny accent (like a thin black line or a rhinestone) on just one or two nails
Insider note: Gel polish tends to provide better coverage and shine for metallics than regular polish, but if you’re using regular polish, apply slightly thicker coats and use quality application brushes to get optimal results.
8. Emerald Green with Diamond Dust

Deep emerald green is the color of luxury and formality, and when paired with diamond dust (crushed glass or actual diamond dust that catches light), it becomes an absolutely show-stopping prom design. Emerald is jewel-toned, it photographs beautifully under all lighting conditions, and it’s dark enough that it won’t clash with any dress color or skin tone.
The diamond dust adds that extra sparkle that makes this design feel genuinely special-occasion. You’re not just wearing dark green nails; you’re wearing jewels on your fingers. The sparkle is the point, and it’s the element that transforms a simple color into a genuine statement.
Emerald Green as a Power Color
Emerald green is the color of luxury goods, fine jewelry, and formal evening wear. It reads as sophisticated rather than casual, intentional rather than trendy, and it’s bold without being loud. The darkness of the green means the color won’t wash you out the way some lighter, brighter greens might, and it creates a beautiful contrast against lighter skin tones while looking regal on deeper skin tones.
Layering Diamond Dust Over Emerald
- Apply a high-quality emerald green base in two to three coats for full opacity (make sure it’s truly emerald and not a blue-green)
- While the final coat is still slightly tacky, apply diamond dust or crushed glass across the entire nail or just on the tips
- Press gently with a brush or your finger to ensure good adherence
- Allow to dry or cure completely, then apply a thick top coat to seal everything
- The top coat should be glossy and clear—you want the diamond dust to show through and sparkle
- If some diamond dust falls off before the top coat, simply reapply it and seal again
Worth knowing: Diamond dust is more durable and looks more refined than regular glitter, but it’s also more expensive. If budget is a concern, a high-quality emerald green with a sparkle or shimmer built into the polish still photographs beautifully and reads as special-occasion appropriate.
9. Blush Ombré with Rhinestone Tips

This design combines two big elements—an ombre (color gradient) and rhinestones—but it works because each element is placed purposefully rather than layered chaotically. A blush pink that transitions from a peachy tone at the base to nearly white at the tips, with a line of tiny rhinestones right at the tip of each stiletto, creates a design that’s romantic and glittery without being costume-y.
The ombré makes your nails look incredibly long because your eye follows the color shift from darker to lighter, and the rhinestones add that prom-appropriate sparkle that photographs like absolute magic. This is a design that translates beautifully to photos, which matters because you’ll want these nails in your prom pictures.
The Balance of Ombré and Rhinestones Together
Using ombré and rhinestones together could easily feel overdone, but the key is placement and restraint. By putting the rhinestones only at the very tip in a thin line, you’re not covering the nail with sparkle—you’re using sparkle as punctuation. The ombré does the artistic heavy lifting, and the rhinestones provide the glamour moment at the tip.
Creating Blush Ombré with Rhinestone Tips
- Apply a base coat and let it dry
- Paint your blush or peachy base color on the entire nail
- Mix a lighter version (or use a light pink or nearly nude shade) and apply with a makeup sponge using a stippling motion along the tips
- Continue blending and lightening until you achieve a gradient from peachy at the base to nearly nude at the tip
- Use a clean, damp sponge to feather the transitions for a smooth blend
- While the ombré is completely dry, apply a thin line of sticky base coat right at the stiletto tip
- Place individual rhinestones (not loose glitter, but actual rhinestone gems) in a line across the tip
- Seal everything with a thick, clear top coat
Pro tip: Individual rhinestones placed with tweezers stay more securely than poured rhinestones, and they create a cleaner, more intentional look.
10. Midnight Blue with Star Constellations
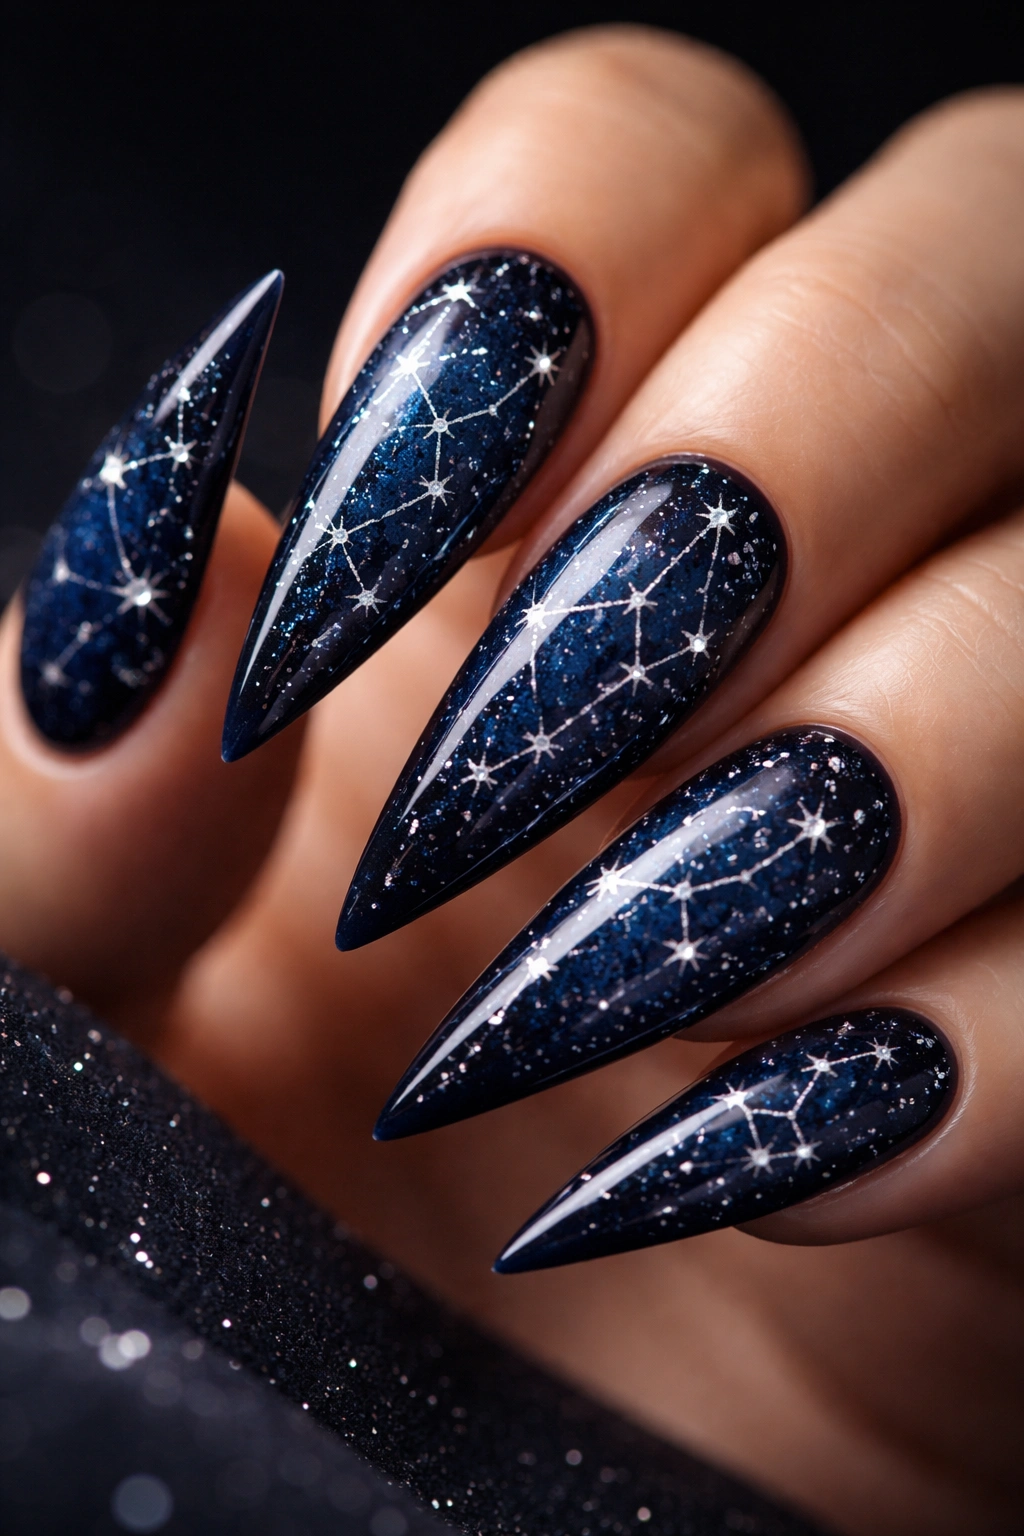
This design is for anyone who wants something genuinely unique and artistic. A deep, rich midnight blue (almost navy but with slightly more depth) as a base, with delicate star constellation patterns picked out in white or silver, creates a design that’s whimsical without being childish, artistic without being over-the-top.
The midnight blue reads as formal and elegant, while the constellation pattern adds a personal, creative element that makes your nails feel uniquely yours. You’re not just wearing a color; you’re wearing a story. Whether you choose constellations that have personal meaning to you or simply arrange stars in a beautiful pattern, this design feels intentional and special.
Why Constellations Feel Personal and Artistic
Constellation designs are having a moment, and for good reason—they allow for creativity and personalization while maintaining a sophisticated aesthetic. You could map your actual birth constellation, create a pattern that means something to you, or simply arrange stars in a way that feels beautiful. The act of choosing a meaningful constellation adds a personal layer to your prom nails that makes them feel even more special.
Painting Midnight Blue with Star Constellations
- Apply a high-quality midnight blue base in two to three coats (ensure full opacity by the final coat)
- Let the base cure or dry completely
- Using a thin liner brush or a dotting tool, paint tiny white or silver stars scattered across the nail in your chosen constellation pattern
- Keep the stars small and delicate—this isn’t a design where you want chunky elements
- You can connect the stars with thin lines, mimicking the actual constellation map, or leave them as individual stars
- Allow the constellation design to dry completely, then seal with a glossy top coat
- For extra shine and to make the stars pop, consider using a metallic silver or white gel for the constellation rather than regular polish
Worth knowing: If you’re worried about freehand star placement, you can lightly sketch the constellation with a pencil first, or use a tiny stencil to guide you—the pencil marks will be covered by your star design.
Final Thoughts
Choosing stiletto nails for prom is about more than just picking a pretty color or design—it’s about selecting a visual that makes you feel like the best version of yourself on a night that matters. Each of these 10 designs delivers on that promise in different ways. Maybe you’re drawn to the timeless confidence of red, the quiet luxury of nude and gold, or the creative expression of midnight blue constellations.
The most important thing is that your nails feel authentically you. Whether you’re getting them done professionally a few days before prom or creating them yourself the night before, know that stiletto nails automatically elevate the entire look. The shape itself commands attention, and the design you choose becomes part of your story for the night.
Pay attention to the details that matter to longevity, too. A stellar manicure three days before prom can start looking rough by evening if you’re not careful—so whether you choose a design with delicate elements like pearls or lace, or something more forgiving like a solid metallic finish, make sure you apply a quality top coat and care for your nails between application and prom night. Avoid rough handling, prolonged water exposure if you’re using regular polish, and be gentle on the delicate tips of those gorgeous stilettos.
Your nails are the finishing touch that ties your entire look together, and they’re the first thing people will notice when you’re photographed, dancing, or simply moving through the evening. Make them count.
