

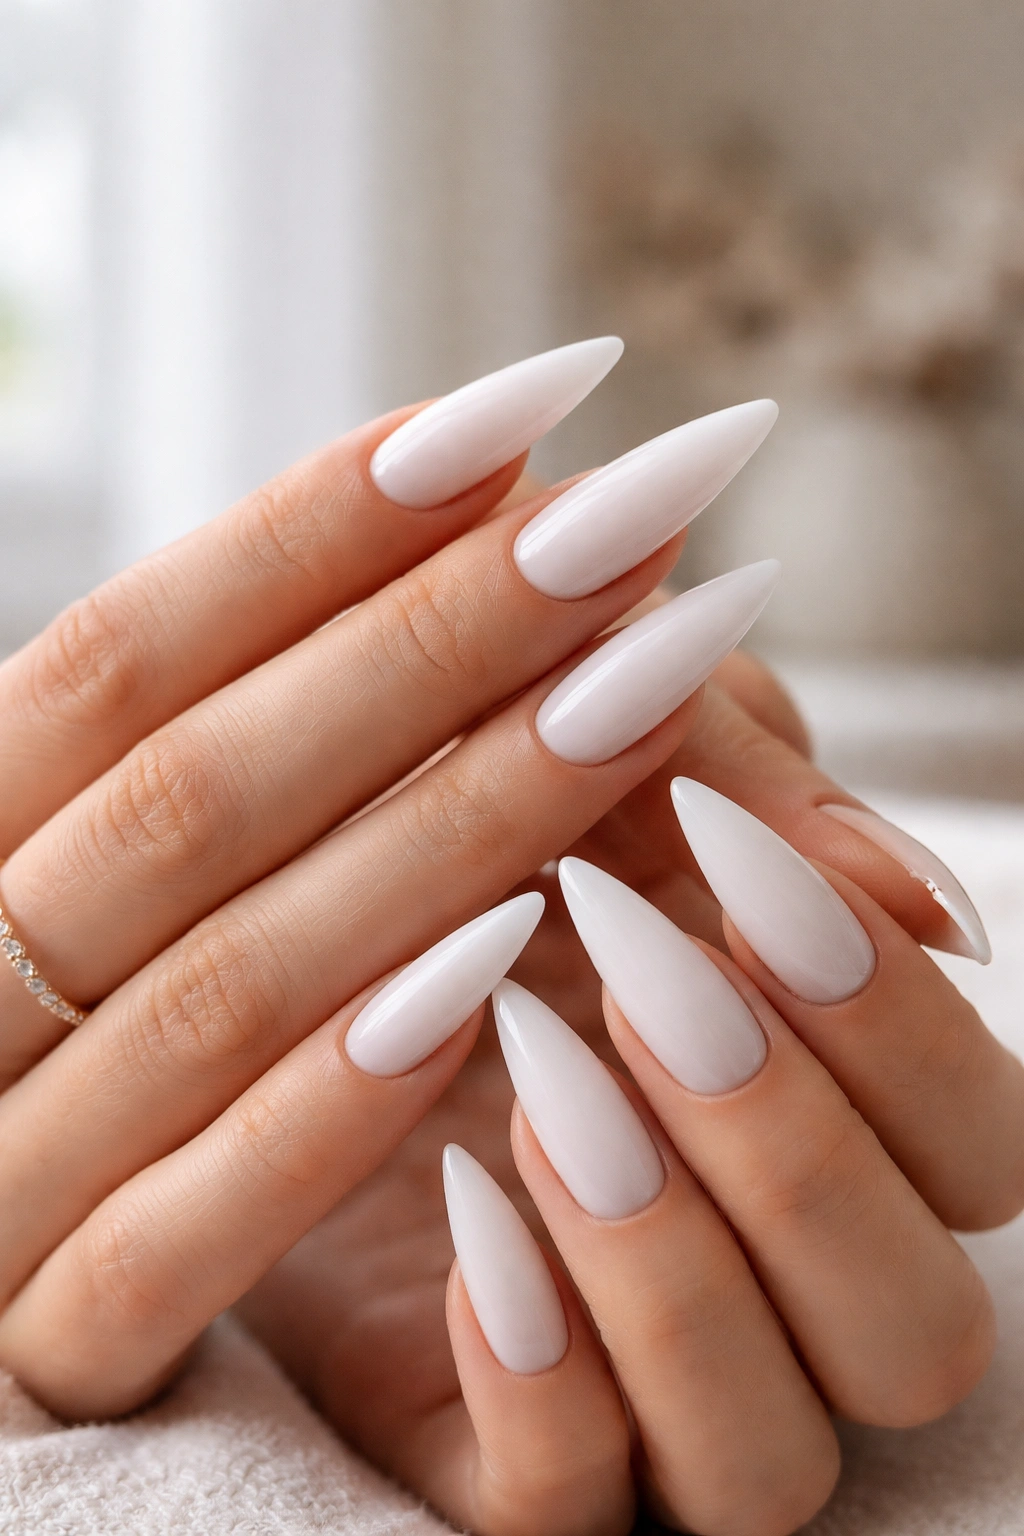
Milky white nails have become the go-to aesthetic for anyone seeking an elegant, versatile look that works for everything from office meetings to evening events. The soft, creamy finish of milky white creates an instantly sophisticated appearance while offering endless room for personalization through design, embellishment, and color layering. If you’re wearing stiletto nails—those dramatic, pointed tips that instantly command attention—milky white becomes an absolute powerhouse base because it’s polished enough to feel high-end yet understated enough to let your personality shine through whatever accent design you choose.
The beauty of milky white stilettos lies in their adaptability. Whether you’re drawn to minimalist elegance, bold artistic statements, or glamorous embellishments, this creamy neutral serves as the perfect canvas. The milky tone sits somewhere between pure white and beige, giving it warmth and dimension that pure white can sometimes lack. It photographs beautifully, photographs even better in natural light, and somehow makes your hands look longer and more refined than they probably do in reality—which is exactly the visual magic most nail enthusiasts are chasing.
What’s exciting about exploring milky white stiletto ideas is that this isn’t a one-note look. A single milky white base can transform depending on your additions, accent colors, finishes, and design choices. The same creamy color can feel minimalist and modern one day and vintage-inspired the next. You’re not locked into a single aesthetic; you’re working with a foundational shade that respects your mood, your schedule, and your willingness to commit to maintenance.
1. Pure Minimalist Milky White with Thin Gold Accent Lines
This design strips away everything except sophistication itself. A smooth, flawless milky white base covers all ten nails, and thin gold lines—either geometric or freehand—create the only visual interest. Think vertical stripes down one or two nails, a minimal gold frame around the cuticle area, or delicate geometric shapes that feel more architectural than decorative.
Why This Design Works for Minimalists
The genius of this approach is restraint. You get maximum impact with virtually zero visual clutter, which appeals to people who appreciate good design principles over ornamentation. The thin gold lines catch light without demanding attention, creating subtle sparkle that reads as intentional rather than accidental. Minimalist designs also tend to age gracefully—they don’t look dated as quickly as trend-heavy styles because the bones of the design are timeless.
Styling and Occasions
This look pairs perfectly with monochromatic wardrobes, professional environments, and anyone who believes their outfit doesn’t need competition from their nails. Wear it with tailored blazers, streamlined dresses, or even casual basics where the simplicity of your nails elevates the entire look. It works for business presentations, first dates where you want to seem collected and intentional, or literally any time you want nails that whisper rather than shout.
Application Tips for Success
The trickiest part isn’t the milky white base—that’s straightforward—it’s keeping those gold lines absolutely clean and precise. Use an ultra-thin detail brush or a gold striping pen (these exist and they’re game-changers). If freehand feels risky, apply thin gold tape before painting, let it dry completely, then remove the tape for perfectly crisp edges. The fewer elements you have, the more any imperfection will be noticed, so patience and precision are your only allies here.
Pro tip: One thin gold line down the center of each nail feels less precious than gold accent nails, and somehow more modern. It’s the difference between obvious luxury and quiet confidence.
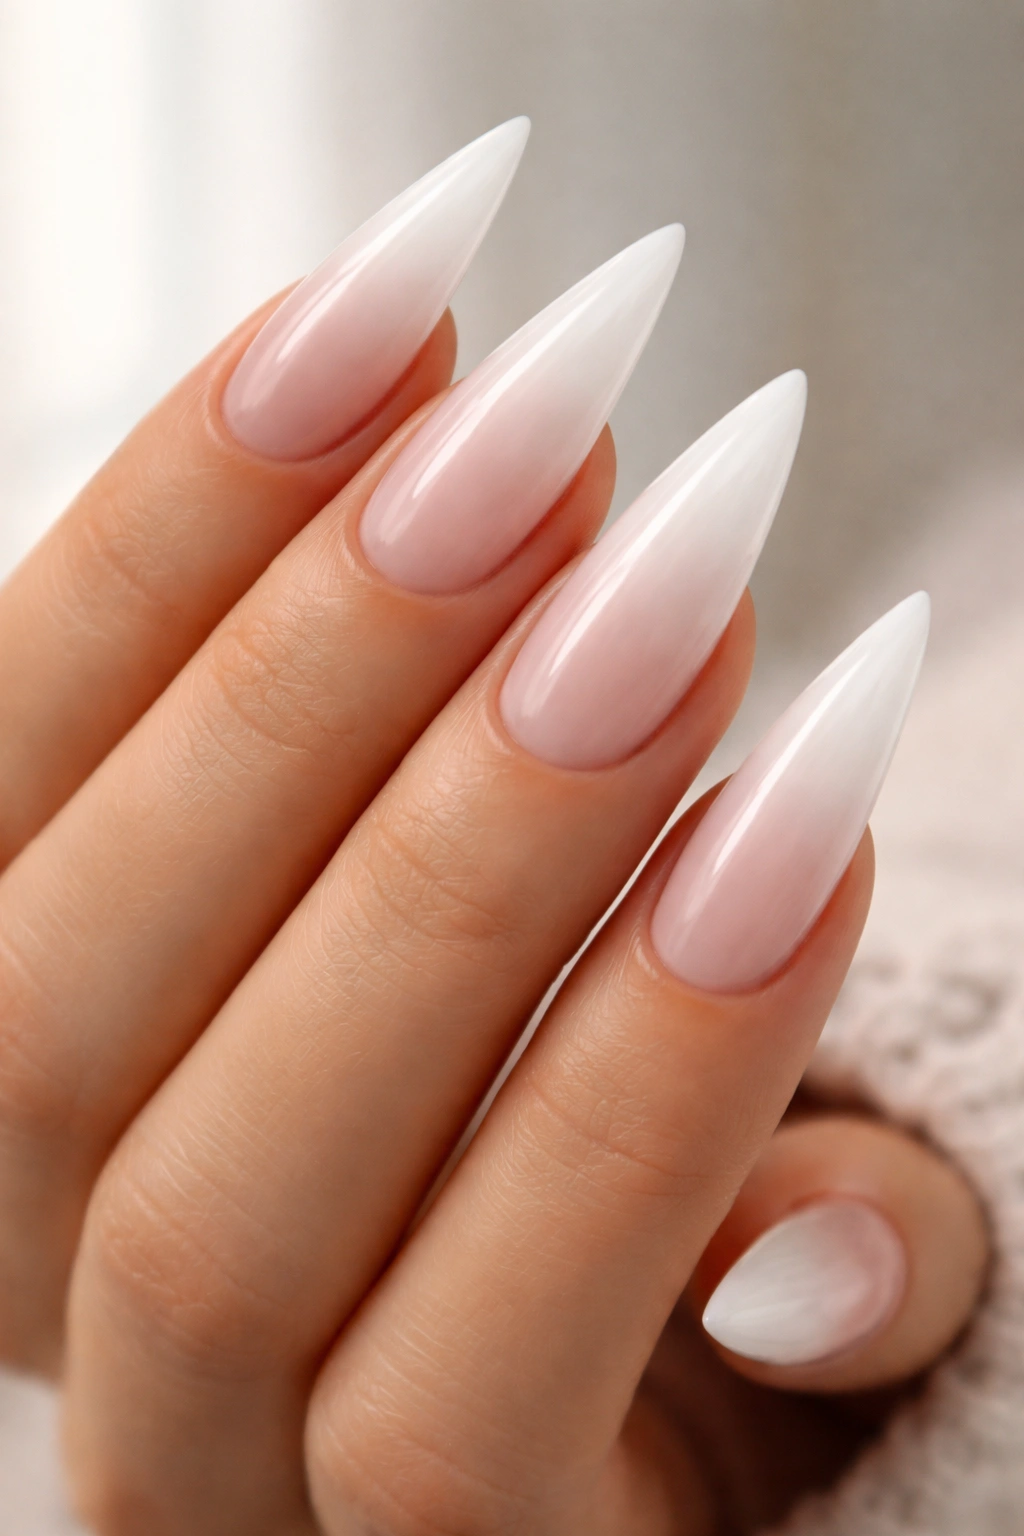
2. Ombré Gradient from Milky White to Nude or Taupe

Rather than a solid color, this design creates a soft gradient that shifts from creamy milky white at the cuticle to progressively warmer tones—nude, taupe, or even a whisper of gray—toward the tip. The gradient is so subtle it almost reads as a single color at first glance, but closer inspection reveals beautiful depth and dimension.
The Color Story Behind This Look
Ombré nails mimic the natural depth of nail beds that shift tone toward the tips, which is why this design feels so harmonious with your actual anatomy. The milky white at the base keeps things fresh and bright near your cuticles, while the gradual fade to warmer tones adds maturity and sophistication. This progression also creates a visual lengthening effect on stiletto nails because the eye travels down a subtle color journey rather than stopping at a hard edge.
How Different Undertones Change the Vibe
If you graduate to warm taupe, the overall effect is earthy and grounded—perfect for autumn or anyone with warmer undertones in their complexion. Shifting into cooler greige (that gray-beige hybrid) feels more contemporary and works beautifully with cooler skin tones and silver jewelry. Even a barely-there shift toward pale pink creates something softer and more romantic. The milky white constant means all of these variations feel cohesive as a collection.
Creating a Flawless Gradient
Ombré requires either a sponging technique or an airbrush for truly seamless blending. If you’re using a sponge, dab increasingly concentrated color onto the sponge in layers, starting with the lightest shade, and press rather than swipe to avoid streaking. Allow each layer to dry slightly before adding more pigment. This is a design best left to professionals unless you’ve practiced extensively—the difference between a beautiful gradient and a muddy mess comes down to technique and patience.
Worth knowing: Gel ombré holds the gradient longer than polish because the colors cure separately rather than potentially blending into each other. If you love this look but aren’t great at DIY application, gel is worth the investment.
3. Milky White Base with Delicate Floral Nail Art
Small, hand-painted flowers scattered across the milky white base transform your nails into a wearable garden. Think tiny wildflowers, cherry blossoms, daisies, or roses depending on your skill level and artistic preference. The flowers can be concentrated on accent nails or distributed across all ten in varying densities.
Choosing Flowers That Suit Your Personality
Minimalist people gravitate toward single blooms—one small flower per nail, perhaps in muted tones like dusty rose or sage green. Maximalists love densely-painted designs with multiple flowers in varied colors cascading across each nail. Romantics choose delicate cherry blossoms or peonies, while someone wanting a botanical vibe might prefer wildflowers in more naturalistic poses and colors. The beauty of floral nail art is that it’s endlessly personal—your flower choices tell a story about what appeals to you aesthetically.
Color Combinations That Enhance Milky White
Soft pinks, muted purples, dusty rose, sage green, and charcoal gray all look stunning against creamy white because there’s enough contrast for the flowers to read clearly without the design feeling harsh. Gold or bronze outlines around the flowers add dimension and elegance. If you’re feeling adventurous, try flowers in unexpected colors like pale blue, soft lavender, or even monochromatic—white flowers on white with only subtle shading to define the petals creates an ethereal, almost 3D effect.
Skill Level and Realistic Expectations
Floral nail art runs the gamut from beginner-friendly to requiring genuine artistic skill. Simple daisy designs with a yellow center and five white petals are absolutely doable for beginners. Intricate roses with multiple layers and dimensional shading require practice and a steady hand. Start with designs that feel achievable, and don’t be discouraged by early attempts—each time you paint, your hand control and muscle memory improve noticeably.
Pro tip: Nail art pens designed for fine detail work are far easier to control than traditional brushes when you’re starting out. They feel more like writing than painting, which your brain already knows how to do.
4. Frosted or Matte Finish Milky White with Glossy Tips
This design plays with texture rather than color or detailed artwork. The base of the nail from cuticle to about two-thirds of the way down the nail is matte or frosted, while the actual tip of the stiletto remains high-gloss. The contrast between the two finishes creates visual interest and emphasizes the shape of the nail while keeping the overall look relatively minimal.
Why Texture-Based Designs Are Underrated
Texture is something that photographs differently in different light, changes how the nail catches attention in person, and adds sophistication without requiring artistic ability. A frosted base instantly feels more modern and refined than a standard glossy finish. The matte-to-gloss contrast also emphasizes the length and shape of your stilettos in a way that’s more subtle than color blocking but equally effective visually.
Creating This Look at Home
Matte topcoat exists specifically for this purpose and applies just like regular topcoat. Paint your milky white base as usual, let it cure or dry, then apply matte topcoat to the areas you want dull. Once that’s set, carefully apply glossy topcoat only to the tips, using tape or a steady hand to create the line between textures. Alternatively, use a frosted or crystallized topcoat to achieve a similar effect with texture built directly into the finish rather than a contrasting gloss zone.
Occasions and Styling
This look works particularly well for situations where you want nails to feel intentional and refined but not obviously decorated. Professional environments often prefer this to nail art designs. It’s also perfect for anyone who loves that matte aesthetic but finds it impractical (matte finishes chip more easily than gloss, so keeping the tips glossy extends the manicure’s lifespan significantly).
Real talk: The line between matte and gloss needs to be crisp to look intentional rather than like you got lazy applying topcoat. Take your time, use tape if needed, and don’t apologize for the extra minute it takes to make the line clean.
5. Milky White Stilettos with Negative Space Geometric Design
Negative space designs create patterns by leaving areas of the nail bare or showing the nail bed beneath, rather than building design through added pigment. Geometric shapes—triangles, lines, abstract shapes, or minimalist line drawings—reveal bare nail in strategic ways that feel modern and artistic.
The Visual Power of What You Remove
Negative space sounds counterintuitive as a design approach, but the power comes from strategic emptiness. A milky white base with triangular negative space cut-outs feels edgy and contemporary. Geometric line designs that create shapes through bare nail reads as intentionally minimalist. This approach automatically feels high-design because it requires you to think about composition and balance rather than just filling space.
Design Ideas That Work Beautifully
Simple geometric shapes work best—triangles, squares, or abstract quadrilaterals in various arrangements. Thin linear designs that create patterns or symbols feel architectural and modern. Half-moon negative space (removing color from the tip area) is easier to execute than intricate geometric shapes and still creates impact. The key is that negative space works best when it’s bold and intentional rather than tentative.
Technical Execution
The easiest approach uses nail stickers or vinyl decals positioned before you paint—paint around them, let the polish cure, then remove the stickers to reveal the negative space. For freehand designs, it’s more complex: you essentially need to paint everything except the shape you want to be negative space, which requires careful brushwork and steady hands. Many nail artists use stencils or guides to keep lines clean.
Pro tip: Negative space designs age really well because as your nails grow, the design adapts naturally rather than looking obviously grown-out. This is a practical advantage to purely aesthetic appeal.
6. Milky White with Pearl or Chrome Accent Nails
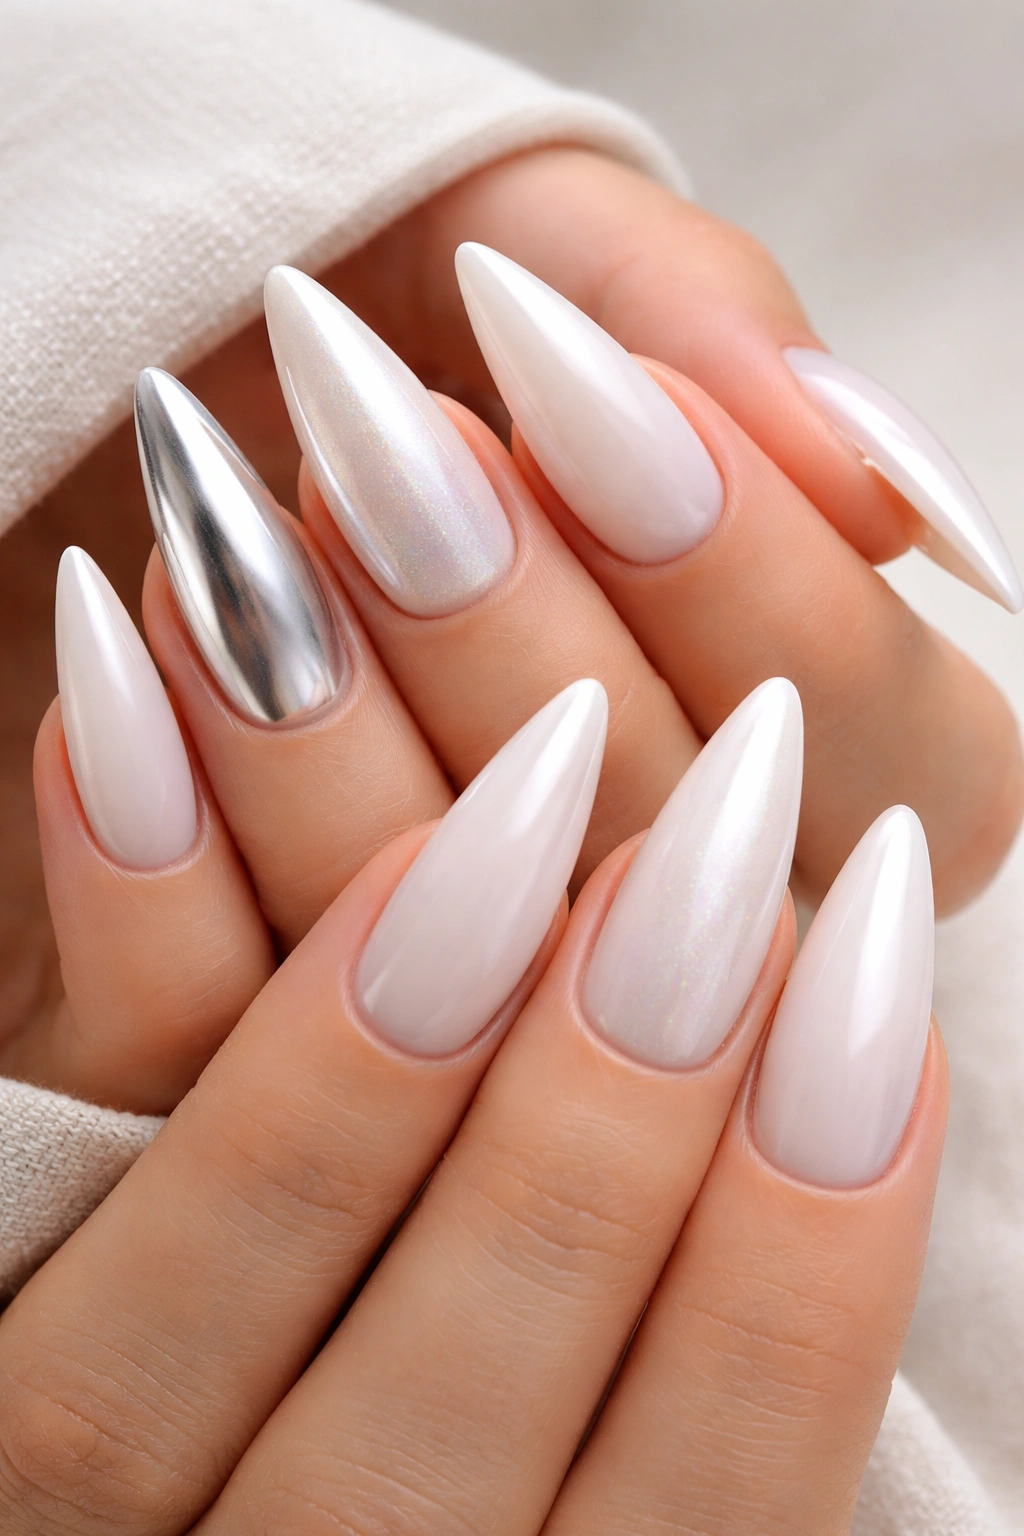
Select one or two accent nails (typically ring finger or pinky) and coat them entirely in pearl or chrome finish while keeping the remaining nails in solid milky white. The accent nails become the focal point—shimmery, iridescent, or reflective—while the milky white nails provide grounding context.
Understanding Pearl vs. Chrome Finishes
Pearl finishes contain suspended pigments that create a subtle iridescent shimmer—they shift between colors as you move your hand, feeling organic and luxurious. Chrome finishes are reflective, almost mirror-like, and create a high-impact metallic look that reads as futuristic and bold. Pearls feel softer and more refined; chrome feels edgy and modern. Both look absolutely stunning against a milky white base because the neutral backdrop makes the shimmer or shine pop without visual competition.
Which Nails to Make Accent Nails
Ring finger is traditional and creates natural visual balance. Pinky works beautifully for a slightly unexpected placement. Some people do both accent nails in pearl or chrome for maximum impact. One or two adjacent nails can work too, especially if you’re building a visual narrative where the design clusters. Symmetry feels harmonious; asymmetry feels more modern and artistic. Both are correct—it’s about your preference.
Color Combinations with Pearl
Rose gold or champagne pearl feels warm and romantic against creamy white. Silver or platinum pearl feels cool and contemporary. Lavender or pink pearl adds softness and femininity. Holographic pearl (which shifts through multiple colors) feels playful and catches light dramatically. You can also find pearls in unexpected colors like blue, green, or multichrome that creates something truly distinctive.
Fun fact: Pearl polishes photograph beautifully and catch light differently in photos than in person, so don’t be surprised if your nails look even more dimensional in pictures than they do in real life.
7. Milky White Stilettos with Gold Foil Flakes and Glitter
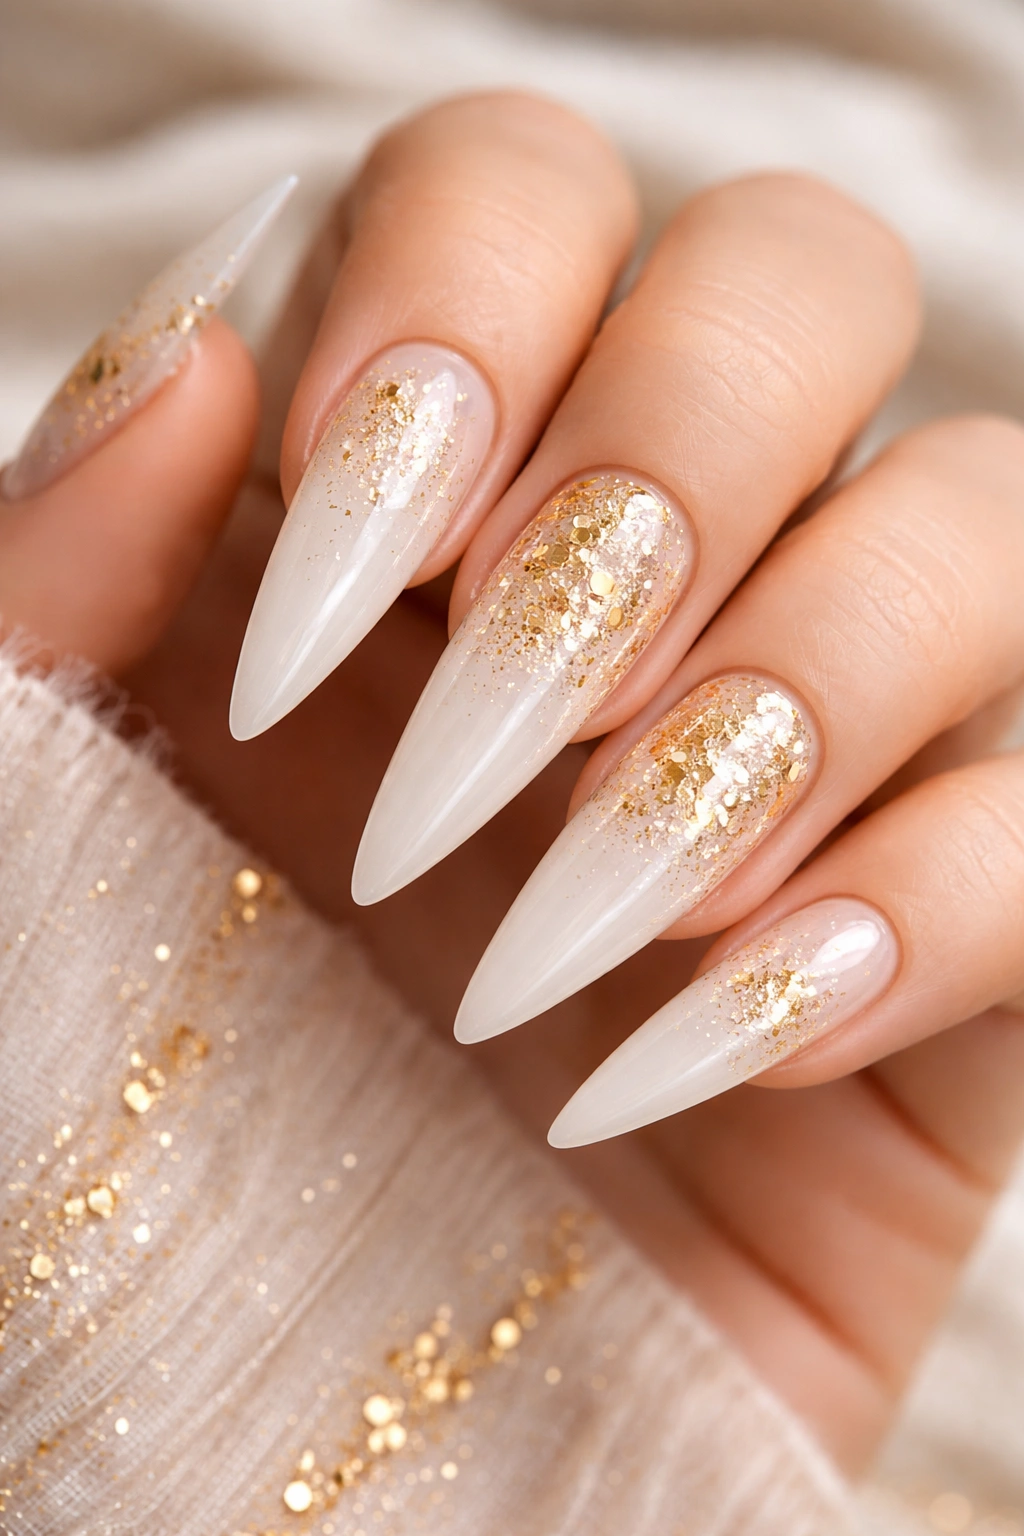
Create a glam design by embedding gold foil flakes, holographic glitter, or standard glitter into a milky white base. The flakes and sparkle can be concentrated on accent nails or distributed across all nails at varying densities, depending on how bold you want the final look.
Different Glitter Approaches and Their Impact
Concentrating glitter heavily on just the tips of the stilettos (where the nail naturally narrows) creates maximum visual impact while keeping the design from feeling chaotic. Sprinkling glitter across the entire nail in a subtle way feels more refined and wearable for everyday. Mixing different sizes of flakes and glitter creates visual depth—large flakes stand out, tiny glitter catches light, and the combination feels more intentional than one type alone.
Best Glitter Types for This Design
Gold foil flakes are the MVP here because they’re thicker than regular glitter, don’t shed as easily, and photograph beautifully. Glass flakes catch light similarly to foil but feel even more luxurious and three-dimensional. Holographic glitter shifts between colors as light hits it, adding an extra dimension that keeps the design from feeling one-dimensional. Traditional glitter also works but requires a good top coat to prevent shedding. Bar glitter (thin sheet form) can be cut into custom shapes for an even more elevated look.
Application and Longevity
For a professional manicure, glitter is embedded while the base polish is still slightly tacky, then sealed with top coat. For at-home application, you can either mix glitter into clear top coat and apply over your milky white base, or use glitter gel formulas specifically designed to stay in place. The key to longevity is a solid seal of top coat—glitter that’s not fully sealed will shed almost immediately.
Worth knowing: Glitter that edges toward champagne or rose gold feels more sophisticated than traditional bright gold, which can read as costume-y. The warmer metallics complement milky white’s creamy undertone beautifully.
8. Marble or Watercolor Effect on Milky White Stilettos
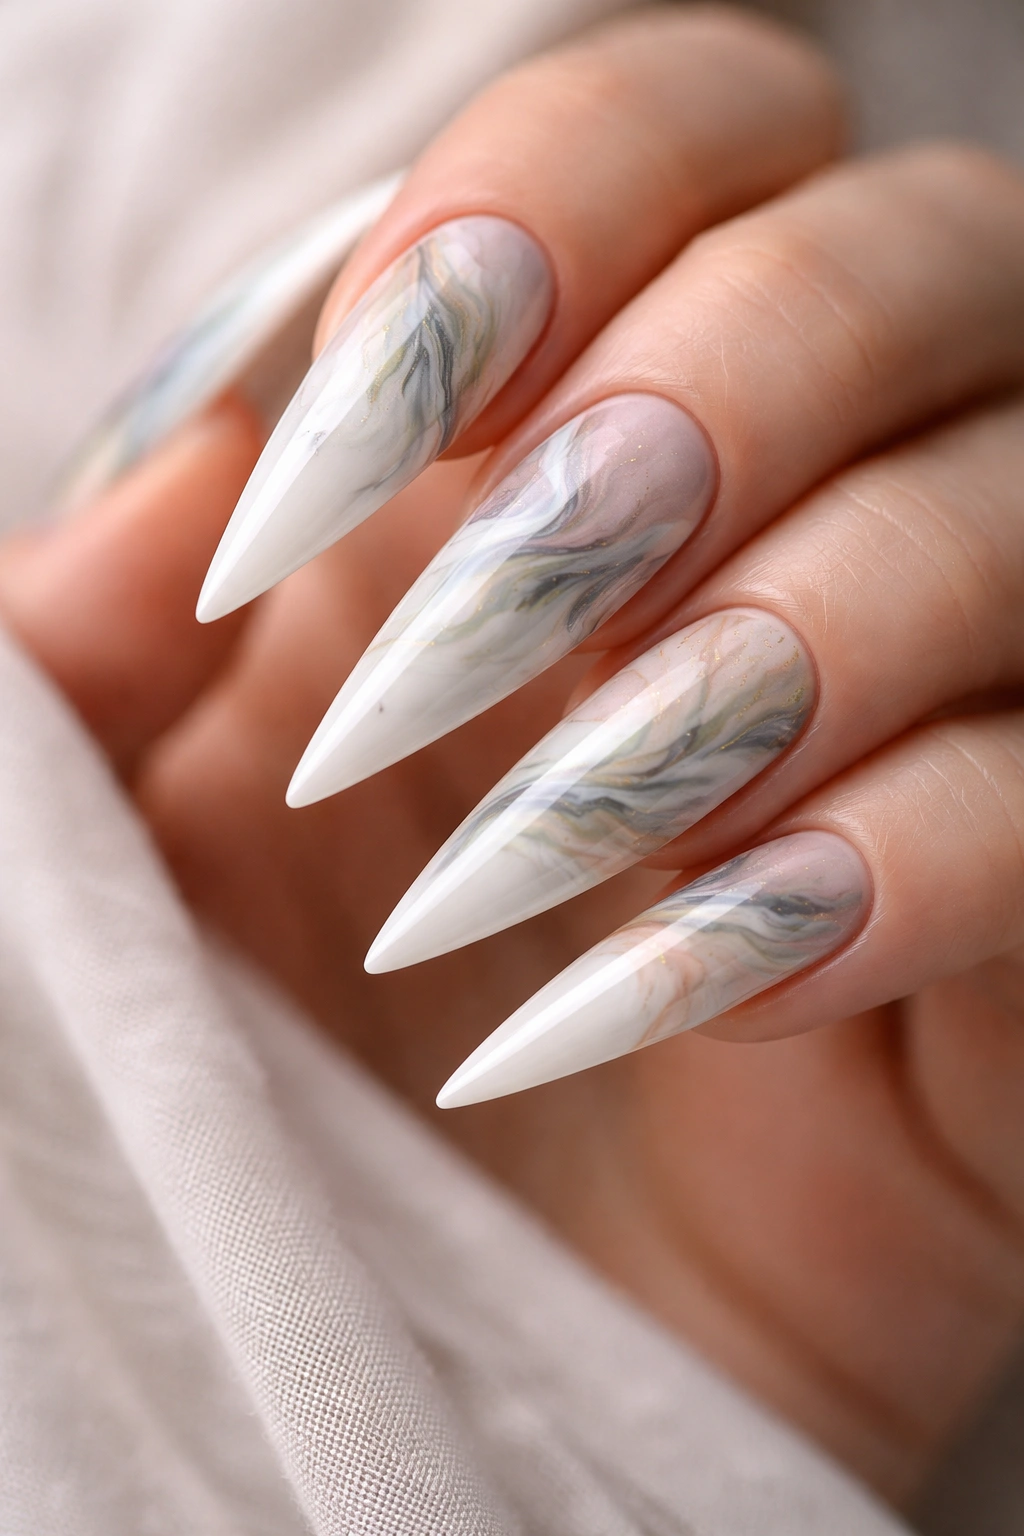
Swirled, organic patterns created through marble or watercolor techniques add artistic sophistication without requiring recognizable imagery. Soft grays, blush pink, sage green, or dusty blue swirl through the milky white base in flowing, natural-looking patterns reminiscent of actual marble stone or watercolor painting.
The Aesthetic Appeal of Marble and Watercolor
These designs feel high-end and artistic because they look effortless while actually requiring technique. Marble-effect nails mimic luxury stone, automatically conjuring images of sophistication and expense. Watercolor effects feel creative and painterly without being cutesy or overly decorated. Both approaches blur the line between nail art and wearable art in a way that elevates the entire aesthetic beyond typical nail design.
Color Combinations That Work Best
For marble effects, soft grays, blacks, and whites create classic elegance. Adding touches of blush pink or sage creates something slightly more interesting. For watercolor effects, soft pastels (pale pink, lavender, blue, green) create a dreamy, romantic vibe. Mixing multiple soft colors creates a more complex, gallery-worthy effect. The key is keeping colors relatively muted—bright watercolor effects can read as juvenile rather than artistic.
Techniques for Achieving This at Home
Marble effects typically use a water-marbling technique with thin polish and water, though this is genuinely difficult to execute consistently. Alternatively, use a marbled effect topcoat designed specifically for this look, which eliminates the technique challenges. Watercolor effects can be achieved by applying thin layers of very diluted polish or using specialized watercolor gel polishes. Many people find it easier to visit a nail artist for these effects because the technique barrier is real.
Pro tip: If DIY feels intimidating, there are nail wraps and sticker designs that beautifully mimic marble and watercolor effects. They give you the aesthetic without requiring the technique, and they last just as long as hand-painted designs.
9. Milky White Base with Delicate Rhinestone or Crystal Embellishments
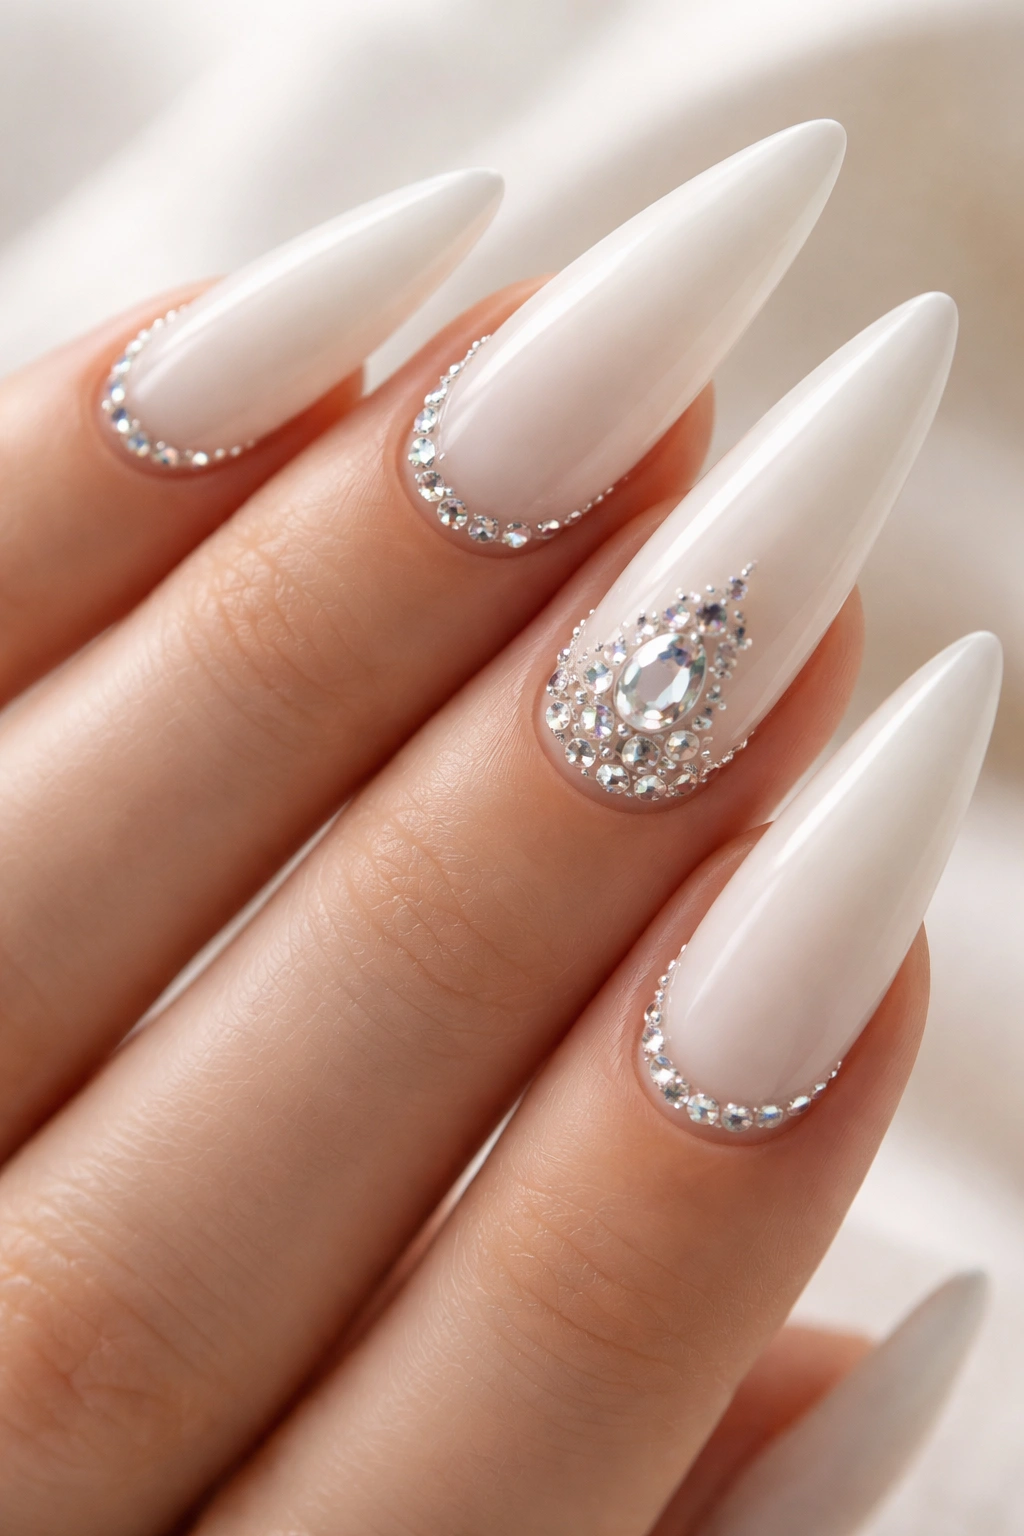
Strategically placed rhinestones, Swarovski crystals, or smaller decorative stones create a glamorous, elevated look without being over-the-top. Stones can be scattered along the cuticle line, clustered on accent nails, or arranged in geometric patterns depending on your aesthetic preference.
Choosing the Right Stones and Placement
Large, statement rhinestones on just the accent nails feel balanced and intentional. Small scattered crystals across all nails feel playful and sparkly without demanding attention. Rhinestones arranged along the cuticle line in a line or subtle pattern create definition and luxury. Geometric arrangements (triangles, lines, grids) feel modern, while organic scattered placements feel romantic or whimsical. The placement fundamentally changes how the design reads.
Stone Types and Their Appearances
Swarovski crystals are the luxury option—they’re higher quality, hold their sparkle longer, and feel more prestigious. Standard rhinestones are budget-friendly and still beautiful but require better topcoat sealing to prevent loss. Opals shift between multiple colors as light hits them, adding complexity. Pearls are subtle and sophisticated. Colored crystals (rose gold, champagne, blush) feel warmer against milky white than clear or white stones.
Durability and Maintenance Concerns
Stones embedded in gel polish last significantly longer than those applied to regular polish because the gel seal is stronger. Stones applied to regular polish may last 7-10 days before some begin to loosen. Wearing gloves during dishwashing protects stones from being caught on fabric or knocked loose. If stones do fall off mid-manicure, it’s usually easy for a nail tech to reapply them with a dab of adhesive, making this a fairly low-stress situation.
Real talk: Embellished nails require slightly more care than plain polish nails. Your subconscious will protect them once you start wearing them, but they’re not quite as worry-free as minimal designs. If you’re rough on your hands or work in an environment where nails get bumped constantly, consider lighter embellishment.
10. Milky White Ombre French Manicure with Gradient Tips
A modern twist on the French manicure, this design keeps the milky white base but creates a gradient tip that transitions from white to a complementary color (soft pink, peachy nude, or even pale gold) rather than ending in a sharp line. The gradient creates a softer, more contemporary feel than traditional French manicure while maintaining that clean, elongating effect.
Why Ombre French Feels So Refined
The traditional French manicure is instantly recognizable and professional, but it can feel a bit dated if executed too literally. The ombre French updates the concept by softening the transition line—instead of a crisp white tip against milky base, you get a flowing gradient that feels modern and dimensional. It’s the best of both worlds: the professional polish of French manicure combined with the contemporary interest of ombre.
Color Gradients That Complement Milky White
Soft peachy or nude gradient tips feel warm and sophisticated—perfect for anyone with warm undertones or who wants an approachable, professional vibe. Pale pink gradients feel romantic and slightly more interesting than pure white tips. Champagne or pale gold gradients add glamour without feeling costume-y. Even a barely-there gradient where the tip becomes only slightly warmer or cooler than the base creates visual interest for people preferring subtlety.
Application Complexity
This design requires sponging or airbrush technique because you need a seamless gradient within just the tip area of the nail. Professionals can execute this relatively quickly with experience. For DIY application, a sponge and careful layering of progressively concentrated color works, though it requires some patience. Alternatively, gel formulas allow you to cure each layer separately, giving you more control over the final gradient.
Occasions Where This Works Perfectly
This design straddles professional and playful beautifully. It works for business environments, social events, date nights, and literally any occasion where you want nails to feel polished and intentional. It’s especially perfect for people who love French manicures but find them too clinical or dated—this is the modern evolution of that classic.
Pro tip: The gradient in the ombre French doesn’t need to be extreme to be effective. A very subtle gradient where the tip is just barely warmer or cooler than the base feels sophisticated because it’s obviously intentional but not obvious enough to feel like a mistake.
Final Thoughts
Milky white stiletto nails offer something rare in nail design—a base that’s equally at home in the boardroom and on a night out. These creamy, sophisticated nails don’t demand you choose between professional polish and creative expression because they seamlessly accommodate both. Whether you’re drawn to minimalist elegance, artistic embellishment, textural play, or glamorous sparkle, milky white provides the perfect foundation for bringing your nail vision to life.
The real advantage of working with milky white specifically is that it’s forgiving in ways pure white isn’t. The creamy undertone means the design feels warm and approachable rather than stark. Minor imperfections in application blend more naturally into a creamy base than they would into pure white. And because milky white works beautifully with virtually every skin tone, you can wear these nails without worrying about whether the color complements you—it universally does.
The stiletto shape amplifies everything you add to this base. The extended length makes even minimal designs feel impactful, and it photographs beautifully because the elongated silhouette is inherently elegant. Combined with milky white’s sophisticated undertone, you’re already 90% of the way to nails that look expensive and intentional before you add a single accent detail.
Your next milky white stiletto manicure should be chosen based on your lifestyle, how much maintenance you’re willing to commit to, and which aesthetic honestly excites you most. There’s no universally “best” design—there’s only the design that makes you feel most like yourself. Whether that’s geometric minimalism, romantic florals, subtle texture play, or full glamorous sparkle, milky white stilettos provide the canvas to make it happen.
