

Kawaii nail art transforms your fingertips into tiny canvases of adorable expression—and when you stretch those designs across the elongated drama of stiletto nails, the effect becomes absolutely mesmerizing. Stiletto nails aren’t just a shape; they’re a statement, and pairing them with cute, whimsical designs creates something genuinely special that goes way beyond the typical manicure. The key to nailing the kawaii aesthetic is balancing sweetness with sophistication, packing maximum charm into a small space, and choosing colors and motifs that feel playful without veering into costume territory.
The beauty of kawaii stiletto nails lies in how the sharp, pointed silhouette actually amplifies cute designs rather than clashing with them. The elongated canvas gives you room to play with gradients, tiny characters, and intricate details that would get lost on shorter nails. Whether you’re drawn to pastel color palettes, miniature illustrated elements, or sparkly embellishments, there’s a kawaii stiletto nail idea here that’ll make you genuinely excited to show your hands off. Let’s dive into 14 stunning options that blend edge, elegance, and pure adorableness.
1. Pastel Rainbow Gradient Stilettos
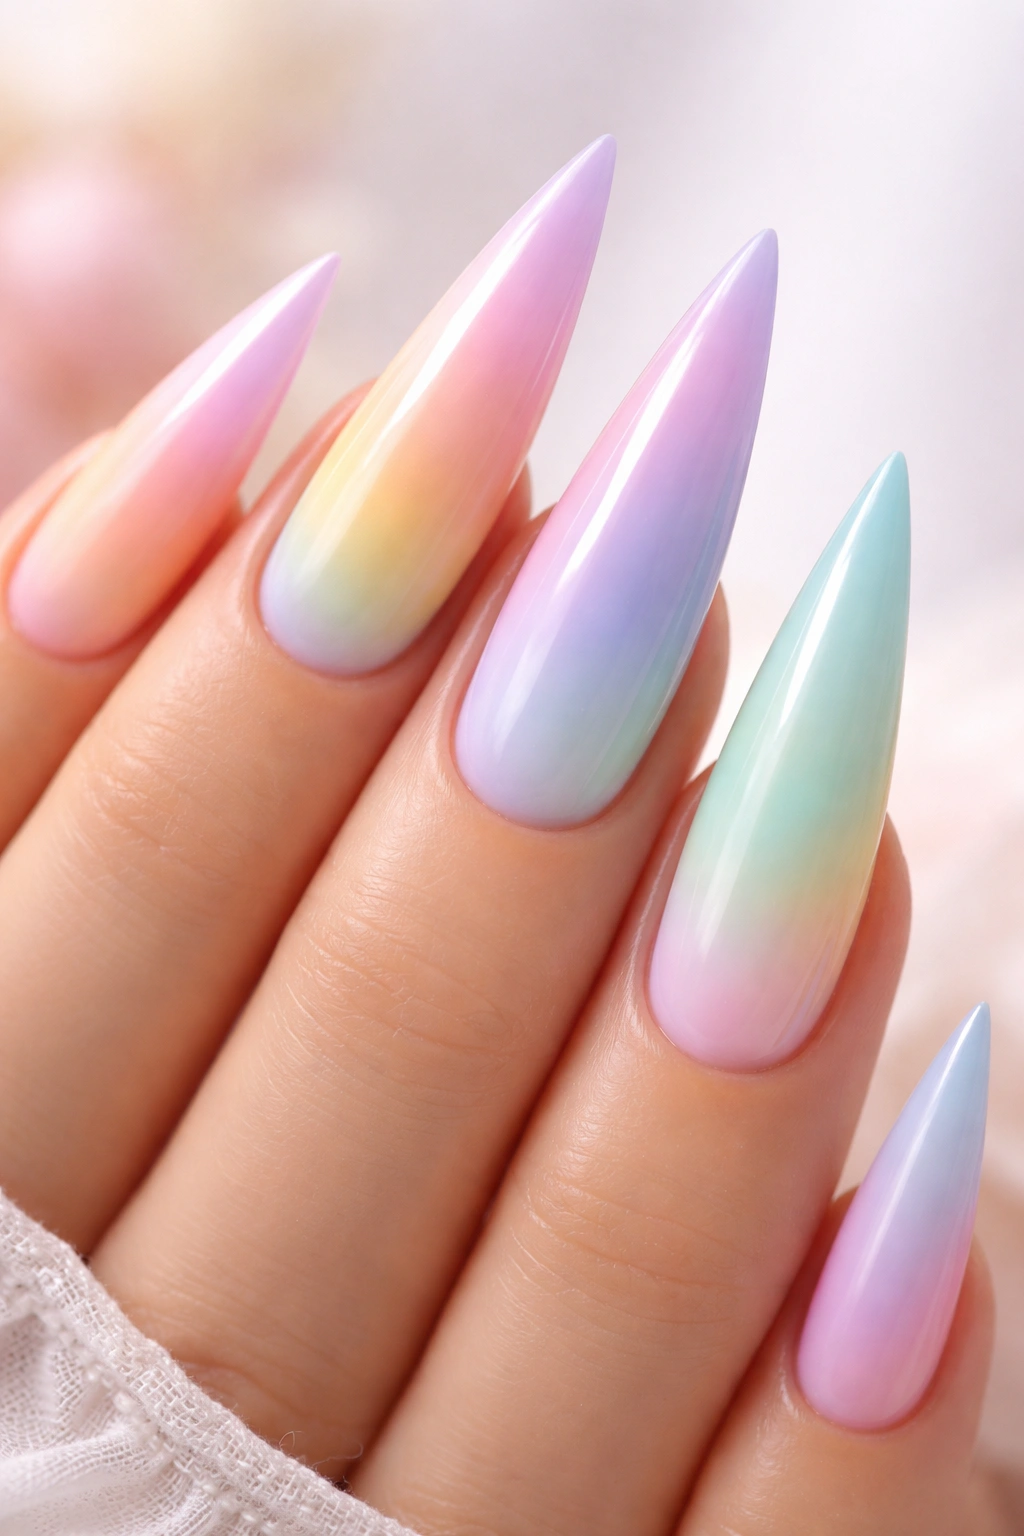
A soft rainbow gradient is the foundation of kawaii nail magic, and on stilettos, it becomes an absolute showstopper. This design uses peachy pinks, soft yellows, lavender, mint green, and baby blue—blending each color smoothly from one to the next across each nail. The gradient doesn’t have to start at the same point on every nail; staggering where each color begins creates visual interest and a more organic, dreamy feel.
Why This Works for Kawaii Aesthetics
Pastel rainbows capture the essence of kawaii culture without relying on any specific character or image. The soft, blended colors evoke that signature sugary-sweet vibe that defines the style. On stiletto nails, the gradient flows naturally down the length, creating an almost ethereal effect that’s both cute and sophisticated.
Application Tips and Color Choices
- Use a sponge technique: apply thin stripes of each pastel shade to a makeup sponge, then press and bounce the sponge across each nail for seamless blending
- Top with a glossy clear coat to make the colors pop and blend even more fluidly
- Seal with a matte topcoat if you prefer a softer, more powdery appearance
- The gradient works especially well when you let each color take up roughly equal space
Pro tip: Paint each nail’s base a pale white or ivory first—this brightens the pastels and prevents the gradient from looking muddy or dark.
2. Cute Star and Moon Design with Cloud Details
This design brings the dreamy, whimsical side of kawaii to life with tiny stars, crescent moons, and puffy clouds scattered across a soft blue or lavender base. The stars should be small and simple (even a basic dot with four tiny lines works), the moons are delicate crescents, and the clouds are little bumpy shapes that feel like they came straight from a cozy storybook. This works beautifully as an all-over scattered pattern or concentrated on one or two accent nails.
Creating the Celestial Look
The beauty of this design is its simplicity—you don’t need advanced artistic skills to pull it off. A thin brush or even a dotting tool can create perfectly charming stars and moons. The key is varying the sizes and angles so everything feels organic rather than gridded or mechanical.
Design Variations
- Add tiny sleeping faces to the clouds for extra kawaii points
- Use a mix of outlined and filled shapes for depth
- Layer gold or silver foil accents over some stars for subtle sparkle
- Incorporate one or two larger focal moon or star element on an accent nail
This design pairs well with a pale blue base, soft purple, or even a pale pink—any color that reads as “calm and dreamlike.”
3. Soft Pink with Delicate Bow Details
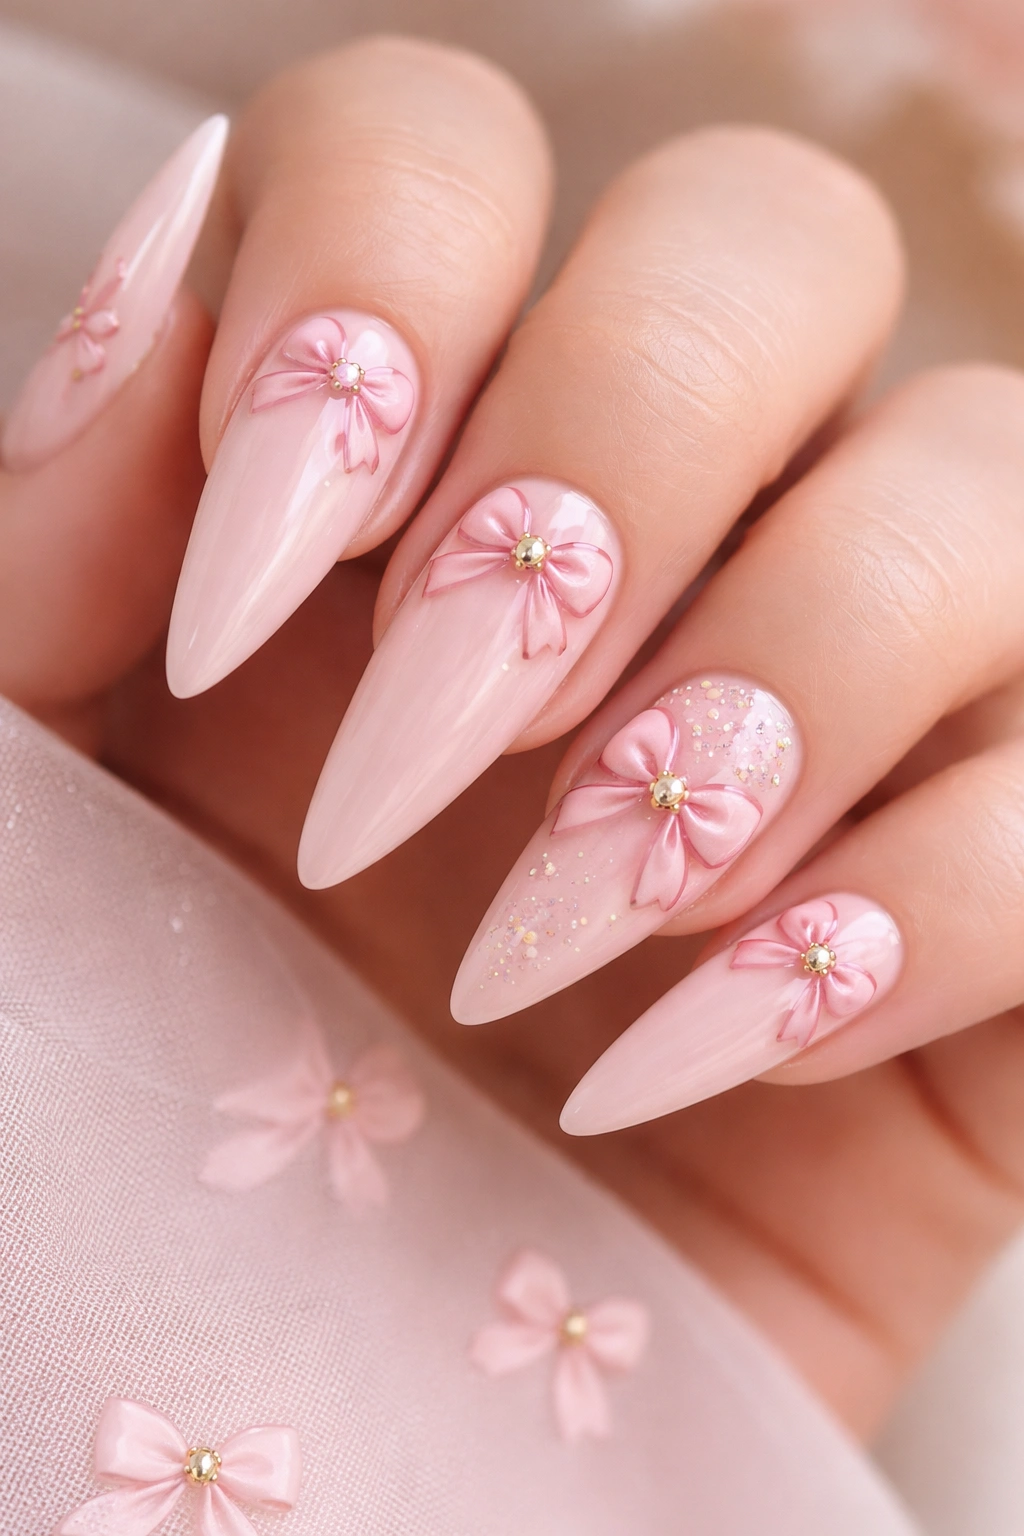
A blush pink base adorned with tiny bows is quintessential kawaii, and it’s surprisingly versatile. The bows themselves become your design element—you can scatter them across all the nails, place them strategically, or concentrate them on an accent nail. Keep the bows small and simple: just curved ribbon shapes with a tiny center knot. They should feel dainty, not heavy.
Bow Design Variations
- Outline bows in a slightly darker pink or nude shade for definition
- Fill some bows with metallic gold or rose gold for subtle richness
- Try two-tone bows where each ribbon loop is a different shade of pink
- Add a single rhinestone in the center of larger focal bows for extra sparkle
Color Combinations That Shine
The soft pink base is truly the star here, so keep it pure and uncomplicated. Pair it with white bows for classic contrast, or try mauve, dusty rose, or nude bows for a more tonal, sophisticated approach. A single nude or gold accent bow on one nail can anchor the entire design without overwhelming it.
This design feels romantic, elegant, and adorably charming—perfect for anyone who loves the softer side of kawaii style.
4. Heart Ombre Effect from Light to Deep
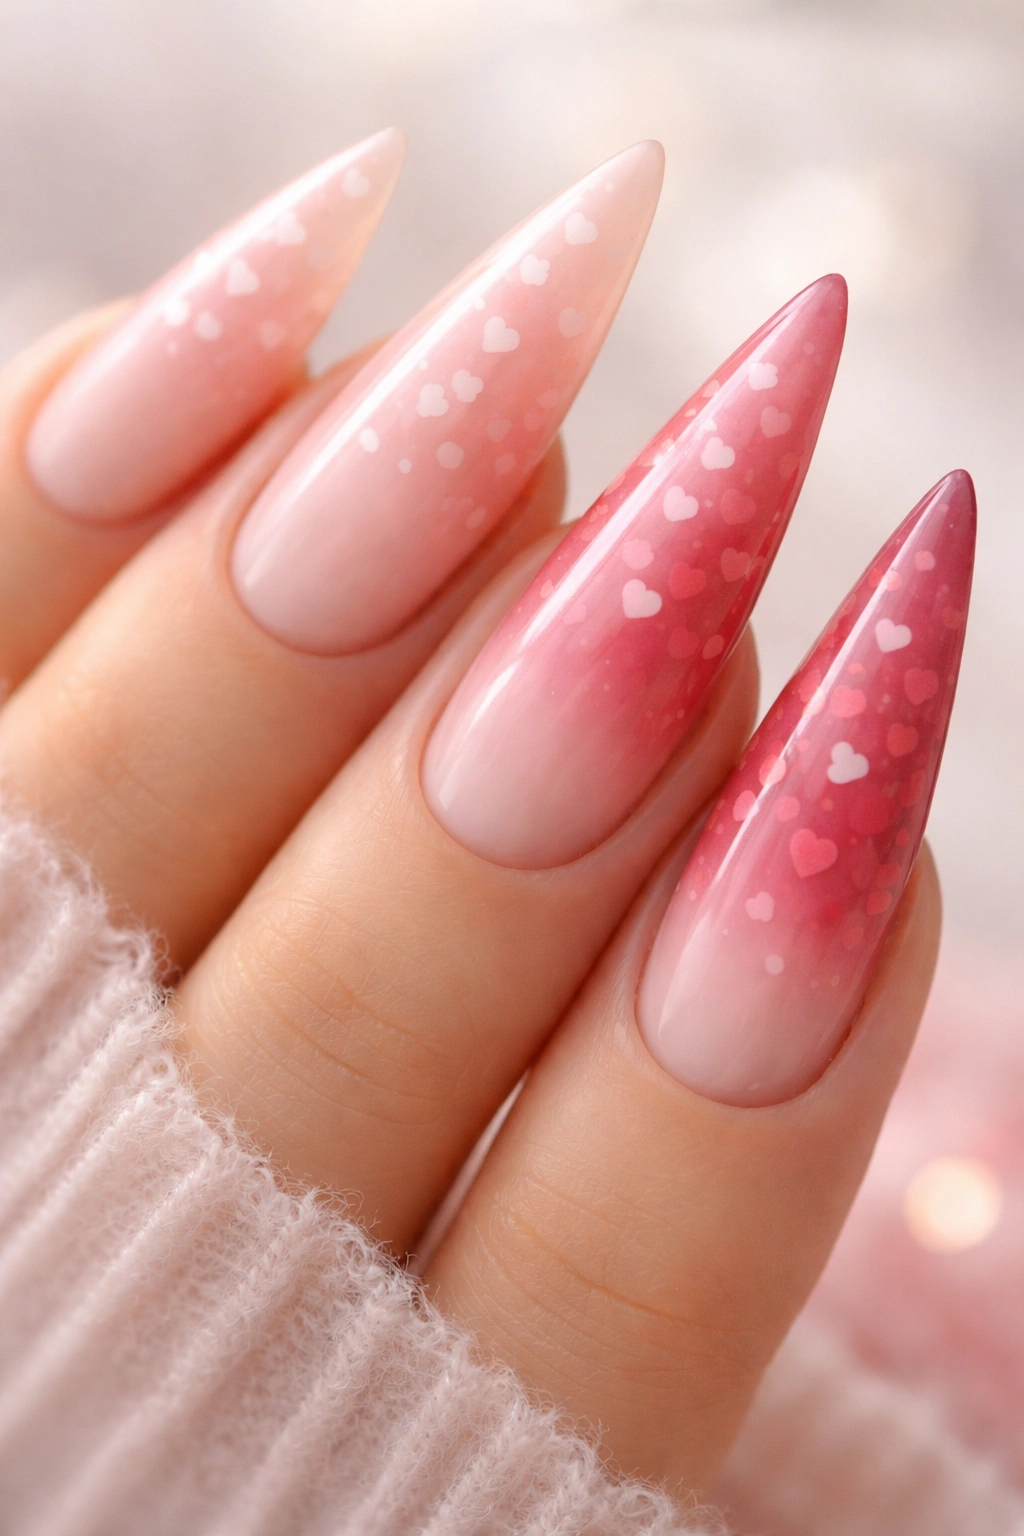
An ombre that transitions from pale blush to deep rose creates instant romance, and adding a subtle heart pattern throughout the gradient amplifies the kawaii factor. You can create this effect by doing a traditional color gradient, then dotting tiny hearts in varying sizes across the ombre. The hearts should follow the gradient too—pale hearts in the lighter sections, deeper rose hearts in the darker sections, creating a cohesive, flowing design.
Executing the Ombre Heart Gradient
- Paint a light pink base across all nails
- Blend slightly deeper pink into the transition zone using a sponge
- Deepen the color further toward the tips
- Once dry, add tiny hearts with a fine brush or dotting tool
- Vary heart sizes from barely-there to about the size of a lentil
Strategic Placement and Density
You don’t need to cover the entire nail with hearts. A scattered, organic pattern with white space showing through feels more elegant and modern than a heavily stamped or filled design. This restraint actually makes the hearts more adorable because they feel intentional rather than overwhelming.
Worth knowing: Use a heart stamp if you have one, but hand-painted hearts (even imperfect ones) often feel more charming and personal on kawaii designs.
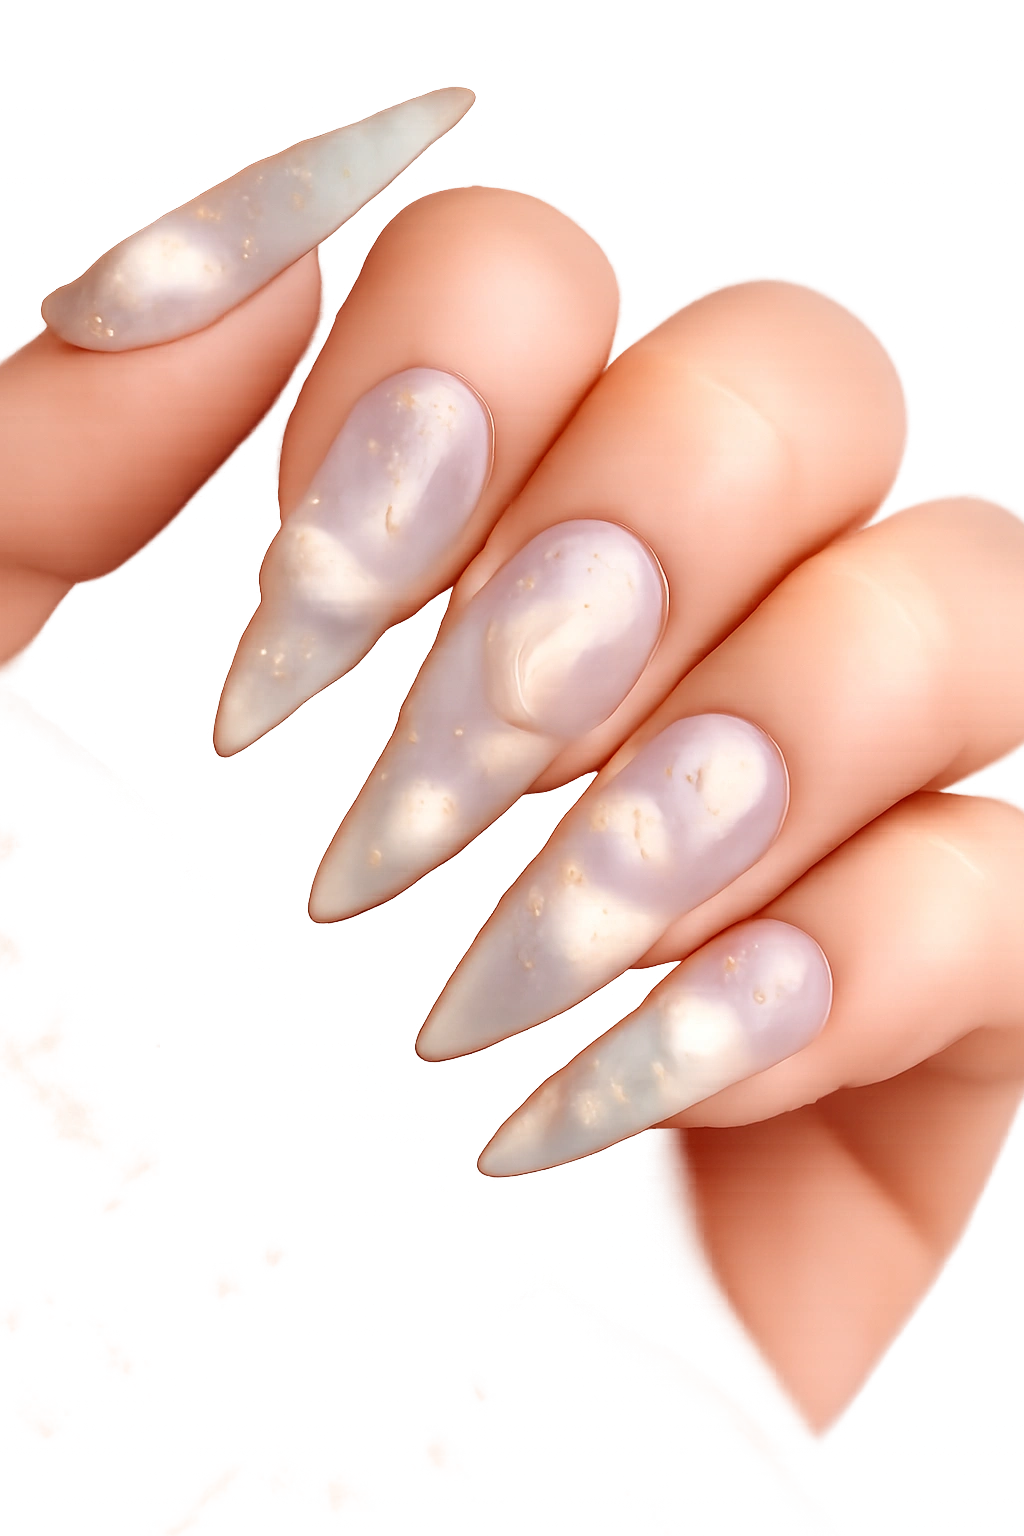
5. Glitter and Pearl Mix in Nude and White
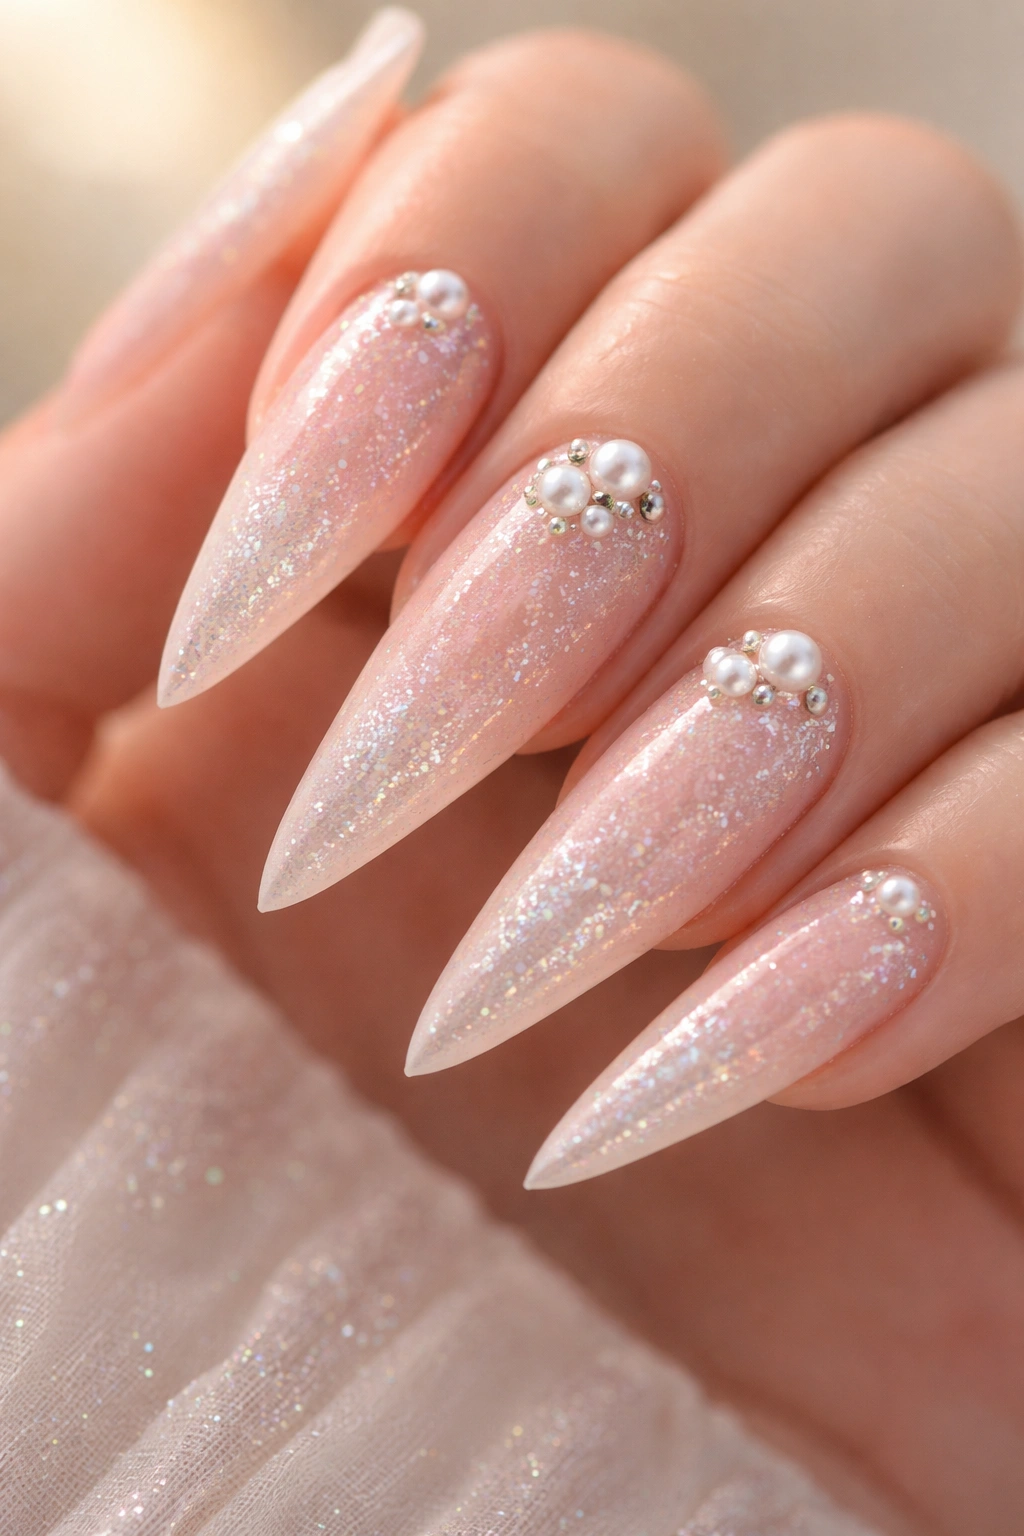
Sometimes kawaii beauty is all about texture and sparkle rather than busy graphics. A sheer nude or soft pink base layered with iridescent glitter, pearl pigment, and strategically placed micro pearls or rhinestones creates a sophisticated, touchable aesthetic that reads as both cute and upscale. The key is restraint—you want to enhance, not bury, the nail underneath.
Choosing Your Sparkle Textures
- Fine iridescent glitter creates a subtle shimmer without visible chunks
- Pearl pigment dusted over a wet topcoat sits smoothly in the finish
- Caviar beads (tiny spheres) add dimension when placed on one or two accent nails
- Mixed metallics (gold, silver, rose gold) together feel more modern than a single shine
Application Technique for a Professional Finish
- Apply your base polish and let it dry completely
- Lightly brush on a glossy topcoat while still wet
- Sprinkle or apply glitter and pearls to specific areas or all over, depending on your vision
- Seal with another layer of glossy topcoat to lock everything in place and create a smooth, wearable surface
This approach feels elevated without looking overdone—perfect for someone who loves kawaii style but wants their nails to feel refined and grown-up too.
6. Mint Green with Tiny Daisy Flowers
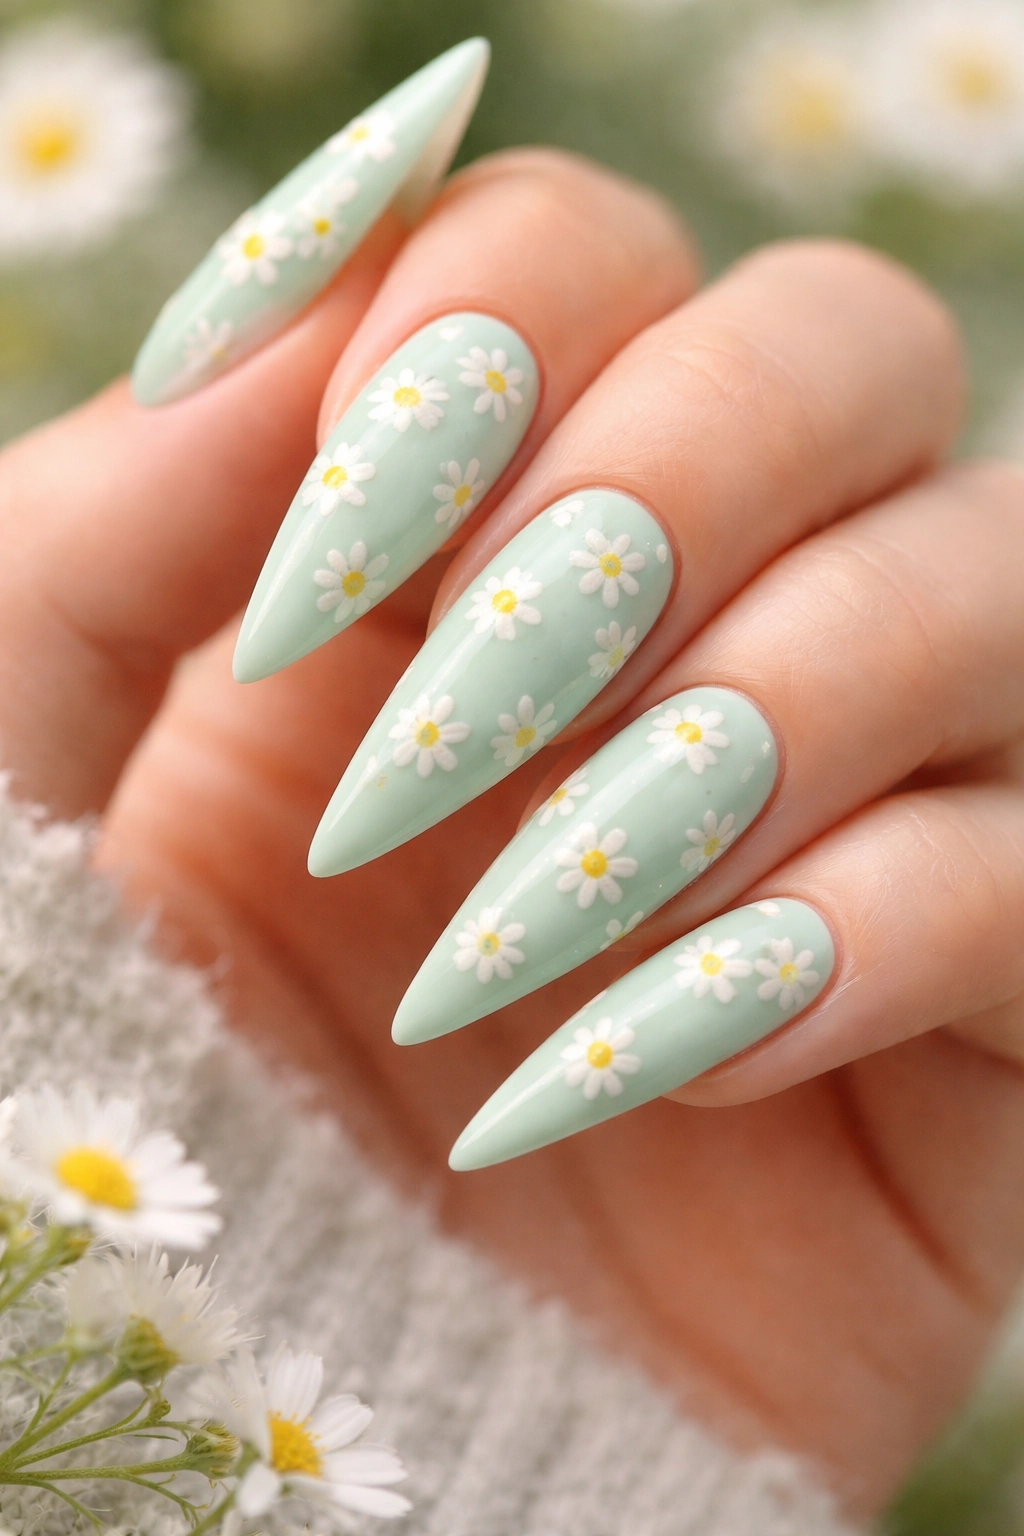
Mint green is THE kawaii color—soft, fresh, slightly playful—and pairing it with delicate daisies turns it into instant garden charm. Paint each nail a pale mint green, then add tiny daisies scattered across the surface. Keep the daisies simple: a small circle center in pale yellow with five or six white petals around it. They should feel spontaneous and light, like little flowers floating across your nails.
Daisy Design Execution
- Use a dotting tool to create the pale yellow flower center
- Paint thin white petal shapes around each center
- Add a tiny dot of a slightly darker yellow in the center for dimension
- Vary the size of flowers from very tiny to the size of a grain of rice
Color Pairings Beyond the Classic
- Mint with white daisies and pale green stems is timeless
- Mint with pale pink daisies creates a softer, more romantic vibe
- Add tiny green leaves or stems to a few flowers for botanical detail
- Include scattered green leaves between flowers for a garden-like feel
This design captures pure, gentle kawaii energy. It’s the nail art equivalent of a cozy, light-filled afternoon—cheerful without being loud, cute without being precious.
7. Lavender Base with Soft Cloud Patterns
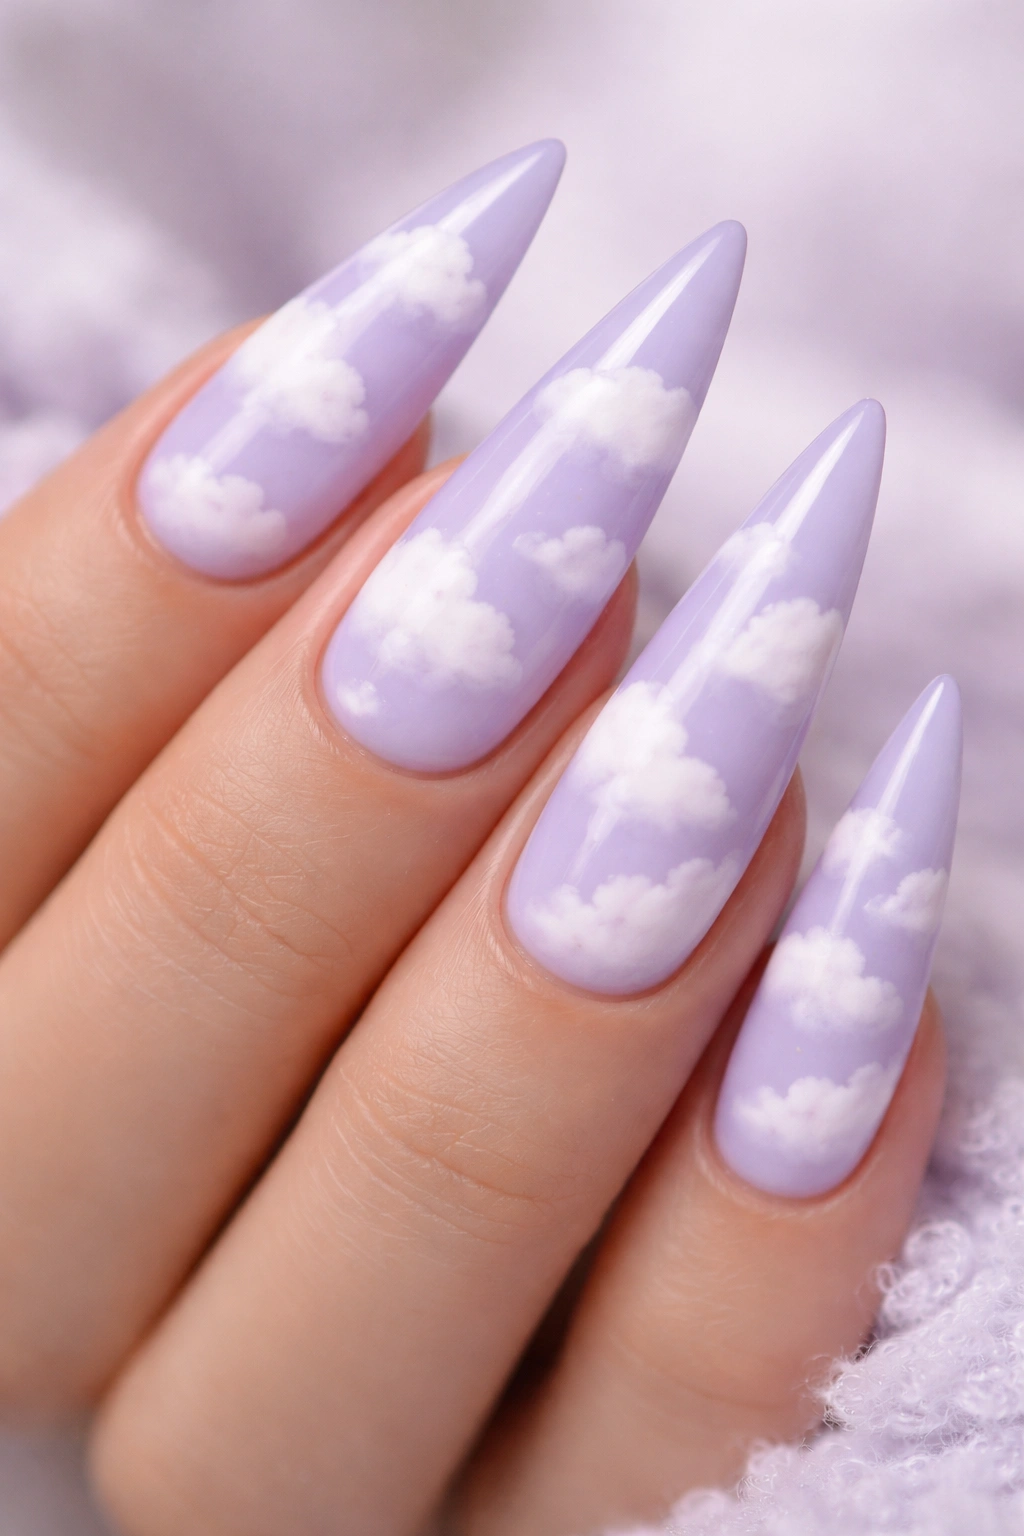
Lavender is fundamentally kawaii—it’s the color of dreams, soft blankets, and calming vibes. Pair it with white or pale cream clouds and you’ve got instant serenity. Paint each nail a pale lavender, then add fluffy cloud shapes scattered across them. The clouds should be soft and bumpy, almost like cotton, with no sharp edges. This design works beautifully as a full coverage pattern or as a sparser, more minimalist version.
Creating Realistic, Soft Clouds
- Use a fine white brush to paint organic, bumpy shapes
- Don’t aim for perfection—slightly irregular clouds feel more authentic
- Add a second layer of white in the highlights for dimension and softness
- Consider adding tiny sleeping faces to select clouds for ultra-kawaii points
Complementary Design Elements
- Tiny raindrops in pale blue near some clouds add storytelling
- Stars or moons peeking out between clouds create a dreamy night sky
- A single larger focal cloud on one accent nail anchors the design
- Pale pink or pale blue accents scattered among the clouds add gentle color variation
Lavender clouds feel inherently calming and cute—like the manicure equivalent of a weighted blanket. This is the design to choose when you want your nails to feel soothing and sweet.
8. Strawberry Shortcake Inspired Nails
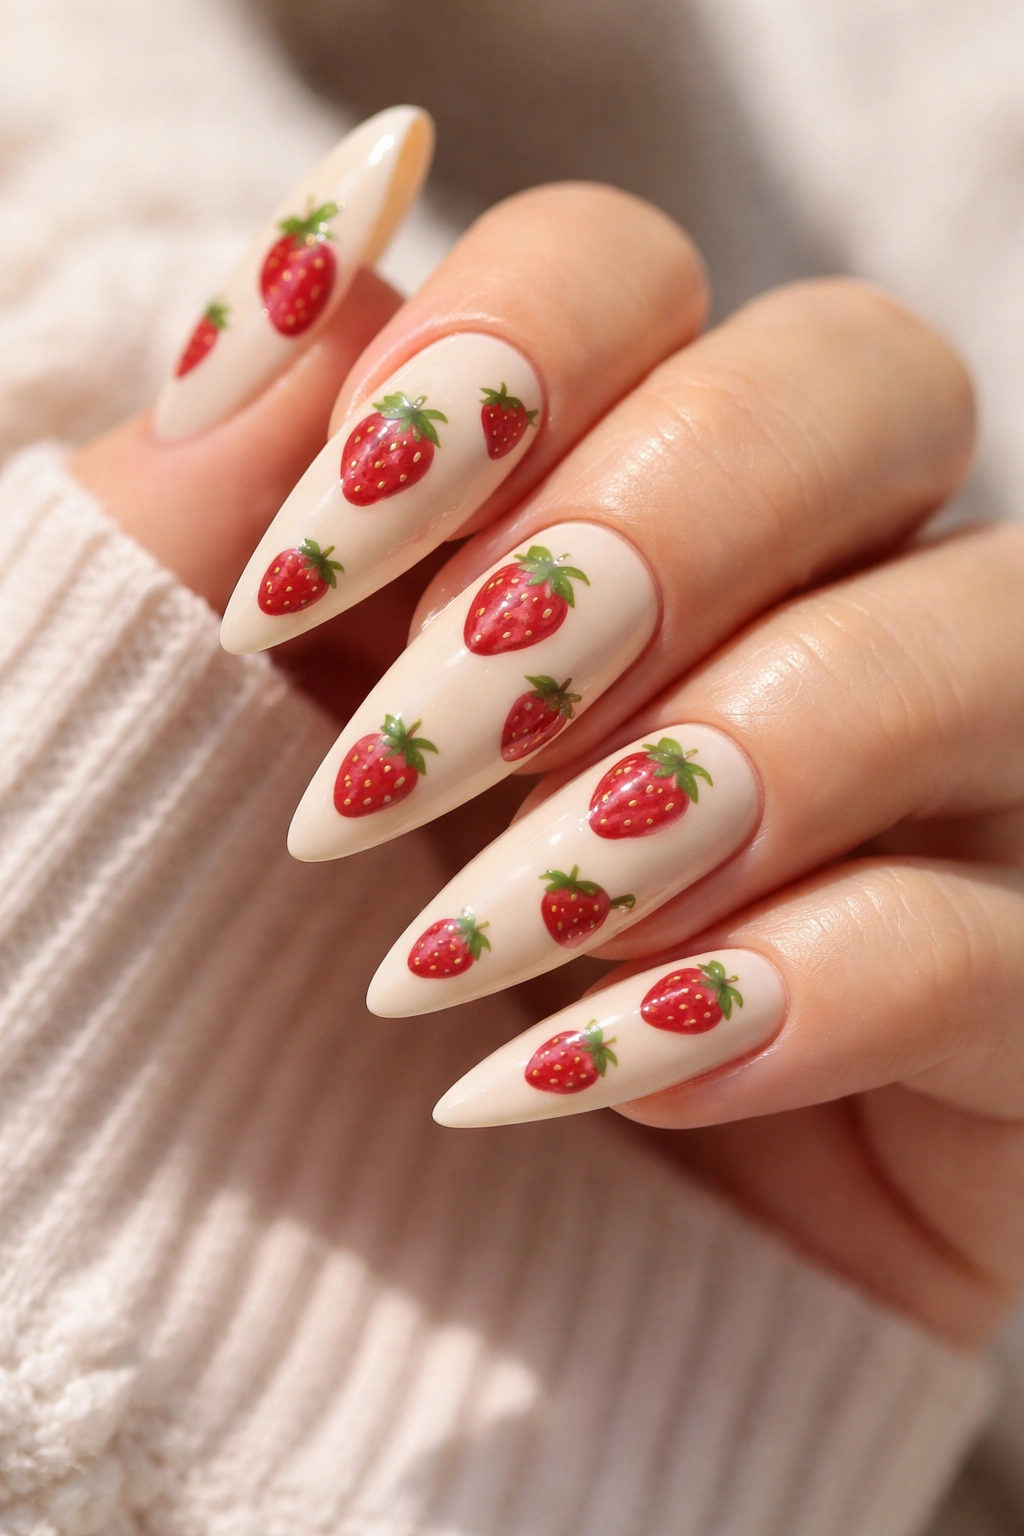
Take your nails to dessert-themed kawaii heaven with a strawberry shortcake design: pale cream or off-white base, tiny strawberry sections scattered across, and possibly a whisper of pale pink blush for dimension. The strawberries should be small and charming—little red hearts with tiny yellow seeds dotted on them. Add a few green leaves at the top of each strawberry to complete the look.
Designing the Strawberry Elements
- Paint tiny heart shapes in bright strawberry red
- Dot small yellow seeds across each heart in a scattered pattern
- Add two small green leaves extending from the top point
- Vary the strawberry size and angle across different nails
Building the Complete Dessert Vibe
- Use a pale cream, vanilla, or soft pink base
- Add strawberries in clusters of 3-5 per nail or scattered throughout
- Include tiny green leaves randomly between strawberries
- Top with a glossy finish for a “sweet and shiny” effect
Pro tip: A tiny white line on each strawberry (like a light reflection) makes them look dimensional and juicy—this small detail makes the entire design read as more professional.
This design tastes like nostalgia and feels undeniably cute. Strawberry shortcake is timeless kawaii, and it works beautifully in miniature form across stiletto nails.
9. Candy Stripe Pattern with Pastel Shades
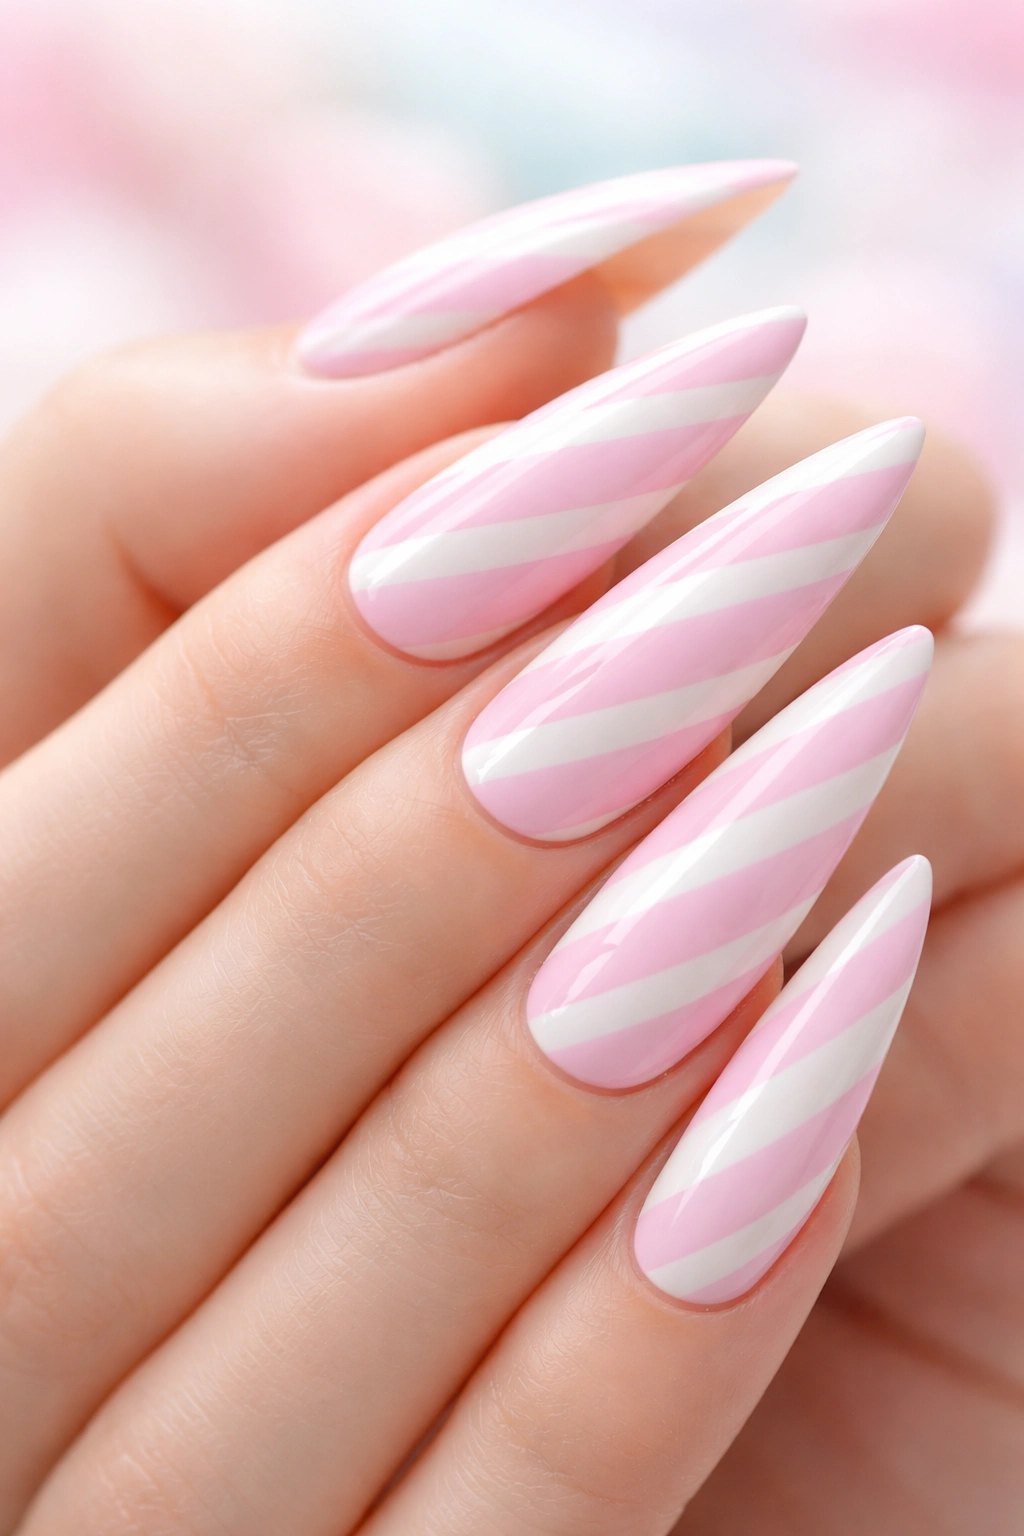
Candy stripes reference classic lollipops and hard candy swirls—instantly recognizable as cute and playful. Create this by painting thin, diagonal stripes across each nail in two pastel colors: pale pink and white, soft yellow and white, or lavender and pale blue. The stripes should be roughly equal width and consistent across all the nails. This geometric pattern feels modern while maintaining that sweet, nostalgic kawaii feeling.
Stripe Technique for Clean Results
- Paint your base color (typically the lighter of your two shades)
- Using a thin striping brush or thin tape, create evenly spaced diagonal lines
- Paint alternate lines in your second pastel color
- Seal with a glossy topcoat to make the stripes pop
Color Combinations to Try
- Soft pink and white: classic and romantic
- Pale yellow and white: cheerful and bright
- Lavender and pale blue: dreamy and cool
- Peachy pink and soft peach: warm and harmonious
- Mint green and white: fresh and playful
The beauty of candy stripes is their simplicity—there’s nothing complex about them, yet they feel intentional and styled. The geometric precision contrasts perfectly with the sweetness of the pastel color choices.
Worth knowing: Slightly imperfect, hand-drawn stripes often look more charming than perfectly straight ones. Don’t stress about pixel-perfect precision.
10. Dreamy Galaxy Design with Tiny Stars and Sparkle
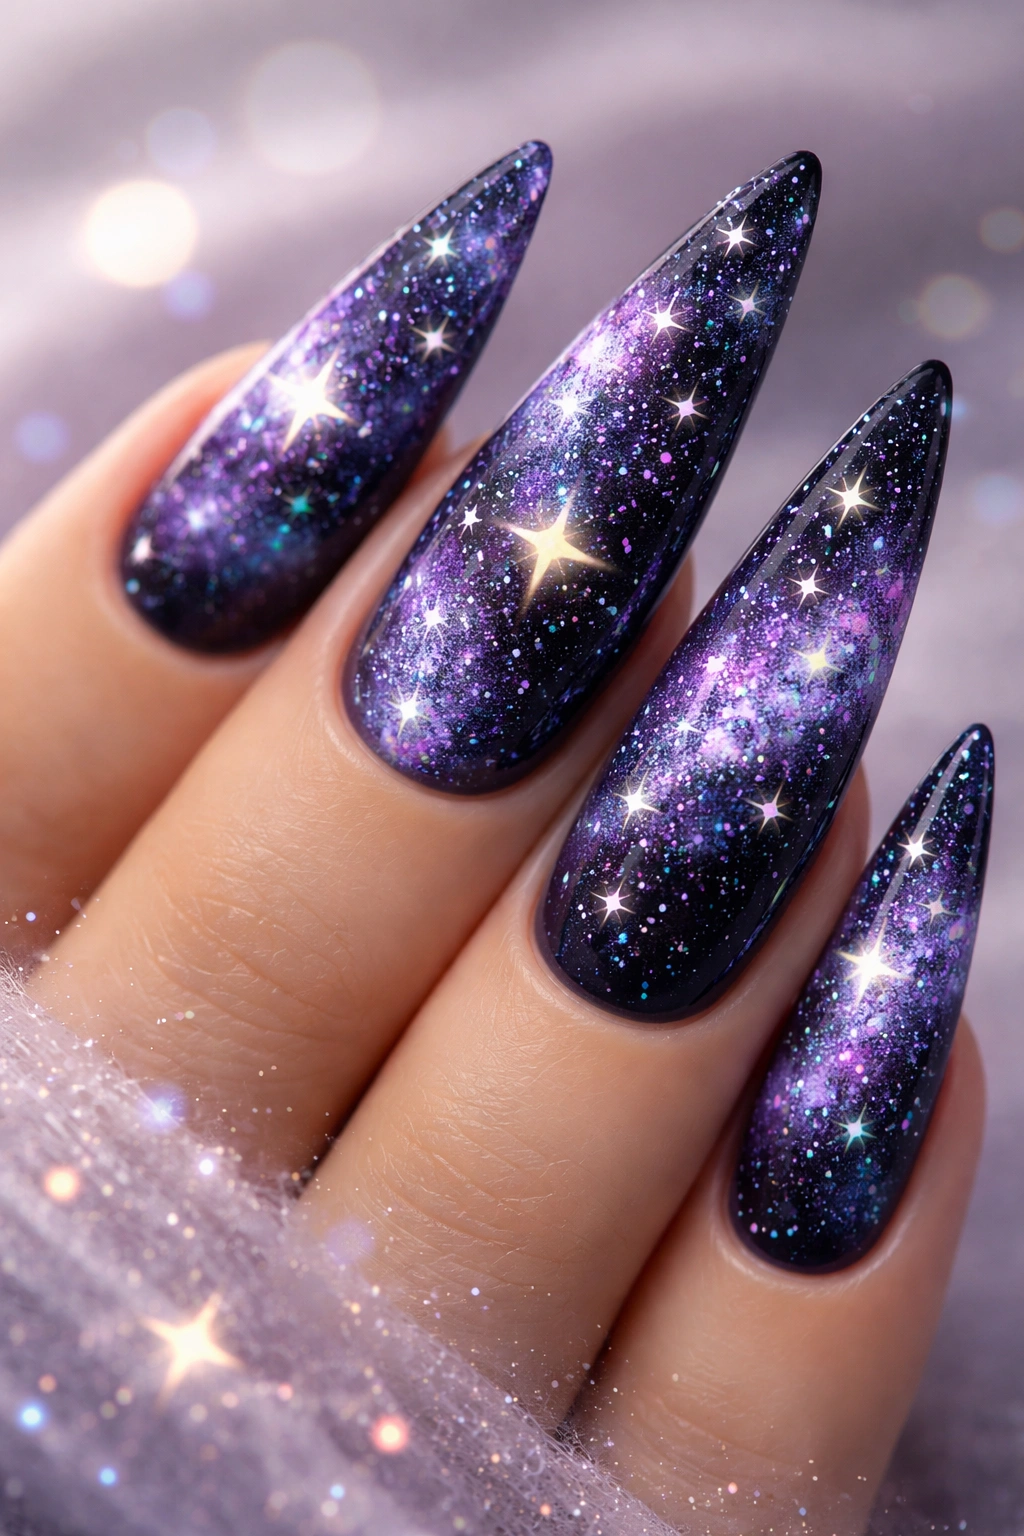
A galaxy design translates beautifully onto stiletto nails with a dark navy or deep purple base, scattered tiny stars, and shimmery shimmer throughout. Create depth by layering dark and medium purples, adding white or pale yellow stars, and finishing with iridescent glitter that catches the light. This design feels cosmic and magical—perfect for a more dramatic, moody take on kawaii.
Building Your Galaxy Base
- Start with a dark navy or deep purple base
- Blend slightly lighter purple into the transition zones using a sponge
- Create texture and depth by adding areas of medium purple
- Let some black or very dark blue show through for contrast
Adding Stars and Sparkle Elements
- Dot tiny white stars randomly across the galaxy
- Add pale yellow or white highlights to some areas for nebula effects
- Dust iridescent glitter over the entire nail while the topcoat is wet
- Consider tiny white or pale yellow lines that could represent star trails or cosmic streams
This design captures the magical, slightly moody side of kawaii—less sugary sweet and more ethereal and thoughtful. It’s perfect for anyone who loves cute aesthetics but wants their nails to feel a bit more grown-up and artistic.
11. Peach Base with Tiny Cute Faces
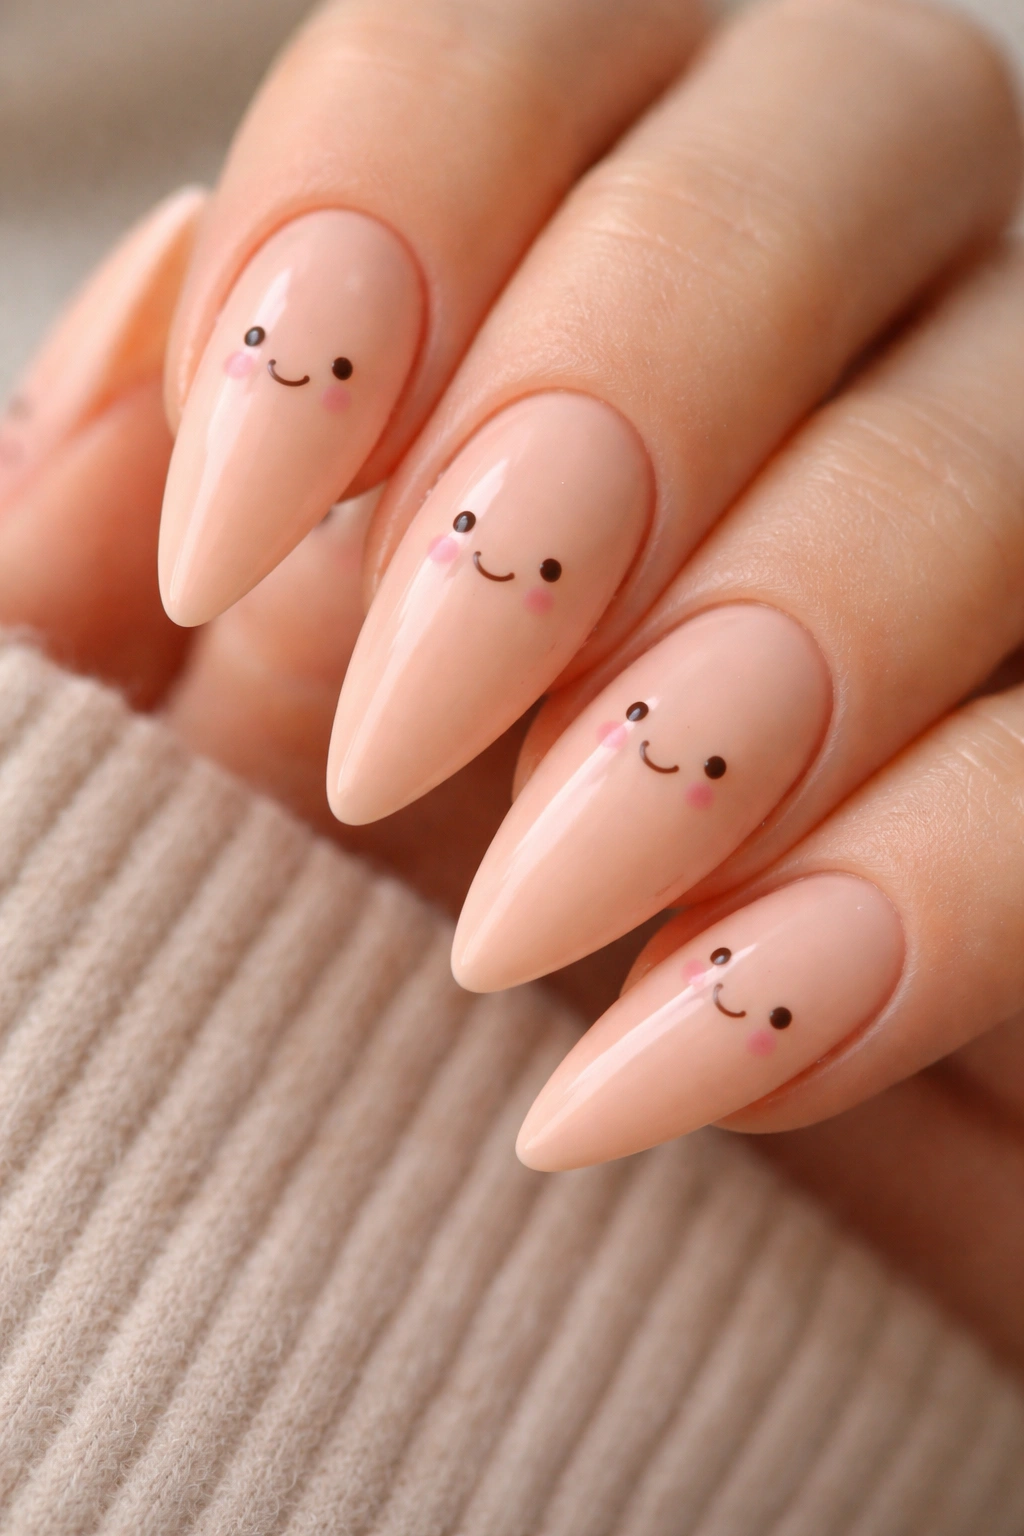
A peachy, warm base adorned with tiny face designs creates instant character and charm. Paint each nail a warm peachy tone, then add minimal face designs scattered across: just two dots for eyes, a curved line for a sweet smile, and perhaps tiny rosy cheeks or a simple nose. Keep each face extremely small—think the size of a sesame seed to a grain of rice. The restraint makes them adorable rather than cartoonish.
Drawing Minimalist Cute Faces
- Use a fine brush or toothpick for the tiniest details
- Two black dots positioned slightly apart create the eyes
- A small curved line underneath becomes a genuine, sweet smile
- Optional: tiny peachy-pink circles on the cheeks for blush
- Some faces could have closed, happy eyes (curved lines instead of dots)
Placement and Density
- Scatter faces organically across all nails or concentrate on accent nails
- Some nails might have 2-3 faces while others have just one
- Leave plenty of white space around and between faces
- Vary the expressions—some smiling, some with eyes closed, some with little ♡ shaped eyes
Real talk: These faces don’t need to be perfect. Slightly wonky or imperfect faces often read as MORE charming because they feel hand-made and genuine. This is one design where machine-like precision actually works against the aesthetic.
This design brings pure, innocent joy to your nails—it’s undeniably cute without being over-the-top or childish.
12. Sparkly Ice Cream Cone Design
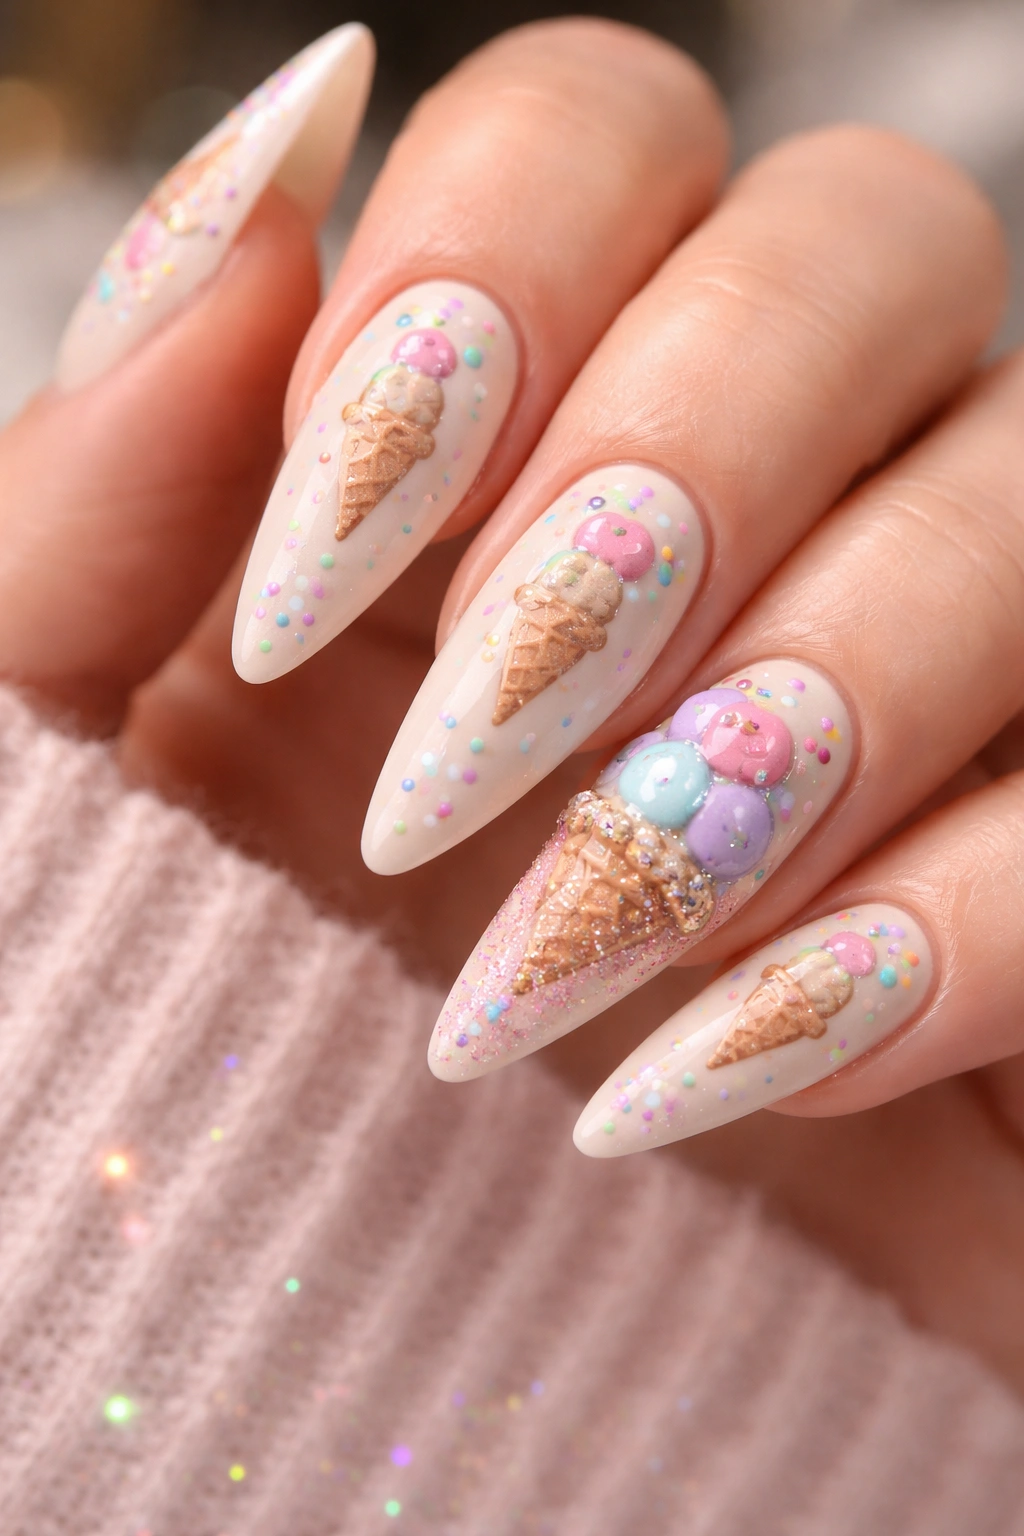
Ice cream is quintessentially kawaii, and rendering it in miniature on stiletto nails creates adorable nostalgia. Paint a pale cream or white base, then add tiny ice cream cone designs: a simple triangle or trapezoid shape in tan or golden for the cone, topped with a small scoop or swirl in pastel colors (pale pink, mint, pale yellow, lavender). Add sprinkles scattered across the nail, and consider placing one larger focal ice cream design on an accent nail.
Creating Charming Ice Cream Elements
- Paint a small triangle or trapezoid in light tan for the cone
- Add a hashtag pattern or crosshatch in the cone for a waffle texture
- Top with a pastel scoop—make it rounded and slightly jiggly-looking
- Dot tiny sprinkles in multiple colors across the nail
- Add a tiny cherry or sparkle on top of the ice cream for extra charm
Color Schemes for Ice Cream Designs
- Pastel pink ice cream with rainbow sprinkles feels playful
- Mint green with pale pink accents reads as cool and sophisticated
- Multiple small scoops (stacked like a real ice cream cone) create dimension
- Glittery sprinkles that actually sparkle make the design more whimsical
This design captures that blissful, indulgent sweetness central to kawaii culture. It’s cheerful, immediately recognizable, and genuinely fun to look at.
13. Butterfly Wing Design with Gradient Colors
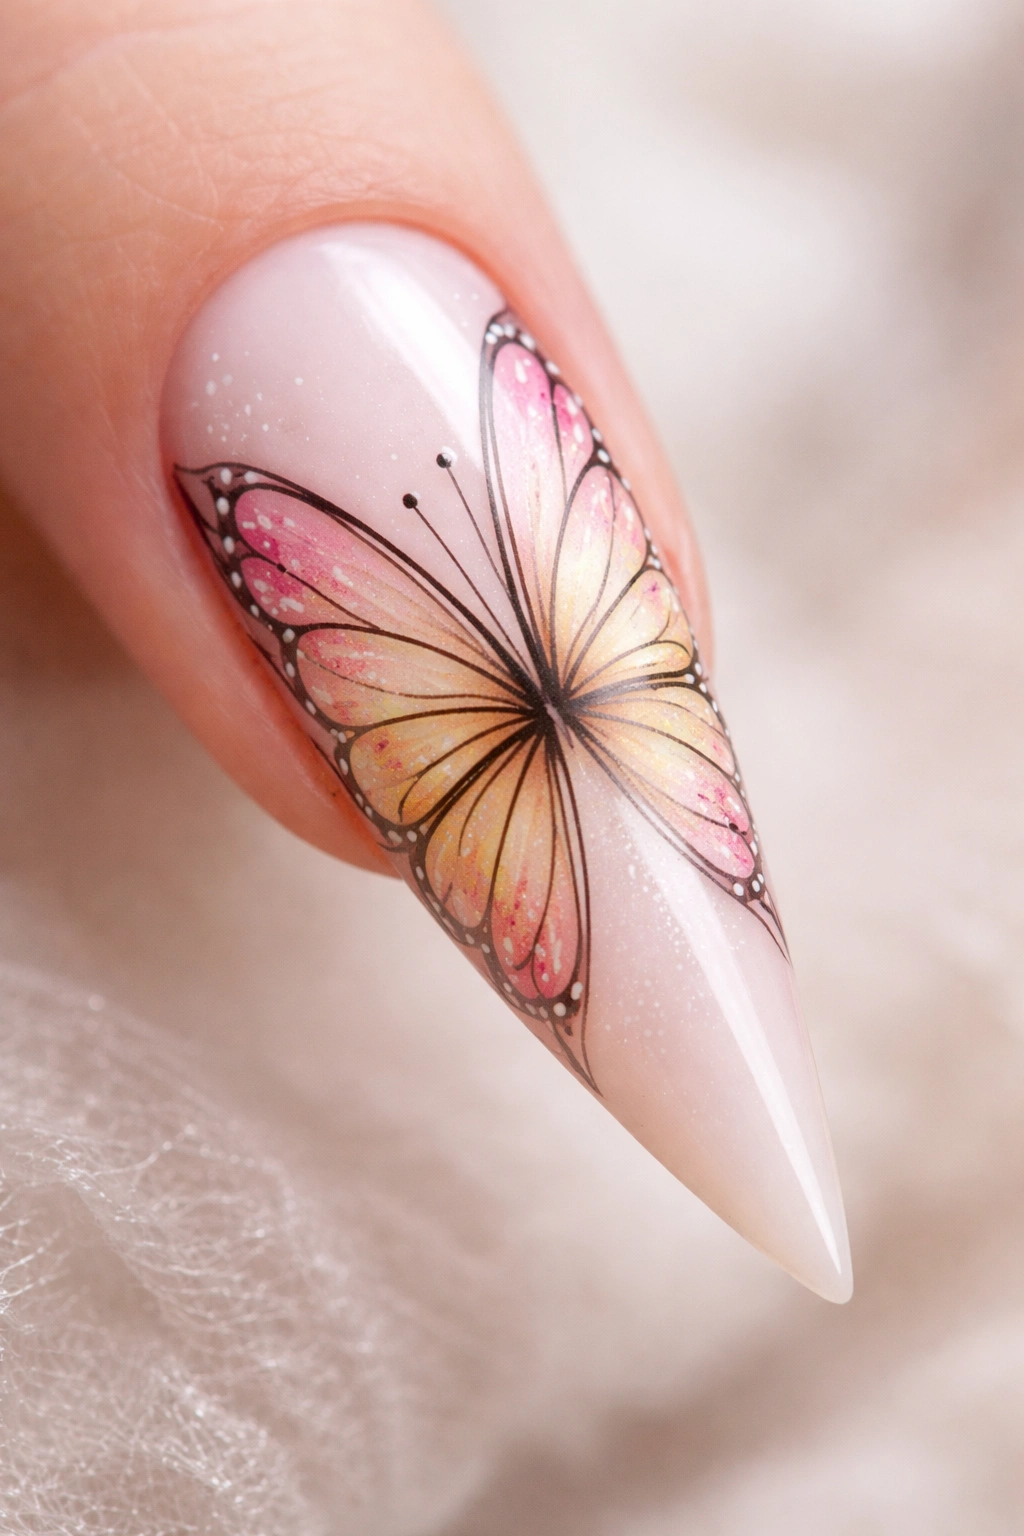
Butterfly designs feel magical and delicate, especially when rendered as wings that span across the nail. Create this by painting a pale base, then adding butterfly wing shapes that start thin at the center nail and flare outward. Fill each wing with a gradient that flows from pale to deeper pastel tones—pale pink to rose, pale yellow to gold, or lavender to deeper purple. Add tiny details like spots or pattern elements within the wings.
Structuring the Butterfly Design
- Sketch the basic wing shape very lightly with a pencil
- Paint the wings using a base pastel shade
- Blend a slightly deeper shade toward the outer edges using a sponge
- Add tiny dots or lines within the wings for texture and interest
- Consider adding tiny antennae at the center of each nail
Color Palettes for Butterfly Nails
- Soft pink to rose: romantic and classic
- Pale yellow to golden: warm and cheerful
- Lavender to purple: regal and dreamy
- Mint to teal: cool and refreshing
- Multiple color combinations across different nails: playful and varied
Worth knowing: You don’t need perfect symmetry for butterfly wings to read as intentional. Slightly organic, asymmetrical wings can feel more artistic and charming than precisely mirrored designs.
This design brings elegance and delicate beauty together—it’s cute but sophisticated, whimsical but polished. Butterflies feel intrinsically magical and lovely.
14. Bubble Tea Inspired Nails with Boba Details
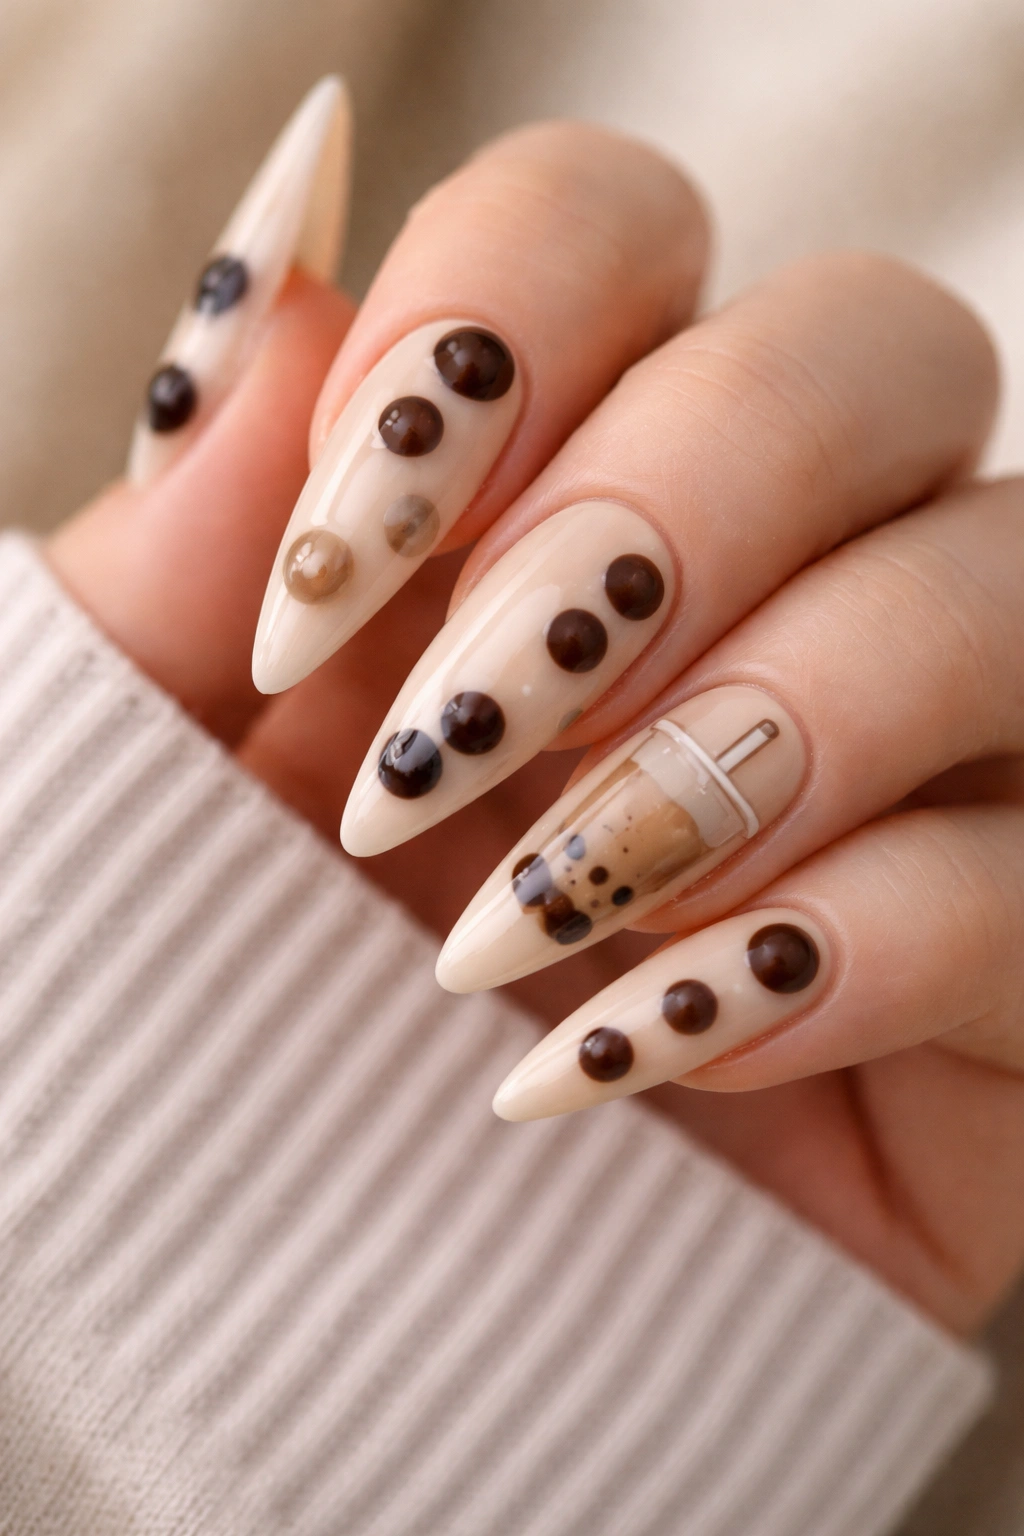
Bubble tea is a beloved kawaii aesthetic, and you can translate it beautifully onto nails with a pale milk-tea colored base, dark brown boba pearls scattered across, and maybe a striped straw element or tea color variation. Paint a pale beige or cream base (representing the milk tea), then add small dark brown circles in varying sizes (the boba pearls) scattered across the nail. Include some tiny lines that could suggest a straw or the outline of a bubble tea cup on an accent nail.
Creating Bubble Tea Nail Art
- Use a pale cream, beige, or very pale brown base
- Dot small dark brown circles (boba) randomly across each nail using a dotting tool
- Vary the boba size from tiny dots to slightly larger pearls
- Add a few lighter brown circles for visual variation (not all boba needs to be the same shade)
- Consider painting a small straw element on one accent nail
Enhancing the Bubble Tea Aesthetic
- Add a thin pink or peach line at the top of an accent nail (representing the tea color variation)
- Include a tiny “cup” outline on one nail for storytelling
- Use slightly iridescent or metallic brown boba for subtle sparkle
- Create depth by painting some boba partially overlapped by others
Pro tip: This design works beautifully with a matte topcoat—it gives the boba pearls a more tactile, three-dimensional appearance.
Bubble tea nails celebrate one of the most beloved elements of modern kawaii culture. It’s instantly recognizable to anyone familiar with the aesthetic, deeply sweet, and genuinely original.
Final Thoughts
Kawaii stiletto nails represent a beautiful intersection of edge and adorability—where elongated, dramatic nails become canvases for the sweetest, most charming designs imaginable. The key to pulling off any of these looks is choosing one that genuinely resonates with you rather than forcing a design that doesn’t feel authentic. Whether you’re drawn to cosmic dreaminess, playful food references, delicate florals, or minimalist character designs, there’s a kawaii stiletto nail idea that’ll make you smile every single time you look at your hands.
The most successful kawaii nail designs share a few common threads: they embrace pastels, they avoid clutter in favor of intentional negative space, they prioritize charm over photorealism, and they feel personal rather than mass-produced. Don’t stress about pixel-perfect execution—slight imperfections and hand-painted wobbles actually enhance the cute factor by making your nails feel unique and genuine.
Take your time with application, invest in good brushes for detailed work, and remember that the beauty of stiletto nails lies partly in their length, which gives you actual room to create. Start with a design that excites you, practice on a practice nail or two if you’re nervous, and embrace the process. Your stiletto nails are about to become something genuinely special.
