

Stiletto nails have become a fashion statement that goes way beyond just grooming—they’re a form of self-expression, and when you add rhinestones into the mix, you’ve got designs that command attention and radiate glamour. Whether you’re heading to a special event, want to elevate your everyday look, or simply love the way sparkle catches the light, rhinestone-adorned stilettos deliver that perfect balance of edge and elegance.
The beauty of this nail style lies in its versatility. Rhinestones can be strategically placed to create intricate patterns, scattered across the entire nail for maximum sparkle, or concentrated on an accent nail for subtle sophistication. You can go full-glam with a design that sparkles from every angle, or choose something more understated that whispers luxury rather than shouts it. The color palette matters too—dark jewel tones, classic nudes, bold reds, and even sheer pinks all provide different backdrops for rhinestone designs, each telling a different style story.
What makes rhinestone stilettos so appealing is their ability to transform an ordinary manicure into something extraordinary with minimal additional effort. Once you know what designs work with your personal style, lifestyle, and aesthetic preferences, you’ll find yourself constantly reaching for this look. From romantic and delicate to fierce and bold, there’s a rhinestone stiletto design that speaks to every mood and occasion.
1. Classic Diamond Cascade Down the Center
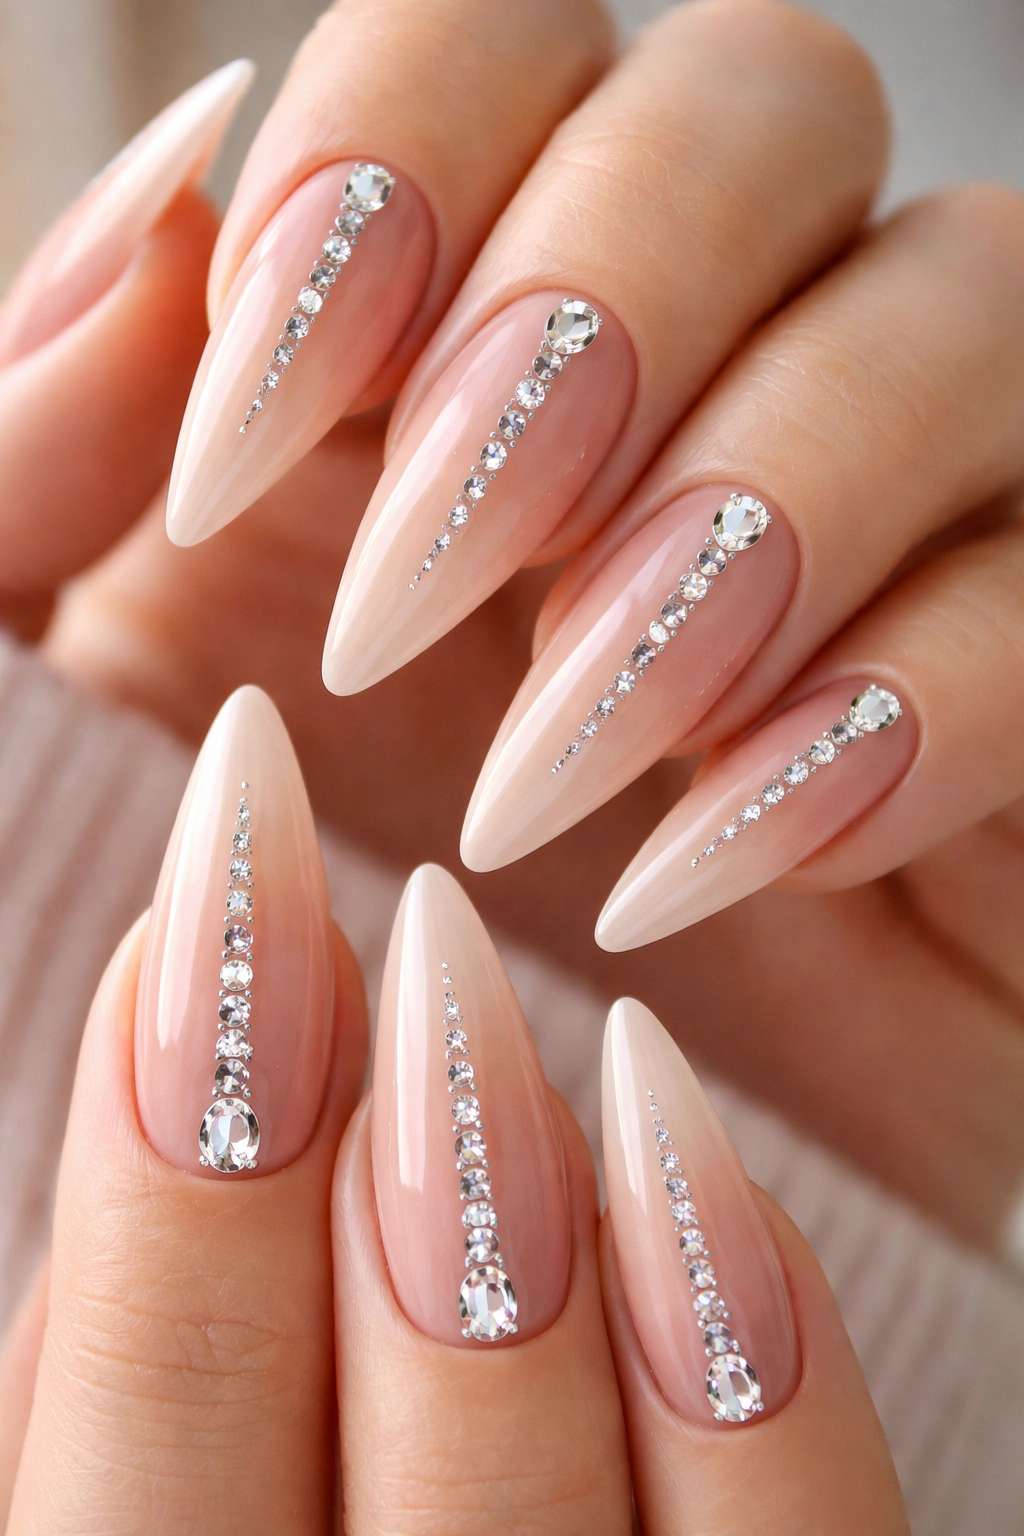
Imagine a single vertical line of diamond-shaped rhinestones running down the center of each nail, creating an elegant waterfall effect. This design works beautifully on nude or soft pink bases, as the diamonds become the undeniable focal point while maintaining an air of sophisticated simplicity. The centerline placement means the stones catch light every time you move your hands, creating an almost hypnotic sparkle effect.
Why This Design Never Goes Out of Style
The center cascade mimics the look of expensive jewelry without requiring you to remove your rings or bracelets. It’s elegant enough for formal events like weddings and galas, yet simple enough to wear to the office without drawing excessive attention. The linear arrangement also makes your fingers appear longer and more elongated, which is a flattering optical illusion that most people find appealing.
Design Details to Perfect It
- Base color: Nude beige, soft champagne, or shell pink for maximum contrast with the rhinestones
- Rhinestone size: Mix small accent stones with slightly larger center diamonds for dimensional visual interest
- Nail shape: Works perfectly with medium to extra-long stilettos since the length emphasizes the vertical line
- Finish: Matte or satin base makes rhinestones pop without competing shine
Pro tip: Ask your nail technician to use high-quality diamond-cut rhinestones with excellent light refraction—cheaper stones can look dull and lifeless.
2. Geometric Pattern with Triangular Stones
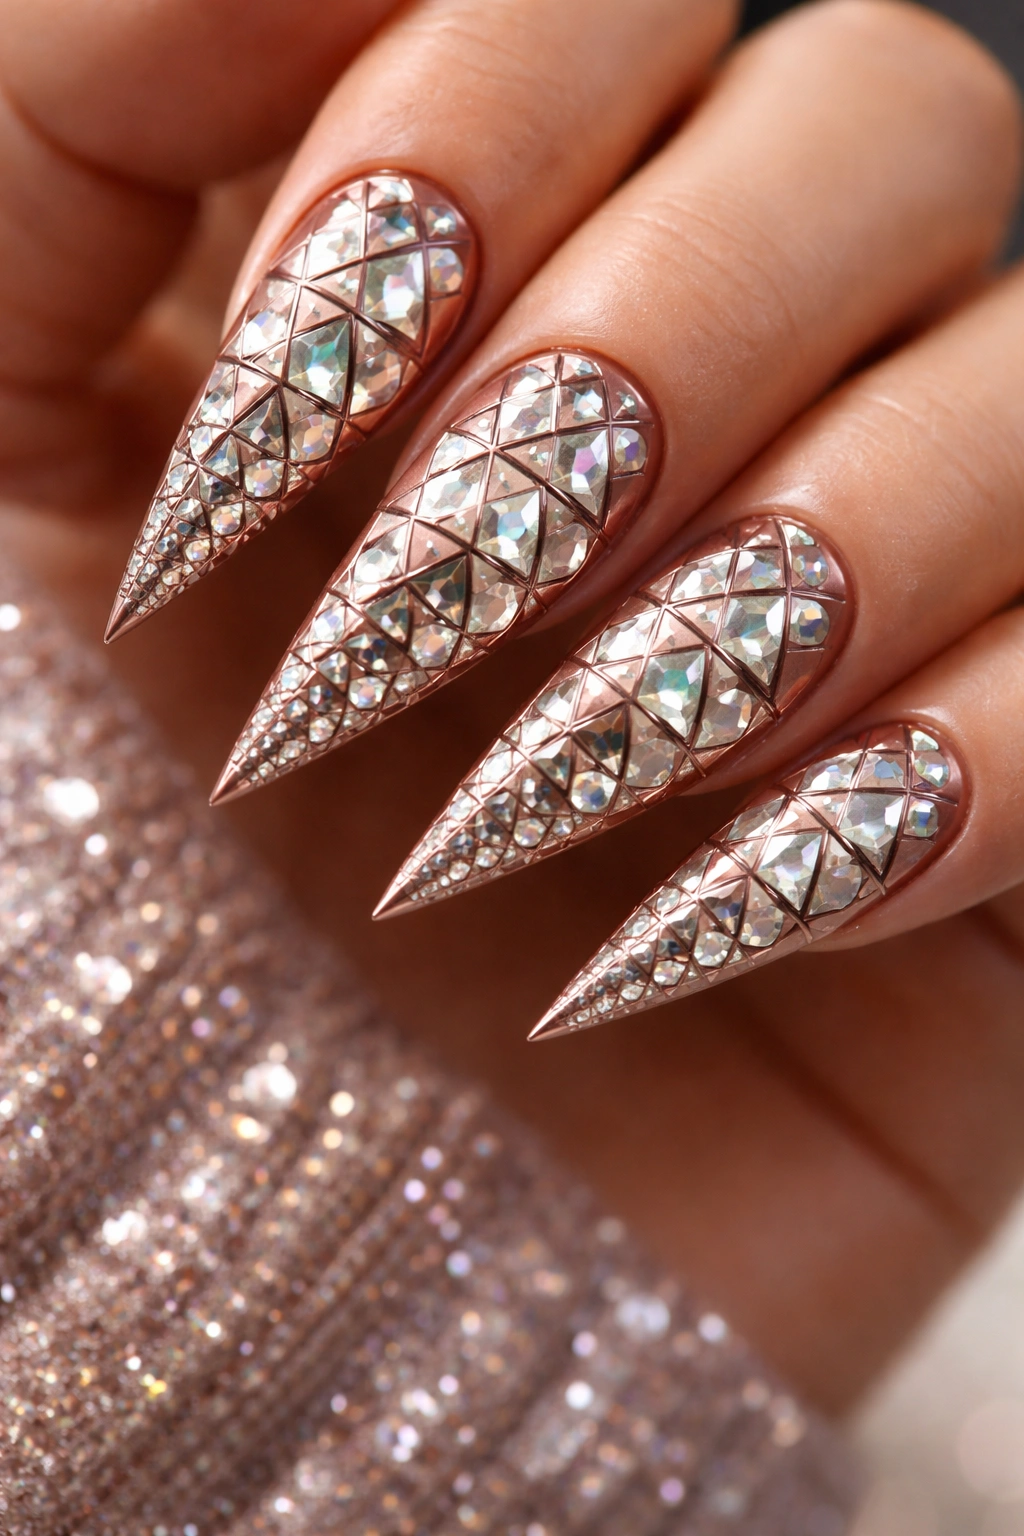
Geometric designs have a modern edge, and when you arrange triangular or square rhinestones in a tessellating pattern across the nail, you create something that feels both contemporary and timeless. Think of small triangular gems forming larger triangular shapes, or offset squares creating a grid pattern that’s visually dynamic yet mathematically precise. This style works beautifully on metallic bases like gold, silver, or rose gold.
The Appeal of Structured Geometric Designs
Geometric rhinestone patterns read as intentional and sophisticated rather than random or scattered. They appeal to people with a more architectural approach to beauty, those who appreciate symmetry and pattern. The structured arrangement also makes it easier to maintain—touching up a few displaced stones is simpler than working with a more freeform design.
Execution Details
- Base color: Metallic shades (champagne gold, platinum, rose gold) or deep jewel tones
- Stone arrangement: Use ruler or nail art guides to ensure precise spacing and alignment
- Rhinestone shapes: Equilateral triangles, squares, or a combination for visual interest
- Application method: Dab tiny dots of nail glue precisely where each stone goes—no guessing
Worth knowing: Geometric patterns require more patience during application but photograph beautifully and hold up well to daily wear.
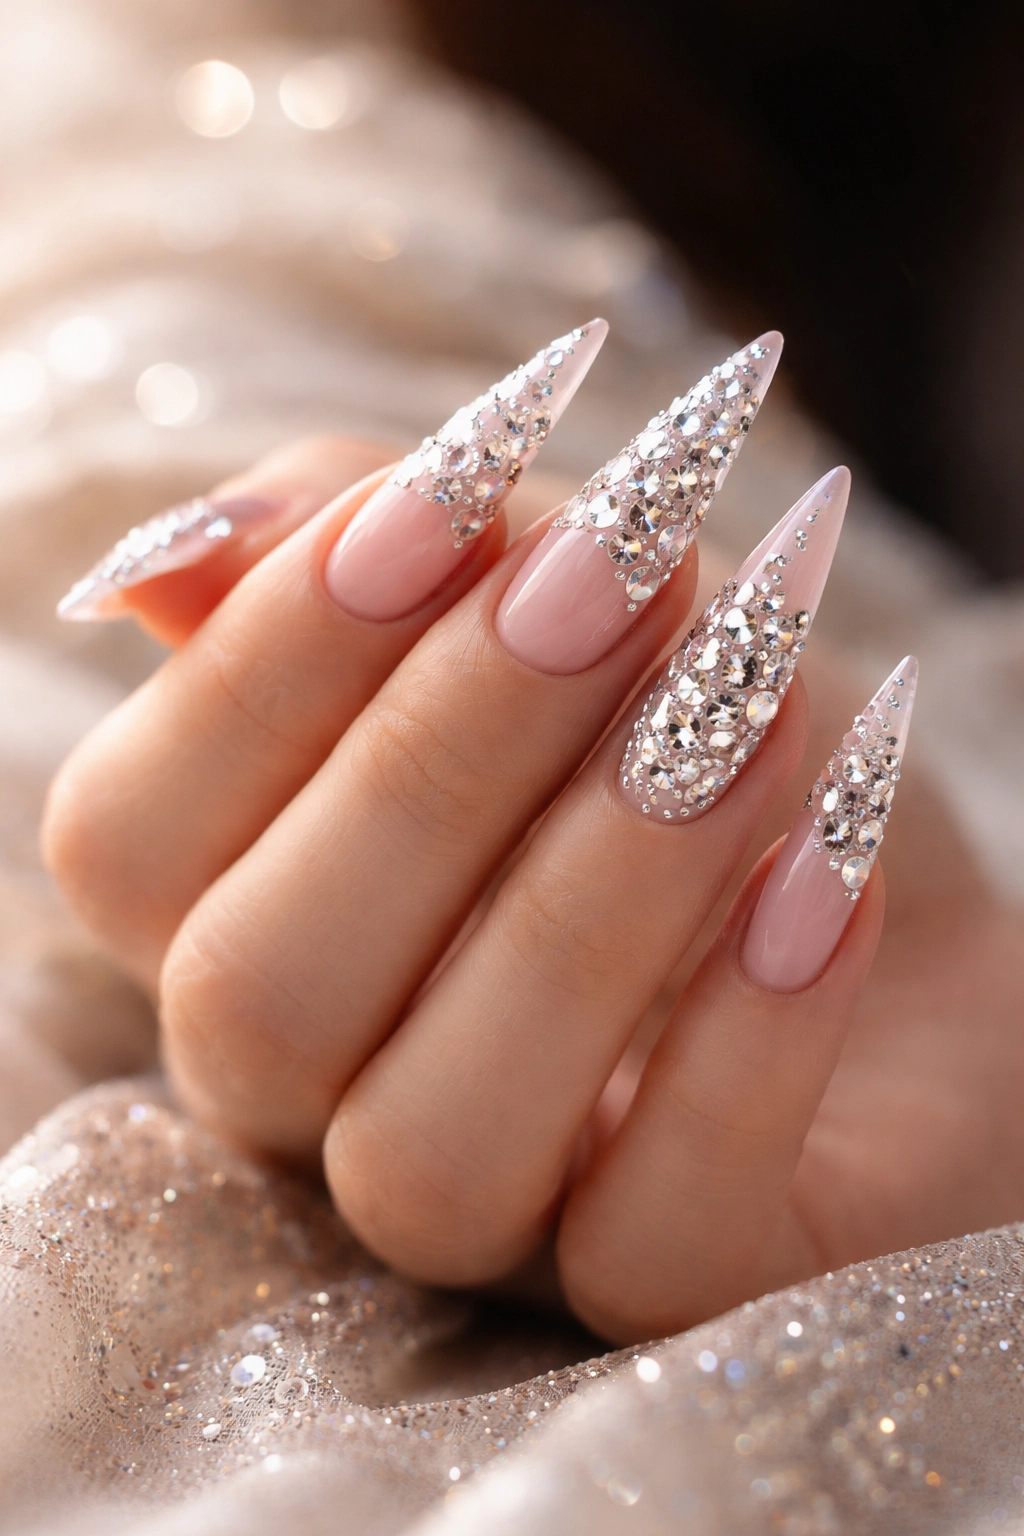
3. Full Sparkle with Mixed Crystal Sizes
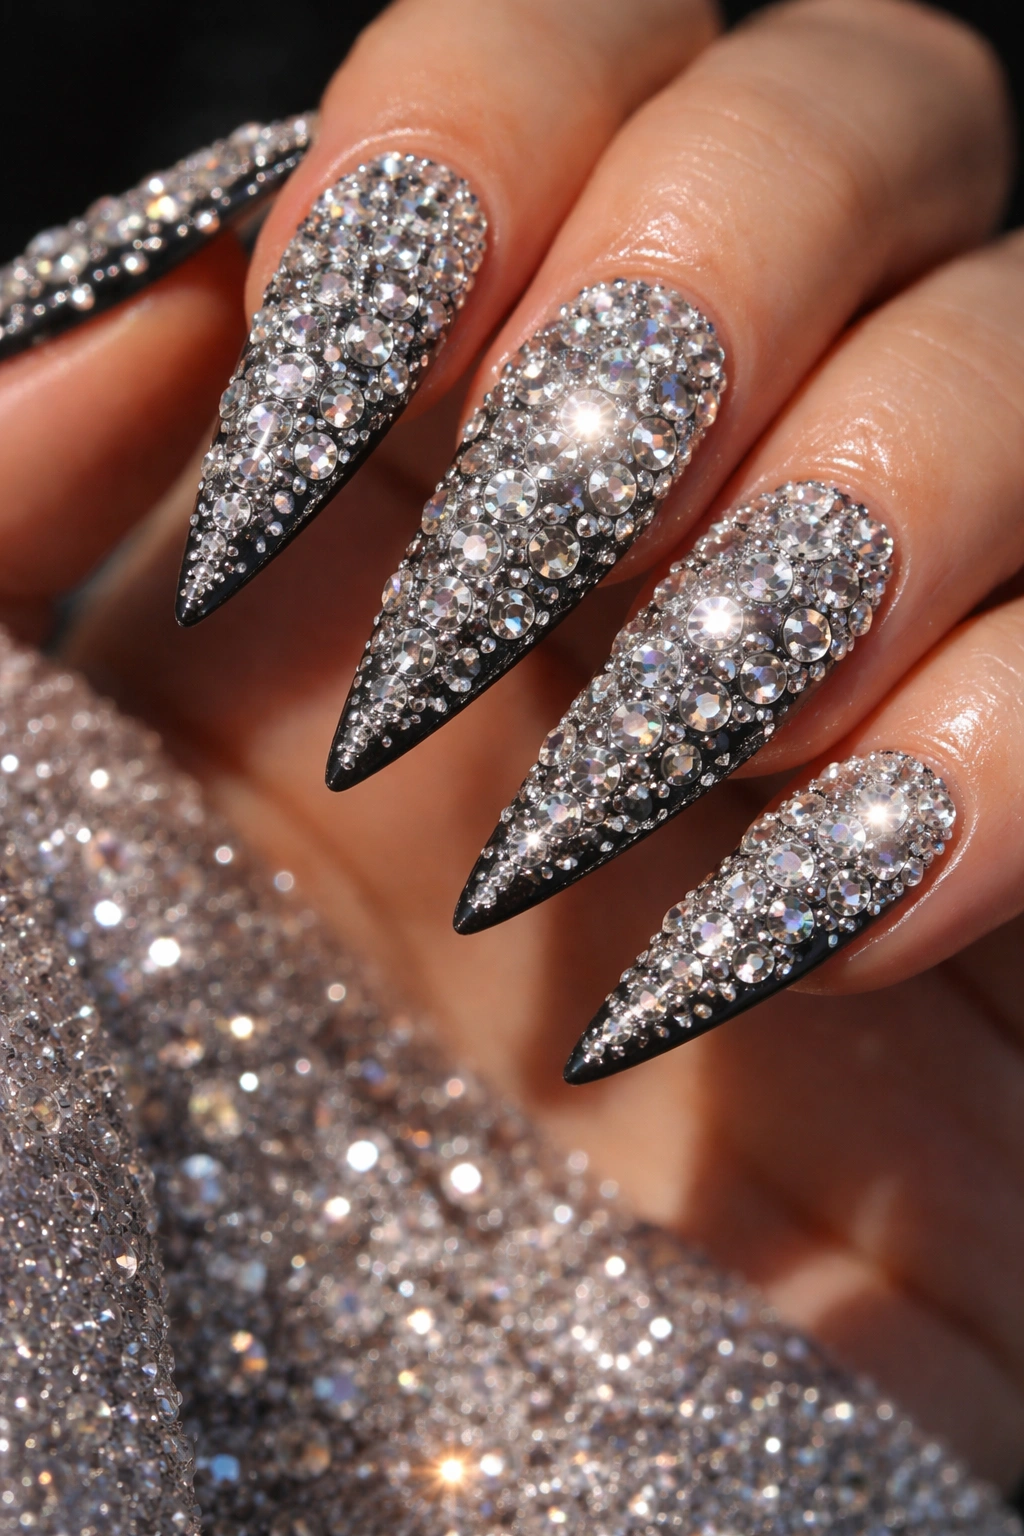
This is the design for people who love maximum glamour—rhinestones cover most of the nail surface in a carefully curated mix of different sizes, creating dimension and depth. Smaller stones fill gaps while larger ones serve as anchor points, and the variation in size prevents the look from feeling flat or one-dimensional. The effect is luxurious, bold, and absolutely eye-catching.
Creating Dimension with Size Variation
Using mixed-size rhinestones is actually more sophisticated than covering a nail with uniform stones. Larger stones (5-8mm) positioned strategically draw the eye, while smaller stones (2-4mm) create sparkle and fill visual space. This technique is called “clustering” and it’s how professional nail artists create that red-carpet, high-jewelry look. The variation creates highlights and shadows that make the design appear three-dimensional.
Technical Considerations
- Base color: A darker shade (black, burgundy, navy, or charcoal) allows stones to pop without competing for attention
- Stone colors: Stick with one crystal color (clear, champagne, or smoke) for cohesion, or mix clear with one complementary color
- Coverage area: Apply rhinestones to most of the nail surface while leaving a thin border of base color at the edges for definition
- Adhesive strength: Use a nail glue specifically formulated for rhinestones—regular polish won’t hold under daily wear
Insider note: This style lasts longer than more delicate designs because the stones are supported by being close together—isolated stones on bare nail are more prone to popping off.
4. Ombre Rhinestone Gradient
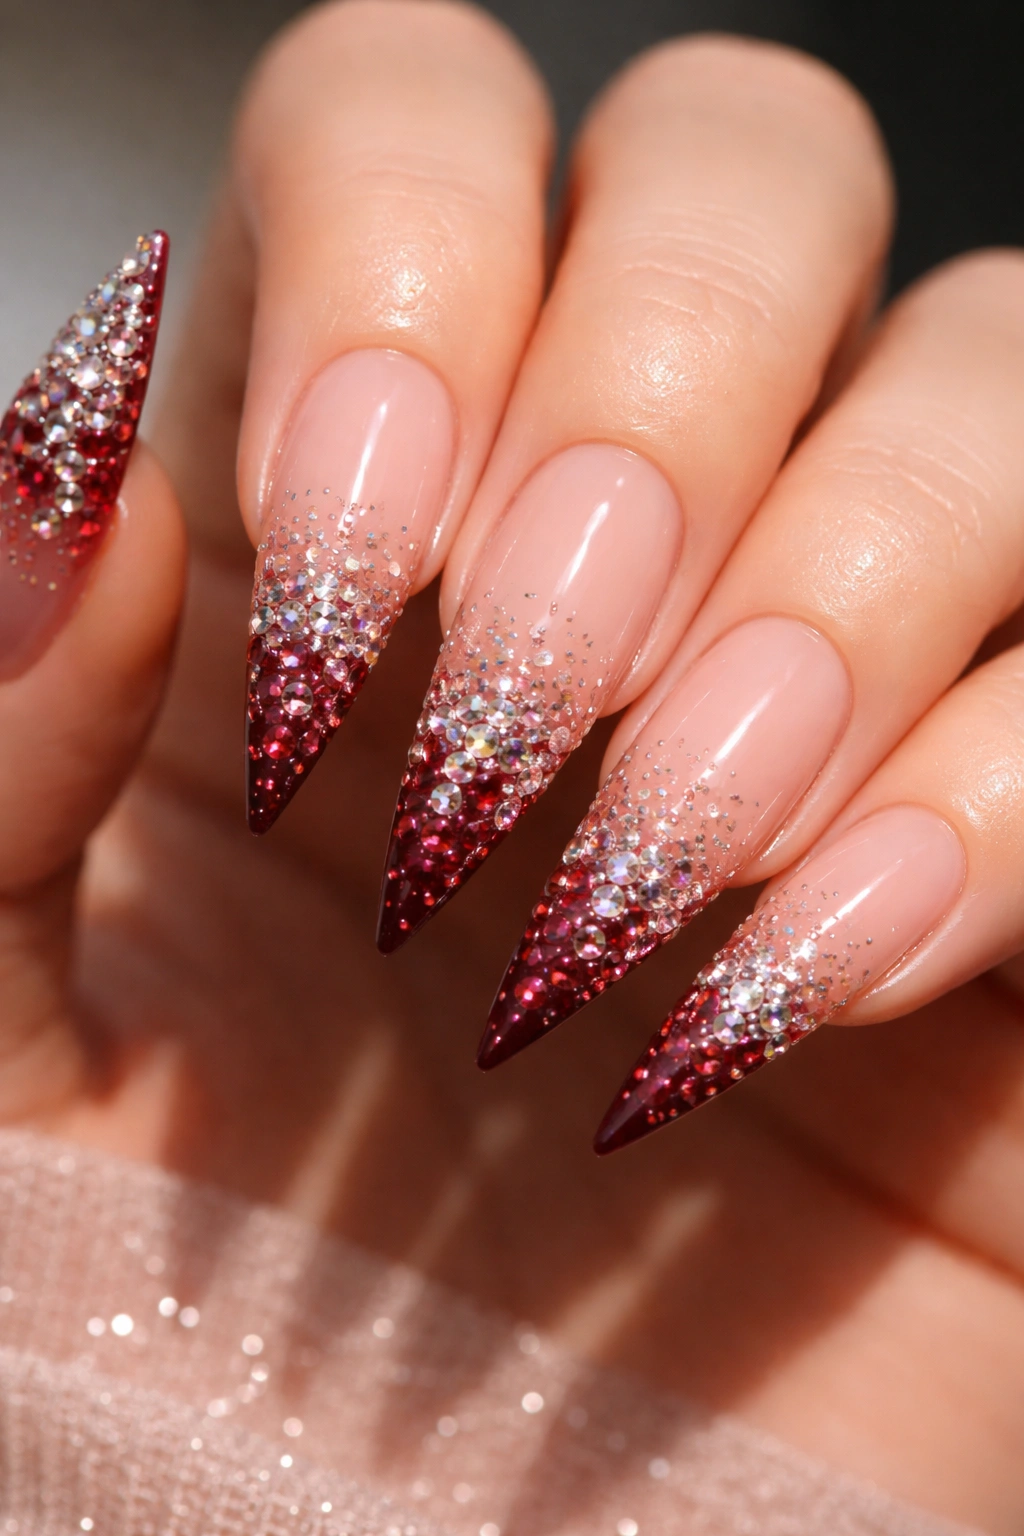
This design merges two trends: the popular ombre color gradient and rhinestone embellishment. The rhinestones are densest at one end of the nail (usually the tip) and gradually become sparser toward the base, mirroring a color gradient pattern. For example, a nail could transition from nude at the base to burgundy at the tip, with rhinestones concentrated in the darker section. It’s a subtle, sophisticated approach to rhinestone nails.
The Magic of Graduated Density
An ombre rhinestone design works because it respects the natural gradient of the nail—your nail beds are typically more transparent near the base and your tips are more opaque. Mirroring this creates a design that feels organic rather than imposed. The concentrated rhinestones at the tip add just enough sparkle without overwhelming the overall aesthetic.
Design Approach
- Color gradient options: Nude to red, white to black, pink to burgundy, or gold to rose gold
- Rhinestone concentration: None at the base, sparse in the middle third, dense at the tip
- Stone color: Clear, champagne, or smoke rhinestones work with any gradient combination
- Nail length: Medium to long stilettos show off the gradient effect best
- Top coat: A shiny topcoat gives the design a polished, cohesive finish
Pro tip: Create the ombre effect using regular polish or dip powder, then apply rhinestones after it’s fully cured—this prevents stones from shifting or becoming embedded in wet product.
5. French Tips with Diamond Accents
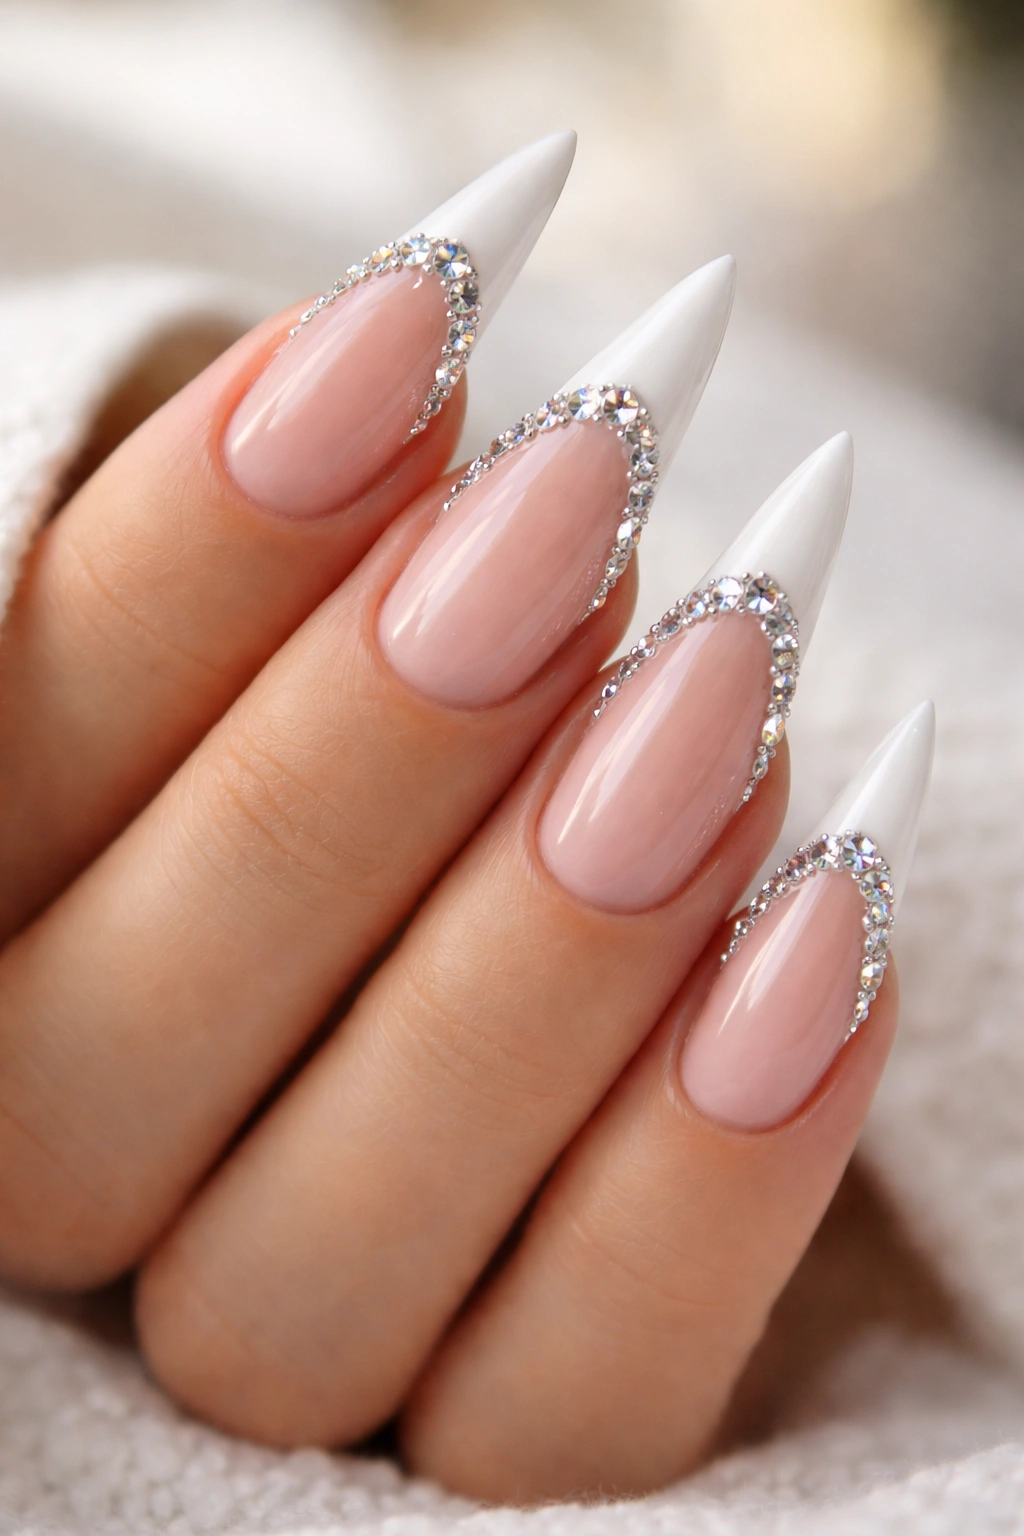
The French manicure is timeless, and adding rhinestones to the white tip section modernizes it instantly. Instead of a standard white line, the tip is created using rhinestones, or rhinestones are placed along the edge where white meets color. This design screams refined luxury—it’s formal without being over-the-top, classic without being boring.
Why Rhinestones Elevate the French Manicure
A traditional French tip is perfect, but predictable. Adding rhinestones shows you’ve taken time to curate something special. The stones add just enough personality and sparkle to make the look feel intentional and unique, while the classic base color maintains sophistication. It’s an ideal design for people who want glamour with restraint.
Styling the Rhinestone French Tip
- Base color: Classic nude or light pink, or go modern with pale gray or champagne
- Tip stones: Clear or white diamond-cut rhinestones for authenticity, or champagne for warmth
- Stone placement: Create a line of stones along the actual tip edge, or fill the entire white section with scattered stones
- Nail bed details: Optional single accent stone on the nail bed for extra sparkle
- Length: Works on medium to long stilettos—the tip area needs enough space for the rhinestone arrangement
Worth knowing: The tip area gets the most wear and tear, so use nail glue that dries quickly and bonds permanently—stones in this location need extra-strong adhesion.
6. Luxury Monochromatic Black and Clear
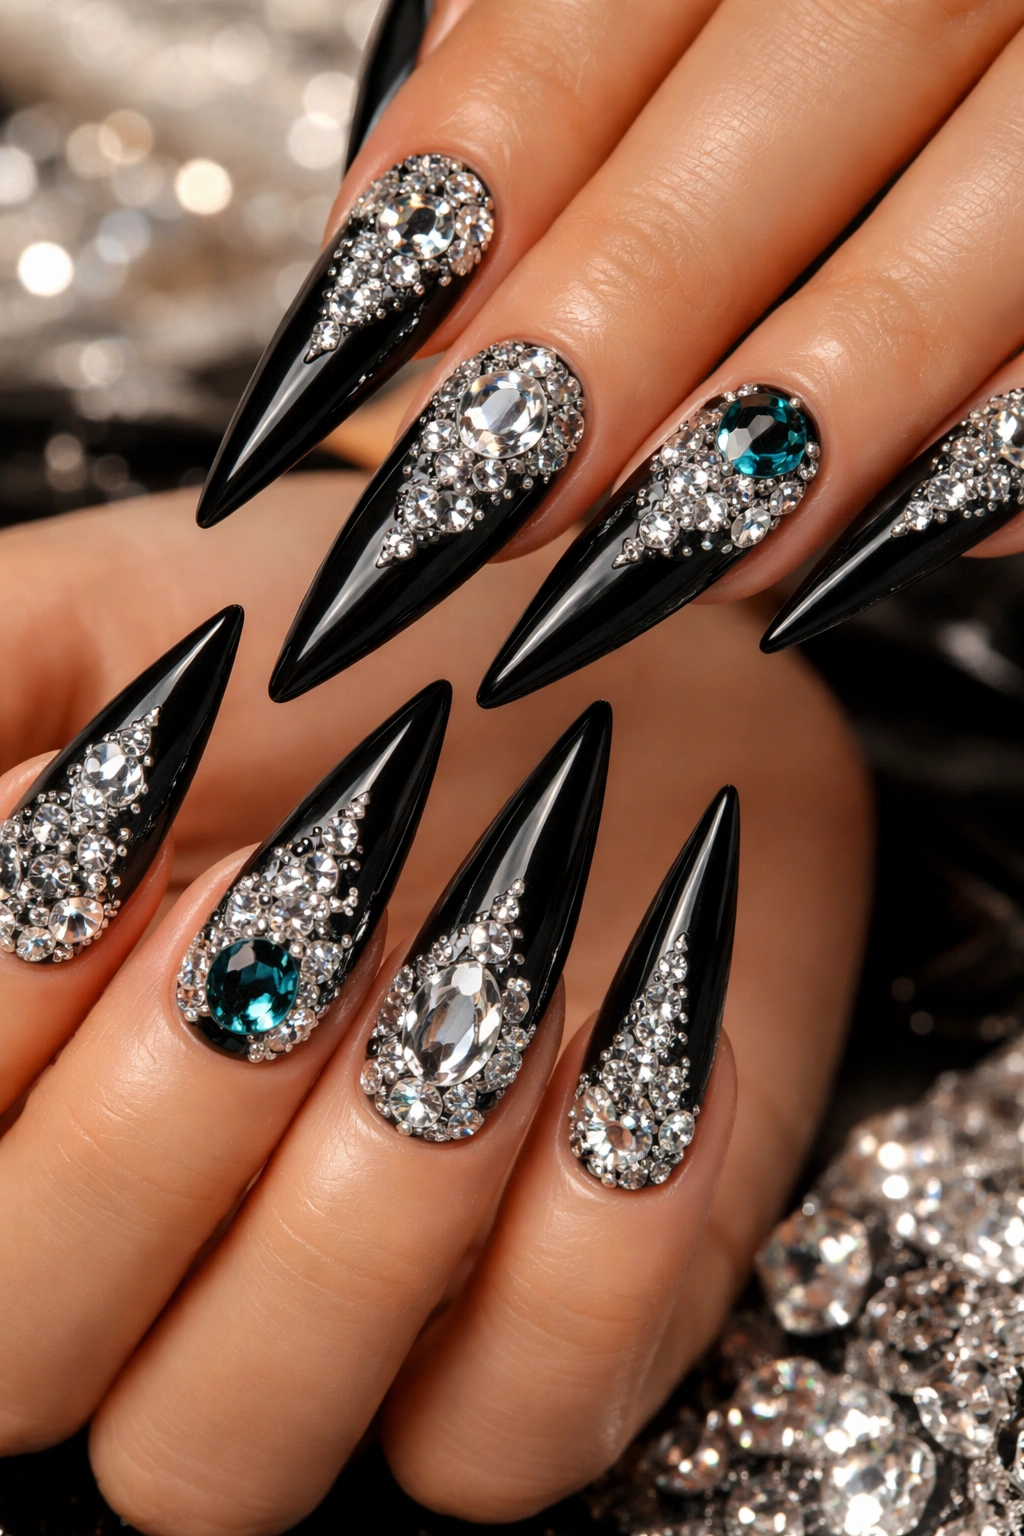
This design pairs black stiletto nails with crystal-clear rhinestones, creating a study in contrast that feels both edgy and refined. The black base acts as a dramatic backdrop, and every rhinestone catches light against the dark surface. Sometimes a few emerald or deep sapphire stones are mixed in for a subtle pop of color, but the primary effect is black and clear sparkle.
The Power of Monochromatic Luxury
Black and clear is a color combination that conveys power, sophistication, and confidence. It works for formal events, professional settings where you want to show personality, and everyday wear where you want to feel fierce. The monochromatic approach means the design never clashes with your outfit—black goes with literally everything.
Perfecting the Look
- Base finish: Glossy black or matte black—both work, but glossy creates more overall shine
- Rhinestone placement: Can be scattered randomly, arranged in patterns, or concentrated on specific areas
- Rhinestone size: Any size works, though mixing sizes (2-6mm) looks more professional than uniform stones
- Additional colors: Optional—add one complementary accent color if you want to break up the monochromatic effect
- Shaping: The sharp stiletto shape emphasizes the edgy vibe of this design
Pro tip: Black can sometimes look slightly dull under certain lighting. Use a UV or LED lamp that produces cool-white light to verify the black and rhinestone combination looks vibrant before you leave the salon.
7. Romantic Rose Gold with Blush Stones
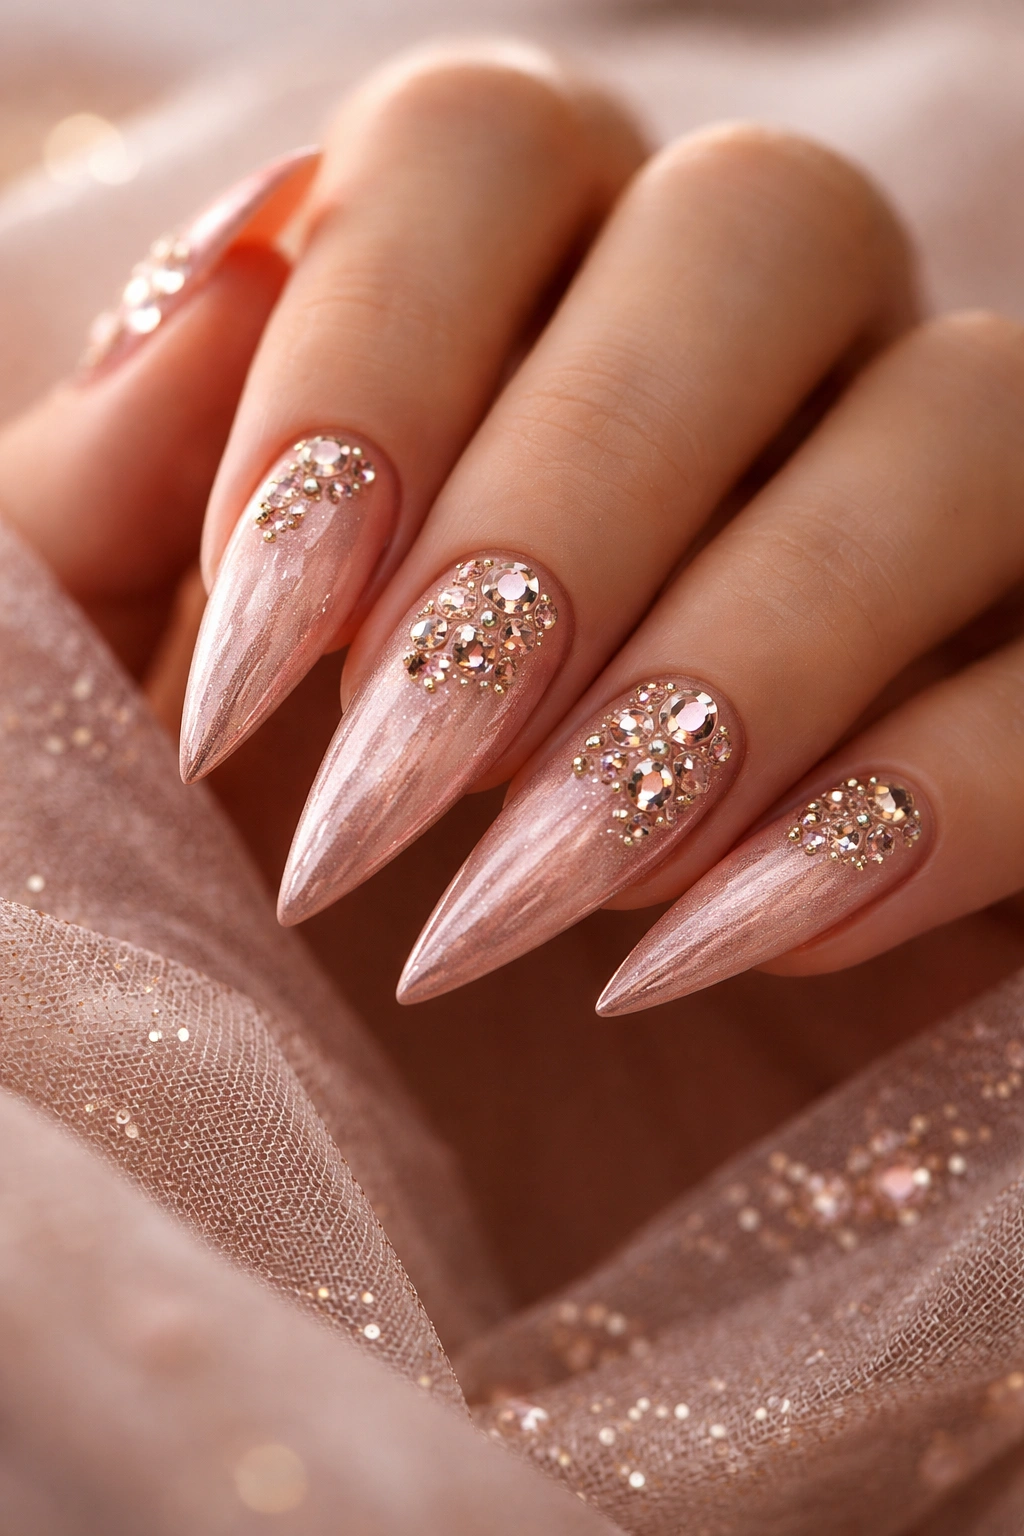
This design combines rose gold nails with blush, pink, or champagne rhinestones for a romantic, feminine aesthetic that feels both modern and timeless. The rose gold base is warm and flattering, and the peachy-pink stones add softness while maintaining that luxe factor. It’s the perfect design for people who want sparkle without looking overly dramatic.
Creating Romance Through Warmth and Softness
Rose gold became popular because it flatters a wider range of skin tones compared to traditional yellow gold. Adding blush or champagne stones creates a cohesive warm palette that feels intentional and curated. This design photographs beautifully and looks equally good in natural daylight and artificial lighting. It’s romantic without being childish, feminine without being fragile.
Design Specifications
- Base color: Rose gold polish or chrome finish
- Rhinestone colors: Blush pink, champagne, rose gold metallic, or clear stones that pick up the rose gold base
- Stone arrangement: Scattered across the nail, clustered on one side, or arranged in a loose pattern
- Accent details: Optional nude or soft pink stripe running through the design for added dimension
- Nail finish: A soft matte or satin base lets the rose gold show without competing shine
Insider note: This design is incredibly popular for engagements, anniversaries, and romantic occasions—it’s aspirational without being costume-like.
8. Gradient Rainbow with Prismatic Stones
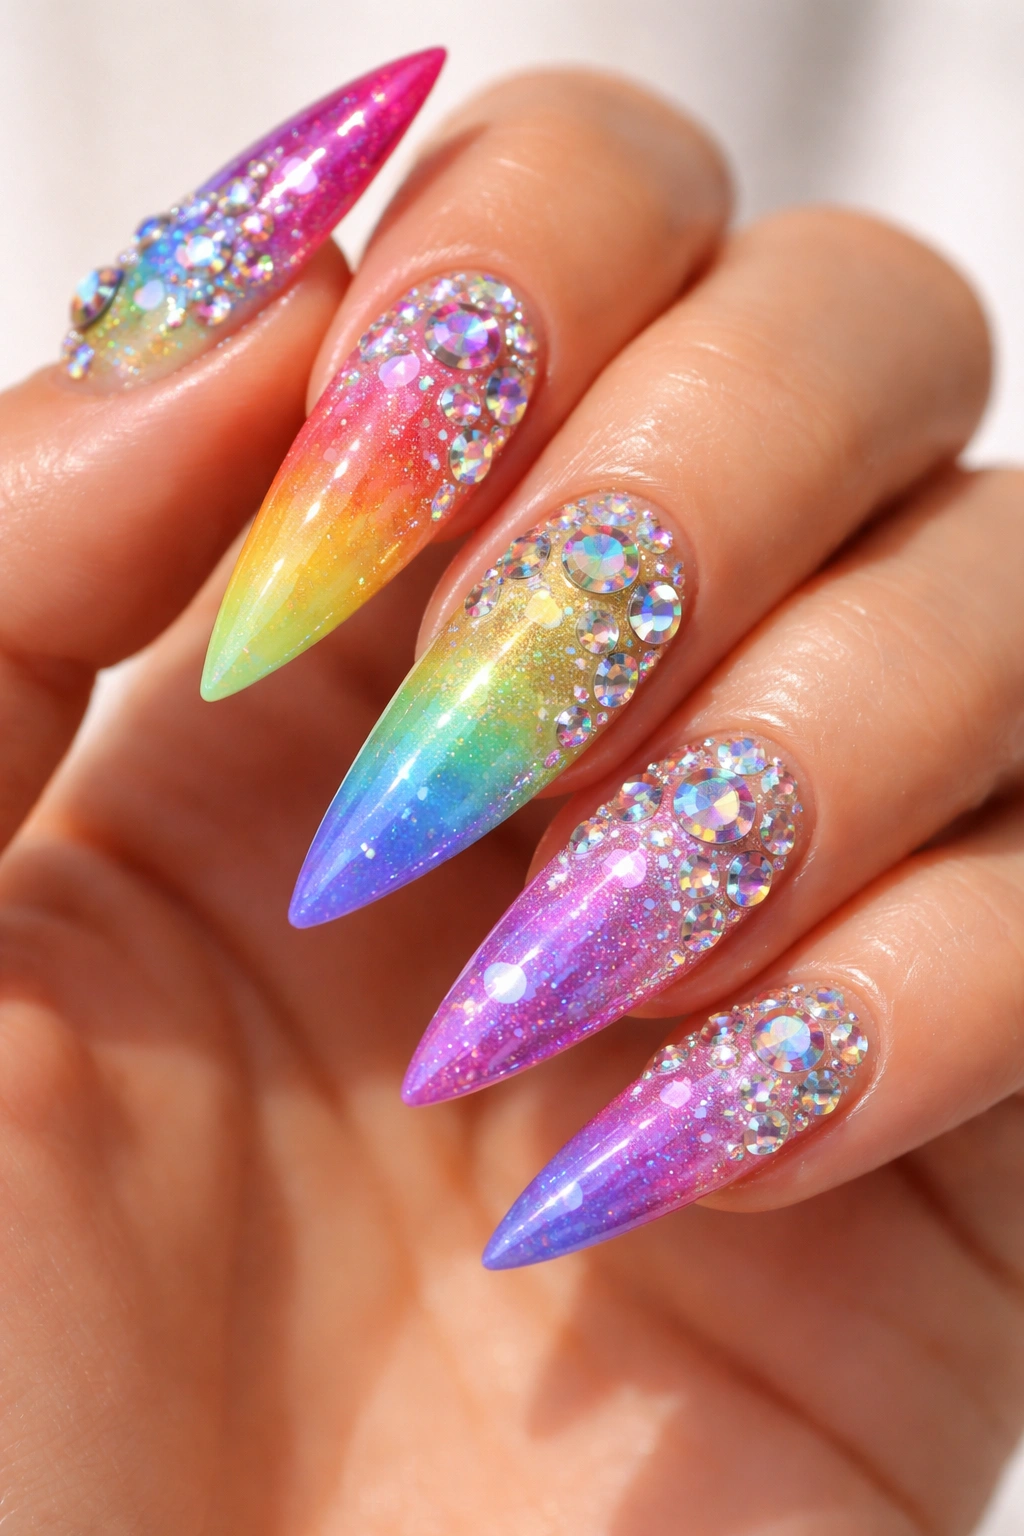
For those who love color and sparkle in equal measure, a rainbow gradient paired with prismatic rhinestones creates a playful, joyful design that celebrates color. The nails transition through rainbow hues (red-orange-yellow-green-blue-purple), and iridescent or AB-coated rhinestones are scattered across, catching different colors of light depending on the angle. It’s bold, fun, and undeniably glamorous.
Why Iridescent Stones Enhance Gradient Designs
Regular clear stones are beautiful, but iridescent or AB-coated rhinestones take it further by reflecting multiple colors. On a rainbow gradient, these stones become almost chameleon-like, shifting between hues. The effect is dynamic, eye-catching, and endlessly interesting to look at. It’s a design that keeps revealing new details every time light hits it differently.
Building the Design
- Gradient technique: Use ombre powder or colored gels to create smooth transitions between rainbow colors
- Rhinestone selection: AB-coated or iridescent crystal rhinestones that shift through multiple colors
- Stone size: Medium stones (4-6mm) work best so the iridescence is clearly visible
- Coverage pattern: Scattered across all nails, or concentrated on accent nails for less commitment
- Finishing coat: A gloss topcoat makes the rainbow and rhinestones sing
Worth knowing: This design appeals to people who aren’t afraid to be noticed. It’s more playful than formal, making it ideal for parties, festivals, and occasions where vibrant self-expression is appropriate.
9. Minimalist Single Stone with Nude Base
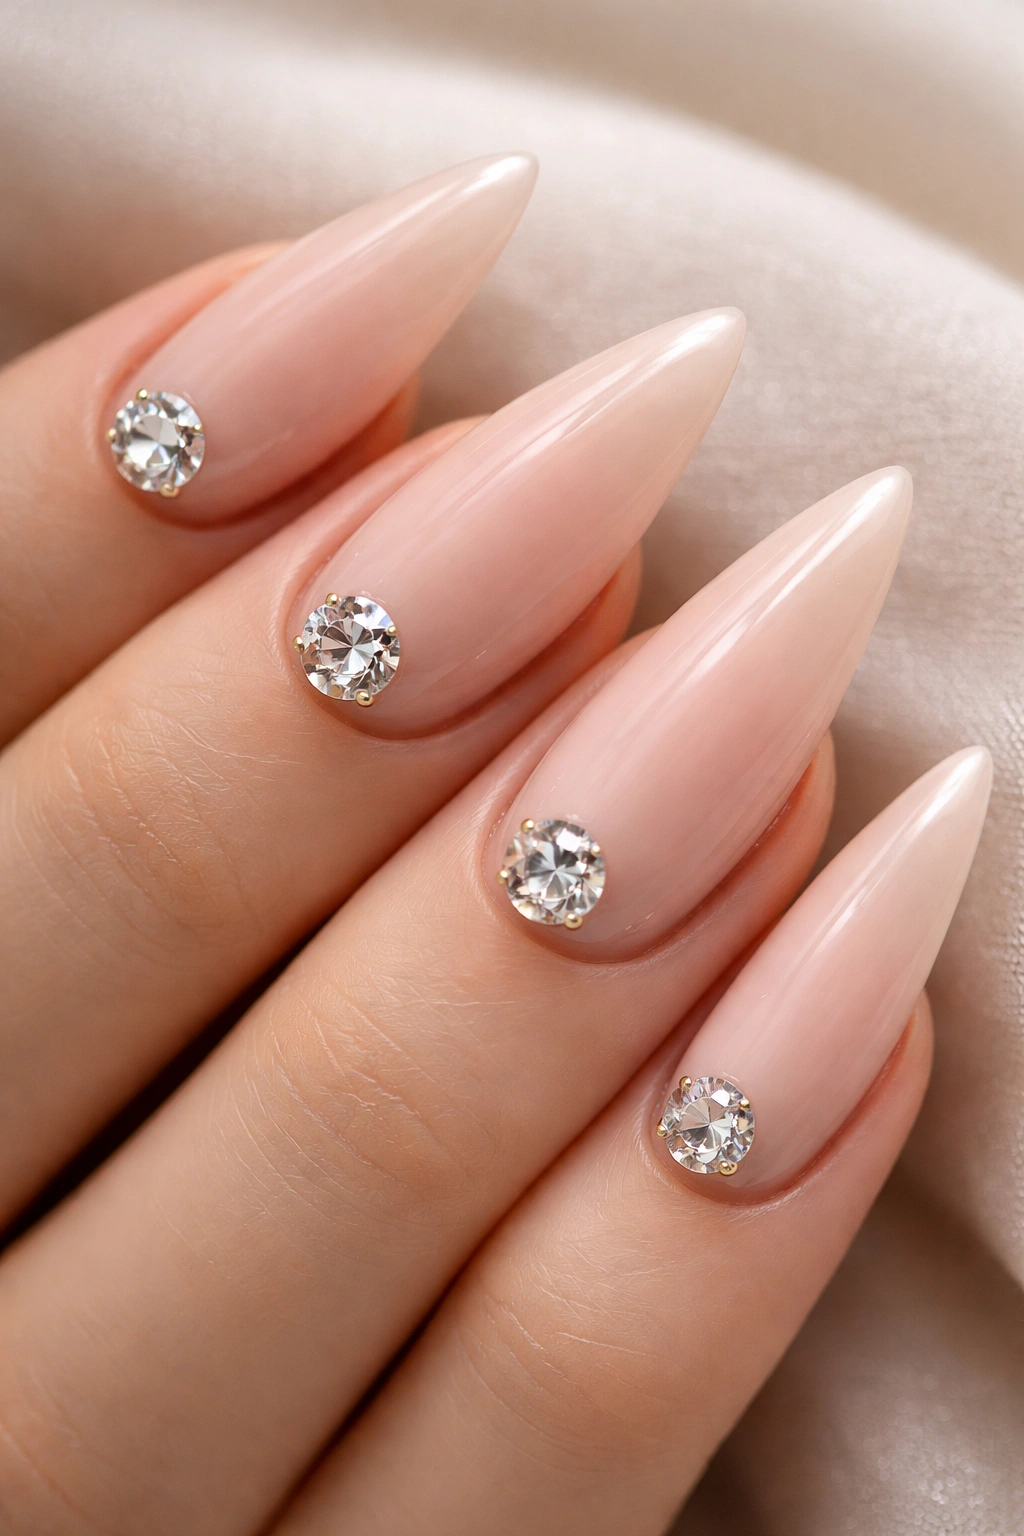
Sometimes less is more, and this design proves it. A single, perfectly placed large rhinestone (8-12mm) sits at the base of each nail, or one nail features the stone as a statement. The rest of the nail is a flawless nude, pale pink, or soft nude-shimmer finish. It’s the epitome of elegance—just enough sparkle to hint at luxury without overwhelming.
The Sophistication of Restraint
This design appeals to people with a more refined aesthetic, those who prefer quality over quantity. A single large stone is a design choice—it says “I know what I like” rather than “I love sparkle everywhere.” It’s formal enough for business settings, elegant enough for galas, and subtle enough for everyday wear. The focus is on nail health and polish perfection, with the rhinestone serving as a subtle signature.
Execution Details
- Base color: Nude, pale pink, soft beige, or nude shimmer
- Rhinestone: One large diamond-cut stone, usually 8-12mm in diameter
- Placement: At the base of each nail, or on the ring finger of one hand for a subtle accent
- Stone color: Clear, champagne, or white diamond for maximum elegance
- Maintenance: Even one stone requires secure application—this isn’t the place to cut corners on glue quality
Pro tip: Place the single stone off-center rather than dead center for a more modern, sophisticated look—it feels intentional rather than accidental.
10. Deep Plum with Gold and Emerald Accents
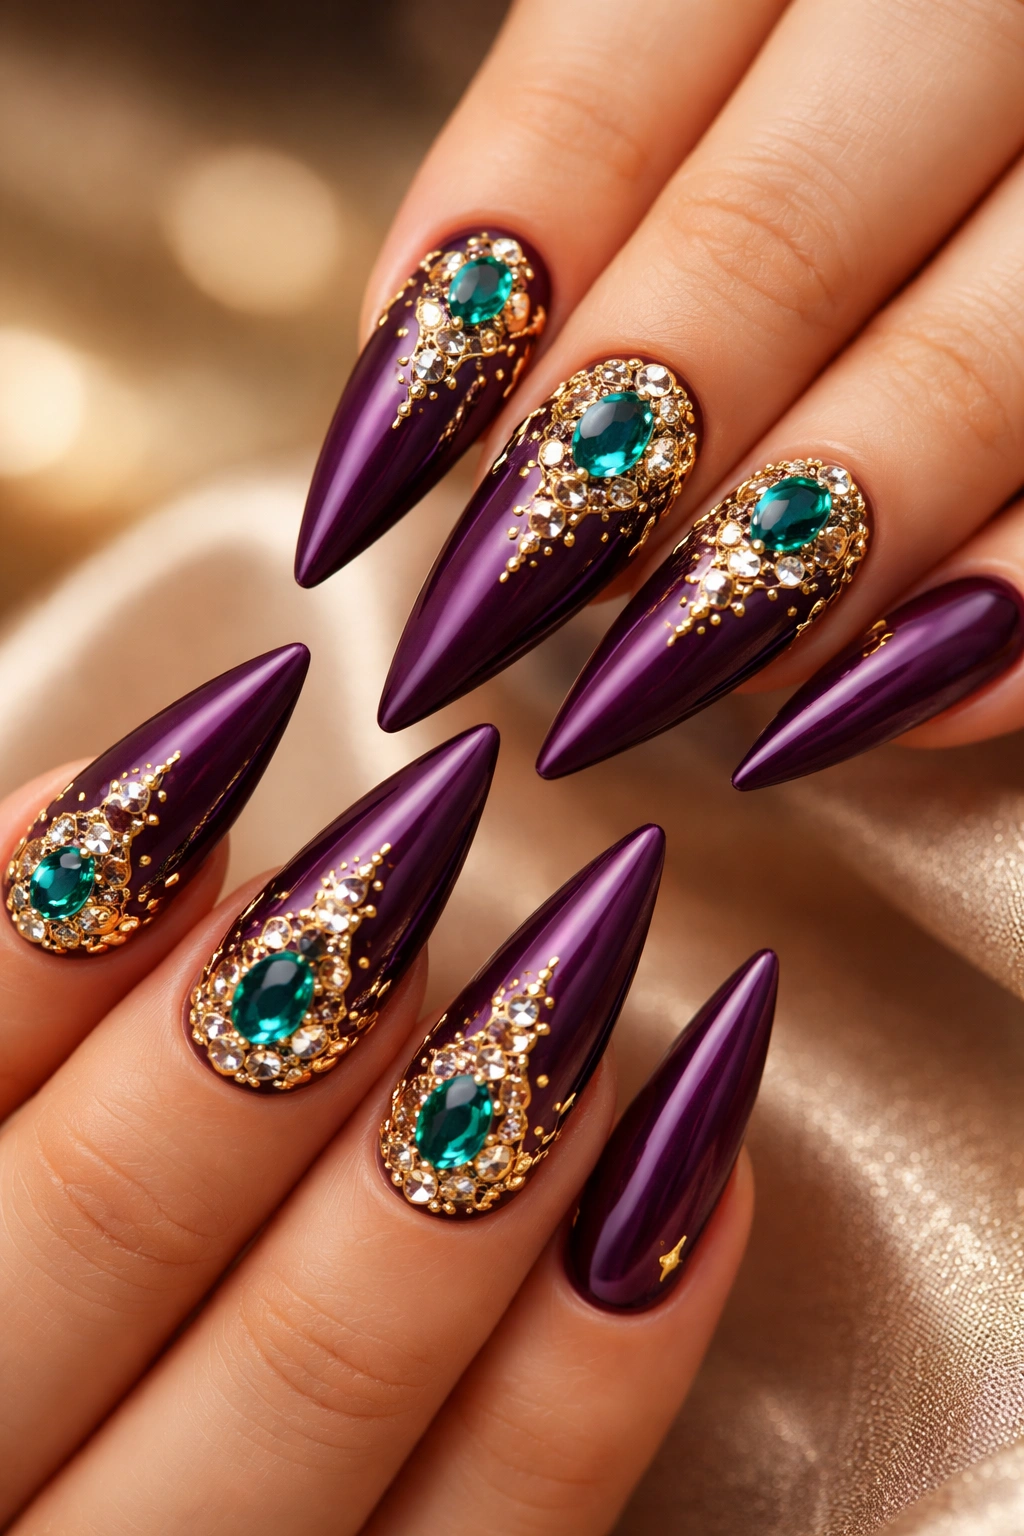
This design combines a deep, luxurious plum base with both warm gold and cool emerald rhinestones scattered across the surface. The color combination feels regal and opulent—think jewels in a royal crown. The mix of warm and cool stones adds complexity and visual interest. This is a design for people who aren’t afraid of color and appreciate nuance.
Balancing Warm and Cool Tones
Most rhinestone designs stick with one tone family, but mixing warm gold with cool emerald green creates unexpected sophistication. The plum base anchors both tones without competing for attention. The result feels curated rather than random—like someone with excellent taste in gemstones hand-selected each stone. This design reads as confident and artistic.
Design Specifics
- Base color: Deep plum purple (medium to dark saturation)
- Warm stones: Gold, champagne, or citrine-colored rhinestones
- Cool stones: Emerald green, sapphire blue, or deep teal rhinestones
- Color ratio: Balance is key—roughly equal amounts of warm and cool stones, or slightly more warm
- Coverage: Scattered across the nail or concentrated in clusters for a more organic feel
Worth knowing: This color combination was inspired by Victorian jewelry design and naturally looks sophisticated—jewel tones paired together always elevate a design.
11. Nude Ombre with Linear Stone Design

This design takes the ombre approach but organizes rhinestones in straight lines rather than scattered randomly. Multiple parallel lines of rhinestones run across the nail, perhaps at slight angles, creating movement and direction while the nude ombre (light to darker nude) provides depth. It’s structured and artistic, combining the softness of ombre with the graphic quality of linear design.
Creating Movement Through Line and Direction
Parallel lines naturally direct the eye and create a sense of movement or flow. When combined with ombre coloring, they add visual complexity without chaos. Each line catches light slightly differently depending on its angle and position, creating a three-dimensional effect. It’s a design that rewards close inspection—every angle reveals new detail.
Technical Breakdown
- Base color: Nude ombre, transitioning from pale at the base to medium nude at the tip
- Line style: 3-5 parallel lines of rhinestones running diagonally or horizontally across the nail
- Rhinestone spacing: Approximately 1-2mm apart within each line, with clear space between lines
- Stone size: Small to medium (3-5mm) stones work best for defining the lines clearly
- Nail finish: Satin or matte base makes the lines stand out clearly
Pro tip: Use a nail guide or faint pencil marks to map out where your lines will go before applying adhesive—precision makes this design look intentional and professional.
12. Deep Navy with White and Silver Contrast
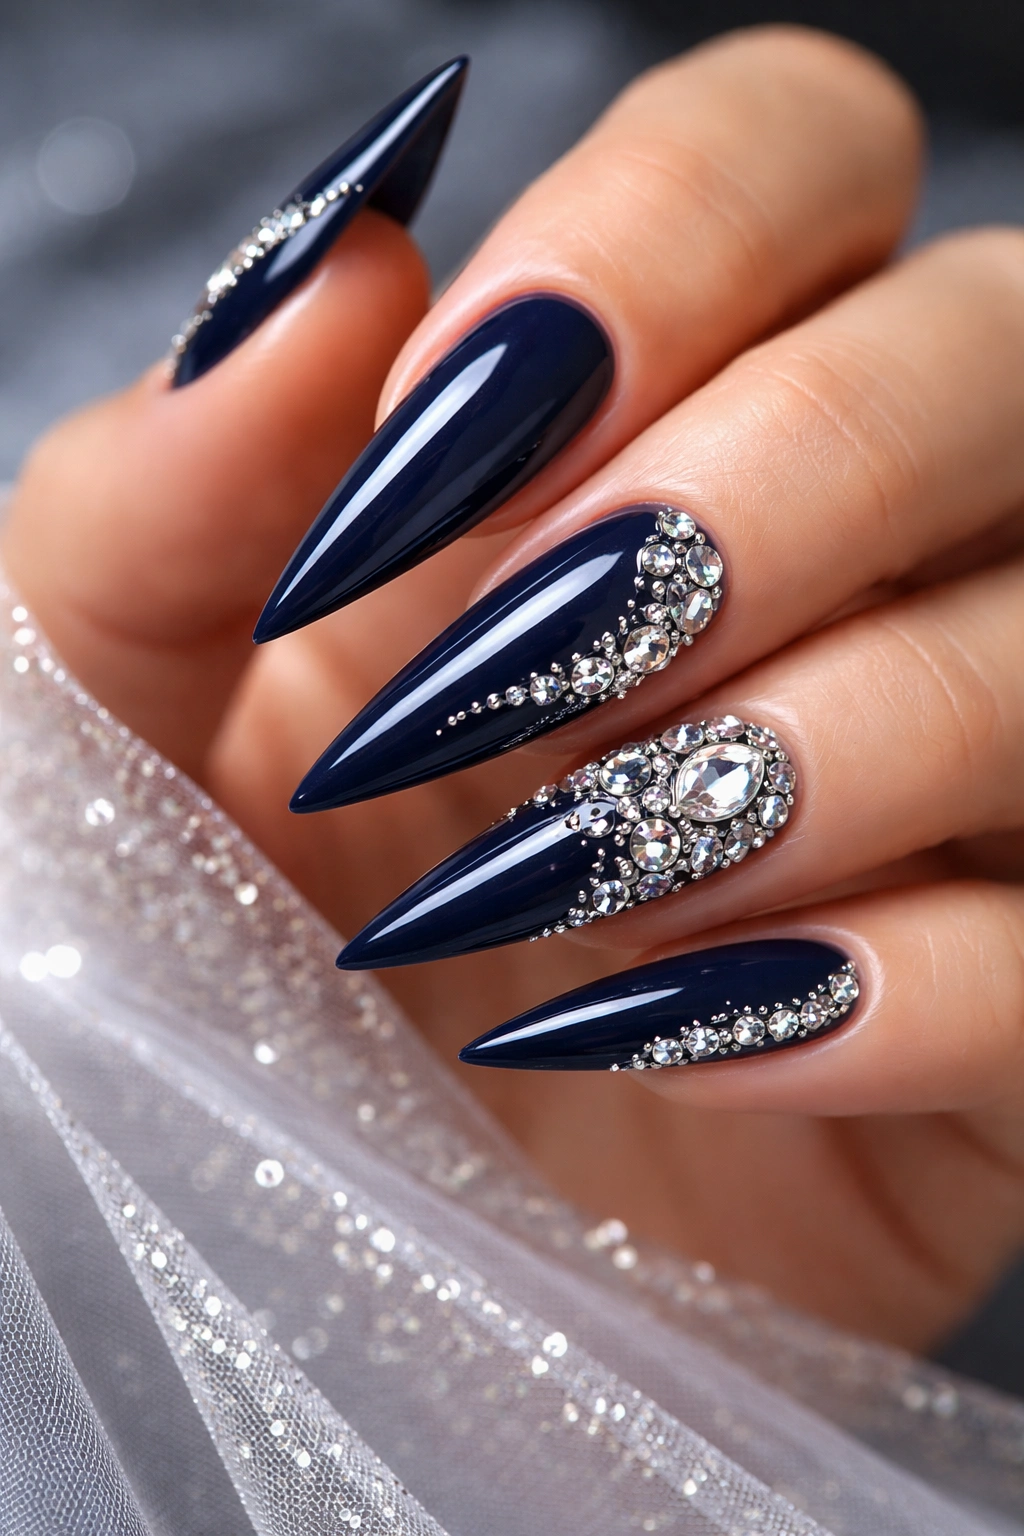
Navy is an underrated choice for dramatic nails, and when paired with white and silver rhinestones, it creates a look that’s sophisticated, modern, and slightly nautical-inspired. The deep navy base is calming yet powerful, and the white and silver stones add crisp contrast. This design works beautifully in professional settings where you want personality without being inappropriate.
Why Navy Deserves More Attention
Navy is often overlooked because people assume it’s too simple or corporate. But navy with the right rhinestone treatment becomes absolutely striking. It’s darker than black but less severe, warmer than blue but more structured than purple. The white and silver stones on navy look crisp and clean—like fresh snow on a clear winter night.
Design Composition
- Base color: Deep navy blue, classic and rich
- White stones: Pearl white or opaque white rhinestones scattered across the nail
- Silver stones: Metallic silver or chrome rhinestones for warm contrast
- Arrangement: Can be scattered randomly, arranged in clusters, or placed along the tip edge
- Finish: Glossy navy base makes the stone contrast sharper and more defined
Insider note: This color combination is popular in professional nail art competitions because it’s technically clean, visually balanced, and universally flattering regardless of skin tone.
13. Soft Pink with Pearl and Rose Gold Stones
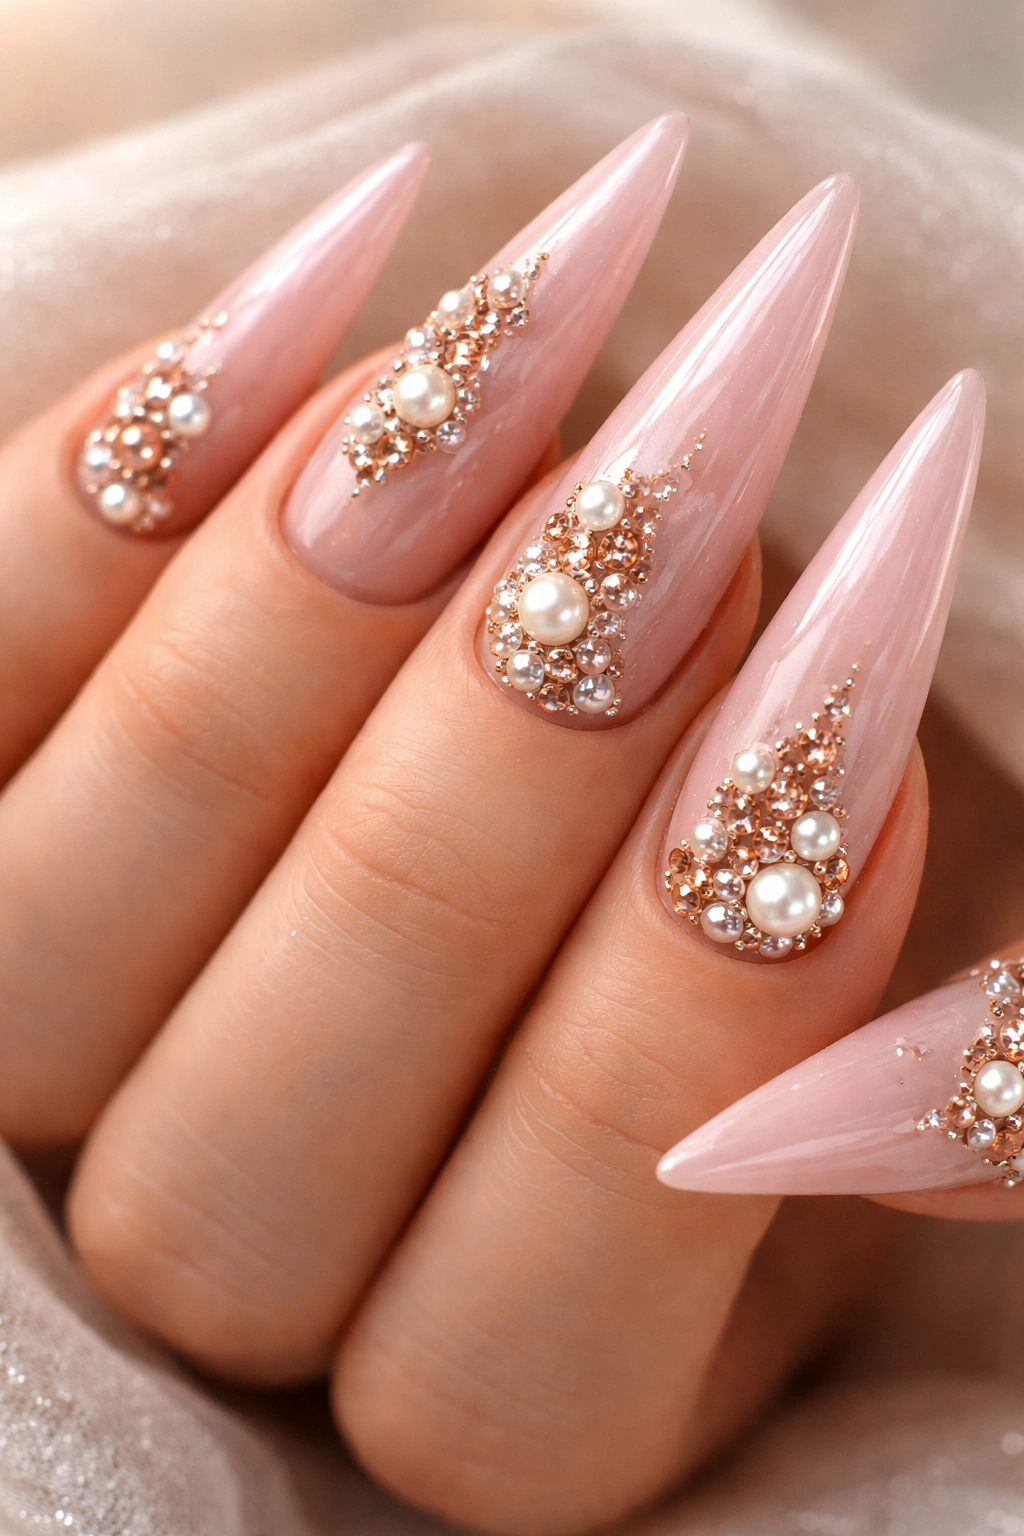
This design is for people who want sparkle with a soft, romantic touch. A soft pink or rose quartz shade forms the base, and pearl-toned rhinestones are mixed with rose gold stones. The overall effect is delicate, feminine, and luxurious without being over-the-top. It’s perfect for engagements, weddings, or any occasion where elegance is the goal.
Creating Femininity Through Soft Materials and Tones
Pearl and rose gold are considered feminine materials, but in combination with a soft pink base, they feel mature and sophisticated rather than juvenile. The matte quality of pearl stones creates a subtle shimmer rather than a mirror-like reflection. This design feels like wearing jewelry that happens to be on your nails.
Design Parameters
- Base color: Soft pink, rose quartz, or pale mauve
- Pearl stones: Cream-colored, pale pink, or white pearl-finish rhinestones
- Rose gold stones: Warm metallic rose gold rhinestones, 3-5mm
- Distribution: Loosely scattered for an organic feel, or clustered on one side for an asymmetrical look
- Application: Apply to clean, buffed nail surfaces for a smooth, polished finish
Pro tip: Pearl-finish stones can sometimes appear dull—ensure your nail technician uses quality pearl stones that have actual luster rather than flat coating.
14. Black Stilettos with Rainbow Gradient Band and Crystal Detail
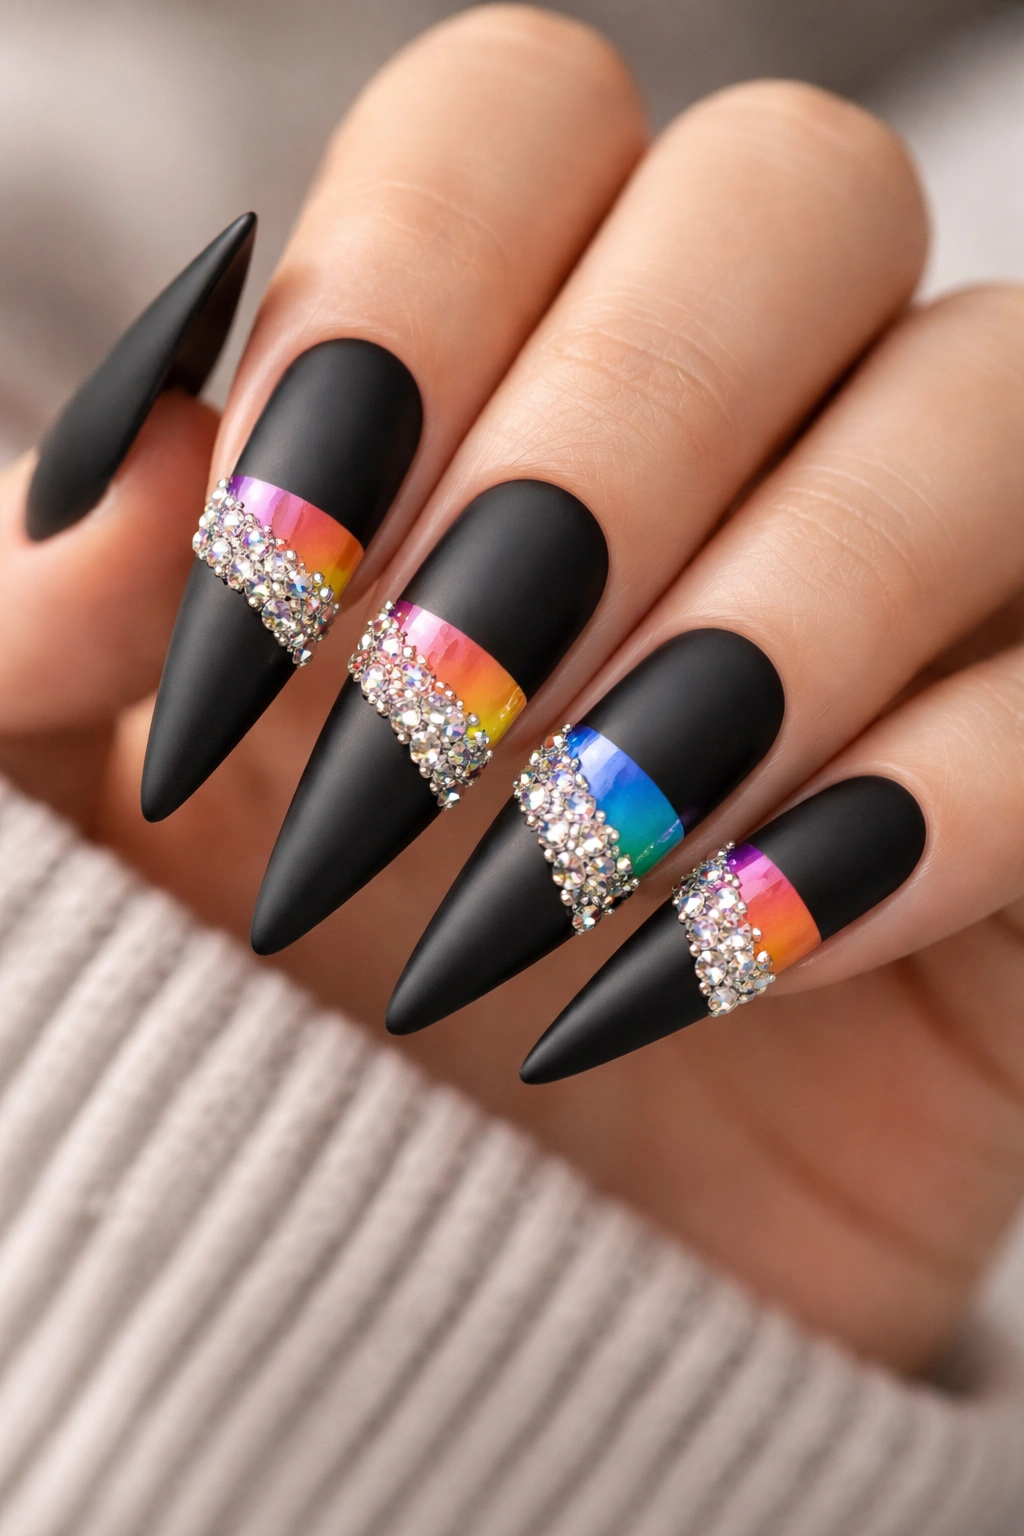
This final design combines edgy black nails with a surprising pop of rainbow color in a horizontal band across the middle third of the nail, topped with a detailed cluster of clear or iridescent rhinestones. The contrast is dramatic—the black ground keeps it sophisticated, the rainbow adds fun and personality, and the crystal stones tie everything together. It’s bold without being overwhelming.
Balancing Contrast and Cohesion
The key to pulling off this design is using the rhinestone cluster to visually bridge the black and rainbow elements. The stones catch light and draw the eye, unifying the different color areas into one cohesive design. It’s a design that makes a statement while maintaining sophistication—you’re not randomly throwing colors together, you’re making intentional, thoughtful choices.
Design Framework
- Base color: Matte or glossy black for the majority of the nail
- Rainbow band: Thin to medium horizontal stripe in rainbow ombre, positioned in the middle third
- Crystal cluster: 5-8 larger rhinestones (5-8mm) positioned where the rainbow meets the black, creating a visual anchor
- Additional stones: Optional smaller crystals scattered in the black area above and below the rainbow band
- Finish: Shiny topcoat over everything to make the stones and rainbow shine
Worth knowing: This design requires precision and patience but delivers maximum impact and compliments. It reads as trendy and artistic while maintaining elegance.
Final Thoughts
Rhinestone stiletto nails offer endless possibilities for self-expression, from barely-there minimalism to full-blown glam. The designs that work best are the ones that reflect your personal style and the occasions you typically attend. Whether you’re drawn to classic elegance, bold statements, romantic softness, or playful color, there’s a rhinestone stiletto design waiting for you.
The key to making any of these designs work is quality execution and proper maintenance. Invest in good nail glue, use high-quality rhinestones, and visit a nail technician who takes pride in precision. Your nails are visible jewelry—they deserve the same care and attention you’d give to any luxury accessory. With the right design and proper application, your rhinestone stiletto nails will look absolutely stunning and last through your busiest weeks.
