

Duck nails have become one of the most playful and eye-catching nail trends, combining the bold geometric shape of short, squared-off nails with longer, elegant tips that extend slightly wider than the base. When you blend this distinctive shape with soft pink tones and classic French tips, you get a manicure that’s sophisticated yet fun, demure yet bold. The contrast between the delicate pale pink base and crisp white tip creates a look that photographs beautifully and flatters almost every skin tone.
What makes pink French tip duck nails so compelling is how they walk the line between timeless elegance and modern edge. Unlike traditional round or almond-shaped nails, duck nails demand attention—they’re unapologetically statement-making. Add the universally flattering pink-and-white color combination, and you’ve got a style that works equally well for everyday wear, special occasions, or just days when you want to feel like your nails are a little more interesting than usual. The shape itself is also surprisingly practical for many people, offering more surface area than pointed acrylics while maintaining that fashionable, Instagram-worthy aesthetic.
The beauty of this particular combination is how endlessly versatile it becomes with small creative adjustments. You can keep it minimalist and classic, or layer in glitters, gradients, patterns, or embellishments that reflect your personal style. Whether you prefer nail art that’s barely-there or designs that make a real statement, there’s a version of pink French tip duck nails that’s perfect for you.
1. Classic Clean White French Tips
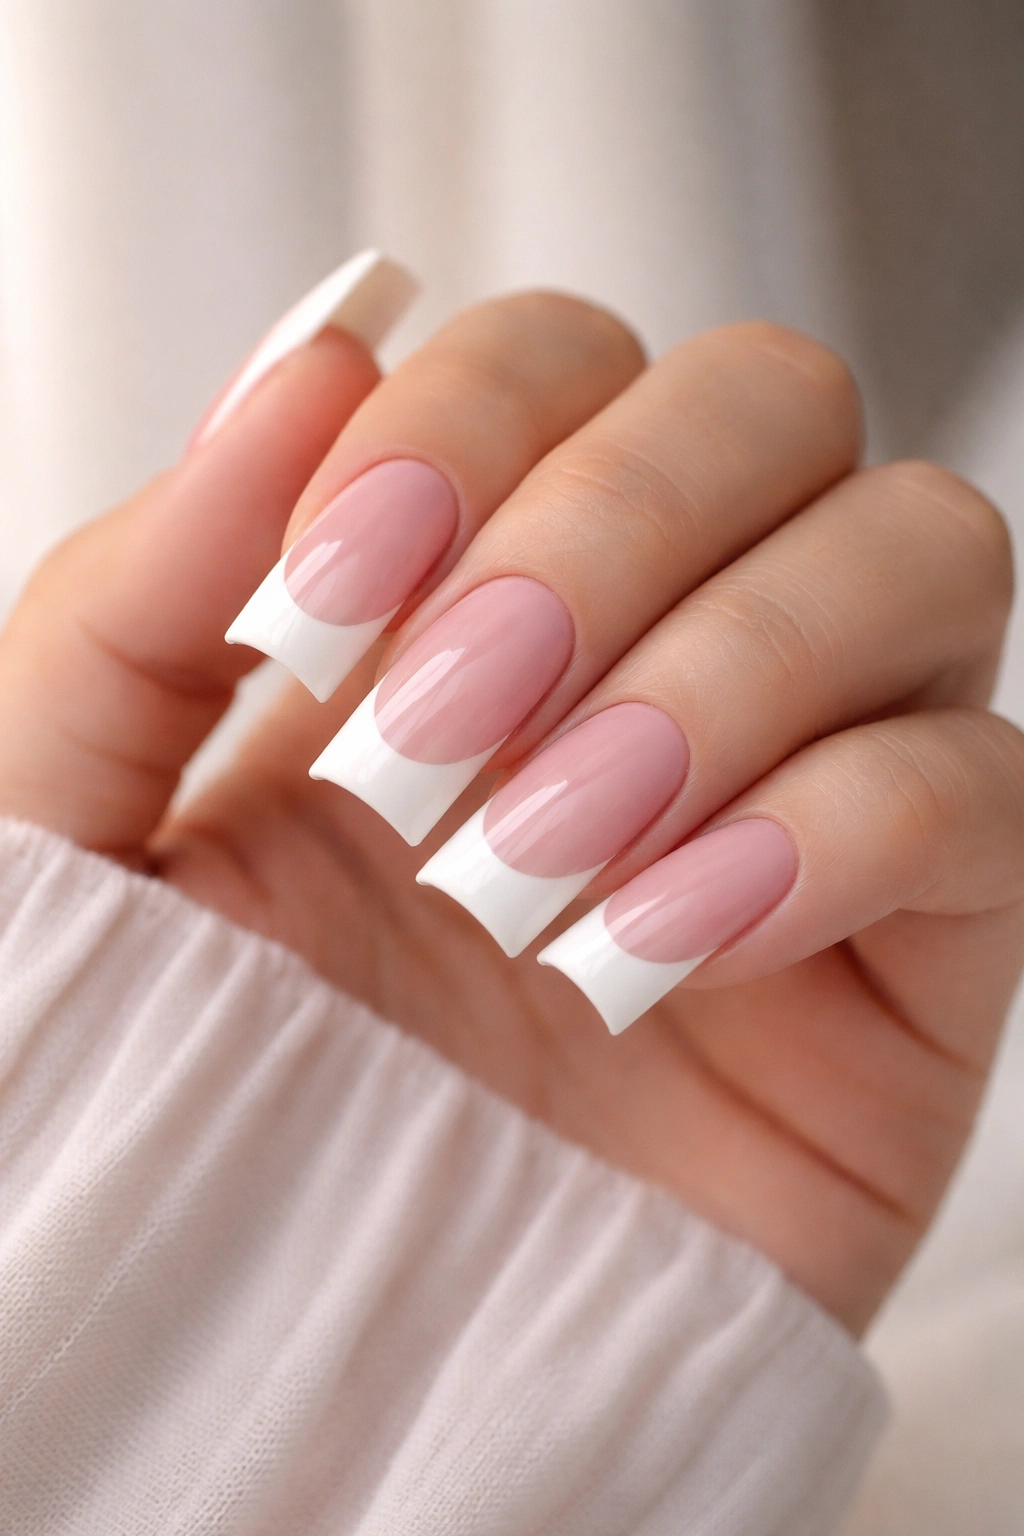
The most timeless approach to pink French tip duck nails is the cleanest version: a soft, creamy pink base paired with a razor-sharp white tip. This design works because of its elegant simplicity—there’s no competing visual detail, just pure, polished sophistication.
Why It’s Always in Style
The classic French tip has remained a go-to manicure for decades because it works with every outfit, every occasion, and every age. Combining it with duck nails adds just enough modern edge to feel current without sacrificing the timeless elegance that makes French tips so universally appealing. The geometric shape draws attention to the tips themselves, making that white line feel intentional and chic rather than accidental.
What Makes This Work Best
- Choose a pale, warm-toned pink (not too light and washed out, not too dark) that sits comfortably between cool and warm undertones
- Keep the white tip line perfectly straight and evenly proportioned—this design has nowhere to hide imperfection
- Use a high-quality base coat to prevent yellowing of the white tip over time
- Finish with a glossy top coat for maximum shine and a professional appearance
Pro tip: This design actually photographs better than most, so if you’re looking to build a consistent aesthetic across your social media, this is your foundation look.
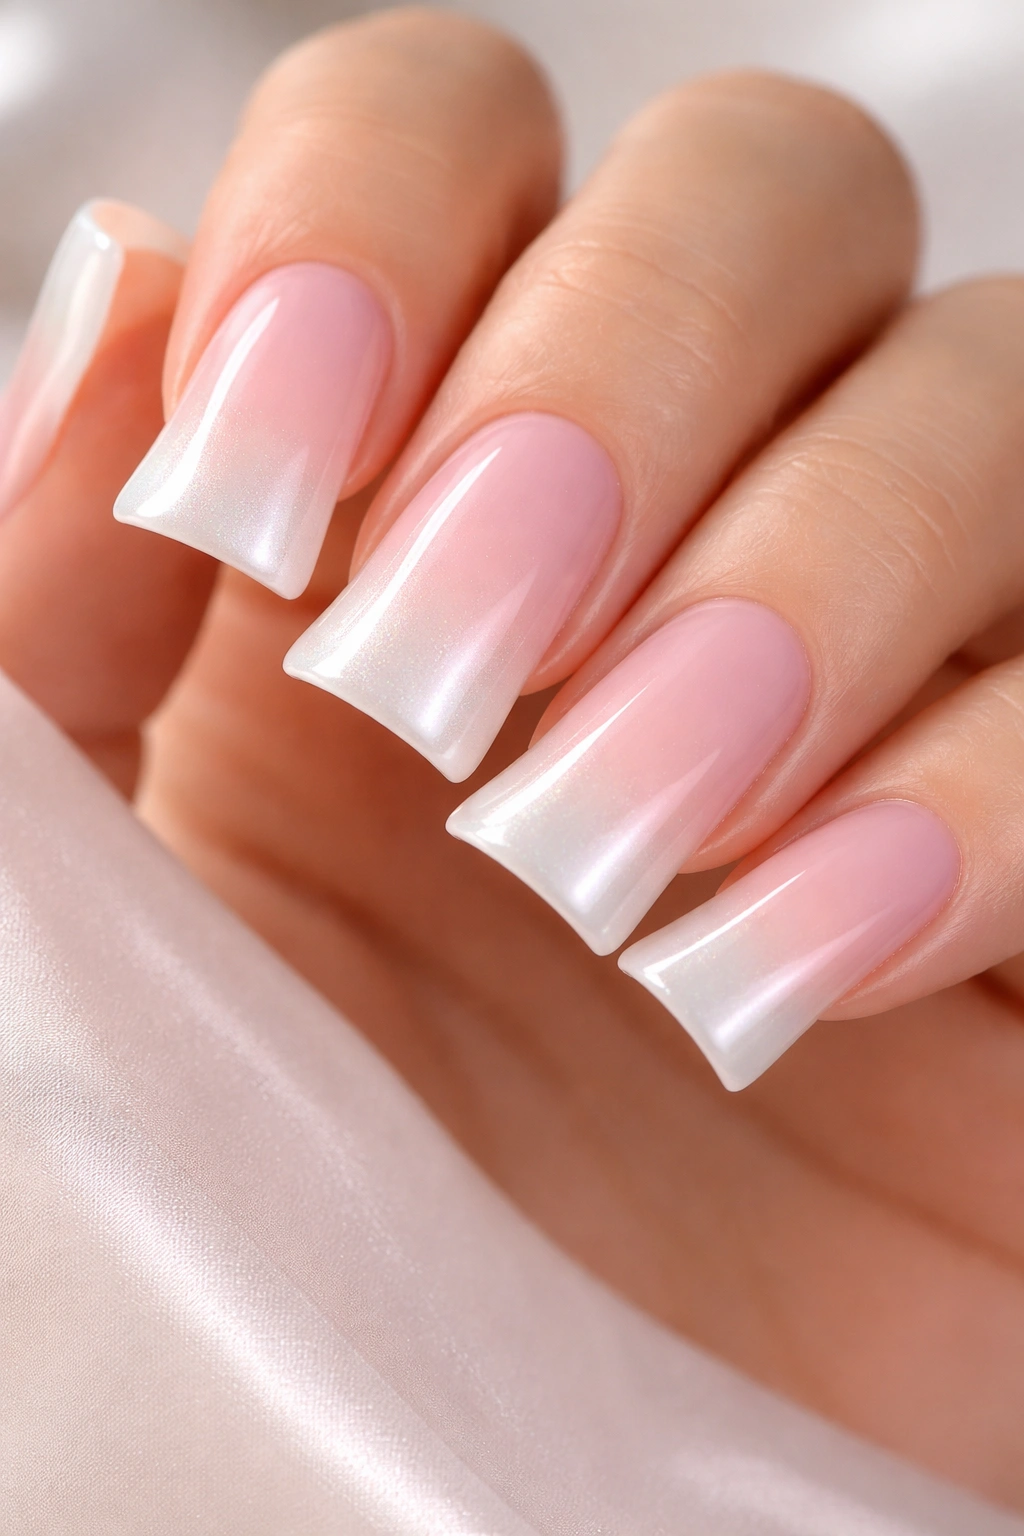
2. Ombré Pink to White Gradient French Tips
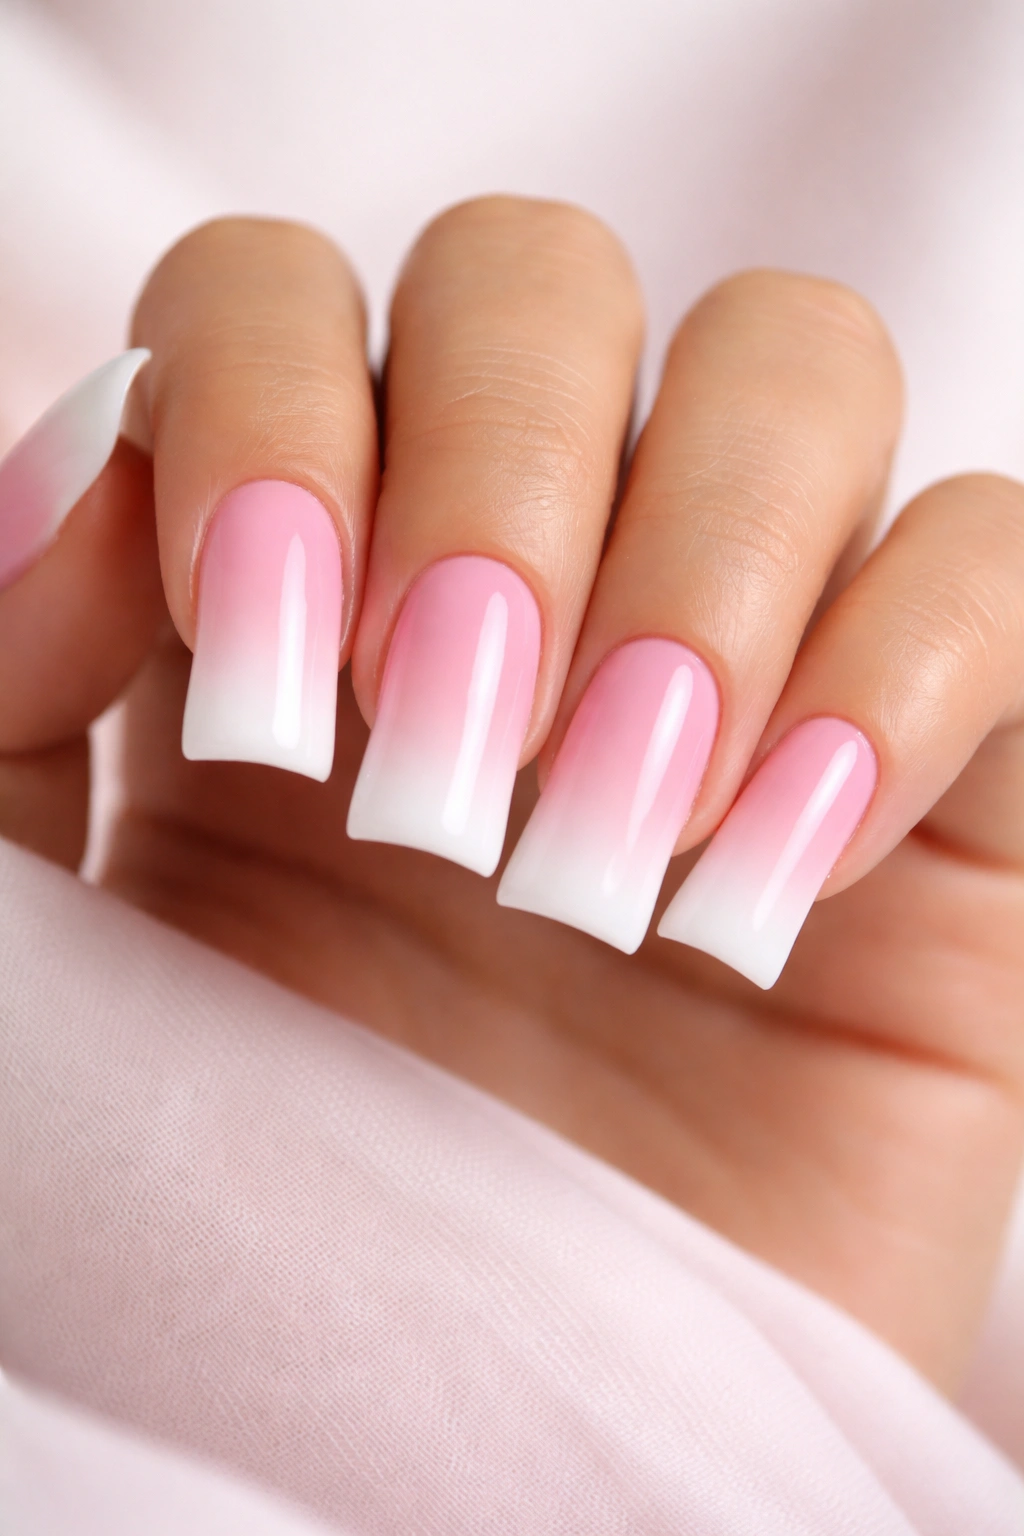
Instead of a sharp line separating pink from white, try blending the two colors in a soft gradient that transitions from pale pink at the base to white at the tip. This creates an almost three-dimensional effect that reads as both romantic and modern.
The Blended Beauty Approach
An ombré French tip removes some of the graphic boldness of the classic version and replaces it with softness and dimension. The gradient catches light differently as your hand moves, making the nails look more interesting without adding any additional detail. It’s a subtle shift that somehow feels more sophisticated than the crisp line version—probably because it requires more technical skill to execute properly.
How to Get the Look
- Ask your nail technician about their ombré or gradient blending technique—this requires some skill to execute smoothly
- Consider a sponging method, where a makeup sponge is used to blend two colors together at the transition point
- If going to a salon, bring inspiration photos showing exactly how subtle or dramatic you want the gradient to be
- At-home attempt tip: Use a dry sponge to blend two colors in the white tip area for a softer transition than a hard line
Worth knowing: This design actually hides minor imperfections better than a crisp French line, since there’s no harsh edge to reveal uneven application.
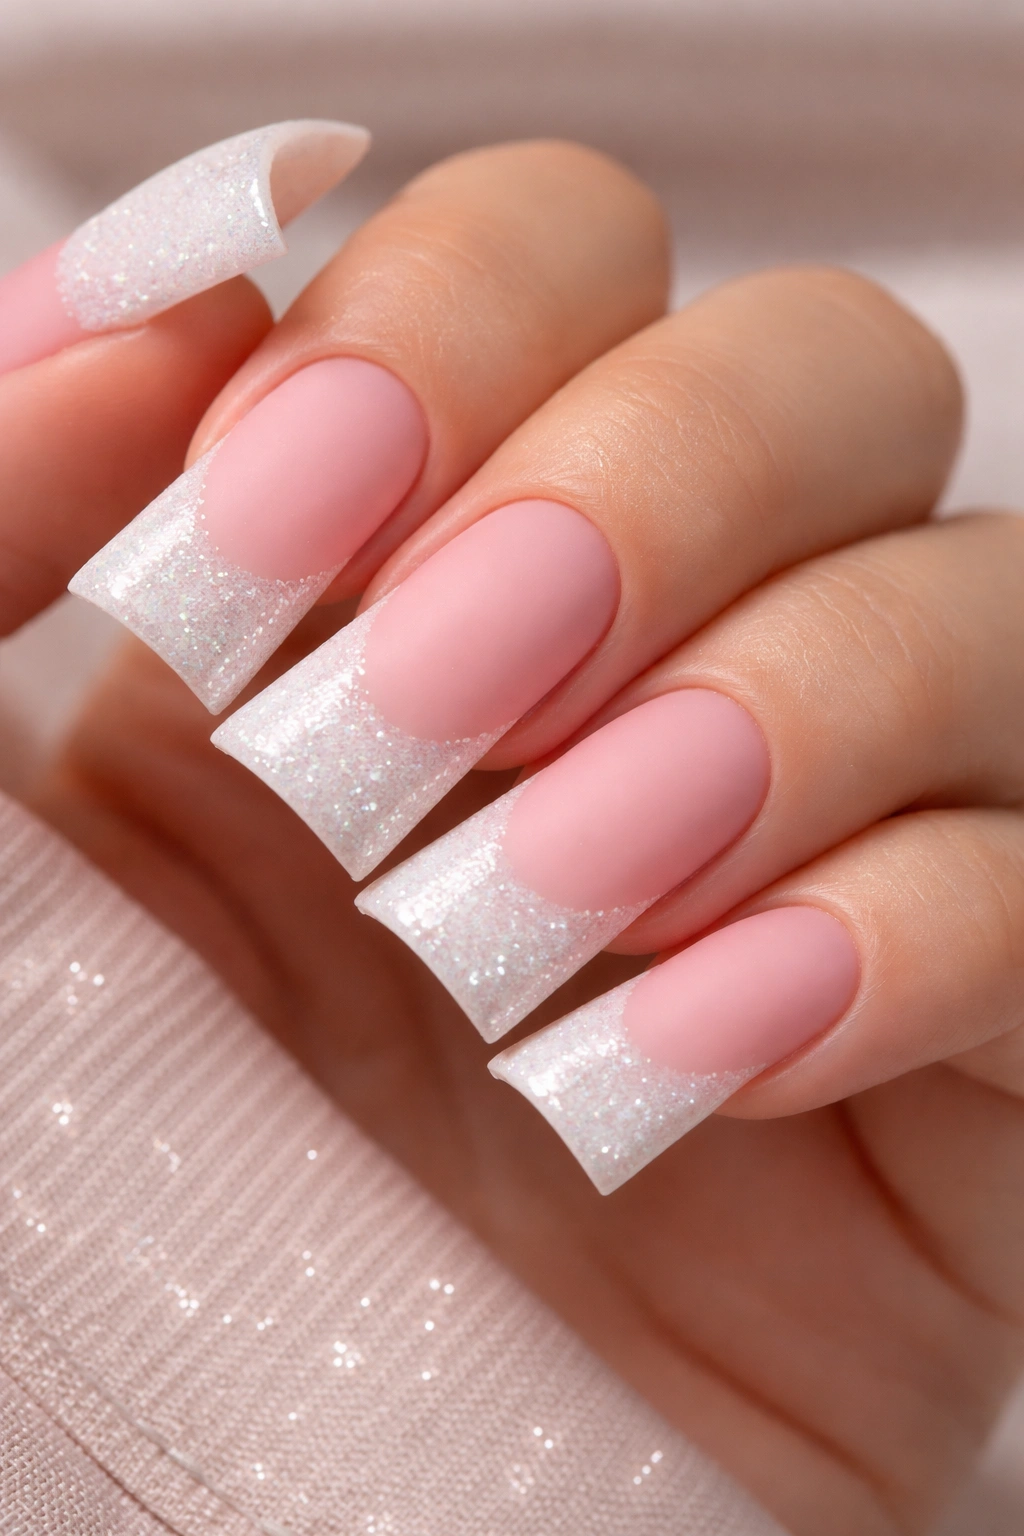
3. Glitter Fade French Tips with Pink Base
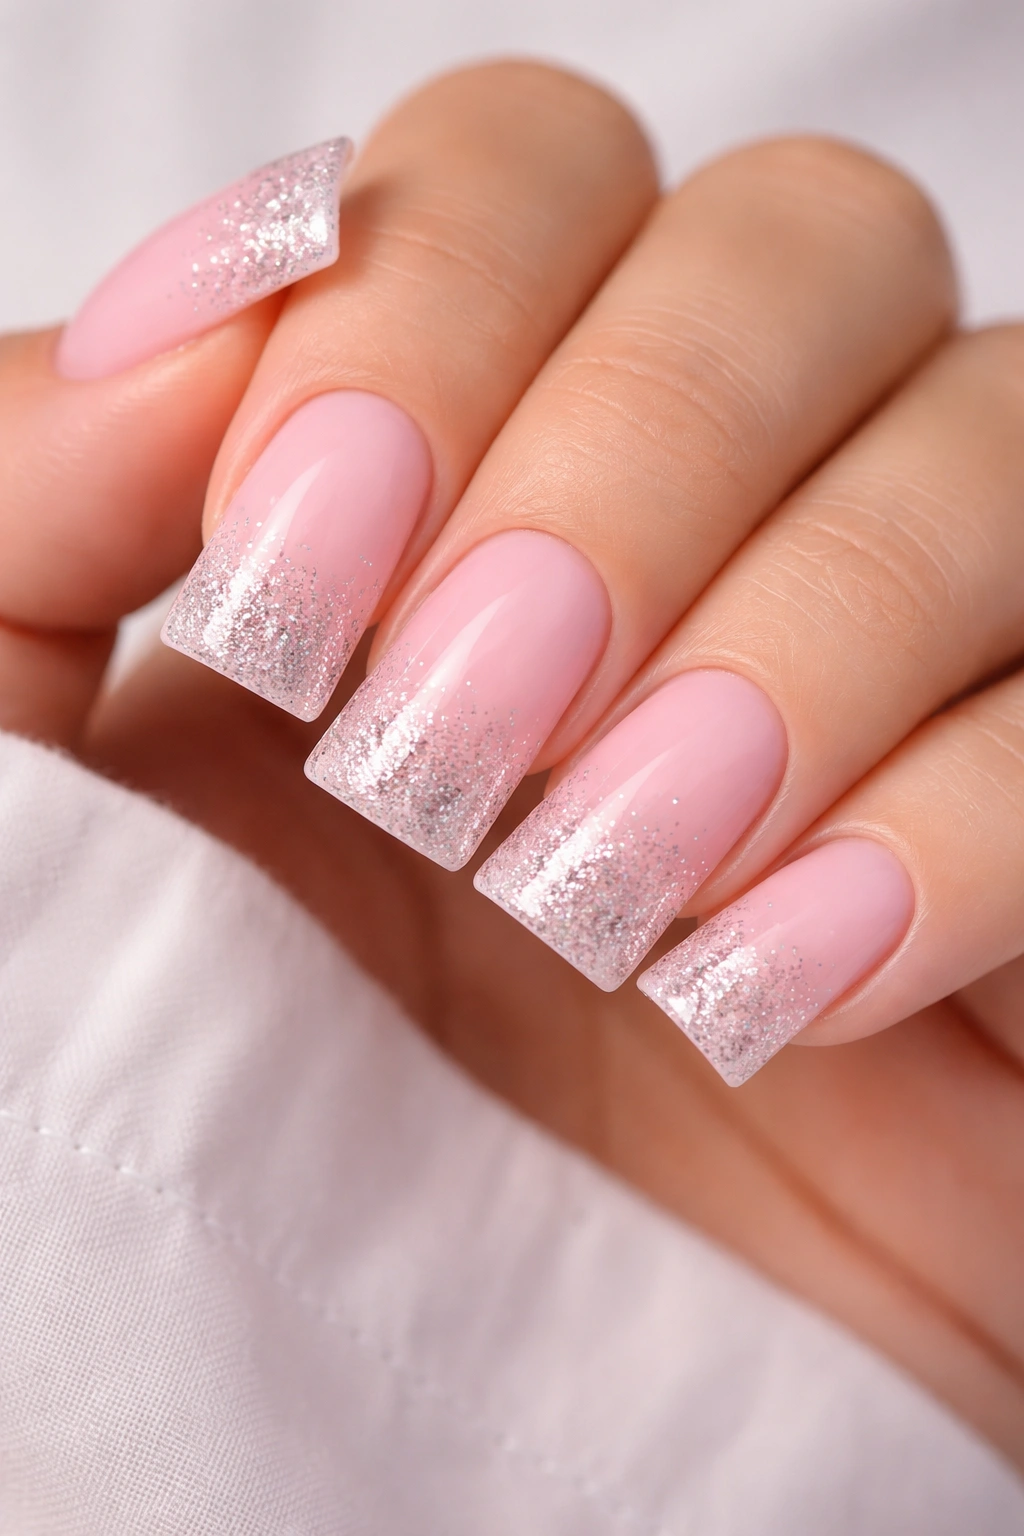
Keep the pink base soft and solid, then introduce fine sparkle that gradually increases in density from the middle of the nail to the tip. The result is a glitter gradient that feels elegant rather than over-the-top.
Adding Just Enough Sparkle
Not everyone loves heavily embellished nails, but most people appreciate a touch of shimmer that adds light-catching dimension without overwhelming the design. A glitter fade keeps the manicure wearable for professional settings while still feeling special and celebratory. The gradual transition is key—jumping from solid pink directly to thick glitter reads as costume-like, but a gentle fade feels intentional and refined.
Creating the Effect
- Use nail art or stamper tools to apply finer glitter particles near the nail bed, gradually building density toward the tip
- Consider using a poly gel or builder gel in between layers to create a smooth foundation for the glitter
- Chrome or holographic micro-glitter works better than chunky confetti glitter for this technique
- Top everything with a clear builder gel or thick top coat to seal the glitter and prevent it from snagging
Insider note: White or silver glitter works beautifully in the white tip section, while nude or rose-gold glitter in the transition zone creates a more cohesive, blended look.
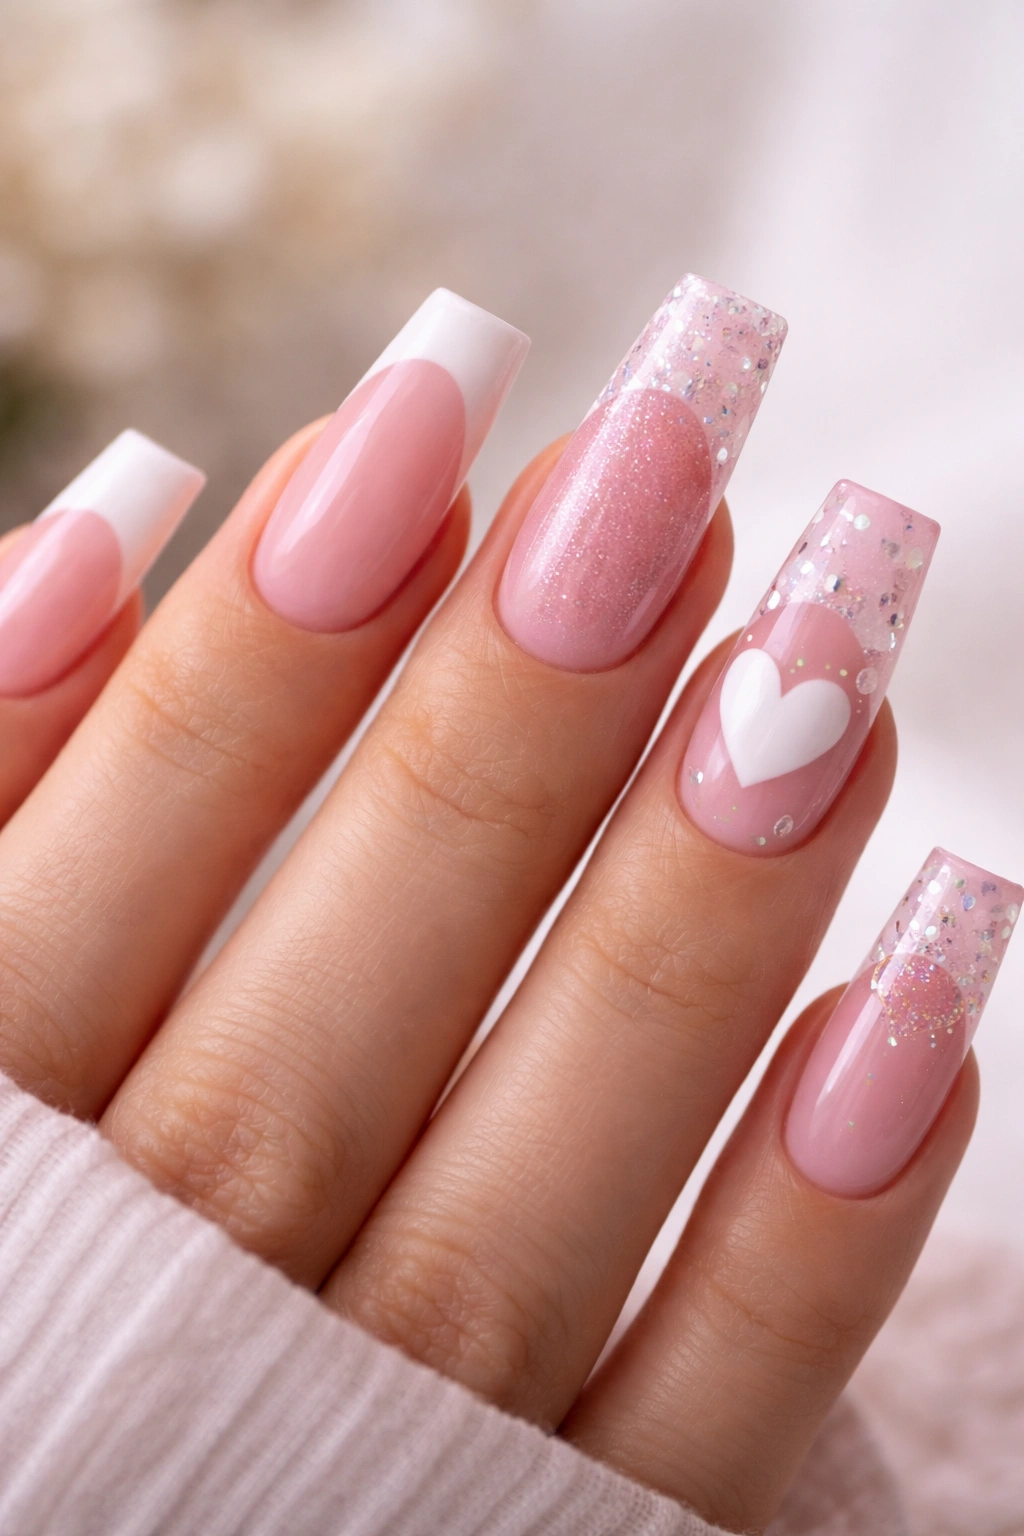
4. Minimalist Accent Nail Design
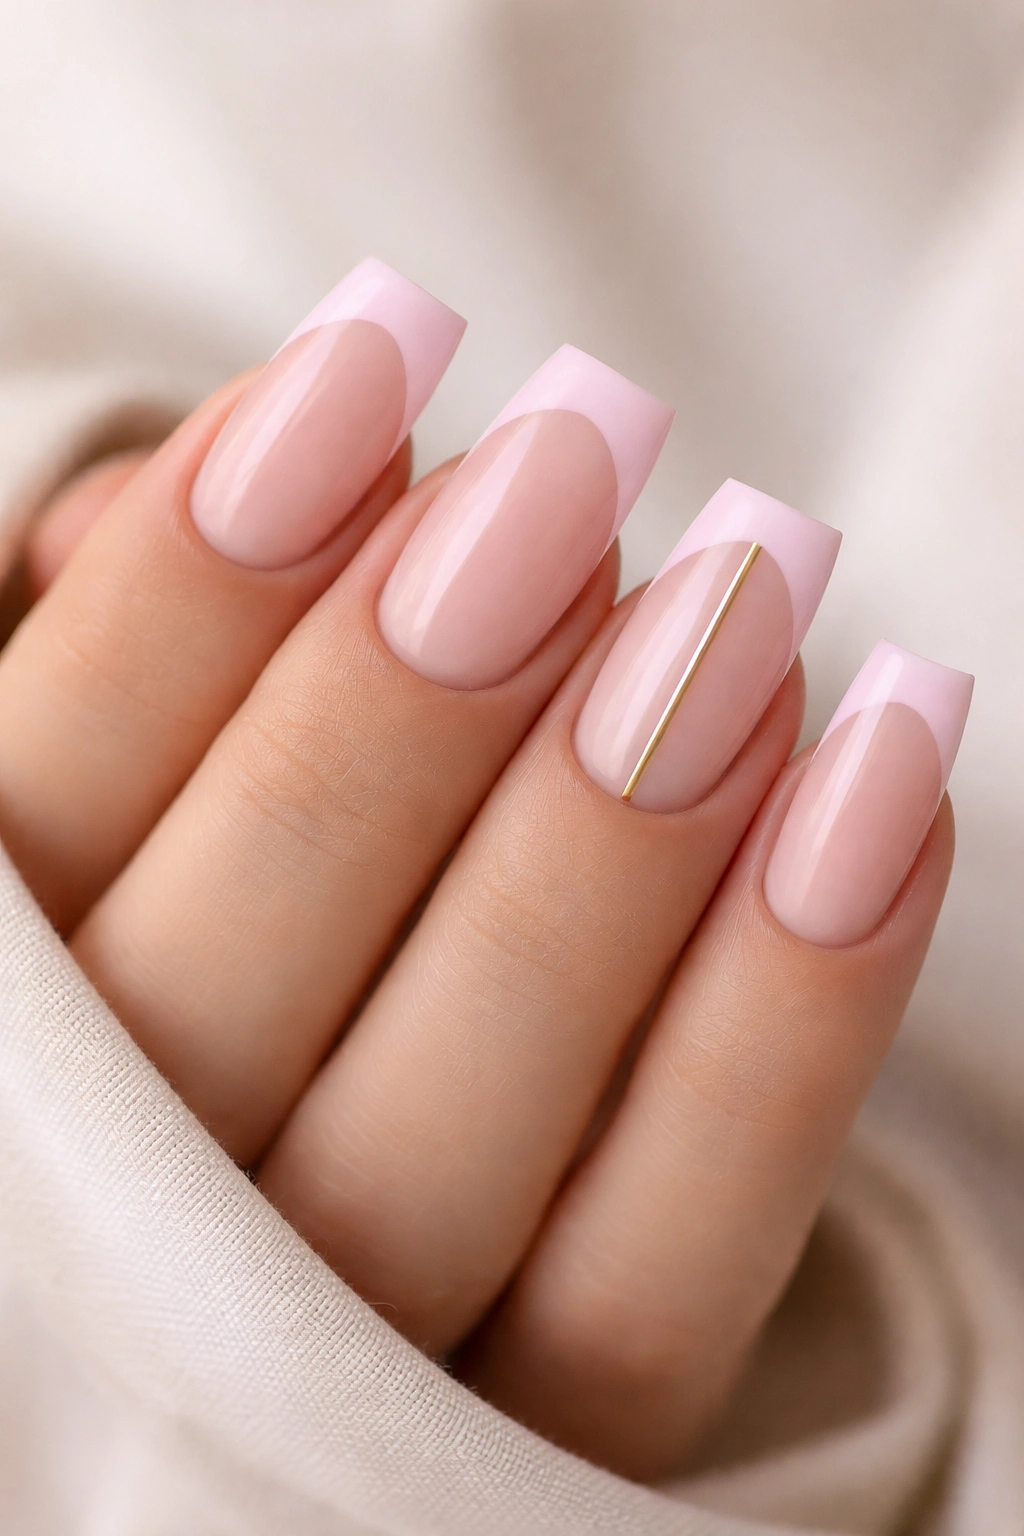
Keep nine nails a simple pink French tip, then use the tenth nail (typically the ring finger on one hand) as a statement accent. This might be a geometric pattern, a small amount of negative space design, a stripe, or a dot pattern in gold, white, or a deeper pink shade.
The Power of Subtle Contrast
One accent nail is enough to prevent a manicure from feeling boring while maintaining the clean, put-together aesthetic of the French tip design. This approach gives you room to be creative and playful without committing your entire manicure to something bold. If you love trying new designs but aren’t ready to go all-in, accent nails are the perfect middle ground.
Easy Accent Ideas to Try
- A single thin gold or rose-gold vertical stripe down the center of one nail
- A tiny negative space cutout showing your natural nail or a contrasting color beneath
- Three or four small dots in a geometric arrangement in the pinky finger (looks like a minimalist constellation)
- A very thin horizontal line about halfway down the nail in matte white, contrasting with the glossy French tip below
Quick note: The accent nail is most striking on your dominant hand’s ring finger, where it naturally gets attention when your hand is relaxed and visible.
5. Pale Pink with Rose Gold Reversed French Tips
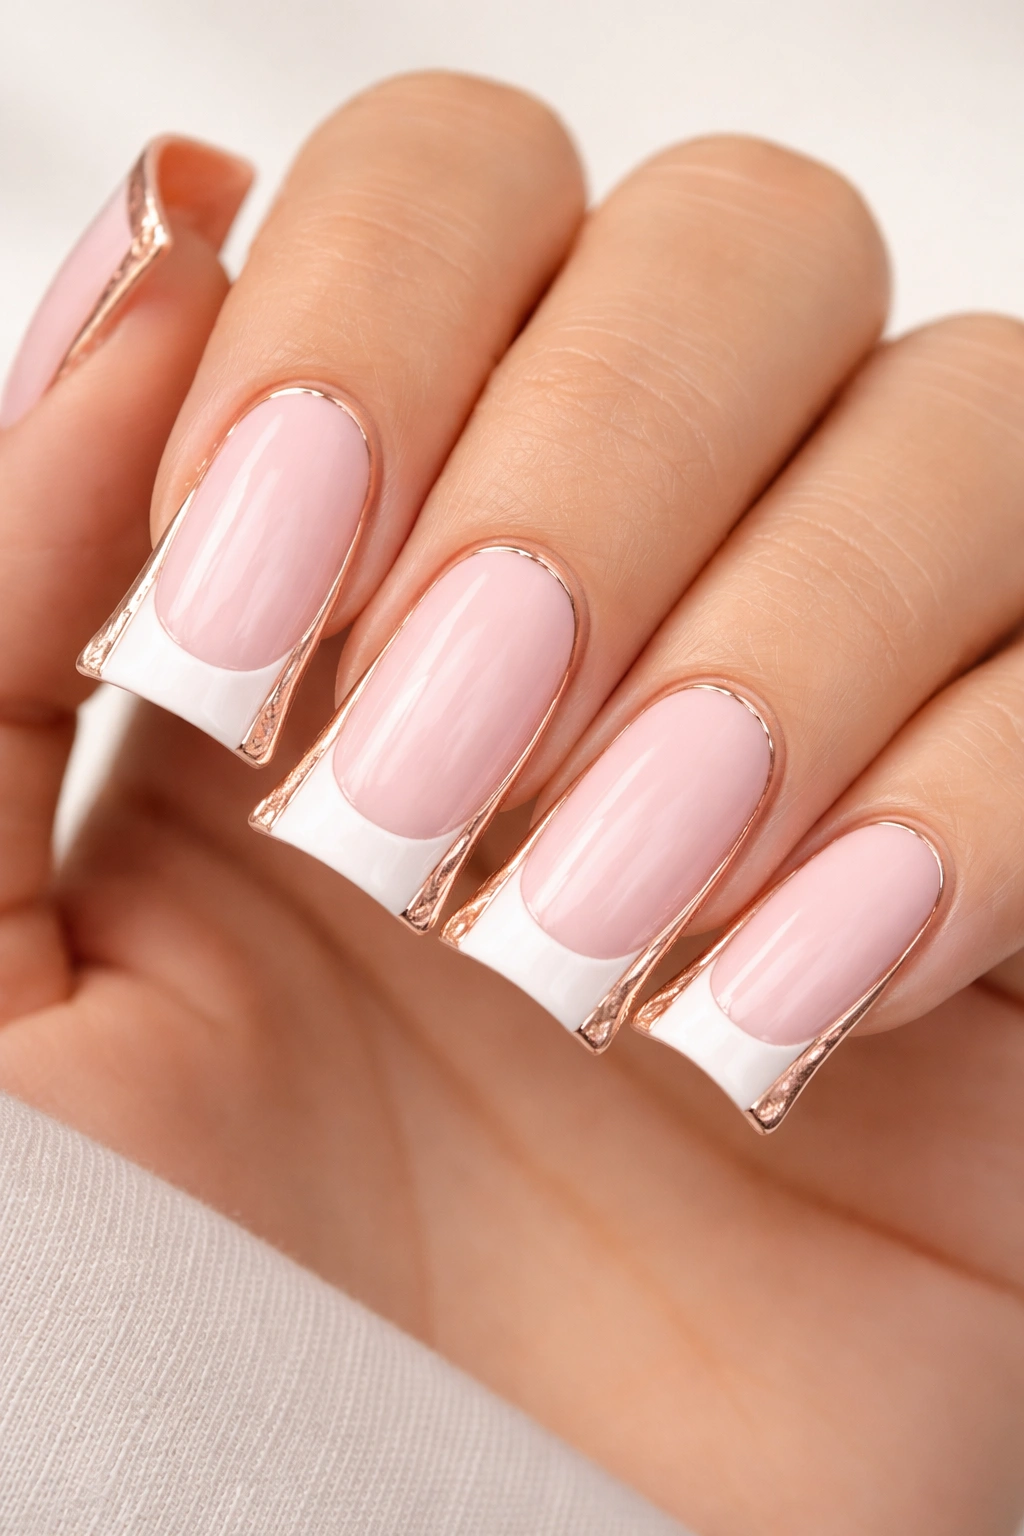
Flip the classic French tip entirely by placing the metallic accent on the base and sides of the nail instead of the tip. Use a pale pink for the majority of the nail, but add rose gold or champagne accents along the side edges and base, creating a frame effect.
Reversing Tradition for Modern Appeal
A reversed French tip challenges what we expect from this classic design, making it feel fresh and contemporary while keeping the familiar pink base. The metallic accents add warmth and luxury without being overwhelming. This design works particularly well for people with warm undertones in their skin, as rose gold naturally complements golden and warm complexions.
How the Reversal Works Best
- Paint the main nail area in pale, neutral pink
- Use a thin brush to apply rose gold metallic paint along the sides of the nail and around the base cuticle area
- Keep the white traditional tip, but let the rose gold frame draw the eye to the negative space around it
- A glossy top coat on the entire nail creates a cohesive, polished appearance
Pro move: This design actually elongates the nail visually compared to a standard French tip, making it particularly flattering on shorter duck nail lengths.
6. Sparkly White Tips with Matte Pink Base
Create contrast not just in color but in finish by keeping the pink base glossy while making the white tip completely matte. Alternatively, try the opposite: glossy white tips with a soft matte pink base. The interplay between the two finishes adds sophistication without adding complexity.
Texture Creates Dimension
A matte-and-gloss combination has become increasingly popular in nail art because it creates visual interest from texture rather than relying solely on color. On duck nails, which are already a statement shape, this finish contrast feels especially impactful. The matte surface actually photographs differently than gloss, catching light in a more subtle way that can look more refined in person and in photos.
Getting the Finish Right
- Finish the pink base with a standard glossy top coat
- After the gloss fully dries, carefully paint only the white tip area with a matte top coat
- Use a matte top coat made specifically for nails (not a matte spray, which can be too thick and uneven)
- A thin brush helps you keep the matte coating only on the tip without getting it on the pink base area
Worth noting: This design actually hides fingerprints better than all-gloss nails, since matte surfaces don’t reflect smudges as obviously.
7. Soft Pink with Thin Gold Striping and White Tips
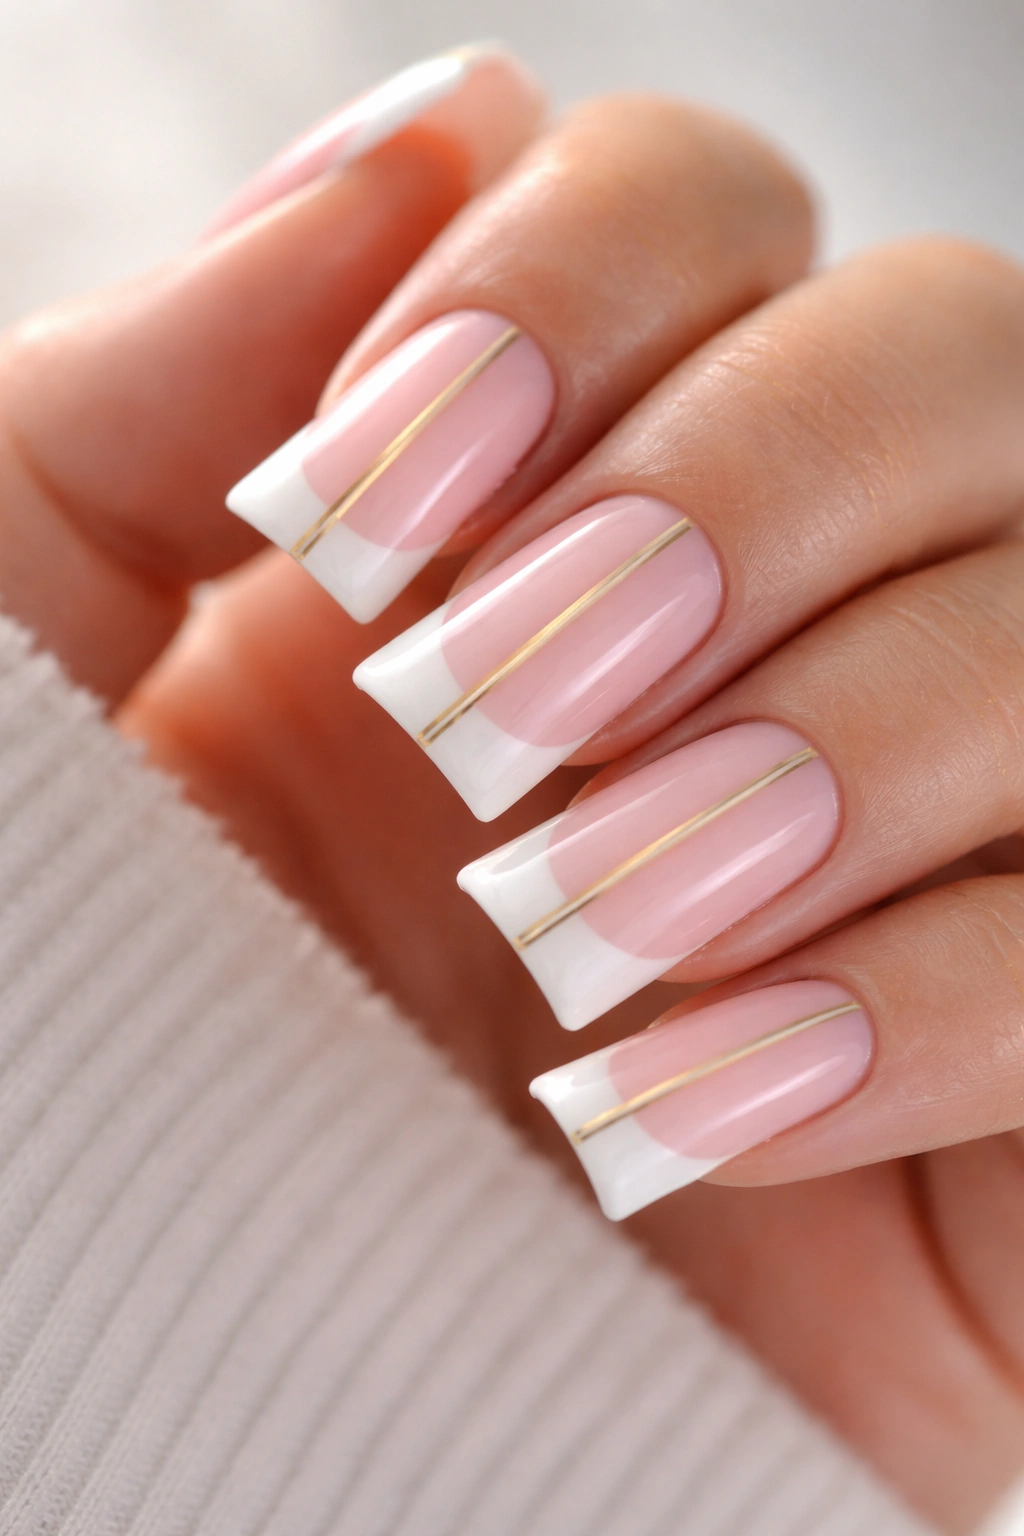
Add delicate gold lines running vertically down the nail (or in other patterns) over the pink base, maintaining the white French tip. The gold provides visual detail that keeps the design interesting without making it feel cluttered or overly ornate.
Elegance Through Minimal Detail
Thin striping is sophisticated because it requires precision and skill without being difficult to wear. Unlike chunky designs or heavy embellishments, fine line work feels refined and wearable for any occasion. Gold striping on pink is a naturally harmonious color combination—the warmth of gold complements the softness of pink beautifully.
Applying Fine Line Details
- Use a thin gel liner brush or a detail art brush designed for nail work
- Paint thin, parallel lines running from the base toward the tip of the nail, or create a crosshatch pattern
- Alternatively, create a thin gold frame around the outer edge of the nail before the white tip begins
- Seal with a thick top coat to protect the delicate lines
Design twist: If you want the lines to be even more subtle, use rose gold instead of bright gold, which blends more seamlessly with the pink base while still adding dimension.
8. Marble Effect with Pink and White Swirls
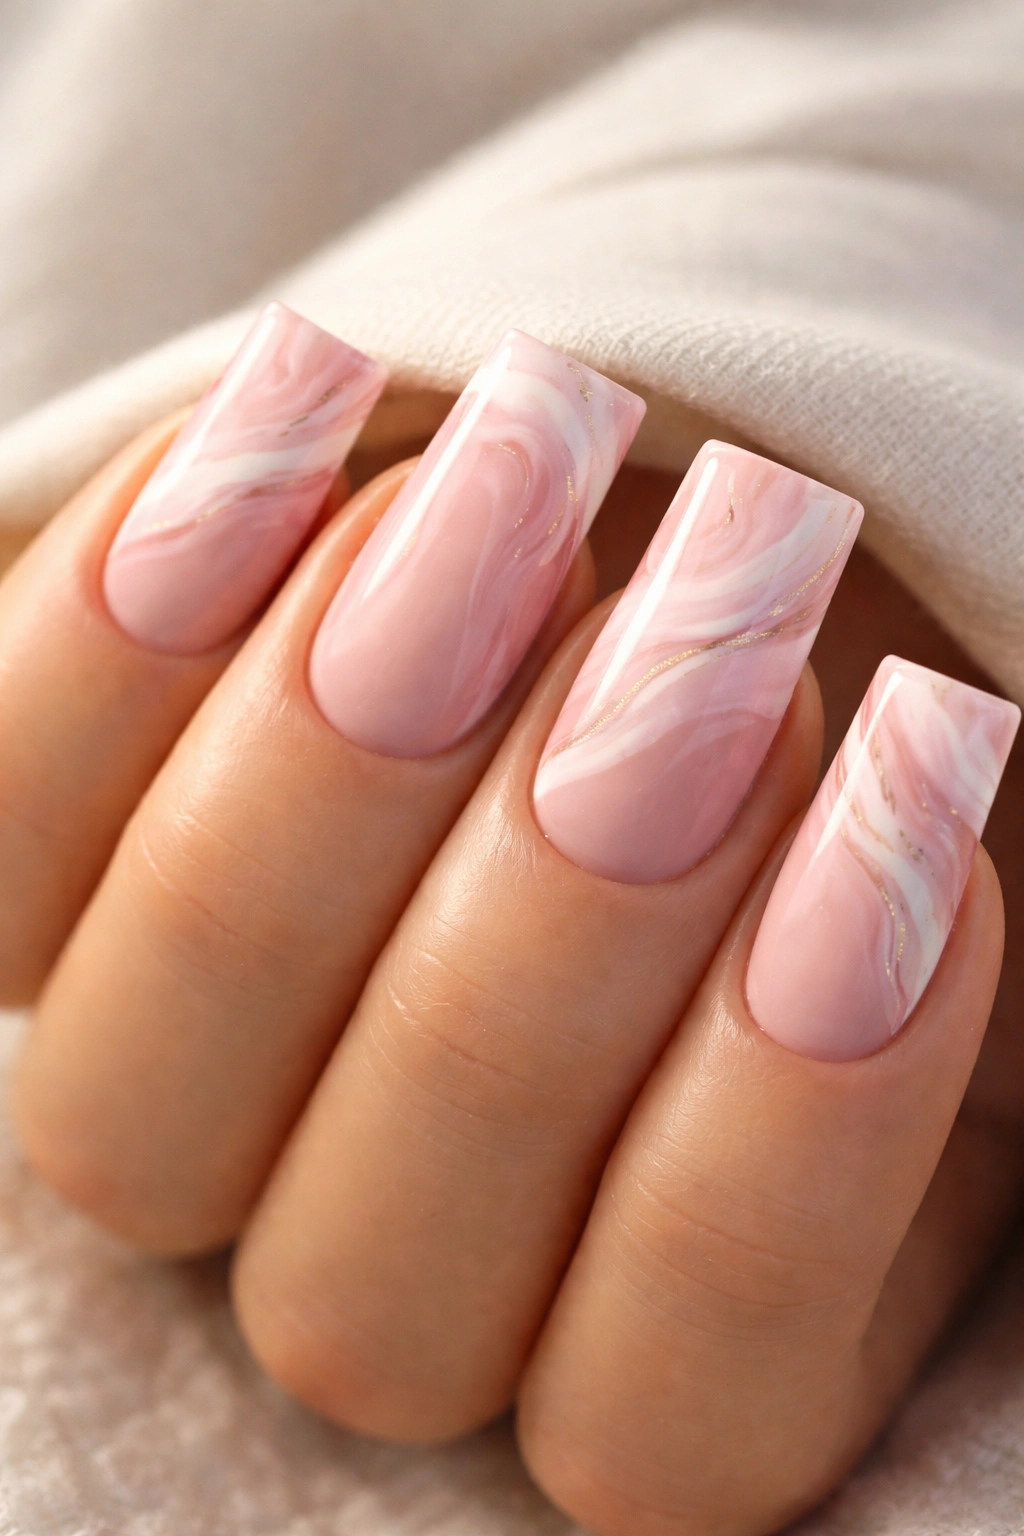
Instead of a defined French tip line, create a marble or watercolor effect that naturally blends pink and white in organic, flowing patterns across the nail. The design mimics natural stone while honoring the French tip color scheme.
Organic Design with Structure
Marble nail art feels artistic and intentional while remaining wearable and modern. On duck nail shapes, the wider tip area becomes a canvas for the swirled effect, making the design feel purpose-built for this specific nail shape. Each marble manicure is unique, which means you’re literally wearing one-of-a-kind nail art.
Creating the Marble Look
- Start with a pale pink base coat
- Drop small amounts of white gel or polish into the white tip area
- Using a thin brush or dotting tool, drag and swirl the white through the pink in organic, flowing motions
- Some areas should be pure white, some pure pink, and some blended in between
- The key is making it look natural rather than perfectly geometric
Insider tip: Thinner coats of white (rather than one thick application) blend more smoothly into the pink base, creating a more convincing marble effect.
9. Nude Pink with Crystal or Rhinestone Embellishments
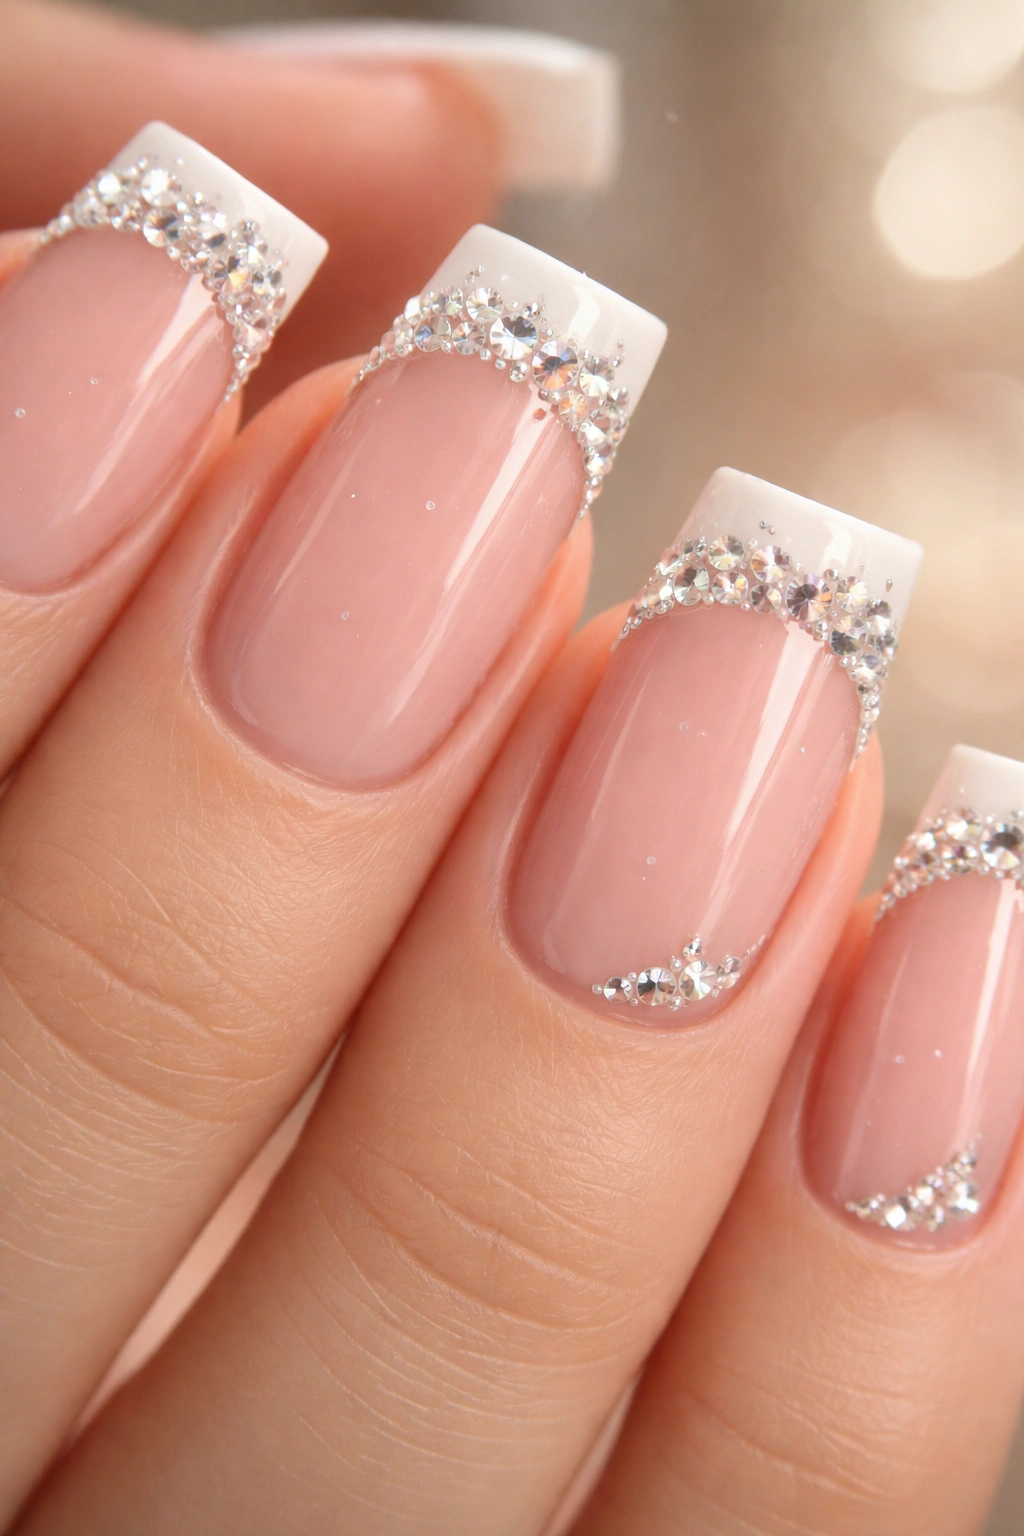
Use a pale nude-pink tone that nearly matches your skin as the base, keeping it very subtle and minimal. Then add small crystals, rhinestones, or nail studs along the white tip line or in a scattered pattern across the tip area. This creates a jeweled, luxe effect that reads as intentional and elegant.
Understated Luxury Approach
When the base color is nude-pink (essentially skin-toned), the nail becomes an extension of your finger, making any embellishment feel like fine jewelry rather than costume decoration. This design works beautifully for weddings, special events, or anyone who loves the illusion of longer, more refined fingers.
Applying Crystals Successfully
- Use nail-specific rhinestones or crystals, not fashion jewelry crystals, which won’t adhere properly or safely
- Apply crystals with a special glue (often sold alongside nail rhinestones) or place them on a wet top coat before it sets
- Consider placing larger crystals at specific points (like along the French tip line) rather than randomly scattered, which looks more intentional
- Seal everything with a thick builder gel or top coat to prevent crystals from catching and pulling away
Pro move: Rhinestones and crystals catch light most beautifully when photographed directly, making them perfect if you love sharing manicure photos.
10. Soft Pink with Pearl Ombré White Tips
Combine the glossiness of the classic French tip with a subtle pearl or iridescent quality in the white tip area. The pearlescence creates a luminous, almost three-dimensional effect that shifts slightly depending on the angle of the light and how your hand moves.
Shimmer Without Glitter
Pearl or iridescent white tips give you sparkle and interest without the texture of actual glitter. The effect is more subtle in person than photos might suggest, making it wearable for professional settings while still feeling special. The pearlescent quality on the white tip makes the French line feel intentional and thought-through rather than basic.
Achieving the Pearl Effect
- Use a pearl white gel or polish specifically formulated with iridescent pigments
- Apply it to just the white tip area, blending slightly where it meets the pink base for a soft transition
- Some pearl polishes work better than others—bring swatches to your nail technician to find the one with the exact level of shimmer you want
- A clear glossy top coat seals in the pearlescence and keeps it looking fresh
Worth knowing: Pearl-finish nails actually look better the slightly less clean they are—a tiny amount of wear or visible growth enhances the iridescent effect rather than detracting from it, so this design photographs beautifully even after a week of wear.
Final Thoughts
Pink French tip duck nails work because they balance opposing qualities beautifully: they’re both classic and contemporary, elegant and playful, simple and statement-making. Whether you choose a minimalist approach or lean into details like glitter, metallic accents, or rhinestones, the foundational combination of soft pink, white tips, and that distinctive squared-off shape does the heavy lifting for you.
The real magic of duck nails is how they make even basic color combinations feel special. The shape itself draws attention, which means your manicure will feel intentional and polished without requiring elaborate art or design work. If you’re someone who loves changing up your nail look frequently, pink French tip duck nails offer an excellent neutral base that you can dress up or down depending on your mood, outfit, or occasion.
Start with the version that appeals most to you, then use the other ideas as inspiration for rotating through different finishes and details as you go. The best manicure is the one that makes you smile when you look at your hands—and with a duck nail base that flatters your fingers and a pink French combination that’s universally gorgeous, you really can’t go wrong.
