

Stiletto nails have become the ultimate power move—that sharp, commanding shape that instantly says you’re confident, bold, and unapologetically yourself. But there’s a difference between simply wearing stilettos and truly owning a baddie aesthetic that stops people in their tracks. The baddie nail game is about attitude. It’s edgy, it’s polished, it’s uncompromising, and it demands a design that matches that energy. Whether you’re going for dark and moody, luxe and glittering, or statement-making geometric, the right stiletto nail idea elevates your entire look from basic to unforgettable.
The beauty of stiletto nails is that they’re a blank canvas for creativity. The elongated almond tip gives you maximum real estate to play with bold colors, intricate designs, and eye-catching embellishments. A true baddie stiletto mani isn’t just about looking pretty—it’s about commanding attention and expressing confidence through your fingertips. Every design choice matters, from the base color to the finishing touches. Some baddie styles whisper luxury through understated elegance, while others demand to be seen with full-on sparkle and drama.
If you’re looking to level up your nail game, you’ve come to the right place. The designs below aren’t your typical soft pink manicures. These are bold, statement-making nail ideas that capture the essence of baddie energy while maintaining that polish and sophistication that separates iconic from trying-too-hard. Each one includes specific breakdown of how to achieve the look, why it works, and how to make it your own. Let’s dive into the nail ideas that belong on your baddie bucket list.
1. Classic Black Stilettos with Gold Accents
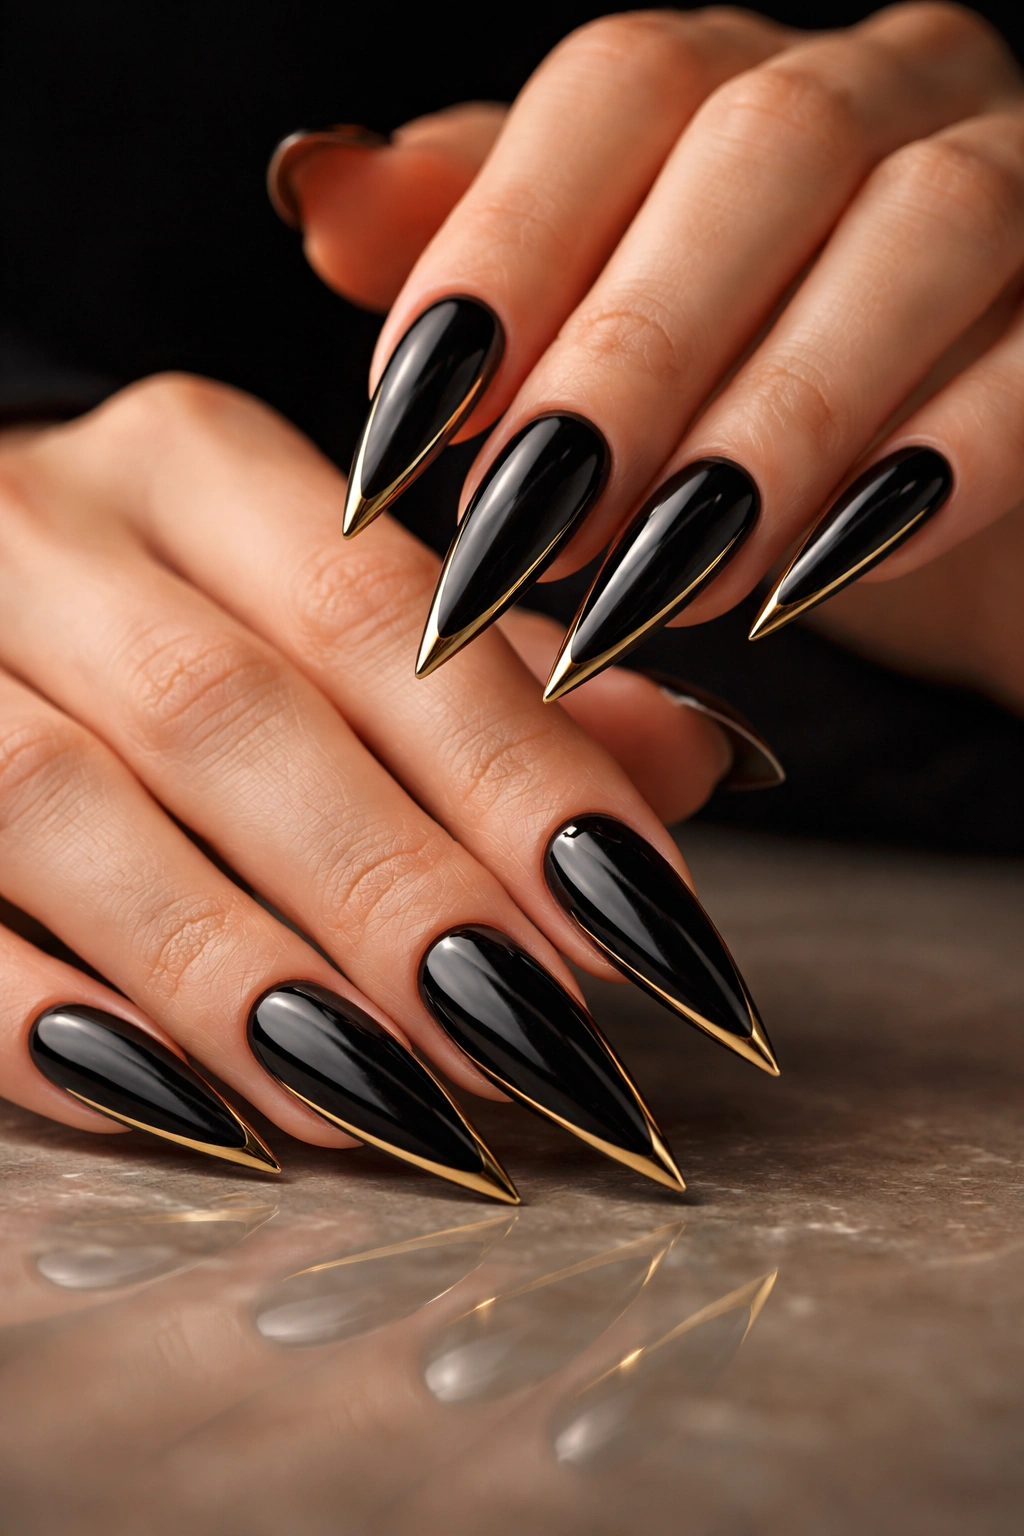
Black stilettos are the uniform of confidence, and when you add gold accents, you’ve officially entered baddie territory. This combination hits that perfect balance between timeless and statement-making—it works for literally any occasion, from casual coffee runs to nighttime events that demand presence. The contrast between deep black and warm metallic gold creates visual drama without feeling costume-like. The beauty of this design is its versatility; you can adapt it to match your mood or the occasion.
Why This Design Rules
The black-and-gold combo is instantly recognizable as a power aesthetic. Black elongates your nails and creates a sleek, sophisticated backdrop, while gold catches light and draws attention to your hands. This pairing works because it’s not trying too hard—it’s effortlessly elevated. Gold against black reads as luxury, and that’s exactly what a baddie aesthetic is about. The high contrast makes your hands look more defined and your nails appear even longer and sharper.
How to Get This Look
Apply a smooth, opaque black base coat (two coats for full coverage). Once dry, use a thin gold gel brush or a gold striping pen to create your accent pattern. The most classic approach is a vertical gold stripe down the center of each nail, but you could also do thin gold lines along the cuticle or a geometric half-moon design at the base. Some people go for full gold foil placement on the accent nail. Seal everything with a high-shine top coat to make the gold absolutely luminous.
Pro Tips for Success
- Use a creamy black polish, not one with too much shimmer—you want the black to be the grounding force
- Let your black base fully cure before applying gold accents; any tackiness will cause your design to smudge
- Gold leaf or foil lasts longer than hand-painted gold lines, but hand-painted gives more precision
- Add a matte top coat instead of glossy for a more modern, editorial baddie vibe
2. Deep Red with Silver Geometric Patterns
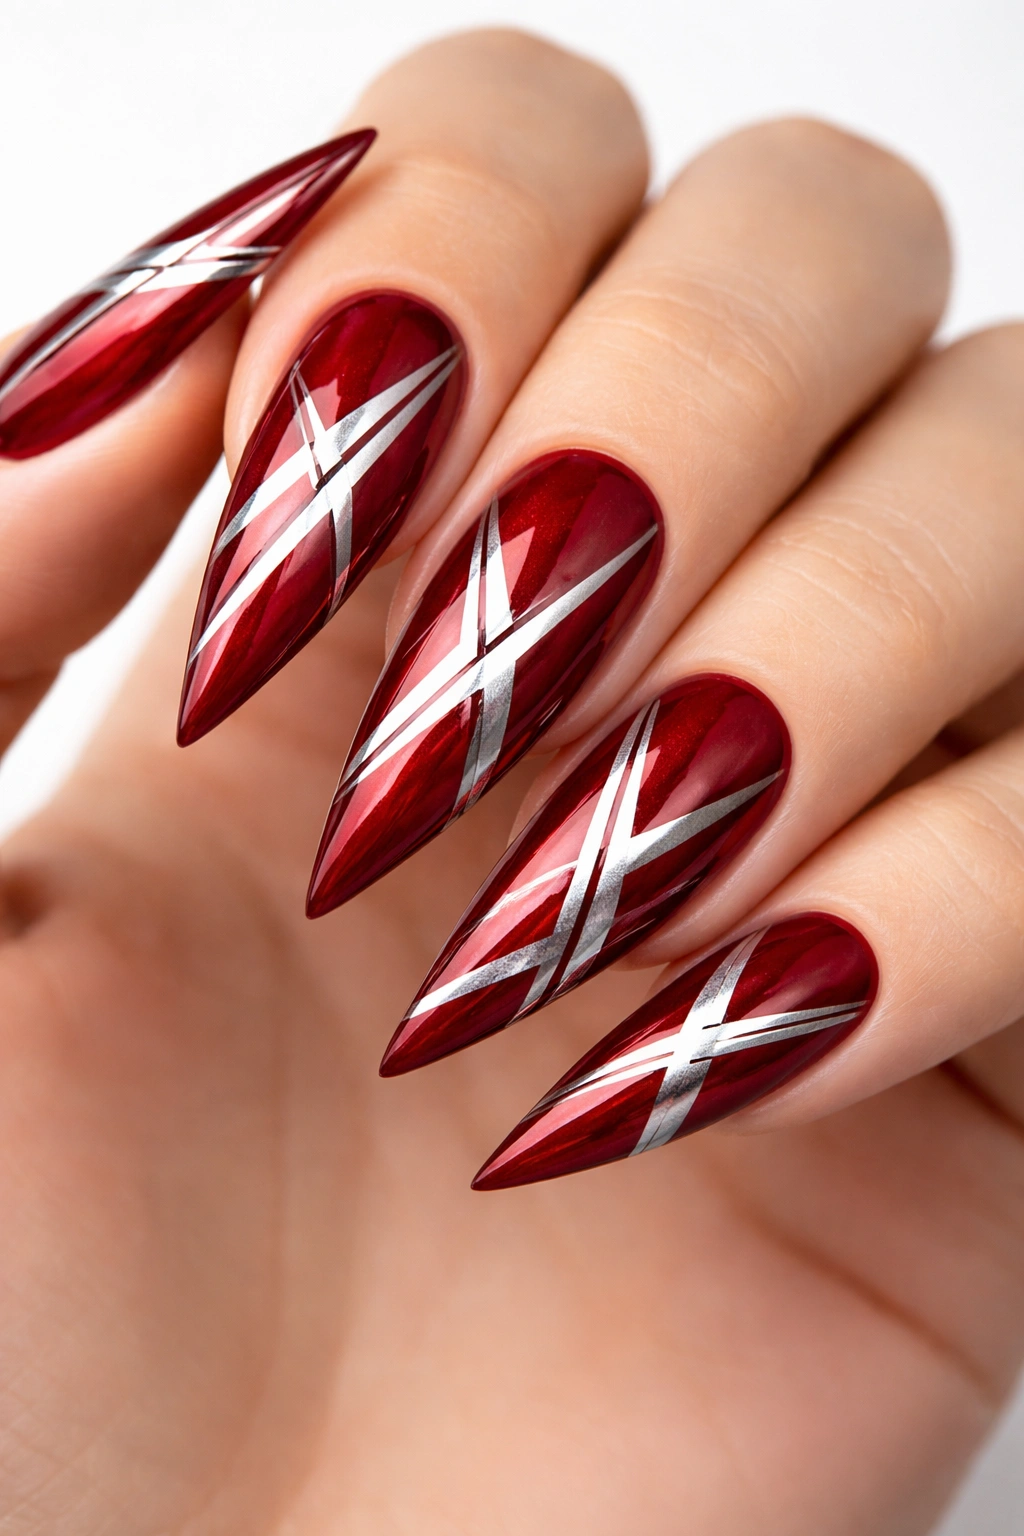
Deep red stilettos have a way of making you feel powerful. Pair that rich, sophisticated red with clean silver geometric lines, and you’ve got a design that screams controlled intensity. This look works because it combines two assertive elements—the bold color and the sharp geometry—in a way that feels intentional rather than chaotic. Silver geometry against red reads as modern and sharp, like you’ve got everything figured out.
What Makes This Combination Pop
Deep red is a color of passion and authority. It’s not shy, and it’s not meant to blend in. When you layer geometric patterns in silver, you’re adding dimension and visual interest that keeps people’s eyes moving across your nails. The geometry also adds an intellectual edge to the sensuality of red. This design works particularly well on stilettos because the sharp lines of the geometric pattern echo the sharp point of the nail shape itself.
Creating the Geometric Design
Start with two to three coats of a deep, true red base (not burgundy, but a vibrant red with depth). Once completely dry, use a thin silver gel brush or a striping pen to map out your geometric pattern. Clean triangles, sharp lines, or angular shapes work best. Consider doing a different pattern on each nail so there’s rhythm across your hand without monotony. You could do diagonal stripes on some nails and triangular shapes on others. Silver chrome powder pressed into the wet polish creates a more luxe version of this design.
Application Hacks
- Deep reds can stain, so apply a base coat before your red polish to prevent discoloration
- Silver shows every imperfection, so make sure your geometric lines are clean and confident
- Start your geometry on your ring finger and pinky, then work toward your thumb—this gives you practice before doing the most visible nails
- A thin brush is non-negotiable for clean lines; don’t try to freehand this without proper tools
3. Nude with Rhinestone Details
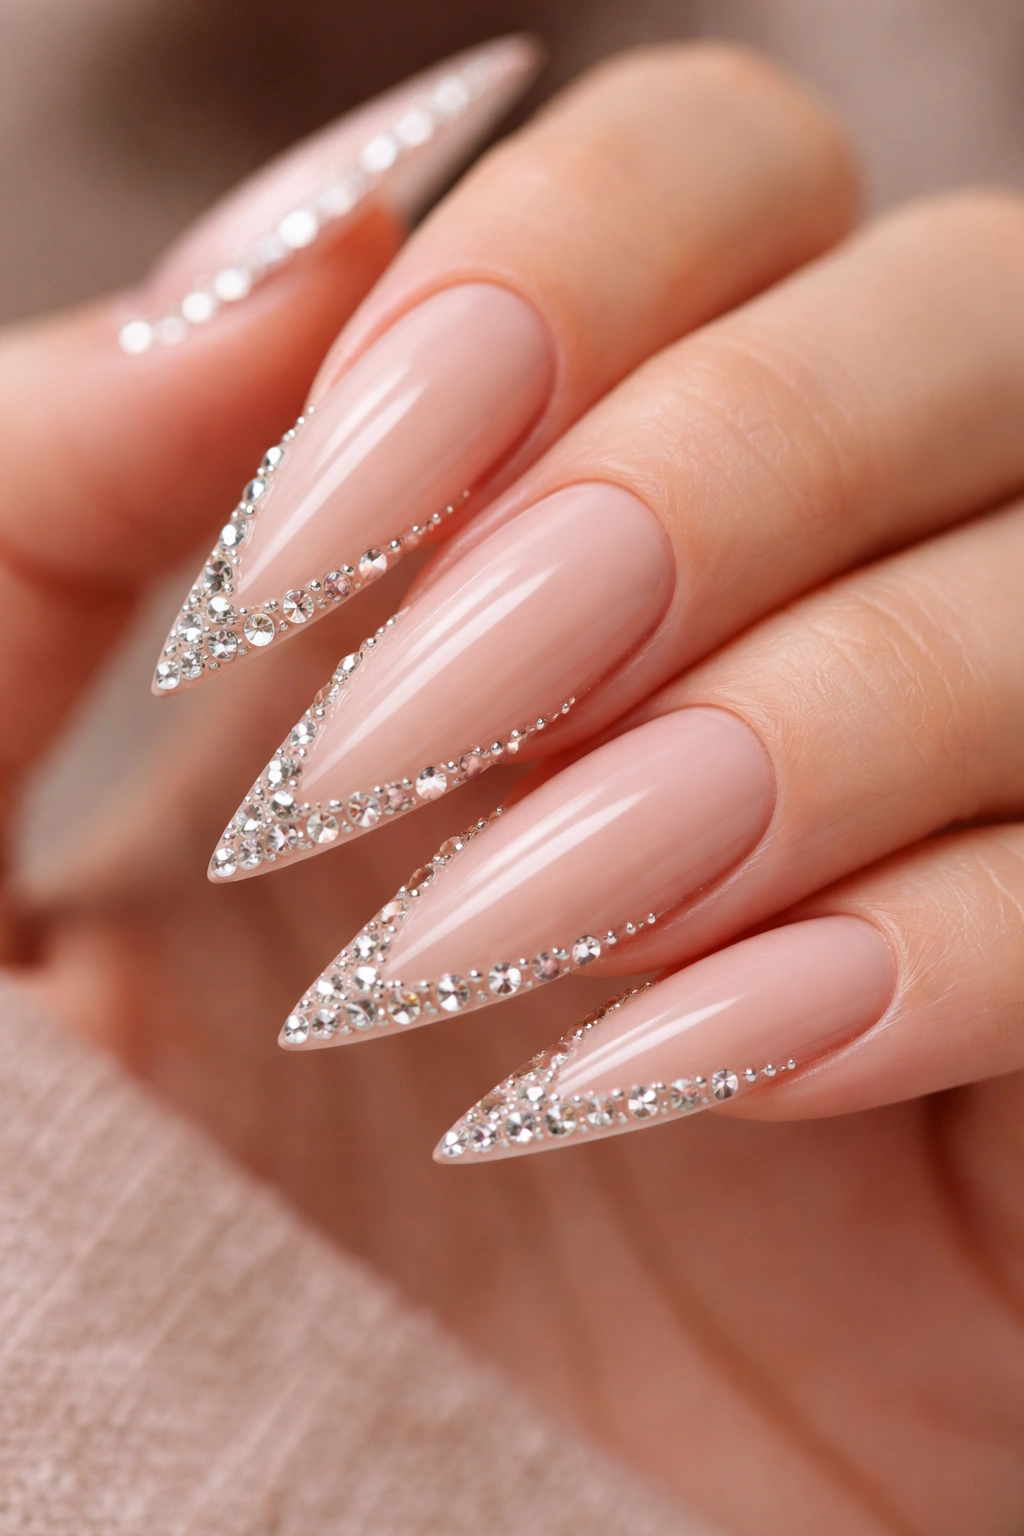
Sometimes baddie energy isn’t about bold color—it’s about smart sophistication. Nude stilettos with strategically placed rhinestones are the definition of understated luxury. This design is for the baddie who doesn’t need to shout to be heard; her confidence is evident in the polish and the polish is evident in every detail. Nude creates an elongating effect that makes your nails look impossibly long, while rhinestones add just enough sparkle to feel special without being costume-y.
Why Rhinestones Elevate Nude
Nude alone is clean and professional, but it can feel boring. Rhinestones change that equation entirely. When you add carefully placed gems, you’ve transformed a neutral mani into something that catches light and demands attention. The key is placement—this isn’t about covering every nail in stones. It’s about knowing exactly where to place them for maximum visual impact. A few well-placed rhinestones feel luxe; covering every inch feels overdone.
The Right Way to Apply Rhinestones
Choose a nude shade that matches your skin tone perfectly (test on your nail edge first). Once your base is fully cured, use a rhinestone picker tool (or a dotting tool with a tiny bit of glue on the tip) to place individual stones exactly where you want them. The most baddie placements: a single line of graduating-size stones down the center of each nail, a rhinestone accent nail with a scattered placement, or stones clustered around the cuticle area only. Seal everything with a thick top coat to secure the stones and create a smooth surface.
Rhinestone Selection Matters
- Clear rhinestones are timeless and work with everything
- Swarovski crystals are worth the extra cost—they catch light better than cheap alternatives
- Mix stone sizes for more visual interest and dimension
- Consider colored rhinestones (rose gold, champagne) if you want warmth without breaking the nude palette
4. Matte Black with Chrome Tips
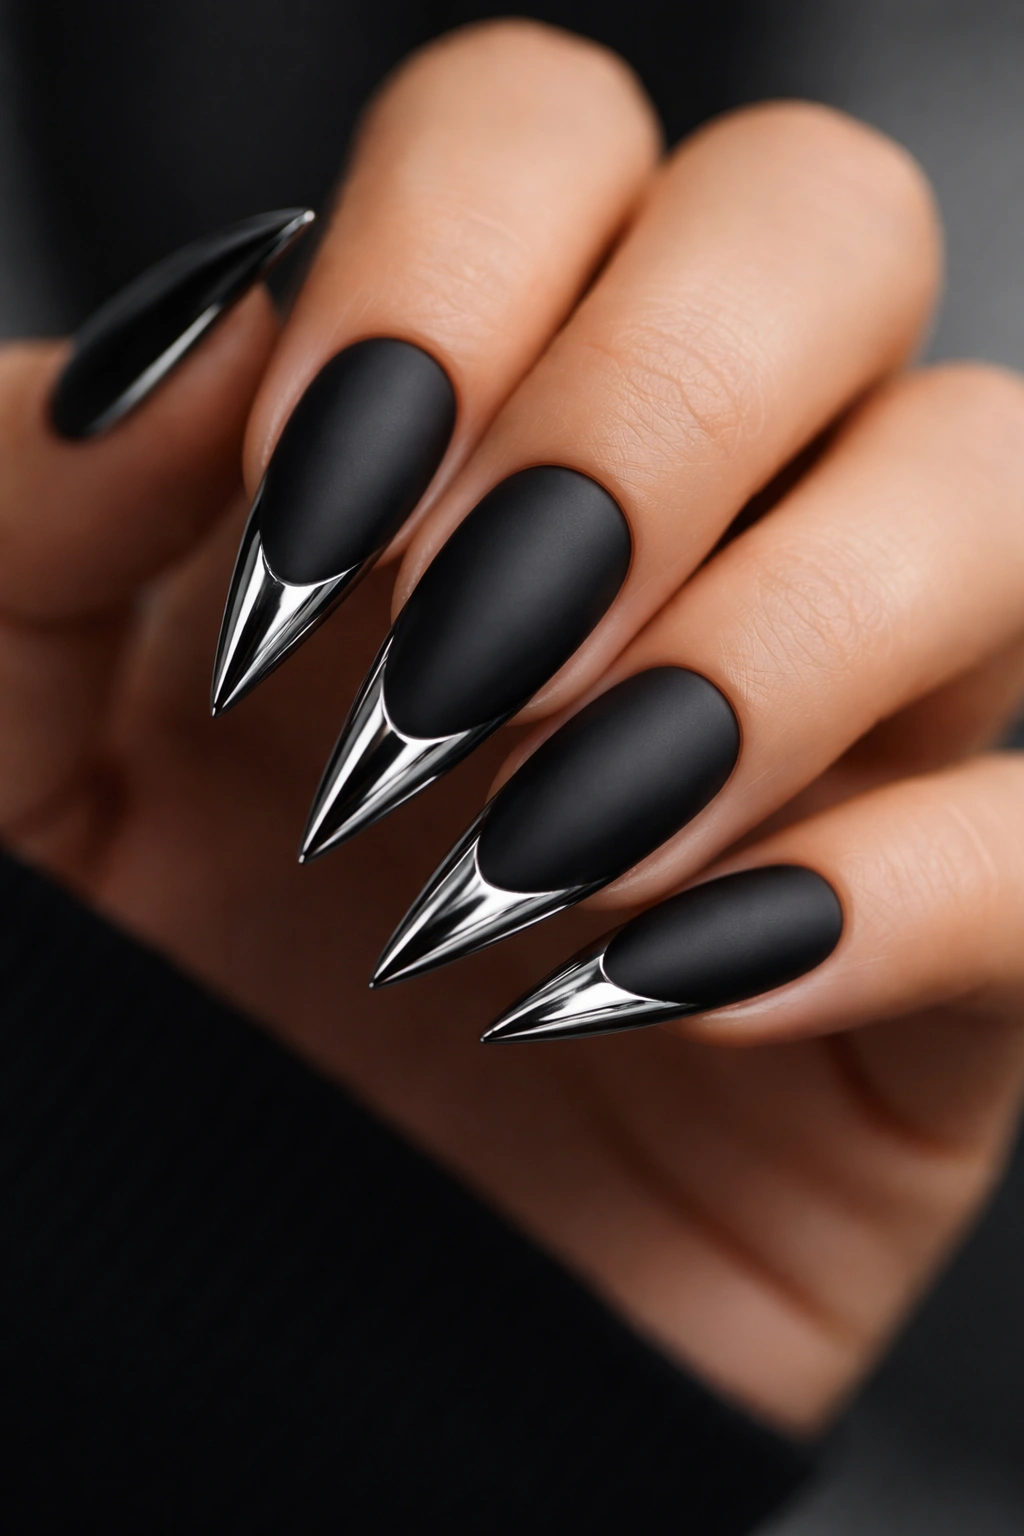
Matte black with chrome tips is the look of a baddie who doesn’t care what anyone thinks—in the best way possible. The matte finish is all modern edge, and then you add a mirror chrome tip that reflects everything around it. This creates a visual contrast that’s absolutely captivating. Chrome is expensive-looking and tech-forward, while matte is understated and cool. Together, they create a design that feels expensive, intentional, and impossible to ignore.
The Psychology of This Combination
Matte finishes are inherently more sophisticated than glossy ones (ask any luxury brand). They also feel more intentional, like you made a deliberate choice. Chrome is the current luxury standard—it’s what high-end nail salons use, and it photographs beautifully. When you combine them, you’re signaling that you understand elevated aesthetics. The stark contrast between the matte darkness and the reflective chrome creates visual tension that’s very on-brand for baddie energy.
How to Execute This Design
Apply your matte black base (two coats for opacity, then apply a matte top coat). Once completely dry, apply chrome powder to the tip of your nail using a rubber tip applicator or a specialized chrome brush. You can do a traditional ombré fade from matte to chrome, or a sharp, clean line where matte meets chrome—the sharp line is more baddie. Seal the chrome tips with a glossy top coat so they maintain their reflective quality while the base stays matte.
Chrome Application Secrets
- Chrome powder works best on a sticky base (a base with residue, not a fully cured gel)
- Use firm, circular motions when applying chrome powder—light pressure leaves gaps
- Don’t oversaturate the powder; a little goes a long way
- Seal immediately after applying chrome or it will lose its reflectivity
5. Burgundy Ombre with Glitter Fade
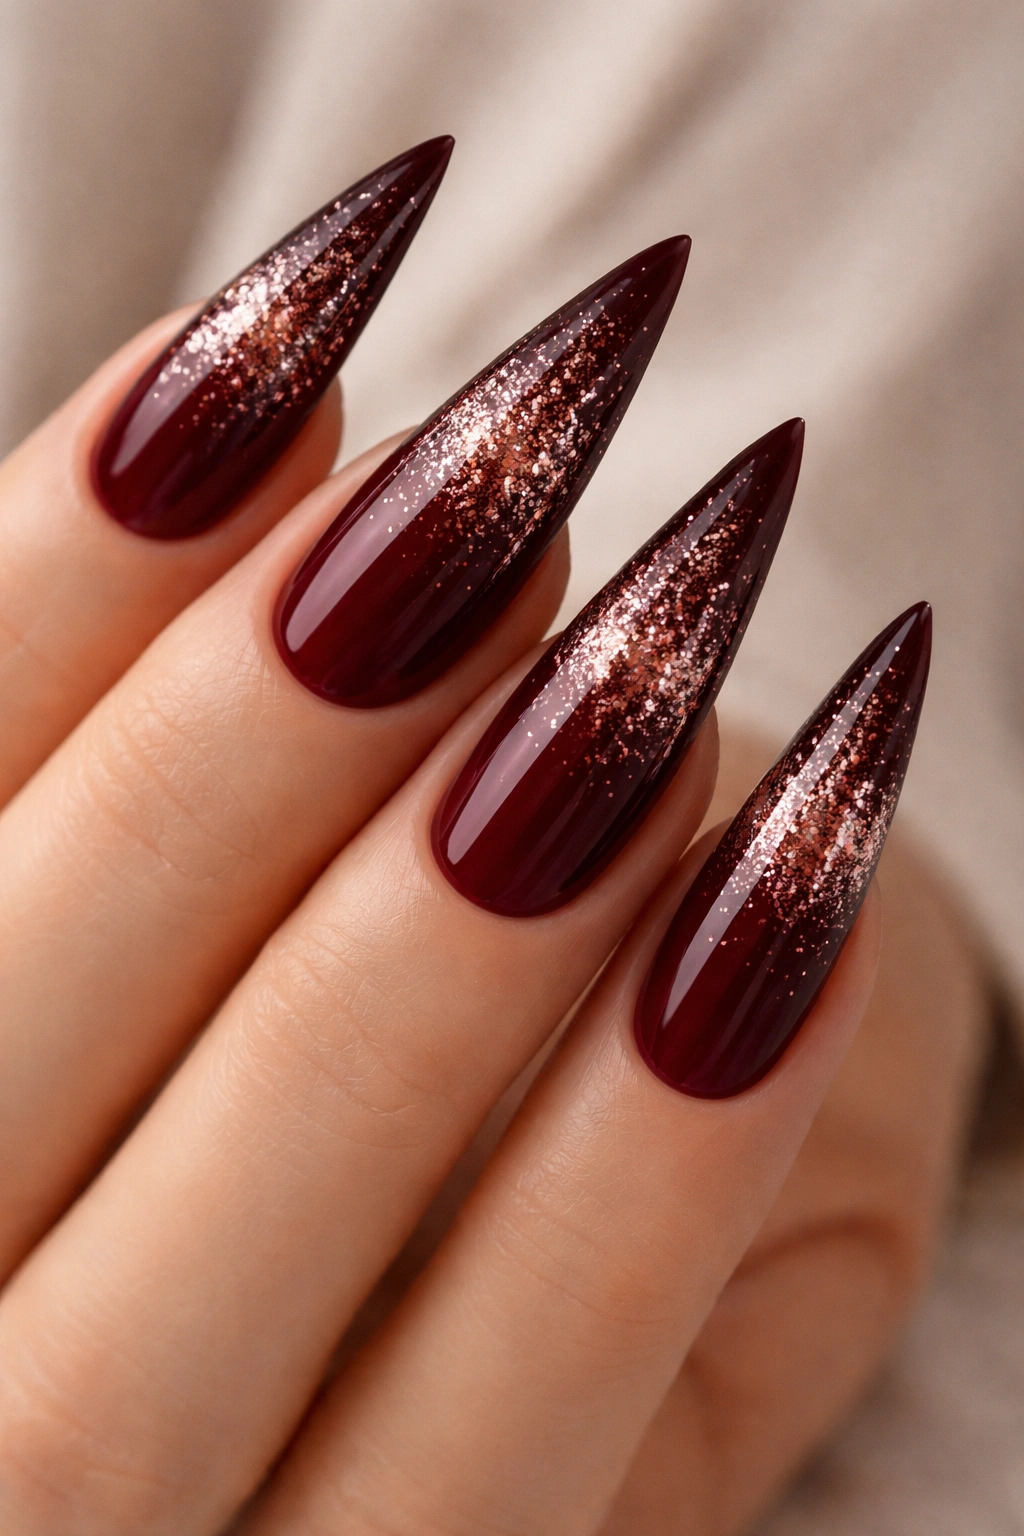
Burgundy ombre nails are the essence of sophisticated baddie—they’re moody, they’re rich, and they have serious depth. Add a glitter fade that transitions the burgundy into sparkle, and you’ve got a design that proves you can be both elegant and eye-catching at the same time. This look reads as expensive because it combines multiple techniques: an ombré base and a glitter gradient. It’s the kind of mani that makes people ask where you got it done.
Why Ombré Plus Glitter Works
Ombré creates movement and visual interest without being loud. Glitter adds that celebratory sparkle. Together, they create a design that feels dynamic and alive. Burgundy is a color that suggests luxury, depth, and sophistication—it’s a step more interesting than plain red. The glitter fade (rather than full glitter coverage) maintains the elegance of the ombré while adding just enough shine to feel special. This is the mani that works for date nights, cocktails, or any occasion where you want to feel elevated.
Creating the Perfect Ombré-to-Glitter Transition
Start with a burgundy base (two coats). Using a sponge and a slightly lighter burgundy or wine shade, create an ombré effect by dabbing and stippling color onto the tip area, creating a gradient. Once your ombré base is set, mix fine glitter with a clear gel and apply it to the tip area in a fading pattern—heavy glitter at the very tip, becoming sparser as you move toward the middle of the nail. The sparser application prevents that harsh line and creates a true fade effect.
Glitter Gradient Hacks
- Use a damp sponge between applications to blend burgundy shades smoothly
- Small glitter particles create a more sophisticated fade than large chunky pieces
- Apply glitter in layers—it’s easier to add more than to take away
- Seal with a thick, smooth top coat to blur the glitter edges and create a seamless transition
6. White with Metallic Gold Stripes
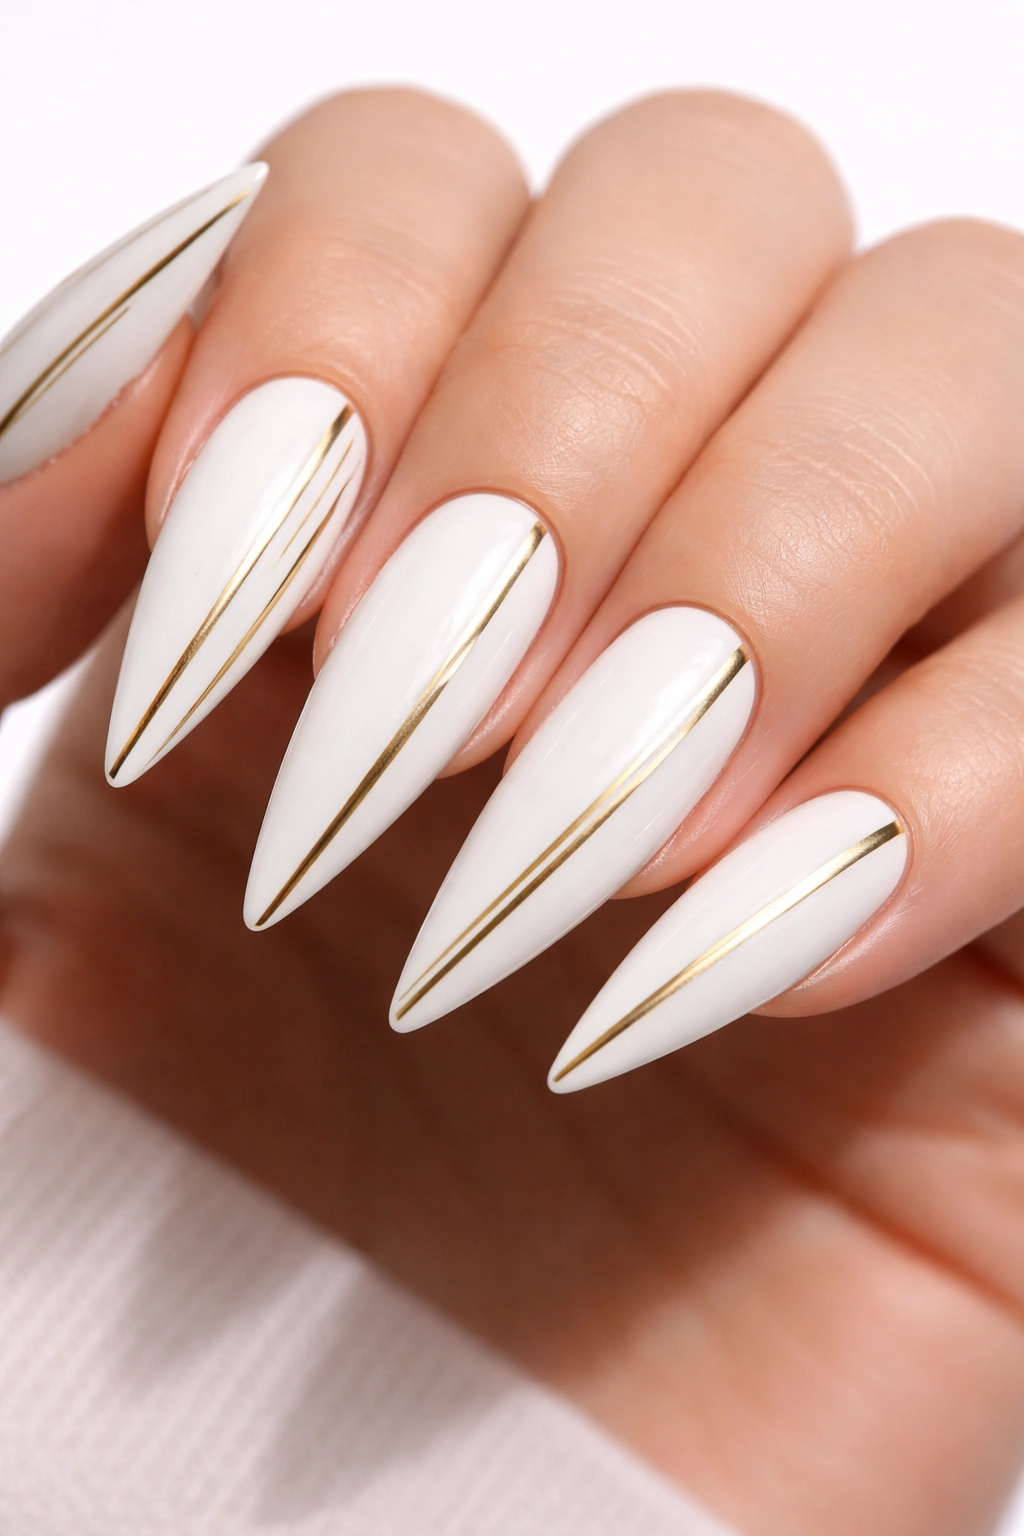
White stilettos are a blank slate that screams luxury, and gold stripes transform them into something undeniably baddie. This design is clean, architectural, and impossible to miss. White elongates your nails and creates a pristine backdrop, while gold stripes add an almost art deco sensibility that feels both vintage and completely modern. The simplicity of this design is its strength—it’s bold without being overdone.
The Minimalist Baddie Approach
Not every baddie design needs to be complex or glittery. Sometimes the most powerful statement comes from clean lines and high contrast. White and gold together are inherently sophisticated—think of every luxury jewelry box, every high-end fashion brand. This design works because it’s so intentional. Every element serves a purpose. The white creates a luminous base that makes your nails look impossibly long and bright, while the gold adds warmth and richness.
Perfecting the Stripe Placement
Use a pure white, opaque polish (test it’s fully covering with one coat). Apply two coats for that pristine white. Once dry, use a thin striping brush with gold metallic polish to create your stripes. Vertical stripes down the center are most flattering and elongating. You could also do diagonal stripes for a more playful feel, or a single stripe down one edge. The key is consistency—make sure your stripes are evenly spaced and roughly the same thickness. Seal everything with a glossy top coat that will make the white even brighter and the gold even more luminous.
White and Gold Pro Tips
- Add a base coat before white polish to prevent staining and yellowing
- Gold metallic polishes can be streaky; use thin coats and build up color rather than applying one thick coat
- Practice stripe placement on a practice wheel first—it’s harder than it looks
- Use a matte top coat instead of glossy for a more modern, editorial take on this design
7. Navy Blue with Pearl Embellishments
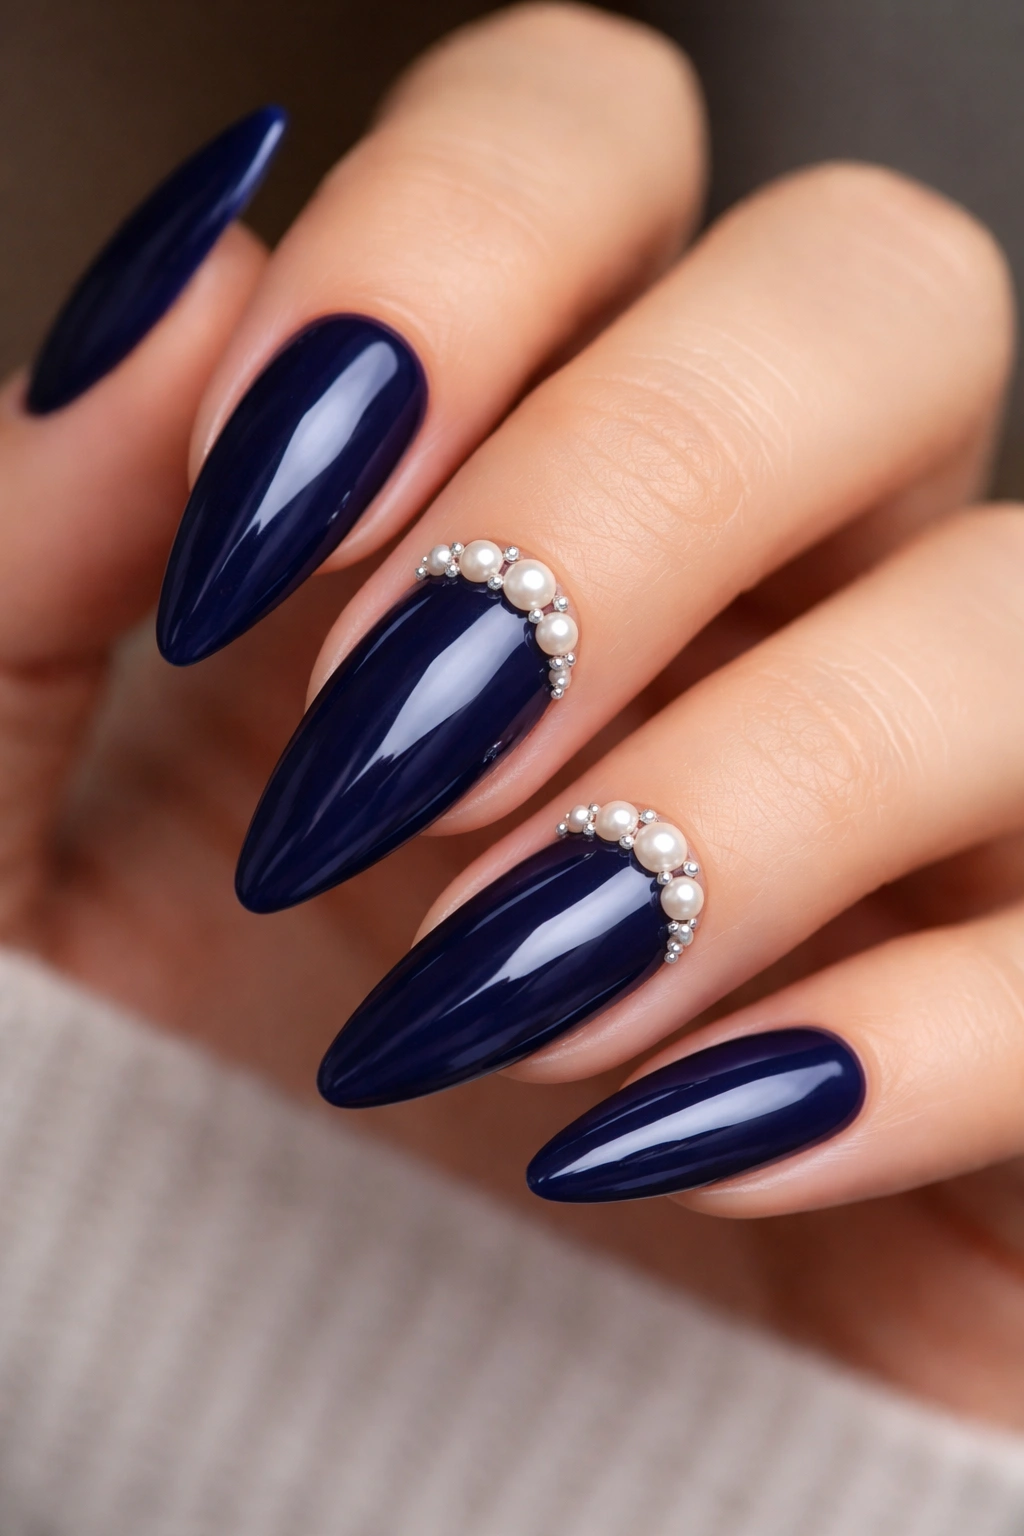
Navy blue is the sophisticated sister to black—it’s still dark and powerful, but it has more warmth and dimension. Add pearl embellishments, and you’ve got a design that’s formal without being costume-y. This is the mani you wear when you want to look expensive and put-together. Navy reads as trustworthy and intelligent, while pearls add an unexpected touch of femininity and luxury. Together, they create a baddie who’s both powerful and refined.
Pearl Power
Pearls are having a major moment, and for good reason—they’re the ultimate symbol of understated luxury. Unlike rhinestones that scream sparkle, pearls are subtle and sophisticated. They catch light differently, with that soft glow that comes from natural nacre. Navy blue provides the perfect backdrop for pearls because the contrast makes them really stand out. A few strategically placed pearls feel intentional and high-fashion, while covering your nails in them would feel costume-y.
Applying Pearls to Perfection
Choose a rich, true navy blue base (not too purple, not too black). Apply two coats and let it fully cure. Using a pearl pick or a dotting tool with a tiny bit of gel adhesive, place individual pearls exactly where you want them. The most elegant placement: a vertical line of pearls down the center nail, or pearls clustered around the cuticle area on every nail. Some people create a “pearl accent nail” with multiple pearls scattered artfully. Seal with a thick, smooth top coat that won’t disturb the pearl placement.
Finding Quality Pearls
- Real pearls are expensive; quality fake pearls from nail supply stores are totally acceptable
- Swarovski pearls are pricier but have better luster and light reflection
- Size matters—pearls that are too small get lost, too large look overwhelming
- Mix pearl sizes for visual interest and movement across your hand
8. Smoky Gray with Mirror Finish
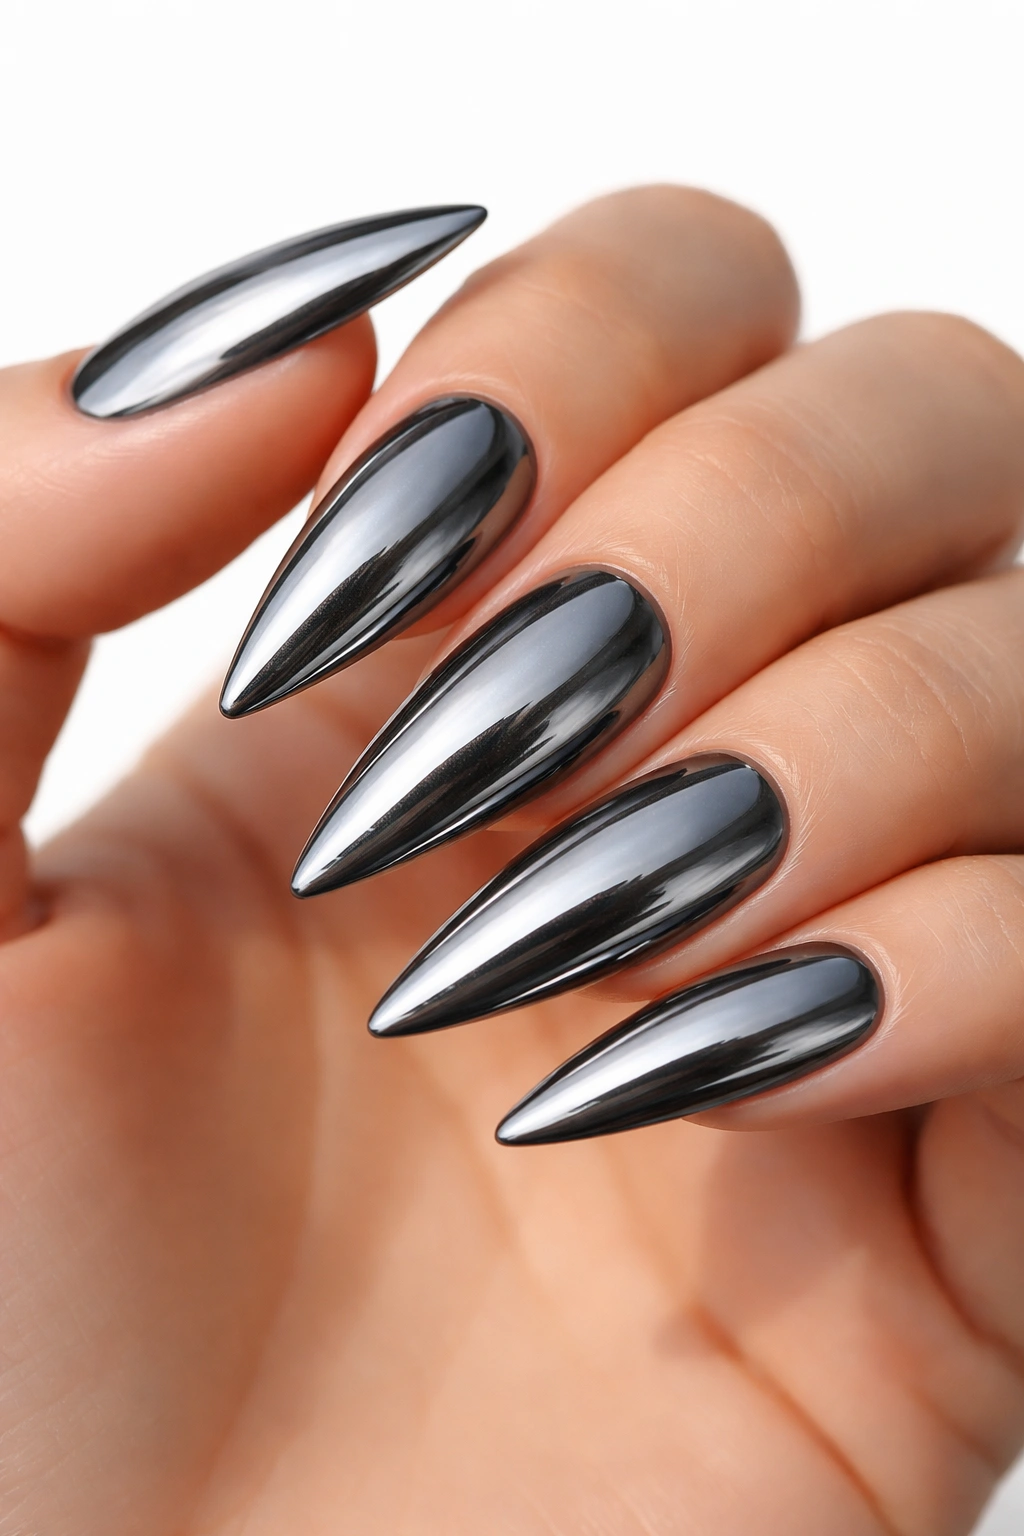
Smoky gray is the color of mystery and control. It’s darker than silver, more interesting than plain gray, and it photographs beautifully. Add a mirror finish, and you’ve created something that looks futuristic and ultra-modern. This design is for the baddie who’s ahead of the trend cycle, who understands that true luxury doesn’t need to be flashy. Mirror finishes reflect everything around them, creating an effect that’s almost hypnotic. It’s the manicure equivalent of a power suit in metallic.
Why Smoky Gray Plus Mirror Works
Smoky gray is subtle in a way that commands respect. It’s not trying to match every outfit because it’s sophisticated enough to transcend that. Mirror finish elevates it from simple to editorial. The reflective quality makes your nails catch light constantly, so you’re never quite invisible, even though the color is muted. This combination works for anyone who wants to look polished and current without going the traditional sparkly route. It’s the sophisticated choice.
Achieving the Smoky Gray Mirror Finish
Apply a smoky gray base that’s opaque and smooth (this might take two coats). Some gel brands make “smoky” shades that have just a hint of shimmer built in, which works beautifully. Once your base is fully cured, apply mirror powder using a rubber applicator. For a true mirror finish, the powder needs to be pressed firmly and evenly across the entire nail. Work in sections, starting at the cuticle and working toward the tip. Buff out any excess powder gently. Seal with a thick glossy top coat to lock in the mirror effect.
Mirror Powder Application Tips
- A sticky base helps mirror powder adhere better than a cured, non-sticky base
- Work quickly—mirror powder loses its reflectivity if you take too long
- Press powder in multiple directions (up, down, side to side) for even coverage
- Skip the matte top coat; mirror effects need shine to be visible
9. Emerald Green with Diamond Accents
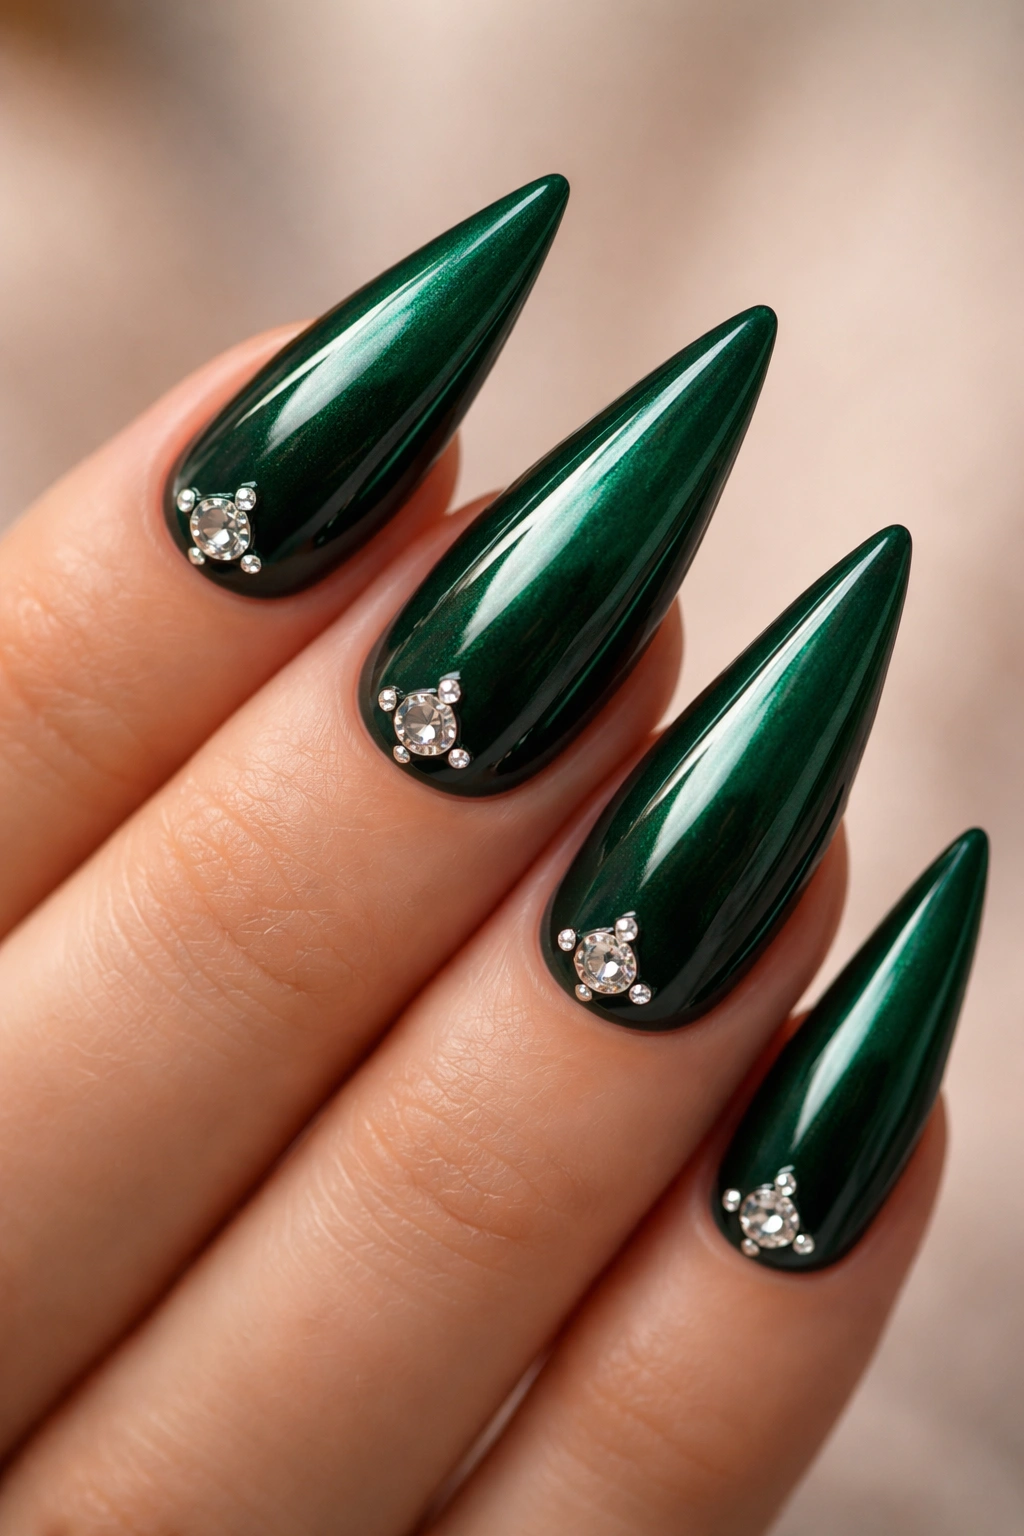
Emerald green is the color of luxury and power. It’s bold without being loud, and it suggests confidence and sophistication in equal measure. Add diamond accents (or diamond-shaped rhinestones), and you’ve taken this look from striking to absolutely regal. This design is for a baddie who knows her worth and doesn’t apologize for it. Emerald is the color of high jewelry and couture, and diamonds are literally the most luxurious thing you can add to a mani.
The Royalty Factor
Emerald green has been associated with royalty and wealth for centuries. It’s a color that commands attention while still feeling refined. When you pair it with diamond accents, you’re making a statement about your understanding of luxury. Diamonds on emerald green create the ultimate contrast—the cool sparkle against the deep, warm green is absolutely stunning. This design doesn’t need to be complicated; sometimes just two or three strategically placed diamond accents are all you need.
Emerald Application and Diamond Placement
Use a rich, saturated emerald green as your base (two coats for full coverage). This needs to be an opaque, jewel-toned green, not a pale sage. Once fully cured, use a diamond picker or a dotting tool with adhesive to place diamond-shaped rhinestones exactly where you want them. Create a line of diamonds down the center of your accent nail, or place a single diamond at the cuticle of each nail. Emerald is rich enough that you don’t need much diamond placement to create impact. Seal everything with a glossy top coat.
Emerald Green Selection
- Avoid green shades that lean yellow or blue; true emerald is balanced
- Test your emerald on the edge of your nail first to see how it looks on your skin tone
- Emerald shows streaks easily, so apply polish carefully with good coverage
- Pair emerald with gold accents for warmth, or silver for a cooler, more modern feel
10. Midnight Blue with Constellation Nails
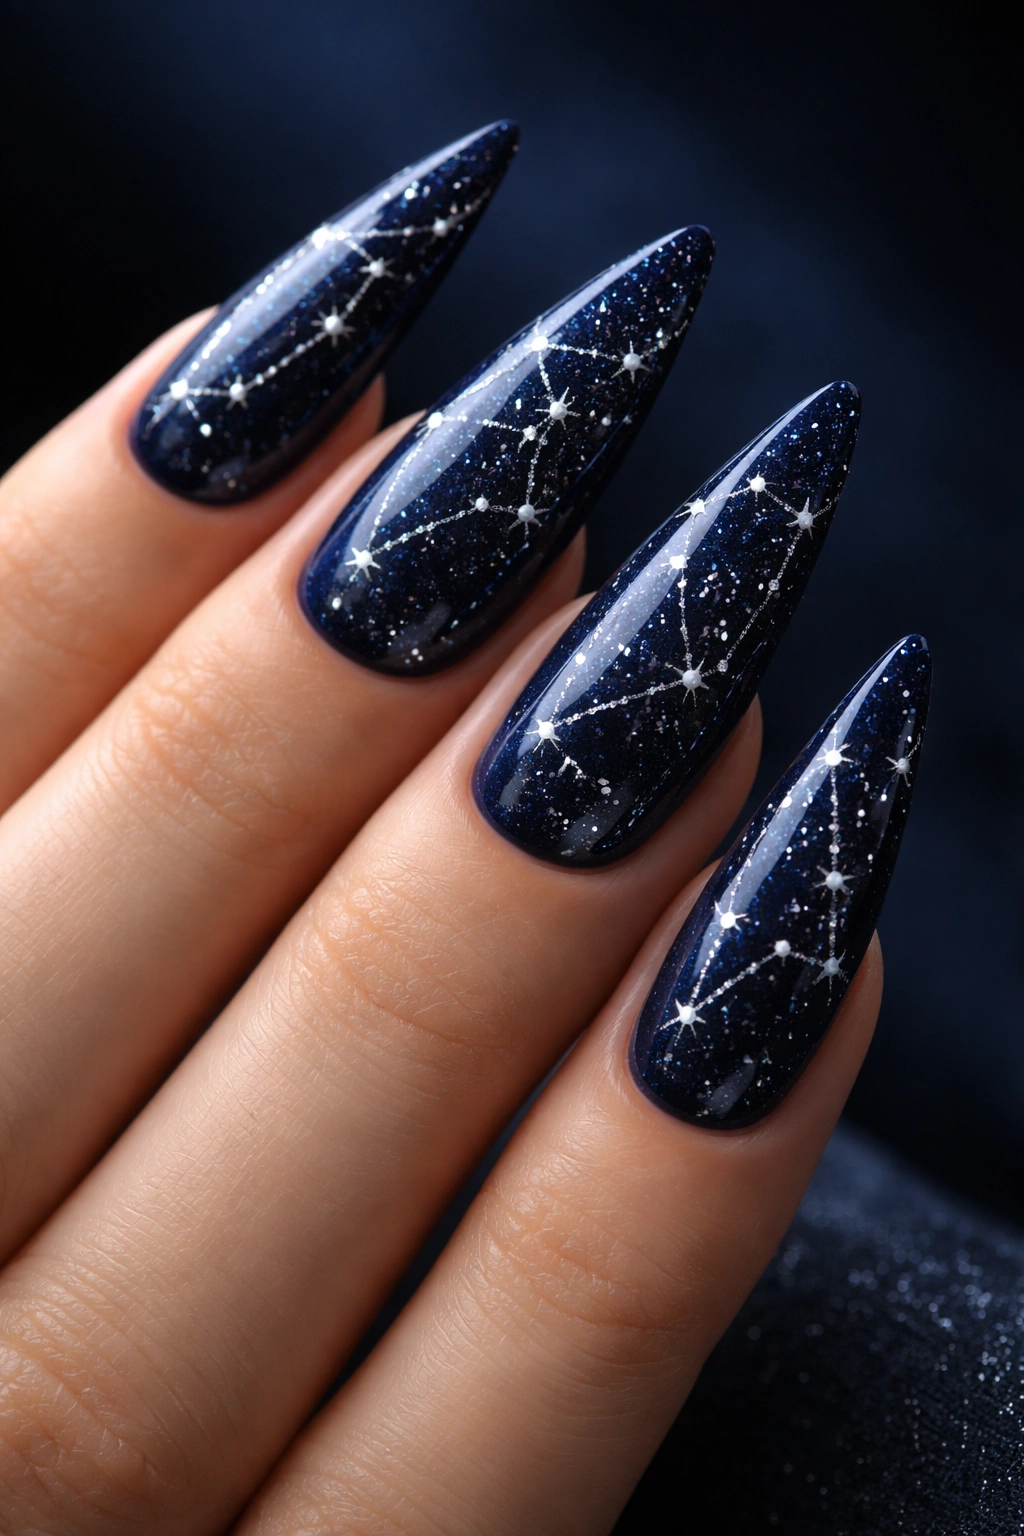
Midnight blue is deep, mysterious, and absolutely mesmerizing. Create a constellation design with tiny white or silver dots, and you’ve turned your nails into a celestial map. This design is for the baddie with depth, the one who’s comfortable being a little mysterious. Constellation nails have become their own aesthetic, and for good reason—they’re beautiful, they’re meaningful, and they give off serious creative energy. Blue represents calm confidence, and constellations add an intellectual, artistic layer.
Why Constellations Make Nails Artistic
Constellation designs transform your nails from mere beauty accessories into wearable art. They’re personal (you could use your zodiac sign or a constellation that means something to you), they’re visually interesting, and they give people something to look at and talk about. The pairing of deep midnight blue with silver or white dots creates beautiful contrast while maintaining sophistication. This design works because it’s not immediately obvious what it is—people have to look closely, which draws attention to your hands and keeps them engaged.
Creating Your Constellation Design
Paint your base in a deep, true midnight blue (not navy, but a very dark blue with depth). Once fully cured, use a thin white or silver gel pen or brush to create your constellation dots. Map out your constellation lightly first in pencil on paper so you know where you’re going. Connect the dots with very fine lines to create the constellation shape. Different nails can have different constellations, or you can create one design that spreads across multiple nails. Keep the lines thin and delicate—this should feel artistic, not messy.
Constellation Design Tips
- Research actual constellations online for accuracy, or create your own abstract version
- Small dots are more elegant than large ones
- Silver or white dots show better against midnight blue than pale blue or gold
- Keep lines connecting the dots very thin and subtle
- Add a few random “stars” that aren’t connected to make it feel more organic and less obviously a known constellation
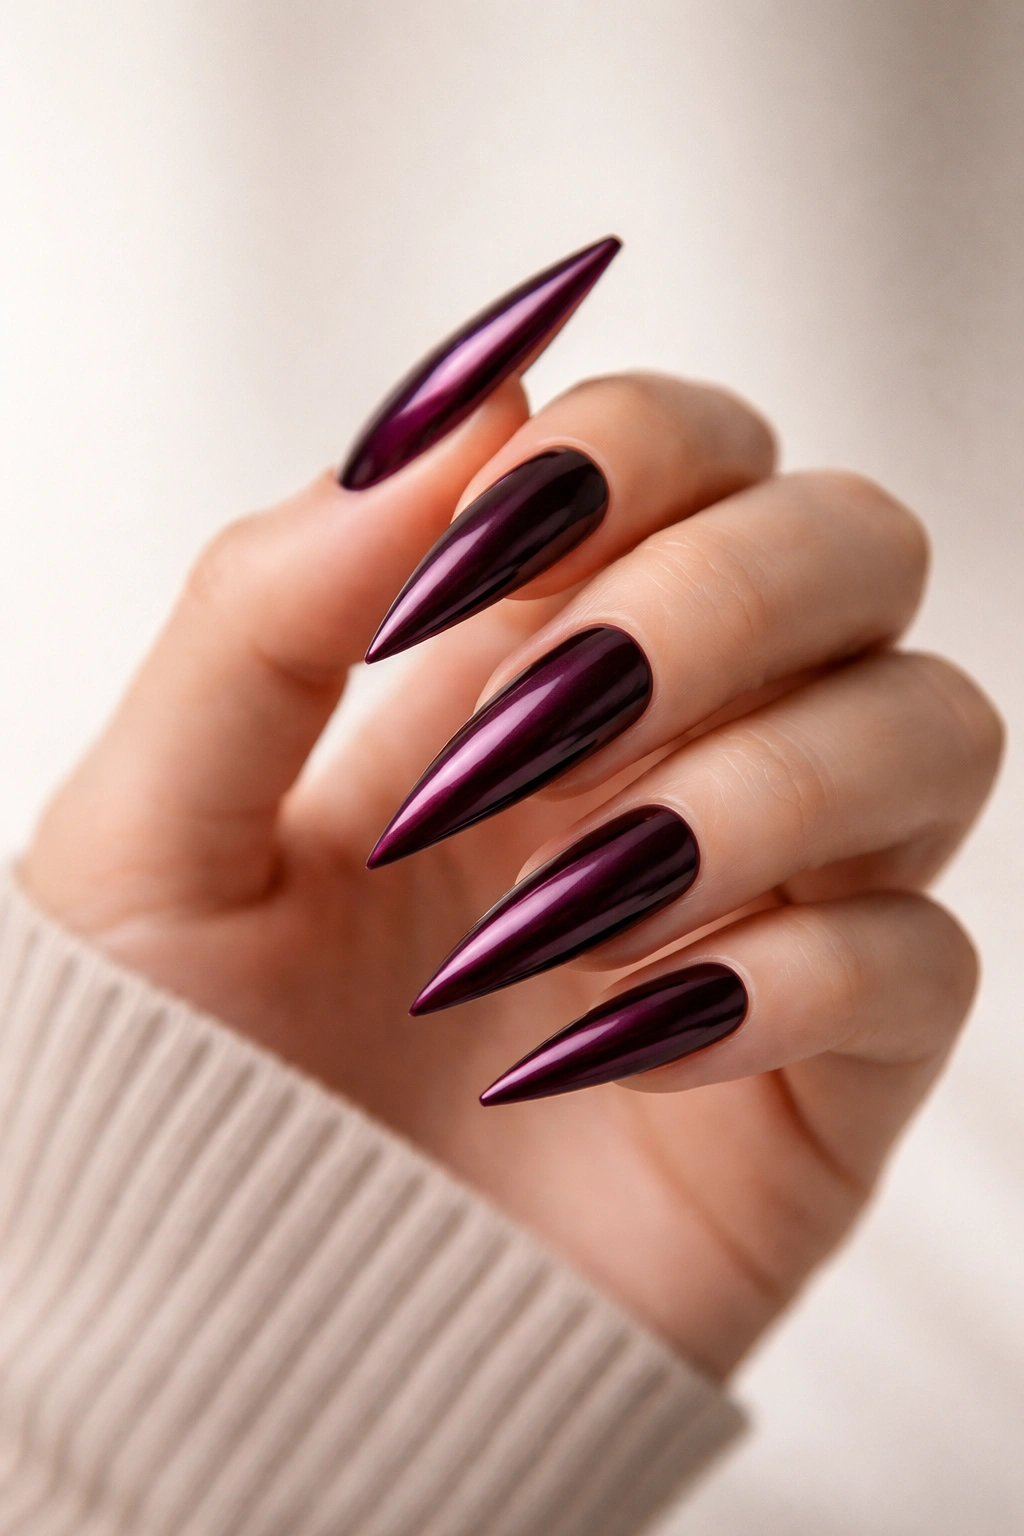
11. Deep Plum with Holographic Sparkle
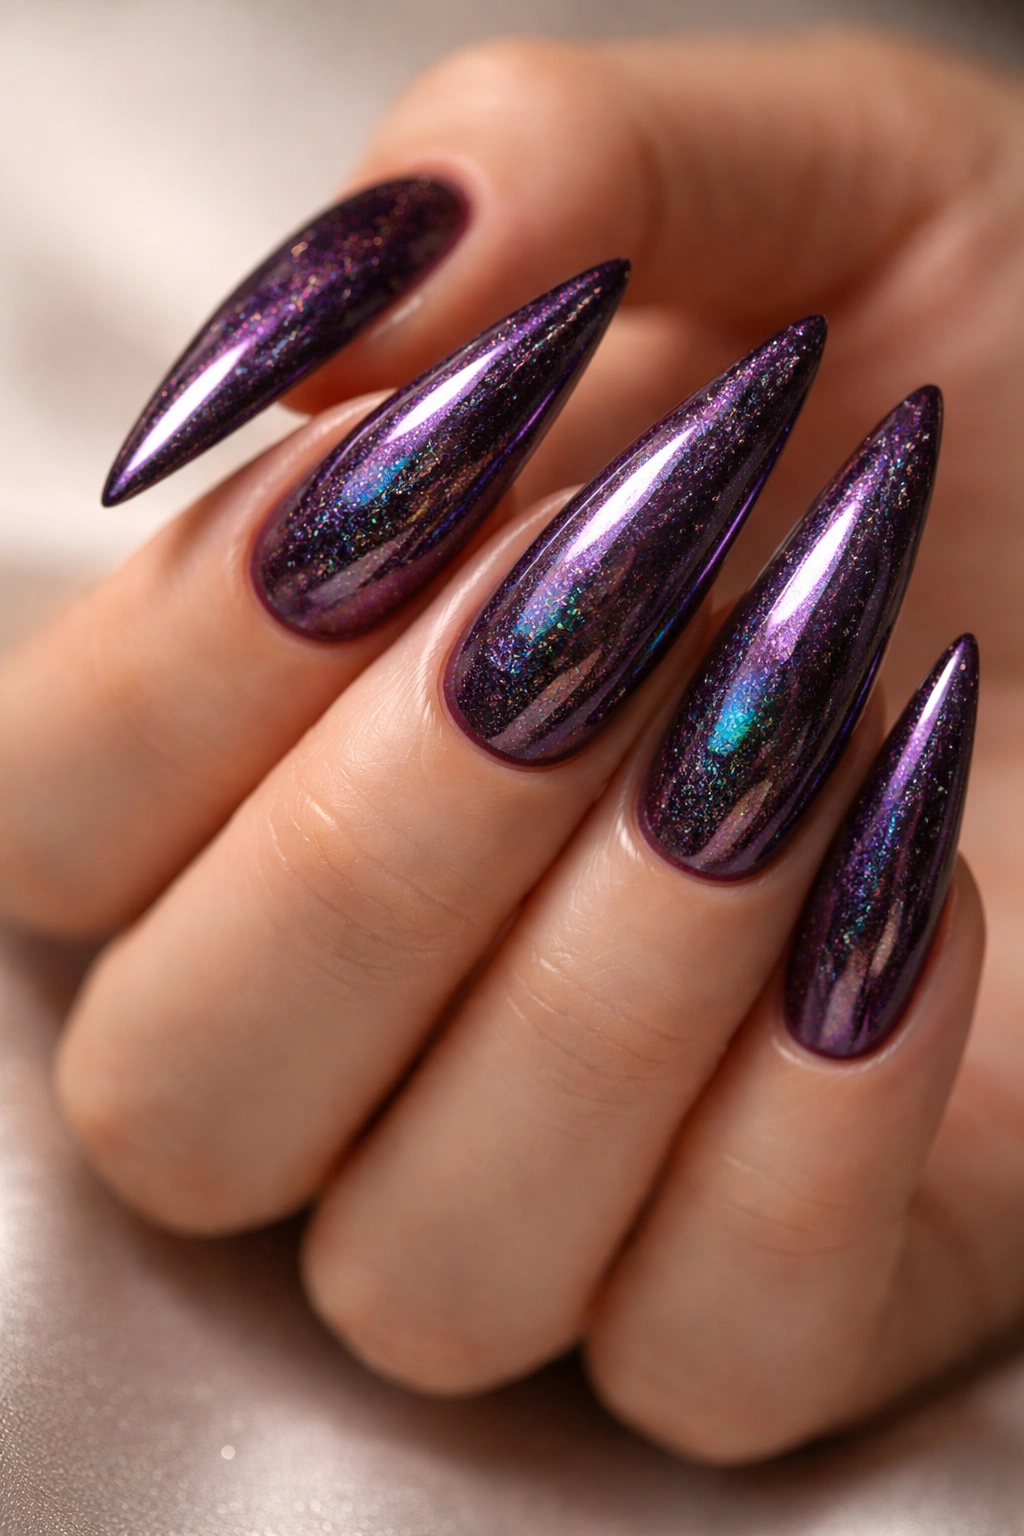
Deep plum is the color of quiet intensity. It’s moody, it’s sophisticated, and it’s the perfect base for holographic sparkle. Holographic effects create rainbow light that shifts and changes as you move your hands, making your nails almost hypnotic to watch. This design works because it pairs a grounded, serious color with a playful, light-reflecting sparkle. It’s the combination of depth and movement, which is very on-brand for baddie energy.
Holographic Effects Explained
Holographic finishes create true rainbow light refraction, unlike regular glitter which just sparkles white. When you apply holographic to a deep plum base, you get this incredibly luxe effect where the sparkle seems to live inside the color rather than on top of it. Holographic powder or flakes are available in every nail supply store, and they’ve become more affordable and easier to apply. The effect is contemporary, high-fashion, and absolutely eye-catching.
Applying Holographic to Deep Plum
Start with two coats of a deep plum or eggplant purple base. Choose a shade that’s dark enough to let the holographic really shine. Once your base is completely cured, apply holographic powder using the wet base method—don’t cure between applications. Press the holographic powder into the wet top coat, which will trap it and create that glass-like effect. Work quickly and cover the entire nail for even distribution. Cure, then apply another coat of clear gel and cure again to seal everything smoothly.
Holographic Selection
- Full holographic coverage is most impactful, but you could do a holographic fade for a more subtle effect
- Holographic shows better on darker bases than lighter ones
- Some holographic powders are finer than others—finer powder creates a more refined look
- Holographic flakes (larger pieces) create a different visual effect than holographic powder (ultra-fine)
12. Black with Marble Swirl Design
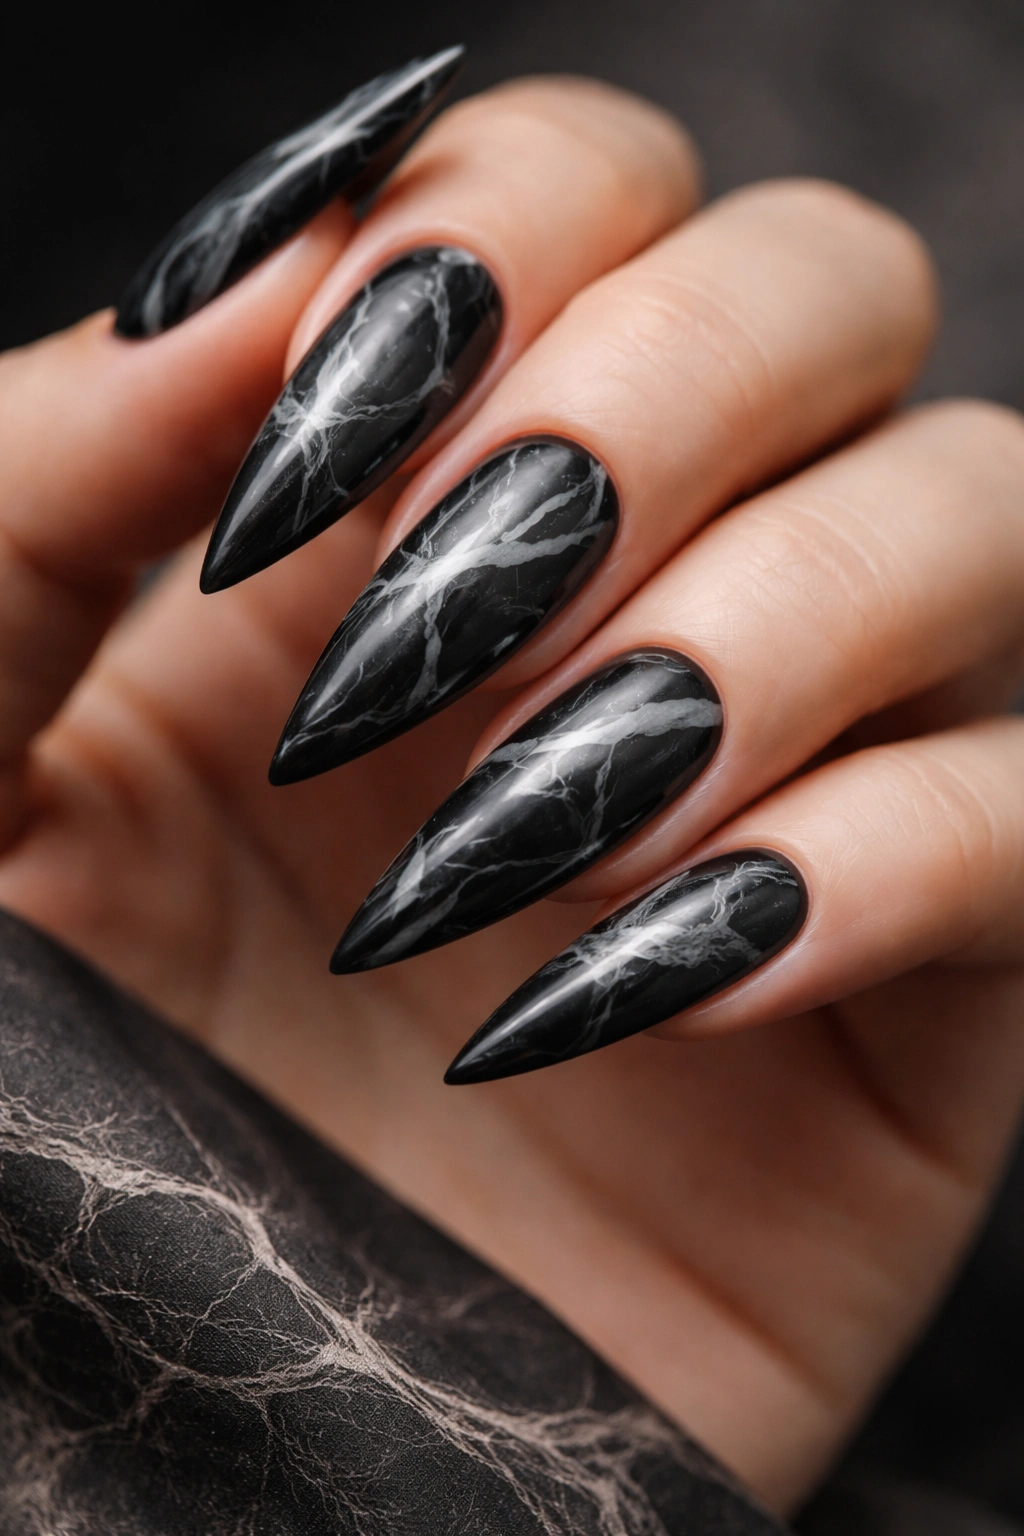
Marble is having a major moment, and for good reason—it’s visually complex, it’s sophisticated, and it suggests luxury and refinement. Black marble in particular is absolute baddie energy. It’s dark, moody, and when executed well, it looks like you’re wearing a piece of actual polished stone. Marble nail designs are deceptively complex to execute, which is part of what makes them so satisfying. A perfectly executed marble mani screams quality and attention to detail.
The Art of Marble Nails
Marble designs create the illusion of texture and depth on your nails. They’re not simple, but they’re learnable. The key is understanding how to layer and blend colors to create that veined, organic look that mimics real stone. Black marble with white, gray, or metallic gold veining creates the most sophisticated version of this design. It reads as expensive because it requires skill to execute well—clients immediately recognize that this wasn’t a quick two-color manicure.
Creating Black Marble Nails
Apply a smooth black base coat (two coats for full opacity). Once cured, mix white and gray gel polish or use a white gel pen to create marble veining. Don’t try to make it perfect—marble is organic and irregular. Use a fine brush to create delicate, branching lines across your nails, occasionally creating thicker “veins.” You can also use a thin striping brush or gel pen for more control. For added luxury, add a tiny bit of gold foil or metallic gel to some of the veins. Seal everything with a glossy top coat that makes the marble pattern really pop.
Marble Execution Secrets
- Black provides maximum contrast for marble veining, making it more visible
- Don’t overthink the pattern—marble is irregular by nature, so perfect symmetry actually looks wrong
- Vary your vein thickness and spacing for a more natural appearance
- White, gray, and gold work best against black; avoid colors that don’t contrast well
13. Rose Gold with Textured Matte Finish
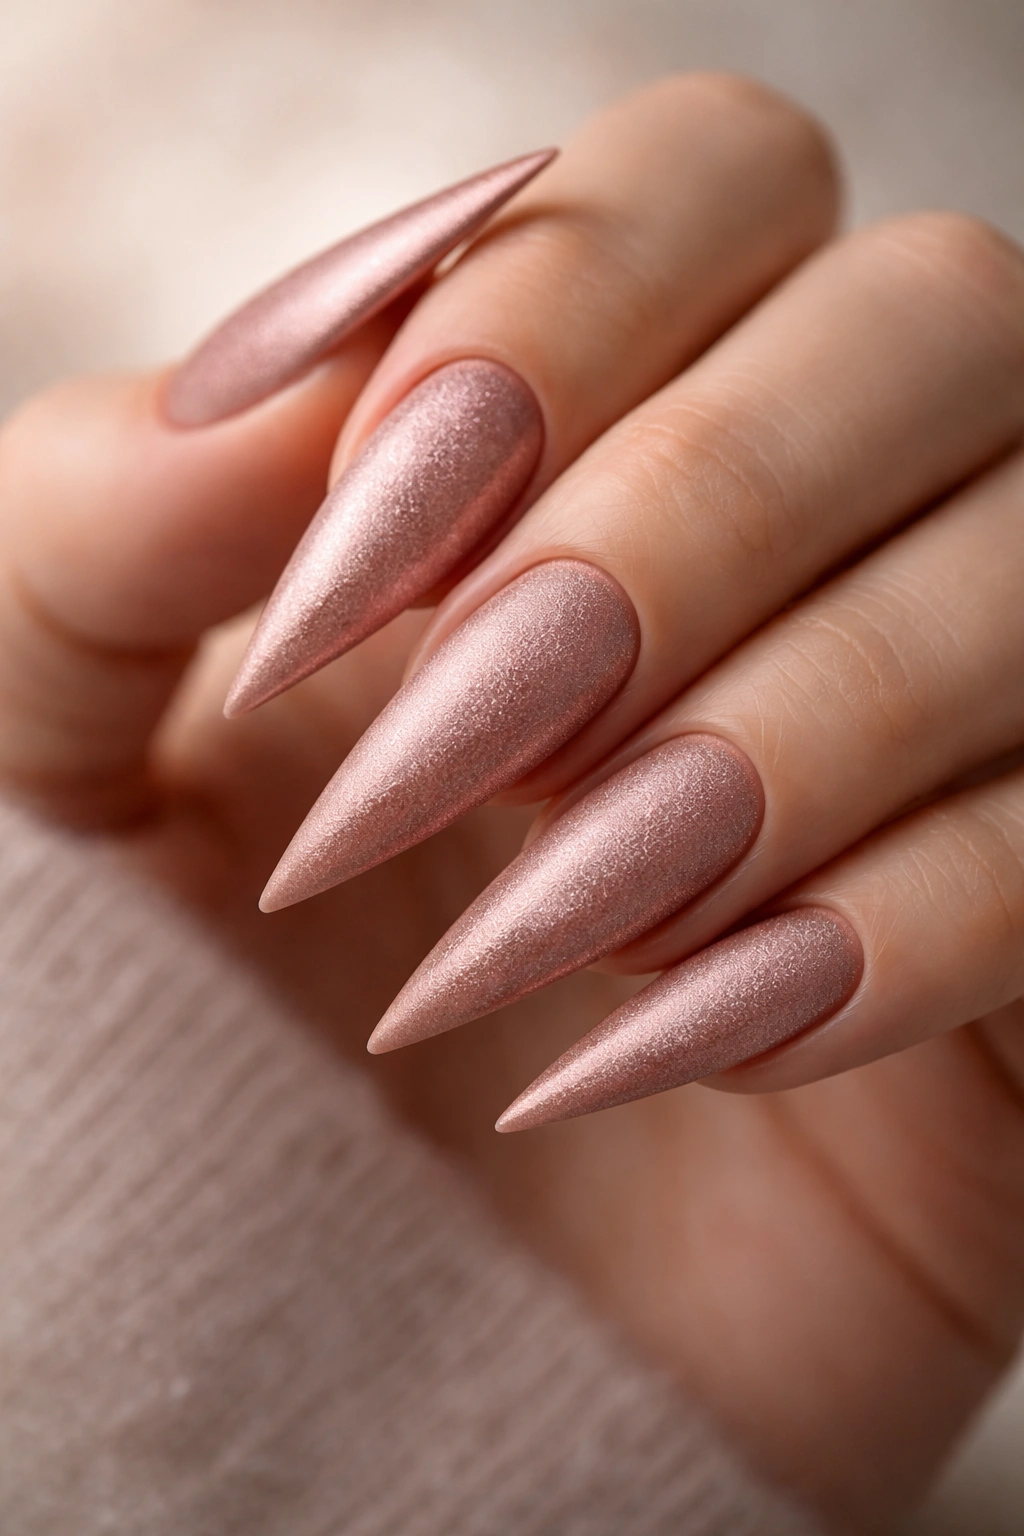
Rose gold is warm, it’s luxe, and it’s surprisingly flattering on almost every skin tone. Pair it with a matte finish, and you’ve created something that feels incredibly high-end. Matte rose gold reads as expensive because it’s an unexpected combination—most rose gold is glossy and shiny. The matte finish subverts that expectation and creates something that feels more editorial and modern. This is the mani for a baddie who appreciates subtle luxury over obvious glitz.
Why Matte Rose Gold Is Peak Sophistication
Matte finishes have become synonymous with luxury and high-fashion. When you take a luxury color like rose gold and matte it, you’re elevating it to a completely different level. The result is a nail that’s elegant without being flashy, warm without being over-the-top, and completely wearable for any situation. Rose gold works with every skin tone because it’s not a true cool or warm color—it’s the perfect balance of both. The matte texture adds an almost velvety quality that makes you want to touch your nails.
Achieving Matte Rose Gold Perfection
Choose a high-quality rose gold gel polish (cheaper brands often look orangey or too peachy). Apply two coats, making sure your coverage is even and smooth—any streaks will be visible on matte. Once fully cured, apply a matte top coat instead of your usual glossy seal. The matte coat completely transforms the shine level and changes how the rose gold reflects light. The result should be a soft, sophisticated glow rather than obvious sparkle.
Rose Gold Matte Considerations
- Make sure your rose gold shade is actually rose (with undertones of both pink and gold), not orange or peachy
- Matte finishes can feel slightly sticky, so avoid rubbing your nails against textured surfaces
- Matte rose gold pairs beautifully with rose gold jewelry
- Add a very thin glossy top coat over your matte if you want a bit more shine while maintaining the matte aesthetic
14. Charcoal with Metallic Lightning Bolt
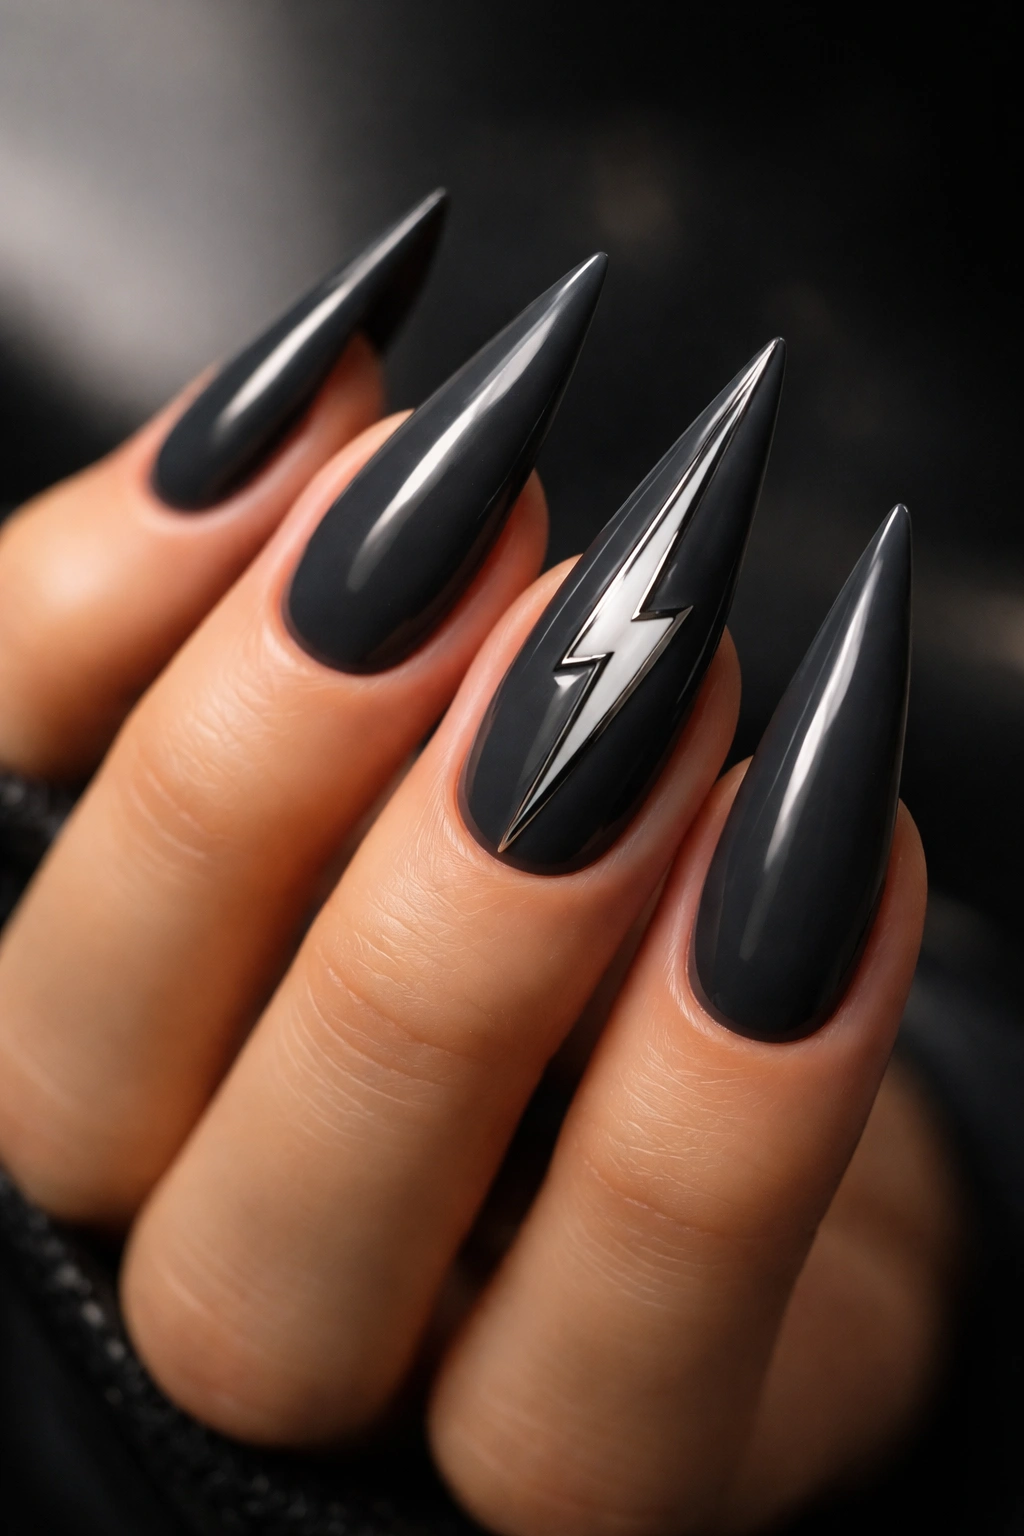
Charcoal gray is understated, it’s sophisticated, and it’s the perfect base for a statement design. A metallic lightning bolt running down your nail creates instant visual drama and baddie attitude. This design is bold without being loud—the charcoal keeps it grounded and refined, while the lightning bolt adds that edge and energy. It’s the kind of design that says you’re cool, you’re confident, and you’re not afraid to be a little different.
Why Lightning Bolts Are Peak Baddie
Lightning bolts are inherently energetic and powerful. They suggest electricity, movement, and strength. When you put a lightning bolt on your nails, you’re making a statement about your own energy and power. Charcoal is the perfect container for this statement because it’s serious enough to support the boldness of the symbol without the design feeling costume-y. This is the mani you wear when you want to feel badass and look expensive at the same time.
Creating the Lightning Bolt Design
Apply charcoal gray as your base (two to three coats until fully opaque). Once cured, use a metallic gold or silver gel brush to create your lightning bolt. Start at the top of your nail and create a bold, angular zigzag pattern down to the tip. Don’t try to make it perfectly straight—lightning is jagged and irregular. You could do a lightning bolt on every nail, or create one accent nail with multiple lightning bolts. Some people do a single bold bolt on their middle or ring finger for maximum impact. Seal everything with a glossy top coat.
Lightning Bolt Execution
- Practice your lightning pattern on a piece of paper first so you feel confident before painting
- Use a thin brush for more control, or a thicker brush if you want a bolder, more graphic bolt
- Metallic gold or silver both work beautifully against charcoal
- You could also create lightning bolts on just one or two nails and keep the others solid charcoal for a more balanced look
Final Thoughts
The right stiletto nail design has the power to completely transform how you feel about yourself. Every one of these baddie nail ideas is about confidence—the confidence to wear color, to try a design, to walk into a room knowing your hands look absolutely incredible. Baddie aesthetic isn’t about being aggressive or mean; it’s about being unapologetically yourself, knowing your worth, and refusing to apologize for taking up space.
The beauty of stiletto nails is that they’re inherently statement-making. The shape itself is bold, so you have permission to go big with your design choices. Whether you’re drawn to the understated luxury of nude and rhinestones, the drama of deep jewel tones, or the edge of black and chrome, there’s a baddie stiletto nail idea here that speaks to you. The most important thing is choosing a design that makes you feel powerful.
These designs are all achievable at home if you’re comfortable with gel polish and nail art, or at a salon with a skilled nail artist. Either way, take your time selecting colors that excite you and designs that make you feel like the absolute best version of yourself. Your nails are something you see all day—make sure they’re working as hard as you are to make you feel badass, beautiful, and undeniably you.
