

When you think of duck nails, you probably picture a sleek, polished look with that signature curved-down shape that mimics a duck’s bill. But there’s a whole world of maximalist nail enthusiasts who’ve taken this trend and gone absolutely wild with it. We’re talking about duck nails loaded with rhinestones, glitter, 3D elements, chrome finishes, and every embellishment imaginable—the kind of nails that command attention the moment you walk into a room.
The beauty of junk duck nails is that they embrace more-is-more energy. Instead of minimalist perfection, these designs celebrate chaos, boldness, and unapologetic glamour. Whether you’re heading to a music festival, a night out with friends, or simply want your nails to be the conversation starter at every event, maximalist duck nails deliver serious statement-making potential. They’re intricate enough to require a skilled nail technician, but the payoff is absolutely worth it—you’ll have nails that look like wearable art.
What makes these designs work is that they’re not randomly thrown together. Even the most chaotic-looking junk duck nail art follows some underlying design logic, whether that’s a color palette, a theme, or a strategic mix of textures. The technician knows exactly which elements go where to create visual impact without looking like a complete disaster. That’s the difference between ambitious nail art and true artistry.
1. Rainbow Rhinestone Explosion
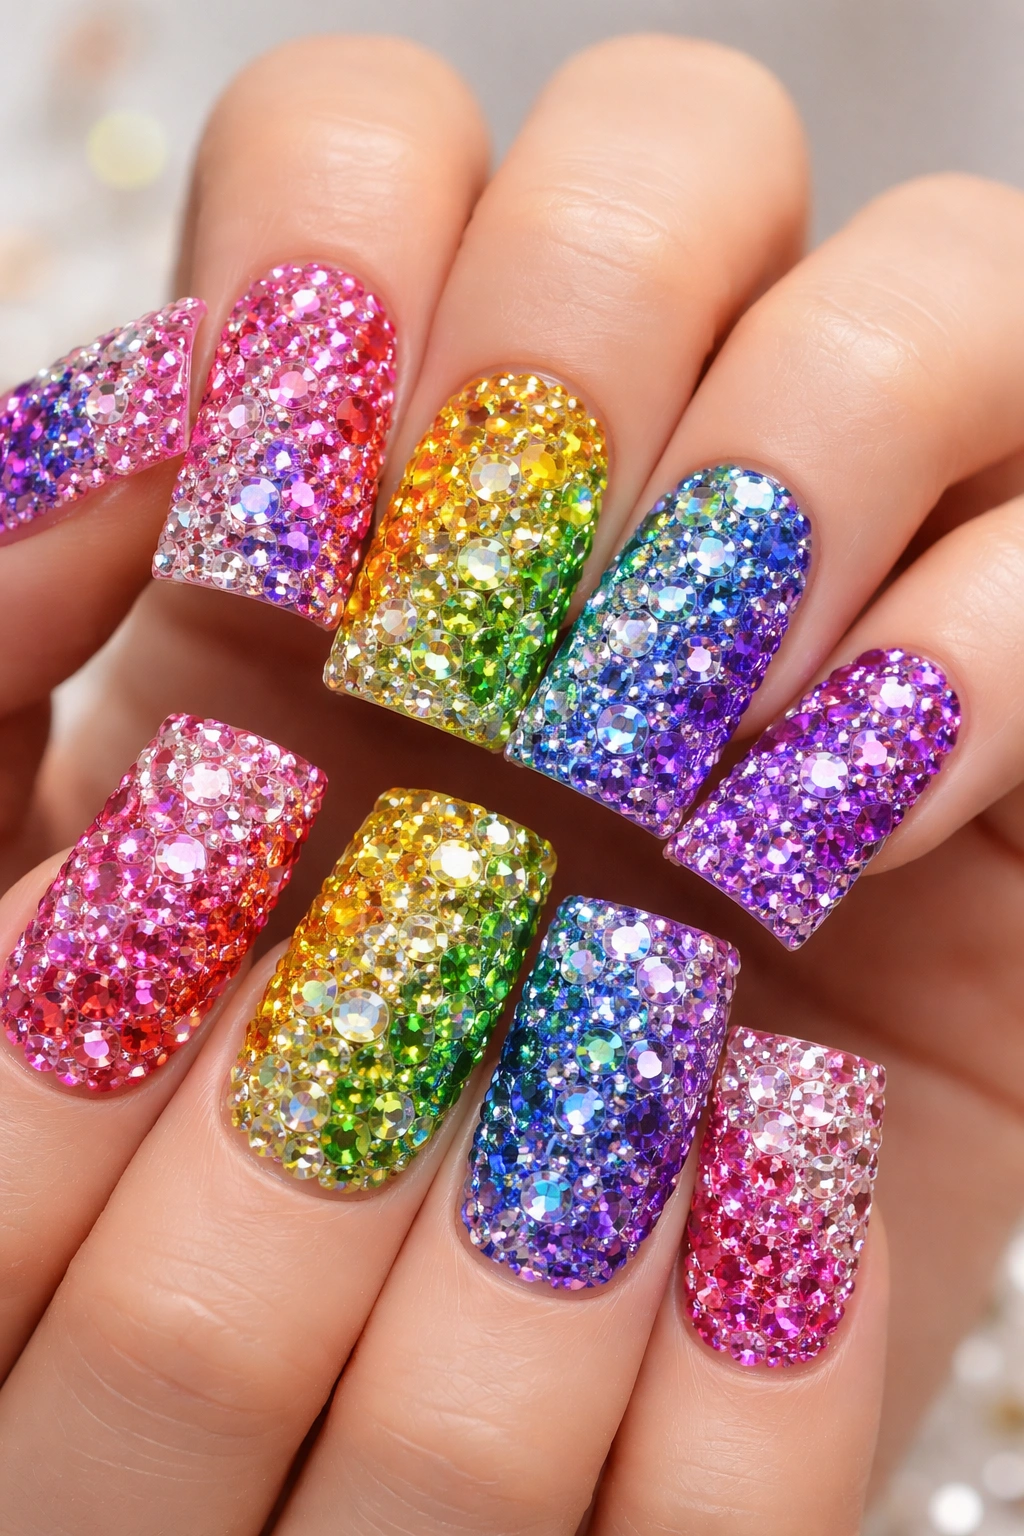
Picture a base of nude or cream-colored polish completely transformed by hundreds of tiny rhinestones in every color of the spectrum. This design works by clustering different-colored gems in sections—reds blending into oranges, oranges fading to yellows—creating a natural rainbow flow across all five nails. Some versions add iridescent or aurora borealis stones that shift color depending on the light, making your hands sparkle from every angle.
Why This Design Stands Out
Rainbow rhinestone explosion duck nails appeal to anyone who loves maximum sparkle without committing to a single color story. The variety of stones means the nails catch light differently with every hand movement, creating an almost holographic effect even without chrome or mirror finishes. This design works especially well for special occasions where you want serious glamour, and it photographs beautifully under any lighting condition.
What You Need to Know
- Application takes 2-3 hours minimum due to the sheer number of stones being hand-placed
- Rhinestones are typically applied with nail glue or builder gel, with a clear top coat sealing everything in place
- You’ll need a variety of rhinestone sizes (ranging from 1-4mm) to create visual depth and prevent the design from looking flat
- Budget for this look is higher than standard nail art—quality rhinestones aren’t cheap
- The design remains durable for 3-4 weeks with proper care and minimal impact
Pro tip: Ask your nail technician to use a mix of stone shapes—round, square, teardrop—rather than all the same shape, which creates more visual interest and dimension.
2. Crystal Confetti Mix
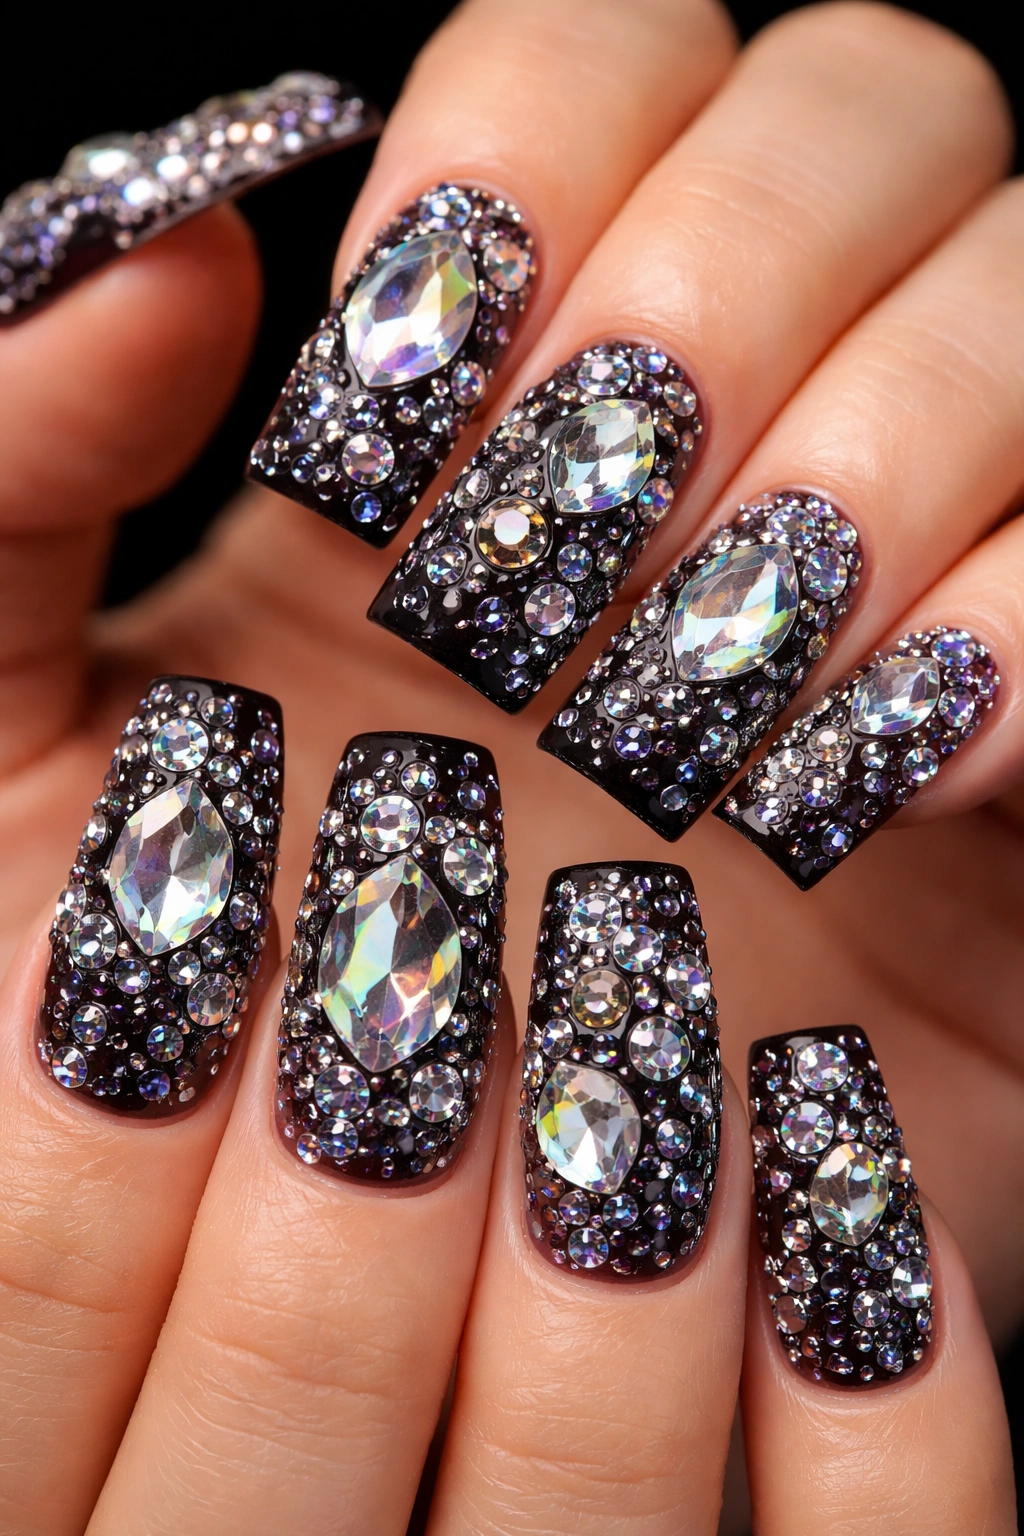
This design takes the chaos concept literally by scattering oversized crystal stones, smaller rhinestones, and glitter pieces across a dark base—usually black, deep burgundy, or dark purple—creating the impression of confetti frozen on your nails. The crystals aren’t arranged in any particular pattern; instead, they’re strategically placed to maximize sparkle while keeping negative space so the base color shows through.
What Makes It Unique
The dark background is key here—it’s what lets every single crystal pop and shine without visual competition. The contrast between the matte or satin base and the high-shine faceted stones creates depth that keeps your eyes moving across the design. Every stone catches light independently, so the overall effect is dazzling rather than overwhelming.
Design Elements to Consider
- Crystal size variation is essential; mixing 3-5mm crystals with tiny 1mm glitter chips creates a more sophisticated look than using uniform stones
- Some versions add hand-painted details—delicate lines, dots, or abstract shapes—between the crystals to tie everything together
- The base color can be metallic (champagne, rose gold, silver) instead of dark for a completely different aesthetic
- Placement strategy matters; clustering crystals in certain areas creates focal points rather than spreading them evenly
- Top coat application is crucial—multiple seal layers keep everything locked in place and protect the investment
Worth knowing: This design looks incredible under UV light and is a popular choice for nightclub-friendly nail art since it practically glows on the dance floor.
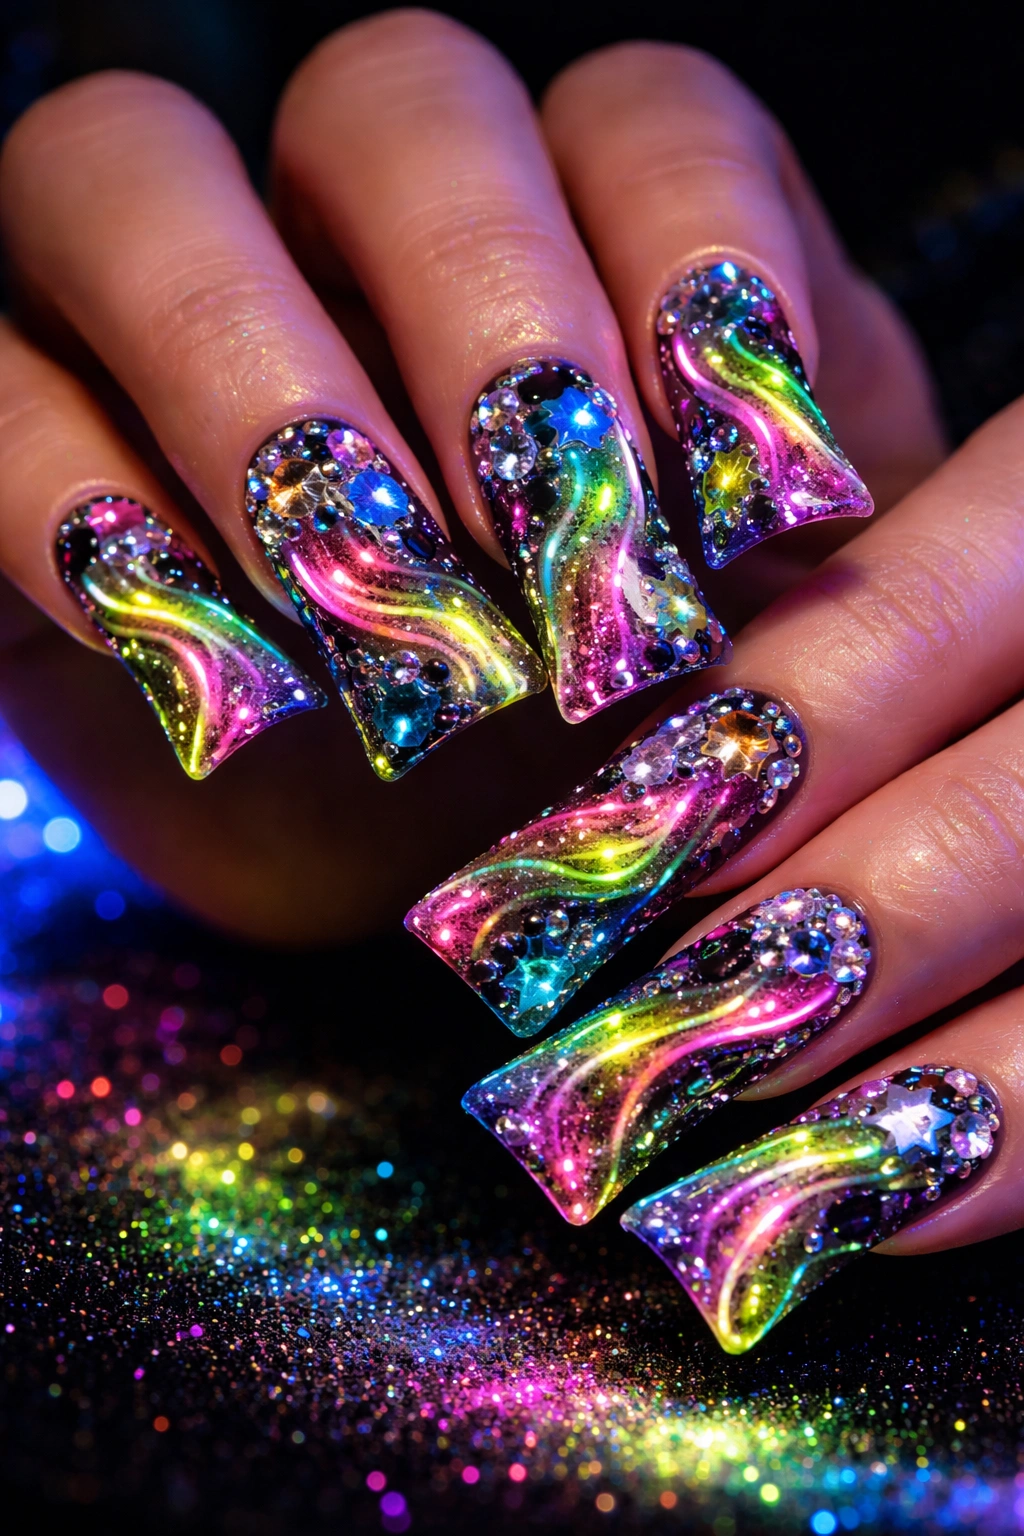
3. Holographic Chaos Design
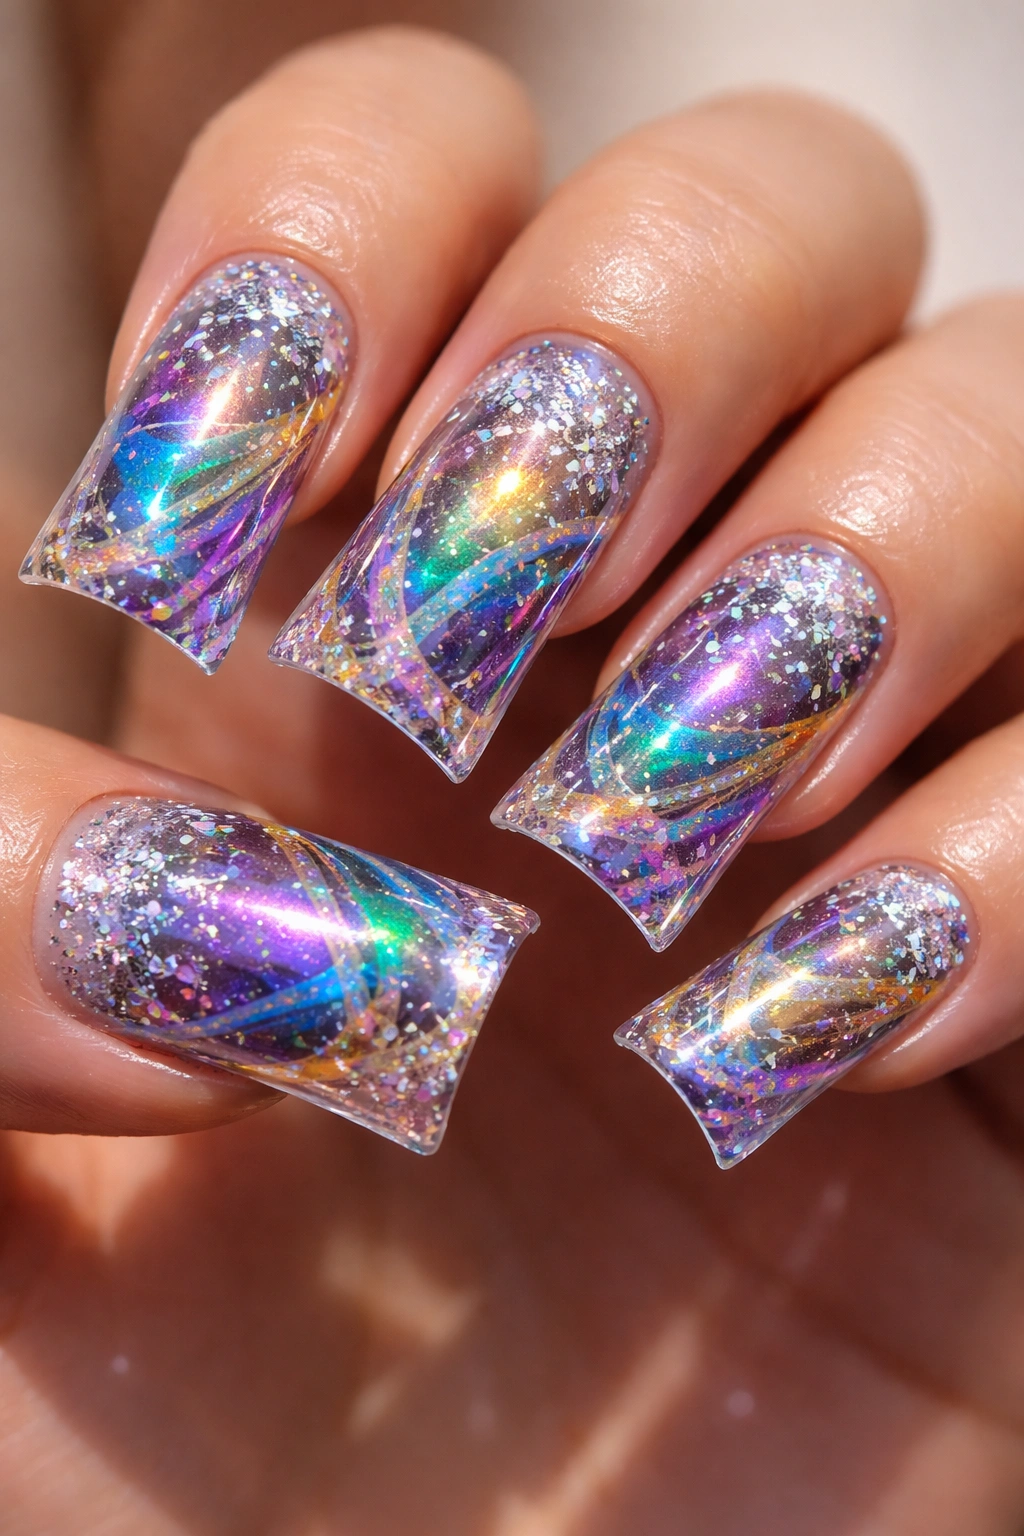
Holographic chaos takes junk duck nails into sci-fi territory by combining holographic powders, chrome flakes, and translucent glitter in swirled, layered patterns. The base might be clear or a soft pastel, with holographic elements built up in layers so that different colors appear depending on the angle you view the nail. This creates an almost liquid or oil-slick effect that’s mesmerizing to watch.
The Visual Effect
When done right, holographic chaos nails shift through the full spectrum as you move your hands—one moment they look purple and blue, the next they shift to green and gold. The effect is created by using multiple types of holographic materials layered on top of each other, each catching light at slightly different wavelengths. It’s the kind of design that makes people literally stop and stare.
Technical Details You Should Know
- Holographic powders require a sticky base coat and typically a strong LED lamp to cure properly
- The layering process means curing happens multiple times throughout the design—this adds to appointment length
- Chrome flakes are added on top of or mixed into holographic powders for extra shine and dimension
- The final top coat is usually matte or a special holographic topcoat to preserve the effect rather than dulling it
- Durability is excellent—typically lasting 4+ weeks without chipping since there are no protruding elements
Insider note: This design is photography gold and will absolutely dominate your Instagram feed; the holographic effect translates even better in photos than in person.
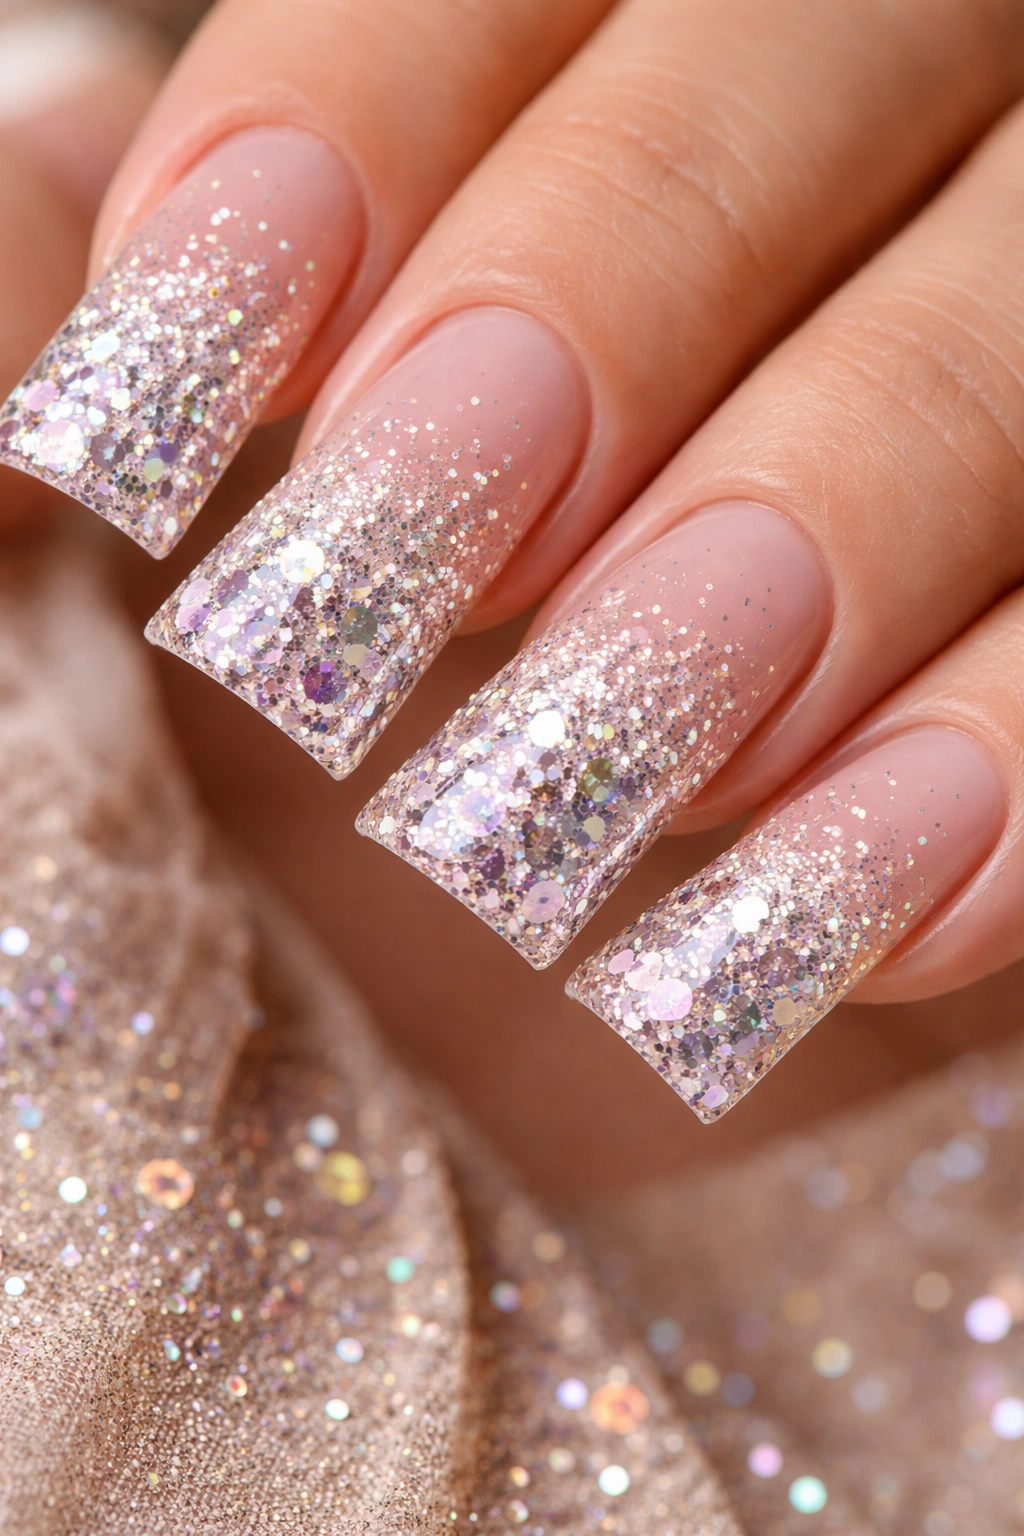
4. Metallic Glitter Overload
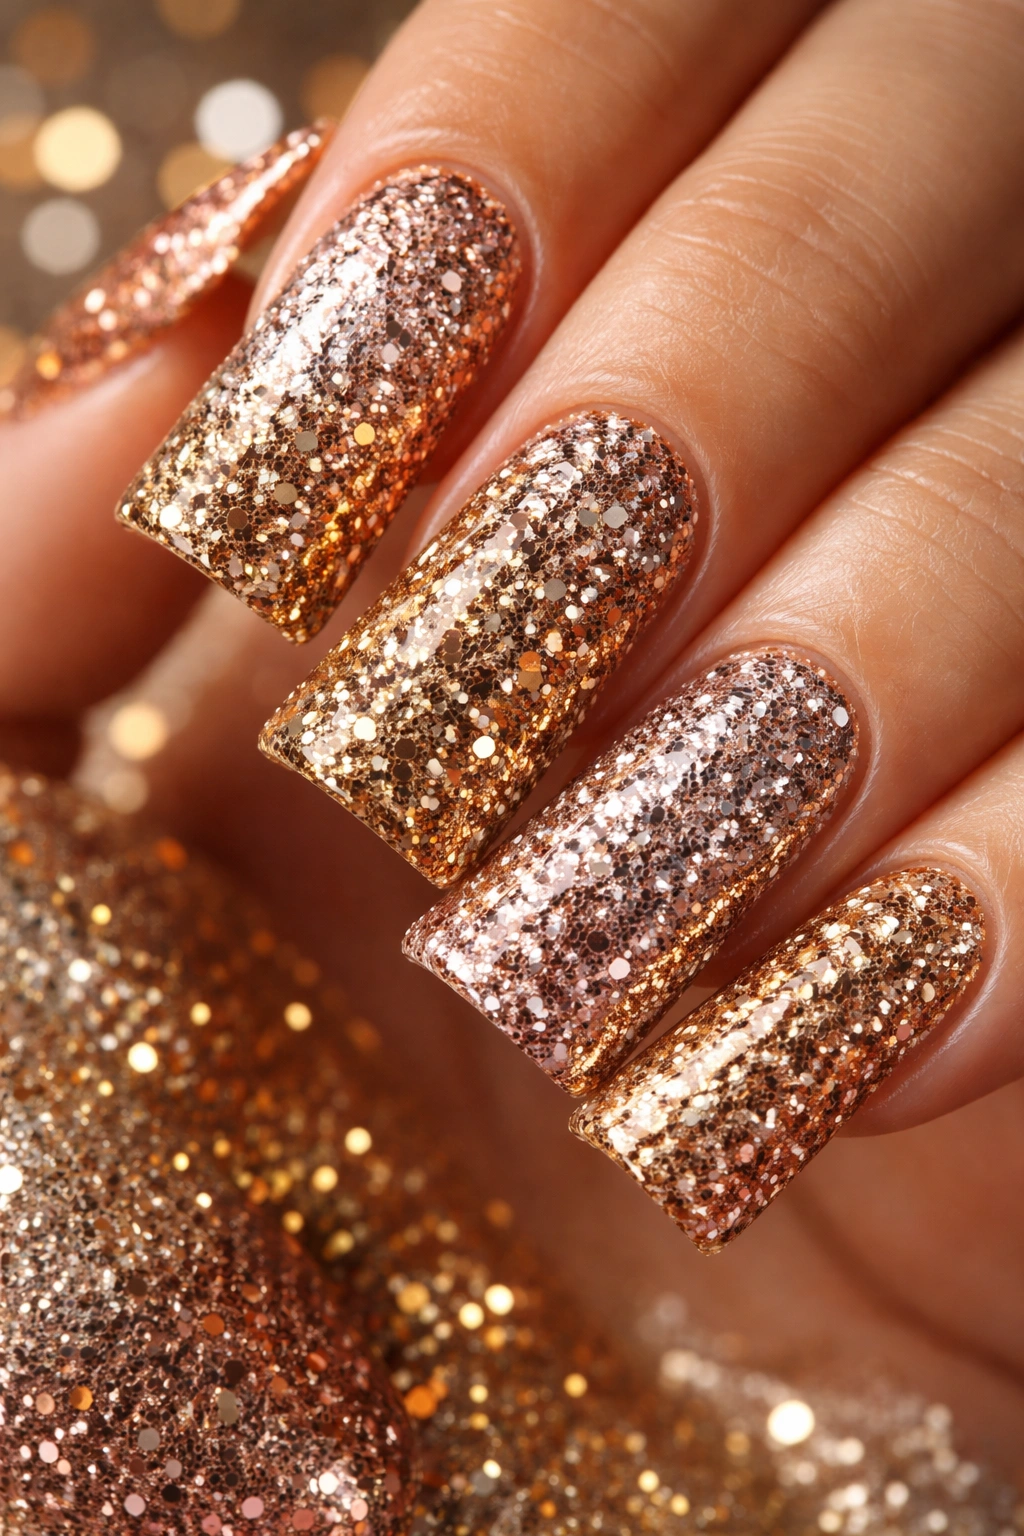
Metallic glitter overload duck nails are exactly what they sound like—multiple shades of metallic glitter (gold, silver, rose gold, copper, bronze) layered and packed onto the nail until it’s almost more glitter than base color. The glitter particles range from super fine to chunky, creating a texture that’s visible from a distance. Some designs arrange the glitters in an ombre gradient from light to dark metallic, while others mix them randomly for pure chaos.
Creating the Impact
The key to pulling off this look is using chunky glitter formulas designed specifically for nails rather than craft glitter, which has sharper edges and can cut your skin. Chunky nail glitter sits smoothly on the nail and catches light more dramatically. Layering different metallics creates depth—a base of fine gold glitter topped with chunky rose gold and silver creates visual interest that a single glitter shade couldn’t achieve.
Application and Maintenance
- Glitter-heavy designs require a builder gel or thick gel base for proper adhesion
- Multiple layers are needed to achieve true glitter overload—this means longer appointment times
- A hard gel topcoat is essential to prevent glitter from catching on clothing or hair
- These nails feel slightly textured rather than smooth, which some people love and others prefer to avoid
- Glitter nails are durable but require careful removal; rushing the process can damage the nail bed
Real talk: The first few times you wear glitter-packed nails, you might notice tiny glitter particles around your workspace. This is completely normal and fades after a few days.
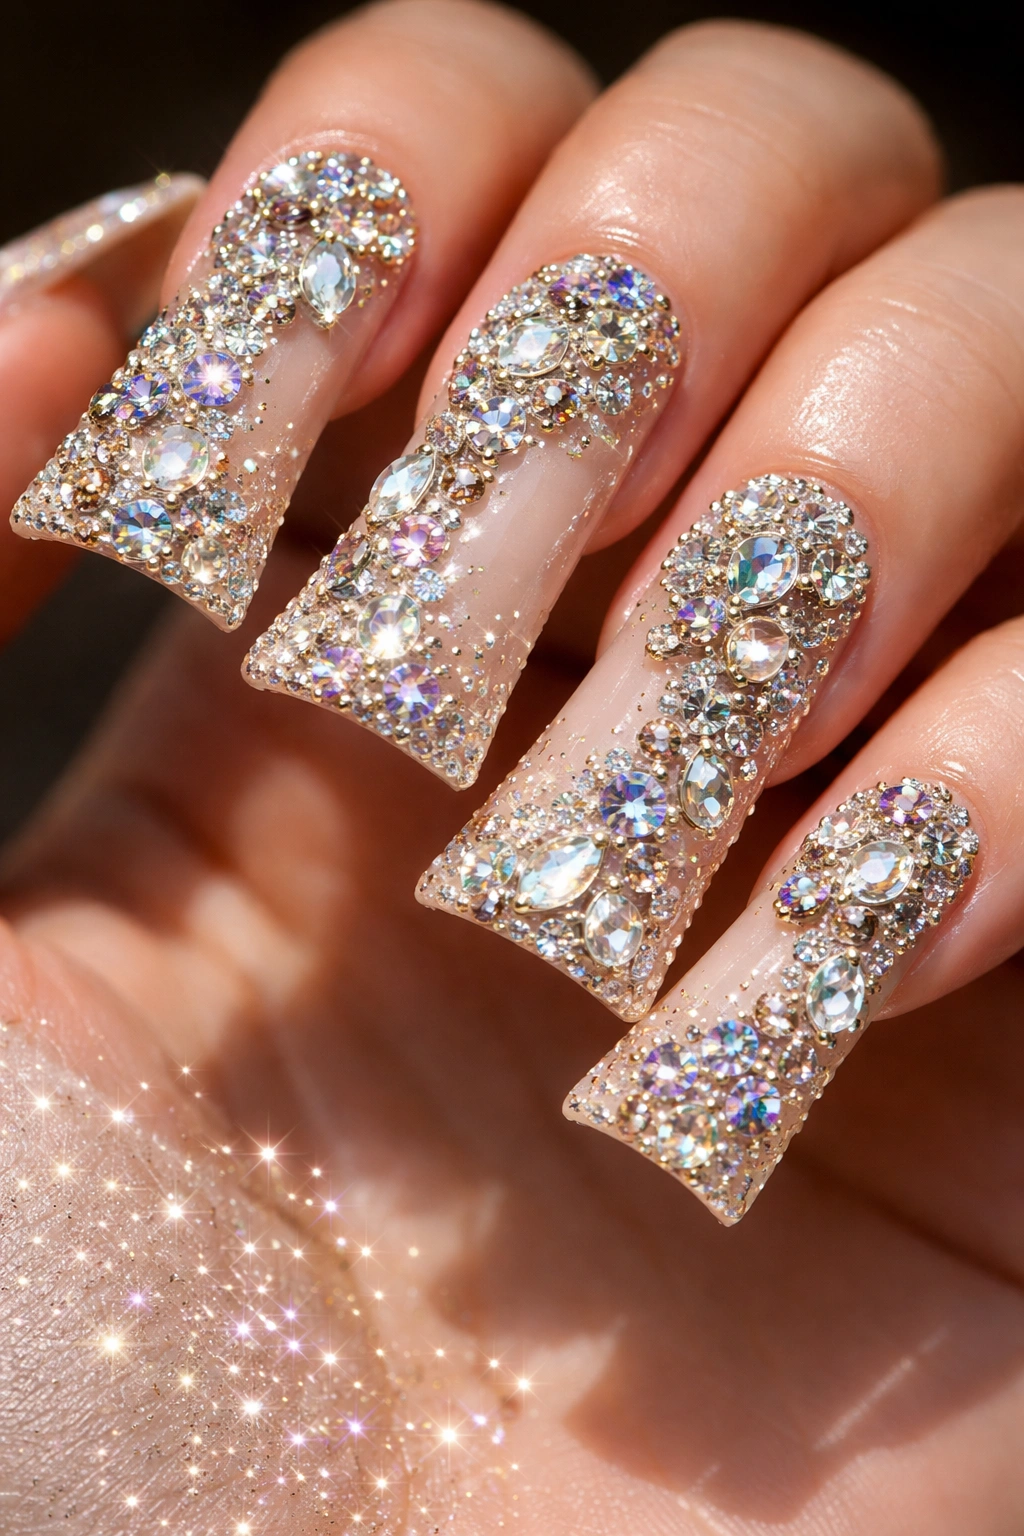
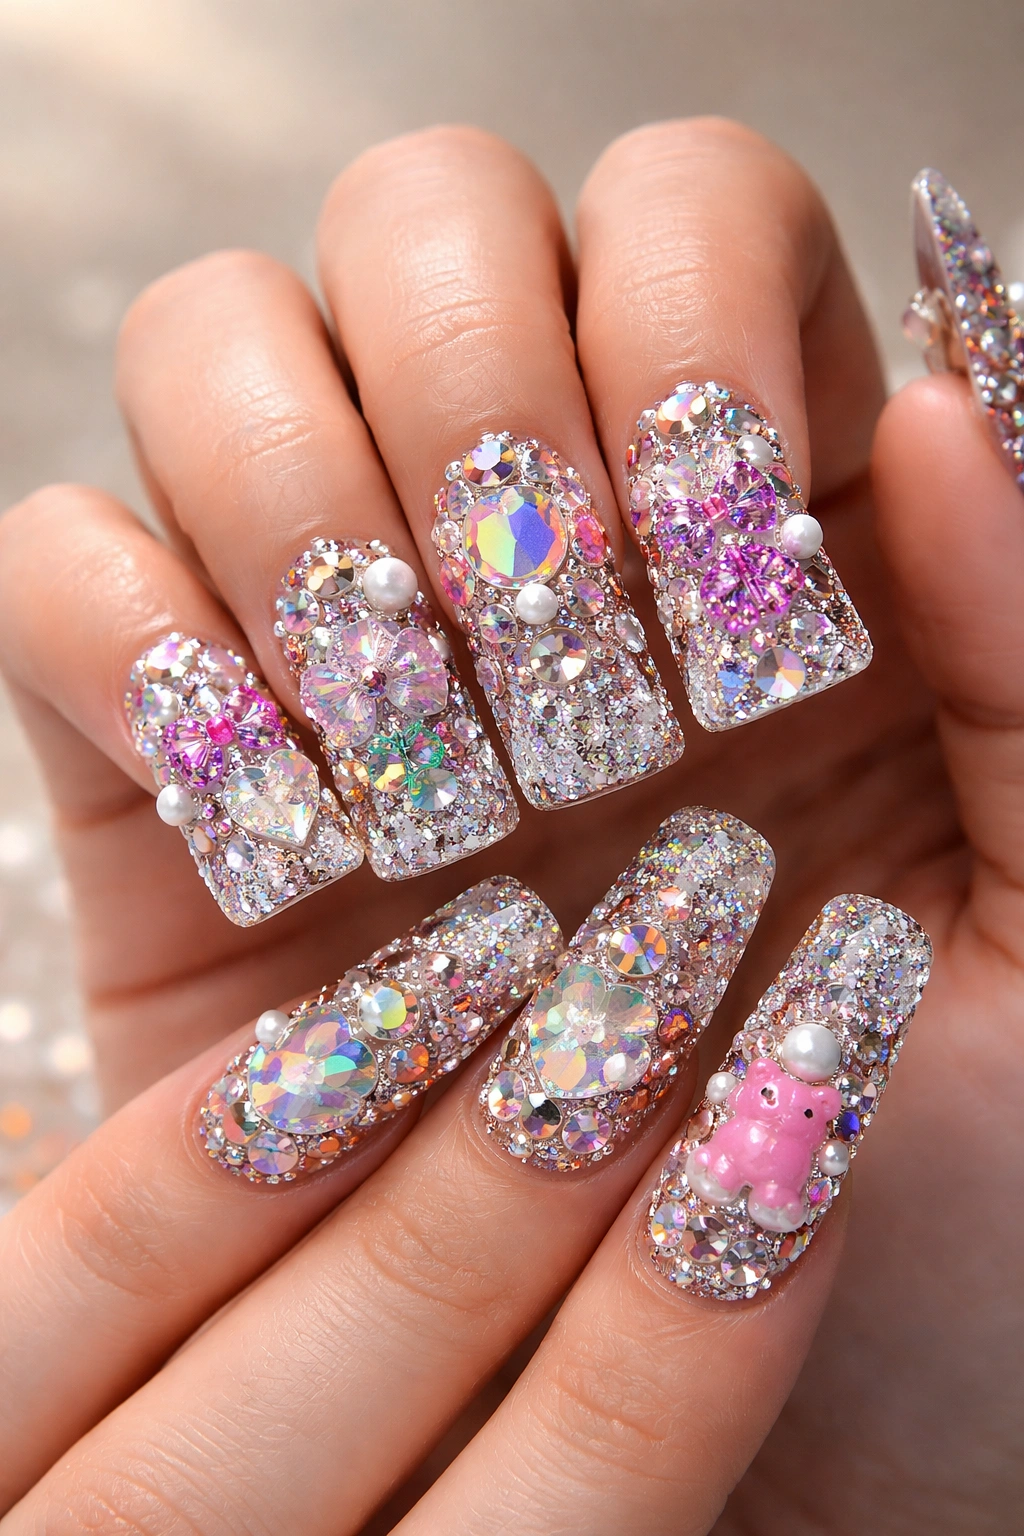
5. Multi-Gem Luxury Nails
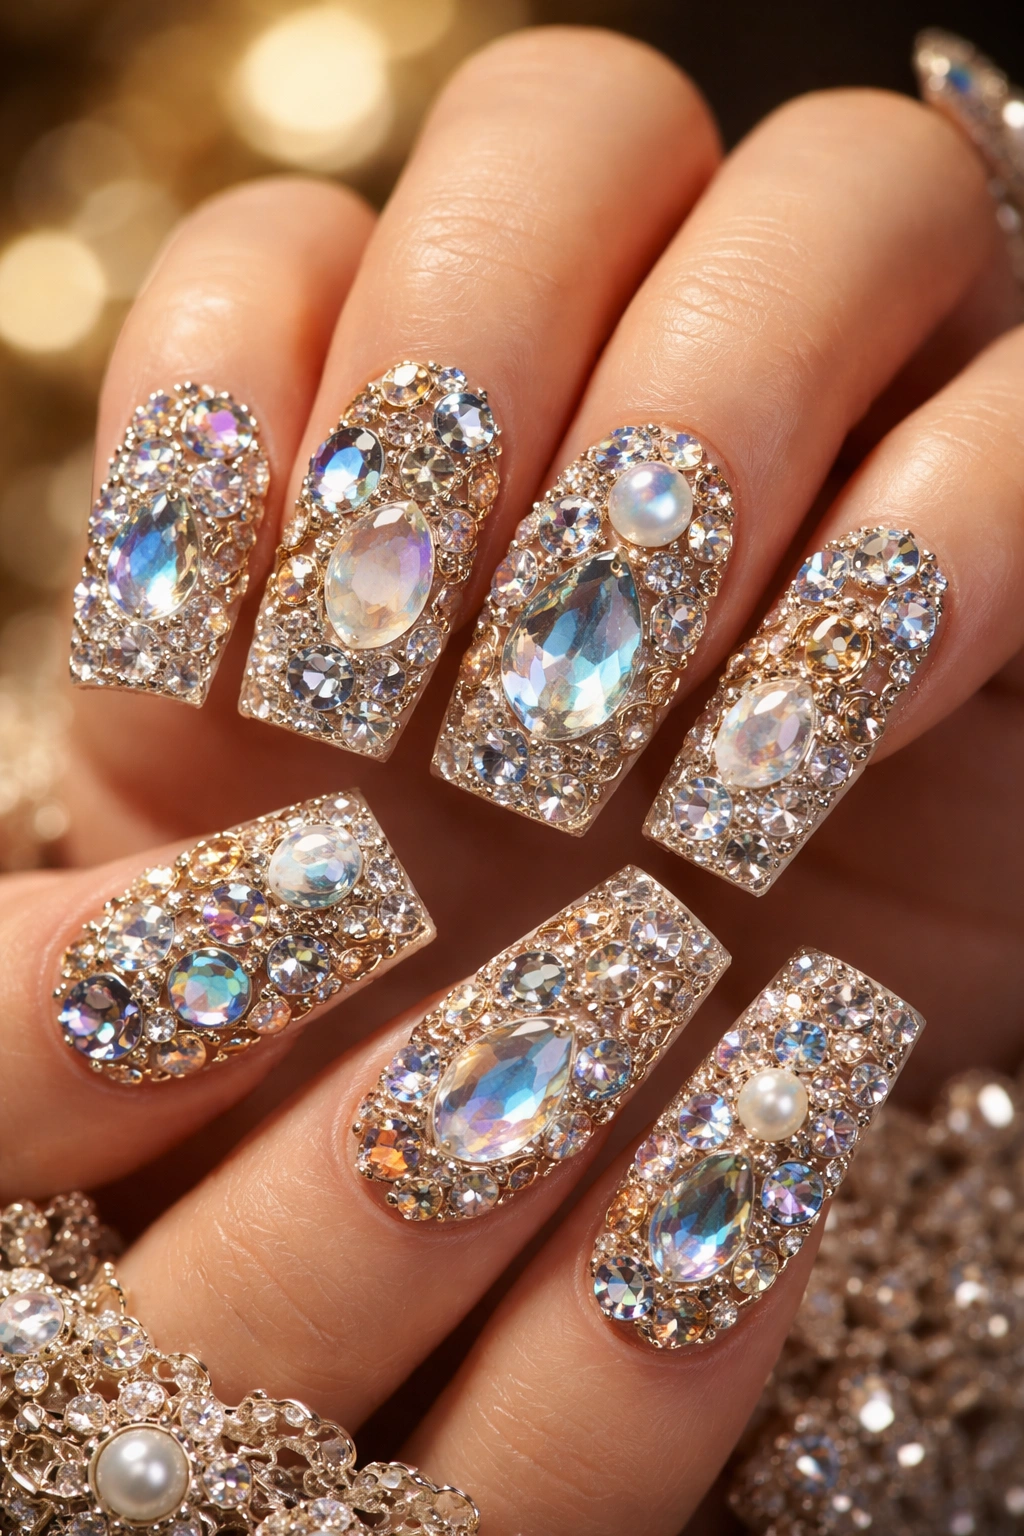
Multi-gem luxury nails combine multiple types of precious and semi-precious stone finishes—think Swarovski crystals, cubic zirconia, natural stone pieces, and high-quality glass gems—all featured prominently on the same set of nails. The design often follows a theme, like a luxury jewelry inspiration or a specific color palette, but every type of gem is represented. The result looks like you’re wearing actual jewelry on your fingertips.
The Luxury Element
What separates multi-gem luxury from simple rhinestone work is the quality and intentionality of stone selection. Premium versions use actual Swarovski crystals (which have superior clarity and sparkle compared to standard rhinestones), combined with high-end cubic zirconia stones for extra brilliance. Some designs even incorporate tiny genuine gemstones like diamonds or sapphires for clients with serious budgets. The overall effect is undeniably high-end and glamorous.
Design Approaches That Work
- Geometric arrangements of gems create a more polished, intentional look than random placement
- Mixing stone shapes (round, cushion, marquise, teardrop) adds sophistication
- Using a color-coordinated base polish (gold, silver, champagne) ties the stones together
- Some designs feature gem-free sections to let the craftsmanship shine and prevent visual overload
- Negative space is actually your friend here—strategic empty areas make the gems appear even more striking
Pro tip: Invest in quality stones; the difference between premium and budget rhinestones is immediately visible, especially on luxury-inspired designs where every detail matters.
6. Neon Chaos Art
Neon chaos art takes the junk nail aesthetic and infuses it with bold, electric neon colors combined with glitter, chrome, and neon glitter powders. The design might feature bright neon pink, lime green, and electric blue swirled together on a dark base, with holographic glitter packed into certain sections and chrome accents catching light everywhere. It’s bold, it’s unapologetic, and it’s absolutely not for the faint of heart.
Achieving the Neon Effect
True neon colors on nails are harder to achieve than you’d think, which is why skilled technicians often layer multiple products. A base of regular neon gel is topped with neon glitter powder, then accented with areas of chrome or holographic flakes. The combination of different finishes—matte, glittery, metallic, holographic—is what creates the visual chaos that makes neon designs so striking. Under regular lighting, the nails are already impressive; under UV light or in a dark venue, they absolutely glow.
Real-World Considerations
- Neon designs photograph differently depending on the lighting; they’ll look different in daylight versus evening light versus photography flash
- These nails are statement-making in a big way; they’re not subtle or office-appropriate
- The bright colors can actually make nails appear longer due to the visual impact
- Durability is typically excellent since the chaos of the design means chips or imperfections blend into the overall aesthetic
- Neon colors fade faster than other finishes, so these nails may need a 2-3 week refresh sooner than standard designs
Worth knowing: Neon chaos nails are wildly popular for music festivals, raves, and nightlife settings where bold self-expression is celebrated.
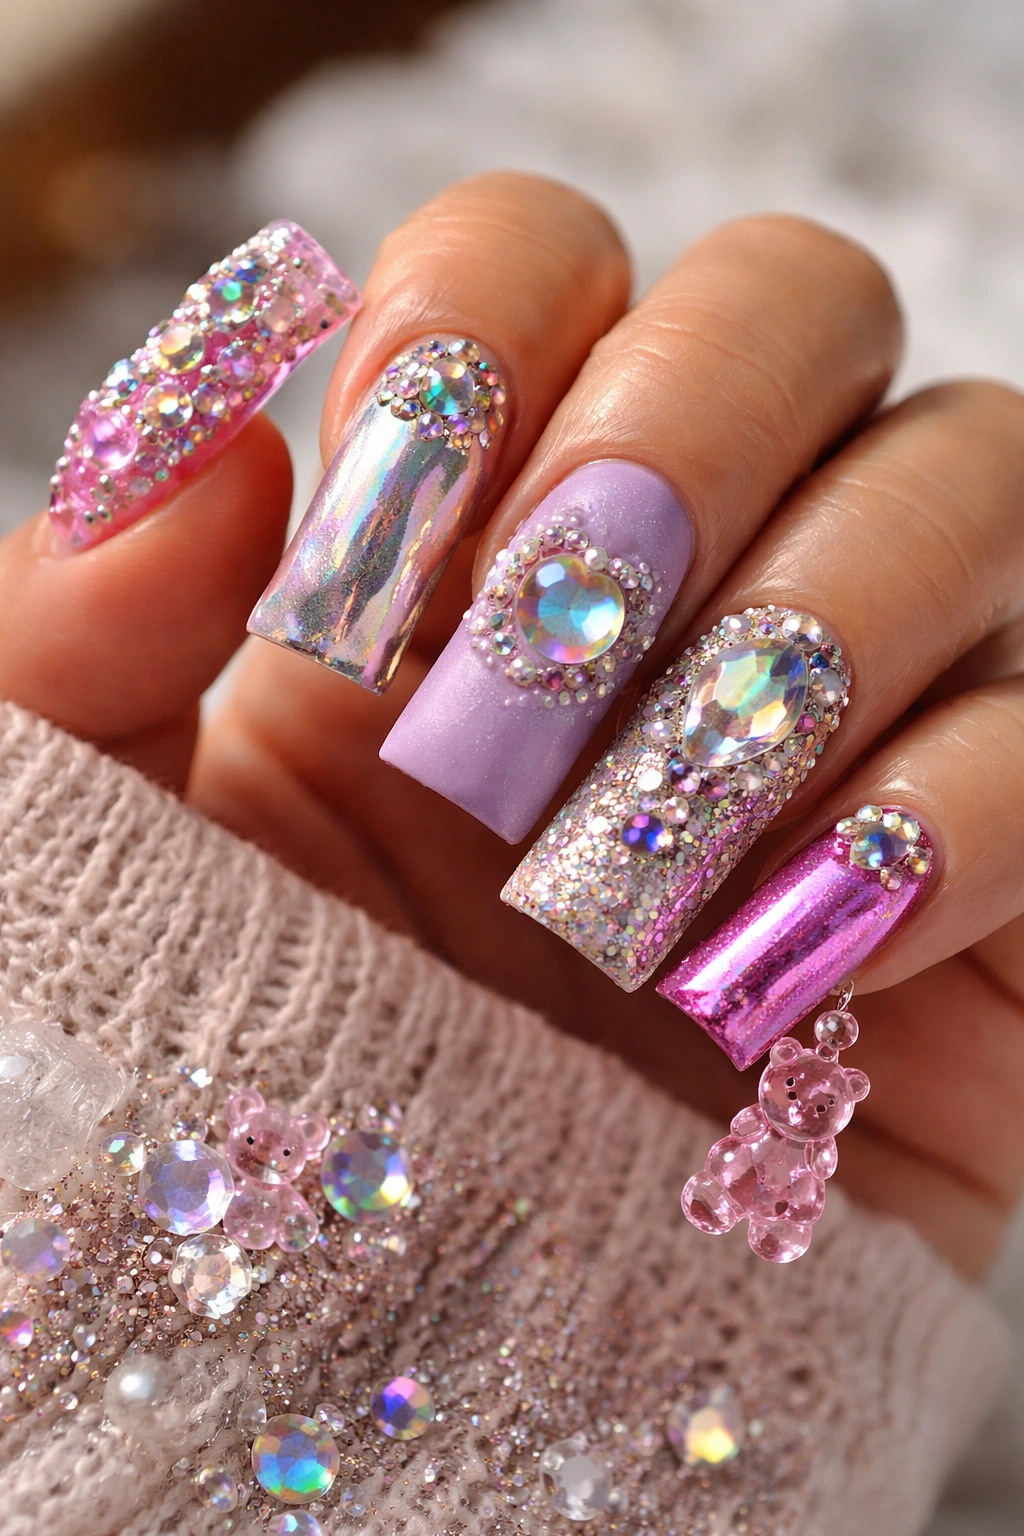
7. Chrome and Bling Fusion
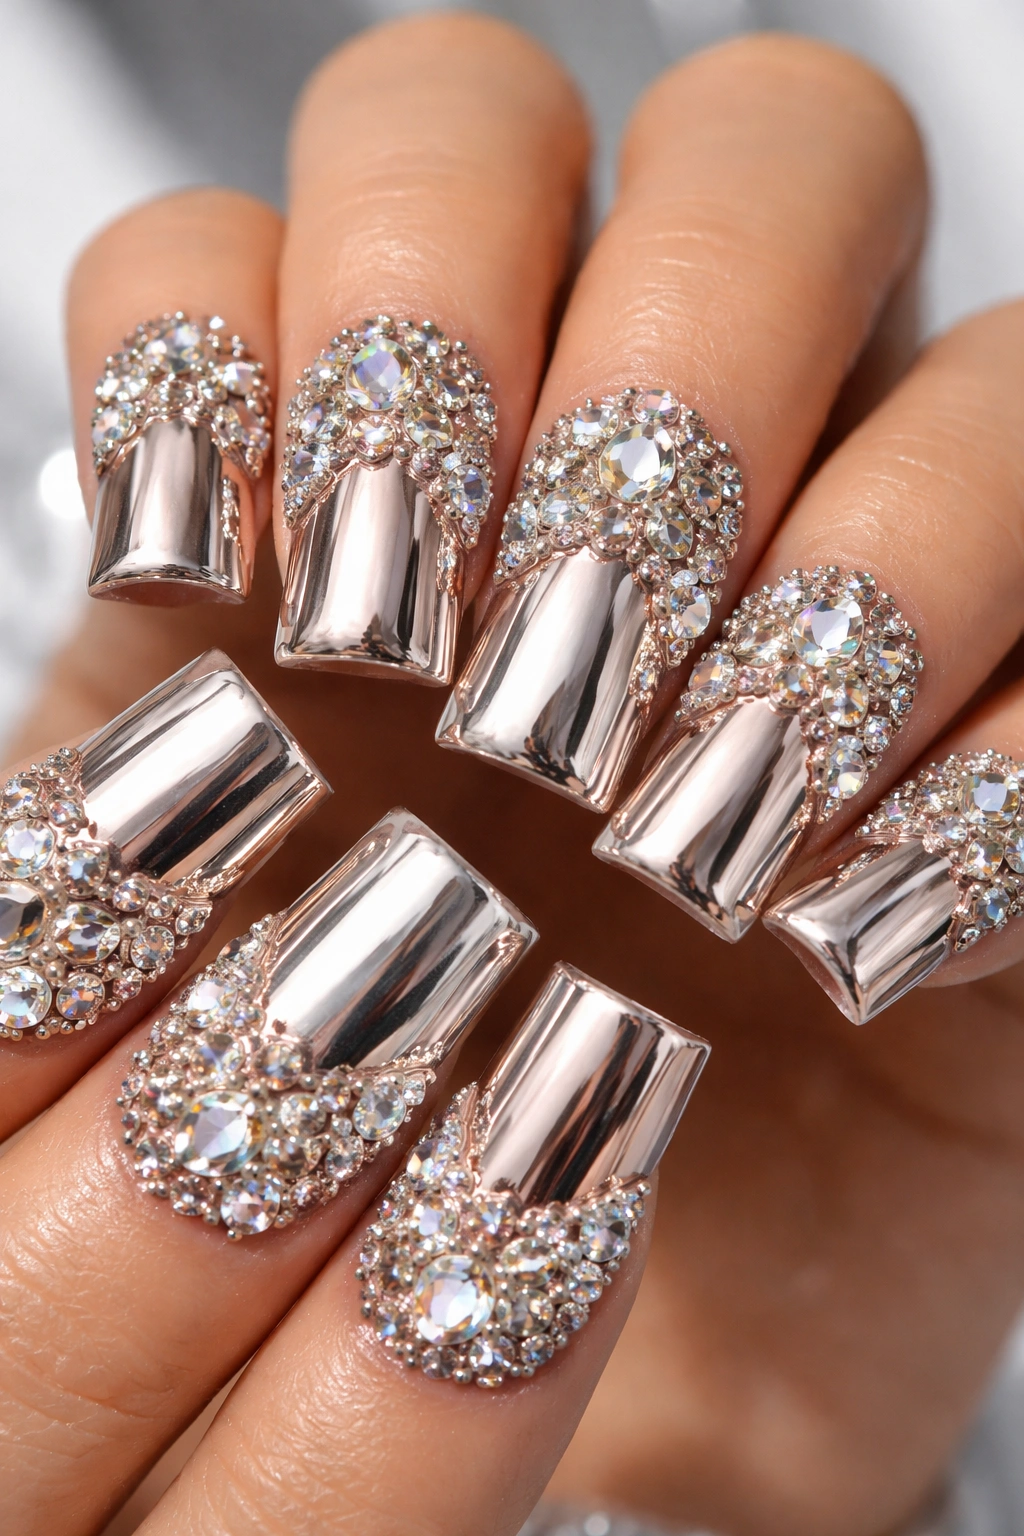
This design combines mirror chrome finishes with extensive rhinestone and crystal embellishments, creating a literally blinding effect that reflects and sparkles from every angle. The chrome might cover the base of the nail in a stunning metallic mirror finish (rose gold chrome, silver chrome, or holographic chrome), while gems are packed onto the top third or arranged in geometric patterns across the surface. The combination of smooth, reflective chrome and faceted, sparkly gems creates visual contrast that’s absolutely mesmerizing.
The Technical Execution
Chrome powders are applied to a sticky gel base, then sealed before gems are added on top. This layering approach means chrome won’t crack or chip under the weight of heavy stone placement. Some versions create an ombre effect where the chrome fades from intense mirror shine to a softer, more subtle finish as it approaches the gems. Others keep the chrome and gems completely separate, using the gems as a bold accent on a solid chrome base.
Styling Considerations
- Chrome finishes show fingerprints and dust more readily than other finishes, so these nails require frequent cleaning
- The reflective quality means these nails look even more impressive in person than in photos
- Gem placement matters; too many gems over chrome can look tacky, while strategic placement looks intentional and high-end
- This combination works beautifully on longer nail shapes, especially the duck nail silhouette
- The look screams luxury and glamour, making it perfect for special events, celebrations, or anyone who loves maximalist jewelry-inspired nails
Pro tip: Ask for a matte topcoat over the chrome rather than glossy; it tones down the shine just enough to let the gems be the main focal point.
8. 3D Dimensional Madness
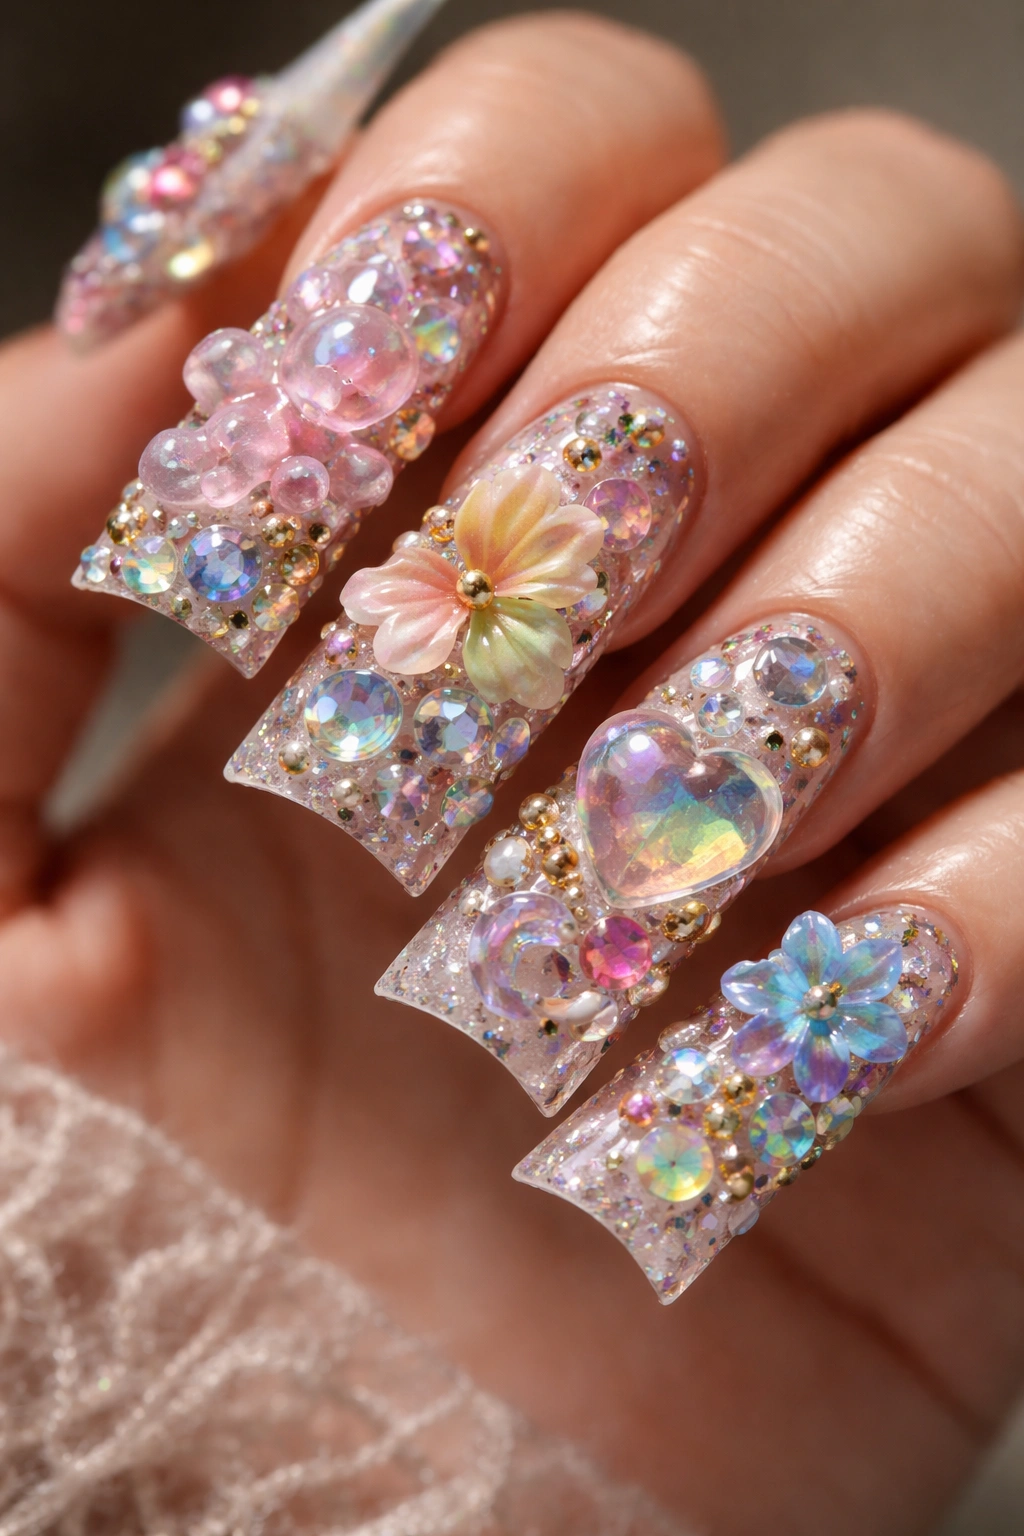
3D dimensional madness takes junk duck nails into actual sculptural territory by adding built-up gel elements, resin pieces, and three-dimensional embellishments that extend beyond the nail surface. You might see sculpted flowers, miniature nail art scenes, layered geometric shapes, or even tiny charms and accessories positioned on the nail. This design absolutely requires a skilled technician because it involves advanced gel sculpting techniques and careful balance to keep the nail wearable.
What Makes It Dimensional
True 3D nail art involves building up materials layer by layer, sometimes sculpting with clear or colored builder gels, sometimes embedding pre-made resin pieces. The finished nail has actual depth and shadow that a flat, 2D design can’t achieve. Light hits the raised elements differently than the base, creating visual interest from multiple angles. Some designs incorporate hand-painted details on the 3D elements for added complexity.
Practical Realities of 3D Nails
- These nails are heavier and require a longer adjustment period than standard nail art
- Durability depends entirely on proper application and how carefully you use your hands; excessive impact can crack or dislodge 3D elements
- Removal is more complex than standard nails and should only be done by a professional
- Appointment time is significantly longer—expect 3-4 hours for intricate 3D designs
- Cost is substantially higher than standard nail art due to the skill level and additional materials required
- These nails require consistent care and maintenance to prevent damage
Insider note: Some nail artists specialize exclusively in 3D art and have built entire followings around their dimensional creations; it’s truly a niche specialty within nail art.
9. Swirled Pearl Paradise
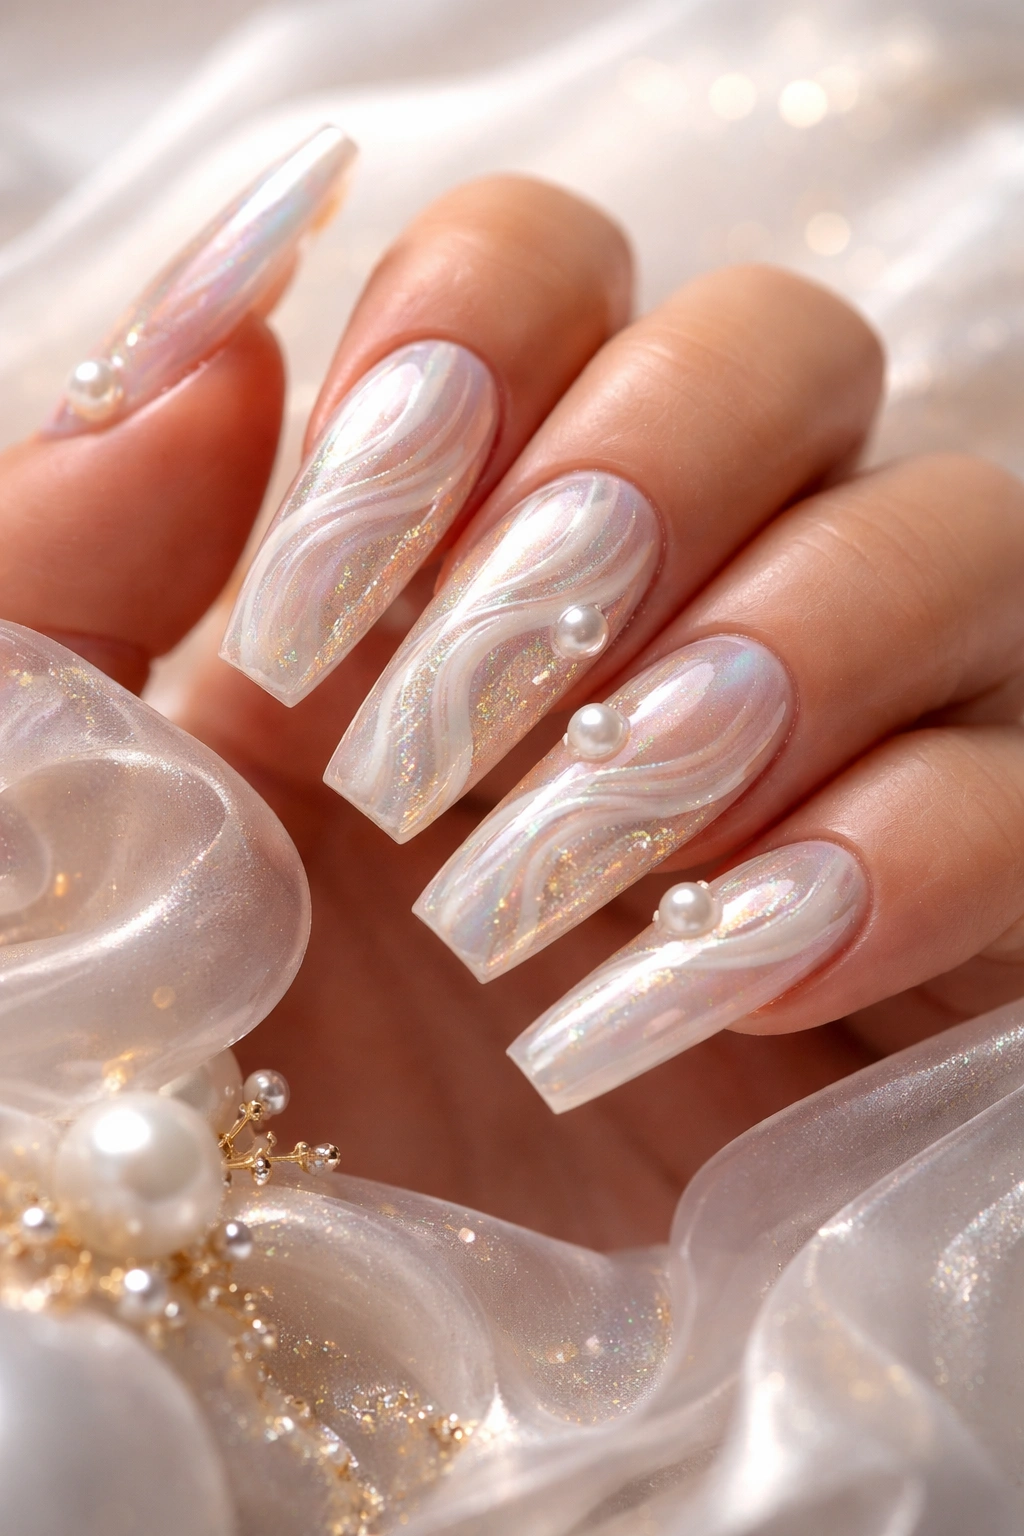
Swirled pearl paradise combines lustrous pearl powders, pearl topcoats, and pearl-finish gems in soft, dreamy color combinations—think blush, cream, white, soft gold, and iridescent—with swirled patterns creating movement across the nail. The pearls catch light softly rather than aggressively, creating an elegant type of sparkle that reads more luxe and less chaotic than some junk nail designs. Yet the sheer amount of pearl elements and the intricate swirling patterns definitely put it in the maximalist category.
The Pearl Effect
Pearl powders applied to a gel base create a luminous, almost liquid-looking finish that shifts subtly as light changes. When multiple pearl shades are swirled together, the effect is almost mesmerizing—it looks like you’re wearing captured light on your fingertips. Pearl-finish rhinestones and crystals add dimension without harsh sparkle, keeping the overall vibe elegant rather than chaotic. Some designs add a single accent color (deep burgundy, navy, emerald) to anchor the otherwise all-pearl design.
Design Elements Worth Noting
- Pearl designs photograph beautifully in natural light but can look washed out in flash photography
- The soft sparkle appeals to people who love maximalist nails but prefer understated elegance
- Swirled patterns require steady hands and skill to execute well; rushed swirling looks sloppy
- These nails work for both casual and formal settings, making them more versatile than some junk nail designs
- Pearl finishes tend to be durable and long-lasting, easily holding up for 4+ weeks
Worth knowing: Pearl paradise nails are a favorite choice for brides and bridesmaids who want statement nails that still coordinate with traditional wedding aesthetics.
10. Gemstone Cascade
Gemstone cascade features precious and semi-precious stone pieces arranged so they literally flow down the nail like a waterfall or cascade. You might see clusters of gems starting densely at the cuticle area and gradually decreasing toward the tip, or gems arranged along the sides of the nail so they appear to tumble down the edges. The base color is often neutral (nude, white, champagne) or dark (black, navy) to let the gems be the absolute star of the show.
Creating the Cascade Effect
The arrangement of gems matters enormously here. Rather than random placement, each stone is positioned intentionally to create visual flow. Larger gems might be used at the top, gradually transitioning to smaller stones toward the tip. The spacing between gems matters too—too crowded and it looks like a mass of gems; properly spaced and it looks like a planned, elegant cascade. Color coordination of gems enhances the effect; using gems in one color family or alternating complementary colors creates harmony.
Installation and Durability
- Gems are applied with strong adhesive suitable for nail art and sealed thoroughly to prevent loss
- The concentration of weight on one area (the top or side) means reinforcement is sometimes necessary
- These nails are surprisingly durable despite the complexity, often lasting 3-4 weeks without major issues
- Careful hand positioning becomes habit to protect the gem-heavy areas from impact
- Professional removal is recommended to preserve the natural nail underneath
Pro tip: This design looks absolutely stunning on the ring finger and middle finger, making those fingers the focal point of your hands.
11. Glitter Ombre Excess
Glitter ombre excess takes the popular ombre gradient concept and explodes it with glitter in multiple sizes and finishes layered throughout. Instead of a simple color gradient, you’re looking at a blend of colors created entirely through glitter depth—starting light and delicate at the cuticle and building to dense, chunky glitter at the tip, or vice versa. Every layer is multiple glitter shades combined, creating a sophisticated gradient effect that’s anything but simple.
The Ombre Technique with Glitter
Creating a true glitter ombre requires careful application of different glitter sizes and finishes in specific placement. Fine glitter goes down first as a base, then progressively chunkier glitter is applied to create the gradient effect. Some designs use an ombre that shifts through colors (blush to gold to rose gold, for example) while maintaining increasing glitter density. Others keep the color consistent but vary the glitter from fine to chunky across the nail.
Maintenance and Durability
- Glitter ombre nails are surprisingly durable since glitter-heavy designs hide minor imperfections well
- The textured surface means these nails feel slightly rough rather than smooth, which you’ll adjust to quickly
- These nails shed tiny glitter particles initially, which is completely normal
- Glitter buildup over time means these nails may need refreshing sooner than solid-color designs
- The visual complexity means minor chips or wear blends into the overall aesthetic
Real talk: Glitter ombre nails are lower-maintenance than they appear; the chaos of the design means you can wear them confidently even with minor imperfections that would show on simpler designs.
12. Mixed Texture Maximalist
Mixed texture maximalist is the ultimate junk nail design—combining smooth gel base, matte finishes, glossy sections, holographic glitter, chunky glitter, rhinestones, chrome accents, and possibly 3D elements all on the same set of nails. Each nail might feature a completely different texture and design, creating a cohesive whole through careful color coordination and shared decorative elements. This is nail art as pure self-expression and artistic freedom.
The Art of Balancing Multiple Textures
What keeps mixed texture maximalist from looking like a complete disaster is intentional design choices. Even with multiple textures, there’s usually an underlying color story or theme connecting everything. Perhaps every nail uses a palette of warm golds and roses but executes them in different textures. Or each nail features a different texture but they’re all accented with the same gem color. The technician making these choices is essentially an artist with a specific vision.
When to Choose This Design
- Mixed texture maximalist is perfect for clients who struggle to choose just one type of nail art because they want it all
- This design is ideal for special occasions where you want maximum impact and don’t care about subtle understatement
- It’s a great choice for people who love art and self-expression and view their nails as a canvas
- These nails are bold enough to work as an entire outfit statement, meaning everything else can be relatively neutral
- The complexity means your nails will absolutely be the main topic of conversation
Final thought: Mixed texture maximalist nails are high-maintenance in terms of appointment length and cost, but they’re the ultimate form of self-expression through nail art, and they’re guaranteed to be utterly unforgettable.
Final Thoughts
Junk duck nails that go all out represent the ultimate in maximalist nail art—where more is genuinely more and self-expression takes precedence over subtlety. Whether you’re drawn to the rainbow sparkle of crystal-covered designs, the futuristic appeal of holographic chaos, or the pure artistic audacity of mixed texture maximalism, there’s a maximalist duck nail design that speaks to your personal style. These designs demand skilled technicians, quality materials, and genuine commitment to the vision, but the payoff is nails that are absolutely impossible to ignore.
The beauty of junk nail art is that it celebrates boldness and confidence. You’re not trying to blend in or maintain a professional appearance—you’re making a statement that says you love color, sparkle, dimension, and visual interest. Wearing nails like these signals that you’re comfortable with attention and that you view your appearance as an art form rather than something constrained by conventional rules.
If you’re considering taking the plunge into maximalist duck nail territory, find a technician whose portfolio excites you and have a detailed consultation about what’s possible. Bring inspiration photos, discuss your lifestyle and how carefully you can handle intricate nails, and be honest about your budget since these designs are an investment. Once you experience the absolute confidence boost that comes from wearing truly spectacular nails, you might just find yourself becoming a junk nail enthusiast for life.
