

Duck nails have taken over the nail world for good reason — they’re playful, flattering, and way more achievable than they look. If you’ve got the basic duck shape down but feel stuck in a style rut, the designs you’re about to see prove that this trending nail shape is infinitely more versatile than blunt acrylics or stilettos. From bold minimalist statements to intricate nail art that makes people do a double-take, duck nails can embody literally any aesthetic you’re drawn to.
The beauty of duck nails is that they work as a blank canvas. That curved, organic shape naturally frames nail art without overwhelming it, and the slightly wider tip creates more real estate for detailed designs without looking cartoonish. Whether you’re into maximalist art or clean, stripped-down elegance, there’s a duck nail design that’ll feel like it was made specifically for you. The shape flatters most hand shapes and nail beds, too — they’re shorter and sturdier-looking than ultra-long stilettos, but still feel special and intentional.
What makes these 14 designs rockstars is that they each bring something different to the table. Some lean into the playfulness of the shape itself, while others almost make you forget you’re wearing ducks until someone asks about your nails. Some work as immediate statement-making looks, while others are the kind of understated gems that reveal themselves when you’re typing or scrolling. Let’s dive into the designs that’ll take your duck nails from pretty to unforgettable.
1. Gradient Ombré Dream
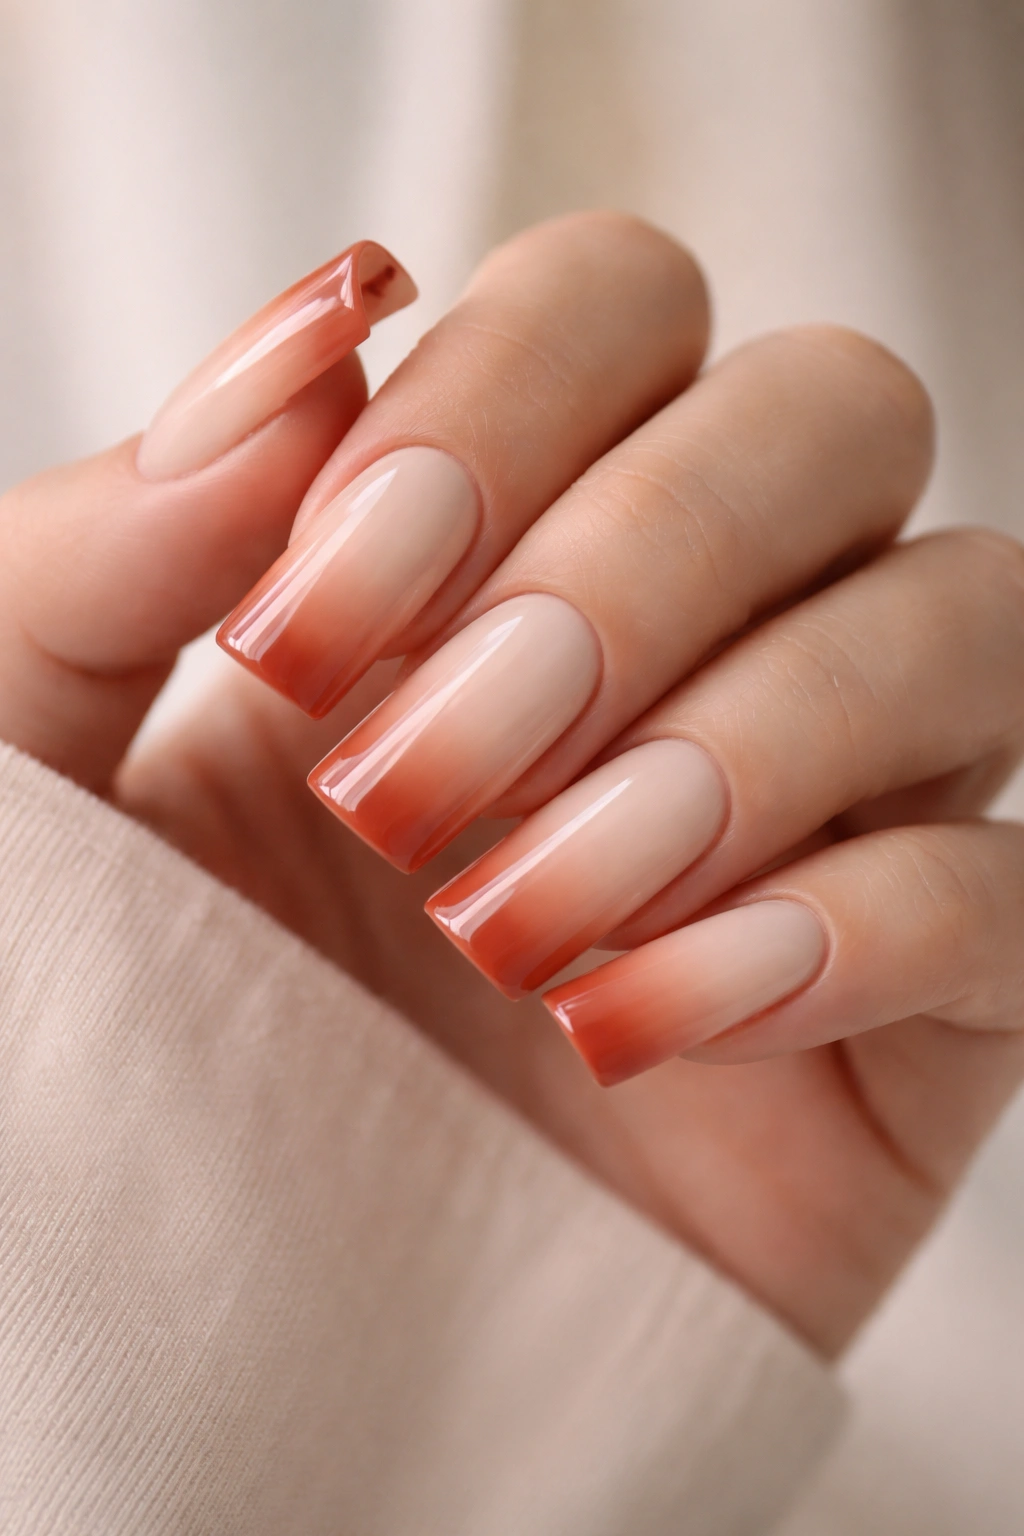
The ombré effect on duck nails creates this dreamy, almost ethereal quality that catches light from every angle. Start with a pale, creamy base — think soft ivory or barely-there blush — and gradually deepen the color toward the tips into a richer shade like terracotta, dusty rose, or even a deep burgundy. The curved shape of the duck nail actually makes the gradient look more sophisticated because the color transition follows the natural slope of the nail.
Why This Design Stands Out
An ombré literally makes your nails look longer and more polished without needing extreme length. The blending technique creates dimension and movement that solid colors can’t match. You can use warm or cool tones depending on your skin undertone — warm gradients (peach to rust) feel cozy, while cool gradients (soft gray to charcoal) feel modern and editorial.
How to Nail This Look
- Use a sponging technique with two to three shades of polish for the smoothest blend
- Apply a glossy top coat to seal the gradient and amplify the light-catching effect
- Try unexpected color combos: sage green to forest green, or buttery yellow to gold
- The gradient works on both long and short duck nails — shorter nails look chic, longer ones look haute couture
- Add a delicate gold stripe down the center of one accent nail for extra dimension
Pro tip: If you’re doing this at home, blend your colors while the polish is still slightly wet — once it dries, blending becomes nearly impossible.
2. Black Cat Chic
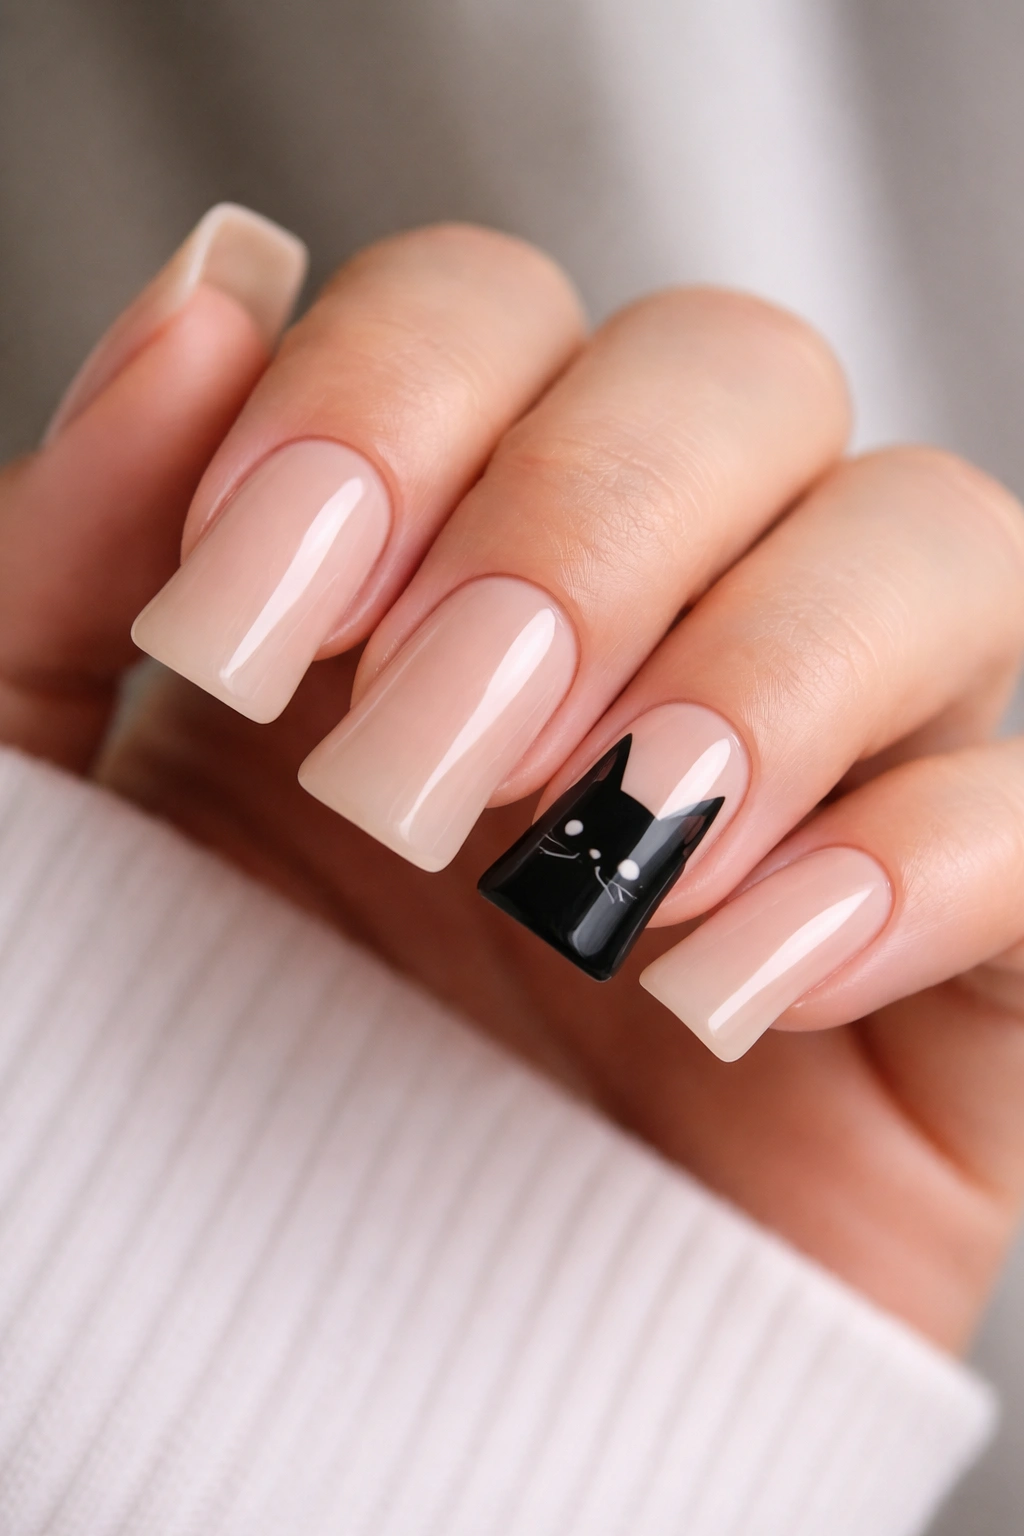
Bold, graphic, and undeniably cool — the black cat design on duck nails plays with that satisfying contrast between the pale nail bed and deep black ink. A minimalist black cat face peeks out from one or two accent nails, with simple line-drawn features, pointed ears, and those knowing cat eyes. Keep everything else neutral so the cat truly becomes the focal point.
What Makes It Iconic
The simplicity is what makes this design hit hard. No wild color combinations or competing elements — just clean black lines on a nude or off-white base. It’s the kind of design that looks expensive and intentional, even though the execution is pretty straightforward. Cat imagery has that inherent sophistication that works whether you’re heading to brunch or a gallery opening.
Making It Your Own
- Use a thin detail brush or nail art pen for the sharpest lines
- Add whiskers extending onto the base color for a playful touch
- Experiment with different cat expressions — sleepy, smug, wide-eyed, or grumpy all read differently
- Place the cat face slightly off-center on the nail for a more artistic, less symmetrical feel
- Consider adding a tiny pink nose or dots for the eyes instead of black for a softer variation
Insider note: One accent nail with the black cat design is enough to make the whole manicure feel intentional — you don’t need cats on every finger.
3. Jeweled Sparkle Statement
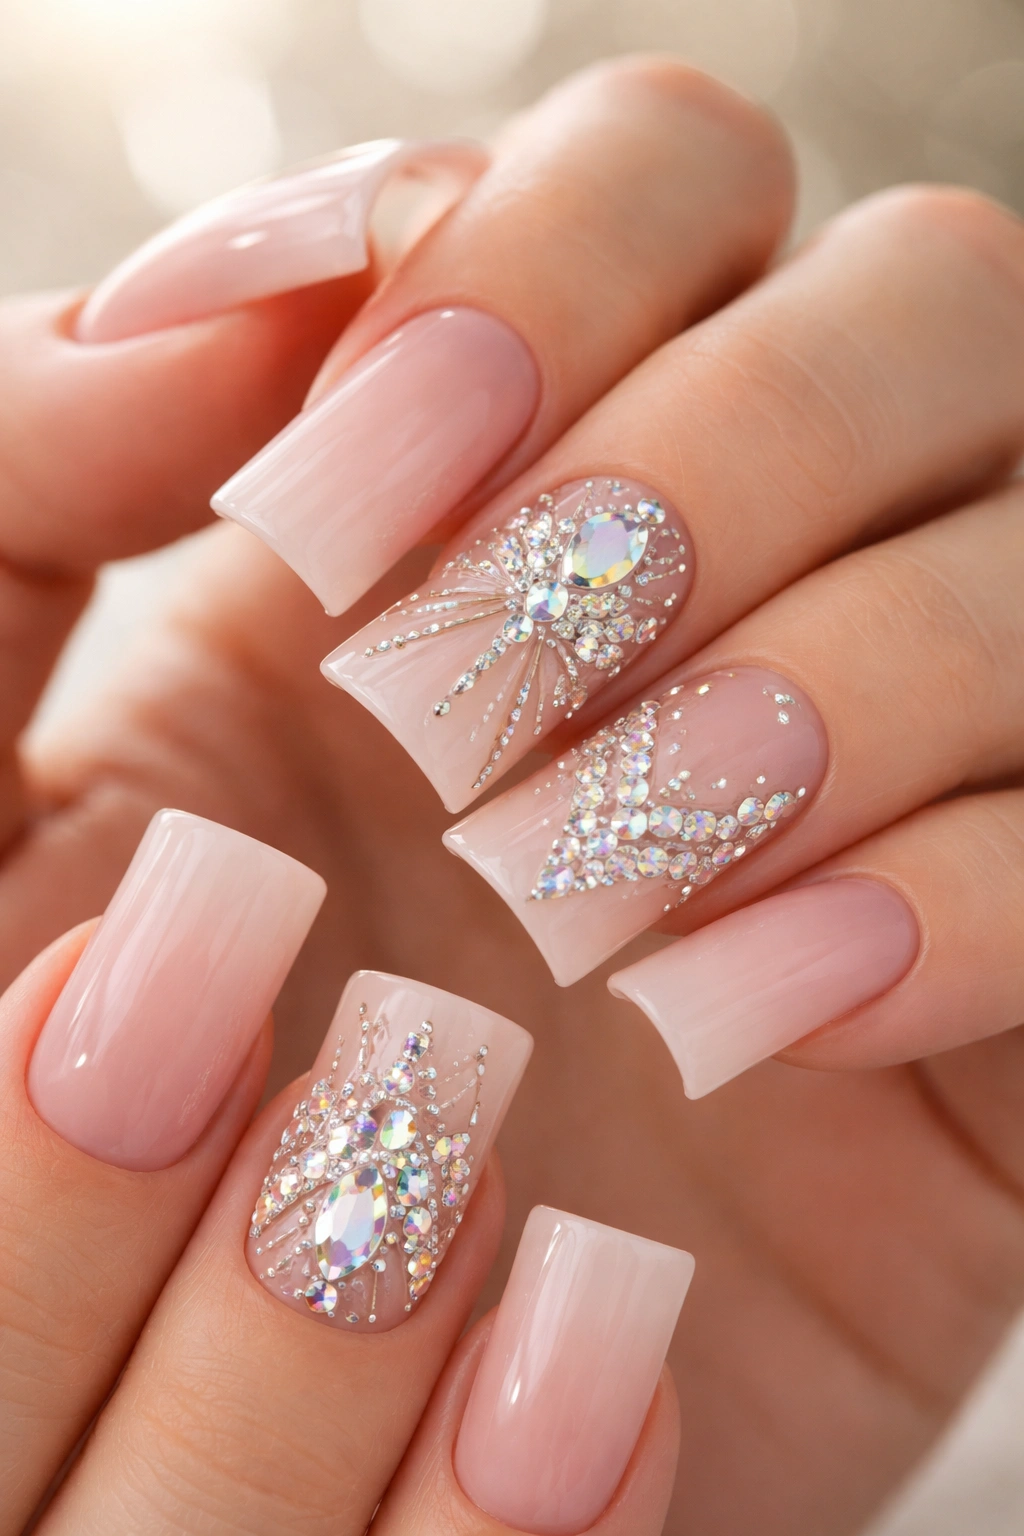
Duck nails are the perfect shape for showcasing rhinestones and gems because the wider tip area gives you space to create actual patterns rather than just scattering stones randomly. Arrange small gems in geometric patterns — think stripes, triangles, or a sunburst radiating from the center — over a nude, blush, or even a deep jewel-tone base. The result feels like wearable nail jewelry without tipping into costume territory.
The Strategic Gem Placement
Clusters of smaller stones create more visual interest than randomly placed singles, and geometric arrangements look more intentional and high-end than scattered gems. You can go monochromatic with all the same color stones, or mix warm and cool tones for more drama. The curved shape of the duck nail actually helps gems sit smoothly without catching and snagging because the tip is less pointed.
Application Tips for Maximum Sparkle
- Use gel polish as your base and adhesive — it holds gems more securely than regular polish
- Apply gems while the gel is still tacky, before you cure it
- Don’t go overboard on every nail — gem one or two accent nails and keep others simple
- Mix stone sizes for dimension — combine tiny accent stones with slightly larger focal gems
- A glossy or sparkly top coat over the stones amplifies their light-catching power
Worth knowing: Gem duck nails work better for special occasions or weekend wear — they can snag on fabric more easily than some other designs.
4. Marble Luxe Finish
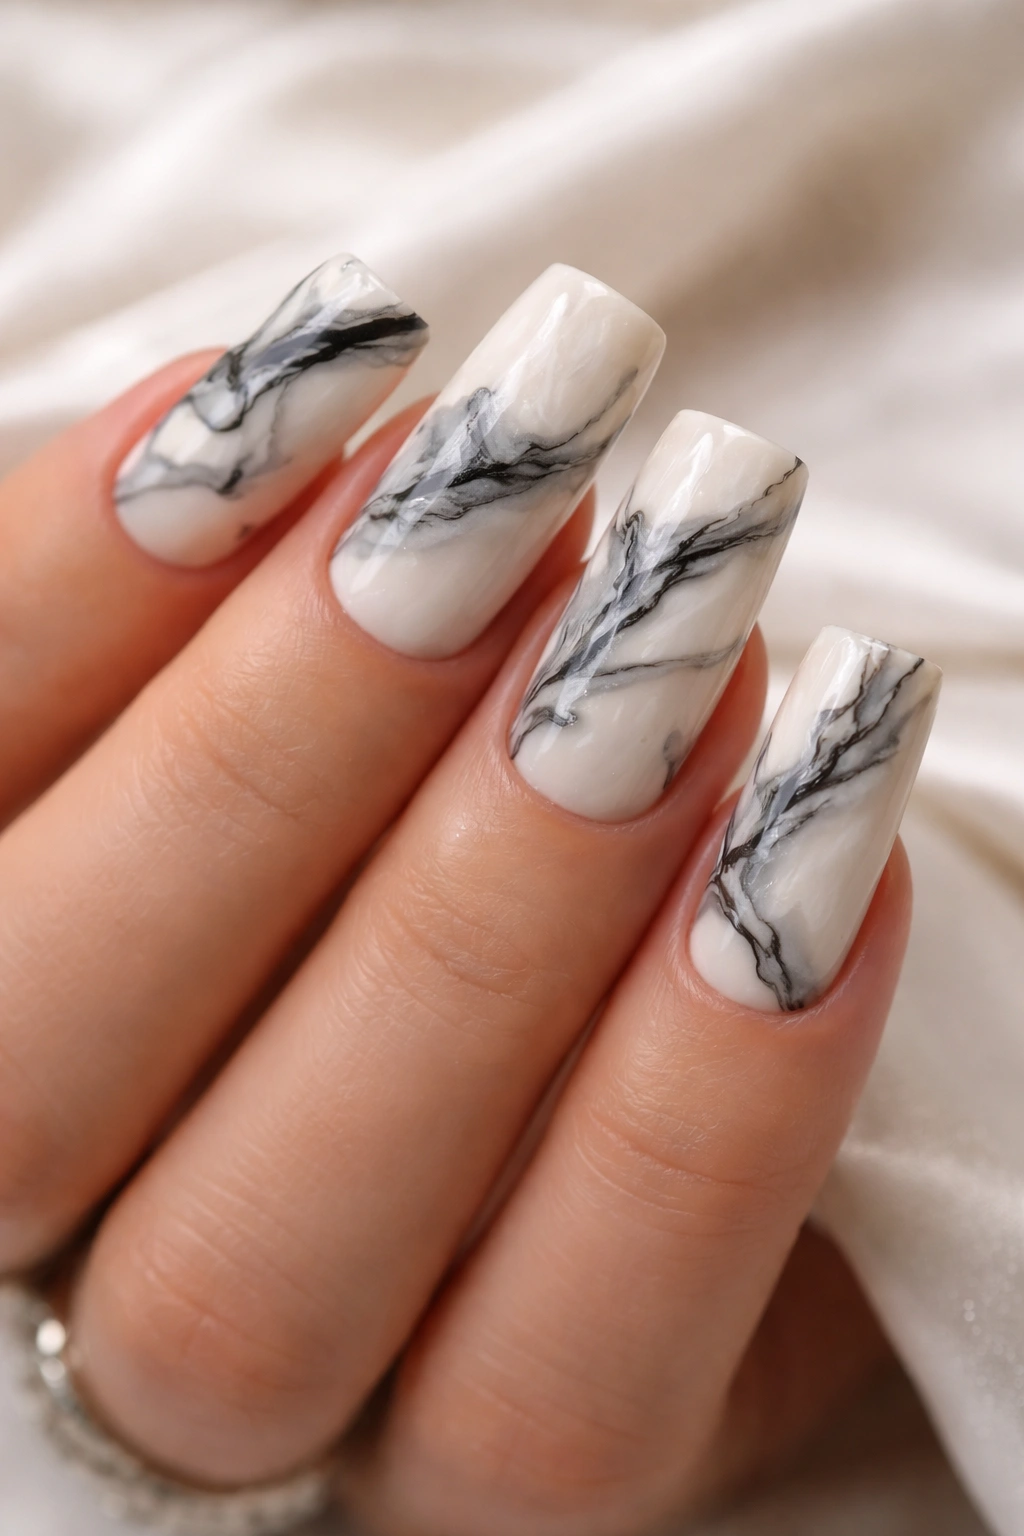
Marble patterns on duck nails feel inherently sophisticated because the organic, flowing veins mimic the look of actual stone. Create the effect using the water-marbling technique or simply freehand swirls of one or two contrasting colors over a creamy base. Soft black and white marbling looks classic, but try grey and gold, navy and white, or even blush and emerald for something more unexpected.
Why Marble Never Goes Out of Style
Marble is one of those designs that feels both trendy and timeless simultaneously. The natural variations mean no two nails are exactly alike, which adds to the handcrafted, artisanal feeling. On duck nails specifically, the gentle curves and fuller surface area showcase the marble pattern beautifully without the veins getting lost or looking too busy.
Achieving the Perfect Marble Look
- The water-marbling technique is fiddly but creates the most realistic marble effect — practice on practice nails first
- Freehand marble with a thin brush is less precise but totally acceptable and requires less setup
- Keep your color palette limited to two or three shades for the cleanest marble appearance
- Seal marble designs with a matte top coat for a more luxe, stone-like appearance, or glossy for drama
- One accent nail with full marble coverage and the rest solid colors keeps the look balanced
Real talk: Marble can look muddy if you use too many colors or blend them into brown. Stick with high contrast for the most striking effect.
5. Butter Yellow Sunshine
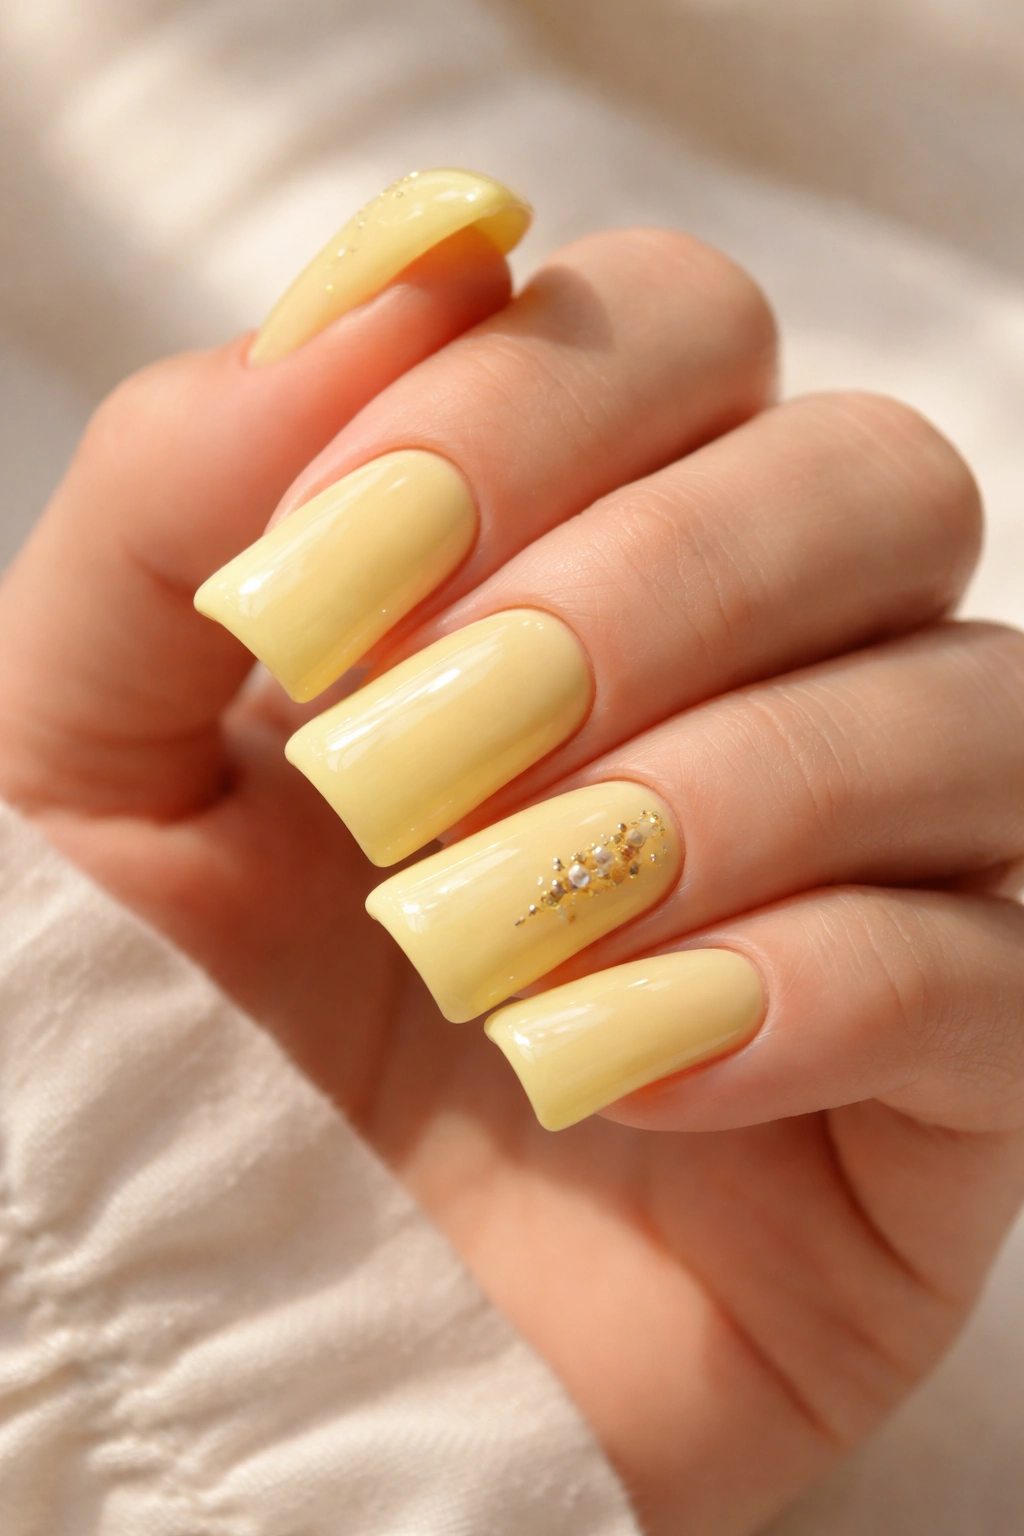
Warm, optimistic, and surprisingly wearable — butter yellow on duck nails feels joyful without being jarring. The shape keeps yellow feeling sophisticated rather than childish. Go for a rich, creamy butter shade rather than a neon yellow, and pair it with a glossy top coat so it glows like actual butter or honey catching the light.
The Warmth Factor
Yellow is tricky because it can look harsh or washed-out depending on the undertone and finish. On duck nails, a warm, golden butter yellow with a slightly opaque finish creates an almost edible-looking result. The curved shape of the nail makes yellow read as intentional luxury rather than a bright pop of color. It photographs beautifully too — something about that curved surface catches light gorgeously.
Styling Butter Yellow
- Pair butter yellow with gold accents for maximum warmth — thin gold lines or geometric shapes on one accent nail
- Match your butter nails with warm-toned jewelry and metallic accessories for cohesion
- A matte top coat transforms butter yellow into a velvety, suede-like finish for something more understated
- Layer a shimmery top coat for a glittery, luminous quality that feels festive but still polished
- Keep cuticles and skin around the nails well-moisturized — bright yellows can make dry skin look parched
Pro tip: Butter yellow shows imperfections more obviously than darker shades, so take extra care with your base coat and cleanup.
6. Deep Emerald Elegance
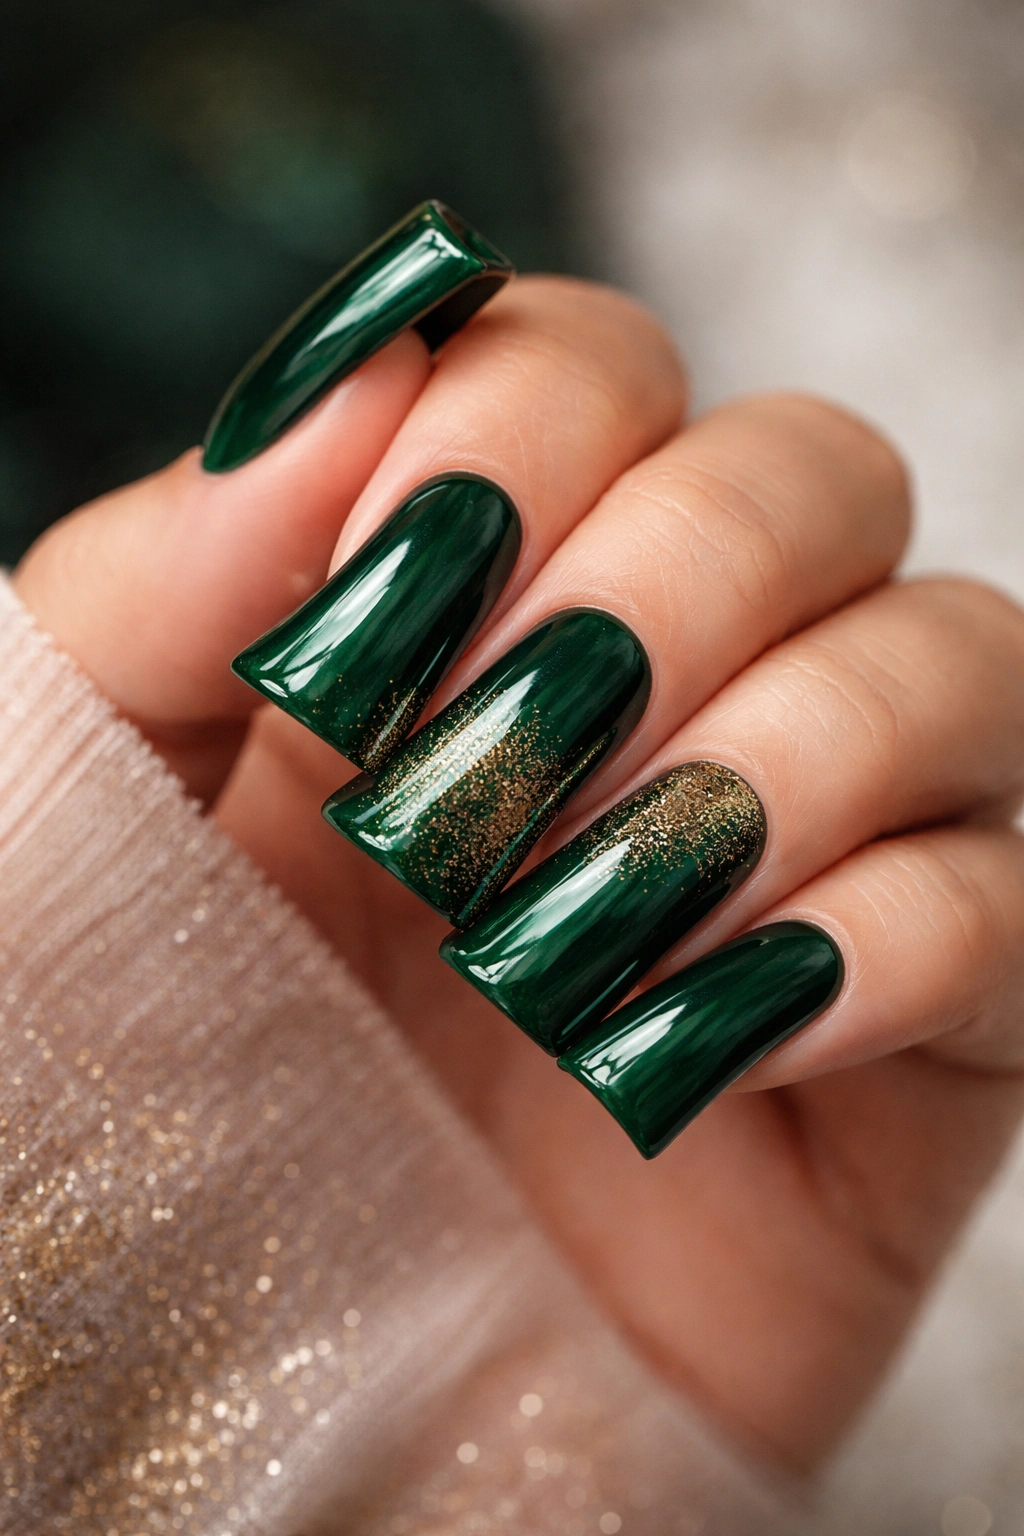
Emerald green on duck nails reads as pure luxury — it’s deep enough to feel serious and sophisticated while still being a color that works for multiple seasons. The rich jewel tone creates beautiful contrast against pale skin and shows depth and dimension when light hits it just right. Add subtle gold shimmer throughout, and you’ve got a design that feels museum-worthy.
Why Emerald Works for Everyone
Unlike some bold colors, emerald is flattering across a wide range of skin tones. It doesn’t look harsh or garish — instead it brings out brightness in the eyes and warmth in the skin. The duck nail shape doesn’t compete with the color; instead, it shows it off with the graceful curved tip and wider base.
Styling This Jewel Tone
- Keep designs on emerald nails minimal — the color is statement enough without added embellishment
- Layer gold geometric patterns or fine gold lines across one or two accent nails for a slight uplift
- Pair emerald duck nails with rose gold, gold, or antique metal jewelry for maximum impact
- A semi-matte finish softens emerald slightly while a gloss amplifies its depth
- Emerald works year-round but pairs especially well with warm-toned clothing and metals
Insider note: Emerald can stain lighter nail beds if you use a thin base coat, so always use two protective base coat layers.
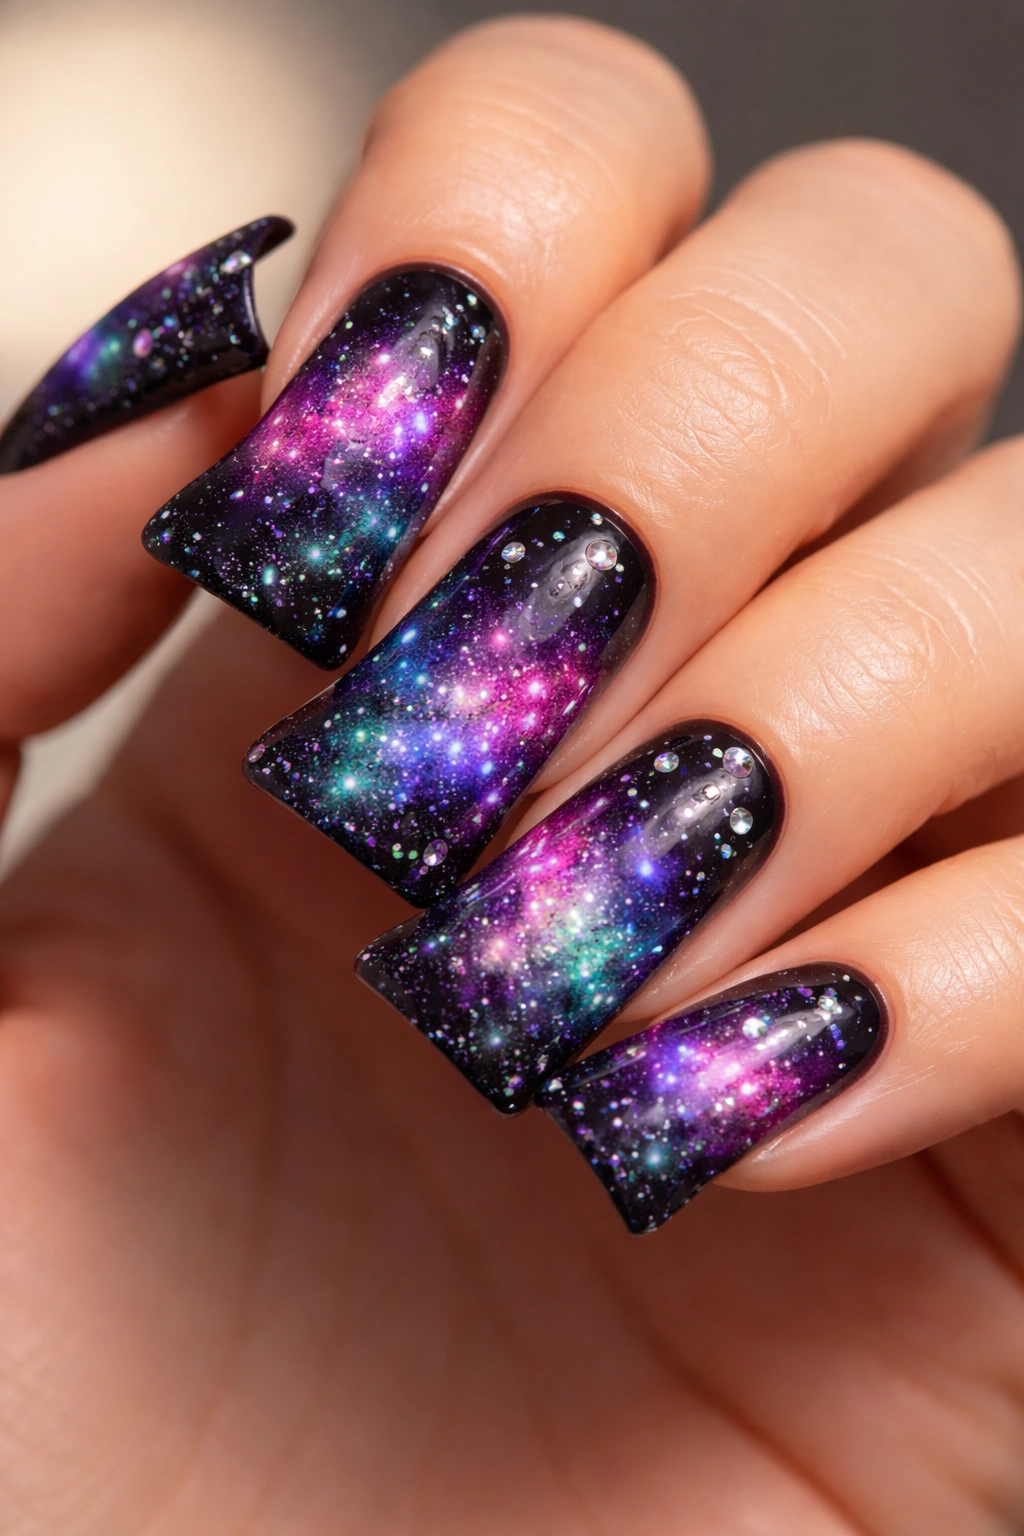
7. Cosmic Galaxy Dreamscape
Transport your nails to outer space with a galaxy design that looks like you’ve got a tiny universe on your fingertips. Create a dark base using black, deep purple, or dark navy, then add swirls of jewel tones — deep purple, magenta, teal — and dust with holographic glitter or shimmer. Add tiny white dots for stars and you’ve created an immersive cosmic moment on duck nails.
Building the Galaxy Effect
The beauty of galaxy nails is that imperfection actually adds to the aesthetic — the more chaotic and swirled, the more it looks like actual space. On duck nails, you’ve got enough surface area to create genuine depth and complexity without the design feeling cramped. The wider tip is perfect for concentrating the most saturated color and shimmer.
Galaxy Design Details
- Use a sponge to apply multiple colors in overlapping, irregular patches rather than clean lines
- Add holographic or ultra-fine glitter to the darkest areas for maximum shimmer and drama
- White or pale yellow dots of various sizes create the star field effect
- Include at least one accent nail with the full galaxy treatment and keep others darker and simpler
- A glossy top coat amplifies all the shimmer and creates that wet, cosmic look
Worth knowing: Galaxy nails work better on longer duck nails where you have more space to work with, but they’re absolutely possible on short nails too.
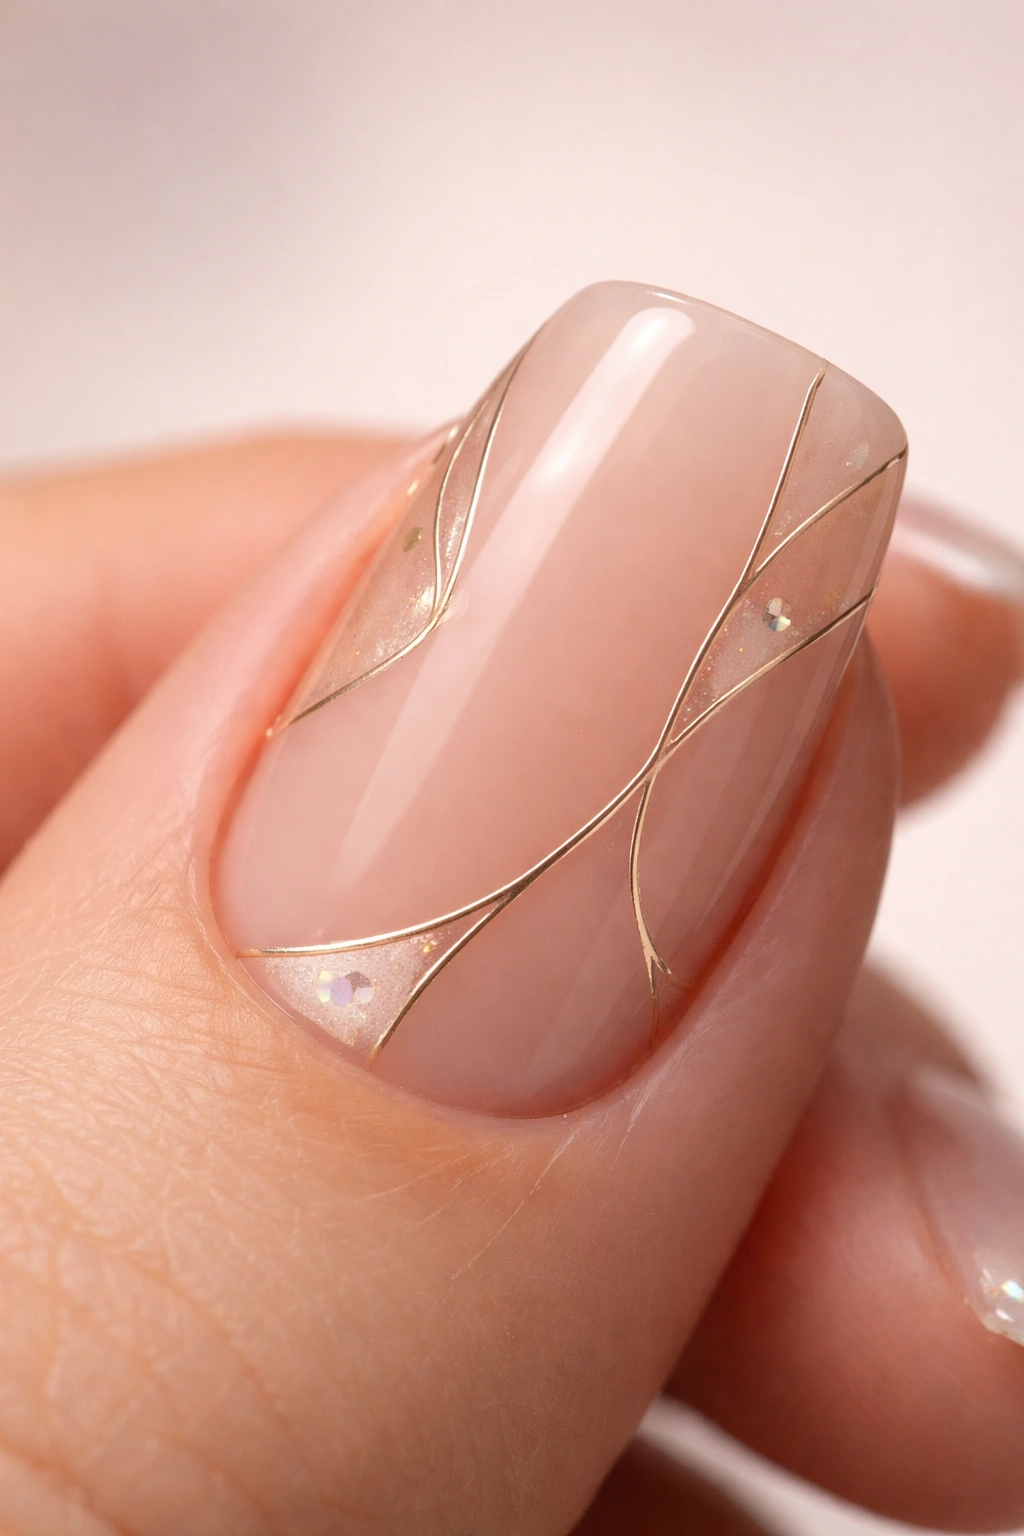
8. Minimalist Geometric Lines
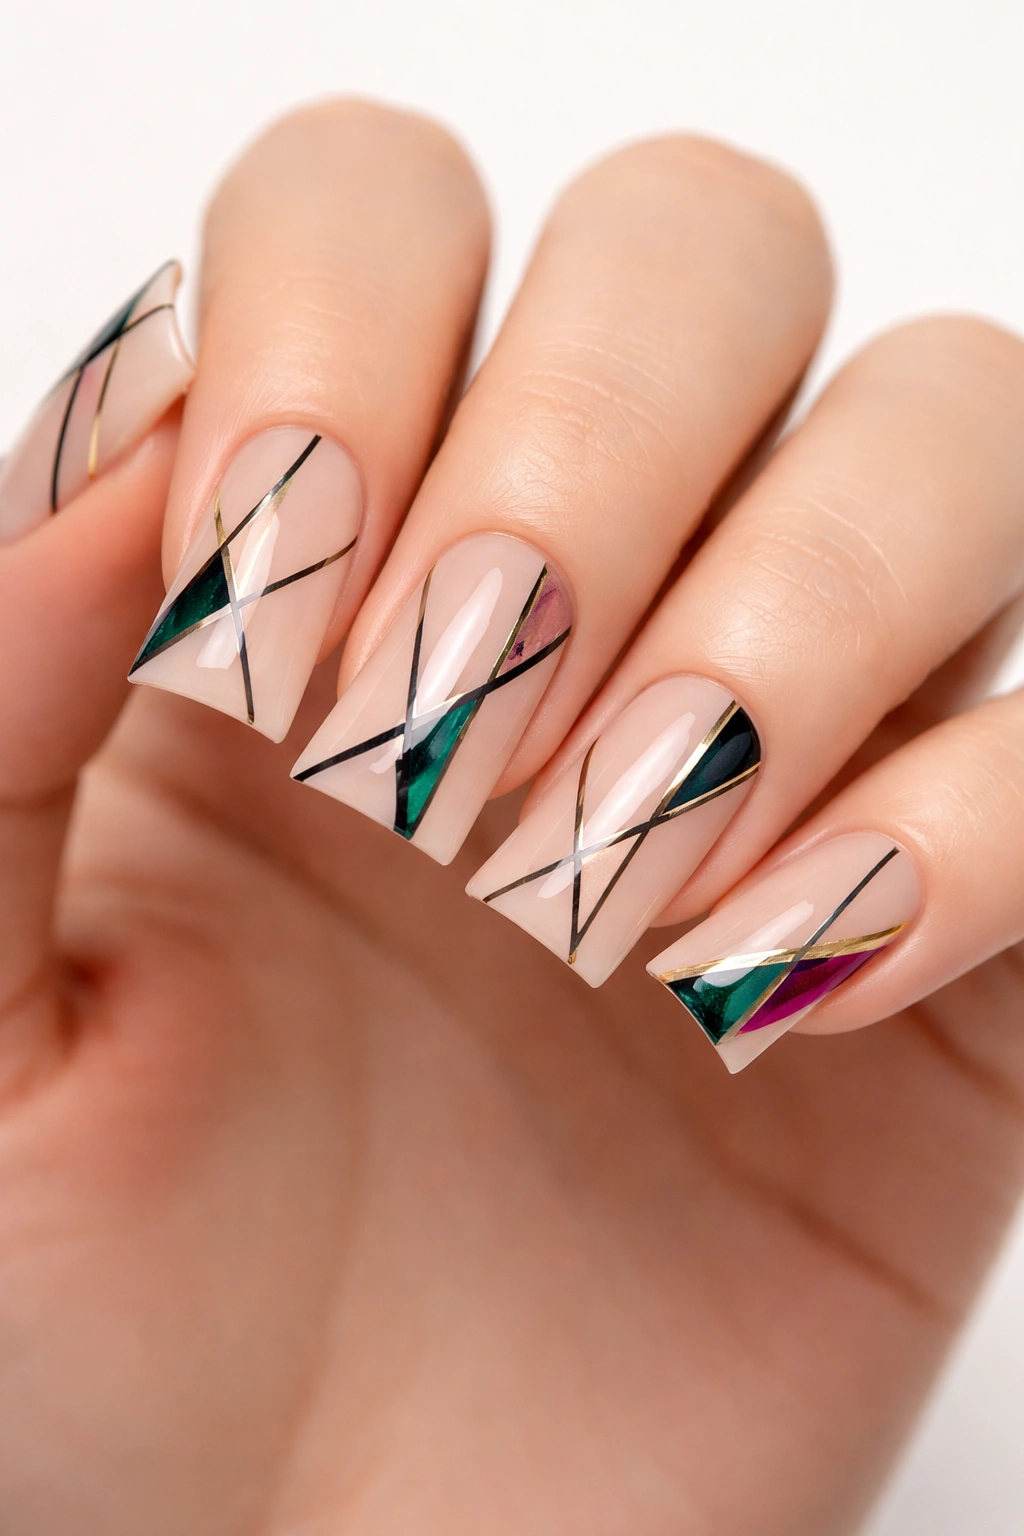
Thin, precise geometric lines in contrasting colors create sophisticated nail art that never feels overdone. Think simple line patterns — one or two thin stripes, a clean triangular shape, or abstract geometric divisions — in black or a rich jewel tone over a neutral base. The lines don’t need to match across all nails; in fact, varied line placement makes the design feel more intentional and editorial.
The Power of Negative Space
Geometric designs work on duck nails because the shape itself is already somewhat geometric — you’re not fighting against the natural curve. By keeping lines thin and spacing clean, you create breathing room that makes the entire manicure feel elevated. One nail with dramatic geometry and the rest solid or nude feels more chic than every nail matching perfectly.
Executing Clean Geometry
- Use a thin detail brush or nail art pen to ensure crisp, clean lines
- Tape off sections with thin nail tape for absolutely straight edges if you’re not steady-handed
- Keep your color palette limited — two colors maximum for the clearest geometric impact
- Place geometric elements off-center or asymmetrically for a more modern, artistic feel
- A glossy finish emphasizes the clean lines and creates contrast with any matte accent nails
Pro tip: If your lines wobble or aren’t perfectly straight, lean into it — imperfect lines read as more artistic and intentional than robot-straight geometry.
9. Floral Garden Romance
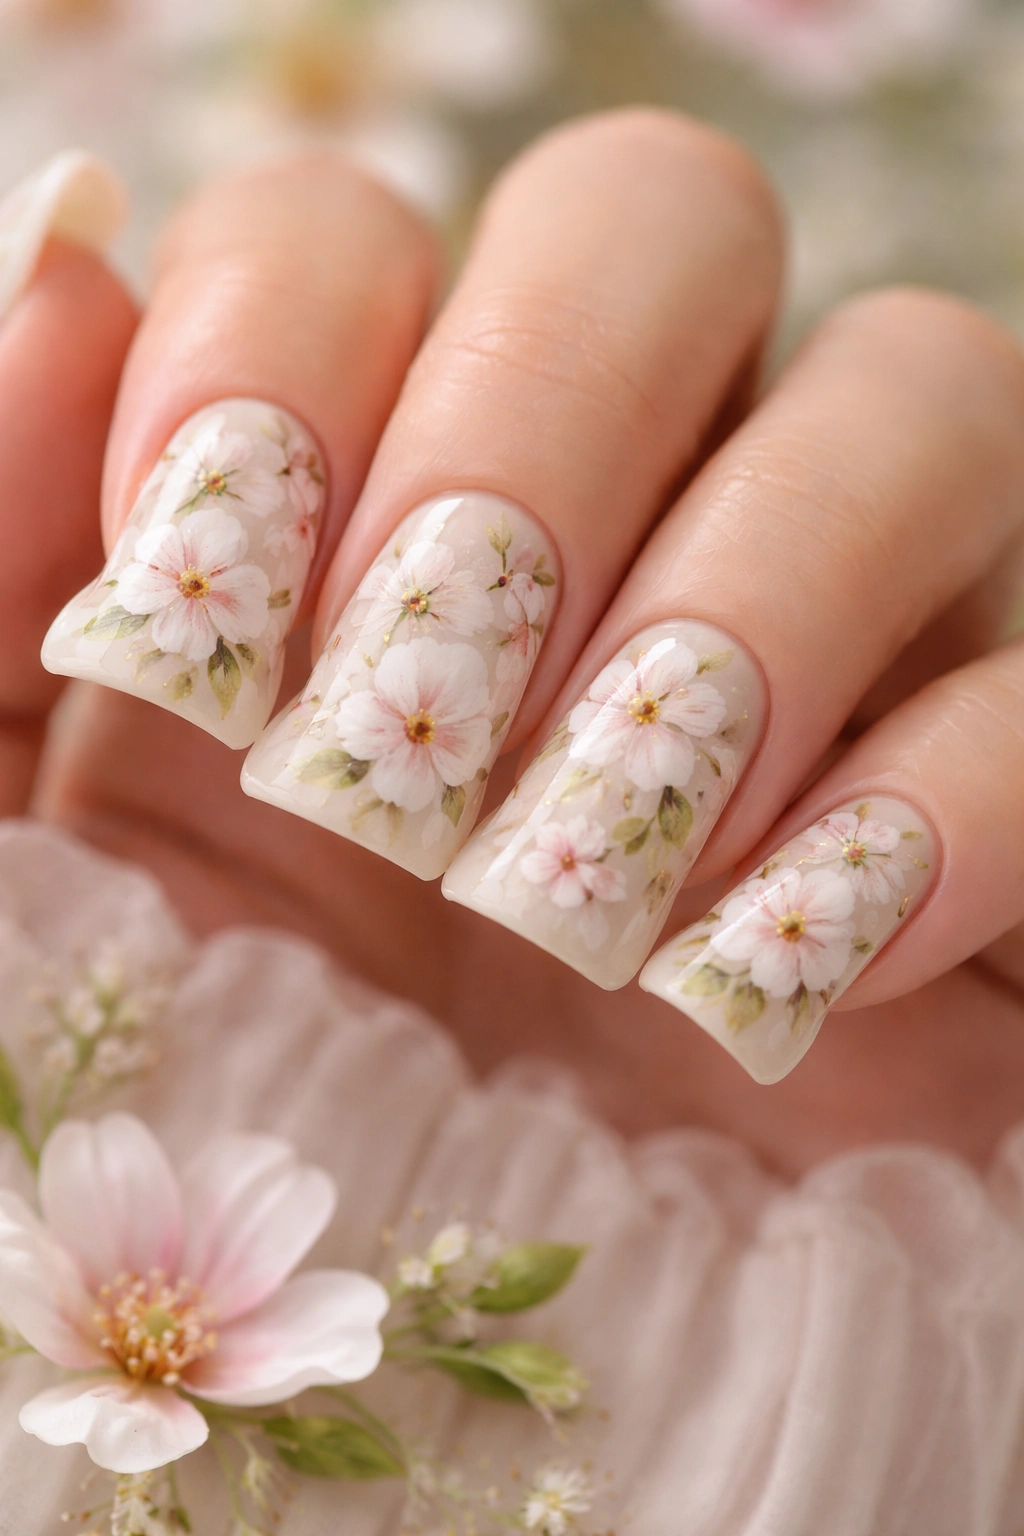
Delicate, hand-painted flowers scattered across duck nails create a romantic, garden-inspired aesthetic that feels both timeless and current. Choose a soft, neutral base and paint tiny flowers in realistic colors — white and pale pink flowers, tiny green leaves, maybe a hint of yellow centers. The designs don’t need to be photorealistic; loose, painterly florals often look more sophisticated than precise botanical accuracy.
Translating Florals to Duck Nails
The curved shape of duck nails actually frames florals beautifully because the designs sit naturally within the nail’s curve. You’ve got enough space for actual flower clusters rather than single isolated blooms. Mixing flower types — tiny daisies, small roses, delicate flowers with leaves — creates visual richness without chaos.
Floral Design Approach
- Start with a soft base like ivory, pale pink, or light peachy nude that lets flowers pop
- Paint flowers with a thin brush and use loose brushstrokes rather than tight, controlled lines
- Include tiny green leaves and stems to give flowers context and ground them
- Concentrate florals on accent nails and keep other nails solid or lightly accented with a single stem
- A matte top coat softens the look and makes florals feel more painterly and vintage
Real talk: Hand-painted florals take practice and a steady hand, but they’re absolutely doable if you start with simpler flower shapes like daisies before attempting complex roses.
10. Chrome Mirror Metallic Magic
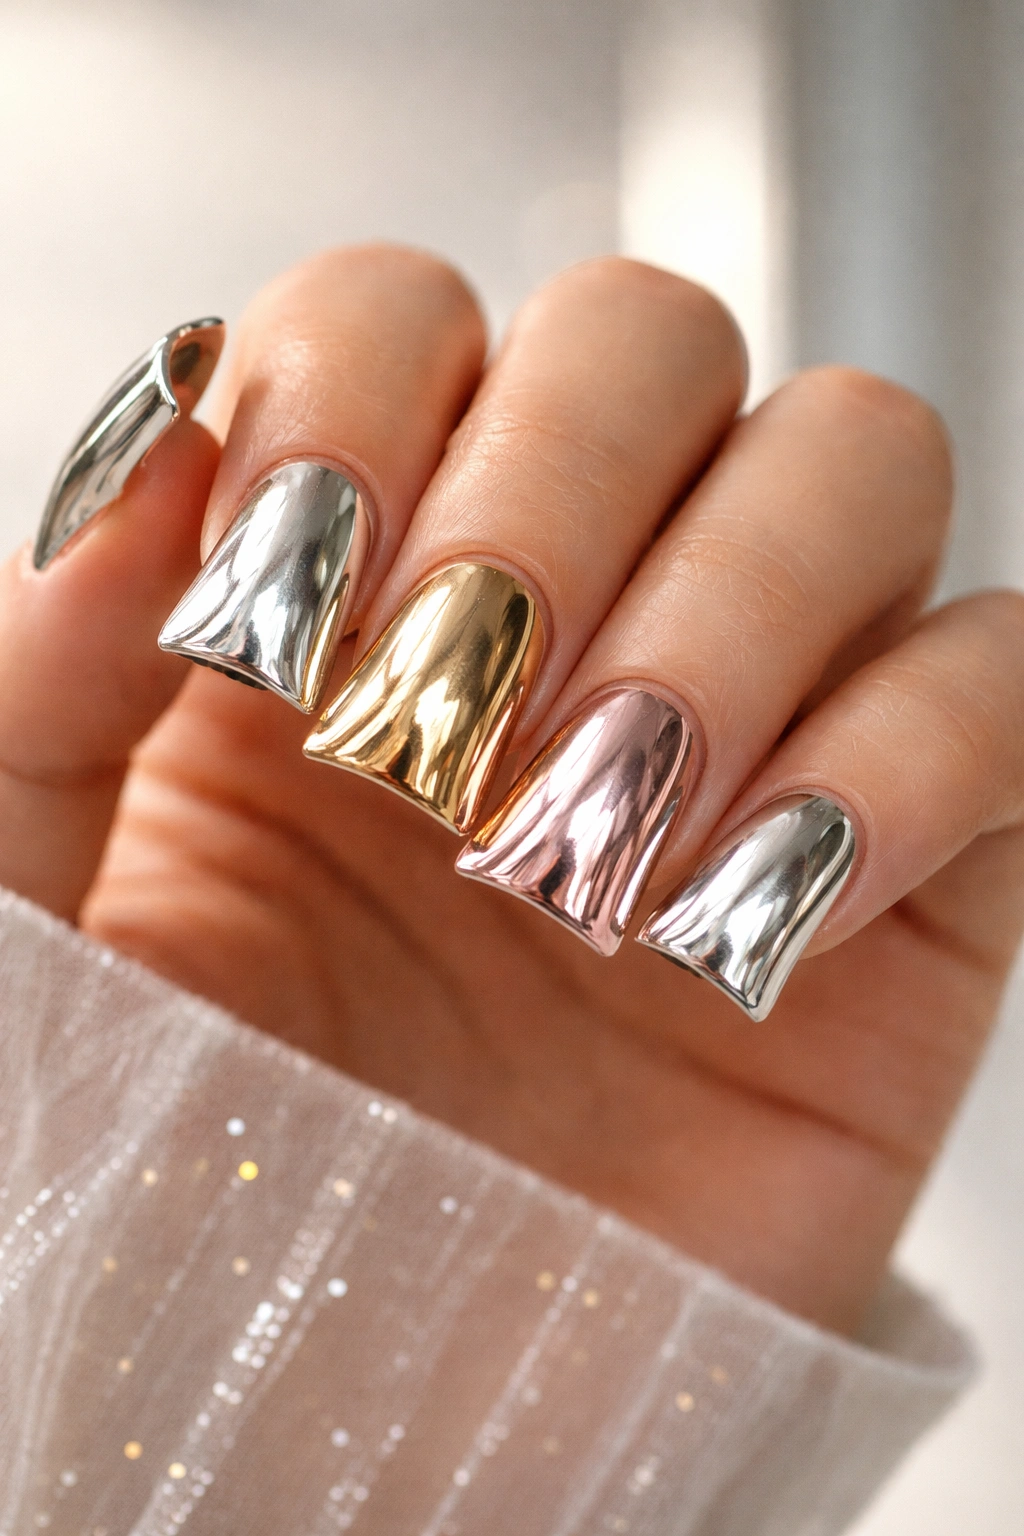
Chrome and mirror finishes on duck nails create an almost sci-fi aesthetic that catches light dramatically from every angle. The curved surface of the duck nail becomes a literal mirror, reflecting light and creating depth that flat nails can’t achieve. Go for a full chrome effect in silver, gold, rose gold, or even iridescent holographic chrome for maximum impact.
The Science of the Shine
Chrome polish is made differently than regular shimmer — it uses fine metallic powder that creates an almost mirror-like, reflective surface. On duck nails, this effect is amplified because the wider tip catches and reflects light more effectively. The shape also prevents the chrome from looking flat or one-dimensional.
Applying Chrome for Maximum Effect
- Chrome requires a very smooth base — use multiple layers of base coat and a top coat after the chrome
- Apply chrome polish in thin layers — multiple thin layers create better reflection than one thick coat
- Buff the surface gently with a soft brush between layers if you’re building the effect gradually
- Avoid the super-shiny top coat that comes with some chrome kits — a standard glossy top coat works better
- Chrome works on all nail lengths but the effect is more dramatic on longer duck nails
Insider note: Some chrome effects require a special activator spray — read your polish instructions carefully and follow them exactly for the best result.
11. Soft Nude with Pearl Elegance
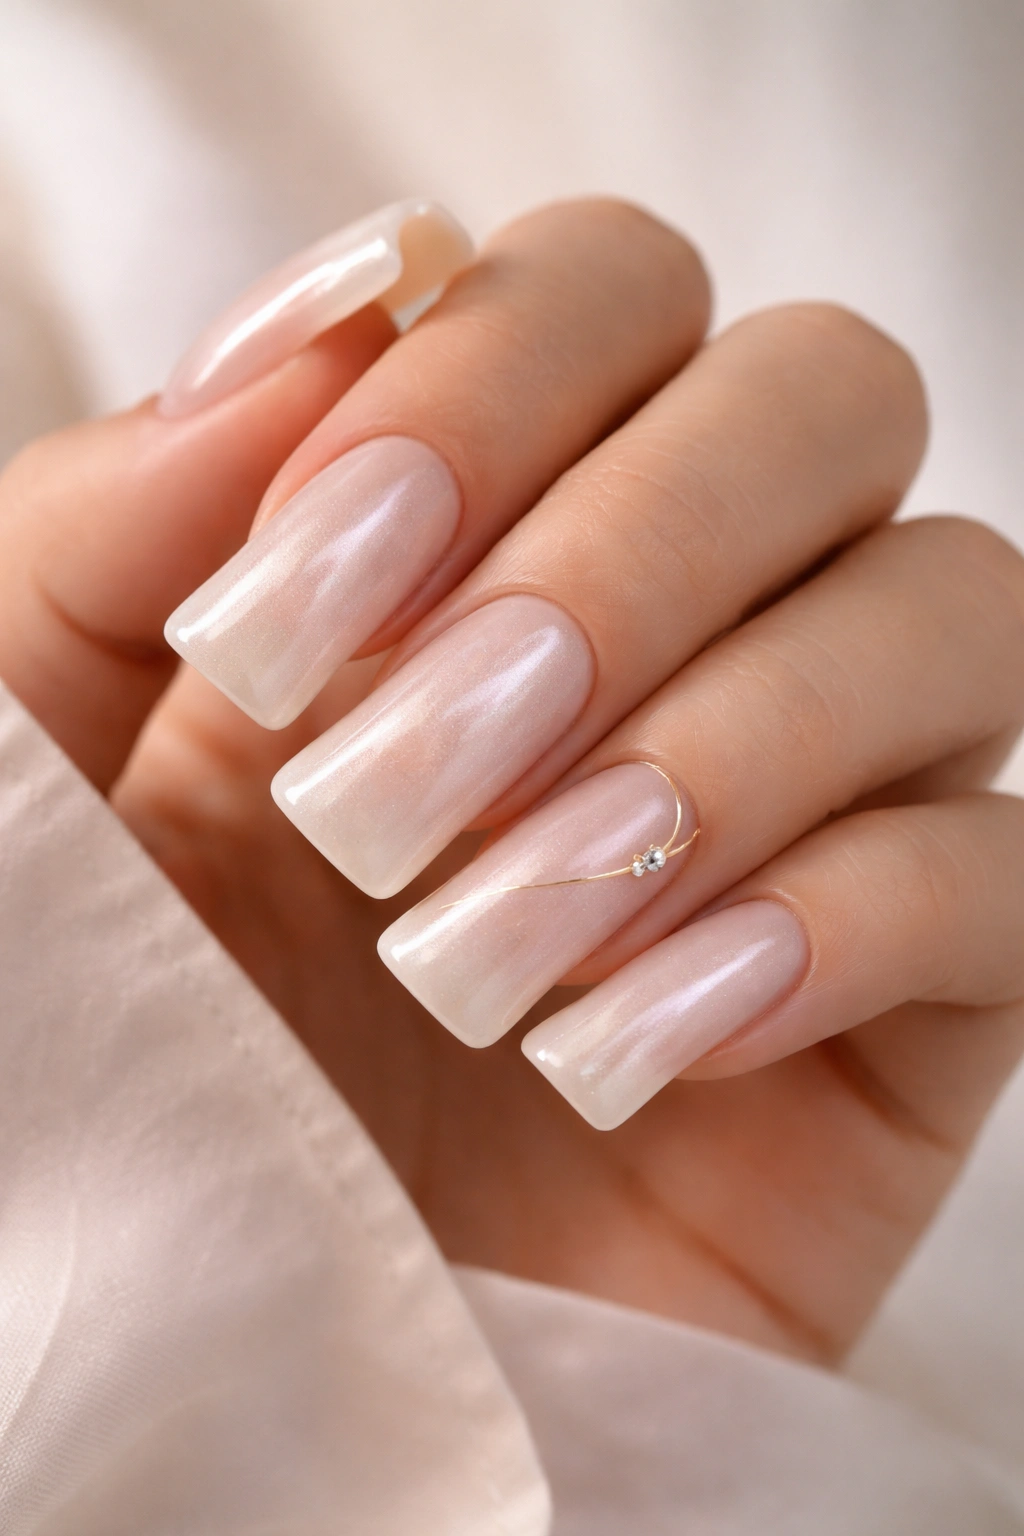
Nude duck nails with a pearl or opalescent finish create understated luxury that works for literally any occasion. Choose a nude shade that matches your skin tone closely, then apply a pearl top coat that adds subtle shimmer and dimension without making the nails look glittery or overdone. The result is elegant, timeless, and polished enough for business meetings yet pretty enough for dates.
Why Nude Endures
Nude nails elongate the fingers and create a sophisticated backdrop for jewelry and other accessories. On duck nails, a nude with pearl finish feels refined and expensive-looking. The pearl finish adds just enough visual interest to keep the nails from looking boring, while the soft color keeps everything feeling subtle and intentional.
Creating the Perfect Nude Pearl
- Find a nude that matches your skin tone exactly — too light and it looks washed out, too dark and it looks muddy
- Apply pearl finish strategically: full coverage on all nails for maximum subtlety, or just on tips for a pearl gradient
- Skip the chunky glitter top coat — a fine pearl shimmer or mother-of-pearl effect is more sophisticated
- Consider adding one delicate accent nail with a thin metallic line or minimal nail art for visual interest
- This design looks professional enough for any setting, from job interviews to weddings
Pro tip: Pearl nude nails look even more elegant when paired with metallic jewelry in complementary tones.
12. Bold Color Block Abstract
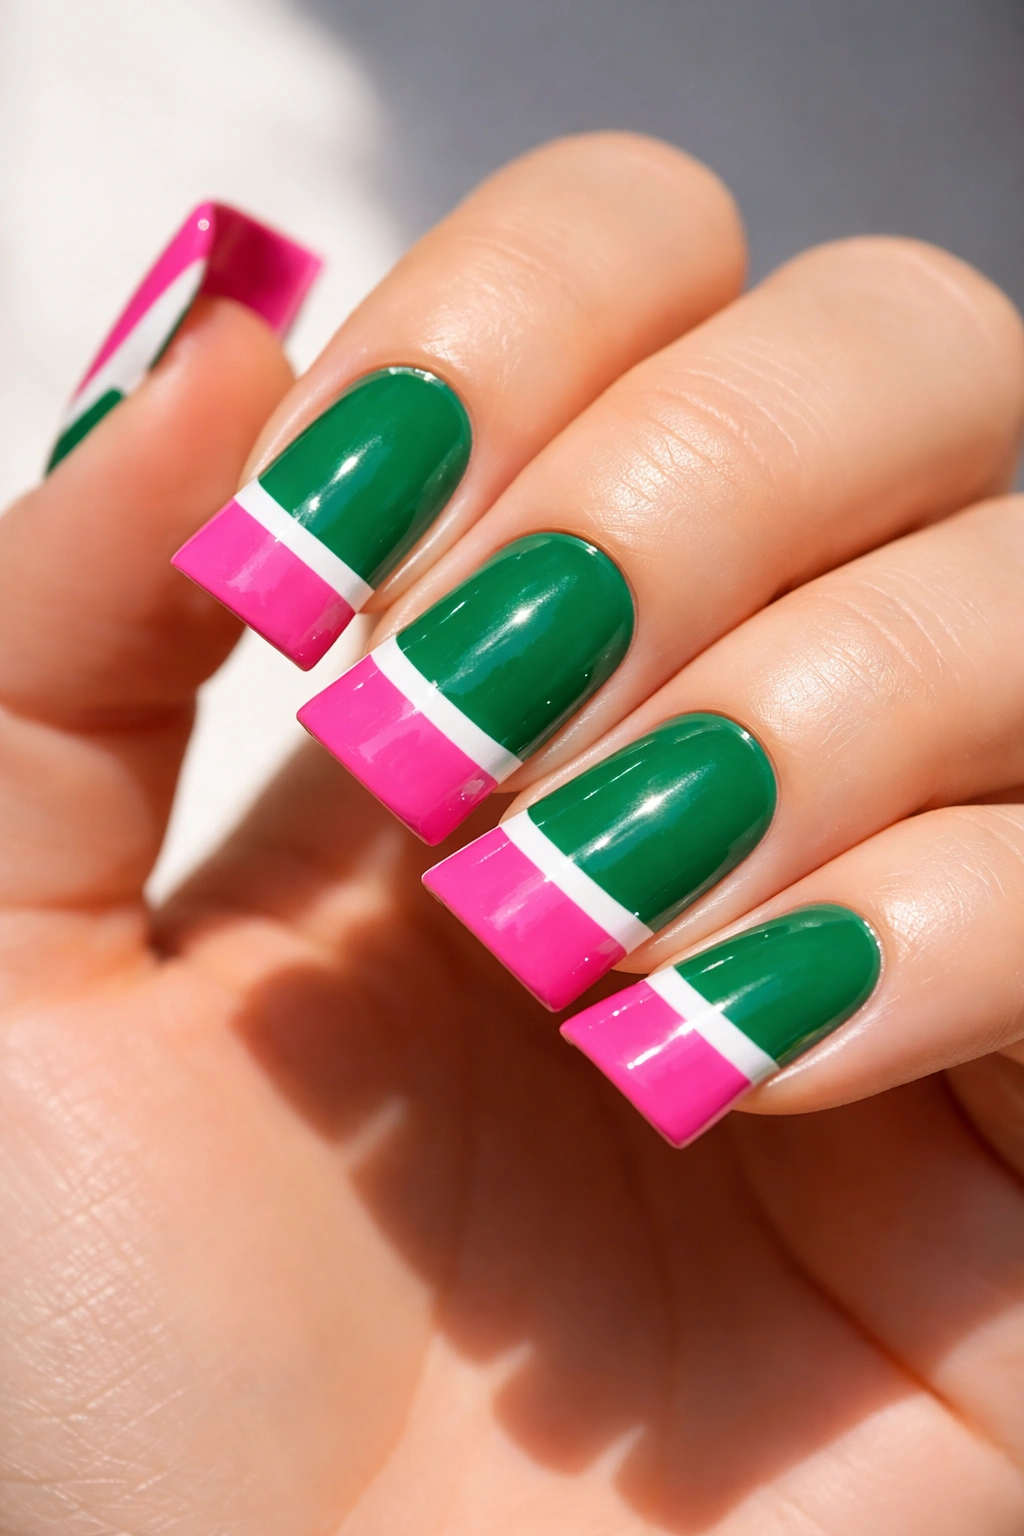
Create visual drama by dividing each duck nail into geometric sections filled with contrasting bold colors — maybe emerald green on the base and hot pink on the tip, separated by a thin white line. Or try color-blocking with one color on the left half and an entirely different color on the right half. The duck nail shape allows you to play with these divisions in interesting ways.
The Art of Color Blocking
Bold color blocking works because the contrast draws the eye and creates immediate visual impact. Duck nails allow you to experiment with color-blocking shapes — diagonal splits, vertical divisions, or even abstract shape divisions that flow across the nail. The key is keeping transitions clean and intentional rather than chaotic.
Executing Color Blocks
- Use thin nail tape to create perfectly straight division lines between colors
- Choose colors with genuine contrast — pastels against pastels muddles the effect, but jewel tones against neutrals pops
- Keep the color divisions bold and simple — more than three colors on one nail starts feeling chaotic
- One or two accent nails with color-blocking keeps the manicure from feeling overwhelming
- A glossy top coat enhances the color saturation and creates clean visual lines
Worth knowing: Color-blocking works on short duck nails too, where simpler divisions (vertical splits or a two-color gradient) look fresh and intentional.
13. Negative Space Art
Negative space designs use the natural nail color or a light base coat as part of the actual design. Paint graphic shapes, lines, or patterns around the edges while deliberately leaving sections of light nail showing through, creating sophisticated designs that feel modern and artistic. Try painted tips with bare nail in the middle, side patterns with bare space in between, or scattered shapes that don’t connect.
Why Negative Space Feels Elevated
Negative space immediately reads as intentional and artistic rather than accidental. It shows restraint and design sophistication — you’re not covering every millimeter of nail, which paradoxically makes the design feel more impactful. On duck nails, the curved shape becomes part of the design itself when you use negative space effectively.
Designing with Negative Space
- Start with a clear mental picture of where you want bare nail to show and where you want pattern
- Use painters tape to mask off sections if you want perfectly clean edges
- Thin lines and minimal shapes work better than thick design elements when using negative space
- Metallic or sparkly patterns against nude negative space creates luxury without excess
- The wider duck nail tip gives you more room to play with negative space patterns
Real talk: Negative space designs require a steady hand and clear planning, but the result is always more impressive than chaotic full-coverage nail art.
14. Sunset Ombré Gradient
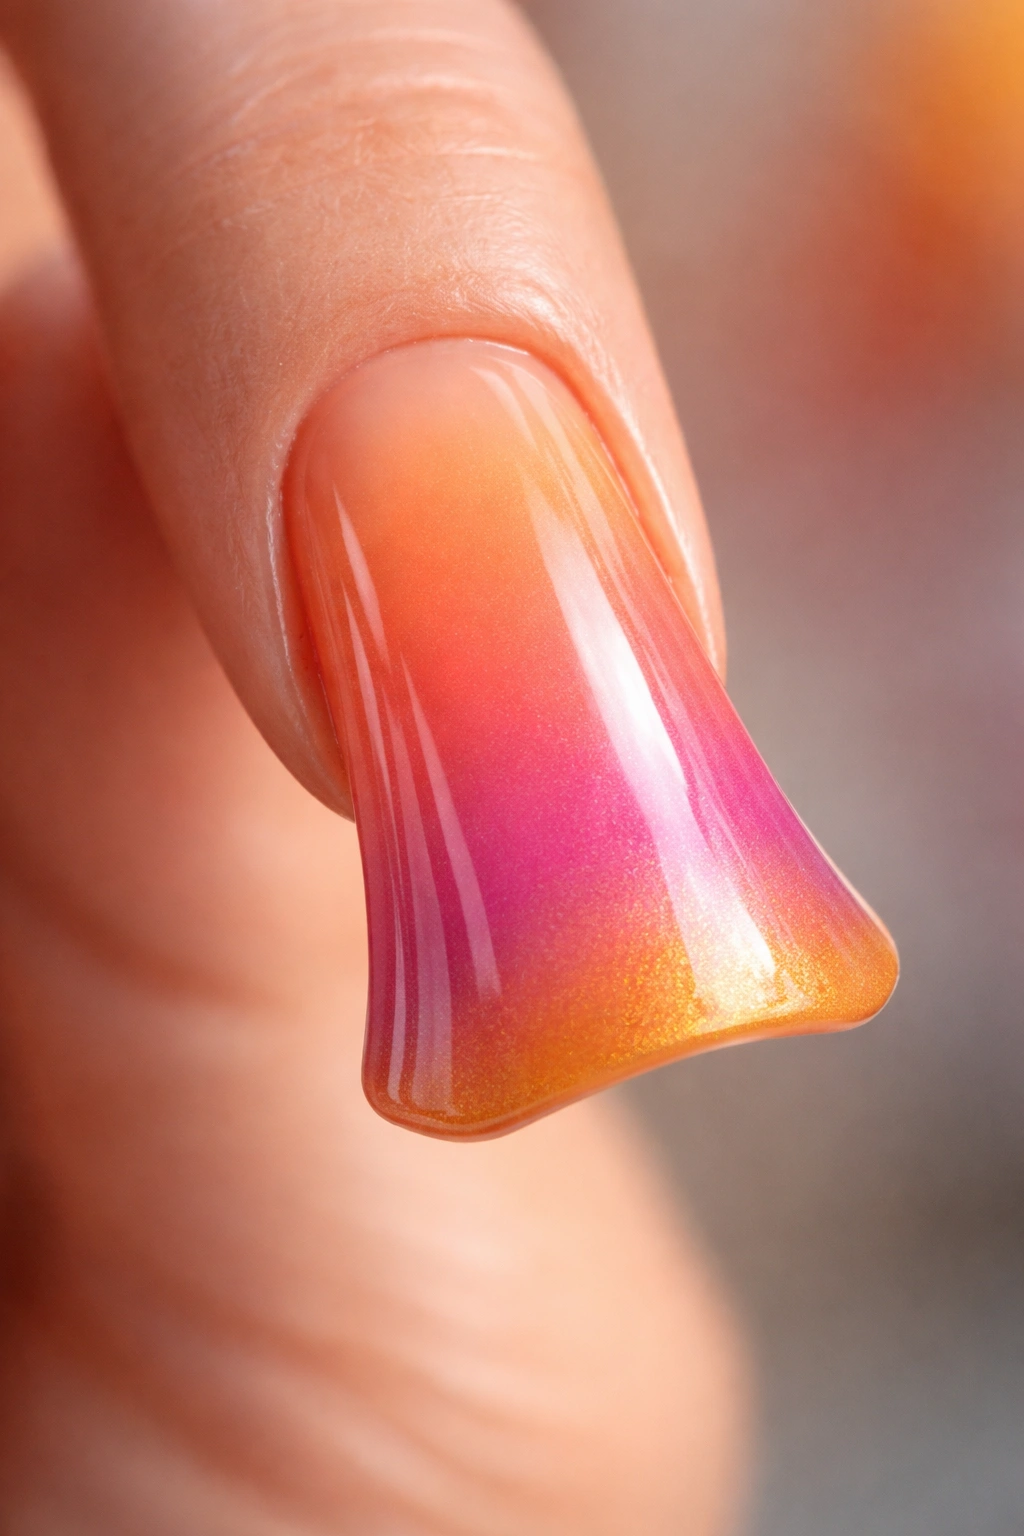
Create a fiery sunset effect that transitions from warm peachy-orange on the base through coral and pink to deep golden-orange or even a hint of purple on the tip. The gradient creates the illusion of movement and depth, and sunsets naturally feel optimistic and warm. The duck nail’s curved surface showcases the gradient beautifully as light reflects differently across the transitions.
Building the Sunset Spectrum
Sunset ombré works because the colors naturally want to flow into each other — there’s no jarring transitions like some gradient combinations. Start with your warmest, lightest color on the base and gradually deepen the shade toward the tip, allowing colors to blend slightly where they meet. The result should feel like you’re watching a sunset unfold across your fingertip.
Creating Seamless Sunset Gradients
- Use a sponging technique with three to four coordinating warm shades for smooth blending
- Blend colors while the polish is still wet — once dry, corrections become difficult
- Consider adding a thin metallic gold line down the center nail for extra dimension and glow
- Matte finish softens and romanticizes the sunset effect; glossy amplifies warmth and dimension
- This design works beautifully as a full manicure where all nails match, since the gradient is visually complex enough on its own
Pro tip: Keep your base coat and top coat applications thin and even so gradient transitions remain smooth and don’t look muddy.
Final Thoughts
Duck nails have evolved from a novelty shape into a seriously versatile canvas for self-expression. Whether you’re drawn to bold statements or subtle sophistication, these 14 designs prove that duck nails work for literally every aesthetic and occasion. The shape flatters your hands, elongates your fingers, and gives you enough surface area to showcase actual nail art without things feeling cramped.
The best design is the one that makes you feel confident and like yourself. Some of these will speak to you immediately — you’ll recognize your vibe right away. Others might inspire you to experiment with colors or techniques you’ve never tried. Mix and match elements from different designs; there’s nothing wrong with combining the marble technique from design five with the geometric lines from design eight, or adding elements from multiple designs until you create something entirely your own.
Remember that imperfection is part of the charm with most of these designs. Hand-painted nail art will never look computer-generated, and that’s exactly why it’s beautiful. Your duck nails don’t need to be gallery-quality to feel special and make you smile every time you look at your hands. Start with designs that match your current skill level and branch into more complex ones as you build confidence. The nail art learning curve is real, but it’s also incredibly rewarding — every manicure teaches you something.
