

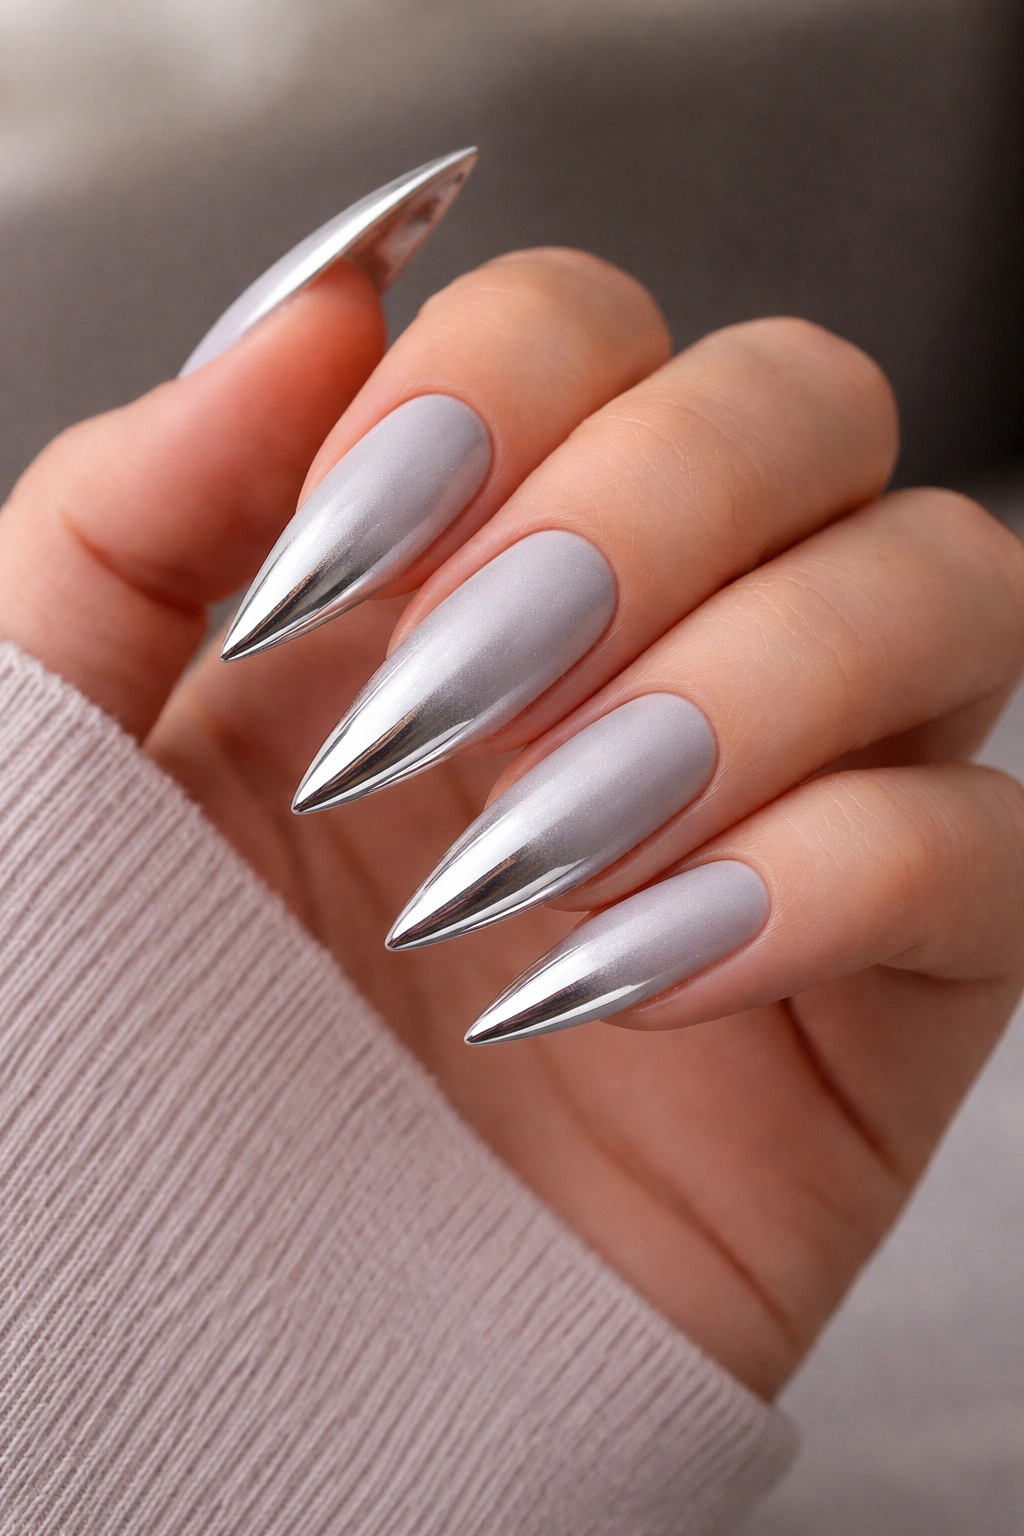
Stiletto nails demand confidence—and when you add the cool, sophisticated shimmer of silver, you’ve got a look that works for literally any occasion. Silver is the ultimate chameleon shade. It photographs like a dream, catches light in the most flattering way, and has that magical quality of feeling both edgy and elegant at the same time. Whether you’re going for glamorous evening vibes, modern minimalism, or something that just makes your hands feel powerful, silver stiletto nails are the answer.
The thing is, “silver” doesn’t mean boring repetition. This shade has enormous range—from mirror-bright chrome to subtle matte finishes, from frosted effects to glittery gradients. You can layer it with other techniques, pair it with complementary colors and textures, and create looks that feel completely personalized. The stiletto shape amplifies whatever design you choose, making even simple designs feel sharp and intentional.
If you’re ready to try silver stilettos but want more than just a solid coat of polish, you’re in the right place. These 10 ideas range from minimalist sophistication to full-on sparkle, and every single one translates beautifully to the elongated stiletto shape. Let’s dive into designs that’ll have you—and everyone around you—noticing your nails.
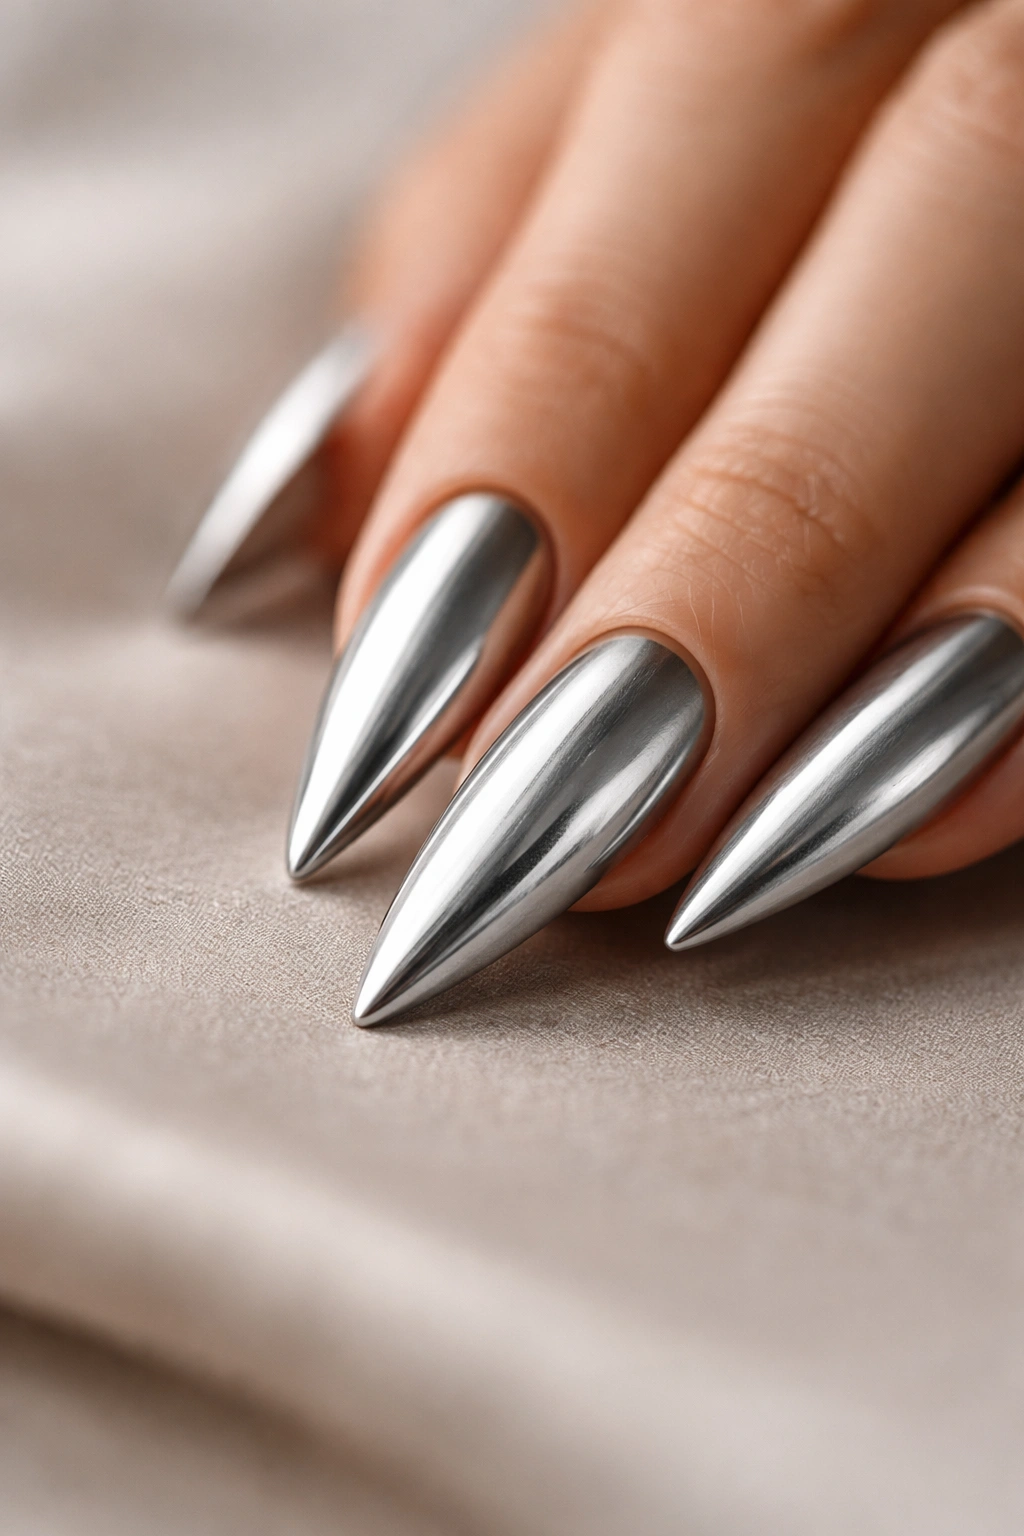
1. Polished Chrome Silver Mirror Finish
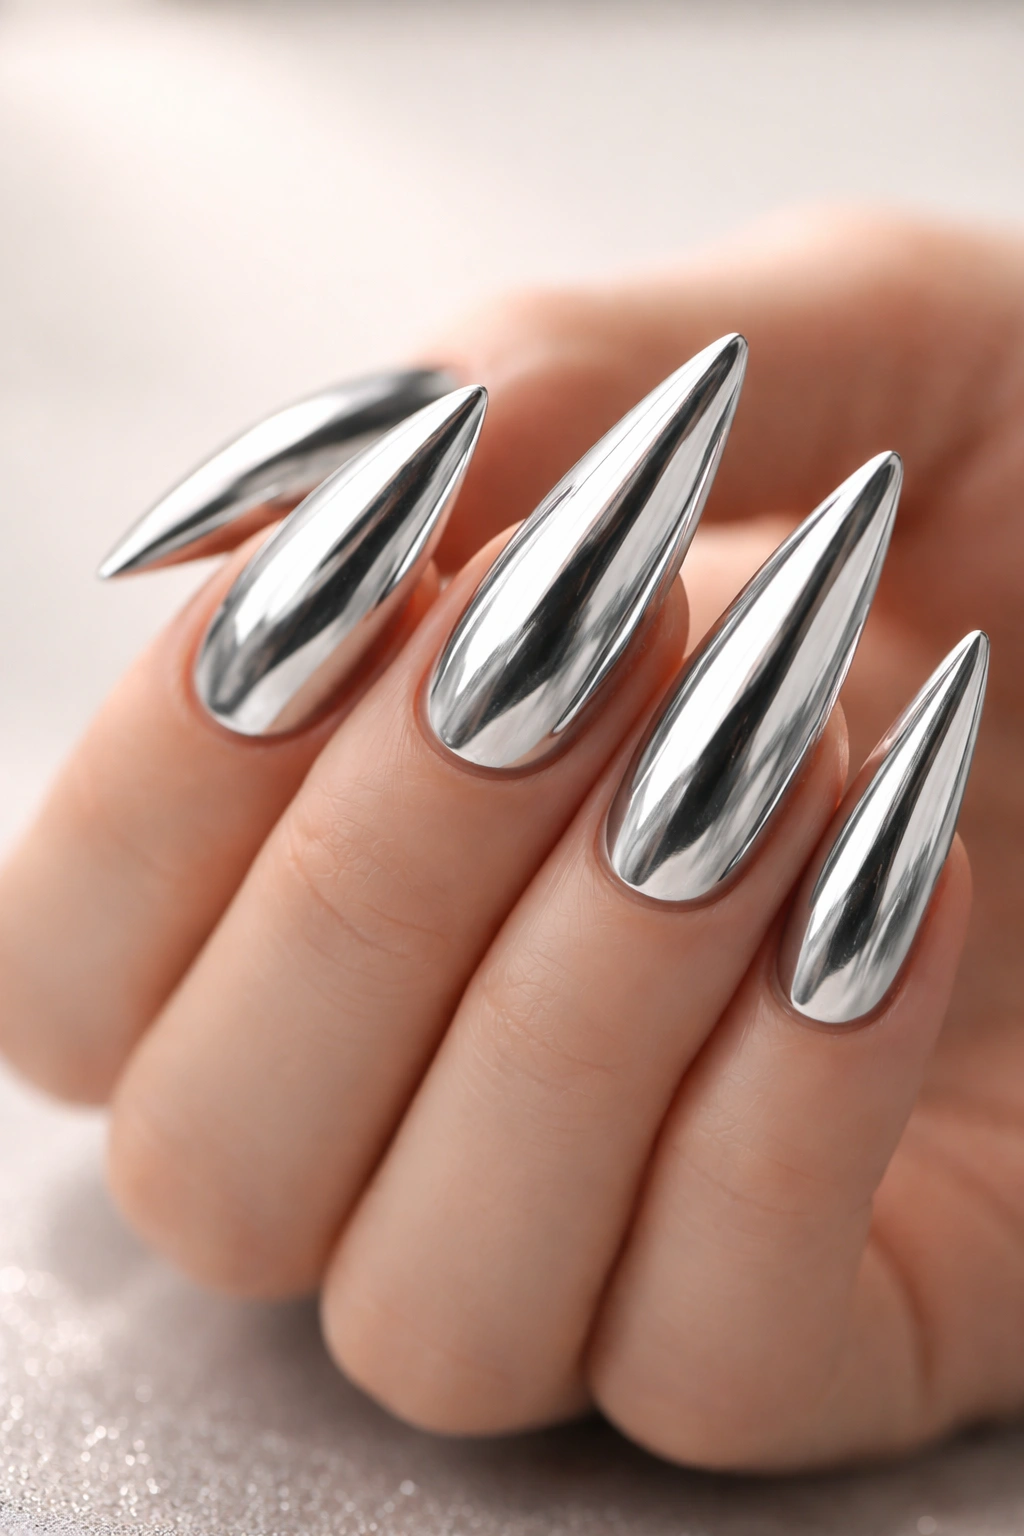
This is the foundation of iconic silver stiletto nails, and it’s a lot more striking than it might sound at first. A true chrome or mirror silver creates a nearly metallic, reflective surface that catches and bounces light with every movement. It’s the kind of finish that looks different from every angle—sometimes appearing almost blue, sometimes nearly white, depending on the light and your viewing angle.
Why This Look Commands Attention
Chrome silver works because it demands to be noticed without requiring any additional embellishment. The shimmer itself becomes the entire design story. On stiletto nails, the elongated shape amplifies the reflective quality, making your hands catch light in ways that shorter nails simply can’t. This finish photographs beautifully under most lighting conditions, which is why it’s such a favorite for professional photos and special occasions.
What Makes Chrome Silver Different From Regular Metallic Silver
- Chrome finish reflects light like a mirror, creating that highly glossy, reflective effect rather than a regular shimmer
- Requires a top coat with extra shine to maintain that reflective quality and prevent dulling
- Stays true and vibrant for up to three weeks without significant fading or yellowing
- Works beautifully on its own or as a base for accent designs on one or two nails
- Pairs perfectly with any skin tone but looks particularly striking on deeper skin tones and cooler undertones
Pro tip: Apply chrome silver in very thin layers rather than one thick coat—multiple thin layers create a more authentic mirror effect than one heavy application.
2. Silver Glitter Gradient From Base to Clear
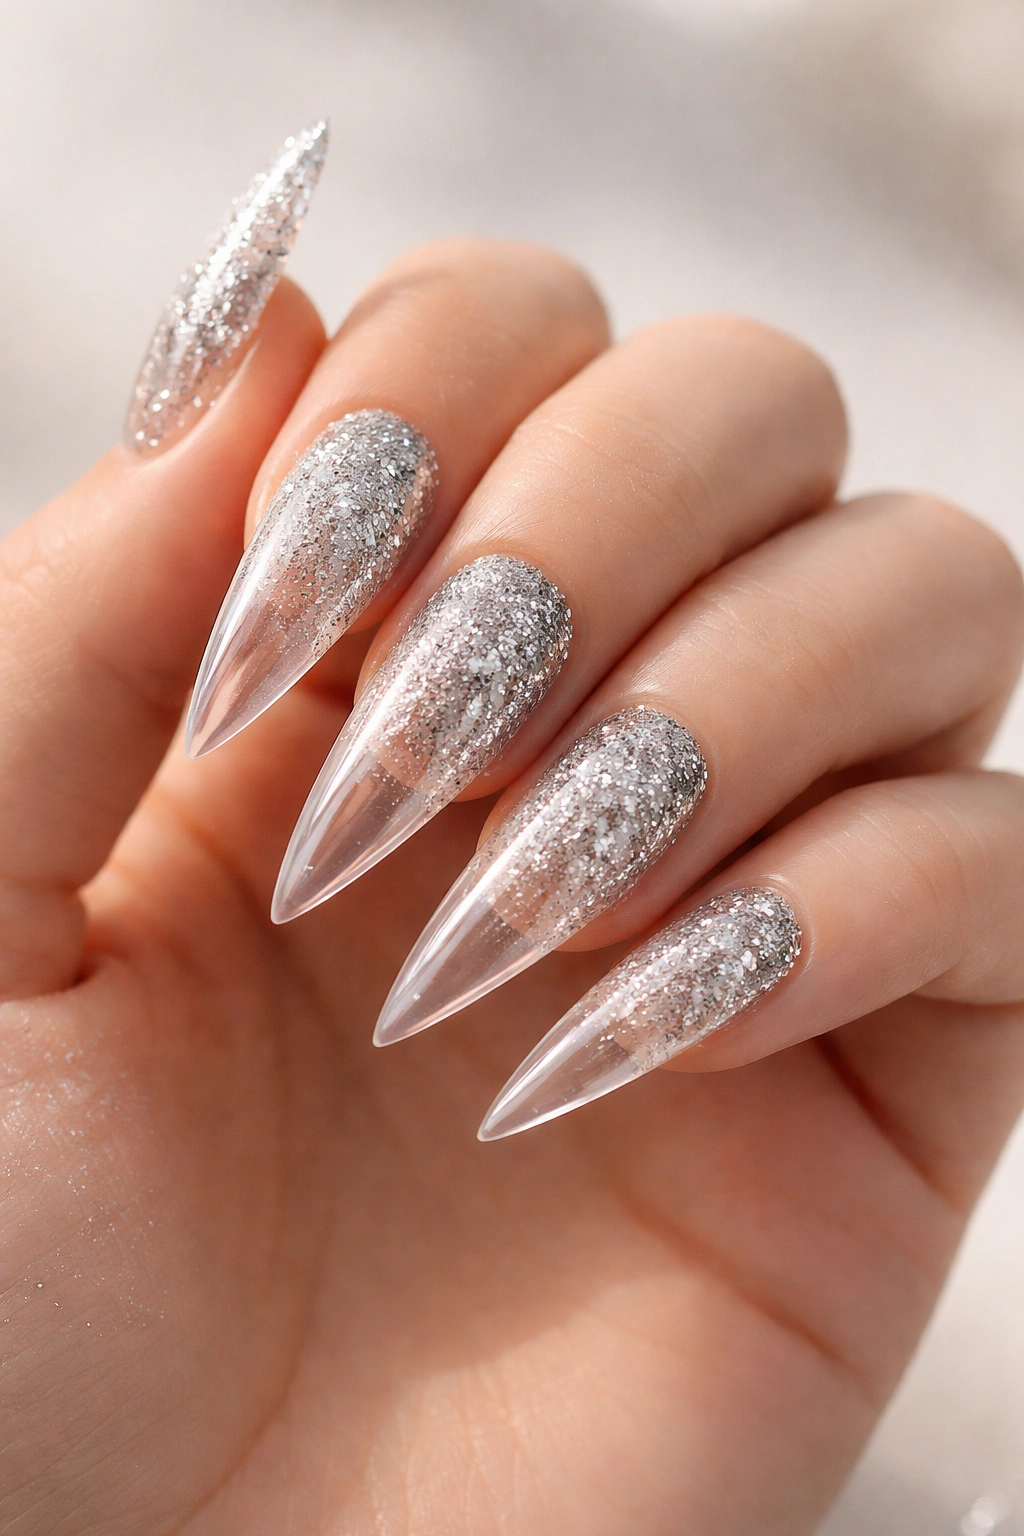
This design starts with solid silver glitter at the base of the nail and gradually transitions to a clear, transparent tip. The effect is sophisticated, not childish—think quality iridescent or holographic glitter suspended in a translucent gel or polish that fades out as it reaches the tip.
The Gradient Technique That Makes This Work
A proper glitter gradient isn’t random sprinkling. You’re deliberately concentrating glitter particles near the nail bed and strategically reducing the density as you move toward the free edge. This creates dimension and visual interest without overwhelming the entire nail. On stiletto nails, the elongated length gives this gradient room to breathe, creating a subtle fade that feels intentional and refined.
Application Tips and Design Details
- Use a clear or slightly tinted base coat to allow glitter to show clearly without muddy undertones
- Layer micro or iridescent glitter particles in the lower half, then feather them out toward the middle
- Leave roughly the top third of the nail with minimal or no glitter for that transparent-to-glitter effect
- Seal with a shiny top coat that will enhance both the glitter and the clear areas
- This design works beautifully in both warm and cool-toned silver glitter varieties
- The gradient can take 15-20 minutes extra application time but lasts just as long as solid polish
Insider note: If you’re doing this at home, use a damp makeup sponge to stipple glitter particles onto the base layer rather than brushing—you’ll have much better control over the density and distribution.
3. Matte Silver With Glossy Tips (Reverse Ombré)
Instead of the typical glossy-to-matte transition, flip it completely. Start with a velvety, soft matte silver that covers most of the nail, then transition to a high-gloss, reflective finish at the tip. The contrast between matte and glossy creates a striking two-tone effect that feels modern and intentional.
Why This Reversal Creates Visual Impact
Traditional ombré on stilettos usually goes from dark to light or matte to glossy in one direction. Reversing that sequence creates a visual surprise—your brain expects matte-to-glossy, so glossy-to-matte feels unexpected and fresh. The matte base also softens the overall look while the glossy tips add that sharp, polished edge that suits stilettos perfectly.
Creating the Transition Zone
- Apply matte silver to the entire nail first, allowing it to dry completely (about 5-10 minutes with gel polish)
- Using a precise brush or striping tool, apply glossy top coat or shine-enhancing sealer to just the tip portion
- The transition zone should be about ¼ inch of gradual shift from matte to glossy for a seamless effect
- Aim for a clean line if you prefer a more graphic look, or feather the glossy finish for a softer blend
- A high-shine top coat applied only to the tip area will enhance the contrast between the two finishes
- This design works across all nail lengths but feels particularly sophisticated on longer stilettos
Worth knowing: Matte finishes can feel delicate on longer nails since they’re less protected than glossy finishes. Use a strengthening top coat before applying the matte layer to help prevent chipping.
4. Silver With Black Geometric Patterns
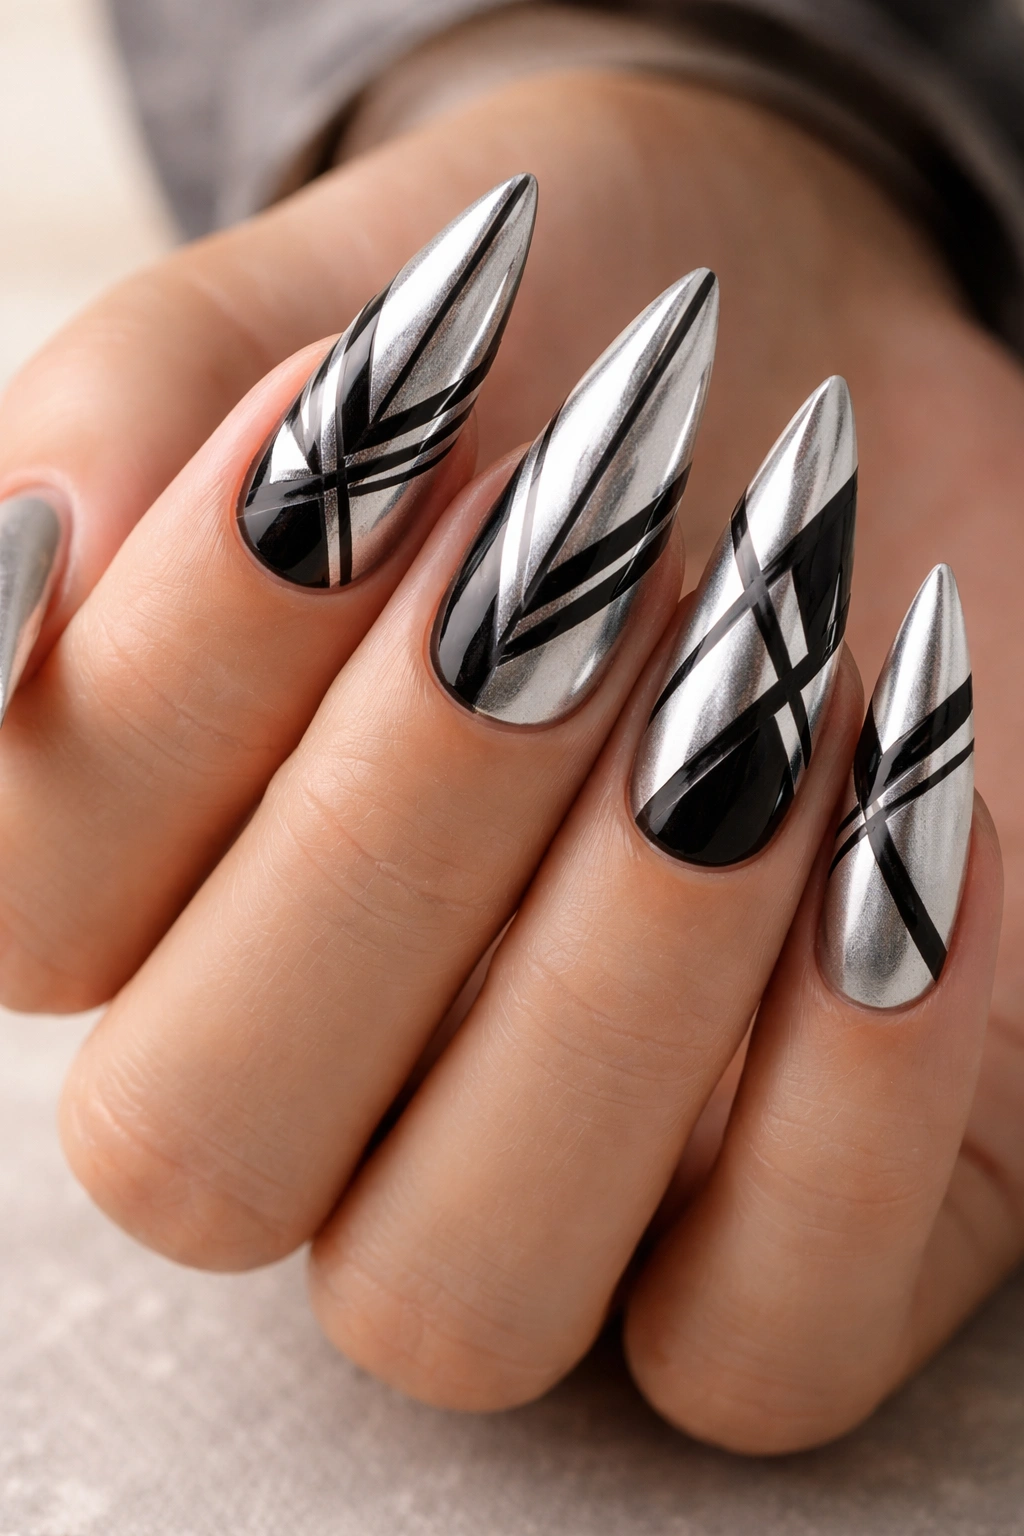
Pair crisp silver with bold black lines to create geometric patterns—think triangles, stripes, chevrons, or asymmetrical blocks. The contrast between the cool silver and stark black creates a modern, edgy look that works for both casual and formal settings.
Design Patterns That Shine on Stiletto Nails
Geometric designs benefit enormously from the elongated stiletto shape. Vertical stripes can run the full length of the nail, triangles can point toward the tip, and asymmetrical blocks can create movement and visual interest. The length gives you room for complexity without the design feeling cramped or overwhelming.
Execution and Pattern Ideas
- Thin vertical black stripes (every ¼ inch) over solid silver create a subtle striped effect
- Large black triangles pointing downward from the cuticle create a bold graphic look
- Black diagonal stripes across the entire nail create movement and flow
- Asymmetrical black shapes on alternating nails (e.g., silver on index and ring fingers, geometric on middle and pinky)
- A single thick black stripe down the center of the nail with silver on either side
- Half-moons or crescents in black at the base or tip of silver nails
Pro tip: Use a thin striping brush or nail art pen for black lines—this gives you precision and prevents the black from bleeding or looking fuzzy against the silver.
5. Silver With Delicate White Lace Details

Imagine a shimmering silver base overlaid with intricate white lace patterns—like you’re wearing jewelry on your nails. This design feels elegant, feminine, and surprisingly versatile. The white lace breaks up the silver while maintaining a cohesive, refined aesthetic.
Creating Realistic Lace Effects
True lace details on nails aren’t complicated, but they do require a steady hand or the right tools. You can achieve this look in several ways: using actual nail lace stickers (thin adhesive lace patterns that stick directly onto the polish), hand-painting lace designs with a thin brush and white polish, or using white gel paint with a needle tool to create lace-like filigree patterns.
Different Approaches to Lace Details
- Full lace coverage across all nails for maximum elegance and visual impact
- Lace accents on just the tips (combined with solid silver at the base) for subtle sophistication
- Delicate lace borders along the edges of the nail combined with silver center sections
- One accent nail with full lace design while others remain solid silver
- Lace details only on the tips, fading to pure silver as you move toward the cuticle
- Lace stickers applied with precision are the fastest and most forgiving application method
Pro tip: If using white gel paint for hand-painted lace, work slowly and let each line dry before adding adjacent lines—this prevents colors from bleeding into each other and keeps lace designs looking crisp and intentional.
6. Holographic Silver Shimmer
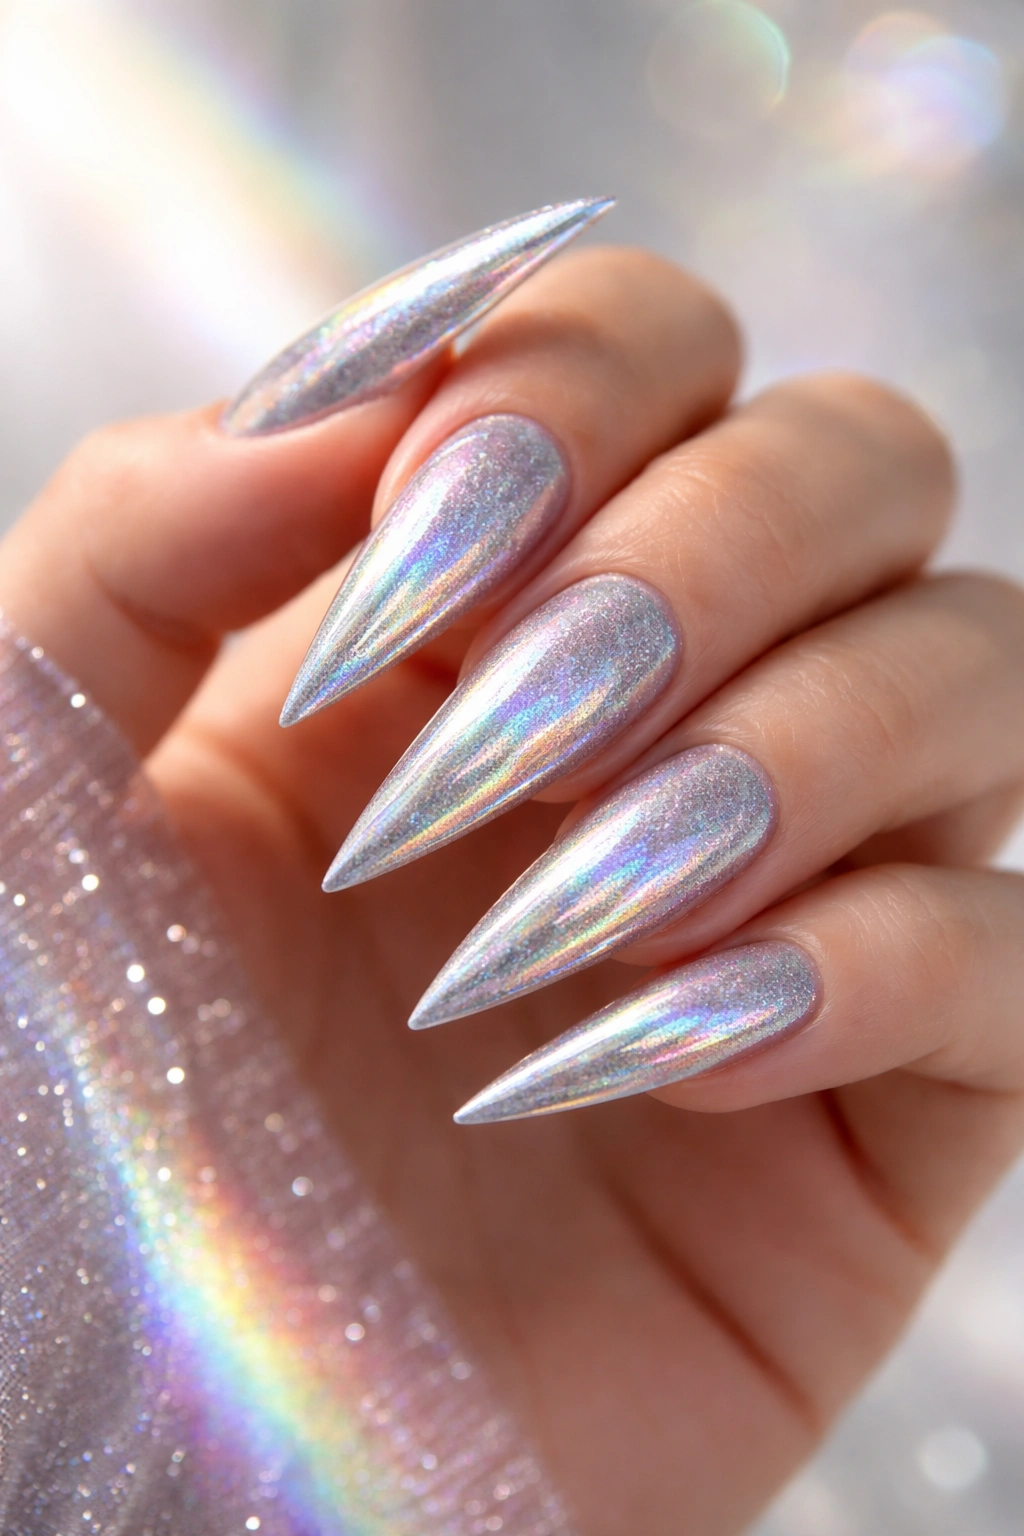
Holographic polish catches light in multiple colors simultaneously—your nails shift between silver, pink, blue, and purple depending on the angle and lighting. It’s like magic happening on your fingertips. This finish feels playful and modern while maintaining elegance through the sophisticated silver base tone.
What Makes Holographic Different From Regular Shimmer
Holographic finishes contain tiny prismatic particles that refract light differently than standard shimmer or glitter. Rather than reflecting light uniformly (like chrome), holographic particles bend light into a rainbow spectrum. The effect is mesmerizing—your nails look like they’re shifting colors as you move.
Application and Durability Considerations
- Holographic polishes work in both regular polish and gel formulations
- Three thin layers typically create a more vivid holographic effect than one or two thick layers
- The holographic effect is most visible in bright, natural light and less pronounced in dim indoor lighting
- Top coat intensity affects how dramatic the holographic effect appears (high-shine coats amplify it)
- Holographic finishes last 2-3 weeks on stilettos without significant fading or dulling
- Some holographic polishes shift more dramatically between colors than others—test before full application
Insider note: Holographic effects look most stunning under natural daylight or bright LED lighting. If you’re going to an indoor event with only warm tungsten lighting, the effect may be more subtle than in your home or office.
7. Silver Foil or Crackle Texture Finish

Instead of smooth polish, opt for a textured finish that creates depth and visual interest. Foil effects create a shattered, broken-mirror appearance, while crackle textures look like dried mud or shattered glass. Both add dimension to silver stilettos without requiring additional colors or complicated designs.
How Foil Finishes Create Drama
Foil effects use metallic leaf or flake particles that create an irregular, fragmented surface. When applied over silver, the effect is stunning—it looks like pieces of silver foil have been pressed onto your nails. The texture catches light unevenly, creating highlights and shadows that make the design feel three-dimensional rather than flat.
Texture Application Methods
- Foil flakes can be mixed into clear top coat or gel and applied as a final layer
- Crackle polish is applied in thin layers and naturally shrinks as it dries, creating the cracked effect
- Texture finishes work best over a coordinating base color—silver foil over silver creates cohesion
- These finishes require a smooth, even base coat to prevent bumpy application
- Texture finishes typically last slightly shorter than smooth finishes (2-3 weeks rather than 3-4)
- Top coat helps smooth and protect textured finishes, extending their wear time
Worth knowing: Textured finishes can feel slightly rough to the touch, even after top coat application. If you prefer completely smooth nails, this might not be your ideal design.
8. Silver With Nude Transition (Ombré Effect)
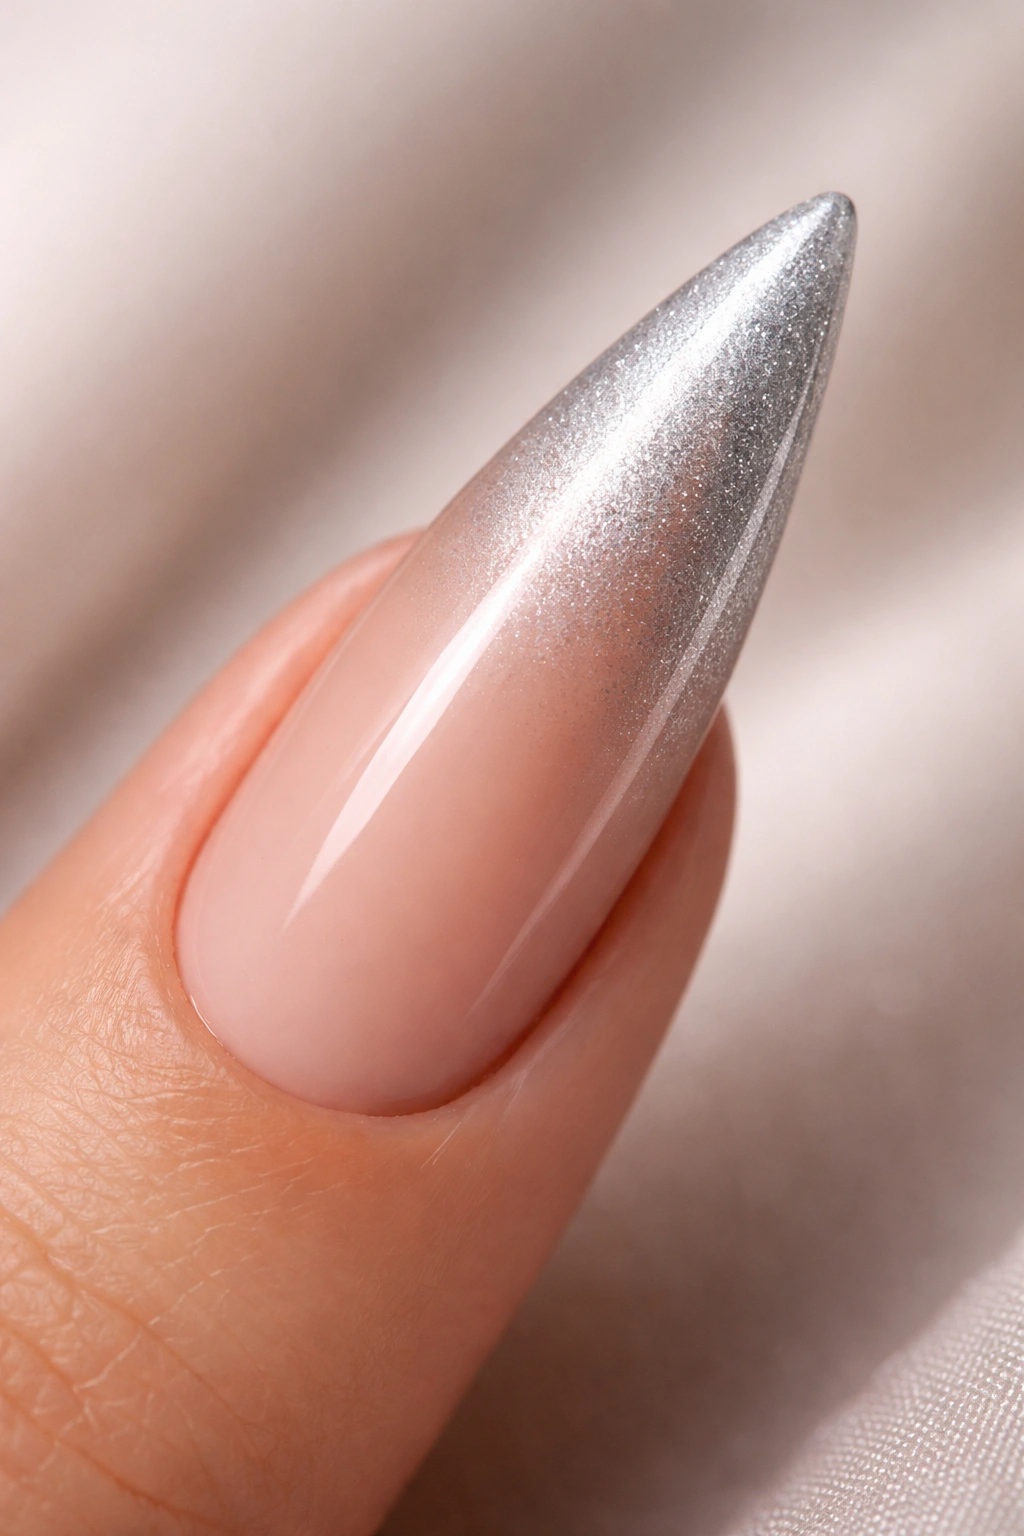
Create a gradient that transitions from warm nude at the cuticle to bright silver at the tip. This design elongates the appearance of your fingers, feels sophisticated, and is surprisingly wearable across different settings. The nude base feels neutral and professional while the silver tip adds glamour.
Building the Perfect Ombré Gradient
A successful ombré requires three elements: two coordinating colors, a medium tone to bridge them, and a blending technique. For silver and nude, you’re moving from warm to cool, so the transition needs to be subtle enough to feel intentional rather than jarring.
Gradient Techniques and Color Coordination
- Choose a nude that matches your skin tone as closely as possible for maximum elongating effect
- The middle transition zone should use a taupe or champagne tone that bridges nude and silver
- Use a dry sponge stippling method to blend the colors from one section to the next
- The cuticle area should be solid nude (no blending), the tip should be solid silver, with only the middle third featuring the gradient
- This design works beautifully on all skin tones when you choose coordinating nude shades
- Ombré gradients require 15-20 extra minutes of application time but last as long as regular polish
Pro tip: If you’re nervous about blending, use gel polish with a thick, shiny top coat—this fills in any imperfections and creates a seamless blend even if your transition zone isn’t absolutely perfect.
9. Silver With Rhinestone and Crystal Embellishments
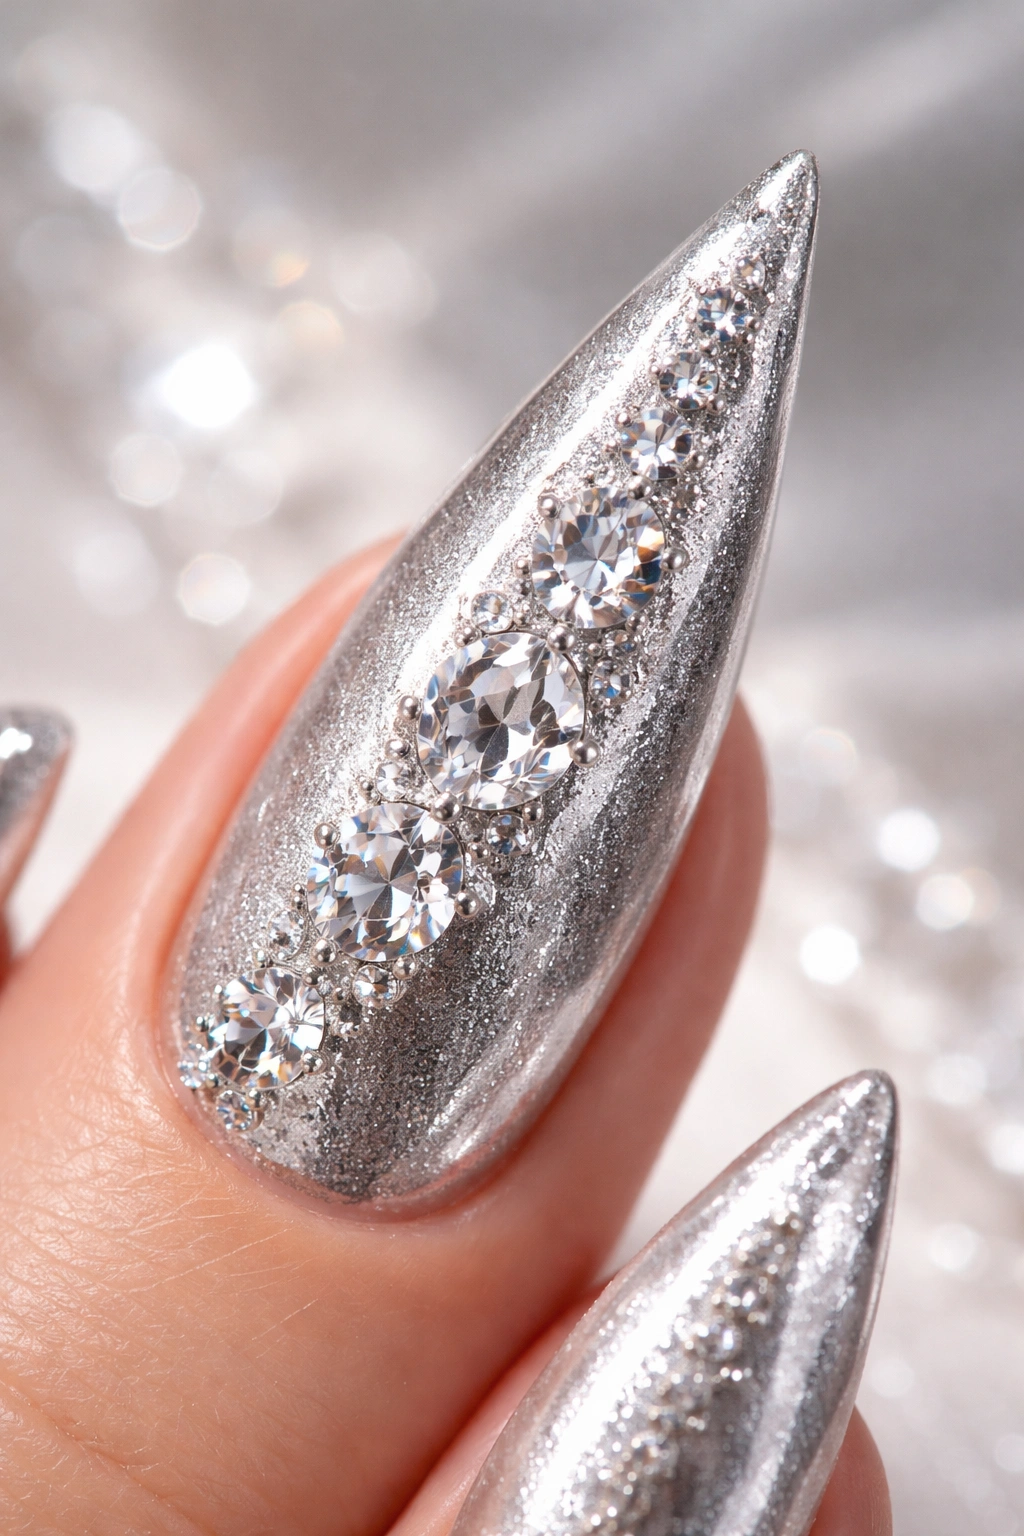
Take the sophistication to the maximum by adding high-quality rhinestones, crystals, or gemstones to your silver stilettos. This works beautifully as an all-over studded design or as strategic placement on select nails or nail sections.
Choosing Quality Stones for Maximum Impact
Not all rhinestones are equal. High-quality crystals (like Swarovski) sparkle dramatically and catch light in multiple directions, while cheaper alternatives can look dull and plastic. For stiletto nails, quality matters because the length and shape amplify either the elegance or the cheapness of your design.
Rhinestone Application and Design Ideas
- Full coverage with small rhinestones creates a luxurious, glittering effect
- Strategic placement (just along the tips or down the center) feels more elegant than complete coverage
- Larger statement stones (one per nail) create bold focal points
- Mixed stone sizes create depth—combine larger center stones with smaller surrounding stones
- Clear, silver, or iridescent stones all complement silver polish beautifully
- Stones adhere best to gel polish rather than regular polish (the sticky base holds them better)
- A thick top coat over stones protects them and prevents loosening or loss
Pro tip: Apply stones to wet gel polish before curing under UV/LED light—once cured, apply another layer of gel to partially seal the stone while still leaving it visible and dimensional.
10. Frosted Silver With Matte Finish
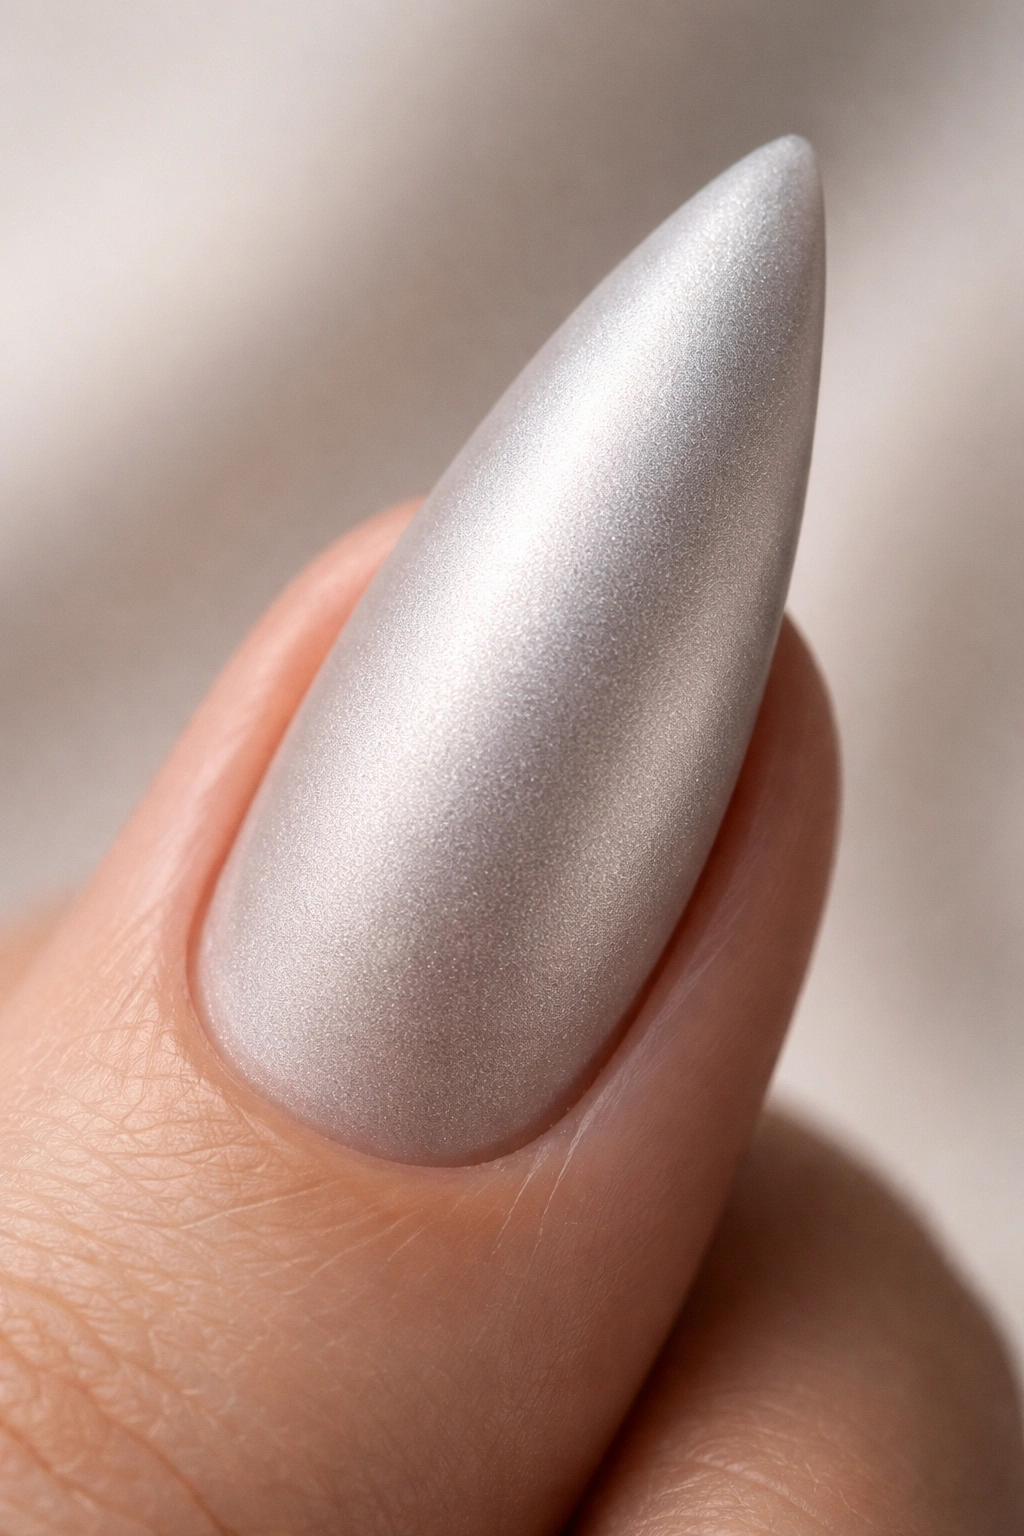
A velvety, soft frosted silver creates an understated, sophisticated look that feels modern and luxurious. Unlike chrome’s reflective shine or matte’s complete flatness, frosted finishes have subtle dimension and a slightly textured appearance that catches light gently rather than dramatically.
The Subtle Sophistication of Frosted Finishes
Frosted effects use special polish formulations that contain tiny particles creating a soft, diffused light-reflection. Rather than looking shiny or dull, frosted nails appear to glow softly. On stiletto nails, this creates an elegant, refined look that works across professional and social settings without demanding attention.
Achieving and Maintaining Frosted Finishes
- Frosted polish is usually available in dedicated frosted formulations rather than as a finish applied over regular polish
- Apply frosted silver in thin, even coats (usually two to three coats for full opacity)
- Avoid thick top coats with frosted finishes—they can muddy the effect and make the finish appear dull
- A thin, matte top coat maintains the frosted appearance and provides protection
- Frosted finishes show fingerprints less obviously than shiny finishes, making them practical for everyday wear
- The frosted effect lasts 3-4 weeks without significant degradation
- Frosted finishes feel slightly velvety to the touch, creating a pleasant tactile experience
Insider note: Frosted finishes photograph differently than shiny finishes—they look softer and more romantic in photos while maintaining elegance in person. If photos matter for your occasion, test this finish in advance.
Final Thoughts
Silver stiletto nails offer endless possibilities because silver itself is so versatile. Whether you choose mirror-bright chrome, intricate lace details, textured finishes, or sparkling rhinestones, you’re working with a shade that automatically feels sophisticated and intentional. The elongated stiletto shape amplifies whatever design you choose, turning even simple variations into statement nails.
The key is starting with a design that aligns with both your personal style and the occasion. If you love maximum drama, go for holographic or rhinestone designs. If you prefer understated elegance, frosted or matte finishes deliver. And if you want flexibility across different settings, geometric patterns or gradient effects offer that perfect middle ground.
Take your time with application—whether you’re visiting a professional nail technician or doing this at home. Quality base coats, even color coverage, and proper sealing matter more than rushing through the process. Your silver stiletto nails deserve the care that transforms them from pretty into absolutely stunning. Pick one of these ideas, commit to it fully, and enjoy having nails that feel as powerful as they look.
