

Teal nails have become a go-to choice for anyone who wants a statement manicure that sits perfectly in the middle of bold and wearable. It’s striking enough to turn heads, but sophisticated enough to work from the office to dinner with friends. When you combine teal with the drama of stiletto nails, you’ve got something genuinely special—a nail style that photographs beautifully and actually makes you want to show off your hands.
The thing about teal is that it’s incredibly versatile. It works with gold accents for glamour, silver for modern edge, and neutral tones for understated elegance. Stiletto nails amplify whatever design you choose, making even simple color looks like a curated aesthetic. Whether you’re drawn to minimalist designs or intricate nail art, teal gives you a canvas that feels simultaneously trendy and timeless.
If you’ve been scrolling through nail inspiration and keep coming back to teal but aren’t sure exactly what direction to go, this is the perfect place to start. I’ve pulled together sixteen distinct teal stiletto nail ideas—each one a different mood, technique, and vibe. Some are perfect for special occasions, others work for everyday wear, and a few are specifically designed to handle the transition between seasons. Let’s dive in and find the teal stiletto look that’s calling your name.
1. Solid Teal with Chrome Accent Strip
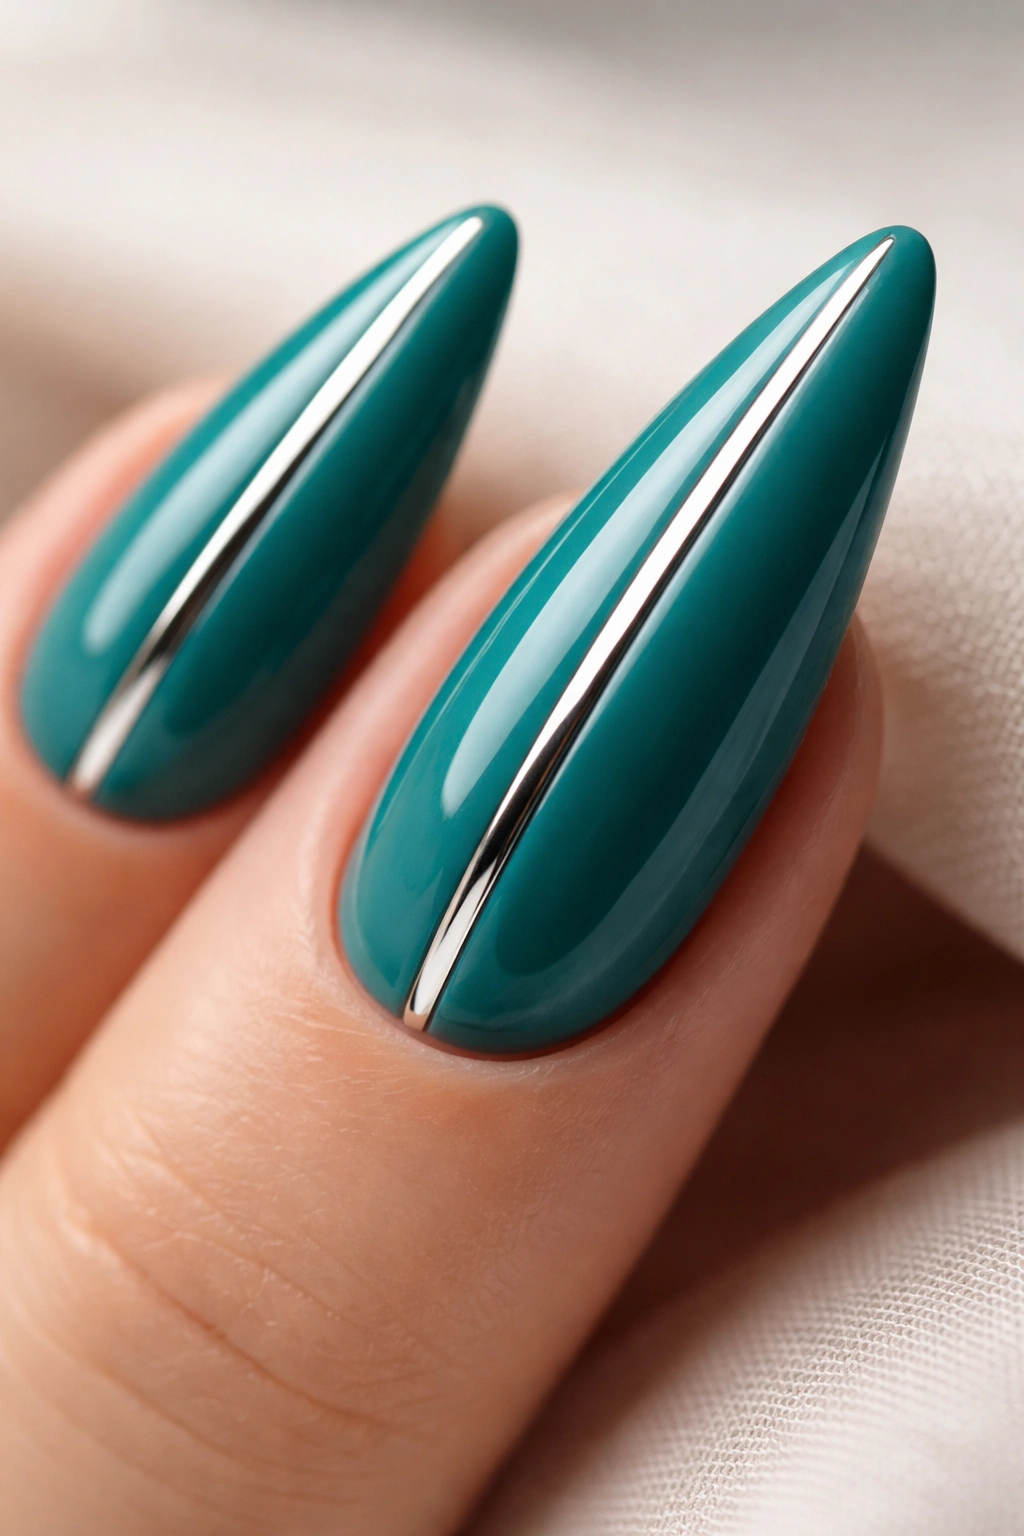
A single chrome accent strip running down the center of one or two nails creates an instant sense of luxury without overwhelming the design. The metallic catch the light beautifully against the matte or glossy teal base, creating dimension that pulls everything together.
Why This Design Works
The simplicity of this look makes it deceptively sophisticated. Chrome accents reflect light in a way that instantly elevates even a basic teal polish, and the vertical stripe on a stiletto nail creates an elongating effect that’s genuinely flattering. You get maximum impact with minimal design effort—perfect if you’re short on time but want something that feels intentional and polished.
Application and Maintenance Tips
- Use a thick gel-based chrome powder applied to a slightly sticky base coat layer for best adhesion
- The chrome strip should be about one-quarter inch wide for balanced proportions on stiletto nails
- Apply a glossy top coat over the entire nail to seal the chrome and prevent it from lifting at the edges
- Chrome will stay pristine for 2-3 weeks, but you may need to refresh the top coat around week two if it starts to dull
- If chrome powder is new to you, watch videos showing the buffing technique first—applying it correctly makes all the difference
Pro tip: For an unexpected twist, apply the chrome strip off-center or at a slight angle rather than perfectly straight down the middle. It feels more modern and artistic.
2. Ombre Teal to White Gradient
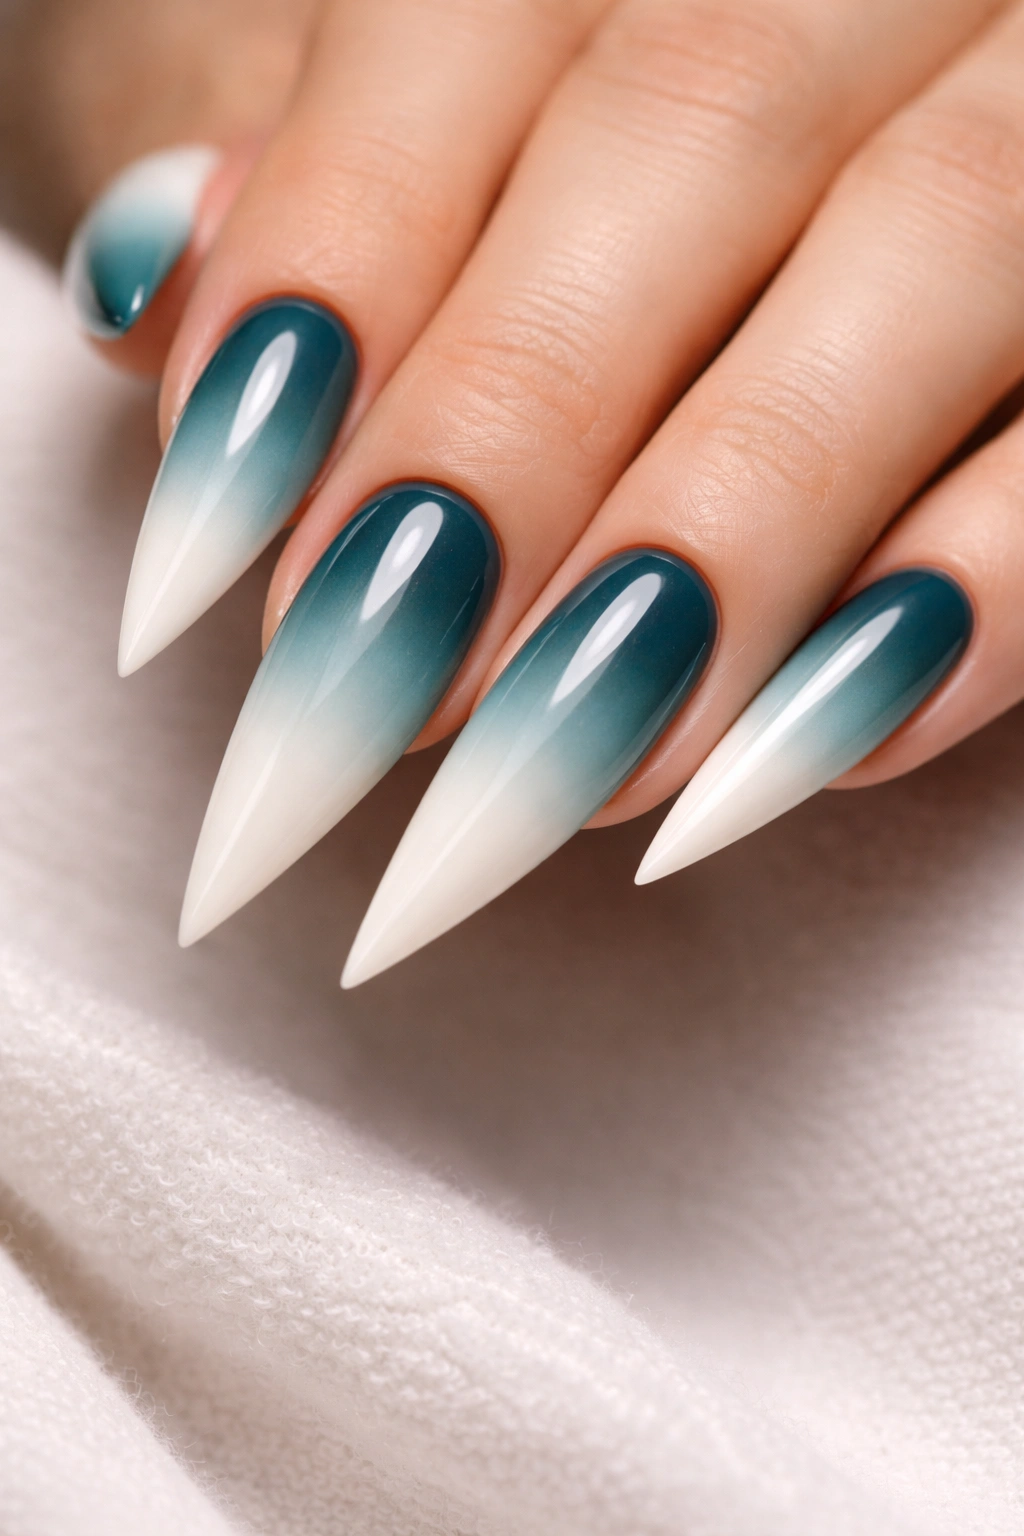
An ombre that transitions from deep teal at the base to soft white or cream at the tip creates a dreamy, almost ethereal vibe. The gradient draws attention upward toward the tip, emphasizing the length of your stilettos.
Why This Gradient Feels Special
This design works because it plays with depth perception. Your eye travels from the darker color at the base to the lighter color at the tip, making the nails feel longer and more elegant than they actually are. The white tip also gives subtle nod to classic French manicure sophistication, but with a modern twist that teal brings. It’s especially stunning on fair skin tones, where both the teal and white show up with maximum clarity.
How to Achieve a Flawless Ombre
- Use a sponge method with teal and white gel polishes for the smoothest gradient (not a dry sponge—lightly mist it with setting spray first)
- Start by applying a thin layer of teal base polish to the entire nail and cure
- Load three shades onto your sponge if possible: teal, a lighter teal, and white—this creates a more seamless transition
- Dab the sponge gently starting at the tip, working your way down so each color merges naturally with the next
- Seal everything with a thick clear top coat to smooth any sponge texture
- The ombre will remain crisp for 3-4 weeks if you avoid harsh chemicals during that first week of healing
Worth knowing: This design actually looks better slightly imperfect. A perfectly smooth gradient can sometimes read as flat on stiletto nails, but one with slight color variation feels more organic and artistic.
3. Teal with Gold Leaf and Marble Swirls
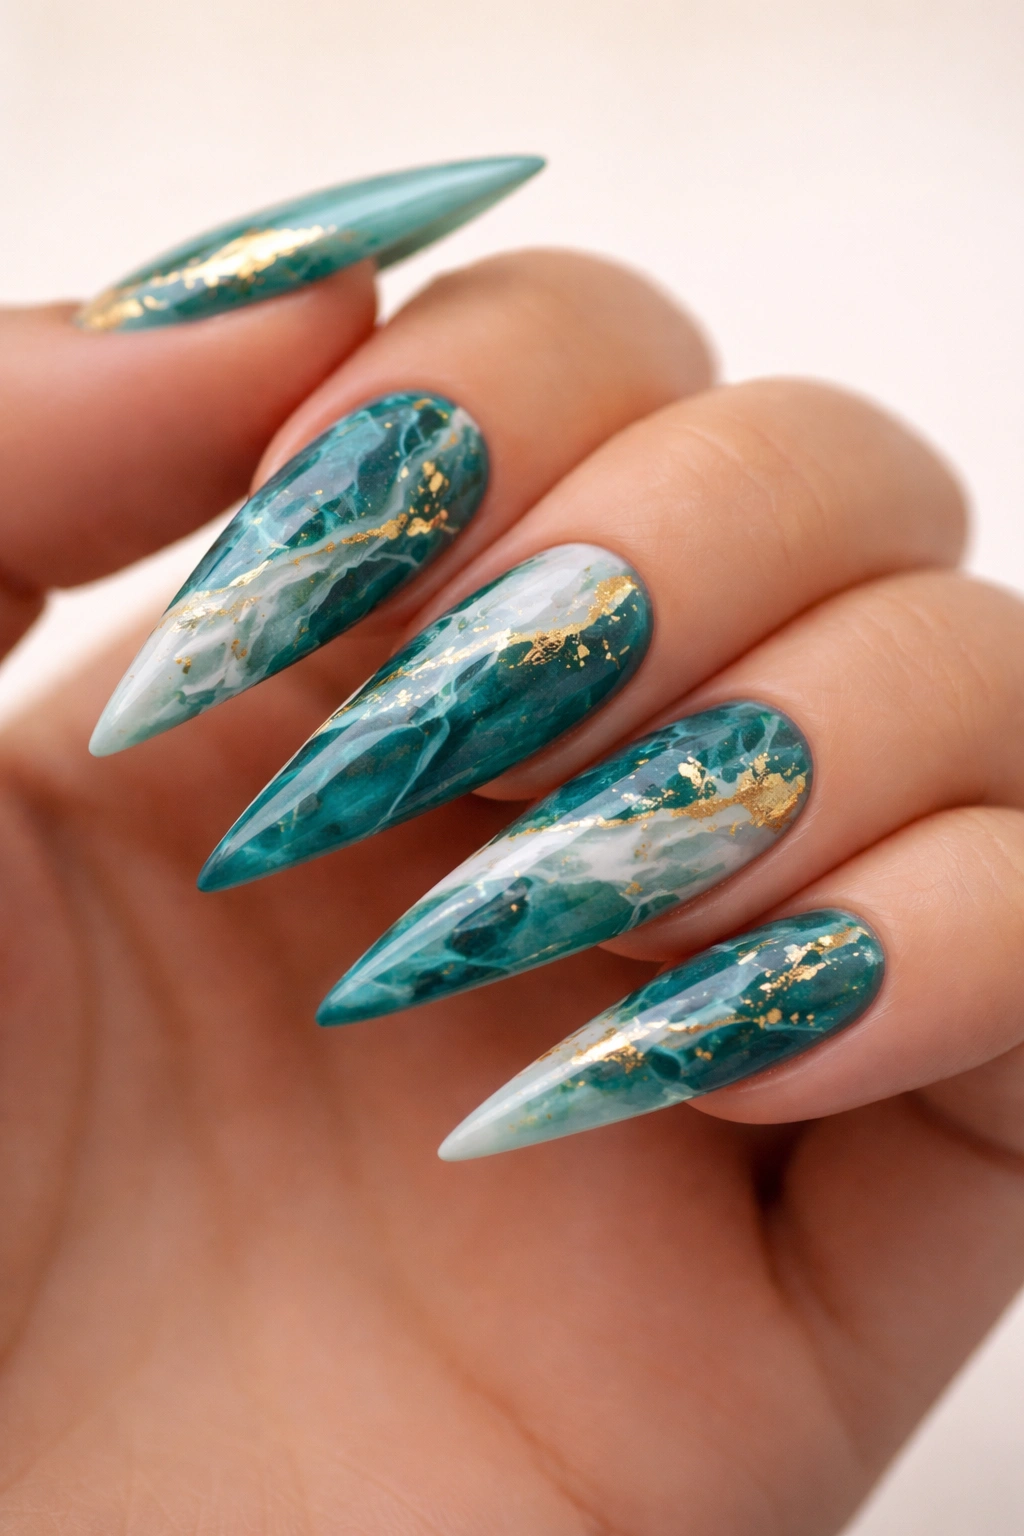
Scattered gold leaf flakes combined with hand-painted white marble veining creates an organic, high-end art piece effect. This is the design that makes people ask where you got your nails done.
Why This Combination Feels Luxe
Gold and teal together have an inherent richness—they feel expensive and intentional. The addition of marble veining adds complexity and depth that prevents the design from reading as flat. On stiletto nails, this creates a canvas that’s genuinely engaging to look at; your eyes move across the design and always find something new to focus on.
Creating Marble Veining on Teal
- Start with a fully cured teal base coat
- Mix a tiny amount of white gel with a drop of black gel to create a soft gray—this is your marble color
- Use a very thin detailing brush (size 0 or smaller) to paint irregular, flowing lines across the nail
- Don’t aim for symmetry; real marble has organic, unpredictable patterns
- While the gray is still wet, use a dry brush to blend the edges slightly, creating that soft veining effect
- Sprinkle gold leaf flakes onto specific nails (usually the accent nail or every other nail) for visual interest
- Seal immediately with top coat to lock everything in place
Insider note: The gold leaf application works best if you apply it to the sticky layer just before curing the top coat, rather than trying to glue it on top of a fully cured surface.
4. Deep Teal Matte with Rhinestone Accent
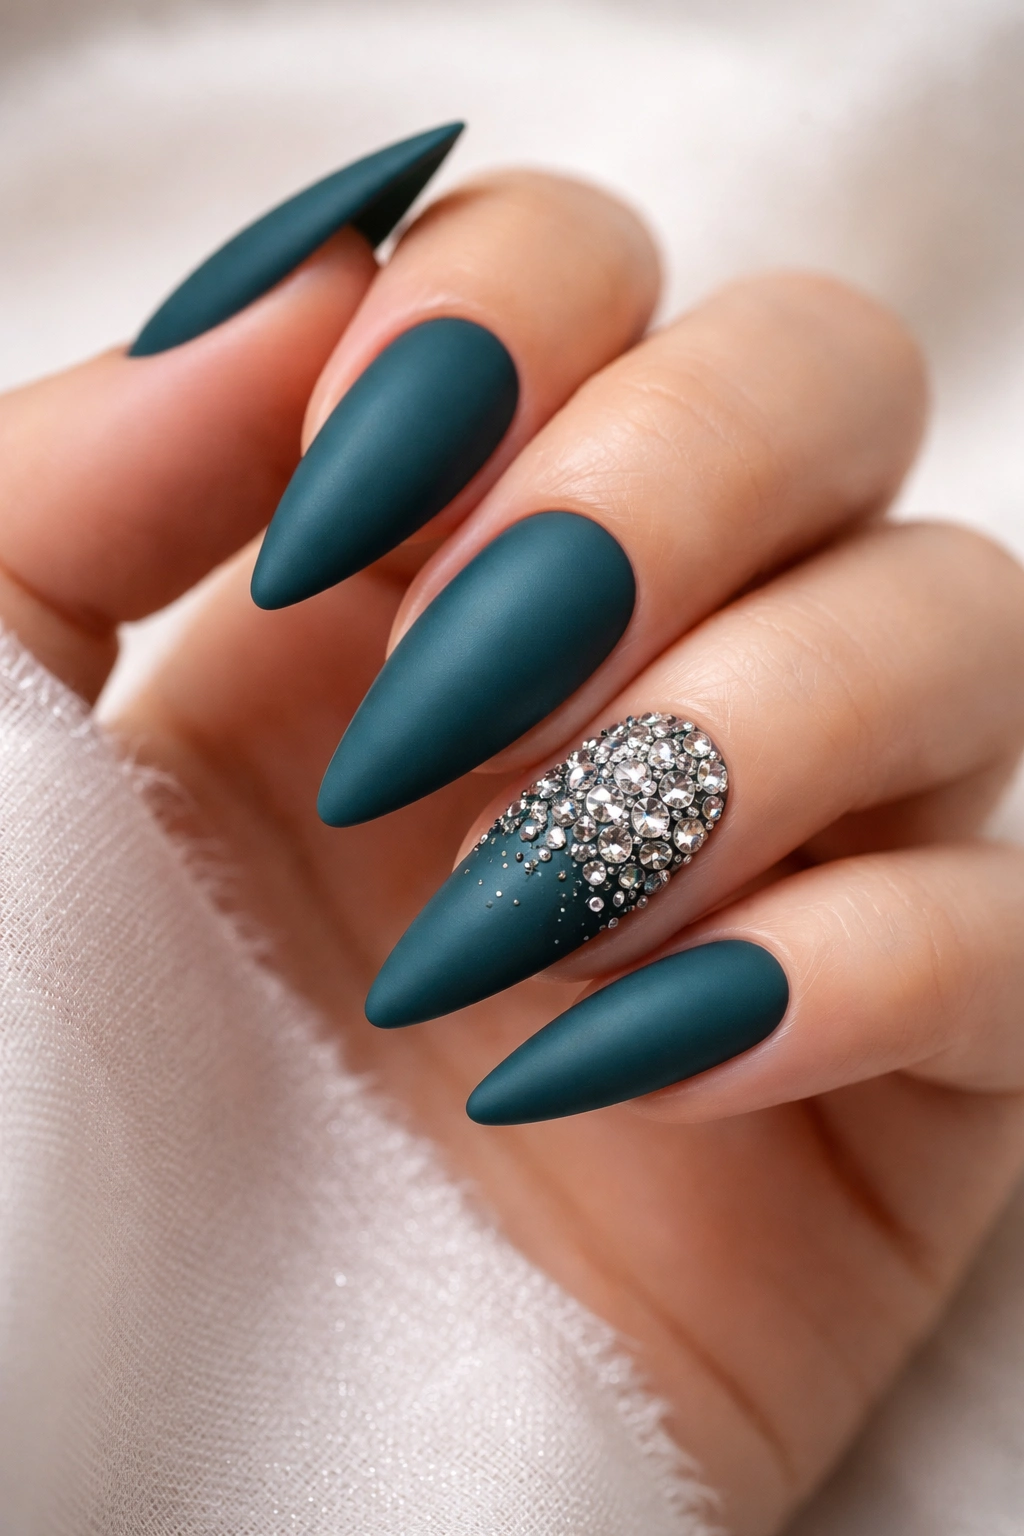
A velvety matte teal base paired with a carefully placed rhinestone feature nail creates instant glamour. The rhinestones catch light in a way that makes the understated matte base feel infinitely more special.
The Psychology of This Design
Matte finishes feel modern and sophisticated on their own, but add some sparkle and suddenly you have a look that works for both casual and formal occasions. The teal matte also gives your skin a subtle warm glow while the rhinestones pull focus to your hands. On stiletto nails, this creates an elegant silhouette that reads as intentional styling rather than trying too hard.
Rhinestone Placement Strategies
- A full vertical line of rhinestones down the center nail creates a runway-ready look
- A scattered cluster of 5-7 stones on just one accent nail feels more wearable for everyday
- A half-moon arrangement of larger stones at the tip creates a subtle statement that’s perfect for work
- Use nail glue specifically designed for gems and rhinestones—regular nail glue won’t hold properly
- Seal rhinestones with a thick, glossy top coat that flows around (not over) each stone to prevent them from shifting
- This look will last 2-3 weeks, though individual rhinestones may shift slightly and require gentle repositioning
Pro tip: Use a pencil eraser or rhinestone picker tool to position stones precisely before they dry. This prevents you from getting glue on your fingers while trying to adjust placement.
5. Teal with White Minimalist Line Art
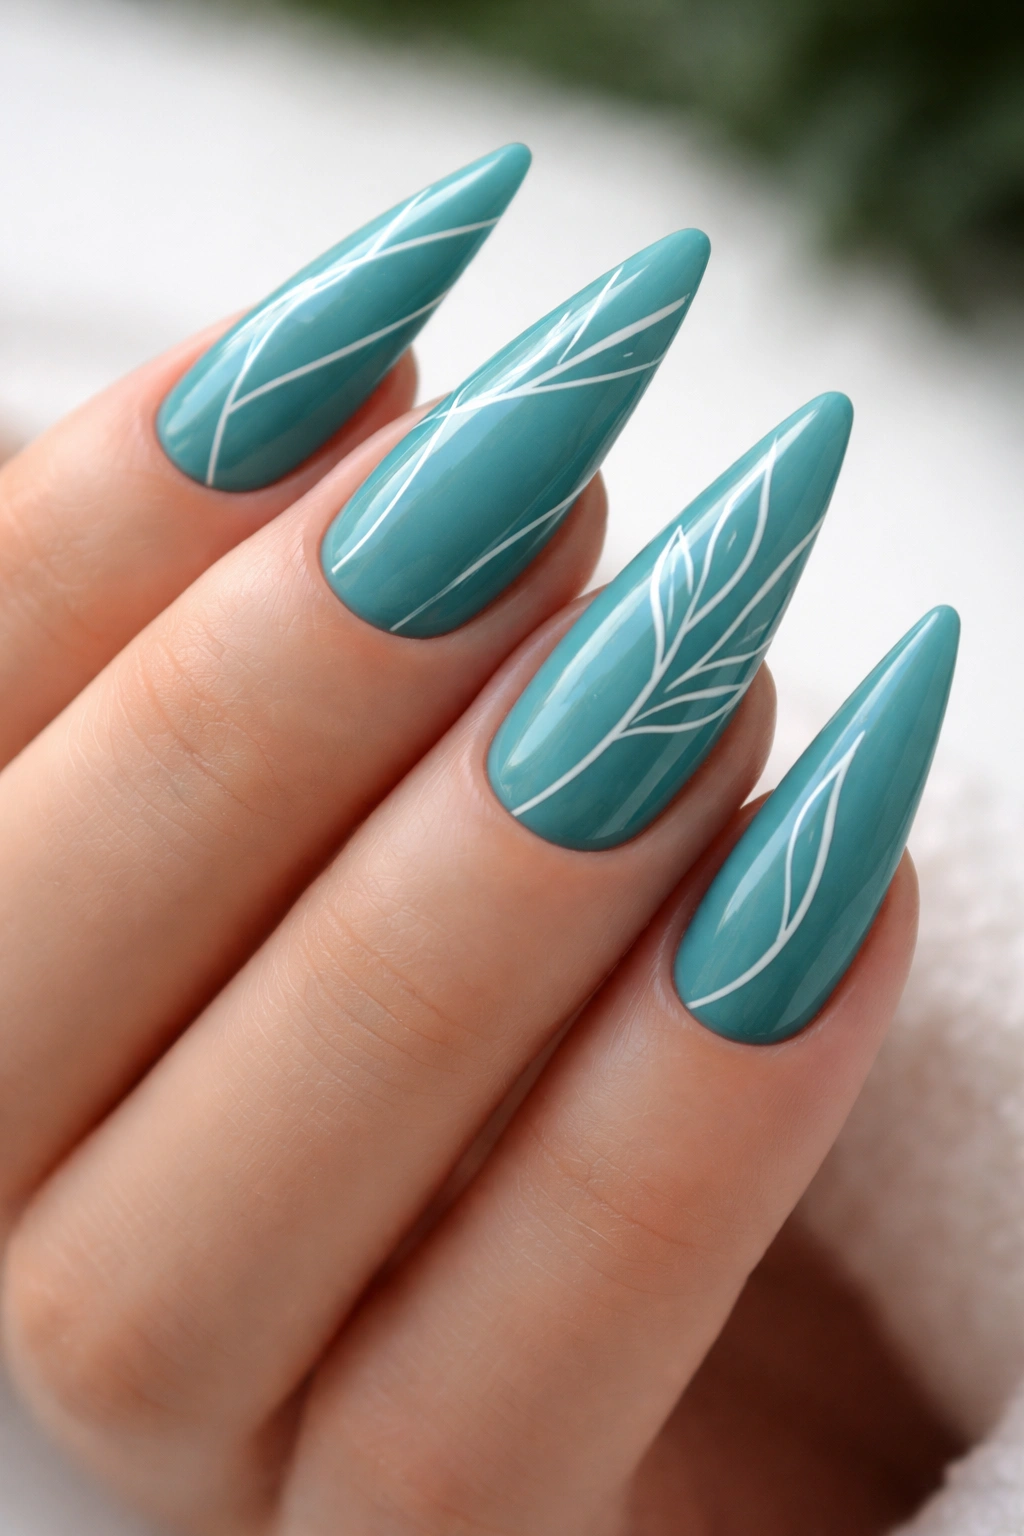
Thin, delicate white lines creating abstract geometric shapes or botanical designs on a teal base create an artistic, almost gallery-quality aesthetic. This is perfect if you love nail art but prefer clean, modern lines.
Why Minimalist Line Art Feels Timeless
Minimalist designs have this unique quality where they feel current without looking trendy. The white lines against teal create enough contrast to be visible and intentional, but the simplicity keeps the overall vibe sophisticated. On stiletto nails, minimalist line work emphasizes the shape rather than competing with it. This design also translates beautifully to both professional settings and weekend wear.
Executing Clean Line Work
- Use a gel pen or ultra-thin detailing brush (size 000) with white gel polish
- Practice your design on a piece of paper first to build confidence
- Work on the uncured base coat if you’re nervous—it’s easier to correct mistakes before curing
- Keep lines thin and let them flow naturally; straight-edge geometric lines are harder to execute freehand
- Botanical designs (simple leaves, branches) are more forgiving than strict geometric patterns
- Seal with a glossy top coat to make the white lines pop against the teal
- This design lasts the full length of your mani without special maintenance
Worth knowing: If you’re not confident with freehand line work, consider using nail stencils or guides designed for stiletto shapes. They make geometric patterns dramatically easier to execute.
6. Teal Glitter Gradient on One Accent Nail
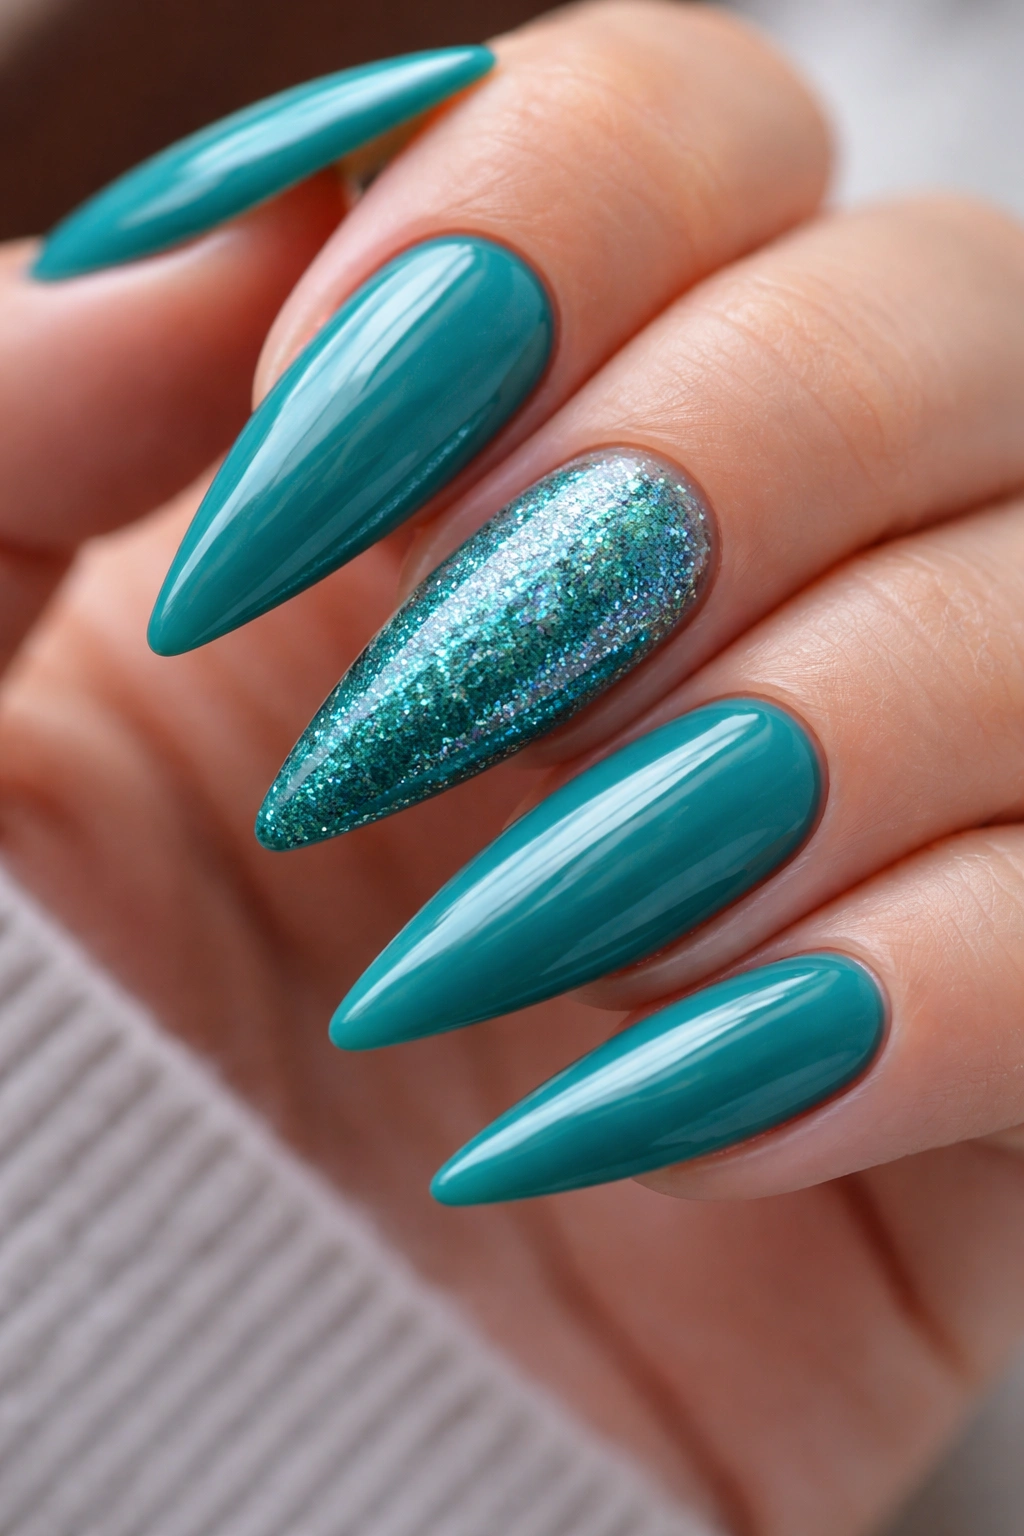
One nail transitions from solid teal at the base to increasingly dense glitter as it reaches the tip. The glitter effect creates a subtle disco-ball moment that’s perfect for evening wear.
Why Glitter Gradients Feel Modern
This specific application of glitter avoids the “party nail” feeling of full glitter coverage while still giving you that sparkle factor. The gradient also draws the eye upward, enhancing the elongated effect of stiletto nails. Teal’s depth means even clear or silver glitter shows up beautifully against it—the two colors complement each other rather than competing.
Achieving a Perfect Glitter Gradient
- Start with a cured teal base on all nails
- Apply a sticky base coat to just the accent nail
- Load a brush with clear gel mixed with fine glitter (about 3 parts gel to 1 part glitter)
- Apply glitter mixture heavily at the tip, tapering it off as you move down the nail—use less and less product as you go toward the base
- The base should have just a dusting of glitter, while the tip is fully encrusted
- Cure and seal with a thick clear top coat
- The gradient will remain flawless for 4+ weeks since glitter is permanently sealed under gel
Pro tip: Use tweezers to position any glitter particles that move around before you cure, creating a more intentional pattern rather than random distribution.
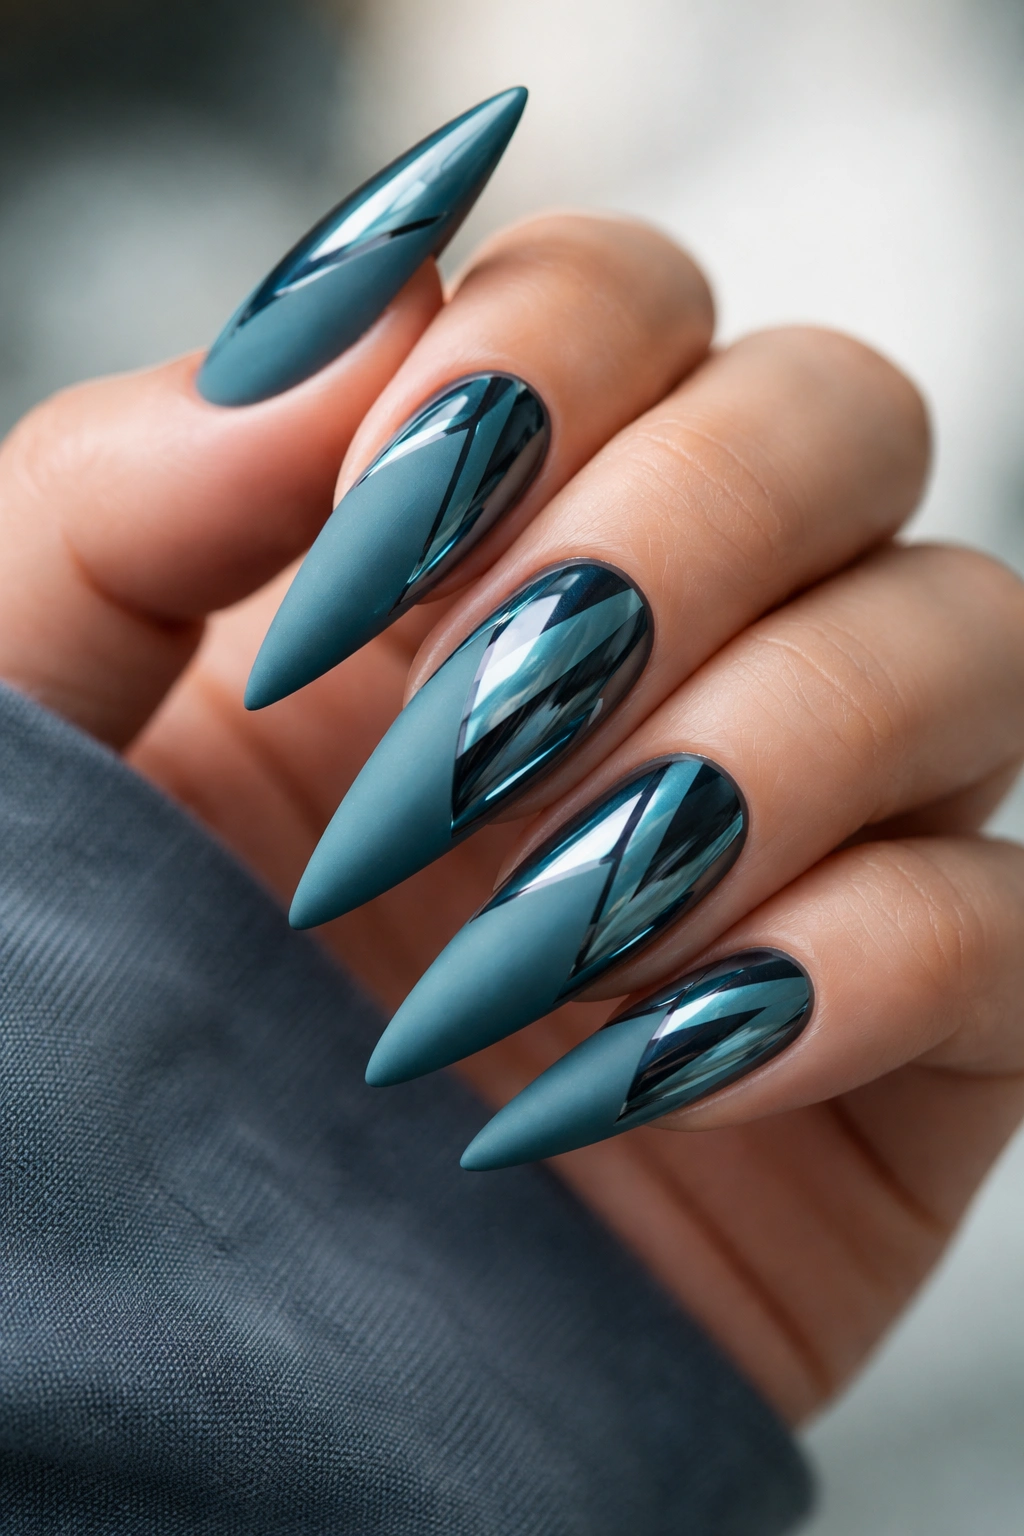
7. Holographic Teal with Silver Mirror Nails

A holographic teal base paired with silver mirror coating on one or two accent nails creates a futuristic, almost metallic vibe. This is the design for someone who likes their nails to feel slightly otherworldly.
The Future-Forward Appeal
Holographic and mirror finishes together create a multidimensional effect that’s genuinely hard to look away from. The teal holographic shifts colors slightly as you move your hand, while the mirror nails reflect your surroundings. On stiletto nails, this creates a sci-fi elegance that feels fashion-forward without being costume-y.
Layering Holographic and Mirror Effects
- Apply holographic powder to teal gel polish using a sticky base layer and buffing technique—let it fully cure before topcoat
- For mirror nails, use a metallic chrome gel as the base layer, then apply silver mirror powder while still uncured
- Seal both finishes with a high-quality glossy top coat to maintain the reflection
- Avoid touching or cleaning these nails with harsh chemicals during the first 48 hours while the finish is still settling
- The mirror effect will remain pristine for 3-4 weeks; holographic effects last slightly longer but may begin to shift after 5 weeks
- If the mirror finish starts to dull after a few weeks, it usually means the top coat needs refreshing rather than reapplication of the entire effect
Worth knowing: Photography with mirror nails is tricky because they reflect everything around them. Angle your hand with soft, diffuse lighting for the best visual impact.
8. Teal with Delicate Gold Filigree Patterns
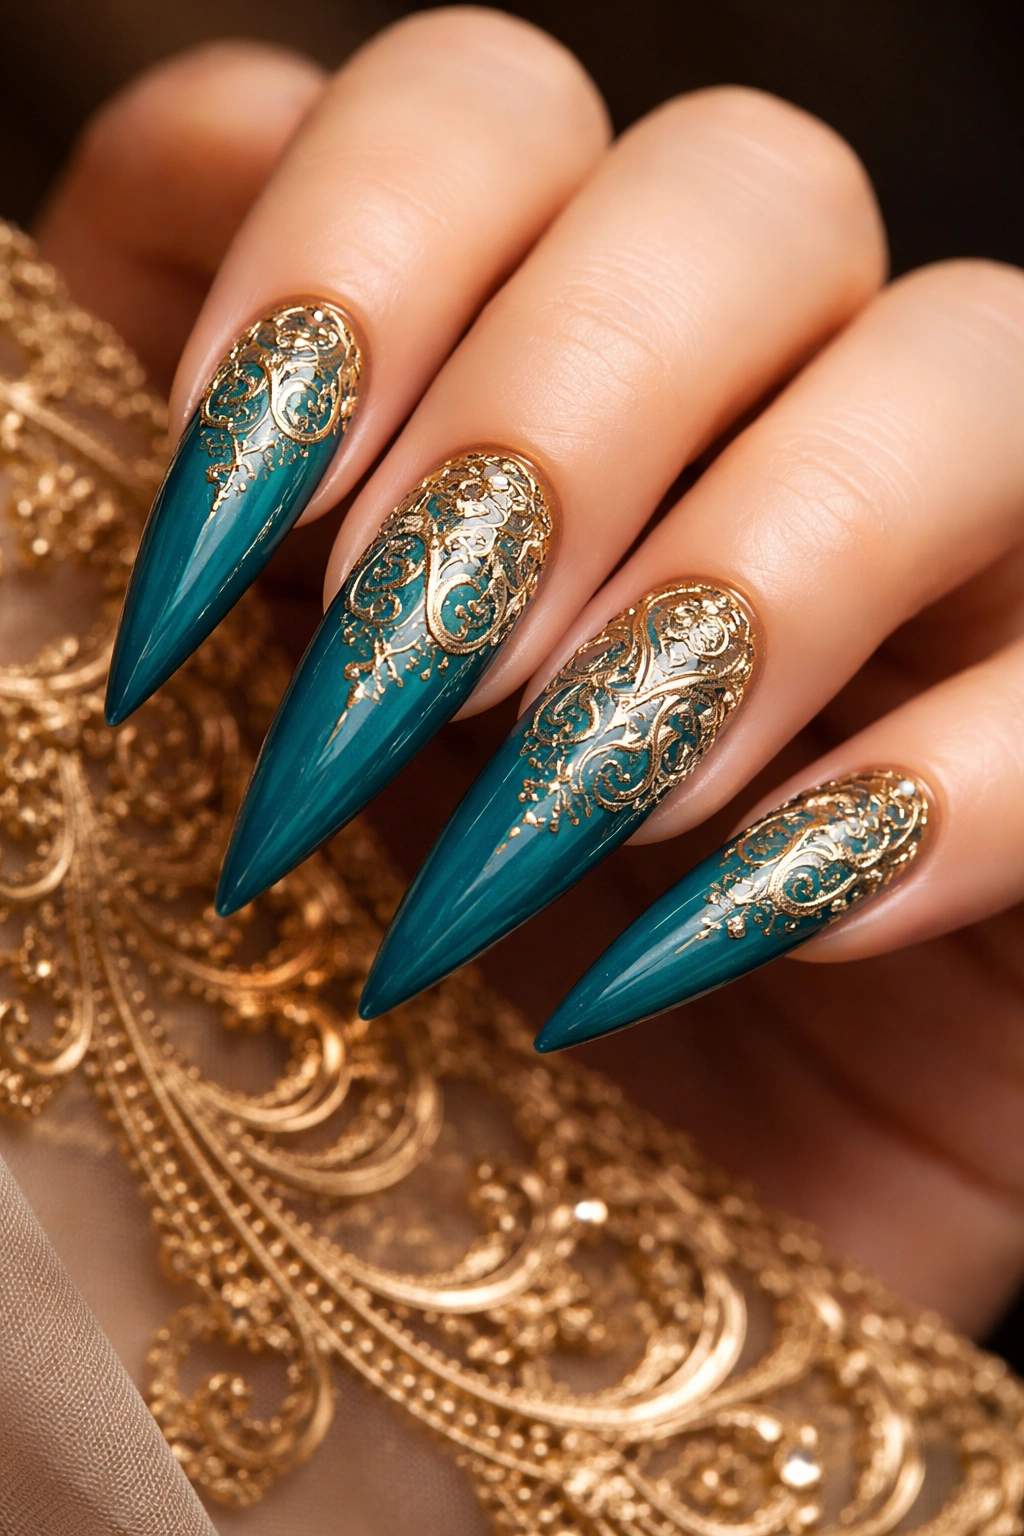
Intricate, lacy gold filigree designs painted over teal create an heirloom jewelry aesthetic. This is the design for someone who appreciates fine detail and old-world elegance.
Why Filigree Feels Timeless
Filigree patterns have existed for centuries across cultures—there’s something inherently sophisticated and quality-feeling about them. The fine lines require patience and precision, which sends a signal that these nails are a thoughtful choice rather than a quick decision. Gold against teal specifically evokes luxury jewelry and high-end aesthetics.
Painting Filigree Without Professional Training
- Use a thin gel pen in gold or a very fine detailing brush
- Start with simple patterns: repeating curls, delicate vines, or symmetrical designs
- Practice spacing your lines so they feel balanced rather than overcrowded
- Work from the center of the nail outward to maintain symmetry
- If freehand feels intimidating, filigree decal stickers designed for stiletto nails exist and look remarkably realistic
- Seal with a clear top coat once all filigree is in place
- This design is durable and will last the full length of your mani without special care
Pro tip: Filigree looks especially stunning if you use a semi-opaque gold rather than bright, neon gold. It feels more refined and jewelry-like.
9. Teal Cat Eye with Magnetic Gel
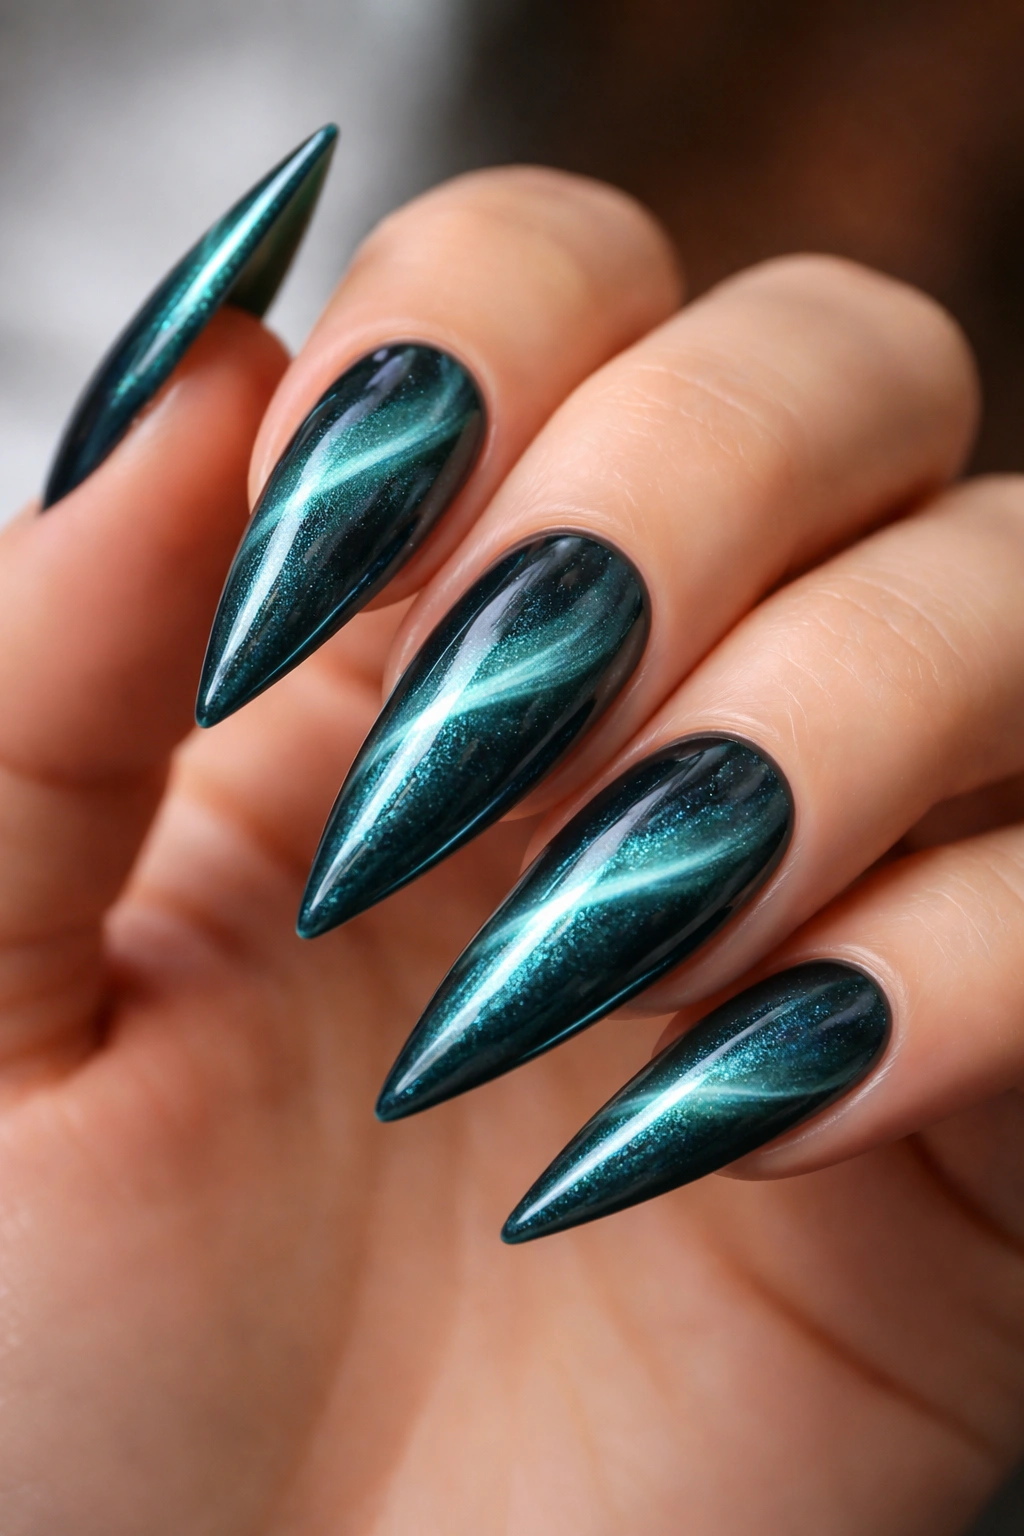
A magnetic gel creates a linear light-reflecting stripe effect that appears to move across the nail as you turn your hand. The cat eye effect is hypnotic and instantly eye-catching.
Why Cat Eye Effects Are So Satisfying
There’s something almost magical about watching a light reflection move across your nail. Cat eye creates movement where your nail shape alone would be static—and on stiletto nails, this additional visual interest feels playful while still sophisticated. The effect is polarizing (people either love it or find it gimmicky), but if you’re willing to commit, it’s genuinely unique.
Creating a Cat Eye Effect Correctly
- Use a gel specifically formulated for cat eye effects—regular magnet products won’t work
- Apply a base coat of teal gel polish and cure
- Apply a generous layer of cat eye magnetic gel polish
- Before curing, hold a specialized cat eye magnet (with the appropriate stripe pattern) directly above the nail for 10-15 seconds
- The magnet pulls iron oxide particles in the gel, creating a linear stripe that reflects light
- The position and angle of the magnet determines the stripe’s location and width
- Cure and seal with top coat
- The cat eye effect will remain perfectly visible for the full 4+ week lifespan
Worth knowing: Cat eye effects are more dramatic on darker teal shades than lighter ones. Deep teal against a light reflection creates maximum contrast.
10. Teal with Pearl Inlay Design
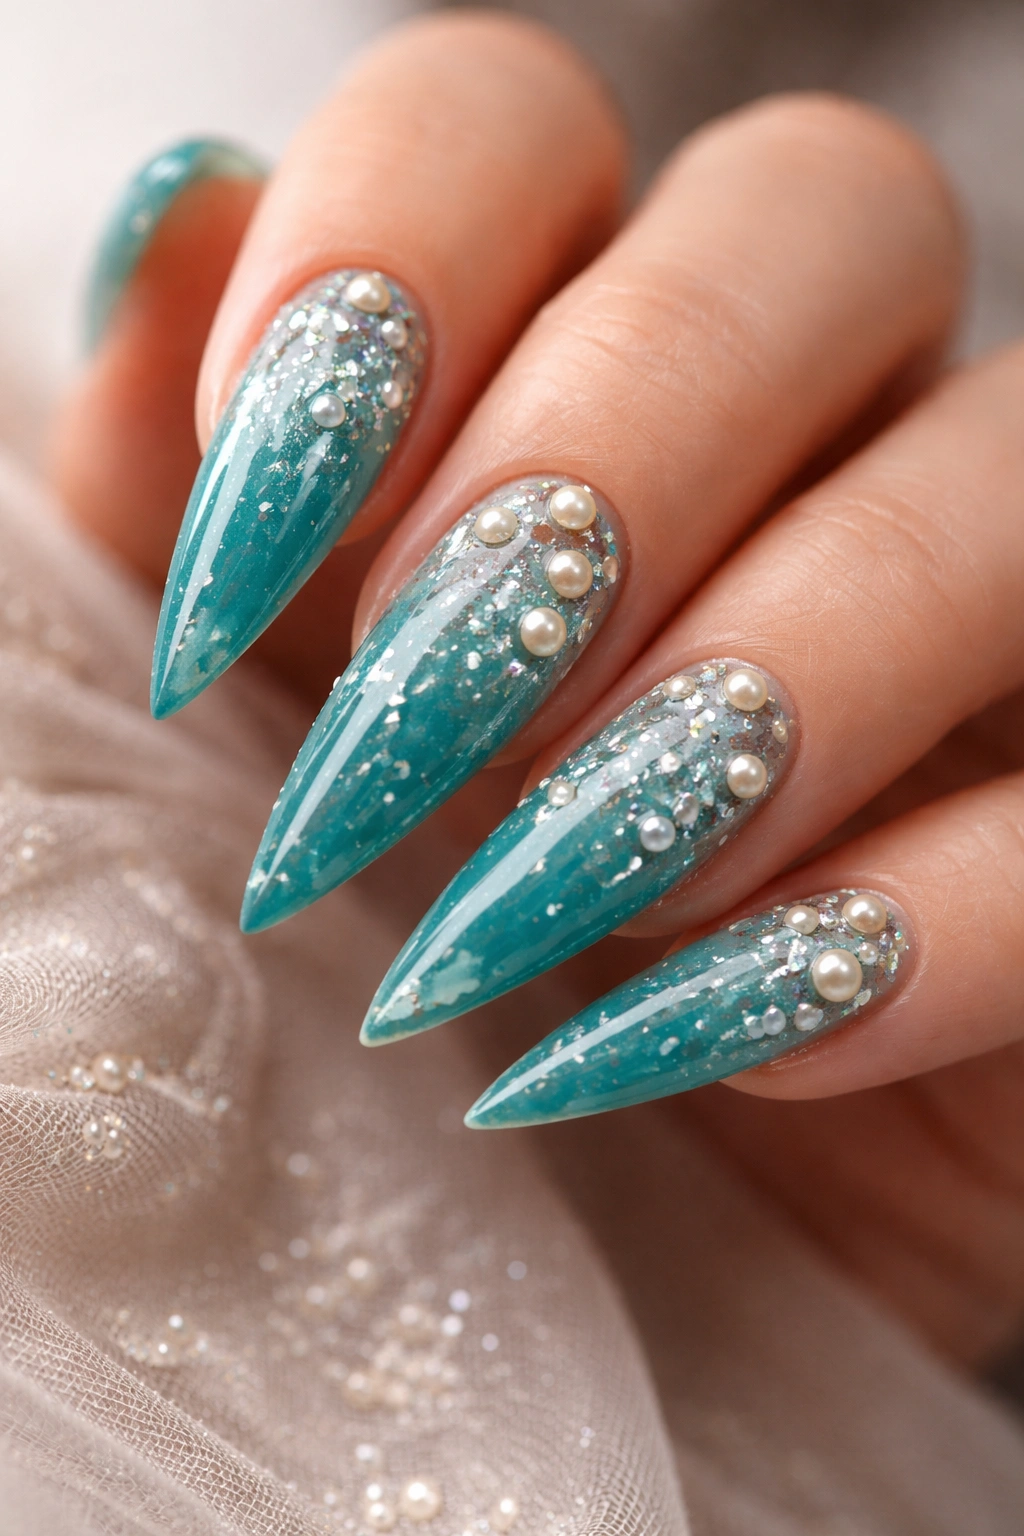
Tiny pearl elements inlaid directly into the gel create a subtle but luxurious texture. This is perfect if you love the feel of embellished nails without wanting them to look overly decorated.
The Tactile Appeal
Unlike flat nail art, pearl inlays add dimension you can actually feel and see from different angles. Pearls scattered across a teal base feel organic—like you’re wearing a tiny work of wearable jewelry. This design works especially well on stiletto nails because the extra length gives you more canvas to distribute pearls without overcrowding.
Embedding Pearls Into Gel
- Use a sticky base coat of teal gel polish
- While still uncured, use a dotting tool to position tiny pearl elements where you want them
- You can create patterns (geometric, scattered, clustered at the tips) or place them organically
- Once pearls are positioned, cure everything together so they set permanently in the gel
- Apply additional thin layers of clear gel around and over the pearls to fully encapsulate them and create a smooth surface
- Final seal with glossy top coat
- Pearls won’t shift or fall out once cured—they’re permanently embedded
- This design lasts 4+ weeks without maintenance
Pro tip: Use a variety of pearl sizes (mix millimeter sizes) for visual interest. Uniform pearl sizes can feel too structured and less elegant.
11. Matte Teal with Glossy Geometric Cutouts
Create the illusion of cutouts by leaving geometric sections of the nail bare (or painting them differently) while the rest stays matte teal. The contrast between matte and glossy creates visual depth that’s surprisingly impactful.
The Design Theory Behind This Look
The combination of matte and glossy surfaces creates contrast that tricks the eye into seeing more dimension than actually exists. Geometric cutout illusions are trending across fashion and nail art because they feel modern and artistic. On stiletto nails, this creates an almost avant-garde vibe that’s wearable if you style it right.
Creating Geometric Cutout Illusions
- Start with a full matte teal base, fully cured
- Use stencils or nail tape to map out geometric shapes (triangles, hexagons, straight lines) on the nail
- For each shape, paint the area inside with a glossy clear gel or contrasting color
- Remove the stencil and cure
- The shiny area inside each shape contrasts dramatically against the matte teal background
- The effect is most striking from certain angles and in good lighting
- This design lasts 3-4 weeks; the matte finish may begin to show wear slightly before the glossy sections, so touch-ups are fairly minimal
Worth knowing: This design photographs absolutely beautifully because camera flash highlights the contrast between matte and glossy surfaces.
12. Teal with Negative Space French Tip
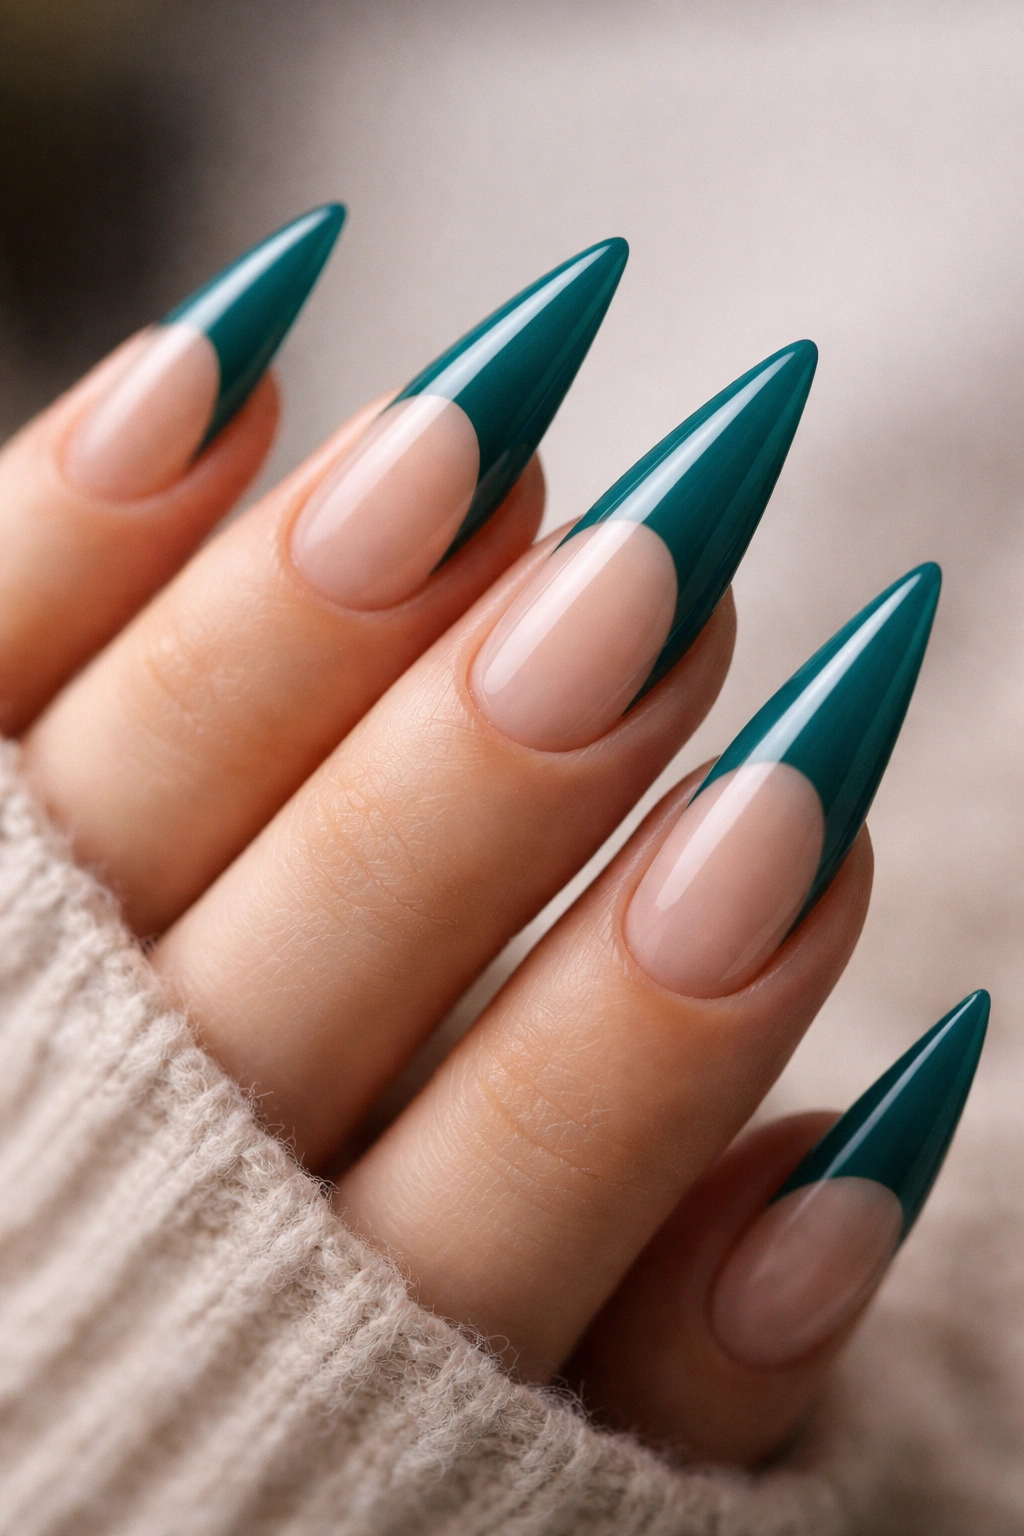
Instead of a traditional white French tip, leave a small section of nail bed visible at the tip, creating a negative space that shows your natural nail. The result is sophisticated and unexpected.
Why Negative Space Feels Modern
Negative space in design (the intentional use of empty space) is fundamentally about confidence. It says you don’t need to fill every inch of available surface. On stiletto nails, a negative space French tip is genuinely elegant because it plays with the nail’s natural length and shape rather than trying to decorate it into submission. This design also has a lower maintenance profile than most stiletto designs.
Executing Negative Space Correctly
- Apply teal gel polish to the entire nail, leaving just the very tip unpainted
- The exposed section should be about one-eighth inch wide—enough to be intentional but not so wide that it looks unfinished
- Seal the painted portion with top coat; the negative space remains bare
- You can use nail tape as a guide to keep the line crisp and even
- The design is durable and looks clean for 4+ weeks
- As your nails grow, the negative space will expand—you can refresh the teal around week three if you want to maintain the original proportions
Pro tip: This design works better with a matte or satin finish on the teal rather than high-gloss. It feels more intentional and less like you accidentally forgot to paint the tip.
13. Teal Ombre with Tiny Rhinestone Frame
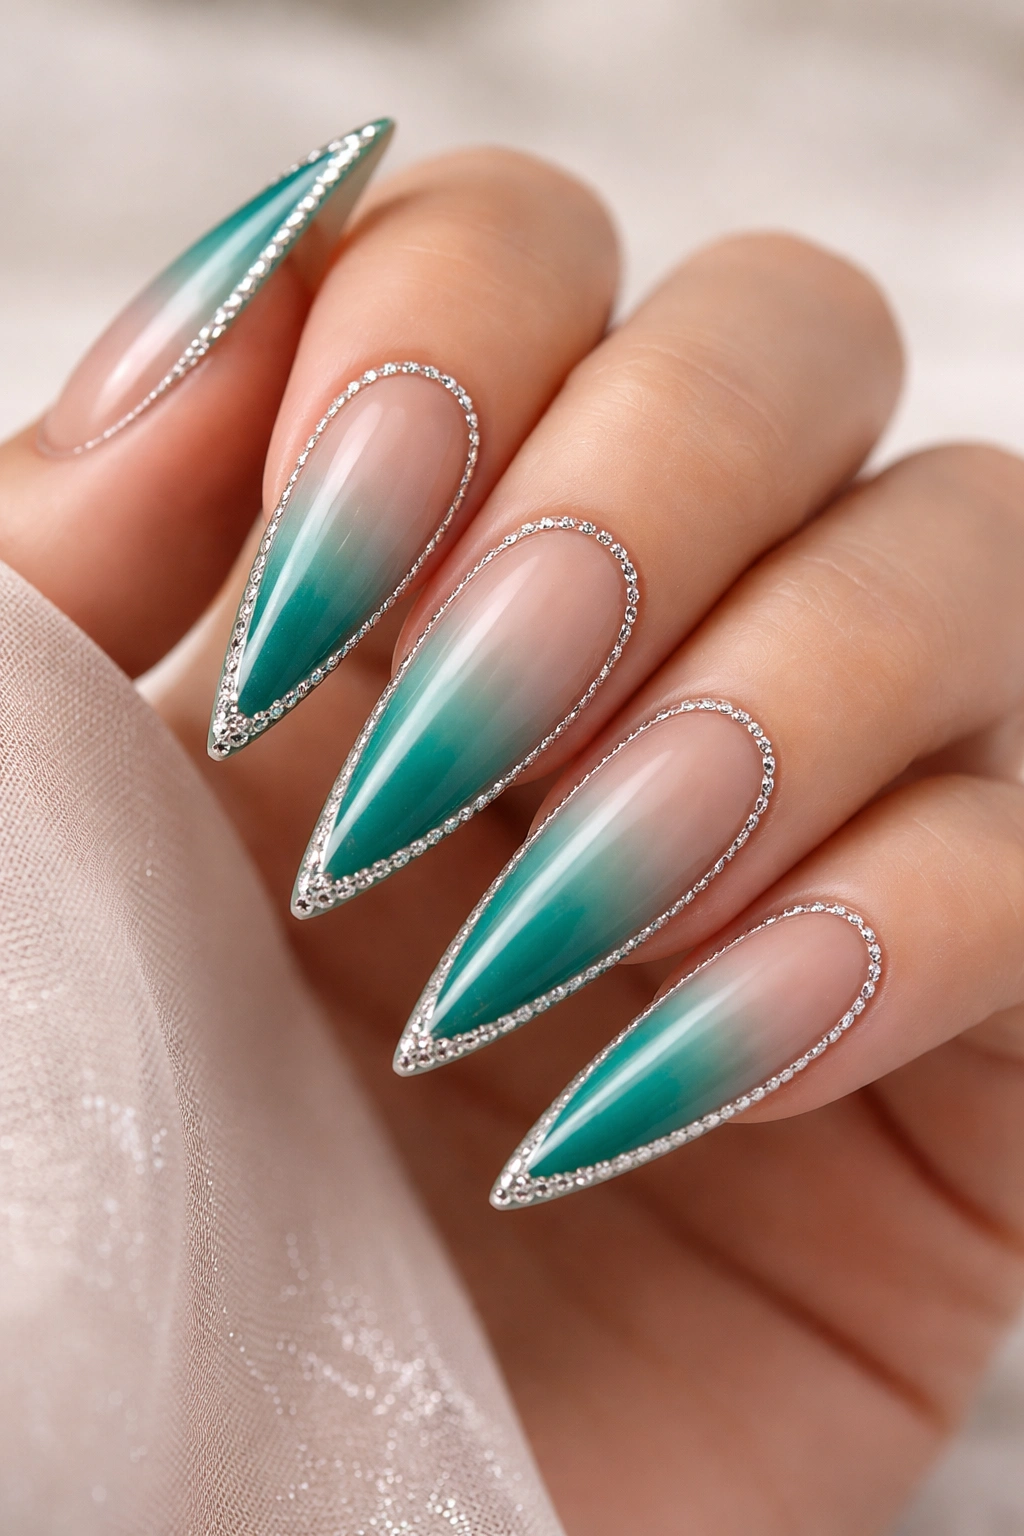
An ombre from teal to nude is framed with a delicate rhinestone border, creating the feeling of a framed artwork on each nail. This is ornate but refined.
The Ornate-But-Refined Balance
Rhinestones can feel overdone if not positioned thoughtfully. Framing them creates a narrative—they’re not just scattered decoration but intentional ornamentation that draws attention to the ombre itself. The ombre is already complex and interesting, so the rhinestones enhance rather than compete. On stiletto nails, this creates a high-fashion manicure that’s genuinely impressive without feeling costume-y.
Creating a Rhinestone Frame
- Paint the ombre first (teal base, graduating to nude or white at the tip) and cure fully
- Plan your rhinestone frame by marking lightly with a pencil on the cured surface
- A typical frame consists of small rhinestones placed along the edges of the nail—usually one per side (top, bottom, left, right) plus corners
- Alternatively, create a full border by spacing rhinestones every few millimeters around the entire perimeter
- Use nail glue or a rhinestone-specific adhesive to place each stone individually
- Once all stones are positioned and glue is dry, seal with a thick top coat
- The frame will remain secure for 3-4 weeks
- If stones loosen, they can be re-glued without disturbing the ombre
Worth knowing: Larger rhinestones (3-4mm) create more drama than tiny ones (1-2mm). Choose size based on how bold you want the frame to read.
14. Teal with Black Linear Design and White Accents
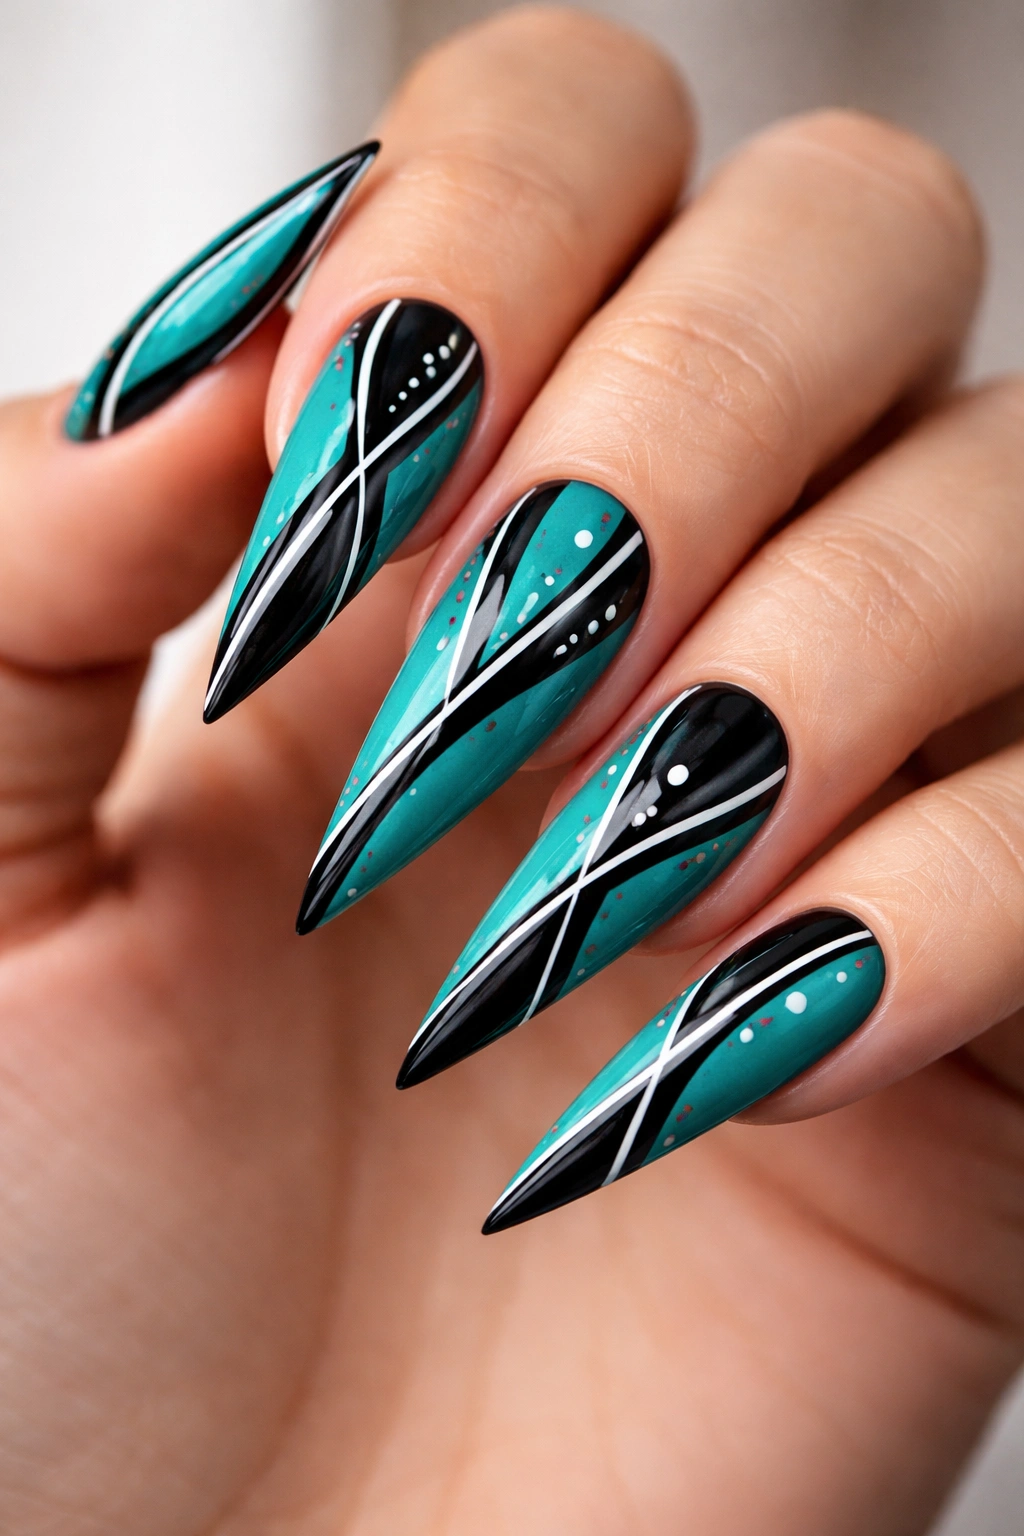
Black line-work creating geometric or abstract patterns on teal, with white accent dots or dashes, creates a striking high-contrast design. This is for someone who loves bold graphics.
Why High Contrast Reads as Artistic
The combination of black, teal, and white creates maximum visual separation—each color occupies its own visual space and none blends into another. This is why graphic design principles favor high-contrast palettes; the eye can process the information instantly and clearly. On stiletto nails, high contrast designs feel intentional and bold without being chaotic.
Painting Black and White Graphic Designs
- Start with fully cured teal base on all nails
- Use a thin black gel pen or detailing brush to paint primary lines and shapes
- Cure the black layer
- Add white accents using a super-fine brush or gel pen—tiny dots, small dashes, or small geometric shapes
- The white should feel purposeful rather than scattered; grouping white elements creates visual weight
- Cure everything and seal with clear top coat
- This design lasts 4+ weeks without special care
- The high contrast means any minor imperfections in line work are visible, so take your time during application
Pro tip: If freehand isn’t your strength, nail art stencils designed for graphic black line-work exist and eliminate the precision problem entirely.
15. Teal with Subtle Shimmer and Confetti Center Accent
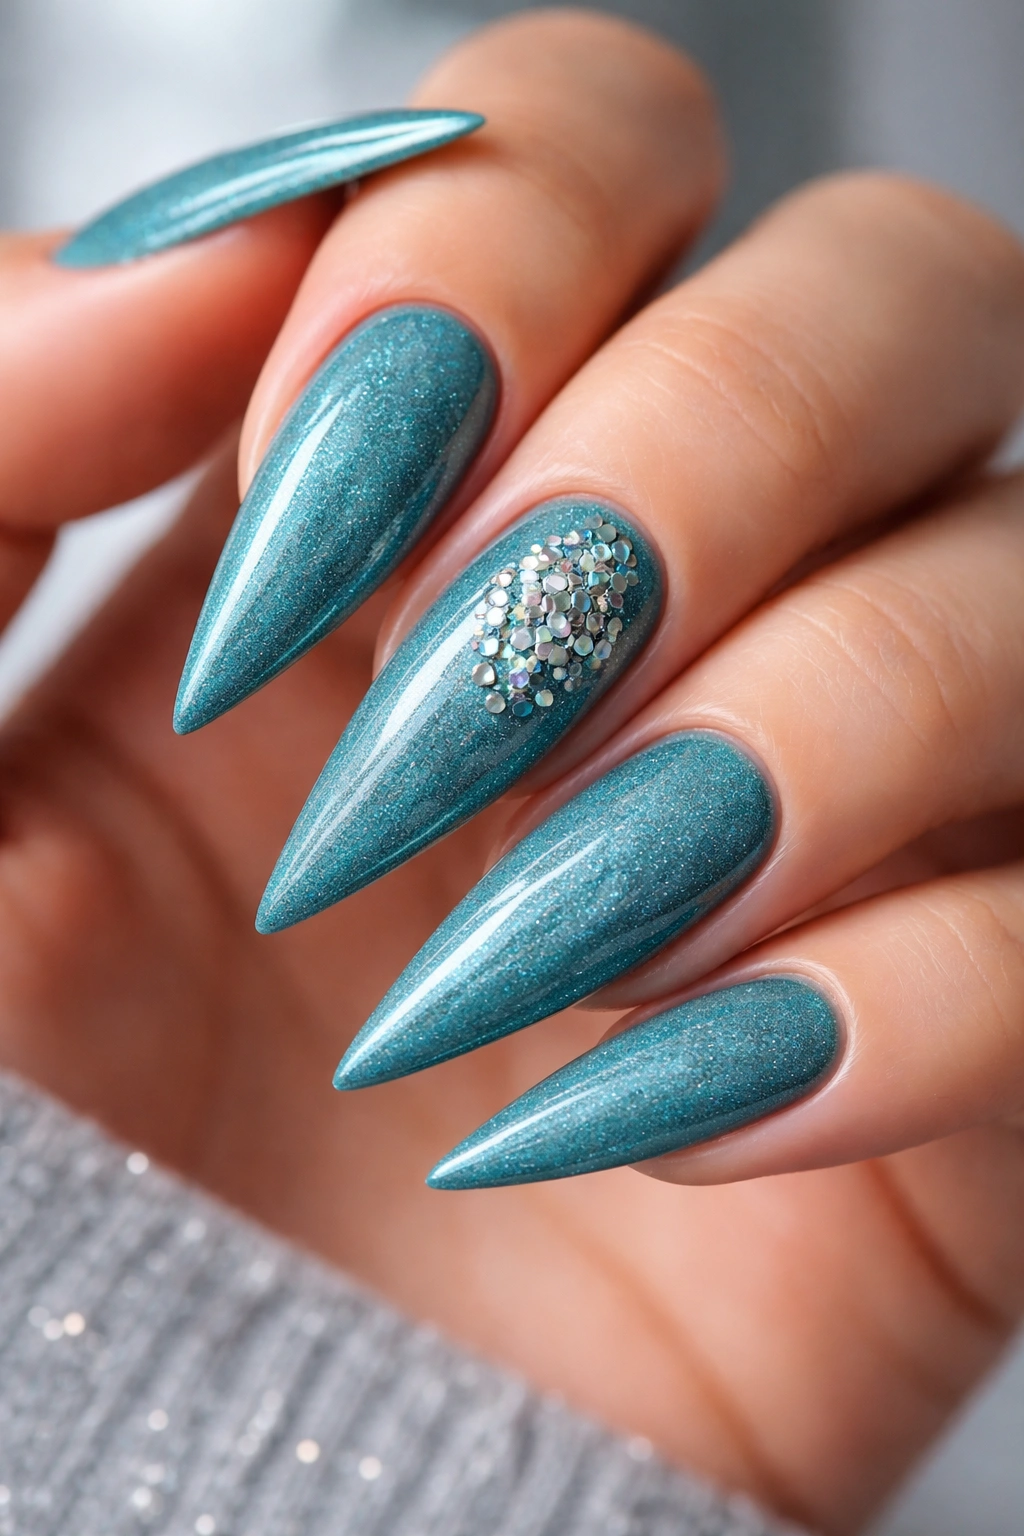
A teal base with ultra-fine shimmer throughout is accented with a small section of larger confetti (mixed size glitter pieces) clustered in the center of one accent nail. This is understated sparkle meets statement detail.
Why This Combination Works
Shimmer is invisible in low light but catches light beautifully outdoors or in bright settings—it’s a manicure that reveals itself. The confetti cluster adds a focal point that prevents the design from feeling one-note. On stiletto nails, this creates visual interest without overwhelming the shape or feeling overdone.
Layering Shimmer and Confetti
- Apply a shimmer teal gel (pre-mixed with fine shimmer particles, available from most quality brands) as your base coat and cure
- Apply a sticky base coat to your accent nail only
- Mix clear gel with various sizes of glitter (fine, medium, and chunky pieces) in a separate container
- Apply this glitter mixture to just the center section of the accent nail, allowing some overlap into the surrounding area
- Cure and seal with clear top coat
- The shimmer will remain visible for 4+ weeks; confetti may need a refresh of top coat around week three if it starts to dull
- The contrast between subtle all-over shimmer and focused confetti creates depth
Worth knowing: Confetti glitter stays embedded better if you apply thick glitter gel rather than trying to glue individual pieces to cured polish.
16. Icy Teal Gloss with Subtle Ombre Shadow
A cool, icy teal base with barely-there shading that creates a subtle 3D shadow effect on the underside of the nail tip. This is sophisticated minimalism that rewards close inspection.
The Appeal of Subtle Dimensionality
The most sophisticated manicures often feel like they’re barely there until someone looks closely. This design operates on that principle—from a distance it reads as simple and elegant, but close up reveals a thoughtfully executed shading effect that creates dimension. On stiletto nails, subtle shadows emphasize the shape without competing with it.
Creating Subtle Ombre Shadows
- Use a very pale teal or blue-gray gel as your base coat
- While uncured, use an extremely diluted darker teal (mixed with lots of clear gel to pale it significantly) to create a shadow on the underside of the tip
- Apply the shadow only to the underside of the very tip—think of it as creating a shadow cast by light shining from above
- This should be so subtle that it reads as a trick of the light rather than an intentional design
- Cure and seal with glossy top coat
- The effect is durable and will remain visible for 4+ weeks
- This design photographs beautifully because the subtle shading shows up in photos even when it’s barely visible in person
Pro tip: This design is easier to execute than it sounds because you’re actually aiming for subtlety rather than perfection. Any blending that happens is exactly what you want.
Final Thoughts
Teal stiletto nails offer an incredible range of aesthetic possibilities—from understated elegance to bold fashion statements. The beauty of this color is that it genuinely works across different skin tones, seasons, and personal styles. Whether you’re drawn to minimalist line work or detailed embellishments, chrome effects or soft gradients, there’s a teal stiletto option that matches exactly what you’re looking for.
The designs above work across different lifestyles and occasions. Some are perfect for everyday wear without drawing unwanted attention, while others make a confident statement. Some are best executed by a professional nail technician, while others are totally achievable at home if you’re willing to invest some time learning the technique. The common thread across all of them is that they treat your stiletto nails as a canvas worth paying real attention to.
Start by choosing one design that genuinely excites you—not one you think you “should” like, but one that makes you want to show off your hands. That’s the one worth investing time and resources into. Once you find your perfect teal stiletto look, you’ll understand why this combination has become such a staple in nail aesthetics.
