

Blue is the ultimate power color for stiletto nails—bold without being aggressive, sophisticated without trying too hard, and endlessly versatile across every season and occasion. Whether you’re drawn to deep jewel tones that feel like liquid sapphire or icy pastels that catch the light like frosted glass, blue stilettos offer that perfect balance of drama and wearability that keeps people coming back.
The beauty of blue stiletto designs lies in their range. A single bottle of cobalt can transform into completely different nail looks depending on what you pair it with—metallics shift the vibe, negative space makes it modern, glitter turns up the glamour, and minimalist accents keep things refined. The length and sharp angle of stilettos amplify whatever design you choose, making even simple solid colors feel like a statement.
What follows aren’t generic color swatches or tired Pinterest repeats. These are specific, tested ideas that work because they tap into why blue nails actually stand out: the color itself already does half the heavy lifting, which means you can get creative with finishes, accents, and techniques without overcomplicating things. Real people wear these looks to work, to weddings, to brunch, and they genuinely hold up.
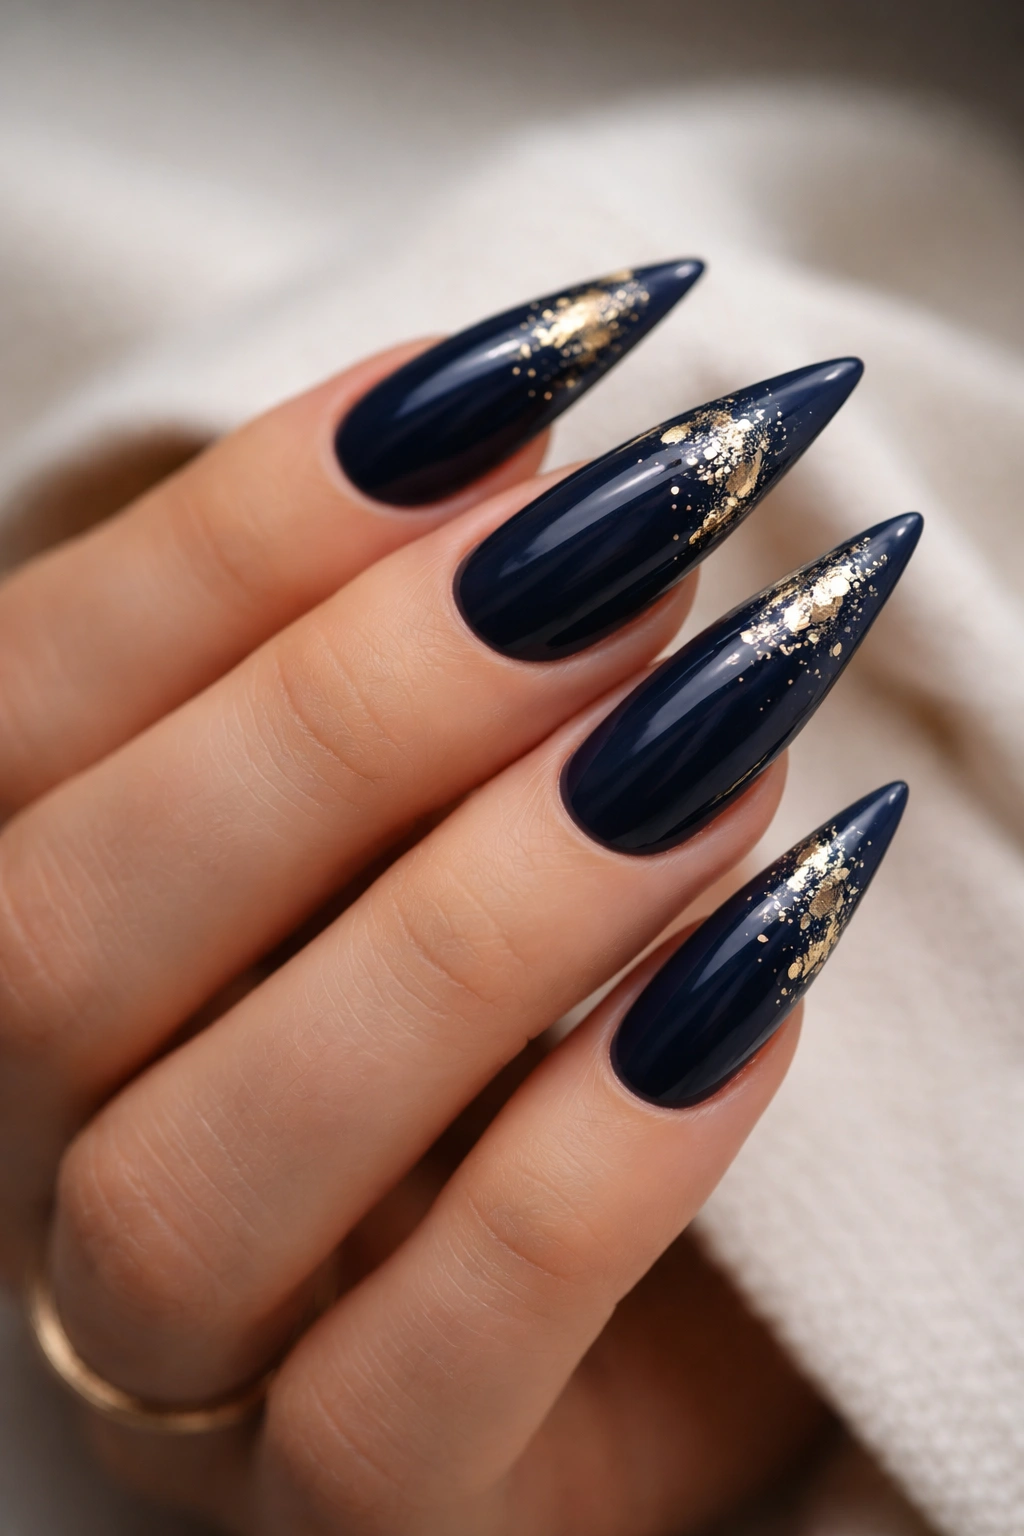
1. Deep Navy with Gold Foil Accents
Deep navy stilettos paired with delicate gold foil detailing create an instantly elegant look that reads both professional and polished. The navy provides the drama while the gold catches light without competing for attention.
Why This Combination Works So Well
Navy is the most flattering blue for almost every skin tone, which is exactly why this design has staying power. Gold foil doesn’t require a steady hand—you apply the foil while the base polish is still slightly tacky, then seal it with clear topcoat. The result feels high-end without looking overdone.
Application Tips and Best Practices
- Paint 2-3 thin coats of navy base for full opacity and depth
- While the final coat is still slightly wet, press small pieces of gold foil onto the surface in scattered patterns
- Use a firm, quick motion—don’t drag the foil or it’ll bunch up
- Seal everything with a glossy topcoat to lock the foil in place
- For longevity, apply a fresh topcoat every 3-4 days
Pro tip: Start with small foil pieces on just your ring and pinky fingers if you’re nervous. Once you see how stunning it looks, you’ll want to add it to every nail.
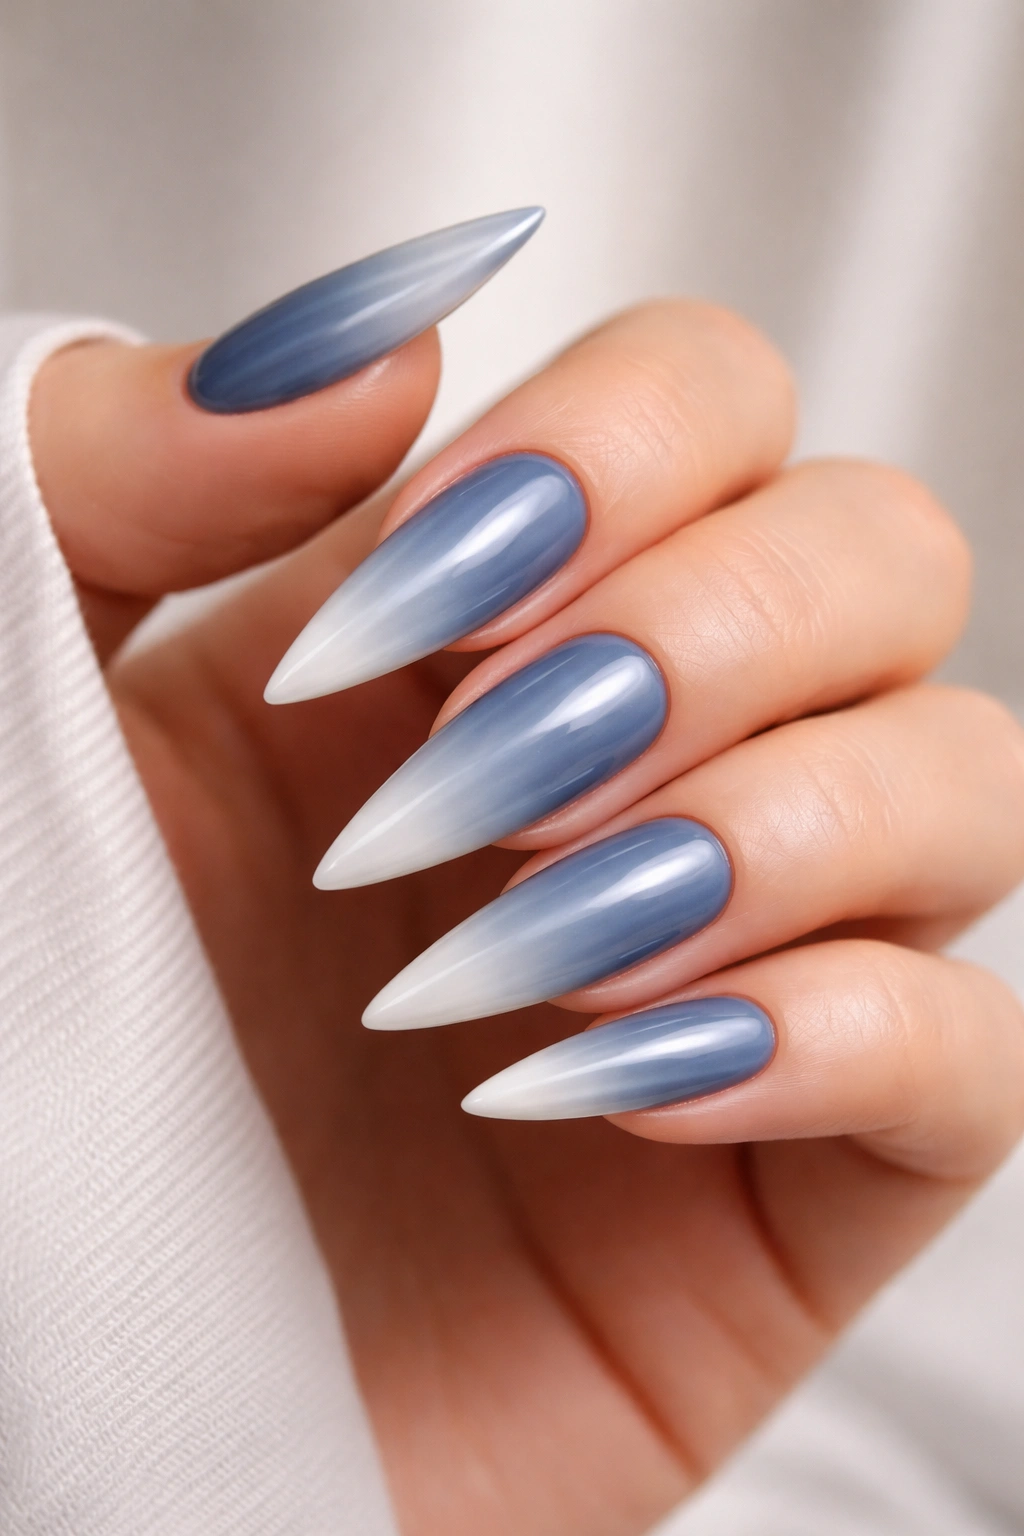
2. Ombre Blue to Purple Gradient
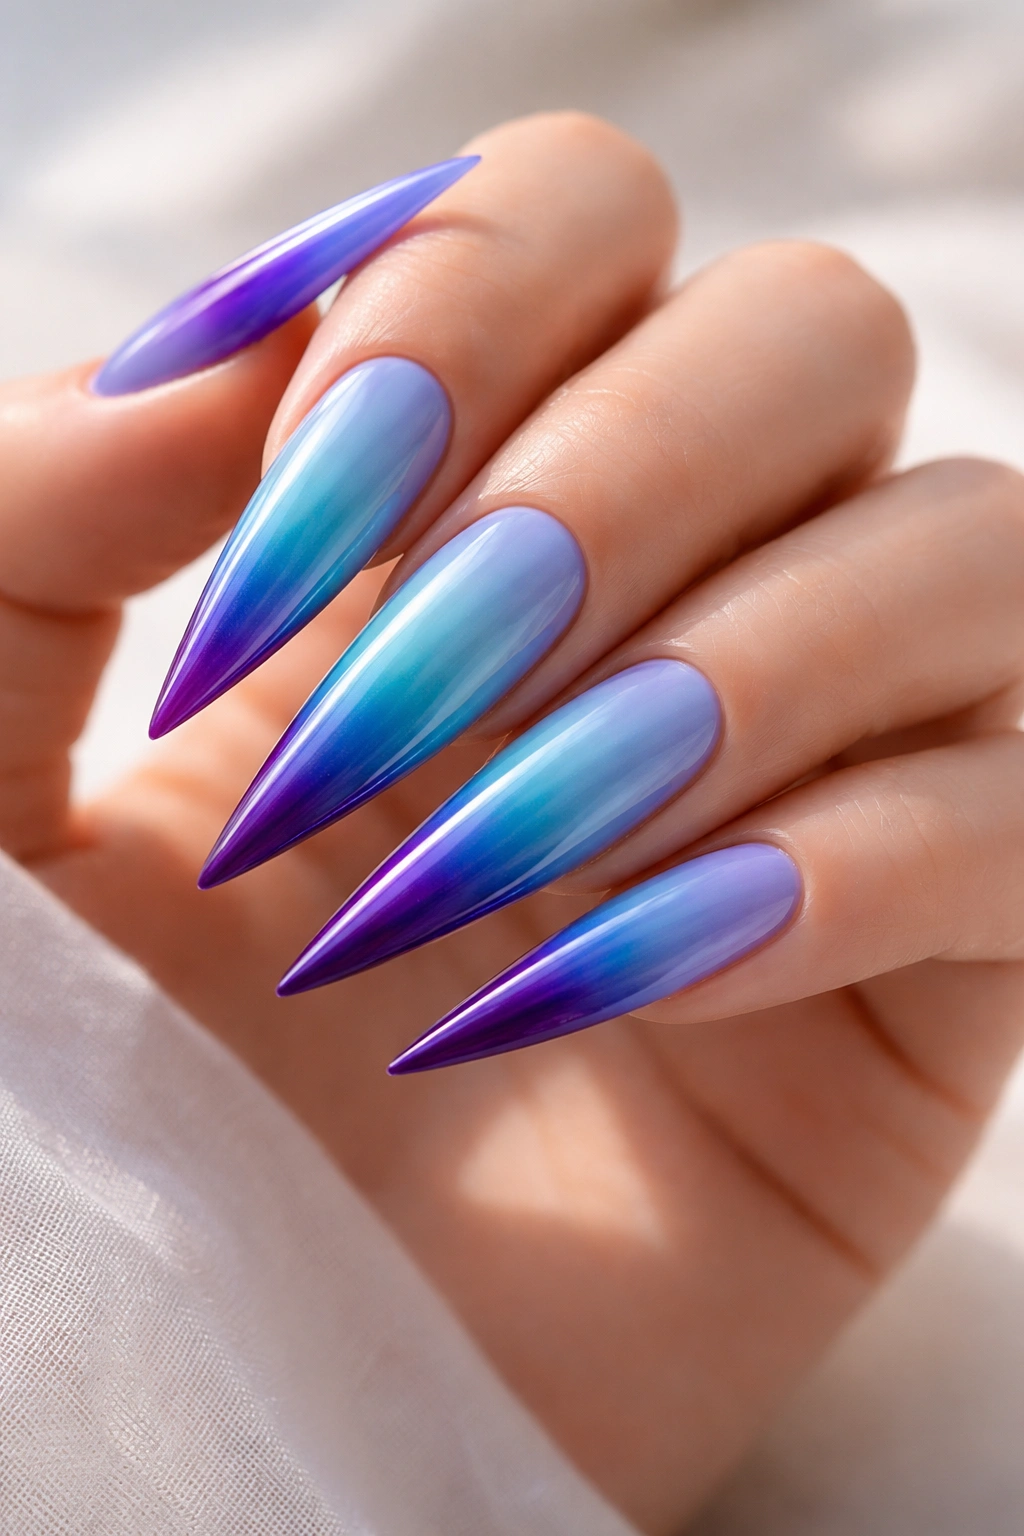
An ombre that transitions from bright sky blue at the cuticle through turquoise to deep purple at the tip creates depth and visual interest on longer stiletto nails. This gradient catches light differently depending on the angle, so the nails look different throughout the day.
How the Gradient Creates Dimension
The color transition works because each shade sits in the blue family but moves toward different undertones. Sky blue is fresh and cool, turquoise adds complexity, and purple adds warmth at the edges. Together, they create a sophisticated flow rather than a jarring color clash.
Technique for Smooth Color Transitions
- Apply your base blue shade first and let it dry completely
- Use a makeup sponge to dab on the middle turquoise shade, focusing on the center-nail area
- Dab the purple shade onto the tip and slightly overlap where the colors meet
- The sponge creates a naturally soft blend—don’t worry about precision here
- Seal with a clear topcoat that will smooth and blend the colors further
- For extra smoothness, use a detail brush with clear polish to feather out any harsh lines
Worth knowing: This design looks most striking when you’ve allowed plenty of white nail growth at the tip. The contrast between the polish and the white edge really emphasizes the stiletto shape.
3. Classic Cobalt with White Stiletto Tip
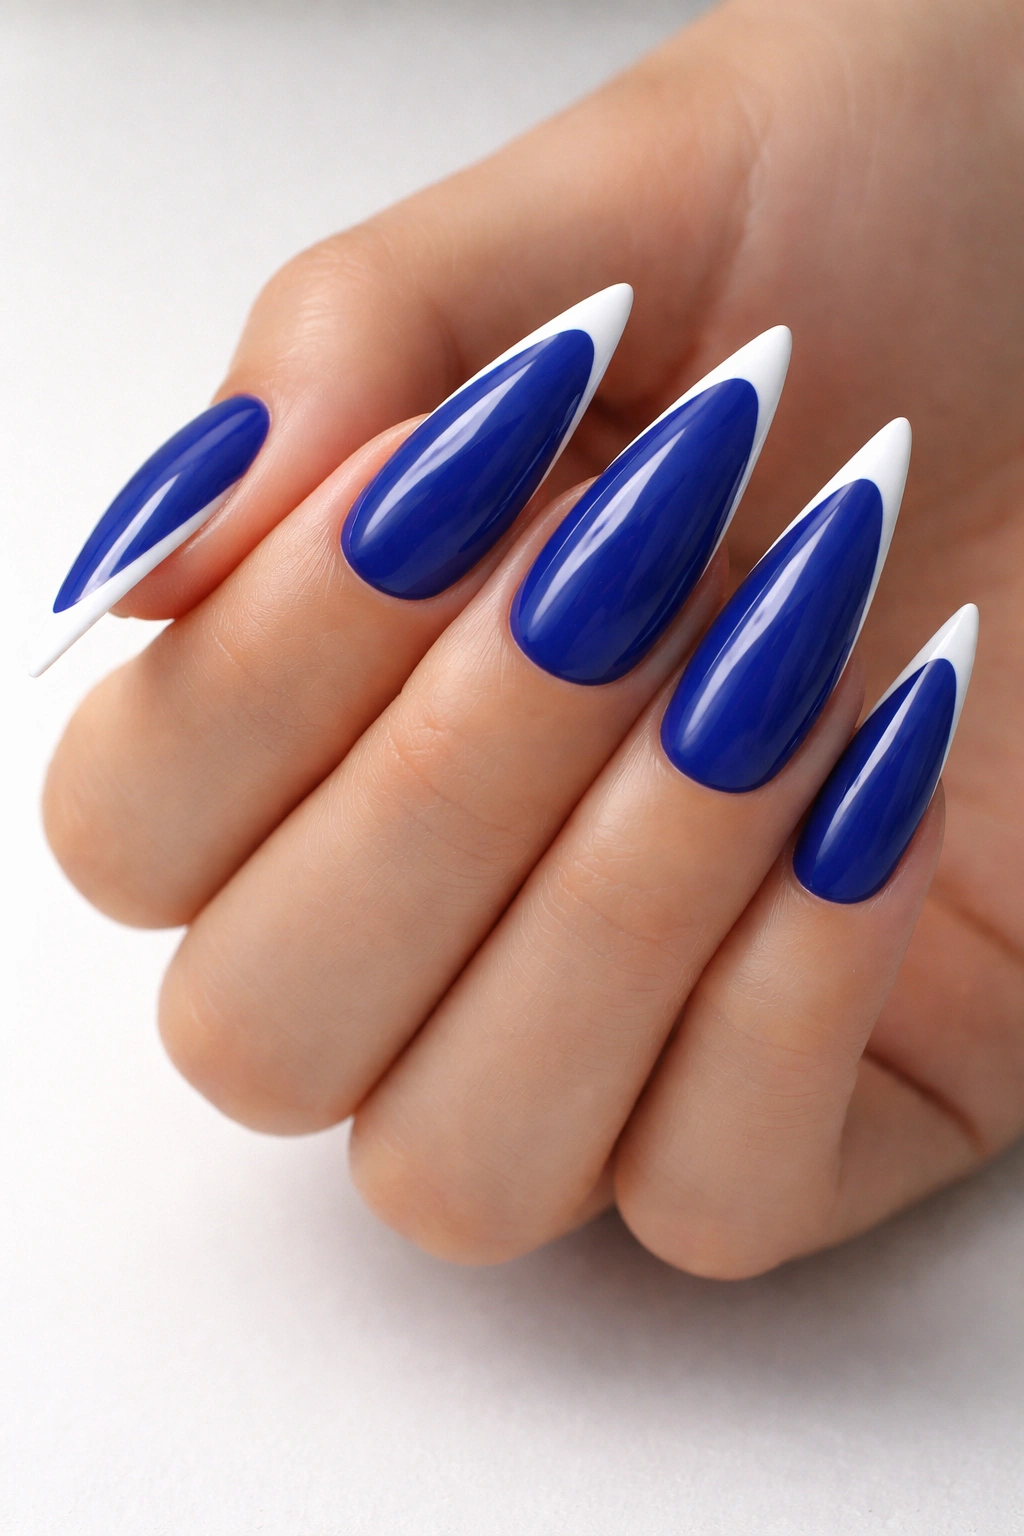
Solid cobalt blue throughout with a crisp white tip line creates a modern take on the French manicure that feels contemporary and intentional. The contrast is clean, the look is undeniably chic, and it works across every setting.
Why the Blue French Manicure Never Goes Out of Style
This design works because it respects the elongated shape of stilettos rather than fighting against it. The white tip elongates the visual line, and the cobalt base keeps it from feeling boring. It’s a design that works just as well on short-medium stilettos as it does on extreme lengths.
Achieving a Perfectly Crisp White Line
- Paint full nails in cobalt blue and let dry completely
- Use a thin nail art brush or a striping brush for the white line
- Apply the white line at a slight angle following the natural curve of your nail edge
- Don’t try to do it in one perfect stroke—two thin coats of white look better than one thick one
- If the line isn’t perfect, a thin coat of clear topcoat over the white helps camouflage minor imperfections
Insider note: The thinner your white line, the more modern and sophisticated it looks. Fat white tips read as dated—aim for delicate.
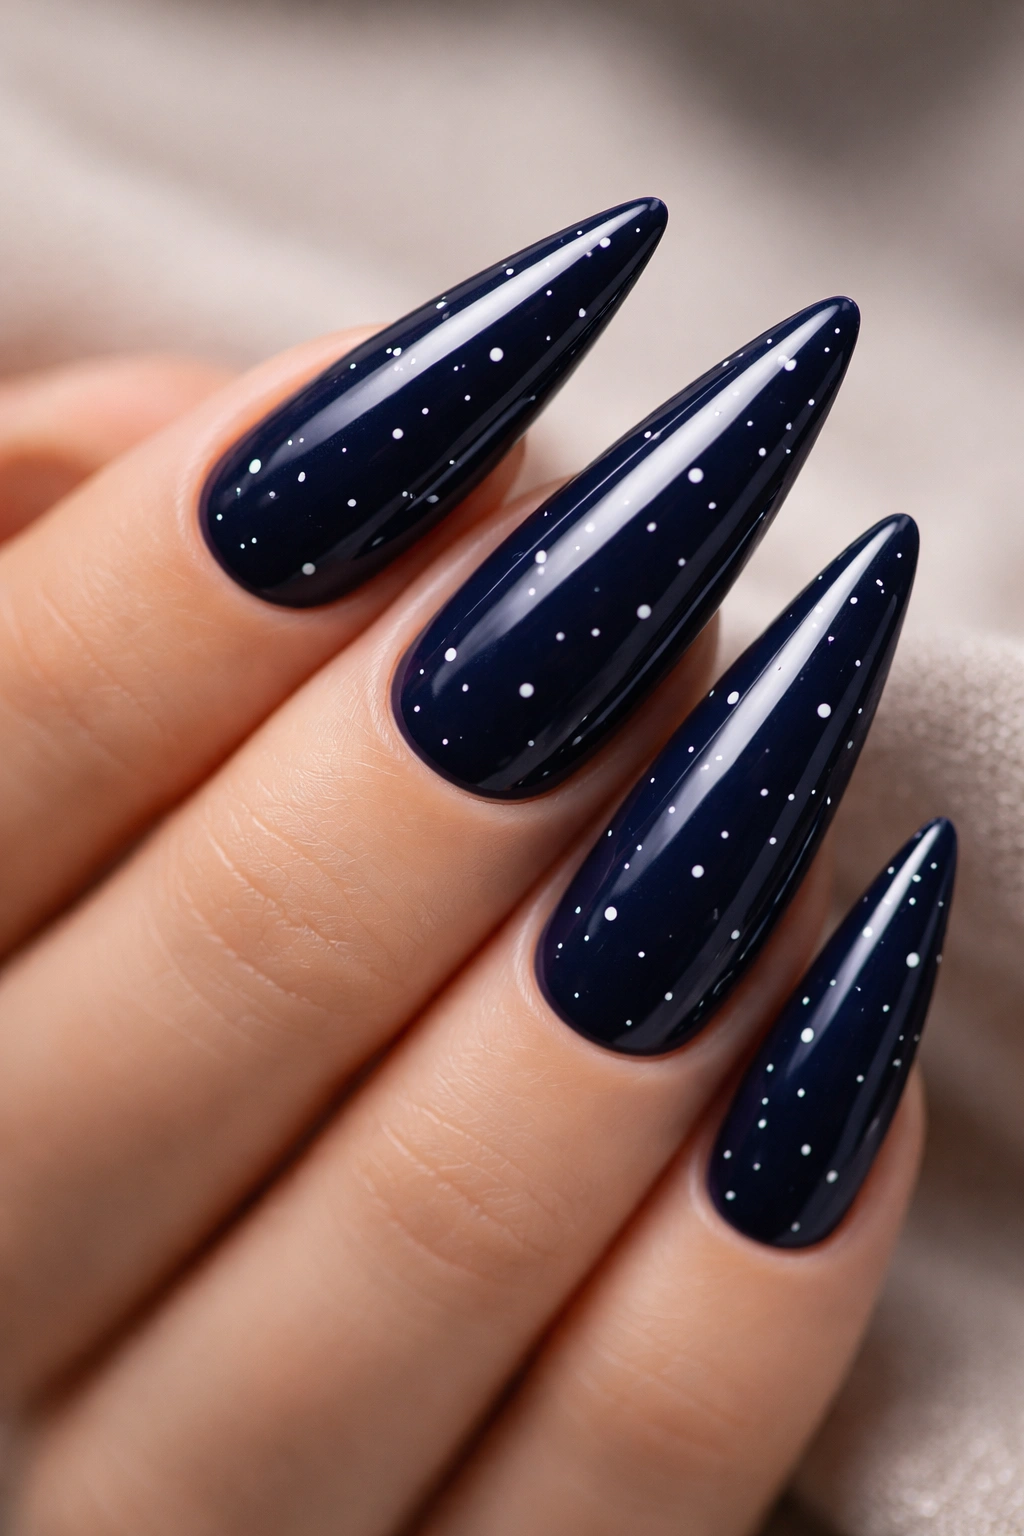
4. Midnight Blue with Silver Glitter Base
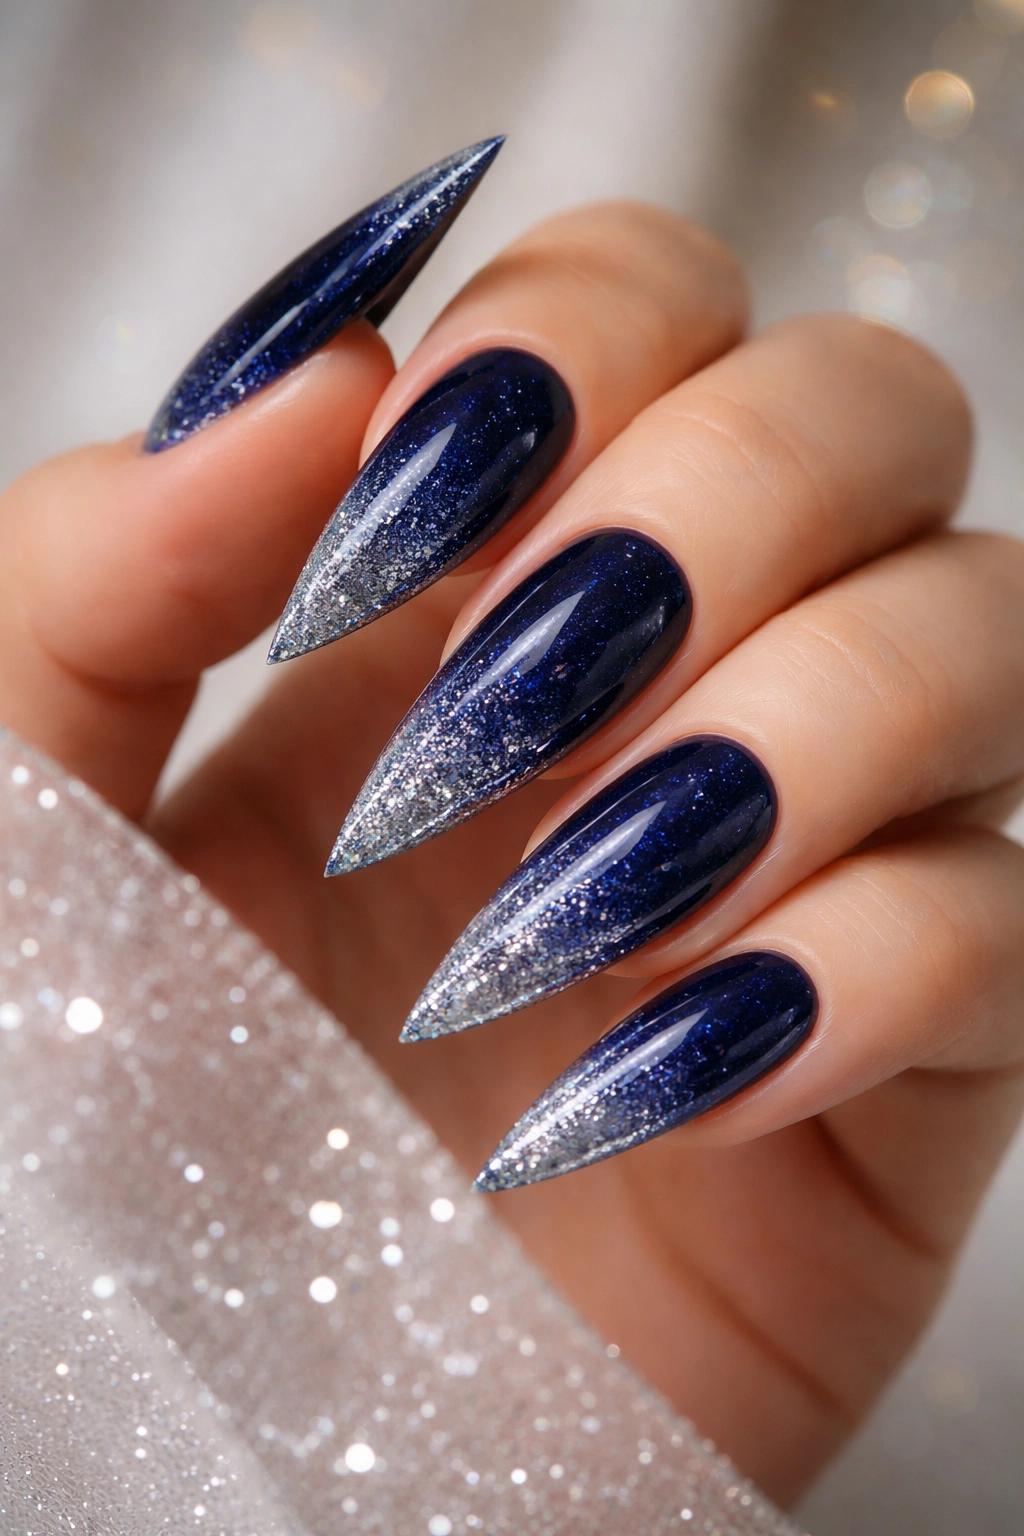
Midnight blue with a silver glitter base layer creates a starry night effect that feels festive without being costume-like. The glitter peeks through slightly when light hits it, giving dimension to what would otherwise be a solid color.
Creating Depth with Layered Glitter
Start with a silver glitter base coat—use a shade with medium-sized glitter pieces, not chunky confetti. Let that dry, then paint midnight blue on top. The glitter shows through the translucent blue layer, creating that starry effect. This approach is smarter than mixing glitter directly into blue polish because you control the glitter density and the blue color stays true.
Layer Application and Durability Tips
- Apply a clear base coat first to prevent staining from the silver glitter
- Apply 1-2 coats of silver glitter polish, depending on glitter density
- Once the glitter is completely dry, paint 2 coats of midnight blue, letting each dry between coats
- The blue might look slightly purple-tinted at first—it’ll settle into true midnight once dry
- Use a thick topcoat to seal everything and protect the glitter from chipping
Pro tip: This design photographs beautifully, especially in indoor lighting where the glitter catches flash.
5. Royal Blue with Rhinestone Accent Nails
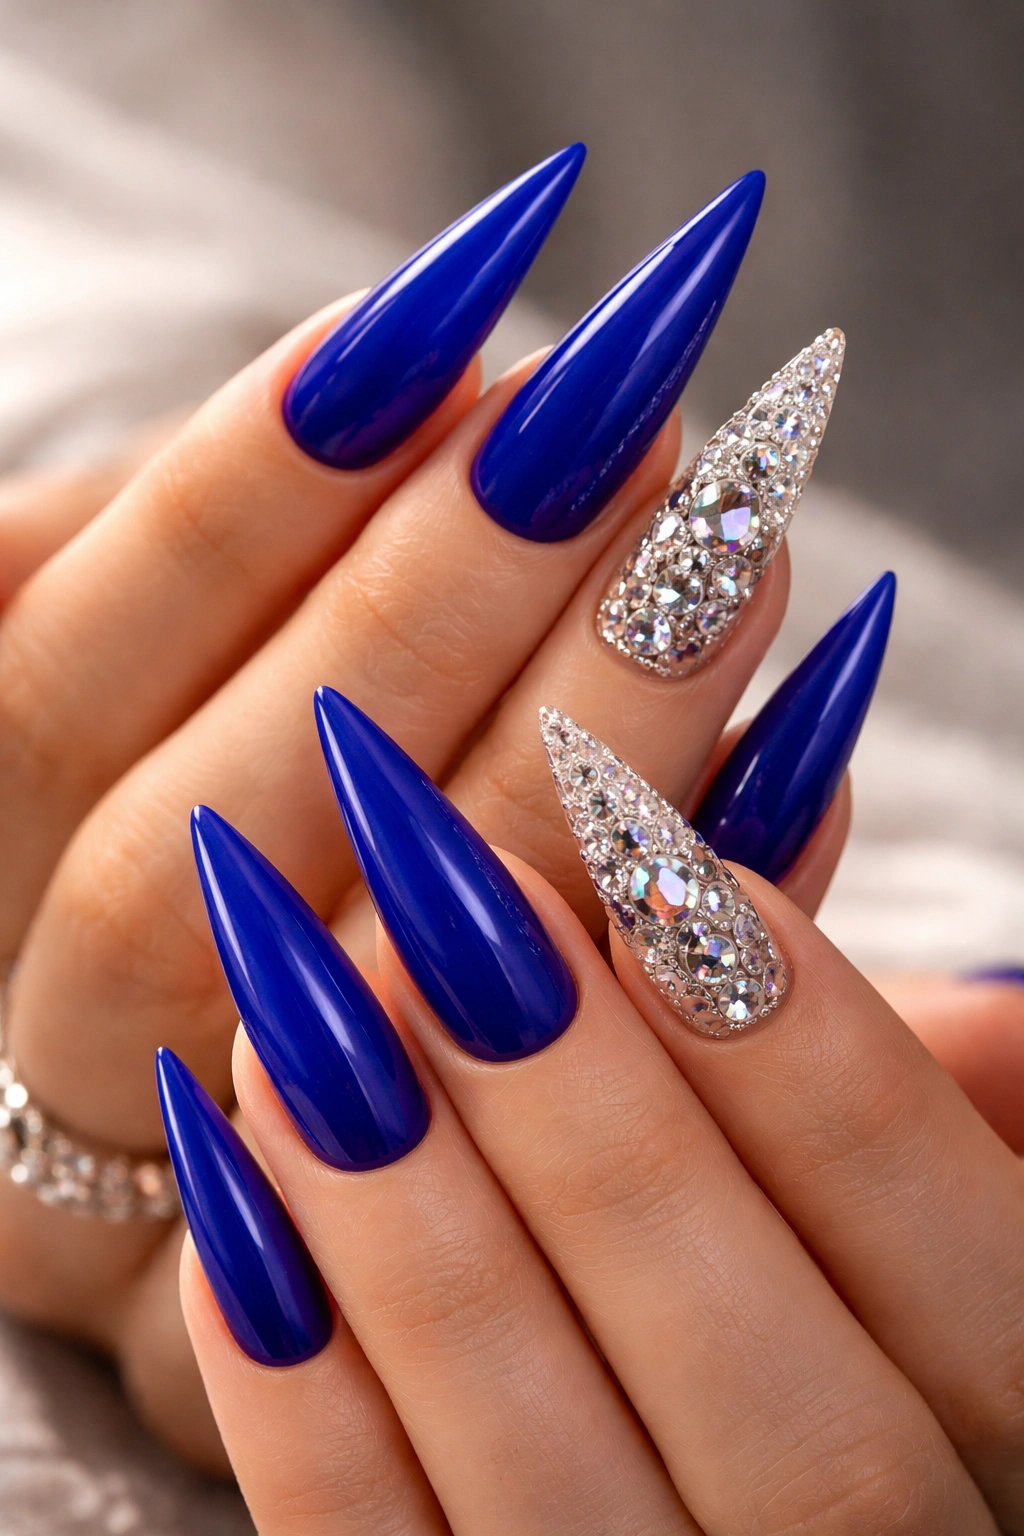
Royal blue stilettos with scattered rhinestones clustered on just your ring and pinky fingers (or just your accent nails if you prefer) combines elegance with sparkle without looking over-the-top. The strategically placed stones catch light and draw attention without competing with the nail shape itself.
Strategic Rhinestone Placement
The best placements are along the side edges of the nail or clustered near the cuticle area—these spots catch light as you move your hands. Avoid placing stones right down the center, which can make nails feel visually shorter. Choose clear or AB-finish rhinestones that complement rather than distract from the royal blue base.
Securing Rhinestones for Lasting Wear
- Paint your royal blue base and seal with topcoat—let dry completely
- Use a gel adhesive or nail glue designed for rhinestones (regular nail glue breaks down too quickly)
- Place stones individually using a rhinestone picker tool or the tip of a dotting tool
- Apply a fresh topcoat over the entire nail to lock stones in place
- Reapply a thin layer of topcoat every 3-4 days to extend longevity
Worth knowing: Rhinestones on stilettos are surprisingly durable if you seal them properly, but they’re not forever. They’re worth the extra care for events and occasions where you want maximum sparkle.
6. Cornflower Blue with Matte Finish
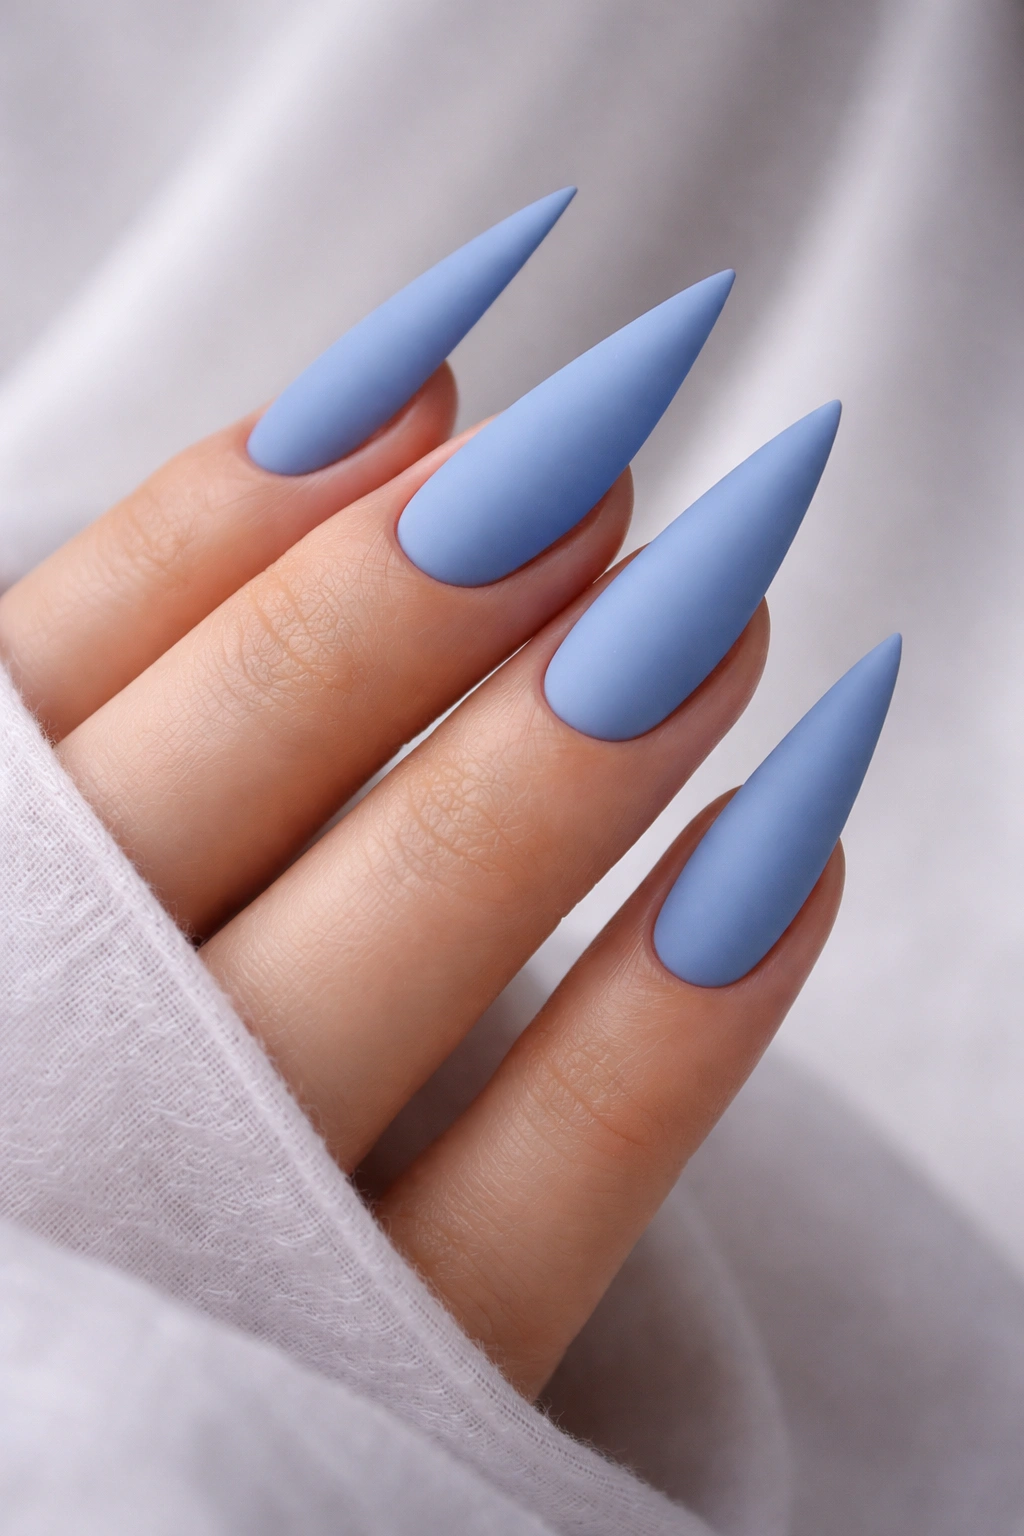
A matte cornflower blue creates a soft, velvety finish that feels contemporary and surprisingly wearable for stilettos. The non-reflective surface actually makes the elongated shape feel sleeker and more architectural.
Why Matte Finishes Suit Stiletto Nails
Glossy stilettos catch light and draw attention upward—which is great if that’s your goal. Matte stilettos feel more sophisticated and let the shape of your nail, rather than shine, be the focal point. Cornflower blue is the perfect shade for matte because it’s not so dark that it disappears, and it’s not so light that it feels washed out without the reflectivity of gloss.
Applying and Maintaining Matte Polish
- Use a dedicated matte topcoat over regular blue polish for best results—this gives you better color control than buying matte polish directly
- Paint your cornflower base in 2-3 thin coats for even coverage
- Once fully dry, apply a matte topcoat and let it cure completely
- Matte finishes can feel sticky immediately after application—wait 10+ minutes before touching anything
- To restore shine if matte dulls, add a very thin layer of matte topcoat
Pro tip: Matte finishes show fingerprints and dust more obviously than gloss, so you might need to gently buff with a soft cloth between manicures if they spend time looking smudged.
7. Periwinkle with Negative Space and Geometric Lines

Periwinkle stilettos with negative space cutouts and geometric line work—such as sharp triangles, stripes, or angular shapes—create a modern, almost architectural look. This design says you know what you’re doing aesthetically.
Designing Geometric Patterns on Stiletto Nails
Negative space works beautifully on stilettos because the length gives you room to be creative with pattern. Think triangular shapes along the side edges, diagonal stripes, or even geometric cutouts that show your natural nail beneath. The patterns should follow the elongated shape of the nail rather than fight against it.
Tools and Execution for Clean Geometry
- Use nail tape or striping tape to create crisp, clean lines
- A thin-bristled brush or striping brush is essential for geometric work
- Mark guidelines lightly with a pencil before painting if precision matters to you
- Let the periwinkle base dry completely before adding geometric elements
- Geometric designs in white or chrome contrast best against periwinkle
- Apply a protective topcoat over everything once designs are dry
Worth knowing: Geometric negative space designs are surprisingly forgiving because clean lines are the point—slight imperfections actually add to the modern aesthetic rather than detracting from it.
8. Sky Blue Marble Effect
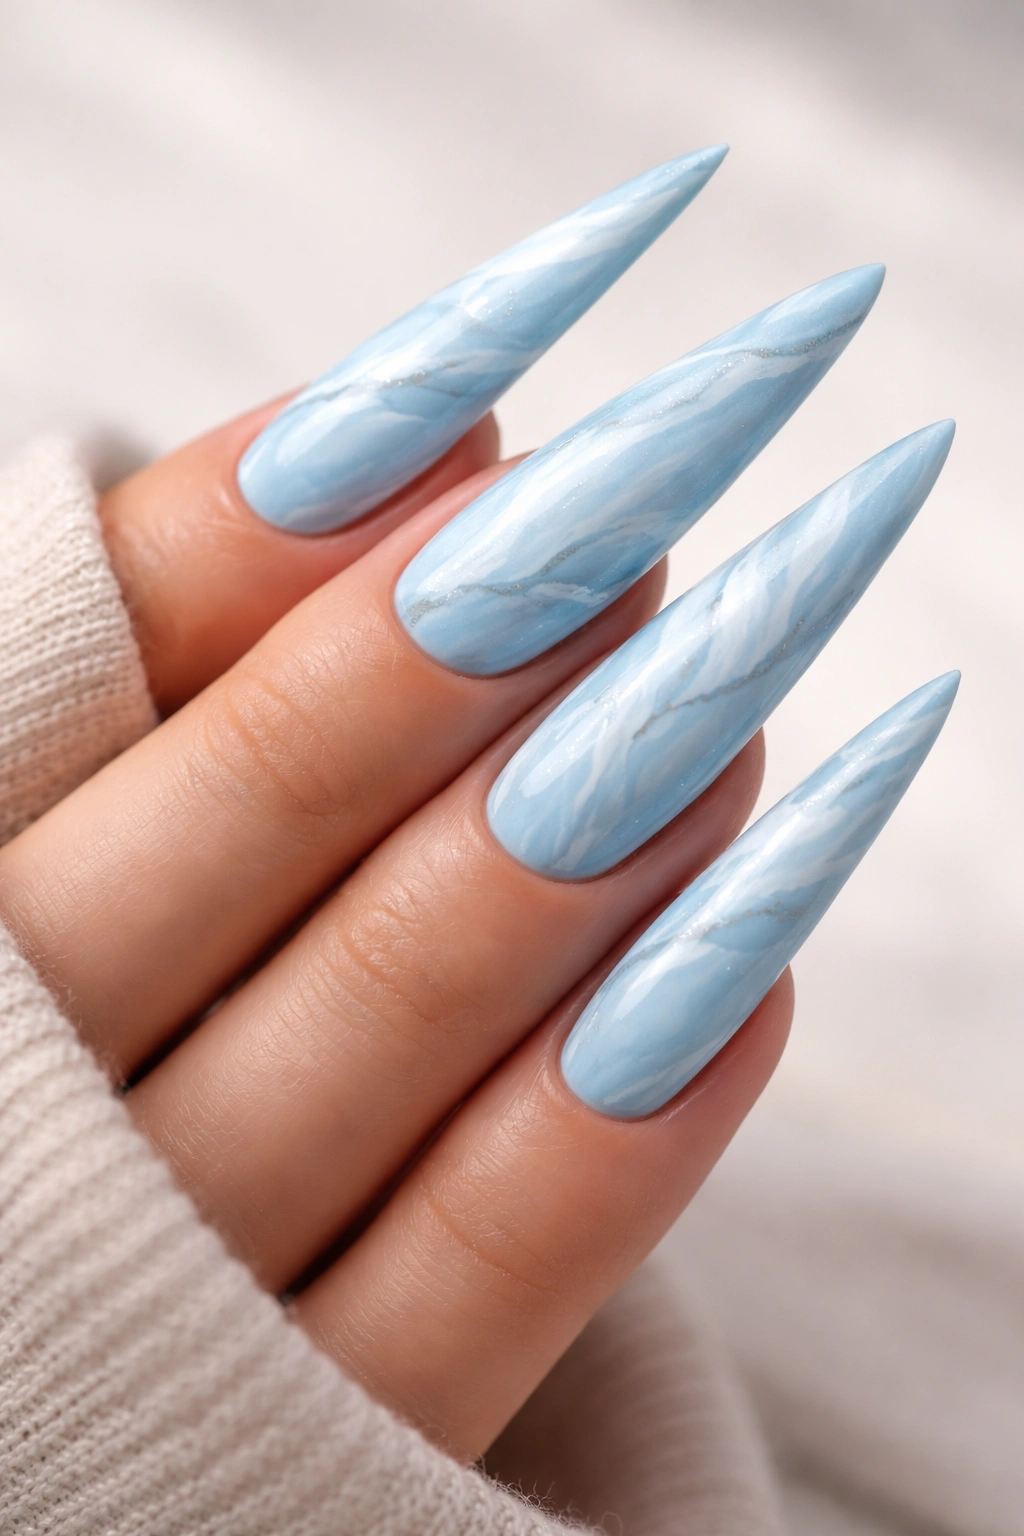
Sky blue with white or cream marble veining creates a sophisticated, almost stone-like effect that feels more upscale than the base color alone would suggest. The marbling technique adds movement and visual interest without adding sparkle or drama.
Creating Natural-Looking Marble Patterns
The marble effect works because it’s random and organic—there’s no single “right” way to do it, which removes the pressure of perfection. The key is using colors that are close in tone (light blue and white or cream) so the veining looks natural rather than graphic.
Marbling Technique and Best Practices
- Paint a sky blue base in 2-3 coats and let dry completely
- Mix white or cream polish with clear polish on a plate to create the “veining” color (thinner polish spreads more easily)
- Use a fine detail brush to drag thin, irregular lines across the nail surface
- Don’t plan where the lines go—let your hand move naturally and create organic patterns
- Add a second layer of veining if the first looks too sparse
- Seal with topcoat once completely dry
Pro tip: If your marble looks too chaotic, add a few thin white lines over the whole design to unify it—marbling is very forgiving once you understand that more veining usually looks better than less.
9. Teal Stilettos with Gold Leaf Accents
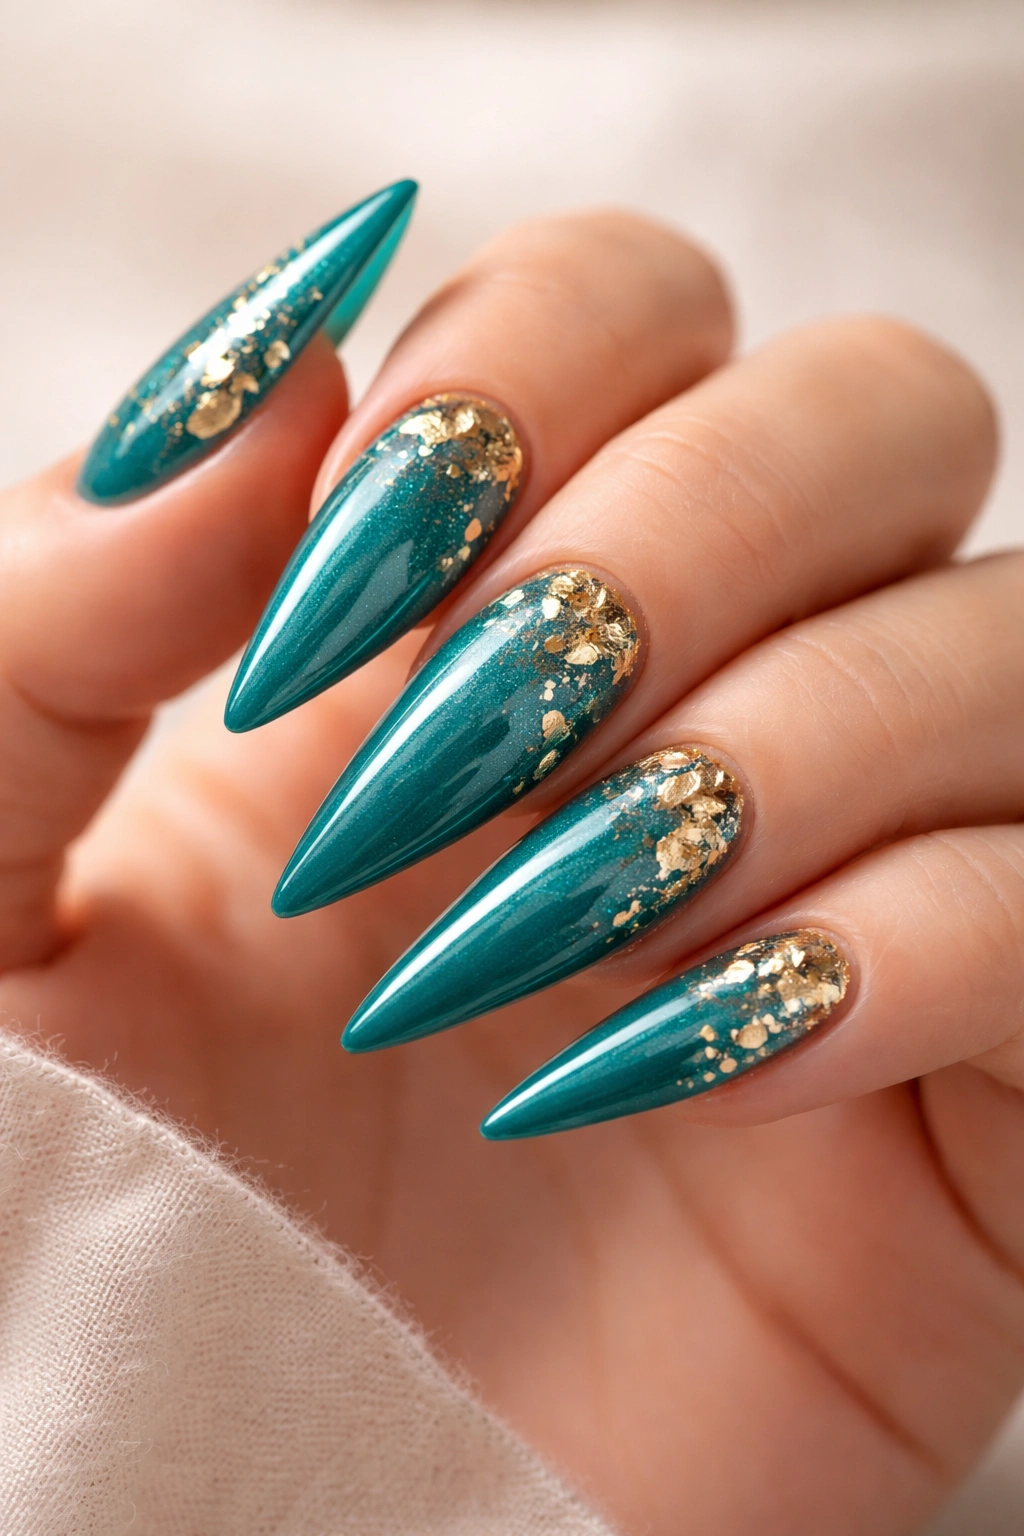
Teal (that perfect blue-green hybrid) with gold leaf accents scattered across the nail creates an earthy-luxe vibe. This design feels more organic than traditional glitter because gold leaf has a natural, almost weathered quality.
Why Teal and Gold Create a Luxury Aesthetic
Teal pulls toward turquoise and green while maintaining blue’s cool undertones, making it feel sophisticated and a bit unexpected. Gold leaf against teal evokes expensive ceramics, high-end packaging, and curated interiors—it automatically elevates the look without requiring much technical skill.
Applying Gold Leaf for Maximum Impact
- Paint teal base color in 2-3 thin coats
- While the final coat is still slightly tacky (about 30-60 seconds after application), press pieces of gold leaf onto the surface
- Use the brush side of a gold leaf kit to press the leaf flat against the nail
- The leaf will stick in the tacky polish—don’t worry about perfection
- Once everything is dry, seal with clear topcoat to lock the leaf in place
- Gold leaf is more delicate than foil, so treat your nails gently for the first 24 hours
Worth knowing: Gold leaf looks most impressive when used sparingly—resist the urge to cover your entire nail. Leave white space and nail visible. Less is more.
10. Powder Blue Ombre to Silver
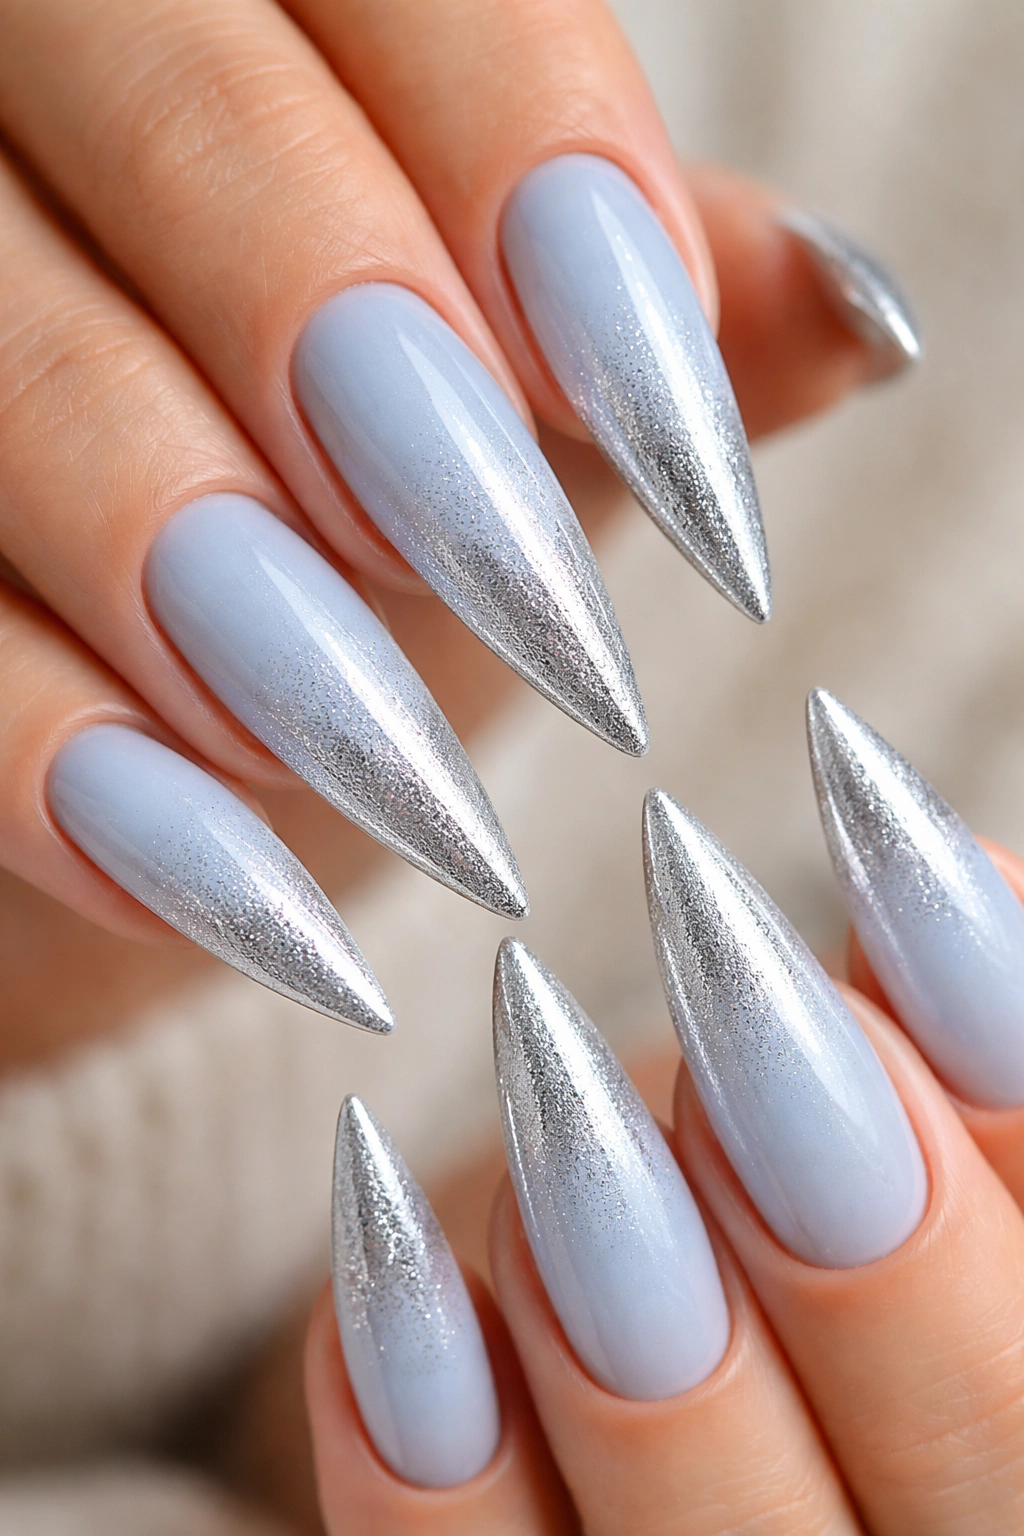
Powder blue at the cuticle fading to silver at the tip creates a dreamy, almost frosted appearance. This design is particularly stunning on longer stilettos where the gradient has room to develop naturally.
Using Ombre to Elongate the Nail Visually
Because the color transitions from light (powder blue) to reflective (silver), your eye travels from the base to the tip, which elongates the visual perception of the nail. This is a design principle that works specifically well on stilettos because it emphasizes their signature shape.
Ombre Sponging Technique for Smooth Blending
- Paint powder blue base coat and let dry completely
- Use a makeup sponge to apply silver shade, focusing on the tip area
- Dab rather than swipe—dabbing creates softer transitions than swiping
- Overlap the colors slightly in the middle and use the sponge to blend where they meet
- Apply a topcoat, which naturally smooths and blends the colors even further
- If blending isn’t smooth enough, use a detail brush with clear polish to feather out harsh lines
Pro tip: This design photographs beautifully in natural light because the silver catches the light differently as you move your hand—it’s constantly changing.
11. Sapphire Blue with Chrome Accent Tips
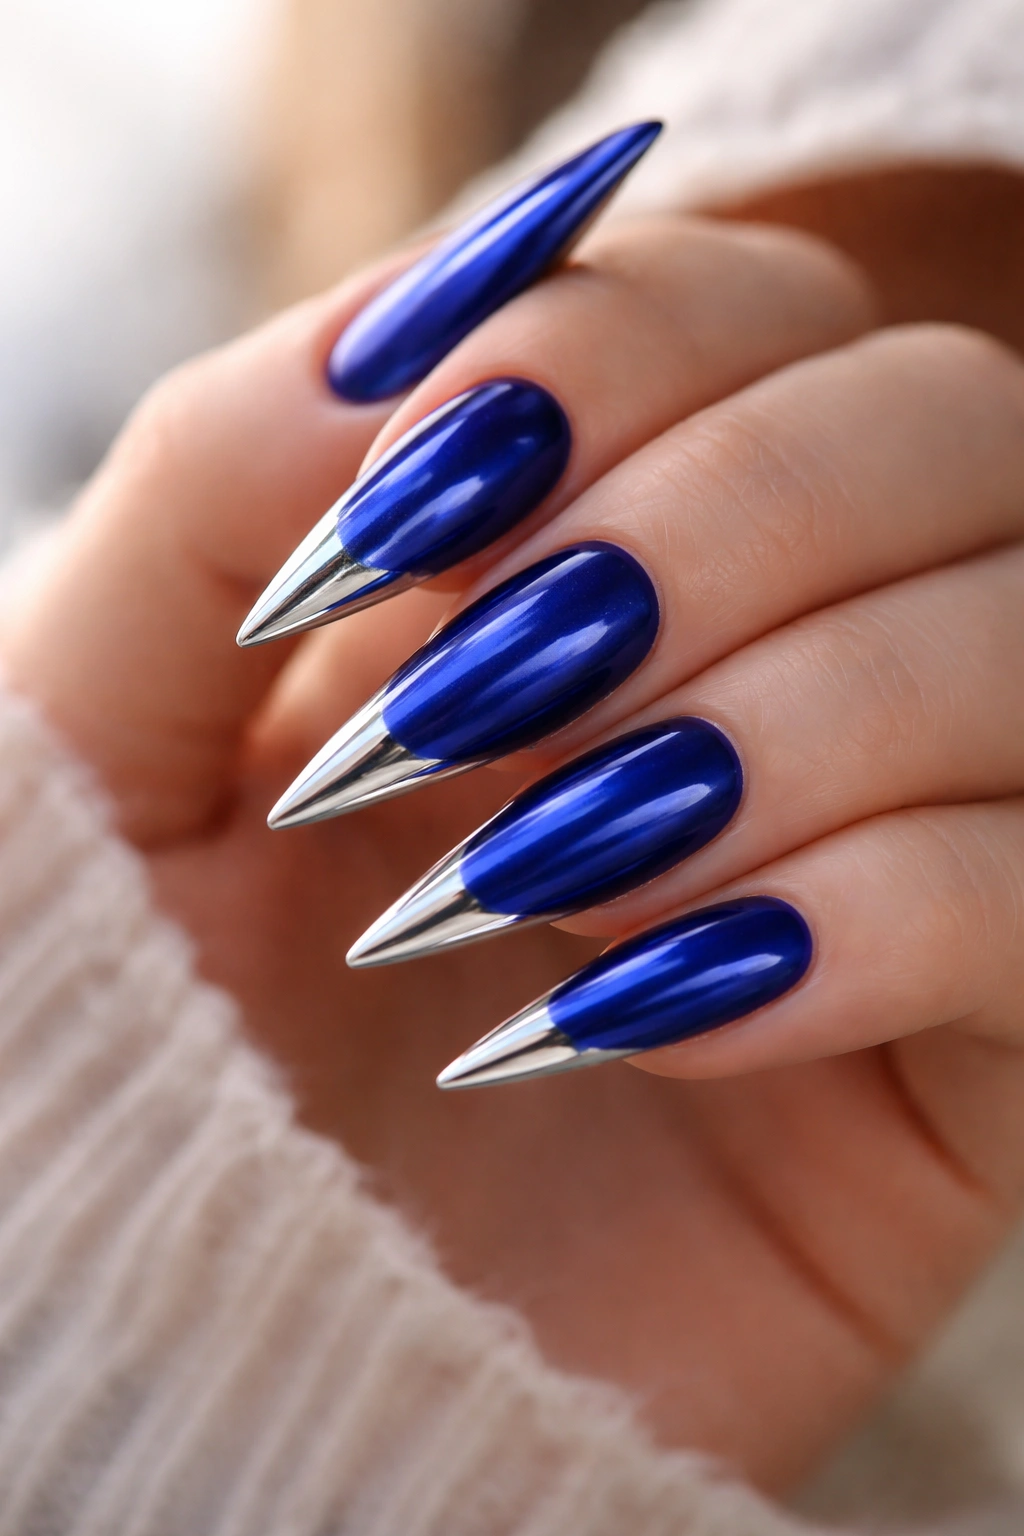
Sapphire blue—that deep, jewel-toned blue—with just the very tip finished in chrome creates instant luxury. The chrome catches light like liquid metal and makes the already-dramatic stiletto feel almost otherworldly.
Why Chrome Works on Stilettos
Chrome has a mirror-like, reflective quality that makes the tip area seem to glow and shift as you move. On a stiletto, which already emphasizes the tip, adding chrome makes that signature point feel like the focal point of your entire look. It’s bold without being costume-like.
Applying Chrome for a Flawless Mirror Finish
- Paint sapphire blue base in 2-3 coats and let dry completely
- Apply a sticky topcoat base (chrome polish sticks best to tacky surfaces)
- Use a chrome powder applicator or a soft flat brush to swipe chrome powder across the tip area
- Press the powder into the topcoat firmly so it adheres fully
- Once you’ve applied the chrome, immediately seal with a thick, protective topcoat
- Chrome can be delicate until fully sealed, so let it cure for at least 30 minutes
Worth knowing: Chrome powder comes in different grades—fine chrome is more reflective and looks like actual mirror finish, while rough chrome has more texture. For stilettos, fine chrome looks more sophisticated.
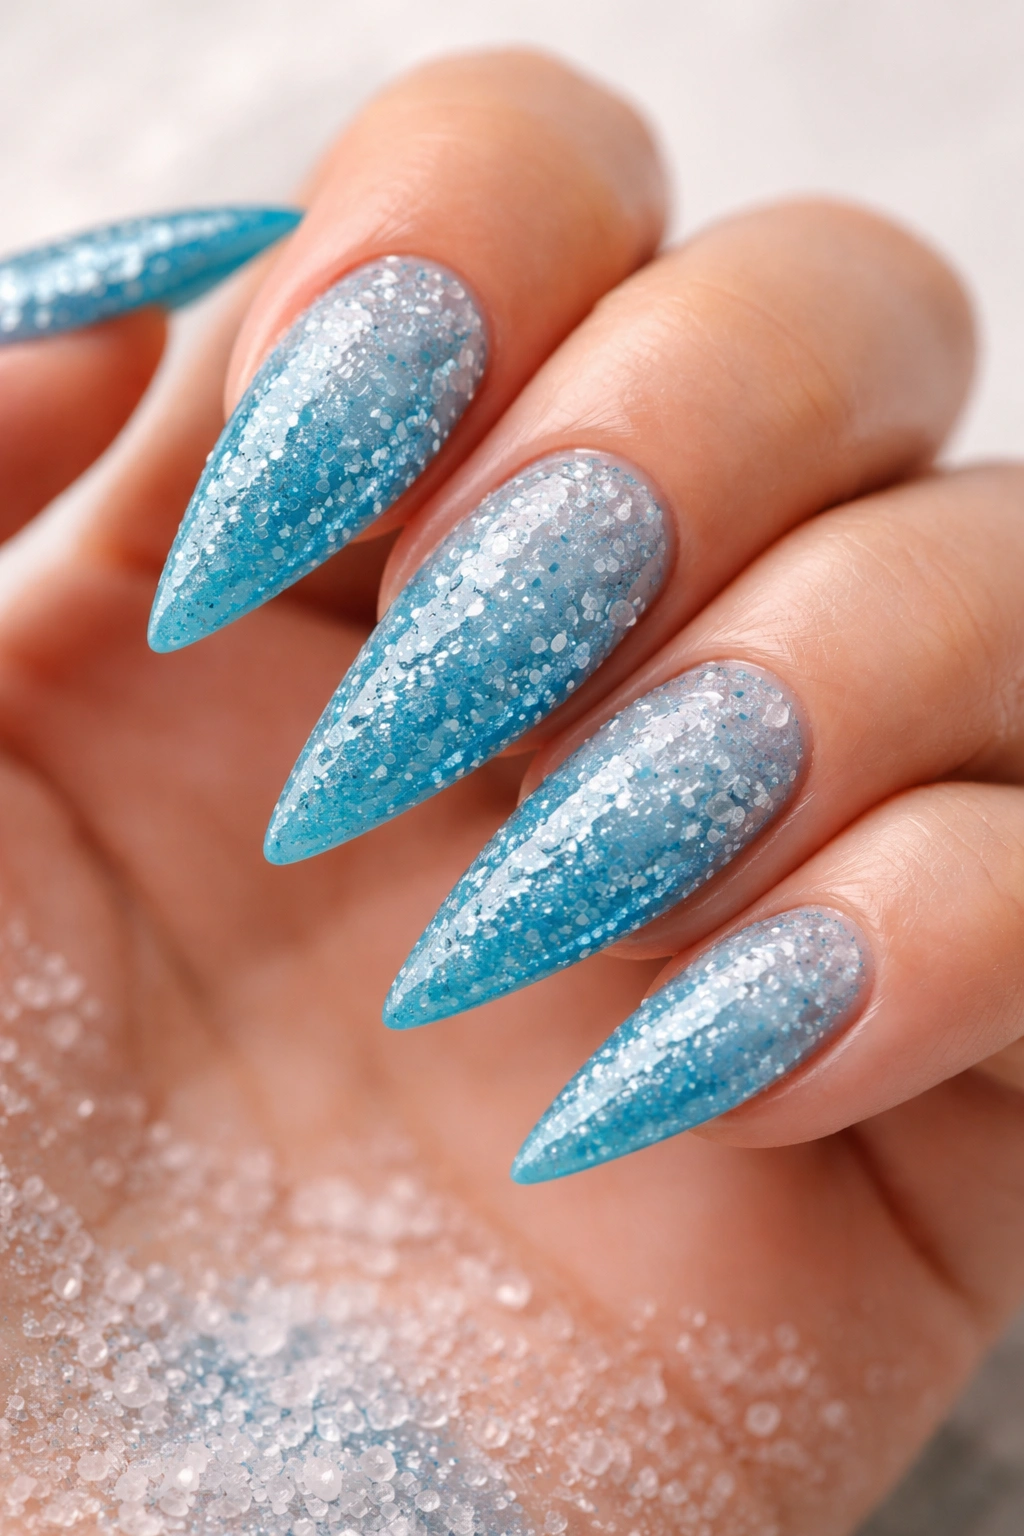
12. Light Blue with Holographic Glitter Ombre

Light blue transitioning into holographic glitter creates a magical, prism-like effect. The holographic pieces catch different colors of light as you move, making the nails feel almost iridescent.
Understanding Holographic Effects on Blue Bases
Holographic glitter over blue base creates rainbow refraction—you’ll see touches of purple, pink, green, and gold depending on the light source and angle. This dynamic quality means the nails never look the same twice, which keeps the design feeling fresh.
Ombre Technique with Holographic Glitter
- Paint light blue base in 2-3 coats
- Apply a clear topcoat once the blue is completely dry
- While the topcoat is still slightly tacky, brush holographic glitter into it, focusing on the tip area
- Use a soft brush to blend the glitter upward into the light blue, creating an ombre effect
- The glitter will be thicker at the tip and fade out toward the cuticle
- Seal everything with another thick layer of clear topcoat once dry
Pro tip: The light blue base is crucial here—it lets the holographic glitter shine without the nails looking dark or muddy. Avoid darker blues for this design.
13. Navy Blue with Minimalist White Dots
Navy blue with small, scattered white dots in a minimalist pattern creates an elegant, understated look that still reads as intentional. This design proves you don’t need complexity to create impact.
Why Minimalism Works on Stilettos
Stilettos are already a bold statement due to their shape and length—you don’t need to add much else to make them feel complete. Minimalist dots respect the nail shape and let the blue color be the primary focus while adding just enough visual interest to feel designed rather than boring.
Dot Application Using Dotting Tools
- Paint navy blue base in 2-3 coats and let dry completely
- Use a dotting tool or the end of a bobby pin to create small dots in white polish
- Space dots unevenly—aim for 5-8 dots per nail scattered across the surface
- Don’t feel obligated to match dots from nail to nail—variety looks more intentional than matching
- Let the white dots dry completely, then seal with topcoat
Worth knowing: Dots look more sophisticated when they’re small and subtly placed rather than large and centered. Resist the urge to make them symmetrical or perfectly matched.
14. Ocean Blue Stilettos with Scattered Sea Salt Texture
Ocean blue with a scattered sea salt texture creates a beach-inspired look that feels organic and tactile. The texture adds dimension that solid color alone can’t achieve.
Creating Textured Effects with Sea Salt
Sea salt texture is created by sprinkling actual sea salt onto tacky polish—the salt crystals stick and create an irregular, bumpy surface. It’s surprisingly wearable and feels more modern than glitter despite being less refined.
Applying Sea Salt for Even Texture Distribution
- Paint ocean blue base color in 2-3 coats
- Apply a final coat of polish and let it become slightly tacky (about 30-45 seconds)
- Sprinkle fine sea salt (or specialized nail texture salt) across the surface
- Press gently with your finger or a brush so the salt adheres fully
- Let it dry completely, then brush away any loose salt particles
- Seal with a thick topcoat that smooths the texture slightly while protecting it
Pro tip: Use fine sea salt rather than coarse—fine particles create a more refined texture that feels less chunky. If you use regular sea salt, grind it finer with a mortar and pestle first.
15. Royal Blue with Silver Nail Art Design
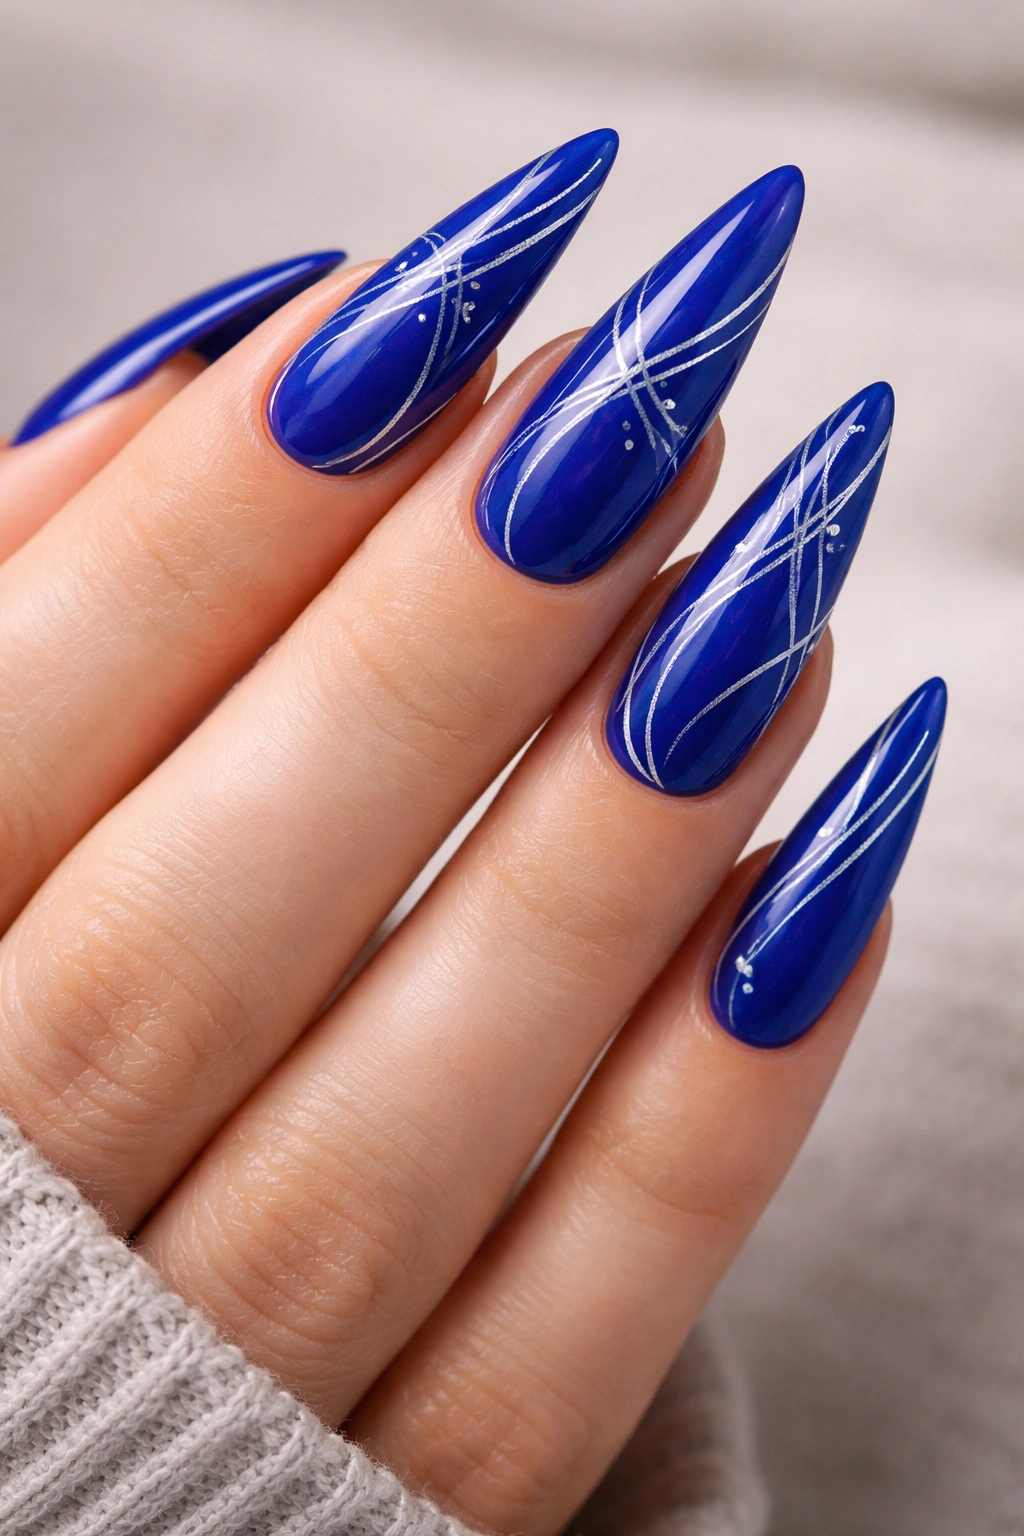
Royal blue as the base with silver hand-drawn designs—think thin lines, delicate flourishes, or simple geometric shapes—creates a personalized, artistic look. This design bridges the gap between simple and intricate.
Designing Custom Artwork on Your Stilettos
You don’t need to be an artist to create nail art designs—even imperfect lines add character and intention. Think thin lines along the edge of the nail, simple geometric shapes, or even abstract doodles. Silver shows up beautifully against royal blue.
Tools and Techniques for Hand-Drawn Designs
- Use a ultra-thin striping brush or detail brush for precise lines
- A nail art pen designed for detailed work is easier to control than brush and polish
- Paint your design freehand—wobbly lines actually add charm
- Let the royal blue base dry completely before adding silver designs
- Apply designs in layers if you’re doing something complex—let each layer dry before adding the next
- Seal everything with topcoat once the design is dry and final
Worth knowing: Hand-drawn designs are trending because they feel more personal and less mass-produced than printed nail art. Even simple lines elevate the look.
16. Steel Blue with Gradient French Ombre Tip
Steel blue base with a gradient ombre effect that transitions into a French-tip-style white or cream at the very tip creates a modern, elongated look. The gradient softens what could be a harsh line.
Why Gradient French Tips Suit Stilettos
Traditional French tips create a sharp line that can make long stilettos feel blunt. A gradient French tip honors the French manicure concept while respecting the softer, more contemporary aesthetic. The transition from color to white feels natural rather than geometric.
Creating Smooth Gradient French Tips
- Paint steel blue base in 2-3 coats and let dry completely
- Apply a clear topcoat base for the gradient area
- While the topcoat is still slightly tacky, use a makeup sponge to apply white or cream polish to the tip area
- Dab rather than swipe to create a soft, diffused transition
- Let it dry, then apply another topcoat to seal and blend everything
- The final topcoat naturally smooths the gradient further
Pro tip: The longer your stilettos, the more beautiful this gradient effect looks. The length gives the color transition room to develop naturally.
17. Cerulean Blue with Pearl Shimmer Finish
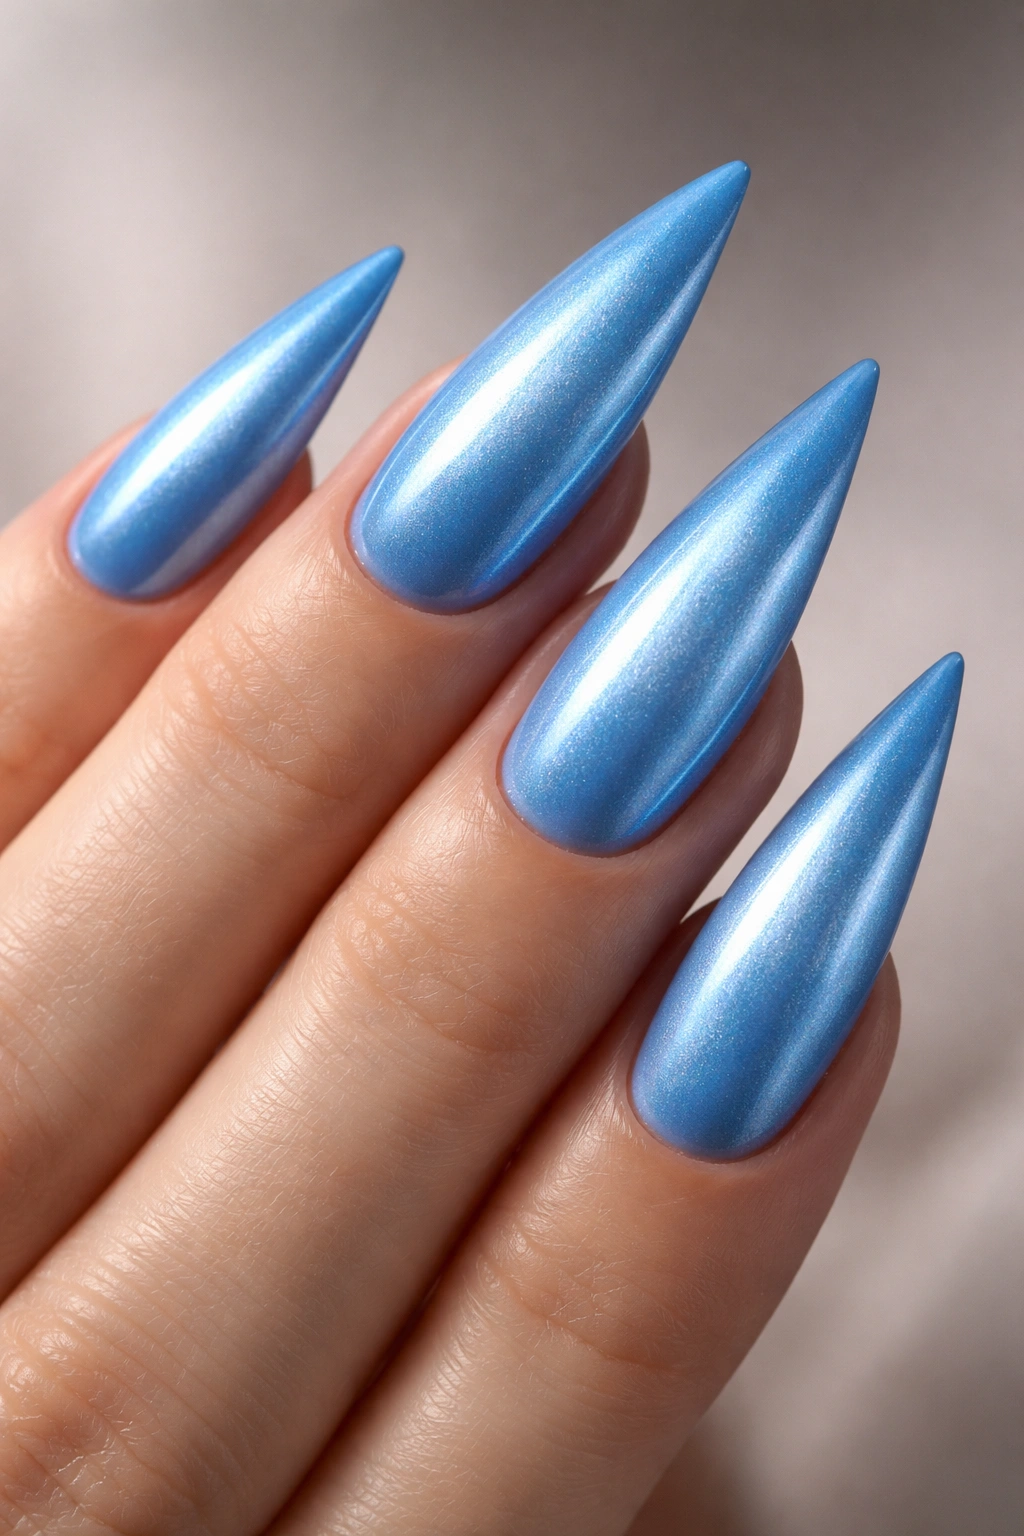
Cerulean blue (that bright, almost neon-tinged blue) with a pearl shimmer finish creates a sophisticated glow. The shimmer catches light without the glitter being obvious, giving the nails an expensive, expensive-looking sheen.
Understanding Pearl Shimmer vs. Glitter
Pearl shimmer is built into the polish itself—it’s not chunky glitter pieces but rather tiny pearl particles suspended throughout the polish. This creates a smooth, subtle sparkle that feels more polished than traditional glitter while still having luminosity.
Application for Maximum Pearl Shine
- Paint cerulean blue with pearl shimmer in 2-3 thin coats
- Pearl finishes show imperfections more than opaque colors, so apply thin coats rather than thick ones
- Let each coat dry completely between applications
- Pearl finish doesn’t need additional topcoat (it already has shine), but you can add a very thin layer for protection
- The nails will have built-in luminosity that changes slightly depending on lighting
Worth knowing: Pearl finishes can sometimes look a bit flat if you apply topcoat over them—if you want to preserve maximum shine, skip the topcoat entirely and just carefully wear the nails.
18. Denim Blue with Gold Striping Tape Design
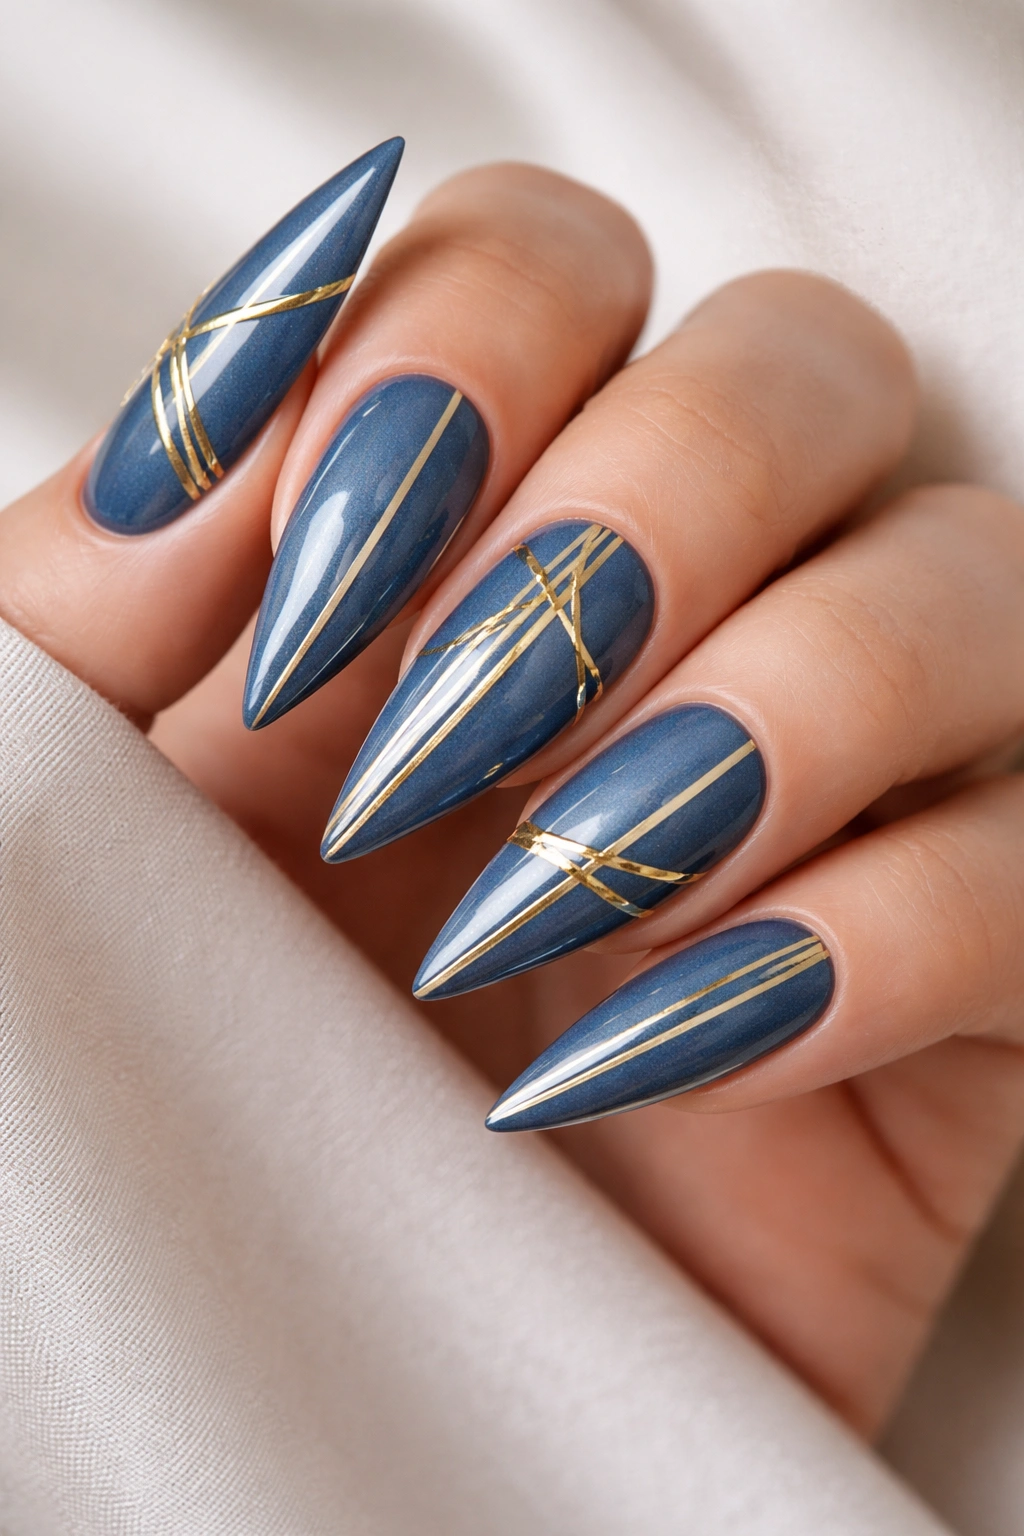
Denim blue (that casual, wearable mid-tone blue) with geometric designs created using gold striping tape creates a high-fashion look that’s actually very simple to execute. Striping tape removes the “perfect artist hand” requirement.
Why Striping Tape Removes Design Anxiety
Striping tape gives you the ability to create perfectly straight lines, geometric patterns, and multi-color designs without needing artistic skill. Apply the tape to your nail, paint over it, remove the tape while the polish is still wet, and you have a perfect design every time.
Striping Tape Technique for Clean Designs
- Paint denim blue base in 2-3 coats and let dry completely
- Choose your striping tape width (thin creates delicate lines, wider tape creates bolder statements)
- Apply tape to your nail in your desired pattern (stripes, triangles, geometric shapes)
- Press the tape edges firmly so polish doesn’t seep underneath
- Paint a contrasting color (gold works beautifully) over the taped area
- While the paint is still slightly wet, carefully peel away the tape—you’ll have perfect clean lines
- Let everything dry completely, then seal with topcoat
Pro tip: Remove striping tape while the polish is wet, not dry. Removing dry polish can sometimes pull up bits of the underlying color. Wet paint releases much more cleanly.
Final Thoughts
Blue stiletto nails work because blue itself is universally flattering, and stilettos are the ultimate blank canvas for creative nail design. What starts as a single color becomes endless—add texture, combine finishes, layer effects, or keep it stripped back and minimal. The designs above are starting points, not rules. Mix elements from different ideas to create something that feels entirely your own.
The real power of stiletto nails lies in how they transform even subtle changes into bold statements. A matte finish feels different from glossy. Gold accents shift the entire energy compared to silver. Length matters too—these designs work across every stiletto length, but they hit differently at medium length versus extreme length. Pay attention to what feels right for your style and lifestyle.
Start with one design that calls to you, commit to wearing it long enough to feel confident in it, and then branch into experimenting. Blue stilettos are forgiving because the color does so much of the heavy lifting. You can’t really go wrong—you can only find what feels most like you.
