

Aura nails have become the go-to manicure trend for anyone who wants their nails to practically glow. The signature blend of iridescent, gradient-like color shifts creates an almost ethereal effect that catches light beautifully at every angle. When you combine that dreamy aesthetic with the bold, dramatic silhouette of stiletto nails—those sharp, elongated tips that command attention—you get a nail style that’s equal parts sophisticated and eye-catching.
The genius of aura stiletto nails lies in how the shape amplifies the color-shifting magic. That extended length gives you a larger canvas for the gradient to play across, making the iridescent effect even more pronounced and mesmerizing. Whether you’re going for something subtle and wearable or completely show-stopping and experimental, stiletto nails provide the perfect foundation for aura magic.
The best part? You don’t need to stick with one formula. There are countless ways to interpret the aura trend—soft pastels that shift delicately, bold jewel tones that pop dramatically, minimalist designs that let the shimmer speak for itself, or intricate nail art layered over your aura base. The versatility is genuinely impressive, and the result is always that hypnotic, almost liquid quality that makes people unable to stop staring at your hands.
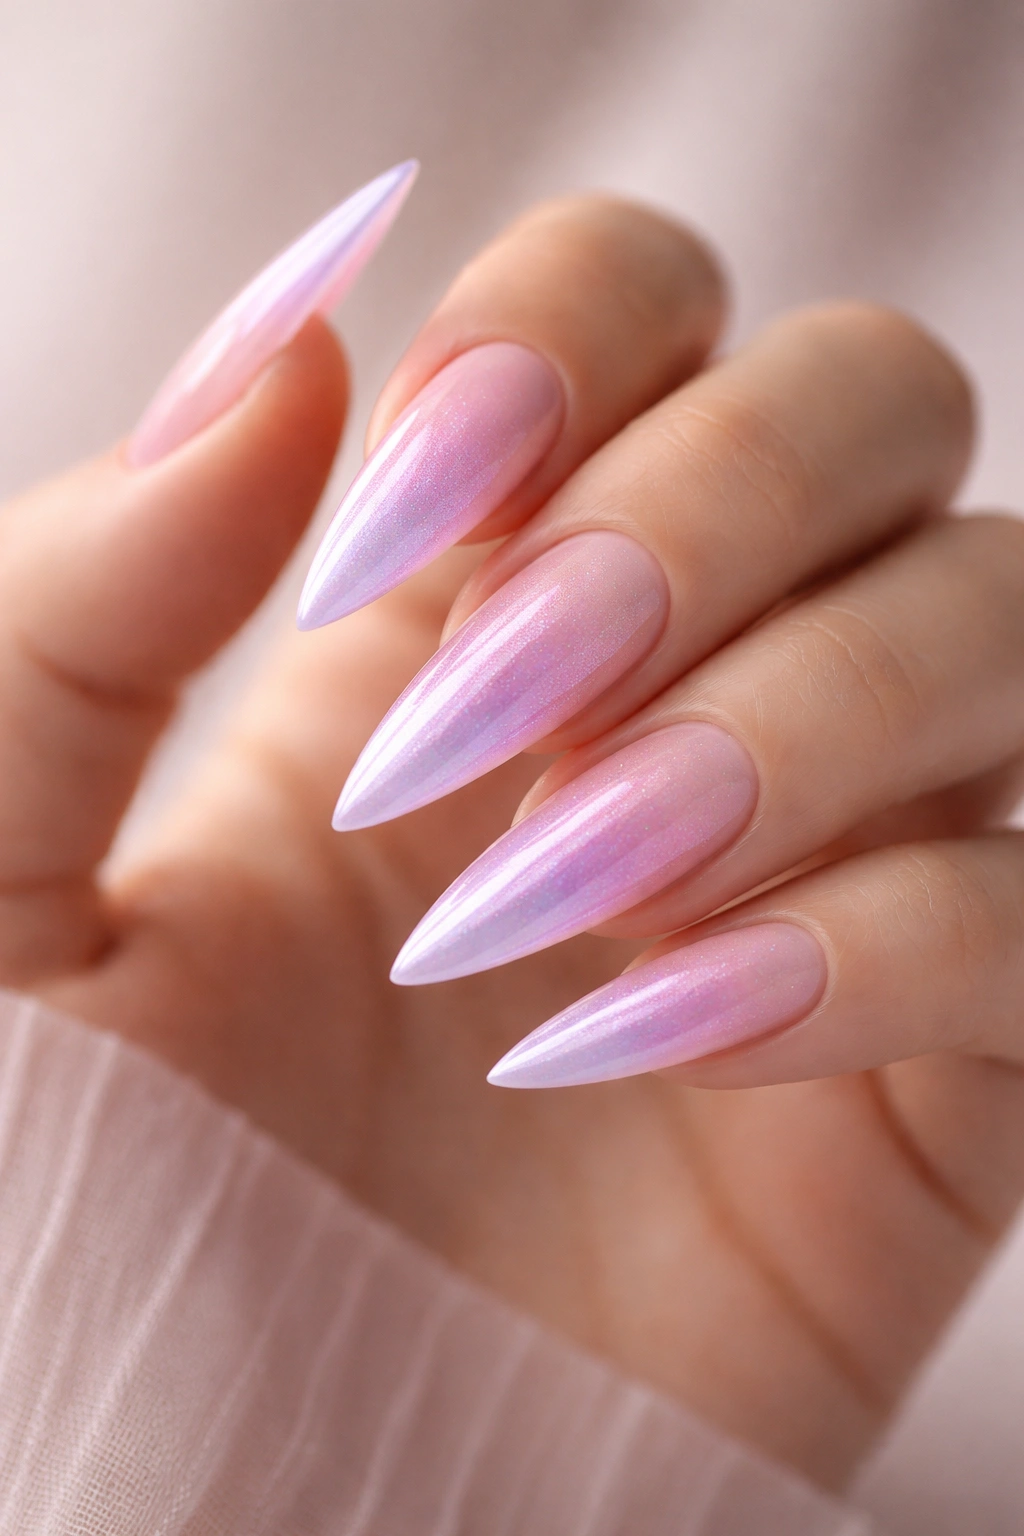
1. Soft Pink-to-Purple Twilight Aura
This dreamy gradient captures that magical hour right before sunset when the sky shifts from rose to lavender. The aura effect in this combination feels softer and more romantic than bolder color transitions, making it perfect for those who love the trend but want something understated enough for everyday wear.
Why This Color Story Works
The pink-to-purple aura sits right in the sweet spot of elegance and trendiness. Pink is universally flattering on most skin tones and has a naturally refined quality, while the purple shift adds depth and an unexpected coolness that prevents the manicure from feeling too precious or one-note. The iridescent particles catch light continuously as you move your hands, creating that signature aura shimmer without ever looking garish.
How to Execute It Flawlessly
- Start with a soft pink base coat—something like a ballet or dusty rose shade rather than a hot fuchsia
- Apply the aura chrome powder in a sweeping motion from the center of the nail toward the free edge, focusing heavily on the tip
- Layer a purple-tinted translucent topcoat to deepen the purple shift while maintaining the soft, graduated feel
- Build the effect gradually with thin layers rather than trying to get full intensity in one application; this creates a more natural gradient
- Seal everything with a glossy, thick topcoat to maximize the luminous effect and protect the chrome finish
Pro tip: This combination photographs exceptionally well in soft, natural light—it’s one of the few aura styles that looks equally stunning in sunlight and indoor lighting without looking completely different.
2. Deep Ocean Blue-to-Teal Metallic Aura
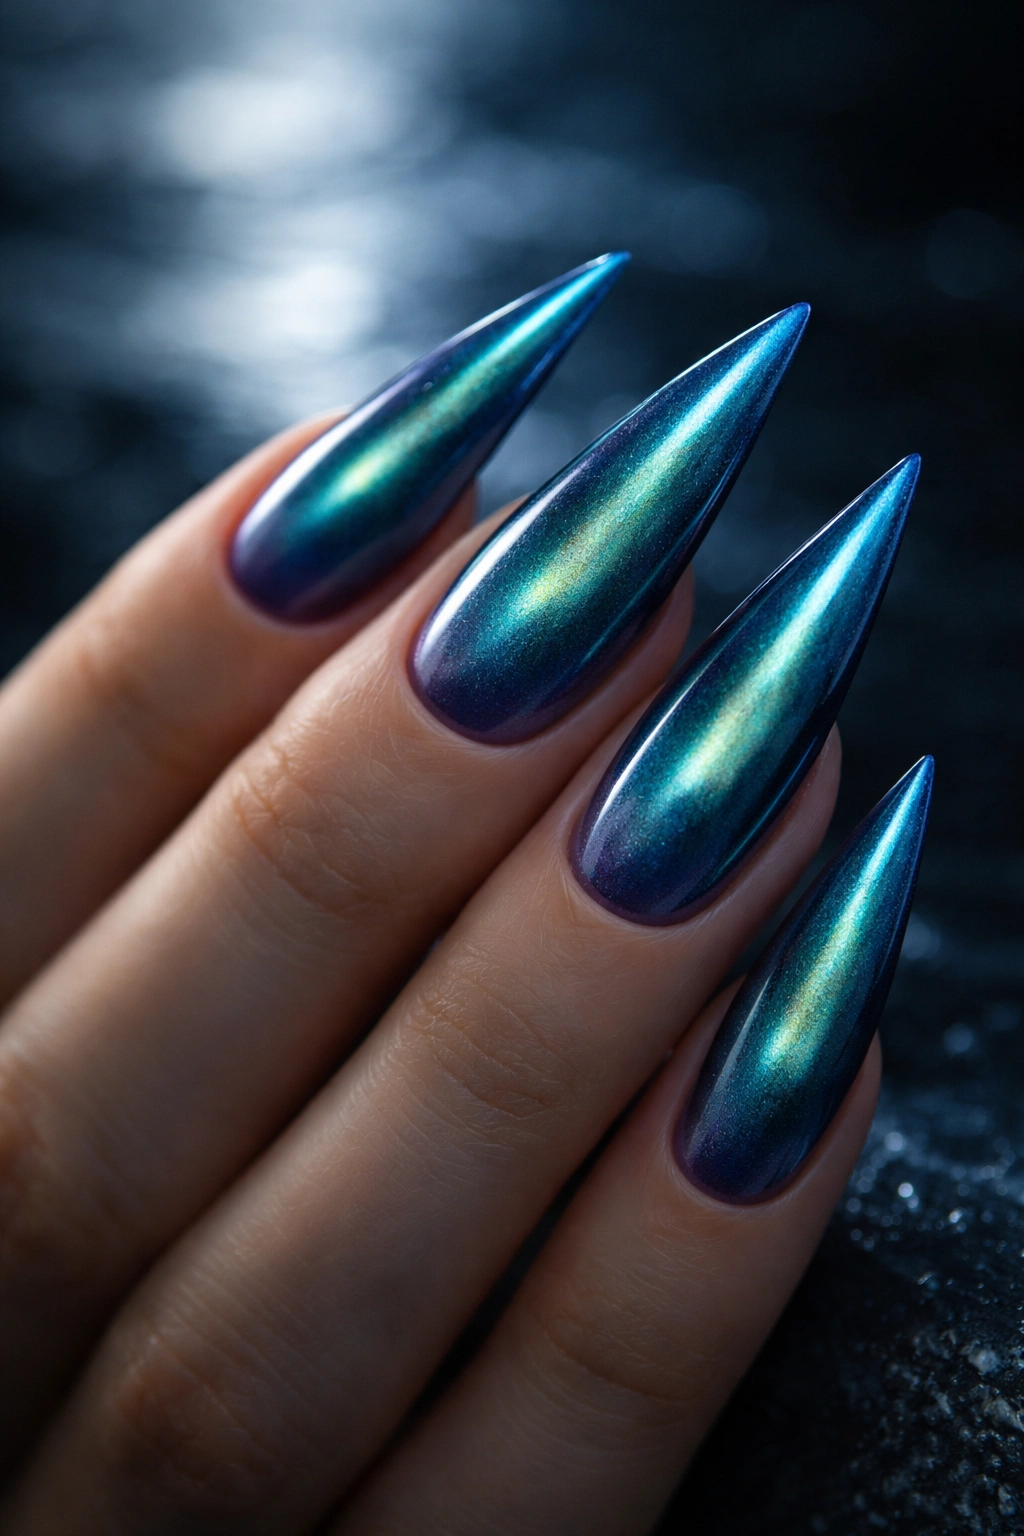
Dive into depths of blue-green that shift like water under moonlight. This aura combination has moody sophistication written all over it—it’s the kind of nail color that makes a serious statement while remaining oddly calming to look at. The teal shift gives the design a contemporary edge that prevents it from feeling nostalgic or dated.
The Underwater Gradient Appeal
Blue-to-teal auras work because both colors share the same cool undertone family, which means the transition feels organic and intentional rather than jarring. The iridescent shimmer in this color family tends to glow with a silvery-green accent, creating an almost opalescent effect that’s more sophisticated than simple glitter. This is the aura style for people who want something bold but not neon-bright.
Application Steps for Maximum Impact
- Use a deep ocean blue as your base—think navy with just a hint of teal, not a bright cerulean
- Apply the chrome powder with a slightly thicker hand than you might with pastels, as darker bases can sometimes make delicate shimmer appear muddy
- Work the powder from the tip toward the center, creating a gradient that gets deeper and more saturated at the edges
- Blend with a soft brush or sponge to ensure no harsh lines between the base and the chrome effect
- Finish with a UV-cured topcoat for maximum durability and a glass-like shine
Worth knowing: This color combination tends to photograph with extra depth when shot indoors or in artificial light, making it ideal if you do a lot of video calls or social media posting.
3. Blush-Gold Romantic Aura with Delicate Florals
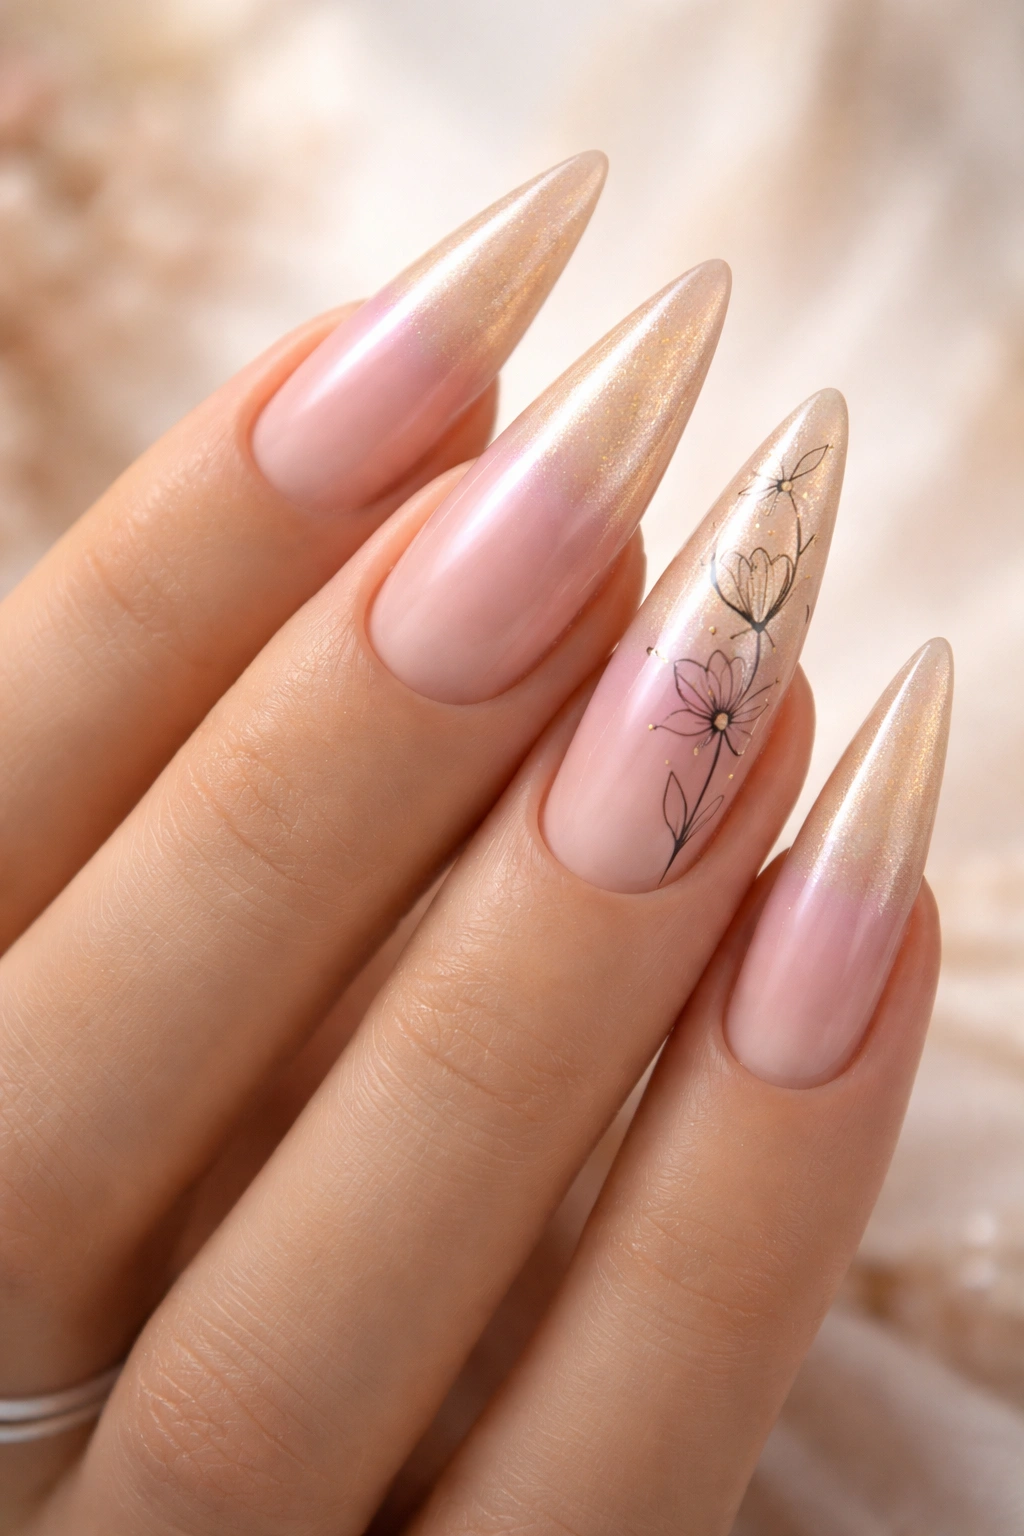
Combine the soft romance of blush pink with warm golden highlights, then layer in minimalist wildflower line art for a manicure that feels both trendy and timeless. This design proves that aura nails don’t have to be purely gradient-based—they work beautifully as a backdrop for carefully chosen nail art elements.
Why Adding Florals Elevates the Aesthetic
Minimalist florals drawn in thin black or dark brown lines create contrast and visual interest against the soft shimmer. The florals ground the ethereal aura effect and give your hands a more intentional, curated look. This combination reads as “elegant special occasion” rather than “everyday trend,” making it perfect for weddings, engagements, or any time you want nails that spark conversations.
How to Layer Florals Over Your Aura Base
- Create your blush-to-gold aura base exactly as you would normally, layering chrome powder and sealing it with topcoat
- Once fully cured, use an ultra-thin nail art brush (size 0 or smaller) with dark gel polish or acrylic paint
- Sketch delicate stems on 2-3 nails—try alternating which nails get florals so the design doesn’t feel overwhelming
- Add tiny five-petal flowers at different points along the stems, varying the size slightly for organic movement
- Use a toothpick to create small dots and details that suggest flower centers or scattered petals
- Seal the entire design with a glossy topcoat, making sure to fully cover all the line work
Insider note: This design works beautifully asymmetrically—try placing all the florals on your ring and middle fingers while keeping the other nails pure aura, which creates visual balance and makes the design feel more curated.
4. Green-to-Gold Luxury Aura
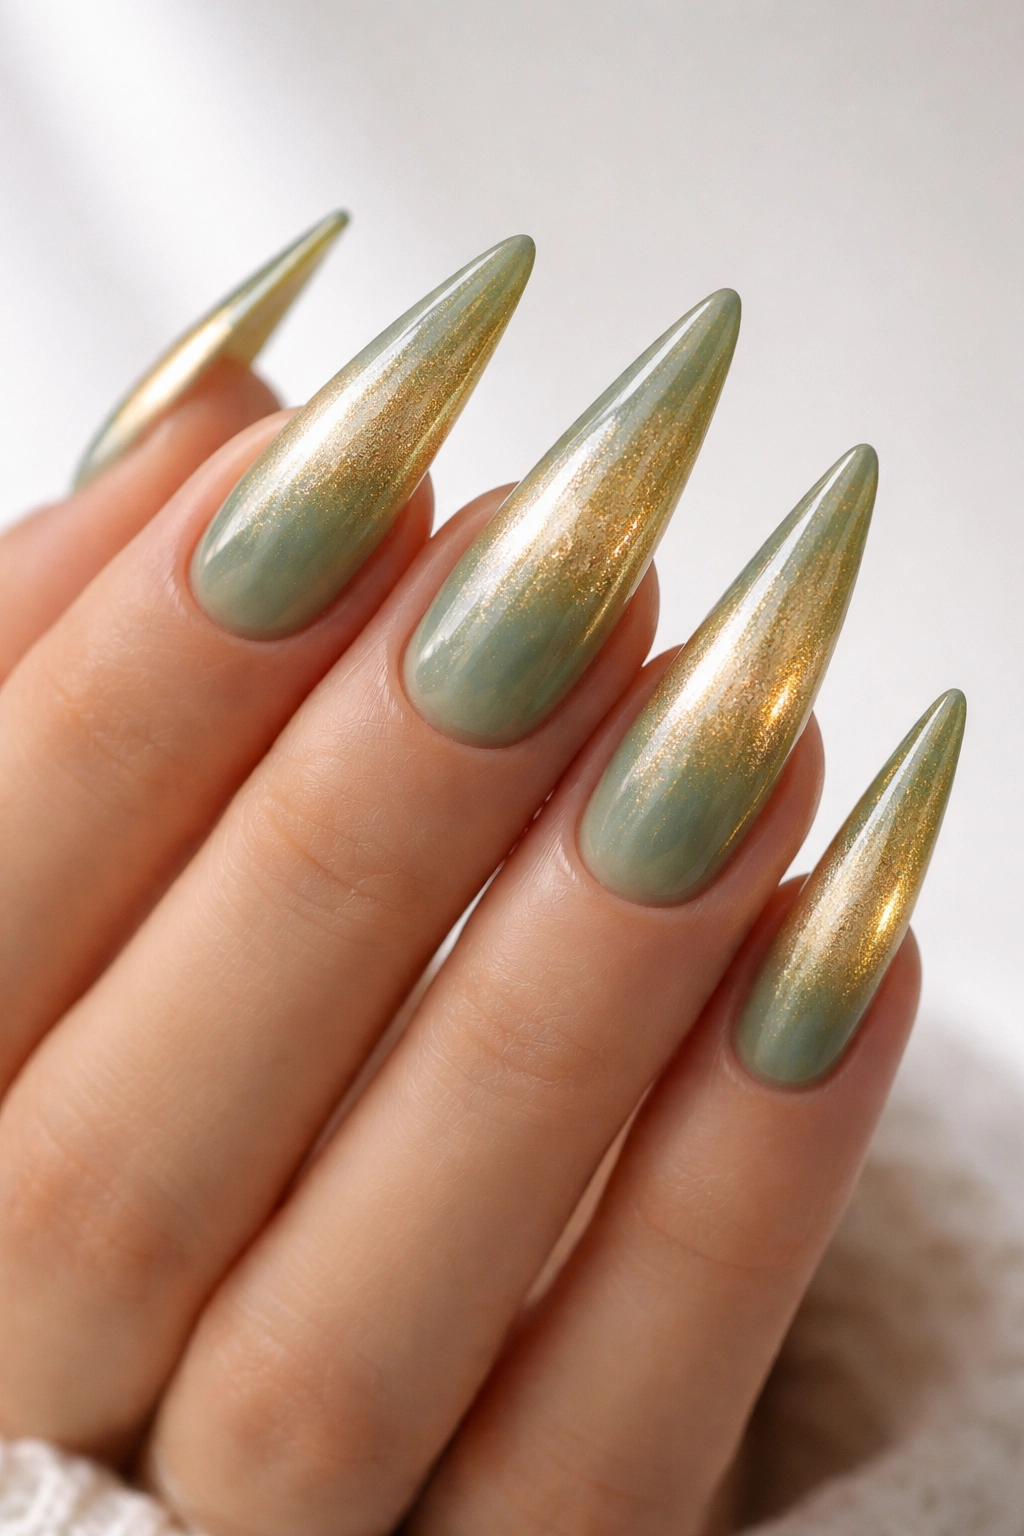
Picture the exact color of high-end champagne flutes shifting into the green-gold hue of vintage glass in sunlight. This aura combination feels luxurious and refined in a way that transcends trends. It’s the kind of nail color that reads as intentionally sophisticated rather than just following along with what’s popular.
The Premium Feel of This Palette
Green-to-gold auras sit in a rare space where they feel both current and timeless simultaneously. The green base provides earthiness and wearability, while the gold shift adds glamour and richness. This combination never photographs poorly and works across all seasons without needing adjustment—it’s genuinely one of the most universally flattering aura color choices available.
Building the Green-to-Gold Effect
- Start with a soft, muted sage or celadon green base—avoid anything too neon or tropical-feeling
- Apply your aura chrome powder with focus on creating depth through layering, not just a surface application
- Angle your powder application so the gold shift is most prominent at the tip and center of the nail
- The green should remain strongest near the base and around the sides, creating a multidimensional effect
- Use a heavy-coverage topcoat that’s specifically formulated for chrome—this creates the luminous, almost liquid appearance that makes this aura style so stunning
Pro tip: This combination looks absolutely magical when paired with gold jewelry or gold nail art accents, but it’s equally gorgeous completely solo.
5. Sunset Ombre Aura with Peach-Orange-Red Gradient
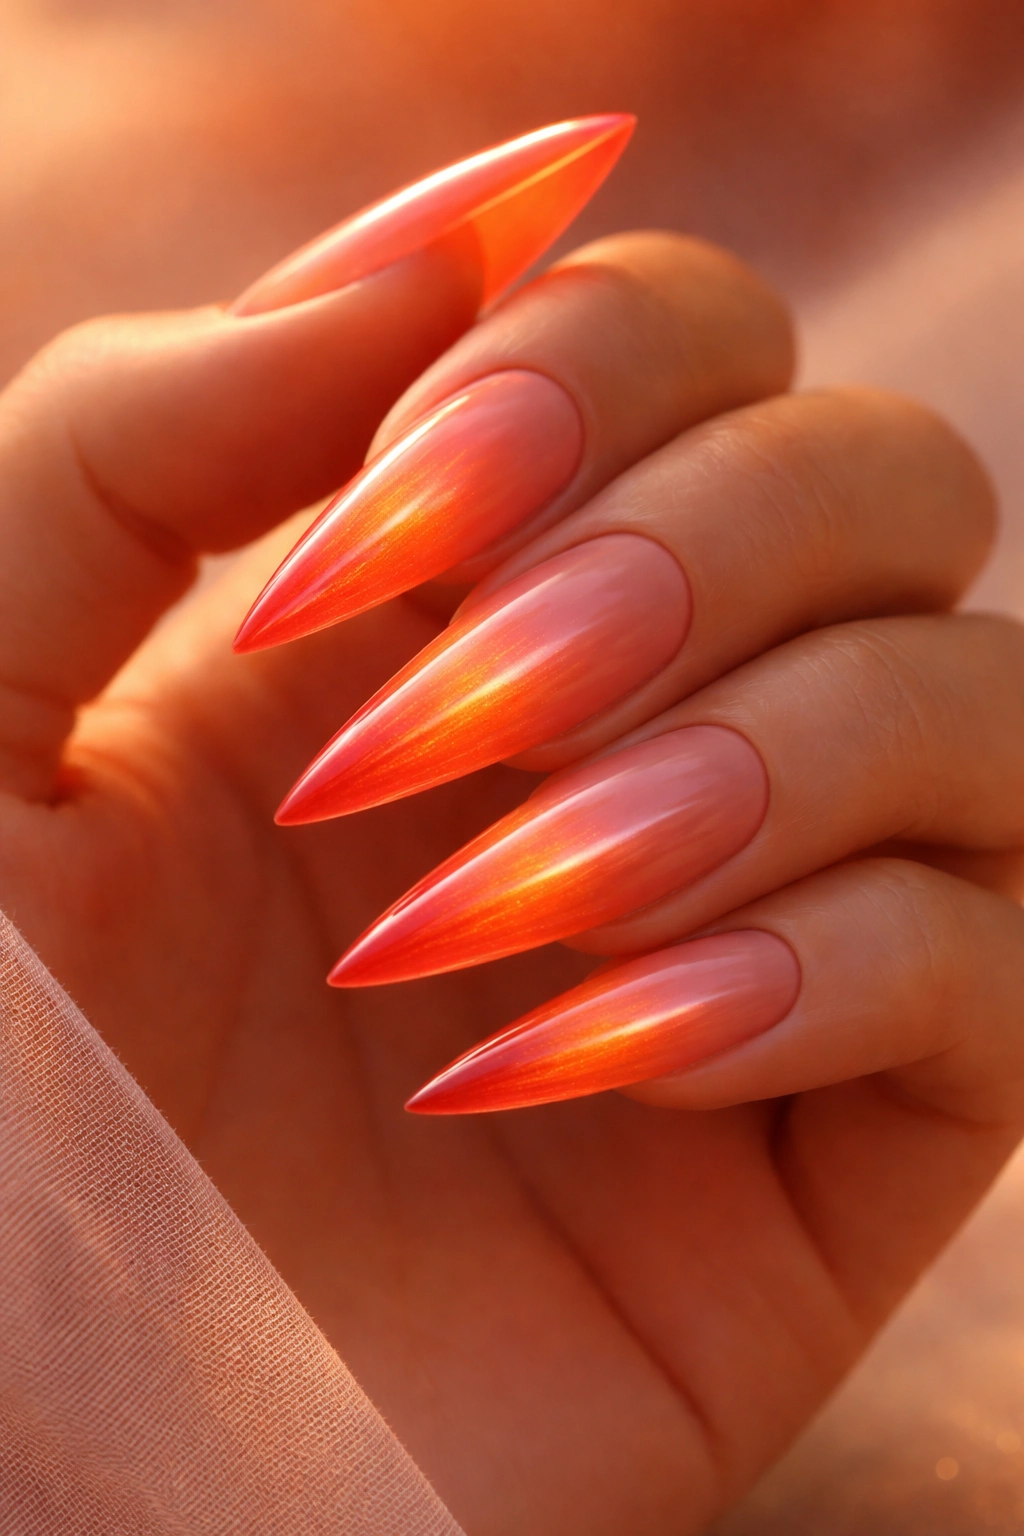
Bottle that feeling of watching a sunset paint the sky in impossible colors and put it directly on your nails. This aura design uses a warm color family that flows from peachy-coral through true orange and into deep red-coral, creating a multi-tonal effect that feels dynamic and energetic. It’s unapologetically statement-making and impossible to ignore.
Why Warm Auras Hit Different
Warm-toned auras feel bolder and more playful than their cool-toned counterparts. The peach-orange-red progression catches light in warm, glowing ways that make your hands literally appear to shine. This color family works particularly well on deeper skin tones where the warmth creates exceptional luminosity, but it’s genuinely beautiful on everyone—the key is getting the proportions right in your gradient.
Creating the Multi-Tonal Sunset Effect
- Begin with a peachy-coral base that leans more toward the warm side of the spectrum
- Apply your first layer of chrome powder, focusing on getting an even distribution across the entire nail
- Once that first layer is set, apply a second layer of chrome powder that’s slightly deeper—aim for a true orange tone
- Layer a third application in the deepest shade, concentrating the powder at the tip and along the edges
- Each layer should be thinner than the last, creating a gradient effect rather than defined stripes
- Seal with a topcoat and cure fully, then evaluate if you need additional layers of shimmer for the effect you want
Worth knowing: This design requires patience and multiple thin applications rather than fewer heavy ones—rushing the process results in muddy, over-saturated nails rather than that gorgeous gradient effect.
6. Purple-to-Pink Cosmic Aura with Star Accents
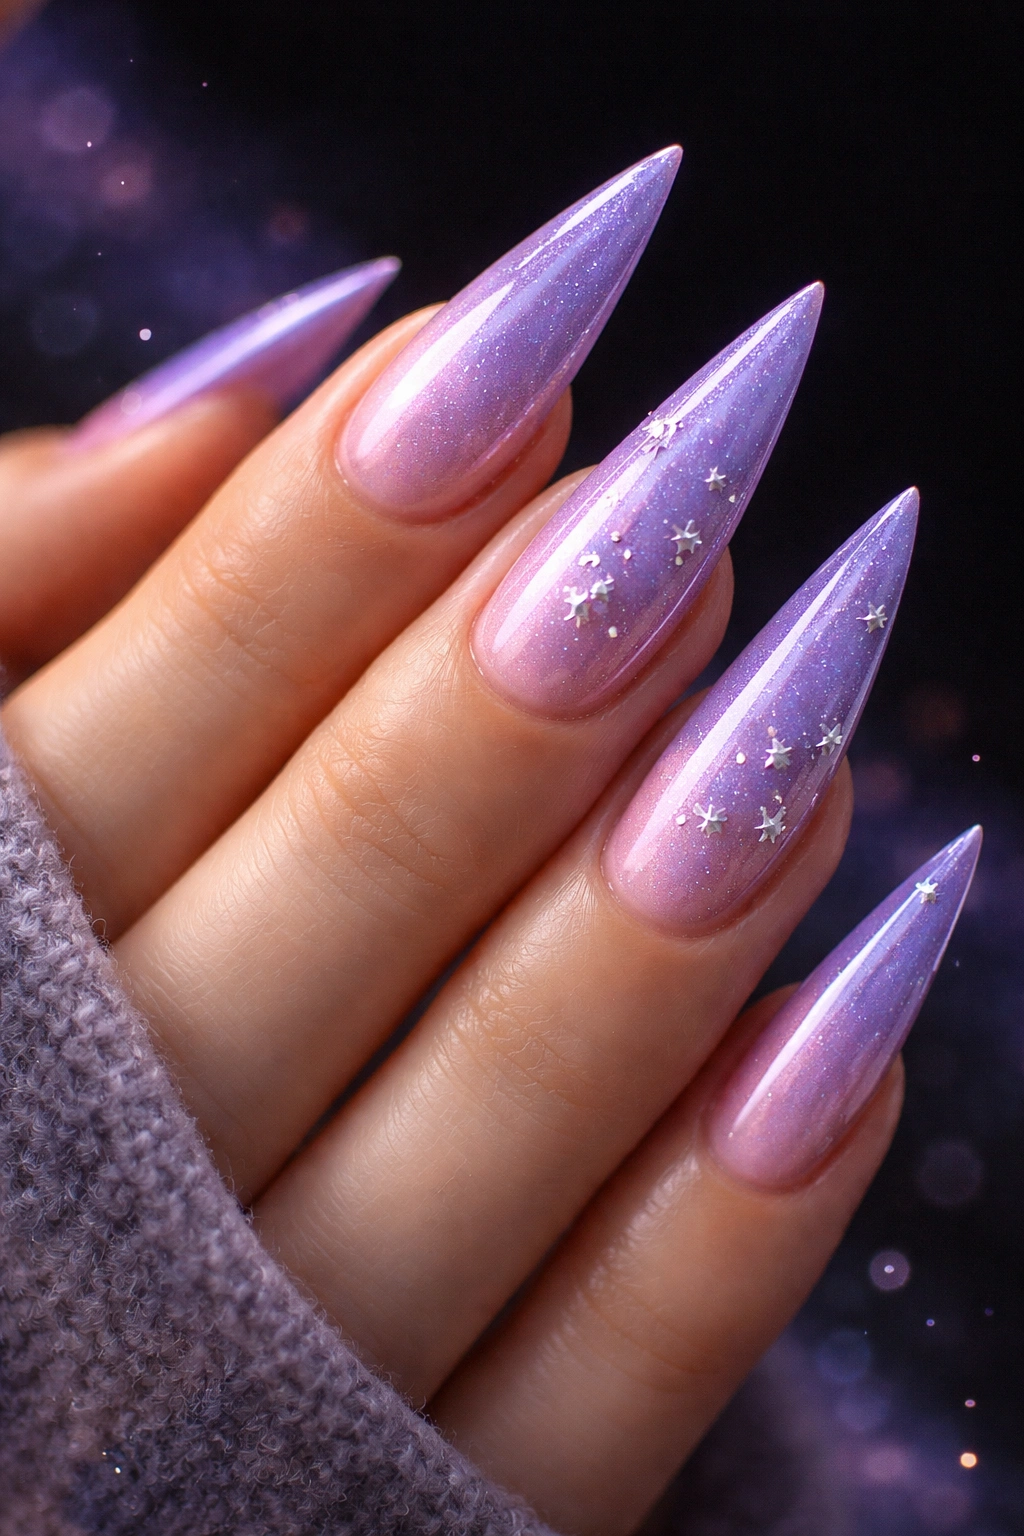
Take your aura base and elevate it with a celestial twist. This design layers a purple-to-pink aura with tiny gold or silver star designs, creating a “cosmic dreamer” energy that’s both whimsical and high-fashion. The key is keeping the stars minimal and precise so they enhance rather than overwhelm the aura effect.
The Magic of Celestial Accents
Stars scattered across aura nails add a playful dimension without competing with the iridescent shimmer. The metallic stars create points of light that complement the overall glowing effect. This design strikes an unusual balance—it’s artistic and intentional enough to feel special, but simple enough to feel wearable for non-formal occasions.
Executing Stars Over Your Aura Base
- Complete your purple-to-pink aura base following standard techniques, ensuring it’s fully cured and sealed
- Using a very fine brush or a dotting tool dipped in metallic gel (gold, silver, or chrome all work beautifully), place tiny stars randomly across 2-4 nails
- Keep the stars small—think pinhead-sized rather than obvious—so they read as subtle accents rather than bold art
- Try placing more stars at the cuticle area and fewer as you move toward the tip, which creates natural visual balance
- Add a tiny dot in the center of each star if you want extra dimension, or leave them solid for a simpler look
- Cure everything and seal with your final topcoat layer
Insider note: This design particularly shines if you use a metallic that contrasts with your aura base—silver stars pop beautifully against purple-pink, while gold stars create a more cohesive, monochromatic luxe feeling.
7. Lavender-to-Blue Aura with Holographic Foil Details
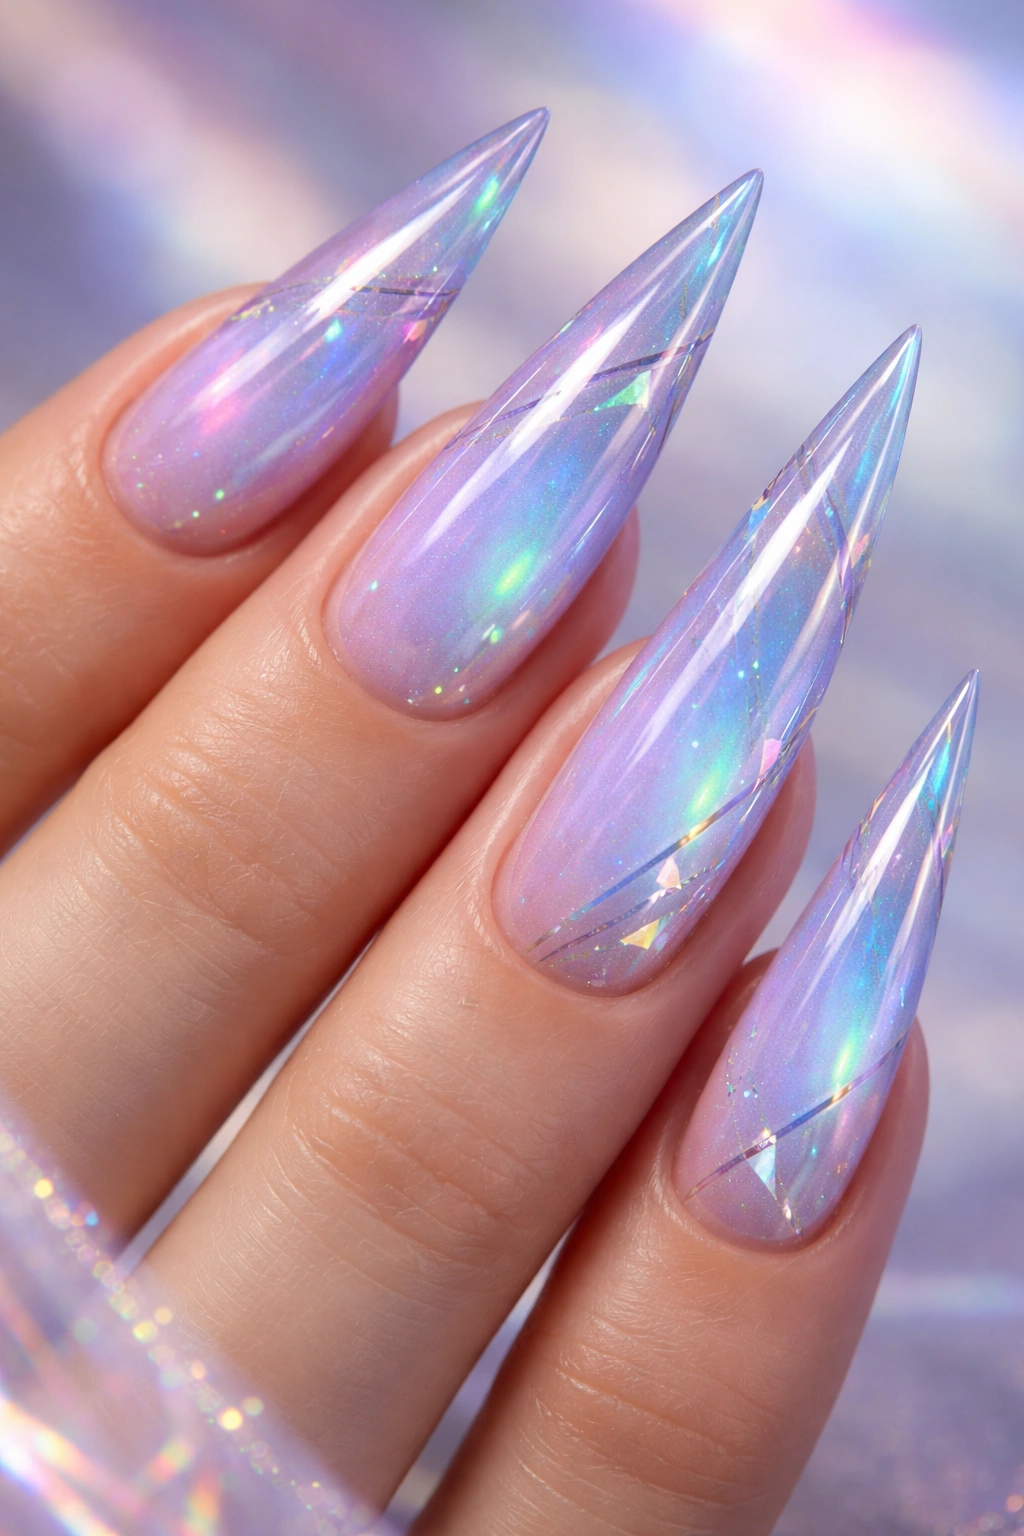
Holographic foils create deliberate geometric catches of light that work in conversation with the natural shimmer of your aura base. This design uses a lavender-to-blue aura as the foundation and adds small holographic foil accents—tiny lines, triangles, or abstract shapes—that create a manicure that’s genuinely futuristic in feeling.
Why Foil Accents Amplify Aura
Holographic foils reflect light in sharp, precise ways that are different from the diffused shimmer of aura chrome powder. Together, they create a multifaceted effect that feels dimensional and almost 3D. This is sophisticated nail art that doesn’t require extensive technical skill—the foil does most of the visual work once you’ve placed it correctly.
Applying Foil Over Your Aura Base
- Build your lavender-to-blue aura base normally and allow it to fully cure
- Use a sticky base coat or a gel topcoat that has slight tackiness even when cured—this is what holds the foil
- Cut small pieces of holographic foil into the shapes you want (thin lines, small triangles, or organic scattered shapes)
- Using tweezers or a precision tool, place the foil pieces where you want them, pressing gently to ensure adhesion
- Once all foil is in place, seal everything with a thick, clear topcoat and cure fully
- This creates a smooth, protected surface while locking the foil permanently into place
Pro tip: The holographic foil creates the most dramatic effect when placed on only one or two accent nails, rather than distributed across all ten—this keeps the design feeling intentional rather than chaotic.
8. Dusty Rose Aura with Minimalist Line Work
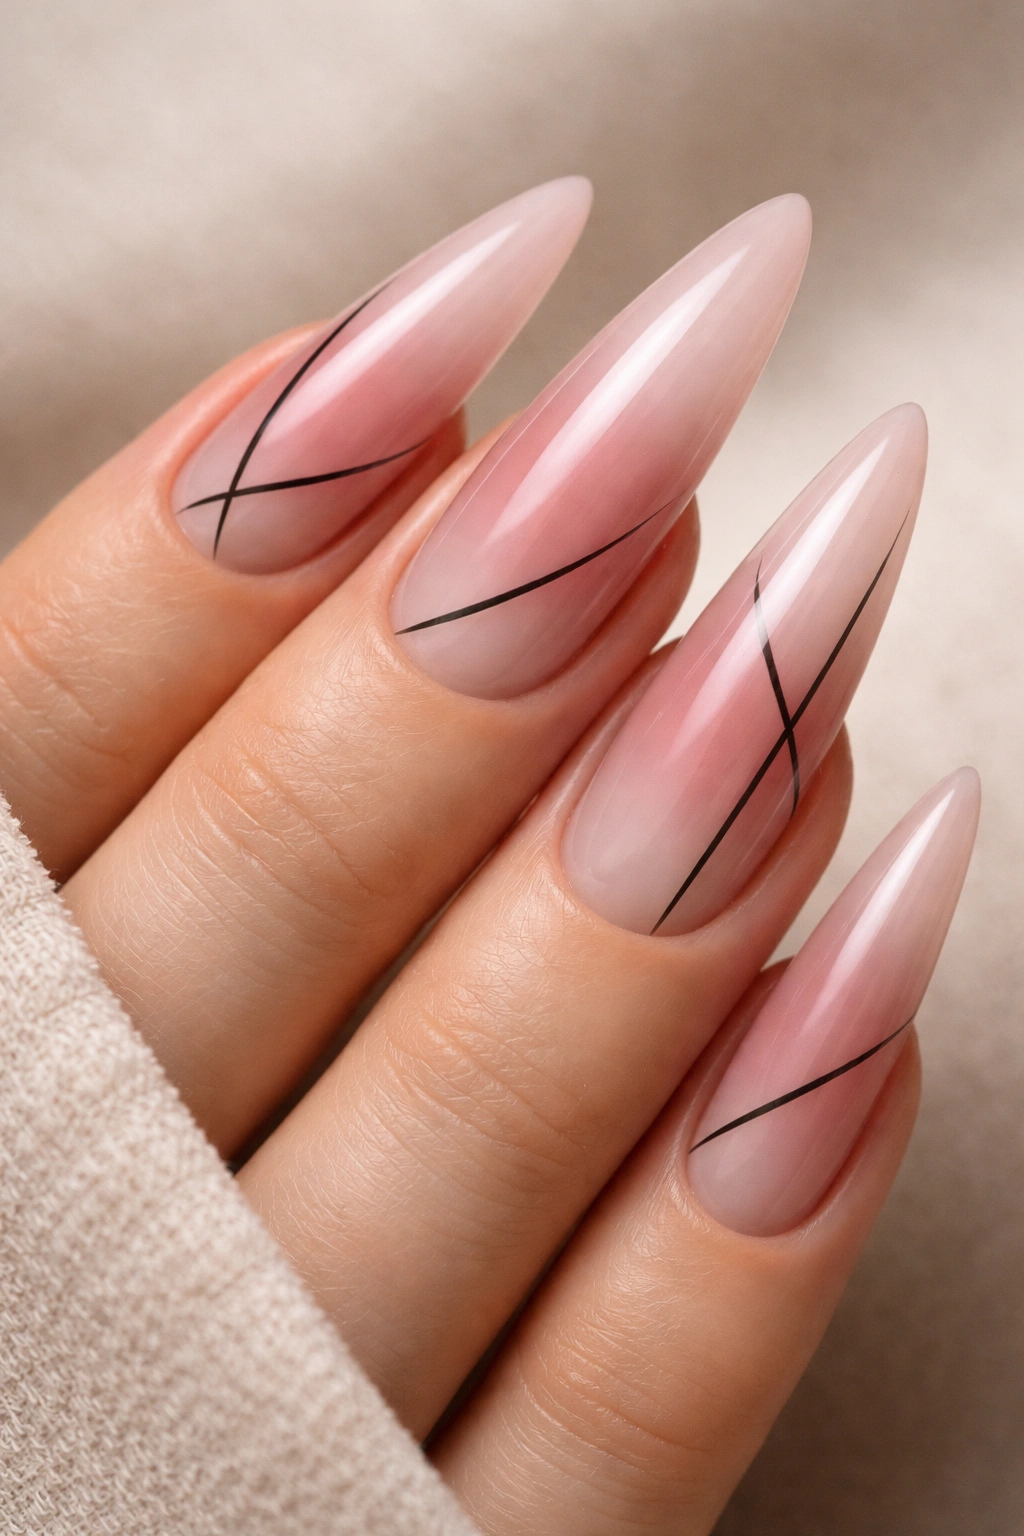
This design takes the most minimal approach possible: a dusty rose aura base with one or two thin black lines that create simple geometric shapes or negative space designs. It’s proof that complex nail art isn’t necessary—sometimes sophisticated simplicity is more striking than elaborate decoration.
The Power of Restraint in Nail Design
Minimalist line work over aura creates a sophisticated, almost gallery-worthy aesthetic. The lines become visible focal points against the soft shimmer, creating visual interest through contrast rather than visual complexity. This is the nail style of someone with confidence and taste—the kind of manicure that makes a subtle but unmistakable statement.
Creating Minimal Line Work
- Complete your dusty rose aura base with slightly thicker topcoat application than usual, which gives you a smoother surface for line work
- Using black gel polish or acrylic paint and an ultra-fine brush (size 0 or smaller), draw one simple geometric element per nail or just on accent nails
- Try thin diagonal lines from cuticle to tip, small triangles at the tip, or a single curved line down the center of the nail
- Keep lines perfectly straight or perfectly curved—the precision is what makes minimalist work feel intentional and designed
- Seal with a glossy topcoat and cure fully, ensuring the lines are completely protected
Worth knowing: This design requires a steadier hand than more forgiving styles, but even slightly imperfect lines often read as intentionally hand-drawn rather than sloppy, especially over the iridescent shimmer of aura.
9. Multichromatic Rainbow Aura with Soft Pastel Blend
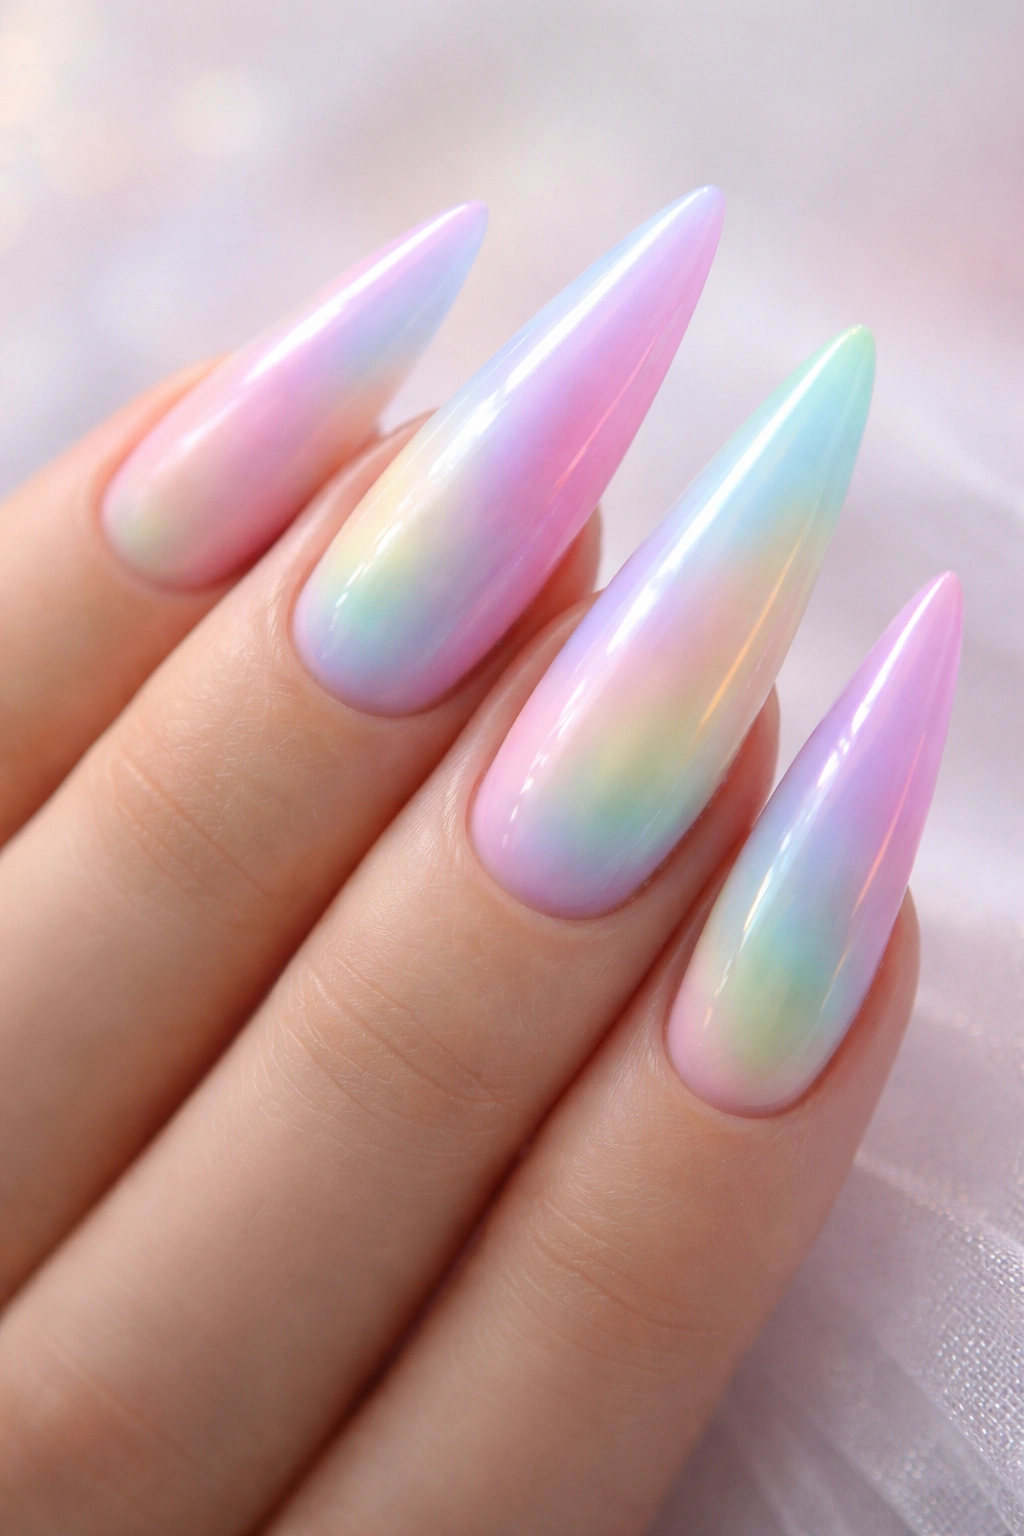
Instead of a two-color or three-color shift, create an aura effect that includes the entire pastel rainbow—soft versions of pink, lavender, blue, green, and yellow all blending together in a dreamy gradient. This is the most whimsical aura option, creating an almost cotton candy effect that feels youthful and joyful without being childish.
Blending Multiple Colors Successfully
The key to a successful rainbow aura is ensuring none of the individual colors overpower the others—you want each shade to blend smoothly into the next, creating one cohesive dreamy effect rather than a striped pattern. Soft, muted versions of each color are essential; bright neons create harsh lines rather than soft transitions.
Building Your Rainbow Aura Gradient
- Start with a white or off-white base coat, which provides a neutral canvas that allows all your colors to show at full saturation
- Apply each aura chrome powder color one at a time in thin layers, starting with one color (perhaps soft pink at one edge) and gradually transitioning through each shade
- Work deliberately across the nail, making sure each new color overlaps slightly with the previous one to create blended, transitional zones
- Angle the application so colors are more concentrated in different areas of the nail—pink near one corner, blue near another, etc.
- This requires patience and multiple thin layers rather than trying to get the effect in one heavy application
- Seal with several layers of clear topcoat, building up thickness that protects and enhances the overall shimmer
Insider note: This design photographs beautifully in natural daylight where each color in the gradient becomes visible and distinct, but it also has a glowing, unified appearance in artificial light.
10. Moody Plum-to-Black Aura with Gold Specks
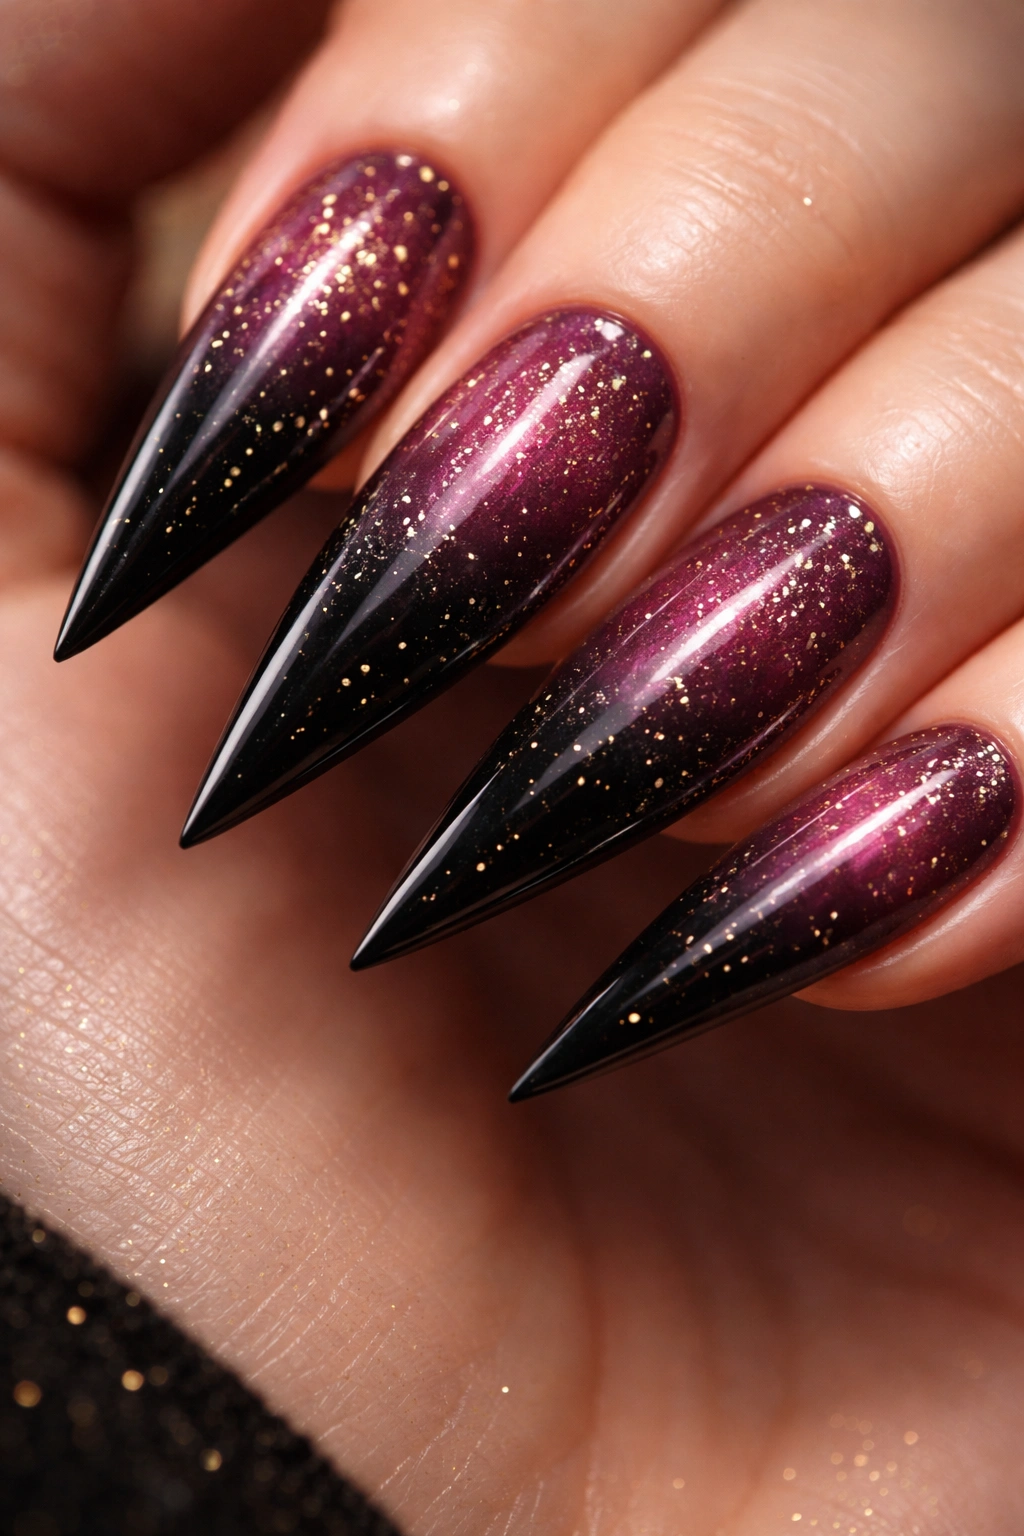
End with a deep, luxurious aura that uses moody plum as your base, shifts into near-black at the tips, and incorporates tiny specks of gold foil or gold chrome to create a starry, upscale aesthetic. This is the aura design for special occasions, evening wear, or any time you want your nails to feel genuinely high-end.
The Sophistication of Dark Aura
Dark aura combinations often feel more elegant than lighter pastels, especially when executed with precision and premium products. The plum-to-black gradient feels both edgy and luxurious—the kind of color choice that someone with style and confidence makes. The subtle gold specks prevent the design from feeling heavy or goth, instead adding just enough glamour.
Creating the Plum-to-Black Gradient
- Use a deep plum base coat as your foundation—this should be a rich, wine-like tone rather than a bright purple
- Apply your first layer of aura chrome powder across the entire nail, using slightly heavier application than you might with pastels
- Layer a second, darker chrome powder or use black aura chrome powder concentrated at the tips and edges, creating a gradient toward the deeper color
- The transition should be subtle and blended, not a harsh line between plum and black
- Once your gradient is complete and cured, use a precise dotting tool or fine brush to apply tiny specks of gold foil or gold chrome scattered randomly
- Seal everything with a premium topcoat formulated for dark colors, which prevents that somewhat flat appearance that dark auras sometimes get
Pro tip: The gold specks in this design create the most dramatic effect when they’re genuinely scattered—try sprinkling them across all ten nails for a cohesive, luxurious look that reads as intentionally designed.
Final Thoughts
Aura stiletto nails offer endless possibilities for self-expression, whether you’re drawn to soft, romantic pastels or bold, moody jewel tones. The combination of the dramatic stiletto shape with the mesmerizing iridescent effect creates a manicure style that’s genuinely hard to pull off poorly—the technique does most of the heavy lifting for you, which is exactly why it’s become such a beloved trend.
The designs above are starting points rather than fixed rules. You can adapt any color combination to match your skin tone, personal style, or the occasion you’re dressing for. The beauty of aura nails is that they work equally well as a standalone statement or as a canvas for minimal nail art. Mix and match techniques, experiment with different chrome powders and finishes, and don’t be afraid to ask your nail technician about creating a custom aura blend if you fall in love with a particular color combination.
Remember that the quality of your aura manicure depends significantly on the products you’re using—invest in good chrome powders and high-quality topcoats specifically formulated for metallic finishes. Your nails will look more luminous, the effect will last longer, and the difference is genuinely noticeable compared to budget alternatives. Whether you’re getting your aura stilettos done at a salon or attempting the design at home, give yourself permission to take your time building up the layers. Rushing the process results in muddy, over-saturated nails, while layering strategically creates that coveted otherworldly glow that makes aura nails so addictive to wear.
