

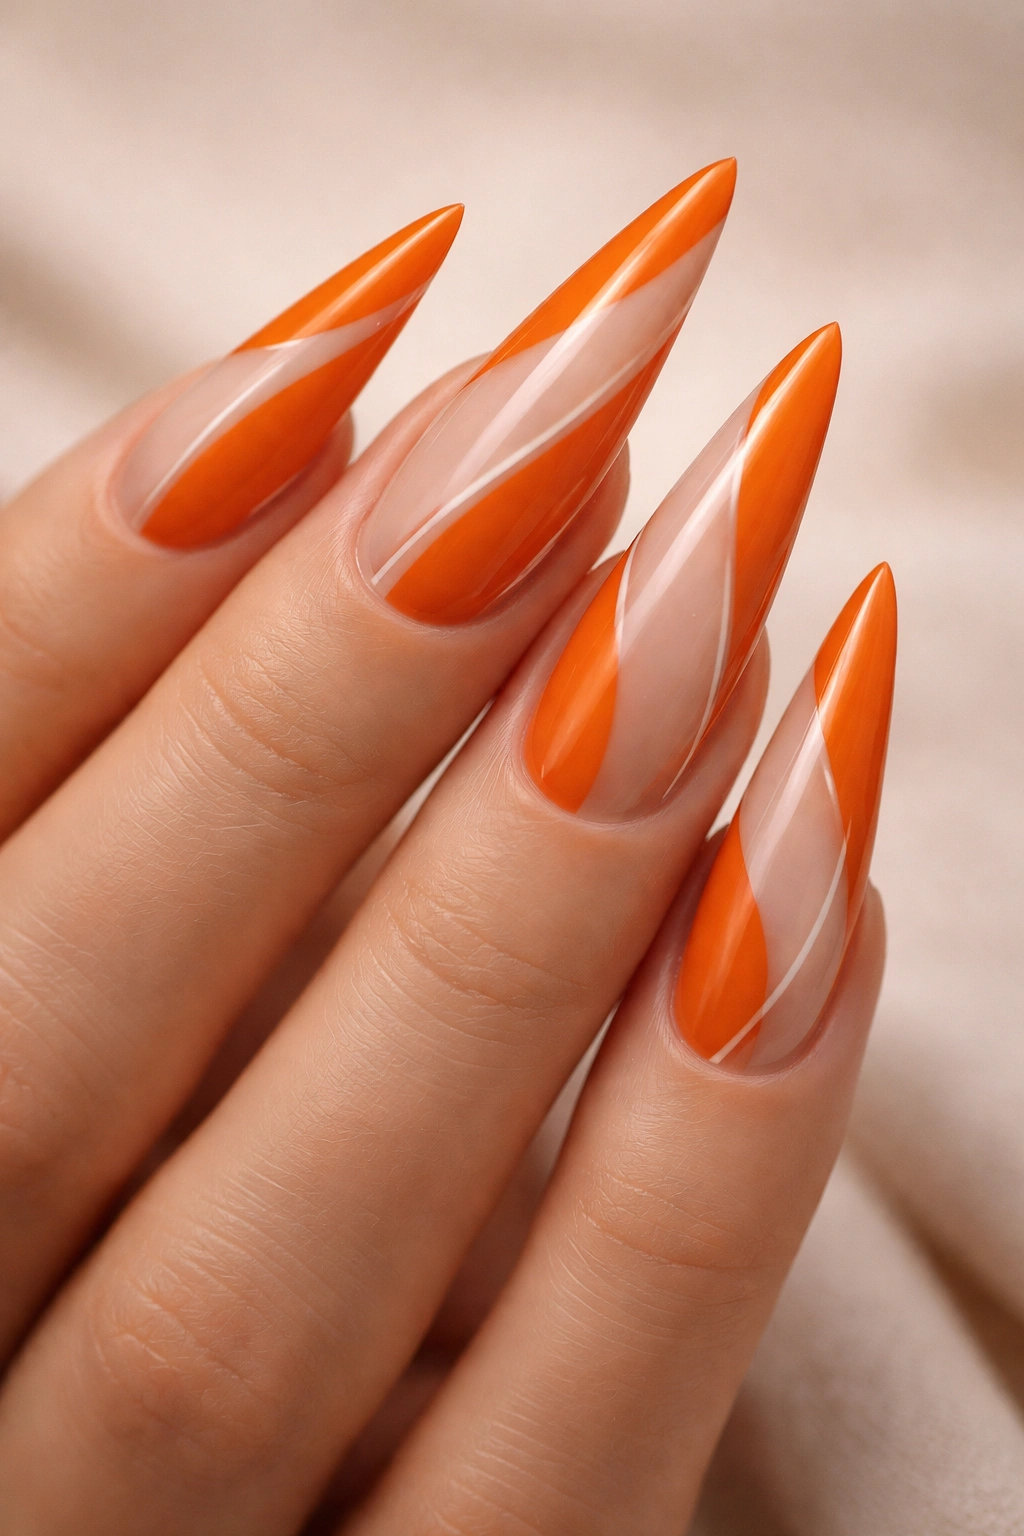
Orange is one of those nail colors that commands attention the moment your fingers come into view. There’s something about the warmth and boldness of this shade that instantly makes a statement, whether you’re going for sophisticated elegance or playful energy. When you pair orange with the sharp, elongated silhouette of stiletto nails, you’ve got a combination that’s impossible to ignore—and incredibly versatile depending on how you style it. From burnt orange and coral to peachy tones and vibrant tangerine, this color family works across seasons, occasions, and personal aesthetics in ways that surprise people who might assume it’s just a summer-only choice.
The beauty of orange stilettos isn’t just about picking a shade and stopping there. This is where nail art, finishes, and creative design details truly shine. Whether you’re drawn to minimalist elegance, maximalist drama, or something that walks the line between bold and subtle, there’s an orange stiletto concept waiting for you. The color pairs beautifully with metallics, creates stunning contrast with jewel tones, and looks absolutely electric against nail art accents like leopard print, geometric patterns, or negative space designs.
If you’ve been scrolling through nail inspiration and keep coming back to orange, but you’re not sure exactly which direction to take it—you’re in the right place. The ideas below span different techniques, color combinations, and design philosophies, so you’ll find at least a few that make you immediately bookmark them for your next salon visit or DIY nail session.
1. Burnt Orange with Gold Leaf Accents
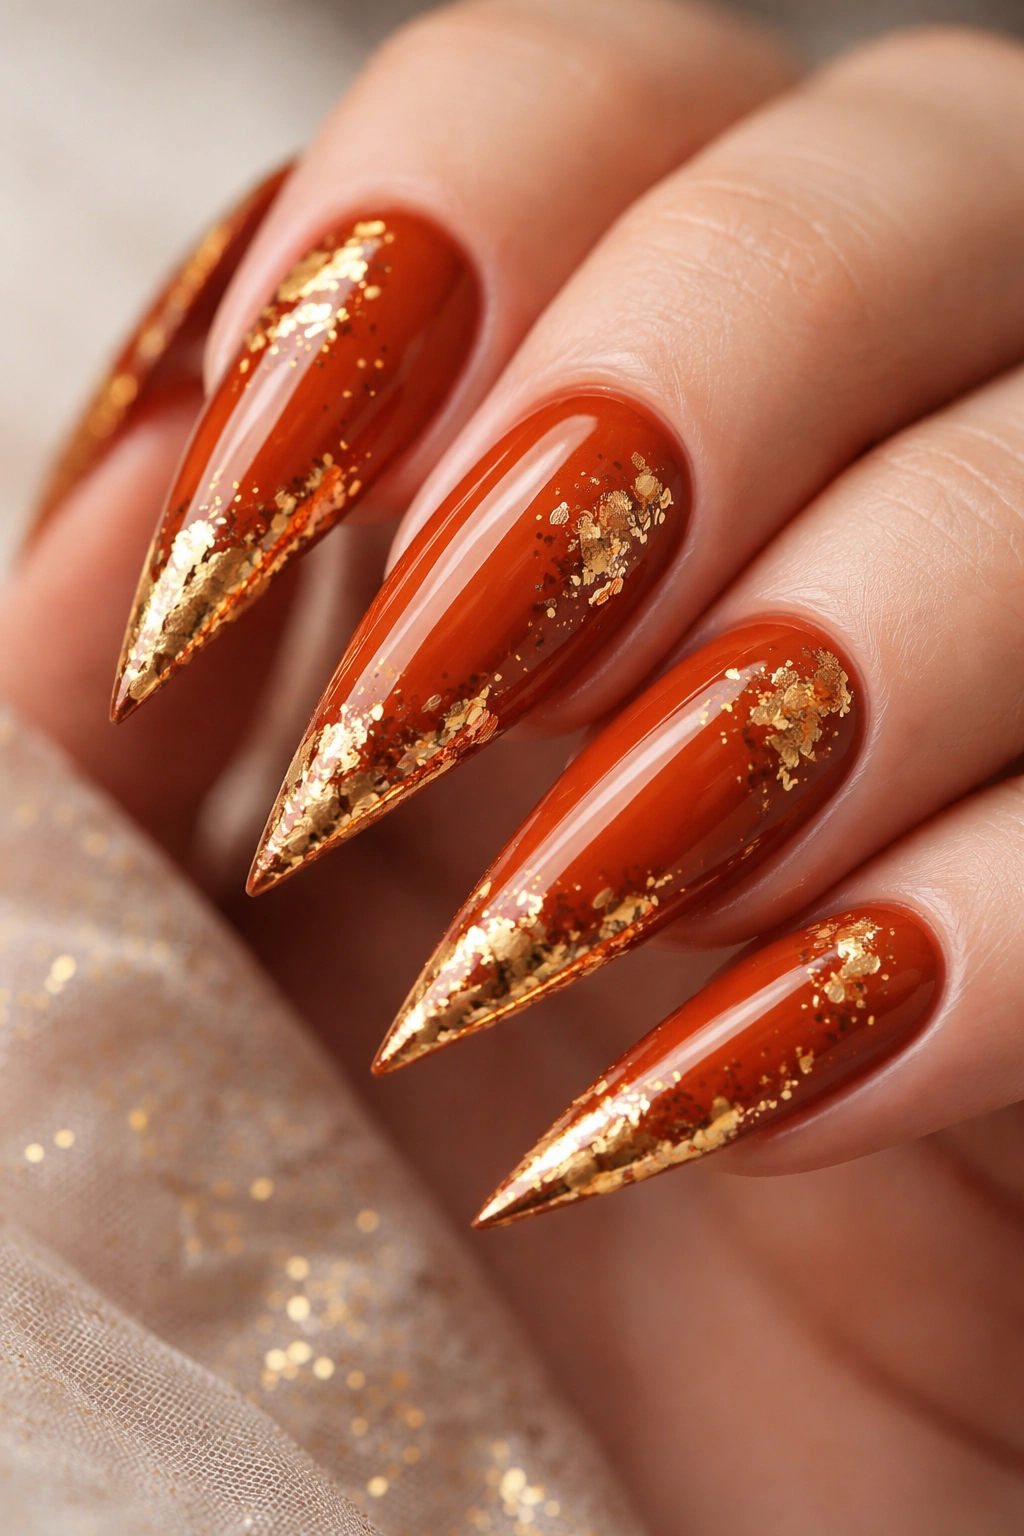
Burnt orange has an understated sophistication that feels both warm and mature. When you introduce thin gold leaf flakes along the tips or scattered across the surface, the nails instantly become gallery-worthy. The gold catches light and creates dimension that keeps the look from feeling flat.
Why This Design Works
Burnt orange and gold are a naturally harmonious pairing—neither one fights for attention, and together they suggest luxury without screaming for it. The leaf accents give you that handcrafted, artistic quality that makes people lean in to look closer.
How to Achieve It
- Start with two coats of a burnt orange base in a creamy finish (think terracotta-adjacent, not neon)
- While the second coat is still slightly tacky, apply thin pieces of gold leaf using a flat brush or tweezers
- Seal everything with a high-shine topcoat
- For extra durability, apply the topcoat, let it dry completely, then press the gold leaf gently and seal again
Pro tip: Real gold leaf is affordable and available online, and a little goes a very long way—a small sheet will cover multiple manicures.
2. Coral Orange with White Marble Veining
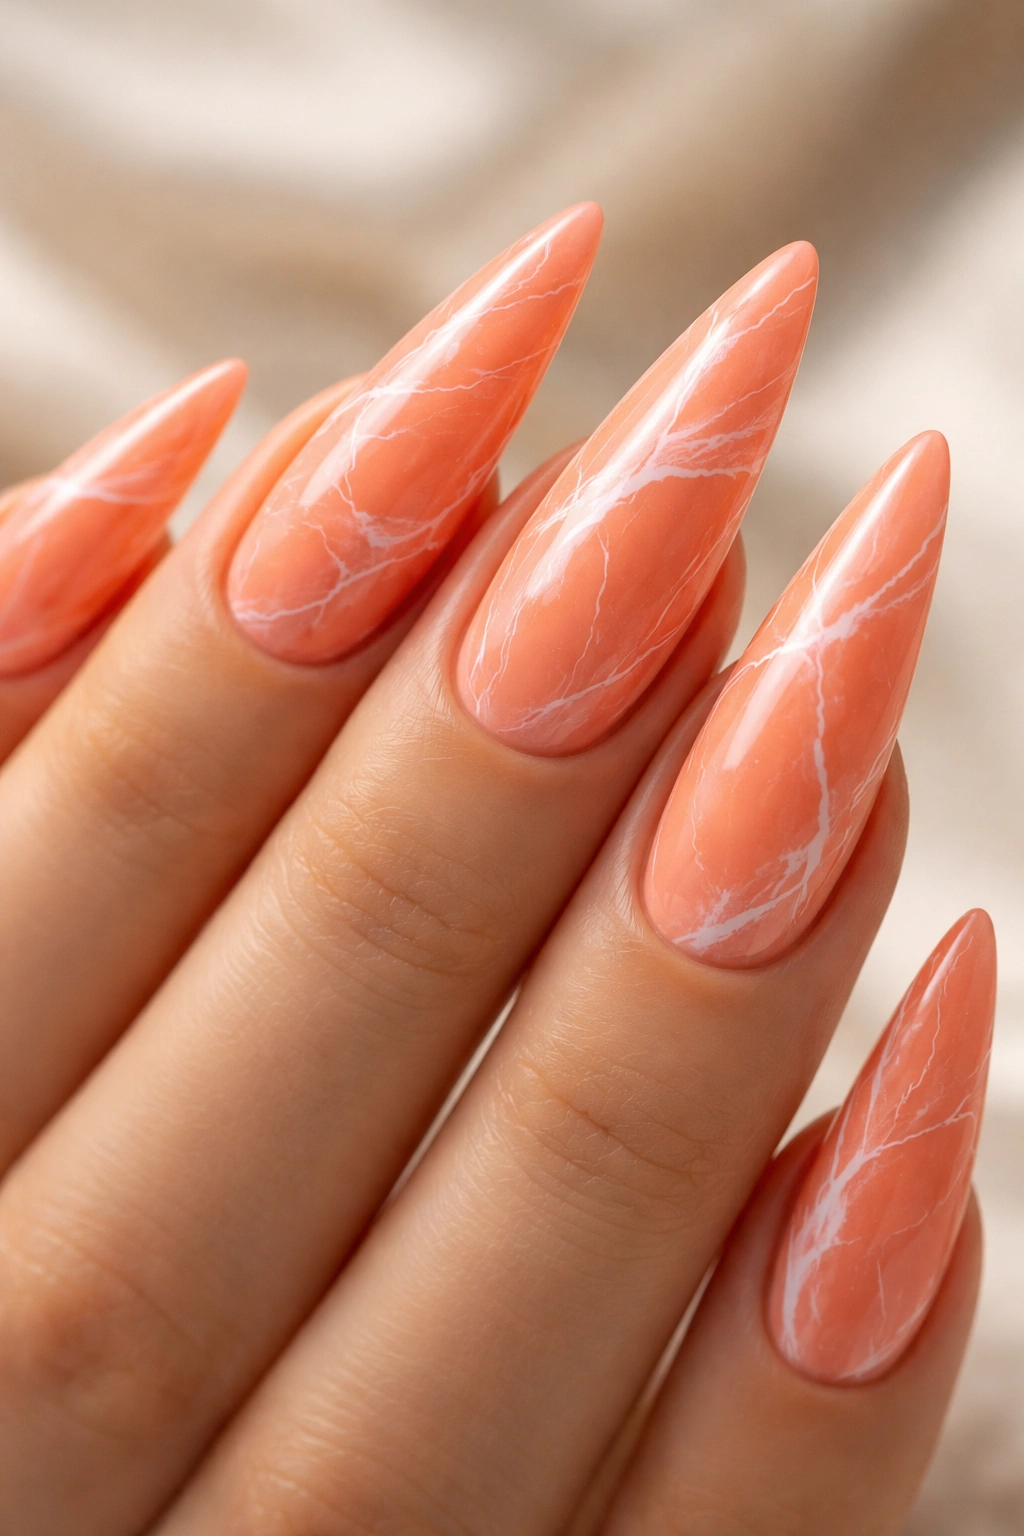
Coral-leaning orange has a brighter, friendlier energy than burnt tones. Layer in white marble veining that runs across the nail surface, and you’ve created something that feels organic yet deliberate—like a polished stone rather than a painted nail.
The Appeal of Marble
Marble designs automatically elevate any base color. White veining on warm orange creates contrast that’s easy on the eye but visually interesting, giving you movement and depth without being chaotic.
Application Method
- Apply two coats of coral-orange base color
- Using a thin detail brush or a marble tool, apply diluted white polish in organic, vein-like patterns
- Don’t overthink it—natural marble isn’t perfectly symmetrical
- Top with matte or glossy finish depending on your preference (matte gives a more sophisticated stone-like appearance)
3. Ombre Orange to Yellow Gradient
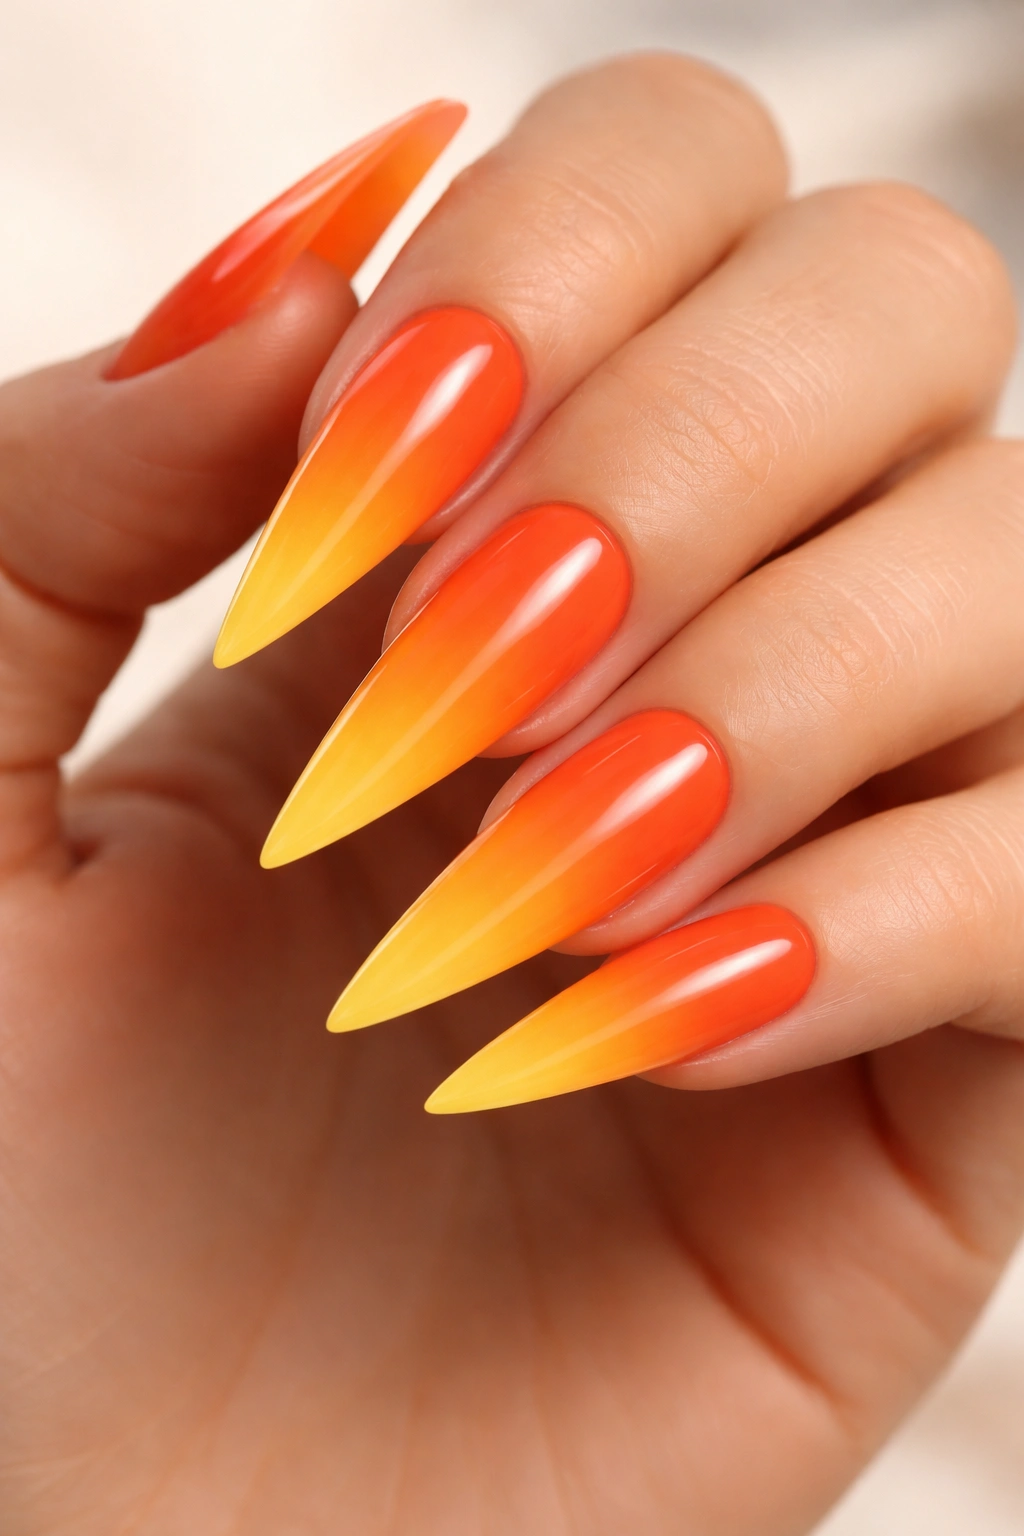
Ombre remains one of the most visually striking nail techniques, and orange-to-yellow is an underrated gradient combination. Each nail transitions from a deeper burnt orange at the base to sunshine yellow at the tip, creating an almost sunset effect.
Why Gradients Matter
An ombre effect adds movement to your nails and creates a sense of depth that a solid color can’t achieve. Your fingers look longer and more elegant because the eye travels along the gradient rather than stopping at one point.
The Easiest Ombre Method
- Paint the entire nail a yellow shade first
- On a makeup sponge, dab orange along one edge and blend it into the yellow by dabbing gently across the transition zone
- Repeat this sponging technique until the color blends smoothly
- Clean up your cuticles and surrounding skin with a small brush dipped in cleanup solution
- Apply a smoothing topcoat (it’ll help blend the colors further)
4. Deep Orange with Black Geometric Lines
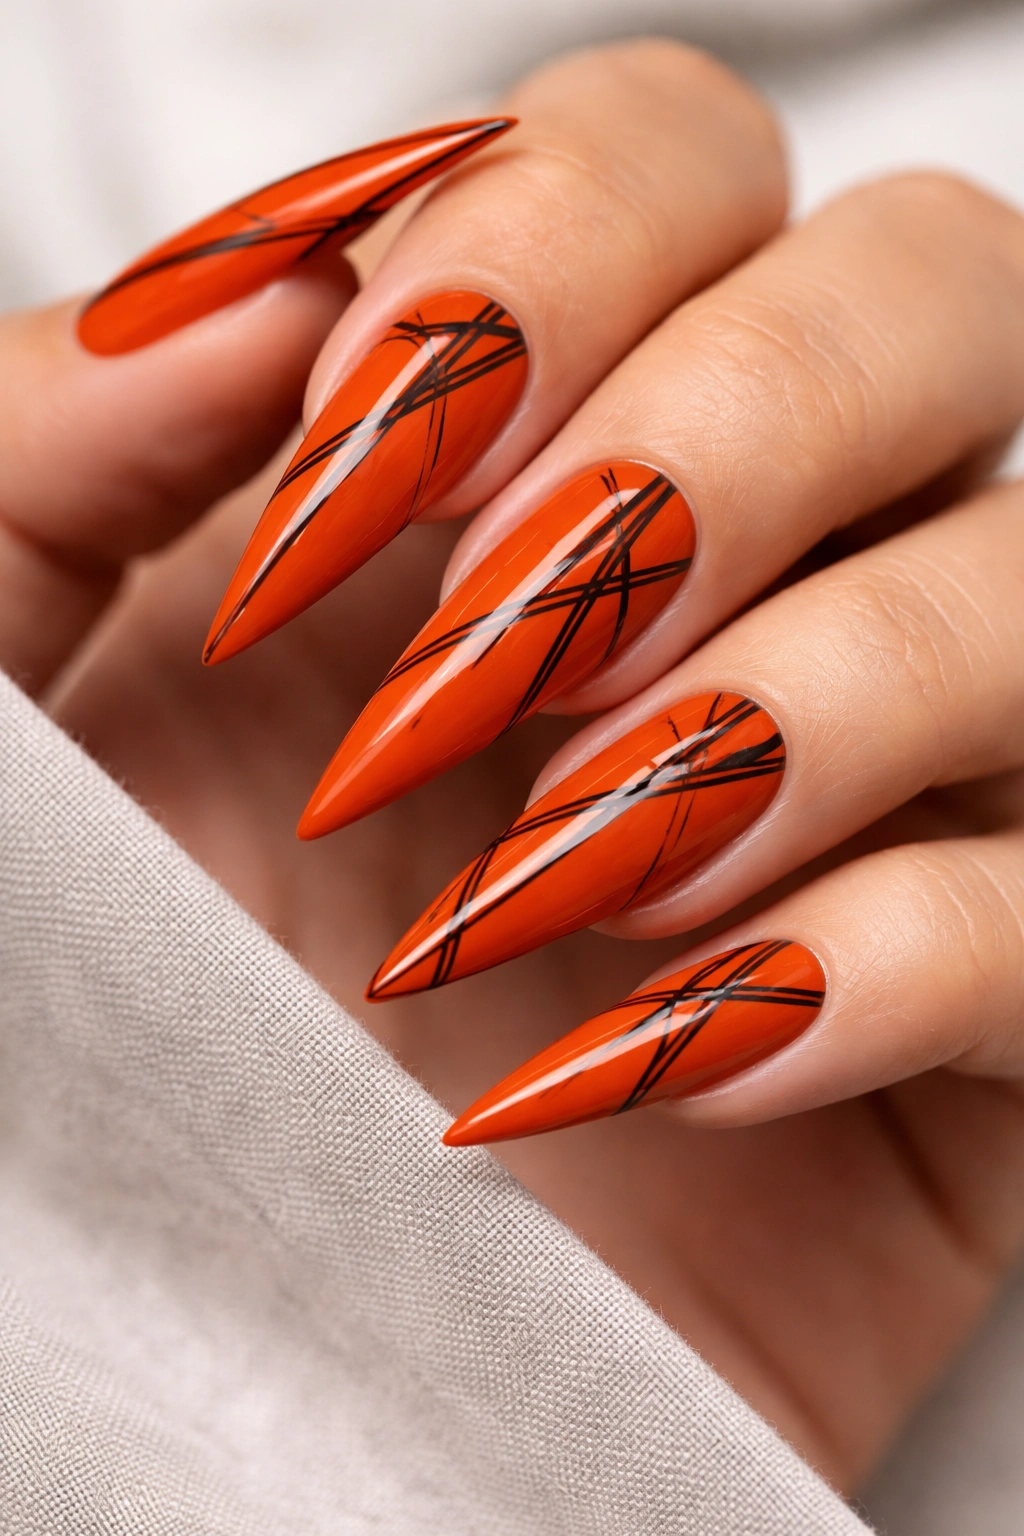
Geometric nail art has a modern, architectural quality that contrasts beautifully with warm orange. Thin black lines creating triangles, hexagons, or linear patterns across a deep orange base give you an edgy, contemporary look that still reads as sophisticated.
The Geometry Appeal
Clean lines and geometric shapes feel intentional and polished. Black on orange has excellent contrast, so your design reads clearly even from a distance, and the pattern-making process is actually quite forgiving once you get your lines down.
Creating Geometric Designs
- Base coat and two coats of your orange shade
- Using a thin black striping brush or nail art pen, draw your chosen pattern lightly first in pencil (yes, nail pencil is a thing)
- Go over the pencil with your black polish once you’re happy with the placement
- A steady hand matters here, but imperfection can actually look intentional
- Seal with topcoat
5. Peachy Orange with Glitter Gradient
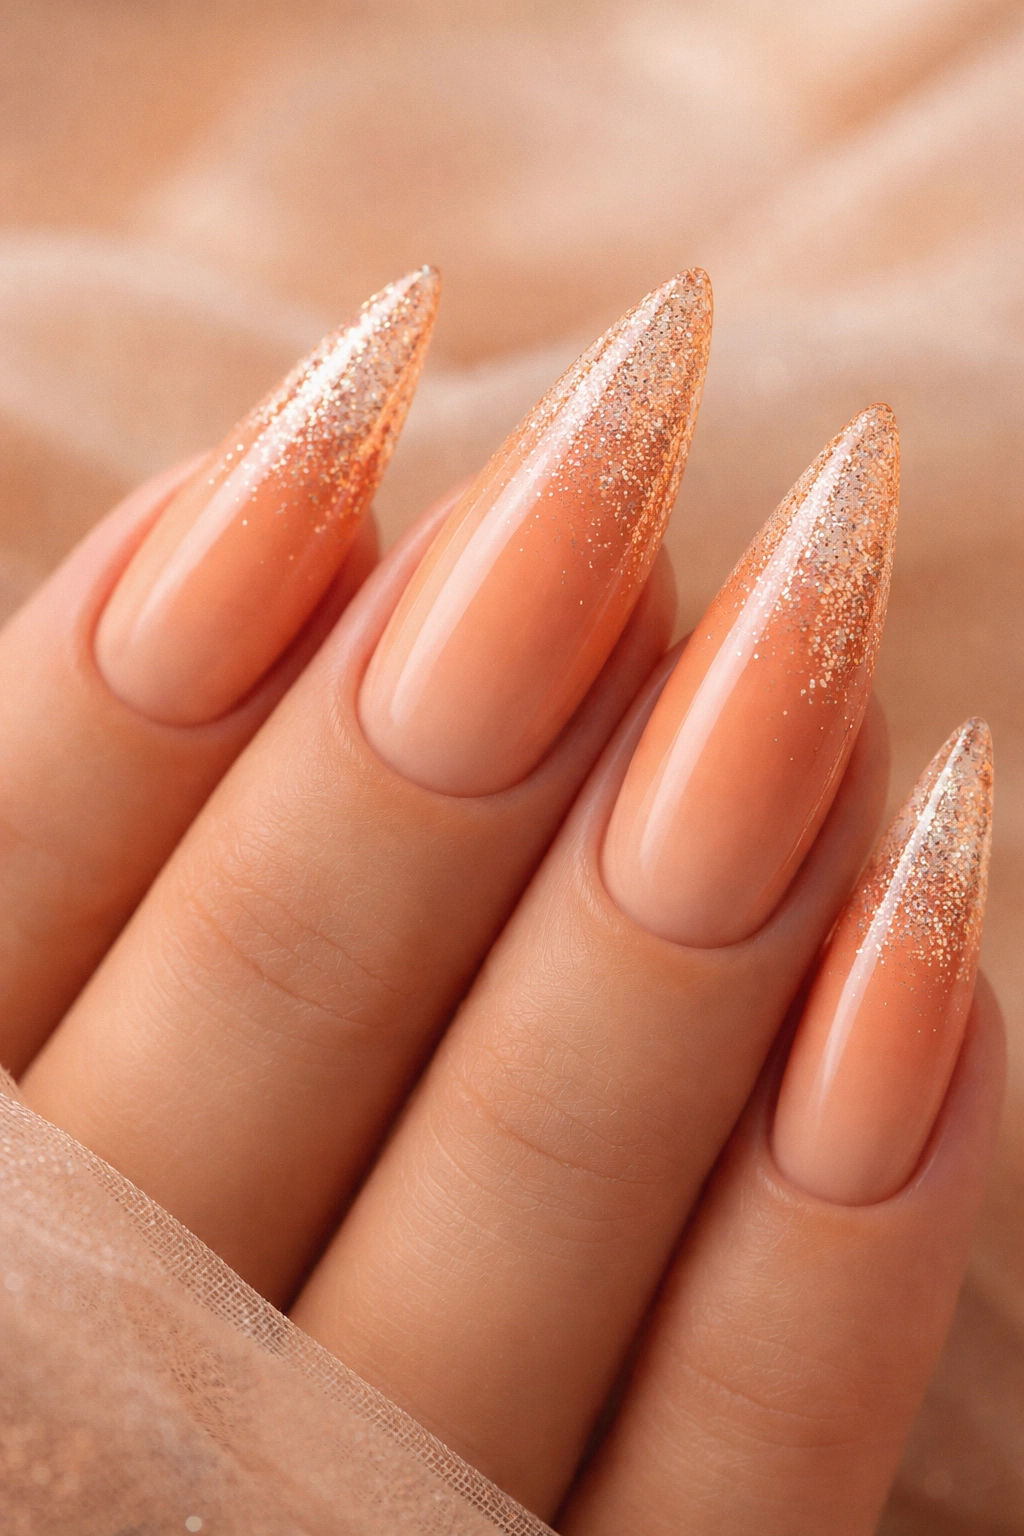
Peachy orange is softer and more versatile than true orange, and it pairs wonderfully with fine glitter that concentrates at the tips. The glitter gradient creates texture variation that’s beautiful to look at and fun to feel.
Glitter Gradient Benefits
You get sparkle without overwhelming your entire nail—the glitter concentrated at the tips feels celebratory but still wearable. Peachy tones make glitter look warm and sunset-inspired rather than cold or party-focused.
How to Layer Glitter Properly
- Two coats of peachy-orange base
- Mix your chosen fine glitter with a clear gel or thick topcoat
- Using a detail brush, apply this glitter mixture to the tip area, feathering it back slightly to create a gradient
- You can also dip the wet topcoat into loose glitter, then seal it down
- Finish with a clear topcoat to smooth everything and lock the glitter in place
6. Orange with Negative Space Abstract Design
Negative space designs work brilliantly on stiletto nails because of their length—you can create patterns that wouldn’t work on shorter nails. Leave sections of your natural nail visible, or use clear polish, and paint abstract shapes in shades of orange.
Why Negative Space Feels Fresh
It’s minimalist but not boring. The contrast between your natural nail and the colored sections creates visual interest, and the design feels contemporary and artistic rather than decorative.
Planning Your Negative Space Layout
- Decide what percentage of the nail you want to leave bare (usually 30-50% works best)
- Use a pencil to lightly sketch your pattern
- Paint sections with your chosen orange shade, leaving bare areas exposed
- You can use different orange tones in different sections for added interest
- Clear topcoat to finish
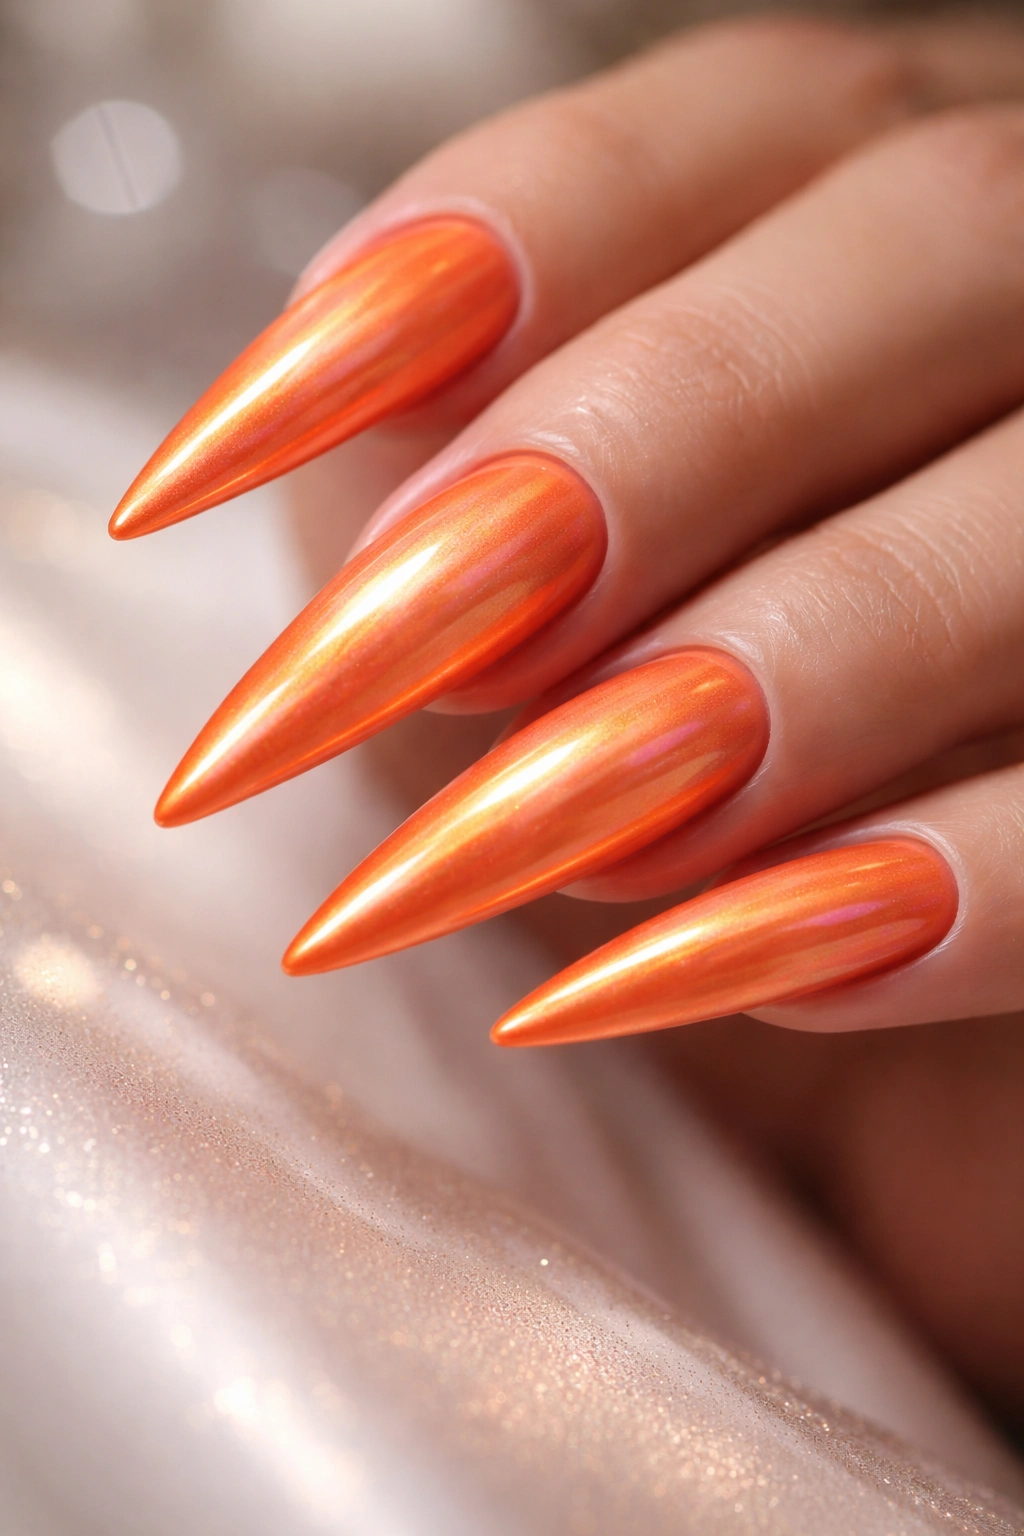
7. Tangerine Orange with Pearl Finish
Pearl finish polishes have a subtle iridescence that catches light differently depending on the angle and lighting. On tangerine orange, a pearl finish creates depth and sophistication without adding patterns or decorations.
The Power of Pearl Finishes
Pearl finishes are underrated in nail design. They give your nails a dimensional quality that feels expensive and carefully considered—like you’ve invested in a premium manicure rather than a basic solid color.
Achieving a Pearl Finish
- Most quality nail brands now offer pearl finishes in warm tones
- Apply two coats for full color and pearl effect payoff
- Use a glossy topcoat to enhance the reflective quality
- In different lighting (natural versus artificial, sunny versus indoor), your nails will subtly shift, which is part of the appeal
8. Burnt Orange with Thin Gold Outline
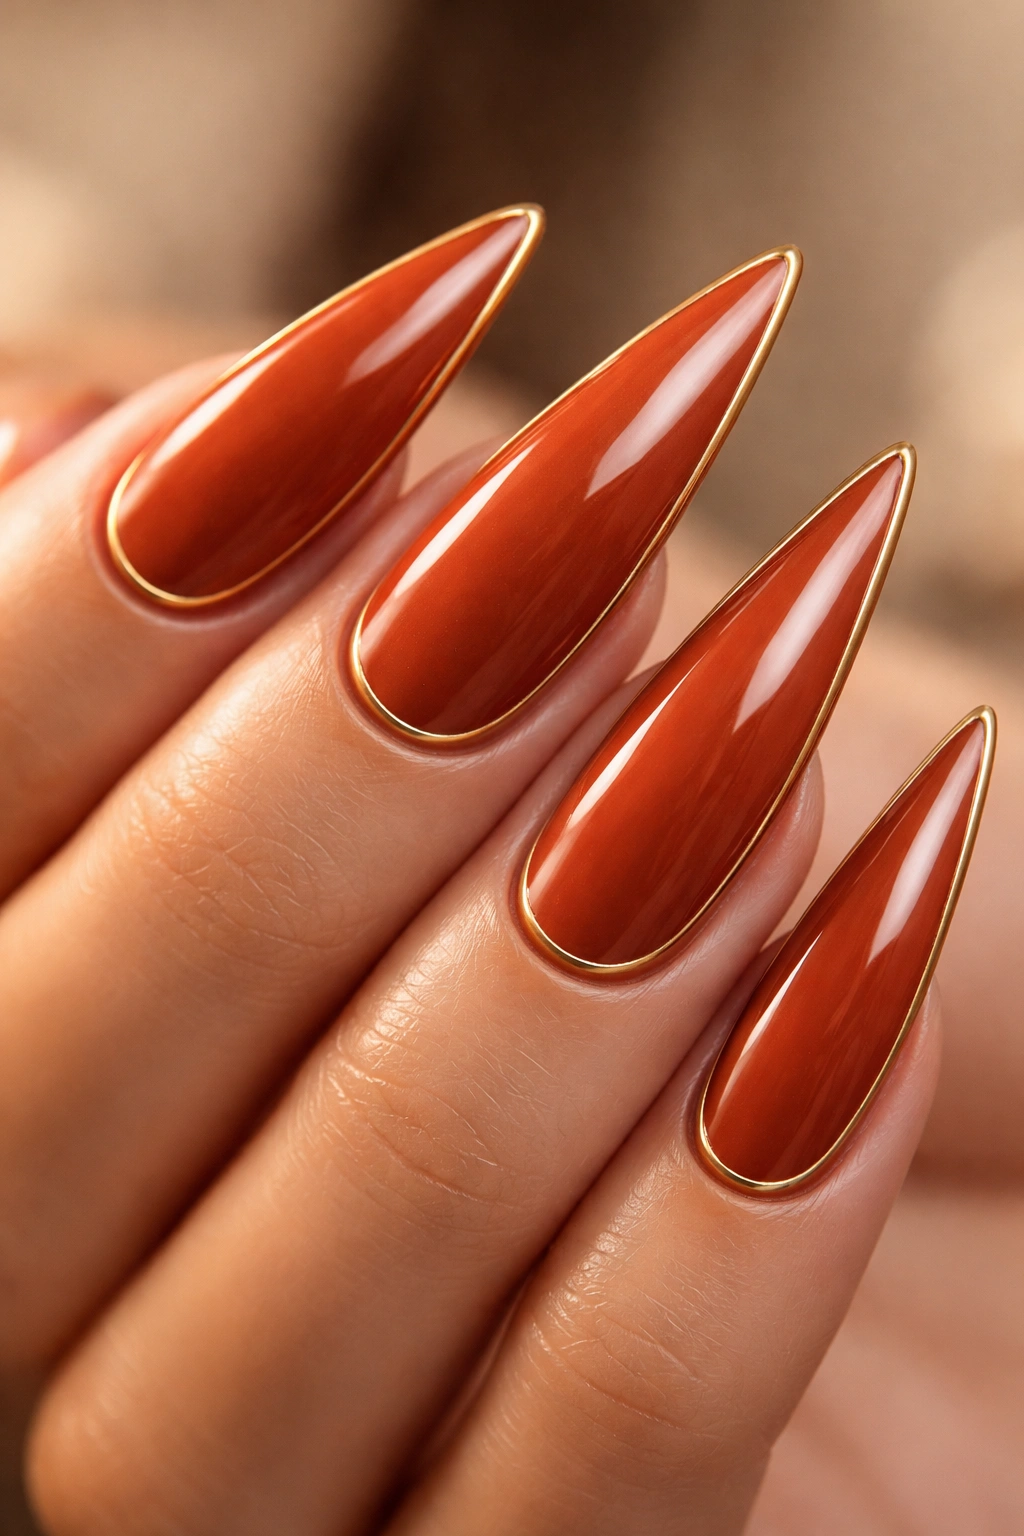
Simplicity done well always stands out. A burnt orange stiletto nail with a delicate gold outline around the perimeter creates definition and elegance without being complicated to execute or maintain.
The Minimalist Appeal
Sometimes the most striking designs are the simplest ones. A thin outline draws focus to the nail shape itself—in this case, that beautiful elongated stiletto form—while the gold against orange feels luxe and intentional.
Creating a Clean Outline
- Apply and cure your burnt orange base
- Using a gold striping pen or extremely thin brush, paint a thin line around the entire edge of each nail
- Start at one corner and work slowly, keeping even pressure
- The outline should sit right at the edge of the nail, not floating inward
- Seal with a glossy topcoat
9. Orange with Tortoiseshell Pattern
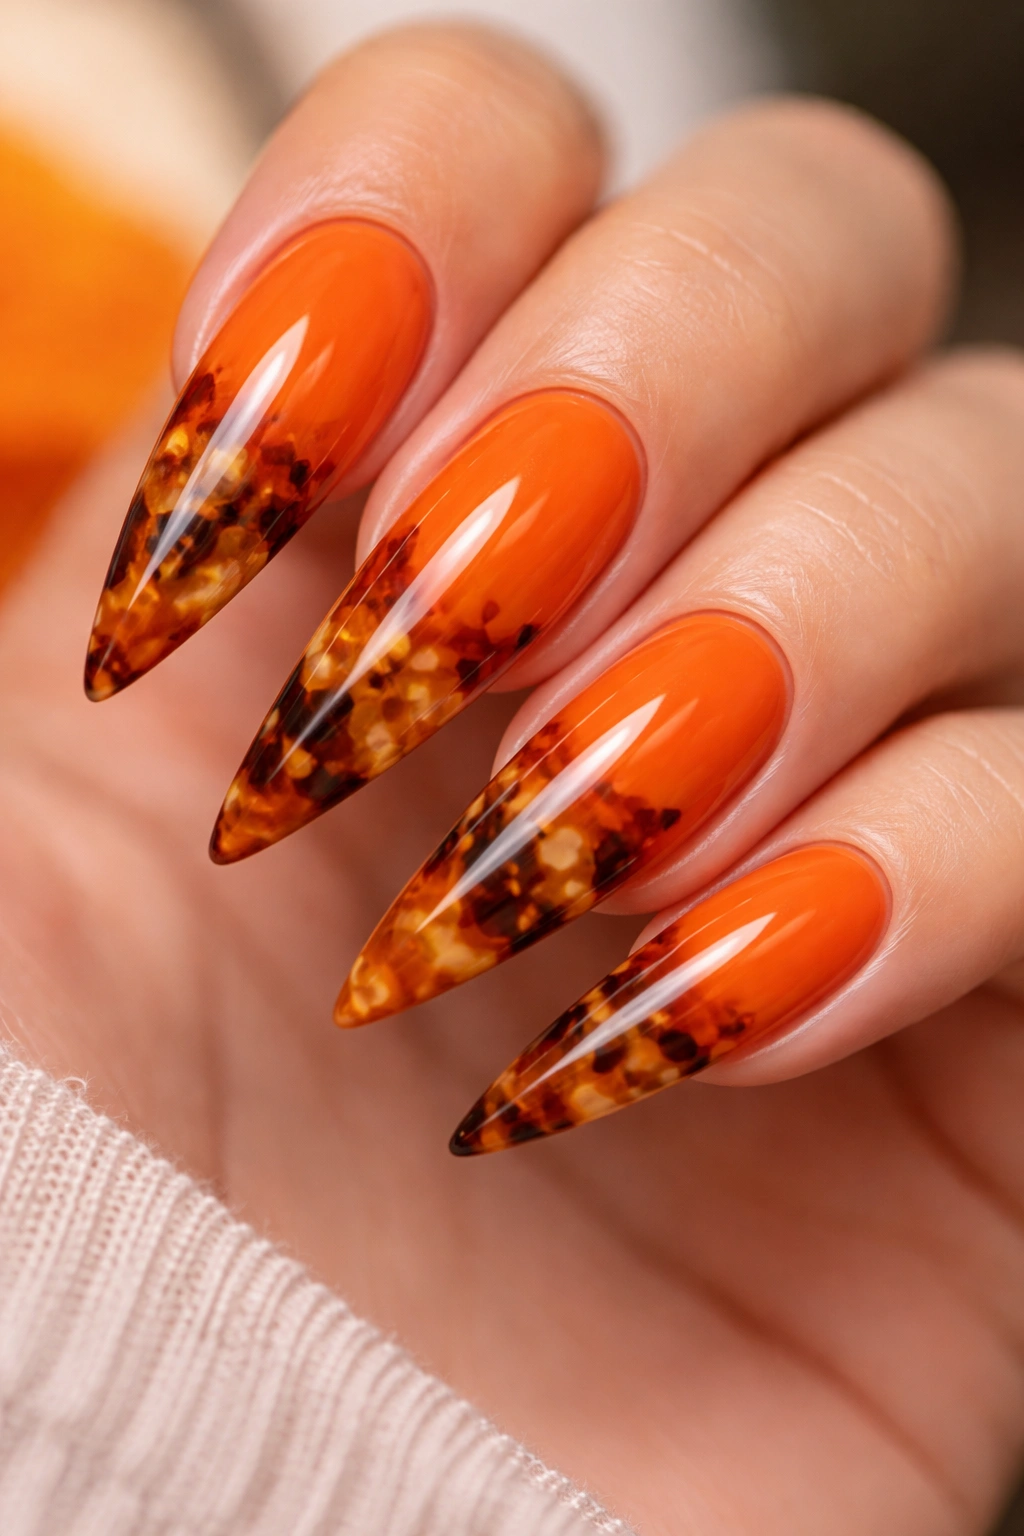
Tortoiseshell is a perennial favorite that works on virtually every base color, including orange. The brown, amber, and cream swirls create a sophisticated, textured appearance that feels both natural and luxurious.
Tortoiseshell Versatility
This pattern works across seasons and occasions. On orange, it skews warm and autumnal, giving your nails a collected, intentional aesthetic rather than trendy.
The Tortoiseshell Technique
- Base coat, then two coats of your orange shade
- Using a detail brush, apply thin strokes of brown, amber, and cream polish in an organic, overlapping pattern
- The key is randomness—don’t try to create a perfect pattern; real tortoiseshell is irregular
- Use a dry brush to gently feather the colors together where they meet
- Topcoat to seal
10. Coral Orange with Holographic Accents
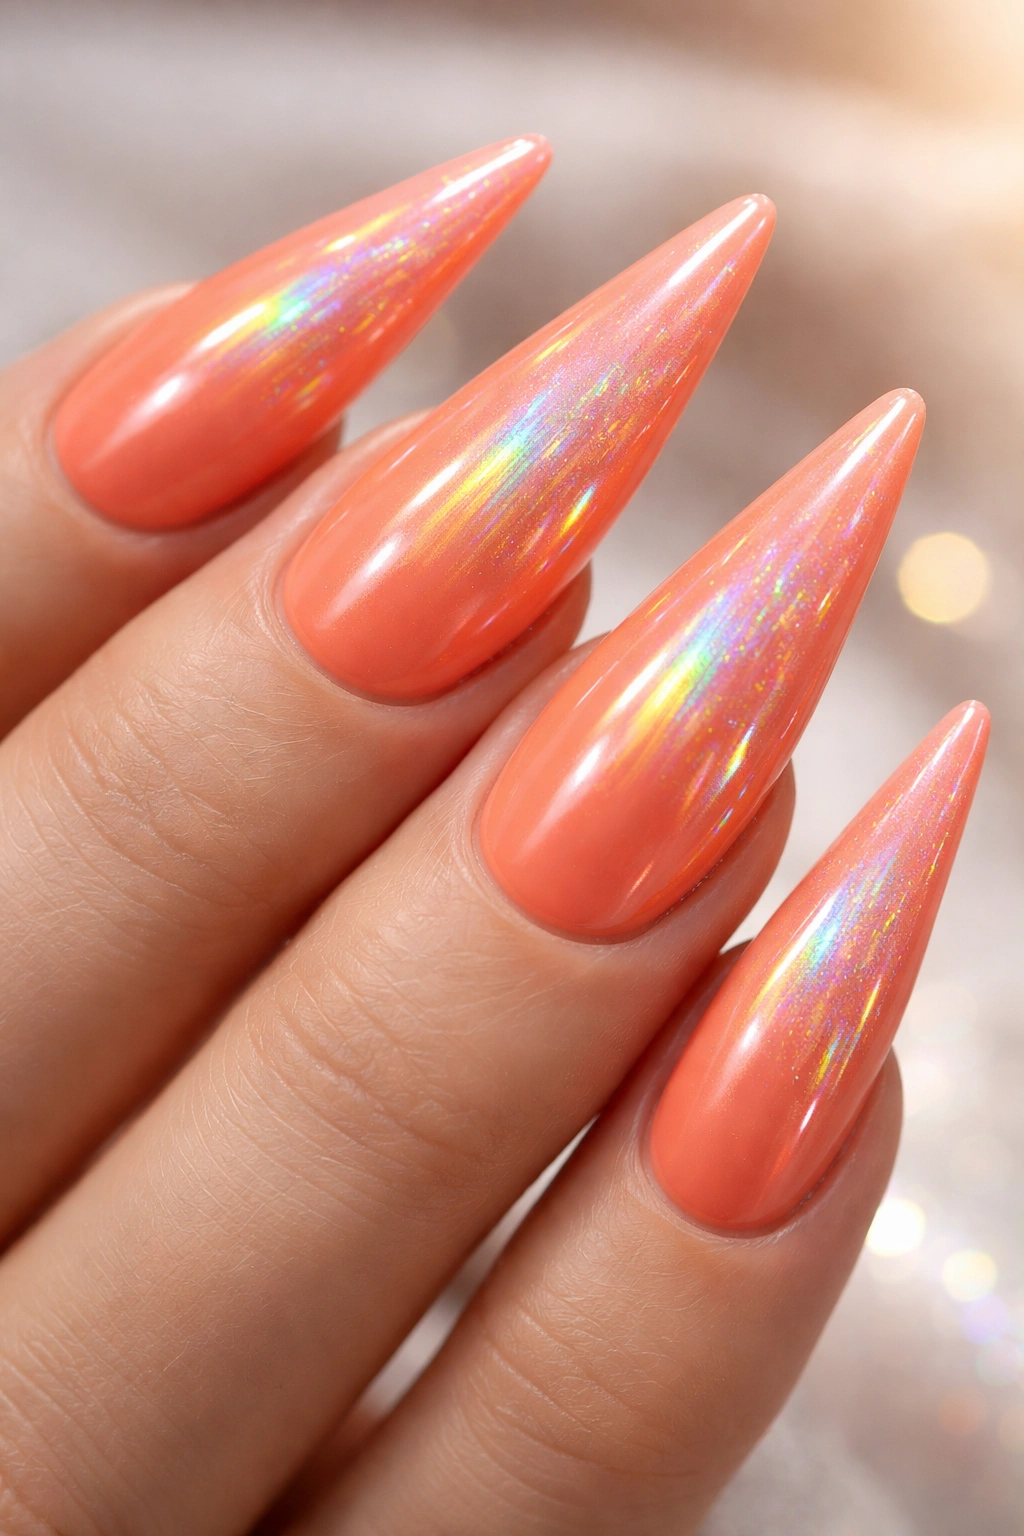
Holographic effects reflect rainbow colors, and on a coral-orange base, they create an eye-catching, dimensional look that’s perfect if you love something with movement and light-play.
Holographic Appeal
These finishes have a captivating quality—people will notice your nails and want to look at them from different angles to see how the colors shift. It’s fun without being chaotic.
Using Holographic Elements
- Paint a coral-orange base
- You can either use holographic polish for the entire nail, or apply holographic powder to a section or accent nail
- Holographic powder adheres best to a slightly sticky topcoat layer
- Seal with a clear topcoat to lock everything in place and smooth the texture
11. Deep Orange Ombré to Chrome
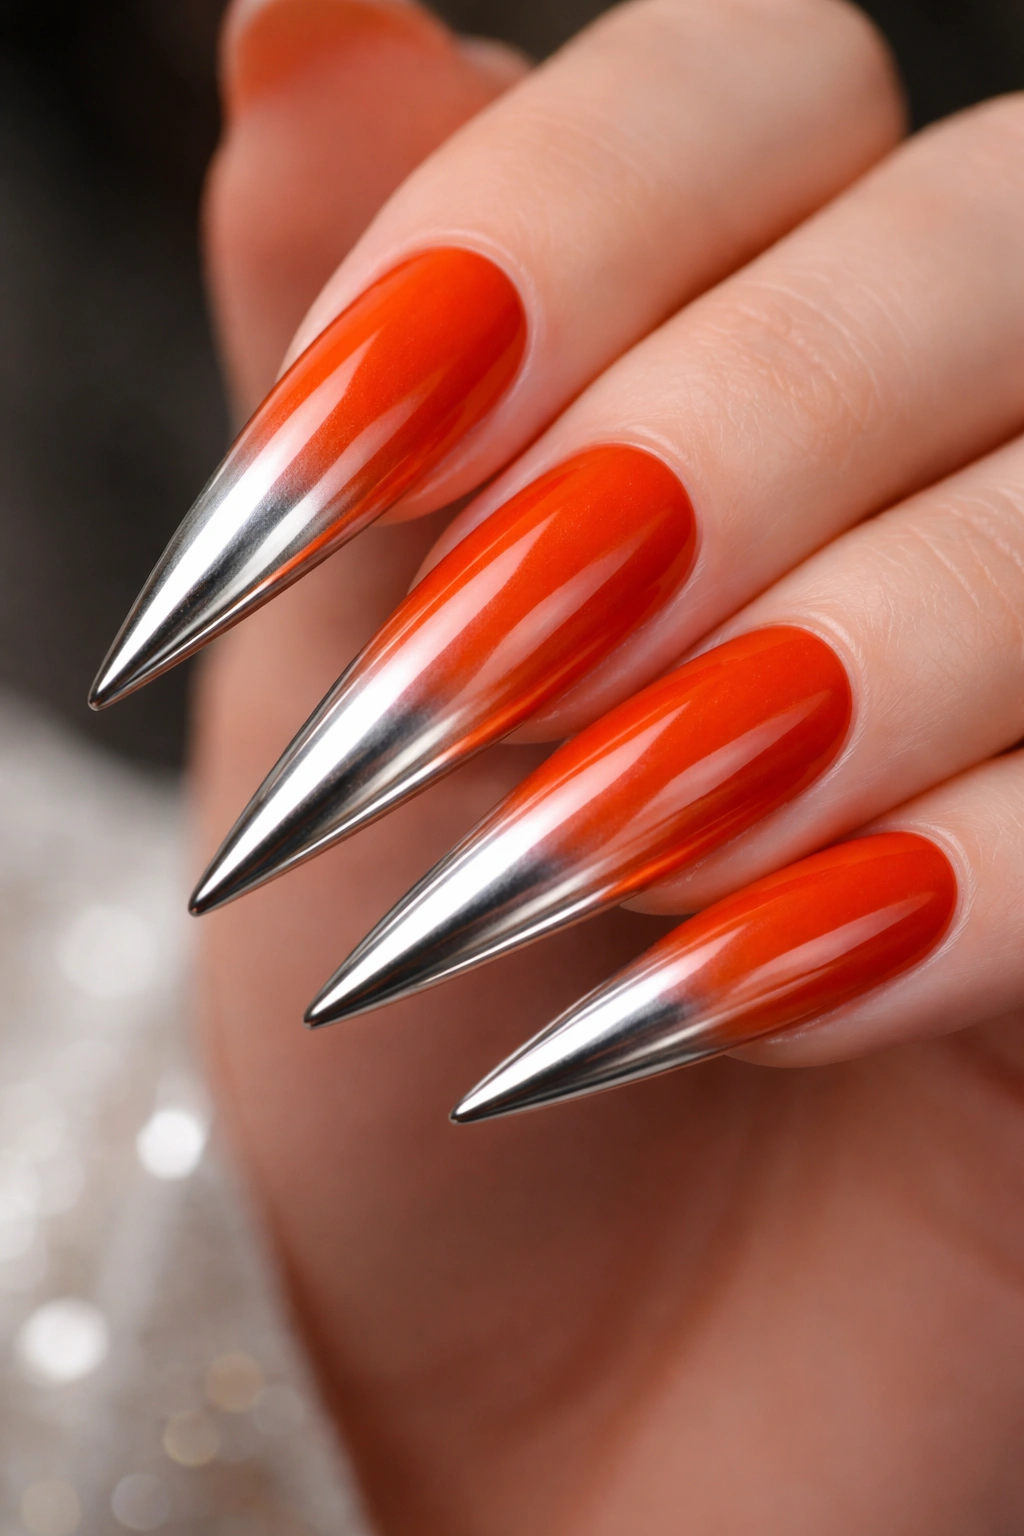
Chrome finishes are striking, and when you blend them with a deep orange ombré effect, you get something that looks incredibly modern and expensive. The nail transitions from warm orange at the base to cool silver chrome at the tip.
Why Orange-to-Chrome Works
You’re combining warm and cool tones, which creates visual tension in the best way. The chrome at the tips catches light like metal, while the orange maintains warmth—it’s an interesting play on opposites.
Achieving Orange-to-Chrome
- Paint a deep orange base
- Use a sponge to create an ombré effect toward a lighter orange or peach shade
- In the last third of the nail, apply a very thin layer of chrome powder (use a flat brush to press it on, not sweep it)
- Work in small sections and build the chrome intensity gradually
- Seal with topcoat
12. Sunset Gradient with Purple Tips
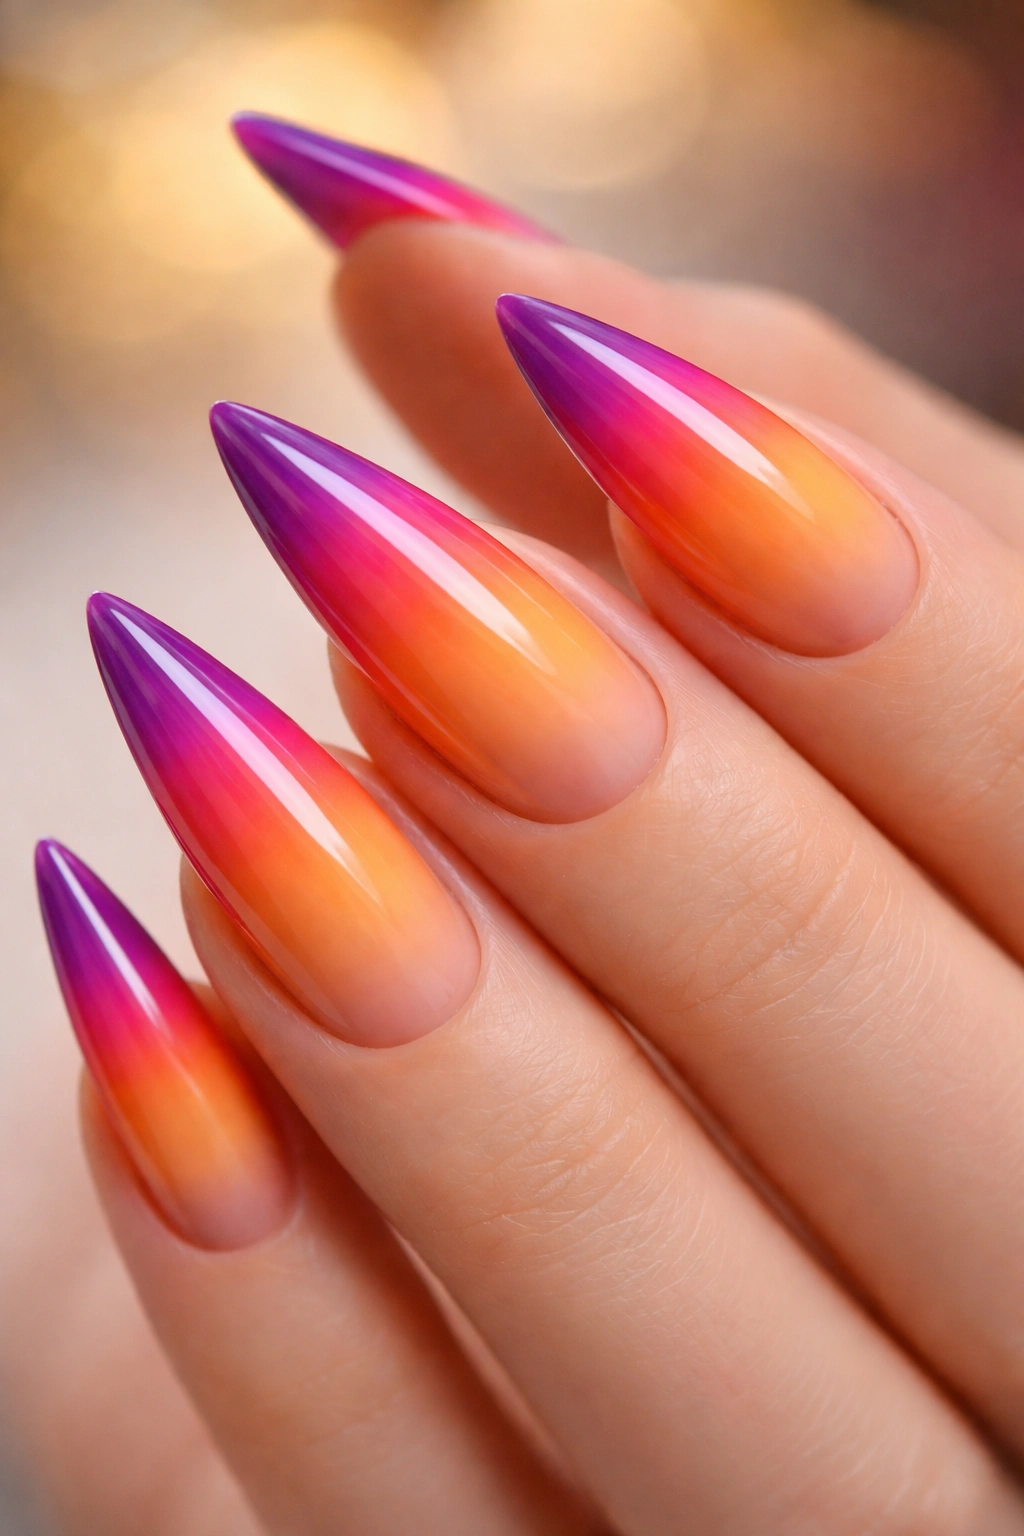
Orange flows beautifully into deeper tones like coral-red and purple, creating a sunset effect that’s naturally stunning. The purple tips add an unexpected cool-tone contrast to warm orange.
The Sunset Concept
There’s something inherently beautiful about sunset colors—they’re universally flattering and evoke warmth, beauty, and transition. Purple tips add sophistication and prevent the look from feeling too basic.
Blending the Sunset
- Start with a pale yellow or cream base
- Sponge on orange in the middle zone
- Blend peachy or coral tones where orange meets the tips
- Introduce purple at the very tips, feathering it back gently
- Use a smoothing topcoat to blend everything
13. Burnt Orange with Copper Stamping Details
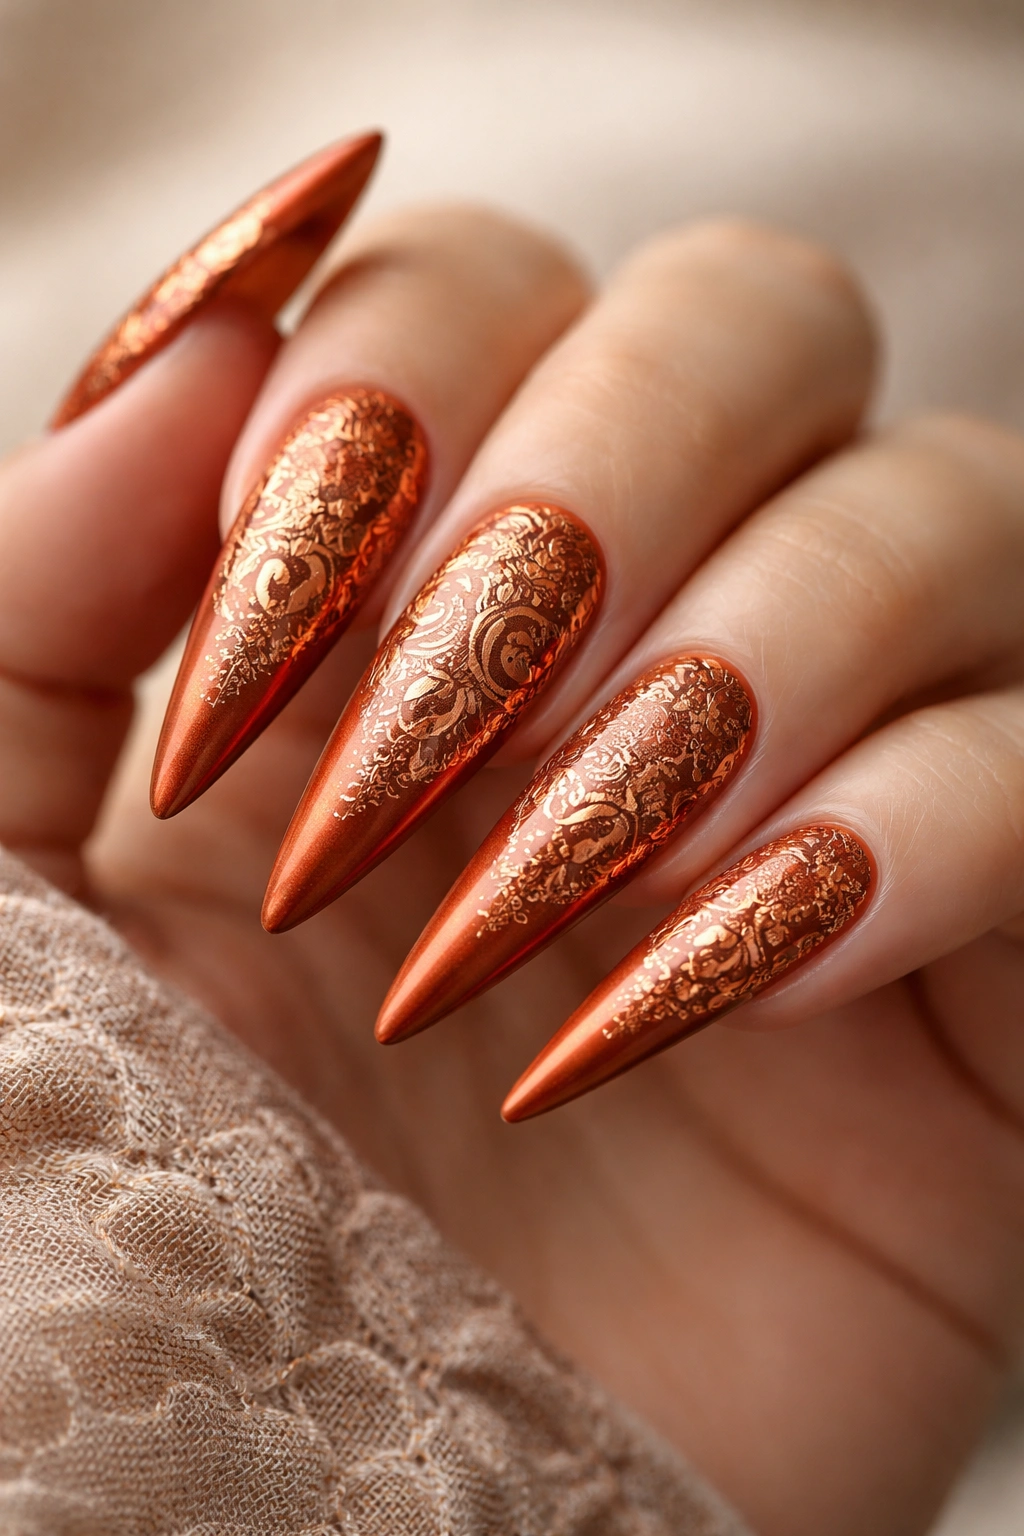
Nail stamping allows you to create detailed patterns quickly and consistently. Copper-toned stamped designs on burnt orange create an ornate, slightly vintage aesthetic that feels upscale.
Stamping Benefits
Stamping gives you intricate detail without requiring freehand drawing skills. Copper on burnt orange has a harmonious, warm quality that feels coordinated rather than clashing.
How to Stamp Successfully
- Paint your burnt orange base and let it fully cure
- Choose a stamping plate with a design you love
- Apply copper-colored polish to the stamping plate
- Using the stamper, pick up the design and carefully roll it onto your nail
- Practice on a few nails first—stamping takes a light touch
- Seal with topcoat
14. Orange with Minimalist Line Art
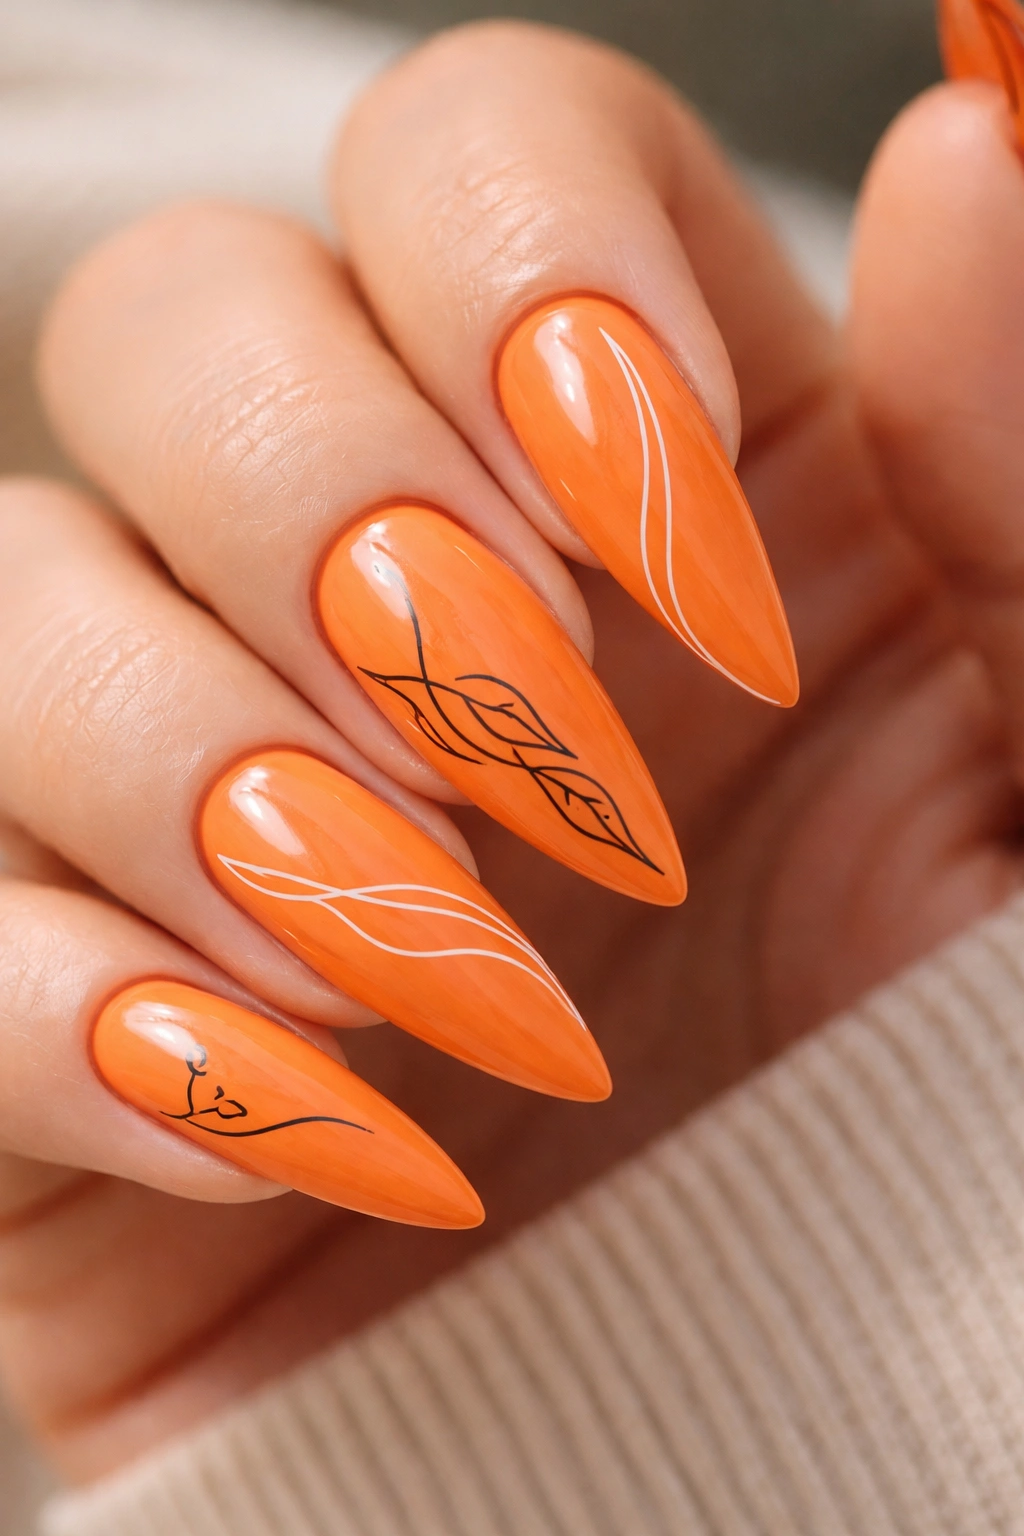
Minimalist line art—simple botanical shapes, geometric forms, or abstract figures—adds artistic flair without overwhelming your nails. A few thin black or white lines on orange stilettos create an understated, creative look.
The Minimalist Movement
This approach appeals if you want nail art but prefer subtle, sophisticated designs. A few thoughtfully placed lines can say more than an entire complex pattern.
Creating Line Art
- Base coat and orange color
- Using an extremely thin brush or nail art pen, draw your chosen design
- Keep it simple—a single leaf, a simple face outline, a geometric shape, or an abstract swoosh
- You can add one design per nail or create a cohesive pattern across all nails
- Topcoat
15. Peach Orange with Encapsulated Foil
Encapsulation means trapping foil or flakes between layers of polish, creating a dimensional effect that’s smooth to the touch unlike loose glitter or flakes. Peach orange with trapped rose-gold foil is elegant and eye-catching.
Encapsulation Appeal
The foil sits safely between polish layers, so it won’t catch on fabric or fall off. The effect is rich and layered, giving your nails a premium appearance.
The Encapsulation Process
- Base coat and first layer of peach-orange color
- While still slightly tacky, lay small pieces of rose-gold foil directly on the nail
- Carefully apply a topcoat or clear polish layer over the foil, being gentle to avoid moving it
- The foil will seem to float between the layers once everything dries
- Cure or dry completely before handling
16. Orange with Floral Watercolor Design
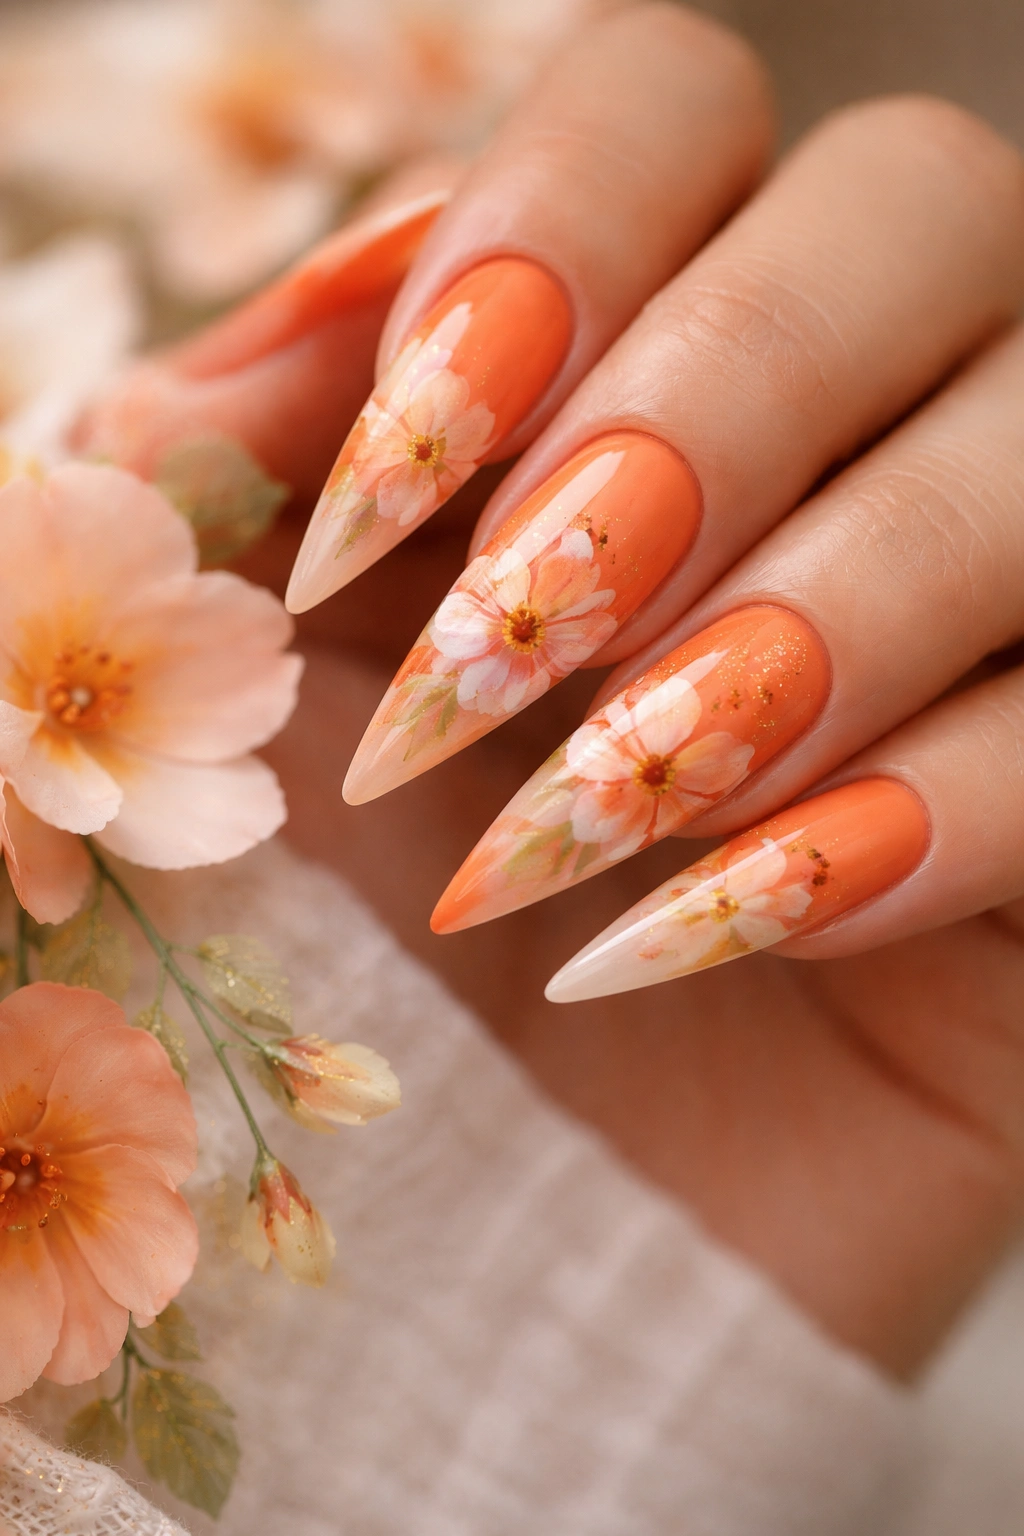
Watercolor nail art has a romantic, artistic quality. Delicate watercolor florals—flowers, leaves, and stems in complementary colors—on an orange background create something that feels personal and hand-painted.
Watercolor Elegance
These designs have a soft, creative energy that’s more approachable than photorealistic nail art. Watercolor on orange feels warm and organic.
Creating Watercolor Effects
- Base color: light orange or peachy tone
- Thin your acrylic paints or use watercolor nail polish with a little water
- Using a small, soft brush, paint simple floral shapes
- Allow colors to blend slightly where they touch, but don’t overwork it
- Keep designs loose and impressionistic rather than perfectly controlled
- Seal with topcoat
17. Vibrant Orange with Chrome Tips
Chrome tips on vibrant orange create a bold, modern look that’s less subtle than chrome-ombré but more wearable than full chrome nails. The chrome catches light dramatically while the orange base maintains warmth.
The Chrome Tip Strategy
Focusing chrome on just the tips extends the visual length of your stiletto nails and creates a sleek finish without overwhelming the eye. It’s fashion-forward without being costume-like.
Applying Chrome Tips
- Two coats of vibrant orange base color
- Apply a sticky topcoat layer
- Using a flat brush, apply chrome powder to the tip area only
- Press gently and build in thin layers rather than applying heavily all at once
- Define a clear line between orange and chrome if you prefer, or let them blend
- Seal with topcoat
18. Rust Orange with Matte Finish and Pearl Accents
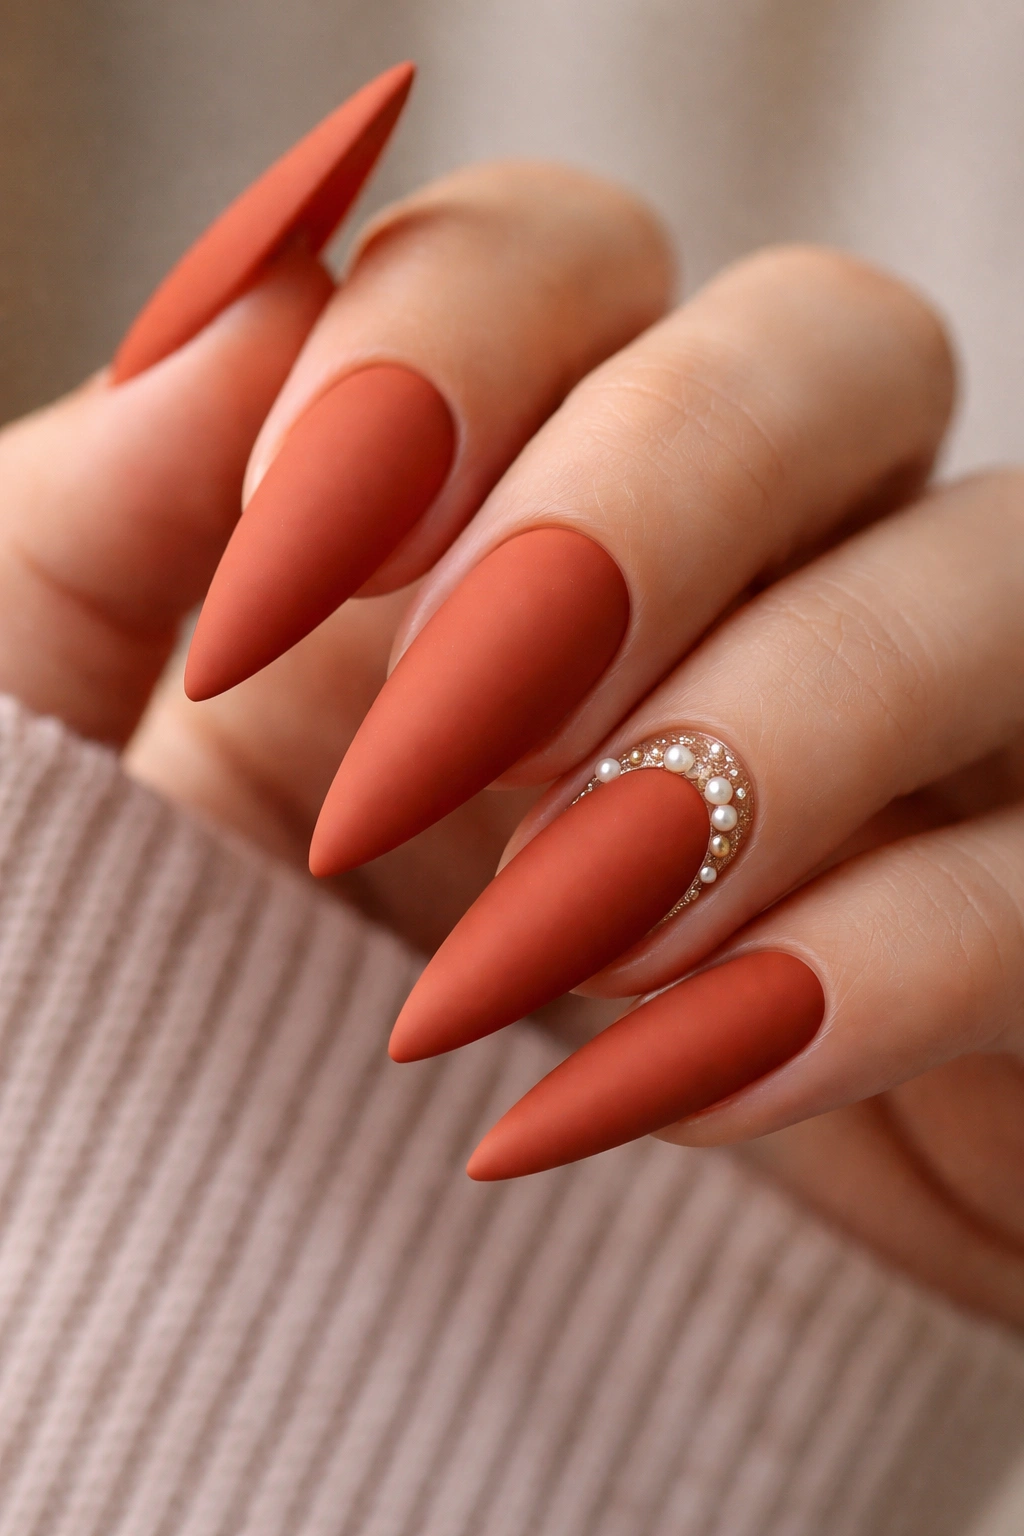
Matte finishes feel modern and tactile, and on rust orange, they create a sophisticated, almost velvety appearance. Add small pearl accents on an accent nail or scattered across a few nails, and you’ve balanced matte simplicity with subtle shine.
Matte Sophistication
Matte nails are criminally underrated. They feel contemporary, artistic, and deliberately chosen. The contrast between the matte orange and glossy pearl accents creates visual interest through texture.
Achieving Matte with Pearl Accents
- Two coats of rust-orange color
- Apply a matte topcoat instead of glossy (most brands offer both)
- Let it fully dry
- On your accent nail or select areas, apply a glossy topcoat to certain spots
- While tacky, place small pearl studs or use a detail brush to add tiny pearl highlights
- Seal everything with a final matte topcoat for consistency
19. Orange with Leopard Print in Brown and Black
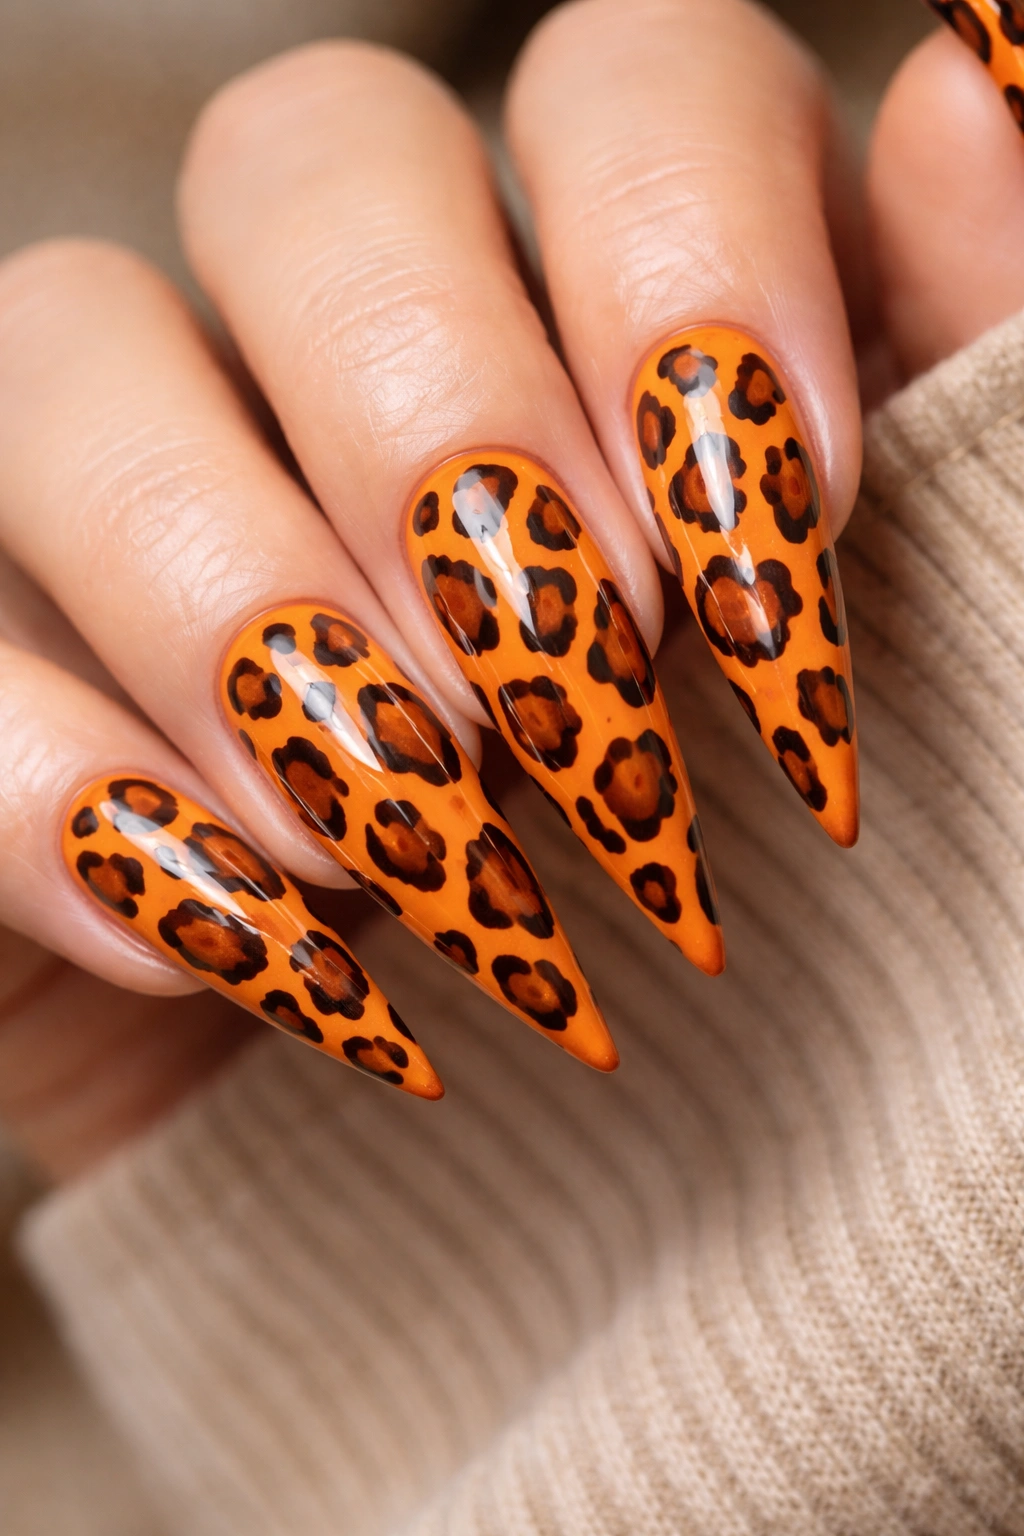
Animal print on stiletto nails is inherently glamorous, and leopard print in particular feels timeless. Brown and black spots on an orange base create a warm, earthy take on the pattern that’s less expected than traditional tan leopard print.
Leopard Print Appeal
This design instantly makes your nails feel fun and intentional. Leopard never goes out of style, and the brown-and-orange color combination is sophisticated rather than cutesy.
Creating Leopard Print
- Base coat and orange color (two coats)
- Using a thin detail brush, paint small, irregular oval shapes in brown
- Go back and add small black spots inside or near the brown shapes
- Leopard spots should be slightly different sizes and scattered organically, not perfectly evenly spaced
- Leave some orange background showing between spots
- Topcoat to seal
20. Apricot Orange with Gradient to Clear
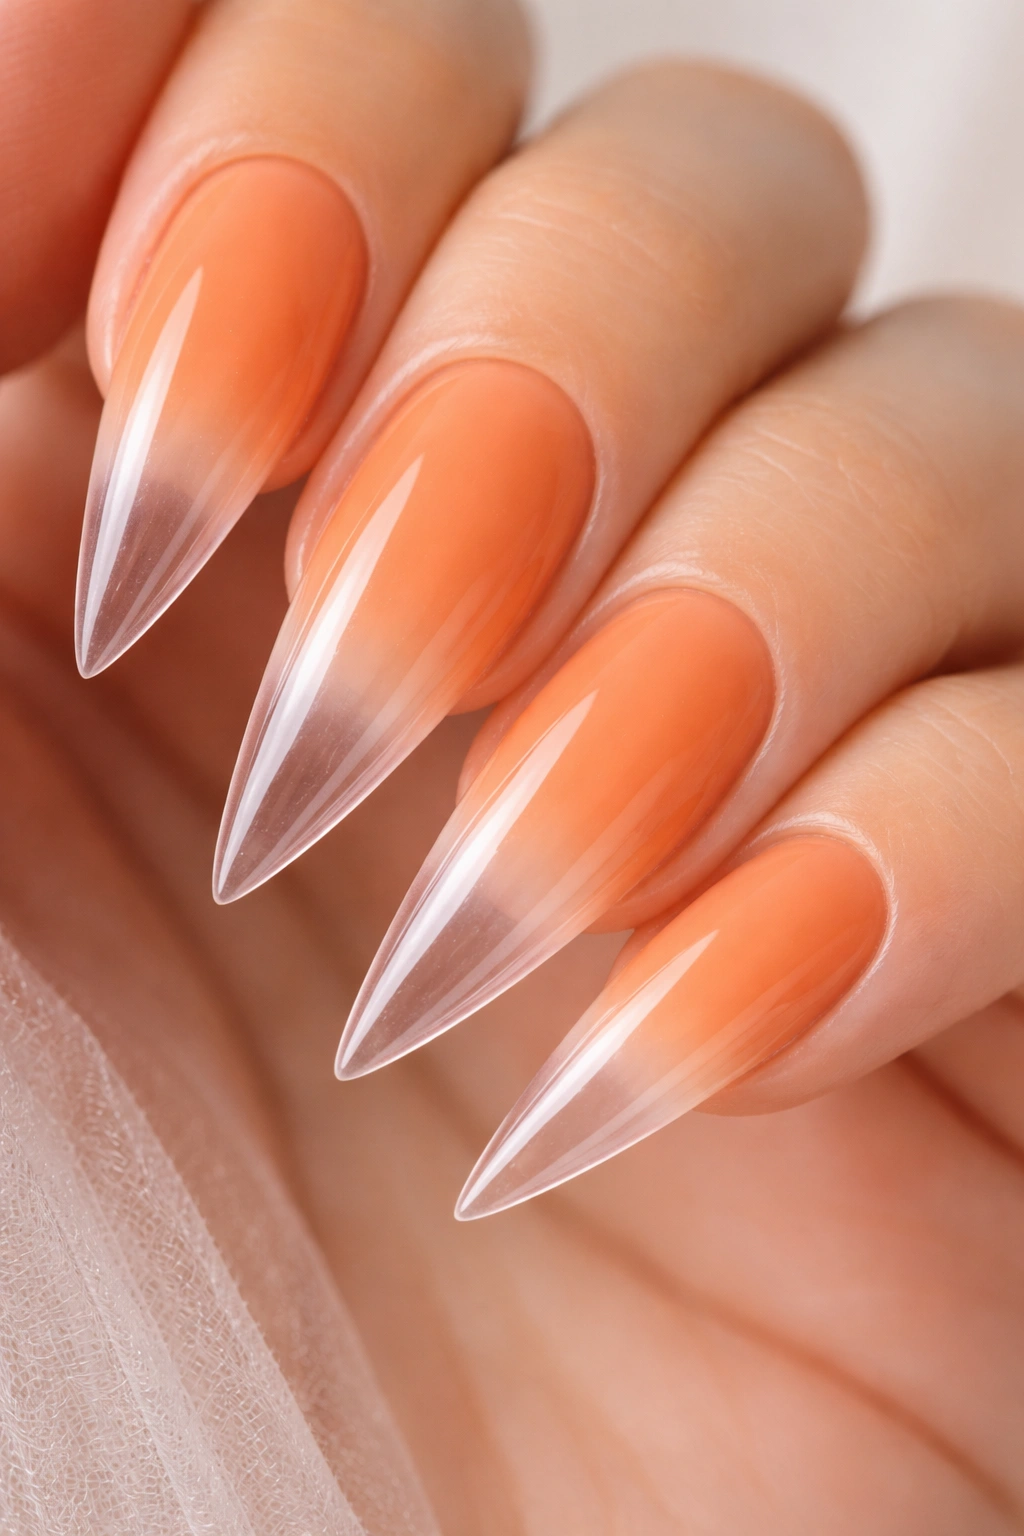
This creates an almost glass effect—the color is concentrated at the base of the nail and gradually fades to clear at the tips. It’s elegant, modern, and gives your nails a soft-focus quality that’s genuinely beautiful.
The Ombré-to-Clear Concept
This design has become popular in high-end nail salons because it’s sophisticated and visually striking. The gradient from colored to clear creates an ombré effect that looks expensive and intentional.
Creating Gradient to Clear
- Base coat
- Apply apricot-orange polish to the bottom half of the nail
- Using a clean sponge or blending brush, sponge a lighter peachy shade in the middle zone, blending the transition
- Blend even further toward clear, using barely-pigmented clear polish with a tiny amount of your color
- The transition should be gradual, not abrupt—this takes patience
- Seal with a smooth topcoat to blend everything further
Final Thoughts
Orange stiletto nails offer an incredible range of possibilities, and the designs above represent just the beginning of what you can create with this versatile color. Whether you’re drawn to minimalist elegance, maximalist embellishment, or something in between, there’s an orange stiletto concept that aligns with your aesthetic and skill level. The color works year-round, translates across different occasions, and flatters virtually every skin tone when you choose the right undertone—warm burnt tones for cooler skin, coral for warmer complexions, and peachy shades for literally everyone.
The key to pulling off any of these designs successfully is choosing quality products and taking your time with application. Stiletto nails are already making a statement through their shape, so your design just needs to be clean and intentional to look salon-quality. Start with designs that feel achievable for your skill level—maybe begin with solid colors and simple accents before moving toward more complex techniques like stamping or watercolor.
Remember that trends will shift, but the warm, confident energy of orange nails is timeless. Pick a design that makes you feel like yourself, and rock those stilettos with the confidence they deserve.
