

French tip nails have made a glorious comeback over the past few years, and when you pair that classic elegance with the drama of stiletto nails, you’ve got something that commands serious attention. The stiletto shape—that elongated, pointed silhouette—creates the perfect canvas for French tips, giving them an undeniably sophisticated edge that goes way beyond the office-appropriate manicure your grandmother might have worn. What makes French tips on stilettos so universally flattering is that the crisp white line (or your color of choice) visually lengthens your nails even more, creating an illusion of strength and grace in a single manicure.
The beauty of French tip stiletto nails is their versatility. You can keep them absolutely minimal and timeless, or you can push the boundaries with metallics, glitter, marble effects, and bold color combinations. Whether you’re heading to a formal event, want to refresh your everyday look, or you’re simply experimenting with nail art, there’s a French tip stiletto style that’ll feel absolutely right. The key is understanding which designs work best for different occasions and knowing exactly how to execute them—or communicate what you want to your nail technician if that’s your route.
Below, you’ll find 12 stunning French tip stiletto nail ideas that range from subtle refinement to full-on artistic expression. Each one is completely achievable and can be customized to match your personal style, skin tone, and the season. Let’s dive into each design and break down what makes it work, how to create it, and when you’d want to wear it.
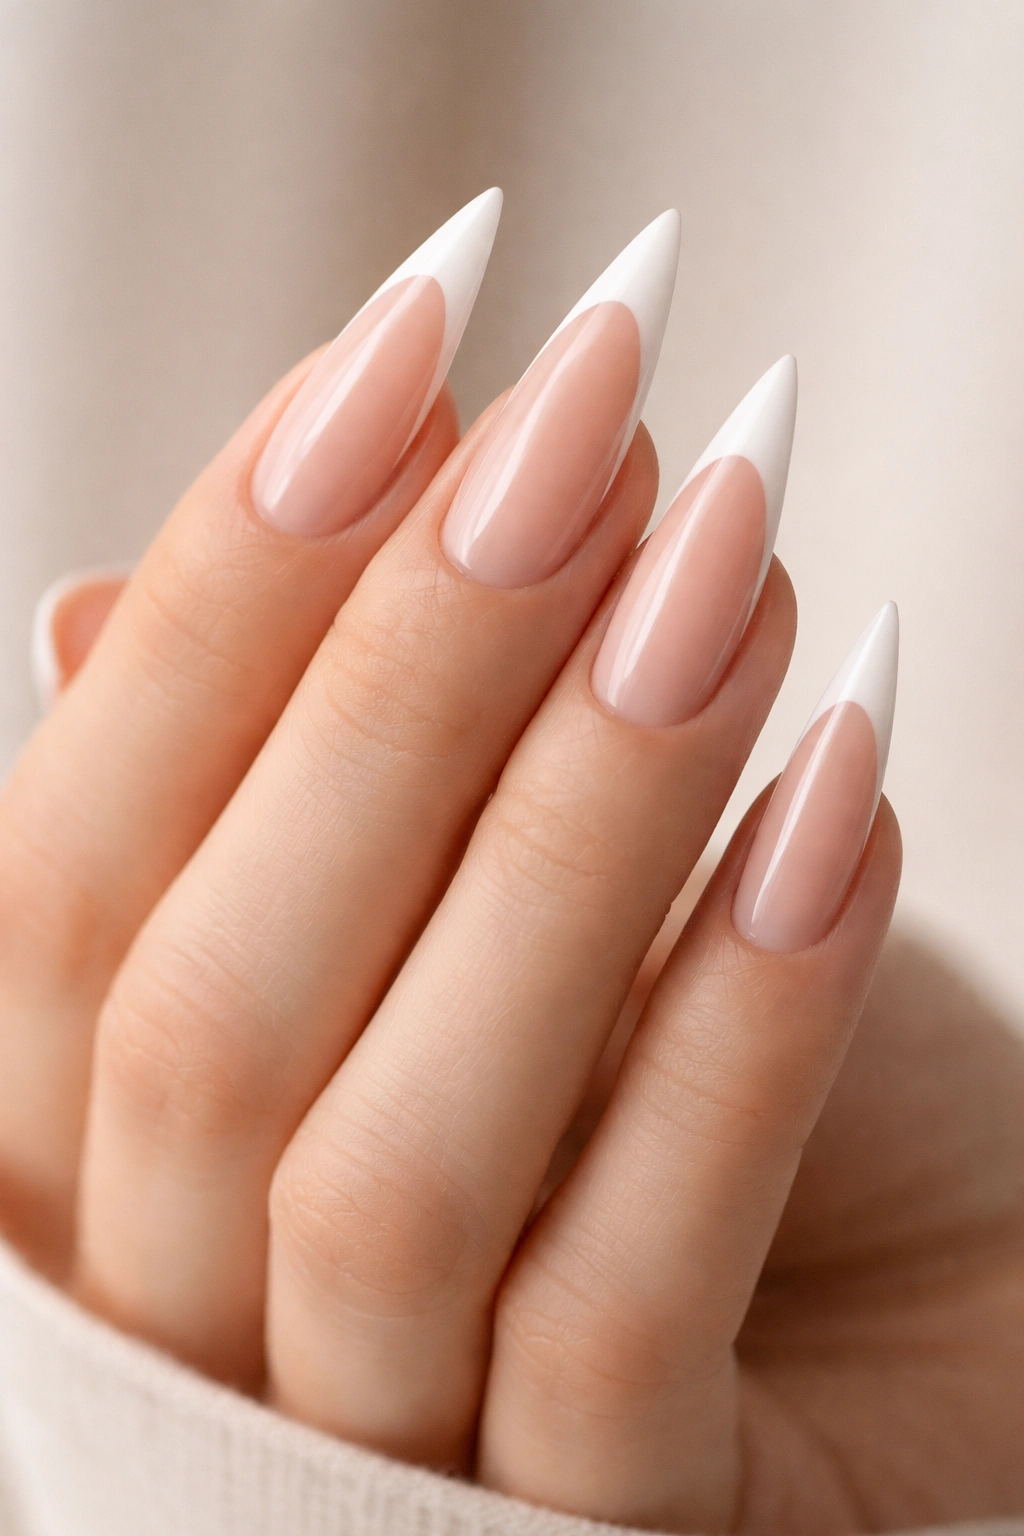
1. Classic White Tips with Rose Gold Accents
This is the elevated version of the original French manicure—the white tip remains pristine and clean, but a delicate rose gold stripe or accent line along the edge of the tip adds a layer of modern luxury. The nude or pale pink base keeps everything timeless, while that rose gold catches the light and adds unexpected glamour. It’s sophisticated enough for a professional setting but interesting enough that you’re clearly putting thought into your appearance.
Why It Works
Rose gold has become the perfect “neutral luxury” metal because it complements virtually every skin tone without looking overwrought. The thin rose gold line (usually just a hair-thin stripe right along the white edge) doesn’t overwhelm the classic French tip formula—it enhances it. This design reads as intentional and curated, suggesting that you pay attention to detail without announcing that you’re wearing a dramatic manicure.
How to Achieve This Look
- Start with a smooth nude or very pale pink base coat on the nail bed, using 2 coats for opacity
- Use a crisp white polish or a white gel polish to create a sharp tip line, keeping the edge as defined as possible—practice your angle before committing
- Once the white is completely dry, use a very thin rose gold stripe brush or a detail liner to paint a delicate line right along the bottom edge of the white tip
- Seal everything with a glossy or matte topcoat depending on your preference
- Rose gold gel polish works beautifully here because it holds its reflective shimmer throughout the manicure’s lifespan
Pro tip: If hand-painting the rose gold line feels shaky, consider using rose gold metallic tape to create a perfectly straight edge, then remove it before topcoat.
2. Nude Gradient with Ombré French Tips
This design layers two trendy nail techniques—a gradient or ombré effect across the entire nail that shifts from a light nude at the base to a slightly deeper tone toward the tip, with an exaggerated French tip line that’s dramatically darker or metallicized. The effect is incredibly dimensional and modern. The gradient makes the nail appear longer, and the contrasting French tip line frames the point beautifully without feeling harsh.
Why It Works
Gradient nails create an optical illusion of depth and movement on a small canvas, so combining that with a French tip essentially doubles the visual impact. The ombré effect suggests sophistication and effort, even though modern gel systems make it relatively straightforward to achieve. This design flatters hands with shorter fingers because the gradient pulls the eye toward the longest point.
How to Achieve This Look
- Apply a base coat and your lightest nude shade as a base
- Using a gradient sponge or a blending brush, create a soft ombré effect by dabbing a slightly deeper nude or taupe shade across the tip area, blending where the two colors meet
- Once the gradient is set, use a crisp white or nude-shimmer French tip line—the contrast between the gradient and the tip line is what makes this design pop
- Optional: add a very thin metallic line (gold, rose gold, or silver) right along the edge of the French tip for extra dimension
- Finish with a glossy topcoat that emphasizes the gradient’s luminosity
Worth knowing: Gel polish works best for gradients because you can build the ombré effect layer by layer without the colors muddying together, and it holds the blended effect permanently once cured.
3. Glitter-Dipped Tips with Metallic Edge
Imagine a crisp French tip but instead of solid white, the tip is dipped in fine glitter—either clear glitter that catches light, or champagne and rose gold glitter mixed for warmth. A thin metallic line frames the very edge of the glitter, creating a sharp boundary between the glitter and the nail base. This design is celebratory and glamorous without reading as costume-y, especially when you choose finer glitter particles rather than chunky confetti glitter.
Why It Works
Glitter adds immediate festiveness and visual texture, but when it’s contained strictly to the tip area (not scattered across the whole nail), it feels intentional and controlled. The metallic edge line serves as a visual anchor, keeping the design grounded and preventing the glitter from looking sloppy. This is one of the most universally flattering dramatic French tip variations because the glitter catches light constantly, making your hands look dynamic and alive.
How to Achieve This Look
- Create a clean French tip with white or nude polish as your base line
- Instead of painting a solid tip, use a glitter-laden polish—either a pre-made glitter formula or press fine glitter into a wet clear topcoat while it’s still tacky
- Layer the glitter densely enough in the tip area that it appears intentional, not like stray sparkles
- Once cured, use a thin brush and a metallic polish (gold, silver, or rose gold) to create a precise line along the very edge where the glitter meets the air
- Seal with a thick, glossy topcoat that holds the glitter firmly in place and creates a smooth, wearable finish
Pro tip: Champagne and rose gold glitter together creates a warm, luxurious effect that flatters most skin tones better than cool-toned silver glitter.
4. Geometric French Tip Design
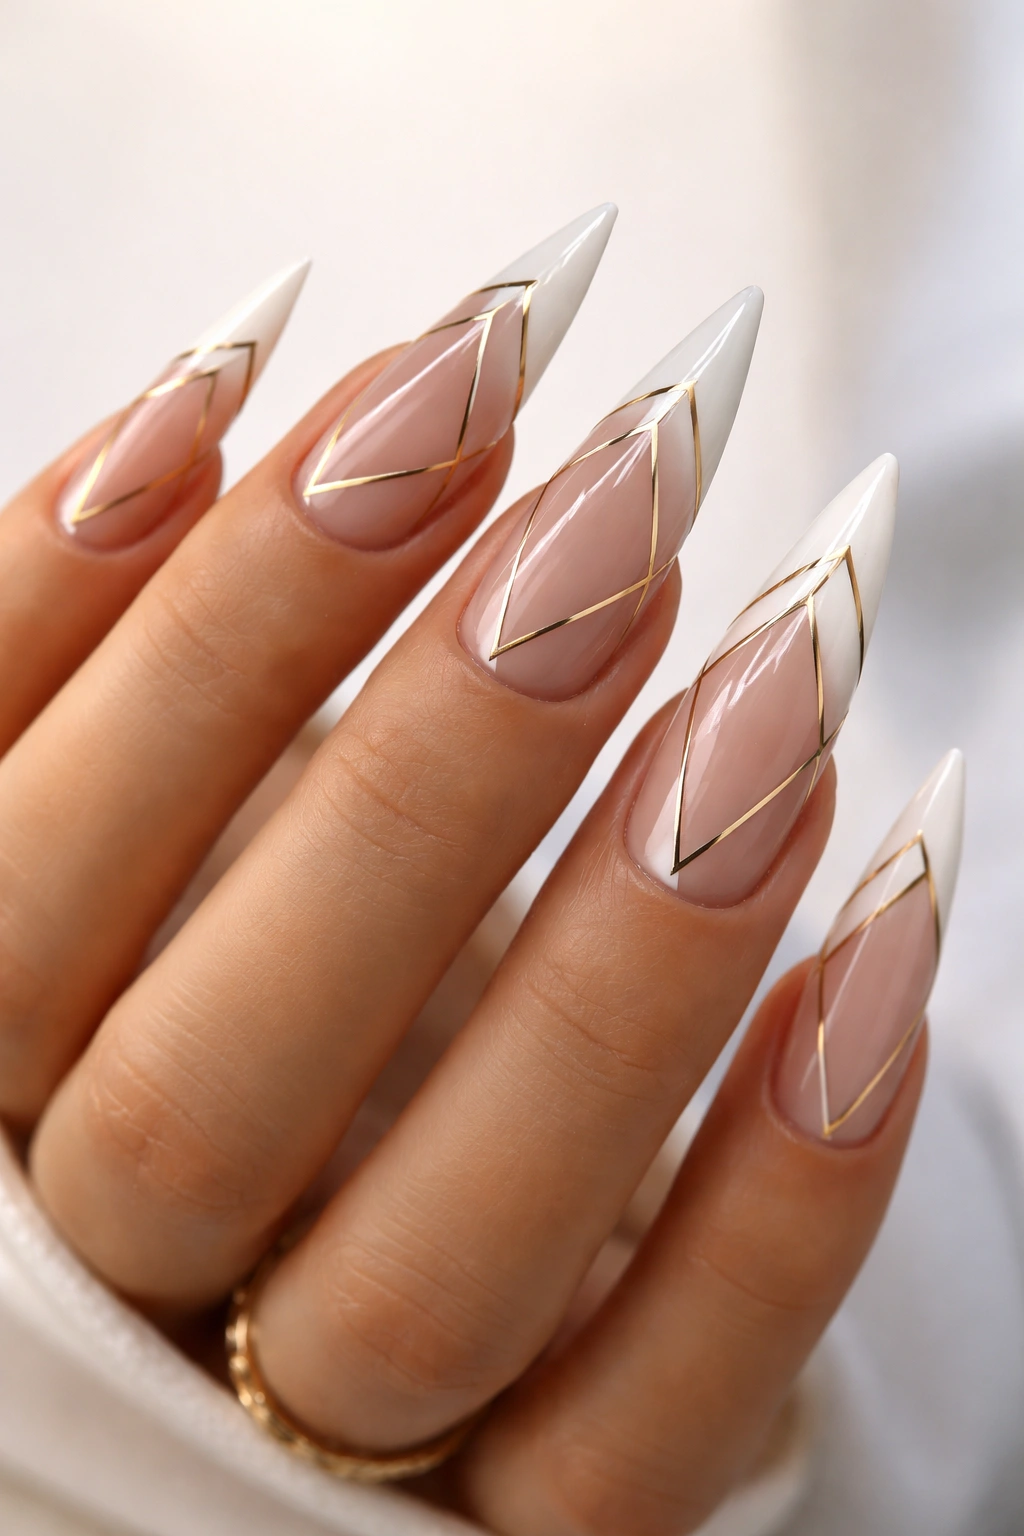
This is for the nail art enthusiast—the white French tip becomes the canvas for geometric patterns. Think thin metallic lines creating angular shapes, negative space triangles, color-blocking, or even tiny geometric illustrations that complement the pointed stiletto shape. The stiletto’s dramatic angle makes it the perfect nail shape for geometric designs because the point naturally completes angular compositions. A simple version might be just two or three thin lines creating a minimalist triangle; a more complex version could feature multiple stacked geometric elements.
Why It Works
Geometric designs feel modern and intentional in a way that organic patterns sometimes don’t. They align beautifully with the sharp, pointed aesthetic of stiletto nails, creating visual harmony between the nail shape and the art itself. Geometric designs also tend to age well—they don’t feel trendy in the way that certain character designs might feel dated in a few years.
How to Achieve This Look
- Start with a crisp white French tip as your base, using quality white polish for opacity
- Plan your geometric pattern lightly with a pencil or use a template if you’re new to geometric nail art
- Use a thin detail brush and metallic or contrasting color polish to paint your geometric shapes—straight lines, triangles, or abstract angular forms
- Common geometric combinations include: a thin rose gold outline around the white tip, thin metallic lines creating stacked triangles, or color-blocking where you divide the white tip into sections using metallic lines
- For cleaner lines, consider using metallic striping tape to create perfectly straight edges, then paint within those boundaries
- Seal with a topcoat that keeps all your fine lines intact and undamaged
Worth knowing: Metallic gel polishes and topcoats tend to create sharper lines than regular polish, making geometric designs noticeably crisper and more professional-looking.
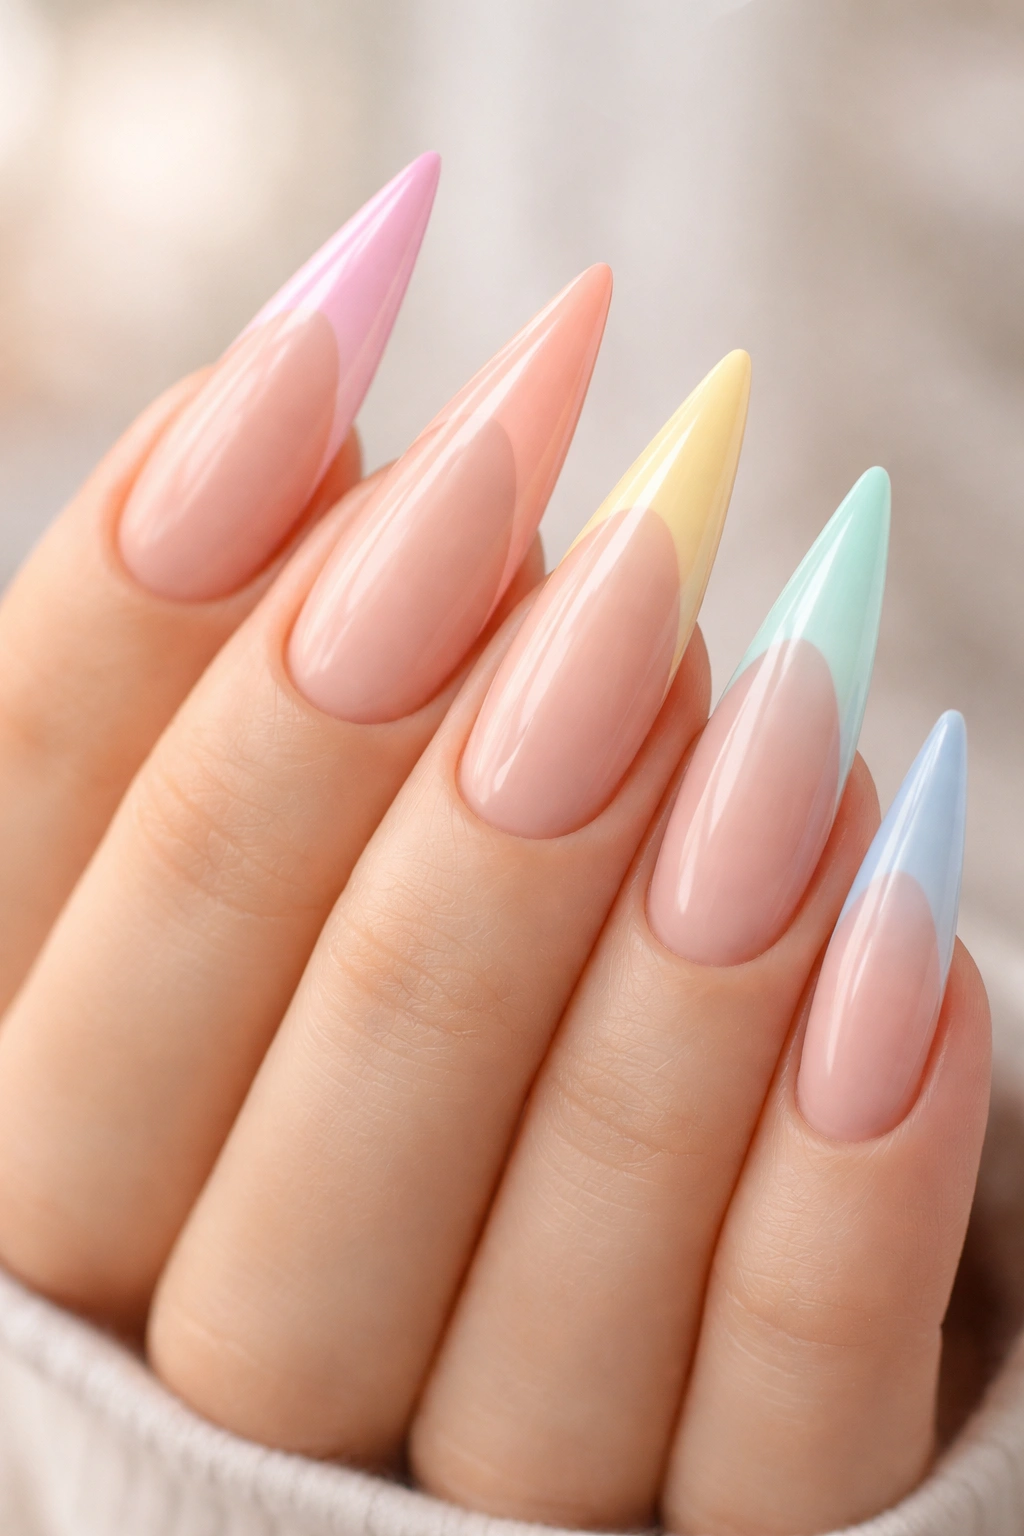
5. Pastel Ombré French Stilettos
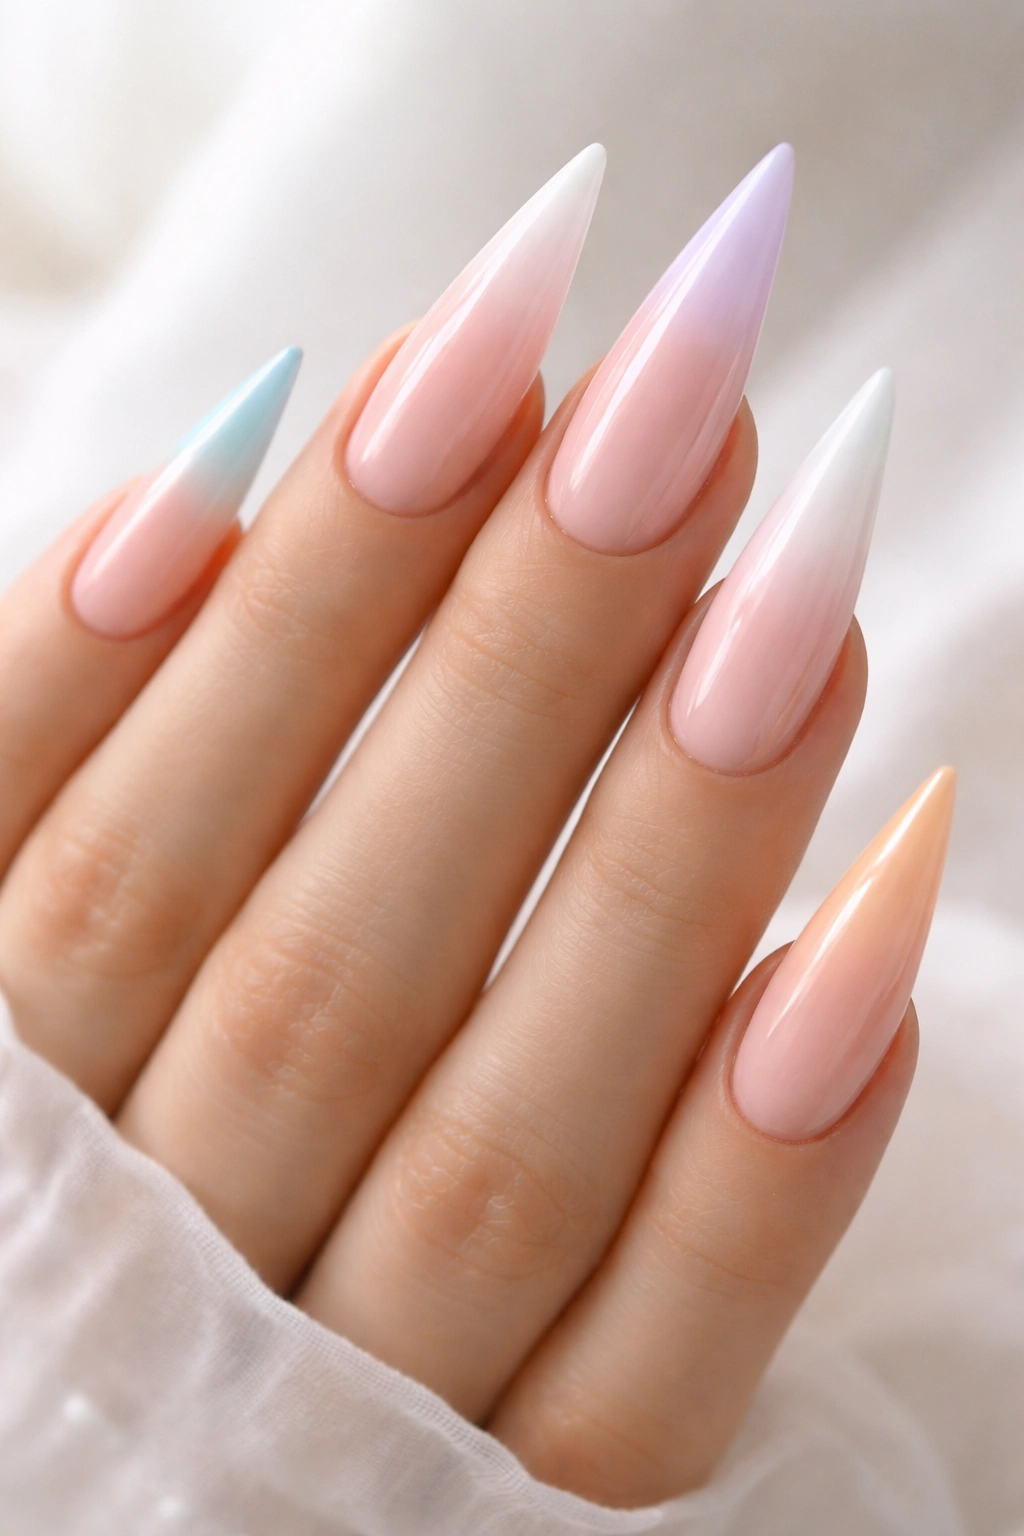
Instead of the traditional white tip, imagine a French tip in a soft pastel that ombré-blends into an even softer pastel at the very point. A soft pink fading to white, a lavender fading to pale blue, or a peach fading to nude creates an ethereal, almost watercolor effect. The stiletto shape elongates this gradient beautifully, making the color transition appear more dramatic than it would on a shorter nail. This is one of the most Instagram-worthy designs because the soft colors and smooth gradient read as both effortless and expertly executed.
Why It Works
Pastel ombré on stilettos hits the sweet spot between trendy and timeless. The soft colors feel gentle and wearable for everyday styling, but the gradient effect and the dramatic nail shape elevate it into something clearly intentional. The color transition naturally draws the eye toward the point of the nail, emphasizing the elongating effect. This design particularly flatters fair and medium skin tones, though you can adjust the specific pastel shades to suit any complexion.
How to Achieve This Look
- Apply a base coat and your lightest pastel shade across the entire nail
- Using a gradient sponge, blend a slightly deeper (or slightly different) pastel shade across the tip area—for example, blend soft pink into the pale pink base, or blend pale blue into lavender
- The key is using two shades that are close enough in value that they blend smoothly without creating harsh color separation
- Build the gradient gradually with multiple light layers rather than one heavy application
- Finish with a glossy topcoat that emphasizes the smooth gradient effect—matte topcoat will mute the softness of the colors
Pro tip: The softer and closer in tone your two pastel shades are to each other, the more ethereal and watercolor-like the effect becomes.
6. Black and White Marble French Tips
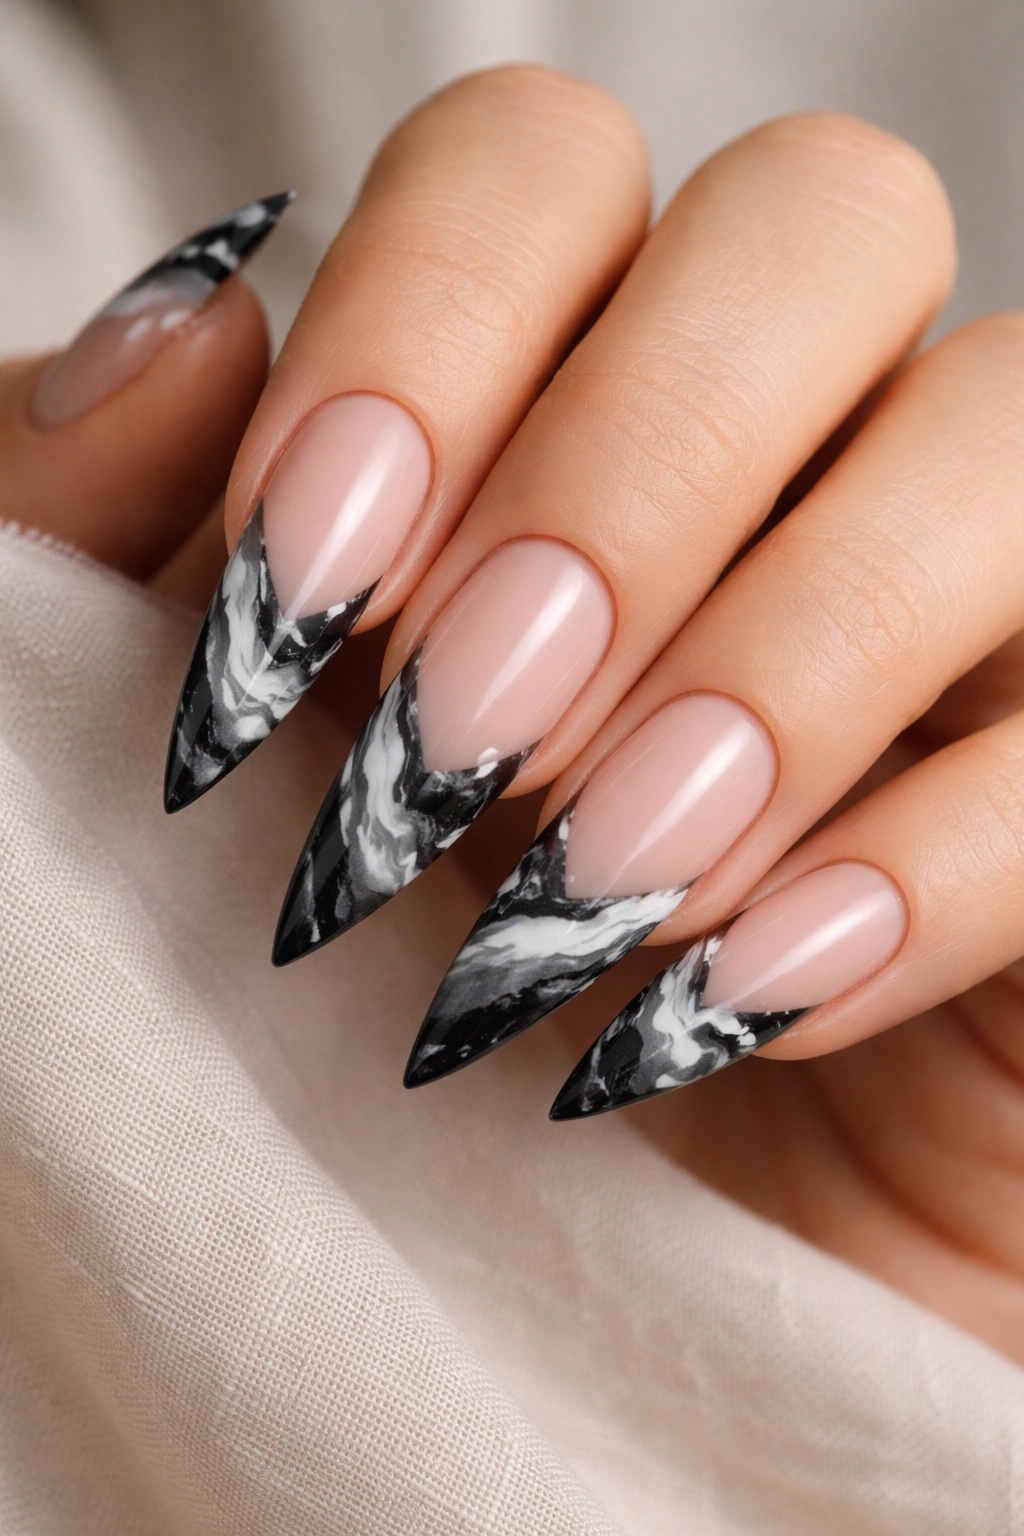
This design takes the elegant black-and-white marble trend and applies it specifically to the French tip area. The base remains a clean nude or pale pink, but the tip features a swirled black and white marble pattern—no solid French line, but instead organic, interlocking black and white veining that mimics natural marble. The contrast is striking against the neutral base, and the marble pattern in the pointed tip area creates an almost sculptural effect.
Why It Works
Black and white marble reads as simultaneously bold and sophisticated. It’s a classic color combination that feels upscale and intentional, like you’re wearing a piece of jewelry on your nails. The organic marble veining softens the geometric severity of the stiletto point, making the design feel less sharp and more artistic. This design photographs beautifully and looks expensive even though it’s achievable at home or by any nail technician.
How to Achieve This Look
- Create a clean nude or pale pink base across the entire nail using 2 coats for full opacity
- Once dry, use white and black gel polish to create marble veining in the tip area—you can do this with a thin brush using freehand swirled lines, or use a marbling technique with a marble topcoat product
- If using the brush method: paint thin white lines in the tip area, then paint thin black lines between and across the white lines, creating an organic interlocking pattern
- For a more sophisticated look, keep the marble pattern high-contrast and well-defined rather than blurry and muddy
- Seal with a glossy topcoat that emphasizes the marble veining and creates a smooth, wearable finish
Worth knowing: Gel polish performs better for marble designs than regular polish because the colors don’t blend together unexpectedly and you can cure each layer separately, giving you more control.
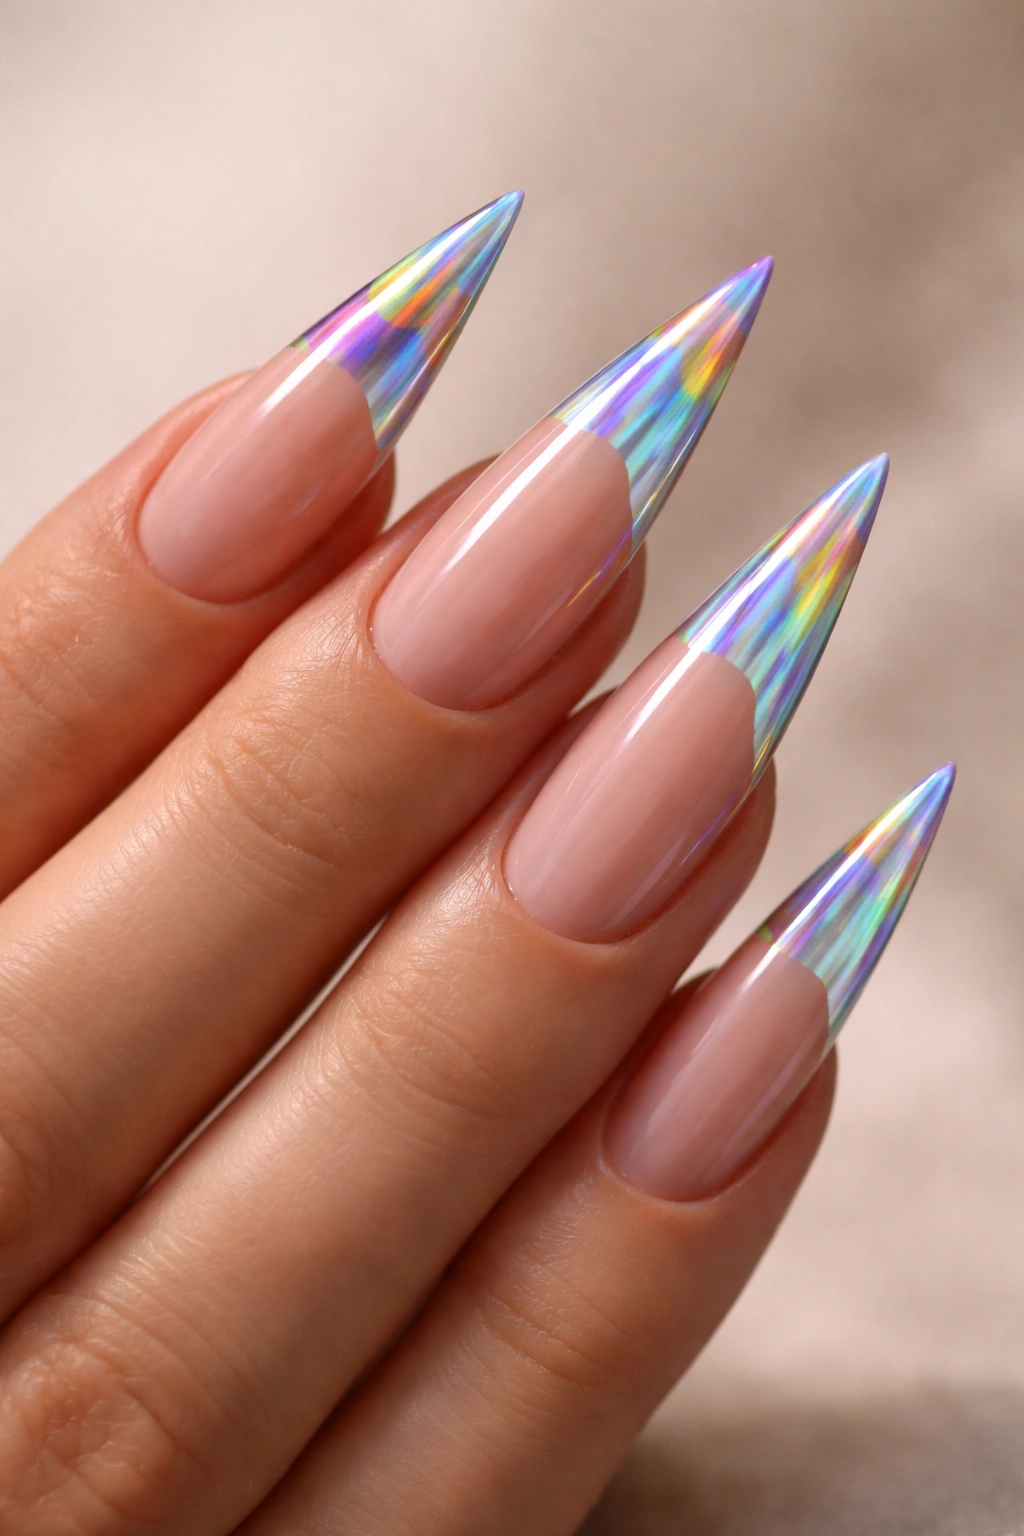
7. Chrome and French Tip Hybrid
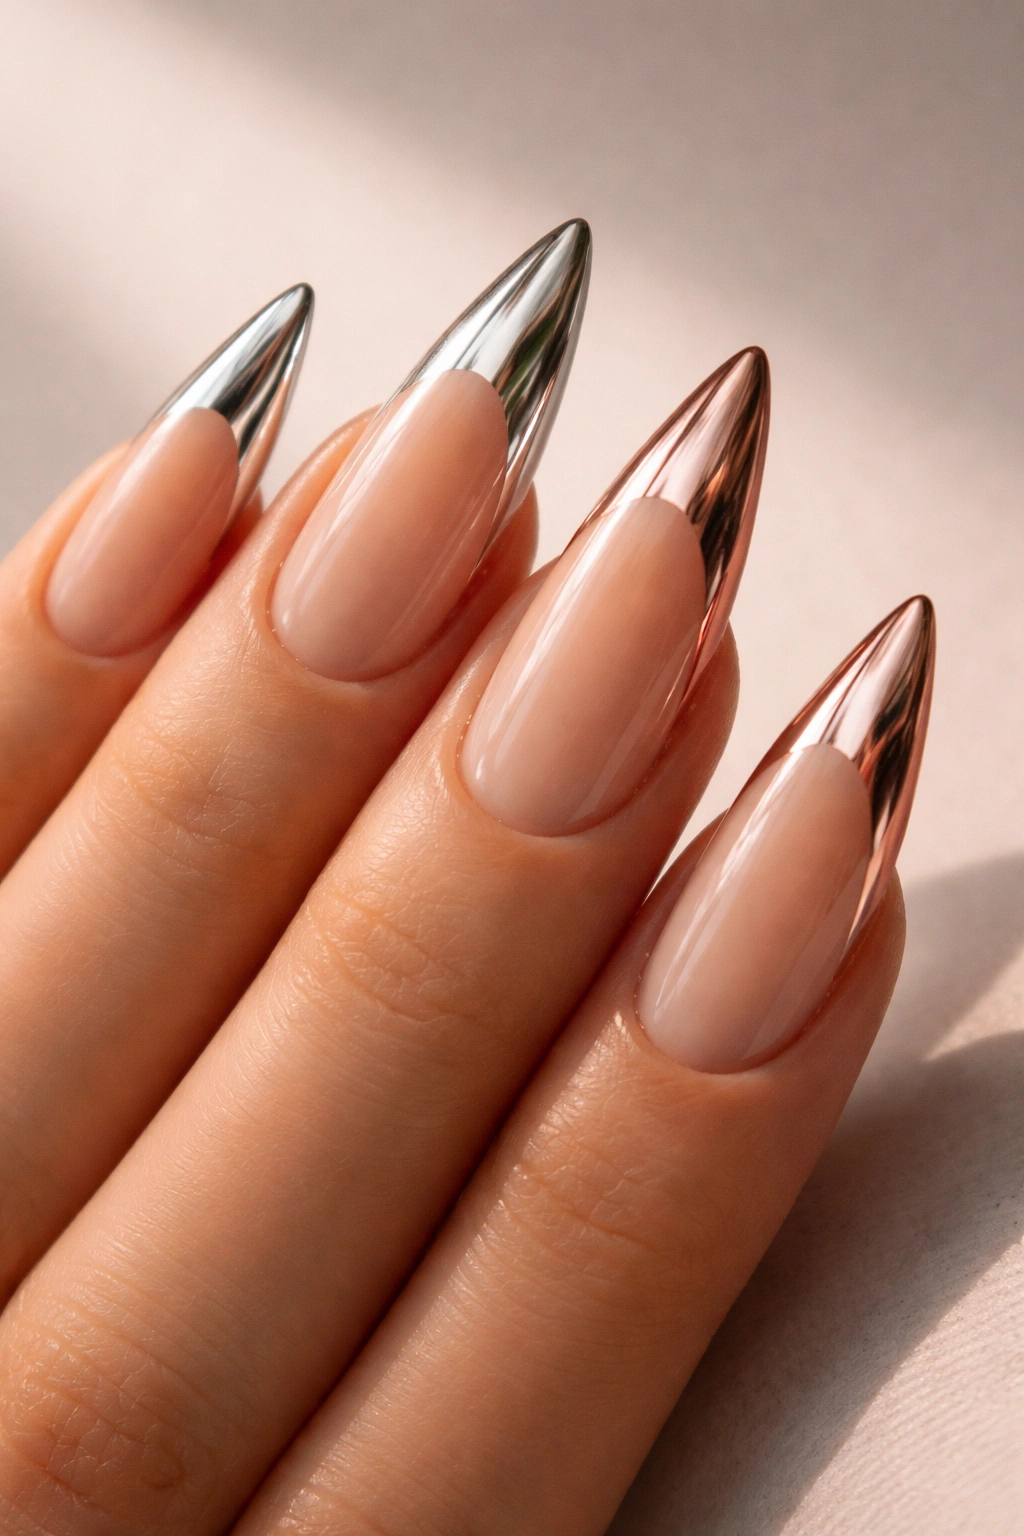
This cutting-edge design combines a chrome or mirror-finish tip with a traditional French tip silhouette. Instead of white, your tip is a high-shine chrome finish in gold, rose gold, silver, or even holographic tones. The base might remain nude, but the chrome effect is so reflective and dimension-creating that it becomes the star of the manicure. The contrast between the matte or satin nude base and the ultra-reflective chrome tip creates an almost 3D effect—your nails look thick and substantial.
Why It Works
Chrome finishes are genuinely eye-catching because they reflect light and surroundings in real-time. On a stiletto point, this creates an almost jewel-like effect. The French tip structure gives chrome an elegant framework rather than letting it dominate the entire nail. This design reads as very current and fashion-forward while still maintaining some classical French tip sophistication. It’s particularly stunning in person because the chrome effect shifts and changes as you move.
How to Achieve This Look
- Apply a smooth nude, pale pink, or even very soft gray base coat
- Use a chrome powder or chrome gel polish system to create a mirror-finish tip—this typically involves applying a sticky base gel, pressing chrome powder onto the tip area, then brushing away excess and sealing with topcoat
- Alternatively, some brands now make chrome gel polishes that don’t require powder—these are simpler but the effect may be slightly less intense
- The application is the trickiest part—you want the chrome concentrated in the tip area only, with a clear line between the matte base and the reflective tip
- Seal with a regular topcoat, though some chrome systems come with their own specific sealant
- The finished effect should look like you’re wearing tiny metal shields on your fingertips
Pro tip: Chrome finishes require a perfectly smooth base to look flawless—any ridges or dust will show up dramatically in the reflective surface, so invest time in nail prep.
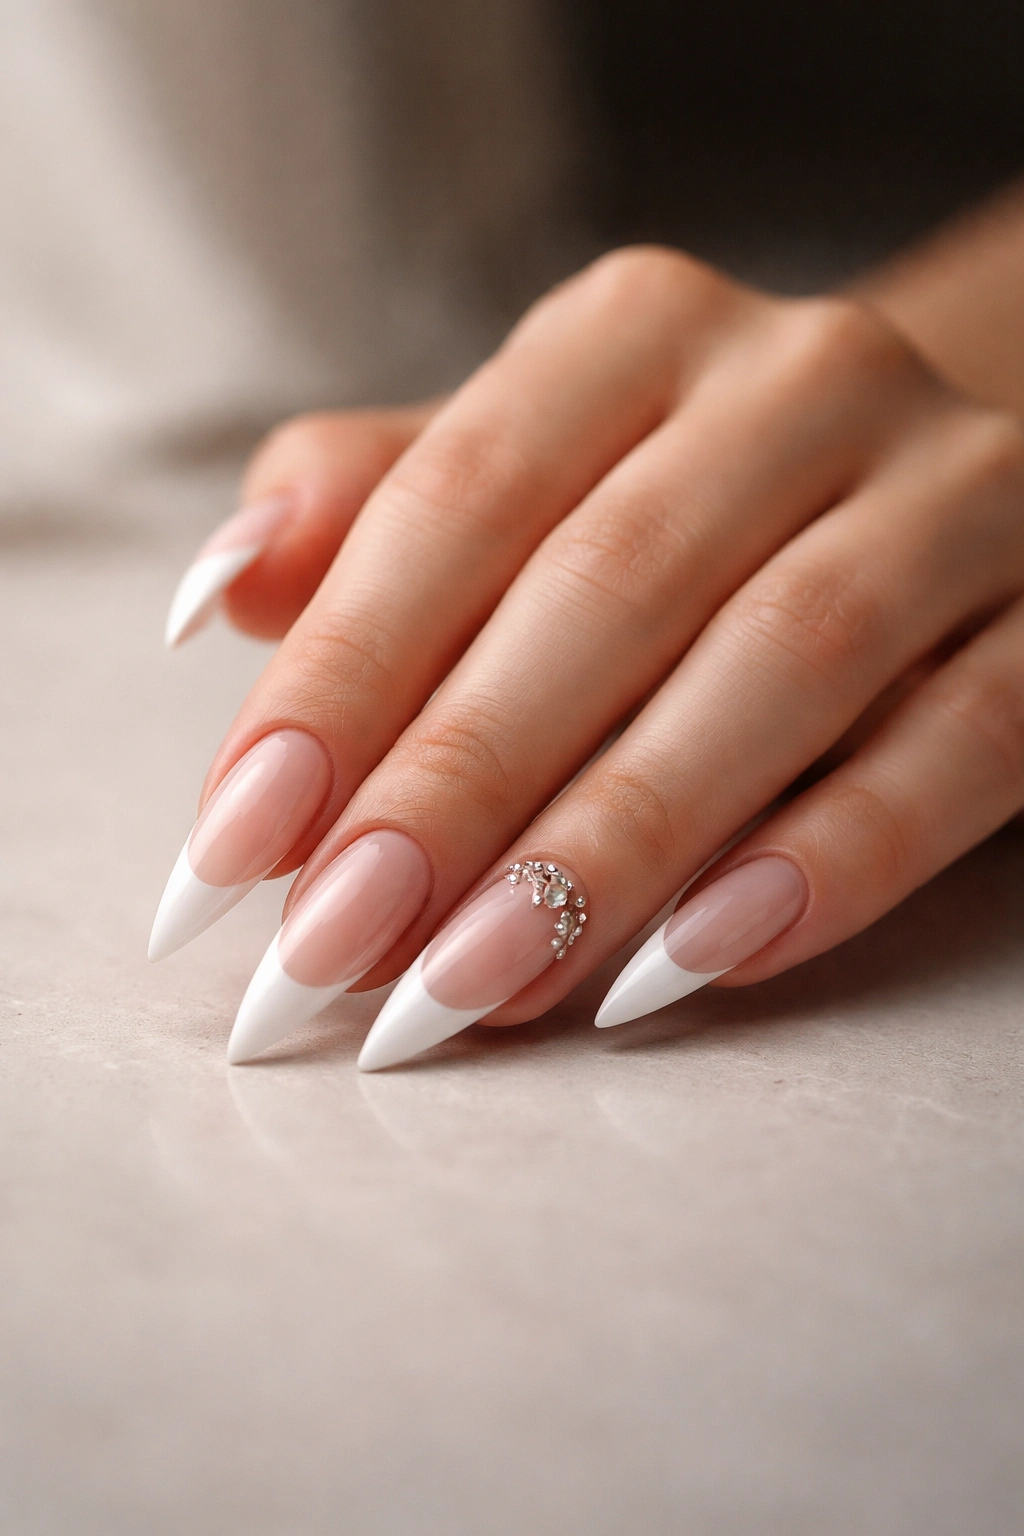
8. Jeweled French Tip Stilettos
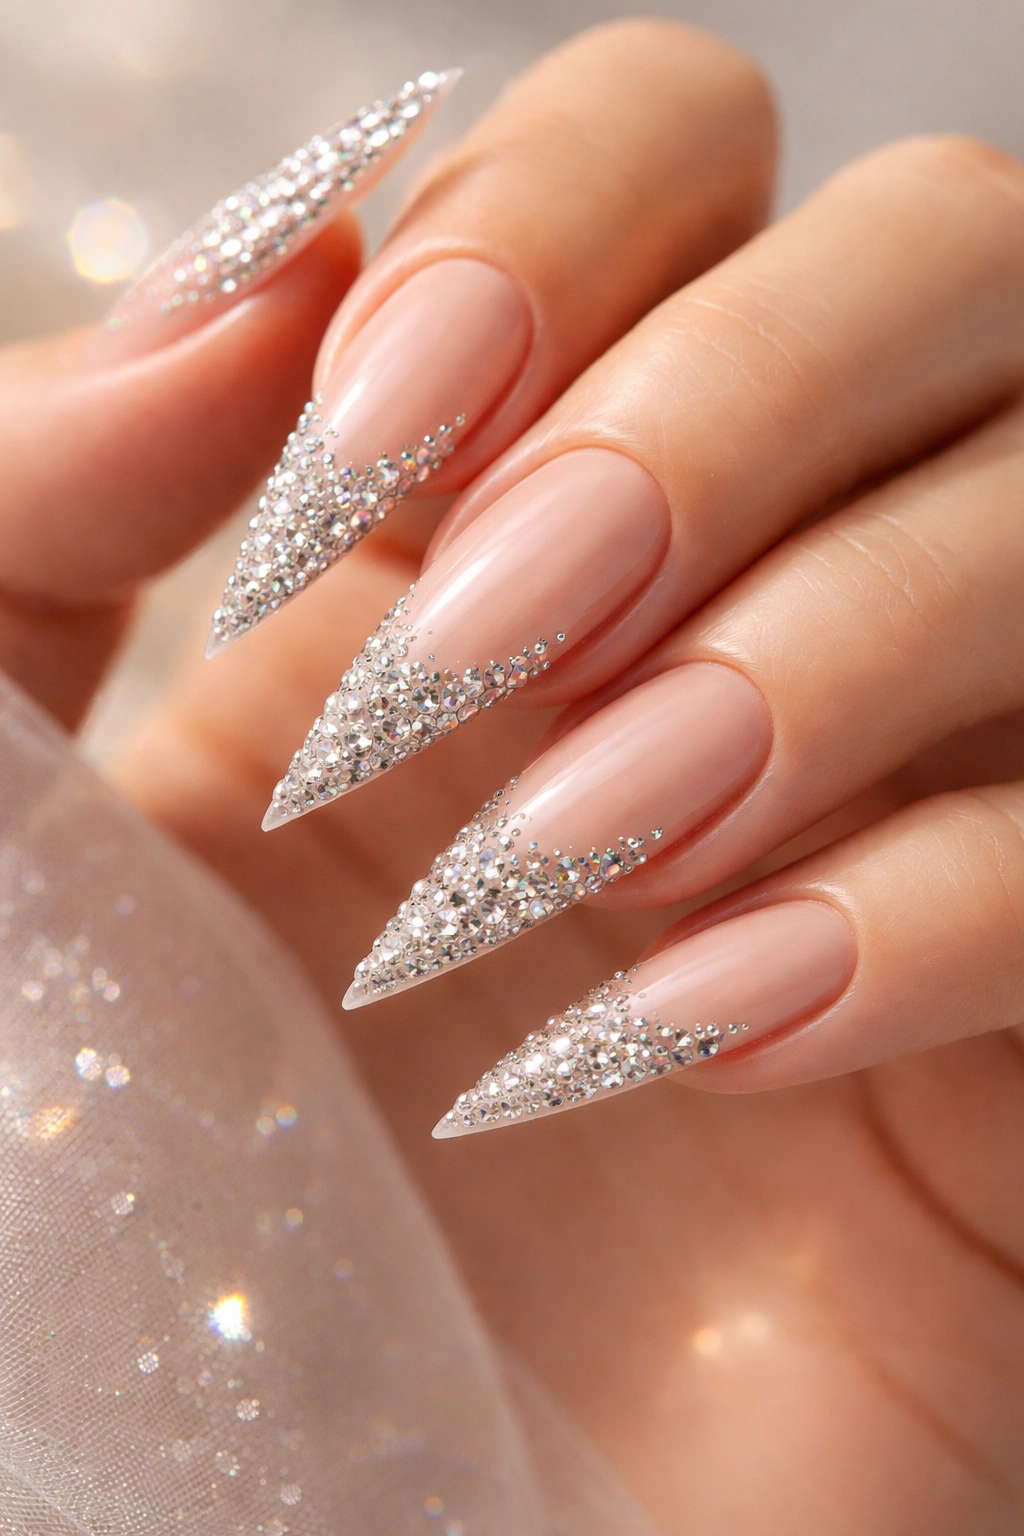
This is the most luxurious version of a French tip—instead of traditional polish in the tip area, you’re embellishing with rhinestones, crystals, or gemstones. The base remains a simple nude or white, but the tip is encrusted with carefully placed crystals that create a gradient effect (smaller at the base of the tip, larger toward the point) or a precise geometric pattern. The light-catching sparkle is absolutely mesmerizing, and the crystalline effect elevates the whole manicure into jewelry territory.
Why It Works
Jeweled nails are immediately aspirational and special-occasion appropriate. The way crystals catch and refract light creates an illusion of even more length and dimension than the stiletto shape alone provides. Jeweled tips read as intentional luxury rather than trying too hard—especially when the stones are quality (Swarovski or high-grade rhinestones rather than plastic) and the arrangement is thoughtful rather than random. This design makes your hands feel pampered and decorated, which is genuinely mood-boosting.
How to Achieve This Look
- Create a clean, smooth base using nude or white polish—this is your foundation, and any bumps will be visible beneath the stones
- Use a nail glue or thick topcoat that acts as an adhesive for the crystals
- Using a crystal picker tool or the sticky end of a toothpick, place individual crystals in your chosen pattern—start with larger stones at the point and graduate to smaller stones toward the base, or create a symmetrical geometric arrangement
- Allow the adhesive to cure fully before touching your nails
- Once all stones are set, seal the entire nail (including around the stones) with a thick topcoat, being careful not to dislodge stones while applying
- The topcoat creates a protective seal and prevents the stones from shifting
Worth knowing: Swarovski crystals are worth the investment because they maintain their sparkle for the entire wear time, while lower-grade rhinestones can become cloudy and lose their shine.
9. Minimalist French Tips with Negative Space
This design proves that French tips don’t always need to be fully opaque—negative space (leaving actual nail bed visible) creates an incredibly modern, gallery-like effect. The white or color French tip line is thin and crisp, but portions of the tip might be left bare, or the line itself might be interrupted by small gaps showing the nail bed underneath. The result feels artistic and intentionally sparse. The stiletto shape makes negative space especially striking because the pointed geometry plays beautifully with open areas.
Why It Works
Minimalist designs feel sophisticated and current. The negative space creates visual intrigue—a viewer’s eye has to work slightly to complete the image, which makes the design more memorable. This approach is also more comfortable to wear daily because there’s less bulk on your nail tip. The restraint of this design (using so little color or embellishment) paradoxically makes it feel more expensive and considered, like you’re confident enough not to need maximum decoration.
How to Achieve This Look
- Start with a clean, buffed nail and a clear or very pale topcoat as your base
- Use a thin brush and white or neutral polish to create a French tip line that’s either slightly thinner than traditional, or interrupted by small gaps
- Alternative approach: create two short white lines at the edges of the tip with bare nail in the center, creating a “negative space French tip”
- Some versions involve a very thin metallic line (gold or rose gold) instead of white, which adds dimension without adding visual weight
- Keep everything crisp and intentional—this design doesn’t tolerate sloppy application
- Finish with a clear, glossy topcoat that emphasizes the natural nail bed visible in the negative space areas
Pro tip: This design looks freshest when your nails are absolutely clean and healthy-looking—any discoloration or spots on the nail bed will be visible, so prep matters.
10. Holographic French Tip Design
Holographic finishes are arguably the most futuristic and eye-catching nail aesthetic—and when applied specifically to the French tip area, they create an almost otherworldly effect. The tip doesn’t look like a solid color; instead, it shifts between rainbow hues as you move your hand, catching blues, purples, pinks, and greens. The base remains a neutral nude or white, while the holographic tip is pure dynamism. In certain light, the effect is almost iridescent—your nails look like they’re made of liquid mirror.
Why It Works
Holographic finishes are conversation starters. The way the color shifts in real-time makes the design endlessly interesting both to the wearer and anyone looking at your nails. On a stiletto point, the holographic effect is magnified because there’s more surface area for the finish to be seen from different angles. This design bridges the gap between edgy and elegant—it’s definitely bold, but the quality finish keeps it from feeling costume-y. It’s perfect for creative professionals, performers, or anyone who loves unique style.
How to Achieve This Look
- Create a smooth nude or white base using regular or gel polish—this is your foundation
- Use a holographic gel polish or apply holographic powder using a special method (similar to chrome application)
- Holographic gel polishes typically don’t require powder—you simply apply the gel to the tip area, cure, and finish with topcoat
- If using holographic powder, apply a sticky base gel, press the powder onto the tip area, brush away excess, and seal with topcoat
- The holographic effect is best achieved with gel polish rather than regular polish because gel creates a smooth, even surface that refracts light optimally
- Ensure your application is streak-free and smooth for the best light-shifting effect
- Finish with a quality topcoat—some holographic systems come with specific sealants that maximize the color-shift effect
Worth knowing: Holographic finishes can fade slightly with heavy daily use, especially if exposed to frequent water or sunlight, so plan for touch-ups every 2-3 weeks.
11. Reverse French Tips with Bold Colors
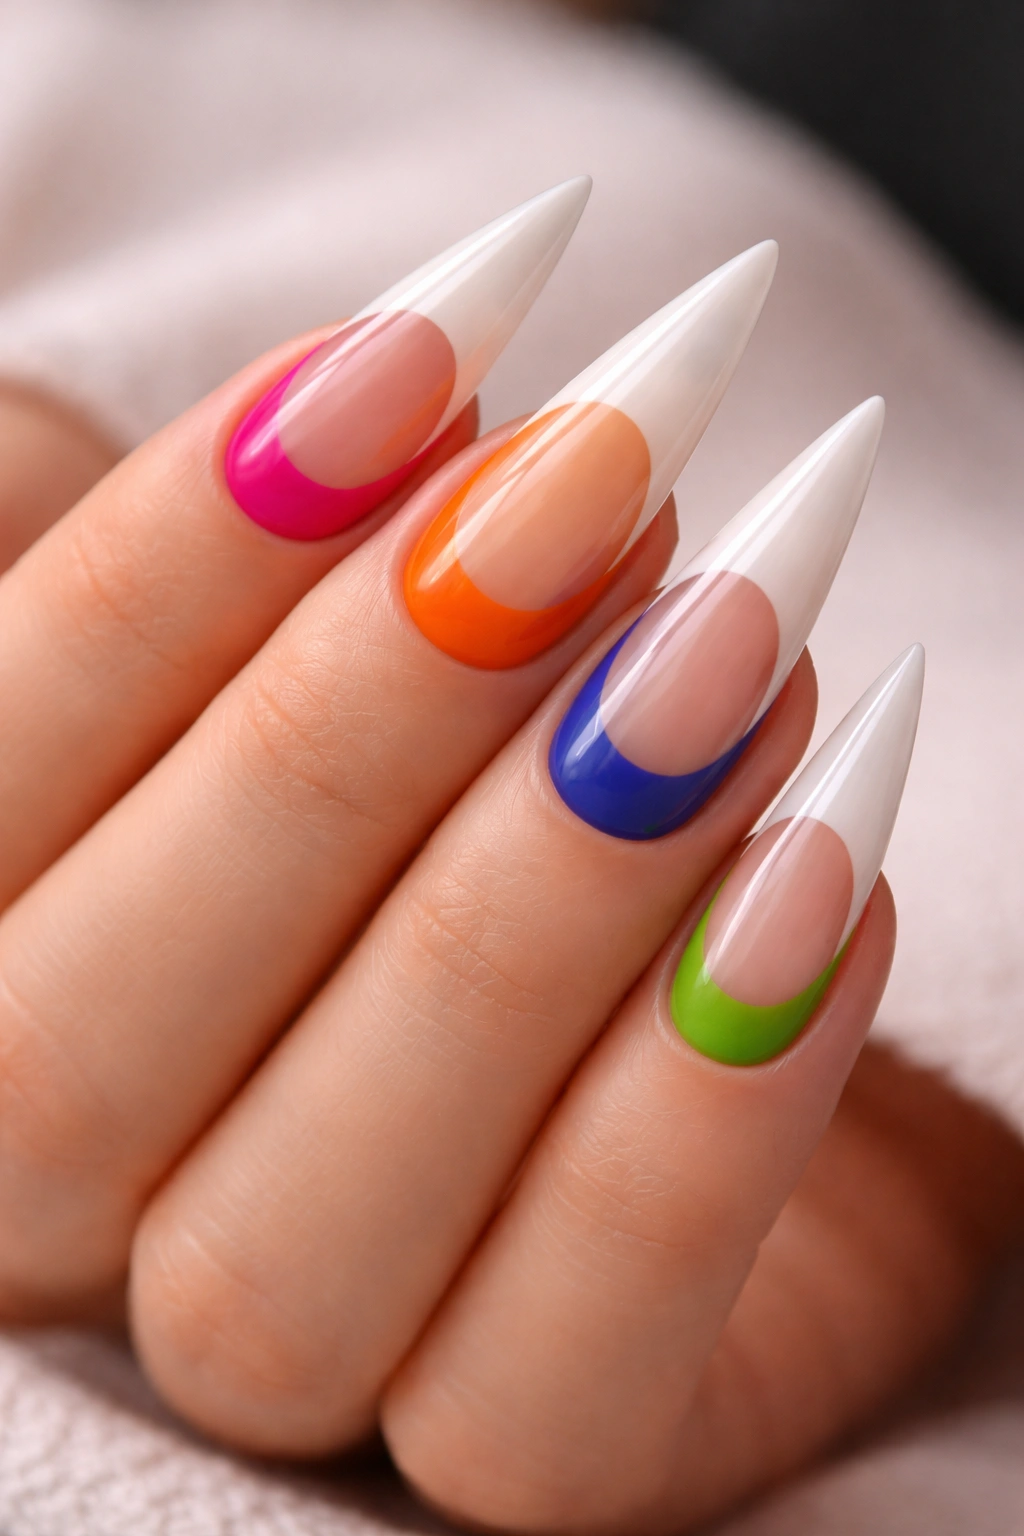
This design inverts the traditional French tip formula—instead of white on top, you paint the nail bed near the base in a bold color (emerald, burgundy, cobalt, mustard yellow) and leave the actual tip white or nude. Alternatively, the “reverse” describes positioning: the color is where the white would traditionally go, and the nail bed shows through in a traditional neutral. It’s a playful, modern twist on a classic, and the bold color in an unexpected place makes the entire manicure feel fashion-forward and intentional. On stilettos, the reverse French tip is especially striking because the color concentrates at the wide base of the nail and tapers down toward the pale point.
Why It Works
Reverse French tips are instantly recognizable as a design choice rather than a happy accident—it signals that you understand nail design and you’re confident enough to play with tradition. The bold color draws attention to the nail bed area, which can be very flattering if you have naturally nice-looking nail beds. The contrast between the bold color and the pale tip creates drama and visual interest without the design feeling overdone. This is a brilliant option if you love color but aren’t sure about wearing it on your entire nail.
How to Achieve This Look
- Start with a clean, buffed base and apply a clear topcoat or very pale nude base
- Using a thin brush, paint your bold color across the nail bed area (the part closest to the cuticle), stopping about two-thirds of the way down the nail
- Keep the color line relatively clean, though it doesn’t need to be perfectly surgical
- The remaining third toward the tip stays white, nude, or pale, creating the reverse French effect
- A thin metallic line (gold, silver, rose gold) along the color line can add extra definition and sophistication
- Finish with a glossy topcoat that emphasizes both the bold color and the pale tip
Pro tip: Jewel tones (emerald, sapphire, amethyst) and rich neutrals (burgundy, mustard, chocolate) tend to be more flattering on most skin tones than bright, saturated primaries.
12. Seasonal Themed French Stilettos
This design adapts the French tip aesthetic to reflect the current season or a specific occasion—think cherry blossom pink tips with delicate floral accents for spring, sunset orange and gold-gradient tips for fall, icy silver and blue ombre for winter, or bright coral tips with tropical fruit illustrations for summer. The French tip structure remains, but the color palette and any accompanying art shifts seasonally. This keeps your manicure feeling fresh and relevant throughout the year, and it’s an excellent way to express seasonal style preferences without completely abandoning the classic French tip aesthetic you love.
Why It Works
Seasonal nails feel intentional and show that you’re paying attention to the world around you. The French tip framework keeps these designs from becoming too costume-y even when they’re thematically specific. A cherry blossom French tip reads as chic and artful, not childish. Seasonal designs are also excellent conversation starters because they’re instantly timely and relatable. This approach works beautifully for people who like to change their nail aesthetic regularly but want some consistency in the underlying design structure.
How to Achieve This Look
- Spring version: Soft pink or pale green base with white-to-blush ombre tips; optional tiny floral illustrations or metallic details
- Summer version: Bright coral or peach base with white or pale yellow tips; optional tiny fruit or shell illustrations
- Fall version: Warm rust, burnt orange, or deep gold base with an ombre gradient toward the tip; optional leaf illustrations or metallic accents
- Winter version: Icy blue, silver, or pale gray base with gradient tips; optional snowflake details or holographic accents
- Each seasonal version follows the same application steps as a traditional French tip, but with seasonal color choices and optional thematic art
- The key to making seasonal nails look elevated rather than costume-y is keeping the color palette sophisticated and the art minimal (small details rather than full nail illustrations)
Worth knowing: Creating a seasonal manicure chart for yourself (spring colors, summer colors, etc.) makes it easier to maintain consistency while still rotating your design regularly.
Final Thoughts
French tip stiletto nails represent that perfect intersection of classic elegance and contemporary edge—they’re sophisticated enough for any setting but interesting enough that you’re clearly putting intentional effort into your appearance. Whether you choose the timeless purity of a classic white tip, the glamorous drama of jeweled nails, or something completely experimental like holographic or geometric designs, you’re working within a framework that’s inherently flattering and universally recognizable.
The beauty of these 12 designs is that they’re not rigid formulas—they’re starting points for your own creativity. You can mix elements (jeweled tips with ombré bases, geometric designs with chrome finishes), adjust colors to match your skin tone and personal style, and adapt them for different occasions and seasons. What matters is that the crisp French tip line and the pointed stiletto shape remain your foundation, creating instant visual impact and elegance.
If you’re getting these nails professionally done, bring reference photos of whichever design speaks to you and discuss any customizations with your technician. If you’re creating them at home, invest in quality gel polish or regular polish (good formula matters), practice your technique on a few nails before committing to all ten, and don’t skip the detail work—clean lines and precise application are what elevate a manicure from good to genuinely stunning. Your nails are visible constantly, so they deserve the same attention and care you’d give to any other aspect of your appearance.
