

Stiletto nails have been the go-to choice for anyone looking to make a bold statement with their manicure. Their sharp, elongated silhouette doesn’t just look striking—it demands confidence from the person wearing them. But here’s where color becomes your secret weapon: while the shape itself turns heads, the right color combination transforms a simple stiletto nail from pretty to absolutely unforgettable.
The magic happens when you move beyond basic reds and nudes. Colorful stiletto nails let you express personality, match your mood, adapt to different occasions, and play with trends without committing to a permanent change. Whether you’re drawn to jewel tones that catch the light, pastels that whisper elegance, neons that scream fun, or metallics that catch every eye in the room, there’s a color combination waiting for you.
What makes this so appealing is the versatility. You can go monochromatic for a sleek, modern look, mix complementary colors for visual drama, or layer patterns and designs across your elongated canvas. Stiletto nails give you extra surface area to work with, which means intricate designs, ombré effects, and detailed nail art actually become achievable and look professional rather than cramped.
Let’s explore twenty stunning colorful stiletto nail ideas that range from timeless elegance to trend-forward creativity—each one offering a different vibe and level of sophistication.
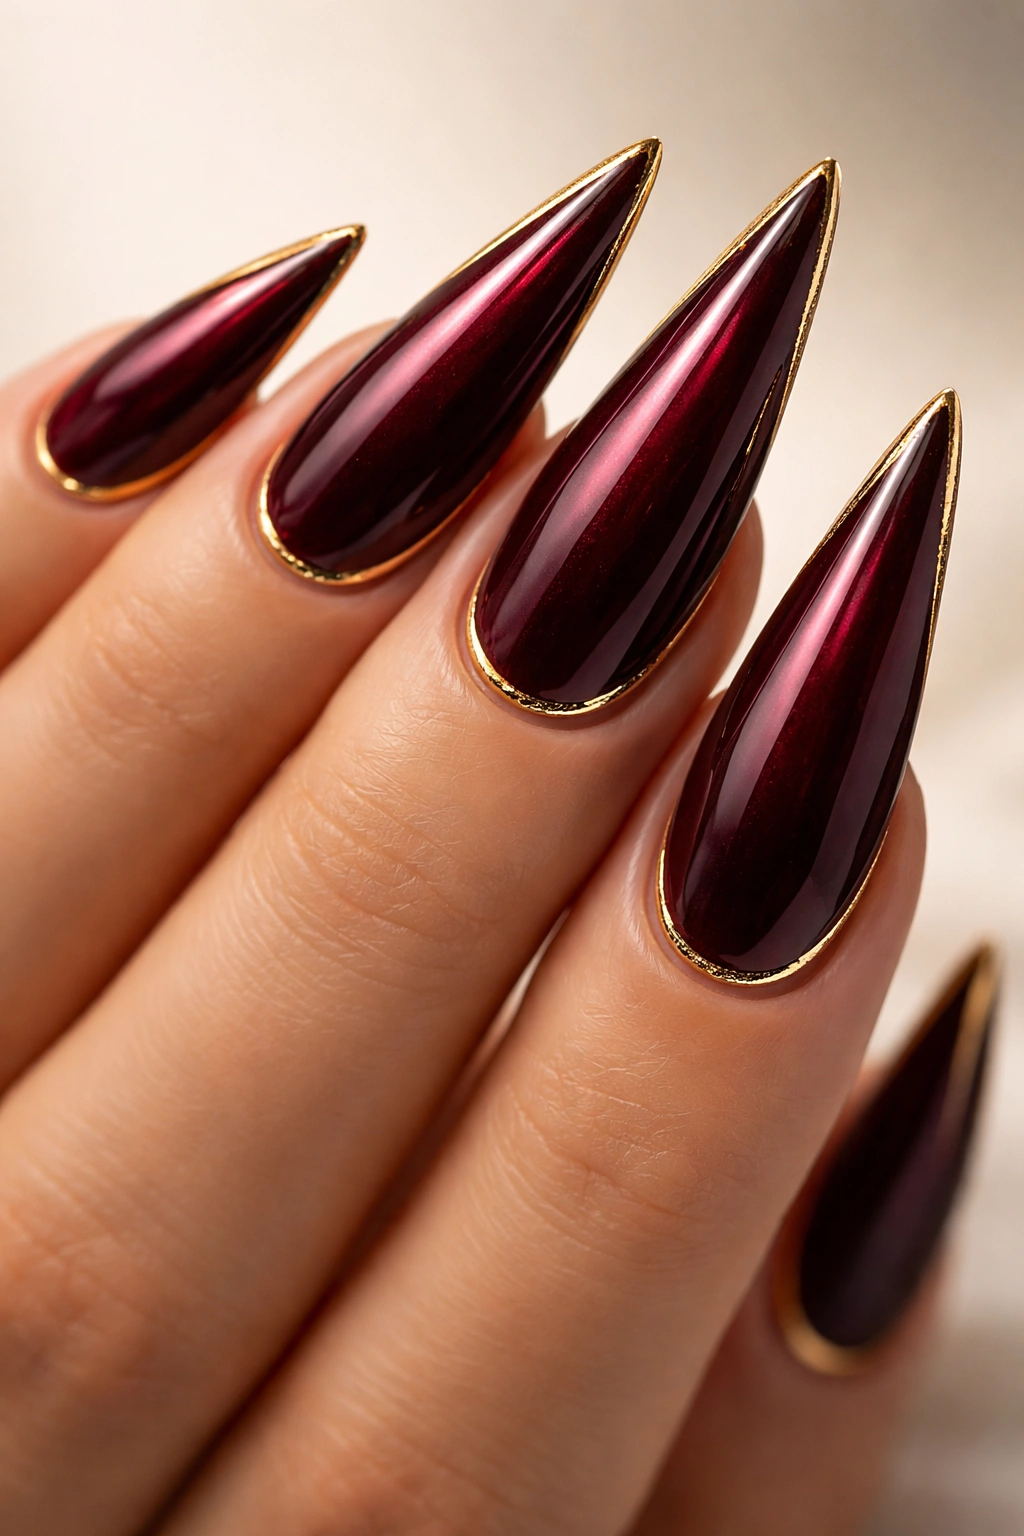
1. Deep Burgundy with Gold Accents
Deep burgundy stiletto nails bring an air of sophistication that feels both modern and timeless at once. This rich, wine-toned shade sits perfectly between red and brown, making it flattering against virtually every skin tone while maintaining that powerful, confident energy that stilettos naturally command.
Why This Combination Works So Well
The pairing of burgundy with gold creates an inherent luxury feel without trying too hard. The warmth of the gold catches on the depth of the burgundy, creating visual interest and dimension that makes the nails look more expensive and intentional than a solid color alone. This combination draws inspiration from classic elegance while still feeling contemporary and wearable for everyday situations. The contrast between the matte or satin burgundy base and the reflective gold details creates a professional yet glamorous aesthetic that translates beautifully across different settings—from office environments to evening events.
How to Execute This Look
- Apply two coats of burgundy gel or polish as your base, allowing each layer to dry completely before applying the next
- Use thin gold striping tape or a fine detail brush to create accent lines down the center of each nail, or draw a gold metallic stripe along the very tip
- Consider adding delicate gold geometric shapes, thin horizontal lines near the cuticle, or a champagne foil accent on one accent nail for added dimension
- Seal everything with a glossy top coat to enhance the gold’s reflection and protect your design
- Pro tip: If you’re not confident with freehand detail work, use pre-made nail stickers featuring gold patterns designed for stiletto shapes—they save time and guarantee precise lines.
2. Soft Pink Ombré to White
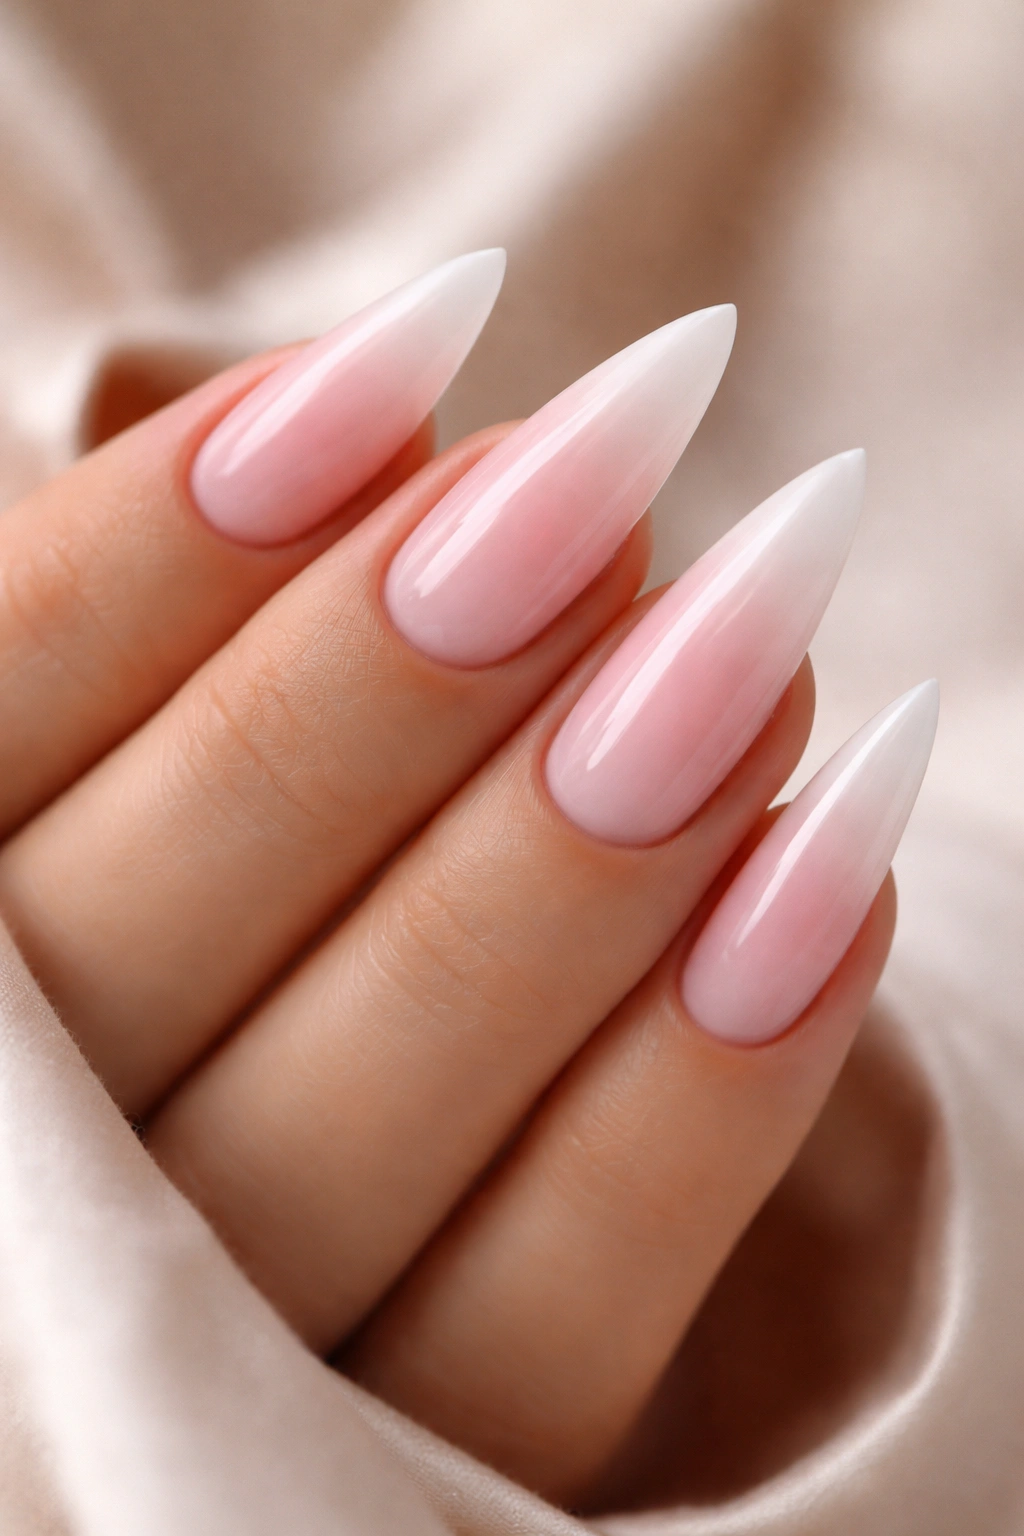
A soft pink-to-white ombré on stiletto nails creates a romantic, ballet-inspired aesthetic that’s both feminine and sophisticated. This gradient effect draws the eye from the deeper pink at the base to a pristine white tip, mimicking a classic ballet pointe shoe aesthetic while feeling entirely modern and elegant.
The Psychology Behind This Gradient
The ombré effect works because it creates visual elongation—the eye travels naturally across the gradient, making the nail appear even longer and more refined. Soft pink is universally flattering and conveys elegance without aggression, while the white tip provides a clean, crisp finish point that looks polished and professional. This combination bridges the gap between everyday wearability and special occasion glamour, making it one of the most versatile stiletto nail looks available. The soft color palette means it works year-round and complements both warm and cool undertones beautifully.
Application Steps for Perfect Ombré
- Start with a clear base coat to protect your natural nails
- Apply a soft pink shade to your entire nail as the foundation color
- Using a makeup sponge or ombré brush, dab white polish onto the tip area (roughly the outer third of the nail)
- Gently blend the transition zone by dabbing back and forth with a clean section of your sponge, creating a soft gradient rather than a harsh line
- Build opacity gradually with multiple light layers rather than one heavy application
- Seal with a glossy top coat to add dimension and protect the design
3. Emerald Green with Silver Sparkle
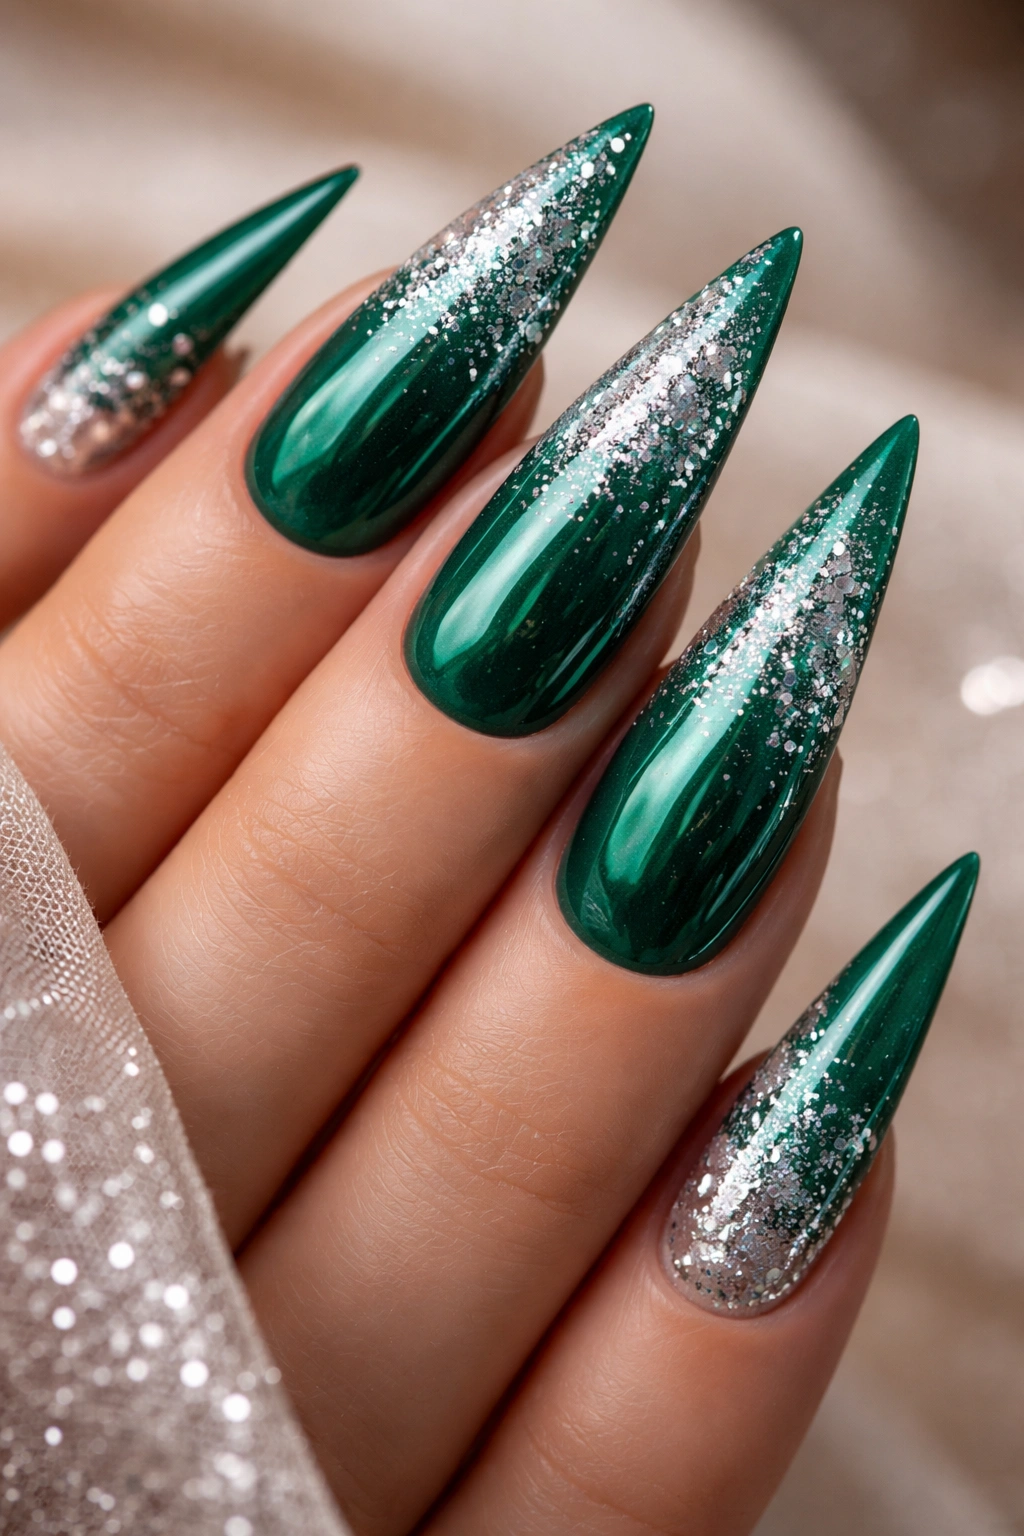
Emerald green stiletto nails deliver instant luxury and drama, evoking precious gemstones and high-end sophistication. When paired with silver sparkle or glitter accents, the look becomes absolutely captivating—rich, jewel-toned, and undeniably glamorous.
Why Emerald Commands Attention
Emerald sits at the intersection of blue and green, creating a shade that appears different under varying lighting conditions. It’s deep enough to feel grown-up and luxurious, yet bright enough to feel fresh and modern. The richness of this color makes it feel expensive and intentional, positioning it as the nail equivalent of a statement piece in your wardrobe. Silver complements emerald beautifully because the cool undertones of silver echo the blue tones within the emerald, creating harmony rather than contrast. This pairing has been associated with luxury for decades, from emerald jewelry worn by royalty to high-end fashion moments.
Creating This Emerald Sparkle Design
- Paint your stiletto nails with two coats of a true emerald green shade (avoid yellow-based greens that can look murky)
- Mix silver glitter or confetti with a clear top coat formula, or use a pre-made silver sparkle gel
- Apply the glitter mixture to the tips or create a gradient where the sparkle concentrates toward the edges
- Alternatively, create a glitter ombre by applying more sparkle to the tip and gradually fading it back toward the base
- Use a matte top coat over just the green portion if you want the sparkle to stand out more prominently
- Worth knowing: Emerald can stain lighter skin tones if left on too long, so consider using a base coat and rotating this design rather than wearing it continuously.
4. Coral with Mint Green Tips
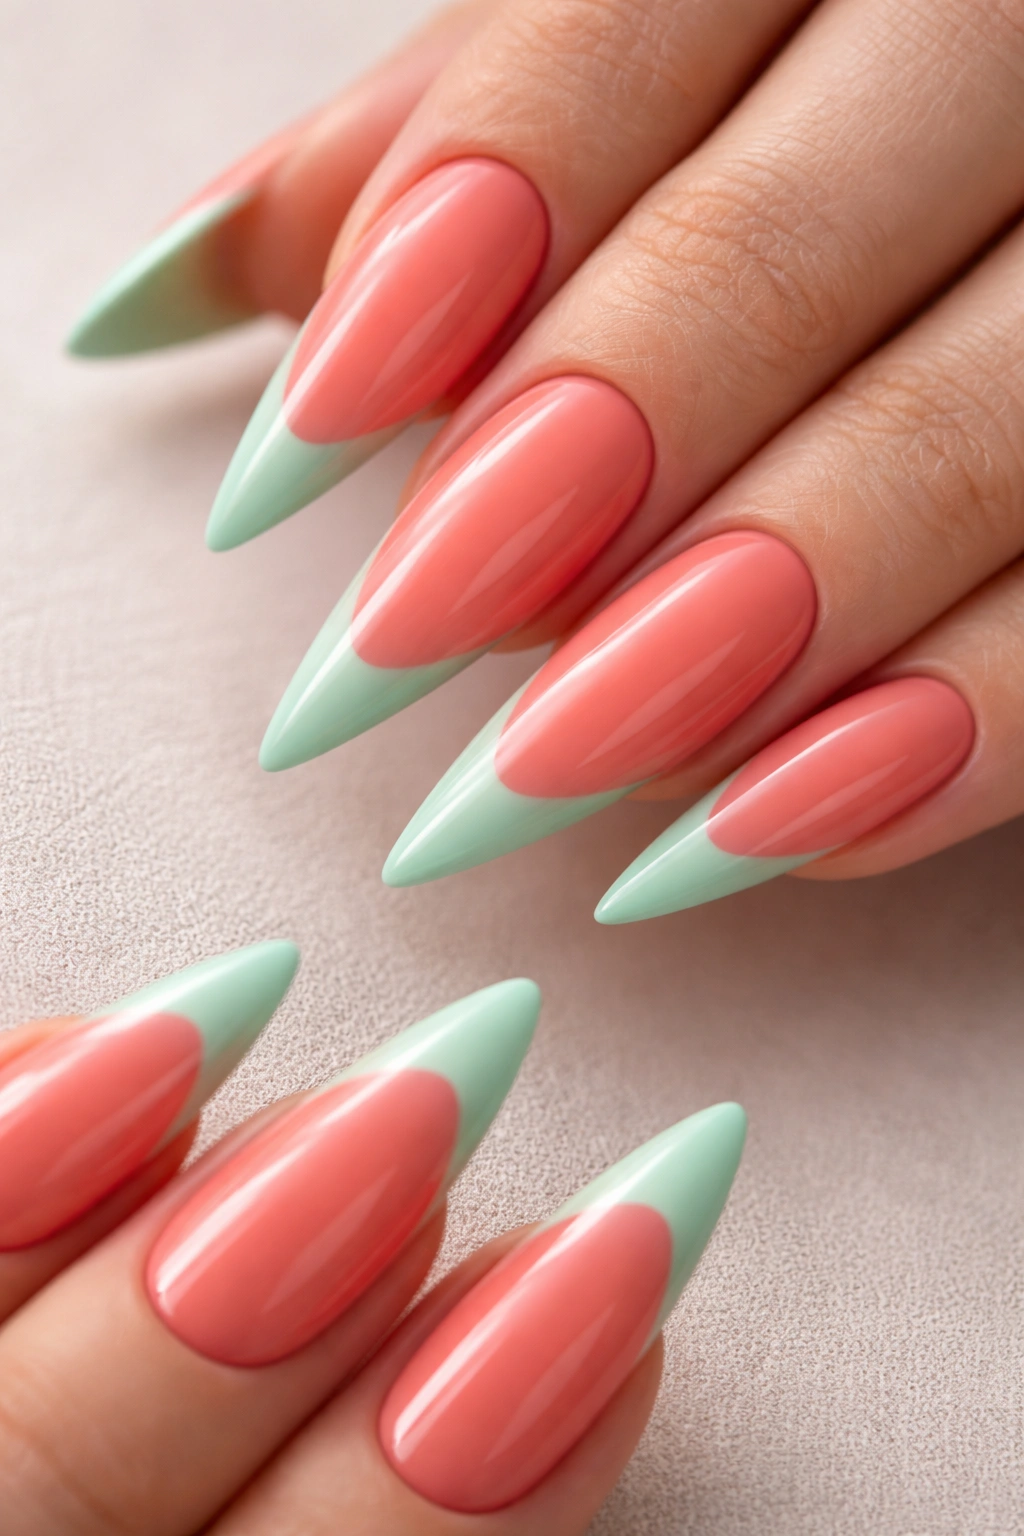
Coral and mint green create an unexpectedly stunning color combination that feels fresh, playful, and undeniably modern. This pairing works because the warm coral balances the cool mint, creating visual harmony while still delivering maximum color impact on your elongated stiletto canvas.
The Color Theory Behind This Pairing
Coral sits in the warm family (red plus orange plus pink), while mint green lives in the cool family (blue plus green plus white). When placed together, these opposing temperatures create visual excitement without clashing—instead, they complement each other through contrast. This is why this combination appears in contemporary fashion and interior design so frequently. The playfulness of the pairing makes it perfect for spring and summer wear, creative professionals, or anyone who wants their nails to reflect an optimistic, fun-loving personality. The combination feels youthful without reading as juvenile, sophisticated without being stuffy.
How to Achieve This Two-Tone Look
- Paint your entire nail with coral as the base color, using two coats for full opacity
- Once the coral is completely dry, paint just the tip of each nail with a mint green shade, starting roughly where the smile line would naturally sit
- Create either a sharp geometric line or a softer, curved transition depending on your preferred aesthetic
- Use a fine brush or striping tool to keep the mint line crisp and precise
- If you prefer a softer transition, use a damp brush or sponge to slightly feather where the coral and mint meet
- Finish with a glossy top coat that unifies the two colors and adds shine
5. Black with Rainbow Gradient
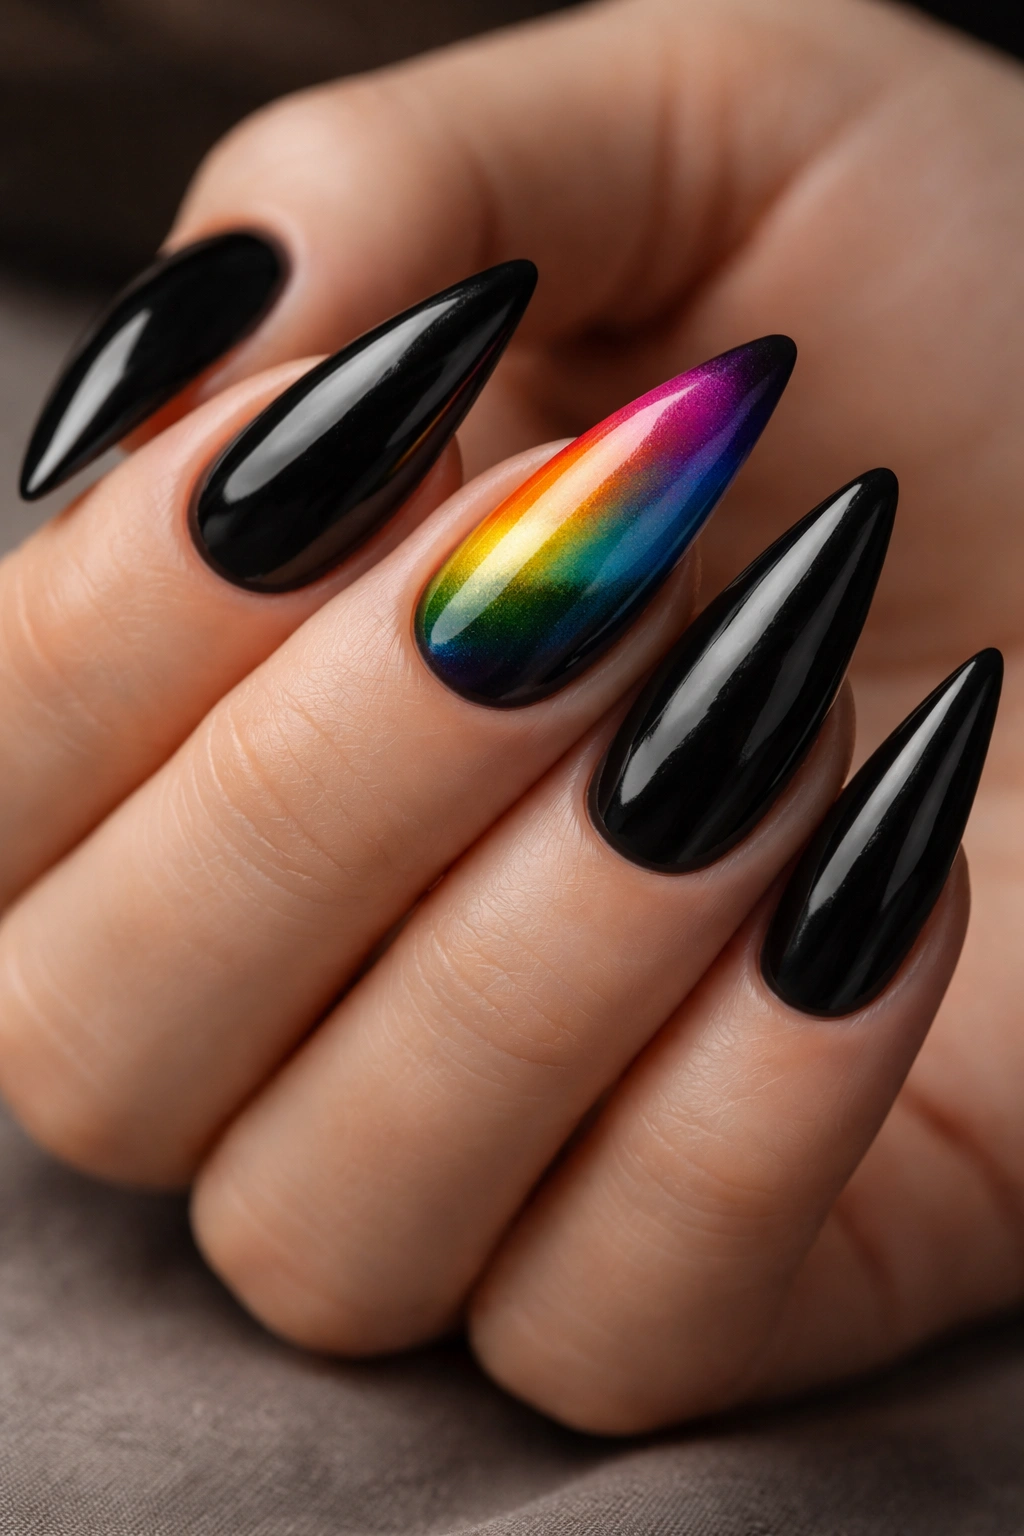
Black stiletto nails with a rainbow gradient accent create a modern, edgy aesthetic that balances darkness with vibrant color. This design is perfect for anyone who loves bold looks but wants the sophistication of black as their anchor color, with rainbow details adding personality and fun.
Why Black Serves as the Perfect Base
Black acts as a neutral canvas that makes every other color pop with more intensity. When you introduce rainbow colors against black, they appear more saturated and vivid than they would against a lighter background. Black also provides sophistication and edge, preventing the rainbow gradient from reading as childish or overly playful. This combination bridges the gap between artistic expression and professional maturity, making it wearable in more contexts than a full rainbow would be. The contrast between the matte darkness of black and the reflective, colorful gradient creates depth and dimension that makes the nails feel three-dimensional.
Execution for Maximum Color Impact
- Apply two coats of true black (not dark gray or navy) to all nails as your base
- On one or two accent nails, create a rainbow gradient using thin lines or a blended effect
- You can either paint thin vertical stripes of red, orange, yellow, green, blue, and purple, or use a sponge to create a blended gradient effect
- Alternatively, apply the rainbow gradient only to the tip of the black nail, creating a “sunset” effect over the black base
- Use holographic or iridescent colors rather than flat rainbow shades for added sophistication and dimension
- Seal with a clear or glossy top coat that enhances the contrast between black and color
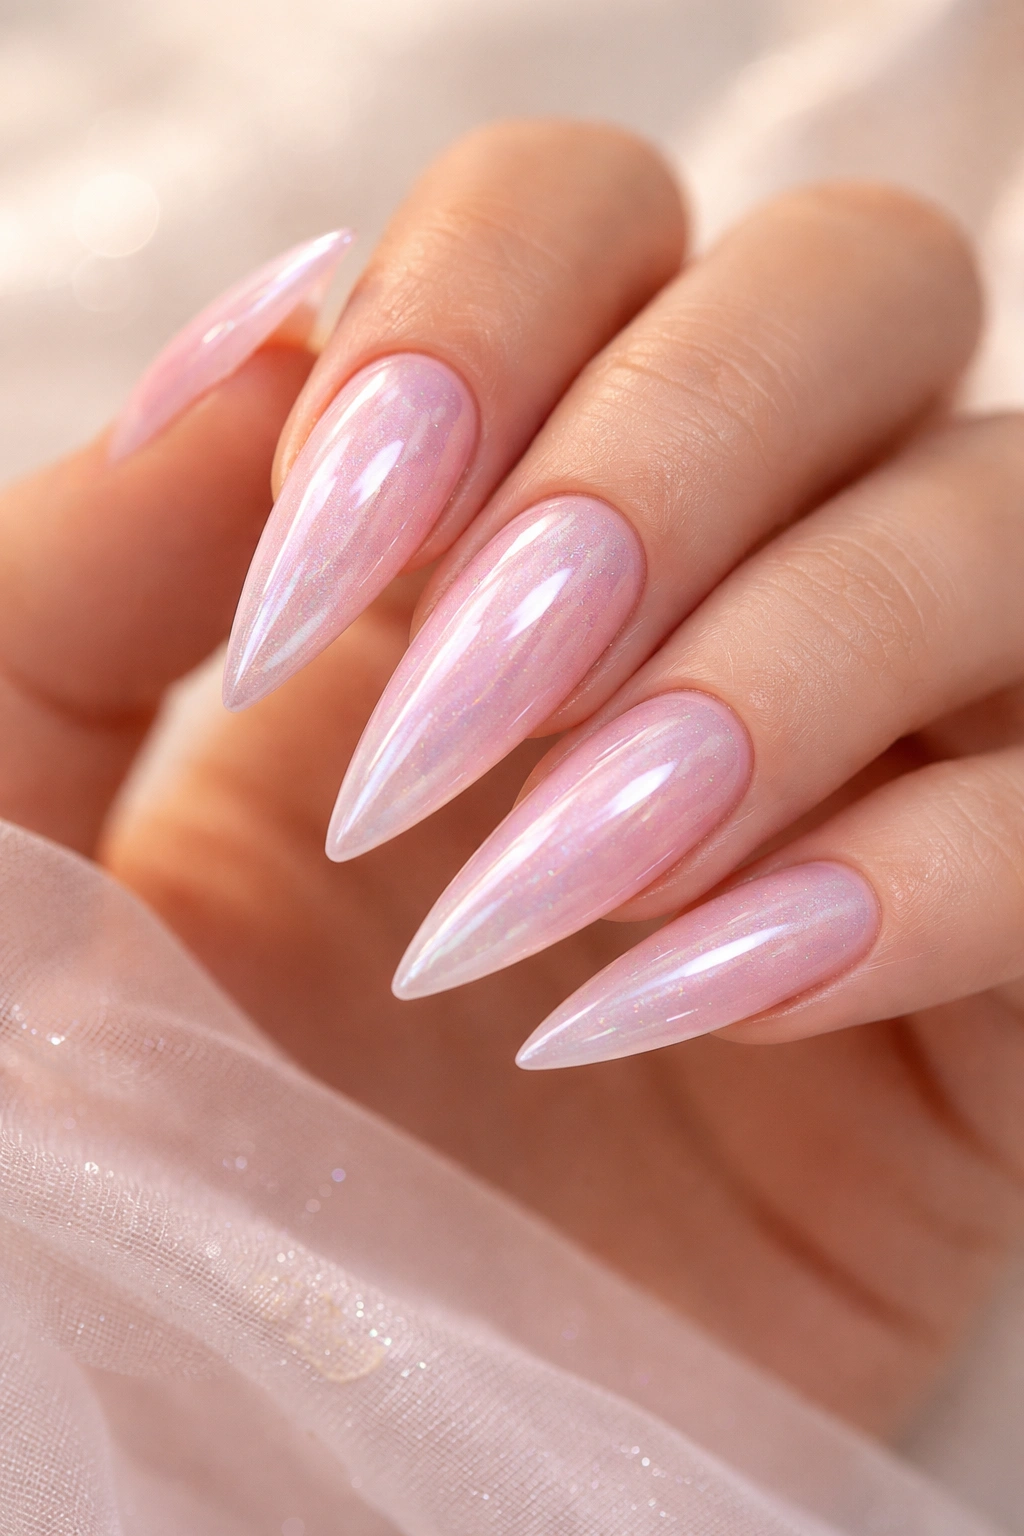
6. Nude with 3D Glitter Encapsulation
A nude base with encapsulated 3D glitter creates an elegant, subtle look that still commands attention through texture and dimension. Encapsulation means the glitter is sealed within the gel layers themselves, creating a design that catches light from every angle without the glitter feeling loose or overly embellished.
The Appeal of Encapsulated Designs
Encapsulation is a game-changer for long-wearing, sophisticated nail art. Rather than sitting on top of your nails where it can snag or flake, the glitter is protected within the polish itself, meaning your design stays pristine for weeks. Nude tones are universally flattering and appear sleek and professional, but nude alone can sometimes feel plain—adding the subtle sparkle through encapsulation adds just enough interest without screaming for attention. This design works beautifully for professional settings, formal events, or everyday wear where you want something special but not ostentatious. The 3D effect created by different sizes and shapes of glitter gives the nail visual depth and makes it appear more expensive than the materials actually cost.
Creating Your Encapsulated Glitter Nails
- Apply a thin base coat of gel
- Paint your nude shade over the base coat
- Before it cures, sprinkle fine glitter, holographic powder, or crushed mirror pieces onto the wet gel
- Apply a clear gel top coat carefully, sealing the glitter inside without disturbing its placement
- Cure under UV or LED light
- If desired, add one more thin layer of gel on top for a completely smooth, encapsulated finish
- Pro tip: Work on one nail at a time to ensure you can seal the glitter before the gel cures, preventing any shifting or movement.
7. Navy Blue with Rose Gold Accents
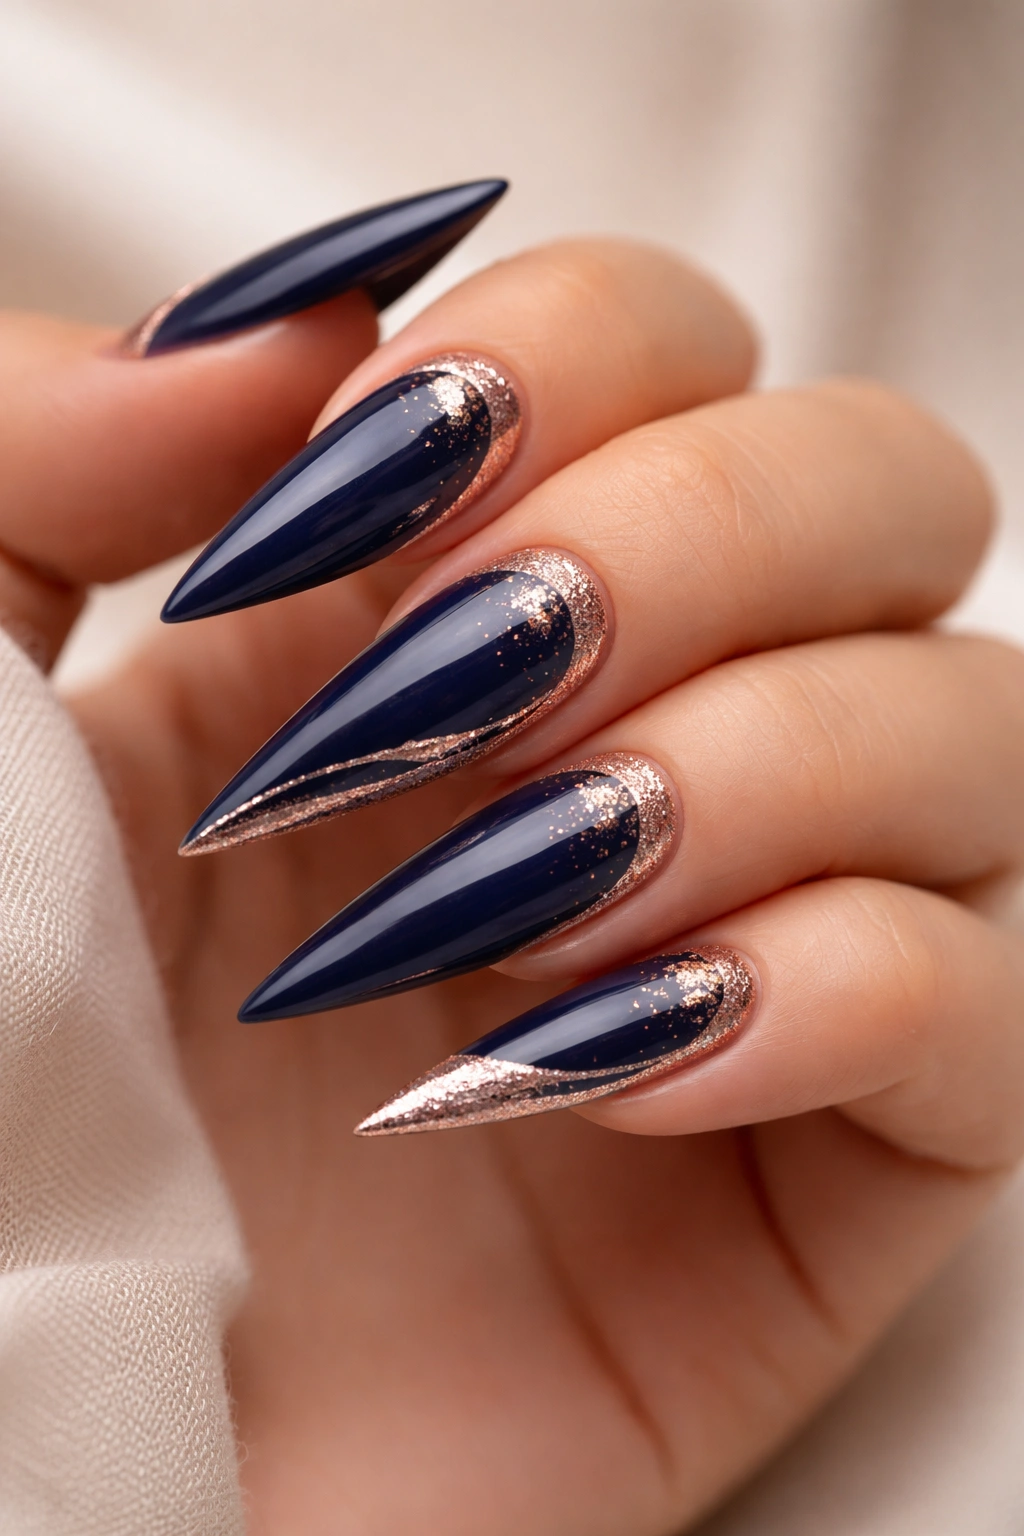
Navy blue stiletto nails paired with rose gold accents create an elegant, jewel-toned look that feels both classic and thoroughly contemporary. Navy reads as sophisticated and grounded, while rose gold adds warmth, femininity, and just enough sparkle to elevate the entire design.
The Timeless Appeal of This Combination
Navy has been considered a wardrobe staple for centuries because it’s versatile, flattering, and inherently refined. Rose gold, though more recently popularized in mainstream beauty and fashion, works because it bridges the gap between warm yellowy golds and cool silvers. This pairing has a vintage-modern quality—it feels inspired by classic elegance while appearing completely current. The color combination works beautifully on all skin tones, as navy creates contrast that makes hands appear more slender and delicate, while rose gold adds a warm glow that reflects beautifully off the skin. This is a safe choice for professional environments while still feeling special enough for evening wear.
Applying Navy with Rose Gold Details
- Paint your nails with two coats of a true navy blue shade, avoiding navy shades that lean too heavily purple or black
- Once dry, add rose gold accents using a thin brush, creating delicate stripes, geometric shapes, or a metallic tip
- Consider a rose gold ombre effect fading from the tip toward the center of the nail for subtle elegance
- You can also apply rose gold foil to select nails (typically the ring finger and thumb) for a coordinated but not overwhelming look
- Add rose gold speckles or stars scattered across the navy for a starry night aesthetic
- Finish with a glossy top coat that makes the rose gold shimmer more visible
8. Hot Pink with White Geometric Patterns
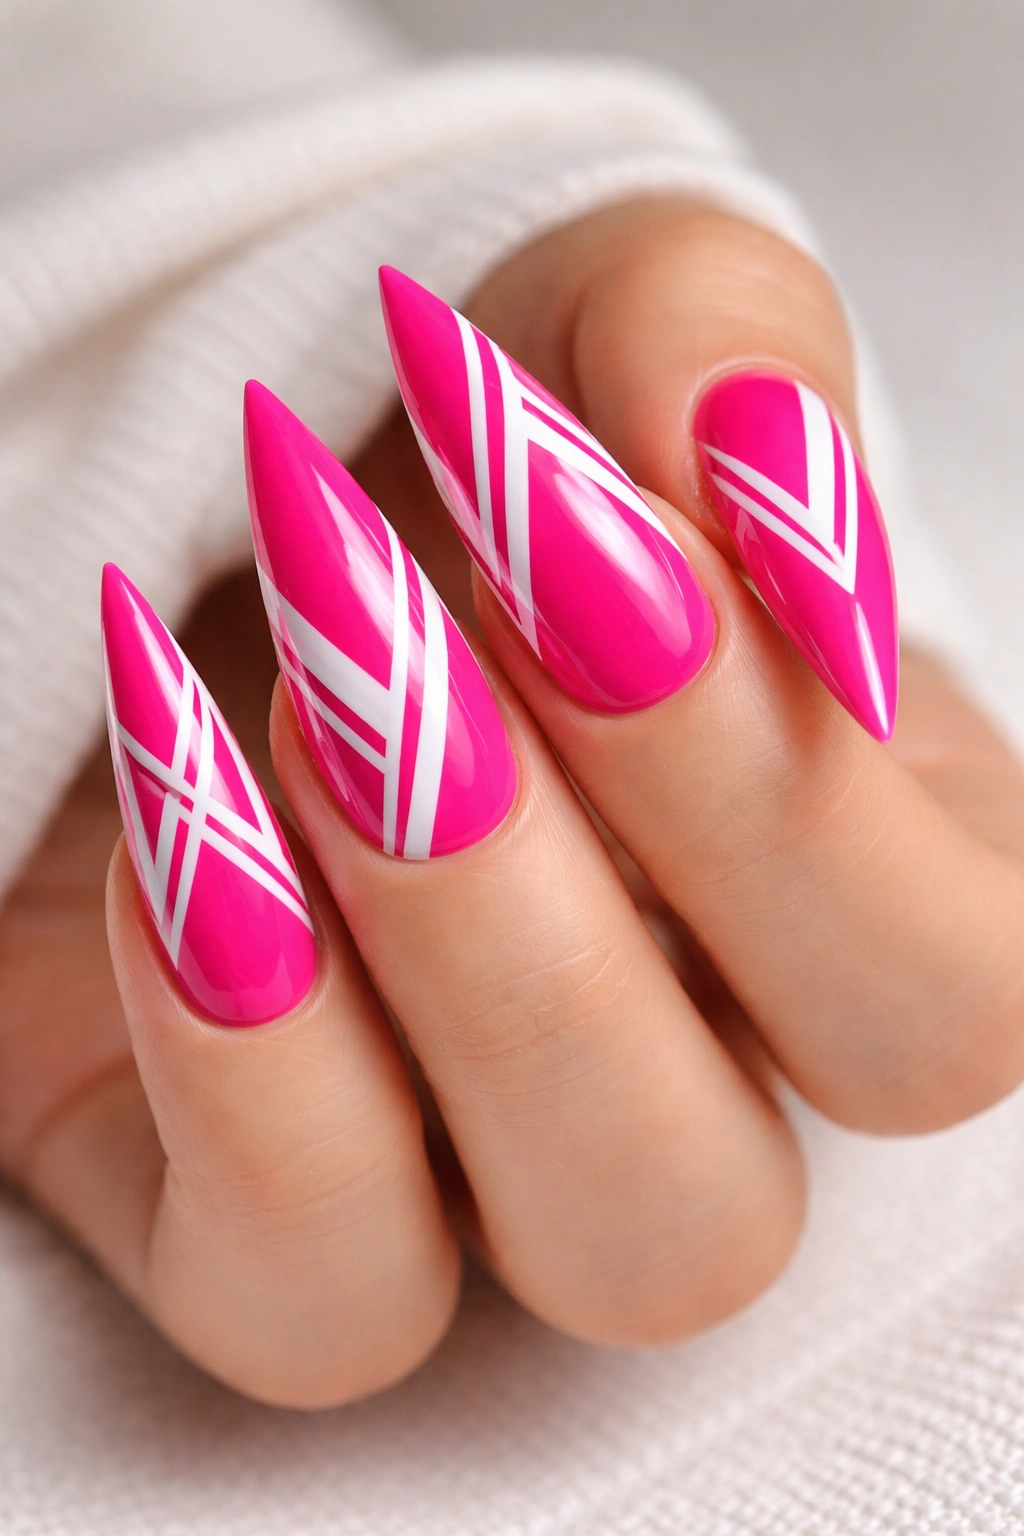
Hot pink stiletto nails with crisp white geometric patterns create a bold, graphic aesthetic that feels fashion-forward and playful without being childish. The high contrast between hot pink and white makes the design immediately striking, while geometric shapes keep it modern and intentional rather than decorative.
Why Bold Pink Pairs Perfectly with Clean Lines
Hot pink is a statement color that demands attention, so pairing it with structured, geometric patterns prevents the design from feeling chaotic—instead, the organization of the geometric shapes channels the boldness into sophistication. White provides maximum contrast against hot pink, making any patterns appear incredibly crisp and precise. Geometric designs on stiletto nails create visual interest through the interplay of lines and shapes, turning the elongated canvas into actual artwork. This look bridges edgy and elegant, making it perfect for creative professionals, fashion enthusiasts, or anyone confident enough to wear bold color.
Creating Crisp Geometric Designs on Hot Pink
- Paint your nails with hot pink as your base, using two coats for full color saturation
- Once completely dry, use white gel or polish with a thin detail brush or striping brush to create your geometric patterns
- Simple designs like vertical lines, triangles at the tip, or diagonal stripes work beautifully on stilettos without being overwhelming
- Use striping tape to create perfectly straight lines if freehand feels risky—apply the tape, paint white over it, then remove the tape while the polish is still slightly wet
- Create a geometric ombre by layering white designs more densely toward the tip and spacing them out toward the base
- Seal with a glossy top coat to make the white designs pop against the hot pink background
9. Lavender with Pearl Finish
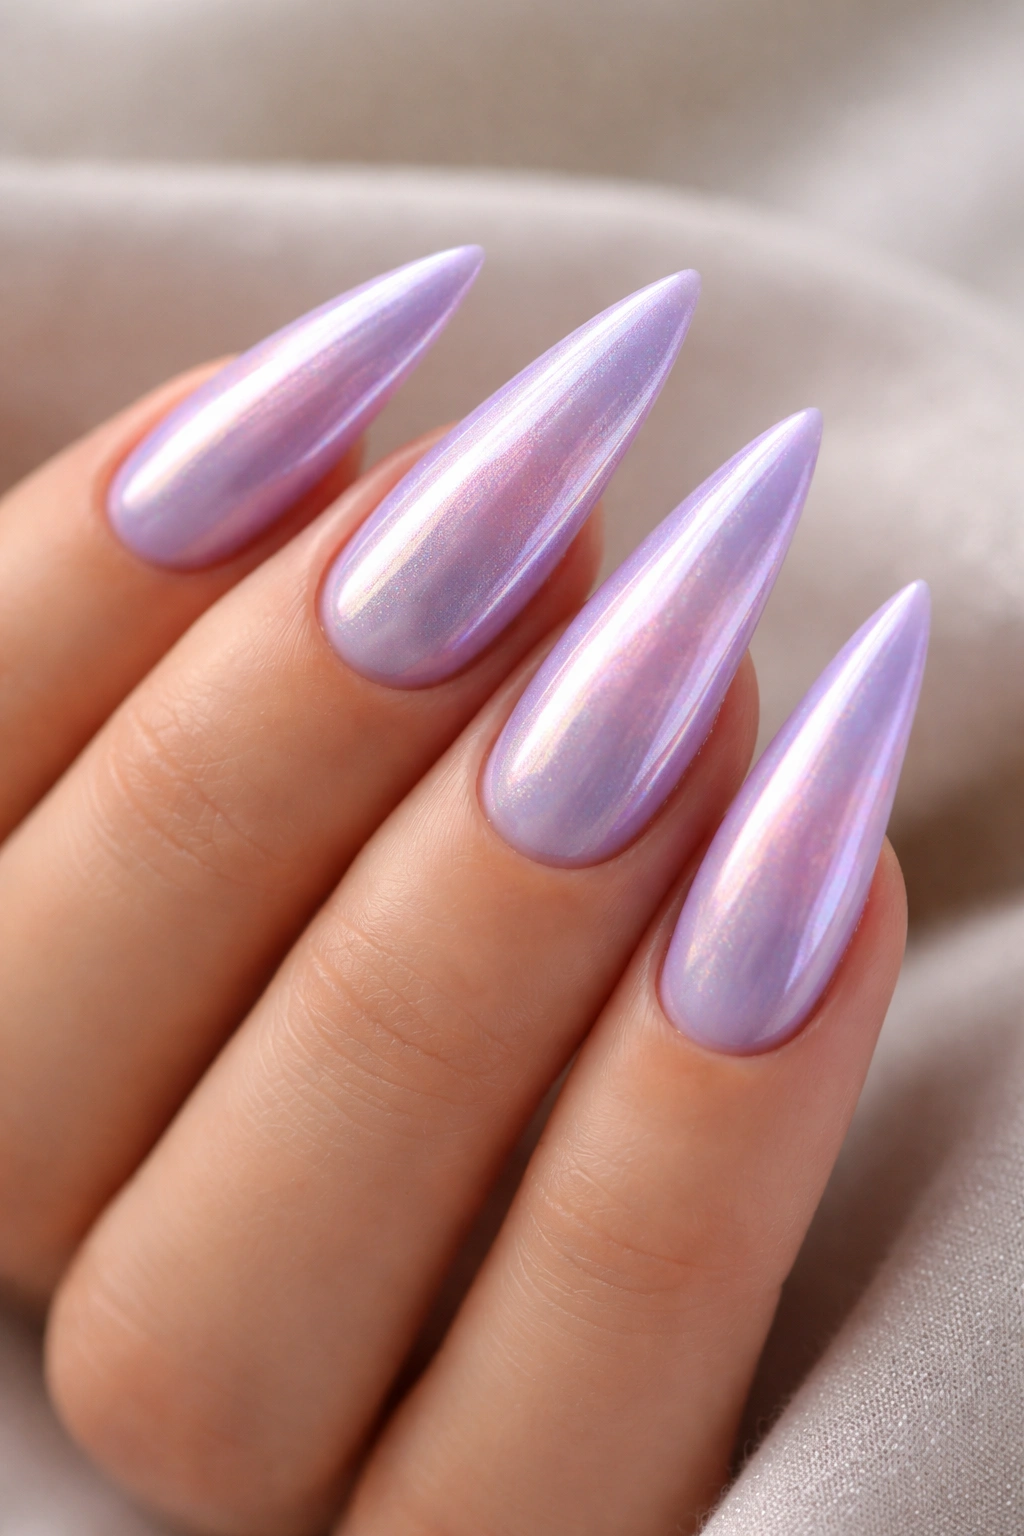
Lavender stiletto nails with a pearl finish create a dreamy, ethereal aesthetic that feels romantic and sophisticated all at once. The pearl finish adds a subtle iridescence that catches light beautifully, making the lavender appear different under various lighting conditions while maintaining its soft, calming presence.
The Magic of Pearl Finishes
Pearl finishes contain light-reflecting particles that create an opalescent, color-shifting effect—the shade appears subtly different when viewed from various angles or under different lighting. This quality elevates a simple color into something that feels more dimensional and expensive. Lavender is inherently calming and elegant, often associated with relaxation and refined taste, while the pearl finish adds movement and visual interest. Pearl finishes are particularly flattering on elongated nails because the light-catching quality emphasizes the length and creates the illusion of even more shimmer and dimension. This combination works beautifully year-round, though it feels especially appropriate in spring and winter when both lavender florals and pearl jewelry feel seasonally relevant.
Getting a Perfect Pearl Finish on Lavender
- Look for a lavender shade specifically formulated with pearl particles, or purchase a pearl top coat to layer over lavender polish
- Apply a clear base coat first to ensure the color applies smoothly and protects your nails
- Paint your lavender shade using two coats, allowing each to dry completely
- Apply a pearl top coat or a multi-chrome pearl finish over the dried lavender
- The pearl coating will interact with the lavender underneath, creating subtle color shifts
- Use a glossy top coat over everything to seal the pearl finish and enhance its light-catching properties
- Worth knowing: Pearl finishes can sometimes make lighter colors appear slightly dusty, so make sure your lavender shade is vibrant enough to shine through the pearl coating.
10. Burnt Orange with Teal Accents
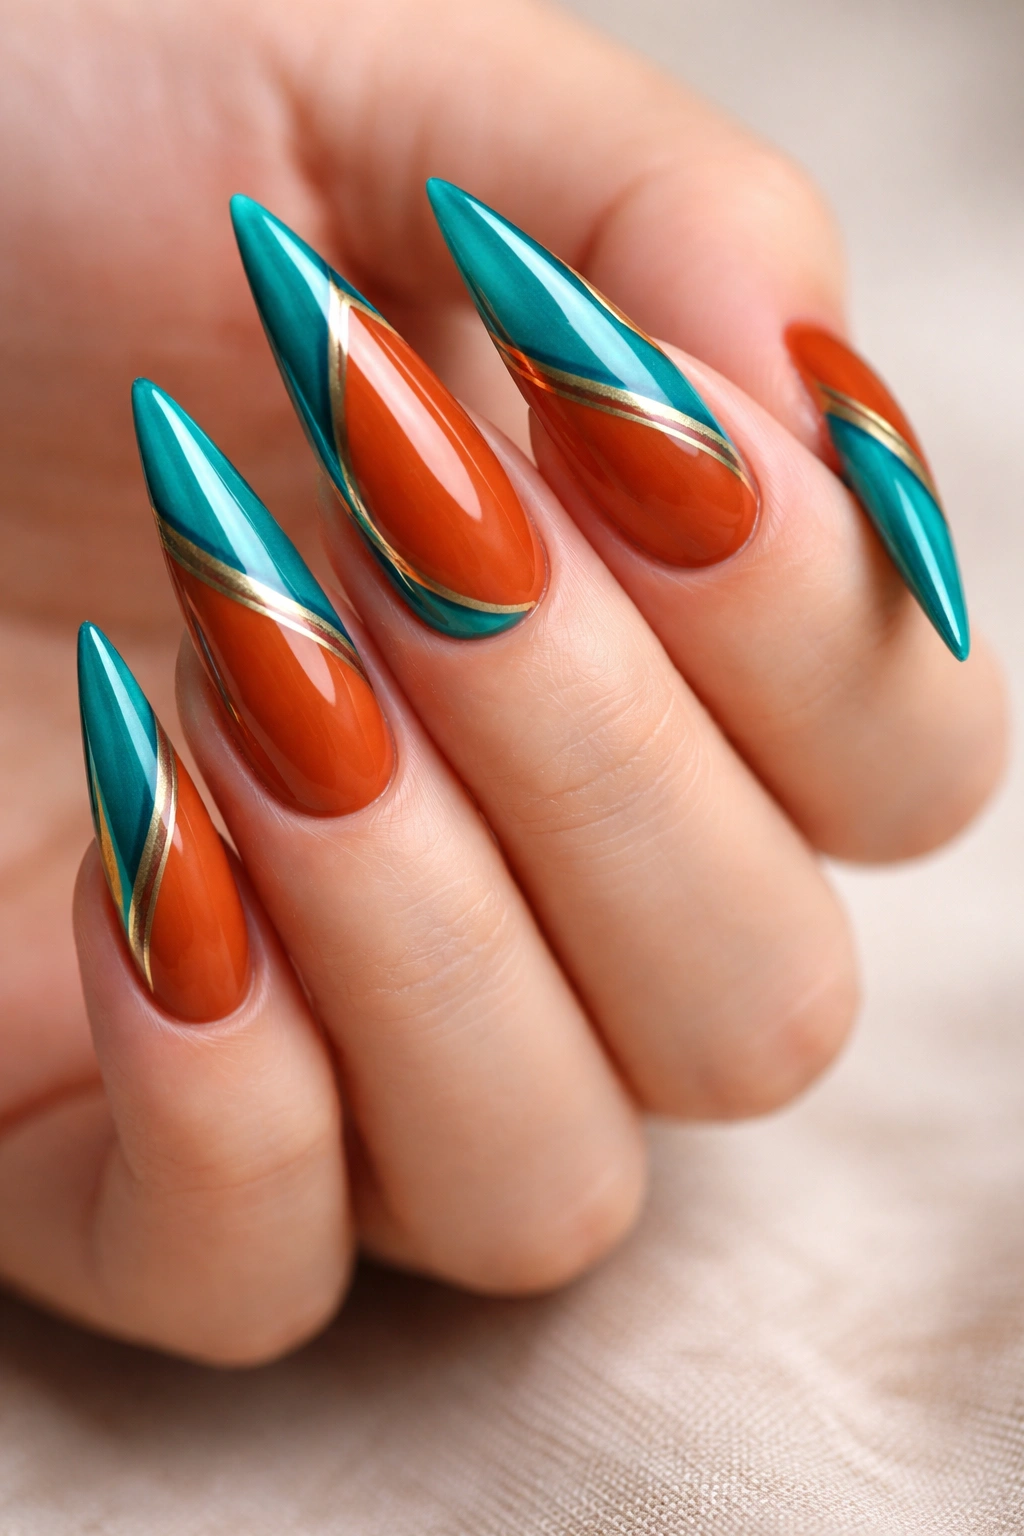
Burnt orange with teal accents creates an unexpectedly gorgeous color combination that bridges warm and cool tones beautifully. This pairing feels autumn-inspired yet modern, sophisticated yet bold, making it perfect for fashion-forward individuals who appreciate color theory and aren’t afraid to take risks with their nail designs.
Color Theory That Actually Works Here
Burnt orange and teal are nearly opposite on the color wheel, making them complementary colors that create natural harmony despite their apparent boldness. Rather than clashing, these colors actually enhance each other—the warmth of burnt orange makes the teal appear cooler and more vivid, while the teal’s coolness makes the orange appear warmer and more inviting. This combination has gained popularity in contemporary interior design and fashion because it feels both modern and timeless. The burnt orange (versus a true orange) adds sophistication and prevents the combination from feeling overly bright, while teal provides an unexpected cool-toned accent that elevates the entire aesthetic beyond basic color blocking.
Designing Your Burnt Orange and Teal Nails
- Paint your stiletto nails with burnt orange as the base color, using two coats for opacity
- Create teal accents on one or two accent nails—try a teal ombre effect fading from the tip, or a teal stripe down the center of the nail
- Alternatively, create a “sunset” effect by blending the burnt orange base into a teal tip
- Use a makeup sponge to create a soft, diffused blend where the colors meet
- For a more graphic approach, use striping tape to create clean geometric divisions between the burnt orange and teal sections
- Add metallic gold or copper details to tie the two colors together and add dimensional depth
- Finish with a glossy or satin top coat depending on the finish you prefer
11. Soft Yellow with Purple Ombre
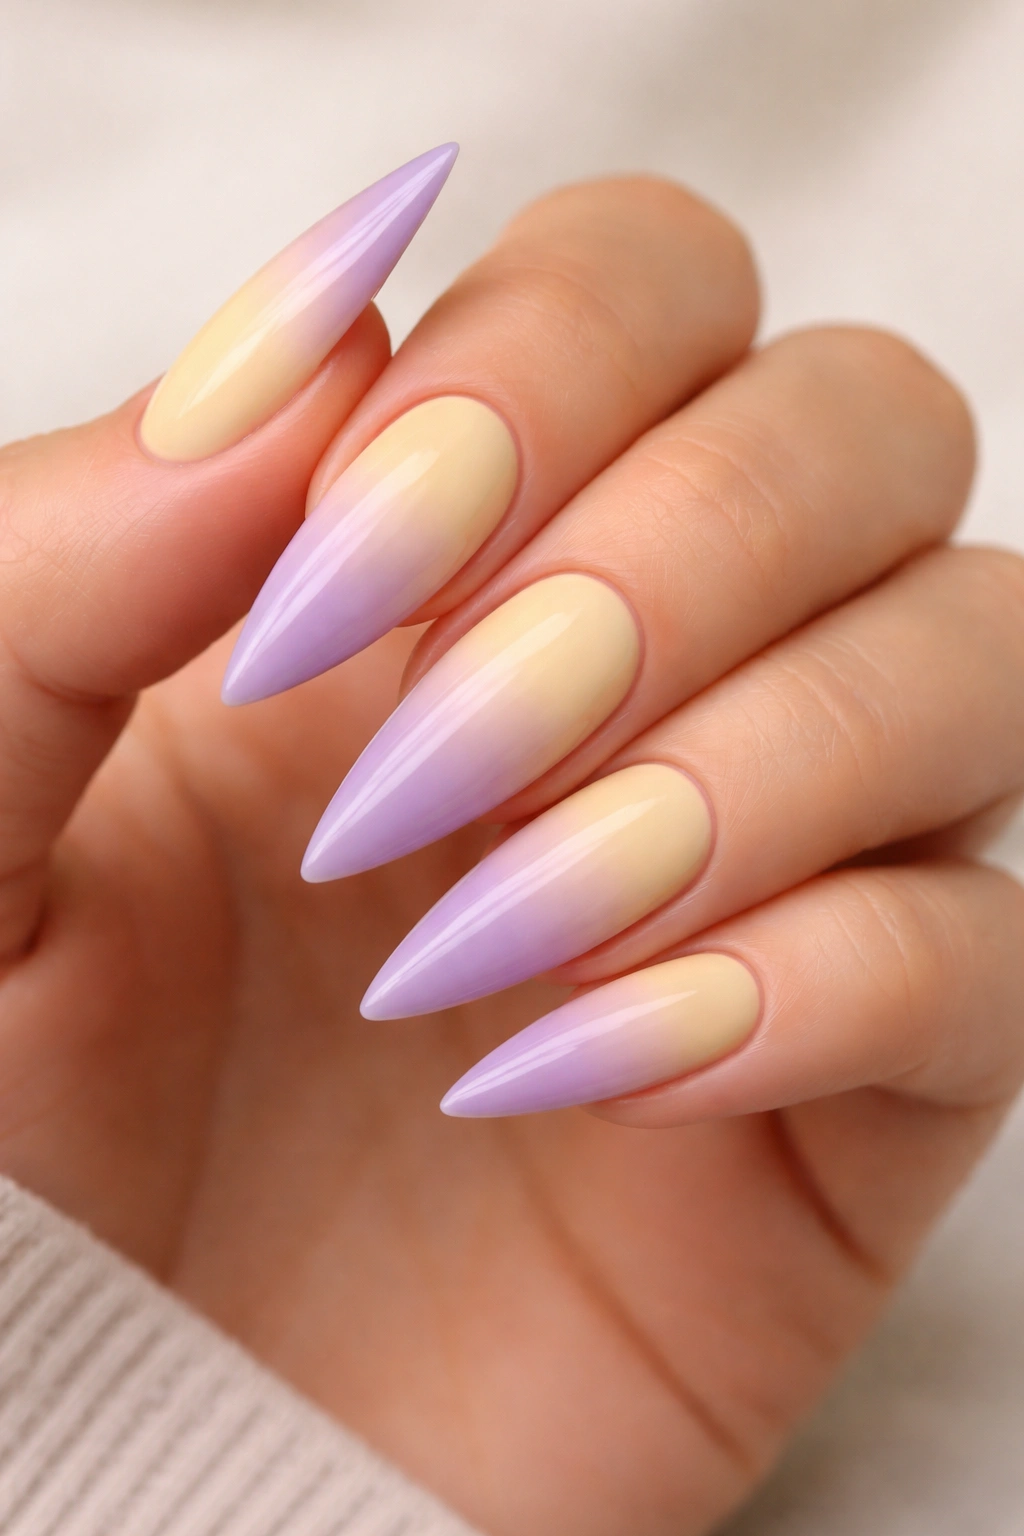
Soft yellow with purple ombre creates a cheerful yet sophisticated color journey on your stiletto nails. This gradient moves from the warmth and optimism of yellow toward the depth and mystery of purple, creating a design that feels both playful and refined.
Why This Gradient Works Emotionally and Aesthetically
Yellow is associated with happiness, energy, and optimism, making it perfect for anyone wanting their nails to reflect positivity. Purple brings creativity, luxury, and calm—creating a balance against yellow’s exuberance. The gradient effect creates visual interest and movement across the nail’s length, which is especially striking on stiletto shapes. The transition from warm yellow to cool purple is inherently beautiful and appears naturally in sunsets and flowers, so it feels organic rather than forced. This combination works year-round and complements all skin tones, though it’s especially stunning on deeper skin tones where the contrast between yellow and purple becomes more visually dramatic.
Creating a Flawless Yellow-to-Purple Ombre
- Paint soft yellow as your base color across all nails, using two coats
- Mix purple polish with a clear gel or polish to create a lighter purple shade
- Using a makeup sponge, dab the lighter purple onto the upper third of each nail
- Working in the overlap area, blend back and forth with a clean section of your sponge, creating a soft transition zone
- Gradually build opacity with multiple light layers rather than one heavy application
- Add a darker purple shade to the very tip if you want more depth and definition
- Cure if using gel, then seal with a glossy top coat
- Pro tip: Practice your blending technique on a paper swatch first—the more gently you blend, the more seamless your ombre will appear.
12. Forest Green with Gold Leaf Details
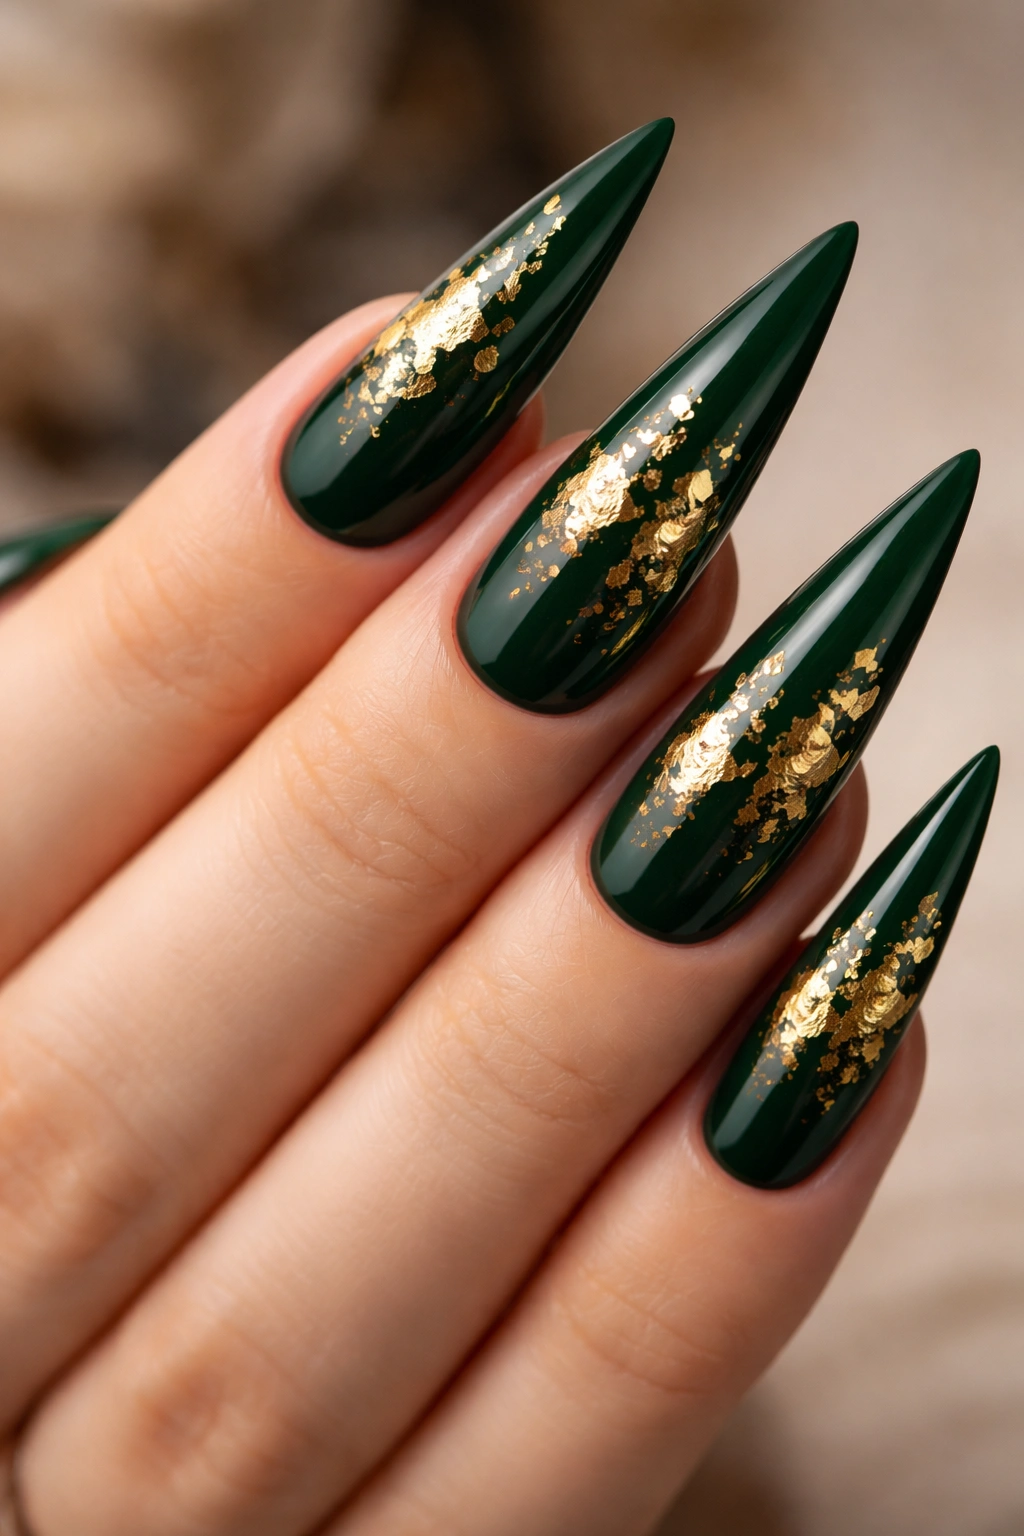
Forest green stiletto nails with delicate gold leaf details create an earthy, luxurious aesthetic that feels grounded yet glamorous. The deep green base provides a rich backdrop for gold accents, creating a design that reads as sophisticated rather than flashy despite its obvious sparkle.
The Luxury of Layered Textures
Gold leaf, when applied intentionally to nails, creates actual dimension and texture that catches light differently depending on the viewing angle. Forest green is a natural, calming color that feels contemporary while also having historical significance in luxury design. This combination draws from nature—think forest floors with golden sunlight filtering through trees, or the richness of botanical designs. The use of gold leaf (rather than gold glitter or foil) adds an element of artisanal craftsmanship that elevates the entire design. This look works beautifully for both professional and creative environments, for everyday wear and special occasions.
Applying Gold Leaf Over Forest Green
- Paint your nails with forest green as the base, using two coats for full color coverage
- Once completely dry, apply a thin layer of clear gel or a special adhesive designed for gold leaf (standard polish isn’t tacky enough to hold leaf effectively)
- Using a fine brush or specialized leaf application tool, place delicate pieces of gold leaf onto your nails
- You can create a concentrated accent on one nail, scattered pieces across all nails, or a more geometric pattern
- Gently press the gold leaf into place using a soft brush or cotton swab
- Apply a clear gel top coat carefully to seal the gold leaf in place without disturbing it
- Cure under UV or LED light
- Add a thin layer of clear gel if needed to ensure the gold leaf is completely encapsulated and won’t flake
13. Baby Pink with Pearlescent Accents
Baby pink stiletto nails with pearlescent accents create a soft, romantic, utterly feminine aesthetic that feels timeless and elegant. The pale pink base provides a delicate foundation, while pearlescent details add subtle glamour and dimension without overwhelming the soft color palette.
The Psychology of Baby Pink
Baby pink is universally associated with femininity, softness, and Romance—it’s a color that flatters virtually every skin tone and age. Pearlescent finishes on nails create movement and light-catching qualities that make hands appear more elegant and refined. This combination is perfect for anyone who wants their nails to enhance their natural beauty rather than make a loud statement. Baby pink reads as wearable for professional settings while still feeling special enough for special occasions. The softness of the color makes it appropriately balanced for everyday wear, yet the pearlescent accents prevent it from feeling boring or plain.
Creating Subtle Pearlescent Details on Baby Pink
- Paint your nails with a true baby pink shade (not too warm, not too cool), using two coats for even coverage
- Using a thin brush or dotting tool, create delicate dots of pearlescent polish or gel across your nails
- Alternatively, dab pearlescent powder or shimmer onto a wet top coat layer to create scattered light-catching accents
- Create a pearlescent ombre by concentrating the shimmer toward the tips and fading it back toward the base
- Use a pearlescent top coat over just the tips or center of each nail for a subtle, integrated look
- Consider adding delicate thin lines of pearlescent detail using a striping brush for a more graphic approach
- Seal everything with a glossy top coat that enhances the shimmer without adding too much thickness
14. Deep Plum with Silver Sparkle Gradient
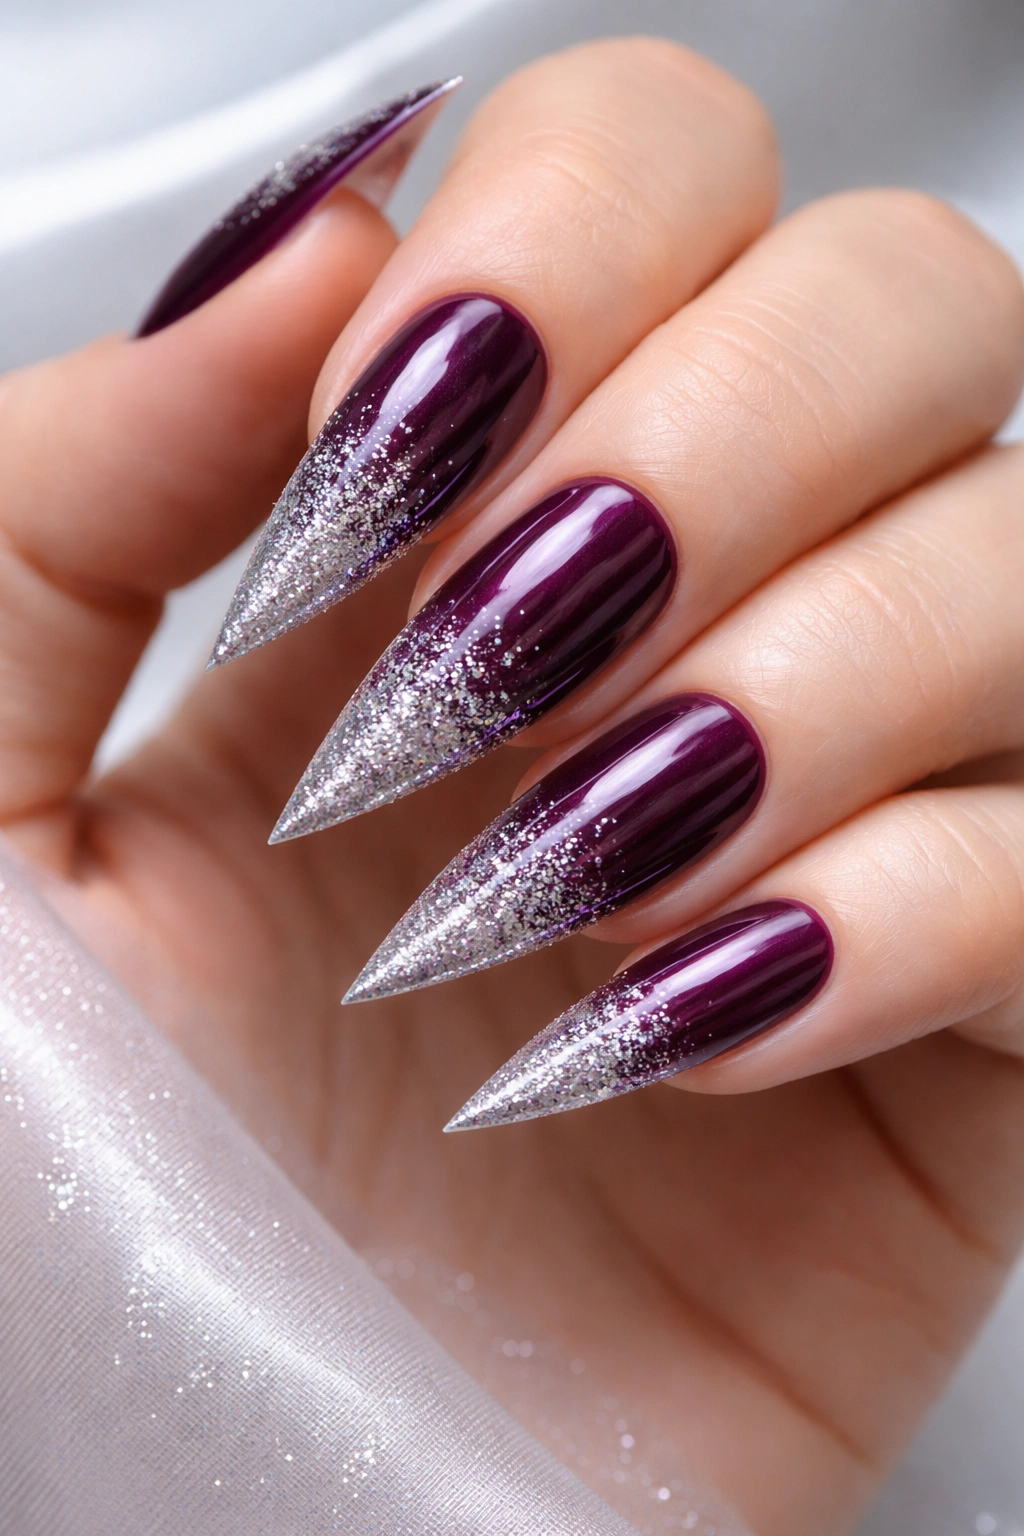
Deep plum stiletto nails with a silver sparkle gradient create a luxurious, jewel-toned aesthetic that feels both mysterious and celebratory. The plum base provides richness and depth, while the silver sparkle gradient adds glamour and movement from the base toward the tips.
Why This Gradient Reads as Intentional Luxury
Plum is a sophisticated color that sits between purple and burgundy, making it inherently elegant and seasonally versatile. When you layer silver sparkle over plum in a gradient effect, you’re creating a visual journey that emphasizes the nail’s length and draws attention without being gaudy. The gradient technique (rather than solid sparkle coverage) shows intentionality and craftsmanship, making the design appear more high-end. This combination works for professional environments, creative spaces, and formal events—it’s bold enough to feel special but refined enough to read as tasteful. The cool tones of silver complement the sophistication of plum beautifully, creating harmony in color temperature.
Building Your Plum-to-Silver Gradient
- Paint your entire nail with deep plum using two coats, ensuring full color saturation
- Create a silver sparkle mixture by combining fine silver glitter or holographic powder with a clear gel or polish base
- Using a makeup sponge, apply the silver sparkle mixture to the tip area of each nail
- Blend the transition zone by gently dabbing back and forth with a clean sponge section, creating a soft fade where plum meets sparkle
- Build the sparkle gradient gradually—you can always add more, but it’s harder to remove excess
- If using gel, cure after each layer to set the gradient in place
- Seal with a glossy top coat that makes the silver sparkle more reflective and visible
15. Coral Pink with White Ombre Fade
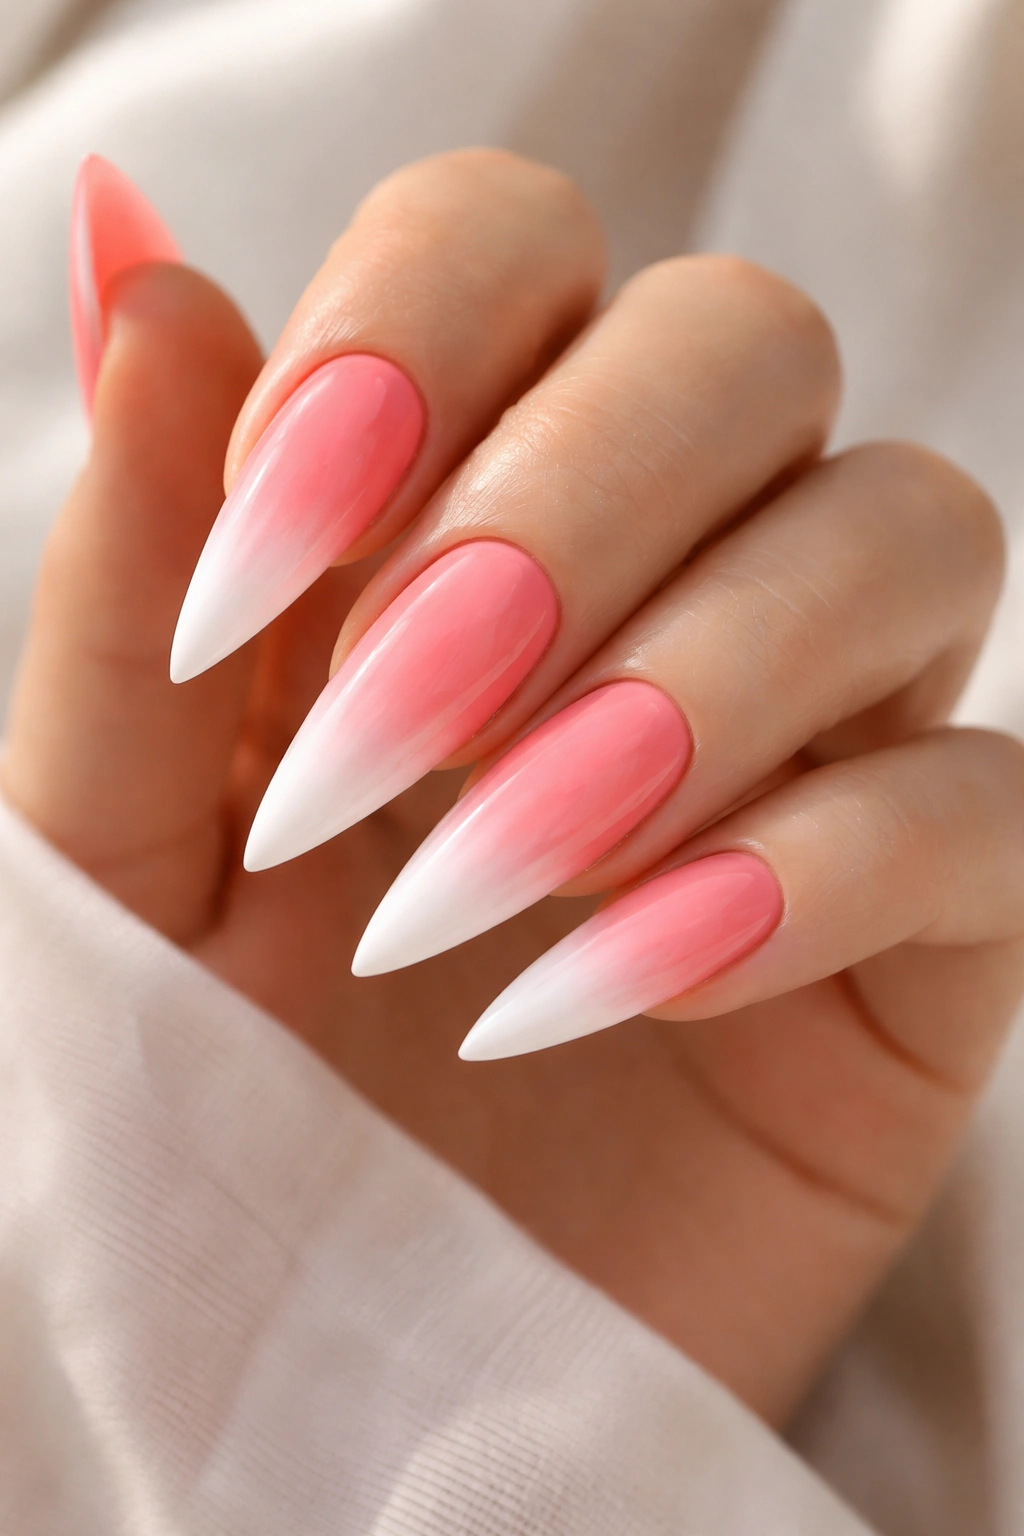
Coral pink stiletto nails with a white ombre fade create a fresh, modern look that feels both playful and elegant. The warm coral base transitions smoothly toward crisp white at the tips, creating a design that appears effortlessly sophisticated despite the technical complexity of the ombre effect.
Why Coral Pink Reads as Modern and Approachable
Coral pink sits in the sweet spot between orange warmth and pink softness, making it flattering on all skin tones while feeling current and fashion-forward. The white fade at the tips creates visual interest and emphasizes the nail’s length, while the ombre technique shows skill and artistry. This combination feels springtime-appropriate while remaining wearable year-round. The softness of the color palette prevents this from reading as overly trendy, while the ombre technique keeps it from feeling basic. This design works beautifully for both professional environments and creative settings where individuality is valued.
Creating a Smooth Coral-to-White Ombre
- Paint your nails entirely with coral pink, using two coats for solid coverage
- Have white polish or gel ready in a small container
- Using a makeup sponge, dab white onto the tips of your nails, starting roughly at the smile line (where the tip naturally ends on a stiletto)
- With a clean section of your sponge, gently blend the transition zone by dabbing back and forth horizontally
- Work gradually—use multiple light layers of blending rather than trying to achieve perfect ombre with one pass
- You can slightly dampen your sponge (with water or polish remover) to help with blending if transitions feel too harsh
- Build opacity slowly, ensuring the gradient looks smooth and intentional rather than splotchy
- Finish with a glossy top coat that unifies the colors and adds shine
16. Electric Blue with Black Accent Nails
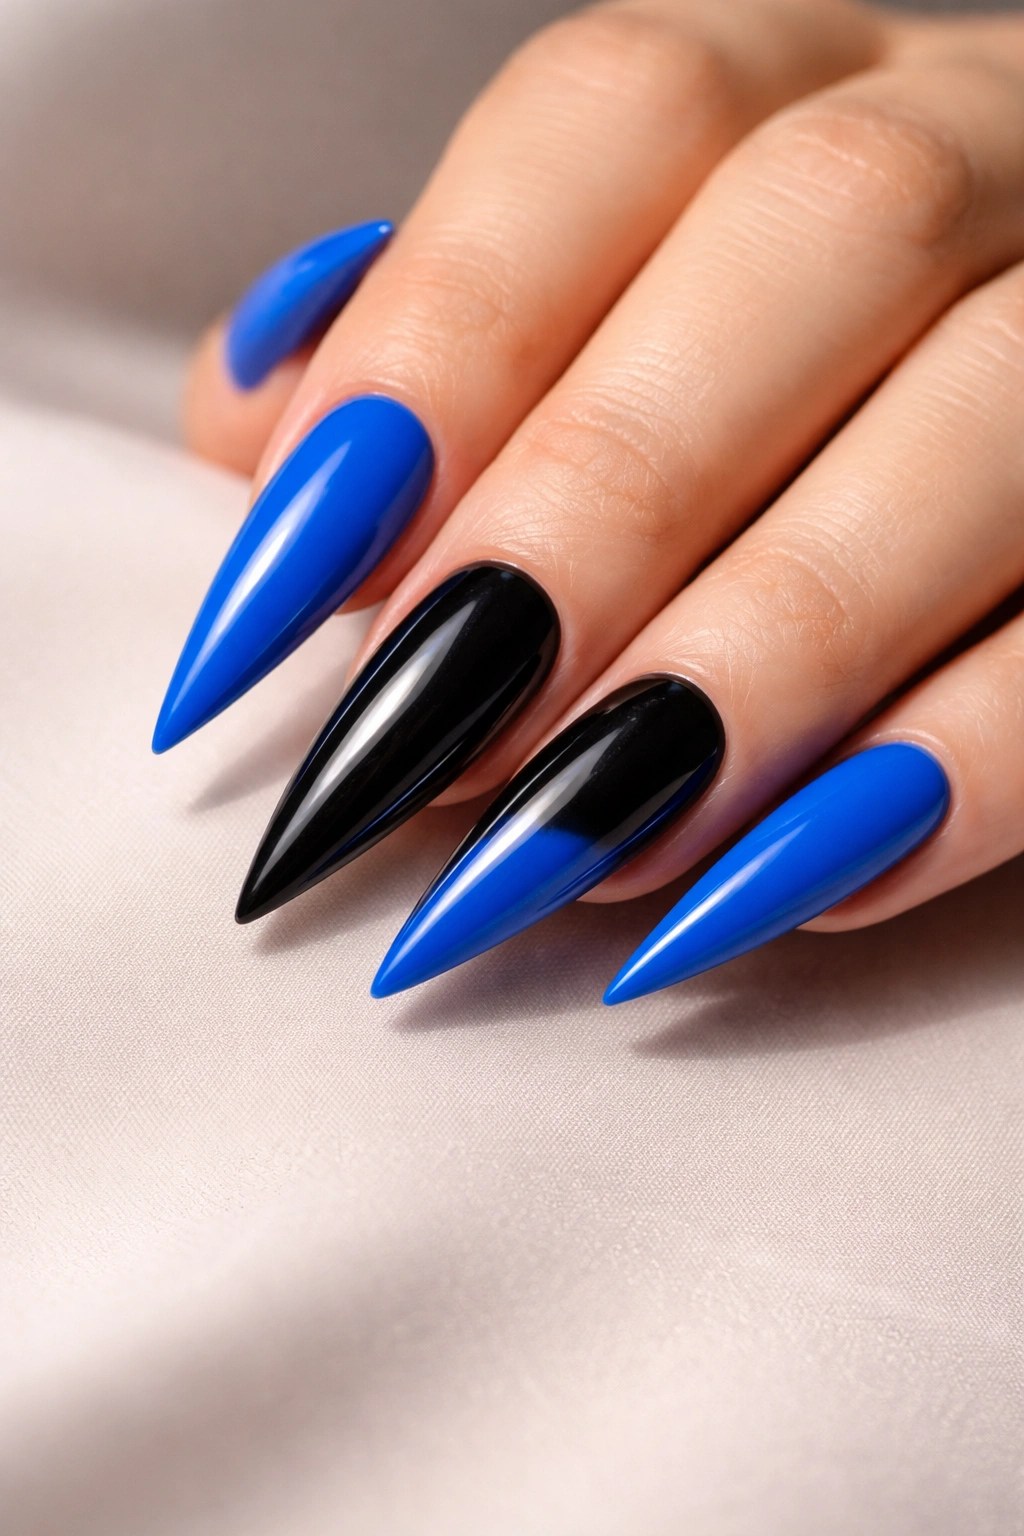
Electric blue stiletto nails with black accent nails create a striking, high-contrast design that feels bold, modern, and undeniably eye-catching. The vibrant electric blue commands attention, while the black accents (usually on one or two nails) provide grounding and prevent the look from feeling overwhelming.
The Power of Color Blocking and Contrast
Electric blue is a vivid, saturated shade that doesn’t hesitate—it announces itself confidently and suits people who love color and aren’t afraid to stand out. Black acts as a visual anchor, preventing the overall look from reading as chaotic or juvenile. The high contrast between electric blue and black is striking without being uncomfortable to look at, creating a design that photographs well and makes a statement in person. This combination works beautifully for creative professionals, fashionable individuals, or anyone attending an event where standing out is encouraged. The geometric simplicity of having two distinct colors (rather than complex blending) makes this design appear intentional and curated.
Executing Electric Blue and Black Color Blocking
- Choose a true electric blue shade that’s vibrant and saturated, not a navy or muted blue
- Paint three or four nails (typically all except your ring finger and thumb, or just your accent fingers) with two coats of electric blue
- Paint your accent nails (usually one or two) with two coats of true black
- Keep the transition clean and geometric—a sharp division between electric blue and black creates a more intentional look than any blending
- Consider adding a small detail on the black nails—a thin electric blue stripe, some sparkle, or a geometric shape—to tie the two colors together
- Alternatively, paint all nails electric blue and reserve the black for tips or geometric shapes on select nails
- Seal everything with a glossy top coat that makes both the electric blue’s vibrancy and the black’s depth more prominent
17. Sage Green with Cream Ombre
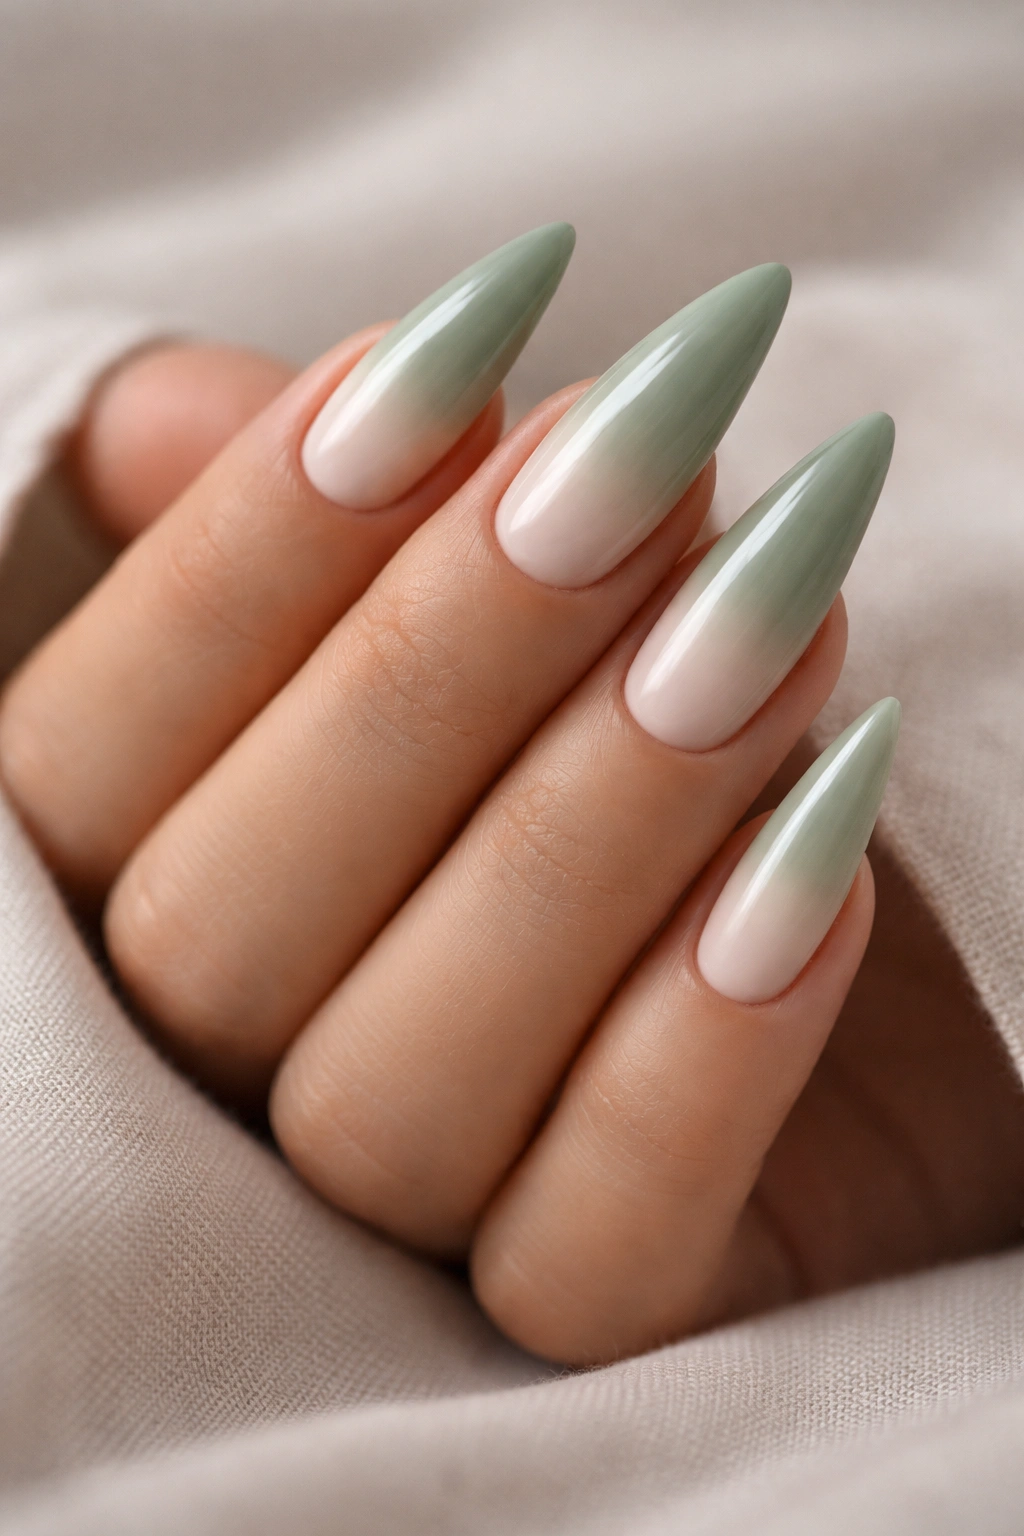
Sage green stiletto nails with a cream ombre fade create a serene, natural-looking design that feels grounded and effortlessly sophisticated. The muted sage green provides a calm, earthy foundation, while the cream fade adds lightness and airiness to the design.
The Appeal of Soft, Natural Color Palettes
Sage green is having a major moment in contemporary design because it feels both modern and timeless, calming yet interesting. It’s a color that works in nearly any context—professional, creative, casual, formal—without feeling out of place. Cream is universally flattering and reads as clean and fresh, making it a perfect fade partner for deeper tones. The ombre effect creates visual interest and emphasizes nail length, while the soft color palette keeps the overall effect subtle and wearable rather than dramatic. This design appeals to minimalists who still want something special, to nature lovers who appreciate botanical-inspired colors, and to anyone seeking a nail design that feels calming rather than assertive.
Creating a Gentle Sage-to-Cream Transition
- Paint your entire nail with sage green, using two coats to ensure full, even coverage
- Have cream or off-white polish ready for your ombre
- Using a makeup sponge, dab cream onto the upper third of each nail, starting at the tip
- Working in the transition zone (the middle section where sage and cream meet), gently dab back and forth to blend the colors together
- The goal is a soft, gradual fade rather than a distinct line—work patiently with multiple light passes
- Build opacity with layers rather than applying heavy amounts of color that create harsh transitions
- If the transition feels too stark, lightly dampen your sponge and continue gentle blending motions
- Cure if using gel, and seal with a glossy top coat that adds shine and emphasizes the ombre effect
18. Hot Red with Matte Black Tips
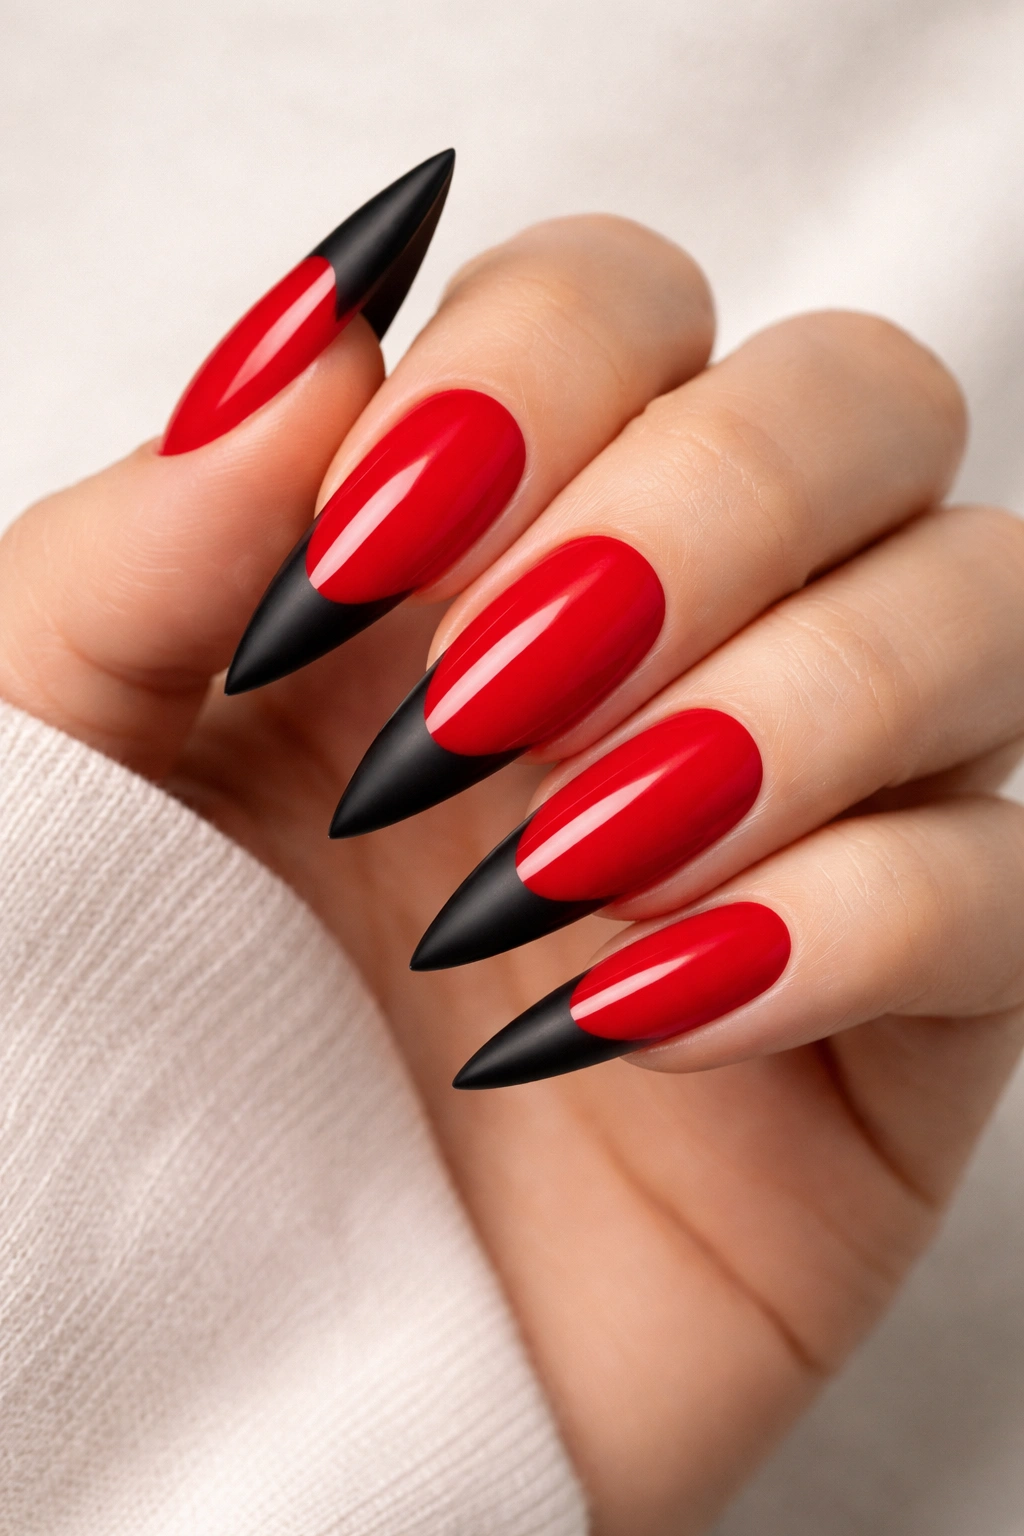
Hot red stiletto nails with matte black tips create a bold, dramatic aesthetic that feels powerful, sexy, and unapologetically confident. The high-contrast combination is striking and visually interesting, while the mix of finishes (glossy red with matte black) adds dimensional sophistication.
Why Red and Black Will Always Command Attention
Red is the ultimate power color—it conveys confidence, passion, and impact—while black provides grounding and adds an edge that prevents the design from reading as merely feminine or delicate. The matte finish on the black tips adds texture and visual interest that glossy finishes alone can’t achieve, making the design feel more intentional and artistic. This combination has historical significance in fashion and beauty—red nails with black accents appear throughout fashion photography and high-end nail design. The color combination is timeless yet contemporary, working perfectly for both professional settings where red nails are considered power moves and for evening events where bold nails are celebrated.
Creating Precise Red-to-Black Tip Definition
- Paint your nails with a true, vibrant hot red using two coats, ensuring solid coverage
- Once completely dry, paint the tips (roughly the outer third of the stiletto nail) with glossy black polish, creating a clean geometric line where red meets black
- Use a thin brush or striping tool to keep the line precise and deliberate
- Alternatively, use black striping tape to create a perfectly straight line and paint the black tip over the tape, removing the tape while the polish is slightly wet
- Once the black is dry, apply a matte top coat to only the black portion, leaving the red glossy for contrast
- The matte finish on black creates a sophisticated two-tone texture effect
- Seal the entire nail with a clear, glossy top coat to protect both finishes
19. Mint Green with Rose Gold Shimmer
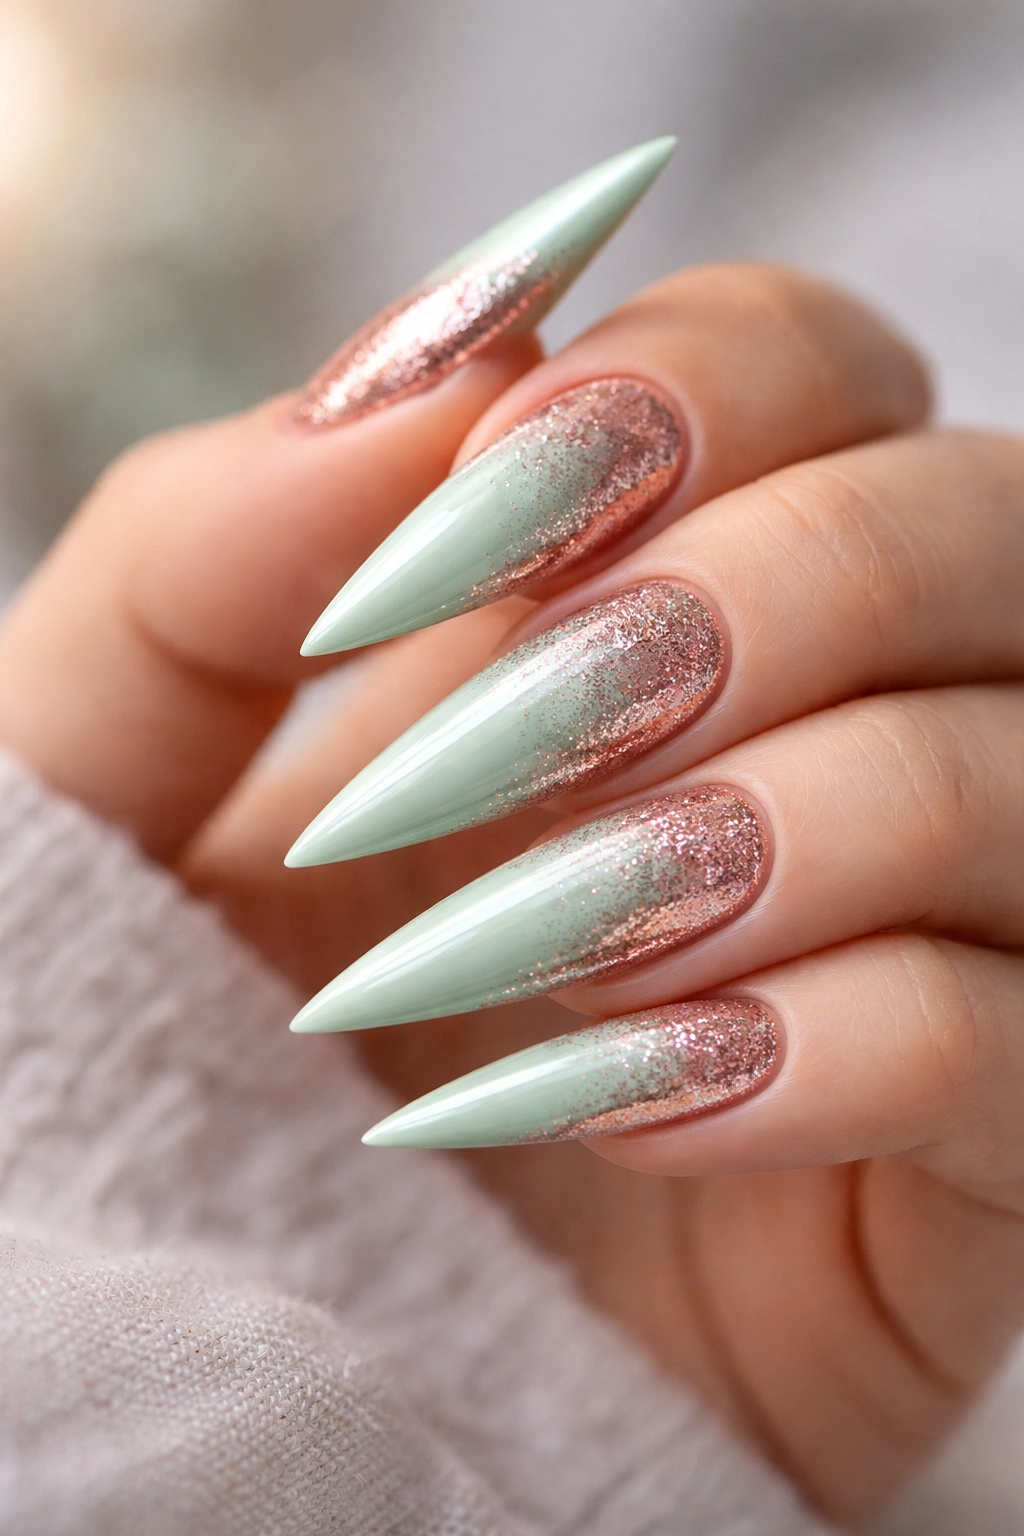
Mint green stiletto nails with rose gold shimmer create a fresh, luxurious aesthetic that feels both playful and elevated. The cool, pale mint green provides a soft, approachable base, while rose gold shimmer adds glamour and warmth without overwhelming the design’s gentle feel.
The Complementary Relationship Between Mint and Rose Gold
Mint green is a pale, cool-toned shade that feels fresh, clean, and contemporary—it’s become increasingly popular in fashion and beauty because it’s flattering, wearable, and inherently cheerful. Rose gold brings warmth and softness while still reading as luxurious and sophisticated. The interplay between mint’s coolness and rose gold’s warmth creates visual balance and prevents either color from overwhelming the other. This combination feels modern without being trendy, special without being dramatic. It works beautifully for spring and summer wear, for creative professionals, and for anyone seeking a design that feels both delicate and intentional.
Applying Rose Gold Shimmer to Mint Green
- Paint your nails with a soft, true mint green using two coats for even coverage
- Create a rose gold shimmer mixture by combining rose gold glitter, metallic powder, or holographic elements with a clear gel or top coat
- Apply the rose gold shimmer mixture across your nails using a makeup sponge for a diffused, scattered effect
- Alternatively, concentrate the shimmer toward the tips or tips edges, creating a subtle gradient
- You can also use a thin brush to apply rose gold details—delicate stripes, geometric shapes, or scattered accents
- If using loose shimmer, carefully apply a clear gel layer over the wet top coat to encapsulate the shine and prevent it from shifting
- Seal with a glossy top coat that makes the rose gold shimmer more reflective and prominent against the mint green
20. Deep Burgundy Ombre to Nude
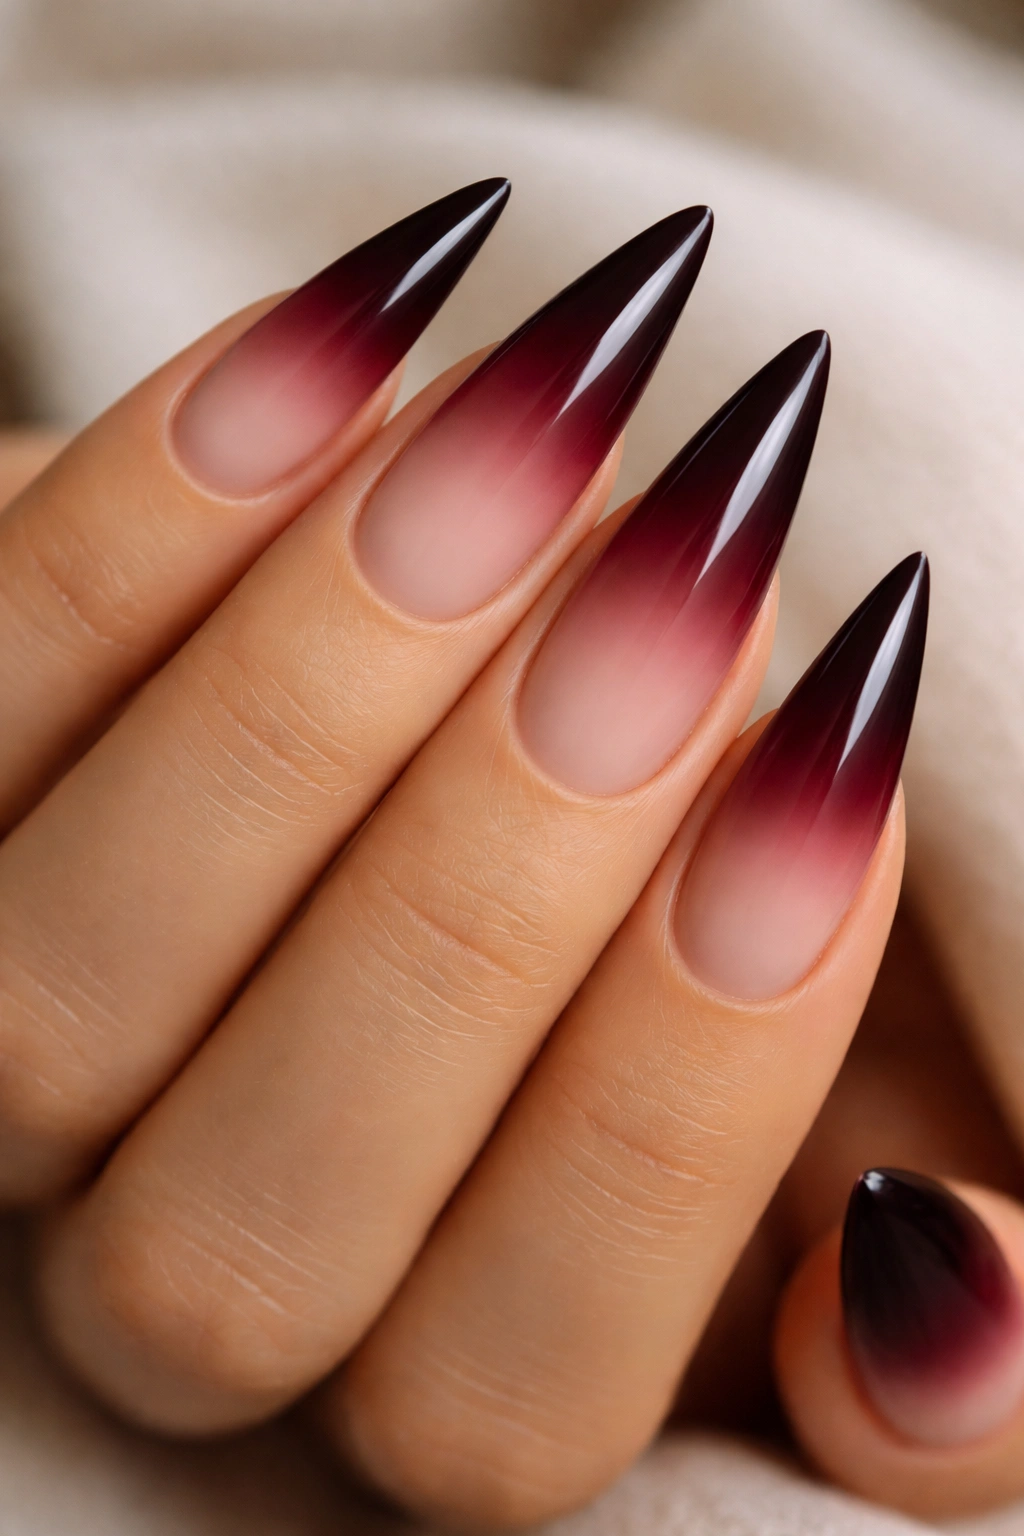
Deep burgundy ombre fading to nude creates an elegant, transitional design that feels sophisticated and subtly complex. The rich burgundy base gradually lightens and warms into nude, creating a visual journey that emphasizes the nail’s length while maintaining a professional, polished aesthetic.
Why This Gradient Feels Universally Sophisticated
Deep burgundy reads as luxurious and refined, while nude is the ultimate professional color—pairing them creates a design that works in virtually any context. The ombre effect creates visual interest without feeling chaotic, showing artistry and intention. The transition from cool burgundy to warm nude happens gradually across the nail’s length, which is especially striking on stiletto shapes. This color combination flatters all skin tones—the burgundy provides depth for cooler undertones, while the nude portion ensures the design remains balanced and wearable. This design works beautifully for formal events, professional environments, and anyone seeking a nail design that feels special without demanding constant attention.
Building Your Burgundy-to-Nude Ombre
- Paint your entire nail with deep burgundy using two coats, ensuring full color saturation
- Have nude polish ready—choose a shade slightly warmer than your skin tone for the most flattering effect
- Using a makeup sponge, dab nude polish onto the tips and upper portion of each nail
- In the transition zone (middle section of the nail), gently blend back and forth using the sponge, creating a soft fade from burgundy toward nude
- Work patiently with multiple light blending passes—this creates a more seamless transition than trying to achieve ombre in one pass
- The gradient should feel natural and gradual, not abrupt or splotchy
- Build opacity slowly to ensure smooth color transitions
- Cure if using gel, then seal with a glossy top coat that adds shine and emphasizes the ombre depth
Final Thoughts
Stiletto nails with color are about so much more than just having pretty hands—they’re about expressing confidence, creativity, and intention through a form of art that you wear every single day. Whether you gravitate toward jewel tones that whisper luxury, soft pastels that convey elegance, bold brights that announce your personality, or complex gradients that show artistic skill, there’s a colorful stiletto design waiting to make you feel absolutely fabulous.
The beauty of working with color on stiletto nails is that the elongated shape gives you a generous canvas to work with. You can layer techniques, combine multiple shades, experiment with textures, and play with finishes in ways that would feel cramped on shorter nails. This means you can authentically express yourself through your manicure, whether that means subtle sophistication or bold self-expression.
Remember that nail health matters more than any design. Keep your natural nails strong by maintaining a solid nail care routine between manicures, staying hydrated, and giving your nails breaks from polish and extensions. The most beautiful stiletto nails are still healthy nails underneath. Start with one design idea that resonates with you, see how it makes you feel, and then build from there. Your perfect colorful stiletto nail design is out there waiting.
