

The intersection of delicate romantic aesthetics and bold elongated nail shapes has created one of the most captivating trends in nail art. Duck nails—characterized by their distinctive flared, curved shape that widens toward the tips—provide the perfect canvas for the soft, feminine coquette aesthetic that celebrates vintage charm, lace details, and playful elegance. When you combine these two elements, you get nail designs that feel simultaneously sophisticated and whimsical, the kind of manicure that photographs beautifully and makes you want to show your hands off every chance you get.
The beauty of coquette duck nails lies in the way the extended length and flared shape naturally draw attention to intricate details and delicate artwork. The curved silhouette mimics the graceful lines of ballet pointe shoes and vintage fashion, while the width of the tips provides ample real estate for elaborate designs, layered colors, and fine decorative elements that might get lost on shorter nail shapes. Whether you’re drawn to soft pastels, tiny bows, ornamental details, or a minimalist approach with just a hint of romance, duck nails offer the structural foundation to make your coquette vision come to life.
This guide explores eighteen distinct coquette duck nail ideas that range from understated elegance to full-on maximalist romance. Each design captures a different facet of the aesthetic—from bubble gum pink with delicate bows to moody deep reds with vintage lace patterns, from soft ombre gradients to character-inspired nail art. Whether you’re preparing these yourself or bringing these ideas to your nail technician, you’ll find specific color palettes, decorative elements, and techniques that make each design achievable and absolutely worth the effort.
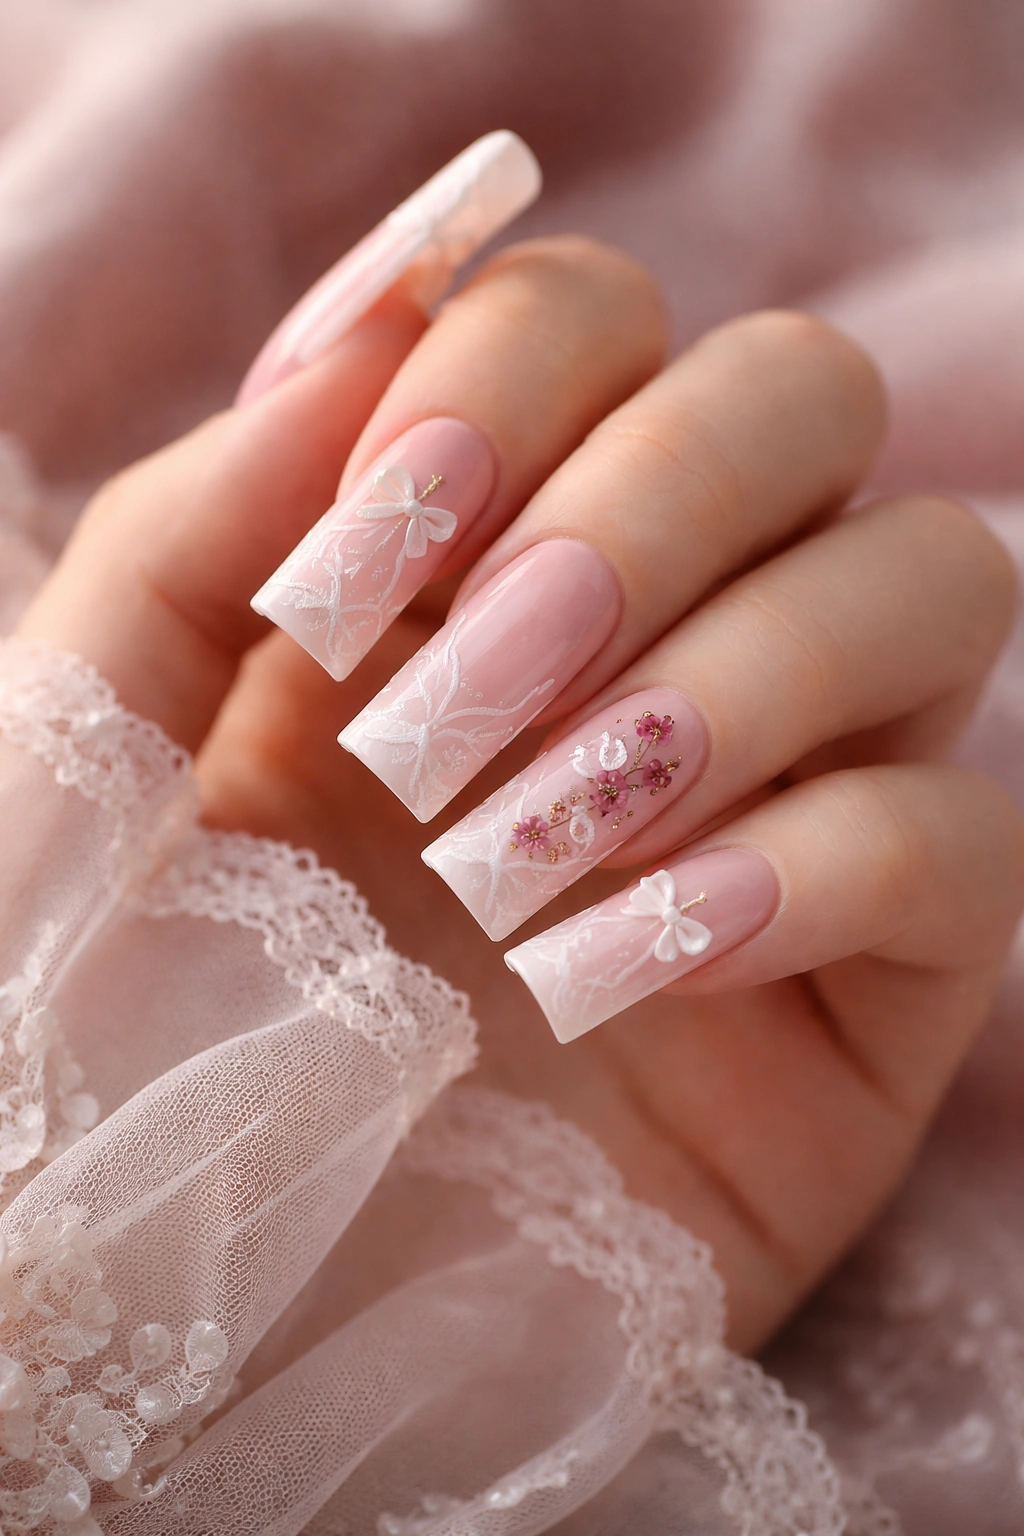
1. Baby Pink with Micro Bows
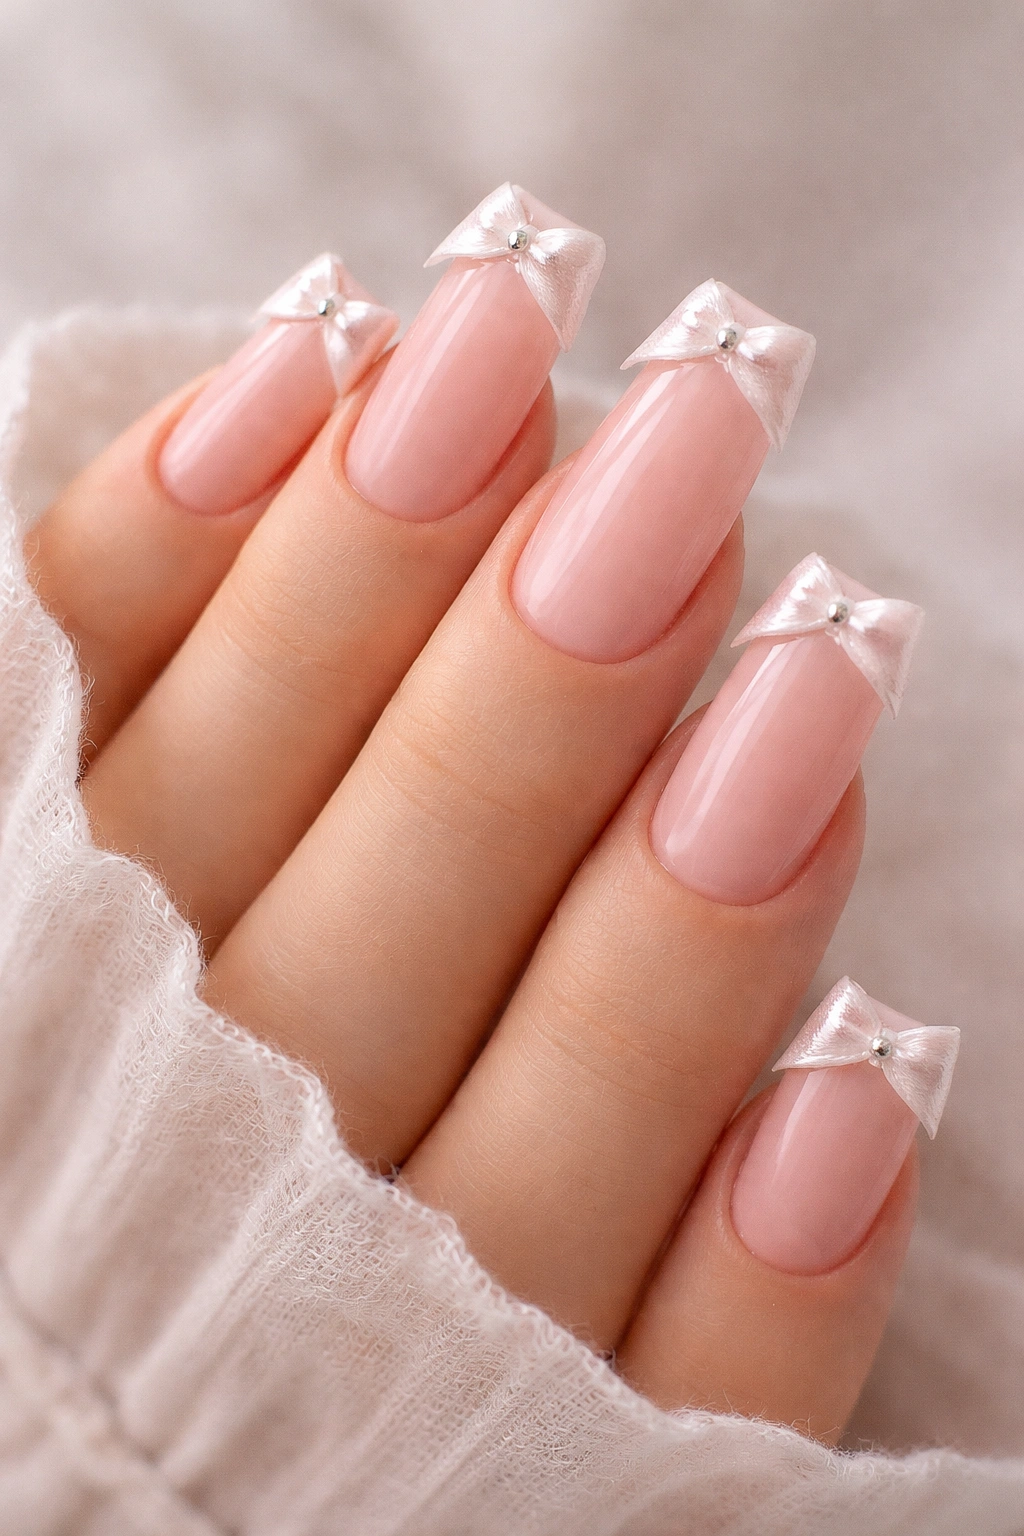
Soft, powdery baby pink serves as the ideal base for capturing that signature coquette essence, especially when paired with tiny three-dimensional bow details strategically placed across the nail surface. This design works beautifully on duck nails because the extended tip gives each bow room to breathe while maintaining perfect symmetry. The bows can be created with gel, acrylic, or even nail stickers designed specifically for this aesthetic.
Why This Aesthetic Works Perfectly
Baby pink is the quintessential coquette color—it reads as feminine without being juvenile, romantic without being overdone. The micro bows add dimension and visual interest without overwhelming the overall look. This combination creates an instantly recognizable coquette vibe that works year-round for both everyday wear and special occasions.
Design Details and Execution Tips
- Paint all nails in a sheer or opaque baby pink using at least two coats for even coverage
- Create mini bows (approximately 5-8mm in diameter) using a thin striping brush or a toothpick dipped in white, nude, or a slightly darker pink
- Alternatively, use pre-made bow embellishments adhered with gel or nail glue positioned across multiple nails or just the accent nails
- Add a glossy top coat to create dimension, or use matte for a softer, more vintage-inspired finish
- Consider placing bows at different angles on each nail to avoid a cookie-cutter appearance
Pro tip: If you’re creating bows by hand, practice on a piece of paper first—the proportions matter, and slightly imperfect bows often look more charming and handmade than perfectly symmetrical ones.
2. Nude Base with Delicate Lace Overlay
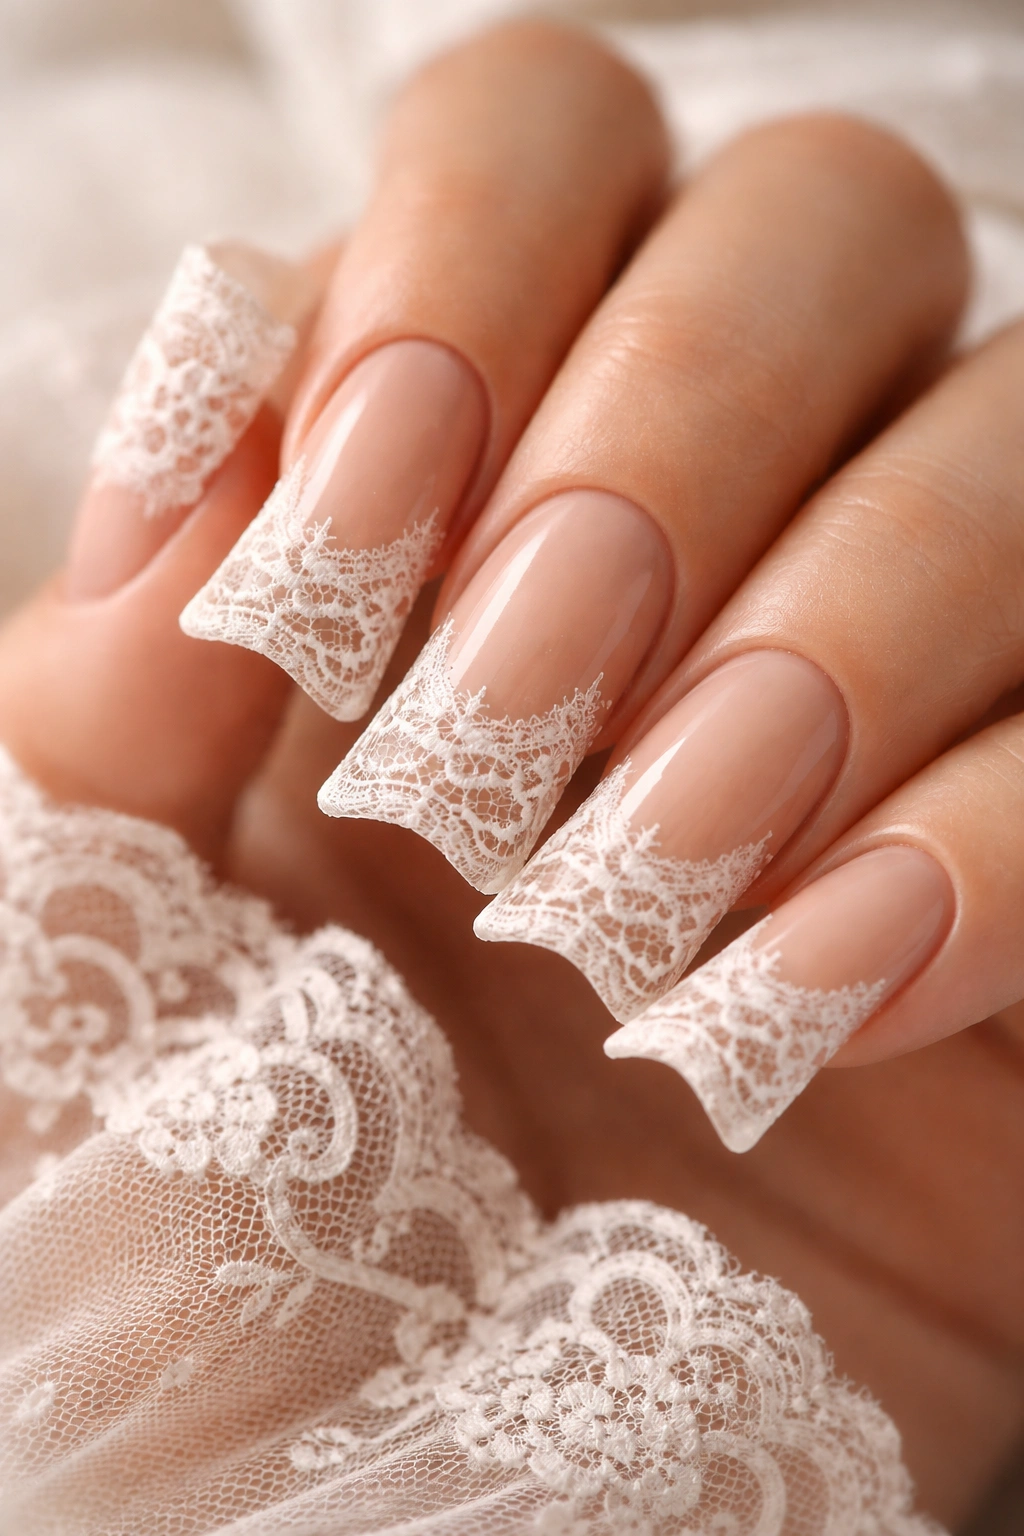
A nude or nude-pink base paired with intricate white or gold lace detailing creates a sophisticated take on the coquette aesthetic that reads as refined and elegant. The duck nail shape allows the lace pattern to span across the entire nail surface without looking cramped, and the curved tip naturally follows the organic lines of vintage lace designs.
The Timeless Appeal of Lace Details
Lace represents the heart of coquette style—it evokes vintage fashion, delicate femininity, and romantic nostalgia all at once. When applied to duck nails, lace patterns create the illusion of wearing tiny gloves or fingerless lace mittens, which is exactly the kind of whimsical detail that defines this aesthetic. The contrast between the neutral base and the precise lace work creates visual sophistication.
How to Layer Lace Designs
- Start with a nude, beige, or very pale pink base and allow it to dry completely
- Use a thin nail art brush or specialized lace stamp to apply white gel or acrylic paint in delicate lace patterns across the nail
- Focus lace lines along the edges and around the curved tip for a framing effect
- Consider adding a single gold accent line or chain detail to elevate the design
- Seal with a glossy top coat to make the lace lines pop against the neutral base
Worth knowing: Pre-made lace nail stickers take the guesswork out of this design and create perfectly detailed results if hand-painting feels intimidating.
3. Pastel Ombre Gradient with Pearl Accents
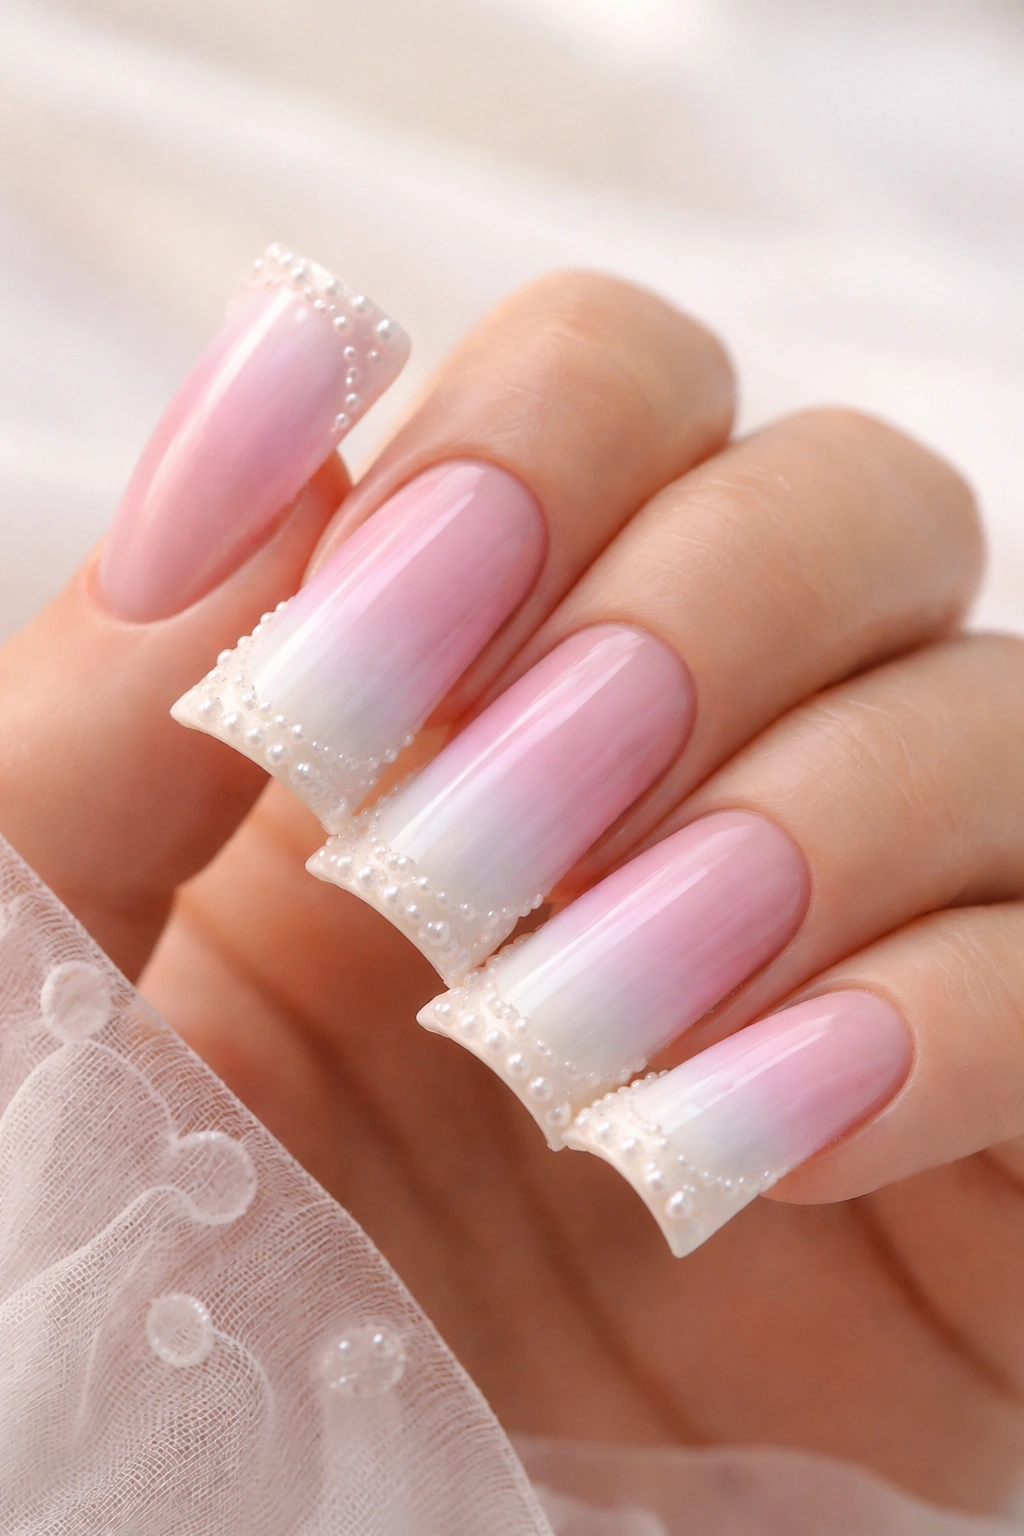
A dreamy gradient transitioning through two or three soft pastel shades—think baby pink to lavender to pale yellow—instantly captures the romantic, multi-colored aesthetic of coquette style. The duck nail’s gradual curve becomes a natural showcase for smooth color transitions, especially when finished with subtle pearl or chrome details along the tip.
Creating Seamless Pastel Transitions
Ombre gradients work exceptionally well on duck nails because the extended surface allows the color transition to unfold gradually and elegantly. The technique creates a soft, almost watercolor effect that feels inherently romantic. The flared tip becomes the dramatic culmination of the gradient, drawing the eye naturally to the curve.
Step-by-Step Gradient Application
- Select two or three soft pastel colors that complement each other (example: pink → lavender → cream)
- Apply the first color as a full base coat and let dry
- Using a makeup sponge or specialized nail sponge, dab the second color onto the tips of the nails, blending slightly with the base color
- Add the third color only to the very tips if using three colors, creating a subtle transition
- Apply pearl powder or fine chrome dust to just the curved tip portion for a magical shimmer effect
- Seal with a high-shine top coat
Insider note: The key to a professional-looking gradient is allowing each layer to dry slightly before adding the next color—this prevents colors from mixing into muddy tones.
4. Blush Pink with Minimalist Bow on Ring Finger
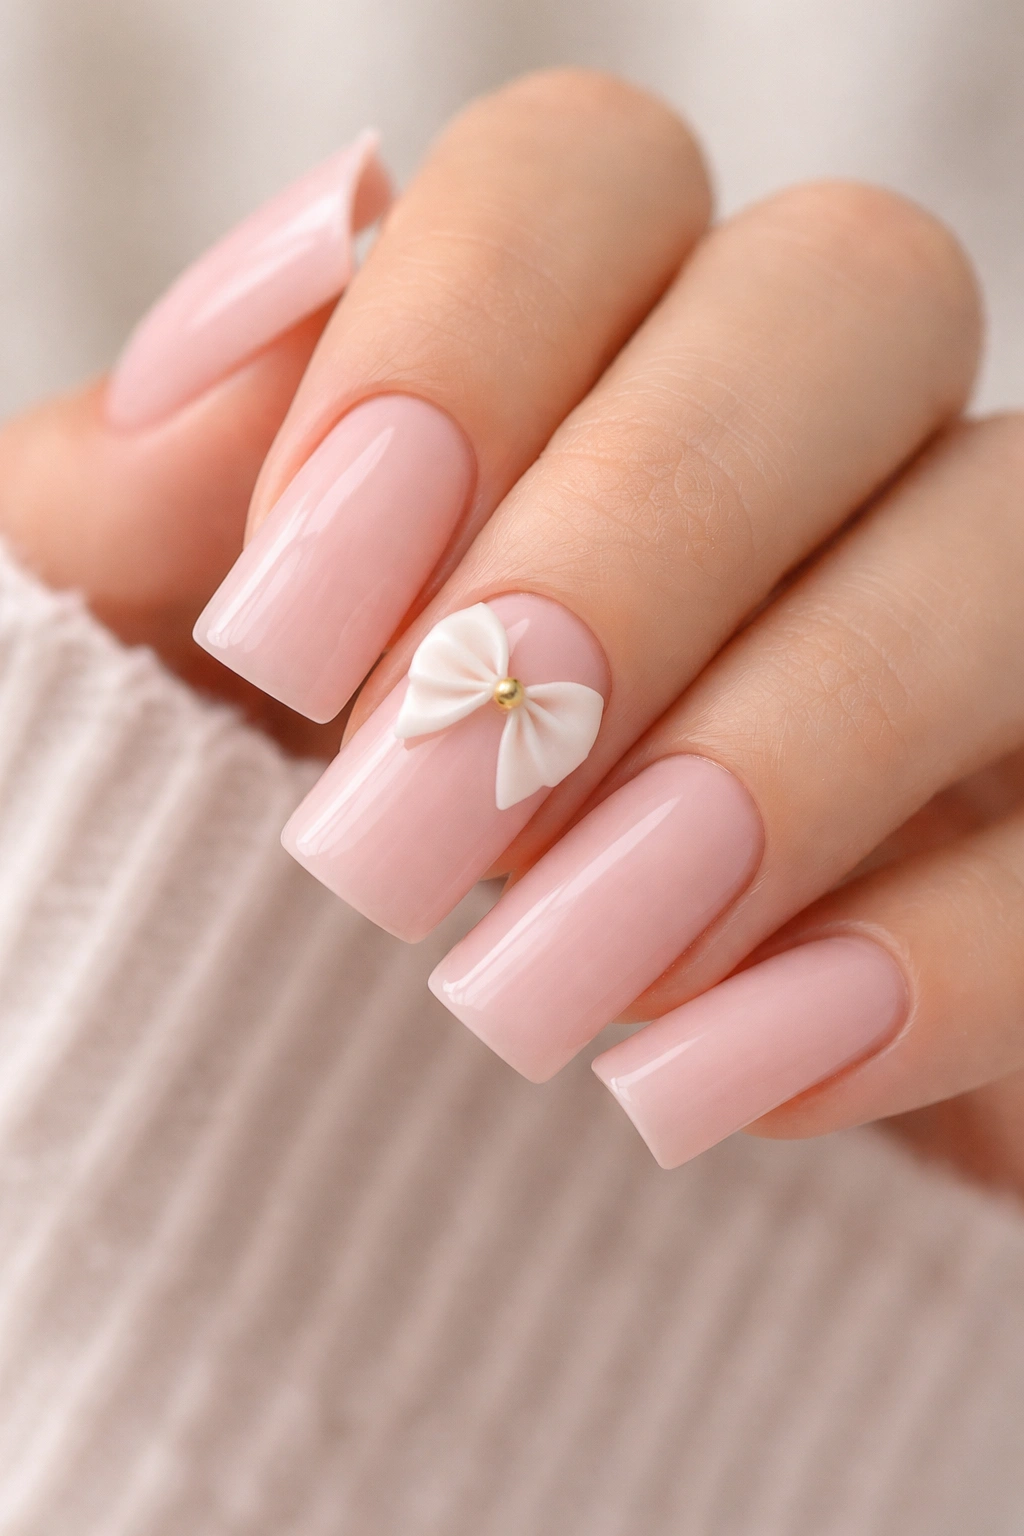
Sometimes less is more, and this design proves the point: a simple nude-blush base across all nails with a single elegant bow accent on the ring finger (and optionally the pinky) creates a sophisticated, wearable coquette look. The minimalism makes it perfect for professional settings while still clearly communicating the aesthetic.
The Power of Strategic Placement
By reserving the bow accent for just one or two nails rather than covering all five, you create a refined look that feels intentional rather than costume-like. The duck nail shape makes this single bow even more impactful because of the nail’s inherent elegance. This approach also makes the manicure more practical for those who work with their hands frequently.
Creating a Statement Single Bow
- Paint all nails with a soft blush or barely-there pink (nearly nude)
- Create one substantial bow (roughly 1cm x 1cm) on the ring finger using a small detail brush or pre-made embellishment
- Consider making the bow gold, white, or a darker shade of pink to create contrast against the base
- Add a delicate line or two around the bow if desired (a thin arc or gentle swirl adds femininity without clutter)
- Option: Repeat the bow on the pinky for balance, or keep it singular for maximum refinement
Pro tip: A single well-executed detail looks more sophisticated than multiple mediocre ones—invest time in making that one bow absolutely perfect.
5. Deep Burgundy with Vintage Floral Illustrations
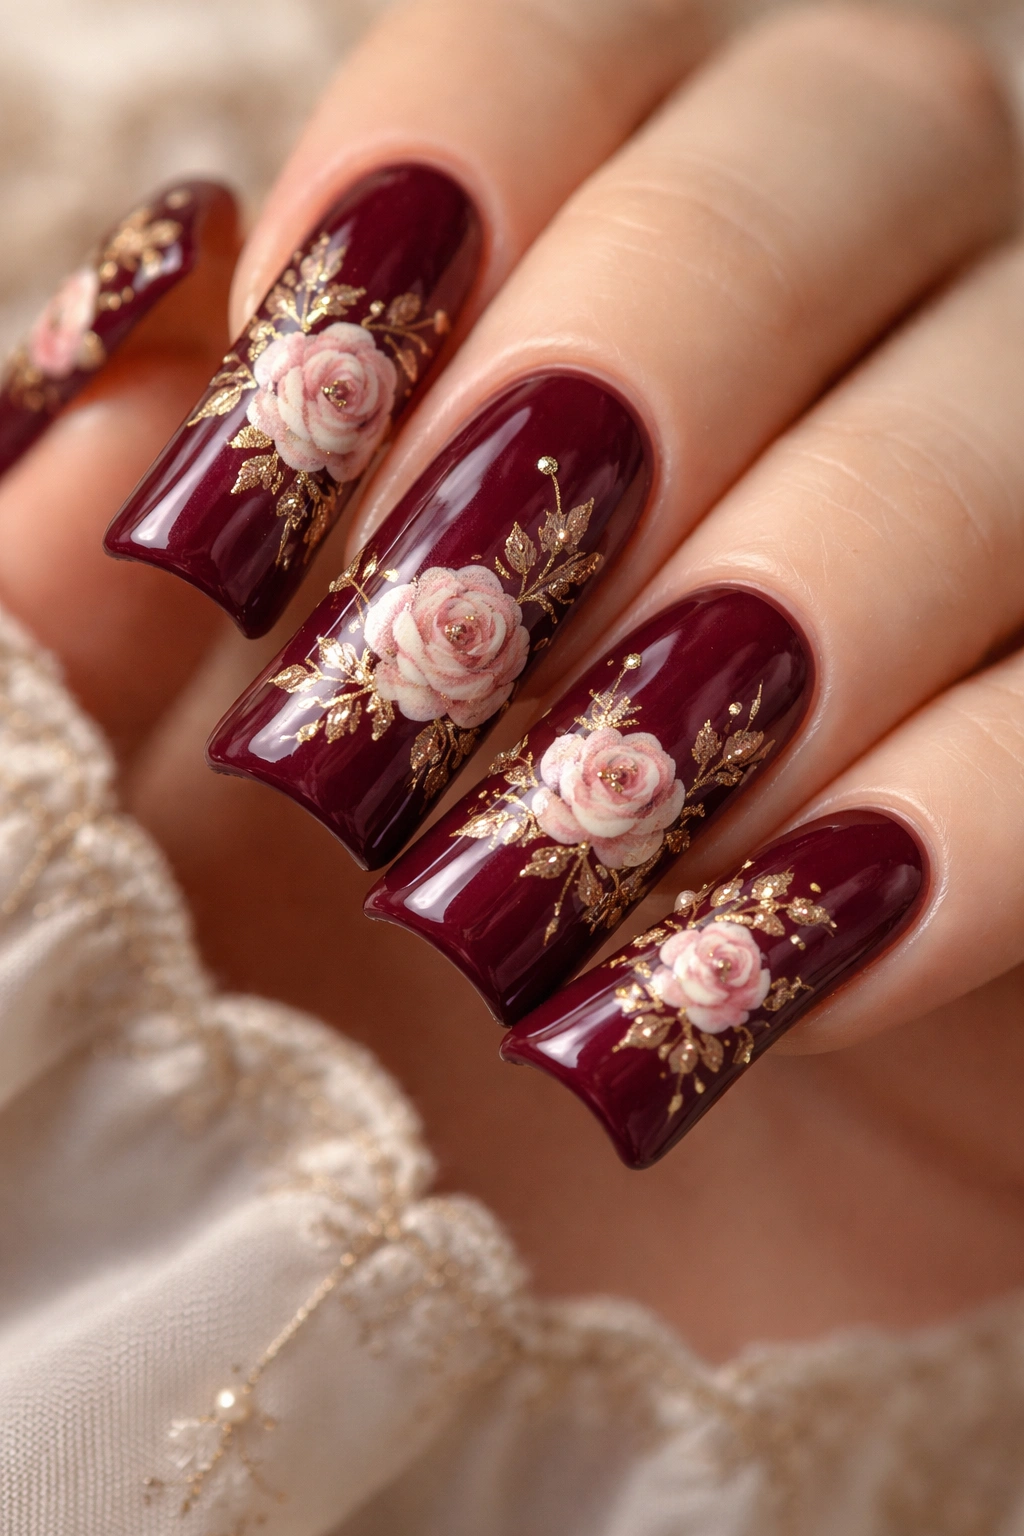
Move into moodier coquette territory with a rich burgundy or wine-toned base paired with hand-painted or stamped vintage floral motifs in cream, gold, or pale pink. This design captures the romantic coquette aesthetic through a more mature color palette that works beautifully on elongated duck nails.
Florals and Femininity in Deeper Tones
Burgundy represents sophisticated coquette—it’s still undeniably feminine and romantic but carries an edge of maturity and complexity. The deep tone provides perfect contrast for delicate floral line work that would get lost on lighter backgrounds. Think Victorian botanical illustrations rendered in miniature across your nail tips.
Achieving Detailed Floral Work
- Apply burgundy or wine as a full base coat (minimum two coats for rich color saturation)
- Using a very thin detail brush, paint tiny roses, peonies, or wildflower sprigs in cream or pale pink across the nail surface
- Alternatively, use floral nail stamps designed for smaller nails and adjust the design placement as needed
- Add fine gold or copper accent lines (thin stems or decorative swirls) between floral elements
- Consider gradient-blending the burgundy darker toward the tip to create depth
- Seal with a matte or satin top coat for a vintage-inspired finish, or glossy for more glamour
Worth knowing: Practice floral designs on practice tips or paper first—tiny florals are intricate work that benefits from a steady hand and patient execution.
6. Lavender with Tiny Star Accents and Rhinestones
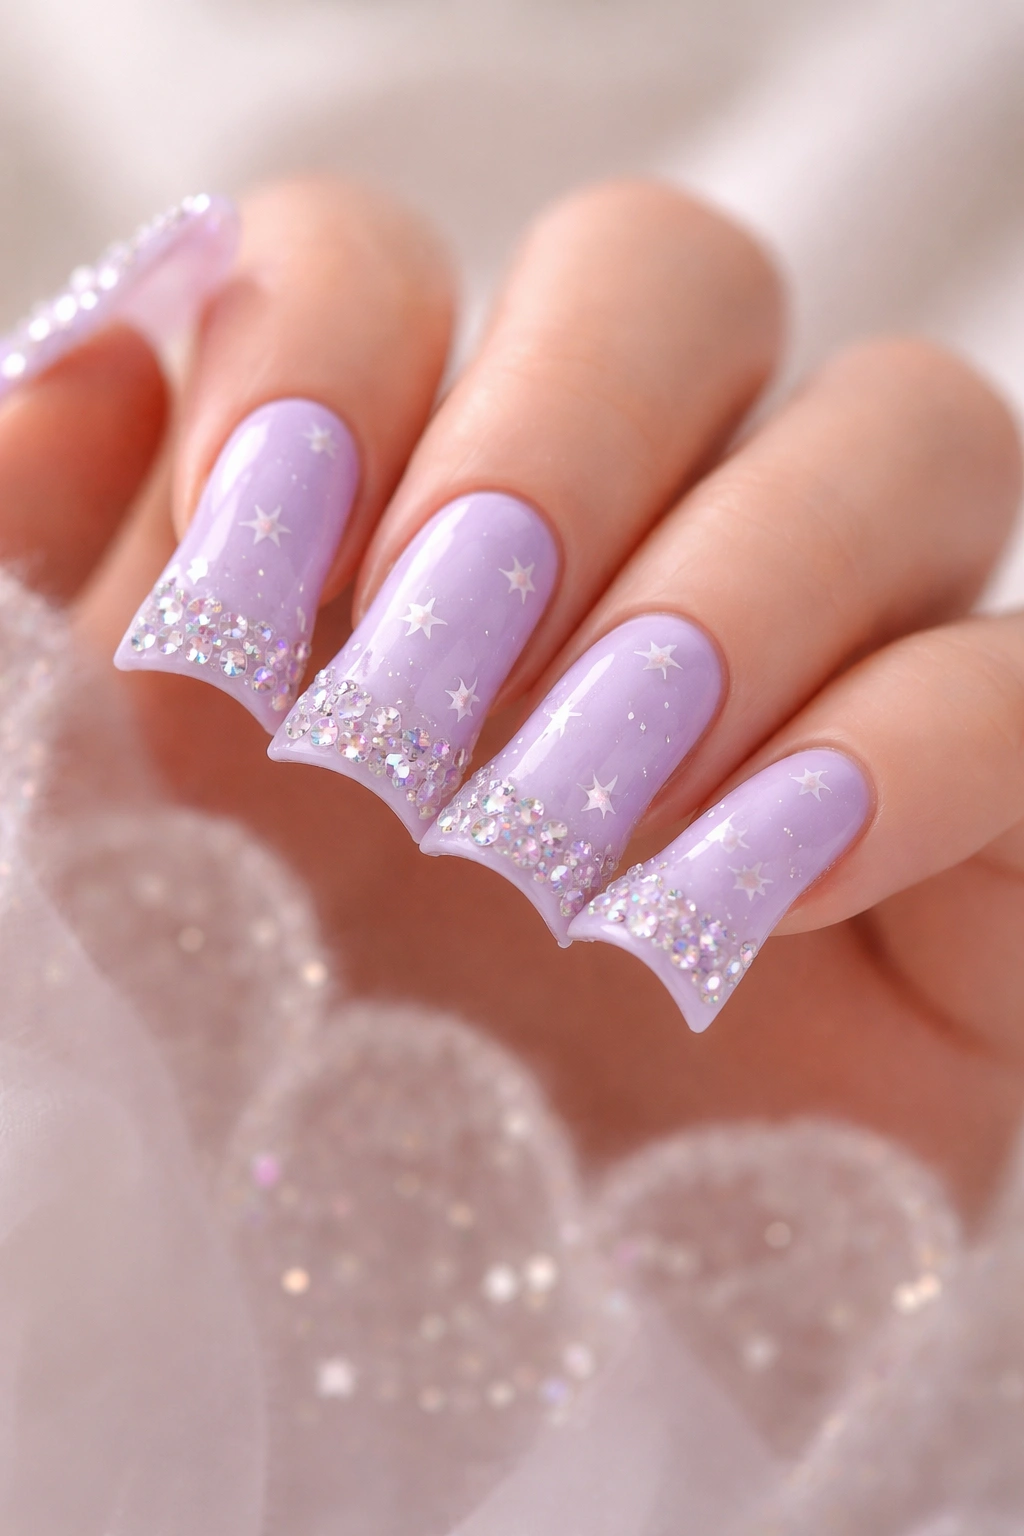
Soft lavender paired with delicate star details and strategically placed rhinestones creates a dreamy, almost magical coquette aesthetic that feels both whimsical and elegant. The stars and sparkle elements catch light beautifully on the extended duck nail tips, creating a subtle shimmering effect.
Magical Minimalism Through Strategic Sparkle
Lavender has a naturally romantic, slightly ethereal quality that pairs perfectly with star motifs—together they evoke storybook illustrations and fairy tale aesthetics. The rhinestones add glamour and dimension without overwhelming the design, especially on duck nails where the space naturally accommodates scattered crystals beautifully.
Applying Stars and Rhinestones
- Paint all nails with soft lavender and allow to dry completely
- Create tiny stars (approximately 4-6mm) using white paint and a fine brush, or use pre-made star stickers and embellishments
- Position stars scattered across the nails or concentrated near the tips
- Apply small rhinestones (1-2mm size works best for the scale of duck nails) using a rhinestone picker tool dipped in thick gel or special adhesive
- Cluster rhinestones around star details or along the curved tip line for a connected design
- Seal with gel top coat (regular top coat may cause rhinestones to shift)
Pro tip: Arrange rhinestones in slightly random, natural-looking clusters rather than perfect geometric patterns—this creates a more organic, coquette-appropriate aesthetic.
7. Cream Base with Fine Gold Chain Details
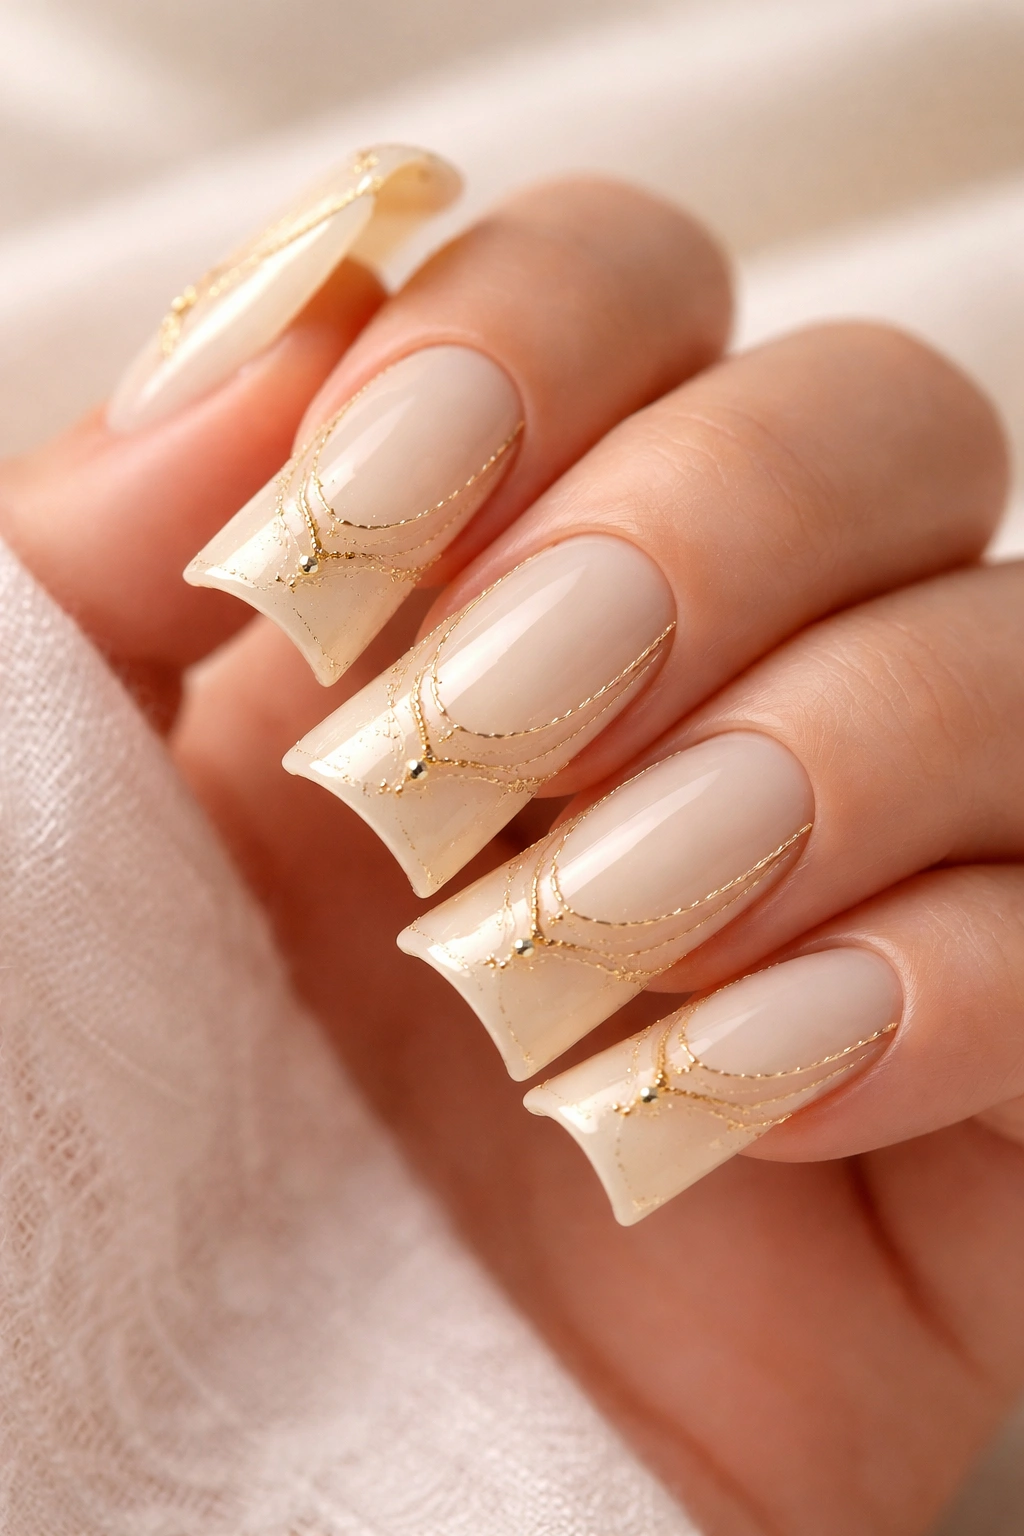
An ivory or cream base becomes a canvas for delicate gold chain-inspired line work and geometric details that creates an elegant, understated coquette look. This design works particularly well on duck nails because the chains can wrap around the curved shape, following the nail’s natural contours.
Chains as Feminine Framing
Gold chains represent luxury and femininity in coquette style—they suggest jewelry, elegance, and refined taste. Using chain designs on a pale base creates contrast and visual interest without relying on bold colors. The technique adds sophistication and captures that “dressed-up” feeling the aesthetic celebrates.
Creating Chain and Geometric Patterns
- Apply cream or ivory as a smooth, even base coat
- Using a thin brush or specialized nail pen, draw delicate chain patterns in gold along the edges of the nail
- Consider creating a chain “frame” around the tip of the nail, following the duck nail’s curved edge
- Add small geometric shapes (tiny diamonds, squares, or circular links) to break up the chain design
- Layer a second gold color or add white highlights for dimensional depth
- Use a glossy top coat to emphasize the metallic shine and create a polished appearance
Insider note: If hand-drawing chains feels difficult, gold nail striping tape or pre-made chain nail vinyls provide perfect geometric alternatives that deliver professional results.
8. Soft Pink with French Tip in Gold
A contemporary twist on the classic French manicure, this design features a soft pink base with a warm gold French tip on duck nails. The flared shape of the tips makes the gold line even more dramatic and visually striking while maintaining the coquette color palette.
Modern Takes on Classic French Tips
The traditional French manicure gets a coquette makeover through color choice—soft pink instead of stark white, warm gold instead of pure white tips. This creates a softer, more romantic version of the look while maintaining its timeless appeal and wearability.
Executing a Perfect Gold French Tip
- Paint all nails soft pink as a base and let dry completely
- Use a thin striper brush or specialized French tip brush to paint a clean gold line approximately 2-3mm from the edge of the tip
- For a more modern interpretation, make the gold line slightly thicker or slightly curved rather than perfectly straight
- Alternatively, use gold French tip nail stickers for precision placement
- Ensure the line is smooth and even across all nails for a polished appearance
- Seal with a shiny top coat that emphasizes the metallic gold
Pro tip: A small edge of the pink base showing between the gold and the absolute tip of the nail (about 1mm) creates more visual interest than gold extending all the way to the edge.
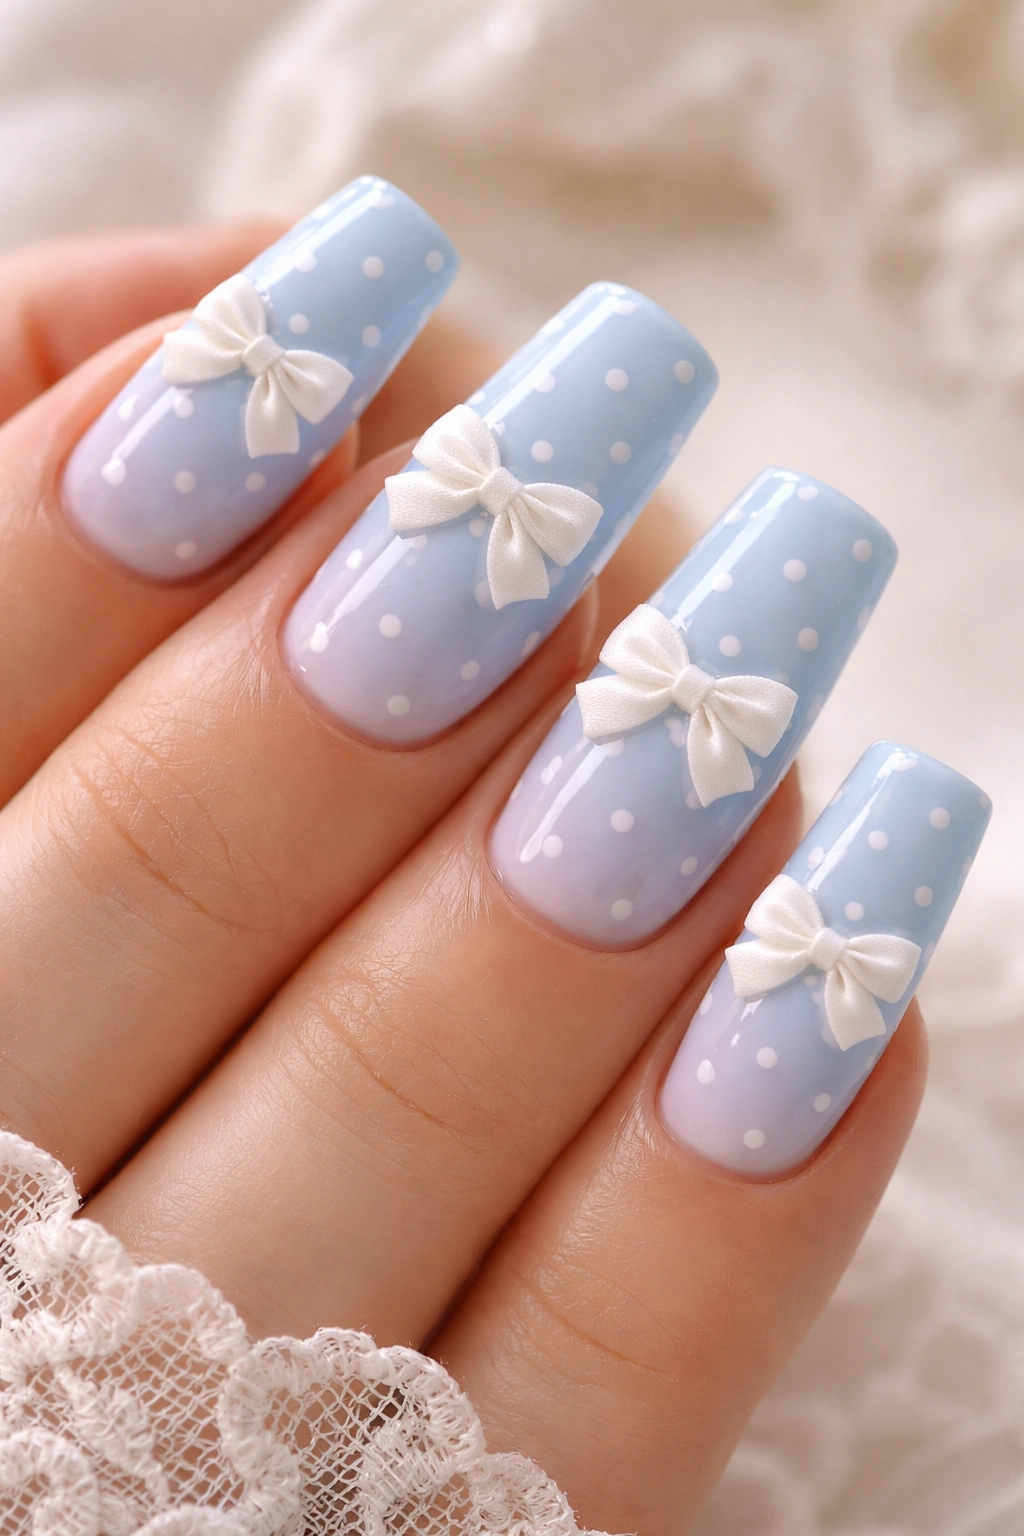
9. Baby Blue with White Dot Details and Bows
A serene, dreamy aesthetic emerges when you pair pale blue with white polka dots and delicate white bows. This design captures the playful side of coquette while introducing a cooler color that feels refreshingly feminine without being exclusively pink-based.
Soft Blue Femininity
Baby blue has an innocent, charming quality that perfectly complements coquette style. When combined with white dots and bows, it creates a look that feels sweet and youthful without reading as costume-like. The design works beautifully on duck nails where the dots can be scattered across the entire nail surface.
Layering Dots and Bows
- Apply pale blue or baby blue as a full base coat (two coats for even color)
- Using a dotting tool, create white polka dots across the nail surface in varying sizes (2-4mm diameter)
- Aim for an asymmetrical scattering that feels organic rather than perfectly arranged
- Add one or more small white bows, focusing them on the accent nail or spread across several nails
- Consider adding a single thin white line around the edge of the nail to frame the design
- Finish with a glossy top coat that emphasizes the brightness of the white details against the soft blue
Worth knowing: Pre-made dot and bow stickers designed for nail art take the precision work out of this design if hand-creating feels challenging.
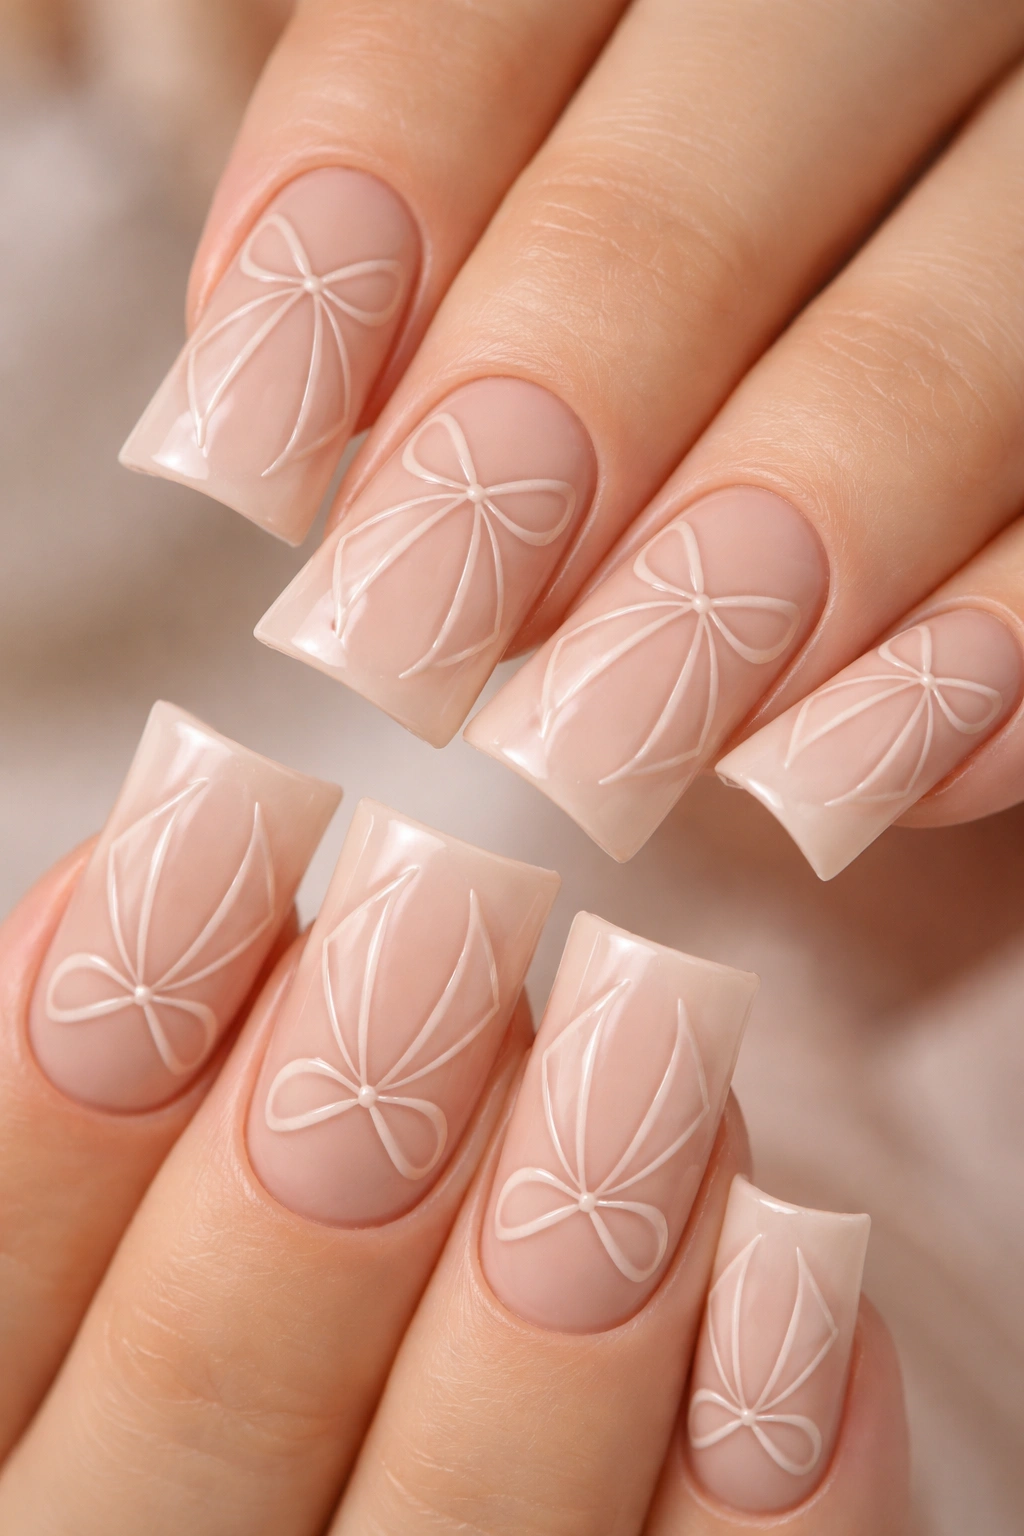
10. Nude with Negative Space Bow Outline
A sophisticated minimalist approach: a nude base with a carefully sculpted bow shape created through negative space (where you leave small areas unpainted to reveal the nail bed or a contrasting color beneath). This design showcases the artistic skill and creates an elegant, architectural aesthetic within the coquette framework.
Negative Space as Elegant Design
Negative space nail art creates a refined, gallery-like quality—it’s bold yet understated, complex yet clean. The bow outline in negative space immediately communicates the coquette aesthetic while maintaining visual simplicity. On duck nails, the negative space bow becomes a stunning focal point that draws attention without relying on color.
Creating a Negative Space Bow
- Apply a very pale pink or nude as a base coat
- Lightly map out a bow shape in the center or off-center on the nail using a very light pencil or thin brush
- Carefully paint around the bow outline using a slightly darker shade (taupe, cool pink, or soft gray)
- The bow shape itself remains unpainted (nude), creating the negative space effect
- Alternatively, paint nude as the base with a nude-chrome or nude-shimmer outline for subtle dimension
- Seal with a matte top coat to emphasize the architectural quality of the design
Insider note: This technique requires a steady hand and fine motor control—practice the outline first on a sticky note before applying directly to the nail.
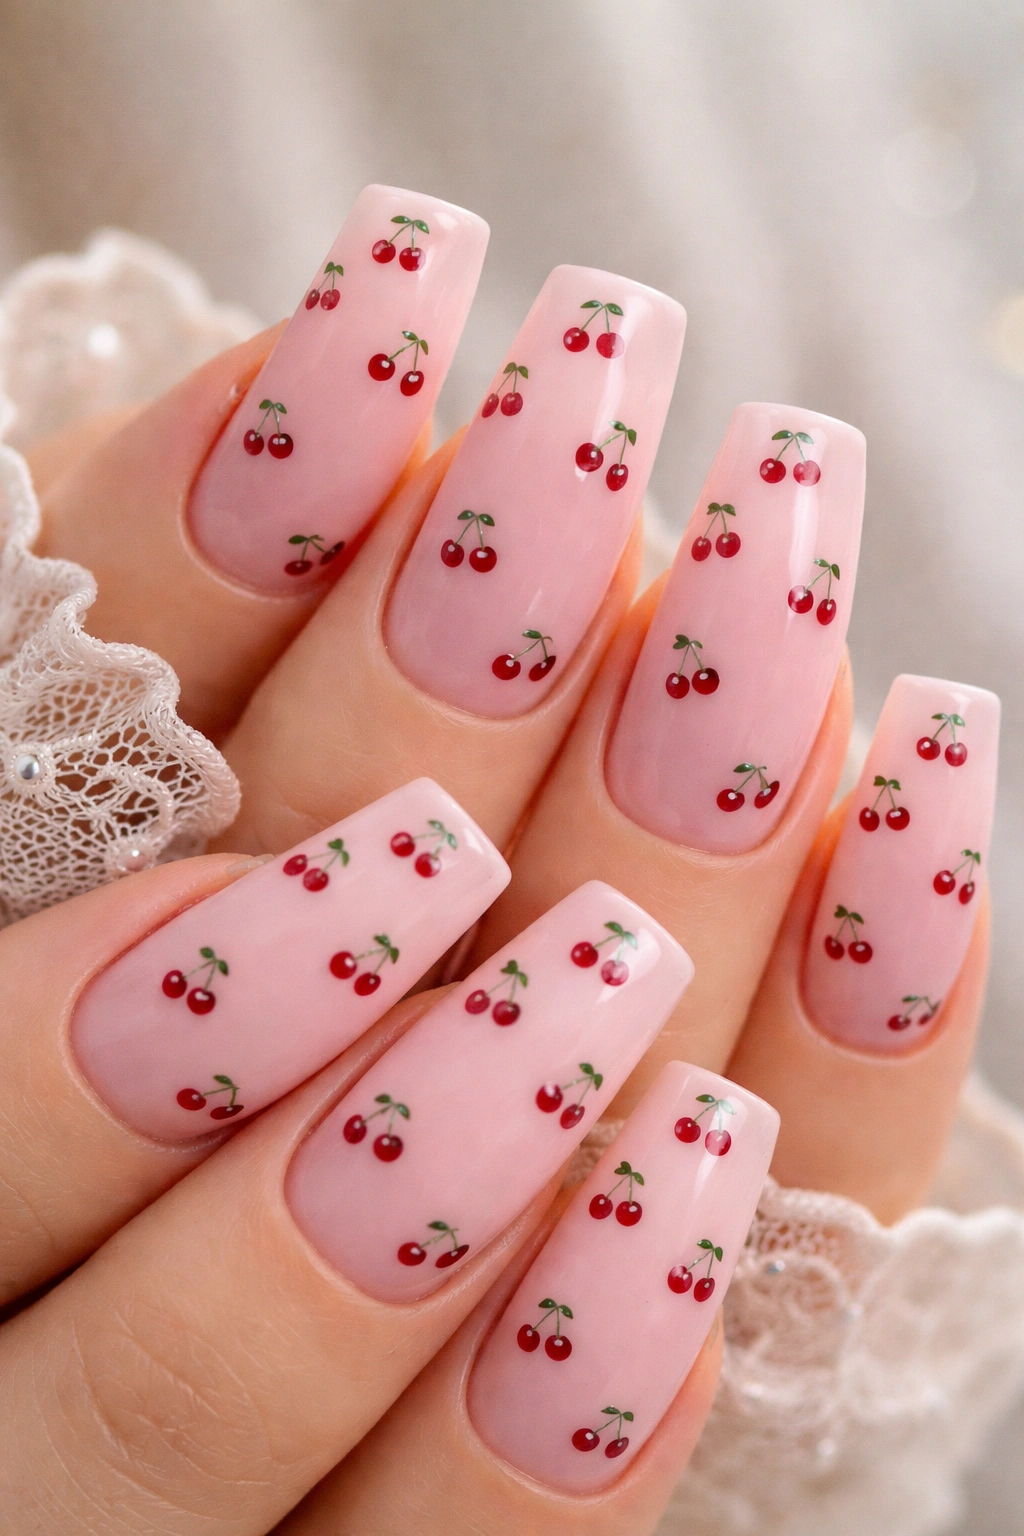
11. Blush Pink with Tiny Cherry Details
A charmingly playful design featuring soft blush pink with miniature cherry illustrations (complete with stems) scattered across the nails creates an adorable, vintage-inspired coquette look. Cherries perfectly capture the whimsical, sweet nature of the aesthetic while adding visual personality.
Whimsical Fruit as Design Element
Cherries represent feminine charm and retro Americana—they evoke 1950s pinup culture and vintage fashion, both touchstones of coquette style. In miniature form on duck nails, they become delightfully quirky and unexpected while remaining undeniably elegant due to the nail shape and soft color palette.
Painting Detailed Cherry Elements
- Paint all nails soft blush pink and let dry completely
- Using a small detail brush, paint tiny pairs of connected circles (the cherry pair) in deep red or burgundy
- Add thin, curved green stems connecting the two circles
- Scatter cherries across multiple nails in an organic, unpatterned way
- Consider adding tiny green leaves occasionally for a fully realized botanical look
- Add a delicate highlight (a small white dot) on each cherry pair for dimension and shine
- Finish with a glossy top coat that makes the cherries appear almost three-dimensional
Pro tip: Slightly imperfect cherries look more charming and handmade than technically perfect ones—embrace the quirk.
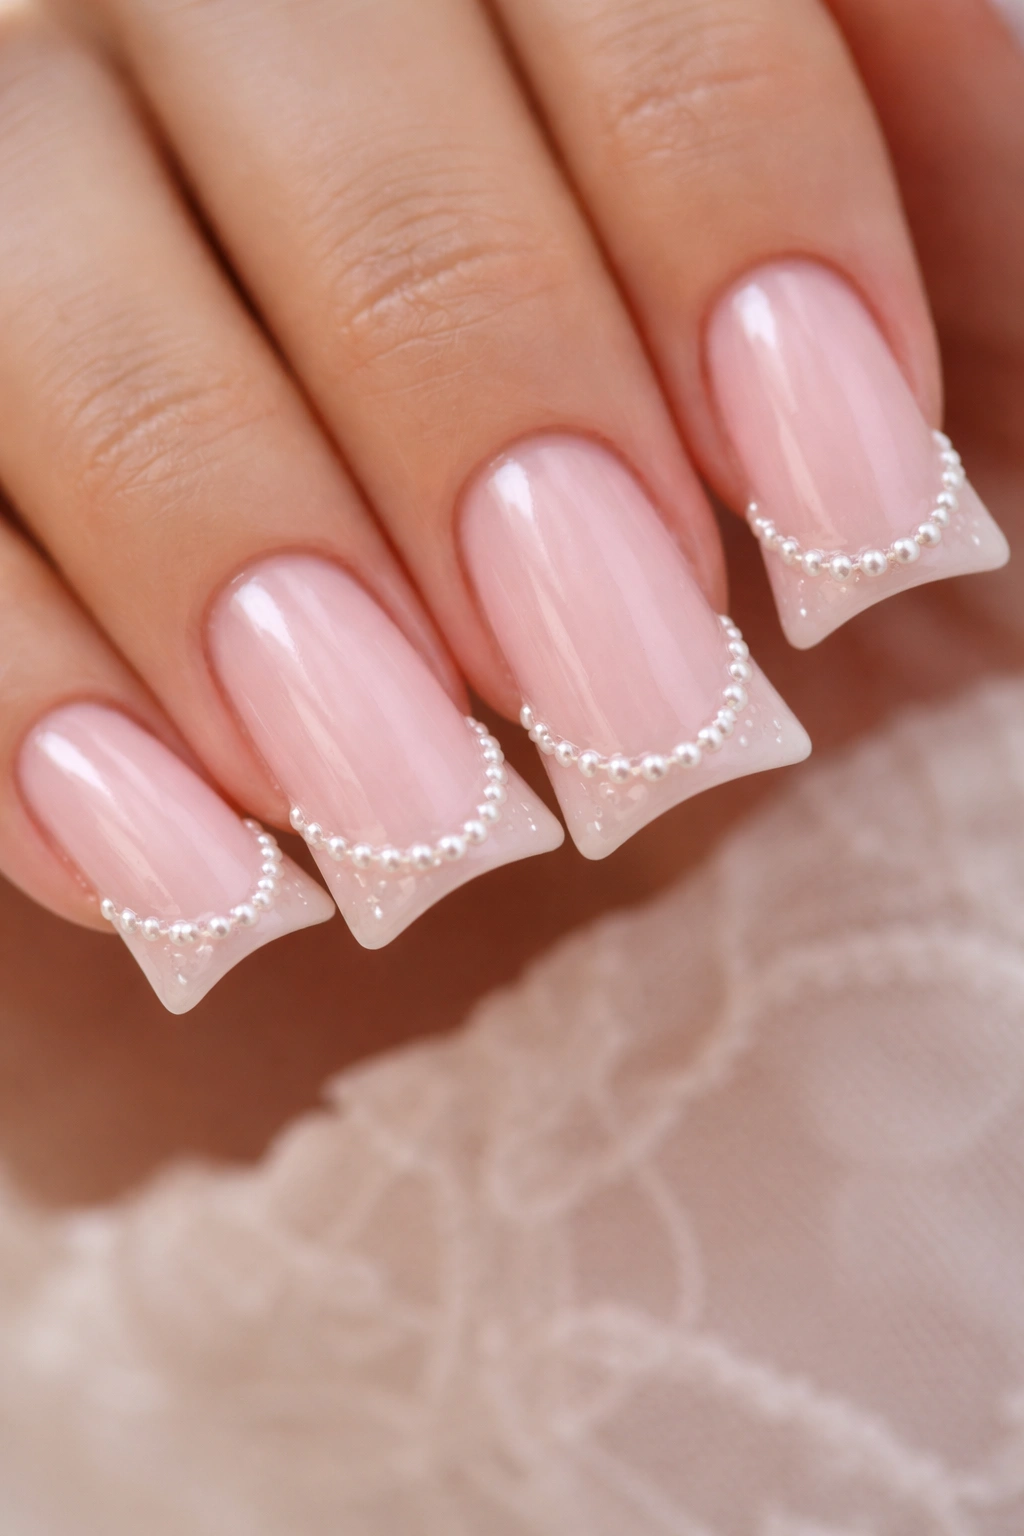
12. Pale Pink with Dainty Pearl Inlay Along the Tip
An elegant, sophisticated design where tiny pearl beads are set along the curved tip edge of duck nails, creating a delicate jewelry-like accent against a pale pink base. This design looks especially glamorous and works beautifully for special occasions while remaining fundamentally romantic and coquette-appropriate.
Pearls and Refined Femininity
Pearls represent timeless elegance and classic femininity—they’re the perfect jewelry element for the coquette aesthetic. Inlaying them along the tip of duck nails creates the impression of wearing a delicate tiara or crown, which aligns perfectly with the romantic, slightly whimsical nature of the style.
Setting Pearls Into the Design
- Apply pale pink as a smooth base coat and let dry thoroughly
- Create a thin line or pattern along the very edge of the curved tip using a thick gel or special nail adhesive
- Using a precise tool or tweezers, pick up individual micro pearls (1-2mm size) and place them into the adhesive line
- Space pearls approximately 2-3mm apart, or cluster them in groups for visual interest
- Ensure each pearl is secure and level with the nail surface
- Seal with a gel top coat that envelops the pearls and creates a smooth, safe surface
- Cure fully according to your gel system instructions
Worth knowing: Micro pearls specifically designed for nail art adhere better than regular craft pearls—the investment in quality materials ensures durability.
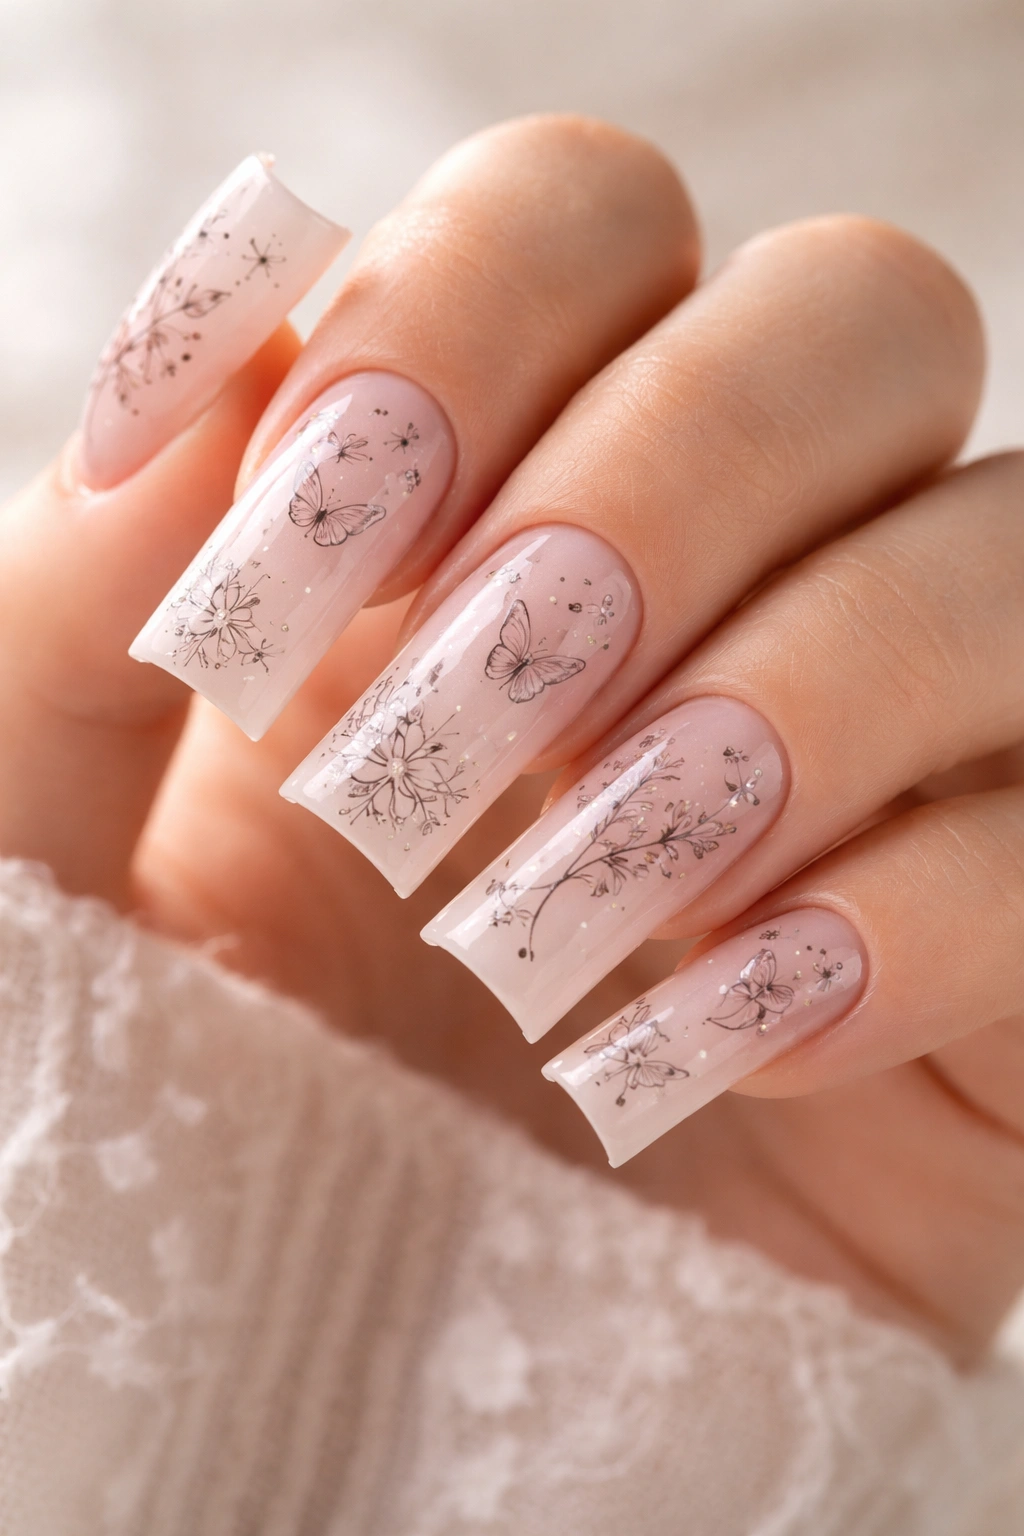
13. White Base with Delicate Butterfly Motifs
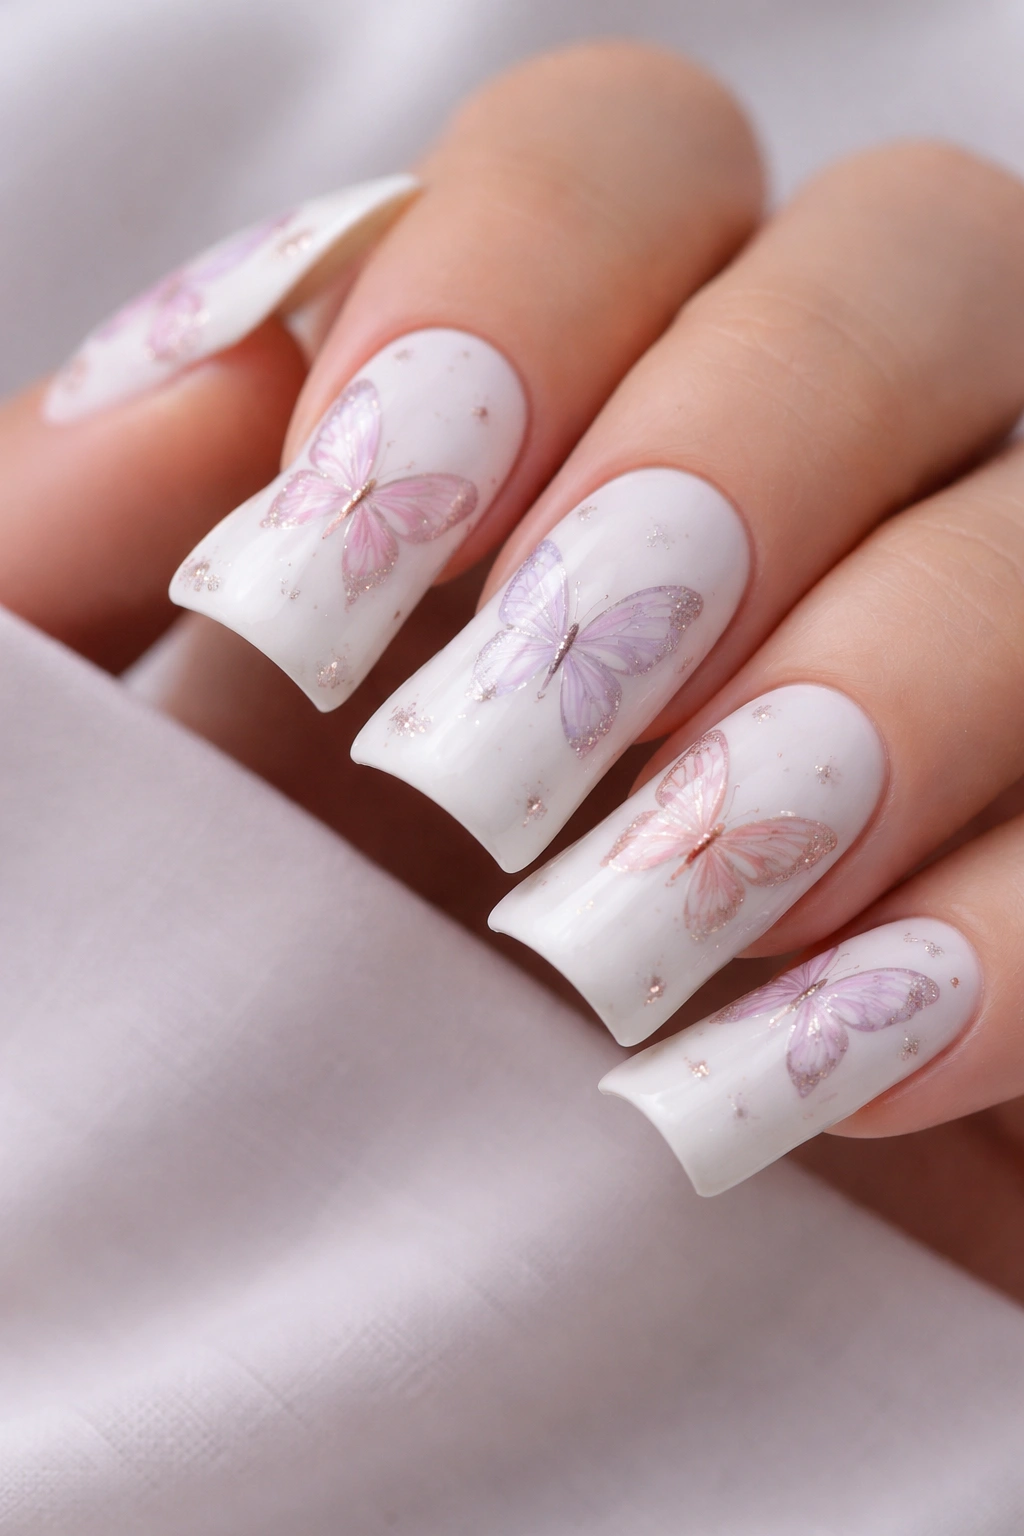
Bring ethereal, romantic beauty to duck nails with a crisp white base decorated with hand-painted or stamped delicate butterflies in soft pastels or metallics. Butterflies perfectly capture the transformation and beauty themes central to coquette aesthetics while adding movement and visual interest to the extended nail shape.
Butterflies as Transformation and Beauty
Butterflies symbolize transformation, grace, and delicate beauty—all core themes of the coquette aesthetic. When rendered in miniature across duck nails, they create a sense of whimsical elegance and natural beauty. The extended nail provides the perfect canvas for butterfly details to really shine.
Creating Butterfly Details
- Paint all nails white or off-white as a clean, bright base coat
- Using a small detail brush and diluted paint or gel, create butterfly outlines using pale pink, lavender, soft yellow, or rose gold
- Draw the butterfly body as a thin vertical line with two sets of wings on either side
- Add delicate line details within the wings (veins, patterns, or swirls)
- Alternatively, use butterfly nail stamps or pre-made stickers for consistent results
- Scatter butterflies across nails, focusing some on the tips while including some on the main nail body
- Consider adding tiny dots or flowers near the butterflies to suggest a garden setting
- Finish with a glossy top coat
Insider note: Butterflies in slightly different sizes and angles look more natural and visually compelling than perfectly identical repeats.
14. Rose Gold Shimmer with Soft Pink Marble Swirls
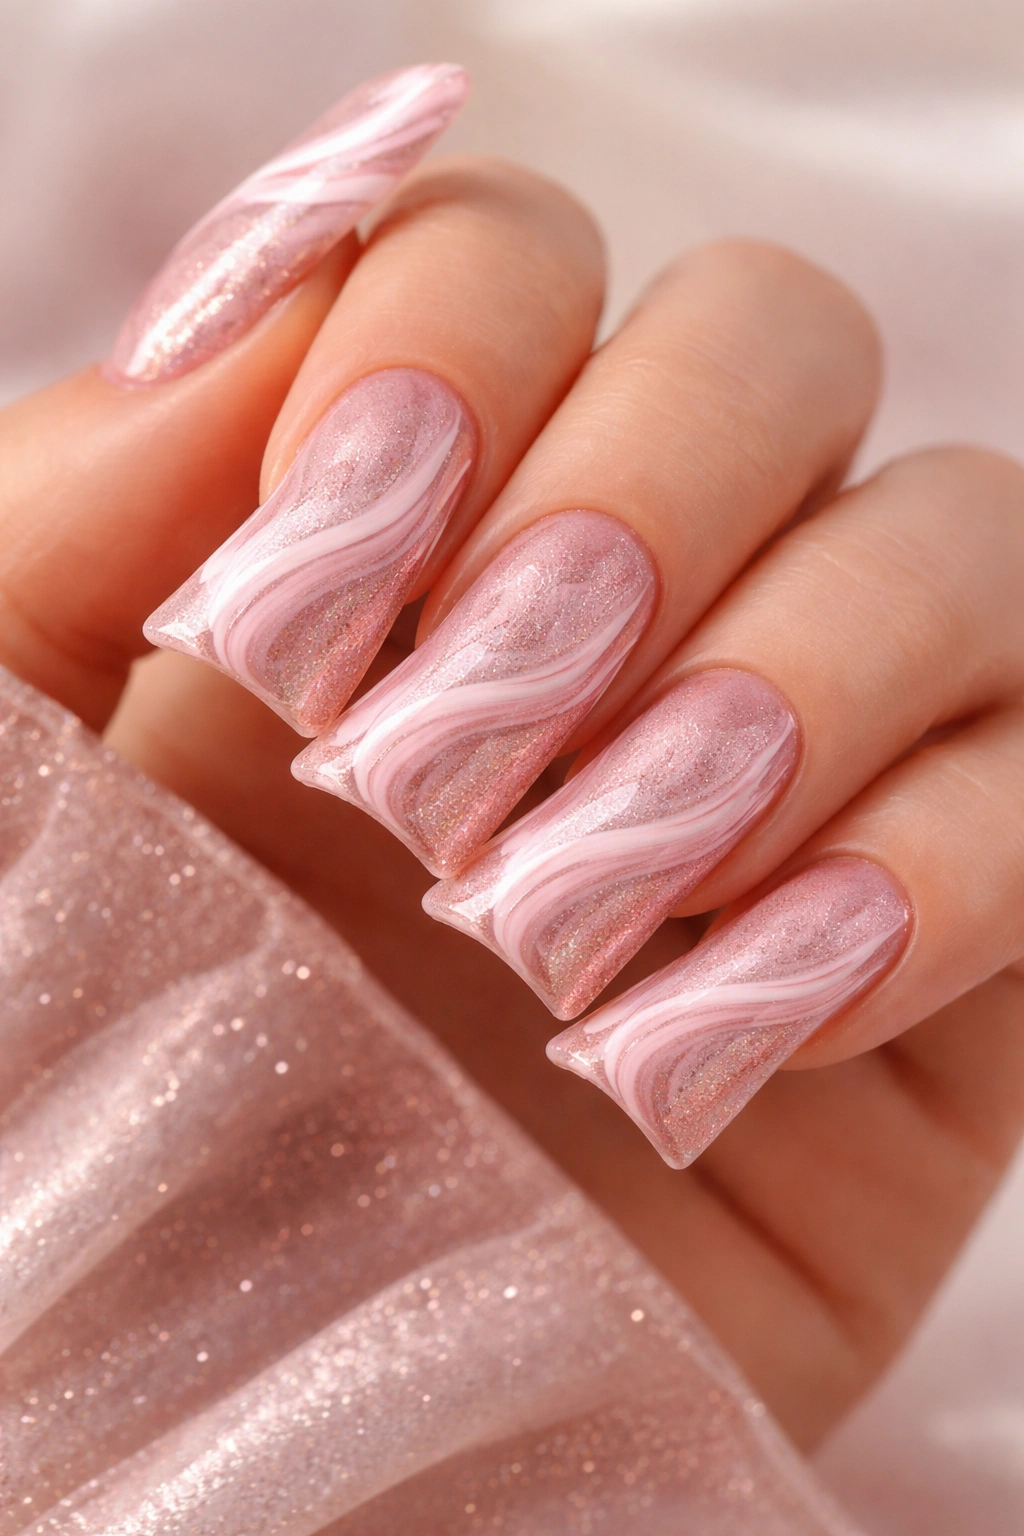
Combine luxe metallics with soft romantic swirls in this design: a rose gold shimmer base marble-effect overlaid with delicate soft pink and white swirled patterns. The duck nail shape allows the marble patterns to create flowing, elegant lines that follow the natural curves of the tip.
Marble as Sophisticated Romance
Marble patterns bring an inherent sense of luxury and sophistication while the soft pink and white color choices keep the overall feeling romantic and coquette-aligned. The shimmer adds glamour without overwhelming the design, and the marble technique creates organic, flowing movement.
Creating Marble Swirl Patterns
- Apply rose gold shimmer as a complete base coat and allow to dry
- Using a thin brush or marble tool, create soft pink and white swirled lines across the nail
- Keep swirls flowing and organic rather than geometric—let them follow the nail’s natural curves
- Focus more intense swirling at the tips where the duck nail shape is most dramatic
- Blend colors slightly where they meet to create a watercolor effect
- Alternatively, create the marble effect on the base color and add shimmer overlay on top for a more blended appearance
- Seal with a glossy top coat to enhance depth and dimension
Pro tip: Use a thin striping brush rather than a thick one for more delicate, control marble work that suits the coquette aesthetic better than bold, chunky patterns.
15. Cream with Minimalist Gold Cuticle Frame
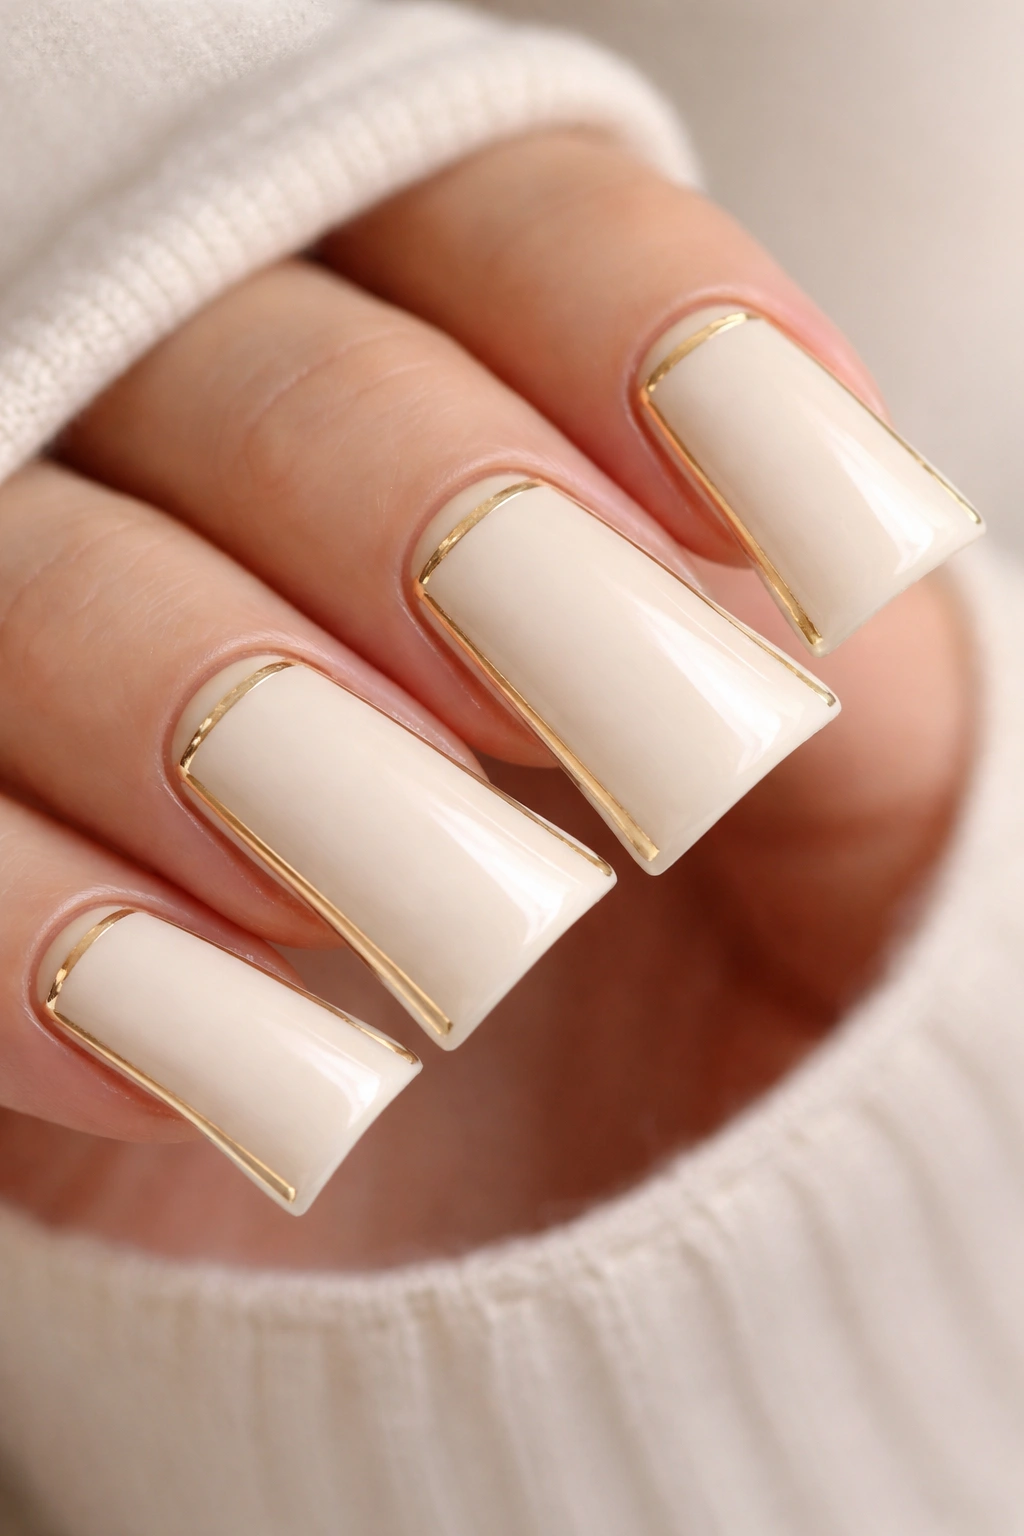
A refined, gallery-like aesthetic emerges when you add a delicate gold frame line at the cuticle area of cream-colored duck nails. This architectural approach to coquette design creates a polished, put-together appearance that focuses attention on the extended nail shape itself.
Architecture as Design Philosophy
The minimalist gold frame represents intentional, considered design—it speaks to refined taste and sophisticated femininity. By framing the cuticle area rather than decorating the entire nail, you create a design that’s elegant, wearable, and incredibly chic.
Creating the Cuticle Frame
- Paint all nails cream or ivory and let dry completely
- Using a thin striping brush or nail pen, draw a thin gold line approximately 3-4mm from the cuticle
- Create a simple geometric frame by drawing vertical lines from the corners of this horizontal line down to the bottom of the visible nail area
- The result should resemble a delicate gold rectangle framing the nail
- Keep lines smooth, even, and precisely spaced across all fingers
- Add a second, thinner gold line inside the first frame for a more complex frame-within-frame look if desired
- Seal with a matte or satin top coat for understated sophistication
Worth knowing: Nail striping tape provides perfect, precise lines if free-hand painting feels too challenging for this design.
16. Pale Peach with White Lace Stockings Pattern
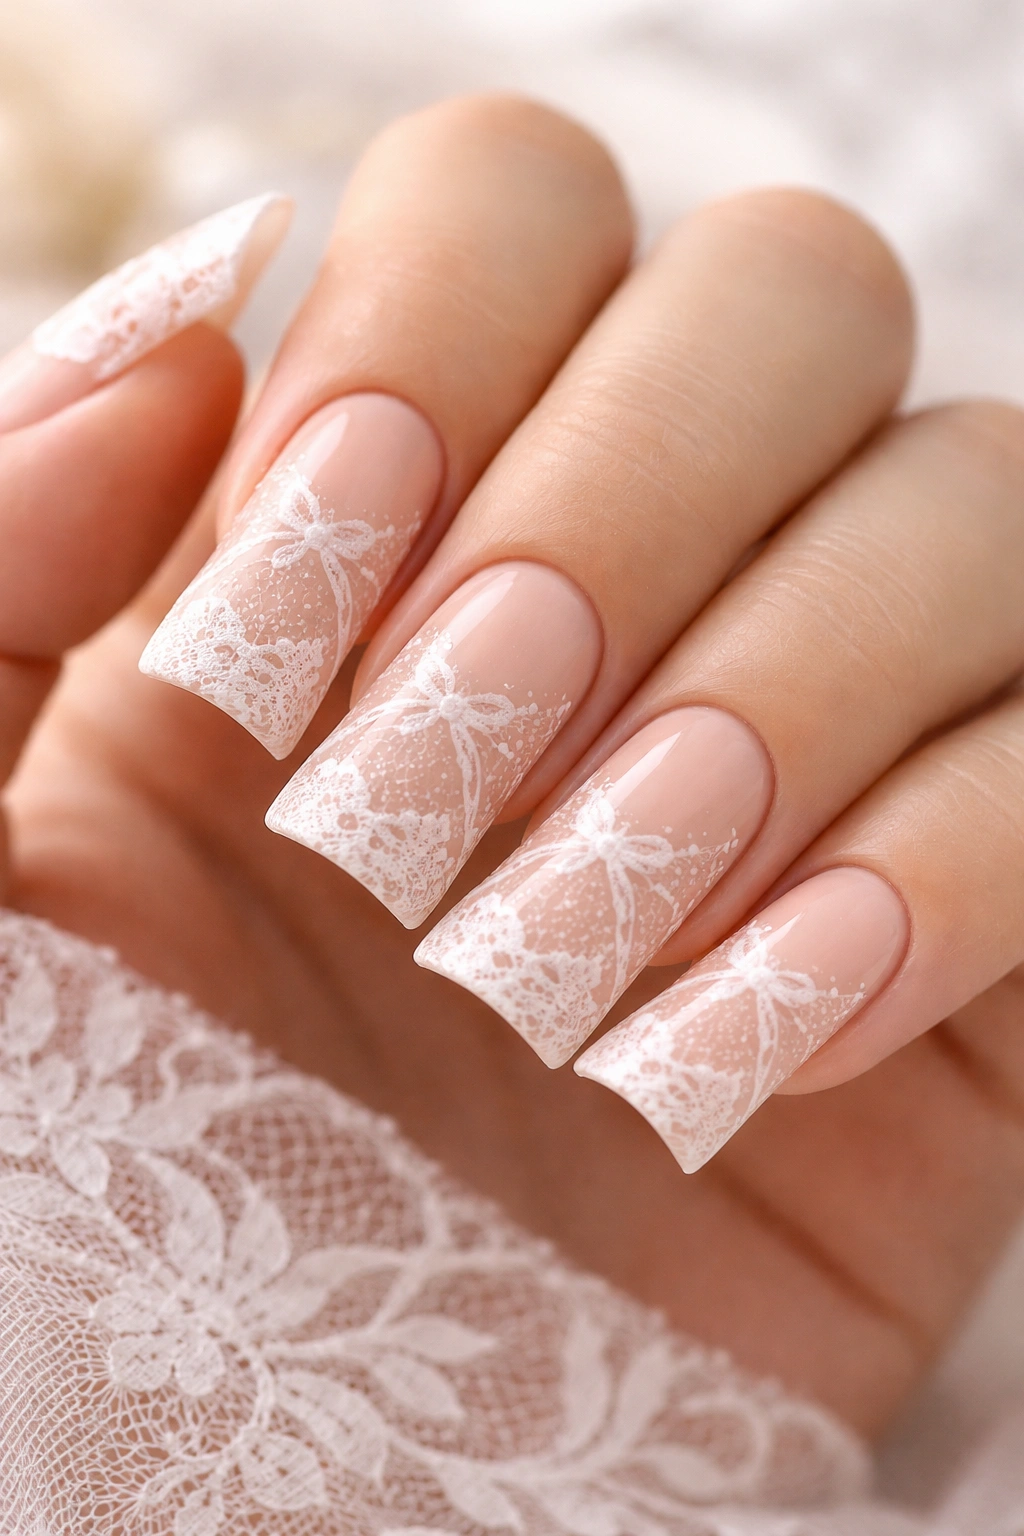
Create the illusion of wearing tiny delicate lace stockings with this design: a pale peach or nude-peach base with white geometric lace patterns climbing from the cuticle area toward the tip. This design beautifully references vintage fashion while maintaining the elegant duck nail aesthetic.
Fashion-Inspired Nail Art
The lace stocking pattern draws inspiration from vintage hosiery, creating a playful nod to classic femininity and vintage fashion—both crucial elements of coquette style. On duck nails, the pattern creates a flowing, elegant line that enhances the nail’s natural shape.
Creating the Lace Stocking Illusion
- Paint all nails pale peach or nude-peach as a smooth base
- Starting near the cuticle, use white paint and a thin brush to create delicate lace patterns
- Begin with a horizontal band of intricate lace-like details using small loops, diamonds, or lattice patterns
- Gradually transition to thinner, more scattered lace lines as you move toward the tip
- Keep the very tip (last 2-3mm) mostly bare for a gradient effect
- Alternatively, use white lace nail stickers positioned to create the stocking effect
- Seal with a glossy top coat to emphasize the contrast between the delicate white pattern and peachy base
Pro tip: Study actual vintage lace or stocking patterns for inspiration—the more detailed and ornate your lace work, the more authentic the stocking effect.
17. Soft Pink with Hand-Drawn Heart Details and Gold Accents
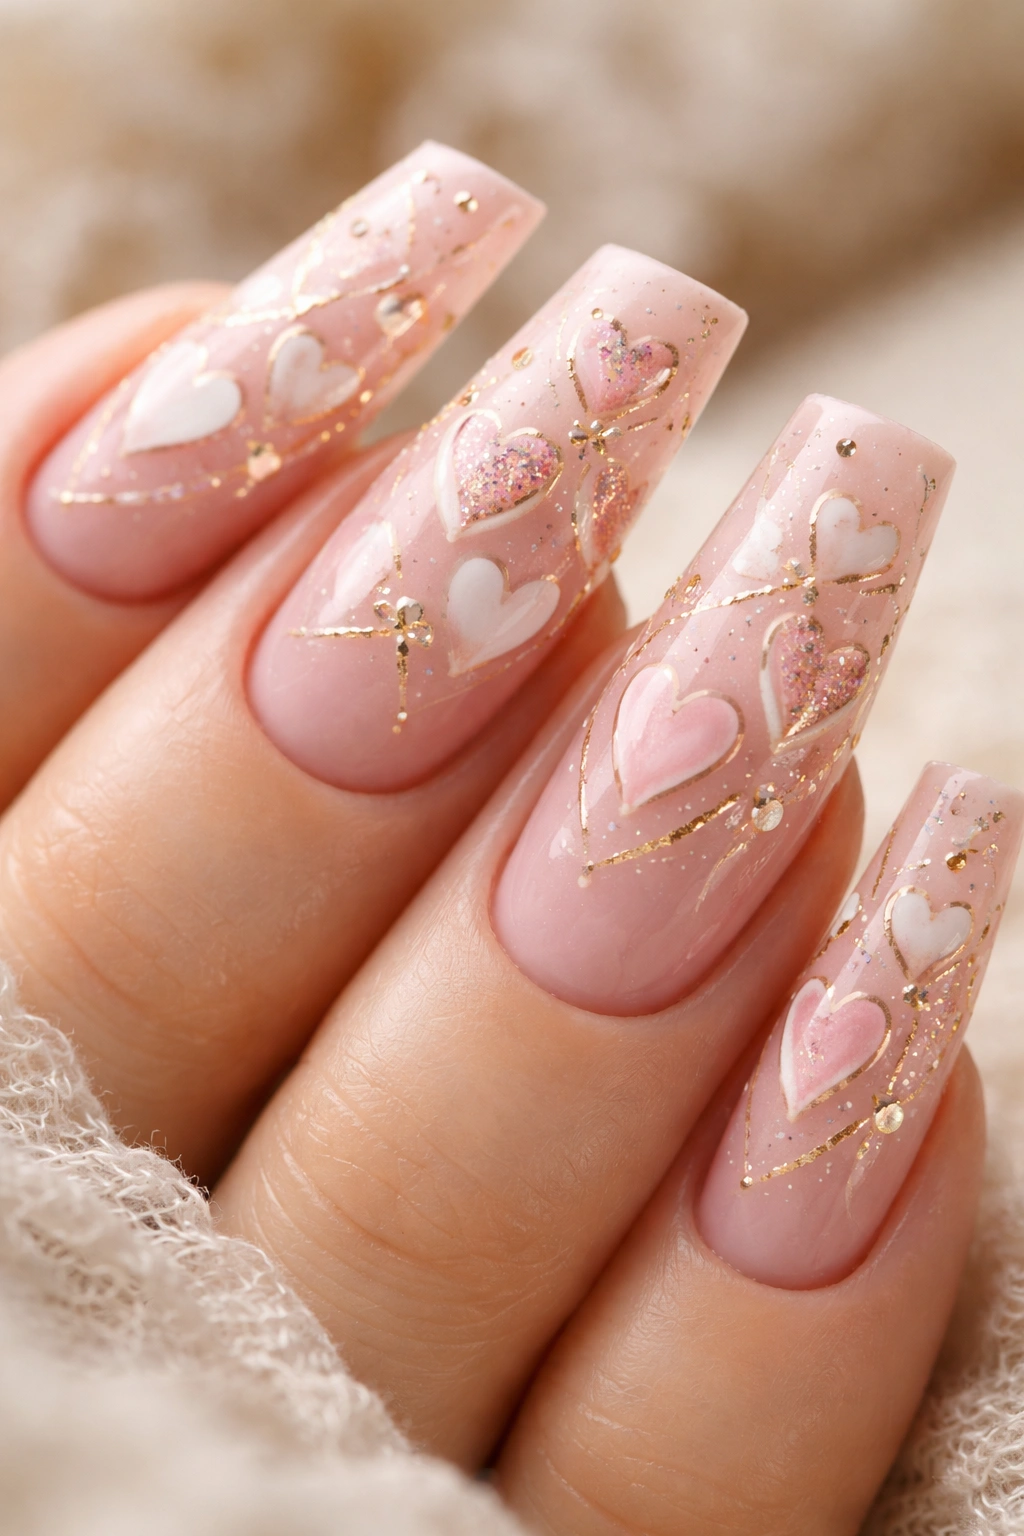
Embrace the adorably romantic heart of coquette style with soft pink duck nails decorated with delicate hand-drawn hearts in varying sizes and gold accent details. This design is unabashedly sweet and charming while remaining sophisticated through careful execution and color choice.
Hearts as Unconditional Coquette
Hearts are the most universally recognizable romantic symbol, and they feel entirely at home in coquette aesthetic. The key to making this design wearable rather than costume-like is varying heart sizes, placing them thoughtfully rather than covering every surface, and incorporating metallic accents that add sophistication.
Creating Heart Details
- Paint all nails soft pink and let dry completely
- Using a small detail brush, paint hearts in white, pale pink, or rose gold across the nails
- Vary heart sizes from large (approximately 8mm) to tiny (2-3mm) for visual interest
- Scatter hearts organically rather than in perfect rows or patterns
- Add small gold dots or lines near hearts to create connected details
- Consider creating a larger, more detailed heart on the accent nail as a focal point
- Add delicate gold lines or swirls connecting hearts for movement and flow
- Finish with a glossy top coat
Insider note: Hearts drawn with slightly uneven proportions or slightly imperfect curves look more charming and handmade than technically perfect geometric hearts.
18. Pale Pink with Delicate Tattoo-Inspired Fine Line Work
End with an artistic, sophisticated design: pale pink duck nails decorated with fine black or deep gray line work inspired by delicate tattoo aesthetics—think tiny florals, stars, moon phases, or abstract lines. This design combines the romantic color palette of coquette with an artistic, almost bohemian sensibility.
Tattoo Artistry Meets Romantic Femininity
Fine line tattoo work has become increasingly popular in nail art, especially when paired with the romantic coquette aesthetic. The combination creates a design that’s simultaneously feminine and artistic, delicate and bold. The duck nail’s extended shape becomes a perfect canvas for intricate line work that might feel cramped on shorter nails.
Executing Fine Line Details
- Paint all nails pale pink and allow to dry thoroughly
- Using the finest detail brush available and black or deep gray paint, create intricate line work
- Design options include: tiny florals with stems and leaves, moon phases in sequence, abstract line patterns, small celestial symbols, or miniature constellations
- Keep lines extremely thin and precise—this technique rewards patience and a steady hand
- Space line work thoughtfully across the nail, avoiding crowding
- Consider making one nail a focal point with more detailed work while keeping others more sparse
- Add a accent nail with a larger, more elaborate design if desired
- Seal with a glossy top coat that enhances the contrast of the fine dark lines against the light pink base
Worth knowing: This design requires significant skill and patience—it’s worth investing time in practice or seeking a highly skilled nail technician who specializes in detailed line work.
Final Thoughts
The coquette duck nail aesthetic celebrates a particular kind of femininity—one that’s romantic, intentional, and unapologetically beautiful. Whether you choose the sweetness of baby pink with bows, the sophistication of burgundy florals, the whimsy of cherries and stars, or the artistic expression of fine line work, you’re selecting a manicure that communicates thoughtfulness about beauty and design.
Duck nails themselves elevate any design through their inherent elegance and extended shape, which provides space for details to shine without feeling cramped. When paired with the romantic coquette aesthetic, they become a statement—one that says you value femininity, artistry, and the delightful details that make beauty personal and expressive.
The designs here range from wearable and professional to maximalist and statement-making, meaning you can find an approach that fits your lifestyle and personal expression. Some people will gravitate toward the minimalist elegance of a single bow or a gold frame, while others will embrace the full maximalist joy of detailed florals, rhinestones, and pearls. Both approaches are entirely valid, and both capture the essence of what makes coquette duck nails so captivating—they’re a celebration of considered, intentional beauty worn with confidence and joy.
